AQUILA - Cato Network Integration(Linux)
Cato Networks provides a cloud-native SASE (Secure Access Service Edge) platform that converges networking and security into a global cloud service. The platform generates security and connectivity events that can be collected, analyzed, and monitored for network insights and threat detection. This integration enables centralized event collection from Cato Networks using the Cato CLI for visualization and analysis.
Integration Overview
This integration supports event collection through:
- Cato CLI (catocli) using the Events Feed API
- Automated event polling via systemd service
- File-based log collection with structured JSON output
Events can be searched, observed, and visualized for security monitoring, connectivity analysis, and network performance tracking.
Compatibility
- Supports event collection for Security and Connectivity event types
- Requires Python 3.6 or higher
- Compatible with Linux, macOS, and Windows operating systems
- Requires valid Cato Network API token and Account ID
- Systemd service integration for Linux-based systems
Prerequisites
Before configuring the Cato Network integration, ensure you have:
- Python 3.6 or higher installed
- Python virtual environment configured
- Cato CLI (catocli) installed
- Valid Cato Network API token
- Valid Cato Network Account ID
Python Installation
Linux Installation:
Step 1: Open the Terminal and refresh package lists:
sudo apt update
Step 2: Update installed packages:
sudo apt upgrade -y
Step 3: Install Python (replace [version number] with your desired version):
sudo apt install python[version number]
Creating Python Virtual Environment
A Python virtual environment isolates project dependencies and prevents conflicts with system-wide Python packages.
Linux/macOS:
Step 1: Open a Terminal.
Step 2: Navigate to your project directory using the cd command:
cd /path/to/your/projectStep 3: Create a virtual environment:
python3 -m venv venv
Step 4: Activate the virtual environment:
source venv/bin/activate
Step 5: Once activated, the virtual environment name (e.g., (venv)) will appear in your terminal prompt.
Step 6: To deactivate the virtual environment, type:
deactivateCato CLI Installation
Step 1: Ensure your virtual environment is activated.
Step 2: Install the Cato CLI using pip:
pip3 install catocli
Step 3: Verify the installation by running:
catocli --version
Validating Cato Network API Token and Account ID
Step 1: Configure the Cato CLI with your API token and Account ID:
catocli configure set --cato-token "your-api-token" --account-id "12345"
Replace "your-api-token" with your actual Cato Network API token and "12345" with your Account ID.
Configuring the Cato Network Integration (Linux)
Creating a Dedicated User (Optional but Recommended):
For security and isolation, create a dedicated system user to run the Cato event collection service.
Step 1: Optional - Create a system user named (for this example) testing-cato:
sudo useradd -r -s /bin/false testing-catoStep 2: Create required directories for data, logs:
sudo mkdir -p /var/lib/cato /var/log/cato
Step 3: Set ownership of the directories to the dedicated user:
sudo chown -R testing-cato:testing-cato /var/lib/cato /var/log/cato
Creating the Bash Wrapper Script:
The wrapper script manages event collection, logging, and ensures only one instance runs at a time.
Step 1: Create the wrapper script file:
sudo nano /usr/local/bin/cato-eventsfeed.sh
Step 2: Add the following content to the file:
Important: Replace "testing-cato" in CATOCLI to the actual user
#!/bin/bash
# Cato Networks Event Feed Wrapper Script
# Supports venv, logging, single instance, watchdog

MARKER_FILE="/var/lib/cato/events-marker.txt"
LOCK_FILE="/var/lock/cato-eventsfeed.lock"
LOG_FILE="/var/log/cato/events.log"
WATCHDOG_FILE="/var/run/cato-eventsfeed.watchdog"

CATOCLI="/home/testing-cato/venv/bin/catocli"

# Ensure only one instance runs at a time
exec 200>"$LOCK_FILE"
flock -n 200 || exit 1

# Run the feed once
$CATOCLI query eventsFeed \
    --run \
    --print-events \
    --marker-file="$MARKER_FILE" \
    --runtime-limit=10 \
    --event-types="Security,Connectivity" >> "$LOG_FILE" 2>&1

# Update watchdog file for systemd
date +%s > "$WATCHDOG_FILE"

# Notify systemd (if using sd_notify)
if [ -n "$NOTIFY_SOCKET" ]; then
    /bin/echo "WATCHDOG=1" | systemd-cat --identifier=cato-eventsfeed
fi
Step 3: Save and exit the file (Ctrl+X, then Y, then Enter).
Step 4: Make the script executable:
sudo chmod +x /usr/local/bin/cato-eventsfeed.sh
Step 5: Set ownership to the dedicated user:
sudo chown testing-cato:testing-cato /usr/local/bin/cato-eventsfeed.sh
Creating the Systemd Service File:
The systemd service ensures the event collection runs continuously and restarts automatically on failure.
Step 1: Create the service file:
sudo nano /etc/systemd/system/cato-eventsfeed.service
Step 2: Add the following content to the file:
[Unit]
Description=Cato Networks Event Feed Collector (production)
After=network-online.target
Wants=network-online.target

[Service]
Type=simple
ExecStart=/usr/local/bin/cato-eventsfeed.sh
Restart=always
RestartSec=5
StartLimitBurst=10
StartLimitIntervalSec=60

# Watchdog: restart if hung
WatchdogSec=30s
NotifyAccess=all

# Use Python venv in PATH
Environment="PATH=/home/testing-cato/venv/bin:/usr/local/sbin:/usr/local/bin:/usr/sbin:/usr/bin"

# Run as dedicated non-root user
User=testing-cato
Group=testing-cato
WorkingDirectory=/var/lib/cato

# Optional: memory and CPU limits
# MemoryMax=200M
# CPUQuota=50%

[Install]
WantedBy=multi-user.target
Note: In Environment path, replace the path of the actual path of your python virtual path "PATH=/home/testing-cato/venv/bin:/usr/local/sbin:/usr/local/bin:/usr/sbin:/usr/bin". Change User and Group for non-root user as well.
Step 3: Save and exit the file (Ctrl+X, then Y, then Enter).
Configuring Log Rotation
To manage log file sizes and prevent disk space issues, configure log rotation for Cato event logs.
Step 1: Create a logrotate configuration file:
sudo nano /etc/logrotate.d/cato-eventsStep 2: Add the following configuration to the file:
/var/log/cato/events.log {
    hourly
    rotate 24
    missingok
    notifempty

    copytruncate

    compress
    compressoptions -1
    delaycompress

    dateext
    dateformat -%Y%m%d-%H%M%S

    create 0640 testing-cato testing-cato
}
This configuration:
- Rotates logs hourly
- Keeps the last 24 rotated log files
- Compresses old log files to save disk space
- Creates new log files with appropriate permissions
Step 3: Save and exit the file (Ctrl+X, then Y, then Enter).
Configuring Hourly Log Rotation
By default, logrotate runs daily. To ensure more frequent log rotation for high-volume Cato event logs, configure the logrotate timer to run hourly.
Creating the Timer Override File:
Step 1: Create the systemd override directory:
sudo mkdir -p /etc/systemd/system/logrotate.timer.dStep 2: Create the override configuration file:
sudo nano /etc/systemd/system/logrotate.timer.d/override.confStep 3: Add the following configuration to the file:
[Timer]
OnCalendar=
OnCalendar=hourly
AccuracySec=1m
Persistent=true
This configuration:
- Clears the default daily schedule with the empty 'OnCalendar'=
- Sets the timer to run hourly
- Ensures the timer runs within 1 minute of the scheduled time
- Catches up on missed runs if the system was offline
Step 4: Save and exit the file (Ctrl+X, then Y, then Enter).
Reloading and Restarting the Timer
Step 1: Reload the systemd daemon to recognize configuration changes:
sudo systemctl daemon-reexec
sudo systemctl daemon-reload
Step 2: Restart the logrotate timer to apply the new schedule:
sudo systemctl restart logrotate.timerStep 3: Verify the timer is active and scheduled correctly:
sudo systemctl status logrotate.timerStep 4: Check the next scheduled run time:
systemctl list-timers logrotate.timerThe output should show the timer scheduled to run hourly.
Enabling and Starting the Service
Step 1: Reload systemd to recognize the new service file:
sudo systemctl daemon-reload
Step 2: Enable the service to start automatically on boot:
sudo systemctl enable cato-eventsfeed
Step 3: Start the service:
sudo systemctl start cato-eventsfeed
Step 4: Verify the service is running:
sudo systemctl status cato-eventsfeed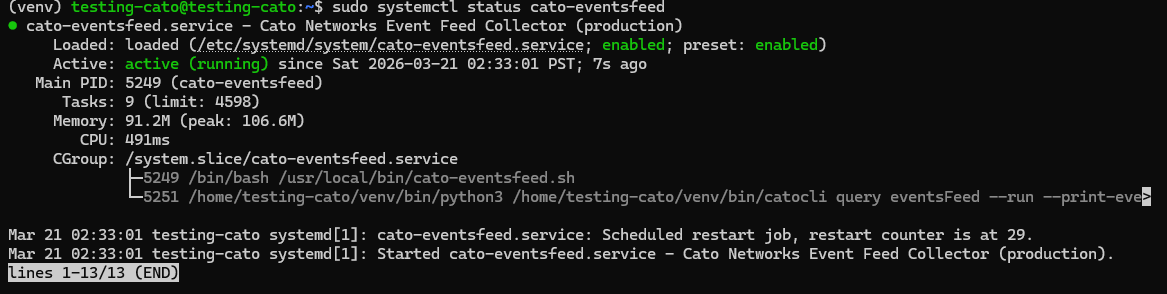
The status should show active (running) in green text.
Monitoring Live Logs:
To view real-time logs from the Cato event feed service:
journalctl -u cato-eventsfeed -fPress Ctrl+C to stop viewing the live logs.
Event Collection Settings
The integration collects the following event types from Cato Networks:
- Security Events: Threat detection, malware blocks, IPS alerts, and security policy violations
- Connectivity Events: Site connectivity changes, tunnel status, WAN link failures, and network performance issues
Configuration Parameters:
- Marker File:
/var/lib/cato/events-marker.txt- Tracks the last processed event to prevent duplicates - Lock File:
/var/lock/cato-eventsfeed.lock- Ensures only one instance of the script runs at a time - Log File:
/var/log/cato/events.log- Stores collected events in JSON format - Runtime Limit: 10 minutes per execution cycle
- Event Types: Security and Connectivity events
Log Events
Enable this option to collect Cato Network log events across all configured event types from your Cato SASE platform.
Logs Dataset
The cato.events dataset contains events collected from the Cato Networks Events Feed API. All Cato-specific event fields are available in the /var/log/cato/events.log file for detailed analysis, including:
- Event timestamps and identifiers
- Source and destination information
- Security threat classifications
- Network connectivity status
- Policy enforcement actions
- Geographic and site information
For the Back-end Side
Add this in the processor:
processors:
  - decode_json_fields:
      fields: ["message"]
      target: ""
      overwrite_keys: true
      add_error_key: true
  - add_fields:
      target: event
      fields:
        module: cato-network
  - add_fields:
      target: component
      fields:
        id: cato-firewall
No comments to display
No comments to display