Events can be searched, observed, and visualized for security monitoring, connectivity analysis, and network performance tracking.
##### **Compatibility** - Supports event collection for Security and Connectivity event types - Requires Python 3.6 or higher - Compatible with Linux, macOS, and Windows operating systems - Requires valid Cato Network API token and Account ID - Systemd service integration for Linux-based systems ##### **Prerequisites**Before configuring the Cato Network integration, ensure you have:
- Python 3.6 or higher installed - Python virtual environment configured - Cato CLI (catocli) installed - Valid Cato Network API token - Valid Cato Network Account ID #### **Python Installation** ##### **Linux Installation:** ##### **Step 1:** Open the Terminal and refresh package lists: ``` sudo apt update ``` [](https://cytechint-docs-bookstack.s3.amazonaws.com/uploads/images/gallery/2026-03/KF6h5bY5QGCPa5Hs-image.png) ##### **Step 2:** Update installed packages: ``` sudo apt upgrade -y ``` [](https://cytechint-docs-bookstack.s3.amazonaws.com/uploads/images/gallery/2026-03/dJLuZQGlfYpl9Yup-image.png) ##### **Step 3:** Install Python (replace \[version number\] with your desired version): ``` sudo apt install python[version number] ``` [](https://cytechint-docs-bookstack.s3.amazonaws.com/uploads/images/gallery/2026-03/eEB6el60eELJcHL5-image.png) #### **Creating Python Virtual Environment** A Python virtual environment isolates project dependencies and prevents conflicts with system-wide Python packages. #### **Linux/macOS:** ##### **Step 1:** Open a Terminal. ##### **Step 2:** Navigate to your project directory using the cd command: ``` cd /path/to/your/project ``` ##### **Step 3:** Create a virtual environment: ``` python3 -m venv venv ``` [](https://cytechint-docs-bookstack.s3.amazonaws.com/uploads/images/gallery/2026-03/6m9xJWxlJoM4JZgX-image.png) ##### **Step 4:** Activate the virtual environment: ``` source venv/bin/activate ``` [](https://cytechint-docs-bookstack.s3.amazonaws.com/uploads/images/gallery/2026-03/8JwkcTJNarZXDjV8-image.png) ##### **Step 5:** Once activated, the virtual environment name (e.g., (venv)) will appear in your terminal prompt. ##### **Step 6:** To deactivate the virtual environment, type: ``` deactivate ``` #### **Cato CLI Installation** ##### **Step 1:** Ensure your virtual environment is activated. ##### **Step 2:** Install the Cato CLI using pip: ``` pip3 install catocli ``` [](https://cytechint-docs-bookstack.s3.amazonaws.com/uploads/images/gallery/2026-03/TDTJvkiIMQeZjJSX-image.png) ##### **Step 3:** Verify the installation by running: ``` catocli --version ``` [](https://cytechint-docs-bookstack.s3.amazonaws.com/uploads/images/gallery/2026-03/I7ClZSlQtUACeBRR-image.png) #### **Validating Cato Network API Token and Account ID** ##### **Step 1:** Configure the Cato CLI with your API token and Account ID: ``` catocli configure set --cato-token "your-api-token" --account-id "12345" ``` [](https://cytechint-docs-bookstack.s3.amazonaws.com/uploads/images/gallery/2026-03/4LRoTcRf5CQwm73z-image.png)Replace `"your-api-token"` with your actual Cato Network API token and `"12345"` with your Account ID.
#### **Configuring the Cato Network Integration (Linux)** ##### **Creating a Dedicated User (Optional but Recommended):**For security and isolation, create a dedicated system user to run the Cato event collection service.
##### **Step 1:** Optional - Create a system user named (for this example) `testing-cato`: ``` sudo useradd -r -s /bin/false testing-cato ``` ##### **Step 2:** Create required directories for data, logs: ``` sudo mkdir -p /var/lib/cato /var/log/cato ``` [](https://cytechint-docs-bookstack.s3.amazonaws.com/uploads/images/gallery/2026-03/ZRqQkYqmlKfsJL4j-image.png) ##### **Step 3:** Set ownership of the directories to the dedicated user: ``` sudo chown -R testing-cato:testing-cato /var/lib/cato /var/log/cato ``` [](https://cytechint-docs-bookstack.s3.amazonaws.com/uploads/images/gallery/2026-03/1afigOby8PUfoHUA-image.png) #### **Creating the Bash Wrapper Script:**The wrapper script manages event collection, logging, and ensures only one instance runs at a time.
##### **Step 1:** Create the wrapper script file: ``` sudo nano /usr/local/bin/cato-eventsfeed.sh ``` [](https://cytechint-docs-bookstack.s3.amazonaws.com/uploads/images/gallery/2026-03/b2P0ZvFyPtoVS4sx-image.png) ##### **Step 2:** Add the following content to the file:Important: Replace "testing-cato" in CATOCLI to the actual user
```bash Ask Cytech Support For the Source code ``` ##### **Step 3****:** Save and exit the file ##### **Step 4****:** Make the script executable: ``` sudo chmod +x /usr/local/bin/cato-eventsfeed.sh ``` [](https://cytechint-docs-bookstack.s3.amazonaws.com/uploads/images/gallery/2026-03/ZpbIlyeQDiAgLnwn-image.png) ##### **Step 5:** Set ownership to the dedicated user: ``` sudo chown testing-cato:testing-cato /usr/local/bin/cato-eventsfeed.sh ``` [](https://cytechint-docs-bookstack.s3.amazonaws.com/uploads/images/gallery/2026-03/MZYxUVp3xeoPojV4-image.png) #### **Creating the Systemd Service File:**The systemd service ensures the event collection runs continuously and restarts automatically on failure.
##### **Step 1:** Create the service file: ``` sudo nano /etc/systemd/system/cato-eventsfeed.service ``` [](https://cytechint-docs-bookstack.s3.amazonaws.com/uploads/images/gallery/2026-03/0rREOoDP43ogMFqm-image.png) ##### **Step 2:** Add the following content to the file: ```ini Ask Cytech Support for the Source Code ```Note: In Environment path, replace the path of the actual path of your python virtual path "PATH=/home/**testing-cato/venv/**bin:/usr/local/sbin:/usr/local/bin:/usr/sbin:/usr/bin". Change User and Group for non-root user as well.
##### **Step 3:** Save and exit the file (Ctrl+X, then Y, then Enter). #### **Configuring Log Rotation** To manage log file sizes and prevent disk space issues, configure log rotation for Cato event logs. ##### **Step 1:** Create a logrotate configuration file: ``` sudo nano /etc/logrotate.d/cato-events ``` ##### **Step 2:** Add the following configuration to the file: ``` /var/log/cato/events.log { hourly rotate 24 missingok notifempty copytruncate compress compressoptions -1 delaycompress dateext dateformat -%Y%m%d-%H%M%S create 0640 testing-cato testing-cato } ```This configuration: - Rotates logs hourly - Keeps the last 24 rotated log files - Compresses old log files to save disk space - Creates new log files with appropriate permissions
##### **Step 3:** Save and exit the file (Ctrl+X, then Y, then Enter). #### **Configuring Hourly Log Rotation** By default, logrotate runs daily. To ensure more frequent log rotation for high-volume Cato event logs, configure the logrotate timer to run hourly. ##### **Creating the Timer Override File:** ##### **Step 1:** Create the systemd override directory: ``` sudo mkdir -p /etc/systemd/system/logrotate.timer.d ``` ##### **Step 2:** Create the override configuration file: ```bash sudo nano /etc/systemd/system/logrotate.timer.d/override.conf ``` ##### **Step 3:** Add the following configuration to the file: ```ini [Timer] OnCalendar= OnCalendar=hourly AccuracySec=1m Persistent=true ```This configuration: - Clears the default daily schedule with the empty 'OnCalendar'= - Sets the timer to run hourly - Ensures the timer runs within 1 minute of the scheduled time - Catches up on missed runs if the system was offline
##### **Step 4:** Save and exit the file (Ctrl+X, then Y, then Enter). #### **Reloading and Restarting the Timer** ##### **Step 1:** Reload the systemd daemon to recognize configuration changes: ```bash sudo systemctl daemon-reexec sudo systemctl daemon-reload ``` ##### **Step 2:** Restart the logrotate timer to apply the new schedule: ``` sudo systemctl restart logrotate.timer ``` ##### **Step 3:** Verify the timer is active and scheduled correctly: ``` sudo systemctl status logrotate.timer ``` ##### **Step 4:** Check the next scheduled run time: ``` systemctl list-timers logrotate.timer ``` The output should show the timer scheduled to run hourly. #### **Enabling and Starting the Service** ##### **Step 1:** Reload systemd to recognize the new service file: ``` sudo systemctl daemon-reload ``` [](https://cytechint-docs-bookstack.s3.amazonaws.com/uploads/images/gallery/2026-03/Tu7V23sh2jsdjsNA-image.png) ##### **Step 2:** Enable the service to start automatically on boot: ``` sudo systemctl enable cato-eventsfeed ``` [](https://cytechint-docs-bookstack.s3.amazonaws.com/uploads/images/gallery/2026-03/79JRLWTK8bNIR1yJ-image.png) ##### **Step 3:** Start the service: ``` sudo systemctl start cato-eventsfeed ``` [](https://cytechint-docs-bookstack.s3.amazonaws.com/uploads/images/gallery/2026-03/Dudlo9JFOl1nIPH7-image.png) ##### **Step 4:** Verify the service is running: ``` sudo systemctl status cato-eventsfeed ``` [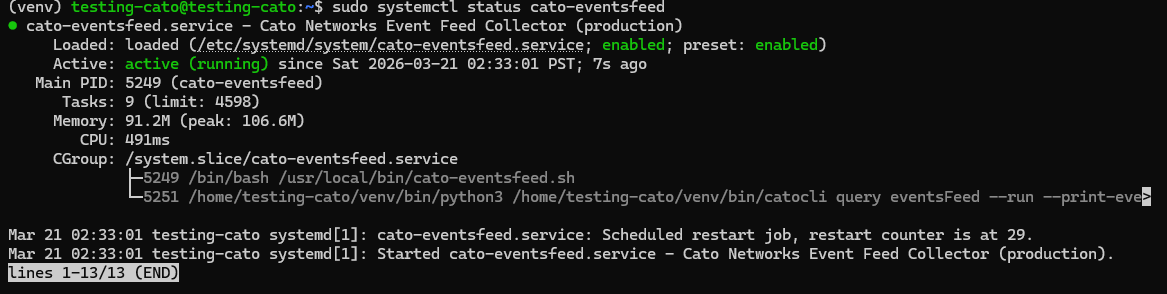](https://cytechint-docs-bookstack.s3.amazonaws.com/uploads/images/gallery/2026-03/zeBYSJRErF63eghq-image.png)The status should show *active (running)* in green text.
##### **Monitoring Live Logs:** To view real-time logs from the Cato event feed service: ``` journalctl -u cato-eventsfeed -f ``` Press **Ctrl+C** to stop viewing the live logs. ##### **Event Collection** **Settings** The integration collects the following event types from Cato Networks: - **Security Events**: Threat detection, malware blocks, IPS alerts, and security policy violations - **Connectivity Events**: Site connectivity changes, tunnel status, WAN link failures, and network performance issues ##### **Configuration Parameters:** - **Marker File**: `/var/lib/cato/events-marker.txt` - Tracks the last processed event to prevent duplicates - **Lock File**: `/var/lock/cato-eventsfeed.lock` - Ensures only one instance of the script runs at a time - **Log File**: `/var/log/cato/events.log` - Stores collected events in JSON format - **Runtime Limit**: 10 minutes per execution cycle - **Event Types**: Security and Connectivity events ##### **Log Events** Enable this option to collect Cato Network log events across all configured event types from your Cato SASE platform. ##### **Logs Dataset** The `cato.events` dataset contains events collected from the Cato Networks Events Feed API. All Cato-specific event fields are available in the `/var/log/cato/events.log` file for detailed analysis, including: - Event timestamps and identifiers - Source and destination information - Security threat classifications - Network connectivity status - Policy enforcement actions - Geographic and site information --- ##### **For the Back-end Side** Add this in the processor: ```yaml processors: - decode_json_fields: fields: ["message"] target: "" overwrite_keys: true add_error_key: true - add_fields: target: event fields: module: cato-network - add_fields: target: component fields: id: cato-SASE ```