
AQUILA - SalesForce Integration in Two Deferent Methods (JWT Bearer Flow and Username-Password Flow)
Salesforce requires secure communication protocols for authorization and data exchange between external applications and Salesforce orgs. This involves creating digital certificates, configuring external client apps, and establishing secure authentication methods. OpenSSL provides the cryptographic tools needed to generate private keys and self-signed certificates for secure communication over networks.
Integration Overview
This integration supports secure communication through:
- JWT (JSON Web Token) authentication using digital certificates
- OAuth authentication with external client apps
- Self-signed certificates and keystore management
Organizations can authorize Salesforce CLI commands and establish secure API connections using these authentication methods.
Compatibility
- Supports Salesforce CLI authorization via JWT Bearer Flow
- Compatible with macOS, Linux, and Windows operating systems
- Requires OpenSSL for certificate generation
Requires Java keytool for keystore conversion (optional)
Installing OpenSSL in your Log Collector (JWT Bearer Flow)
OpenSSL is an open-source software library that provides tools and protocols for secure communication over networks. It helps encrypt data so that information like passwords, credit card numbers, and private messages stay secure when sent over the internet.
Step 1:
In Linux:
Install OpenSSL on your system:
sudo apt install openssl
In Windows:
Downloadyou thecan Installer:refer 1.this Gomanual tofor themore info: Shining Light Productions page and download the "Win64 OpenSSL Light" EXE installer (current version 3.x is recommended).
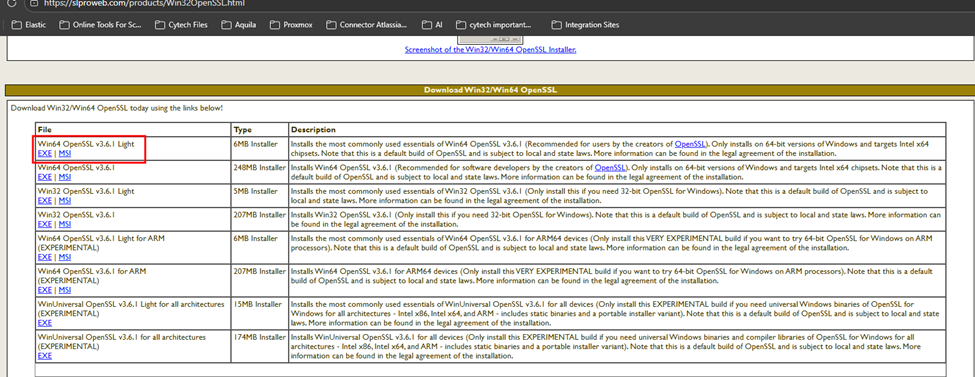
2. Run the Installer: Execute the downloaded file and follow the on-screen instructions.3.Openssl Installation Path: It is generally recommended to install in the default location, typically C:\Program Files\OpenSSL-Win64.4. Configure System Environment Variable:Search for "Environment Variables" in the Windows search bar.Click "Edit the system environment variables".Click "Environment Variables".Under "System Variables", find and select Path, then click "Edit".11
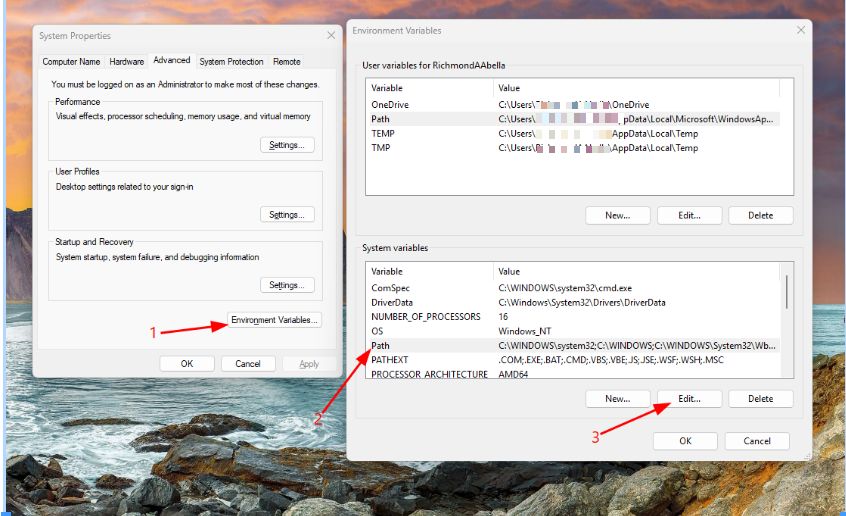
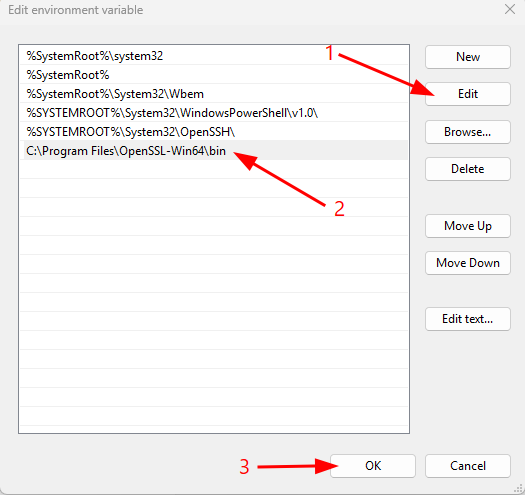
Click "Edit" and add the path to the bin folder, for example: C:\Program Files\OpenSSL-Win64\bin.Click OK on all windows to save.
Step 2:
Verify OpenSSL installation by running:
- macOS/Linux:
which openssl - Windows:
where openssl

Creating a Private Key and Self-Signed Digital Certificate
A digital certificate and the private key used to sign the certificate are needed to authorize an organization using the org login jwt command. While it is strongly advised to utilize a certificate issued by a certifying authority, you can use OpenSSL to generate a self-signed certificate to get started.
This process produces two files:
- server.key — The private key used when authorizing an org with the
org login jwtcommand - server.crt — The digital certificate uploaded when creating the required external client app
Step 1:
Open a terminal (macOS and Linux) or command prompt (Windows).
Step 2:
Create a directory to hold the generated files and navigate to it:
mkdir /Users/jdoe/JWT
cd /Users/jdoe/JWT
Step 3:
Create a private key and save it as server.key file:
Remember to change "<your password>" to the password of your choice. The password should be the same with the server.pass.key and server.key.
- server.pass.key command
openssl genpkey -aes-256-cbc -algorithm RSA -pass pass:<your password> -out server.pass.key -pkeyopt rsa_keygen_bits:2048
- server.key command
openssl rsa -passin pass:<your password> -in server.pass.key -out server.key
Step 4:
Use the server.key file to create a certificate signing request and save it as server.csr:
When prompted, provide your organization’s details. Enter only the Country Name, State or Province, Locality, and Organization Name—you may leave all other fields blank.
Do not enter a password when generating the server.csr, as it may cause an authentication mismatch.
openssl req -new -key server.key -out server.csr
Step 5:
Create a self-signed digital certificate using the server.key and server.csr files:
openssl x509 -req -sha256 -days 365 -in server.csr -signkey server.key -out server.crt
Step 6:
Clone the server.key file and save it as server.pem
Important step to successfully integrate into SIEM
- For Linux
cp server.key server.pem- For Windows
-
copy server.key server.pem
-
Creating User for JWT Bearer Flow/Username-Password Flow
- In Setup, enter Users in the Quick Find box, then select Users.
- Click New User.
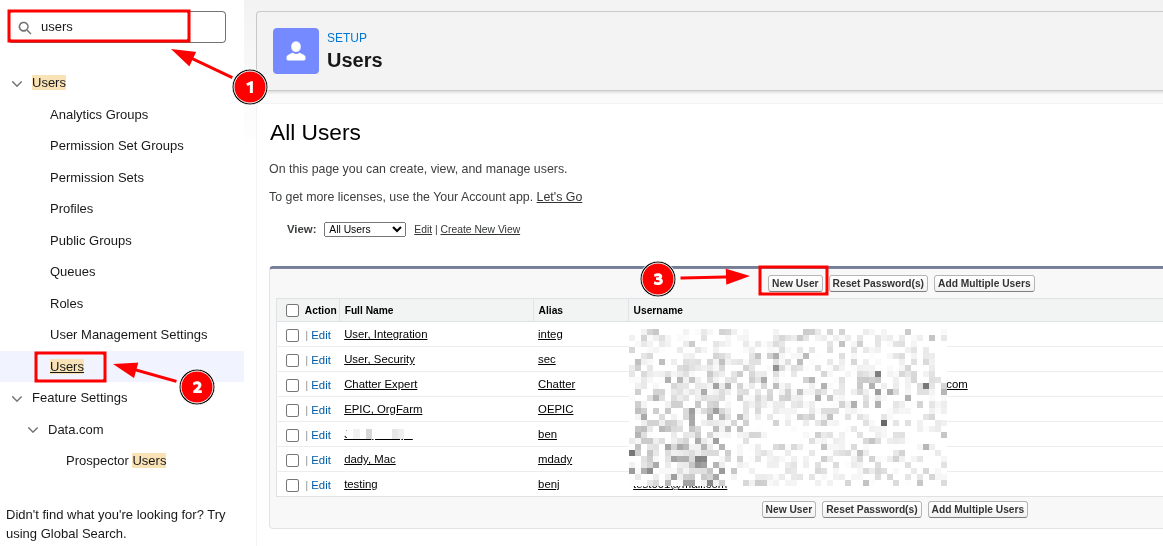
- Fill out the form, and assign the System Administrator.
- Role > None Specified
- User License > Salesforce
- Profile > System Administrator
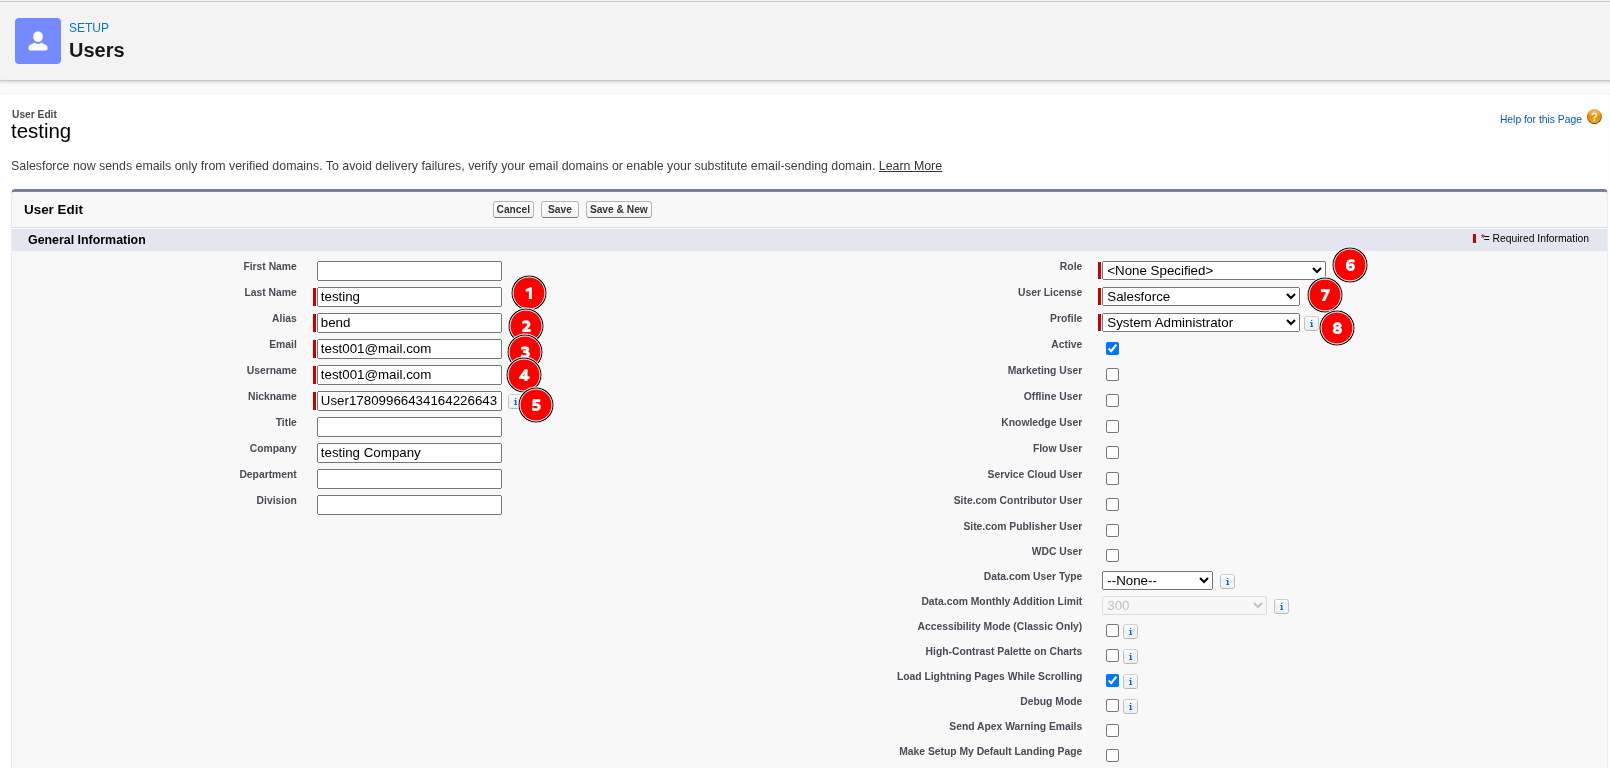
- Click Save.
Creating an External Client App in Your Salesforce Organization(JWT Bearer Flow)
Salesforce CLI requires an external client app in the org that you're authorizing. An external client app is a packageable framework that enables a third-party application (Salesforce CLI) to integrate with Salesforce using APIs and security protocols. You must create your own external client app when authorizing the org with the org login jwt command.
Step 1:
Log in to your Salesforce Organization.
Note: If the salesforce dashboard interface is in classic mode change it to lighting mode.
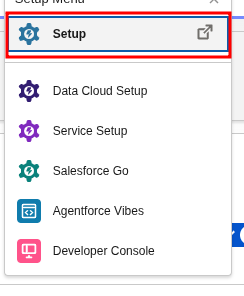
- In the Upper Right Corner click the gear icon.

- Select setup.
STEP 2:
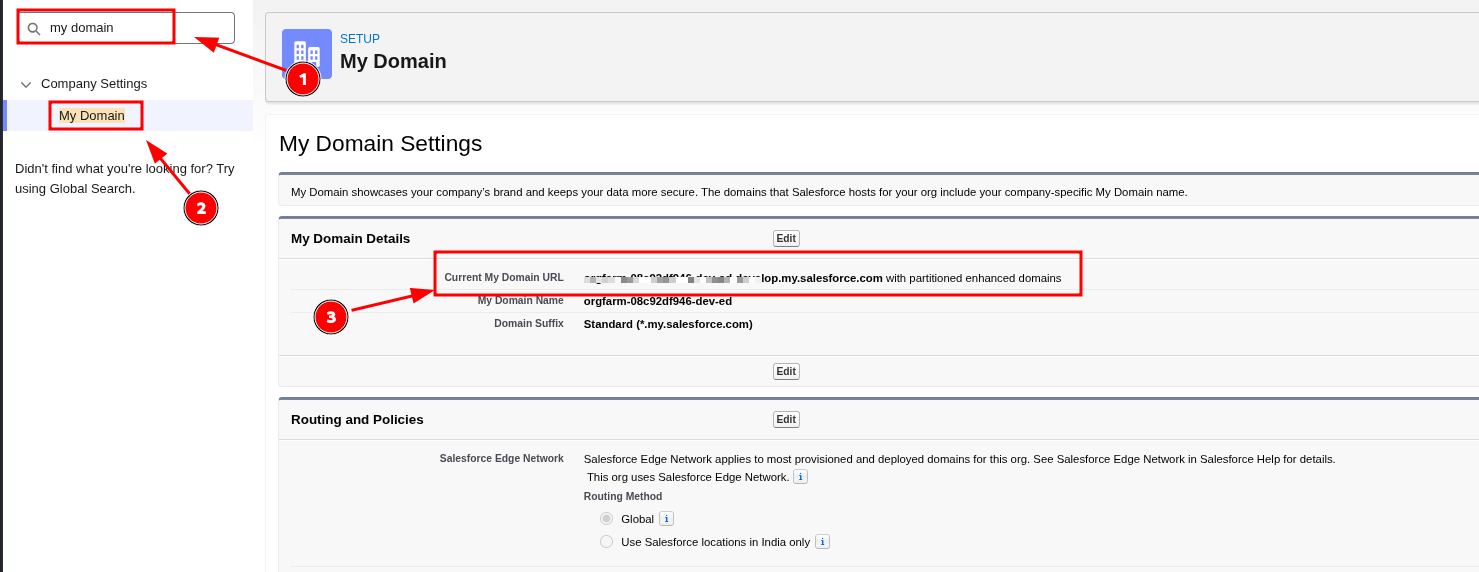
To find the base URL and instance URL follow the guide below.
- In quick find box, enter my domain then select my domain under Company Settings.
- Under My Domain Details copy Current My Domain URL that's your base URL and Instance URL. (Give it to Cytech Support)
Step 3:
From the Quick Find box in Setup, enter App Manager, then click App Manager.
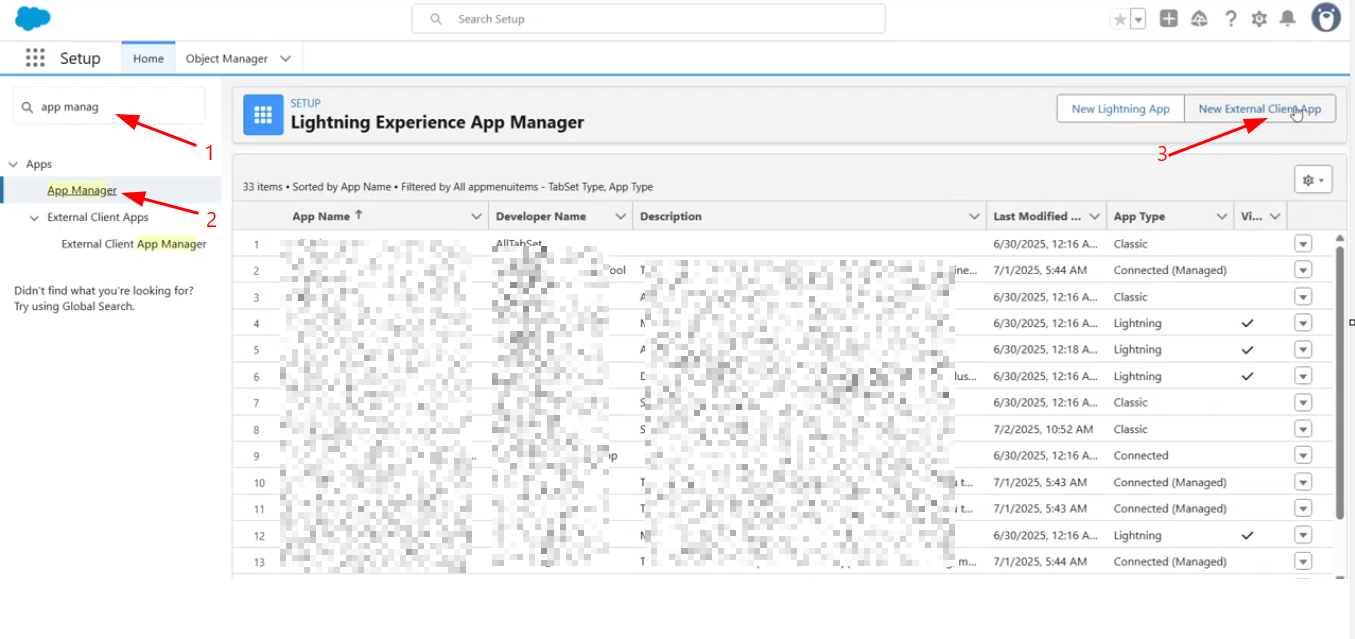
Step 3:
Click New External Client App.
Step 4:
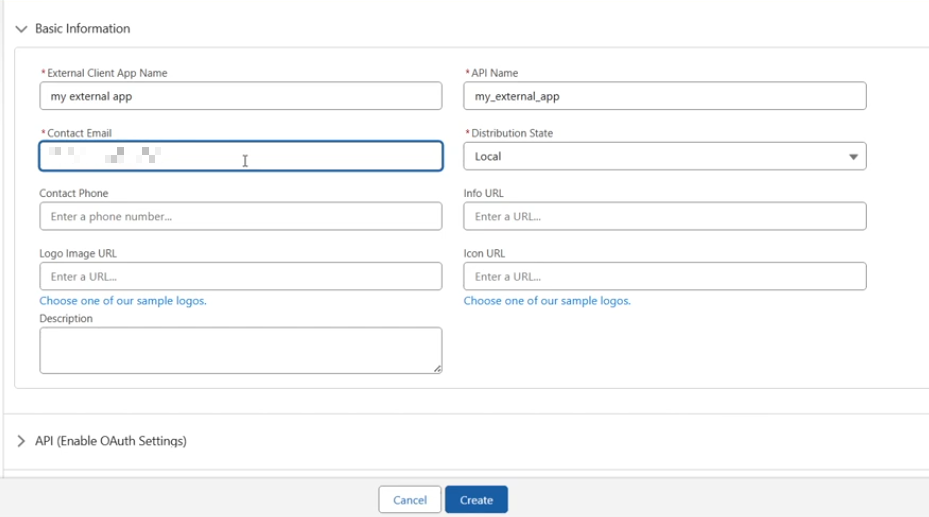
Update the basic information as needed, such as the external client app name and your contact email address.
Note: The email address provided must be valid, as Salesforce will use it to communicate with your team regarding any updates or issues related to your application usage.
Step 5:
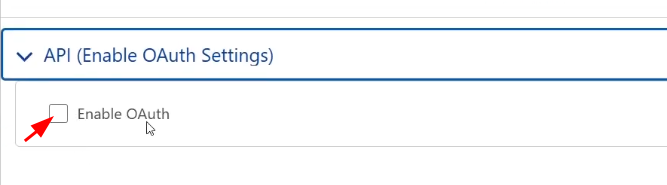
Under API (Enable OAuth Settings), click Enable OAuth.
Step 6:
Under App Settings, in the Callback URL box, enter the URL below:
https://<base-url>/callback
Step 7:
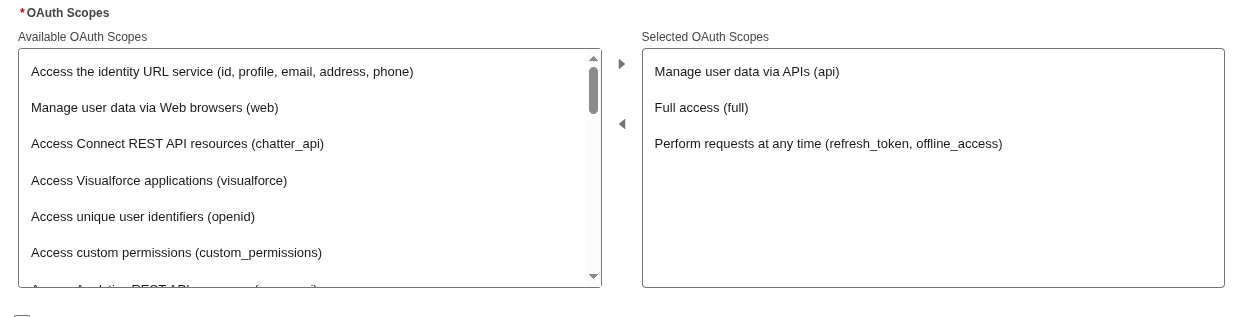
In the OAuth Scopes section, select these scopes:
- Manage user data via APIs (api) - Gives you access to user data.
- Perform requests at any time (refresh_token, offline_access) - Permits you to get an OAuth access token.
- Full access (full) - grant all access to the permission for integration.
Step 8:
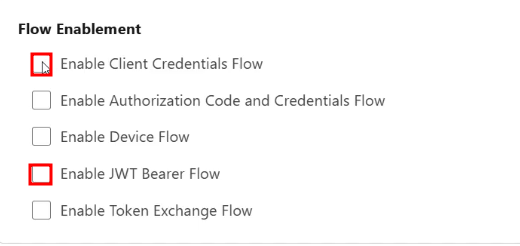
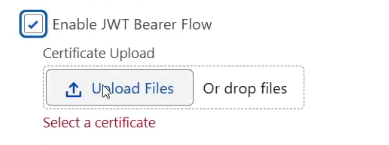
(Required for JWT) In the Flow Enablement section, select Enable Client Credentials Flow and Enable JWT Bearer Flow.
- Enable Client Credentials Flow - Allows your app to exchange its client credentials for an access token. And be able to access the credential Client ID.
- Enable JWT Bearer Flow - A secure, server-to-server authentication method used to integrate external applications with Salesforce without requiring manual user login.
Step 9:
(Required for JWT) Click Upload Files and upload your digital certificate file (server.crt).
Step 10:
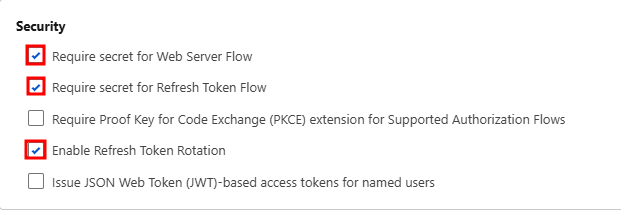
In Security section check the following:
- Require secret for
Web Server Flow Require secret forRefresh Token Flow- Enable Refresh Token Rotation
Step 11:
Click Create and Edit to configure additional settings.
Step 12:
(Required for JWT) Click the Policies tab and configure the following:
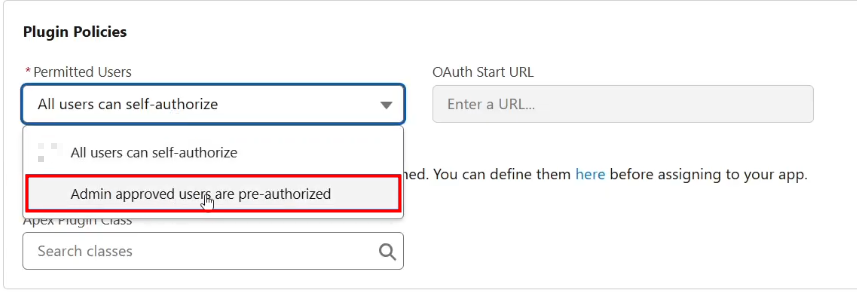
- Open OAuth(Open Authorization) Policies
- In the Plugin Policies section, set Permitted Users to Admin approved users are pre-authorized
- (Optional) In OAuth Start URL use your organization base URL example: (https://fun-dream-996.my.salesforce.com/)
- Click OK
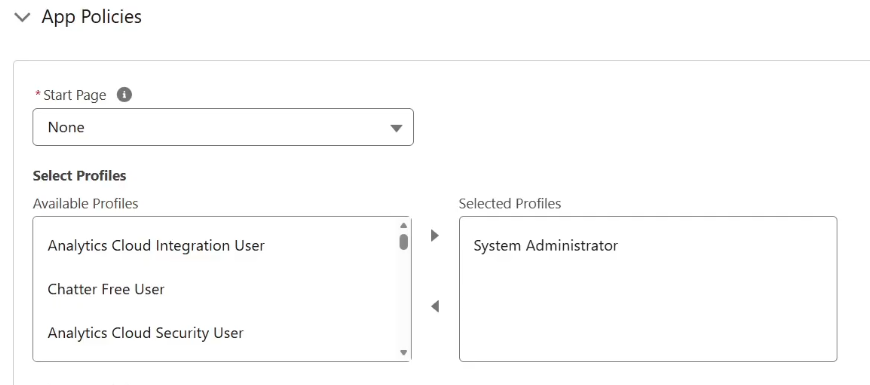
- In the App Policies section, select the profiles and permission sets that are pre-authorized to use this external client app
Step 14:
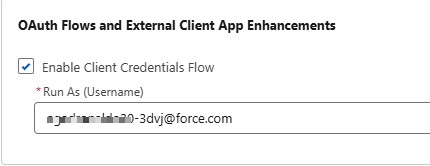
Step 15:
Step 16:
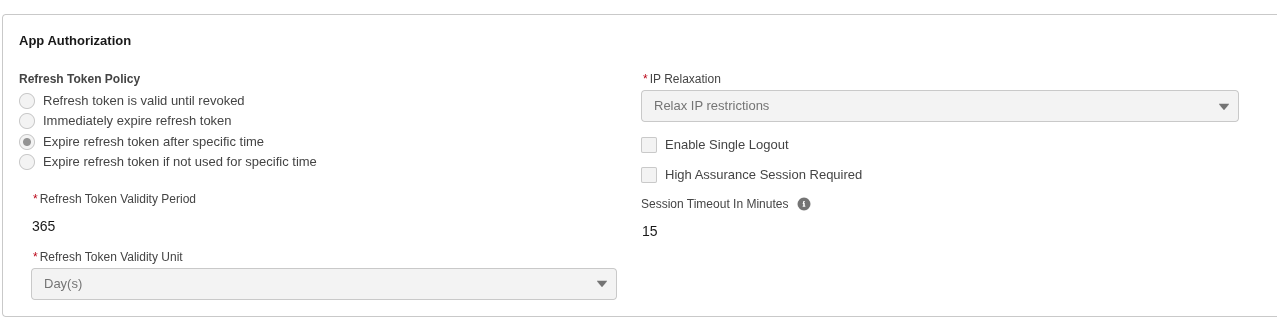
Configure token expiration settings:
- Refresh Token Validity Period: Enter 365
- Refresh Token Validity Unit: Select Day(s)
Step 17:
In the Session Timeout in Minutes box, enter 15.
Step 18:
In IP Relaxation Select Relax IP restrictions and the Click Save.
Step 19:
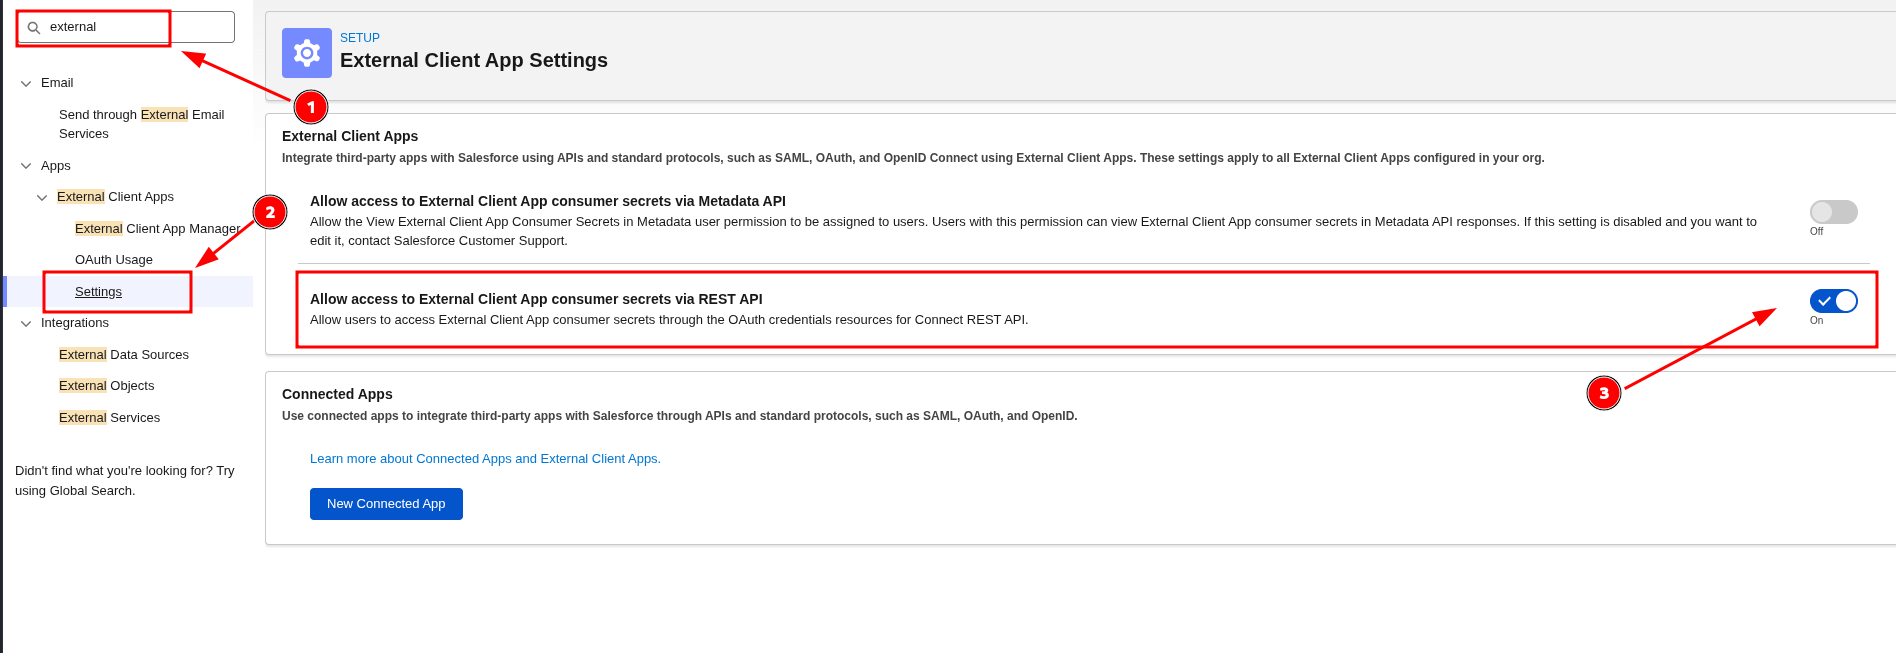
Enable Allow Access to External Client App Consumer Secret via REST API
External Client App Setting > Allow Access to External Client App Consumer Secret via REST API
Step 20:
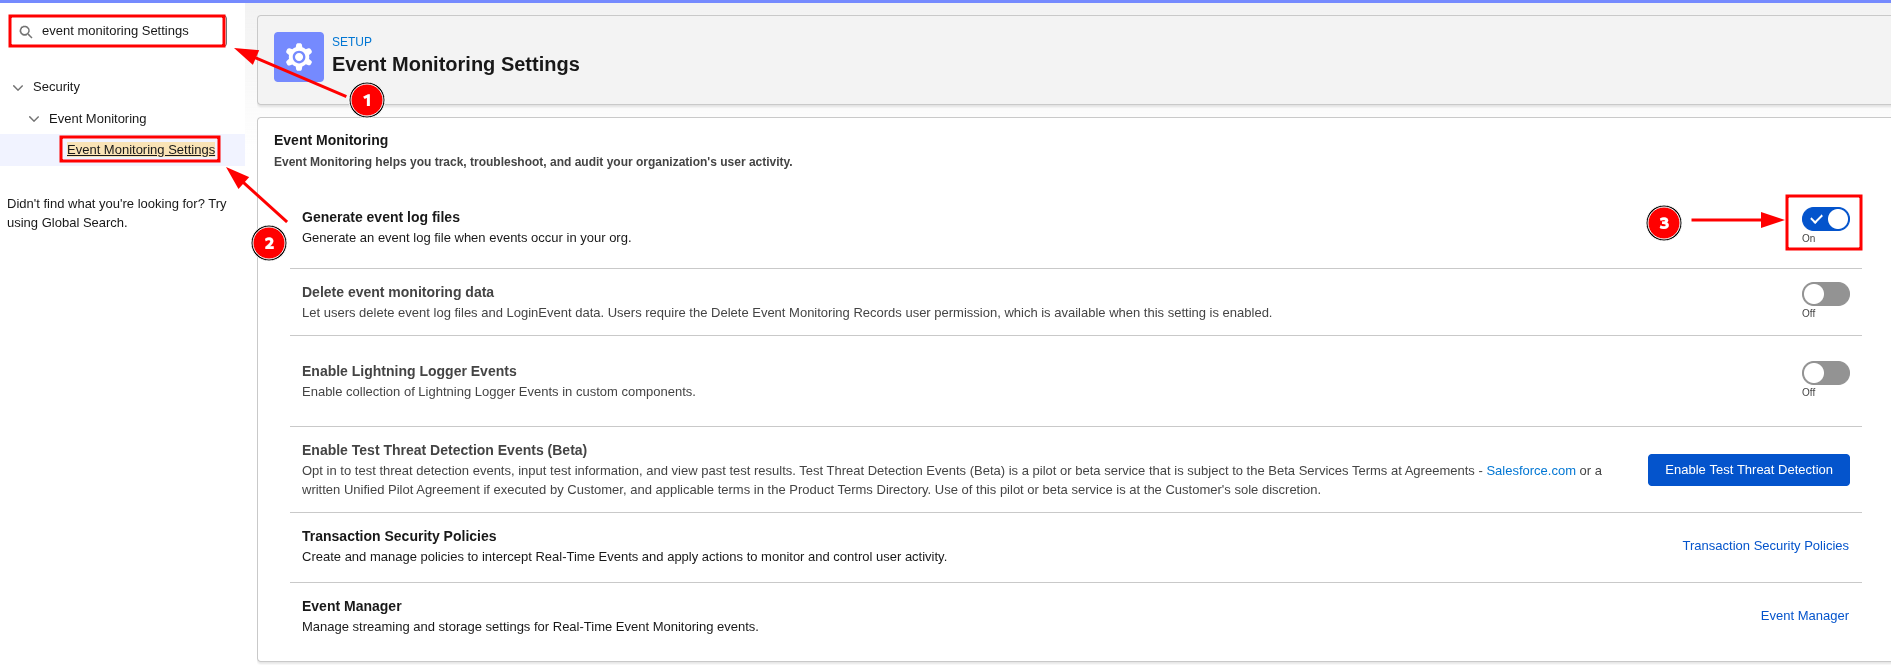
Enable Event log files
Event Monitoring Settings > Generate event log files
Your external client app is now ready to use.
How to Find Client ID (Consumer Key) in External Client App
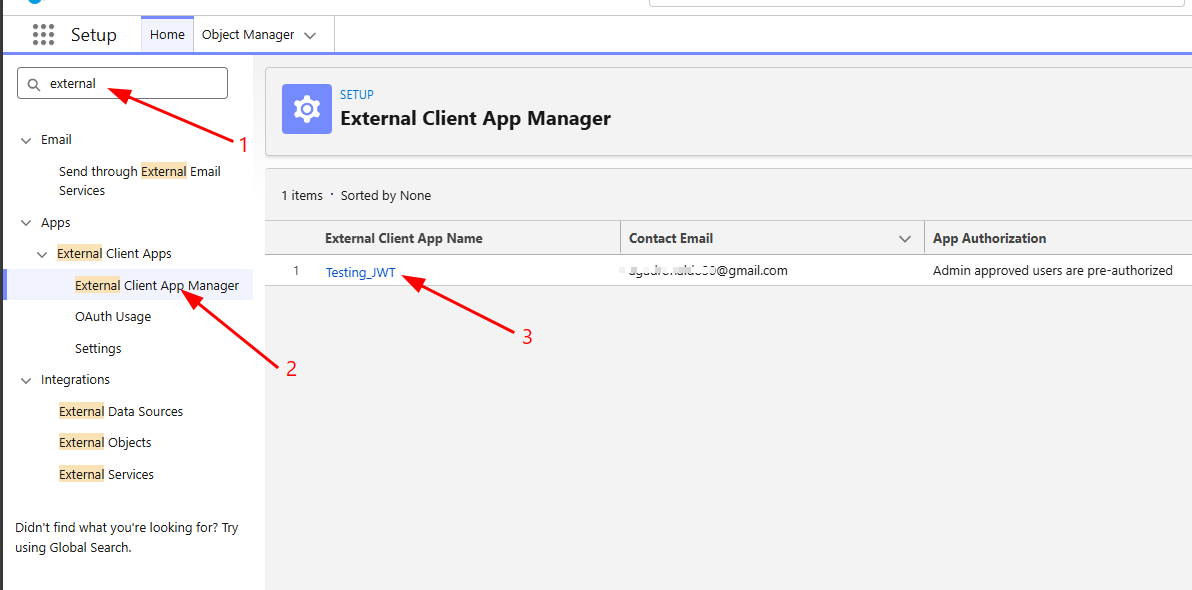
- type external in quick find search bar and click external client app manager
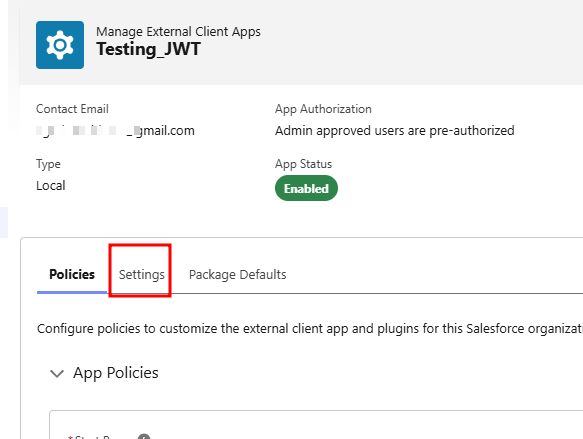
- under External Client App Name locate the app you created earlier and click it.
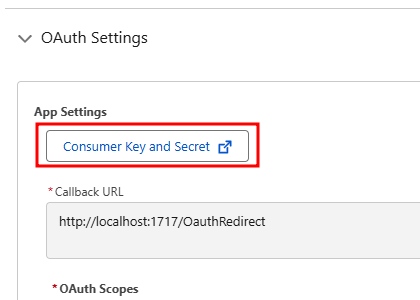
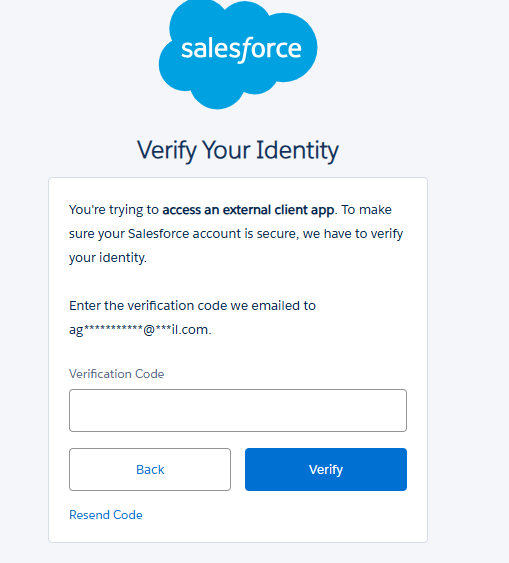
- under settings tab click OAuth Settings then you can the view your client key and client secret after the verification process.
ConvertingCreate server.crtA toConnected JKSApps Keystore(Username-Password FileFlow)
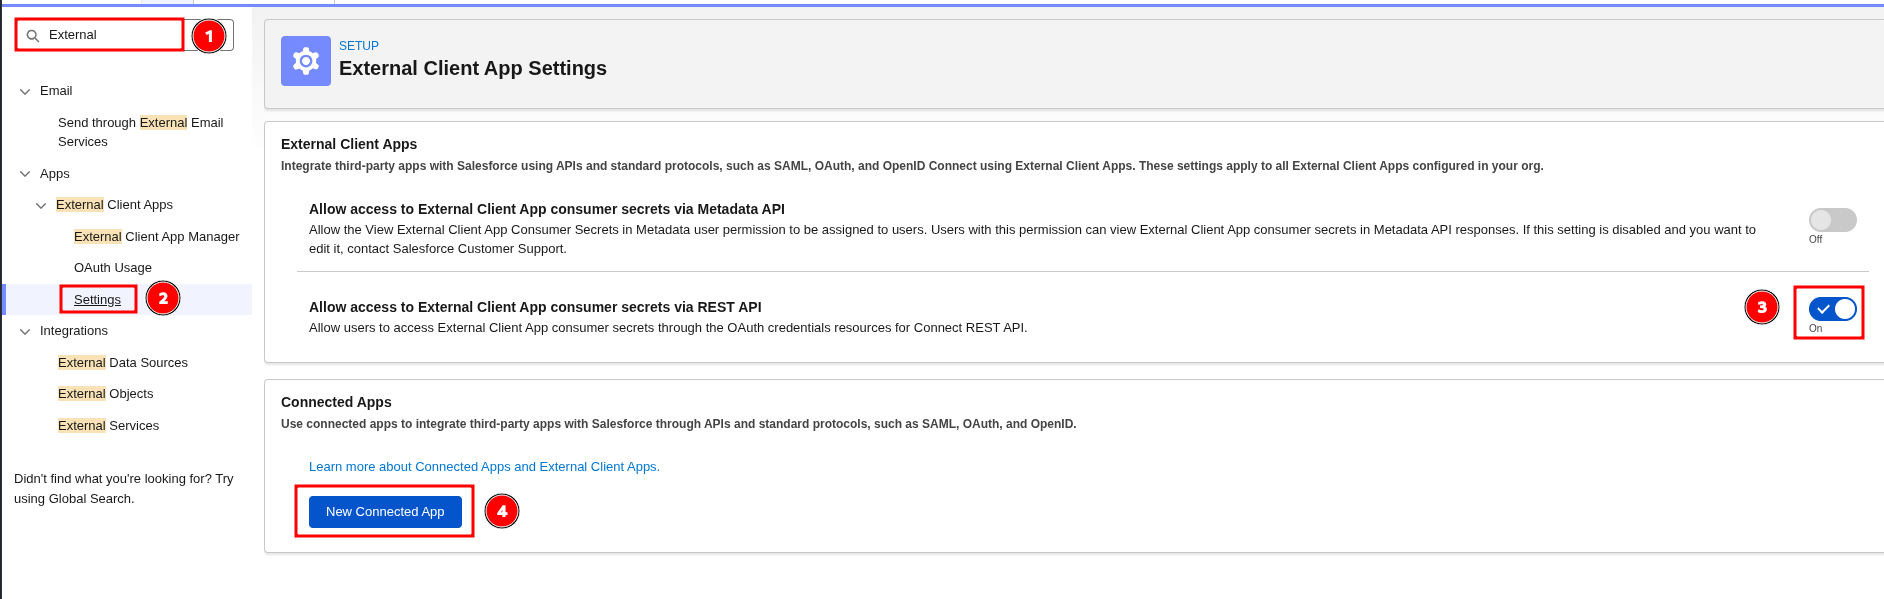
ToFor security reasons, Salesforce blocks the OAuth 2.0 Username-Password flow by default in recent releases. Prefer the JWT bearer flow. If you must use the certificateUsername-Password withflow, Salesforce,in convertOAuth , select itand OpenID Connect SettingsAllow OAuth Username-Password Flows. For more information, see the Salesforce release note: Username-Password OAuth flow blocked by default.

- Log in to
a Java KeyStoreSalesforce (JKS)Lightningformat.UI). - From
1:
Step
Setup, Importantin stepQuick toFindsuccessfullyenter integrateExternal intoClient SIEM
Clone the server.key fileApps and saveselect itSettings. asTurn server.pem.
InAllow Linux
cpof server.keyconnected server.pemappsNote: Step 2 - 4 are Optional - (use for salesforce to salesforce integration)
Step 2:
Create a PKCS12 keystore file (minimum password length: 6 characters):
openssl pkcs12 -export -in server.crt -inkey server.pem -out keystore.p12Step 3:
Convert the PKCS12 file to JKS format:
keytool -importkeystore -srckeystore keystore.p12 -srcstoretype pkcs12 -destkeystore servercert.jks -deststoretype JKSYou will be prompted toTo create a password.connected Rememberapp, thisselect passwordNew Connected App.
Basic Information: Connected App Name, API Name, Contact Email.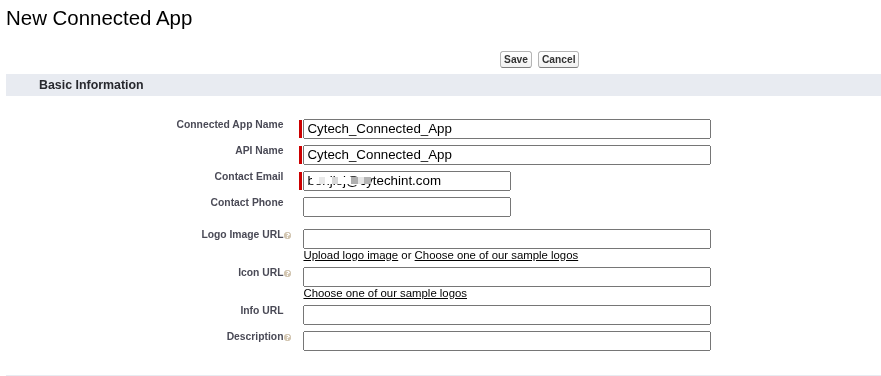
API (Enable OAuth Settings), check Enable OAuth Settings.Callback URL:
https://yourapp.example.com/callback).
Manage user data via APIs (api)Perform requests at any time (refresh_token, offline_access)Full access (full)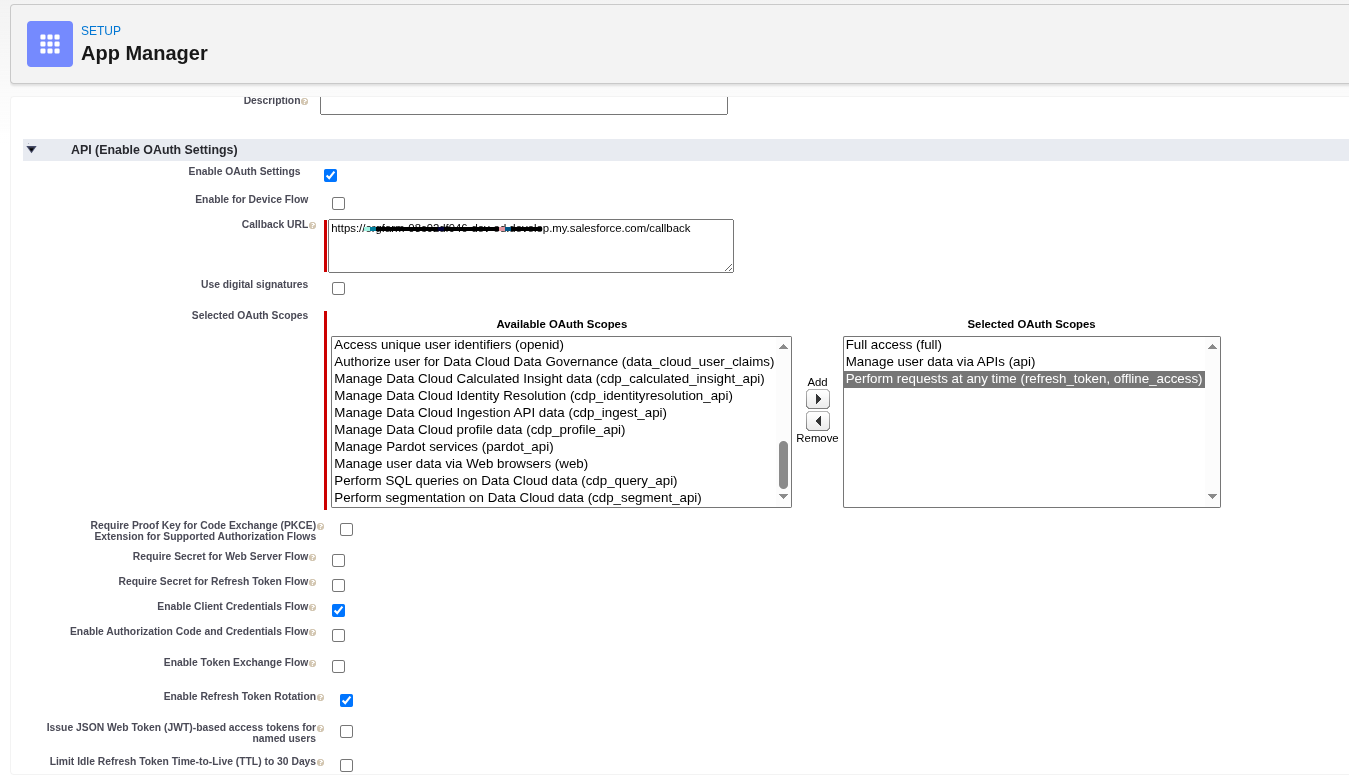
Connected App to propagate.
Save. It can take up to 10 minutes for futurethe use.
Manage Consumer Details to obtain Consumer Key and Consumer Secret.Manage Consumer Details Appears only once so better to copy consumer key and consumer secret in a safe place.
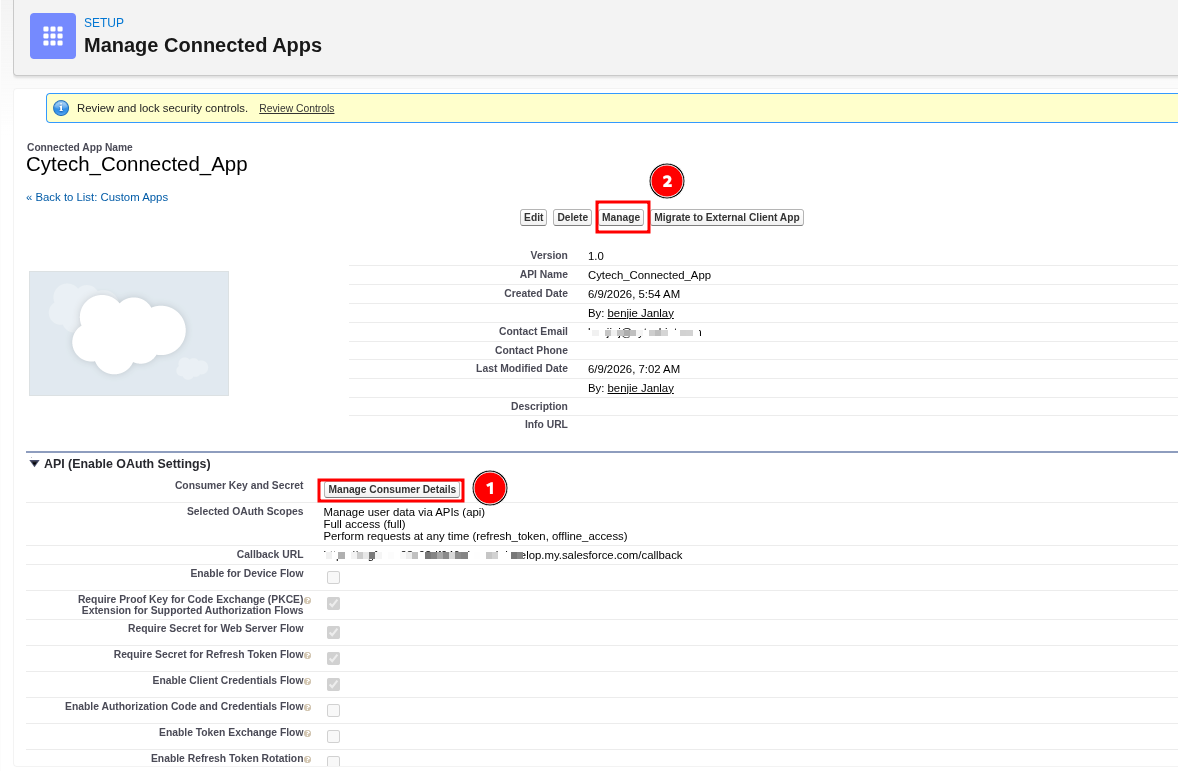
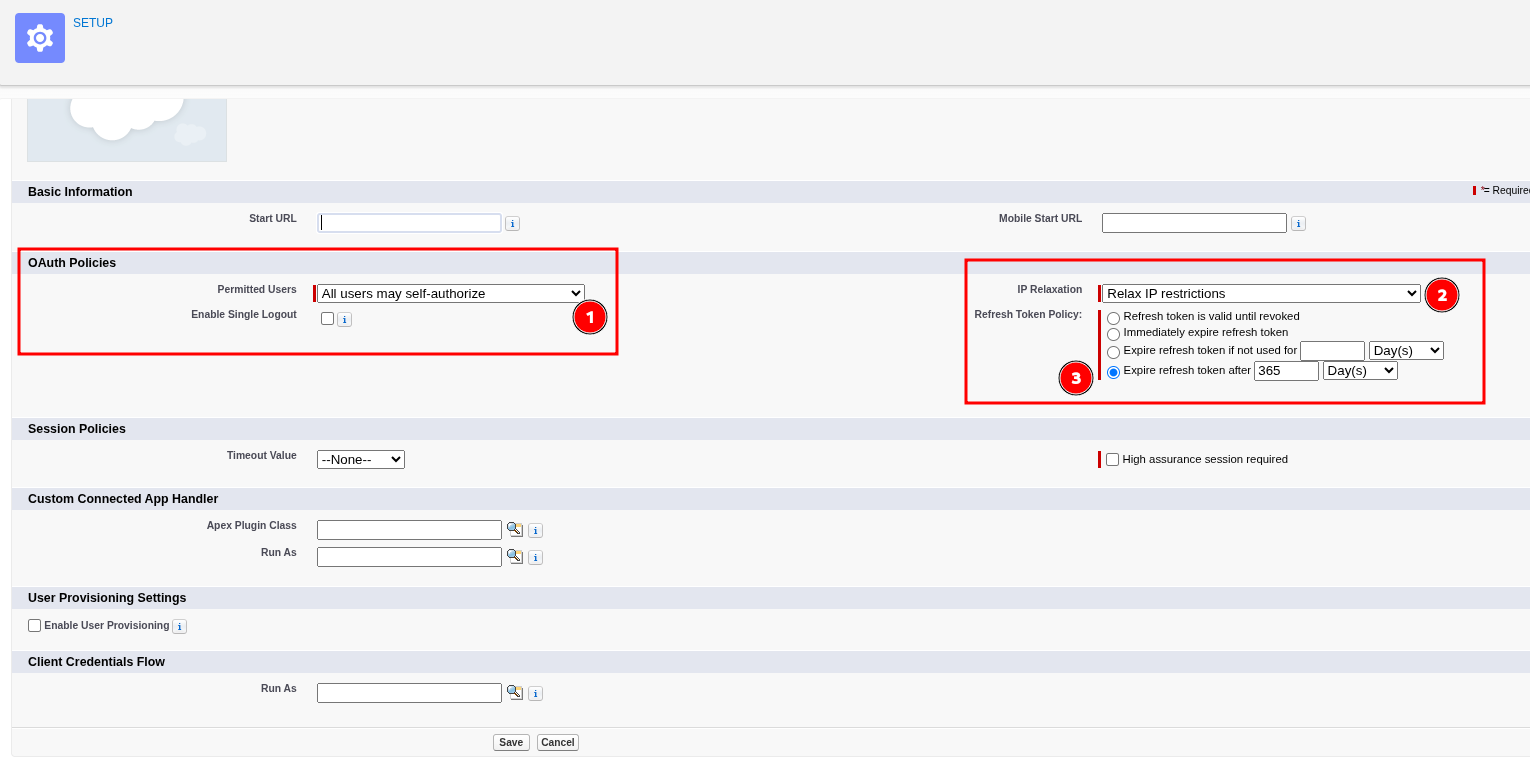
- Then Click Manage to OAuth Policies
- Permitted Users > All users may self-authorize
- IP Relaxation > Relax IP Restrictions
- Refresh Token Policy > Expire refresh token after "365" days
- Client Credentials Flow > "the user you created earlier"
Step 4:
Change the default alias (Salesforce doesn't support alias "1"):
keytool -keystore servercert.jks -changealias -alias 1 -destalias <name of certificate>Required fields for JWT Authenticationand Username-Password Flow Integration:
For JWT Bearer Flow:
-
JWT Authentication Client Key Path (full file folder path of server.pem not in root directory)- ex: Users/jdoe/JWT/server.pem
-
Username (can be found in View Profile > Settings > Personal Information)or If you have dedicated user for integration can be found in (Quick Find > Users > Username)- example format: ADMIN-3dvj@force.com
-
Client ID (Consumer Key)- example format: 3MVxxxxxtCx.CV6cbh7fSpKs_5iexxxxxxxxxxxxxxxxxxxxxxxxxxxZKBaepcxlJUhO1
-
Instance URL- example format: https://company.my.salesforce.com
-
API Version- in quick find type Apex Classes
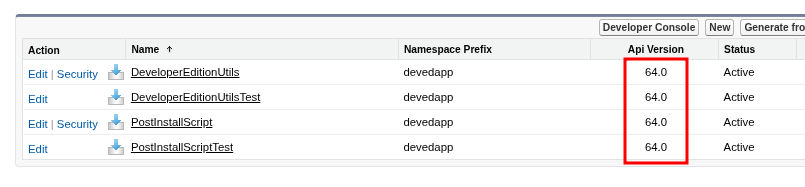
- in quick find type Apex Classes
For Username-Password Flow:
- Username
- Password
- Consumer Key
- Consumer Secret
- Instance URL
Provide this required fields to CyTech Support.
Reference Link:
Create an External Client App in Your Org | Salesforce DX Developer Guide | Salesforce Developers
If you need further assistance, kindly contact our support at support@cytechint.com for prompt assistance and guidance.