# Windows Server - Deploy Software via Group Policy (GPO)
### **Introduction
**Deploy Software via Group Policy (GPO)** is a method used in **Windows Active Directory (AD)** environments to automatically **install, update, or remove software** on computers or for users centrally and silently, without manual installation on each machine. It’s mainly handled by **Group Policy Objects (GPOs)** through Microsoft Installer (MSI) packages.
#### **Open the Windows Server Device:**
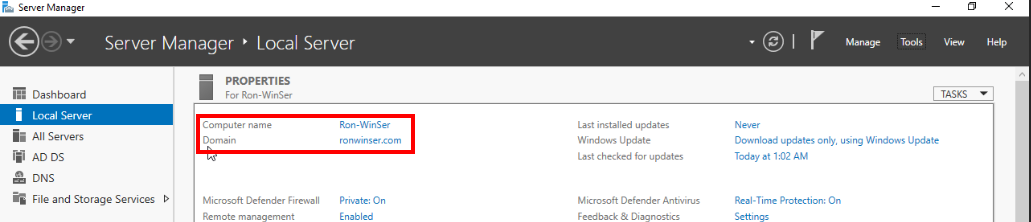
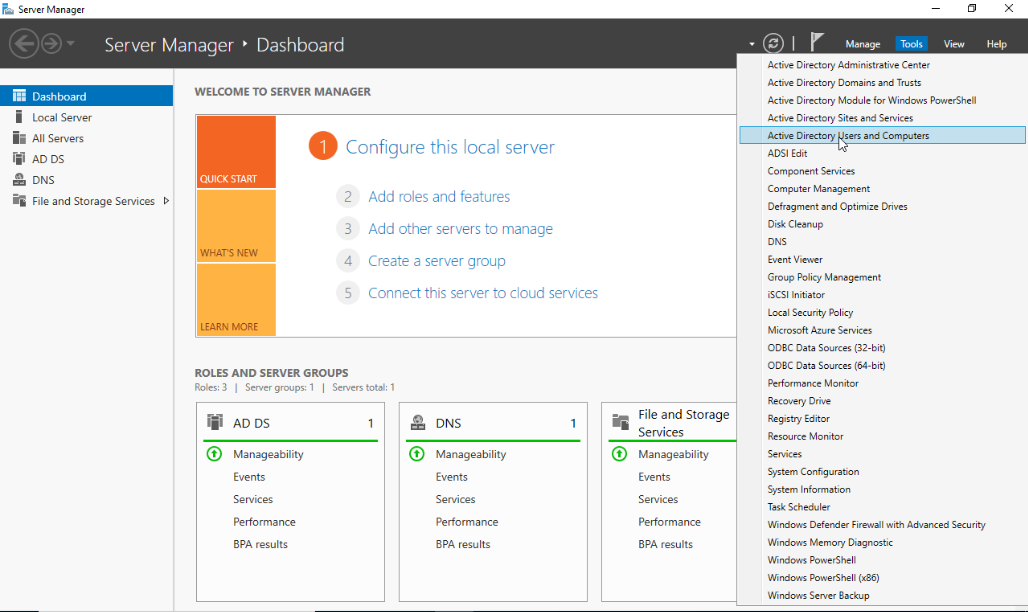
- Open **Server Manager dashboard** click **Tools** on the upper right side and choose the **Active Directory Users and Computers.**
[](https://cytechint-docs-bookstack.s3.amazonaws.com/uploads/images/gallery/2026-01/MQQgkMhG5cjA5SEQ-image.png)
[](https://cytechint-docs-bookstack.s3.amazonaws.com/uploads/images/gallery/2026-01/phG9efsyRpAoBEsr-image.png)
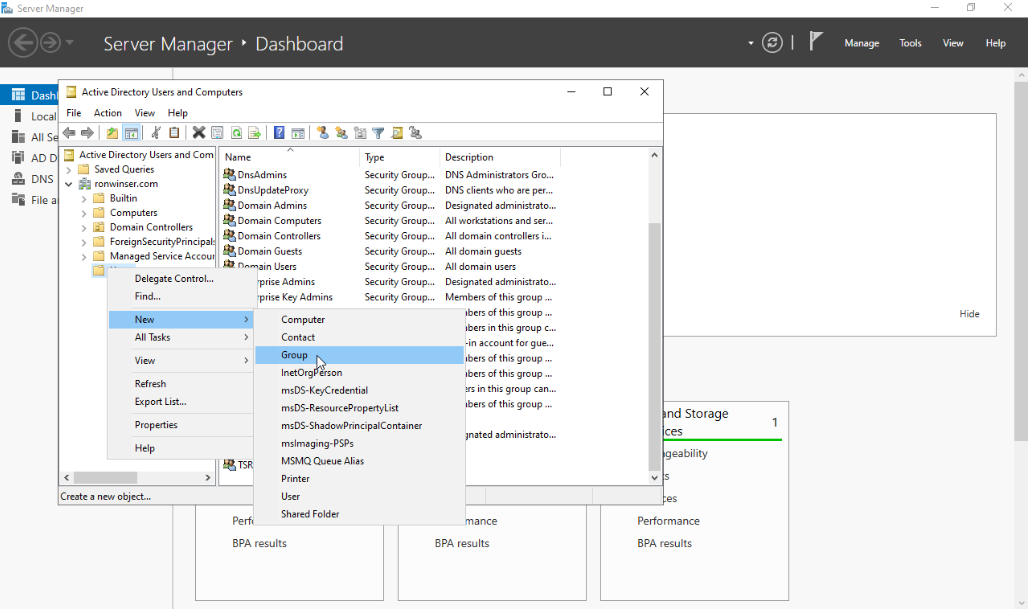
- On the **Active Directory Users and Computers** right click the **Users** folder select **New** and **Group.**
[](https://cytechint-docs-bookstack.s3.amazonaws.com/uploads/images/gallery/2026-01/wEdjfYkKvgoRLxeH-image.png)
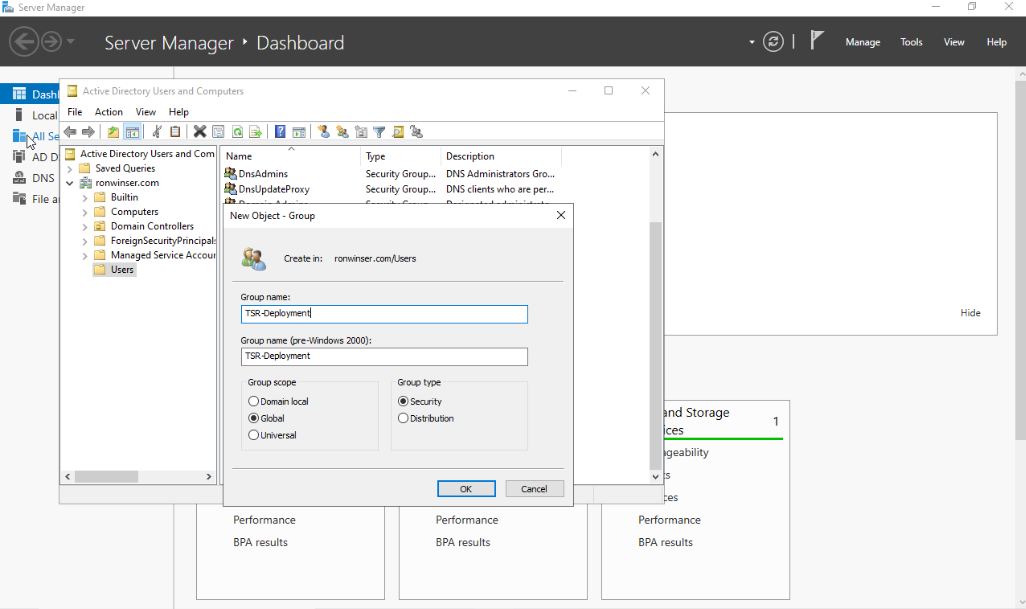
After you clicked the Computer, New Object - Computer window displayed.
- **Input your desired Computer Name:** TSR-Deployment
- **Group scope: Global**
- **Group type: Security**
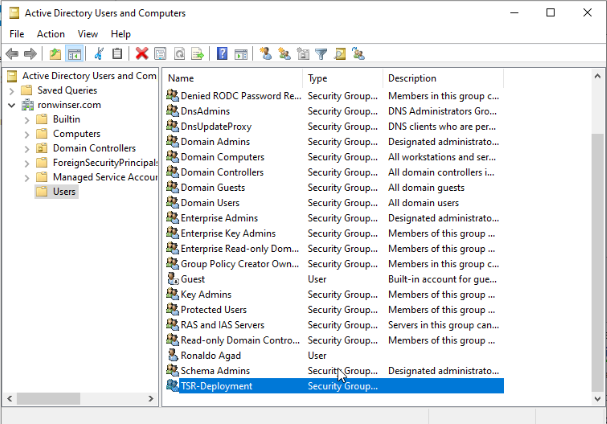
Click "OK" once done and you will see the **TSR-Deployment** added on the **Active Directory Users and Computers**.
[](https://cytechint-docs-bookstack.s3.amazonaws.com/uploads/images/gallery/2026-01/jaJv4HWiS9v3AheT-image.png)
[](https://cytechint-docs-bookstack.s3.amazonaws.com/uploads/images/gallery/2026-01/0OlRbArKvhNc6x1O-image.png)
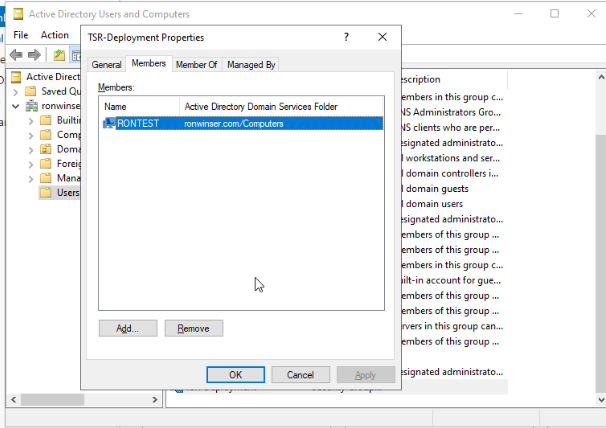
- Next Process double click the **TSR-Deployment** on the **Active Directory Users and Computers, TSR-Deployment Properties** will appear and click the **Members** tab.
[](https://cytechint-docs-bookstack.s3.amazonaws.com/uploads/images/gallery/2026-01/ow5BVIAB80PJK0fs-image.png)
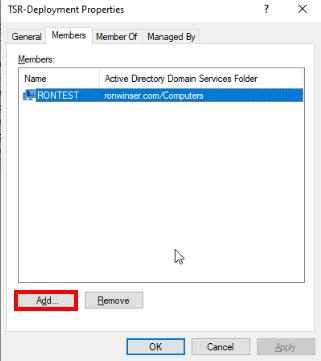
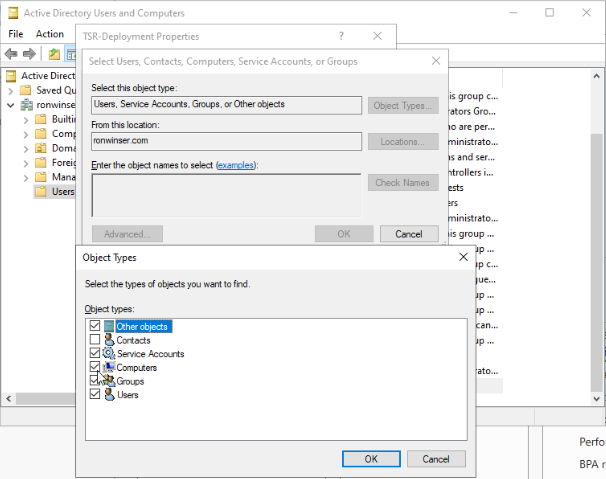
- Click **Add**, then select **Object Types**. Once it opens, check the **Computers**.
[](https://cytechint-docs-bookstack.s3.amazonaws.com/uploads/images/gallery/2026-01/YB5G1EOVe2ERMHmx-image.png)
[](https://cytechint-docs-bookstack.s3.amazonaws.com/uploads/images/gallery/2026-01/AsF2mxZKR1A8llWC-image.png)
- Type the **computer name** that is connected to the domain. Then, click **Check Names** and select only the **Computer** icon that corresponds to your device.
[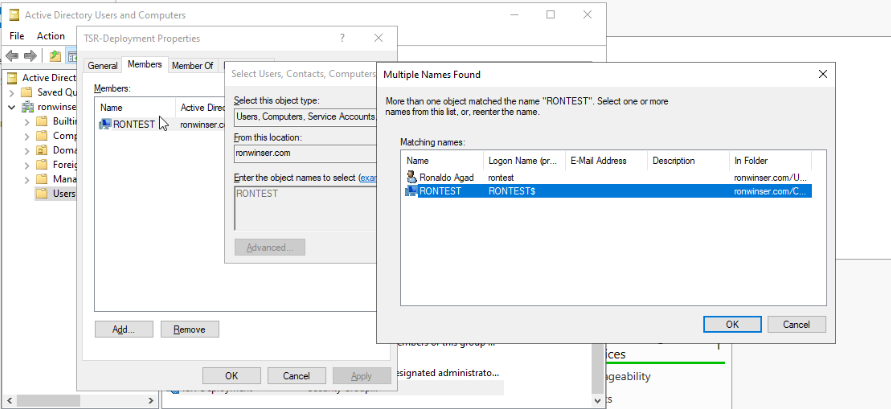](https://cytechint-docs-bookstack.s3.amazonaws.com/uploads/images/gallery/2026-01/aeehraMDeA0YUH7H-image.png)
##### **Creating a UNC Path for Software Folders (Windows Server)**
To ensure domain-joined computers can access the AQUILA EDR ZIP file package and folder for centralizing logs, create a shared network folder and configure appropriate permissions.
1. On a **Document** folder, create another folder inside of it with your desired name (e.g., **software**).
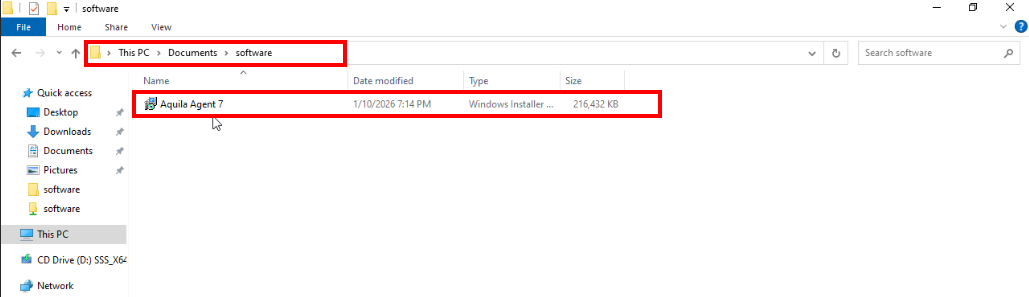
- Inside of the **software** folder, place the `aquila agent 7.msi` into this folder.
[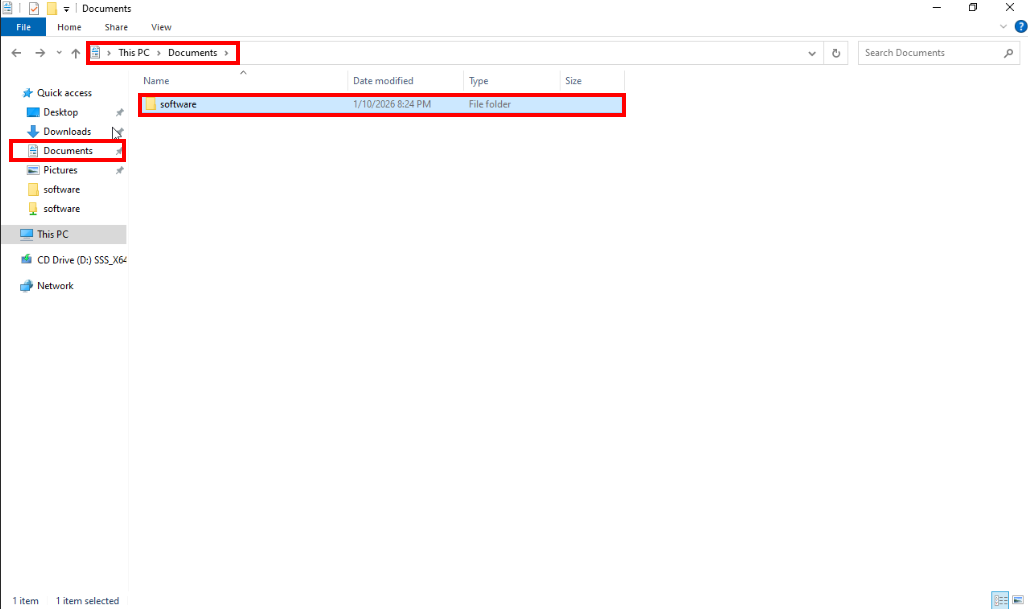](https://cytechint-docs-bookstack.s3.amazonaws.com/uploads/images/gallery/2026-01/S0lg9M1r9EFECEYj-image.png)
[](https://cytechint-docs-bookstack.s3.amazonaws.com/uploads/images/gallery/2026-01/rvva6I87H1FJ8j0s-image.png)
2. **Enable Folder Sharing**
- Right-click the **software** folder and select **Properties**.
- Navigate to the **Sharing** tab and click **Advanced Sharing**.[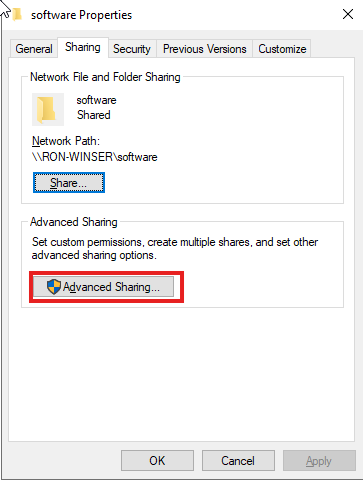](https://cytechint-docs-bookstack.s3.amazonaws.com/uploads/images/gallery/2026-01/opYjeqE5wFFJ3Z8V-image.png)
- Check the box **Share this folder**.[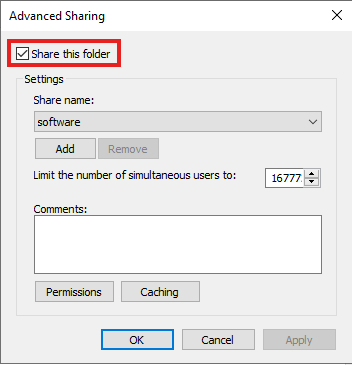](https://cytechint-docs-bookstack.s3.amazonaws.com/uploads/images/gallery/2026-01/BTHQBRIZqm8z8flC-image.png)
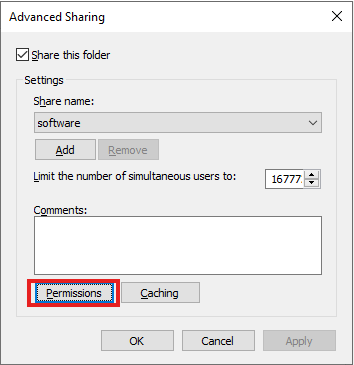
3. Set Permissions
- Click Permissions
- Grant the **Read** permission to `Domain Computers`.
- Grant the **Full Control** permission to `Domain Admins`
[](https://cytechint-docs-bookstack.s3.amazonaws.com/uploads/images/gallery/2026-01/myA2I9R7JSAhtqXd-image.png)
- Once the **Permission** clicked, **Permissions for software** will be shown and kindly **Remove** the **Everyone.**
[](https://cytechint-docs-bookstack.s3.amazonaws.com/uploads/images/gallery/2026-01/3q3dwKXWXABHMPEG-image.png)
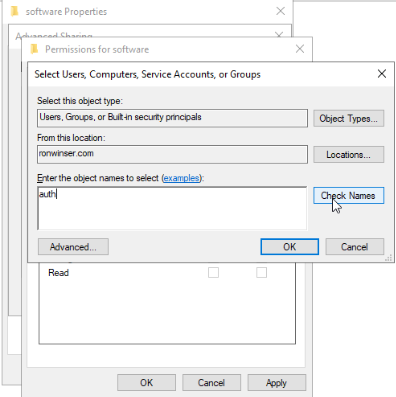
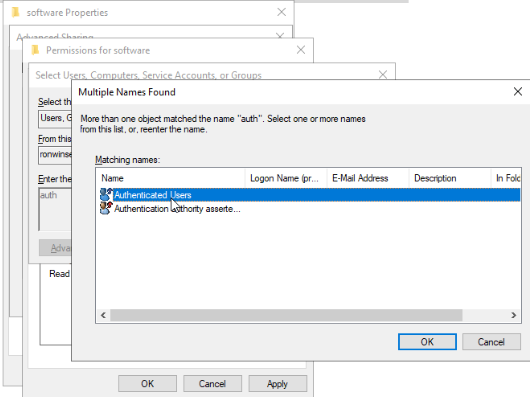
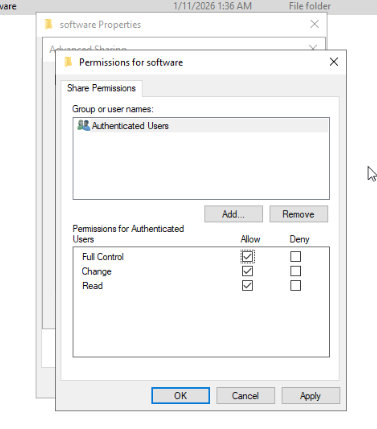
- After clicking the **Remove**, click the **Add**, then **Select Users, Computers, Service Accounts, or Group** will be shown. Type "**auth"** then click **Check Names.** The **Multiple Names Found** will be shown and select the **Authenticated Users** and click **OK.** [](https://cytechint-docs-bookstack.s3.amazonaws.com/uploads/images/gallery/2026-01/vjt3uArmsu3RYQgF-image.png)
[](https://cytechint-docs-bookstack.s3.amazonaws.com/uploads/images/gallery/2026-01/zVDiSopC92yCAQ9n-image.png)
[](https://cytechint-docs-bookstack.s3.amazonaws.com/uploads/images/gallery/2026-01/TNrjql3n2fdmHv3W-image.png)
- Once **Authenticated Users** selected allow **Full Control,** click **Apply** and **OK.** Including the **Advanced Sharing** click **Apply** and **OK.**
[](https://cytechint-docs-bookstack.s3.amazonaws.com/uploads/images/gallery/2026-01/BGPSc75jbdelNeBK-image.png)
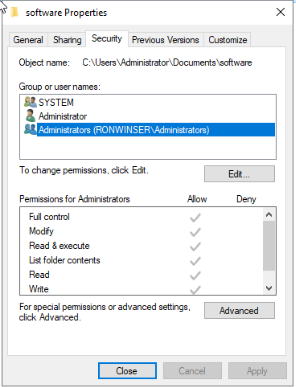
- On the **software folder properties** click the **Security** tab. Point your mouse at **Administrator** ("username"\\administrator) and click **Edit**
[](https://cytechint-docs-bookstack.s3.amazonaws.com/uploads/images/gallery/2026-01/YSq1qwaWqA2Dc1Yt-image.png)
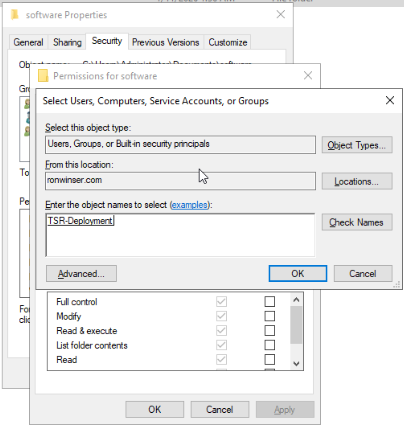
- On the **Permission for software,** click **Add** and type the **Security Group** name you created "**tsr-deployment**" and click the **Check Names (**It will automatically call the **Security Group**) and click **OK.**
[](https://cytechint-docs-bookstack.s3.amazonaws.com/uploads/images/gallery/2026-01/6YRhck0CPRFZkvoq-image.png)
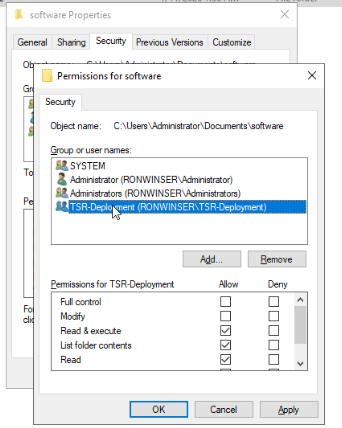
- As you can see the "**TSR-Deployment**" Security Group are added. To proceed click **Apply** and **OK.**
[](https://cytechint-docs-bookstack.s3.amazonaws.com/uploads/images/gallery/2026-01/5bZePJdlQQl3caCf-image.png)
#### **Let's go back to the Server Manager dashboard.**
- On the **Server Manager** click **Tools** on the upper right side and choose the **Group Policy Management**.
[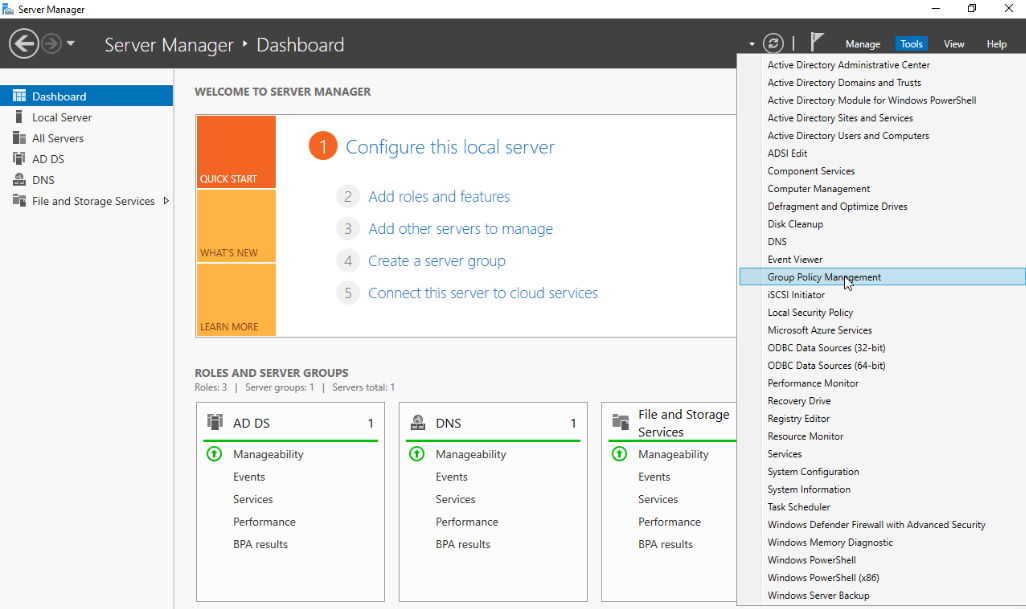](https://cytechint-docs-bookstack.s3.amazonaws.com/uploads/images/gallery/2026-01/ScQSGuxv1yulVkCs-image.png)
- Select or double click the **Domain.**
[](https://cytechint-docs-bookstack.s3.amazonaws.com/uploads/images/gallery/2026-01/k077w4t2kb6KBe91-image.png)
- Under your **Domain,** you can see the **domain name** `(e.g., ronwinser.com).`
[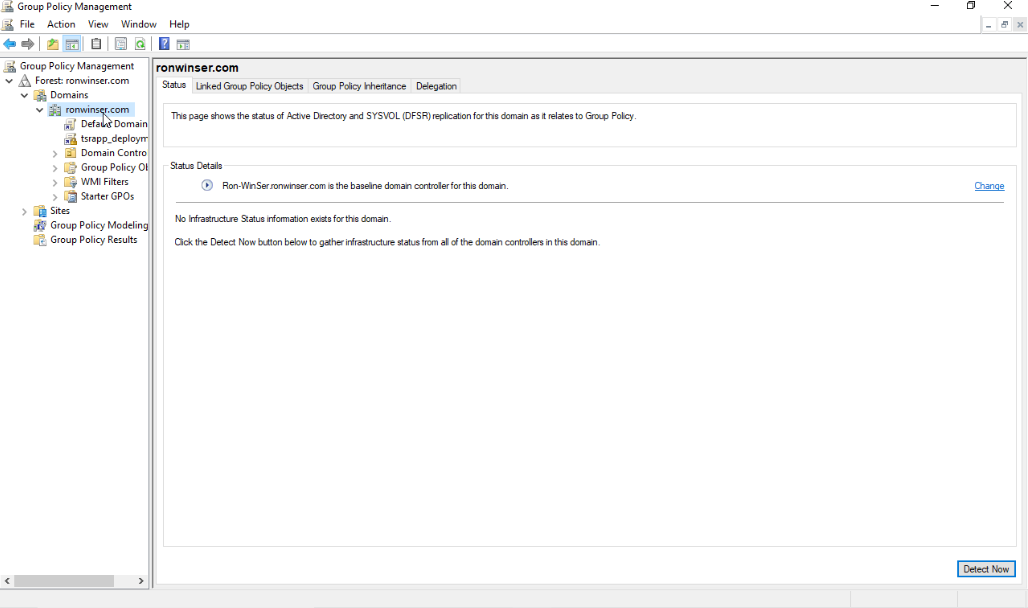](https://cytechint-docs-bookstack.s3.amazonaws.com/uploads/images/gallery/2026-01/ccYm3gNKfXqVqixX-image.png)
- Right click your **domain name** and click the **Create a GPO in this domain, and Link it here** and give a name `(e.g., tsrapp_deployment)` click **OK** once done.
[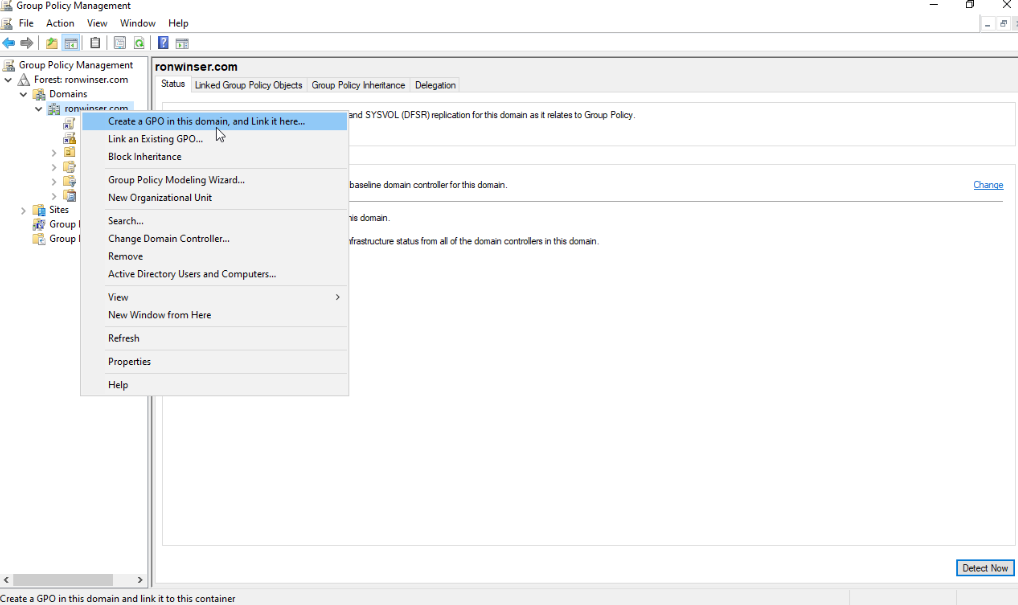](https://cytechint-docs-bookstack.s3.amazonaws.com/uploads/images/gallery/2026-01/hCOWsJlaoUZ06ZSL-image.png)
[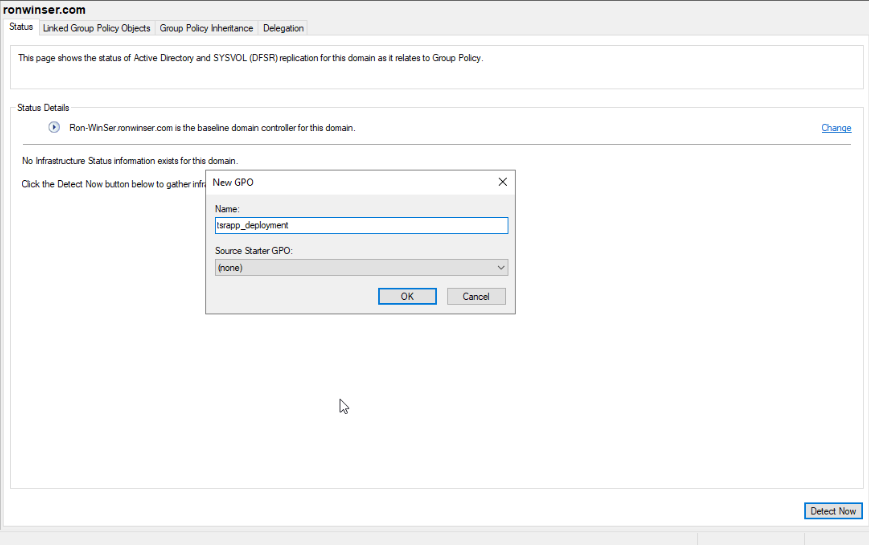](https://cytechint-docs-bookstack.s3.amazonaws.com/uploads/images/gallery/2026-01/ZanwQn9leRwGzX2S-image.png)
- On the **GPO** you created, right click and choose the **Edit.**
[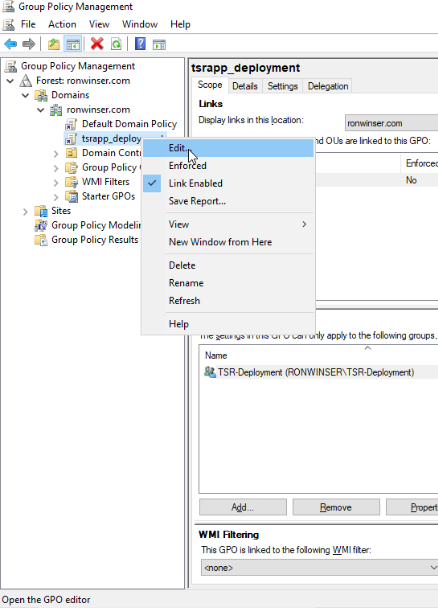](https://cytechint-docs-bookstack.s3.amazonaws.com/uploads/images/gallery/2026-01/PgogkPRg90f6Mhs5-image.png)
- Once you **Edit**, the **Group Policy Management** Editor will be shown just click the arrow from **Computer Configuration** > **Policies** > **Software Settings** > **Software installation,** inside the **Software installation** right click on the enviroment and choose the **New** > **Package.**
[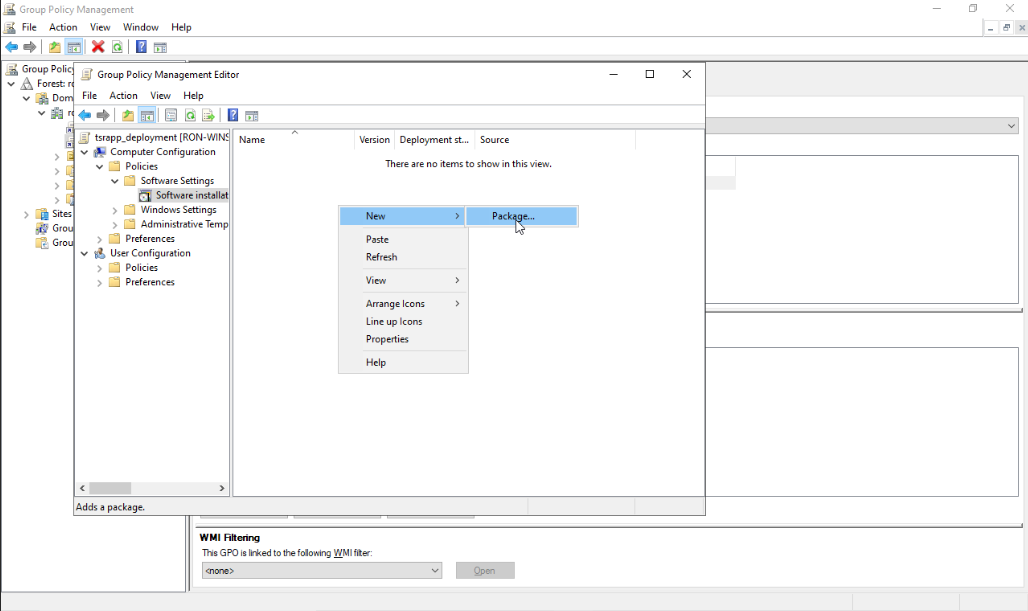](https://cytechint-docs-bookstack.s3.amazonaws.com/uploads/images/gallery/2026-01/1lvK7APBP8uZ0Juv-image.png)
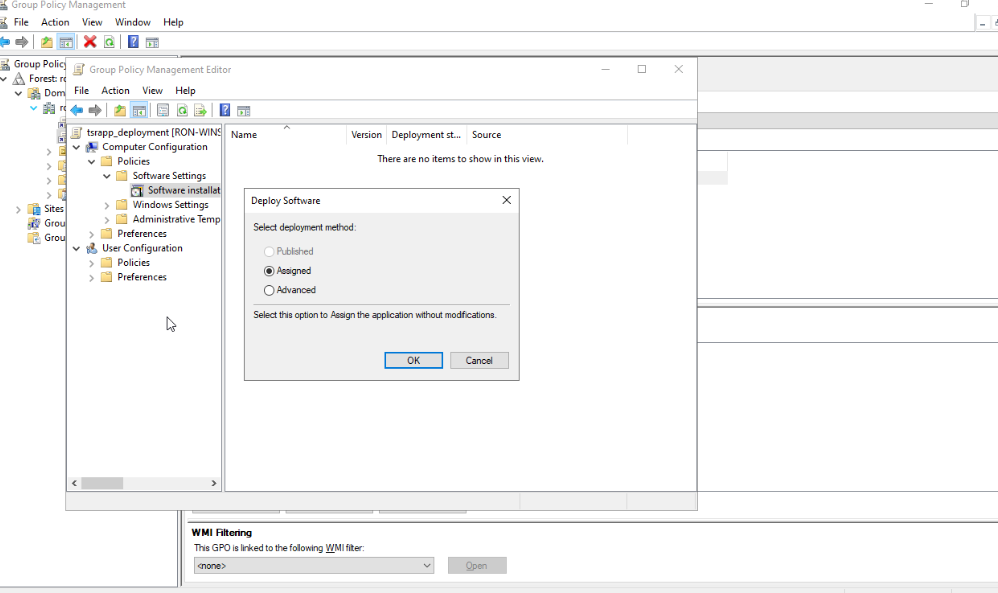
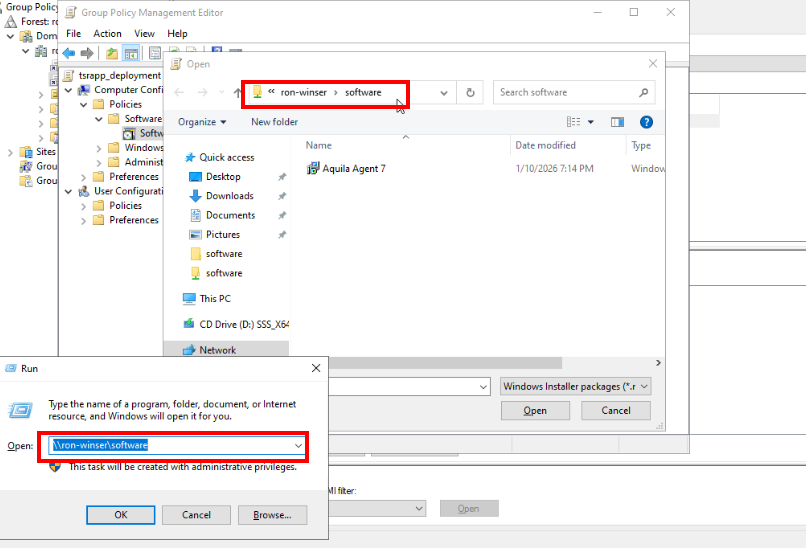
- Once you clicked the **Package** it will direct you from the **folder** you've **created** with a name of "**software".** Kindly click the **Open** your **software installer (Aquila Agent 7 with MSI format)** will be added inside to your **Group Policy Management Edit** or **GPO**. Do not change the "**Assigned**" option from **Deploy Software**.
[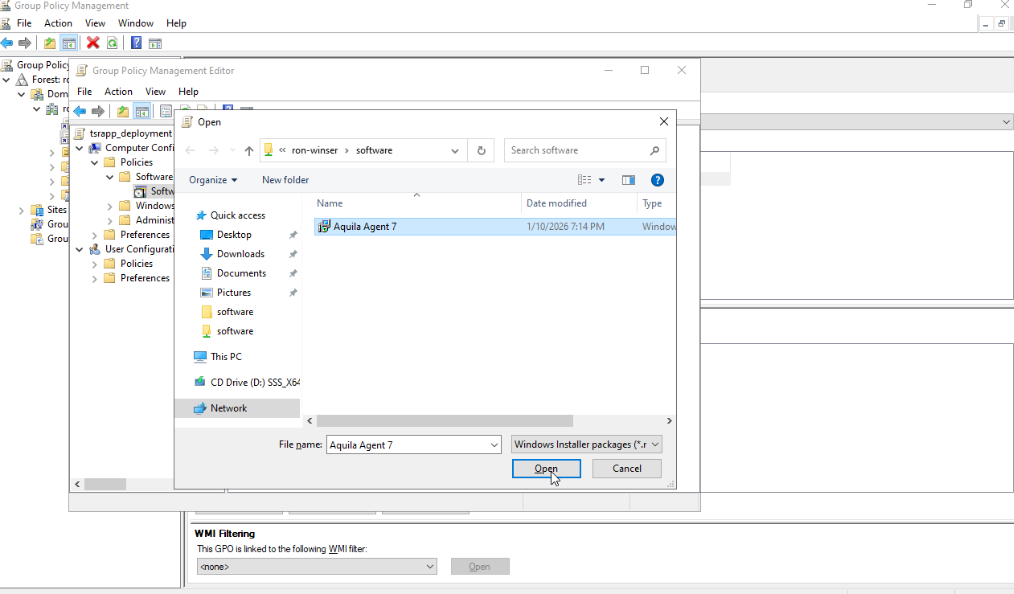](https://cytechint-docs-bookstack.s3.amazonaws.com/uploads/images/gallery/2026-01/Vdlj3jSQUhw1kjou-image.png)
[](https://cytechint-docs-bookstack.s3.amazonaws.com/uploads/images/gallery/2026-01/2NX9sjFNb90NK2j5-image.png)
- As you can see, we're able to **map out** also the **Network path** of the "**software"** folder we shared earlier.
[](https://cytechint-docs-bookstack.s3.amazonaws.com/uploads/images/gallery/2026-01/iKaLw34H5NTBa8WA-image.png)
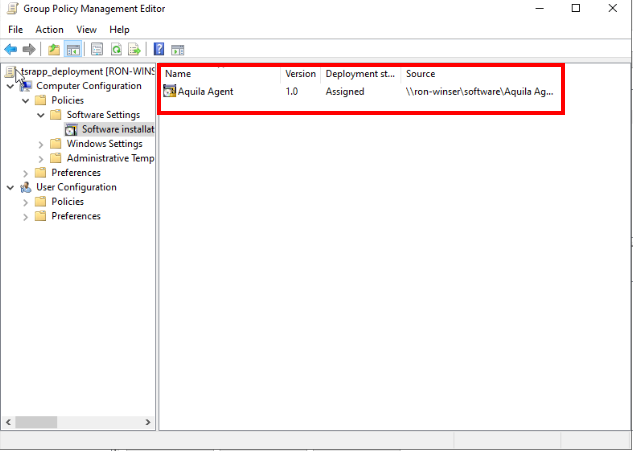
- So now your **Aquila Agent** with **.msi** format installer is now already added in the **GPO**.
#### [](https://cytechint-docs-bookstack.s3.amazonaws.com/uploads/images/gallery/2026-01/o46In13znWwBH2Ap-image.png)
#### **Let's navigate again to the "Group Policy Management".**
- On your **Group Policy Managent** remove the default **Authenticated Users** in **Security Filtering**.
[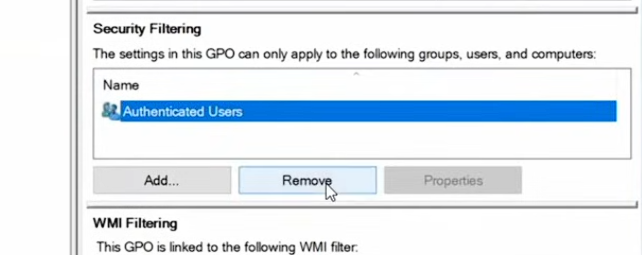](https://cytechint-docs-bookstack.s3.amazonaws.com/uploads/images/gallery/2026-01/KyeBPWWHnlDUVaqY-image.png)
- Then click the **Add** button from **Security Filtering**, type **Security Groups** you've created, but for this case was "**TSR-Deployment**" and click the **Check Names** and press **OK.**
[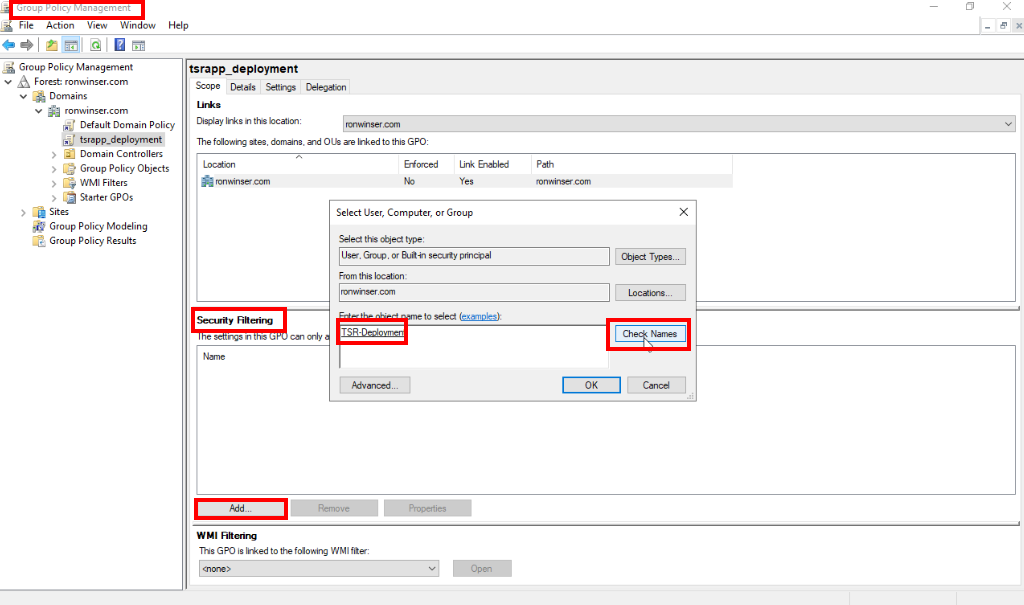](https://cytechint-docs-bookstack.s3.amazonaws.com/uploads/images/gallery/2026-01/wuHETHOghgSuBPwY-image.png)
- Your **TSR-Deployment** which is the **Global Security group** you've created was already added on the **Security Filtering.** Kindly close the **Group Policy Management** or leave it open.
[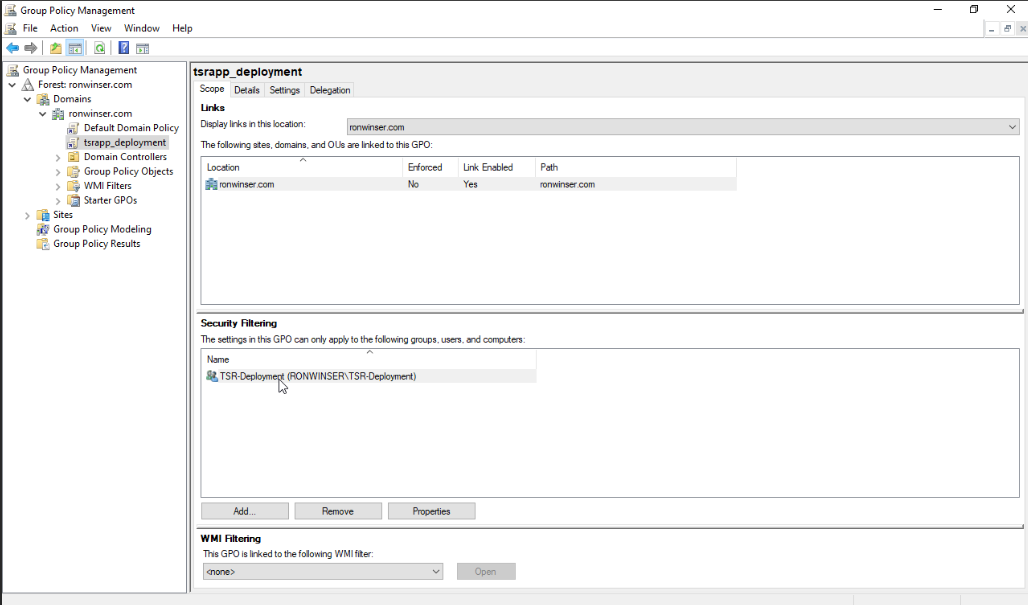](https://cytechint-docs-bookstack.s3.amazonaws.com/uploads/images/gallery/2026-01/p0rqErF1M8gAKK2i-image.png)
> In this case, the setup of **Active Directory Users and Computers** and **Group Policy Management** for software deployment via **Group Policy (GPO)** has already been completed. The installer packages have also been added to **Group Policy Management** and are ready for deployment on the client end.
#### **Let’s proceed to the client-side desktop that is connected to Windows Server domain.**
- Make sure the **PC/Desktop** is connected to the **Windows Server domain**.
[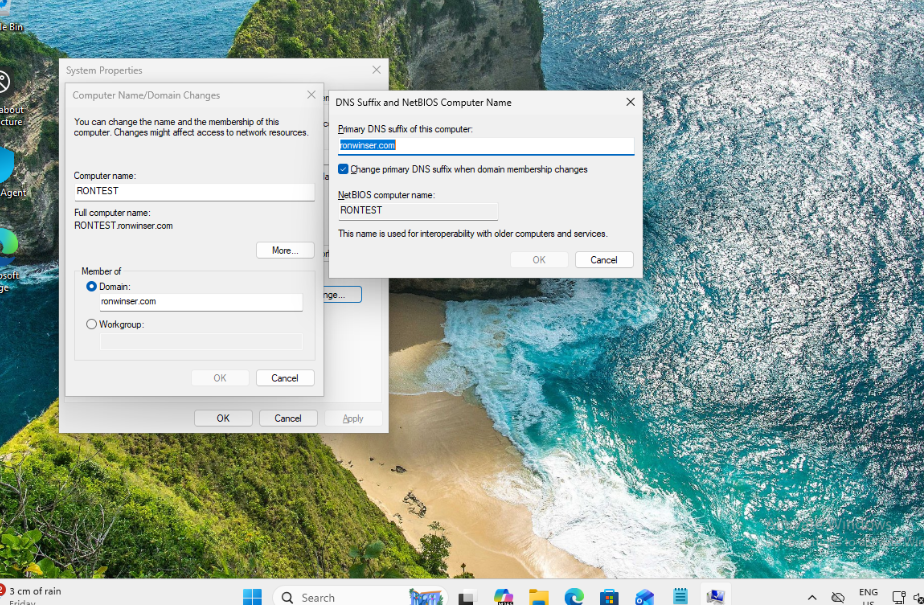](https://cytechint-docs-bookstack.s3.amazonaws.com/uploads/images/gallery/2026-01/7sPDpslUhZ3gfCUz-image.png)
- To automatically install the **software application** from **GPO** to client-end's desktop, we need to update the group policy through **CMD.**
1. Open the **CMD** as **administrator.**
2. Type **gpupdate /force** and hit **enter**.
[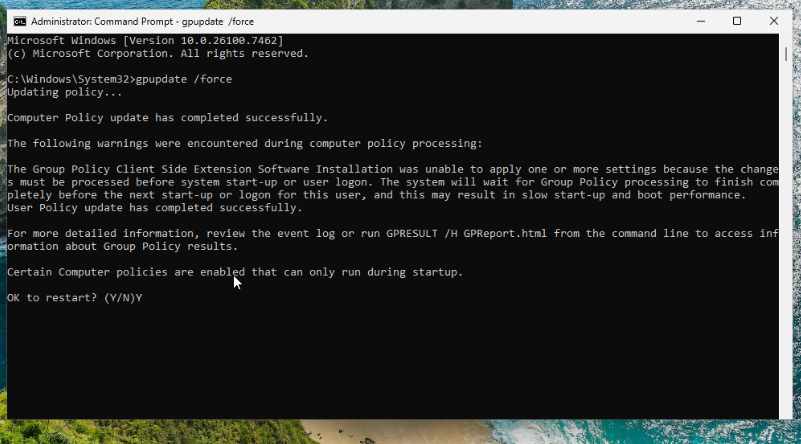](https://cytechint-docs-bookstack.s3.amazonaws.com/uploads/images/gallery/2026-01/pW7OY5yX466t8MzL-image.png)
3. If the group policy updates successfully, type **“Y”** to restart your PC. This allows your **endpoint** to **synchronize** with the GPO.
4. Once the **PC/Desktop** is open, the Aquila Agent installer will automatically be installed, to ensure everything is running kindly proceed to **task manager** and type **Aquila** on the **search bar** and check the status of its module.
[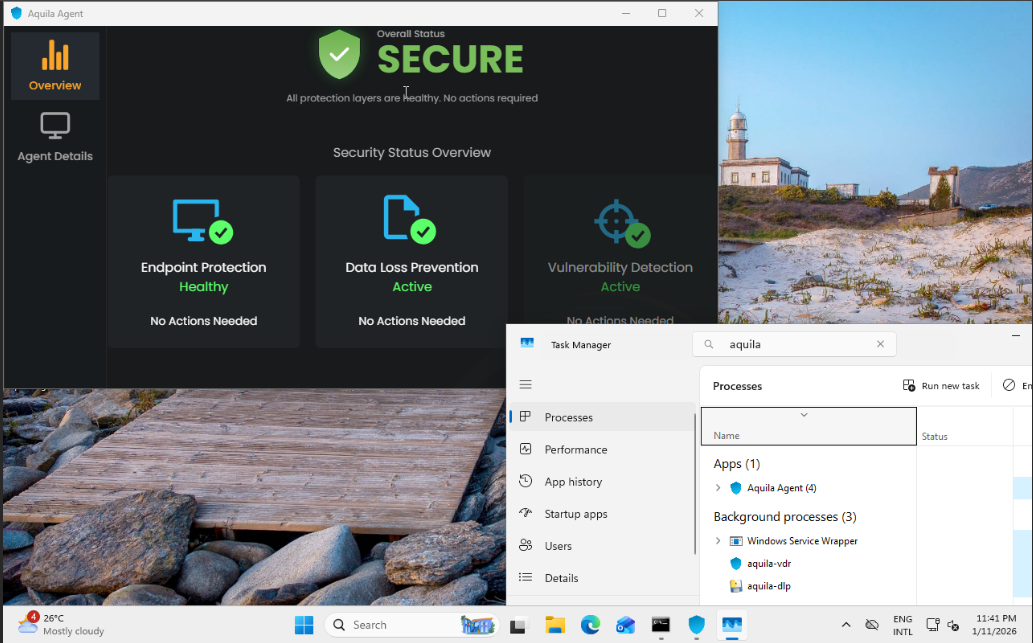](https://cytechint-docs-bookstack.s3.amazonaws.com/uploads/images/gallery/2026-01/V43axki7I75jcwQm-image.png)
*If you need further assistance, kindly contact our technical support at **** for prompt assistance and guidance.*