# Phishing Campaign - Setting Up Microsoft o365
##### **Why Whitelist in Office 365?**
Whitelisting ensures the **CyTech - AQUILA Phishing Simulation(PS) Module** functions without issue and prevents PS emails from being automatically moved to the spam folder or notifying users about potential phishing emails. The Connection Filter Policy and Spam Filtering both required to be whitelisted.
##### **Key Configurations:**
1. **[Microsoft Defender](https://security.microsoft.com/)**
- Whitelist the Connection Filter Policy
- Whitelist Using Advanced Delivery Policies
2. **[Exchange Admin Center](https://admin.exchange.microsoft.com/#/)**
- Whitelist Spam Filtering
- Whitelist Advanced Threat Protection (ATP)
##### **Whitelist Connection Filter Policy**
The Office 365 Exchange Connection Filter identifies good or bad source email servers by their IP addresses. The actions below will allow all emails from CyTech IP addresses to be received.
##### **Whitelist the Connection Filter Policy**
1. Login to Microsoft Defender, click here - **[Microsoft Defender.](https://security.microsoft.com/)**
2. Navigate through **Email & Collaboration>Policies & Rules>Threat Policies>Anti-spam.**
[](https://cytechint-docs-bookstack.s3.amazonaws.com/uploads/images/gallery/2025-05/PDl8uDXvhHXHskUW-image.png)
[](https://cytechint-docs-bookstack.s3.amazonaws.com/uploads/images/gallery/2025-05/4Fah0R9XdAWXbZvU-image.png)
3. Click on "**Connection filter policy**". Then click on "**Edit connection filter policy**".
[](https://cytechint-docs-bookstack.s3.amazonaws.com/uploads/images/gallery/2025-05/qNwcvxjpzdNb3STp-image.png)
4. Add the **IP's** to the "Always allow messages from the following IP addresses or address range:". Then click the "**Save**" button.
**Allow IP's: 35.153.237.243**(Mail Server), **107.22.65.180**(Landing Page)
[](https://cytechint-docs-bookstack.s3.amazonaws.com/uploads/images/gallery/2025-05/MvJvE5Zk2I9lb0Tp-image.png)
##### **Whitelist Using Advanced Delivery Policies in Microsoft Defender for Office 365**
Phishing simulations are attacks orchestrated by your security team and used for training and learning. Simulations can help identify vulnerable users and lessen the impact of malicious attacks on your organization.
Third-party phishing simulations require at least one Sending domain entry \[source domain or DKIM\] AND at least one Sending IP entry. Simulations URLs to allow entries are optional, and prevent the simulated phishing URLs from being blocked at time of click.
1. Go to **Email & Collaboration > Policies & Rules > Threat policies > Advanced delivery in the Rules section**.
[](https://cytechint-docs-bookstack.s3.amazonaws.com/uploads/images/gallery/2025-05/mN1S2kTRaISM8muh-image.png)
2. In the Advanced delivery menu, navigate to the Phishing simulation tab and press Edit to either add new or configure existing values (refer to the screenshot below). After editing all the needed Domain, Sending IP and Simulation URLs to allow**.** Click **"Save".**
[](https://cytechint-docs-bookstack.s3.amazonaws.com/uploads/images/gallery/2025-05/8y5eyi7HQva7D6au-image.png)
3. On the Edit third-party phishing simulation menu that opens, configure the following settings:
**Domain:** Expand this setting and enter at least one sending domain specific for campaign by clicking in the box, entering a value, and then pressing Enter or selecting the domains displayed below. Repeat this step as many times as necessary. You can add up to 20 entries.
- slackj.com
- ttrelli.com
- airbnd.cc
- attlassians.com
- eebbey.com
- lastpasss.net
- my1psswords.com
- zooms.cc
[](https://cytechint-docs-bookstack.s3.amazonaws.com/uploads/images/gallery/2025-05/iUgoti0IotleAb1x-image.png)
**Sending IP:** Expand this setting and enter at least one valid IPv4 address by clicking in the box, entering a value, and then pressing Enter or selecting the value that's displayed below the box. Repeat this step as many times as necessary. You can add up to 10 entries.
[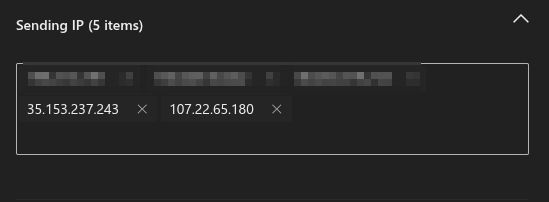](https://cytechint-docs-bookstack.s3.amazonaws.com/uploads/images/gallery/2025-05/Z463XX4cNcj2NV6U-image.png)
**Simulation URLs to allow:** Expand this setting and optionally enter specific URLs that are part of your phishing simulation campaign that should not be blocked or detonated by clicking in the box, entering a value, and then pressing Enter or selecting the value that's displayed below the box.
For the URL syntax format, see URL syntax for the Tenant Allow/Block List (opens in a new tab). These URLs are wrapped at the time of the click, but they aren't blocked.
When you're finished, you can click Add, and click close afterward if this was a first-time addition, or if you were editing existing values click Save and then click Close.
- [Manage allows and blocks in the Tenant Allow/Block List](https://learn.microsoft.com/en-us/defender-office-365/tenant-allow-block-list-about?view=o365-worldwide#url-syntax-for-the-tenant-allowblock-list)
Refer to these simulation URLs to allow in your campaign:
- slackj.com/\*
- ttrelli.com/\*
- airbnd.cc/\*
- attlassians.com/\*
- eebbey.com/\*
- lastpasss.net/\*
- my1psswords.com/\*
- zooms.cc/\*
[](https://cytechint-docs-bookstack.s3.amazonaws.com/uploads/images/gallery/2025-05/2upgxf44qn82hAs8-image.png)
##### **Whitelist Spam Filtering**
All mail systems have spam filtering. As the CyTech PS emails are "phishing: by definition, the Microsoft spam filter must be whitelisted. The steps below outline how to disable all spam checks for CyTech PS emails, so you won't experience issues with 100% clicked and 100% opened emails, even if the users don't click on them.
**Steps to Whitelist the Spam Filtering**
1. Login to Exchange Admin Center, click here - **[Exchange Admin Center.](https://admin.exchange.microsoft.com/#/)**
2. Navigate through **Mail flow>Rules>+Add a rule>"Create a new rule"**.
[](https://cytechint-docs-bookstack.s3.amazonaws.com/uploads/images/gallery/2025-05/hAk8OrVkreZ6pU04-image.png)
3. Give the rule a name, such as "**CyTech Spam Filtering**". Click on "**Apply this rule if** → "**The sender"** → "**IP address is in any of these ranges or exactly matches".**
[](https://cytechint-docs-bookstack.s3.amazonaws.com/uploads/images/gallery/2025-05/gyMSuVo3bL5JlDBM-image.png)
4. Specify the IP addresses in the field IP's: **35.153.237.243**(Mail Server), **107.22.65.180**(Landing Page). Please do not forget to click on "**Save**".
[](https://cytechint-docs-bookstack.s3.amazonaws.com/uploads/images/gallery/2025-05/r7CiZYkeJCeTjbwE-image.png)
5. Click the "**+**" to add another rule condition for the message headers.
[](https://cytechint-docs-bookstack.s3.amazonaws.com/uploads/images/gallery/2025-05/S4ggBIlJx5MjjZNX-image.png)
6. Click on "**The message headers...."** → "**includes any of these words".**
[](https://cytechint-docs-bookstack.s3.amazonaws.com/uploads/images/gallery/2025-05/mQmSmJQgc8EVK6Ft-image.png)
7. Click → **Enter text.**
[](https://cytechint-docs-bookstack.s3.amazonaws.com/uploads/images/gallery/2025-05/E2lddVdrD882aVpr-image.png)
8. Specify header name → **X-PHISHTEST** and specify words or phrases **→ CYTECH.**
[](https://cytechint-docs-bookstack.s3.amazonaws.com/uploads/images/gallery/2025-05/JIYvK0wFwmjjI0G9-image.png)
9. Click the "**+**" to add another rule condition for the The sender.
[](https://cytechint-docs-bookstack.s3.amazonaws.com/uploads/images/gallery/2025-05/S4ggBIlJx5MjjZNX-image.png)
10. Click on "**The sender...."** → "**domains is".** Specify the domain in your case**.** Then click **"Save".**
[](https://cytechint-docs-bookstack.s3.amazonaws.com/uploads/images/gallery/2025-05/M9MlpGJUEccQSdOf-image.png)
11. Click on "**Do the following** → **Modify the message properties** → **Set a Message Header**"
[](https://cytechint-docs-bookstack.s3.amazonaws.com/uploads/images/gallery/2025-05/FKdNYeHZgcr2lIs5-image.png)
12. Click the "**Enter text**" buttons by the right side of the "**Do the following**" field and enter these values: "**MS-Exchange-Organization-BypassClutter**" and "**true**".
[](https://cytechint-docs-bookstack.s3.amazonaws.com/uploads/images/gallery/2025-05/n9dPl6FKLcXOswSX-image.png)
13. Click on the "**+**" sign, to add another rule condition.
[](https://cytechint-docs-bookstack.s3.amazonaws.com/uploads/images/gallery/2025-05/MRkPKW5VW7yuUTso-image.png)
14. Choose "**Modify the message properties** → **Set the spam confidence level (SCL)**" and select "**Bypass Spam Filtering**", this will set the value of SCL to **-1**. Then click "**Save**" button.
[](https://cytechint-docs-bookstack.s3.amazonaws.com/uploads/images/gallery/2025-05/C3I64J9LDmN9k8bT-image.png)
15. Make sure you have the same output as shown in the image below before proceeding on clicking the "**Next**" button.
[](https://cytechint-docs-bookstack.s3.amazonaws.com/uploads/images/gallery/2025-05/bhMwvKPYIz8UpsNf-image.png)
16. Leave the Set Rule settings as is and proceed to the Review and finish window and save the rule.
[](https://cytechint-docs-bookstack.s3.amazonaws.com/uploads/images/gallery/2025-05/VemlEkaeC8mYkQWO-image.png)
17. Please make sure the rule is **Enabled**, and priority is **set to "0"**. Your final Completed Mail Flow Rule screen should look as below:
[](https://cytechint-docs-bookstack.s3.amazonaws.com/uploads/images/gallery/2025-05/ztnnPiUIWFeTARcW-image.png)
*If you need further assistance, kindly contact our support at **support@cytechint.com** for prompt assistance and guidance.*