# How to Upload Certificate in Salesforce

#### **<span style="color: rgb(53, 152, 219);">Steps to Upload Certificate:</span>**

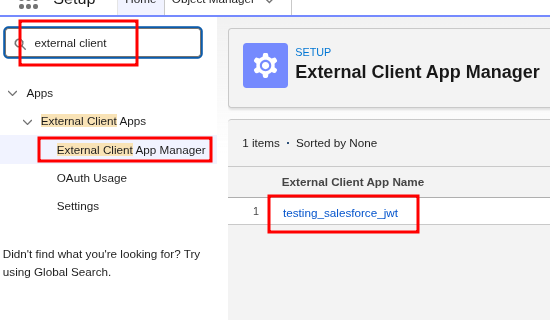
<div class="x_elementToProof" data-olk-copy-source="MessageBody" id="bkmrk-1.-log-in-to-salesfo">1. Log in to Salesforce and navigate to **Setup**.</div><div class="x_elementToProof" id="bkmrk-2.-in-the-quick-find">2. In the Quick Find box, type **External Client App Manager** and select it from the results.</div>[![image.png](https://cytechint-docs-bookstack.s3.amazonaws.com/uploads/images/gallery/2026-07/scaled-1680-/GuiXrWIZwQn0eFOn-image.png)](https://cytechint-docs-bookstack.s3.amazonaws.com/uploads/images/gallery/2026-07/GuiXrWIZwQn0eFOn-image.png)

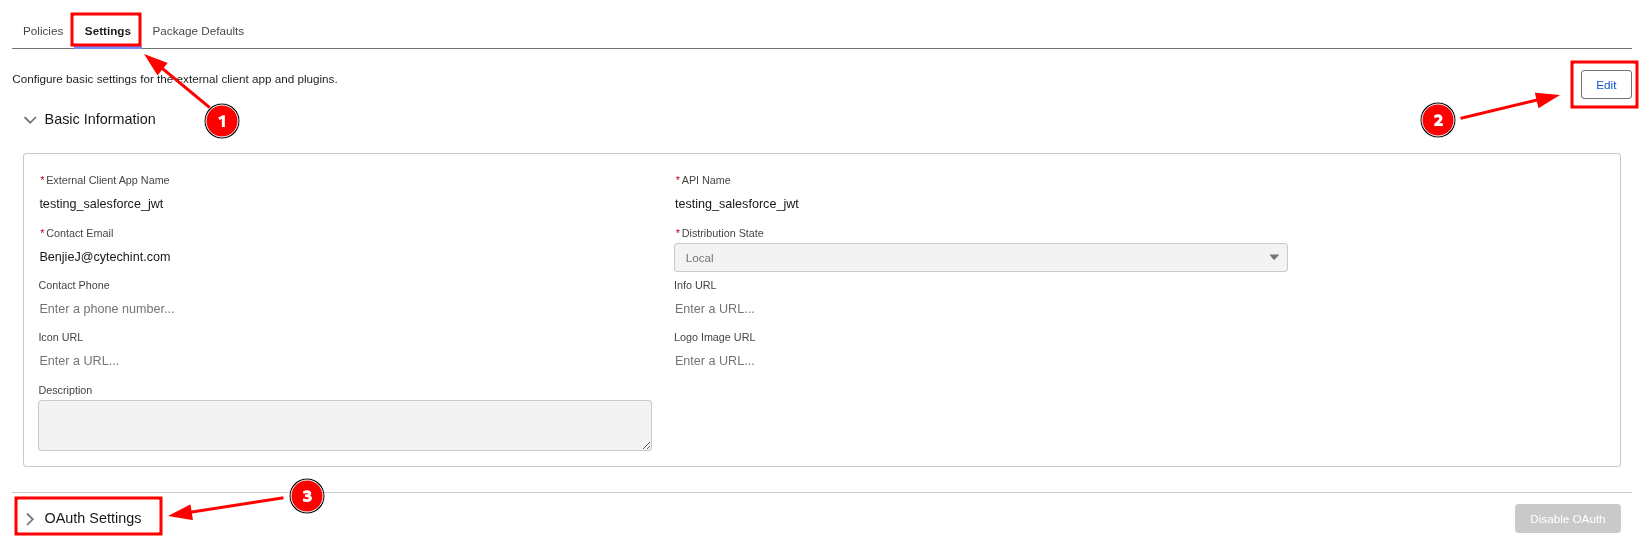
<div class="x_elementToProof" id="bkmrk-3.-locate-and-open-t">3. Locate and open the relevant External Client App from the list.</div><div class="x_elementToProof" id="bkmrk-4.-navigate-to-the%C2%A0s">4. Navigate to the **Setting** section and click **Edit** then under **OAuth Settings** locate **Flow Enablement**.</div>[![image.png](https://cytechint-docs-bookstack.s3.amazonaws.com/uploads/images/gallery/2026-07/scaled-1680-/nzY8PW4aL9Q1xyif-image.png)](https://cytechint-docs-bookstack.s3.amazonaws.com/uploads/images/gallery/2026-07/nzY8PW4aL9Q1xyif-image.png)

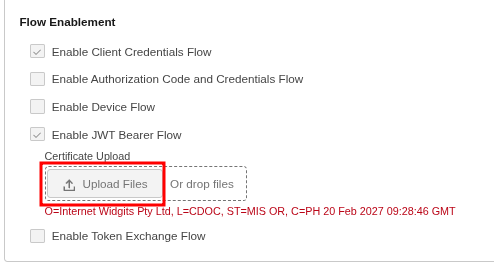
<div class="x_elementToProof" id="bkmrk-5.-click%C2%A0upload-file">5. Click **Upload Files**, then browse and select the s**erver.crt** file.</div>[![image.png](https://cytechint-docs-bookstack.s3.amazonaws.com/uploads/images/gallery/2026-07/scaled-1680-/9LEVki6pNBPuowZd-image.png)](https://cytechint-docs-bookstack.s3.amazonaws.com/uploads/images/gallery/2026-07/9LEVki6pNBPuowZd-image.png)

<div class="x_elementToProof" id="bkmrk-6.-click-save-to-app">6. Click **Save** to apply and confirm the certificate upload.</div>