# How to Protect a Website with Cloudflare WAF

#### <span style="color: rgb(53, 152, 219);">**Introduction**</span>

<span style="color: rgb(0, 0, 0);">This guide explains how to protect your website using **Cloudflare Web Application Firewall (WAF)**.</span>  
<span style="color: rgb(0, 0, 0);">Cloudflare sits in front of your website and filters all incoming traffic. By changing your DNS to go through Cloudflare, you get:</span>

- <span style="color: rgb(0, 0, 0);">Protection against common web attacks (SQL injection, XSS, etc.)</span>
- <span style="color: rgb(0, 0, 0);">Built-in DDoS protection</span>
- <span style="color: rgb(0, 0, 0);">Free SSL certificates</span>
- <span style="color: rgb(0, 0, 0);">Performance benefits from Cloudflare’s global CDN</span>

<span style="color: rgb(0, 0, 0);">The process takes a few steps, but once set up, all visitors to your website are automatically filtered through Cloudflare before reaching your server.</span>

##### <span style="color: rgb(53, 152, 219);">**Step 1: Log in to Cloudflare**</span>

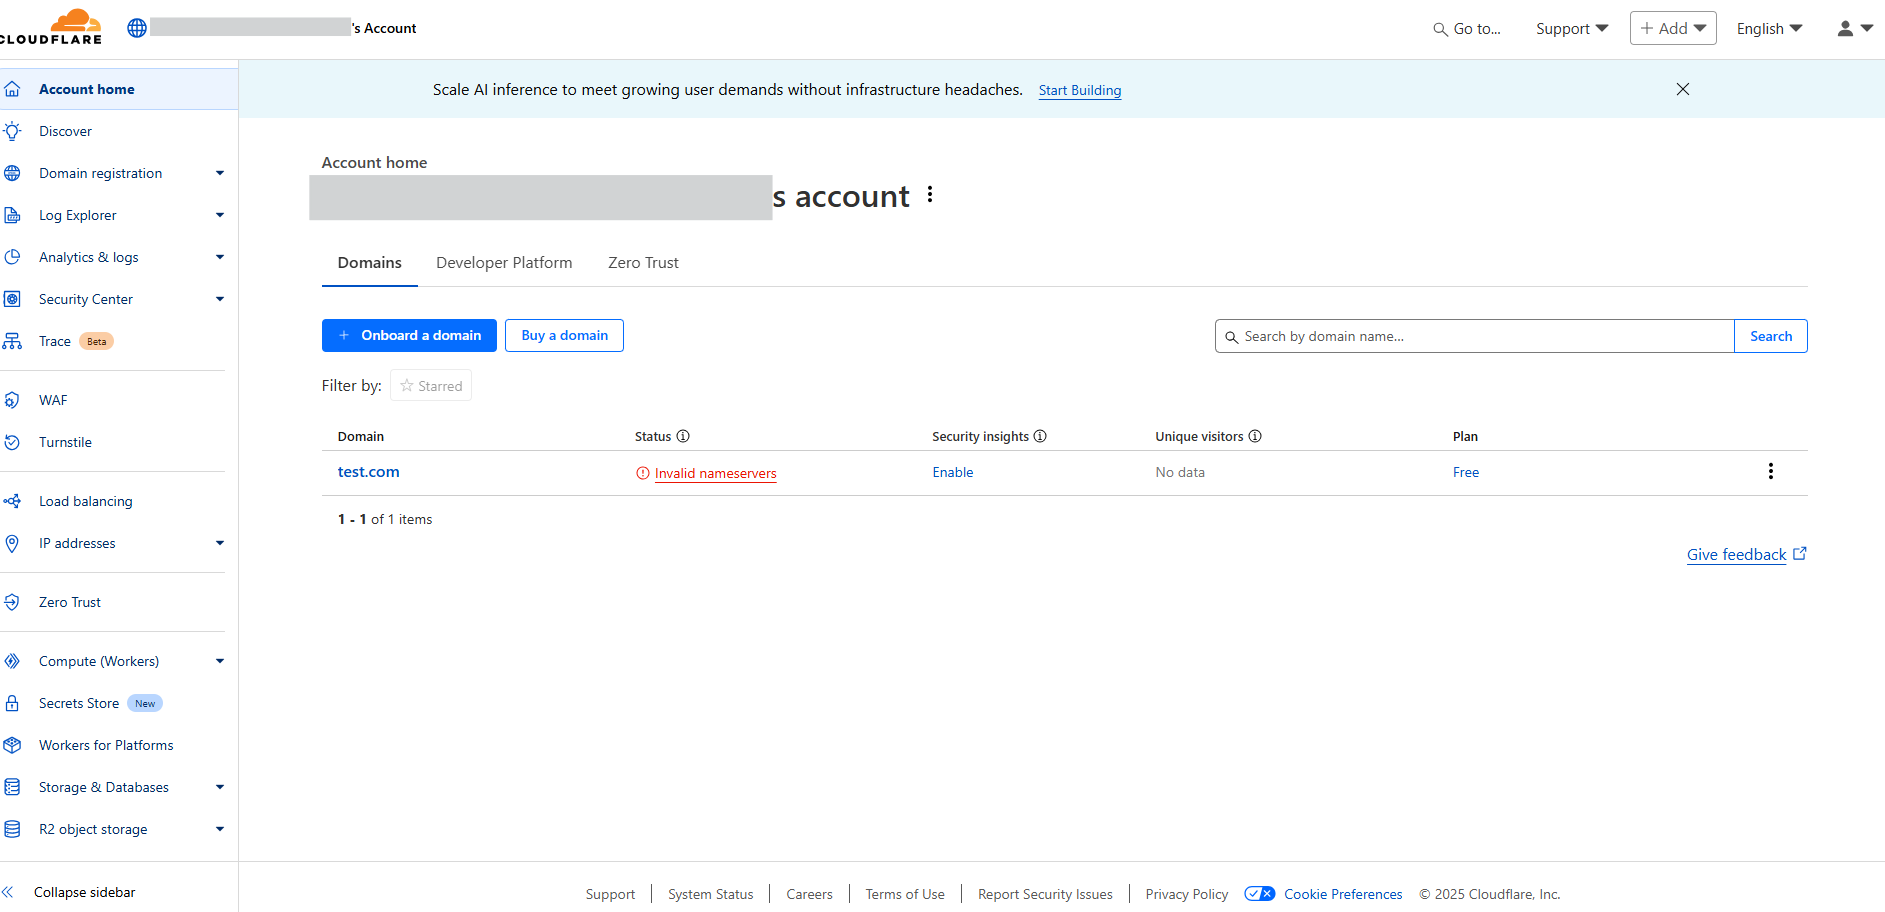
<span style="color: rgb(0, 0, 0);">Go to https://dash.cloudflare.com<a class="decorated-link cursor-pointer" data-end="331" data-start="273" rel="noopener" style="color: rgb(0, 0, 0);" target="_new"> </a>and log in with your account.</span>

<span style="color: rgb(0, 0, 0);">[![image.png](https://cytechint-docs-bookstack.s3.amazonaws.com/uploads/images/gallery/2025-09/scaled-1680-/KnK3WKc9iGC6MIWx-image.png)](https://cytechint-docs-bookstack.s3.amazonaws.com/uploads/images/gallery/2025-09/KnK3WKc9iGC6MIWx-image.png)</span>

##### <span style="color: rgb(53, 152, 219);">**Step 2: Add Your Website**</span>

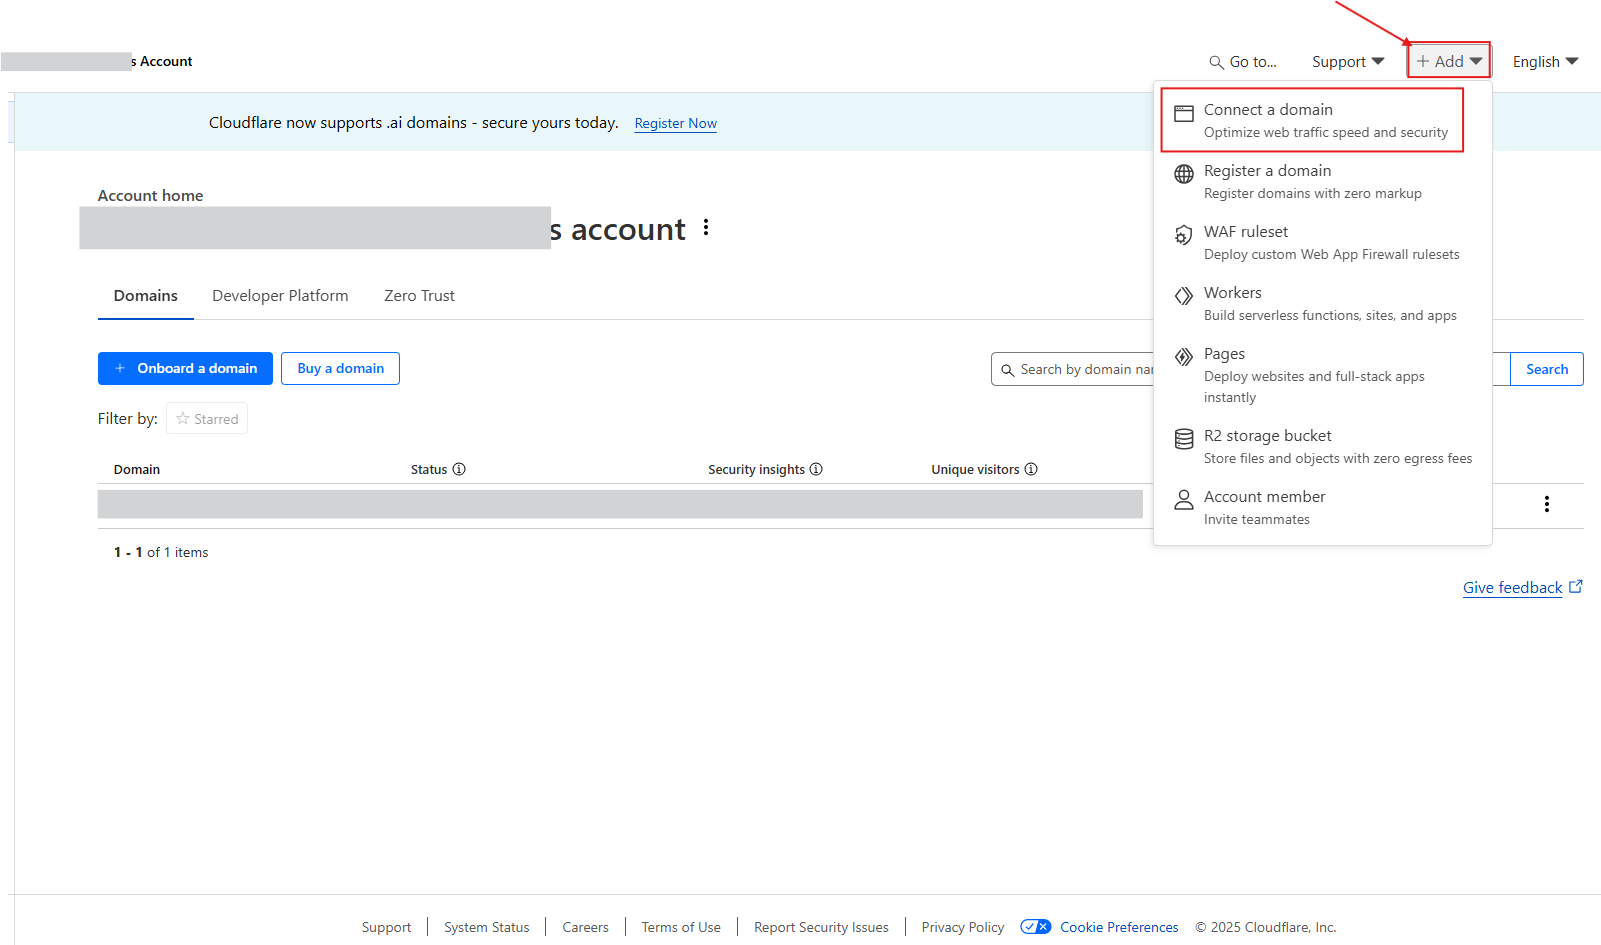
1. <span style="color: rgb(0, 0, 0);">In the dashboard, click **+ Add** at the top.</span>
2. <span style="color: rgb(0, 0, 0);">Select **Connect a domain**.</span>

<span style="color: rgb(0, 0, 0);">[![image.png](https://cytechint-docs-bookstack.s3.amazonaws.com/uploads/images/gallery/2025-09/scaled-1680-/0wCyOwMfCVpzJGPk-image.png)](https://cytechint-docs-bookstack.s3.amazonaws.com/uploads/images/gallery/2025-09/0wCyOwMfCVpzJGPk-image.png)</span>

##### <span style="color: rgb(53, 152, 219);">**Step 3: Enter Your Domain**</span>

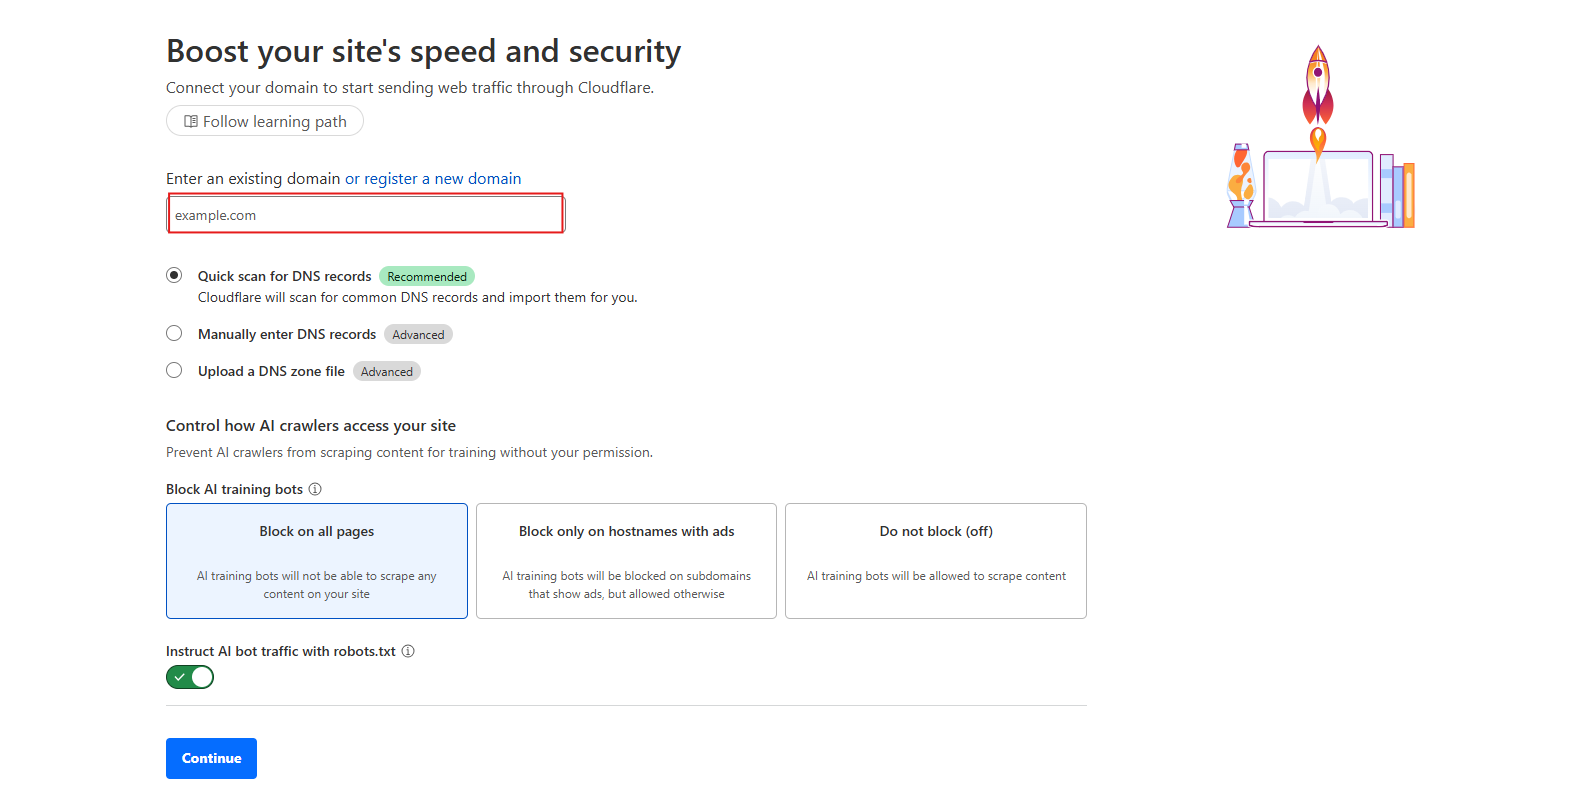
<span style="color: rgb(0, 0, 0);">Type your domain name (example: `yourdomain.com`) and click **Continue**.</span>

<span style="color: rgb(0, 0, 0);">[![image.png](https://cytechint-docs-bookstack.s3.amazonaws.com/uploads/images/gallery/2025-09/scaled-1680-/SqfhfS6Vfs5oCNVQ-image.png)](https://cytechint-docs-bookstack.s3.amazonaws.com/uploads/images/gallery/2025-09/SqfhfS6Vfs5oCNVQ-image.png)</span>

##### <span style="color: rgb(53, 152, 219);">**Step 4:  Choose a Plan**</span>

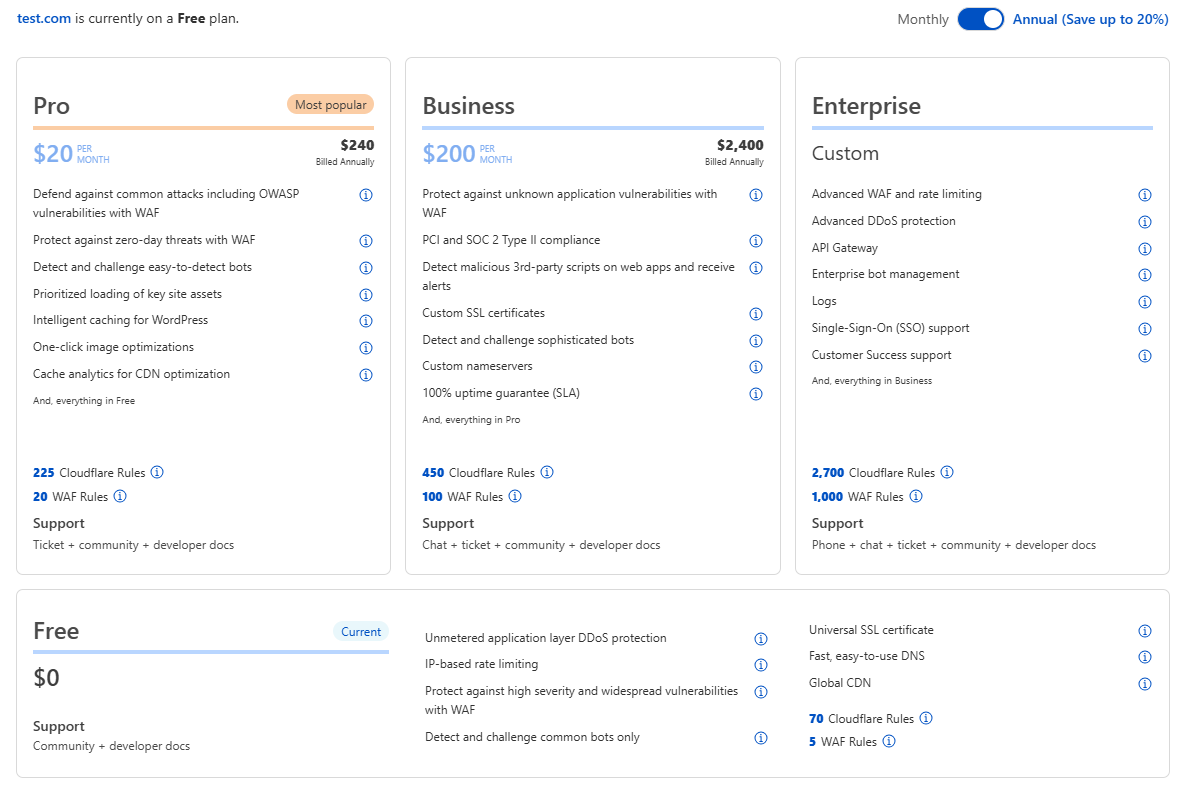
<span style="color: rgb(0, 0, 0);">Cloudflare will ask you to choose a plan.</span>

- <span style="color: rgb(0, 0, 0);">If you just want the WAF and basic protection, select **Free** (Plan $0).</span>
- <span style="color: rgb(0, 0, 0);">Then click **Continue**[![image.png](https://cytechint-docs-bookstack.s3.amazonaws.com/uploads/images/gallery/2025-09/scaled-1680-/I0brqMOgRA6GmMb9-image.png)](https://cytechint-docs-bookstack.s3.amazonaws.com/uploads/images/gallery/2025-09/I0brqMOgRA6GmMb9-image.png)</span>

##### <span style="color: rgb(53, 152, 219);">**Step 5: Review Your DNS Records**</span>

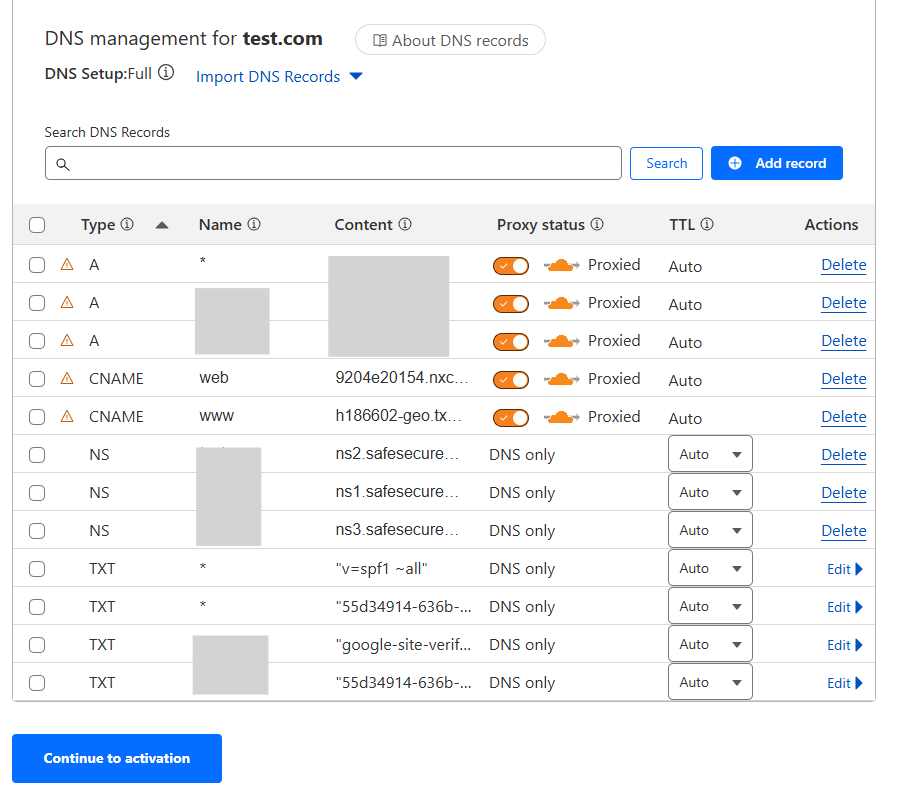
<span style="color: rgb(0, 0, 0);">Cloudflare scans your existing DNS records.</span>

- <span style="color: rgb(0, 0, 0);">Make sure your main records (A and CNAME for your domain and www) are there.</span>
- <span style="color: rgb(0, 0, 0);">The **orange cloud (Proxied)** should be ON for the records you want protected by Cloudflare WAF.</span>
- <span style="color: rgb(0, 0, 0);">NS (Nameserver) records should remain as **DNS only** (gray cloud).</span>

<span style="color: rgb(0, 0, 0);">[![image.png](https://cytechint-docs-bookstack.s3.amazonaws.com/uploads/images/gallery/2025-09/scaled-1680-/6KQX9ura0ZpZcCax-image.png)](https://cytechint-docs-bookstack.s3.amazonaws.com/uploads/images/gallery/2025-09/6KQX9ura0ZpZcCax-image.png)</span>

<span style="color: rgb(0, 0, 0);">Once ready, click **Continue** (you don’t need to tick the checkboxes).</span>

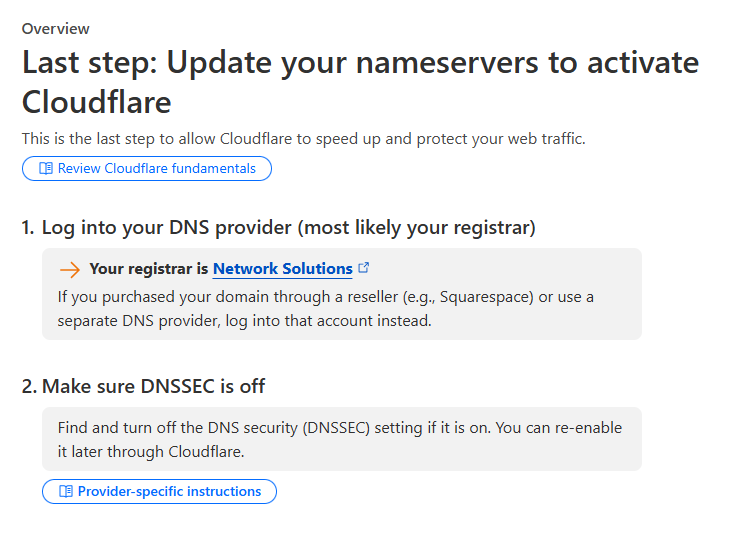
##### <span style="color: rgb(53, 152, 219);">**Step 6: Change Your Nameservers**</span>

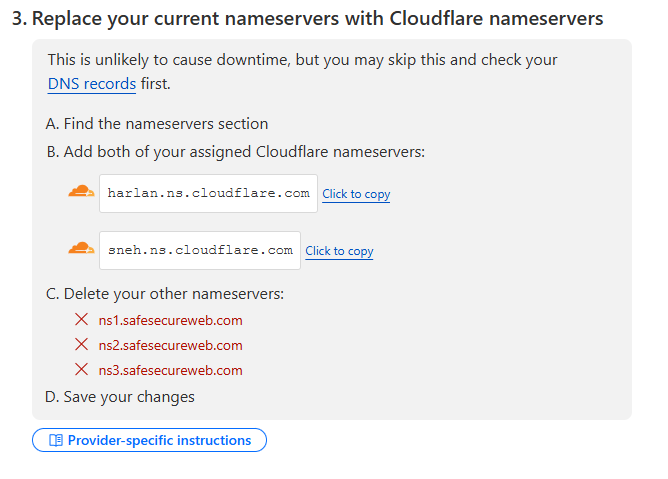
<span style="color: rgb(0, 0, 0);">Cloudflare will give you **two new nameservers**.</span>

<p class="callout info"><span style="color: rgb(0, 0, 0);">Go to your **Cloudflare dashboard** → **Websites** → select your domain → **DNS** → scroll to **Cloudflare Nameservers** section.</span></p>

<span style="color: rgb(0, 0, 0);">[![image.png](https://cytechint-docs-bookstack.s3.amazonaws.com/uploads/images/gallery/2025-09/scaled-1680-/RkRekm8M5ogdeSw0-image.png)](https://cytechint-docs-bookstack.s3.amazonaws.com/uploads/images/gallery/2025-09/RkRekm8M5ogdeSw0-image.png)</span>

<span style="color: rgb(0, 0, 0);">[![image.png](https://cytechint-docs-bookstack.s3.amazonaws.com/uploads/images/gallery/2025-09/scaled-1680-/10DwLk0ct3KDQPue-image.png)](https://cytechint-docs-bookstack.s3.amazonaws.com/uploads/images/gallery/2025-09/10DwLk0ct3KDQPue-image.png)</span>

- <span style="color: rgb(0, 0, 0);">Go to your domain registrar (the company where you bought your domain, like GoDaddy or Namecheap).</span>
- <span style="color: rgb(0, 0, 0);">Replace the old nameservers with the Cloudflare ones.</span>
- <span style="color: rgb(0, 0, 0);">Save changes.</span>

<div class="contain-inline-size rounded-2xl relative bg-token-sidebar-surface-primary" id="bkmrk-your-registrar-%E2%86%92-rep"><div class="sticky top-9">  
</div><div class="overflow-y-auto p-4" dir="ltr"><span style="color: rgb(0, 0, 0);">`<span class="hljs-string">Your</span> <span class="hljs-string">registrar</span> <span class="hljs-string">→</span> <span class="hljs-attr">Replace:</span>   <span class="hljs-string">ns1.oldprovider.com</span>   <span class="hljs-string">ns2.oldprovider.com</span><span class="hljs-attr">With Cloudflare:</span>   <span class="hljs-string">ada.ns.cloudflare.com</span>   <span class="hljs-string">josh.ns.cloudflare.com</span>`</span></div></div>##### <span style="color: rgb(53, 152, 219);">**Step 7: Wait for Propagation**</span>

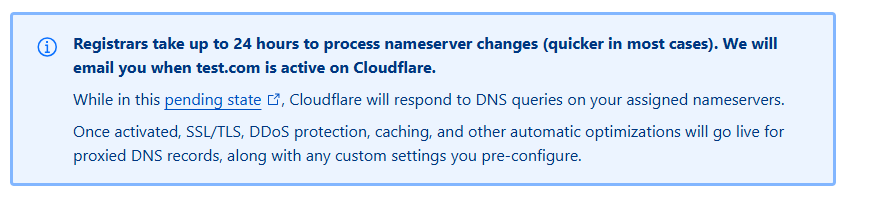
<span style="color: rgb(0, 0, 0);">DNS changes take time. Usually, 15 minutes up to 24 hours.</span>  
<span style="color: rgb(0, 0, 0);">When Cloudflare detects the change, your site will show as **Active** in the dashboard.</span>

<span style="color: rgb(0, 0, 0);">[![image.png](https://cytechint-docs-bookstack.s3.amazonaws.com/uploads/images/gallery/2025-09/scaled-1680-/tr27cbYyLnaXWqVu-image.png)](https://cytechint-docs-bookstack.s3.amazonaws.com/uploads/images/gallery/2025-09/tr27cbYyLnaXWqVu-image.png)</span>

##### <span style="color: rgb(53, 152, 219);">**Step 8: Enable WAF Protection**</span>

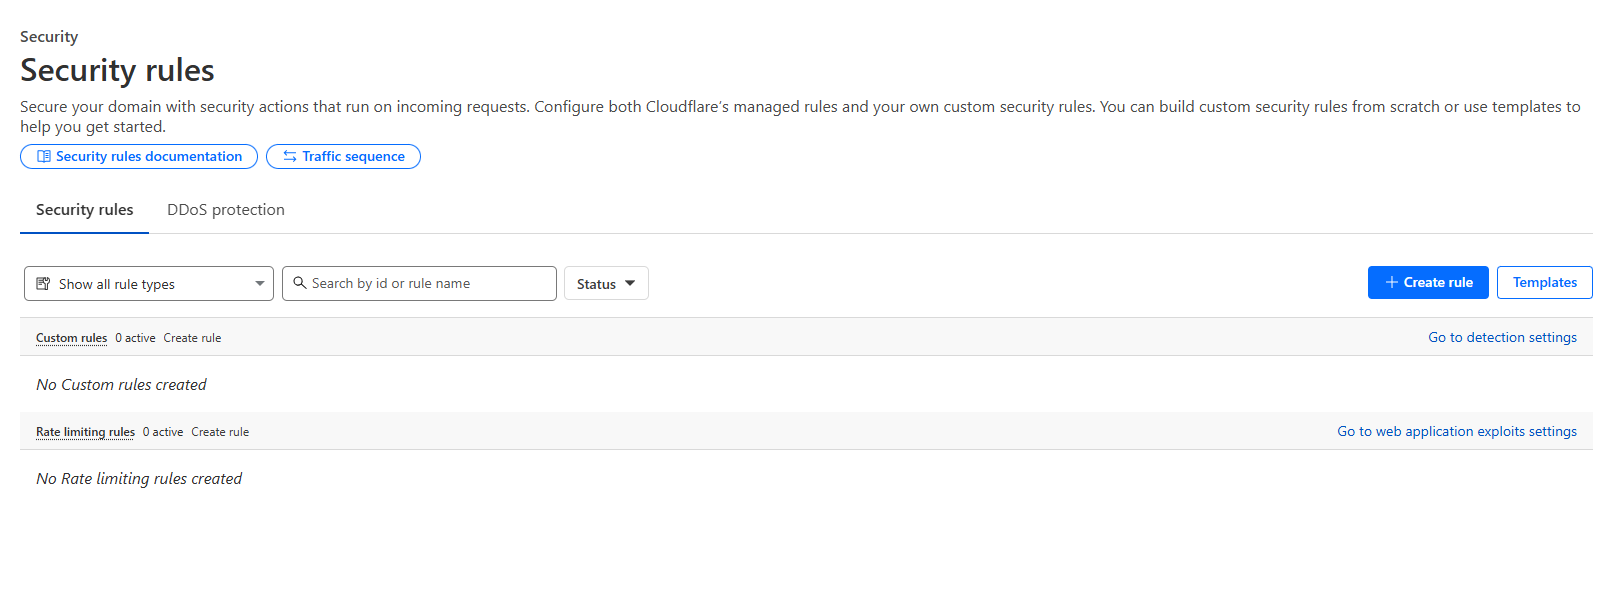
- <span style="color: rgb(0, 0, 0);">In the dashboard, go to **Security &gt; Security Rules &gt; WAF**.</span>
- <span style="color: rgb(0, 0, 0);">Enable **Managed Rulesets** (Cloudflare OWASP Core Ruleset, Cloudflare Managed Ruleset).</span>
- <span style="color: rgb(0, 0, 0);">Cloudflare will now filter malicious traffic before it reaches your site.</span>
- <span style="color: rgb(0, 0, 0);">Optionally create **Custom Rules** (e.g., block countries, rate limit requests, block SQL injection patterns).</span>
- <span style="color: rgb(0, 0, 0);">Test in “Simulate” mode before switching to “Block” to avoid false positives.</span>

<span style="color: rgb(0, 0, 0);">[![image.png](https://cytechint-docs-bookstack.s3.amazonaws.com/uploads/images/gallery/2025-09/scaled-1680-/XYGgF0rP3qvSkob6-image.png)](https://cytechint-docs-bookstack.s3.amazonaws.com/uploads/images/gallery/2025-09/XYGgF0rP3qvSkob6-image.png)</span>

##### <span style="color: rgb(53, 152, 219);">**Step 9: Verify**</span>

- <span style="color: rgb(0, 0, 0);">Use a tool like **dig** or **nslookup** to confirm the domain resolves to Cloudflare IPs (not your origin server).</span>
- <span style="color: rgb(0, 0, 0);">Try visiting the site; Cloudflare headers like **cf-cache-status** should appear.</span>
- <span style="color: rgb(0, 0, 0);">You can also test WAF by visiting **http://yoursite.com/?&lt;script&gt;alert(1)&lt;/script&gt;** (Cloudflare should block it if rules are active).</span>

<span style="color: rgb(0, 0, 0);">*If you need further assistance, kindly contact our technical support at **<support@cytechint.com>** for prompt assistance and guidance.*</span>