# AQUILA - Atlassian Confluence Integration through Oauth 2.0(3LO) and API Key(File Path)

#### <span style="color: rgb(53, 152, 219);">**What are API Token Scopes?**</span>

Scopes define what actions an API token is allowed to perform in Atlassian apps such as Jira and Confluence. They enhance security by limiting permissions to only what's needed (e.g., read-only access to audit logs). Always use scoped tokens for AQUILA integrations—unscoped tokens are deprecated for most apps and may not support fine-grained access. For audit logs (events like user actions, config changes, or security incidents), use the specific scopes listed below. Broader scopes may be needed for other integrations (e.g., content indexing) but stick to these for basic monitoring to minimize risk.

##### <span style="color: rgb(53, 152, 219);">**Prerequisites**</span>

1. Atlassian Admin Email Account
2. Atlest have a read rights linux privilege
3. Broswer (firefox,chrome)

---

#### <span style="color: rgb(53, 152, 219);">**Creating an API Token with Scopes**</span>

1. Log in to [https://id.atlassian.com/manage-profile/security/api-tokens](https://id.atlassian.com/manage-profile/security/api-tokens).
2. Select "Create API token with scopes".
3. Enter a descriptive name for the token (e.g., "AQUILA- Audit Logs Monitoring").

Choose an expiration date for the token (between 1 and 365 days; consider shorter for security).

1. Select the application Atlassian Confluence.
2. Select "Create API token with scopes".
3. Select the scopes or permissions the token should have: 
    - For Atlassian Confluence (audit logs): **`read:audit-log:confluence`** to access /wiki/rest/api/audit.
4. Click "Create".
5. Copy the token and save it securely. You cannot view it again after this step. If lost, generate a new one. Share only with trusted integrations like AQUILA—revoke if compromised.

---

#### <span style="color: rgb(53, 152, 219);">**<span data-teams="true">OAuth 2.0(3LO)apps</span>**</span>

<span data-teams="true">*OAuth 2.0 (3LO)* (also known as "three-legged OAuth" or "authorization code grants") apps. OAuth 2.0 (3LO) allows external applications</span>

<span data-teams="true">and services to access Atlassian product APIs on a user's behalf. OAuth 2.0 (3LO) apps are created and managed in the [developer console](https://developer.atlassian.com/console/myapps/).</span>

---

##### <span style="color: rgb(53, 152, 219);">**<span data-teams="true">Enabling OAuth 2.0(3LO)</span>**</span>

1. <span data-teams="true">Select your profile icon in the top-right corner, and from the dropdown, select Developer console.  
    </span>[![image.png](https://cytechint-docs-bookstack.s3.amazonaws.com/uploads/images/gallery/2026-04/scaled-1680-/jxdunNFi29RQx2Wh-image.png)](https://cytechint-docs-bookstack.s3.amazonaws.com/uploads/images/gallery/2026-04/jxdunNFi29RQx2Wh-image.png)
2. Select your app from the list (or create one if you don't already have one).  
    [![image.png](https://cytechint-docs-bookstack.s3.amazonaws.com/uploads/images/gallery/2026-04/scaled-1680-/GLr4z8AGP77xDqny-image.png)](https://cytechint-docs-bookstack.s3.amazonaws.com/uploads/images/gallery/2026-04/GLr4z8AGP77xDqny-image.png)[![image.png](https://cytechint-docs-bookstack.s3.amazonaws.com/uploads/images/gallery/2026-04/scaled-1680-/5VIzqFLCjZMQjnzU-image.png)](https://cytechint-docs-bookstack.s3.amazonaws.com/uploads/images/gallery/2026-04/5VIzqFLCjZMQjnzU-image.png)
3. Select Permissions in the left menu.
4. Next to the API you want to add, select Configure or Add.  
    [![image.png](https://cytechint-docs-bookstack.s3.amazonaws.com/uploads/images/gallery/2026-04/scaled-1680-/tz9LZYlW50k0GsvZ-image.png)](https://cytechint-docs-bookstack.s3.amazonaws.com/uploads/images/gallery/2026-04/tz9LZYlW50k0GsvZ-image.png)
    
    [![image.png](https://cytechint-docs-bookstack.s3.amazonaws.com/uploads/images/gallery/2026-04/scaled-1680-/SK89J1rKP3PCjoxl-image.png)](https://cytechint-docs-bookstack.s3.amazonaws.com/uploads/images/gallery/2026-04/SK89J1rKP3PCjoxl-image.png)
5. Select Authorization in the left menu.
6. Next to OAuth 2.0 (3LO), select Configure or Add.  
    [![image.png](https://cytechint-docs-bookstack.s3.amazonaws.com/uploads/images/gallery/2026-04/scaled-1680-/dlIErAPJlf0DYWFz-image.png)](https://cytechint-docs-bookstack.s3.amazonaws.com/uploads/images/gallery/2026-04/dlIErAPJlf0DYWFz-image.png)
7. Enter the Callback URL. Set this to any URL that is accessible by the app. When you implement OAuth 2.0 (3LO) in your app (see next section). in this example "base URL /callback" <p class="callout info">**<span data-teams="true">The redirect\_uri must match this URL.</span>**</p>
    
      
    [![image.png](https://cytechint-docs-bookstack.s3.amazonaws.com/uploads/images/gallery/2026-04/scaled-1680-/vmzdQskGSufwcHHW-image.png)
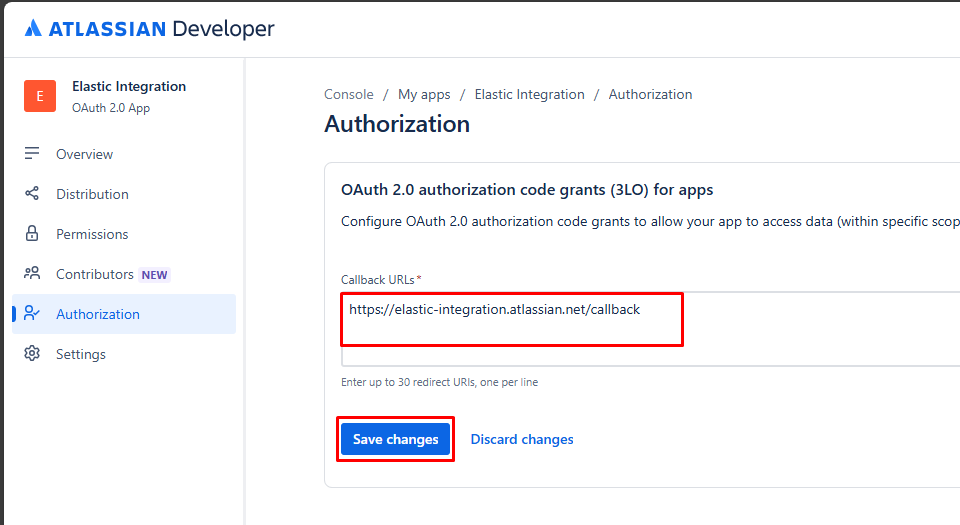
](https://cytechint-docs-bookstack.s3.amazonaws.com/uploads/images/gallery/2026-04/vmzdQskGSufwcHHW-image.png)
8. Click Save changes.
9. In **Authorization URL generator** Copy and Paste in the browser.  
    [![image.png](https://cytechint-docs-bookstack.s3.amazonaws.com/uploads/images/gallery/2026-04/scaled-1680-/B6IYfcH2luAqwRAs-image.png)
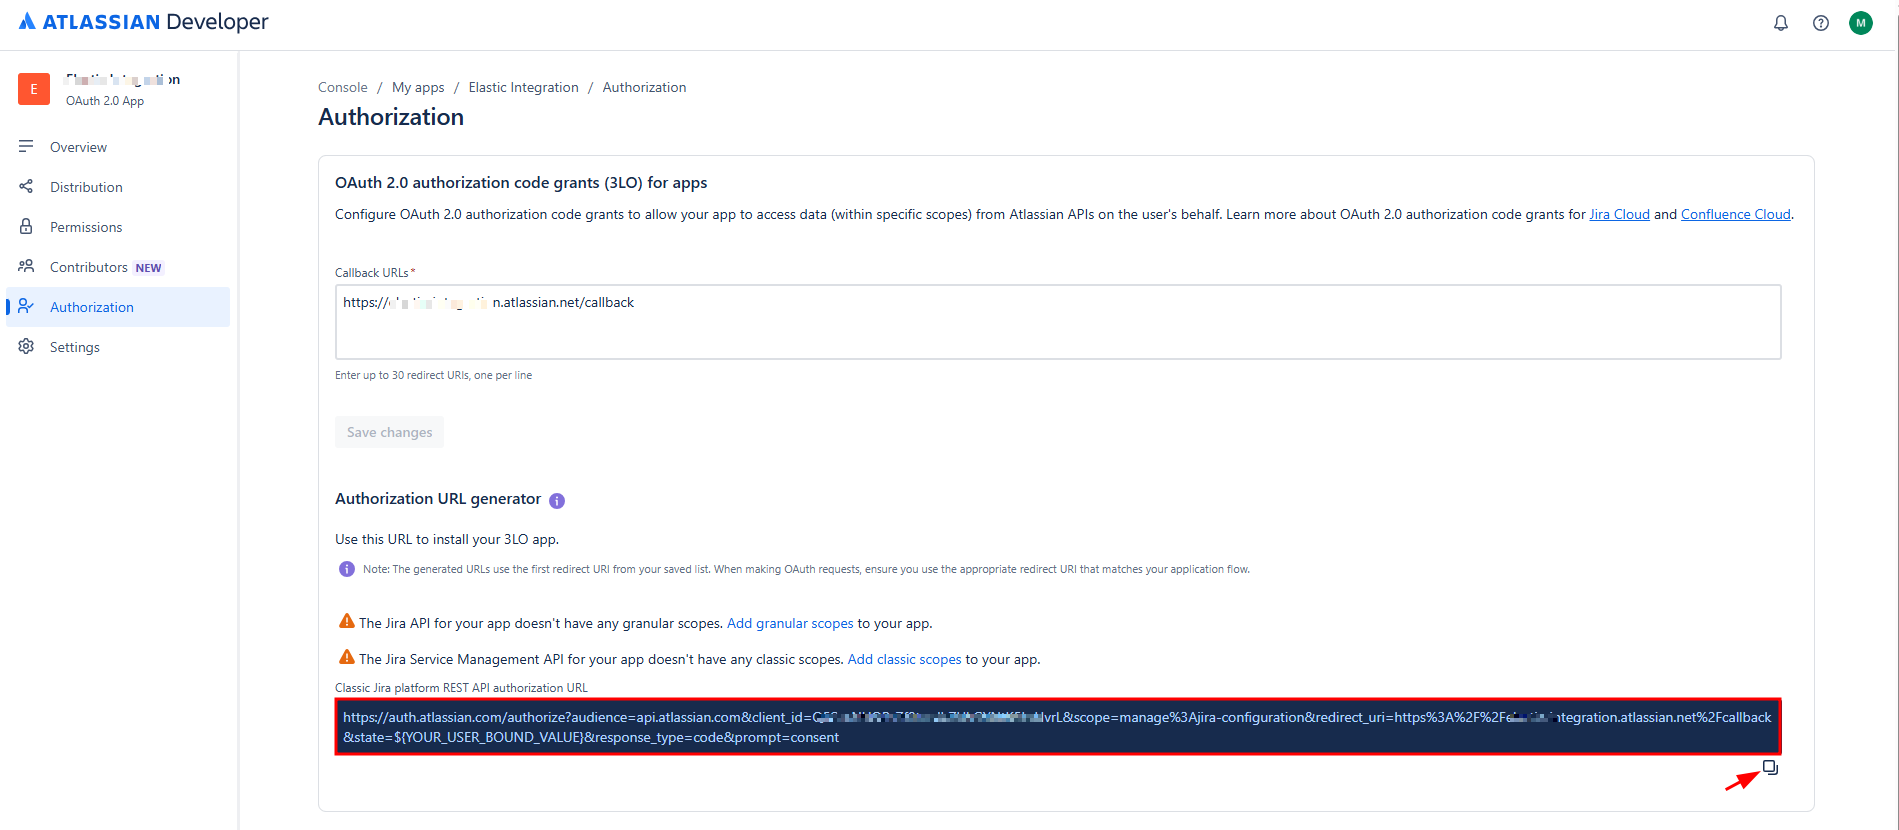
](https://cytechint-docs-bookstack.s3.amazonaws.com/uploads/images/gallery/2026-04/B6IYfcH2luAqwRAs-image.png)
    
    [![image.png](https://cytechint-docs-bookstack.s3.amazonaws.com/uploads/images/gallery/2026-04/scaled-1680-/19XHXQfd2zApQpIO-image.png)
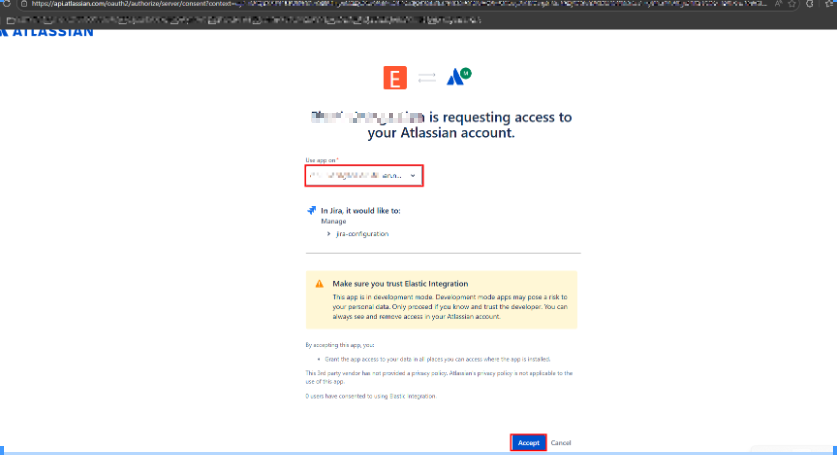
](https://cytechint-docs-bookstack.s3.amazonaws.com/uploads/images/gallery/2026-04/19XHXQfd2zApQpIO-image.png)
10. Copy the URL and paste in text editor (notepad).  
    <p class="callout info">[![image.png](https://cytechint-docs-bookstack.s3.amazonaws.com/uploads/images/gallery/2026-04/scaled-1680-/nXh8vWzcku4XLqYA-image.png)
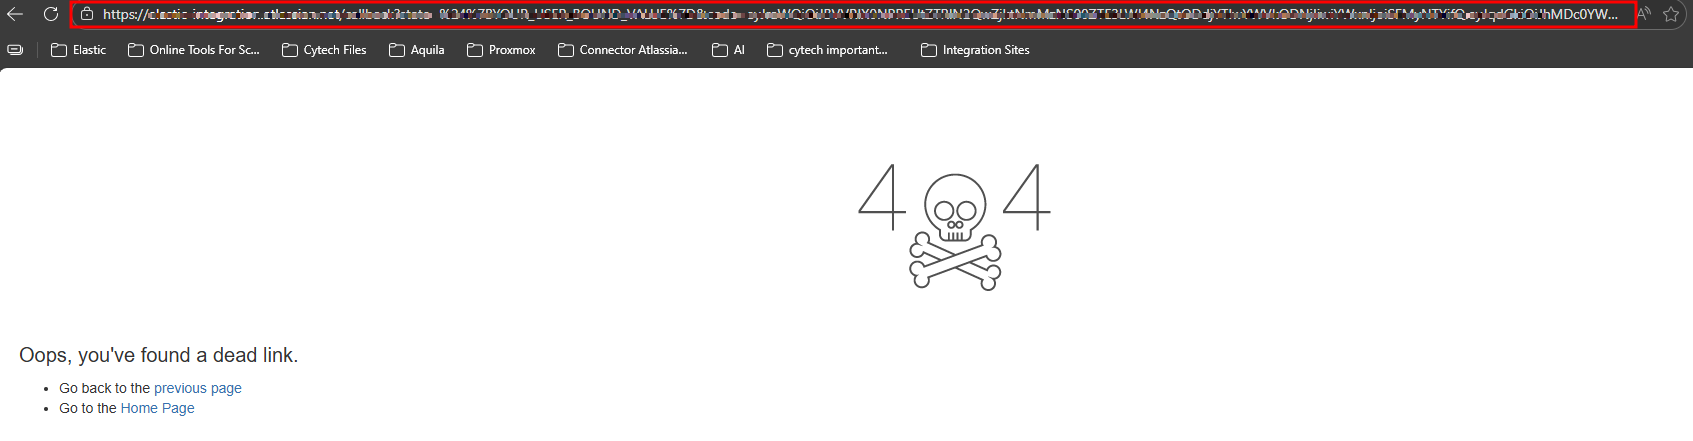
](https://cytechint-docs-bookstack.s3.amazonaws.com/uploads/images/gallery/2026-04/nXh8vWzcku4XLqYA-image.png)  
    **Example of a copied URL (the boxed section contains the authorization code).**</p>

---

##### <span data-teams="true"> **<span style="color: rgb(53, 152, 219);">Exchange authorization code for access token</span>**</span>

<p class="callout info"><span data-teams="true">**Paste this Curl command into terminal.**</span></p>

```bash
curl --request POST \
  --url 'https://auth.atlassian.com/oauth/token' \
  --header 'Content-Type: application/json' \
  --data '{"grant_type": "authorization_code","client_id": "YOUR_CLIENT_ID","client_secret": "YOUR_CLIENT_SECRET","code": "YOUR_AUTHORIZATION_CODE","redirect_uri": "https://YOUR_APP_CALLBACK_URL"}'
```

Change all fields:

- `client_id`: (*required*) Set this to the **Client ID** for your app. Find this in **Settings** for your app in the [developer console](https://developer.atlassian.com/console/myapps/ "https://developer.atlassian.com/console/myapps/").
- `client_secret`: (*required*) Set this to the **Secret** for your app. Find this in **Settings** for your app in the [developer console](https://developer.atlassian.com/console/myapps/ "https://developer.atlassian.com/console/myapps/").
- `code`: (*required*) Set this to the authorization code received from the initial authorize call (described above).
- `redirect_uri`: (*required*) Set this to the callback URL configured for your app in the [developer console](https://developer.atlassian.com/console/myapps/ "https://developer.atlassian.com/console/myapps/").

<p class="callout info">**<span data-teams="true">If successful, this call returns an access token similar to this:</span>**</p>

```json
HTTP/1.1 200 OK
Content-Type: application/json

{
  "access_token": <string>,
  "expires_in": <expiry time of access_token in second>,
  "scope": <string>
}
```

---

##### <span style="color: rgb(53, 152, 219);">**Make calls to the API using the access token Get the `cloudid` for your site**</span>

Your app now has an access token that it can use to authorize requests to the APIs for the Atlassian site. To make requests, do the following:

1. **Get the <span class="sc-htoDjs eujlDE">`cloudid`</span> for your site.**
2. Construct the request URL using the <span class="sc-htoDjs eujlDE">`cloudid`</span>.
3. Call the API, using the access token and request URL.

---

##### <span style="color: rgb(53, 152, 219);">**Get the <span class="sc-htoDjs eujlDE">`cloud_id`</span> for your site**</span>

**Make a GET request to [https://api.atlassian.com/oauth/token/accessible-resources<span aria-label="Follow" class="css-1wits42" role="img"><svg height="24" role="presentation" viewbox="0 0 24 24" width="24"><g fill="currentColor" fill-rule="evenodd"><path d="M11.031 7A1.03 1.03 0 0010 8.036a1.05 1.05 0 001.044 1.045l3.121.014.014 3.121a1.05 1.05 0 001.045 1.044 1.03 1.03 0 001.036-1.035l-.019-4.161a1.053 1.053 0 00-1.045-1.045L11.035 7h-.004z"></path><path d="M13.364 8.292l-7.072 7.071a1.002 1.002 0 000 1.415c.39.39 1.024.39 1.415 0l7.071-7.071A1.002 1.002 0 0014.071 8a1 1 0 00-.707.292z"></path></g></svg></span>](https://api.atlassian.com/oauth/token/accessible-resources) passing the access token as a bearer token in the header of the request. For example:**

<p class="callout warning">**Replace "ACCESS\_TOKEN" with your newly generated token.**</p>

```bash
curl --request GET \
  --url https://api.atlassian.com/oauth/token/accessible-resources \
  --header 'Authorization: Bearer ACCESS_TOKEN' \
  --header 'Accept: application/json'
```

This will retrieve the sites that have scopes granted by the token (see [Check site access for the app](https://developer.atlassian.com/cloud/jira/platform/oauth-2-3lo-apps/#siteaccess) below for details). Find your site in the response and copy the <span class="sc-htoDjs eujlDE">`id`</span>. This is the <span class="sc-htoDjs eujlDE">`cloud_id`</span> for your site.

<p class="callout info">**sample output: a Atlassian Confluence site:**</p>

```json
[
  {
    "id": "1324a887-45db-1bf4-1e99-ef0ff456d421",
    "name": "Site name",
    "url": "https://your-domain.atlassian.net",
    "scopes": [
      "write:confluence-content",
      "read:confluence-content.all",
      "manage:confluence-configuration"
    ],
    "avatarUrl": "https:\/\/site-admin-avatar-cdn.prod.public.atl-paas.net\/avatars\/240\/flag.png"
  }
]

```

---

#### <span style="color: rgb(53, 152, 219);">**Creating the Bash Wrapper Script:**</span>

<p class="callout info">**The wrapper script manages event collection, logging, and ensures only one instance runs at a time.**</p>

1. **Create required directories for data, logs:** <p class="callout info">**Create a directory named `confluence` (for this example):** </p>
    
    <div>  
    </div>```
    mkdir confluence
    ```
2. **Create the wrapper script file:** ```
    sudo nano /usr/local/bin/confluence_audit.sh
    ```
3. **Add the following content to the file:  
      
    Replace the file path `FLAT_FILE` as well as `CLOUD_ID`, `USER_EMAIL`, and `API_KEY`, with their actual values.**<p class="callout warning">**Don't change "flattened.json" file name so that the script will work properly.** </p>
    
      
    ```bash
    #!/bin/bash
    
    set -euo pipefail
    
    # ----------------------------
    # Config
    # ----------------------------
    FLAT_FILE="/home/<testing-confluence>/confluence/flattened.json"
    LOCK_FILE="/var/lock/confluence-events.lock"
    CLOUD_ID=" "
    USER_EMAIL=" "
    API_KEY=" "
    
    # Ensure only one instance runs at a time
    exec 200>"$LOCK_FILE"
    flock -n 200 || exit 1
    
    # ----------------------------
    # Call Atlassian Confluence API
    # ----------------------------
    RESPONSE=$(curl -s --request GET \
      --url "https://api.atlassian.com/ex/confluence/$CLOUD_ID/wiki/rest/api/audit" \
      --user "$USER_EMAIL:$API_KEY" \
      --header "Accept: application/json")
    
    # ----------------------------
    # Validate JSON
    # ----------------------------
    if ! echo "$RESPONSE" | jq . >/dev/null 2>&1; then
      echo "Error: API did not return valid JSON"
      exit 1
    fi
    
    # ----------------------------
    # Flatten directly to file
    # ----------------------------
    echo "$RESPONSE" | jq -c '
      (.results // [])[]
    ' > "$FLAT_FILE"
    
    # ----------------------------
    # Count records
    # ----------------------------
    count=$(echo "$RESPONSE" | jq '(.results // []) | length')
    
    echo "Flattened $count results into $FLAT_FILE"
    
    ```
4. **Make the script executable:** ```
    sudo chmod +x /usr/local/bin/confluence_audit.sh
    ```
5. **Set ownership to the dedicated user**:  
      
    <p class="callout warning">**<span class="token token">Replace the "user:group" in this example both `<testing-confluence:testing-confluence>`.</span>**</p>
    
      
    ```
    sudo chown testing-confluence:testing-confluence /usr/local/bin/confluence_audit.sh
    ```

---

#### <span style="color: rgb(53, 152, 219);">**Creating the Systemd Service File:**</span>

<p class="callout info">**<span class="token token">The systemd </span><span class="token token">service</span><span class="token token"> ensures the event collection runs continuously and restarts automatically on failure.</span>**</p>

**<span class="token token">1. Create the service file:  
</span>**

```
sudo nano /etc/systemd/system/confluence-audit.service
```

**<span class="token token">2. Add the following content to the file:</span>**

<p class="callout warning">**<span class="token token">Replace WorkingDirectory file path.</span>**</p>

```ini
[Unit]
Description=Atlassian Confluence Audit Log Fetcher
After=network.target
Wants=network-online.target

[Service]
Type=oneshot
ExecStart=/usr/local/bin/confluence_audit.sh

# Run as your user
User=testing-confluence
WorkingDirectory=/home/testing-confluence/confluence

# Logging
StandardOutput=journal
StandardError=journal

# Security (optional but recommended)
NoNewPrivileges=true

[Install]
WantedBy=multi-user.target
```

---

#### <span style="color: rgb(53, 152, 219);">**Create a Systemd Timer to handle looping and run automatically in the background:**</span>

A systemd timer is a feature of <span class="hover:entity-accent entity-underline inline cursor-pointer align-baseline"><span class="whitespace-normal">systemd</span></span> used to schedule tasks to run automatically at specific times or intervals.

**<span class="token token">1. Create the timer file:</span>**

```
sudo nano /etc/systemd/system/confluence-audit.timer
```

**<span class="token token">2. Add the following content to the file:</span>**

```ini
[Unit]
Description=Run Atlassian Confluence Audit every 10 minutes

[Timer]
OnBootSec=60
OnUnitActiveSec=600
Persistent=true
Unit=confluence-audit.service

[Install]
WantedBy=timers.target
```

---

#### <span style="color: rgb(53, 152, 219);">**<span class="token token">Configuring Log Rotation</span>**</span>

<span class="token token">To manage log file sizes and prevent disk space issues, configure log rotation for Atlassian Confluence Audit Logs.</span>

##### <span class="token token">**Step 1:** Create a logrotate configuration file:</span>

```
sudo nano /etc/logrotate.d/confluence_audit
```

##### <span class="token token">**Step 2:** Add the following configuration to the file:</span>

<p class="callout warning"><span class="token token">**Replace `/home/your_user/` with your actual path, and update `user_owner` and `user_group` to match the correct user and group.**</span></p>

```
/home/your_user/confluence/flattened.json {
    daily
    rotate 7
    missingok
    notifempty

    copytruncate

    compress
    compressoptions -1
    delaycompress

    dateext
    dateformat -%Y%m%d-%H%M%S

    create 0640 user_owner user_group
}
```

---

#### <span style="color: rgb(53, 152, 219);">**Enabling and Starting the Service**</span>

**Step 1:** **Reload systemd to recognize the new service file:**

```
sudo systemctl daemon-reload
```

**Step 2: Enable the service to start automatically on boot:**

```
sudo systemctl enable --now confluence-audit.timer
```

**Step 3: Verify the service is running:**

```
sudo systemctl list-timers
```

<p class="callout info">**You should see something like this.**</p>

[![image.png](https://cytechint-docs-bookstack.s3.amazonaws.com/uploads/images/gallery/2026-04/scaled-1680-/EOvKLRBONp828xQT-image.png)
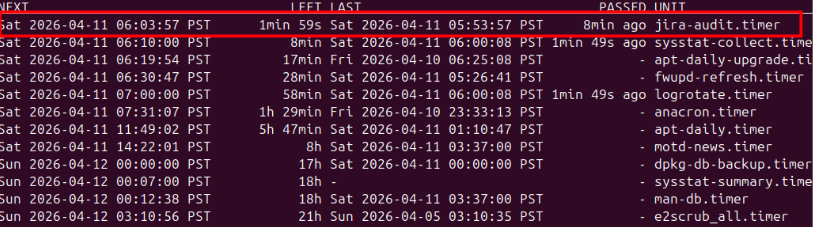
](https://cytechint-docs-bookstack.s3.amazonaws.com/uploads/images/gallery/2026-04/EOvKLRBONp828xQT-image.png)

---

##### <span style="color: rgb(53, 152, 219);">**Monitoring Live Logs:**</span>

To view real-time logs from the confluence-audit service:

```
journalctl -u confluence-audit -f
```

---

<p class="callout info">**Please provide the following information to CyTech.**</p>

- **Flattened.json file path example "/home/testing-confluence/confluence/flattened.json"**

---

***If you need further assistance, kindly contact our support at <support@cytechint.com> for prompt assistance and guidance.***