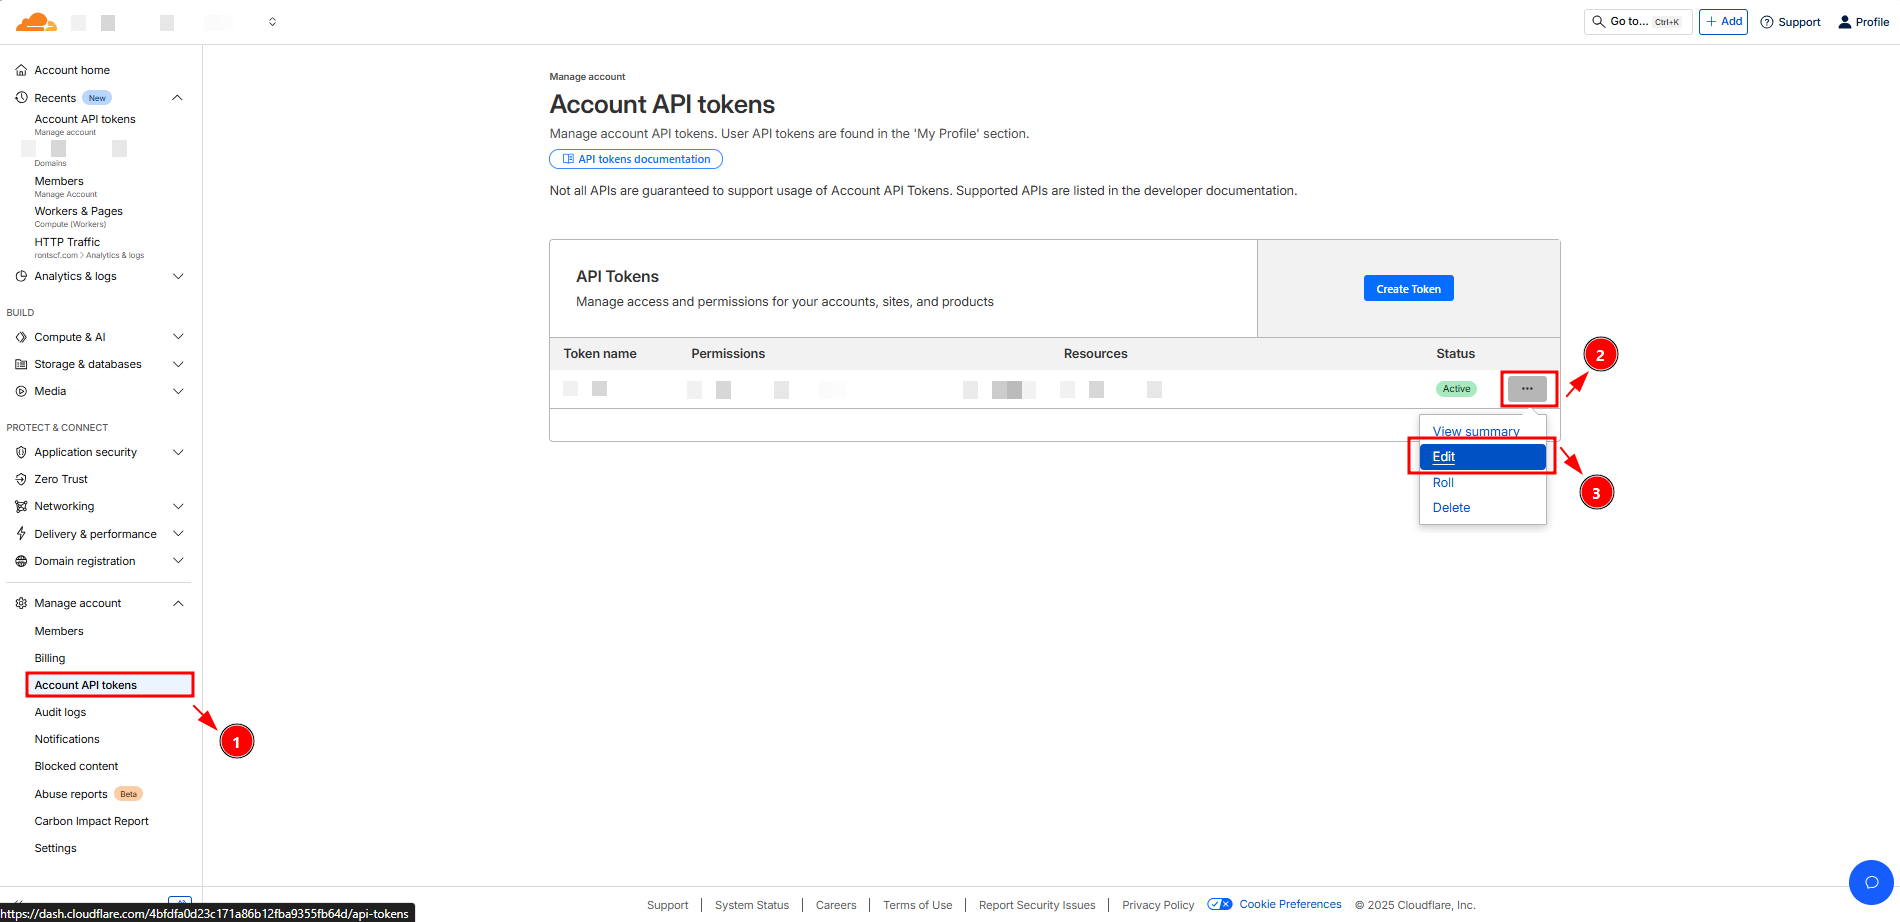
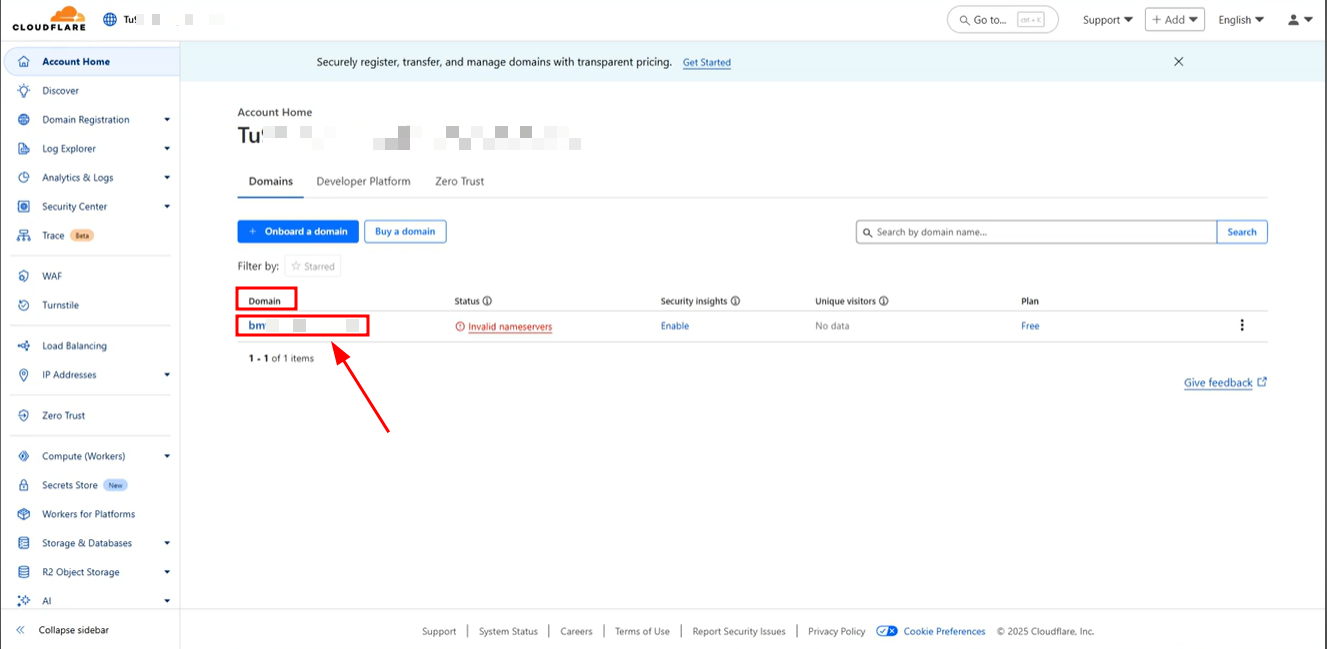
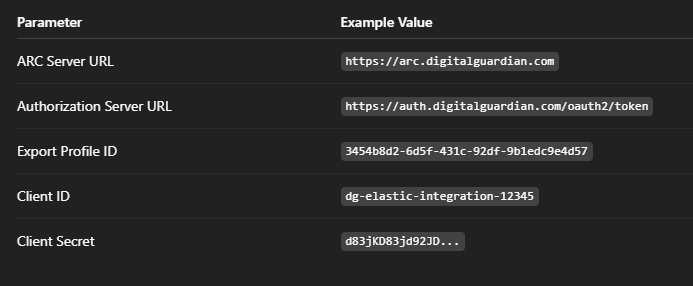
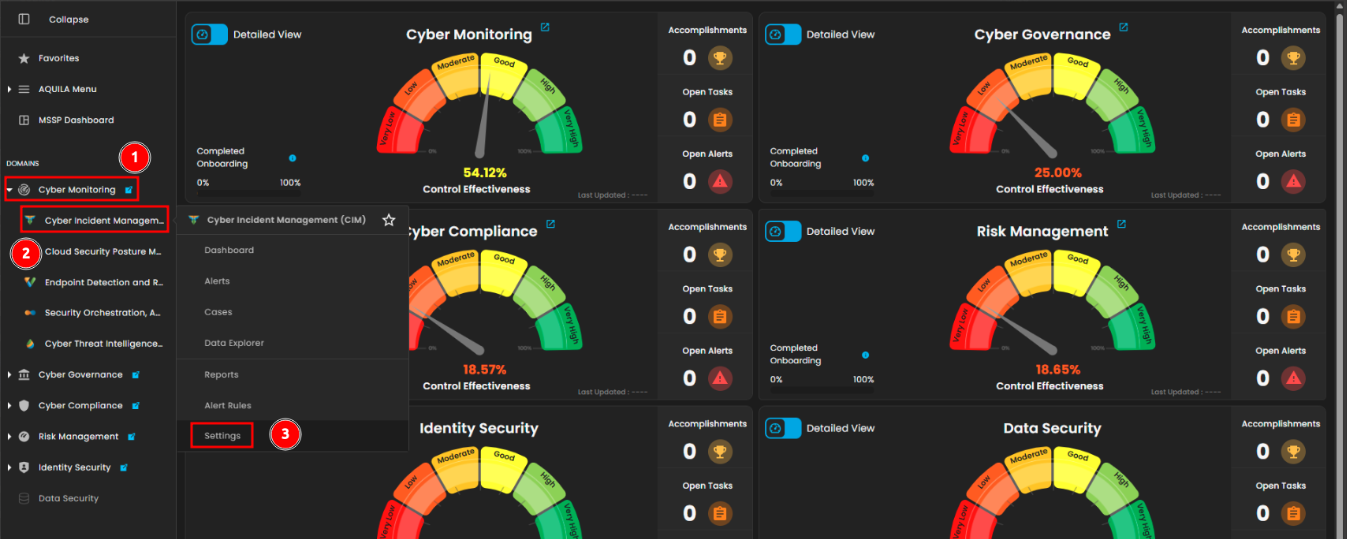
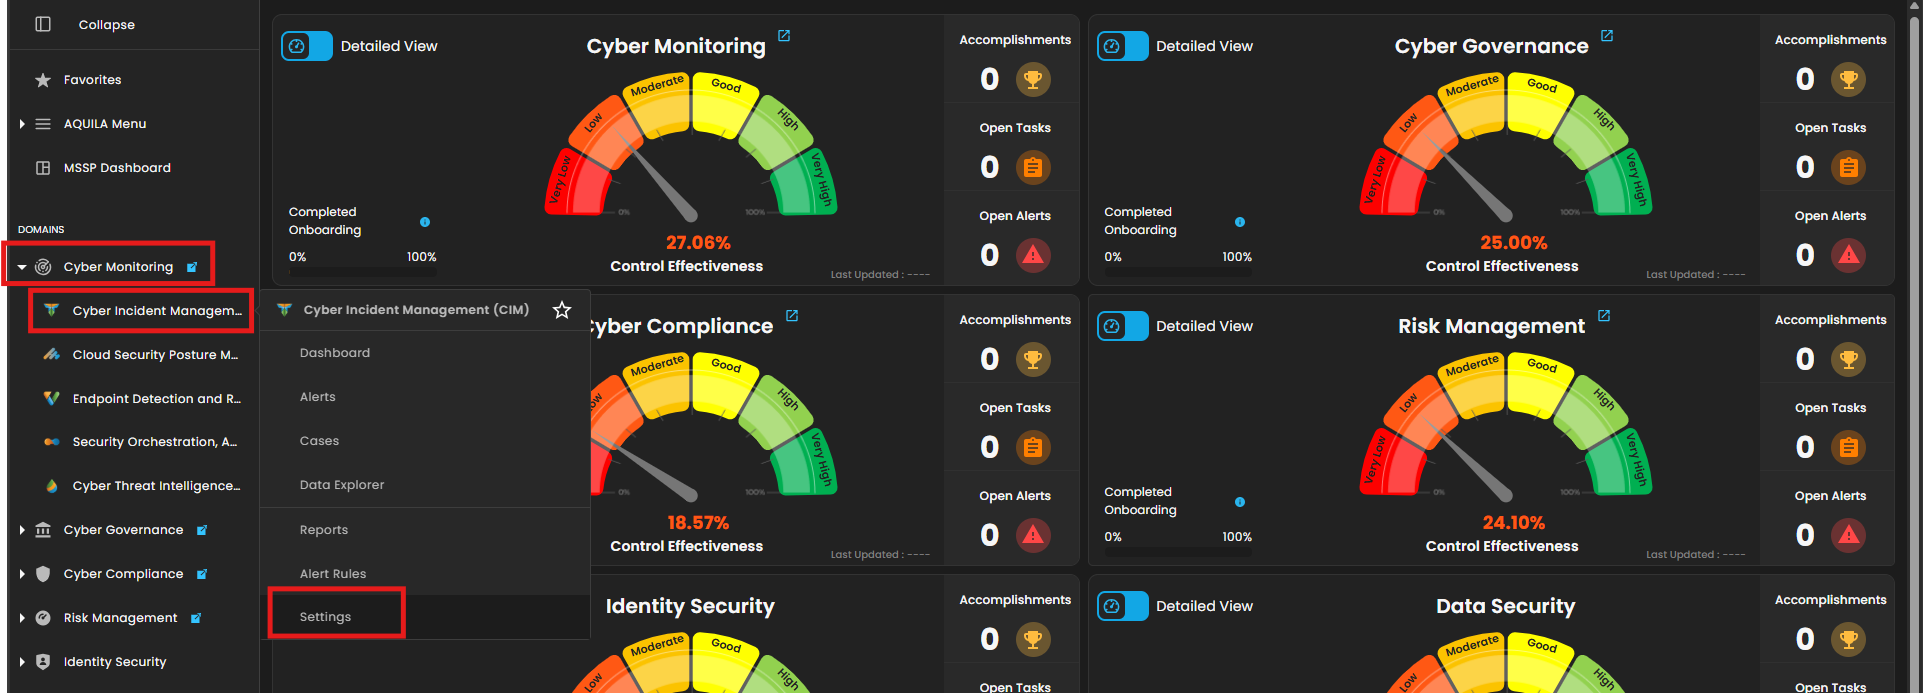
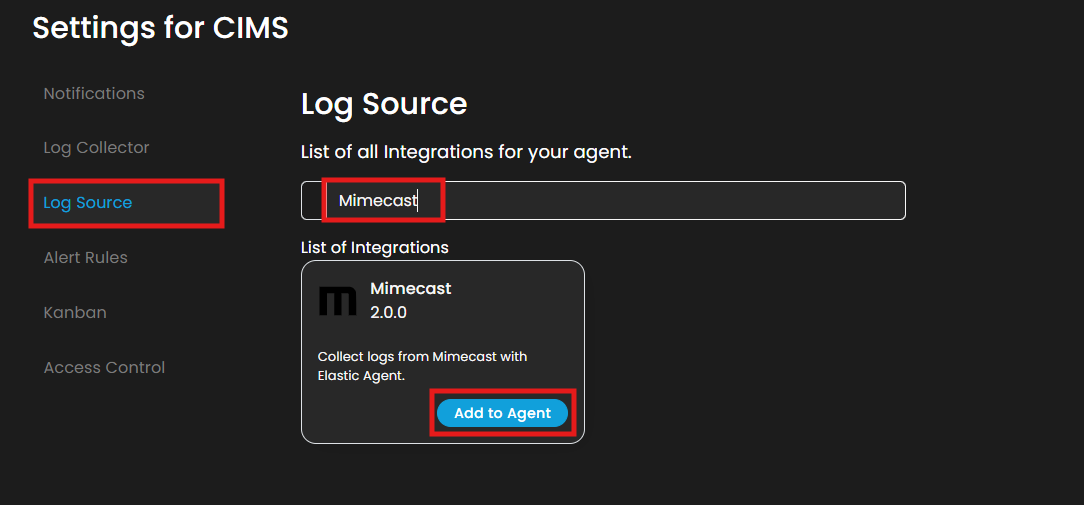
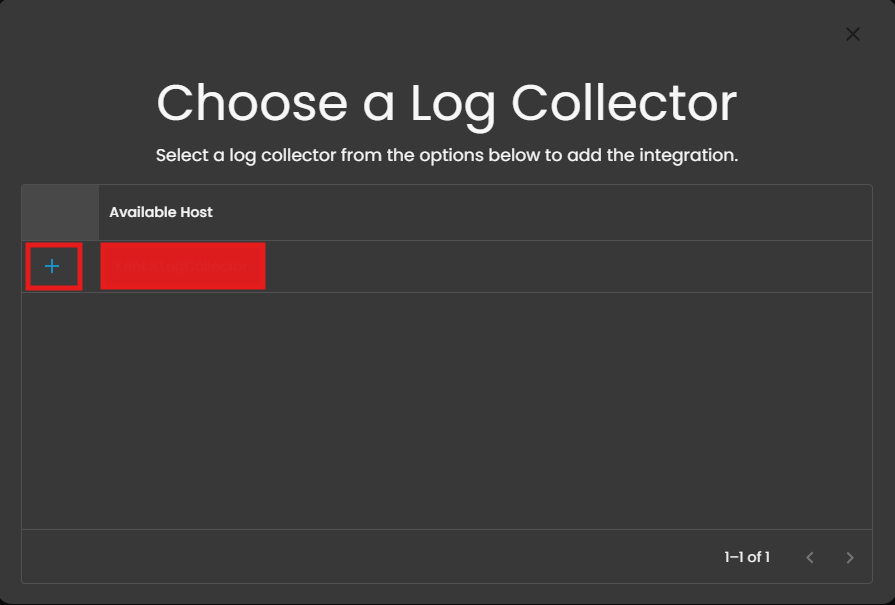
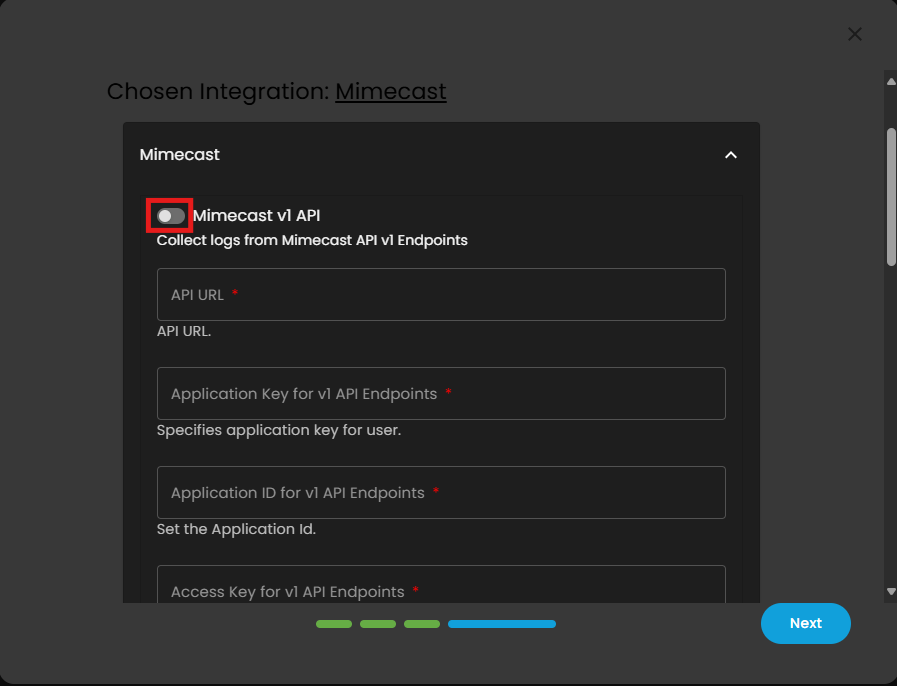
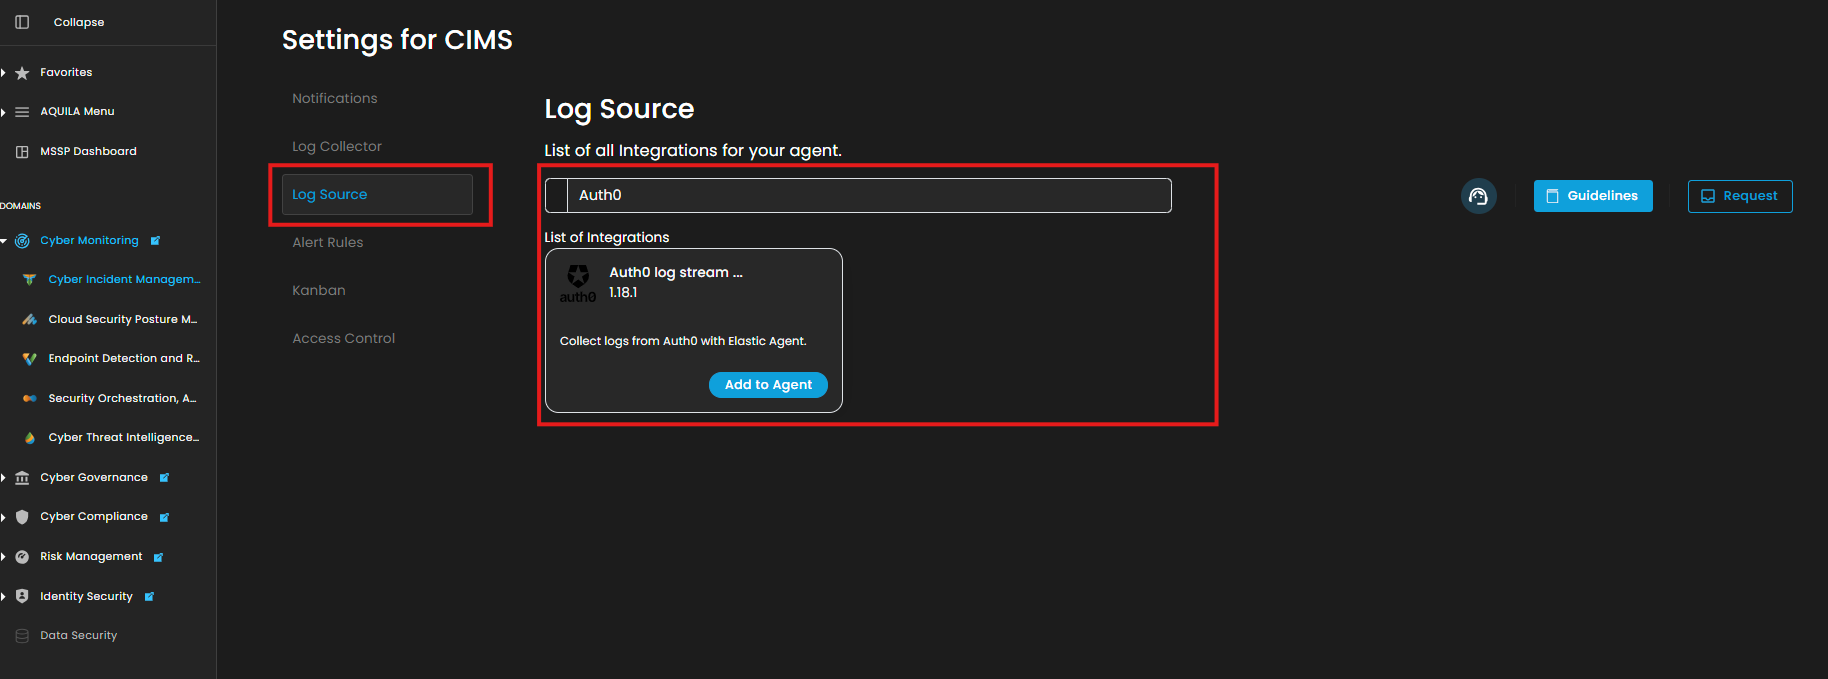
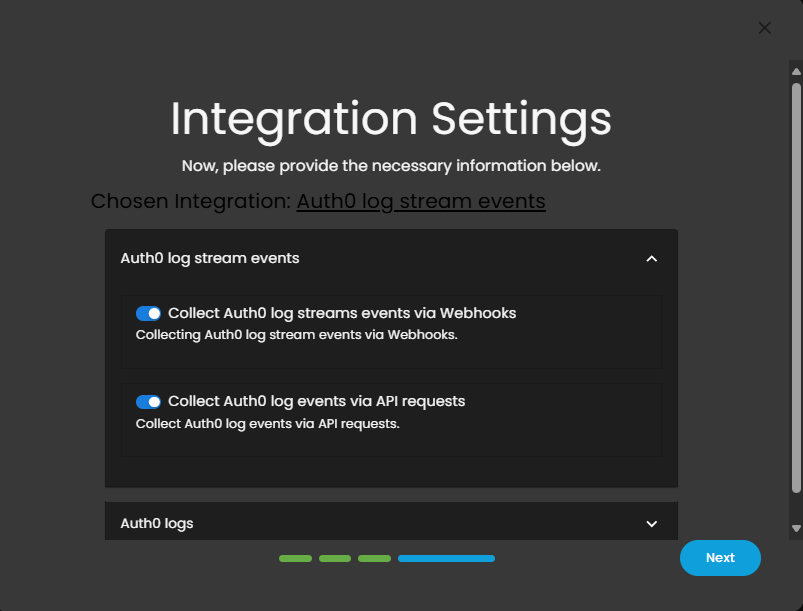
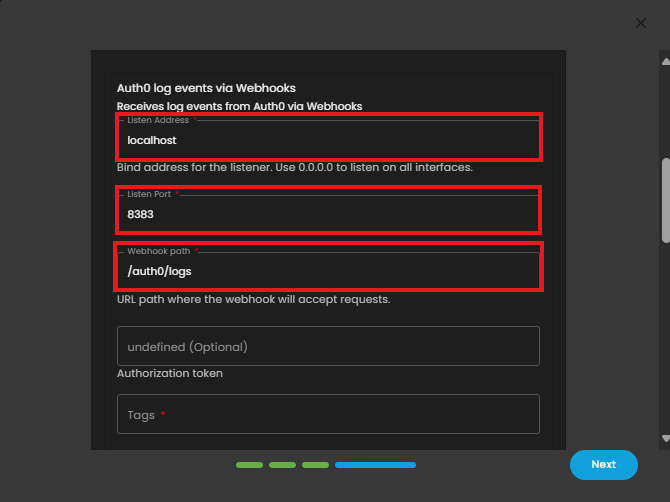
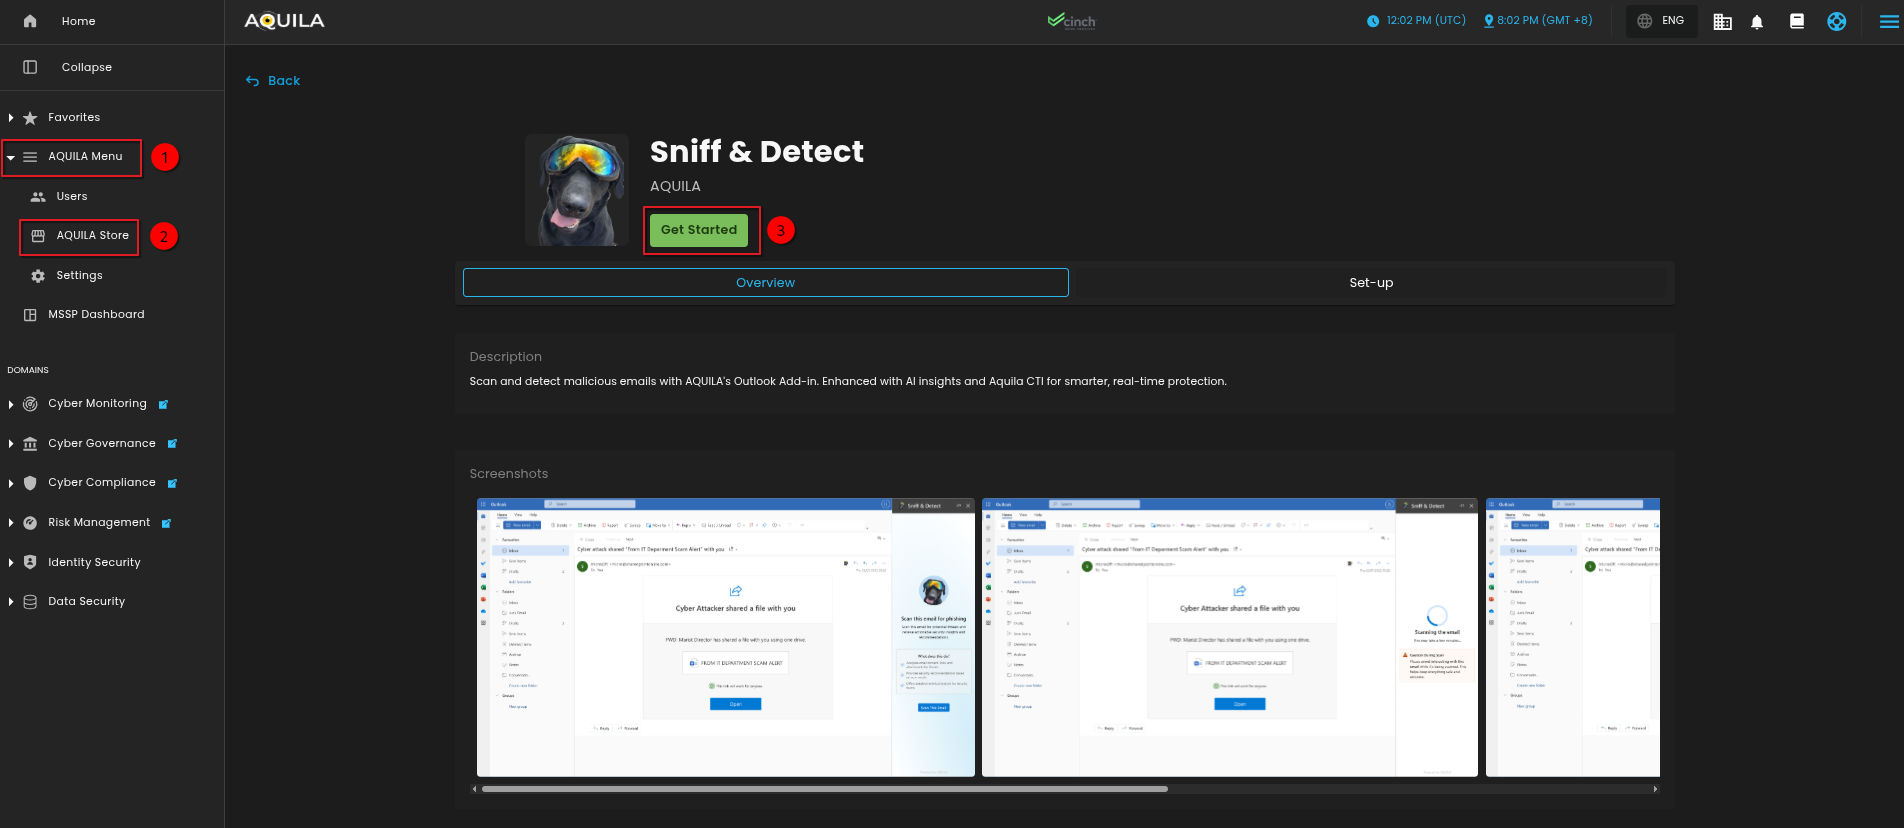
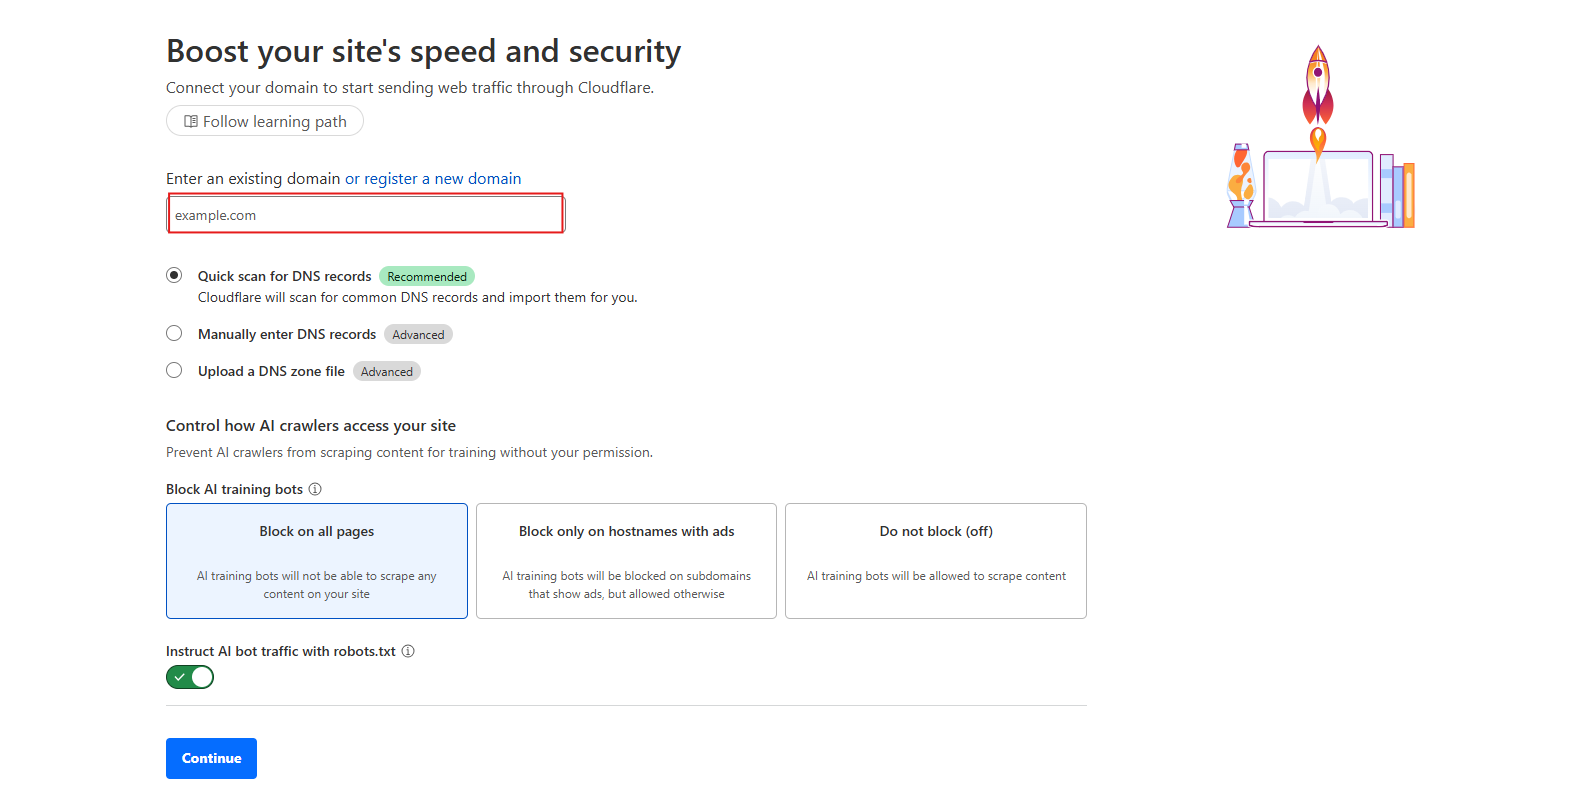
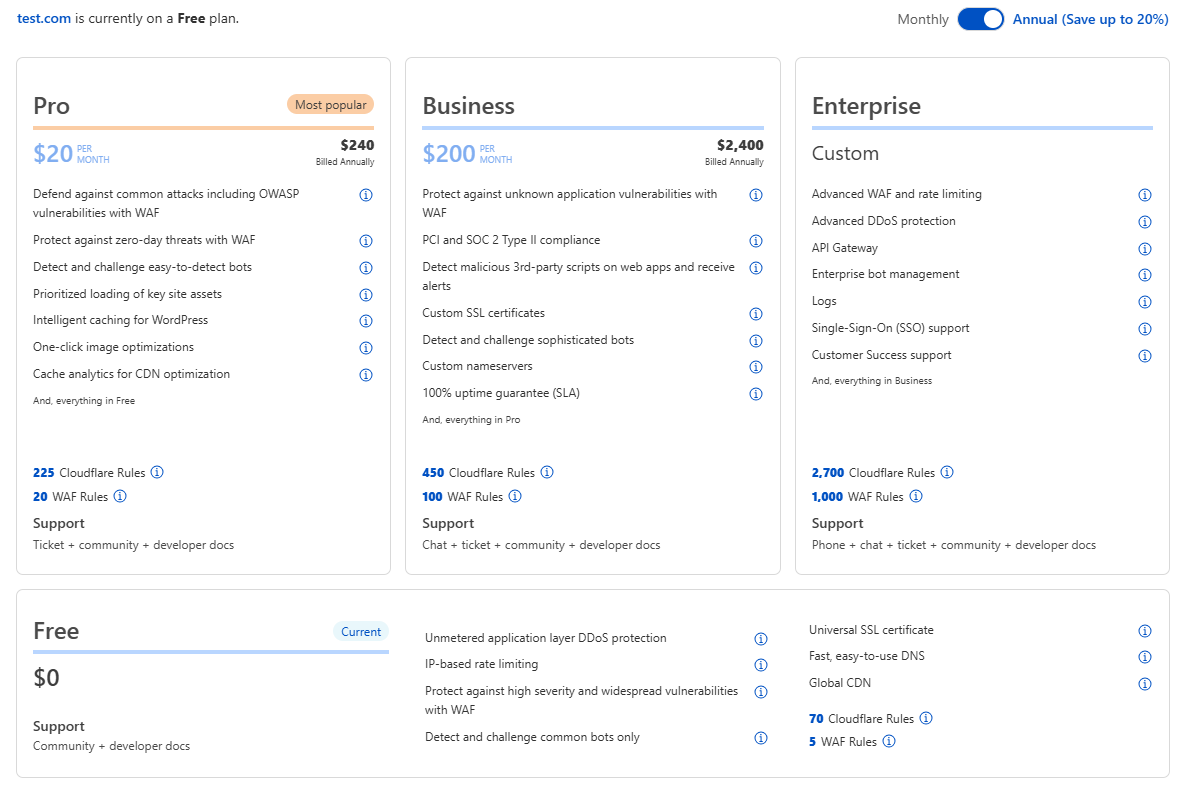
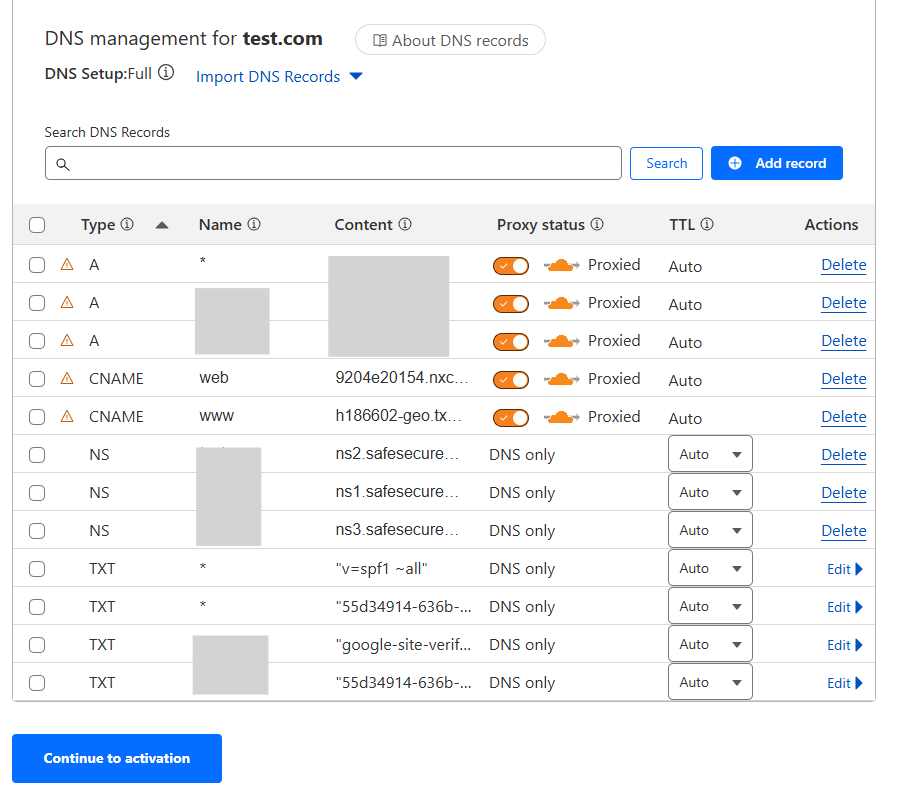
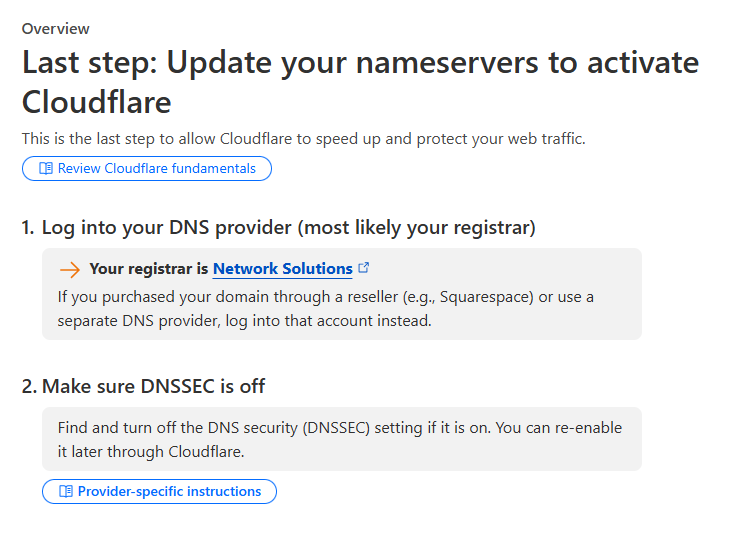
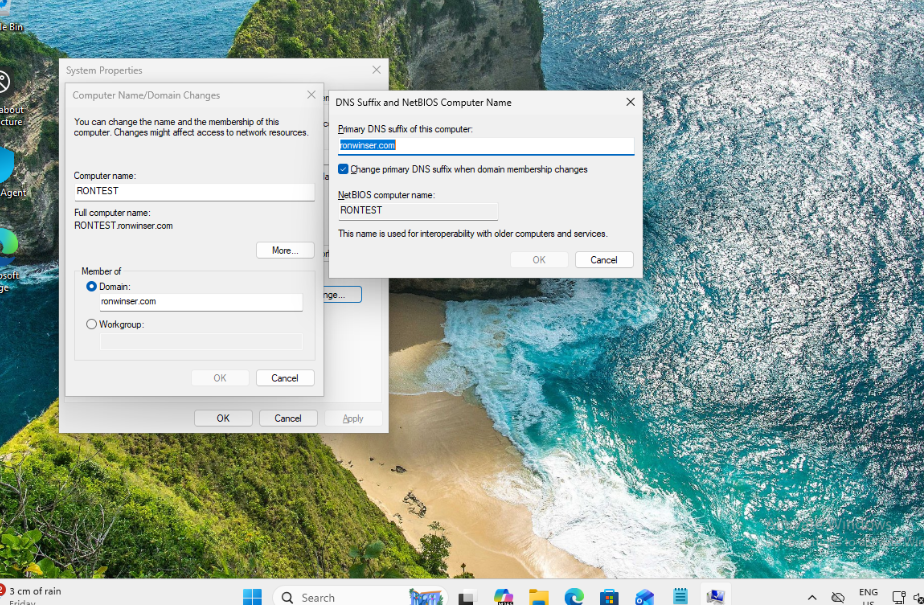
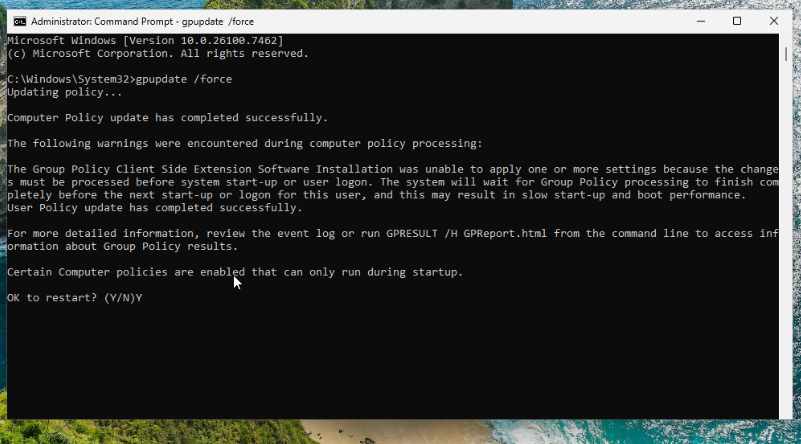
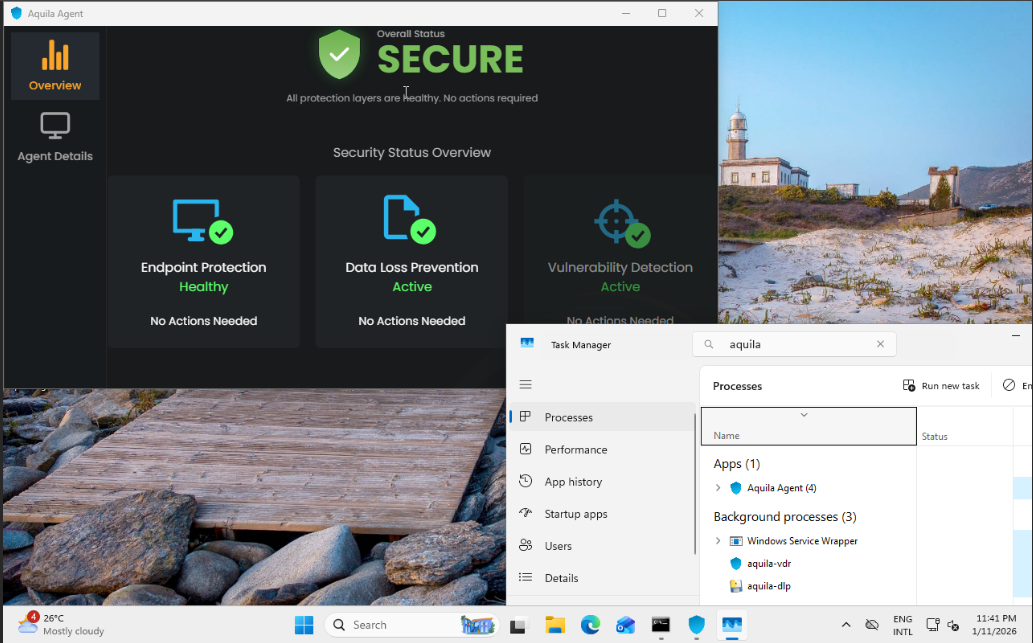
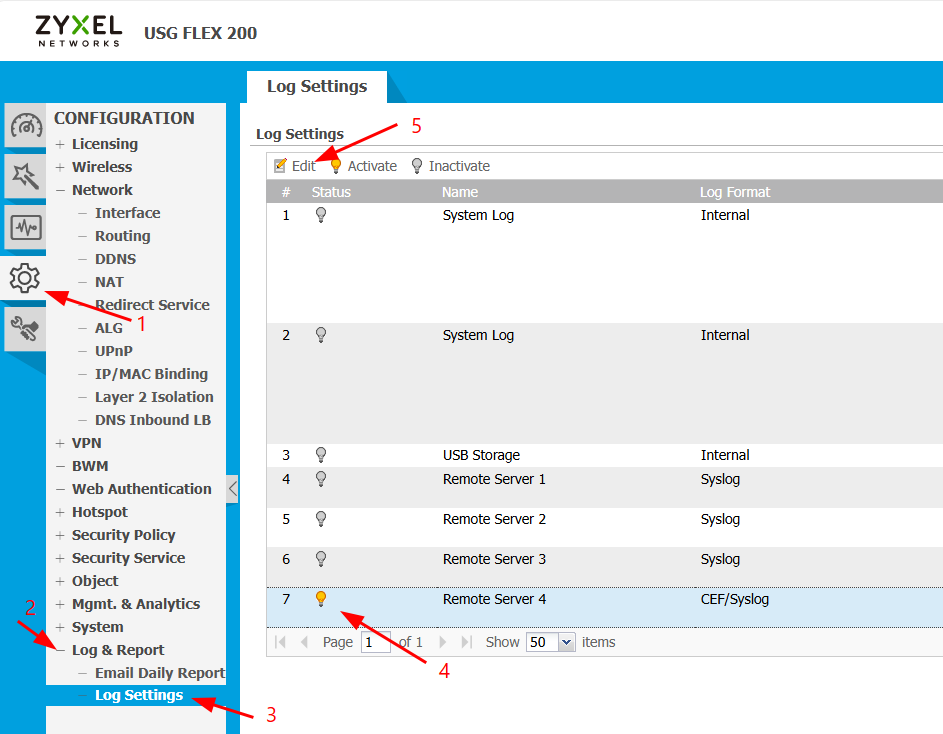
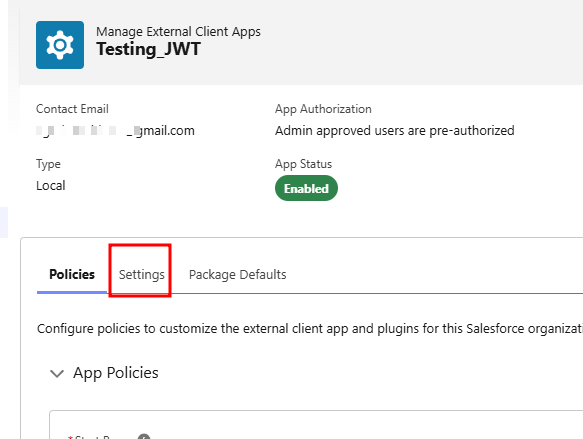
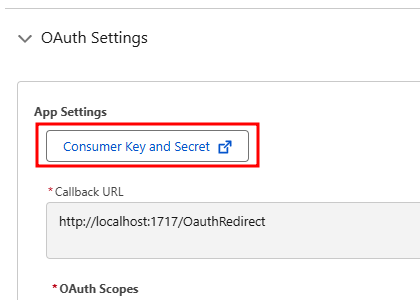
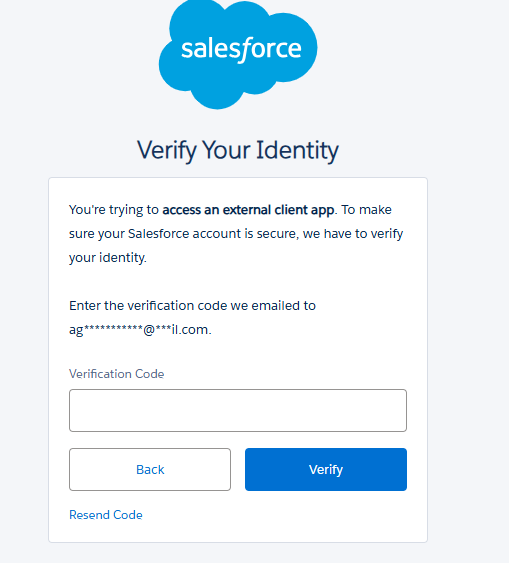
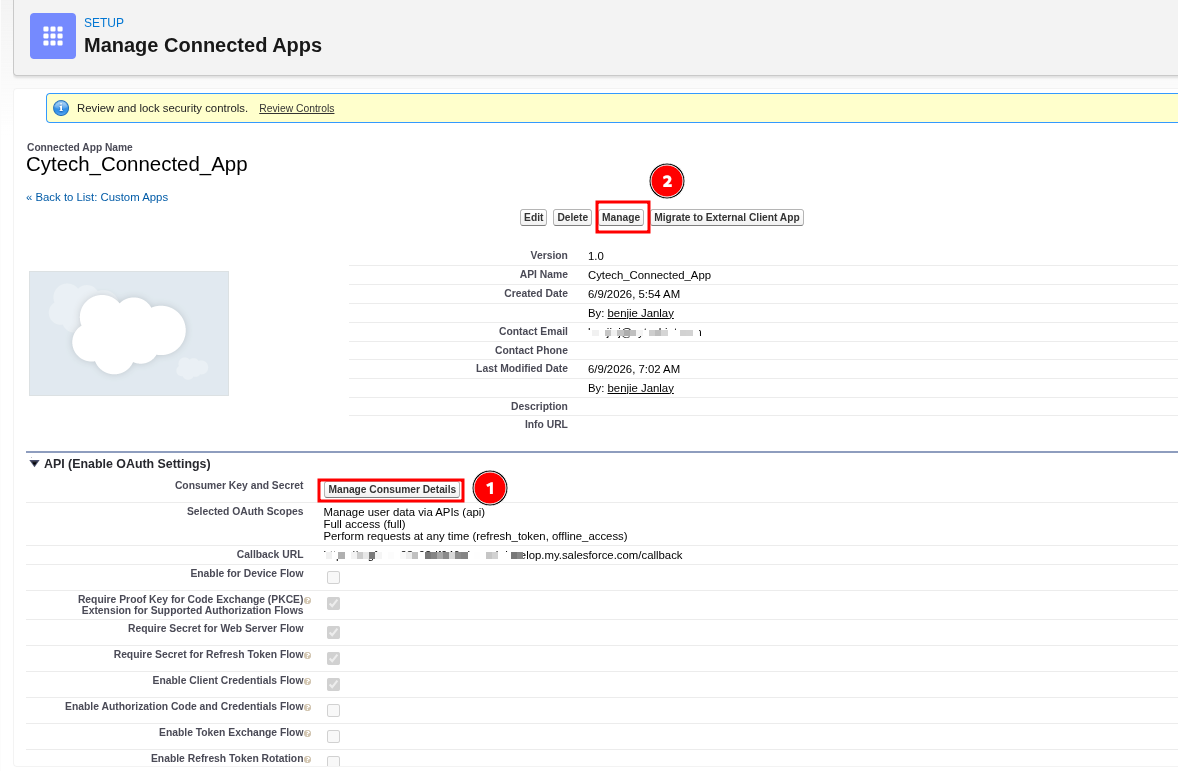
# System Integrations

**Can't find your integration?**

<span>No worries, if your desired integration isn't listed, you can </span>[create a support ticket](https://support.cytechint.io/)<span> and let us know what you need. Our team will check your request and get back to you with updates or alternatives.</span>

***Tip:** *Share details like the integration name, platform, and how you plan to use it to help us assist you faster.**

# 1 Password Integrations

##### <span style="color: rgb(53, 152, 219);">**<span class="TextRun SCXW6182031 BCX8" data-contrast="none" lang="EN-US" xml:lang="EN-US"><span class="NormalTextRun SCXW6182031 BCX8" data-ccp-charstyle="Style (Complex) Open Sans" data-ccp-charstyle-defn="{"ObjectId":"c4047817-e8ec-4238-819b-840227996baa|232","ClassId":1073872969,"Properties":[201342446,"1",201342447,"5",201342448,"1",201342449,"1",469777841,"Open Sans",469777842,"Open Sans",469777843,"Calibri",469777844,"Open Sans",201341986,"1",469769226,"Open Sans",268442635,"22",335559704,"1037",335559705,"1033",335551547,"1033",335559740,"259",201341983,"0",335559739,"160",469775450,"Style (Complex) Open Sans",201340122,"1",134233614,"true",469778129,"StyleComplexOpenSans",335572020,"1",469778324,"Default Paragraph Font"]}">Introduction</span></span><span class="EOP SCXW6182031 BCX8" data-ccp-props="{"134245418":true,"134245529":true,"201341983":0,"335559738":240,"335559739":0,"335559740":360}"> </span>**</span>

<span class="TextRun SCXW6182031 BCX8" data-contrast="auto" lang="EN-US" xml:lang="EN-US"><span class="NormalTextRun SCXW6182031 BCX8" data-ccp-charstyle="Style (Complex) Open Sans">With 1Password Business, you can send your account activity to your security information and event management (SIEM) system, using the 1Password Events API.</span></span><span class="EOP SCXW6182031 BCX8" data-ccp-props="{"201341983":0,"335559685":360,"335559739":160,"335559740":259}"> </span>

<span class="TextRun SCXW6182031 BCX8" data-contrast="auto" lang="EN-US" xml:lang="EN-US"><span class="NormalTextRun SCXW6182031 BCX8" data-ccp-charstyle="Style (Complex) Open Sans">Get reports about 1Password activity, such as sign-in attempts and item usage, while you manage all your company’s applications and services from a central location.</span></span> <span class="EOP SCXW6182031 BCX8" data-ccp-props="{"201341983":0,"335559685":360,"335559739":160,"335559740":259}"> </span>

<span class="TextRun SCXW6182031 BCX8" data-contrast="auto" lang="EN-US" xml:lang="EN-US"><span class="NormalTextRun SCXW6182031 BCX8" data-ccp-charstyle="Style (Complex) Open Sans">With 1Password Events Reporting and Elastic SIEM, you can:</span></span><span class="EOP SCXW6182031 BCX8" data-ccp-props="{"201341983":0,"335559685":360,"335559739":160,"335559740":259}"> </span>

<div class="SCXW6182031 BCX8" id="bkmrk-control-your-1passwo"><div class="ListContainerWrapper SCXW6182031 BCX8">- <span class="TextRun SCXW6182031 BCX8" data-contrast="auto" lang="EN-US" xml:lang="EN-US"><span class="NormalTextRun SCXW6182031 BCX8" data-ccp-charstyle="Style (Complex) Open Sans">Control your 1Password data </span><span class="NormalTextRun SCXW6182031 BCX8" data-ccp-charstyle="Style (Complex) Open Sans">retention</span></span><span class="EOP SCXW6182031 BCX8" data-ccp-props="{"201341983":0,"335559739":160,"335559740":259}"> </span>
- <span class="TextRun SCXW6182031 BCX8" data-contrast="auto" lang="EN-US" xml:lang="EN-US"><span class="NormalTextRun SCXW6182031 BCX8" data-ccp-charstyle="Style (Complex) Open Sans">Build custom graphs and </span><span class="NormalTextRun SCXW6182031 BCX8" data-ccp-charstyle="Style (Complex) Open Sans">dashboards</span></span><span class="EOP SCXW6182031 BCX8" data-ccp-props="{"201341983":0,"335559739":160,"335559740":259}"> </span>
- <span class="TextRun SCXW6182031 BCX8" data-contrast="auto" lang="EN-US" xml:lang="EN-US"><span class="NormalTextRun SCXW6182031 BCX8" data-ccp-charstyle="Style (Complex) Open Sans">Set up custom alerts that trigger specific </span><span class="NormalTextRun SCXW6182031 BCX8" data-ccp-charstyle="Style (Complex) Open Sans">actions</span></span><span class="EOP SCXW6182031 BCX8" data-ccp-props="{"201341983":0,"335559739":160,"335559740":259}"> </span>
- <span class="TextRun SCXW6182031 BCX8" data-contrast="auto" lang="EN-US" xml:lang="EN-US"><span class="NormalTextRun SCXW6182031 BCX8" data-ccp-charstyle="Style (Complex) Open Sans">Cross-reference 1Password events with the data from other services</span></span><span class="EOP SCXW6182031 BCX8" data-ccp-props="{"201341983":0,"335559739":160,"335559740":259}"> </span>

</div></div>##### <span style="color: rgb(53, 152, 219);">**<span class="TextRun SCXW6182031 BCX8" data-contrast="auto" lang="EN-US" xml:lang="EN-US"><span class="NormalTextRun SCXW6182031 BCX8" data-ccp-charstyle="Style (Complex) Open Sans">Events</span></span><span class="EOP SCXW6182031 BCX8" data-ccp-props="{"201341983":0,"335559685":360,"335559739":160,"335559740":259}"> </span>**</span>

**<span class="TextRun SCXW6182031 BCX8" data-contrast="auto" lang="EN-US" xml:lang="EN-US"><span class="NormalTextRun SCXW6182031 BCX8" data-ccp-charstyle="Style (Complex) Open Sans">Sign-in Attempts</span></span><span class="EOP SCXW6182031 BCX8" data-ccp-props="{"201341983":0,"335559685":360,"335559739":160,"335559740":259}"> </span>**

<span class="TextRun SCXW6182031 BCX8" data-contrast="auto" lang="EN-US" xml:lang="EN-US"><span class="NormalTextRun SCXW6182031 BCX8" data-ccp-charstyle="Style (Complex) Open Sans">Use the 1Password Events API to retrieve information about sign-in attempts. Events include the name and IP address of the user who </span><span class="NormalTextRun SCXW6182031 BCX8" data-ccp-charstyle="Style (Complex) Open Sans">attempted</span><span class="NormalTextRun SCXW6182031 BCX8" data-ccp-charstyle="Style (Complex) Open Sans"> to sign </span><span class="NormalTextRun SCXW6182031 BCX8" data-ccp-charstyle="Style (Complex) Open Sans">in to</span><span class="NormalTextRun SCXW6182031 BCX8" data-ccp-charstyle="Style (Complex) Open Sans"> the account, when the attempt was made, and – for failed attempts – the cause of the failure.</span></span><span class="EOP SCXW6182031 BCX8" data-ccp-props="{"201341983":0,"335559685":360,"335559739":160,"335559740":259}"> </span>

**<span class="TextRun SCXW6182031 BCX8" data-contrast="auto" lang="EN-US" xml:lang="EN-US"><span class="NormalTextRun SCXW6182031 BCX8" data-ccp-charstyle="Style (Complex) Open Sans">Item Usages</span></span><span class="EOP SCXW6182031 BCX8" data-ccp-props="{"201341983":0,"335559685":360,"335559739":160,"335559740":259}"> </span>**

<span class="TextRun SCXW6182031 BCX8" data-contrast="auto" lang="EN-US" xml:lang="EN-US"><span class="NormalTextRun SCXW6182031 BCX8" data-ccp-charstyle="Style (Complex) Open Sans">This uses the 1Password Events API to retrieve information about items in shared vaults that have been </span><span class="NormalTextRun SCXW6182031 BCX8" data-ccp-charstyle="Style (Complex) Open Sans">modified</span><span class="NormalTextRun SCXW6182031 BCX8" data-ccp-charstyle="Style (Complex) Open Sans">, accessed, or used. Events include the name and IP address of the user who accessed the item, when it was accessed, and the vault where the item is stored.</span></span><span class="EOP SCXW6182031 BCX8" data-ccp-props="{"201341983":0,"335559685":360,"335559739":160,"335559740":259}"> </span>

##### <span style="color: rgb(53, 152, 219);">**<span class="TextRun Highlight SCXW6182031 BCX8" data-contrast="none" lang="EN-US" xml:lang="EN-US"><span class="NormalTextRun SCXW6182031 BCX8" data-ccp-charstyle="eop">Requirements</span></span><span class="EOP SCXW6182031 BCX8" data-ccp-props="{"134245418":true,"134245529":true,"201341983":0,"335559738":240,"335559739":0,"335559740":360}"> </span>**</span>

<span class="TextRun Highlight SCXW6182031 BCX8" data-contrast="auto" lang="EN-US" xml:lang="EN-US"><span class="NormalTextRun SCXW6182031 BCX8" data-ccp-charstyle="eop">You can set up Events Reporting if </span><span class="NormalTextRun SCXW6182031 BCX8" data-ccp-charstyle="eop">you’re</span><span class="NormalTextRun SCXW6182031 BCX8" data-ccp-charstyle="eop"> an owner or administrator.</span></span><span class="EOP SCXW6182031 BCX8" data-ccp-props="{"201341983":0,"335559685":360,"335559739":160,"335559740":259}"> </span>

<span class="TextRun Highlight SCXW6182031 BCX8" data-contrast="auto" lang="EN-US" xml:lang="EN-US"><span class="NormalTextRun SCXW6182031 BCX8" data-ccp-charstyle="eop">Ready to get started? </span></span><span class="EOP SCXW6182031 BCX8" data-ccp-props="{"201341983":0,"335559685":360,"335559739":160,"335559740":259}"> </span>

<div class="SCXW6182031 BCX8" id="bkmrk-https%3A%2F%2Fsupport.1pas"><div class="ListContainerWrapper SCXW6182031 BCX8">- [<span class="TextRun Highlight Underlined SCXW6182031 BCX8" data-contrast="none" lang="EN-US" xml:lang="EN-US"><span class="NormalTextRun SCXW6182031 BCX8" data-ccp-charstyle="Hyperlink">https://support.1password.com/events-reporting/</span></span>](https://support.1password.com/events-reporting/)<span class="EOP SCXW6182031 BCX8" data-ccp-props="{"201341983":0,"335559739":160,"335559740":259}"> </span>

</div><div class="ListContainerWrapper SCXW6182031 BCX8">  
</div></div>##### <span style="color: rgb(53, 152, 219);">**<span class="TextRun SCXW6182031 BCX8" data-contrast="none" lang="EN-US" xml:lang="EN-US"><span class="NormalTextRun SCXW6182031 BCX8" data-ccp-charstyle="eop">1Password</span><span class="NormalTextRun SCXW6182031 BCX8" data-ccp-charstyle="eop"> Integration Procedures</span></span><span class="EOP SCXW6182031 BCX8" data-ccp-props="{"134245418":true,"134245529":true,"201341983":0,"335559738":240,"335559739":0,"335559740":360}"> </span>**</span>

<span class="TextRun SCXW6182031 BCX8" data-contrast="auto" lang="EN-US" xml:lang="EN-US"><span class="NormalTextRun SCXW6182031 BCX8" data-ccp-charstyle="eop">Please provide the following information to </span><span class="NormalTextRun SpellingErrorV2Themed SCXW6182031 BCX8" data-ccp-charstyle="eop">CyTech</span><span class="NormalTextRun SCXW6182031 BCX8" data-ccp-charstyle="eop">:</span></span><span class="EOP SCXW6182031 BCX8" data-ccp-props="{"201341983":0,"335559685":720,"335559739":160,"335559740":259}"> </span>

<span class="TextRun SCXW6182031 BCX8" data-contrast="auto" lang="EN-US" xml:lang="EN-US"><span class="NormalTextRun SCXW6182031 BCX8">The 1Password Events API Beat returns information from 1Password through requests to the Events REST API and sends that data securely to Elasticsearch. Requests are authenticated with a bearer token. </span></span>[<span class="TextRun Underlined SCXW6182031 BCX8" data-contrast="none" lang="EN-US" xml:lang="EN-US"><span class="NormalTextRun SCXW6182031 BCX8" data-ccp-charstyle="Hyperlink">Issue a token</span></span>](https://support.1password.com/events-reporting-elastic/#issue-a-bearer-token)<span class="TextRun SCXW6182031 BCX8" data-contrast="auto" lang="EN-US" xml:lang="EN-US"><span class="NormalTextRun SCXW6182031 BCX8"> for each application or </span><span class="NormalTextRun ContextualSpellingAndGrammarErrorV2Themed SCXW6182031 BCX8">service</span><span class="NormalTextRun SCXW6182031 BCX8"> you use.</span></span><span class="EOP SCXW6182031 BCX8" data-ccp-props="{"201341983":0,"335559685":720,"335559739":160,"335559740":259}"> </span>

<span class="TextRun SCXW6182031 BCX8" data-contrast="auto" lang="EN-US" xml:lang="EN-US"><span class="NormalTextRun SCXW6182031 BCX8">To connect your 1Password account to Elastic:</span></span><span class="EOP SCXW6182031 BCX8" data-ccp-props="{"201341983":0,"335559685":720,"335559739":160,"335559740":259}"> </span>

<div class="SCXW6182031 BCX8" id="bkmrk-download-and-install"><div class="ListContainerWrapper SCXW6182031 BCX8">1. <span class="TextRun SCXW6182031 BCX8" data-contrast="auto" lang="EN-US" xml:lang="EN-US"><span class="NormalTextRun SCXW6182031 BCX8">Download and install </span></span>[<span class="TextRun Underlined SCXW6182031 BCX8" data-contrast="none" lang="EN-US" xml:lang="EN-US"><span class="NormalTextRun SCXW6182031 BCX8" data-ccp-charstyle="Hyperlink">the 1Password Events API Elastic Beat </span></span>](https://github.com/1Password/events-api-elastic/releases)<span class="TextRun SCXW6182031 BCX8" data-contrast="auto" lang="EN-US" xml:lang="EN-US"><span class="NormalTextRun SCXW6182031 BCX8"> from the 1Password GitHub repository.</span></span><span class="EOP SCXW6182031 BCX8" data-ccp-props="{"201341983":0,"335559739":160,"335559740":259}"> </span>

</div></div><div class="SCXW6182031 BCX8" id="bkmrk-download%E2%80%AFan-example%E2%80%AF"><div class="ListContainerWrapper SCXW6182031 BCX8">2. <span class="TextRun SCXW6182031 BCX8" data-contrast="auto" lang="EN-US" xml:lang="EN-US"><span class="NormalTextRun SCXW6182031 BCX8">Download </span></span>[<span class="TextRun Underlined SCXW6182031 BCX8" data-contrast="none" lang="EN-US" xml:lang="EN-US"><span class="NormalTextRun SCXW6182031 BCX8" data-ccp-charstyle="Hyperlink">an example </span><span class="NormalTextRun SCXW6182031 BCX8" data-ccp-charstyle="Hyperlink">eventsapibeat.yml</span><span class="NormalTextRun SCXW6182031 BCX8" data-ccp-charstyle="Hyperlink"> file </span></span>](https://github.com/1Password/events-api-elastic/blob/main/eventsapibeat-sample.yml)<span class="TextRun SCXW6182031 BCX8" data-contrast="auto" lang="EN-US" xml:lang="EN-US"><span class="NormalTextRun SCXW6182031 BCX8">.</span></span><span class="EOP SCXW6182031 BCX8" data-ccp-props="{"201341983":0,"335559739":160,"335559740":259}"> </span>

</div><div class="ListContainerWrapper SCXW6182031 BCX8">3. [<span class="TextRun Underlined SCXW6182031 BCX8" data-contrast="none" lang="EN-US" xml:lang="EN-US"><span class="NormalTextRun SCXW6182031 BCX8" data-ccp-charstyle="Hyperlink">Configure the YAML file for the Beat</span></span>](https://support.1password.com/events-reporting-elastic/#appendix-elastic-beat-yaml-file-schema)<span class="TextRun SCXW6182031 BCX8" data-contrast="auto" lang="EN-US" xml:lang="EN-US"><span class="NormalTextRun SCXW6182031 BCX8"> to include:</span></span><span class="EOP SCXW6182031 BCX8" data-ccp-props="{"201341983":0,"335559739":160,"335559740":259}"> </span>

</div><div class="ListContainerWrapper SCXW6182031 BCX8">- <span class="TextRun SCXW6182031 BCX8" data-contrast="auto" lang="EN-US" xml:lang="EN-US"><span class="NormalTextRun SCXW6182031 BCX8">The bearer token you saved previously in the </span><span class="NormalTextRun SpellingErrorV2Themed SCXW6182031 BCX8">auth\_token</span><span class="NormalTextRun SCXW6182031 BCX8"> fields for each </span></span>[<span class="TextRun Underlined SCXW6182031 BCX8" data-contrast="none" lang="EN-US" xml:lang="EN-US"><span class="NormalTextRun SCXW6182031 BCX8" data-ccp-charstyle="Hyperlink">1Password event type</span></span>](https://support.1password.com/events-reporting-elastic/#appendix-list-of-1password-event-types)<span class="TextRun SCXW6182031 BCX8" data-contrast="auto" lang="EN-US" xml:lang="EN-US"><span class="NormalTextRun SCXW6182031 BCX8"> you plan to </span><span class="NormalTextRun SCXW6182031 BCX8">monitor</span><span class="NormalTextRun SCXW6182031 BCX8">.</span></span><span class="EOP SCXW6182031 BCX8" data-ccp-props="{"201341983":0,"335559739":160,"335559740":259}"> </span>
- <span class="TextRun SCXW6182031 BCX8" data-contrast="auto" lang="EN-US" xml:lang="EN-US"><span class="NormalTextRun SCXW6182031 BCX8">The output for events (sent directly to Elasticsearch, or through Logstash).</span></span><span class="EOP SCXW6182031 BCX8" data-ccp-props="{"201341983":0,"335559739":160,"335559740":259}"> </span>
- <span class="TextRun SCXW6182031 BCX8" data-contrast="auto" lang="EN-US" xml:lang="EN-US"><span class="NormalTextRun SCXW6182031 BCX8">Any other configurations you want to customize.</span></span><span class="EOP SCXW6182031 BCX8" data-ccp-props="{"201341983":0,"335559739":160,"335559740":259}"> </span>

</div><div class="ListContainerWrapper SCXW6182031 BCX8">4. <span class="TextRun SCXW6182031 BCX8" data-contrast="none" lang="EN-US" xml:lang="EN-US"><span class="NormalTextRun SCXW6182031 BCX8" data-ccp-parastyle="Normal (Web)">Run the following command</span><span class="NormalTextRun ContextualSpellingAndGrammarErrorV2Themed SCXW6182031 BCX8" data-ccp-parastyle="Normal (Web)">:</span> </span><span class="TextRun SCXW6182031 BCX8" data-contrast="none" lang="EN-US" xml:lang="EN-US"><span class="NormalTextRun ContextualSpellingAndGrammarErrorV2Themed SCXW6182031 BCX8" data-ccp-charstyle="HTML Code">.</span><span class="NormalTextRun SCXW6182031 BCX8" data-ccp-charstyle="HTML Code">/</span><span class="NormalTextRun SpellingErrorV2Themed SCXW6182031 BCX8" data-ccp-charstyle="HTML Code">eventsapibeat</span><span class="NormalTextRun SCXW6182031 BCX8" data-ccp-charstyle="HTML Code"> -c </span><span class="NormalTextRun SpellingErrorV2Themed SCXW6182031 BCX8" data-ccp-charstyle="HTML Code">eventsapibeat.yml</span><span class="NormalTextRun SCXW6182031 BCX8" data-ccp-charstyle="HTML Code"> -e</span></span><span class="EOP SCXW6182031 BCX8" data-ccp-props="{"134233117":false,"134233118":false,"201341983":2,"335557856":16777215,"335559738":0,"335559739":312,"335559740":384}"> </span>

</div></div><span class="TextRun SCXW6182031 BCX8" data-contrast="none" lang="EN-US" xml:lang="EN-US"><span class="NormalTextRun SCXW6182031 BCX8" data-ccp-parastyle="Normal (Web)">You can now use Elasticsearch with the 1Password Events API Beat to </span><span class="NormalTextRun SCXW6182031 BCX8" data-ccp-parastyle="Normal (Web)">monitor</span><span class="NormalTextRun SCXW6182031 BCX8" data-ccp-parastyle="Normal (Web)"> events from your 1Password account. The returned data will follow the </span></span>[<span class="TextRun Underlined SCXW6182031 BCX8" data-contrast="none" lang="EN-US" xml:lang="EN-US"><span class="NormalTextRun SCXW6182031 BCX8" data-ccp-charstyle="Hyperlink">Elastic Common Schema (ECS)</span></span>](https://support.1password.com/events-reporting-elastic/#appendix-elastic-common-schema)<span class="TextRun SCXW6182031 BCX8" data-contrast="none" lang="EN-US" xml:lang="EN-US"><span class="NormalTextRun SCXW6182031 BCX8" data-ccp-parastyle="Normal (Web)"> specifications.</span></span>

##### <span style="color: rgb(53, 152, 219);">**<span class="TextRun SCXW6182031 BCX8" data-contrast="none" lang="EN-US" xml:lang="EN-US"><span class="NormalTextRun SCXW6182031 BCX8" data-ccp-charstyle="eop">Collect events from 1Password Events API</span></span><span class="EOP SCXW6182031 BCX8" data-ccp-props="{"134245418":true,"134245529":true,"201341983":0,"335559685":792,"335559738":240,"335559739":0,"335559740":360}"> </span>**</span>

<div class="SCXW6182031 BCX8" id="bkmrk-url-of-1password-eve"><div class="ListContainerWrapper SCXW6182031 BCX8">1. <span class="TextRun SCXW6182031 BCX8" data-contrast="auto" lang="EN-US" xml:lang="EN-US"><span class="NormalTextRun SCXW6182031 BCX8" data-ccp-charstyle="eop">URL of 1Password Events </span><span class="NormalTextRun SCXW6182031 BCX8" data-ccp-charstyle="eop">API Server</span><span class="NormalTextRun SCXW6182031 BCX8" data-ccp-charstyle="eop"> - </span><span class="NormalTextRun SCXW6182031 BCX8" data-ccp-charstyle="eop">options: https://events.1password.com, https://events.1password.ca, https://events.1password.eu, https://events.ent.1password.com. path is </span><span class="NormalTextRun SCXW6182031 BCX8" data-ccp-charstyle="eop">automatic</span></span><span class="EOP SCXW6182031 BCX8" data-ccp-props="{"201341983":0,"335559685":1800,"335559739":160,"335559740":259}"> </span>

</div><div class="ListContainerWrapper SCXW6182031 BCX8">2. <span class="TextRun SCXW6182031 BCX8" data-contrast="auto" lang="EN-US" xml:lang="EN-US"><span class="NormalTextRun SCXW6182031 BCX8" data-ccp-charstyle="eop">1Password Authorization Token</span><span class="NormalTextRun SCXW6182031 BCX8" data-ccp-charstyle="eop"> - </span><span class="NormalTextRun SCXW6182031 BCX8" data-ccp-charstyle="eop">Bearer Token, </span><span class="NormalTextRun SCXW6182031 BCX8" data-ccp-charstyle="eop">e.g.</span><span class="NormalTextRun SCXW6182031 BCX8" data-ccp-charstyle="eop"> "</span><span class="NormalTextRun SpellingErrorV2Themed SCXW6182031 BCX8" data-ccp-charstyle="eop">eyJhbGciO</span><span class="NormalTextRun SCXW6182031 BCX8" data-ccp-charstyle="eop">..."</span></span><span class="EOP SCXW6182031 BCX8" data-ccp-props="{"201341983":0,"335559685":1800,"335559739":160,"335559740":259}"> </span>

</div></div>

# Active Directory Integrations

##### <span style="color: rgb(53, 152, 219);">**<span class="TextRun SCXW148341486 BCX8" data-contrast="none" lang="EN-US" xml:lang="EN-US"><span class="NormalTextRun SCXW148341486 BCX8" data-ccp-charstyle="Style (Complex) Open Sans" data-ccp-charstyle-defn="{"ObjectId":"e27ea779-7590-4666-9f57-d1cbdda07f5a|29","ClassId":1073872969,"Properties":[469775450,"Style (Complex) Open Sans",201340122,"1",134233614,"true",469778129,"StyleComplexOpenSans",335572020,"1",201342448,"1",469777841,"Open Sans",469777842,"Open Sans",469777843,"Calibri",469777844,"Open Sans",469769226,"Open Sans,Calibri",469778324,"Default Paragraph Font"]}">Introduction</span></span><span class="EOP SCXW148341486 BCX8" data-ccp-props="{"134245418":true,"134245529":true,"201341983":0,"335559738":240,"335559739":0,"335559740":360}"> </span>**</span>

Elastic Stack security features can be configured to authenticate users through Active Directory by using LDAP to communicate with the directory. Active Directory realms are similar to LDAP realms, as they both store users and groups in a hierarchical structure, which includes containers such as organizational units (OU), organizations (O), and domain components (DC).

The security features support authentication based on Active Directory security groups, but not distribution groups. When authenticating users, the username entered must match the sAMAccountName or userPrincipalName, not the common name (cn). The realm authenticates users via an LDAP bind request, searches for their entry in Active Directory, and retrieves their group memberships from the tokenGroups attribute to assign appropriate roles.

---

##### **Requirements**

Elastic Agent must be installed. For more details and installation instructions, please refer to the [Elastic Agent Installation Guide](https://www.elastic.co/guide/en/fleet/current/elastic-agent-installation.html).

**Installing and managing an Elastic Agent:**

There are several options for installing and managing Elastic Agent:

**Install a Fleet-managed Elastic Agent (recommended):**

With this approach, you install Elastic Agent and use Fleet in Kibana to define, configure, and manage your agents in a central location. We recommend using Fleet management because it makes the management and upgrade of your agents considerably easier.

**Install Elastic Agent in standalone mode (advanced users):**

With this approach, you install Elastic Agent and manually configure the agent locally on the system where it’s installed. You are responsible for managing and upgrading the agents. This approach is reserved for advanced users only.

**Install Elastic Agent in a containerized environment:**

You can run Elastic Agent inside a container, either with Fleet Server or standalone. Docker images for all versions of Elastic Agent are available from the Elastic Docker registry, and we provide deployment manifests for running on Kubernetes.

Please note, there are minimum requirements for running Elastic Agent. For more information, refer to the [Elastic Agent Minimum Requirements](https://www.elastic.co/guide/en/fleet/current/elastic-agent-installation.html#elastic-agent-installation-minimum-requirements).

---

##### **How to add configurations to Elastic Integration** 

**I**. **Active Directory Base DN**

- **Definition**: The Base DN (Distinguished Name) specifies the starting point in the Active Directory hierarchy for user and group searches.
- **Format**: It typically represents the container or organizational unit (OU) where your user accounts are located.
- **Example**: If your AD users are in the "Users" OU under the domain "example.com", the Base DN might look like:
    
    
    - `CN=Users,DC=example,DC=com`

**Note:** Refer to Step **I. Active Directory Information Lookup** for information on how to properly setup the configuration.

**II**. **Active Directory URL**

- **Definition**: The URL of your Active Directory server, specifying either an unsecured LDAP or secure LDAPS connection.
- **Format**:
    
    
    - **LDAP (insecure)**: `ldap://your-ad-server.example.com:389`
    - **LDAPS (secure)**: `ldaps://your-ad-server.example.com:636`
- **Example**:
    
    
    - `ldap://ad.example.com:389`

**Note:** Refer to Step **II. Finding Active Directory URL for information on how to properly setup the configuration.

**III**. **Active Directory User**

- **Definition**: The username of the service account that Elastic Stack will use to authenticate and query AD. This account should have sufficient privileges to search for users and groups.
- **Format**:
    
    
    - It can be in the form of a **fully qualified domain username**: `username@example.com`
    - Or a **Distinguished Name (DN)**: `CN=ServiceAccount,OU=ServiceAccounts,DC=example,DC=com`
- **Example**:
    
    
    - `CN=serviceaccount,OU=ServiceAccounts,DC=example,DC=com`

**Note:** Refer to Step **III. Navigate to Users for information on how to properly setup the configuration.

**IV**. **Active Directory User Password**

- **Definition**: The password for the AD user account used for the connection.
- **Example**:
    
    
    - `MySecurePassword123`

---

##### **I. Active Directory Information Lookup** 

Finding the Base DN (Distinguished Name)

Method 1: Using Active Directory GUI

1. Open "Active Directory Users and Computers"

[![image.png](https://cytechint-docs-bookstack.s3.amazonaws.com/uploads/images/gallery/2024-11/scaled-1680-/pLtHwTEyMKdZDnw9-image.png)](https://cytechint-docs-bookstack.s3.amazonaws.com/uploads/images/gallery/2024-11/pLtHwTEyMKdZDnw9-image.png)

2\. Right-click on your domain

[![image.png](https://cytechint-docs-bookstack.s3.amazonaws.com/uploads/images/gallery/2024-11/scaled-1680-/WQMXNjY3mq5AROMI-image.png)](https://cytechint-docs-bookstack.s3.amazonaws.com/uploads/images/gallery/2024-11/WQMXNjY3mq5AROMI-image.png)

3\. Select "Properties"

[![image.png](https://cytechint-docs-bookstack.s3.amazonaws.com/uploads/images/gallery/2024-11/scaled-1680-/wmZeP90KhCJ7G1g5-image.png)](https://cytechint-docs-bookstack.s3.amazonaws.com/uploads/images/gallery/2024-11/wmZeP90KhCJ7G1g5-image.png)

4\. Look for the "Distinguished Name" field

[![image.png](https://cytechint-docs-bookstack.s3.amazonaws.com/uploads/images/gallery/2024-11/scaled-1680-/K4Sbr4VizYM6T31g-image.png)](https://cytechint-docs-bookstack.s3.amazonaws.com/uploads/images/gallery/2024-11/K4Sbr4VizYM6T31g-image.png)

Method 2: Using PowerShell

1. Open PowerShell with administrator privileges
2. Run the command: Get-ADDomain | Select-Object DistinguishedName[![image.png](https://cytechint-docs-bookstack.s3.amazonaws.com/uploads/images/gallery/2024-11/scaled-1680-/vNlVjoxfLr4licpe-image.png)](https://cytechint-docs-bookstack.s3.amazonaws.com/uploads/images/gallery/2024-11/vNlVjoxfLr4licpe-image.png)
3. The output will be in the format: "DC=company,DC=local"

---

##### **II. Finding Active Directory URL**

Method 1: PowerShell

1. Open PowerShell as administrator
2. Run the command: Get-ADDomainController | Select-Object Hostname  
    [![image.png](https://cytechint-docs-bookstack.s3.amazonaws.com/uploads/images/gallery/2024-11/scaled-1680-/4TClLTUnGWNY1GFU-image.png)](https://cytechint-docs-bookstack.s3.amazonaws.com/uploads/images/gallery/2024-11/4TClLTUnGWNY1GFU-image.png)
3. Take the DC name from the output 
    - [LDAP://servername.domain.com](LDAP://servername.domain.com)
    - [LDAP://server-IP](LDAP://server-IP)

---

##### **III. Navigate to Users**

[![image.png](https://cytechint-docs-bookstack.s3.amazonaws.com/uploads/images/gallery/2024-11/scaled-1680-/XvrzZ1bldTcI5OyY-image.png)](https://cytechint-docs-bookstack.s3.amazonaws.com/uploads/images/gallery/2024-11/XvrzZ1bldTcI5OyY-image.png)

[![image.png](https://cytechint-docs-bookstack.s3.amazonaws.com/uploads/images/gallery/2024-11/scaled-1680-/AEO9NavbNuio7GqR-image.png)](https://cytechint-docs-bookstack.s3.amazonaws.com/uploads/images/gallery/2024-11/AEO9NavbNuio7GqR-image.png)

*If you need further assistance, kindly contact our support at <info@cytechint.com> for prompt assistance and guidance.*

# Add Windows Integrations

##### <span style="color: rgb(53, 152, 219);">**<span class="TextRun SCXW206691485 BCX8" data-contrast="none" lang="EN-US" xml:lang="EN-US"><span class="NormalTextRun SCXW206691485 BCX8" data-ccp-charstyle="Style (Complex) Open Sans" data-ccp-charstyle-defn="{"ObjectId":"ef85351c-f9f5-462a-91fc-fb952a059a22|194","ClassId":1073872969,"Properties":[201342446,"1",201342447,"5",201342448,"1",201342449,"1",469777841,"Open Sans",469777842,"Open Sans",469777843,"Calibri",469777844,"Open Sans",201341986,"1",469769226,"Open Sans",268442635,"22",335559704,"1037",335559705,"1033",335551547,"1033",335559740,"259",201341983,"0",335559739,"160",469775450,"Style (Complex) Open Sans",201340122,"1",134233614,"true",469778129,"StyleComplexOpenSans",335572020,"1",469778324,"Default Paragraph Font"]}">Introduction</span></span><span class="EOP SCXW206691485 BCX8" data-ccp-props="{"134245418":true,"134245529":true,"201341983":0,"335559685":720,"335559738":240,"335559739":0,"335559740":360,"469777462":[720],"469777927":[0],"469777928":[8]}"> </span>**</span>

<span class="TextRun SCXW206691485 BCX8" data-contrast="auto" lang="EN-US" xml:lang="EN-US"><span class="NormalTextRun SCXW206691485 BCX8" data-ccp-charstyle="Style (Complex) Open Sans">The Windows integration allows you to </span><span class="NormalTextRun SCXW206691485 BCX8" data-ccp-charstyle="Style (Complex) Open Sans">monitor</span><span class="NormalTextRun SCXW206691485 BCX8" data-ccp-charstyle="Style (Complex) Open Sans"> the </span></span><span class="TextRun Underlined SCXW206691485 BCX8" data-contrast="auto" lang="EN-US" xml:lang="EN-US"><span class="NormalTextRun SCXW206691485 BCX8" data-ccp-charstyle="Style (Complex) Open Sans">Windows</span></span><span class="TextRun SCXW206691485 BCX8" data-contrast="auto" lang="EN-US" xml:lang="EN-US"><span class="NormalTextRun SCXW206691485 BCX8" data-ccp-charstyle="Style (Complex) Open Sans"> OS, services, applications, and more.</span></span><span class="EOP SCXW206691485 BCX8" data-ccp-props="{"201341983":0,"335559685":720,"335559739":160,"335559740":360}"> </span>

<div class="SCXW206691485 BCX8" id="bkmrk-https%3A%2F%2Fdocs.microso"><div class="ListContainerWrapper SCXW206691485 BCX8">- [<span class="TextRun Underlined SCXW206691485 BCX8" data-contrast="none" lang="EN-US" xml:lang="EN-US"><span class="NormalTextRun SCXW206691485 BCX8" data-ccp-charstyle="Hyperlink">https://docs.microsoft.com/</span></span>](https://docs.microsoft.com/)<span class="EOP SCXW206691485 BCX8" data-ccp-props="{"201341983":0,"335559739":160,"335559740":360}"> </span>

</div></div><span class="TextRun SCXW206691485 BCX8" data-contrast="auto" lang="EN-US" xml:lang="EN-US"><span class="NormalTextRun SCXW206691485 BCX8" data-ccp-charstyle="Style (Complex) Open Sans">Use </span><span class="NormalTextRun ContextualSpellingAndGrammarErrorV2Themed SCXW206691485 BCX8" data-ccp-charstyle="Style (Complex) Open Sans">the Windows</span><span class="NormalTextRun SCXW206691485 BCX8" data-ccp-charstyle="Style (Complex) Open Sans"> integration to collect metrics and logs from your machine. Then visualize that data in Kibana, create alerts to </span><span class="NormalTextRun SCXW206691485 BCX8" data-ccp-charstyle="Style (Complex) Open Sans">notify you</span><span class="NormalTextRun SCXW206691485 BCX8" data-ccp-charstyle="Style (Complex) Open Sans"> if something goes wrong, and reference data when troubleshooting an issue.</span></span><span class="EOP SCXW206691485 BCX8" data-ccp-props="{"201341983":0,"335559685":720,"335559739":160,"335559740":360}"> </span>

<span class="TextRun SCXW206691485 BCX8" data-contrast="auto" lang="EN-US" xml:lang="EN-US"><span class="NormalTextRun SCXW206691485 BCX8" data-ccp-charstyle="Style (Complex) Open Sans">For example, if you wanted to know if a Windows service unexpectedly stops running, you could install </span><span class="NormalTextRun ContextualSpellingAndGrammarErrorV2Themed SCXW206691485 BCX8" data-ccp-charstyle="Style (Complex) Open Sans">the Windows</span><span class="NormalTextRun SCXW206691485 BCX8" data-ccp-charstyle="Style (Complex) Open Sans"> integration to send service metrics to Elastic. Then, you could view real-time changes to service status in Kibana's \[Metrics Windows\] Services dashboard.</span></span><span class="EOP SCXW206691485 BCX8" data-ccp-props="{"201341983":0,"335559685":720,"335559739":160,"335559740":360}"> </span>

##### <span style="color: rgb(53, 152, 219);">**<span class="TextRun SCXW206691485 BCX8" data-contrast="auto" lang="EN-US" xml:lang="EN-US"><span class="NormalTextRun SCXW206691485 BCX8" data-ccp-charstyle="Style (Complex) Open Sans">Data streams</span></span><span class="EOP SCXW206691485 BCX8" data-ccp-props="{"201341983":0,"335559685":720,"335559739":160,"335559740":360}"> </span>**</span>

<span class="TextRun SCXW206691485 BCX8" data-contrast="auto" lang="EN-US" xml:lang="EN-US"><span class="NormalTextRun SCXW206691485 BCX8" data-ccp-charstyle="Style (Complex) Open Sans">The Windows integration collects two types of data: logs and metrics.</span></span><span class="EOP SCXW206691485 BCX8" data-ccp-props="{"201341983":0,"335559685":720,"335559739":160,"335559740":360}"> </span>

<span class="TextRun SCXW206691485 BCX8" data-contrast="auto" lang="EN-US" xml:lang="EN-US"><span class="NormalTextRun SCXW206691485 BCX8" data-ccp-charstyle="Style (Complex) Open Sans">Logs help you keep a record of events that happen on your machine. Log data streams collected by </span><span class="NormalTextRun ContextualSpellingAndGrammarErrorV2Themed SCXW206691485 BCX8" data-ccp-charstyle="Style (Complex) Open Sans">the Windows</span><span class="NormalTextRun SCXW206691485 BCX8" data-ccp-charstyle="Style (Complex) Open Sans"> integration include forwarded events, PowerShell events, and Sysmon events. Log collection for the Security, Application, and System event logs is handled by the System integration. See more details in the </span></span><span class="TextRun Underlined SCXW206691485 BCX8" data-contrast="auto" lang="EN-US" xml:lang="EN-US"><span class="NormalTextRun SCXW206691485 BCX8" data-ccp-charstyle="Style (Complex) Open Sans">Logs reference</span></span><span class="TextRun SCXW206691485 BCX8" data-contrast="auto" lang="EN-US" xml:lang="EN-US"><span class="NormalTextRun SCXW206691485 BCX8" data-ccp-charstyle="Style (Complex) Open Sans">.</span></span><span class="EOP SCXW206691485 BCX8" data-ccp-props="{"201341983":0,"335559685":720,"335559739":160,"335559740":360}"> </span>

<div class="SCXW206691485 BCX8" id="bkmrk-https%3A%2F%2Faquila-elk.k"><div class="ListContainerWrapper SCXW206691485 BCX8">- <span class="TextRun SCXW206691485 BCX8" data-contrast="auto" lang="EN-US" xml:lang="EN-US"><span class="NormalTextRun SCXW206691485 BCX8" data-ccp-charstyle="Style (Complex) Open Sans">https://aquila-elk.kb.us-east-1.aws.found.io:9243/app/integrations/detail/windows-1.15.2/overview#logs-reference</span></span><span class="EOP SCXW206691485 BCX8" data-ccp-props="{"201341983":0,"335559739":160,"335559740":360}"> </span>

</div></div><span class="TextRun SCXW206691485 BCX8" data-contrast="auto" lang="EN-US" xml:lang="EN-US"><span class="NormalTextRun SCXW206691485 BCX8" data-ccp-charstyle="Style (Complex) Open Sans">Metrics give </span><span class="NormalTextRun ContextualSpellingAndGrammarErrorV2Themed SCXW206691485 BCX8" data-ccp-charstyle="Style (Complex) Open Sans">you</span><span class="NormalTextRun SCXW206691485 BCX8" data-ccp-charstyle="Style (Complex) Open Sans"> insight into the state of the machine. Metric data streams collected by the Windows integration include service details and performance counter values. See more details in the </span></span><span class="TextRun Underlined SCXW206691485 BCX8" data-contrast="auto" lang="EN-US" xml:lang="EN-US"><span class="NormalTextRun SCXW206691485 BCX8" data-ccp-charstyle="Style (Complex) Open Sans">Metrics reference</span></span><span class="TextRun SCXW206691485 BCX8" data-contrast="auto" lang="EN-US" xml:lang="EN-US"><span class="NormalTextRun SCXW206691485 BCX8" data-ccp-charstyle="Style (Complex) Open Sans">.</span></span><span class="EOP SCXW206691485 BCX8" data-ccp-props="{"201341983":0,"335559685":720,"335559739":160,"335559740":360}"> </span>

<div class="SCXW206691485 BCX8" id="bkmrk-https%3A%2F%2Faquila-elk.k-1"><div class="ListContainerWrapper SCXW206691485 BCX8">- [<span class="TextRun Underlined SCXW206691485 BCX8" data-contrast="none" lang="EN-US" xml:lang="EN-US"><span class="NormalTextRun SCXW206691485 BCX8" data-ccp-charstyle="Hyperlink">https://aquila-elk.kb.us-east-1.aws.found.io:9243/app/integrations/detail/windows-1.15.2/overview#metrics-reference</span></span>](https://aquila-elk.kb.us-east-1.aws.found.io:9243/app/integrations/detail/windows-1.15.2/overview#metrics-reference)<span class="EOP SCXW206691485 BCX8" data-ccp-props="{"201341983":0,"335559739":160,"335559740":360}"> </span>

</div></div><span class="TextRun SCXW206691485 BCX8" data-contrast="auto" lang="EN-US" xml:lang="EN-US"><span class="NormalTextRun SCXW206691485 BCX8" data-ccp-charstyle="Style (Complex) Open Sans">Note: For 7.11, security, application and system logs have been moved to the system package.</span></span><span class="EOP SCXW206691485 BCX8" data-ccp-props="{"201341983":0,"335559685":720,"335559739":160,"335559740":360}"> </span>

<span class="EOP SCXW206691485 BCX8" data-ccp-props="{"201341983":0,"335559739":160,"335559740":259,"469777462":[1331],"469777927":[0],"469777928":[1]}"> </span>

##### <span style="color: rgb(53, 152, 219);">**<span class="TextRun SCXW206691485 BCX8" data-contrast="none" lang="EN-US" xml:lang="EN-US"><span class="NormalTextRun SCXW206691485 BCX8" data-ccp-charstyle="Style (Complex) Open Sans">Assumptions</span></span><span class="EOP SCXW206691485 BCX8" data-ccp-props="{"134245418":true,"134245529":true,"201341983":0,"335559685":720,"335559738":240,"335559739":0,"335559740":360,"469777462":[720],"469777927":[0],"469777928":[8]}"> </span>**</span>

<span class="TextRun SCXW206691485 BCX8" data-contrast="auto" lang="EN-US" xml:lang="EN-US"><span class="NormalTextRun SCXW206691485 BCX8" data-ccp-charstyle="Style (Complex) Open Sans">The procedures described in Section 3 </span><span class="NormalTextRun ContextualSpellingAndGrammarErrorV2Themed SCXW206691485 BCX8" data-ccp-charstyle="Style (Complex) Open Sans">assumes</span><span class="NormalTextRun SCXW206691485 BCX8" data-ccp-charstyle="Style (Complex) Open Sans"> that a Log Collector has already been </span><span class="NormalTextRun ContextualSpellingAndGrammarErrorV2Themed SCXW206691485 BCX8" data-ccp-charstyle="Style (Complex) Open Sans">setup</span><span class="NormalTextRun SCXW206691485 BCX8" data-ccp-charstyle="Style (Complex) Open Sans">. </span></span><span class="EOP SCXW206691485 BCX8" data-ccp-props="{"201341983":0,"335559685":720,"335559739":160,"335559740":360}"> </span>

##### <span style="color: rgb(53, 152, 219);">**<span class="TextRun SCXW206691485 BCX8" data-contrast="none" lang="EN-US" xml:lang="EN-US"><span class="NormalTextRun SCXW206691485 BCX8" data-ccp-charstyle="Style (Complex) Open Sans">Requirements</span></span><span class="EOP SCXW206691485 BCX8" data-ccp-props="{"134245418":true,"134245529":true,"201341983":0,"335559685":720,"335559738":240,"335559739":0,"335559740":360,"469777462":[720],"469777927":[0],"469777928":[8]}"> </span>**</span>

<span class="TextRun SCXW206691485 BCX8" data-contrast="auto" lang="EN-US" xml:lang="EN-US"><span class="NormalTextRun SCXW206691485 BCX8" data-ccp-charstyle="Style (Complex) Open Sans">You need Elasticsearch for storing and searching your data and Kibana for visualizing and managing it. You can use our hosted Elasticsearch Service on Elastic Cloud, which is recommended, or self-manage the Elastic Stack on your own </span><span class="NormalTextRun SCXW206691485 BCX8" data-ccp-charstyle="Style (Complex) Open Sans">hardware.</span></span><span class="EOP SCXW206691485 BCX8" data-ccp-props="{"201341983":0,"335559685":720,"335559739":160,"335559740":360}"> </span>

<span class="TextRun SCXW206691485 BCX8" data-contrast="auto" lang="EN-US" xml:lang="EN-US"><span class="NormalTextRun SCXW206691485 BCX8" data-ccp-charstyle="Style (Complex) Open Sans">Each data stream collects </span><span class="NormalTextRun SCXW206691485 BCX8" data-ccp-charstyle="Style (Complex) Open Sans">different kinds</span><span class="NormalTextRun SCXW206691485 BCX8" data-ccp-charstyle="Style (Complex) Open Sans"> of metric data, which may require dedicated permissions to be fetched and which may vary across operating systems.</span></span><span class="EOP SCXW206691485 BCX8" data-ccp-props="{"201341983":0,"335559685":720,"335559739":160,"335559740":360}"> </span>

**<span class="TextRun SCXW206691485 BCX8" data-contrast="auto" lang="EN-US" xml:lang="EN-US"><span class="NormalTextRun SCXW206691485 BCX8" data-ccp-charstyle="Style (Complex) Open Sans">Setup</span></span><span class="EOP SCXW206691485 BCX8" data-ccp-props="{"201341983":0,"335559685":720,"335559739":160,"335559740":360}"> </span>**

<span class="TextRun SCXW206691485 BCX8" data-contrast="auto" lang="EN-US" xml:lang="EN-US"><span class="NormalTextRun SCXW206691485 BCX8" data-ccp-charstyle="Style (Complex) Open Sans">For step-by-step instructions on how to set up an integration, see the </span></span><span class="TextRun Underlined SCXW206691485 BCX8" data-contrast="auto" lang="EN-US" xml:lang="EN-US"><span class="NormalTextRun SCXW206691485 BCX8" data-ccp-charstyle="Style (Complex) Open Sans">Getting started</span></span><span class="TextRun SCXW206691485 BCX8" data-contrast="auto" lang="EN-US" xml:lang="EN-US"><span class="NormalTextRun SCXW206691485 BCX8" data-ccp-charstyle="Style (Complex) Open Sans"> guide.</span></span><span class="EOP SCXW206691485 BCX8" data-ccp-props="{"201341983":0,"335559685":720,"335559739":160,"335559740":360}"> </span>

<div class="SCXW206691485 BCX8" id="bkmrk-https%3A%2F%2Fwww.elastic."><div class="ListContainerWrapper SCXW206691485 BCX8">- [<span class="TextRun Underlined SCXW206691485 BCX8" data-contrast="none" lang="EN-US" xml:lang="EN-US"><span class="NormalTextRun SCXW206691485 BCX8" data-ccp-charstyle="Hyperlink">https://www.elastic.co/guide/en/welcome-to-elastic/current/getting-started-observability.html</span></span>](https://www.elastic.co/guide/en/welcome-to-elastic/current/getting-started-observability.html)<span class="EOP SCXW206691485 BCX8" data-ccp-props="{"201341983":0,"335559739":160,"335559740":360}"> </span>

</div></div><span class="TextRun SCXW206691485 BCX8" data-contrast="auto" lang="EN-US" xml:lang="EN-US"><span class="NormalTextRun SCXW206691485 BCX8" data-ccp-charstyle="Style (Complex) Open Sans">Note: Because the Windows integration always applies to the local server, the hosts config </span><span class="NormalTextRun SCXW206691485 BCX8" data-ccp-charstyle="Style (Complex) Open Sans">option</span><span class="NormalTextRun SCXW206691485 BCX8" data-ccp-charstyle="Style (Complex) Open Sans"> is not needed.</span></span><span class="EOP SCXW206691485 BCX8" data-ccp-props="{"201341983":0,"335559685":720,"335559739":160,"335559740":360}"> </span>

##### <span style="color: rgb(53, 152, 219);">**<span class="TextRun SCXW206691485 BCX8" data-contrast="auto" lang="EN-US" xml:lang="EN-US"><span class="NormalTextRun SCXW206691485 BCX8" data-ccp-charstyle="Style (Complex) Open Sans">Ingesting Windows Events via Splunk</span></span><span class="EOP SCXW206691485 BCX8" data-ccp-props="{"201341983":0,"335559685":720,"335559739":160,"335559740":360}"> </span>**</span>

<span class="TextRun SCXW206691485 BCX8" data-contrast="auto" lang="EN-US" xml:lang="EN-US"><span class="NormalTextRun SCXW206691485 BCX8" data-ccp-charstyle="Style (Complex) Open Sans">This integration allows you to seamlessly ingest data from a Splunk Enterprise instance. The integration uses the </span></span><span class="TextRun Underlined SCXW206691485 BCX8" data-contrast="auto" lang="EN-US" xml:lang="EN-US"><span class="NormalTextRun SpellingErrorV2Themed SCXW206691485 BCX8" data-ccp-charstyle="Style (Complex) Open Sans">httpjson</span><span class="NormalTextRun SCXW206691485 BCX8" data-ccp-charstyle="Style (Complex) Open Sans"> input</span></span><span class="TextRun SCXW206691485 BCX8" data-contrast="auto" lang="EN-US" xml:lang="EN-US"><span class="NormalTextRun SCXW206691485 BCX8" data-ccp-charstyle="Style (Complex) Open Sans"> in Elastic Agent to run a Splunk search via the Splunk REST API and then extract the raw event from the results. The raw event is then processed via the Elastic Agent. You can customize both the Splunk search query and the interval between searches. For more information see </span></span><span class="TextRun Underlined SCXW206691485 BCX8" data-contrast="auto" lang="EN-US" xml:lang="EN-US"><span class="NormalTextRun SCXW206691485 BCX8" data-ccp-charstyle="Style (Complex) Open Sans">Ingest data from Splunk</span></span><span class="TextRun SCXW206691485 BCX8" data-contrast="auto" lang="EN-US" xml:lang="EN-US"><span class="NormalTextRun SCXW206691485 BCX8" data-ccp-charstyle="Style (Complex) Open Sans">.</span></span><span class="EOP SCXW206691485 BCX8" data-ccp-props="{"201341983":0,"335559685":720,"335559739":160,"335559740":360}"> </span>

<div class="SCXW206691485 BCX8" id="bkmrk-https%3A%2F%2Fwww.elastic.-1"><div class="ListContainerWrapper SCXW206691485 BCX8">- [<span class="TextRun Underlined SCXW206691485 BCX8" data-contrast="none" lang="EN-US" xml:lang="EN-US"><span class="NormalTextRun SCXW206691485 BCX8" data-ccp-charstyle="Hyperlink">https://www.elastic.co/guide/en/beats/filebeat/current/filebeat-input-httpjson.html</span></span>](https://www.elastic.co/guide/en/beats/filebeat/current/filebeat-input-httpjson.html)<span class="EOP SCXW206691485 BCX8" data-ccp-props="{"201341983":0,"335559739":160,"335559740":360}"> </span>
- [<span class="TextRun Underlined SCXW206691485 BCX8" data-contrast="none" lang="EN-US" xml:lang="EN-US"><span class="NormalTextRun SCXW206691485 BCX8" data-ccp-charstyle="Hyperlink">https://www.elastic.co/guide/en/observability/current/ingest-splunk.html</span></span>](https://www.elastic.co/guide/en/observability/current/ingest-splunk.html) <span class="EOP SCXW206691485 BCX8" data-ccp-props="{"201341983":0,"335559685":1440,"335559739":160,"335559740":360}"> </span>

</div></div><span class="TextRun SCXW206691485 BCX8" data-contrast="auto" lang="EN-US" xml:lang="EN-US"><span class="NormalTextRun SCXW206691485 BCX8" data-ccp-charstyle="Style (Complex) Open Sans">Note: This integration requires Windows Events from Splunk to be in XML format. To achieve this, </span><span class="NormalTextRun SpellingErrorV2Themed SCXW206691485 BCX8" data-ccp-charstyle="Style (Complex) Open Sans">renderXml</span><span class="NormalTextRun SCXW206691485 BCX8" data-ccp-charstyle="Style (Complex) Open Sans"> needs to be set to 1 in your </span><span class="NormalTextRun SpellingErrorV2Themed SCXW206691485 BCX8" data-ccp-charstyle="Style (Complex) Open Sans">inputs.conf</span><span class="NormalTextRun SCXW206691485 BCX8" data-ccp-charstyle="Style (Complex) Open Sans"> file.</span></span><span class="EOP SCXW206691485 BCX8" data-ccp-props="{"201341983":0,"335559685":720,"335559739":160,"335559740":360}"> </span>

##### <span style="color: rgb(53, 152, 219);">**<span class="TextRun SCXW206691485 BCX8" data-contrast="auto" lang="EN-US" xml:lang="EN-US"><span class="NormalTextRun SCXW206691485 BCX8" data-ccp-charstyle="Style (Complex) Open Sans">Logs reference</span></span><span class="EOP SCXW206691485 BCX8" data-ccp-props="{"201341983":0,"335559685":720,"335559739":160,"335559740":360}"> </span>**</span>

**<span class="TextRun SCXW206691485 BCX8" data-contrast="auto" lang="EN-US" xml:lang="EN-US"><span class="NormalTextRun SCXW206691485 BCX8" data-ccp-charstyle="Style (Complex) Open Sans">Forwarded</span></span><span class="EOP SCXW206691485 BCX8" data-ccp-props="{"201341983":0,"335559685":720,"335559739":160,"335559740":360}"> </span>**

<span class="TextRun SCXW206691485 BCX8" data-contrast="auto" lang="EN-US" xml:lang="EN-US"><span class="NormalTextRun SCXW206691485 BCX8" data-ccp-charstyle="Style (Complex) Open Sans">The Windows forwarded data stream provides events from the Windows </span><span class="NormalTextRun SpellingErrorV2Themed SCXW206691485 BCX8" data-ccp-charstyle="Style (Complex) Open Sans">ForwardedEvents</span><span class="NormalTextRun SCXW206691485 BCX8" data-ccp-charstyle="Style (Complex) Open Sans"> event log. The fields will be the same as the channel specific data streams.</span></span><span class="EOP SCXW206691485 BCX8" data-ccp-props="{"201341983":0,"335559685":720,"335559739":160,"335559740":360}"> </span>

**<span class="TextRun SCXW206691485 BCX8" data-contrast="auto" lang="EN-US" xml:lang="EN-US"><span class="NormalTextRun SpellingErrorV2Themed SCXW206691485 BCX8" data-ccp-charstyle="Style (Complex) Open Sans">Powershell</span></span><span class="EOP SCXW206691485 BCX8" data-ccp-props="{"201341983":0,"335559685":720,"335559739":160,"335559740":360}"> </span>**

<span class="TextRun SCXW206691485 BCX8" data-contrast="auto" lang="EN-US" xml:lang="EN-US"><span class="NormalTextRun SCXW206691485 BCX8" data-ccp-charstyle="Style (Complex) Open Sans">The Windows </span><span class="NormalTextRun SpellingErrorV2Themed SCXW206691485 BCX8" data-ccp-charstyle="Style (Complex) Open Sans">powershell</span><span class="NormalTextRun SCXW206691485 BCX8" data-ccp-charstyle="Style (Complex) Open Sans"> data stream provides events from the Windows </span><span class="NormalTextRun SpellingErrorV2Themed SCXW206691485 BCX8" data-ccp-charstyle="Style (Complex) Open Sans">Windows</span><span class="NormalTextRun SCXW206691485 BCX8" data-ccp-charstyle="Style (Complex) Open Sans"> PowerShell event log.</span></span><span class="EOP SCXW206691485 BCX8" data-ccp-props="{"201341983":0,"335559685":720,"335559739":160,"335559740":360}"> </span>

##### <span style="color: rgb(53, 152, 219);">**<span class="TextRun SCXW206691485 BCX8" data-contrast="none" lang="EN-US" xml:lang="EN-US"><span class="NormalTextRun SCXW206691485 BCX8" data-ccp-charstyle="Style (Complex) Open Sans">System Integration Procedures</span></span><span class="EOP SCXW206691485 BCX8" data-ccp-props="{"134245418":true,"134245529":true,"201341983":0,"335559685":720,"335559738":240,"335559739":0,"335559740":360,"469777462":[720],"469777927":[0],"469777928":[8]}"> </span>**</span>

<span class="TextRun SCXW206691485 BCX8" data-contrast="none" lang="EN-US" xml:lang="EN-US">**<span class="NormalTextRun SCXW206691485 BCX8" data-ccp-parastyle="heading 3">Collect events from the following Windows event log channels:</span><span class="NormalTextRun SCXW206691485 BCX8" data-ccp-parastyle="heading 3"> (Enable Yes/No)</span>**</span>**<span class="EOP SCXW206691485 BCX8" data-ccp-props="{"134245418":true,"134245529":true,"201341983":0,"335559685":720,"335559738":40,"335559739":0,"335559740":360}"> </span>**

<div class="SCXW206691485 BCX8" id="bkmrk-preserve-original-ev"><div class="ListContainerWrapper SCXW206691485 BCX8">1. <span class="TextRun SCXW206691485 BCX8" data-contrast="auto" lang="EN-US" xml:lang="EN-US"><span class="NormalTextRun SCXW206691485 BCX8">Preserve original event</span><span class="NormalTextRun SCXW206691485 BCX8"> (Enable Yes/No)</span></span><span class="EOP SCXW206691485 BCX8" data-ccp-props="{"201341983":0,"335559739":160,"335559740":360}"> </span>

</div><div class="ListContainerWrapper SCXW206691485 BCX8">- <span class="TextRun SCXW206691485 BCX8" data-contrast="auto" lang="EN-US" xml:lang="EN-US"><span class="NormalTextRun SCXW206691485 BCX8">Preserves a raw copy of the original XML event, added to the field </span><span class="NormalTextRun SpellingErrorV2Themed SCXW206691485 BCX8">event.original</span></span><span class="EOP SCXW206691485 BCX8" data-ccp-props="{"201341983":0,"335559739":160,"335559740":360}"> </span>

</div><div class="ListContainerWrapper SCXW206691485 BCX8">2. <span class="TextRun SCXW206691485 BCX8" data-contrast="auto" lang="EN-US" xml:lang="EN-US"><span class="NormalTextRun SCXW206691485 BCX8">Event ID</span></span><span class="EOP SCXW206691485 BCX8" data-ccp-props="{"201341983":0,"335559739":160,"335559740":360}"> </span>

</div><div class="ListContainerWrapper SCXW206691485 BCX8">- <span class="TextRun SCXW206691485 BCX8" data-contrast="auto" lang="EN-US" xml:lang="EN-US"><span class="NormalTextRun SCXW206691485 BCX8">A list of included and excluded (blocked) event IDs. The value is a comma-separated list. The accepted values are single event IDs to include (</span><span class="NormalTextRun SCXW206691485 BCX8">e.g.</span><span class="NormalTextRun SCXW206691485 BCX8"> 4624), a range of event IDs to include (</span><span class="NormalTextRun SCXW206691485 BCX8">e.g.</span><span class="NormalTextRun SCXW206691485 BCX8"> 4700-4800), and single event IDs to exclude (</span><span class="NormalTextRun SCXW206691485 BCX8">e.g.</span><span class="NormalTextRun SCXW206691485 BCX8"> -4735). Limit 22 IDs.</span></span><span class="EOP SCXW206691485 BCX8" data-ccp-props="{"201341983":0,"335559739":160,"335559740":360}"> </span>

</div><div class="ListContainerWrapper SCXW206691485 BCX8">3. <span class="TextRun SCXW206691485 BCX8" data-contrast="auto" lang="EN-US" xml:lang="EN-US"><span class="NormalTextRun SCXW206691485 BCX8">Ignore events older than</span></span><span class="EOP SCXW206691485 BCX8" data-ccp-props="{"201341983":0,"335559739":160,"335559740":360}"> </span>

</div><div class="ListContainerWrapper SCXW206691485 BCX8">- <span class="TextRun SCXW206691485 BCX8" data-contrast="auto" lang="EN-US" xml:lang="EN-US"><span class="NormalTextRun SCXW206691485 BCX8">If this </span><span class="NormalTextRun SCXW206691485 BCX8">option</span><span class="NormalTextRun SCXW206691485 BCX8"> is specified, events that are older than the specified amount of time are ignored. Valid time units are "ns", "us" (or "µs"), "</span><span class="NormalTextRun SpellingErrorV2Themed SCXW206691485 BCX8">ms</span><span class="NormalTextRun SCXW206691485 BCX8">", "s", "m", "h".</span></span><span class="EOP SCXW206691485 BCX8" data-ccp-props="{"201341983":0,"335559739":160,"335559740":360}"> </span>

</div><div class="ListContainerWrapper SCXW206691485 BCX8">4. <span class="TextRun SCXW206691485 BCX8" data-contrast="auto" lang="EN-US" xml:lang="EN-US"><span class="NormalTextRun SCXW206691485 BCX8">Language ID</span></span><span class="EOP SCXW206691485 BCX8" data-ccp-props="{"201341983":0,"335559739":160,"335559740":360}"> </span>

</div></div><div class="SCXW206691485 BCX8" id="bkmrk-the-language-id-the-"><div class="ListContainerWrapper SCXW206691485 BCX8">- <span class="TextRun SCXW206691485 BCX8" data-contrast="auto" lang="EN-US" xml:lang="EN-US"><span class="NormalTextRun SCXW206691485 BCX8">The language ID the events will be </span><span class="NormalTextRun SCXW206691485 BCX8">rendered</span><span class="NormalTextRun SCXW206691485 BCX8"> in. The language will be forced regardless of the system language. A complete list of language IDs can be found https://docs.microsoft.com/en-us/openspecs/windows\_protocols/ms-lcid/a9eac961-e77d-41a6-90a5-ce1a8b0cdb9c\[here\]. It defaults to 0, which </span><span class="NormalTextRun SCXW206691485 BCX8">indicates</span><span class="NormalTextRun SCXW206691485 BCX8"> to use the system language. E.g.: 0x0409 for </span><span class="NormalTextRun SpellingErrorV2Themed SCXW206691485 BCX8">en</span><span class="NormalTextRun SCXW206691485 BCX8">-US</span></span><span class="EOP SCXW206691485 BCX8" data-ccp-props="{"201341983":0,"335559739":160,"335559740":360}"> </span>

</div><div class="ListContainerWrapper SCXW206691485 BCX8">5. <span class="TextRun SCXW206691485 BCX8" data-contrast="auto" lang="EN-US" xml:lang="EN-US"><span class="NormalTextRun SCXW206691485 BCX8">Tags</span></span><span class="EOP SCXW206691485 BCX8" data-ccp-props="{"201341983":0,"335559739":160,"335559740":360}"> </span>

</div><div class="ListContainerWrapper SCXW206691485 BCX8">6. <span class="TextRun SCXW206691485 BCX8" data-contrast="auto" lang="EN-US" xml:lang="EN-US"><span class="NormalTextRun SCXW206691485 BCX8">Processors</span></span><span class="EOP SCXW206691485 BCX8" data-ccp-props="{"201341983":0,"335559739":160,"335559740":360}"> </span>

</div><div class="ListContainerWrapper SCXW206691485 BCX8">- <span class="TextRun SCXW206691485 BCX8" data-contrast="auto" lang="EN-US" xml:lang="EN-US"><span class="NormalTextRun SCXW206691485 BCX8">Processors are used to reduce the number of fields in the exported event or to enhance the event with metadata. This executes in the agent before the logs are parsed. See Processors for details.</span></span><span class="EOP SCXW206691485 BCX8" data-ccp-props="{"201341983":0,"335559739":160,"335559740":360}"> </span>

</div><div class="ListContainerWrapper SCXW206691485 BCX8">7. <span class="TextRun SCXW206691485 BCX8" data-contrast="auto" lang="EN-US" xml:lang="EN-US"><span class="NormalTextRun SCXW206691485 BCX8">Synthetic source</span><span class="NormalTextRun SCXW206691485 BCX8"> (Enable Yes/No)</span></span><span class="EOP SCXW206691485 BCX8" data-ccp-props="{"201341983":0,"335559739":160,"335559740":360}"> </span>

</div></div>##### <span style="color: rgb(53, 152, 219);"><span class="TextRun SCXW206691485 BCX8" data-contrast="none" lang="EN-US" xml:lang="EN-US">**<span class="NormalTextRun SpellingErrorV2Themed SCXW206691485 BCX8" data-ccp-parastyle="heading 3">Powershell</span><span class="NormalTextRun SCXW206691485 BCX8" data-ccp-parastyle="heading 3"> (Enable Yes/No)</span>**</span>**<span class="EOP SCXW206691485 BCX8" data-ccp-props="{"134245418":true,"134245529":true,"201341983":0,"335559685":720,"335559738":40,"335559739":0,"335559740":360}"> </span>**</span>

<div class="SCXW206691485 BCX8" id="bkmrk-preserve-original-ev-1"><div class="ListContainerWrapper SCXW206691485 BCX8">1. <span class="TextRun SCXW206691485 BCX8" data-contrast="auto" lang="EN-US" xml:lang="EN-US"><span class="NormalTextRun SCXW206691485 BCX8">Preserve original event</span> <span class="NormalTextRun SCXW206691485 BCX8">(Enable Yes/No)</span></span><span class="EOP SCXW206691485 BCX8" data-ccp-props="{"201341983":0,"335559739":160,"335559740":360}"> </span>

</div><div class="ListContainerWrapper SCXW206691485 BCX8">- <span class="TextRun SCXW206691485 BCX8" data-contrast="auto" lang="EN-US" xml:lang="EN-US"><span class="NormalTextRun SCXW206691485 BCX8">Preserves a raw copy of the original XML event, added to the field </span><span class="NormalTextRun SpellingErrorV2Themed SCXW206691485 BCX8">event.original</span></span><span class="EOP SCXW206691485 BCX8" data-ccp-props="{"201341983":0,"335559739":160,"335559740":360}"> </span>

</div><div class="ListContainerWrapper SCXW206691485 BCX8">2. <span class="TextRun SCXW206691485 BCX8" data-contrast="auto" lang="EN-US" xml:lang="EN-US"><span class="NormalTextRun SCXW206691485 BCX8">Event ID</span></span><span class="EOP SCXW206691485 BCX8" data-ccp-props="{"201341983":0,"335559739":160,"335559740":360}"> </span>

</div><div class="ListContainerWrapper SCXW206691485 BCX8">- <span class="TextRun SCXW206691485 BCX8" data-contrast="auto" lang="EN-US" xml:lang="EN-US"><span class="NormalTextRun SCXW206691485 BCX8">A list of included and excluded (blocked) event IDs. The value is a comma-separated list. The accepted values are single event IDs to include (</span><span class="NormalTextRun SCXW206691485 BCX8">e.g.</span><span class="NormalTextRun SCXW206691485 BCX8"> 4624), a range of event IDs to include (</span><span class="NormalTextRun SCXW206691485 BCX8">e.g.</span><span class="NormalTextRun SCXW206691485 BCX8"> 4700-4800), and single event IDs to exclude (</span><span class="NormalTextRun SCXW206691485 BCX8">e.g.</span><span class="NormalTextRun SCXW206691485 BCX8"> -4735). Limit 22 IDs.</span></span><span class="EOP SCXW206691485 BCX8" data-ccp-props="{"201341983":0,"335559739":160,"335559740":360}"> </span>

</div><div class="ListContainerWrapper SCXW206691485 BCX8">3. <span class="TextRun SCXW206691485 BCX8" data-contrast="auto" lang="EN-US" xml:lang="EN-US"><span class="NormalTextRun SCXW206691485 BCX8">Ignore events older than</span></span><span class="EOP SCXW206691485 BCX8" data-ccp-props="{"201341983":0,"335559739":160,"335559740":360}"> </span>

</div><div class="ListContainerWrapper SCXW206691485 BCX8">- <span class="TextRun SCXW206691485 BCX8" data-contrast="auto" lang="EN-US" xml:lang="EN-US"><span class="NormalTextRun SCXW206691485 BCX8">If this </span><span class="NormalTextRun SCXW206691485 BCX8">option</span><span class="NormalTextRun SCXW206691485 BCX8"> is specified, events that are older than the specified amount of time are ignored. Valid time units are "ns", "us" (or "µs"), "</span><span class="NormalTextRun SpellingErrorV2Themed SCXW206691485 BCX8">ms</span><span class="NormalTextRun SCXW206691485 BCX8">", "s", "m", "h".</span></span><span class="EOP SCXW206691485 BCX8" data-ccp-props="{"201341983":0,"335559739":160,"335559740":360}"> </span>

</div><div class="ListContainerWrapper SCXW206691485 BCX8">4. <span class="TextRun SCXW206691485 BCX8" data-contrast="auto" lang="EN-US" xml:lang="EN-US"><span class="NormalTextRun SCXW206691485 BCX8">Language ID</span></span><span class="EOP SCXW206691485 BCX8" data-ccp-props="{"201341983":0,"335559739":160,"335559740":360}"> </span>

</div><div class="ListContainerWrapper SCXW206691485 BCX8">- <span class="TextRun SCXW206691485 BCX8" data-contrast="auto" lang="EN-US" xml:lang="EN-US"><span class="NormalTextRun SCXW206691485 BCX8">The language ID the events will be </span><span class="NormalTextRun SCXW206691485 BCX8">rendered</span><span class="NormalTextRun SCXW206691485 BCX8"> in. The language will be forced regardless of the system language. A complete list of language IDs can be found https://docs.microsoft.com/en-us/openspecs/windows\_protocols/ms-lcid/a9eac961-e77d-41a6-90a5-ce1a8b0cdb9c\[here\]. It defaults to 0, which </span><span class="NormalTextRun SCXW206691485 BCX8">indicates</span><span class="NormalTextRun SCXW206691485 BCX8"> to use the system language. E.g.: 0x0409 for </span><span class="NormalTextRun SpellingErrorV2Themed SCXW206691485 BCX8">en</span><span class="NormalTextRun SCXW206691485 BCX8">-US</span></span><span class="EOP SCXW206691485 BCX8" data-ccp-props="{"201341983":0,"335559739":160,"335559740":360}"> </span>

</div><div class="ListContainerWrapper SCXW206691485 BCX8">5. <span class="TextRun SCXW206691485 BCX8" data-contrast="auto" lang="EN-US" xml:lang="EN-US"><span class="NormalTextRun SCXW206691485 BCX8">Tags</span></span><span class="EOP SCXW206691485 BCX8" data-ccp-props="{"201341983":0,"335559739":160,"335559740":360}"> </span>

</div><div class="ListContainerWrapper SCXW206691485 BCX8">6. <span class="TextRun SCXW206691485 BCX8" data-contrast="auto" lang="EN-US" xml:lang="EN-US"><span class="NormalTextRun SCXW206691485 BCX8">Processors</span></span><span class="EOP SCXW206691485 BCX8" data-ccp-props="{"201341983":0,"335559739":160,"335559740":360}"> </span>

</div><div class="ListContainerWrapper SCXW206691485 BCX8">- <span class="TextRun SCXW206691485 BCX8" data-contrast="auto" lang="EN-US" xml:lang="EN-US"><span class="NormalTextRun SCXW206691485 BCX8">Processors are used to reduce the number of fields in the exported event or to enhance the event with metadata. This executes in the agent before the logs are parsed. See Processors for details.</span></span><span class="EOP SCXW206691485 BCX8" data-ccp-props="{"201341983":0,"335559739":160,"335559740":360}"> </span>

</div><div class="ListContainerWrapper SCXW206691485 BCX8">7. <span class="TextRun SCXW206691485 BCX8" data-contrast="auto" lang="EN-US" xml:lang="EN-US"><span class="NormalTextRun SCXW206691485 BCX8">Synthetic source</span> <span class="NormalTextRun SCXW206691485 BCX8">(Enable Yes/No)</span></span><span class="EOP SCXW206691485 BCX8" data-ccp-props="{"201341983":0,"335559739":160,"335559740":360}"> </span>

</div></div>##### <span style="color: rgb(53, 152, 219);">**<span class="TextRun SCXW206691485 BCX8" data-contrast="none" lang="EN-PH" xml:lang="EN-PH"><span class="NormalTextRun SpellingErrorV2Themed SCXW206691485 BCX8" data-ccp-parastyle="heading 3">Powershell</span><span class="NormalTextRun SCXW206691485 BCX8" data-ccp-parastyle="heading 3"> Operational</span> <span class="NormalTextRun SCXW206691485 BCX8" data-ccp-parastyle="heading 3">(Enable Yes/No)</span></span><span class="EOP SCXW206691485 BCX8" data-ccp-props="{"134245418":true,"134245529":true,"201341983":0,"335559685":720,"335559738":40,"335559739":0,"335559740":360}"> </span>**</span>

<div class="SCXW206691485 BCX8" id="bkmrk-preserve-original-ev-2"><div class="ListContainerWrapper SCXW206691485 BCX8">1. <span class="TextRun SCXW206691485 BCX8" data-contrast="auto" lang="EN-PH" xml:lang="EN-PH"><span class="NormalTextRun SCXW206691485 BCX8">Preserve original event</span> </span><span class="TextRun SCXW206691485 BCX8" data-contrast="auto" lang="EN-US" xml:lang="EN-US"><span class="NormalTextRun SCXW206691485 BCX8">(Enable Yes/No)</span></span><span class="EOP SCXW206691485 BCX8" data-ccp-props="{"201341983":0,"335559739":160,"335559740":360}"> </span>

</div></div><div class="SCXW206691485 BCX8" id="bkmrk-preserves-a-raw-copy"><div class="ListContainerWrapper SCXW206691485 BCX8">- <span class="TextRun SCXW206691485 BCX8" data-contrast="auto" lang="EN-PH" xml:lang="EN-PH"><span class="NormalTextRun SCXW206691485 BCX8">Preserves a raw copy of the original XML event, added to the field </span><span class="NormalTextRun SpellingErrorV2Themed SCXW206691485 BCX8">event.original</span></span><span class="EOP SCXW206691485 BCX8" data-ccp-props="{"201341983":0,"335559739":160,"335559740":360}"> </span>

</div><div class="ListContainerWrapper SCXW206691485 BCX8">2. <span class="TextRun SCXW206691485 BCX8" data-contrast="auto" lang="EN-PH" xml:lang="EN-PH"><span class="NormalTextRun SCXW206691485 BCX8">Event ID</span></span><span class="EOP SCXW206691485 BCX8" data-ccp-props="{"201341983":0,"335559739":160,"335559740":360}"> </span>

</div><div class="ListContainerWrapper SCXW206691485 BCX8">- <span class="TextRun SCXW206691485 BCX8" data-contrast="auto" lang="EN-PH" xml:lang="EN-PH"><span class="NormalTextRun SCXW206691485 BCX8">A list of included and excluded (blocked) event IDs. The value is a comma-separated list. The accepted values are single event IDs to include (</span><span class="NormalTextRun SCXW206691485 BCX8">e.g.</span><span class="NormalTextRun SCXW206691485 BCX8"> 4624), a range of event IDs to include (e.g. 4700-4800), and single event IDs to exclude (e.g. -4735). Limit 22 IDs.</span></span><span class="EOP SCXW206691485 BCX8" data-ccp-props="{"201341983":0,"335559739":160,"335559740":360}"> </span>

</div><div class="ListContainerWrapper SCXW206691485 BCX8">3. <span class="TextRun SCXW206691485 BCX8" data-contrast="auto" lang="EN-PH" xml:lang="EN-PH"><span class="NormalTextRun SCXW206691485 BCX8">Ignore events older than</span></span><span class="EOP SCXW206691485 BCX8" data-ccp-props="{"201341983":0,"335559739":160,"335559740":360}"> </span>

</div><div class="ListContainerWrapper SCXW206691485 BCX8">- <span class="TextRun SCXW206691485 BCX8" data-contrast="auto" lang="EN-PH" xml:lang="EN-PH"><span class="NormalTextRun SCXW206691485 BCX8">If this </span><span class="NormalTextRun SCXW206691485 BCX8">option</span><span class="NormalTextRun SCXW206691485 BCX8"> is specified, events that are older than the specified amount of time are ignored. Valid time units are "ns", "us" (or "µs"), "</span><span class="NormalTextRun SpellingErrorV2Themed SCXW206691485 BCX8">ms</span><span class="NormalTextRun SCXW206691485 BCX8">", "s", "m", "h".</span></span><span class="EOP SCXW206691485 BCX8" data-ccp-props="{"201341983":0,"335559739":160,"335559740":360}"> </span>

</div><div class="ListContainerWrapper SCXW206691485 BCX8">4. <span class="TextRun SCXW206691485 BCX8" data-contrast="auto" lang="EN-PH" xml:lang="EN-PH"><span class="NormalTextRun SCXW206691485 BCX8">Language ID</span></span><span class="EOP SCXW206691485 BCX8" data-ccp-props="{"201341983":0,"335559739":160,"335559740":360}"> </span>

</div><div class="ListContainerWrapper SCXW206691485 BCX8">- <span class="TextRun SCXW206691485 BCX8" data-contrast="auto" lang="EN-PH" xml:lang="EN-PH"><span class="NormalTextRun SCXW206691485 BCX8">The language ID the events will be </span><span class="NormalTextRun SCXW206691485 BCX8">rendered</span><span class="NormalTextRun SCXW206691485 BCX8"> in. The language will be forced regardless of the system language. A complete list of language IDs can be found https://docs.microsoft.com/en-us/openspecs/windows\_protocols/ms-lcid/a9eac961-e77d-41a6-90a5-ce1a8b0cdb9c\[here\]. It defaults to 0, which </span><span class="NormalTextRun SCXW206691485 BCX8">indicates</span><span class="NormalTextRun SCXW206691485 BCX8"> to use the system language. E.g.: 0x0409 for </span><span class="NormalTextRun SpellingErrorV2Themed SCXW206691485 BCX8">en</span><span class="NormalTextRun SCXW206691485 BCX8">-US</span></span><span class="EOP SCXW206691485 BCX8" data-ccp-props="{"201341983":0,"335559739":160,"335559740":360}"> </span>

</div><div class="ListContainerWrapper SCXW206691485 BCX8">5. <span class="TextRun SCXW206691485 BCX8" data-contrast="auto" lang="EN-PH" xml:lang="EN-PH"><span class="NormalTextRun SCXW206691485 BCX8">Tags</span></span><span class="EOP SCXW206691485 BCX8" data-ccp-props="{"201341983":0,"335559739":160,"335559740":360}"> </span>

</div><div class="ListContainerWrapper SCXW206691485 BCX8">6. <span class="TextRun SCXW206691485 BCX8" data-contrast="auto" lang="EN-PH" xml:lang="EN-PH"><span class="NormalTextRun SCXW206691485 BCX8">Processors</span></span><span class="EOP SCXW206691485 BCX8" data-ccp-props="{"201341983":0,"335559739":160,"335559740":360}"> </span>

</div><div class="ListContainerWrapper SCXW206691485 BCX8">- <span class="TextRun SCXW206691485 BCX8" data-contrast="auto" lang="EN-PH" xml:lang="EN-PH"><span class="NormalTextRun SCXW206691485 BCX8">Processors are used to reduce the number of fields in the exported event or to enhance the event with metadata. This executes in the agent before the logs are parsed. See Processors for details.</span></span><span class="EOP SCXW206691485 BCX8" data-ccp-props="{"201341983":0,"335559739":160,"335559740":360}"> </span>

</div><div class="ListContainerWrapper SCXW206691485 BCX8">7. <span class="TextRun SCXW206691485 BCX8" data-contrast="auto" lang="EN-PH" xml:lang="EN-PH"><span class="NormalTextRun SCXW206691485 BCX8">Synthetic source</span> </span><span class="TextRun SCXW206691485 BCX8" data-contrast="auto" lang="EN-US" xml:lang="EN-US"><span class="NormalTextRun SCXW206691485 BCX8">(Enable Yes/No)</span></span><span class="EOP SCXW206691485 BCX8" data-ccp-props="{"201341983":0,"335559739":160,"335559740":360}"> </span>

</div></div>##### <span class="TextRun SCXW206691485 BCX8" data-contrast="none" lang="EN-PH" style="color: rgb(53, 152, 219);" xml:lang="EN-PH">**<span class="NormalTextRun SCXW206691485 BCX8" data-ccp-parastyle="heading 3">Sysmon Operational</span>** </span>**<span class="TextRun SCXW206691485 BCX8" data-contrast="none" lang="EN-US" style="color: rgb(53, 152, 219);" xml:lang="EN-US"><span class="NormalTextRun SCXW206691485 BCX8" data-ccp-parastyle="heading 3">(Enable Yes/No)</span></span><span class="EOP SCXW206691485 BCX8" data-ccp-props="{"134245418":true,"134245529":true,"201341983":0,"335559685":720,"335559738":40,"335559739":0,"335559740":360}"> </span>**

<div class="SCXW206691485 BCX8" id="bkmrk-preserve-original-ev-3"><div class="ListContainerWrapper SCXW206691485 BCX8">1. <span class="TextRun SCXW206691485 BCX8" data-contrast="auto" lang="EN-US" xml:lang="EN-US"><span class="NormalTextRun SCXW206691485 BCX8">Preserve original event</span> <span class="NormalTextRun SCXW206691485 BCX8">(Enable Yes/No)</span></span><span class="EOP SCXW206691485 BCX8" data-ccp-props="{"201341983":0,"335559739":160,"335559740":360}"> </span>

</div><div class="ListContainerWrapper SCXW206691485 BCX8">- <span class="TextRun SCXW206691485 BCX8" data-contrast="auto" lang="EN-US" xml:lang="EN-US"><span class="NormalTextRun SCXW206691485 BCX8">Preserves a raw copy of the original XML event, added to the field </span><span class="NormalTextRun SpellingErrorV2Themed SCXW206691485 BCX8">event.original</span></span><span class="EOP SCXW206691485 BCX8" data-ccp-props="{"201341983":0,"335559739":160,"335559740":360}"> </span>

</div><div class="ListContainerWrapper SCXW206691485 BCX8">2. <span class="TextRun SCXW206691485 BCX8" data-contrast="auto" lang="EN-US" xml:lang="EN-US"><span class="NormalTextRun SCXW206691485 BCX8">Event ID</span></span><span class="EOP SCXW206691485 BCX8" data-ccp-props="{"201341983":0,"335559739":160,"335559740":360}"> </span>

</div><div class="ListContainerWrapper SCXW206691485 BCX8">- <span class="TextRun SCXW206691485 BCX8" data-contrast="auto" lang="EN-US" xml:lang="EN-US"><span class="NormalTextRun SCXW206691485 BCX8">A list of included and excluded (blocked) event IDs. The value is a comma-separated list. The accepted values are single event IDs to include (</span><span class="NormalTextRun SCXW206691485 BCX8">e.g.</span><span class="NormalTextRun SCXW206691485 BCX8"> 4624), a range of event IDs to include (</span><span class="NormalTextRun SCXW206691485 BCX8">e.g.</span><span class="NormalTextRun SCXW206691485 BCX8"> 4700-4800), and single event IDs to exclude (</span><span class="NormalTextRun SCXW206691485 BCX8">e.g.</span><span class="NormalTextRun SCXW206691485 BCX8"> -4735). Limit 22 IDs.</span></span><span class="EOP SCXW206691485 BCX8" data-ccp-props="{"201341983":0,"335559739":160,"335559740":360}"> </span>

</div><div class="ListContainerWrapper SCXW206691485 BCX8">3. <span class="TextRun SCXW206691485 BCX8" data-contrast="auto" lang="EN-US" xml:lang="EN-US"><span class="NormalTextRun SCXW206691485 BCX8">Ignore events older than</span></span><span class="EOP SCXW206691485 BCX8" data-ccp-props="{"201341983":0,"335559739":160,"335559740":360}"> </span>

</div><div class="ListContainerWrapper SCXW206691485 BCX8">- <span class="TextRun SCXW206691485 BCX8" data-contrast="auto" lang="EN-US" xml:lang="EN-US"><span class="NormalTextRun SCXW206691485 BCX8">If this </span><span class="NormalTextRun SCXW206691485 BCX8">option</span><span class="NormalTextRun SCXW206691485 BCX8"> is specified, events that are older than the specified amount of time are ignored. Valid time units are "ns", "us" (or "µs"), "</span><span class="NormalTextRun SpellingErrorV2Themed SCXW206691485 BCX8">ms</span><span class="NormalTextRun SCXW206691485 BCX8">", "s", "m", "h".</span></span><span class="EOP SCXW206691485 BCX8" data-ccp-props="{"201341983":0,"335559739":160,"335559740":360}"> </span>

</div><div class="ListContainerWrapper SCXW206691485 BCX8">4. <span class="TextRun SCXW206691485 BCX8" data-contrast="auto" lang="EN-US" xml:lang="EN-US"><span class="NormalTextRun SCXW206691485 BCX8">Language ID</span></span><span class="EOP SCXW206691485 BCX8" data-ccp-props="{"201341983":0,"335559739":160,"335559740":360}"> </span>

</div><div class="ListContainerWrapper SCXW206691485 BCX8">- <span class="TextRun SCXW206691485 BCX8" data-contrast="auto" lang="EN-US" xml:lang="EN-US"><span class="NormalTextRun SCXW206691485 BCX8">The language ID the events will be </span><span class="NormalTextRun SCXW206691485 BCX8">rendered</span><span class="NormalTextRun SCXW206691485 BCX8"> in. The language will be forced regardless of the system language. A complete list of language IDs can be found https://docs.microsoft.com/en-us/openspecs/windows\_protocols/ms-lcid/a9eac961-e77d-41a6-90a5-ce1a8b0cdb9c\[here\]. It defaults to 0, which </span><span class="NormalTextRun SCXW206691485 BCX8">indicates</span><span class="NormalTextRun SCXW206691485 BCX8"> to use the system language. E.g.: 0x0409 for </span><span class="NormalTextRun SpellingErrorV2Themed SCXW206691485 BCX8">en</span><span class="NormalTextRun SCXW206691485 BCX8">-US</span></span><span class="EOP SCXW206691485 BCX8" data-ccp-props="{"201341983":0,"335559739":160,"335559740":360}"> </span>

</div></div><div class="SCXW206691485 BCX8" id="bkmrk-tags%C2%A0-processors%C2%A0-pr"><div class="ListContainerWrapper SCXW206691485 BCX8">5. <span class="TextRun SCXW206691485 BCX8" data-contrast="auto" lang="EN-US" xml:lang="EN-US"><span class="NormalTextRun SCXW206691485 BCX8">Tags</span></span><span class="EOP SCXW206691485 BCX8" data-ccp-props="{"201341983":0,"335559739":160,"335559740":360}"> </span>

</div><div class="ListContainerWrapper SCXW206691485 BCX8">6. <span class="TextRun SCXW206691485 BCX8" data-contrast="auto" lang="EN-US" xml:lang="EN-US"><span class="NormalTextRun SCXW206691485 BCX8">Processors</span></span><span class="EOP SCXW206691485 BCX8" data-ccp-props="{"201341983":0,"335559739":160,"335559740":360}"> </span>

</div><div class="ListContainerWrapper SCXW206691485 BCX8">- <span class="TextRun SCXW206691485 BCX8" data-contrast="auto" lang="EN-US" xml:lang="EN-US"><span class="NormalTextRun SCXW206691485 BCX8">Processors are used to reduce the number of fields in the exported event or to enhance the event with metadata. This executes in the agent before the logs are parsed. See Processors for details.</span></span><span class="EOP SCXW206691485 BCX8" data-ccp-props="{"201341983":0,"335559739":160,"335559740":360}"> </span>

</div><div class="ListContainerWrapper SCXW206691485 BCX8">7. <span class="TextRun SCXW206691485 BCX8" data-contrast="auto" lang="EN-US" xml:lang="EN-US"><span class="NormalTextRun SCXW206691485 BCX8">Synthetic source</span> <span class="NormalTextRun SCXW206691485 BCX8">(Enable Yes/No)</span></span><span class="EOP SCXW206691485 BCX8" data-ccp-props="{"201341983":0,"335559739":160,"335559740":360}"> </span>

</div></div>##### <span style="color: rgb(53, 152, 219);"><span class="TextRun SCXW206691485 BCX8" data-contrast="none" lang="EN-US" xml:lang="EN-US">**<span class="NormalTextRun SCXW206691485 BCX8" data-ccp-parastyle="heading 3">Collect Windows </span><span class="NormalTextRun SpellingErrorV2Themed SCXW206691485 BCX8" data-ccp-parastyle="heading 3">perfmon</span><span class="NormalTextRun SCXW206691485 BCX8" data-ccp-parastyle="heading 3"> and service metrics</span> <span class="NormalTextRun SCXW206691485 BCX8" data-ccp-parastyle="heading 3">(Enable Yes/No)</span>**</span>**<span class="EOP SCXW206691485 BCX8" data-ccp-props="{"134245418":true,"134245529":true,"201341983":0,"335559685":720,"335559738":40,"335559739":0,"335559740":360}"> </span>**</span>

<div class="SCXW206691485 BCX8" id="bkmrk-perfmon-group-measur"><div class="ListContainerWrapper SCXW206691485 BCX8">1. <span class="TextRun SCXW206691485 BCX8" data-contrast="auto" lang="EN-US" xml:lang="EN-US"><span class="NormalTextRun SpellingErrorV2Themed SCXW206691485 BCX8">Perfmon</span><span class="NormalTextRun SCXW206691485 BCX8"> Group Measurements </span><span class="NormalTextRun ContextualSpellingAndGrammarErrorV2Themed SCXW206691485 BCX8">By</span><span class="NormalTextRun SCXW206691485 BCX8"> Instance</span> <span class="NormalTextRun SCXW206691485 BCX8">(Enable Yes/No)</span></span><span class="EOP SCXW206691485 BCX8" data-ccp-props="{"201341983":0,"335559739":160,"335559740":360}"> </span>

</div><div class="ListContainerWrapper SCXW206691485 BCX8">- <span class="TextRun SCXW206691485 BCX8" data-contrast="auto" lang="EN-US" xml:lang="EN-US"><span class="NormalTextRun SCXW206691485 BCX8">Enabling this </span><span class="NormalTextRun SCXW206691485 BCX8">option</span><span class="NormalTextRun SCXW206691485 BCX8"> will send all measurements with a matching </span><span class="NormalTextRun SpellingErrorV2Themed SCXW206691485 BCX8">perfmon</span><span class="NormalTextRun SCXW206691485 BCX8"> instance as part of a single </span><span class="NormalTextRun SCXW206691485 BCX8">event</span></span><span class="EOP SCXW206691485 BCX8" data-ccp-props="{"201341983":0,"335559739":160,"335559740":360}"> </span>

</div><div class="ListContainerWrapper SCXW206691485 BCX8">2. <span class="TextRun SCXW206691485 BCX8" data-contrast="auto" lang="EN-US" xml:lang="EN-US"><span class="NormalTextRun SpellingErrorV2Themed SCXW206691485 BCX8">Perfmon</span><span class="NormalTextRun SCXW206691485 BCX8"> Ignore </span><span class="NormalTextRun ContextualSpellingAndGrammarErrorV2Themed SCXW206691485 BCX8">Non Existent</span><span class="NormalTextRun SCXW206691485 BCX8"> Counters</span> <span class="NormalTextRun SCXW206691485 BCX8">(Enable Yes/No)</span></span><span class="EOP SCXW206691485 BCX8" data-ccp-props="{"201341983":0,"335559739":160,"335559740":360}"> </span>

</div><div class="ListContainerWrapper SCXW206691485 BCX8">- <span class="TextRun SCXW206691485 BCX8" data-contrast="auto" lang="EN-US" xml:lang="EN-US"><span class="NormalTextRun SCXW206691485 BCX8">Enabling this </span><span class="NormalTextRun SCXW206691485 BCX8">option</span><span class="NormalTextRun SCXW206691485 BCX8"> will make sure to ignore any errors caused by counters that do not </span><span class="NormalTextRun SCXW206691485 BCX8">exist</span></span><span class="EOP SCXW206691485 BCX8" data-ccp-props="{"201341983":0,"335559739":160,"335559740":360}"> </span>

</div><div class="ListContainerWrapper SCXW206691485 BCX8">3. <span class="TextRun SCXW206691485 BCX8" data-contrast="auto" lang="EN-US" xml:lang="EN-US"><span class="NormalTextRun SpellingErrorV2Themed SCXW206691485 BCX8">Perfmon</span><span class="NormalTextRun SCXW206691485 BCX8"> Queries</span></span><span class="EOP SCXW206691485 BCX8" data-ccp-props="{"201341983":0,"335559739":160,"335559740":360}"> </span>

</div><div class="ListContainerWrapper SCXW206691485 BCX8">- <span class="TextRun SCXW206691485 BCX8" data-contrast="auto" lang="EN-US" xml:lang="EN-US"><span class="NormalTextRun SCXW206691485 BCX8">Will list the </span><span class="NormalTextRun SpellingErrorV2Themed SCXW206691485 BCX8">perfmon</span><span class="NormalTextRun SCXW206691485 BCX8"> queries to execute, each query will have an object </span><span class="NormalTextRun SCXW206691485 BCX8">option</span><span class="NormalTextRun SCXW206691485 BCX8">, an optional instance </span><span class="NormalTextRun SpellingErrorV2Themed SCXW206691485 BCX8">contiguration</span><span class="NormalTextRun SCXW206691485 BCX8"> and the actual </span><span class="NormalTextRun SCXW206691485 BCX8">counters</span></span><span class="EOP SCXW206691485 BCX8" data-ccp-props="{"201341983":0,"335559739":160,"335559740":360}"> </span>

</div><div class="ListContainerWrapper SCXW206691485 BCX8">4. <span class="TextRun SCXW206691485 BCX8" data-contrast="auto" lang="EN-US" xml:lang="EN-US"><span class="NormalTextRun SCXW206691485 BCX8">Period</span></span><span class="EOP SCXW206691485 BCX8" data-ccp-props="{"201341983":0,"335559739":160,"335559740":360}"> </span>

</div><div class="ListContainerWrapper SCXW206691485 BCX8">5. <span class="TextRun SCXW206691485 BCX8" data-contrast="auto" lang="EN-US" xml:lang="EN-US"><span class="NormalTextRun SCXW206691485 BCX8">Synthetic source</span> <span class="NormalTextRun SCXW206691485 BCX8">(Enable Yes/No)</span></span><span class="EOP SCXW206691485 BCX8" data-ccp-props="{"201341983":0,"335559739":160,"335559740":360}"> </span>

</div></div>##### <span style="color: rgb(53, 152, 219);">**<span class="TextRun Highlight SCXW206691485 BCX8" data-contrast="none" lang="EN-US" xml:lang="EN-US"><span class="NormalTextRun SCXW206691485 BCX8" data-ccp-parastyle="heading 3">Windows service metrics</span> </span><span class="TextRun SCXW206691485 BCX8" data-contrast="none" lang="EN-US" xml:lang="EN-US"><span class="NormalTextRun SCXW206691485 BCX8" data-ccp-parastyle="heading 3">(Enable Yes/No)</span></span><span class="EOP SCXW206691485 BCX8" data-ccp-props="{"134245418":true,"134245529":true,"201341983":0,"335559685":720,"335559738":40,"335559739":0,"335559740":360}"> </span>**</span>

<div class="SCXW206691485 BCX8" id="bkmrk-period%C2%A0-processors%C2%A0-"><div class="ListContainerWrapper SCXW206691485 BCX8">1. <span class="TextRun SCXW206691485 BCX8" data-contrast="auto" lang="EN-US" xml:lang="EN-US"><span class="NormalTextRun SCXW206691485 BCX8">Period</span></span><span class="EOP SCXW206691485 BCX8" data-ccp-props="{"201341983":0,"335559739":160,"335559740":360}"> </span>

</div><div class="ListContainerWrapper SCXW206691485 BCX8">2. <span class="TextRun SCXW206691485 BCX8" data-contrast="auto" lang="EN-US" xml:lang="EN-US"><span class="NormalTextRun SCXW206691485 BCX8">Processors</span></span><span class="EOP SCXW206691485 BCX8" data-ccp-props="{"201341983":0,"335559739":160,"335559740":360}"> </span>

</div><div class="ListContainerWrapper SCXW206691485 BCX8">- <span class="TextRun SCXW206691485 BCX8" data-contrast="auto" lang="EN-US" xml:lang="EN-US"><span class="NormalTextRun SCXW206691485 BCX8">Processors are used to reduce the number of fields in the exported event or to enhance the event with metadata. This executes in the agent before the logs are parsed. See Processors for details.</span></span><span class="EOP SCXW206691485 BCX8" data-ccp-props="{"201341983":0,"335559739":160,"335559740":360}"> </span>

</div><div class="ListContainerWrapper SCXW206691485 BCX8">3. <span class="TextRun SCXW206691485 BCX8" data-contrast="auto" lang="EN-US" xml:lang="EN-US"><span class="NormalTextRun SCXW206691485 BCX8">Synthetic source</span> <span class="NormalTextRun SCXW206691485 BCX8">(Enable Yes/No)</span></span><span class="EOP SCXW206691485 BCX8" data-ccp-props="{"201341983":0,"335559739":160,"335559740":360}"> </span>

</div></div>##### <span style="color: rgb(53, 152, 219);"><span class="TextRun SCXW206691485 BCX8" data-contrast="none" lang="EN-US" xml:lang="EN-US">**<span class="NormalTextRun SCXW206691485 BCX8" data-ccp-parastyle="heading 3">Collect logs from third-party REST API (experimental)</span> <span class="NormalTextRun SCXW206691485 BCX8" data-ccp-parastyle="heading 3">(Enable Yes/No)</span>**</span>**<span class="EOP SCXW206691485 BCX8" data-ccp-props="{"134245418":true,"134245529":true,"201341983":0,"335559685":720,"335559738":40,"335559739":0,"335559740":360}"> </span>**</span>

<div class="SCXW206691485 BCX8" id="bkmrk-url-of-splunk-enterp"><div class="ListContainerWrapper SCXW206691485 BCX8">1. <span class="TextRun SCXW206691485 BCX8" data-contrast="auto" lang="EN-US" xml:lang="EN-US"><span class="NormalTextRun SCXW206691485 BCX8">URL of Splunk Enterprise Server</span></span><span class="EOP SCXW206691485 BCX8" data-ccp-props="{"201341983":0,"335559739":160,"335559740":360}"> </span>

</div></div><div class="SCXW206691485 BCX8" id="bkmrk-i.e.-scheme%3A%2F%2Fhost%3Ap"><div class="ListContainerWrapper SCXW206691485 BCX8">- <span class="TextRun SCXW206691485 BCX8" data-contrast="auto" lang="EN-US" xml:lang="EN-US"><span class="NormalTextRun SCXW206691485 BCX8">i.e.</span><span class="NormalTextRun SCXW206691485 BCX8"> scheme://host:port, path is automatic</span></span><span class="EOP SCXW206691485 BCX8" data-ccp-props="{"201341983":0,"335559739":160,"335559740":360}"> </span>

</div><div class="ListContainerWrapper SCXW206691485 BCX8">2. <span class="TextRun SCXW206691485 BCX8" data-contrast="auto" lang="EN-US" xml:lang="EN-US"><span class="NormalTextRun SCXW206691485 BCX8">Splunk REST API Username</span></span><span class="EOP SCXW206691485 BCX8" data-ccp-props="{"201341983":0,"335559739":160,"335559740":360}"> </span>

</div><div class="ListContainerWrapper SCXW206691485 BCX8">3. <span class="TextRun SCXW206691485 BCX8" data-contrast="auto" lang="EN-US" xml:lang="EN-US"><span class="NormalTextRun SCXW206691485 BCX8">Splunk Authorization Token</span></span><span class="EOP SCXW206691485 BCX8" data-ccp-props="{"201341983":0,"335559739":160,"335559740":360}"> </span>

</div><div class="ListContainerWrapper SCXW206691485 BCX8">- <span class="TextRun SCXW206691485 BCX8" data-contrast="auto" lang="EN-US" xml:lang="EN-US"><span class="NormalTextRun SCXW206691485 BCX8">Bearer Token or Session Key, </span><span class="NormalTextRun SCXW206691485 BCX8">e.g.</span><span class="NormalTextRun SCXW206691485 BCX8"> "Bearer eyJFd3e46..." or "Splunk 192fd3e...". Cannot be used with username and password.</span></span><span class="EOP SCXW206691485 BCX8" data-ccp-props="{"201341983":0,"335559739":160,"335559740":360}"> </span>

</div><div class="ListContainerWrapper SCXW206691485 BCX8">4. <span class="TextRun SCXW206691485 BCX8" data-contrast="auto" lang="EN-US" xml:lang="EN-US"><span class="NormalTextRun SCXW206691485 BCX8">SSL Configuration</span></span><span class="EOP SCXW206691485 BCX8" data-ccp-props="{"201341983":0,"335559739":160,"335559740":360}"> </span>

</div><div class="ListContainerWrapper SCXW206691485 BCX8">- <span class="TextRun SCXW206691485 BCX8" data-contrast="auto" lang="EN-US" xml:lang="EN-US"><span class="NormalTextRun SCXW206691485 BCX8">i.e.</span> <span class="NormalTextRun SpellingErrorV2Themed SCXW206691485 BCX8">certificate\_authorities</span><span class="NormalTextRun SCXW206691485 BCX8">, </span><span class="NormalTextRun SpellingErrorV2Themed SCXW206691485 BCX8">supported\_protocols</span><span class="NormalTextRun SCXW206691485 BCX8">, </span><span class="NormalTextRun SpellingErrorV2Themed SCXW206691485 BCX8">verification\_mode</span><span class="NormalTextRun SCXW206691485 BCX8"> etc.</span></span><span class="EOP SCXW206691485 BCX8" data-ccp-props="{"201341983":0,"335559739":160,"335559740":360}"> </span>

</div></div>##### <span class="TextRun SCXW206691485 BCX8" data-contrast="none" lang="EN-US" style="color: rgb(53, 152, 219);" xml:lang="EN-US">**<span class="NormalTextRun SCXW206691485 BCX8" data-ccp-parastyle="heading 3">Windows </span><span class="NormalTextRun SpellingErrorV2Themed SCXW206691485 BCX8" data-ccp-parastyle="heading 3">ForwardedEvents</span><span class="NormalTextRun SCXW206691485 BCX8" data-ccp-parastyle="heading 3"> via Splunk Enterprise REST API</span> <span class="NormalTextRun SCXW206691485 BCX8" data-ccp-parastyle="heading 3">(Enable Yes/No)</span>**</span>**<span class="EOP SCXW206691485 BCX8" data-ccp-props="{"134245418":true,"134245529":true,"201341983":0,"335559685":720,"335559738":40,"335559739":0,"335559740":360}"> </span>**

<div class="SCXW206691485 BCX8" id="bkmrk-interval-to-query-sp"><div class="ListContainerWrapper SCXW206691485 BCX8">1. <span class="TextRun SCXW206691485 BCX8" data-contrast="auto" lang="EN-US" xml:lang="EN-US"><span class="NormalTextRun SCXW206691485 BCX8">Interval to query Splunk Enterprise REST API</span></span><span class="EOP SCXW206691485 BCX8" data-ccp-props="{"201341983":0,"335559739":160,"335559740":360}"> </span>

</div><div class="ListContainerWrapper SCXW206691485 BCX8">- <span class="TextRun SCXW206691485 BCX8" data-contrast="auto" lang="EN-US" xml:lang="EN-US"><span class="NormalTextRun SCXW206691485 BCX8">Go Duration syntax (</span><span class="NormalTextRun SpellingErrorV2Themed SCXW206691485 BCX8">eg.</span><span class="NormalTextRun SCXW206691485 BCX8"> 10s)</span></span><span class="EOP SCXW206691485 BCX8" data-ccp-props="{"201341983":0,"335559739":160,"335559740":360}"> </span>

</div><div class="ListContainerWrapper SCXW206691485 BCX8">2. <span class="TextRun SCXW206691485 BCX8" data-contrast="auto" lang="EN-US" xml:lang="EN-US"><span class="NormalTextRun SCXW206691485 BCX8">Preserve original event</span> <span class="NormalTextRun SCXW206691485 BCX8">(Enable Yes/No)</span></span><span class="EOP SCXW206691485 BCX8" data-ccp-props="{"201341983":0,"335559739":160,"335559740":360}"> </span>

</div><div class="ListContainerWrapper SCXW206691485 BCX8">- <span class="TextRun SCXW206691485 BCX8" data-contrast="auto" lang="EN-US" xml:lang="EN-US"><span class="NormalTextRun SCXW206691485 BCX8">Preserves a raw copy of the original event, added to the field </span><span class="NormalTextRun SpellingErrorV2Themed SCXW206691485 BCX8">event.original</span></span><span class="EOP SCXW206691485 BCX8" data-ccp-props="{"201341983":0,"335559739":160,"335559740":360}"> </span>

</div><div class="ListContainerWrapper SCXW206691485 BCX8">3. <span class="TextRun SCXW206691485 BCX8" data-contrast="auto" lang="EN-US" xml:lang="EN-US"><span class="NormalTextRun SCXW206691485 BCX8">Splunk search string</span></span><span class="EOP SCXW206691485 BCX8" data-ccp-props="{"201341983":0,"335559739":160,"335559740":360}"> </span>

</div><div class="ListContainerWrapper SCXW206691485 BCX8">4. <span class="TextRun SCXW206691485 BCX8" data-contrast="auto" lang="EN-US" xml:lang="EN-US"><span class="NormalTextRun SCXW206691485 BCX8">Tags</span></span><span class="EOP SCXW206691485 BCX8" data-ccp-props="{"201341983":0,"335559739":160,"335559740":360}"> </span>

</div><div class="ListContainerWrapper SCXW206691485 BCX8">5. <span class="TextRun SCXW206691485 BCX8" data-contrast="auto" lang="EN-US" xml:lang="EN-US"><span class="NormalTextRun SCXW206691485 BCX8">Processors</span></span><span class="EOP SCXW206691485 BCX8" data-ccp-props="{"201341983":0,"335559739":160,"335559740":360}"> </span>

</div><div class="ListContainerWrapper SCXW206691485 BCX8">- <span class="TextRun SCXW206691485 BCX8" data-contrast="auto" lang="EN-US" xml:lang="EN-US"><span class="NormalTextRun SCXW206691485 BCX8">Processors are used to reduce the number of fields in the exported event or to enhance the event with metadata. This executes in the agent before the logs are parsed. See Processors for details.</span></span><span class="EOP SCXW206691485 BCX8" data-ccp-props="{"201341983":0,"335559739":160,"335559740":360}"> </span>

</div><div class="ListContainerWrapper SCXW206691485 BCX8">6. <span class="TextRun SCXW206691485 BCX8" data-contrast="auto" lang="EN-US" xml:lang="EN-US"><span class="NormalTextRun SCXW206691485 BCX8">Synthetic source</span> <span class="NormalTextRun SCXW206691485 BCX8">(Enable Yes/No)</span></span><span class="EOP SCXW206691485 BCX8" data-ccp-props="{"201341983":0,"335559739":160,"335559740":360}"> </span>

</div></div>##### <span style="color: rgb(53, 152, 219);"><span class="TextRun Highlight SCXW206691485 BCX8" data-contrast="none" lang="EN-US" xml:lang="EN-US">**<span class="NormalTextRun SCXW206691485 BCX8" data-ccp-parastyle="heading 3">Windows </span><span class="NormalTextRun SpellingErrorV2Themed SCXW206691485 BCX8" data-ccp-parastyle="heading 3">Powershell</span><span class="NormalTextRun SCXW206691485 BCX8" data-ccp-parastyle="heading 3"> Events via Splunk Enterprise REST API</span> <span class="NormalTextRun SCXW206691485 BCX8" data-ccp-parastyle="heading 3">(Enable Yes/No)</span>**</span><span class="EOP SCXW206691485 BCX8" data-ccp-props="{"134245418":true,"134245529":true,"201341983":0,"335559685":720,"335559738":40,"335559739":0,"335559740":360}"> </span></span>

<div class="SCXW206691485 BCX8" id="bkmrk-interval-to-query-sp-1"><div class="ListContainerWrapper SCXW206691485 BCX8">1. <span class="TextRun SCXW206691485 BCX8" data-contrast="auto" lang="EN-US" xml:lang="EN-US"><span class="NormalTextRun SCXW206691485 BCX8">Interval to query Splunk Enterprise REST API</span></span><span class="EOP SCXW206691485 BCX8" data-ccp-props="{"201341983":0,"335559739":160,"335559740":360}"> </span>

</div><div class="ListContainerWrapper SCXW206691485 BCX8">- <span class="TextRun SCXW206691485 BCX8" data-contrast="auto" lang="EN-US" xml:lang="EN-US"><span class="NormalTextRun SCXW206691485 BCX8">Go Duration syntax (</span><span class="NormalTextRun SpellingErrorV2Themed SCXW206691485 BCX8">eg.</span><span class="NormalTextRun SCXW206691485 BCX8"> 10s)</span></span><span class="EOP SCXW206691485 BCX8" data-ccp-props="{"201341983":0,"335559739":160,"335559740":360}"> </span>

</div><div class="ListContainerWrapper SCXW206691485 BCX8">2. <span class="TextRun SCXW206691485 BCX8" data-contrast="auto" lang="EN-US" xml:lang="EN-US"><span class="NormalTextRun SCXW206691485 BCX8">Preserve original event</span> <span class="NormalTextRun SCXW206691485 BCX8">(Enable Yes/No)</span></span><span class="EOP SCXW206691485 BCX8" data-ccp-props="{"201341983":0,"335559739":160,"335559740":360}"> </span>

</div></div><div class="SCXW206691485 BCX8" id="bkmrk-preserves-a-raw-copy-1"><div class="ListContainerWrapper SCXW206691485 BCX8">- <span class="TextRun SCXW206691485 BCX8" data-contrast="auto" lang="EN-US" xml:lang="EN-US"><span class="NormalTextRun SCXW206691485 BCX8">Preserves a raw copy of the original event, added to the field </span><span class="NormalTextRun SpellingErrorV2Themed SCXW206691485 BCX8">event.original</span></span><span class="EOP SCXW206691485 BCX8" data-ccp-props="{"201341983":0,"335559739":160,"335559740":360}"> </span>

</div><div class="ListContainerWrapper SCXW206691485 BCX8">3. <span class="TextRun SCXW206691485 BCX8" data-contrast="auto" lang="EN-US" xml:lang="EN-US"><span class="NormalTextRun SCXW206691485 BCX8">Splunk search string</span></span><span class="EOP SCXW206691485 BCX8" data-ccp-props="{"201341983":0,"335559739":160,"335559740":360}"> </span>

</div><div class="ListContainerWrapper SCXW206691485 BCX8">4. <span class="TextRun SCXW206691485 BCX8" data-contrast="auto" lang="EN-US" xml:lang="EN-US"><span class="NormalTextRun SCXW206691485 BCX8">T</span><span class="NormalTextRun SCXW206691485 BCX8">ags</span></span><span class="EOP SCXW206691485 BCX8" data-ccp-props="{"201341983":0,"335559739":160,"335559740":360}"> </span>

</div><div class="ListContainerWrapper SCXW206691485 BCX8">5. <span class="TextRun SCXW206691485 BCX8" data-contrast="auto" lang="EN-US" xml:lang="EN-US"><span class="NormalTextRun SCXW206691485 BCX8">Processors</span></span><span class="EOP SCXW206691485 BCX8" data-ccp-props="{"201341983":0,"335559739":160,"335559740":360}"> </span>

</div><div class="ListContainerWrapper SCXW206691485 BCX8">- <span class="TextRun SCXW206691485 BCX8" data-contrast="auto" lang="EN-US" xml:lang="EN-US"><span class="NormalTextRun SCXW206691485 BCX8">Processors are used to reduce the number of fields in the exported event or to enhance the event with metadata. This </span><span class="NormalTextRun SCXW206691485 BCX8">executes in the agent before the logs are parsed. See Processors for details.</span></span><span class="EOP SCXW206691485 BCX8" data-ccp-props="{"201341983":0,"335559739":160,"335559740":360}"> </span>

</div><div class="ListContainerWrapper SCXW206691485 BCX8">6. <span class="TextRun SCXW206691485 BCX8" data-contrast="auto" lang="EN-US" xml:lang="EN-US"><span class="NormalTextRun SCXW206691485 BCX8">Synthetic source</span> <span class="NormalTextRun SCXW206691485 BCX8">(Enable Yes/No)</span></span><span class="EOP SCXW206691485 BCX8" data-ccp-props="{"201341983":0,"335559739":160,"335559740":360}"> </span>

</div></div>##### <span style="color: rgb(53, 152, 219);"><span class="TextRun SCXW206691485 BCX8" data-contrast="none" lang="EN-US" xml:lang="EN-US">**<span class="NormalTextRun SCXW206691485 BCX8" data-ccp-parastyle="heading 3">Windows </span><span class="NormalTextRun SpellingErrorV2Themed SCXW206691485 BCX8" data-ccp-parastyle="heading 3">Powershell</span><span class="NormalTextRun SCXW206691485 BCX8" data-ccp-parastyle="heading 3"> Operational Events via Splunk Enterprise REST API</span> <span class="NormalTextRun SCXW206691485 BCX8" data-ccp-parastyle="heading 3">(Enable Yes/No)</span>**</span>**<span class="EOP SCXW206691485 BCX8" data-ccp-props="{"134245418":true,"134245529":true,"201341983":0,"335559685":720,"335559738":40,"335559739":0,"335559740":360}"> </span>**</span>

<div class="SCXW206691485 BCX8" id="bkmrk-interval-to-query-sp-2"><div class="ListContainerWrapper SCXW206691485 BCX8">1. <span class="TextRun SCXW206691485 BCX8" data-contrast="auto" lang="EN-US" xml:lang="EN-US"><span class="NormalTextRun SCXW206691485 BCX8">Interval to query Splunk Enterprise REST API</span></span><span class="EOP SCXW206691485 BCX8" data-ccp-props="{"201341983":0,"335559739":160,"335559740":360}"> </span>

</div><div class="ListContainerWrapper SCXW206691485 BCX8">- <span class="TextRun SCXW206691485 BCX8" data-contrast="auto" lang="EN-US" xml:lang="EN-US"><span class="NormalTextRun SCXW206691485 BCX8">Go Duration syntax (</span><span class="NormalTextRun SpellingErrorV2Themed SCXW206691485 BCX8">eg.</span><span class="NormalTextRun SCXW206691485 BCX8"> 10s)</span></span><span class="EOP SCXW206691485 BCX8" data-ccp-props="{"201341983":0,"335559739":160,"335559740":360}"> </span>

</div><div class="ListContainerWrapper SCXW206691485 BCX8">2. <span class="TextRun SCXW206691485 BCX8" data-contrast="auto" lang="EN-US" xml:lang="EN-US"><span class="NormalTextRun SCXW206691485 BCX8">Preserve original event</span> <span class="NormalTextRun SCXW206691485 BCX8">(Enable Yes/No)</span></span><span class="EOP SCXW206691485 BCX8" data-ccp-props="{"201341983":0,"335559739":160,"335559740":360}"> </span>

</div><div class="ListContainerWrapper SCXW206691485 BCX8">- <span class="TextRun SCXW206691485 BCX8" data-contrast="auto" lang="EN-US" xml:lang="EN-US"><span class="NormalTextRun SCXW206691485 BCX8">Preserves a raw copy of the original event, added to the field </span><span class="NormalTextRun SpellingErrorV2Themed SCXW206691485 BCX8">event.original</span></span><span class="EOP SCXW206691485 BCX8" data-ccp-props="{"201341983":0,"335559739":160,"335559740":360}"> </span>

</div><div class="ListContainerWrapper SCXW206691485 BCX8">3. <span class="TextRun SCXW206691485 BCX8" data-contrast="auto" lang="EN-US" xml:lang="EN-US"><span class="NormalTextRun SCXW206691485 BCX8">Splunk search string</span></span><span class="EOP SCXW206691485 BCX8" data-ccp-props="{"201341983":0,"335559739":160,"335559740":360}"> </span>

</div><div class="ListContainerWrapper SCXW206691485 BCX8">4. <span class="TextRun SCXW206691485 BCX8" data-contrast="auto" lang="EN-US" xml:lang="EN-US"><span class="NormalTextRun SCXW206691485 BCX8">Tags</span></span><span class="EOP SCXW206691485 BCX8" data-ccp-props="{"201341983":0,"335559739":160,"335559740":360}"> </span>

</div><div class="ListContainerWrapper SCXW206691485 BCX8">5. <span class="TextRun SCXW206691485 BCX8" data-contrast="auto" lang="EN-US" xml:lang="EN-US"><span class="NormalTextRun SCXW206691485 BCX8">Processors</span></span><span class="EOP SCXW206691485 BCX8" data-ccp-props="{"201341983":0,"335559739":160,"335559740":360}"> </span>

</div><div class="ListContainerWrapper SCXW206691485 BCX8">- <span class="TextRun SCXW206691485 BCX8" data-contrast="auto" lang="EN-US" xml:lang="EN-US"><span class="NormalTextRun SCXW206691485 BCX8">Processors are used to reduce the number of fields in the exported event or to enhance the event with metadata. This executes in the agent before the logs are parsed. See Processors for details.</span></span><span class="EOP SCXW206691485 BCX8" data-ccp-props="{"201341983":0,"335559739":160,"335559740":360}"> </span>

</div><div class="ListContainerWrapper SCXW206691485 BCX8">6. <span class="TextRun SCXW206691485 BCX8" data-contrast="auto" lang="EN-US" xml:lang="EN-US"><span class="NormalTextRun SCXW206691485 BCX8">Synthetic source</span> <span class="NormalTextRun SCXW206691485 BCX8">(Enable Yes/No)</span></span><span class="EOP SCXW206691485 BCX8" data-ccp-props="{"201341983":0,"335559739":160,"335559740":360}"> </span>

</div></div>##### <span style="color: rgb(53, 152, 219);"><span class="TextRun Highlight SCXW206691485 BCX8" data-contrast="none" lang="EN-US" xml:lang="EN-US">**<span class="NormalTextRun SCXW206691485 BCX8" data-ccp-parastyle="heading 3">Windows Sysmon Operational Events via Splunk Enterprise REST API</span>** </span>**<span class="TextRun SCXW206691485 BCX8" data-contrast="none" lang="EN-US" xml:lang="EN-US"><span class="NormalTextRun SCXW206691485 BCX8" data-ccp-parastyle="heading 3">(Enable Yes/No)</span></span><span class="EOP SCXW206691485 BCX8" data-ccp-props="{"134245418":true,"134245529":true,"201341983":0,"335559738":40,"335559739":0,"335559740":360}"> </span>**</span>

<div class="SCXW206691485 BCX8" id="bkmrk-interval-to-query-sp-3"><div class="ListContainerWrapper SCXW206691485 BCX8">1. <span class="TextRun SCXW206691485 BCX8" data-contrast="auto" lang="EN-US" xml:lang="EN-US"><span class="NormalTextRun SCXW206691485 BCX8">Interval to query Splunk Enterprise REST API</span></span><span class="EOP SCXW206691485 BCX8" data-ccp-props="{"201341983":0,"335559739":160,"335559740":360}"> </span>

</div><div class="ListContainerWrapper SCXW206691485 BCX8">- <span class="TextRun SCXW206691485 BCX8" data-contrast="auto" lang="EN-US" xml:lang="EN-US"><span class="NormalTextRun SCXW206691485 BCX8">Go Duration syntax (</span><span class="NormalTextRun SpellingErrorV2Themed SCXW206691485 BCX8">eg.</span><span class="NormalTextRun SCXW206691485 BCX8"> 10s)</span></span><span class="EOP SCXW206691485 BCX8" data-ccp-props="{"201341983":0,"335559739":160,"335559740":360}"> </span>

</div><div class="ListContainerWrapper SCXW206691485 BCX8">2. <span class="TextRun SCXW206691485 BCX8" data-contrast="auto" lang="EN-US" xml:lang="EN-US"><span class="NormalTextRun SCXW206691485 BCX8">Preserve original event</span> <span class="NormalTextRun SCXW206691485 BCX8">(Enable Yes/No)</span></span><span class="EOP SCXW206691485 BCX8" data-ccp-props="{"201341983":0,"335559739":160,"335559740":360}"> </span>

</div></div><div class="SCXW206691485 BCX8" id="bkmrk-preserves-a-raw-copy-2"><div class="ListContainerWrapper SCXW206691485 BCX8">- <span class="TextRun SCXW206691485 BCX8" data-contrast="auto" lang="EN-US" xml:lang="EN-US"><span class="NormalTextRun SCXW206691485 BCX8">Preserves a raw copy of the original event, added to the field </span><span class="NormalTextRun SpellingErrorV2Themed SCXW206691485 BCX8">event.original</span></span><span class="EOP SCXW206691485 BCX8" data-ccp-props="{"201341983":0,"335559739":160,"335559740":360}"> </span>

</div><div class="ListContainerWrapper SCXW206691485 BCX8">3. <span class="TextRun SCXW206691485 BCX8" data-contrast="auto" lang="EN-US" xml:lang="EN-US"><span class="NormalTextRun SCXW206691485 BCX8">Splunk search string</span></span><span class="EOP SCXW206691485 BCX8" data-ccp-props="{"201341983":0,"335559739":160,"335559740":360}"> </span>

</div><div class="ListContainerWrapper SCXW206691485 BCX8">4. <span class="TextRun SCXW206691485 BCX8" data-contrast="auto" lang="EN-US" xml:lang="EN-US"><span class="NormalTextRun SCXW206691485 BCX8">Tags</span></span><span class="EOP SCXW206691485 BCX8" data-ccp-props="{"201341983":0,"335559739":160,"335559740":360}"> </span>

</div><div class="ListContainerWrapper SCXW206691485 BCX8">5. <span class="TextRun SCXW206691485 BCX8" data-contrast="auto" lang="EN-US" xml:lang="EN-US"><span class="NormalTextRun SCXW206691485 BCX8">Processors</span></span><span class="EOP SCXW206691485 BCX8" data-ccp-props="{"201341983":0,"335559739":160,"335559740":360}"> </span>

</div><div class="ListContainerWrapper SCXW206691485 BCX8">- <span class="TextRun SCXW206691485 BCX8" data-contrast="auto" lang="EN-US" xml:lang="EN-US"><span class="NormalTextRun SCXW206691485 BCX8">Processors are used to reduce the number of fields in the exported event or to enhance the event with metadata. This executes in the agent before the logs are parsed. See Processors for details.</span></span><span class="EOP SCXW206691485 BCX8" data-ccp-props="{"201341983":0,"335559739":160,"335559740":360}"> </span>

</div><div class="ListContainerWrapper SCXW206691485 BCX8">6. <span class="TextRun SCXW206691485 BCX8" data-contrast="auto" lang="EN-US" xml:lang="EN-US"><span class="NormalTextRun SCXW206691485 BCX8">Synthetic source</span> <span class="NormalTextRun SCXW206691485 BCX8">(Enable Yes/No)</span></span><span class="EOP SCXW206691485 BCX8" data-ccp-props="{"201341983":0,"335559739":160,"335559740":360}"> </span>

</div></div>

# AQUILA - 1Password Integration

## <span style="color: rgb(53, 152, 219);">**1Password Events Reporting Integration Manual**</span>

<span style="color: rgb(0, 0, 0);">With **1Password Business**, you can forward account activity to your SIEM system using the <span style="color: rgb(132, 63, 161);">**[1Password Events API](https://support.1password.com/events-reporting/)**</span>. This enables centralized monitoring, improved visibility, and enhanced response to security-related events across your organization.</span>

---

### <span style="color: rgb(53, 152, 219);">**Key Benefits**</span>

<span style="color: rgb(0, 0, 0);">When integrated with your SIEM, 1Password Events Reporting allows you to:</span>

- <span style="color: rgb(0, 0, 0);">**Retain 1Password event data** according to your organization's policies</span>
- <span style="color: rgb(0, 0, 0);">**Build custom dashboards** and visualizations for insights</span>
- <span style="color: rgb(0, 0, 0);">**Configure custom alerts** to automate responses</span>
- <span style="color: rgb(0, 0, 0);">**Correlate 1Password events** with data from other systems and services</span>

---

### <span style="color: rgb(53, 152, 219);">**Permissions Required**</span>

<span style="color: rgb(0, 0, 0);">You must be an **Owner** or **Administrator** of your 1Password Business account to configure Events Reporting.</span>

---

### <span style="color: rgb(53, 152, 219);">**Supported Event Types**</span>

#### <span style="color: rgb(53, 152, 219);">**Sign-In Attempts**</span>

<span style="color: rgb(0, 0, 0);">Track authentication activity including:</span>

- <span style="color: rgb(0, 0, 0);">**Username and IP address** of the user</span>
- <span style="color: rgb(0, 0, 0);">**Timestamp** of the sign-in attempt</span>
- <span style="color: rgb(0, 0, 0);">**Success or failure status**</span>
- <span style="color: rgb(0, 0, 0);">**Cause of failure** (for failed attempts)</span>

<span style="color: rgb(0, 0, 0);">These logs help monitor account access patterns and detect unauthorized access attempts.</span>

---

### <span style="color: rgb(53, 152, 219);">**How to Set Up**</span>

<span style="color: rgb(0, 0, 0);">To begin configuring the integration, refer to the official 1Password guide:</span>  
<span style="color: rgb(132, 63, 161);">**[Set up Elastic Events Reporting Integration](https://support.1password.com/events-reporting/)**</span>

<span style="color: rgb(0, 0, 0);">The 1Password Events API supports JSON-formatted log delivery, which can be ingested by your SIEM using a collector or custom integration script.</span>

<span style="color: rgb(0, 0, 0);">*<span class="TextRun SCXW71272603 BCX0" data-contrast="auto" lang="EN-US" xml:lang="EN-US"><span class="NormalTextRun SCXW71272603 BCX0">If you need further </span><span class="NormalTextRun SCXW71272603 BCX0">assistance</span><span class="NormalTextRun SCXW71272603 BCX0">, kindly contact our support at </span></span><span style="color: rgb(53, 152, 219);">**<span class="TextRun SCXW71272603 BCX0" data-contrast="none" lang="EN-US" xml:lang="EN-US"><span class="NormalTextRun SCXW71272603 BCX0">support@cytechint.com</span></span>**</span><span class="TextRun SCXW71272603 BCX0" data-contrast="auto" lang="EN-US" xml:lang="EN-US"><span class="NormalTextRun SCXW71272603 BCX0"><span style="color: rgb(53, 152, 219);"> </span>for prompt </span><span class="NormalTextRun SCXW71272603 BCX0">assistance</span><span class="NormalTextRun SCXW71272603 BCX0"> and guidance.</span></span><span class="EOP SCXW71272603 BCX0" data-ccp-props="{}"></span>*</span>

# AQUILA - Atlassian Account Integration

##### <span style="color: rgb(53, 152, 219);">**What are API token scopes?**</span>

<span style="color: rgb(0, 0, 0);">Scopes define what actions an API token is allowed to perform in Atlassian apps such as Jira and Confluence. They provide security by limiting the permissions of the token. You can create tokens with scopes (recommended) or without scopes (for apps that do not support scoped tokens).</span>

##### <span style="color: rgb(53, 152, 219);">**Creating an API token with scopes:**</span>

1. <span style="color: rgb(0, 0, 0);">Log in to <span style="color: rgb(132, 63, 161);">[https://id.atlassian.com/manage-profile/security/api-tokens](https://id.atlassian.com/manage-profile/security/api-tokens)</span></span>
2. <span style="color: rgb(0, 0, 0);">Select "Create API token with scopes"</span>
3. <span style="color: rgb(0, 0, 0);">Enter a descriptive name for the token (for example: AQUILA - Monitoring)</span>
4. <span style="color: rgb(0, 0, 0);">Choose an expiration date for the token (between 1 and 365 days)</span>
5. <span style="color: rgb(0, 0, 0);">Select the application (Jira or Confluence)</span>
6. <span style="color: rgb(0, 0, 0);">Select the scopes or permissions the token should have</span>
    
    
    - <span style="color: rgb(0, 0, 0);">Example for Jira: **read:audit-log:jira**</span>
    - <span style="color: rgb(0, 0, 0);">Example for Confluence: **read:audit-log:confluence**</span>
7. <span style="color: rgb(0, 0, 0);">Click "Create"</span>
8. <span style="color: rgb(0, 0, 0);">Copy the token and save it securely. You cannot view it again after this step. If you lose it, you will need to generate a new token.</span>

<p class="callout warning">**<span style="color: rgb(0, 0, 0);">Required credentials for Jira Integration access:</span>**</p>

- <span style="color: rgb(0, 0, 0);">**API URL**: Base Jira API URL without the path</span>
- <span style="color: rgb(0, 0, 0);">**Jira User Identifier**: Your Atlassian email address</span>
- <span style="color: rgb(0, 0, 0);">**Jira API Token**: The API token you created</span>

<span style="color: rgb(0, 0, 0);">*If you need further assistance, kindly contact our support at* <span style="color: rgb(53, 152, 219);">***support@cytechint.com***</span> *for prompt assistance and guidance.*</span>

# AQUILA - AWS Integration

#### <span style="color: rgb(53, 152, 219);">**Overview**</span>

  
<span style="color: rgb(0, 0, 0);">The AWS Integration enables the collection of logs and metrics from your Amazon Web Services (AWS) environment. This integration helps centralize security and operational data for monitoring, investigation, and reporting.</span>

#### **<span style="color: rgb(53, 152, 219);">Data Streams</span>**

  
<span style="color: rgb(0, 0, 0);">The AWS integration collects two main types of data:</span>

1. <span style="color: rgb(0, 0, 0);">**Logs** – Records of events that occur within your AWS account.</span>  
    <span style="color: rgb(0, 0, 0);">Examples:</span>
    
    
    - <span style="color: rgb(0, 0, 0);">Every request received by CloudFront</span>
    - <span style="color: rgb(0, 0, 0);">Actions performed by AWS users or roles</span>
    - <span style="color: rgb(0, 0, 0);">API activity captured by CloudTrail</span>
2. <span style="color: rgb(0, 0, 0);">**Metrics** – Real-time insights into the performance and health of AWS services.</span>  
    <span style="color: rgb(0, 0, 0);">Examples:</span>
    
    
    - <span style="color: rgb(0, 0, 0);">CPU utilization of EC2 instances</span>
    - <span style="color: rgb(0, 0, 0);">S3 storage usage</span>
    - <span style="color: rgb(0, 0, 0);">RDS performance metrics</span>
    - <span style="color: rgb(0, 0, 0);">AWS cost and usage breakdowns</span>

#### **<span style="color: rgb(53, 152, 219);">Requirements</span>**

  
<span style="color: rgb(0, 0, 0);">Before configuring the AWS integration, ensure you have:</span>

1. <span style="color: rgb(0, 0, 0);">**AWS Credentials** – To connect to your AWS account.</span>
2. <span style="color: rgb(0, 0, 0);">**AWS Permissions** – To grant access to the necessary AWS services.</span>

##### <span style="color: rgb(53, 152, 219);">**Step 1. Create IAM User and Custom Policy**</span>

1. **<span style="color: rgb(0, 0, 0);">IAM User</span>**  
    <span style="color: rgb(0, 0, 0);">-an identity you create in **AWS Identity and Access Management (IAM)** that represents a person or application which needs to interact with your AWS resources.</span>
2. <span style="color: rgb(0, 0, 0);">**User Policy and Permissions**</span>

<span style="color: rgb(0, 0, 0);">The IAM User must be granted the following permissions:</span>

```json
{
	"Version": "2012-10-17",
	"Statement": [
		{
			"Effect": "Allow",
			"Action": [
				"ce:GetCostAndUsage",
				"cloudwatch:GetMetricData",
				"cloudwatch:ListMetrics",
				"ec2:DescribeInstances",
				"ec2:DescribeRegions",
				"iam:ListAccountAliases",
				"inspector2:ListFindings",
				"logs:DescribeLogGroups",
				"logs:FilterLogEvents",
				"organizations:ListAccounts",
				"rds:DescribeDBInstances",
				"rds:ListTagsForResource",
				"s3:GetBucketLocation",
				"s3:GetObject",
				"s3:ListBucket",
				"sns:ListTopics",
				"sqs:ChangeMessageVisibility",
				"sqs:DeleteMessage",
				"sqs:GetQueueAttributes",
				"sqs:ListQueues",
				"sqs:ReceiveMessage",
				"sts:AssumeRole",
				"sts:GetCallerIdentity",
				"tag:GetResources"
			],
			"Resource": "*"
		}
	]
}
```

##### **<span style="color: rgb(0, 0, 0);">  
<span style="color: rgb(53, 152, 219);">Step 2: Create Access Key  
</span></span>**  


<span style="color: rgb(0, 0, 0);">Long-term credentials associated with an IAM user or the AWS root account.</span>

- 1. <span style="color: rgb(0, 0, 0);">**Access Key ID** – First part of the access key</span>
    2. <span style="color: rgb(0, 0, 0);">**Secret Access Key** – Second part of the access key</span>

##### **<span style="color: rgb(53, 152, 219);">Step 3: Create a CloudTrail Trail and Send Logs to S3</span>**

<span style="color: rgb(0, 0, 0);">Set up an AWS CloudTrail trail to record account activity and deliver log files into an S3 bucket for secure storage, auditing, and compliance monitoring.</span>

1. <span style="color: rgb(0, 0, 0);">**Open CloudTrail** &gt; </span><span style="color: rgb(0, 0, 0);">Create a **New Trail**</span>
2. **<span style="color: rgb(0, 0, 0);">Trail Settings</span>**
    
    
    - <span style="color: rgb(0, 0, 0);">Trail name: Enter a unique name.</span>
    - <span style="color: rgb(0, 0, 0);">Apply trail to all accounts in my organization.</span>
3. Choose an S3 Bucket
    
    
    - **Storage location** → Select **Create new S3 bucket** or **Use existing bucket**.
    
     If using **new bucket**:
    
    
    - Enter a bucket name.
    - CloudTrail will create the bucket and add the correct permissions.
    
     If using **existing bucket**:
    
    
    - Select your bucket from the dropdown.
    - CloudTrail will prompt you to allow access. Click **Yes** to let CloudTrail update the bucket policy.
4. <span style="color: rgb(0, 0, 0);">Additional Settings</span>
    
    
    - <span style="color: rgb(0, 0, 0);">**Enable for all accounts in my organization**</span>
    - <span style="color: rgb(0, 0, 0);">**Log file SSE-KMS encryption:** Enable if you want encryption with a KMS key(optional).</span>
    - <span style="color: rgb(0, 0, 0);">**Log file validation:** Enable to verify log integrity.</span>
5. <span style="color: rgb(0, 0, 0);">Choose Log Events</span>
    1. **<span style="color: rgb(0, 0, 0);">Event Type</span>**
        - <span style="color: rgb(0, 0, 0);">**Management events** - Capture management operations performed on your AWS resources.</span>
        - <span style="color: rgb(0, 0, 0);">**Data events** - Log the resource operations performed on or within a resource.</span>
        - **Insights events** - Identify unusual activity, errors, or user behavior in your account.
        - <span style="color: rgb(0, 0, 0);">**Network activity events** - Network activity events provide information about resource operations performed on a resource within a virtual private cloud endpoint.</span>
    2. **Management events:**
        
        
        - Check **Read**(default is usually All).
6. <span style="color: rgb(0, 0, 0);">Review and Create</span>
    
    
    - <span style="color: rgb(0, 0, 0);">Review your configuration summary.</span>
    - <span style="color: rgb(0, 0, 0);">Click **Create trail**.</span>

<span style="color: rgb(0, 0, 0);">To configure the AWS Integration:</span>

<p class="callout danger">**<span class="TextRun SCXW124724174 BCX0" data-contrast="none" lang="EN-US" xml:lang="EN-US"><span class="NormalTextRun SCXW124724174 BCX0">Please provide the following information to </span><span class="NormalTextRun SpellingErrorV2Themed SCXW124724174 BCX0">CyTech Support</span><span class="NormalTextRun SCXW124724174 BCX0">:</span></span><span class="EOP SCXW124724174 BCX0" data-ccp-props="{"134233117":false,"134233118":false,"335551550":0,"335551620":0,"335559738":240,"335559739":240}"> </span>**</p>

<div class="ListContainerWrapper SCXW124724174 BCX0" id="bkmrk-project-id%C2%A0---the-pr">- <span style="color: rgb(0, 0, 0);">**Access key ID**</span>
- <span style="color: rgb(0, 0, 0);">**Secret Access Key**</span>
- **<span style="color: rgb(0, 0, 0);">Region</span>**
- <span style="color: rgb(0, 0, 0);">**Trail Log Collection &gt; S3 Bucket ARN**</span>

</div>*If you need further assistance, kindly contact our support at **<span style="color: rgb(53, 152, 219);">[support@cytechint.com](mailto:info@cytechint.com)</span>** for prompt assistance and guidance.*

# AQUILA - Azure Logs Integration

<span style="color: rgb(0, 0, 0);">The **Azure Logs integration** enables you to collect logs from specific Azure services such as:</span>

- <span style="color: rgb(0, 0, 0);">**Microsoft Entra ID** (Sign-in, Audit, Identity Protection, Provisioning logs)</span>
- <span style="color: rgb(0, 0, 0);">**Azure Spring Apps**</span>
- <span style="color: rgb(0, 0, 0);">**Azure Firewall**</span>
- <span style="color: rgb(0, 0, 0);">**Microsoft Graph Activity**</span>
- <span style="color: rgb(0, 0, 0);">**Activity and Platform logs**</span>
- <span style="color: rgb(0, 0, 0);">Additional supported Azure services</span>

#### <span style="color: rgb(53, 152, 219);">**Example Use Cases**</span>

- <span style="color: rgb(0, 0, 0);">**Brute force sign-in detection**: Collect **Microsoft Entra ID sign-in logs** and configure an alert in the Observability Logs app to notify you if failed sign-in attempts exceed a defined threshold.</span>
- <span style="color: rgb(0, 0, 0);">**Capacity planning**: Collect **Azure Activity logs** to track when virtual machines fail to start due to quota limits, helping plan resource scaling.</span>

---

#### <span style="color: rgb(53, 152, 219);">**Data Streams**</span>

<span style="color: rgb(0, 0, 0);">The Azure Logs integration collects **log data streams** from the following sources:</span>

- <span style="color: rgb(0, 0, 0);">Activity Logs</span>
- <span style="color: rgb(0, 0, 0);">Platform Logs</span>
- <span style="color: rgb(0, 0, 0);">Microsoft Entra ID Logs (Sign-in, Audit, Identity Protection, Provisioning)</span>
- <span style="color: rgb(0, 0, 0);">Microsoft Graph Activity Logs</span>
- <span style="color: rgb(0, 0, 0);">Azure Spring Apps Logs</span>

<span style="color: rgb(0, 0, 0);">Logs provide a complete record of events that occur in your Azure environment, allowing you to detect threats, troubleshoot issues, and plan capacity.</span>

---

#### <span style="color: rgb(53, 152, 219);">**Azure Setup Prerequisites**</span>

<span style="color: rgb(0, 0, 0);">To successfully forward Azure logs, you will need:</span>

1. <span style="color: rgb(0, 0, 0);">**Diagnostic Settings**</span>
    
    
    - <span style="color: rgb(0, 0, 0);">Configure diagnostic settings in Azure to export metrics and logs from source services (e.g., Entra ID, Activity Logs).</span>
    - <span style="color: rgb(0, 0, 0);">Logs must be sent to a supported destination for analysis and storage.</span>
2. <span style="color: rgb(0, 0, 0);">**Event Hubs**</span>
    
    
    - <span style="color: rgb(0, 0, 0);">One or more **Event Hubs** to temporarily store and stream logs exported by Azure services.</span>
    - <span style="color: rgb(0, 0, 0);">Log Collector will use Event Hubs as the ingestion point.</span>
3. <span style="color: rgb(0, 0, 0);">**Storage Account Container**</span>
    
    
    - <span style="color: rgb(0, 0, 0);">A **Storage Account container** to store checkpoint information about logs consumed by Log Collector.</span>
    - <span style="color: rgb(0, 0, 0);">This ensures logs are ingested reliably without duplication or loss.</span>


---

#### <span style="color: rgb(53, 152, 219);">**Step 1: Create an Event Hub for Microsoft Entra ID Logs**</span>

1. <span style="color: rgb(0, 0, 0);">**Go to Azure Portal &gt; Event Hubs &gt; Create Namespace**</span>
    
    
    - <span style="color: rgb(0, 0, 0);">Select **Resource Group** or create a new one.</span>
    - <span style="color: rgb(0, 0, 0);">Choose a **Region** and a **Pricing Tier (Standard or Premium)**.</span>
    - <span style="color: rgb(0, 0, 0);">Click **Review + Create** → **Create**.</span>
2. <span style="color: rgb(0, 0, 0);">**Create an Event Hub** inside the namespace</span>
    
    
    - <span style="color: rgb(0, 0, 0);">Navigate to the **Namespace** → Click **+ Event Hub**.</span>
    - <span style="color: rgb(0, 0, 0);">Set **Name**: entra-id-logs (Example)</span>
    - <span style="color: rgb(0, 0, 0);">Set **Partitions**: At least **2** (for redundancy).</span>
    - <span style="color: rgb(0, 0, 0);">Click **Create**.</span>
3. <span style="color: rgb(0, 0, 0);">**Create a Consumer Group (Optional)**</span>
    
    
    - <span style="color: rgb(0, 0, 0);">Go to **Event Hub &gt; Consumer Groups**.</span>
    - <span style="color: rgb(0, 0, 0);">Add a new group (e.g., aquila-agent-group).</span>
4. <span style="color: rgb(0, 0, 0);">**Generate Connection String**</span>
    
    
    - <span style="color: rgb(0, 0, 0);">Navigate to **Event Hubs Namespace &gt; Shared Access Policies**.</span>
    - <span style="color: rgb(0, 0, 0);">Click **+ Add Policy**.</span>
    - <span style="color: rgb(0, 0, 0);">Set Name: AquilaAgentPolicy.</span>
    - <span style="color: rgb(0, 0, 0);">Select **"Listen"** permission.</span>
    - <span style="color: rgb(0, 0, 0);">Copy **Primary Connection String** (used in the next steps).</span>

---

#### <span style="color: rgb(53, 152, 219);">**Step 2: Enable Diagnostic Settings for Microsoft Entra ID**</span>

1. <span style="color: rgb(0, 0, 0);">**Go to Azure Portal &gt; Microsoft Entra ID**.</span>
2. <span style="color: rgb(0, 0, 0);">Navigate to **Monitoring &gt; Diagnostic Settings**.</span>
3. <span style="color: rgb(0, 0, 0);">Click **+ Add Diagnostic Setting** and configure:</span>
    - <span style="color: rgb(0, 0, 0);">**Name**: entra-logs-to-aquila</span>
    - <span style="color: rgb(0, 0, 0);">**Log Categories**:</span>  
        <span style="color: rgb(0, 0, 0);">-Sign-in logs</span>  
        <span style="color: rgb(0, 0, 0);">-Audit logs</span>  
        <span style="color: rgb(0, 0, 0);">-Identity Protection logs</span>  
        <span style="color: rgb(0, 0, 0);">-Provisioning logs</span>
    - <span style="color: rgb(0, 0, 0);">**Destination**: Select **Event Hubs**.</span>
    - <span style="color: rgb(0, 0, 0);">**Choose the Event Hub Namespace** created earlier.</span>
    - <span style="color: rgb(0, 0, 0);">**Select the Event Hub (entra-id-logs)**.</span>
    - <span style="color: rgb(0, 0, 0);">Click **Save**.</span>

---

#### <span style="color: rgb(53, 152, 219);">**Step 3: Configure Azure Storage for Checkpointing**</span>

1. <span style="color: rgb(0, 0, 0);">**Create a Storage Account**</span>
    
    
    - <span style="color: rgb(0, 0, 0);">Navigate to **Azure Portal &gt; Storage Accounts &gt; Create**.</span>
    - <span style="color: rgb(0, 0, 0);">Select **Resource Group** (same as Event Hub).</span>
    - <span style="color: rgb(0, 0, 0);">Set **Storage Account Name**: </span>
    - <span style="color: rgb(0, 0, 0);">**Disable Hierarchical Namespace** and **Enable TLS 1.2**.</span>
    - <span style="color: rgb(0, 0, 0);">Click **Create**.</span>
2. <span style="color: rgb(0, 0, 0);">**Create a Blob Container**</span>
    
    
    - <span style="color: rgb(0, 0, 0);">Open the **Storage Account &gt; Containers**.</span>
    - <span style="color: rgb(0, 0, 0);">Click **+ Container**.</span>
    - <span style="color: rgb(0, 0, 0);">Set **Name**: </span>
    - <span style="color: rgb(0, 0, 0);">Set **Public Access Level**: Private.</span>
3. <span style="color: rgb(0, 0, 0);">**Copy Storage Account Keys**</span>
    
    
    - <span style="color: rgb(0, 0, 0);">Go to **Storage Account &gt; Access Keys**.</span>
    - <span style="color: rgb(0, 0, 0);">Copy **Storage Account Name &amp; Key** for integration configuration.</span>

---

<p class="callout warning">**<span class="TextRun SCXW264382529 BCX0" data-contrast="none" lang="EN-US" xml:lang="EN-US"><span class="NormalTextRun SCXW264382529 BCX0" data-ccp-parastyle="heading 3">Please saved and provide this values to AQUILA Support Team.</span></span>**</p>

- <span style="color: rgb(0, 0, 0);">**Event Hub Name**: </span>
- <span style="color: rgb(0, 0, 0);">**Consumer Group**: </span>
- <span style="color: rgb(0, 0, 0);">**Event Hub Connection String**: </span>
- <span style="color: rgb(0, 0, 0);">**Storage Account Name**: </span>
- <span style="color: rgb(0, 0, 0);">**Storage Account Key**: </span>
- <span style="color: rgb(0, 0, 0);">**Storage Container Name**: </span>
- <span style="color: rgb(0, 0, 0);">**Resource Manager Endpoint(optional)**: </span>

---

<span style="color: rgb(0, 0, 0);">*<span class="TextRun SCXW71272603 BCX0" data-contrast="auto" lang="EN-US" xml:lang="EN-US"><span class="NormalTextRun SCXW71272603 BCX0">If you need further </span><span class="NormalTextRun SCXW71272603 BCX0">assistance</span><span class="NormalTextRun SCXW71272603 BCX0">, kindly contact </span></span><span style="color: rgb(53, 152, 219);">**<span class="TextRun SCXW71272603 BCX0" data-contrast="none" lang="EN-US" xml:lang="EN-US"><span class="NormalTextRun SCXW71272603 BCX0">support@cytechint.com</span></span>**</span><span class="TextRun SCXW71272603 BCX0" data-contrast="auto" lang="EN-US" xml:lang="EN-US"><span class="NormalTextRun SCXW71272603 BCX0"> for prompt </span><span class="NormalTextRun SCXW71272603 BCX0">assistance</span><span class="NormalTextRun SCXW71272603 BCX0"> and guidance.</span></span><span class="EOP SCXW71272603 BCX0" data-ccp-props="{}"></span>*</span>

# AQUILA - Cisco Meraki Integration

<span style="color: rgb(0, 0, 0);">Cisco Meraki provides a centralized cloud management platform for devices like MX Security Appliances, MR Access Points, and more. Its cloud-based architecture enables secure, scalable networks manageable from anywhere via the Meraki Dashboard or Mobile App. Each Meraki network generates events that can be collected and analyzed.</span>

---

##### <span style="color: rgb(53, 152, 219);">**Integration Overview**</span>

<span style="color: rgb(0, 0, 0);">This integration supports event collection through:</span>

- <span style="color: rgb(0, 0, 0);">**Syslog** messages from Meraki devices</span>

<span style="color: rgb(0, 0, 0);">Events can be searched, observed, and visualized.</span>

---

##### <span style="color: rgb(53, 152, 219);">**Compatibility**</span>

- <span style="color: rgb(0, 0, 0);">Supports event collection from **MX Security Appliances** and **MR Access Points** via syslog.</span>
- <span style="color: rgb(0, 0, 0);">**MS Switch** events are **not supported** and will not be recognized.</span>

---

##### <span style="color: rgb(53, 152, 219);">Syslog Setup:</span>  


<span style="color: rgb(0, 0, 0);">1. I**dentify Syslog-ng IP Address**</span>

<span style="color: rgb(0, 0, 0);">Access the log collector virtual machine and open a terminal. Run the following command to determine the IP address of the syslog-ng server:</span>

```
ifconfig -a
```

<p class="callout info"><span style="color: rgb(0, 0, 0);">Please take note of the IP address, as this will be referenced during the configuration.</span></p>

<span style="color: rgb(0, 0, 0);">2. **Install Syslog-ng**</span>

<span style="color: rgb(0, 0, 0);">Install syslog-ng along with its required dependencies using the following command:</span>

```
sudo apt-get install syslog-ng
```

<span style="color: rgb(0, 0, 0);">3. **Configure Syslog-ng**</span>

<span style="color: rgb(0, 0, 0);">Edit the syslog-ng configuration file:</span>

```
sudo nano /etc/syslog-ng/syslog-ng.conf
```

<p class="callout info"><span style="color: rgb(0, 0, 0);">Locate the following line:</span></p>

```
log { source(s_src); filter(f_crit); destination(d_console); };
```

<p class="callout warning"><span style="color: rgb(0, 0, 0);">Add the configuration below it, ensuring that Server\_IP\_Address and &lt;MERAKI\_IP\_ADDRESS&gt; are replaced with the appropriate values:</span></p>

```
# Define syslog source
source s_net { udp(ip(Server_IP_Address) port(5140)); };

# Create filter to match traffic (this filter will catch all syslog messages from the MX)
filter f_meraki { host("<MERAKI_IP_ADDRESS>"); };

# Define a destination for syslog messages
destination df_meraki { file("/var/log/cisco_meraki.log"); };

# Bundle the source, filter, and destination rules together
log { source(s_net); filter(f_meraki); destination(df_meraki); };
```

<span style="color: rgb(0, 0, 0);">4. **Restart Syslog-ng**</span>  
<span style="color: rgb(0, 0, 0);">After saving the configuration, restart the syslog-ng service to apply the changes:</span>

```
sudo /etc/init.d/syslog-ng restart
```

---

##### <span style="color: rgb(53, 152, 219);">**Configuring the Cisco Meraki Integration**</span>

<span style="color: rgb(0, 0, 0);">Once the syslog-ng server is configured, please proceed with the following steps in the Cisco Meraki dashboard:</span>

<span style="color: rgb(0, 0, 0);">1. **Log in to the Cisco Meraki dashboard.**</span>

<span style="color: rgb(0, 0, 0);">2. **Navigate to Network-wide &gt; Configure &gt; General.**</span>

<span style="color: rgb(0, 0, 0);">3. **Click Add a syslog server.**</span>

<span style="color: rgb(0, 0, 0);">4. **Populate the required fields as follows:**</span>

- <span style="color: rgb(0, 0, 0);">Server Address: Syslog server IP address</span>
- <span style="color: rgb(0, 0, 0);">Port: 10514</span>
- <span style="color: rgb(0, 0, 0);">Protocol: UDP</span>

<span style="color: rgb(0, 0, 0);">5. Under Roles, enable**:**</span>

- <span style="color: rgb(0, 0, 0);">Switch Event Log</span>
- <span style="color: rgb(0, 0, 0);">Wireless Air Marshal Events</span>
- <span style="color: rgb(0, 0, 0);">Wireless Flow</span>

<p class="callout info"><span style="color: rgb(0, 0, 0);">Optional: Configuration Verification</span></p>

<span style="color: rgb(0, 0, 0);">To verify successful log ingestion, access the syslog server and run:</span>

```
cd /var/log/
ls
```

<p class="callout success"><span style="color: rgb(0, 0, 0);">If the file **cisco\_meraki.log** is present, the configuration has been successfully applied and logs are being received.</span></p>

---

##### **<span style="background-color: rgb(255, 255, 255); color: rgb(53, 152, 219);">Log Rotation Configuration</span>**

<span style="color: rgb(0, 0, 0);"><span style="background-color: rgb(255, 255, 255);">To manage log growth and prevent disk space issues, please configure log rotation as follows:  
</span><span style="background-color: rgb(255, 255, 255);">Create a logrotate configuration file:</span>**<span style="background-color: rgb(255, 255, 255);">  
</span>**</span>

```
sudo nano /etc/logrotate.d/meraki
```

**<span style="color: rgb(0, 0, 0);">Add the following content:</span>**

```
/var/log/cisco_meraki.log {
    daily
    missingok
    rotate 1
    compress
    delaycompress
    notifempty
    create 0640 root root
    postrotate
        # Optional commands, such as reloading syslog services
        # /etc/init.d/syslog-ng reload
    endscript
}
```

---

##### <span style="color: rgb(53, 152, 219);">**Log Events**</span>

<span style="color: rgb(0, 0, 0);">Enable this option to collect Cisco Meraki log events across all applications configured for the selected log stream.</span>

---

##### <span style="color: rgb(53, 152, 219);">**Logs Dataset**</span>

- <span style="color: rgb(0, 0, 0);">The `cisco_meraki.log` dataset contains events collected from the configured syslog server.</span>
- <span style="color: rgb(0, 0, 0);">All Cisco Meraki specific syslog fields are available under the `cisco_meraki.log` field group for detailed analysis.</span>

---

<span style="color: rgb(0, 0, 0);">*<span class="TextRun SCXW71272603 BCX0" data-contrast="auto" lang="EN-US" xml:lang="EN-US"><span class="NormalTextRun SCXW71272603 BCX0">If you need further </span><span class="NormalTextRun SCXW71272603 BCX0">assistance</span><span class="NormalTextRun SCXW71272603 BCX0">, kindly contact our support at </span></span><span style="color: rgb(53, 152, 219);">**<span class="TextRun SCXW71272603 BCX0" data-contrast="none" lang="EN-US" xml:lang="EN-US"><span class="NormalTextRun SCXW71272603 BCX0">support@cytechint.com</span></span>**</span><span class="TextRun SCXW71272603 BCX0" data-contrast="auto" lang="EN-US" xml:lang="EN-US"><span class="NormalTextRun SCXW71272603 BCX0"> for prompt </span><span class="NormalTextRun SCXW71272603 BCX0">assistance</span><span class="NormalTextRun SCXW71272603 BCX0"> and guidance.</span></span><span class="EOP SCXW71272603 BCX0" data-ccp-props="{}"></span>*</span>

# AQUILA - Cisco Secure Endpoint Integration

##### **<span style="color: rgb(53, 152, 219);">Introduction</span>**

<span style="color: rgb(0, 0, 0);">Cisco **Secure Endpoint** is a cloud-delivered, advanced **endpoint detection and response (EDR)** solution. It provides visibility and protection across multiple control points, enabling organizations to rapidly detect, contain, and remediate advanced threats.</span>

---

##### <span style="color: rgb(53, 152, 219);">**Assumptions**</span>

<span style="color: rgb(0, 0, 0);">The procedures in this guide assume that a **Log Collector** has already been set up.</span>

---

##### <span style="color: rgb(53, 152, 219);">**Requirements**</span>

<span style="color: rgb(0, 0, 0);">This integration is designed for collecting **Cisco Secure Endpoint logs**.</span>

##### <span style="color: rgb(53, 152, 219);">**Supported Dataset**</span>

- <span style="color: rgb(0, 0, 0);">**event dataset** → Supports Cisco Secure Endpoint **event logs**, either:</span>
    
    
    - <span style="color: rgb(0, 0, 0);">Received over **syslog**</span>
    - <span style="color: rgb(0, 0, 0);">Read from a **file**</span>

---

##### **<span style="color: rgb(53, 152, 219);">Generating Client ID and API Key</span>**

<span style="color: rgb(0, 0, 0);">To collect logs via the **Secure Endpoint API**, you must first generate API credentials:</span>

1. <span style="color: rgb(0, 0, 0);">Log in to your **AMP for Endpoints Console**.</span>
2. <span style="color: rgb(0, 0, 0);">Navigate to **Accounts &gt; Organization Settings**.</span>
3. <span style="color: rgb(0, 0, 0);">Under **Features**, click **Configure API Credentials**.</span>
4. <span style="color: rgb(0, 0, 0);">Generate and copy the **Client ID** and **Secure API Key**.</span>

<p class="callout warning"><span style="color: rgb(0, 0, 0);"> **Important:** You can only copy your **API Key** at the time of creation. It cannot be retrieved later. Store it securely.</span></p>

---

##### <span style="color: rgb(53, 152, 219);">**Secure Endpoint Logs**</span>

- <span style="color: rgb(0, 0, 0);">The **event dataset** collects Cisco Secure Endpoint event logs.</span>

---

##### <span style="color: rgb(53, 152, 219);">**Secure Endpoint API Capabilities**</span>

<span style="color: rgb(0, 0, 0);">The **Secure Endpoint API** can be used to retrieve and manage detailed information, including:</span>

- <span style="color: rgb(0, 0, 0);">Generate a list of **organizations** a user has access to.</span>
- <span style="color: rgb(0, 0, 0);">Generate a list of **policies** for a specified organization.</span>
- <span style="color: rgb(0, 0, 0);">Retrieve detailed information about a specific policy, such as:</span>
    
    
    - <span style="color: rgb(0, 0, 0);">General policy data</span>
    - <span style="color: rgb(0, 0, 0);">Associated network control lists</span>
    - <span style="color: rgb(0, 0, 0);">Associated computers</span>
    - <span style="color: rgb(0, 0, 0);">Associated groups</span>
    - <span style="color: rgb(0, 0, 0);">Proxy settings</span>
    - <span style="color: rgb(0, 0, 0);">Policy XML</span>
- <span style="color: rgb(0, 0, 0);">Generate a list of all **policy types** and supported **operating systems** for an organization.</span>

---

##### **<span style="color: rgb(53, 152, 219);">Top Use Cases</span>**

- <span style="color: rgb(0, 0, 0);">**Reporting:** Generate reports on policy settings across an organization.</span>
- <span style="color: rgb(0, 0, 0);">**Inspection:** Review a particular policy’s detailed settings.</span>
- <span style="color: rgb(0, 0, 0);">**Policy Auditing:** Query for policies that match specific criteria to determine which should be updated.</span>

---

##### **<span style="color: rgb(53, 152, 219);">API Response Format</span>**

<span style="color: rgb(0, 0, 0);">The Secure Endpoint API provides responses in three key objects:</span>

- <span style="color: rgb(0, 0, 0);">**Data** → Requested content.</span>
- <span style="color: rgb(0, 0, 0);">**Meta** → Metadata describing the request/response.</span>
- <span style="color: rgb(0, 0, 0);">**Errors** → Error details if the request fails.</span>

---

<p class="callout warning"><span style="color: rgb(0, 0, 0);">To enable log collection from the Cisco Secure Endpoint API, provide the following information to **CyTech Support**:</span></p>

- <span style="color: rgb(0, 0, 0);">**Client ID** → Cisco Secure Endpoint Client ID</span>
- <span style="color: rgb(0, 0, 0);">**API Key** → Cisco Secure Endpoint API Key</span>

<span style="color: rgb(0, 0, 0);">*<span class="TextRun SCXW71272603 BCX0" data-contrast="auto" lang="EN-US" xml:lang="EN-US"><span class="NormalTextRun SCXW71272603 BCX0">If you need further </span><span class="NormalTextRun SCXW71272603 BCX0">assistance</span><span class="NormalTextRun SCXW71272603 BCX0">, kindly contact </span></span><span style="color: rgb(53, 152, 219);">**<span class="TextRun SCXW71272603 BCX0" data-contrast="none" lang="EN-US" xml:lang="EN-US"><span class="NormalTextRun SCXW71272603 BCX0">support@cytechint.com</span></span>**</span><span class="TextRun SCXW71272603 BCX0" data-contrast="auto" lang="EN-US" xml:lang="EN-US"><span class="NormalTextRun SCXW71272603 BCX0"> for prompt </span><span class="NormalTextRun SCXW71272603 BCX0">assistance</span><span class="NormalTextRun SCXW71272603 BCX0"> and guidance.</span></span><span class="EOP SCXW71272603 BCX0" data-ccp-props="{}"></span>*</span>

# AQUILA - CISCO Umbrella Integration

##### <span style="color: rgb(53, 152, 219);">**Introduction**</span>

<span style="color: rgb(0, 0, 0);">Cisco Umbrella is a cloud-delivered security platform that provides an additional layer of defense against malicious threats on the internet using Cisco’s threat intelligence. It helps block access to:</span>

- **<span style="color: rgb(0, 0, 0);">Malware</span>**
- **<span style="color: rgb(0, 0, 0);">Adware</span>**
- **<span style="color: rgb(0, 0, 0);">Botnets</span>**
- **<span style="color: rgb(0, 0, 0);">Phishing attacks</span>**
- **<span style="color: rgb(0, 0, 0);">Known malicious websites</span>**

##### <span style="color: rgb(53, 152, 219);">**Assumptions**</span>

<span style="color: rgb(0, 0, 0);">The procedures described in this guide assume that a Log Collector has already been set up.</span>

##### <span style="color: rgb(53, 152, 219);">**Prerequisites**</span>

- <span style="color: rgb(0, 0, 0);">Full Admin access to Cisco Umbrella to create and manage Umbrella API keys.</span>
- <span style="color: rgb(0, 0, 0);">Umbrella API KeyAdmin access (if managing API key scopes and expirations).</span>

---

##### <span style="color: rgb(53, 152, 219);">**Requirements**</span>

**<span style="color: rgb(0, 0, 0);">This integration supports log ingestion from Cisco Umbrella. Data is collected from:</span>**

- <span style="color: rgb(0, 0, 0);">AWS S3 buckets using an SQS notification queue</span>
- <span style="color: rgb(0, 0, 0);">Cisco-managed S3 buckets without SQS</span>

##### <span style="color: rgb(53, 152, 219);">**Supported Dataset**</span>

- <span style="color: rgb(0, 0, 0);">log dataset: Collects Cisco Umbrella logs.</span>

---

##### <span style="color: rgb(53, 152, 219);">**Umbrella Logs**</span>

**<span style="color: rgb(0, 0, 0);">When using Cisco-managed S3 buckets without SQS:</span>**

- <span style="color: rgb(0, 0, 0);">Load balancing across multiple agents is not supported.</span>
- <span style="color: rgb(0, 0, 0);">A single agent must be configured to poll the S3 bucket.</span>
- <span style="color: rgb(0, 0, 0);">Vertical scaling can be applied by configuring the number of workers.</span>

**<span style="color: rgb(0, 0, 0);">The log dataset is responsible for collecting all Cisco Umbrella logs.</span>**

---

##### <span style="color: rgb(53, 152, 219);">**Advantages of the Umbrella API Integration**</span>

**<span style="color: rgb(0, 0, 0);">The Umbrella API introduces several improvements over older versions (v1 and Reporting v2 APIs):</span>**

- <span style="color: rgb(0, 0, 0);">Intuitive base URI</span>
- <span style="color: rgb(0, 0, 0);">API paths defined by top-level scopes</span>
- <span style="color: rgb(0, 0, 0);">Granular, intent-based API key scopes</span>
- <span style="color: rgb(0, 0, 0);">API key expiration support</span>
- <span style="color: rgb(0, 0, 0);">Updated API administration dashboard</span>
- <span style="color: rgb(0, 0, 0);">Programmatic API key administration</span>
- <span style="color: rgb(0, 0, 0);">Authentication &amp; authorization via OAuth 2.0 client credentials flow</span>
- <span style="color: rgb(0, 0, 0);">Portable, programmable API interface for integrations</span>

**<span style="color: rgb(0, 0, 0);"> Before sending requests to the Umbrella API, create Umbrella API credentials and generate an access token.</span>**  
**<span style="color: rgb(0, 0, 0);">More details: <span style="color: rgb(132, 63, 161);">[Cisco Umbrella API Authentication](https://developer.cisco.com/docs/cloud-security/authentication/#authentication)</span>  
</span>**

---

##### **<span style="color: rgb(53, 152, 219);">Authentication</span>**

- <span style="color: rgb(0, 0, 0);">The Umbrella API provides a **REST interface**.</span>
- <span style="color: rgb(0, 0, 0);">Supports **OAuth 2.0 client credentials flow**.</span>

**<span style="color: rgb(0, 0, 0);">Steps:</span>**

1. <span style="color: rgb(0, 0, 0);">Log in to Umbrella at: <span style="color: rgb(132, 63, 161);">[https://dashboard.umbrella.com](https://dashboard.umbrella.com)</span></span>
2. <span style="color: rgb(0, 0, 0);">Create a new **API Key (ID + Secret)**.</span>
    
    
    - <span style="color: rgb(0, 0, 0);">Keys can only be copied once at creation.</span>
    - <span style="color: rgb(0, 0, 0);">Lost secrets cannot be retrieved.</span>
3. <span style="color: rgb(0, 0, 0);">Generate an **API Access Token** using your credentials.</span>

<p class="callout warning"><span style="color: rgb(0, 0, 0);"> **Important:** API keys, passwords, and tokens grant access to private customer data. **Never share them** with external users or organizations.</span></p>

---

#### <span style="color: rgb(53, 152, 219);">**Managing Umbrella API Keys**</span>

<span style="color: rgb(0, 0, 0);">**Create a New API Key**</span>

1. <span style="color: rgb(0, 0, 0);">Navigate to **Admin &gt; API Keys**</span>
    
    
    - <span style="color: rgb(0, 0, 0);">For MSP/MSSP: **Console Settings &gt; API Keys**</span>
2. <span style="color: rgb(0, 0, 0);">Click **Add Key**.</span>
3. <span style="color: rgb(0, 0, 0);">Enter a **Name** (≤256 characters) and optional **Description**.</span>
4. <span style="color: rgb(0, 0, 0);">Select **Scopes** (Read-Only or Read/Write).</span>
5. <span style="color: rgb(0, 0, 0);">Configure an **Expiry Date** (or select *Never Expire*).</span>
6. <span style="color: rgb(0, 0, 0);">(Optional) Add **Network Restrictions** (up to 10 public IPs or CIDRs).</span>
7. <span style="color: rgb(0, 0, 0);">Click **Create Key** → Copy and save **Key + Secret**.</span>

<span style="color: rgb(0, 0, 0);">**Refresh an API Key**</span>

1. <span style="color: rgb(0, 0, 0);">Go to **Admin &gt; API Keys**.</span>
2. <span style="color: rgb(0, 0, 0);">Expand the target key → Click **Refresh Key**.</span>
3. <span style="color: rgb(0, 0, 0);">Copy and save the new **Key + Secret**.</span>

<span style="color: rgb(0, 0, 0);">**Update an API Key**</span>

1. <span style="color: rgb(0, 0, 0);">Expand an existing key.</span>
2. <span style="color: rgb(0, 0, 0);">Update **Name, Description, Scopes, Expiry, or Network Restrictions**.</span>
3. <span style="color: rgb(0, 0, 0);">Click **Save**.</span>

---

<p class="callout warning"><span style="color: rgb(0, 0, 0);">To integrate Cisco Umbrella logs into AQUILA, provide the following details to **CyTech Support**:</span></p>

- <span style="color: rgb(0, 0, 0);">**Queue URL**</span>
    
    
    - <span style="color: rgb(0, 0, 0);">AWS SQS queue URL where messages will be received.</span>
    - <span style="color: rgb(0, 0, 0);">For Cisco-managed S3 without SQS, use **Bucket ARN** instead.</span>
- <span style="color: rgb(0, 0, 0);">**Bucket ARN**</span>
    
    
    - <span style="color: rgb(0, 0, 0);">Required for Cisco-managed S3.</span>
    - <span style="color: rgb(0, 0, 0);">Example: `arn:aws:s3:::cisco-managed-eu-central-1`</span>
    - [List of Cisco-managed S3 buckets](https://docs.umbrella.com/mssp-deployment/docs/enable-logging-to-a-cisco-managed-s3-bucket)
- <span style="color: rgb(0, 0, 0);">**Bucket Region**</span>
    
    
    - <span style="color: rgb(0, 0, 0);">The AWS region where the bucket is located.</span>
- <span style="color: rgb(0, 0, 0);">**Bucket List Prefix**</span>
    
    
    - <span style="color: rgb(0, 0, 0);">The root folder of the S3 bucket to be monitored (visible in the S3 UI).</span>
    - <span style="color: rgb(0, 0, 0);">Example: `1235_654vcasd23431e5dd6f7fsad457sdf1fd5`</span>
- <span style="color: rgb(0, 0, 0);">**Number of Workers**</span>
    
    
    - <span style="color: rgb(0, 0, 0);">Number of workers to process S3 objects (min = 1).</span>
- <span style="color: rgb(0, 0, 0);">**Bucket List Interval**</span>
    
    
    - <span style="color: rgb(0, 0, 0);">Time interval for polling the S3 bucket. Default = 120s.</span>
- <span style="color: rgb(0, 0, 0);">**Access Key ID**</span>
- <span style="color: rgb(0, 0, 0);">**Secret Access Key**</span>

<span style="color: rgb(0, 0, 0);">*<span class="TextRun SCXW71272603 BCX0" data-contrast="auto" lang="EN-US" xml:lang="EN-US"><span class="NormalTextRun SCXW71272603 BCX0">If you need further </span><span class="NormalTextRun SCXW71272603 BCX0">assistance</span><span class="NormalTextRun SCXW71272603 BCX0">, kindly contact </span></span><span style="color: rgb(53, 152, 219);">**<span class="TextRun SCXW71272603 BCX0" data-contrast="none" lang="EN-US" xml:lang="EN-US"><span class="NormalTextRun SCXW71272603 BCX0">support@cytechint.com</span></span>**</span><span class="TextRun SCXW71272603 BCX0" data-contrast="auto" lang="EN-US" xml:lang="EN-US"><span class="NormalTextRun SCXW71272603 BCX0"> for prompt </span><span class="NormalTextRun SCXW71272603 BCX0">assistance</span><span class="NormalTextRun SCXW71272603 BCX0"> and guidance.</span></span><span class="EOP SCXW71272603 BCX0" data-ccp-props="{}"></span>*</span>

# AQUILA - Cloudflare Integration

#### **<span style="color: rgb(53, 152, 219);">Introduction</span>**

<span style="color: rgb(0, 0, 0);">Cloudflare logs provide detailed insights into client connections, request paths through the Cloudflare network, and origin server responses. These logs help track activity, identify issues, and support security and performance analysis.</span>

---

#### <span style="color: rgb(53, 152, 219);">**Authentication Options**</span>

<span style="color: rgb(0, 0, 0);">You can configure log retrieval using the following authentication methods:</span>

1. <span style="color: rgb(0, 0, 0);">**Auth Email**</span>
2. <span style="color: rgb(0, 0, 0);">**API Token**</span>
3. <span style="color: rgb(0, 0, 0);">**Account ID and Zone ID**</span>

<span style="color: rgb(0, 0, 0);">For detailed information on authentication, refer to the<span style="color: rgb(132, 63, 161);"> **[Cloudflare API documentation](https://developers.cloudflare.com/api/)**</span>.</span>

---

#### <span style="color: rgb(53, 152, 219);">**1. Configure Using Auth Email and Auth Key**</span>

<span style="color: rgb(0, 0, 0);">To set up using this method, you need:</span>

- <span style="color: rgb(0, 0, 0);">**Auth Email**: The email address associated with your Cloudflare account.</span>
- <span style="color: rgb(0, 0, 0);">**Auth Key**: Your global API key, available on the <a class="cursor-pointer" data-end="1015" data-start="955" rel="noopener" style="color: rgb(0, 0, 0);" target="_new">My Profile</a> page.</span>
- <span style="color: rgb(0, 0, 0);">**Zone ID**: The unique identifier of your <span style="text-decoration: underline;">**Cloudflare zone**</span>, available in the zone's dashboard.</span>
- <span style="color: rgb(0, 0, 0);">**Account ID:** The unique identifier of your entire <span style="text-decoration: underline;">**Cloudflare account**,</span> not just a specific zone (domain).</span>

<span style="color: rgb(0, 0, 0);">These credentials must be included in the request headers:</span>

- <span style="color: rgb(0, 0, 0);">`X-Auth-Email`: Your account email.</span>
- <span style="color: rgb(0, 0, 0);">`X-Auth-Key`: Your global API key.</span>

<span style="color: rgb(0, 0, 0);">For more details, refer to Cloudflare’s <a class="cursor-pointer" data-end="1381" data-start="1297" rel="noopener" style="color: rgb(0, 0, 0);" target="_new">authentication headers guide</a>.</span>

---

#### <span style="color: rgb(53, 152, 219);">**2. Configure Using API Token**</span>

<span style="color: rgb(0, 0, 0);">To set up using an API token, you need:</span>

- <span style="color: rgb(0, 0, 0);">**API Token**: A token with appropriate permissions.</span>
- <span style="color: rgb(0, 0, 0);">**Account ID &amp; Zone ID**: As noted above, can be found in your Cloudflare zone dashboard.</span>

<span style="color: rgb(0, 0, 0);">**Cloudflare Permissions for the API Token**:</span>

- <span style="color: rgb(0, 0, 0);">`Account.Access:Audit Logs:Read`</span>
- <span style="color: rgb(0, 0, 0);">`Account.Account:Settings:Read`</span>
- <span style="color: rgb(0, 0, 0);">`<span data-olk-copy-source="MessageBody">Account WAF – Read</span>`</span>
- <span style="color: rgb(0, 0, 0);">`<span data-olk-copy-source="MessageBody">DDoS Protection – Read</span>`</span>
- <span style="color: rgb(0, 0, 0);">`<span data-olk-copy-source="MessageBody">Intel – Read</span>`</span>
- <span style="color: rgb(0, 0, 0);">`<span data-olk-copy-source="MessageBody">API Gateway - Read</span>`</span>
- <span style="color: rgb(0, 0, 0);">`<span data-olk-copy-source="MessageBody">DNS - Read</span>`</span>
- <span style="color: rgb(0, 0, 0);">`<span data-olk-copy-source="MessageBody">Zone Settings - Read</span>`</span>
- <span style="color: rgb(0, 0, 0);">`<span data-olk-copy-source="MessageBody">Analytics - Read</span>`</span>
- <span style="color: rgb(0, 0, 0);">`<span data-olk-copy-source="MessageBody">FirewallServices - Read</span>`</span>
- <span style="color: rgb(0, 0, 0);">`<span data-olk-copy-source="MessageBody">Zone WAF - Read</span>`</span>
- <span style="color: rgb(0, 0, 0);">`<span data-olk-copy-source="MessageBody">Zone - Read</span>`</span>
- <span style="color: rgb(0, 0, 0);">`<span data-olk-copy-source="MessageBody">Logs - Read</span>`</span>

<span style="color: rgb(0, 0, 0);">API Tokens are preferred for security as they support fine-grained access control. Create and manage tokens via the <a class="cursor-pointer" data-end="1877" data-start="1807" rel="noopener" style="color: rgb(0, 0, 0);" target="_new">API Tokens dashboard</a>.</span>

<span style="color: rgb(0, 0, 0);">Manage Account&gt;Account API Tokens&gt;Custom Token&gt;Get Started</span>

[![image.png](https://cytechint-docs-bookstack.s3.amazonaws.com/uploads/images/gallery/2026-02/scaled-1680-/S9182GuszsiqVnWA-image.png)](https://cytechint-docs-bookstack.s3.amazonaws.com/uploads/images/gallery/2026-02/S9182GuszsiqVnWA-image.png)

[![image.png](https://cytechint-docs-bookstack.s3.amazonaws.com/uploads/images/gallery/2026-02/scaled-1680-/Z6OZe0frH96MPSA9-image.png)](https://cytechint-docs-bookstack.s3.amazonaws.com/uploads/images/gallery/2026-02/Z6OZe0frH96MPSA9-image.png)
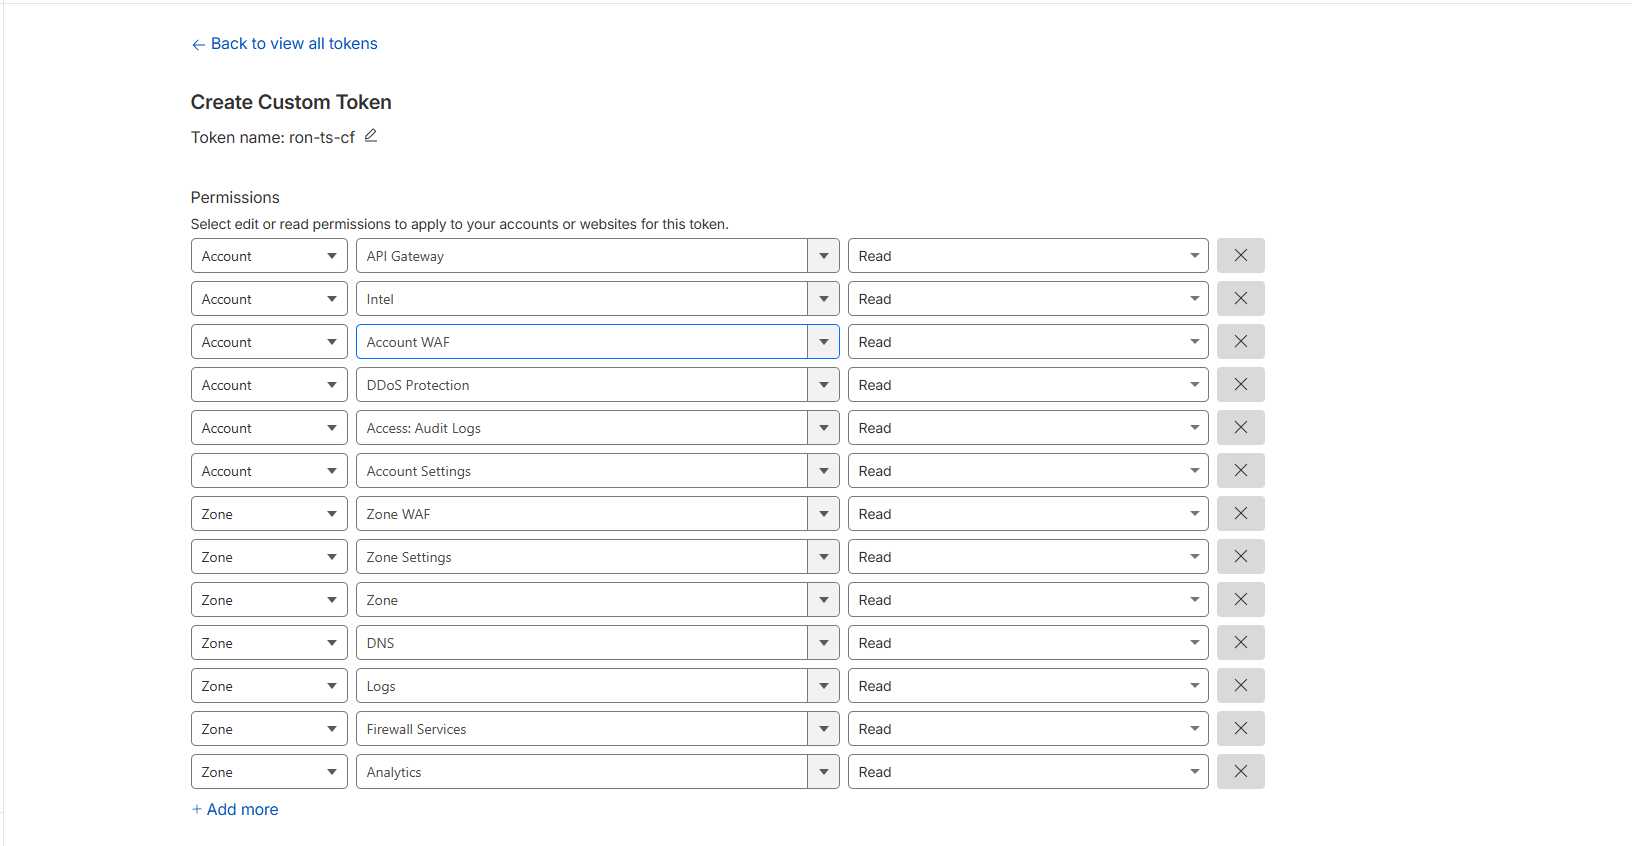
[![image.png](https://cytechint-docs-bookstack.s3.amazonaws.com/uploads/images/gallery/2025-07/scaled-1680-/ZmQwl21RBq8SR7QU-image.png)](https://cytechint-docs-bookstack.s3.amazonaws.com/uploads/images/gallery/2025-07/ZmQwl21RBq8SR7QU-image.png)
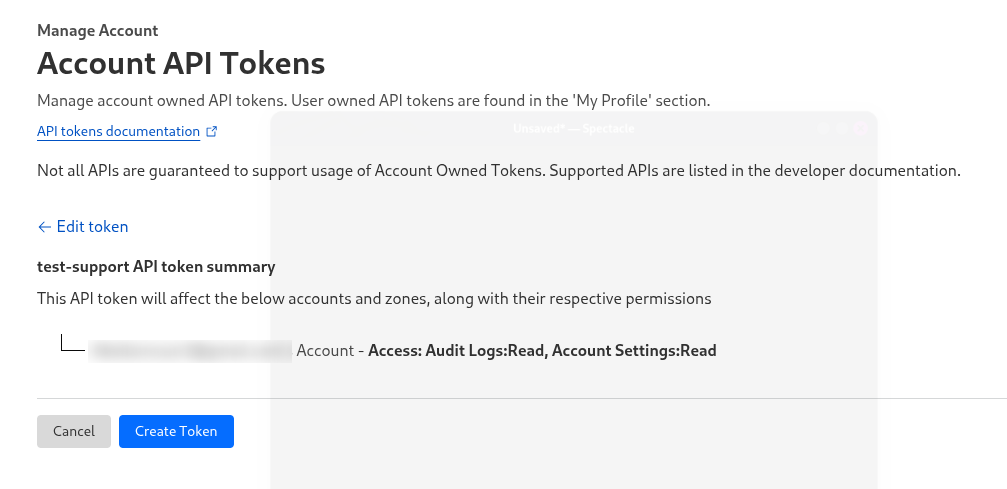
```python
curl -X GET "https://api.cloudflare.com/client/v4/user/tokens/verify" \
  -H "Authorization: Bearer <token>" \
  -H "Content-Type: application/json"

```

[![image.png](https://cytechint-docs-bookstack.s3.amazonaws.com/uploads/images/gallery/2025-07/scaled-1680-/ATiOTiGP9Lom8Psr-image.png)](https://cytechint-docs-bookstack.s3.amazonaws.com/uploads/images/gallery/2025-07/ATiOTiGP9Lom8Psr-image.png)

---

#### <span style="color: rgb(53, 152, 219);">**3. How to get the Account ID and Zone ID** </span>

<div data-ogsc="black" data-olk-copy-source="MessageBody" id="bkmrk-1.-login-to-your%C2%A0clo">1. Login to your **Cloudflare** account.  
2. Head over to your **Dashboard** [https://dash.cloudflare.com/](https://dash.cloudflare.com/ "https://dash.cloudflare.com/").</div><div data-ogsc="black" id="bkmrk-3.-click-your-existi">3. Click your existing **Domain**.</div><div data-ogsc="black" id="bkmrk-4.-the%C2%A0account-id%C2%A0an">4. The **Account ID** and **Zone ID** located in the **right side** after you clicked the existing Domain.  
  
</div>[![image.png](https://cytechint-docs-bookstack.s3.amazonaws.com/uploads/images/gallery/2026-02/scaled-1680-/YrA5bIztXuf3yRkl-image.png)](https://cytechint-docs-bookstack.s3.amazonaws.com/uploads/images/gallery/2026-02/YrA5bIztXuf3yRkl-image.png)  
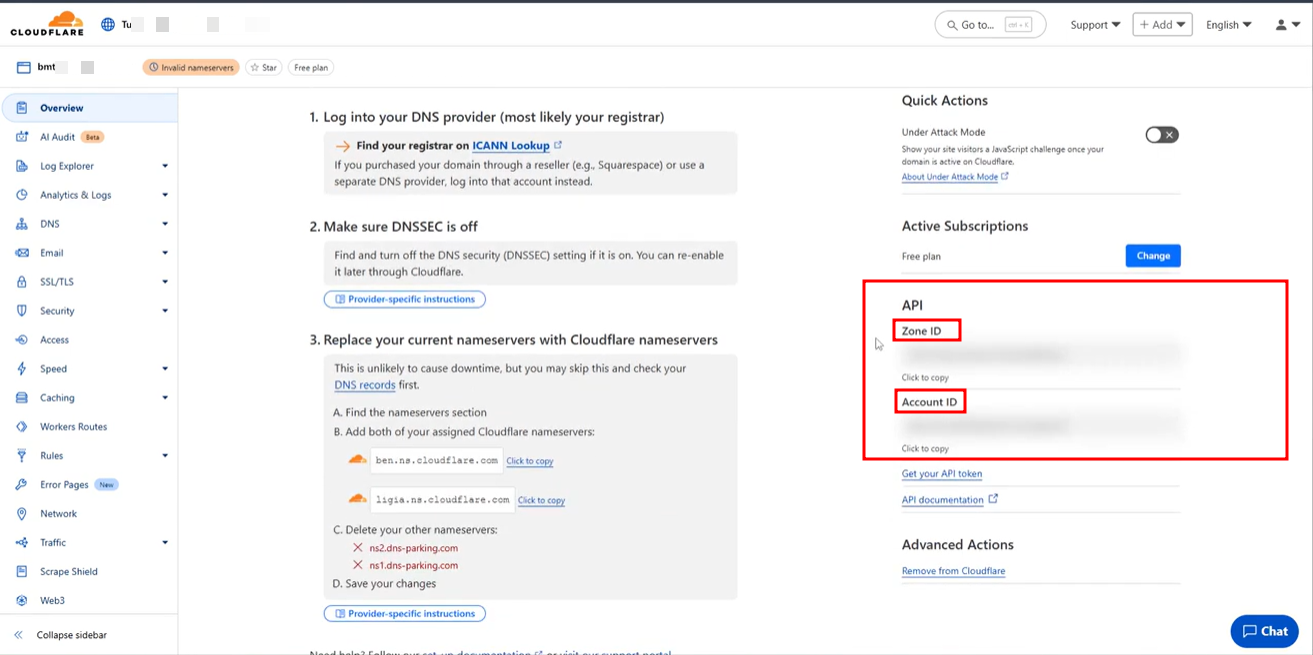
  
  
![](https://cytechint-docs-bookstack.s3.amazonaws.com/uploads/images/gallery/2026-02/KaZkwzkSEe5M07Jg-image.png)

---

**Audit Logs**

<span style="color: rgb(0, 0, 0);">Audit logs provide a record of configuration changes within your Cloudflare account, including:</span>

- <span style="color: rgb(0, 0, 0);">Logins/logouts</span>
- <span style="color: rgb(0, 0, 0);">DNS setting changes</span>
- <span style="color: rgb(0, 0, 0);">Modifications to Firewall, Caching, Page Rules, Speed, Network, and Traffic features</span>

<span style="color: rgb(0, 0, 0);">These logs are essential for tracking administrative activity and detecting unusual behavior.</span>

---

<p class="callout warning"><span style="color: rgb(0, 0, 0);">To enable log collection from the Cloudflare API token, provide the following information to **CyTech Support**:</span></p>

- **<span style="color: rgb(0, 0, 0);">Auth Email</span>**
- **<span style="color: rgb(0, 0, 0);">API Token (Auth Key)</span>**
- **<span style="color: rgb(0, 0, 0);">Account ID</span>**
- **<span style="color: rgb(0, 0, 0);">Zone ID</span>**

<span style="color: rgb(0, 0, 0);">*<span class="TextRun SCXW71272603 BCX0" data-contrast="auto" lang="EN-US" xml:lang="EN-US"><span class="NormalTextRun SCXW71272603 BCX0">If you need further </span><span class="NormalTextRun SCXW71272603 BCX0">assistance</span><span class="NormalTextRun SCXW71272603 BCX0">, kindly contact </span></span><span style="color: rgb(53, 152, 219);">**<span class="TextRun SCXW71272603 BCX0" data-contrast="none" lang="EN-US" xml:lang="EN-US"><span class="NormalTextRun SCXW71272603 BCX0">support@cytechint.com</span></span>**</span><span class="TextRun SCXW71272603 BCX0" data-contrast="auto" lang="EN-US" xml:lang="EN-US"><span class="NormalTextRun SCXW71272603 BCX0"> for prompt </span><span class="NormalTextRun SCXW71272603 BCX0">assistance</span><span class="NormalTextRun SCXW71272603 BCX0"> and guidance.</span></span><span class="EOP SCXW71272603 BCX0" data-ccp-props="{}"></span>*</span>

# AQUILA - Digital Guardian Integration

##### Integrating **Digital Guardian (DG)** with **AQUILA** for security log ingestion typically involves exporting logs from DG and then parsing and ingesting them into **AQUILA.**

##### **Digital Guardian** is a Data Loss Prevention **(DLP)** and endpoint protection tool. It logs:

- ##### Data access
- ##### File operations (copy, move, print, etc.)
- ##### Application usage
- ##### User behavior analytics

##### **Goal:** Extract these logs and ingest them into **AQUILA** to enable searching, visualization, and alerting.

##### **<span class="TextRun SCXW54660973 BCX8" data-contrast="auto" lang="EN-US" xml:lang="EN-US"><span class="NormalTextRun SCXW54660973 BCX8">Digital Guardian</span></span>**<span class="TextRun SCXW54660973 BCX8" data-contrast="auto" lang="EN-US" xml:lang="EN-US"><span class="NormalTextRun SCXW54660973 BCX8">'s native integration with </span></span>**<span class="TextRun SCXW54660973 BCX8" data-contrast="auto" lang="EN-US" xml:lang="EN-US"><span class="NormalTextRun SCXW54660973 BCX8">Aquila Agent</span></span>**<span class="TextRun SCXW54660973 BCX8" data-contrast="auto" lang="EN-US" xml:lang="EN-US"><span class="NormalTextRun SCXW54660973 BCX8"> requires:</span></span><span class="EOP SCXW54660973 BCX8" data-ccp-props="{}"> </span>

- ##### <span class="TextRun SCXW54660973 BCX8" data-contrast="auto" lang="EN-US" xml:lang="EN-US"><span class="NormalTextRun SCXW54660973 BCX8">ARC Server URL</span></span><span class="EOP SCXW54660973 BCX8" data-ccp-props="{}"> </span>
- ##### <span class="TextRun SCXW54660973 BCX8" data-contrast="auto" lang="EN-US" xml:lang="EN-US"><span class="NormalTextRun SCXW54660973 BCX8">Authorization Server URL</span></span><span class="EOP SCXW54660973 BCX8" data-ccp-props="{"134233117":false,"134233118":false,"335559738":240,"335559739":240}"> </span>
- ##### <span class="TextRun SCXW54660973 BCX8" data-contrast="auto" lang="EN-US" xml:lang="EN-US"><span class="NormalTextRun SCXW54660973 BCX8">ARC Export Profile ID</span></span><span class="EOP SCXW54660973 BCX8" data-ccp-props="{"134233117":false,"134233118":false,"335559738":240,"335559739":240}"> </span>
- ##### <span class="TextRun SCXW54660973 BCX8" data-contrast="auto" lang="EN-US" xml:lang="EN-US"><span class="NormalTextRun SCXW54660973 BCX8">Client ID</span></span><span class="EOP SCXW54660973 BCX8" data-ccp-props="{"134233117":false,"134233118":false,"335559738":240,"335559739":240}"> </span>
- ##### <span class="TextRun SCXW54660973 BCX8" data-contrast="auto" lang="EN-US" xml:lang="EN-US"><span class="NormalTextRun SCXW54660973 BCX8">Client Secret</span></span>

##### <span class="EOP SCXW54660973 BCX8" data-ccp-props="{"134233117":false,"134233118":false,"335559738":240,"335559739":240}"><span class="TextRun SCXW48505150 BCX8" data-contrast="auto" lang="EN-US" xml:lang="EN-US"><span class="NormalTextRun SCXW48505150 BCX8">W</span><span class="NormalTextRun SCXW48505150 BCX8">orking</span><span class="NormalTextRun SCXW48505150 BCX8"> with the </span></span>**<span class="TextRun SCXW48505150 BCX8" data-contrast="auto" lang="EN-US" xml:lang="EN-US"><span class="NormalTextRun SCXW48505150 BCX8">Digital Guardian ARC Cloud API</span></span>**<span class="TextRun SCXW48505150 BCX8" data-contrast="auto" lang="EN-US" xml:lang="EN-US"><span class="NormalTextRun SCXW48505150 BCX8"> (Advanced Reporting &amp; Correlation), which is used to export events via a secure API.</span></span></span>

##### <span style="color: rgb(53, 152, 219);">**<span class="EOP SCXW54660973 BCX8" data-ccp-props="{"134233117":false,"134233118":false,"335559738":240,"335559739":240}"><span class="TextRun SCXW48505150 BCX8" data-contrast="auto" lang="EN-US" xml:lang="EN-US"><span class="NormalTextRun SCXW48505150 BCX8">Steps on getting the required information before integrating it to AQUILA</span></span></span>**</span>

##### <span style="color: rgb(53, 152, 219);">**<span class="EOP SCXW54660973 BCX8" data-ccp-props="{"134233117":false,"134233118":false,"335559738":240,"335559739":240}"><span class="TextRun SCXW48505150 BCX8" data-contrast="auto" lang="EN-US" xml:lang="EN-US"><span class="NormalTextRun SCXW48505150 BCX8">1. ARC Server URL</span></span></span>**</span>

- ##### <span class="EOP SCXW54660973 BCX8" data-ccp-props="{"134233117":false,"134233118":false,"335559738":240,"335559739":240}"><span class="TextRun SCXW48505150 BCX8" data-contrast="auto" lang="EN-US" xml:lang="EN-US"><span class="NormalTextRun SCXW48505150 BCX8">This is the base URL for the **Digital Guardian ARC cloud instance**.</span></span></span>
- ##### <span class="EOP SCXW54660973 BCX8" data-ccp-props="{"134233117":false,"134233118":false,"335559738":240,"335559739":240}"><span class="TextRun SCXW48505150 BCX8" data-contrast="auto" lang="EN-US" xml:lang="EN-US"><span class="NormalTextRun SCXW48505150 BCX8">It looks like:</span></span></span>
    
    
    - ##### <span class="EOP SCXW54660973 BCX8" data-ccp-props="{"134233117":false,"134233118":false,"335559738":240,"335559739":240}"><span class="TextRun SCXW48505150 BCX8" data-contrast="auto" lang="EN-US" xml:lang="EN-US"><span class="NormalTextRun SCXW48505150 BCX8">**<span class="TextRun SCXW229902446 BCX8" data-contrast="auto" lang="EN-US" xml:lang="EN-US"><span class="NormalTextRun SCXW229902446 BCX8">https://arc.digitalguardian.com</span></span>**</span></span></span>
- ##### <span class="EOP SCXW54660973 BCX8" data-ccp-props="{"134233117":false,"134233118":false,"335559738":240,"335559739":240}"><span class="TextRun SCXW48505150 BCX8" data-contrast="auto" lang="EN-US" xml:lang="EN-US"><span class="NormalTextRun SCXW48505150 BCX8"><span class="EOP SCXW229902446 BCX8" data-ccp-props="{"134233117":false,"134233118":false,"335559738":240,"335559739":240}"><span class="TextRun SCXW108183864 BCX8" data-contrast="auto" lang="EN-US" xml:lang="EN-US"><span class="NormalTextRun SCXW108183864 BCX8">Sometimes </span><span class="NormalTextRun SCXW108183864 BCX8">it's</span><span class="NormalTextRun SCXW108183864 BCX8"> region-specific (e.g., EU or US </span><span class="NormalTextRun ContextualSpellingAndGrammarErrorV2Themed SCXW108183864 BCX8">ARC</span><span class="NormalTextRun SCXW108183864 BCX8"> instance).</span></span></span></span></span></span>

##### <span style="color: rgb(53, 152, 219);">**<span class="EOP SCXW54660973 BCX8" data-ccp-props="{"134233117":false,"134233118":false,"335559738":240,"335559739":240}"><span class="TextRun SCXW48505150 BCX8" data-contrast="auto" lang="EN-US" xml:lang="EN-US"><span class="NormalTextRun SCXW48505150 BCX8"><span class="EOP SCXW229902446 BCX8" data-ccp-props="{"134233117":false,"134233118":false,"335559738":240,"335559739":240}"><span class="TextRun SCXW108183864 BCX8" data-contrast="auto" lang="EN-US" xml:lang="EN-US"><span class="NormalTextRun SCXW108183864 BCX8">2. Authorization Server URL</span></span></span></span></span></span>**</span>

- ##### <span class="EOP SCXW54660973 BCX8" data-ccp-props="{"134233117":false,"134233118":false,"335559738":240,"335559739":240}"><span class="TextRun SCXW48505150 BCX8" data-contrast="auto" lang="EN-US" xml:lang="EN-US"><span class="NormalTextRun SCXW48505150 BCX8"><span class="EOP SCXW229902446 BCX8" data-ccp-props="{"134233117":false,"134233118":false,"335559738":240,"335559739":240}"><span class="TextRun SCXW108183864 BCX8" data-contrast="auto" lang="EN-US" xml:lang="EN-US"><span class="NormalTextRun SCXW108183864 BCX8">This is the OAuth2 token server used for authenticating API calls.</span></span></span></span></span></span>
- ##### <span class="EOP SCXW54660973 BCX8" data-ccp-props="{"134233117":false,"134233118":false,"335559738":240,"335559739":240}"><span class="TextRun SCXW48505150 BCX8" data-contrast="auto" lang="EN-US" xml:lang="EN-US"><span class="NormalTextRun SCXW48505150 BCX8"><span class="EOP SCXW229902446 BCX8" data-ccp-props="{"134233117":false,"134233118":false,"335559738":240,"335559739":240}"><span class="TextRun SCXW108183864 BCX8" data-contrast="auto" lang="EN-US" xml:lang="EN-US"><span class="NormalTextRun SCXW108183864 BCX8">It may look like:</span></span></span></span></span></span>
    
    
    - ##### **<span class="EOP SCXW54660973 BCX8" data-ccp-props="{"134233117":false,"134233118":false,"335559738":240,"335559739":240}"><span class="TextRun SCXW48505150 BCX8" data-contrast="auto" lang="EN-US" xml:lang="EN-US"><span class="NormalTextRun SCXW48505150 BCX8"><span class="EOP SCXW229902446 BCX8" data-ccp-props="{"134233117":false,"134233118":false,"335559738":240,"335559739":240}"><span class="TextRun SCXW108183864 BCX8" data-contrast="auto" lang="EN-US" xml:lang="EN-US"><span class="NormalTextRun SCXW108183864 BCX8">https://auth.digitalguardian.com</span></span></span></span></span></span>**
- ##### <span class="EOP SCXW54660973 BCX8" data-ccp-props="{"134233117":false,"134233118":false,"335559738":240,"335559739":240}"><span class="TextRun SCXW48505150 BCX8" data-contrast="auto" lang="EN-US" xml:lang="EN-US"><span class="NormalTextRun SCXW48505150 BCX8"><span class="EOP SCXW229902446 BCX8" data-ccp-props="{"134233117":false,"134233118":false,"335559738":240,"335559739":240}"><span class="TextRun SCXW108183864 BCX8" data-contrast="auto" lang="EN-US" xml:lang="EN-US"><span class="NormalTextRun SCXW108183864 BCX8">Or it may be included in your API documentation.</span></span></span></span></span></span>

##### <span style="color: rgb(53, 152, 219);">**<span class="EOP SCXW54660973 BCX8" data-ccp-props="{"134233117":false,"134233118":false,"335559738":240,"335559739":240}"><span class="TextRun SCXW48505150 BCX8" data-contrast="auto" lang="EN-US" xml:lang="EN-US"><span class="NormalTextRun SCXW48505150 BCX8"><span class="EOP SCXW229902446 BCX8" data-ccp-props="{"134233117":false,"134233118":false,"335559738":240,"335559739":240}"><span class="TextRun SCXW108183864 BCX8" data-contrast="auto" lang="EN-US" xml:lang="EN-US"><span class="NormalTextRun SCXW108183864 BCX8">3. ARC Export Profile ID</span></span></span></span></span></span>**</span>

- ##### <span class="EOP SCXW54660973 BCX8" data-ccp-props="{"134233117":false,"134233118":false,"335559738":240,"335559739":240}"><span class="TextRun SCXW48505150 BCX8" data-contrast="auto" lang="EN-US" xml:lang="EN-US"><span class="NormalTextRun SCXW48505150 BCX8"><span class="EOP SCXW229902446 BCX8" data-ccp-props="{"134233117":false,"134233118":false,"335559738":240,"335559739":240}"><span class="TextRun SCXW108183864 BCX8" data-contrast="auto" lang="EN-US" xml:lang="EN-US"><span class="NormalTextRun SCXW108183864 BCX8">This is a **profile ID** that determines which logs (event types, time windows, etc.) are exported via the API.</span></span></span></span></span></span>
- ##### <span class="EOP SCXW54660973 BCX8" data-ccp-props="{"134233117":false,"134233118":false,"335559738":240,"335559739":240}"><span class="TextRun SCXW48505150 BCX8" data-contrast="auto" lang="EN-US" xml:lang="EN-US"><span class="NormalTextRun SCXW48505150 BCX8"><span class="EOP SCXW229902446 BCX8" data-ccp-props="{"134233117":false,"134233118":false,"335559738":240,"335559739":240}"><span class="TextRun SCXW108183864 BCX8" data-contrast="auto" lang="EN-US" xml:lang="EN-US"><span class="NormalTextRun SCXW108183864 BCX8">It is **configured by a DG admin** inside the **DG Management Console** under the **ARC export profiles** section.</span></span></span></span></span></span>
- ##### <span class="EOP SCXW54660973 BCX8" data-ccp-props="{"134233117":false,"134233118":false,"335559738":240,"335559739":240}"><span class="TextRun SCXW48505150 BCX8" data-contrast="auto" lang="EN-US" xml:lang="EN-US"><span class="NormalTextRun SCXW48505150 BCX8"><span class="EOP SCXW229902446 BCX8" data-ccp-props="{"134233117":false,"134233118":false,"335559738":240,"335559739":240}"><span class="TextRun SCXW108183864 BCX8" data-contrast="auto" lang="EN-US" xml:lang="EN-US"><span class="NormalTextRun SCXW108183864 BCX8">Steps for the DG Admin:</span></span></span></span></span></span>
    
    
    - ##### <span class="EOP SCXW54660973 BCX8" data-ccp-props="{"134233117":false,"134233118":false,"335559738":240,"335559739":240}"><span class="TextRun SCXW48505150 BCX8" data-contrast="auto" lang="EN-US" xml:lang="EN-US"><span class="NormalTextRun SCXW48505150 BCX8"><span class="EOP SCXW229902446 BCX8" data-ccp-props="{"134233117":false,"134233118":false,"335559738":240,"335559739":240}"><span class="TextRun SCXW108183864 BCX8" data-contrast="auto" lang="EN-US" xml:lang="EN-US"><span class="NormalTextRun SCXW108183864 BCX8">Log in to the **Digital Guardian Console**.</span></span></span></span></span></span>
    - ##### <span class="EOP SCXW54660973 BCX8" data-ccp-props="{"134233117":false,"134233118":false,"335559738":240,"335559739":240}"><span class="TextRun SCXW48505150 BCX8" data-contrast="auto" lang="EN-US" xml:lang="EN-US"><span class="NormalTextRun SCXW48505150 BCX8"><span class="EOP SCXW229902446 BCX8" data-ccp-props="{"134233117":false,"134233118":false,"335559738":240,"335559739":240}"><span class="TextRun SCXW108183864 BCX8" data-contrast="auto" lang="EN-US" xml:lang="EN-US"><span class="NormalTextRun SCXW108183864 BCX8">Go to **ARC &gt; Export Profiles**.</span></span></span></span></span></span>
    - ##### <span class="EOP SCXW54660973 BCX8" data-ccp-props="{"134233117":false,"134233118":false,"335559738":240,"335559739":240}"><span class="TextRun SCXW48505150 BCX8" data-contrast="auto" lang="EN-US" xml:lang="EN-US"><span class="NormalTextRun SCXW48505150 BCX8"><span class="EOP SCXW229902446 BCX8" data-ccp-props="{"134233117":false,"134233118":false,"335559738":240,"335559739":240}"><span class="TextRun SCXW108183864 BCX8" data-contrast="auto" lang="EN-US" xml:lang="EN-US"><span class="NormalTextRun SCXW108183864 BCX8">Create or view an export profile with appropriate filters.</span></span></span></span></span></span>
    - ##### <span class="EOP SCXW54660973 BCX8" data-ccp-props="{"134233117":false,"134233118":false,"335559738":240,"335559739":240}"><span class="TextRun SCXW48505150 BCX8" data-contrast="auto" lang="EN-US" xml:lang="EN-US"><span class="NormalTextRun SCXW48505150 BCX8"><span class="EOP SCXW229902446 BCX8" data-ccp-props="{"134233117":false,"134233118":false,"335559738":240,"335559739":240}"><span class="TextRun SCXW108183864 BCX8" data-contrast="auto" lang="EN-US" xml:lang="EN-US"><span class="NormalTextRun SCXW108183864 BCX8">Copy the **Export Profile ID** from the profile details.</span></span></span></span></span></span>

##### <span style="color: rgb(53, 152, 219);">**<span class="EOP SCXW54660973 BCX8" data-ccp-props="{"134233117":false,"134233118":false,"335559738":240,"335559739":240}"><span class="TextRun SCXW48505150 BCX8" data-contrast="auto" lang="EN-US" xml:lang="EN-US"><span class="NormalTextRun SCXW48505150 BCX8"><span class="EOP SCXW229902446 BCX8" data-ccp-props="{"134233117":false,"134233118":false,"335559738":240,"335559739":240}"><span class="TextRun SCXW108183864 BCX8" data-contrast="auto" lang="EN-US" xml:lang="EN-US"><span class="NormalTextRun SCXW108183864 BCX8">4. Client ID &amp; Client Secret</span></span></span></span></span></span>**</span>

- ##### These are **OAuth2 credentials** used to authenticate your API access.
- ##### Generated via the **API client registration** feature in the DG admin interface.
- ##### Steps for the DG Admin:
    
    
    - ##### Log into the **Digital Guardian ARC Console**.
    - ##### Navigate to **ARC &gt; API Clients / Applications**.
    - ##### Register a new application.
        
        
        - ##### Assign the **Export Profile ID**.
        - ##### Set appropriate scopes (usually “read:events”).
    - ##### A **Client ID** and **Client Secret** will be generated.
- ##### <span style="color: rgb(224, 62, 45);">**IMPORTANT:**</span> The **Client Secret** is shown **only once**, so it must be secure.

##### <span style="color: rgb(53, 152, 219);">**Sample Information needed from DG Admin**</span>

![image.png](https://cytechint-docs-bookstack.s3.amazonaws.com/uploads/images/gallery/2025-07/scaled-1680-/aIg9wT1ZxDHHmqsO-image.png)

##### **<span style="color: rgb(53, 152, 219);">Integration to AQUILA</span>**

##### 1. Log in to **CyTech - AQUILA.** Choose **Cyber Monitoring -&gt; Cyber Incident Management -&gt; Settings.**

![image.png](https://cytechint-docs-bookstack.s3.amazonaws.com/uploads/images/gallery/2025-07/scaled-1680-/N7sU1IleMKmImW9I-image.png)

##### 2. Click **Log Source.** In the text box type **Digital Guardian,** the log source will show up and click the **Add to Agent.**
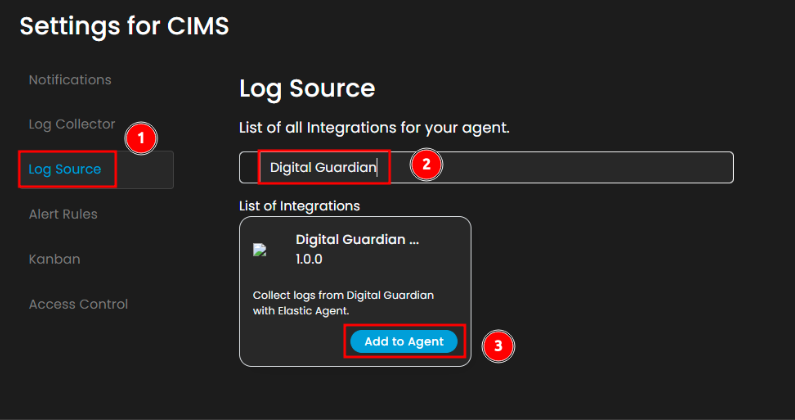
![image.png](https://cytechint-docs-bookstack.s3.amazonaws.com/uploads/images/gallery/2025-07/scaled-1680-/tsyvf6xOZ77kmluq-image.png)

##### 3. Choose the **Log Collector** name you installed. Click the **+** sign.
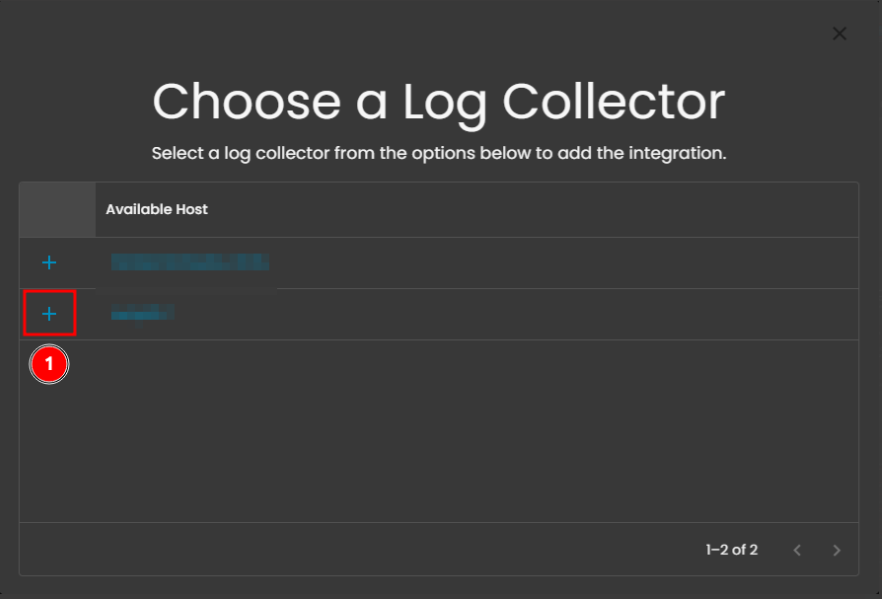
![image.png](https://cytechint-docs-bookstack.s3.amazonaws.com/uploads/images/gallery/2025-07/scaled-1680-/J7zI6S464bkgog6F-image.png)

##### 4. Enable the **Collect Digital Guardian logs via API.**
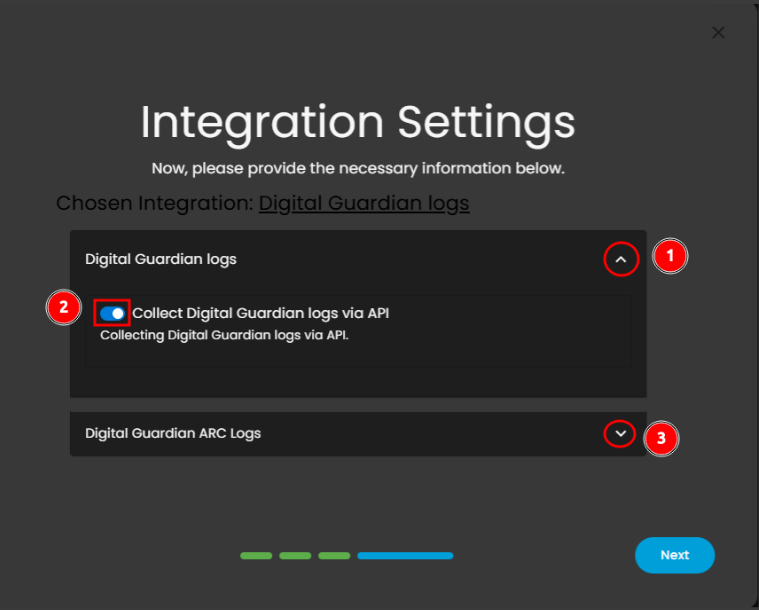
![image.png](https://cytechint-docs-bookstack.s3.amazonaws.com/uploads/images/gallery/2025-07/scaled-1680-/pubk5K9SwdzGLx61-image.png)

##### 5. Paste the information you gather on each text box. **ARC Server URL, Authorization Server URL, ARC Export Profile ID** and **Client ID.** Then scroll down.
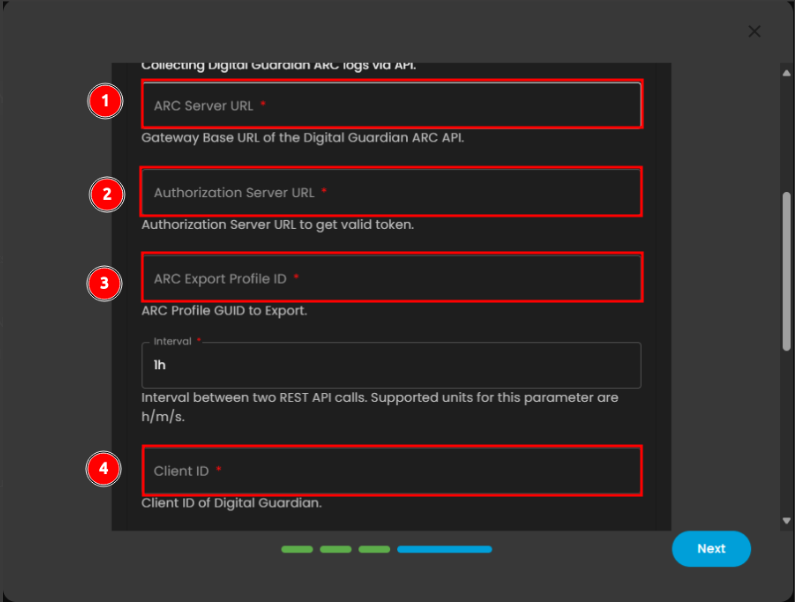
![image.png](https://cytechint-docs-bookstack.s3.amazonaws.com/uploads/images/gallery/2025-07/scaled-1680-/aQ8o3ErKxKE3R8D4-image.png)

##### 6. Paste the information you gather on each text box. **Client Secret,** then click the **Tags** text box, it will show 2 tags you will need to add.
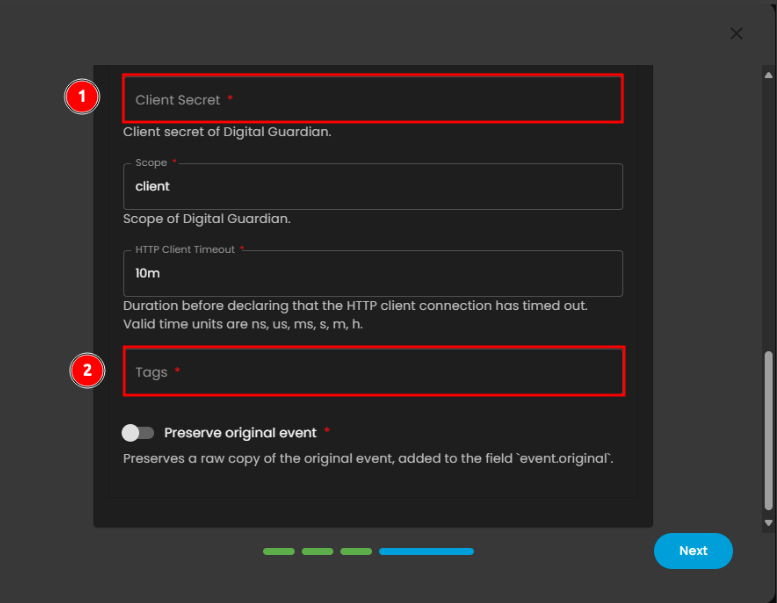
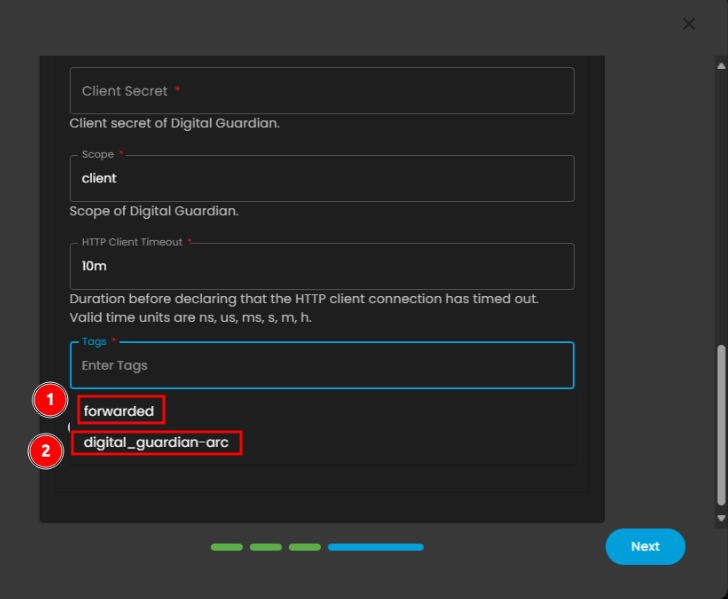
![image.png](https://cytechint-docs-bookstack.s3.amazonaws.com/uploads/images/gallery/2025-07/scaled-1680-/FirlaPXX87KYroNI-image.png)

![image.png](https://cytechint-docs-bookstack.s3.amazonaws.com/uploads/images/gallery/2025-07/scaled-1680-/Z9wdqStiTA5QwCEz-image.png)

##### 7. Then click **Next** so that the integration will process the information you inputted.
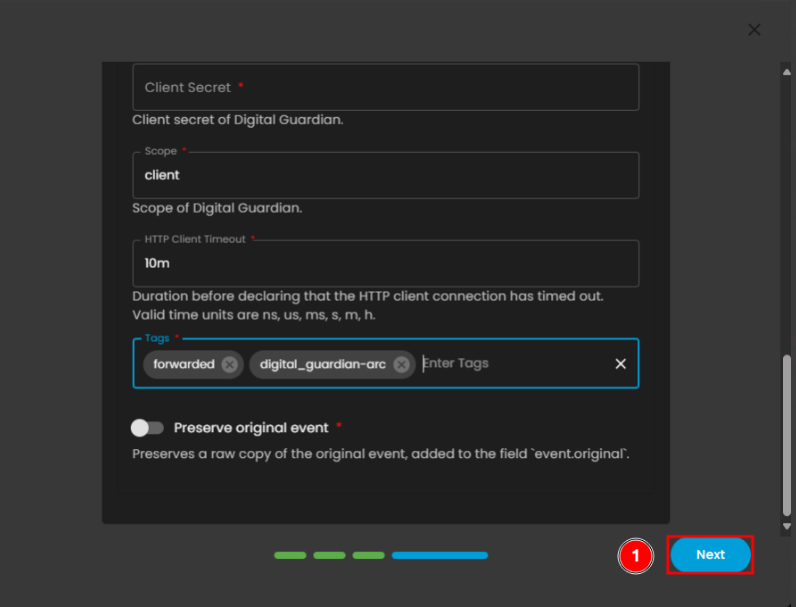
![image.png](https://cytechint-docs-bookstack.s3.amazonaws.com/uploads/images/gallery/2025-07/scaled-1680-/beYymD1SrgPo7Get-image.png)

##### 8. Wait for the **Successful** window to display, this will confirm the successful integration.
![image.png](https://cytechint-docs-bookstack.s3.amazonaws.com/uploads/images/gallery/2025-07/scaled-1680-/m7vXAsPPI420XzRI-image.png)

*If you need further assistance, kindly contact our support at **support@cytechint.com** for prompt assistance and guidance.*

# AQUILA - Fortinet FortiGate Integration

<div data-olk-copy-source="MessageBody" id="bkmrk-please-follow-these-">Please follow these instructions:</div><div id="bkmrk-">  
</div><div id="bkmrk-step-1%3A-log-in-to-yo">Step 1: Log in to your Fortinet FortiGate Admin portal and navigate to CLI console. Please refer to the images below.</div><div id="bkmrk--1">  
</div><div id="bkmrk-%C2%A0">![](https://community.fortinet.com/legacyfs/online/images/kb_16859_1.png) ![](https://community.fortinet.com/legacyfs/online/images/kb_16859_4.png)</div><div id="bkmrk--3">  
</div><div id="bkmrk--4">  
</div><div id="bkmrk--5">  
</div><div id="bkmrk-step-2%3A-in-your-cli-">Step 2: In your CLI Console execute these commands.</div>[![image.png](https://cytechint-docs-bookstack.s3.amazonaws.com/uploads/images/gallery/2025-04/scaled-1680-/OemzjY8aiad8i4XW-image.png)](https://cytechint-docs-bookstack.s3.amazonaws.com/uploads/images/gallery/2025-04/OemzjY8aiad8i4XW-image.png)

<div id="bkmrk--11">  
</div><div id="bkmrk-to-configure-fortiga"><div class="x_elementToProof">**To configure FortiGate to send logs to the syslog server, we need you to provide the following details:**</div>1. **Server IP(Log Collector - Elastic Agent Host)** – This is the IP address of your remote syslog server where the logs will be sent.
2. <div>**Source IP(Fortinet FortiGate Device)**– This is the specific IP address on the FortiGate device that will be used to send the logs.</div>

<div class="x_elementToProof">Since these values depend on your network setup, we require you to provide them so we can proceed with the configuration.</div></div><div id="bkmrk--7"></div><div id="bkmrk-please-execute-these">Please execute these commands. </div><div id="bkmrk--12">  
</div><div id="bkmrk-for-syslog-setting%3A">**For Syslog Setting:**</div><div id="bkmrk--13">  
</div><table data-editing-info="{"topBorderColor":"#ABABAB","bottomBorderColor":"#ABABAB","verticalBorderColor":"#ABABAB","hasHeaderRow":false,"hasFirstColumn":false,"hasBandedRows":false,"hasBandedColumns":false,"bgColorEven":null,"bgColorOdd":"#ABABAB20","headerRowColor":"#ABABAB","tableBorderFormat":0,"verticalAlign":"top"}" id="bkmrk-config-log-syslogd-s" style="height: 255px; width: 51.5476%;"><tbody><tr><td style="width: 100%;"><div>  
</div><div class="x_elementToProof" data-olk-copy-source="MessageBody">config log syslogd setting</div><div class="x_elementToProof"> set status <span style="color: rgb(45, 194, 107);">enable</span></div><div class="x_elementToProof"> set server <span style="color: rgb(224, 62, 45);">&lt;Address of remote syslog server - Log Collector&gt;</span></div><div class="x_elementToProof"> set facility <span style="color: rgb(45, 194, 107);">user</span></div><div class="x_elementToProof"> set source-ip <span style="color: rgb(224, 62, 45);">&lt;Source IP address of syslog - Fortinate Device&gt;</span></div><div class="x_elementToProof"> set port <span style="color: rgb(45, 194, 107);">10514</span></div><div class="x_elementToProof"> set mode <span style="color: rgb(45, 194, 107);">tcp</span></div><div class="x_elementToProof"> set format <span style="color: rgb(45, 194, 107);">default</span></div><div class="x_elementToProof">end</div><div class="x_elementToProof">  
</div><div>  
</div></td></tr></tbody></table>

<div id="bkmrk-%E2%80%82%E2%80%82%E2%80%82">**We recommend using port 10514 if 514 is already used. </div><div id="bkmrk-%E2%80%82%E2%80%82%E2%80%82-1"> </div><div id="bkmrk-for-syslog-filter%3A">**For Syslog Filter:**</div><div id="bkmrk--14">  
</div><table data-editing-info="{"topBorderColor":"#ABABAB","bottomBorderColor":"#ABABAB","verticalBorderColor":"#ABABAB","hasHeaderRow":false,"hasFirstColumn":false,"hasBandedRows":false,"hasBandedColumns":false,"bgColorEven":null,"bgColorOdd":"#ABABAB20","headerRowColor":"#ABABAB","tableBorderFormat":0,"verticalAlign":"top"}" id="bkmrk-config-log-syslogd-f" style="height: 210px; width: 37.2619%;"><tbody><tr><td style="width: 99.6406%;"><div>config log syslogd filter</div><div> set anomaly <span style="color: rgb(45, 194, 107);">enable</span></div><div> set forward-traffic <span style="color: rgb(45, 194, 107);">enable</span></div><div> set local-traffic <span style="color: rgb(45, 194, 107);">enable</span></div><div> set multicast-traffic <span style="color: rgb(45, 194, 107);">disable</span></div><div> set netscan-discovery <span style="color: rgb(45, 194, 107);">enable</span></div><div> set netscan-vulnerability <span style="color: rgb(45, 194, 107);">enable</span></div><div> set severity <span style="color: rgb(45, 194, 107);">warning</span></div><div> set sniffer-traffic <span style="color: rgb(45, 194, 107);">enable</span></div><div> set voip <span style="color: rgb(45, 194, 107);">disable</span></div><div> set ztna-traffic <span style="color: rgb(45, 194, 107);">enable</span></div><div>end</div></td></tr></tbody></table>

<div id="bkmrk--15">  
</div><div id="bkmrk-note%3A%C2%A0please-provide"><div class="x_elementToProof">**<span style="color: rgb(224, 62, 45);">NOTE:</span>** In your **Server IP**, please allow <span style="color: rgb(45, 194, 107);">inbound </span>and <span style="color: rgb(45, 194, 107);">outbound </span>for the specified **Port** and **Protocol**.</div><div class="x_elementToProof">For the **Source IP**, allow the <span style="color: rgb(45, 194, 107);">outbound</span> for the specified **Port** and **Protocol**.</div><div class="x_elementToProof"> **<span style="color: rgb(224, 62, 45);">Important!!</span>**</div><div class="x_elementToProof">**Please provide screenshots of the configurations after executing the commands.**</div><div class="x_elementToProof">**For our integration we need the** <span style="color: rgb(224, 62, 45);">**Server IP**</span> **and** <span style="color: rgb(224, 62, 45);">**Port number**</span>**.**</div><div class="x_elementToProof">  
</div></div><div id="bkmrk-%2A%2A%2Aplease-provide-sc">**\*\*\*Please provide screenshots of the configurations after executing the commands.**</div><div id="bkmrk-%C2%A0-%C2%A0-%C2%A0-%C2%A0for-our-integ"> **For our integration we need the Server IP and Port number.**</div>*Source Link for full Documentation Manual:*

*[https://docs.cytechint.io/books/system-integrations/page/fortinet-fortigate-syslog-setting-and-syslog-filter](https://docs.cytechint.io/books/system-integrations/page/fortinet-fortigate-syslog-setting-and-syslog-filter "https://docs.cytechint.io/books/system-integrations/page/fortinet-fortigate-syslog-setting-and-syslog-filter")*

*Source Link Documentation for Syslog Setting:*

*[https://docs.fortinet.com/document/fortigate/6.4.4/cli-reference/444620/config-log-syslogd-setting](https://docs.fortinet.com/document/fortigate/6.4.4/cli-reference/444620/config-log-syslogd-setting "https://docs.fortinet.com/document/fortigate/6.4.4/cli-reference/444620/config-log-syslogd-setting"):*

*Source Link Documentation for Syslog Filter:*

*[https://docs.fortinet.com/document/fortigate/7.0.9/cli-reference/456620/config-log-syslogd-filter](https://docs.fortinet.com/document/fortigate/7.0.9/cli-reference/456620/config-log-syslogd-filter "https://docs.fortinet.com/document/fortigate/7.0.9/cli-reference/456620/config-log-syslogd-filter")*

*[https://help.fortinet.com/fgt/handbook/cli52\_html/index.html#page/FortiOS%205.2%20CLI/config\_log.16.17.html](https://help.fortinet.com/fgt/handbook/cli52_html/index.html#page/FortiOS%205.2%20CLI/config_log.16.17.html "https://help.fortinet.com/fgt/handbook/cli52_html/index.html#page/FortiOS%205.2%20CLI/config_log.16.17.html")*

*Source link to better understand Log Priority Level:*

*[https://help.fortinet.com/fweb/551/log/Content/FortiWeb/fortiweb-log/Priority\_level.htm](https://help.fortinet.com/fweb/551/log/Content/FortiWeb/fortiweb-log/Priority_level.htm "https://help.fortinet.com/fweb/551/log/content/fortiweb/fortiweb-log/priority_level.htm")*

<div id="bkmrk--8"><div>  
</div>  
</div>

# AQUILA - GitLab Integration

<span style="color: rgb(53, 152, 219);">**Purpose**</span>

This document explains, in a clear and practical way, how to locate **GitLab log files** on the host (or in **Kubernetes**), confirm access, and connect those logs to **AQUILA**. It covers common GitLab installation types (**Omnibus/Linux** package, **self‑compiled**, and **Helm** chart deployments) and troubleshooting tips.

<span style="color: rgb(53, 152, 219);">**Audience**</span>

This guide is written for system administrators, DevOps engineers, and security/observability operators who will configure log collection from **GitLab** into **AQUILA**.

<span style="color: rgb(53, 152, 219);">**Assumptions &amp; prerequisites**</span>

- You have administrative access to the **GitLab** host(s) or **Kubernetes** cluster where GitLab runs.
- You have access to AQUILA site.
- Basic familiarity with **Linux shell commands** and **Kubernetes** (`kubectl`) for **Helm** deployments.

<span style="color: rgb(53, 152, 219);">**Step 1: Overview of required GitLab logs**</span>

The following GitLab logs are commonly consumed by security/observability platforms. Confirm their presence on the host (or in the pods) before configuring **AQUILA**. If you moved any files to different paths, provide the updated absolute paths to **AQUILA**.

- **api\_json.log**
    
    
    - Linux package (Omnibus) installations: `/var/log/gitlab/gitlab-rails/api_json.log`
    - Self‑compiled installations: `/home/git/gitlab/log/api_json.log`
    - Helm chart (Kubernetes): Webservice pods, `subcomponent="api_json"`.
- **application\_json.log**
    
    
    - Linux package: `/var/log/gitlab/gitlab-rails/application_json.log`
    - Self‑compiled: `/home/git/gitlab/log/application_json.log`
    - Helm chart: Sidekiq and Webservice pods, `subcomponent="application_json"`.
- **audit\_json.log**
    
    
    - Linux package: `/var/log/gitlab/gitlab-rails/audit_json.log`
    - Self‑compiled: `/home/git/gitlab/log/audit_json.log`
    - Helm chart: Sidekiq and Webservice pods, `subcomponent="audit_json"`.
- **auth\_json.log**
    
    
    - Linux package: `/var/log/gitlab/gitlab-rails/auth_json.log`
    - Self‑compiled: `/home/git/gitlab/log/auth_json.log`
    - Helm chart: Sidekiq and Webservice pods, `subcomponent="auth_json"`.
- **Pages logs**
    
    
    - Linux package: `/var/log/gitlab/gitlab-pages/current`.
- **production\_json.log**
    
    
    - Linux package: `/var/log/gitlab/gitlab-rails/production_json.log`
    - Self‑compiled: `/home/git/gitlab/log/production_json.log`
    - Helm chart: Webservice pods, `subcomponent="production_json"`.
- **Sidekiq logs**
    
    
    - Linux package: `/var/log/gitlab/sidekiq/current`
    - Self‑compiled: `/home/git/gitlab/log/sidekiq.log`

> If you have moved or renamed any of the above logs, please add the new absolute path(s) to the **Changed Paths** table in the Appendix below before proceeding.

<span style="color: rgb(53, 152, 219);">**Step 2: Install Log Collector Agent**</span>

On the device where **GitLab** is installed, you must also install the **AQUILA Log Collector Agent**. This agent is responsible for collecting the GitLab logs and forwarding them to AQUILA for processing.

Please refer to the official manuals for installing the **AQUILA Log Collector Agent** on different operating systems:

- **Linux:** [Log Collector Installation - Linux Manual](https://docs.cytechint.io/books/log-collector-installations/page/log-collector-installation-linux-manual)
- **Windows:** [Log Collector Installation - Windows Manual](https://docs.cytechint.io/books/log-collector-installations/page/log-collector-installation-windows-manual)
- **Mac:** [Log Collector Installation - Mac Manual](https://docs.cytechint.io/books/log-collector-installations/page/log-collector-installation-mac-manual)

Ensure that after installation, the Log Collector service is running properly.

<span style="color: rgb(53, 152, 219);">**Step 3: Integrate GitLab on AQUILA**</span>

1. Log in to the **AQUILA** site.
2. Navigate to **Cyber Monitoring → Cyber Incident Management (CIM) → Settings**.
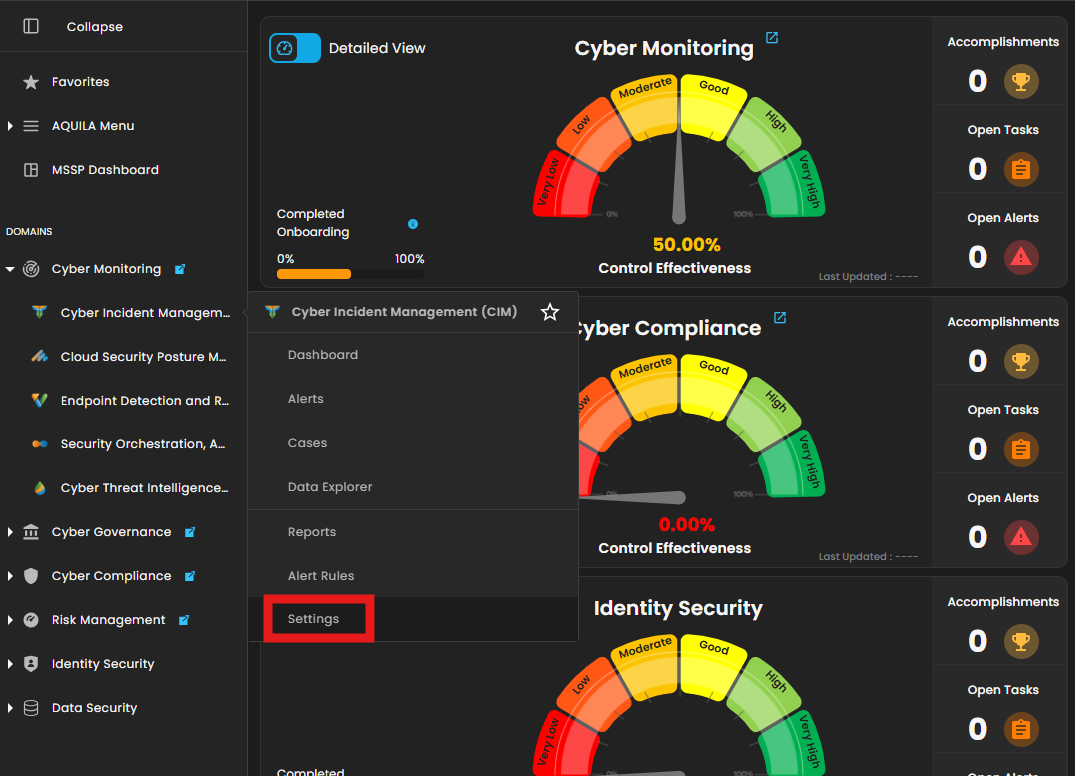
![image.png](https://cytechint-docs-bookstack.s3.amazonaws.com/uploads/images/gallery/2025-09/scaled-1680-/LufwuzyvCZwrQEVT-image.png)

3\. In **Settings for CIM**, go to **Log Source**. In the **Search Integration** textbox, type **"GitLab"** and click **Add to Agent**.
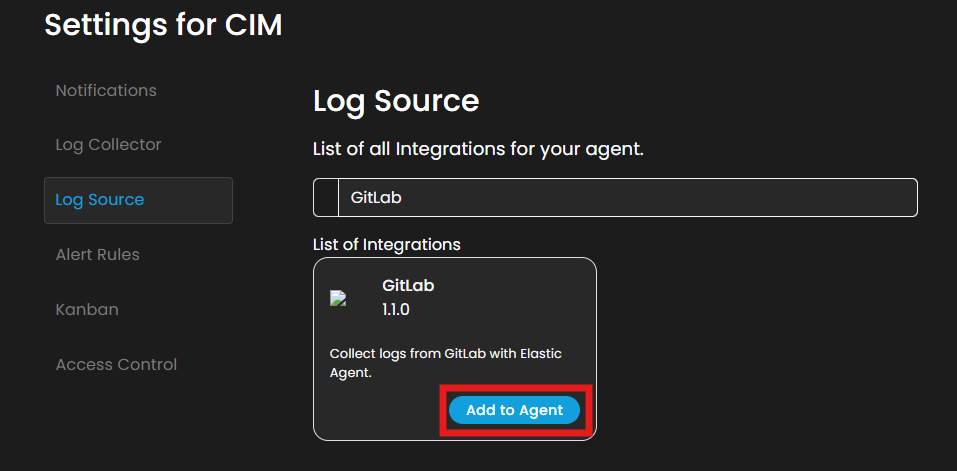
![image.png](https://cytechint-docs-bookstack.s3.amazonaws.com/uploads/images/gallery/2025-09/scaled-1680-/86oAdJt4zfbH02Kx-image.png)

4\. Choose a **Log Collector** and click the **+** button.
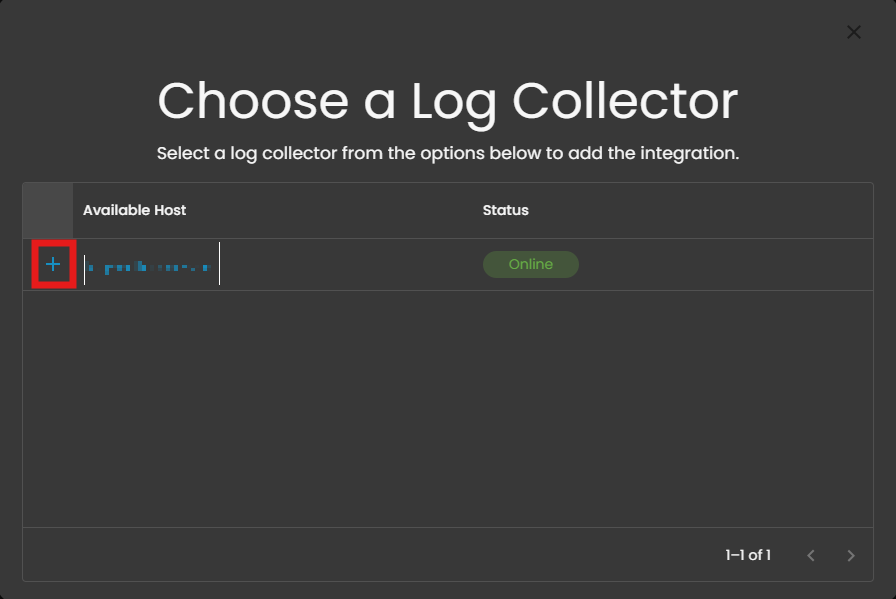
![1.png](https://cytechint-docs-bookstack.s3.amazonaws.com/uploads/images/gallery/2025-09/scaled-1680-/VNHHfnY0lYNsLpPo-1.png)

5\. In the **GitLab** section, select the radio button **Collect GitLab logs via filestream**.
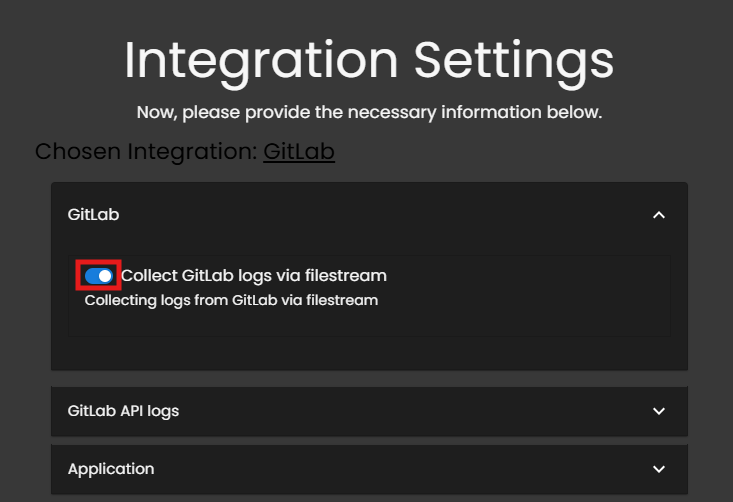
![image.png](https://cytechint-docs-bookstack.s3.amazonaws.com/uploads/images/gallery/2025-09/scaled-1680-/Imnag2mCXAq0KjsK-image.png)

6\. For the following logs, enter the specific paths gathered earlier:

1. - **GitLab API logs** (ex. /var/log/gitlab/gitlab-rails/api\_json.log)
    - **Application logs** (ex. /var/log/gitlab/gitlab-rails/application\_json.log)
    - **Audit logs** (ex. /var/log/gitlab/gitlab-rails/audit\_json.log)
    - **Auth logs** (ex. /var/log/gitlab/gitlab-rails/auth\_json.log)
    - **GitLab Pages logs** (ex. /var/log/gitlab/gitlab-pages/current)
    - **GitLab Production logs** (ex. /var/log/gitlab/gitlab-rails/production\_json.log)
    - **GitLab Sidekiq logs** (ex. /var/log/gitlab/sidekiq/current)
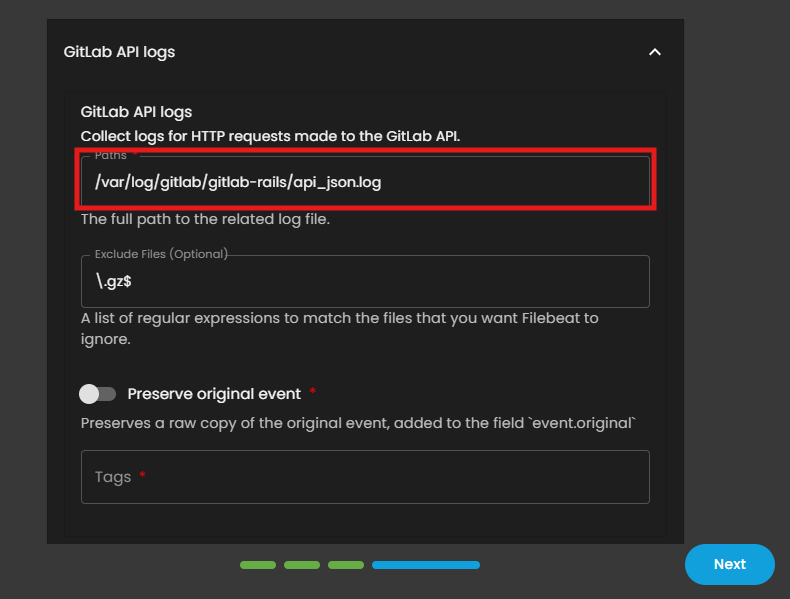
![image.png](https://cytechint-docs-bookstack.s3.amazonaws.com/uploads/images/gallery/2025-09/scaled-1680-/bGEHy4VuvMvBMtUA-image.png)

7\. In the **Tags** field, click the textbox and include all provided tags.
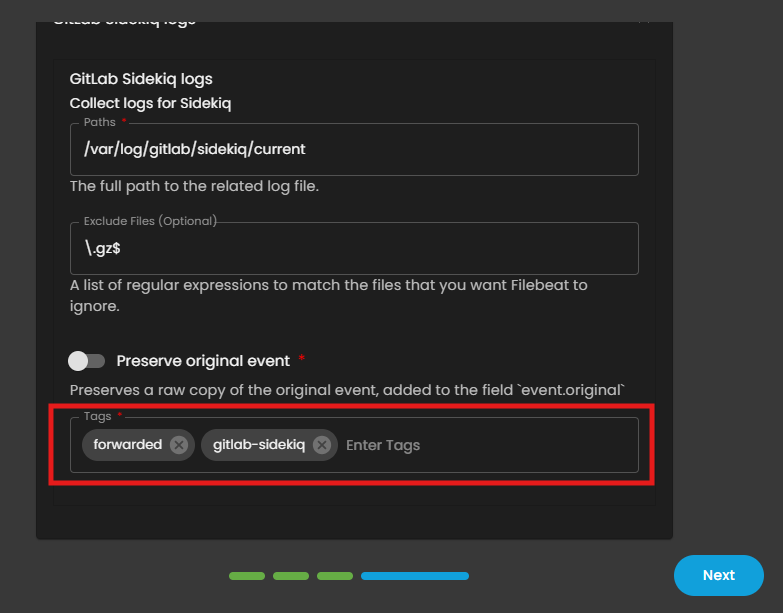
![image.png](https://cytechint-docs-bookstack.s3.amazonaws.com/uploads/images/gallery/2025-09/scaled-1680-/LIMLiumGXK3aWrXA-image.png)

8\. Once all paths and tags have been entered, click **Next** to continue.

9\. Wait for the **Successful** window to display, this will confirm the successful integration.
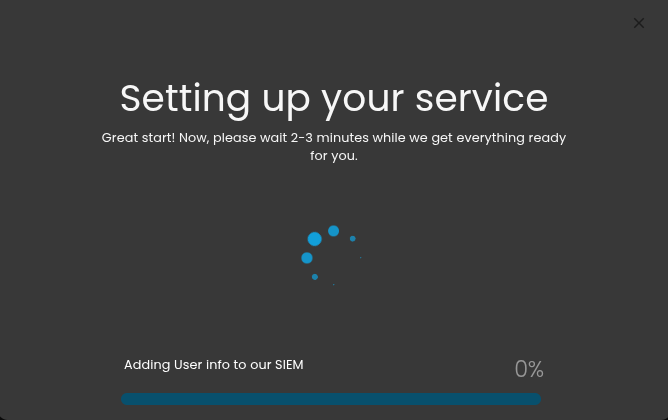
![image.png](https://cytechint-docs-bookstack.s3.amazonaws.com/uploads/images/gallery/2025-09/scaled-1680-/5vmEDGiUFIH8j57q-image.png)

*If you need further assistance, kindly contact our support at **support@cytechint.com** for prompt assistance and guidance.*

# AQUILA - Google Workspace Integration

<div class="SCXW11705193 BCX8" id="bkmrk-"><div class="OutlineElement Ltr SCXW11705193 BCX8">  
</div></div>### <span style="color: rgb(53, 152, 219);">Google Workspace Integration Overview</span>

<span style="color: rgb(0, 0, 0);">The Google Workspace integration collects and parses data from various **<span style="color: rgb(132, 63, 161);">[Google Workspace audit reports APIs ](https://developers.google.com/admin-sdk/reports/reference/rest)</span>**</span><span style="color: rgb(0, 0, 0);"><span class="TextRun Highlight SCXW11705193 BCX8" data-contrast="none" lang="EN-US" xml:lang="EN-US"><span class="NormalTextRun SCXW11705193 BCX8" data-ccp-charstyle="eop">using a service account authorized via the **Admin SDK API**.</span></span></span>

### <span style="color: rgb(53, 152, 219);"><span class="TextRun Highlight SCXW11705193 BCX8" data-contrast="none" lang="EN-US" xml:lang="EN-US"><span class="NormalTextRun SCXW11705193 BCX8" data-ccp-charstyle="eop">Requirements</span></span><span class="EOP SCXW11705193 BCX8" data-ccp-props="{"134245418":true,"134245529":true,"201341983":0,"335559738":240,"335559739":0,"335559740":360}"> </span></span>

<span style="color: rgb(0, 0, 0);">To ingest data from the Google Reports API, the following must be completed:</span>

- <span style="color: rgb(0, 0, 0);">An **administrator account** in Google Workspace.</span>
- <span style="color: rgb(0, 0, 0);">Enable the **Admin SDK API** in GCP.</span>
- <span style="color: rgb(0, 0, 0);">Create and configure a **Service Account**.</span>
- <span style="color: rgb(0, 0, 0);">Enable **Domain-Wide Delegation** for the service account.</span>
- <span style="color: rgb(0, 0, 0);">Configure the **OAuth Consent Screen**.</span>

### <span style="color: rgb(53, 152, 219);">1.Enable Admin SDK API</span>

<span style="color: rgb(0, 0, 0);">Our AQUILA agent will eventually use our GCP service account, which uses the [Workspace Admin SDK](https://developers.google.com/admin-sdk) to interact with the GW admin console REST API, therefore it needs to be enabled in GCP. To keep your mind at ease, we will only be enabling read access to the Reports API for this admin SDK.</span>

<span style="color: rgb(0, 0, 0);">Complete the following steps:</span>

- <span style="color: rgb(0, 0, 0);">Select the Google Cloud navigation menu &gt; **APIs &amp; Services** &gt; **Enabled APIs &amp; Services**</span>
- <span style="color: rgb(0, 0, 0);">Search and enable “**Admin SDK API**” from the **API library page**</span>

<span style="color: rgb(0, 0, 0);">When finished, you will have enabled the Admin SDK API within your project, where your service account will have access to pull data from GW.</span>

[![image.png](https://cytechint-docs-bookstack.s3.amazonaws.com/uploads/images/gallery/2025-09/scaled-1680-/xj1heCkKEmxFRvw0-image.png)](https://cytechint-docs-bookstack.s3.amazonaws.com/uploads/images/gallery/2025-09/xj1heCkKEmxFRvw0-image.png)

### <span style="color: rgb(0, 0, 0);"><span class="absolute -top-32" id="bkmrk--2"></span><span style="color: rgb(53, 152, 219);">2.Configure OAuth Consent Screen</span></span>

<span style="color: rgb(0, 0, 0);">We next need to set up the [OAuth consent screen](https://developers.google.com/workspace/guides/configure-oauth-consent) for our service account and application when they create API requests to GW, as it will include the necessary authorization token.</span>

<span style="color: rgb(0, 0, 0);">Complete the following steps:</span>

1. <span style="color: rgb(0, 0, 0);">Select the Google Cloud navigation menu &gt; **APIs &amp; Services** &gt; **Enabled APIs &amp; Services** &gt; **OAuth Consent Screen**</span>
2. <span style="color: rgb(0, 0, 0);">User Type &gt; Internal &gt; Create</span>
3. <span style="color: rgb(0, 0, 0);">Fill out the following information in subsequent steps</span>
4. <span style="color: rgb(0, 0, 0);">App name: </span>
5. <span style="color: rgb(0, 0, 0);">User support email: </span>
6. <span style="color: rgb(0, 0, 0);">Authorized domains: </span>
7. <span style="color: rgb(0, 0, 0);">Developer contact information:</span>
8. <span style="color: rgb(0, 0, 0);">Save and Continue</span>
9. <span style="color: rgb(0, 0, 0);">Save and Continue</span>
10. <span style="color: rgb(0, 0, 0);">Back to Dashboard</span>

[![image.png](https://cytechint-docs-bookstack.s3.amazonaws.com/uploads/images/gallery/2025-09/scaled-1680-/Wb5ntsAc3GFF6vzC-image.png)](https://cytechint-docs-bookstack.s3.amazonaws.com/uploads/images/gallery/2025-09/Wb5ntsAc3GFF6vzC-image.png)

<span style="color: rgb(0, 0, 0);">When finished, we will now have a registered application using OAuth 2.0 for authorization and the consent screen information set. Please note, the default token request limit for this app daily is 10,000 but can be increased. We recommend setting your agent’s pull rate to every 10 minutes which should not come close to this reaching this threshold. Setting the agent’s pull rate will be done at a later step.</span>

### <span style="color: rgb(0, 0, 0);"><span class="absolute -top-32" id="bkmrk--4"></span><span style="color: rgb(53, 152, 219);">3.Create a Service Account</span></span>

<span style="color: rgb(0, 0, 0);">For the AQUILA agent to ingest data from GW, we will need to create a [service account](https://cloud.google.com/iam/docs/service-accounts) for the agent to use. This account is meant for non-human applications, allowing it to access resources in GW via the Admin SDK API we enabled earlier.</span>

<span style="color: rgb(0, 0, 0);">To create a service account, do the following:</span>

1. <span style="color: rgb(0, 0, 0);">Select the navigation menu in Google Cloud &gt; **APIs &amp; Services** &gt; **Credentials** &gt; **Create Credentials** &gt; **Service Account**</span>
2. <span style="color: rgb(0, 0, 0);">Enter the following information:</span>
3. <span style="color: rgb(0, 0, 0);">Service account name: a</span>
4. <span style="color: rgb(0, 0, 0);">Service account ID: </span>
5. <span style="color: rgb(0, 0, 0);">Leave the rest blank and continue</span>
6. <span style="color: rgb(0, 0, 0);">Select your new **Service Account** &gt; **Keys** &gt; **Add Key** &gt; **Create New Key** &gt; **JSON**</span>

[![image.png](https://cytechint-docs-bookstack.s3.amazonaws.com/uploads/images/gallery/2025-09/scaled-1680-/idneceejFxjgkglB-image.png)](https://cytechint-docs-bookstack.s3.amazonaws.com/uploads/images/gallery/2025-09/idneceejFxjgkglB-image.png)

<span style="color: rgb(0, 0, 0);">By default, the Owner role will be applied to this service account based on inheritance from the project, feel free to scope permissions tighter as best seen fit. When finished, you should have a service account, credentials for this service account in a JSON file saved to your host. We will enter this information during our GW integration setup.</span>

### <span style="color: rgb(0, 0, 0);"><span class="absolute -top-32" id="bkmrk--6"></span><span style="color: rgb(53, 152, 219);">4.Enable Domain-Wide Delegation</span></span>

<span style="color: rgb(0, 0, 0);">Our service account will need [domain-wide delegation](https://developers.google.com/admin-sdk/directory/v1/guides/delegation) of permissions to access APIs that reach outside of GCP and into GW. The important data necessary for this has already been established in earlier steps where we need an API key, service account and OAuth client ID.</span>

<span style="color: rgb(0, 0, 0);">To enable domain-wide delegation for your service account, do the following:</span>

1. <span style="color: rgb(0, 0, 0);">In your GW Admin Console select &gt; **Navigation Menu** &gt; **Security** &gt; **Access and data control** &gt; **API controls**</span>
2. <span style="color: rgb(0, 0, 0);">Select **Manage Domain Wide Delegation** &gt; **Add New**</span>
3. <span style="color: rgb(0, 0, 0);">Client ID: OAuth ID from Service Account in GCP</span>
4. <span style="color: rgb(0, 0, 0);">Google Cloud Console &gt; **IAM &amp; Admin** &gt; **Service Accounts** &gt; **OAuth 2 Client ID** (copy to clipboard)</span>
5. <span style="color: rgb(0, 0, 0);">**OAuth Scopes**: [https://www.googleapis.com/auth/admin.reports.audit.readonly](https://www.googleapis.com/auth/admin.reports.audit.readonly)</span>

[![image.png](https://cytechint-docs-bookstack.s3.amazonaws.com/uploads/images/gallery/2025-09/scaled-1680-/iME4GsGjhRnpwodR-image.png)](https://cytechint-docs-bookstack.s3.amazonaws.com/uploads/images/gallery/2025-09/iME4GsGjhRnpwodR-image.png)

<span style="color: rgb(0, 0, 0);">Our service account in GCP only needs access to admin.reports.audit.readonly to access GW [Audit Reports](https://developers.google.com/admin-sdk/reports/v1/get-start/overview) where these are converted into ECS documents.</span>

<span style="color: rgb(0, 0, 0);">If you made it this far, CONGRATULATIONS you are doing outstanding! Your GW and GCP environments are now set up and finished. At this point you are almost done.</span>

<p class="callout info">**<span style="color: rgb(0, 0, 0);"><span class="TextRun SCXW11705193 BCX8" data-contrast="auto" lang="EN-US" xml:lang="EN-US"><span class="NormalTextRun SCXW11705193 BCX8" data-ccp-charstyle="eop">Please provide the following information to </span><span class="NormalTextRun SpellingErrorV2Themed SCXW11705193 BCX8" data-ccp-charstyle="eop">CyTech Support</span><span class="NormalTextRun SCXW11705193 BCX8" data-ccp-charstyle="eop">:</span></span><span class="EOP SCXW11705193 BCX8" data-ccp-props="{"201341983":0,"335559685":720,"335559739":160,"335559740":259}"> </span></span>**</p>

<div class="SCXW11705193 BCX8" id="bkmrk-jwt-file---specifies"><div class="ListContainerWrapper SCXW11705193 BCX8">- <span class="TextRun SCXW11705193 BCX8" data-contrast="auto" lang="EN-US" style="color: rgb(0, 0, 0);" xml:lang="EN-US">**<span class="NormalTextRun SpellingErrorV2Themed SCXW11705193 BCX8" data-ccp-charstyle="eop">Delegated Account - </span>**<span class="NormalTextRun SpellingErrorV2Themed SCXW11705193 BCX8" data-ccp-charstyle="eop">the email of the administrator account, and not the email of the ServiceAccount.</span></span>
- <span style="color: rgb(0, 0, 0);"><span class="TextRun SCXW11705193 BCX8" data-contrast="auto" lang="EN-US" xml:lang="EN-US">**<span class="NormalTextRun SpellingErrorV2Themed SCXW11705193 BCX8" data-ccp-charstyle="eop">Jwt</span><span class="NormalTextRun SCXW11705193 BCX8" data-ccp-charstyle="eop"> JSON</span>** </span><span class="TextRun SCXW11705193 BCX8" data-contrast="auto" lang="EN-US" xml:lang="EN-US"><span class="NormalTextRun SCXW11705193 BCX8" data-ccp-charstyle="eop">- The JSON credentials file downloaded from GCP. </span><span class="NormalTextRun SCXW11705193 BCX8" data-ccp-charstyle="eop">Raw contents of the JWT file. Useful when hosting a file along with the agent is not possible. NOTE: Please use either JWT File or JWT JSON parameter</span><span class="NormalTextRun SCXW11705193 BCX8" data-ccp-charstyle="eop">.</span></span><span class="EOP SCXW11705193 BCX8" data-ccp-props="{"201341983":0,"335559739":160,"335559740":259}"> </span></span>

</div></div>  *Reference link: [https://www.elastic.co/security-labs/google-workspace-attack-surface-part-two](https://www.elastic.co/security-labs/google-workspace-attack-surface-part-two)*

*<span class="TextRun SCXW71272603 BCX0" data-contrast="auto" lang="EN-US" xml:lang="EN-US"><span class="NormalTextRun SCXW71272603 BCX0">If you need further </span><span class="NormalTextRun SCXW71272603 BCX0">assistance</span><span class="NormalTextRun SCXW71272603 BCX0">, kindly contact our support at </span></span><span style="color: rgb(53, 152, 219);">**<span class="TextRun SCXW71272603 BCX0" data-contrast="none" lang="EN-US" xml:lang="EN-US"><span class="NormalTextRun SCXW71272603 BCX0">support@cytechint.com</span></span>**</span><span class="TextRun SCXW71272603 BCX0" data-contrast="auto" lang="EN-US" xml:lang="EN-US"><span class="NormalTextRun SCXW71272603 BCX0"> for prompt </span><span class="NormalTextRun SCXW71272603 BCX0">assistance</span><span class="NormalTextRun SCXW71272603 BCX0"> and guidance.</span></span><span class="EOP SCXW71272603 BCX0" data-ccp-props="{}"> </span>*

<div class="SCXW11705193 BCX8" id="bkmrk-delegated-account---"></div>

# AQUILA - Host Isolation

#### **Overview**

Host Isolation Exception allows isolated endpoints to maintain connectivity to specific IP addresses while remaining isolated from the rest of the network. This feature is useful when you need to isolate potentially compromised hosts for security purposes while still allowing them to communicate with specific trusted resources. It is also a key cybersecurity practice used primarily in incident response to segregate a potentially compromised device (such as a laptop, server, or workstation) from the rest of the network. This prevents threats like malware, ransomware, or active intruders from spreading laterally or communicating with command-and-control servers. It creates a controlled "quarantine" state while maintaining a secure forensic channel for remote investigation and remediation.

It works through automated or manual triggers from tools like Endpoint Detection and Response (EDR) platforms. Upon detecting suspicious activity (e.g., via behavioral analysis or signatures), the system enforces isolation using:

#### **Prerequisites**

- Administrator permissions
- Access to the Control Panel section

##### **Option 1: Endpoint Detection and Response (EDR) - Endpoints**

**1. Navigate to Endpoint Sub-module in Endpoint Detection and Response (EDR)**

- **Step 1: Log in to CyTech - AQUILA. *click here --&gt;* [usdc.cytechint.io](https://usdc.cytechint.io/)**
- **Step 2: In the left column click Cyber Monitoring -&gt; Endpoint Detection and Response (EDR) -&gt; Dashboard**

[![Frame 1 (4).png](https://cytechint-docs-bookstack.s3.amazonaws.com/uploads/images/gallery/2025-11/scaled-1680-/mb2r0W3bIELVHdZt-frame-1-4.png)](https://cytechint-docs-bookstack.s3.amazonaws.com/uploads/images/gallery/2025-11/mb2r0W3bIELVHdZt-frame-1-4.png)

**2. Access the Endpoint Section**

- **By pressing the eye icon, it will transfer the user to the Endpoint Section where it shows system details, alert rules, alerts, and events.**

[![Frame 1 (3).png](https://cytechint-docs-bookstack.s3.amazonaws.com/uploads/images/gallery/2025-11/scaled-1680-/gj82JtCFMhUF7M5r-frame-1-3.png)](https://cytechint-docs-bookstack.s3.amazonaws.com/uploads/images/gallery/2025-11/gj82JtCFMhUF7M5r-frame-1-3.png)
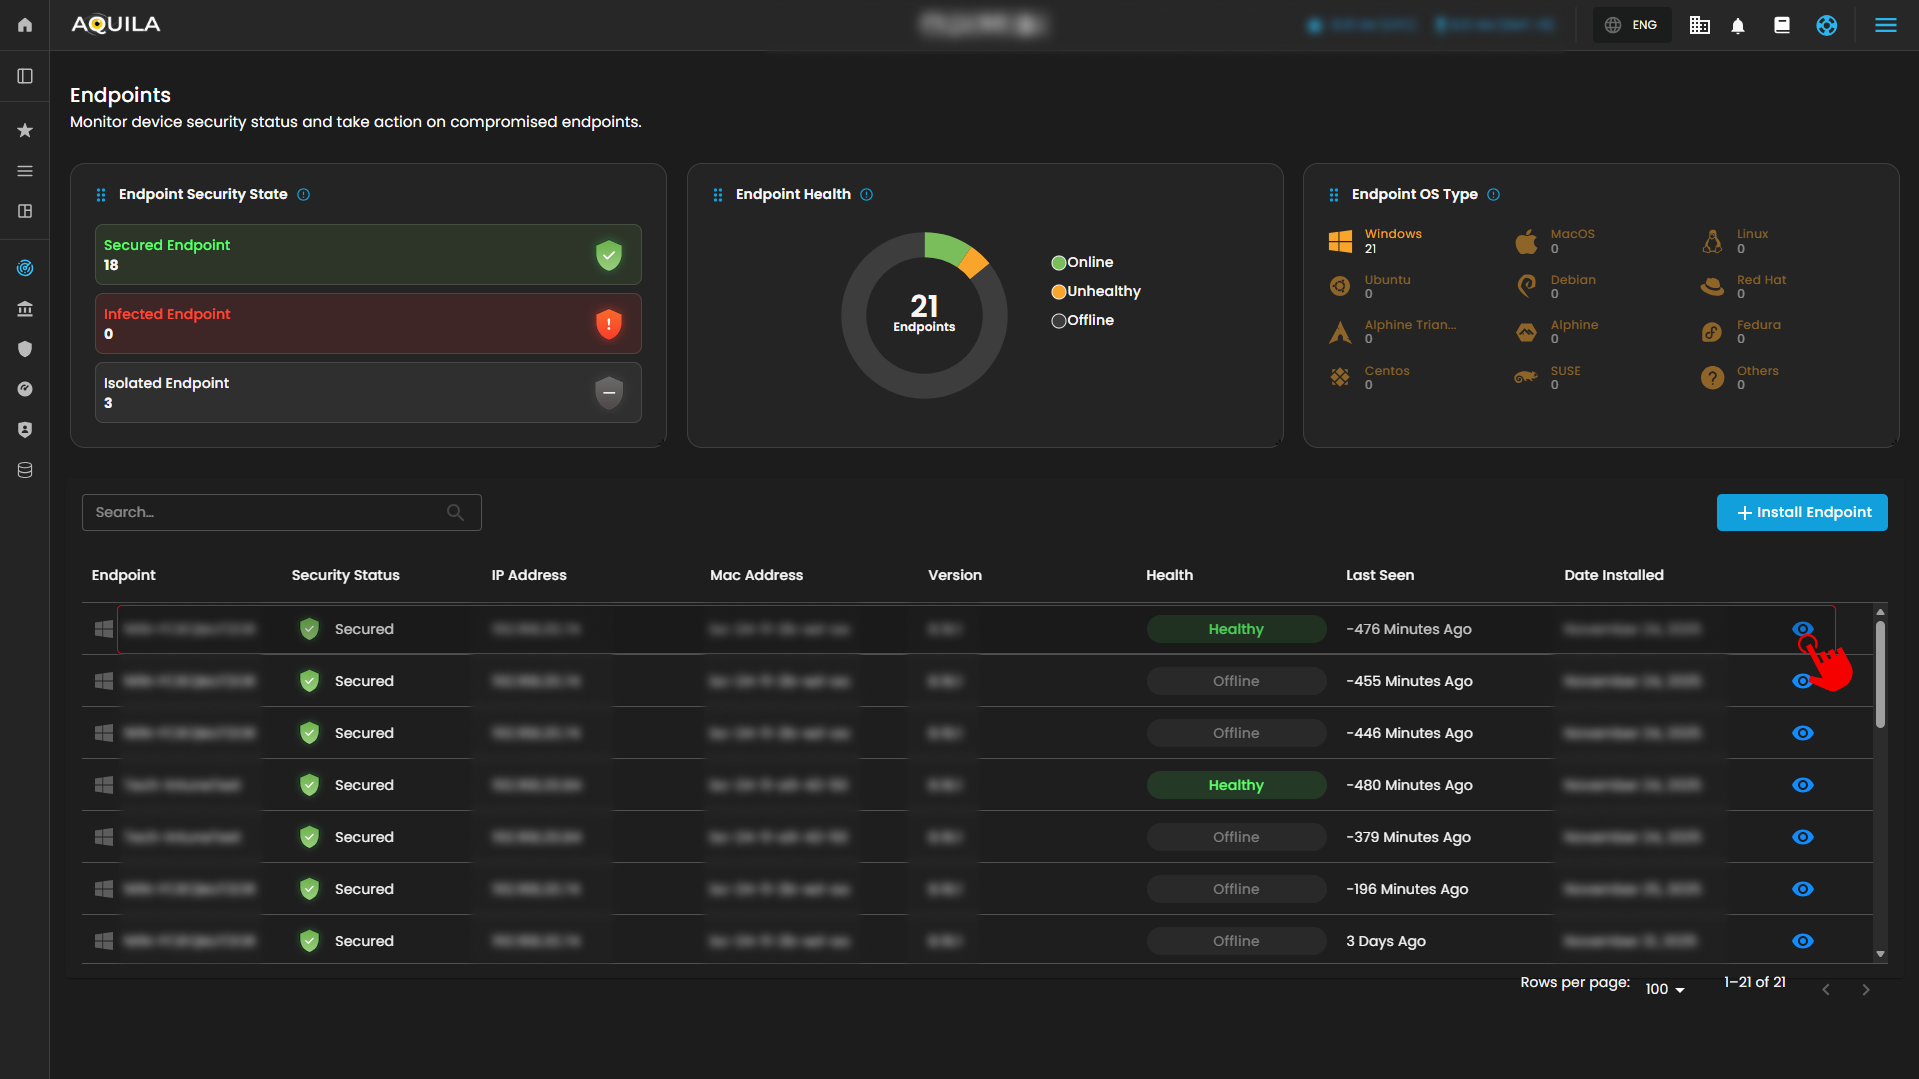
**3. Isolate Host**

- **By Pressing the Respond button, it will show Isolate host where the user can isolate their endpoint or a specific workstation.**

[![Frame 1 (2).png](https://cytechint-docs-bookstack.s3.amazonaws.com/uploads/images/gallery/2025-11/scaled-1680-/LIGV2LNWDpwVNypj-frame-1-2.png)](https://cytechint-docs-bookstack.s3.amazonaws.com/uploads/images/gallery/2025-11/LIGV2LNWDpwVNypj-frame-1-2.png)
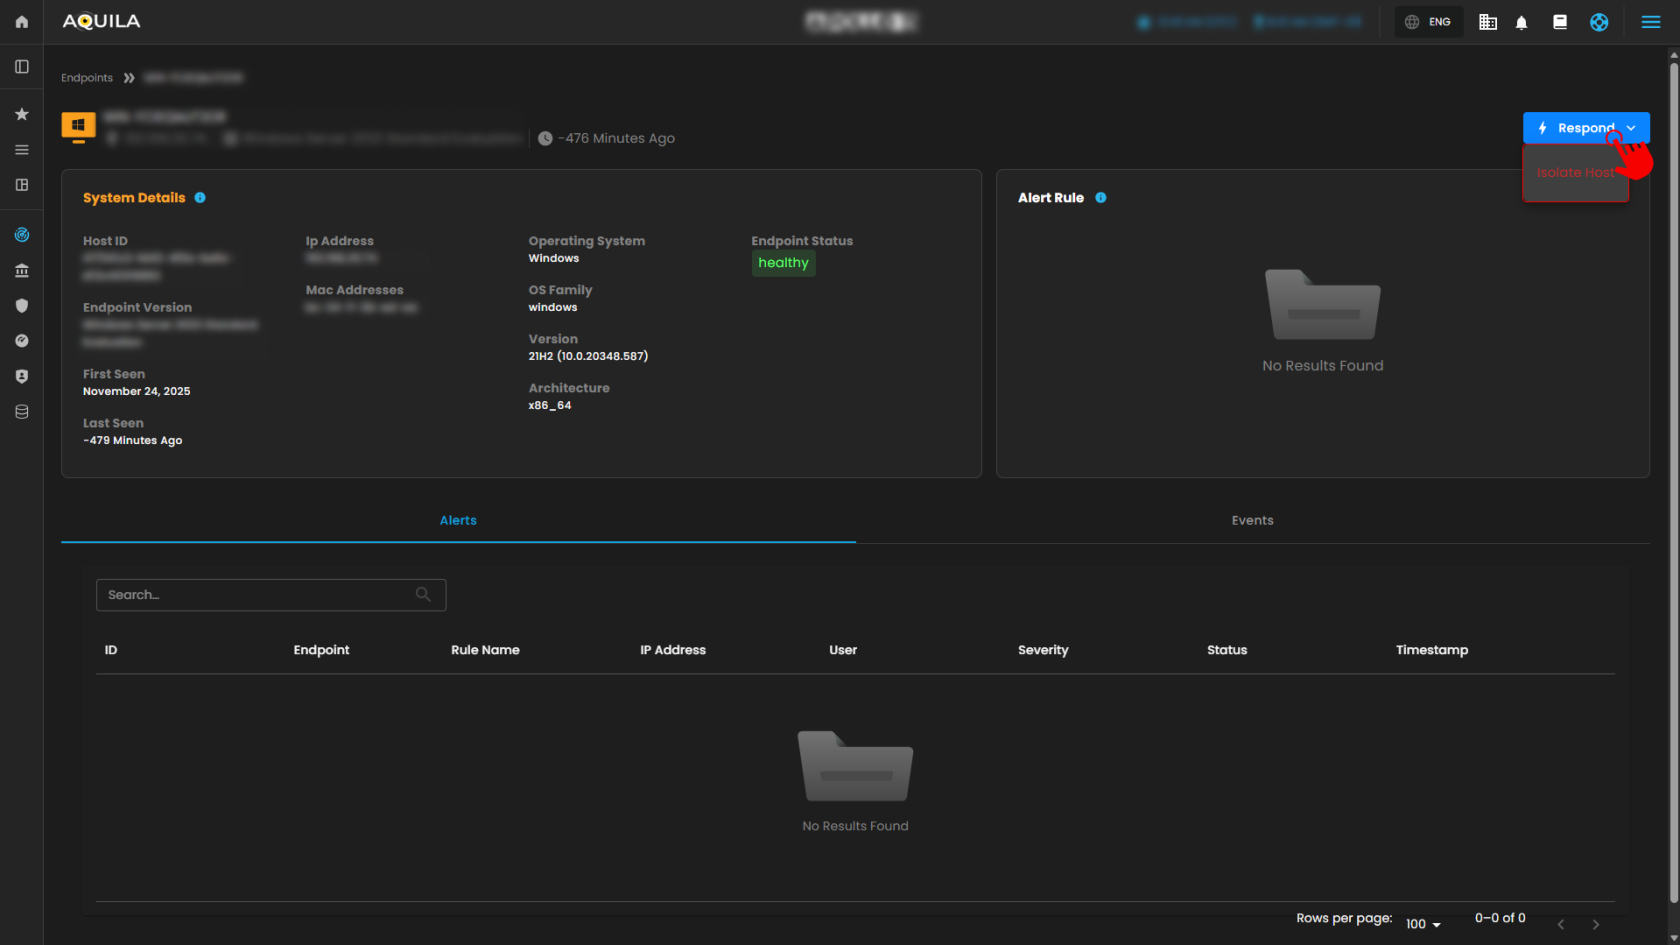
**4. Isolate Endpoint**

- **In this section, the user can disable their endpoint and provide a reason for the isolation.**

[![Frame 1 (1).png](https://cytechint-docs-bookstack.s3.amazonaws.com/uploads/images/gallery/2025-11/scaled-1680-/78N57oWwfAkLwvZO-frame-1-1.png)](https://cytechint-docs-bookstack.s3.amazonaws.com/uploads/images/gallery/2025-11/78N57oWwfAkLwvZO-frame-1-1.png)
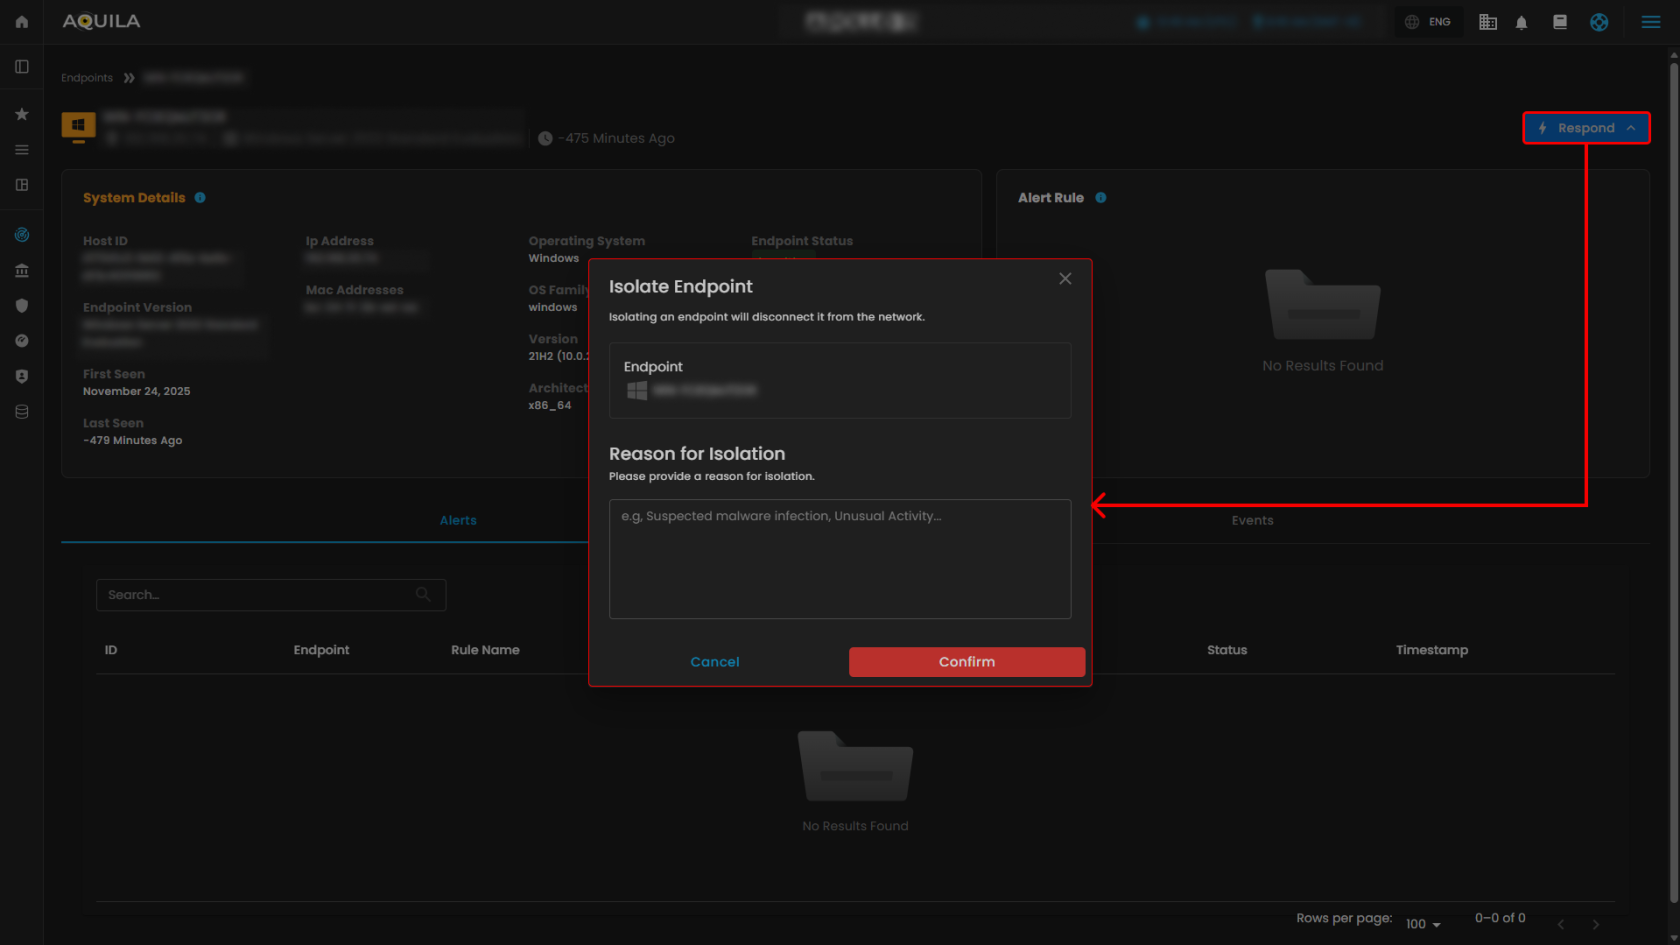
##### **Option 2: Endpoint Detection and Response (EDR) - Control Panel**

##### 1. Navigate to Endpoint Management

[![Frame 1 (5).png](https://cytechint-docs-bookstack.s3.amazonaws.com/uploads/images/gallery/2025-11/scaled-1680-/xB9PgxaZZLLUu7dq-frame-1-5.png)](https://cytechint-docs-bookstack.s3.amazonaws.com/uploads/images/gallery/2025-11/xB9PgxaZZLLUu7dq-frame-1-5.png)
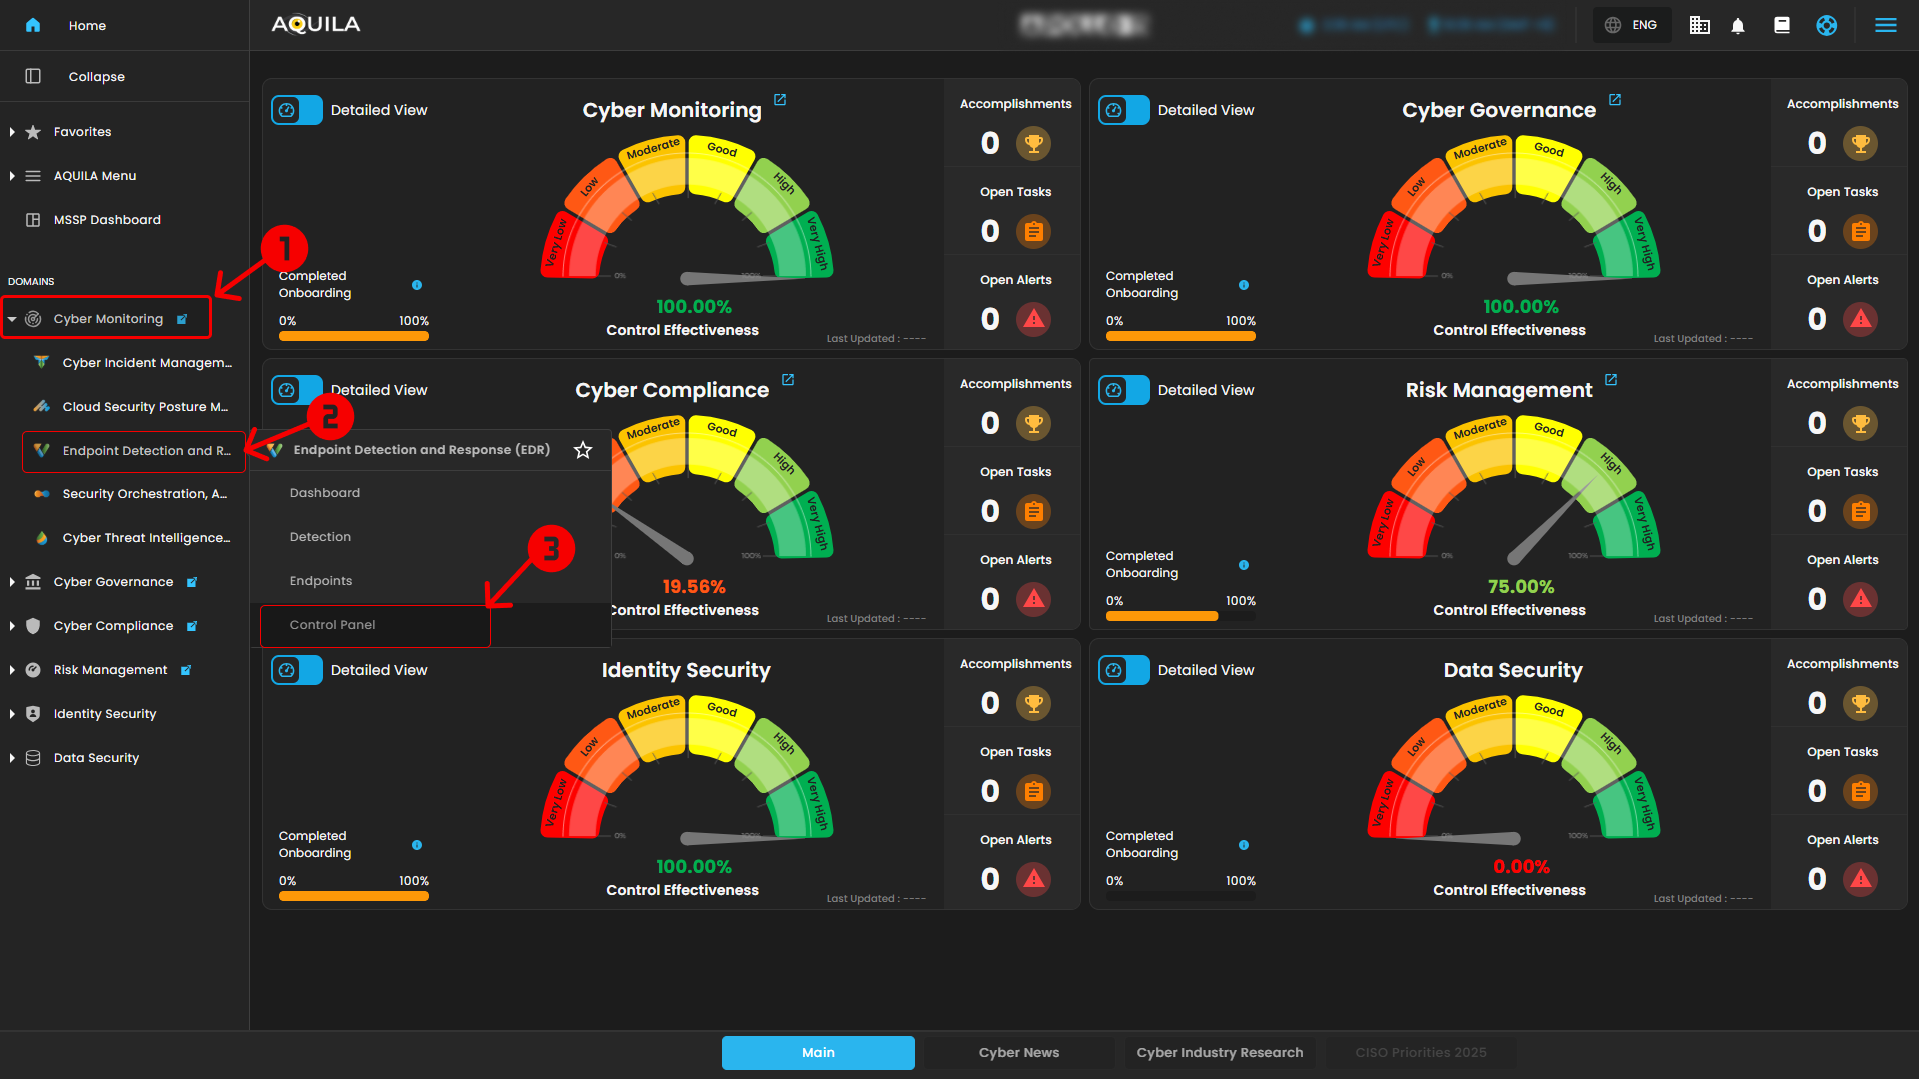
1. From the AQUILA main dashboard, locate the left sidebar menu
2. Under the **DOMAINS** section, click on **Cyber Monitoring**
3. Select **Endpoint Detection and Response (EDR)**
4. Click on **Control Panel**

This will open the endpoint management interface.

##### **2. Access the Manage Endpoints Section**

[![image.png](https://cytechint-docs-bookstack.s3.amazonaws.com/uploads/images/gallery/2025-11/scaled-1680-/Dcv6EOKVF8yr2tlN-image.png)](https://cytechint-docs-bookstack.s3.amazonaws.com/uploads/images/gallery/2025-11/Dcv6EOKVF8yr2tlN-image.png)
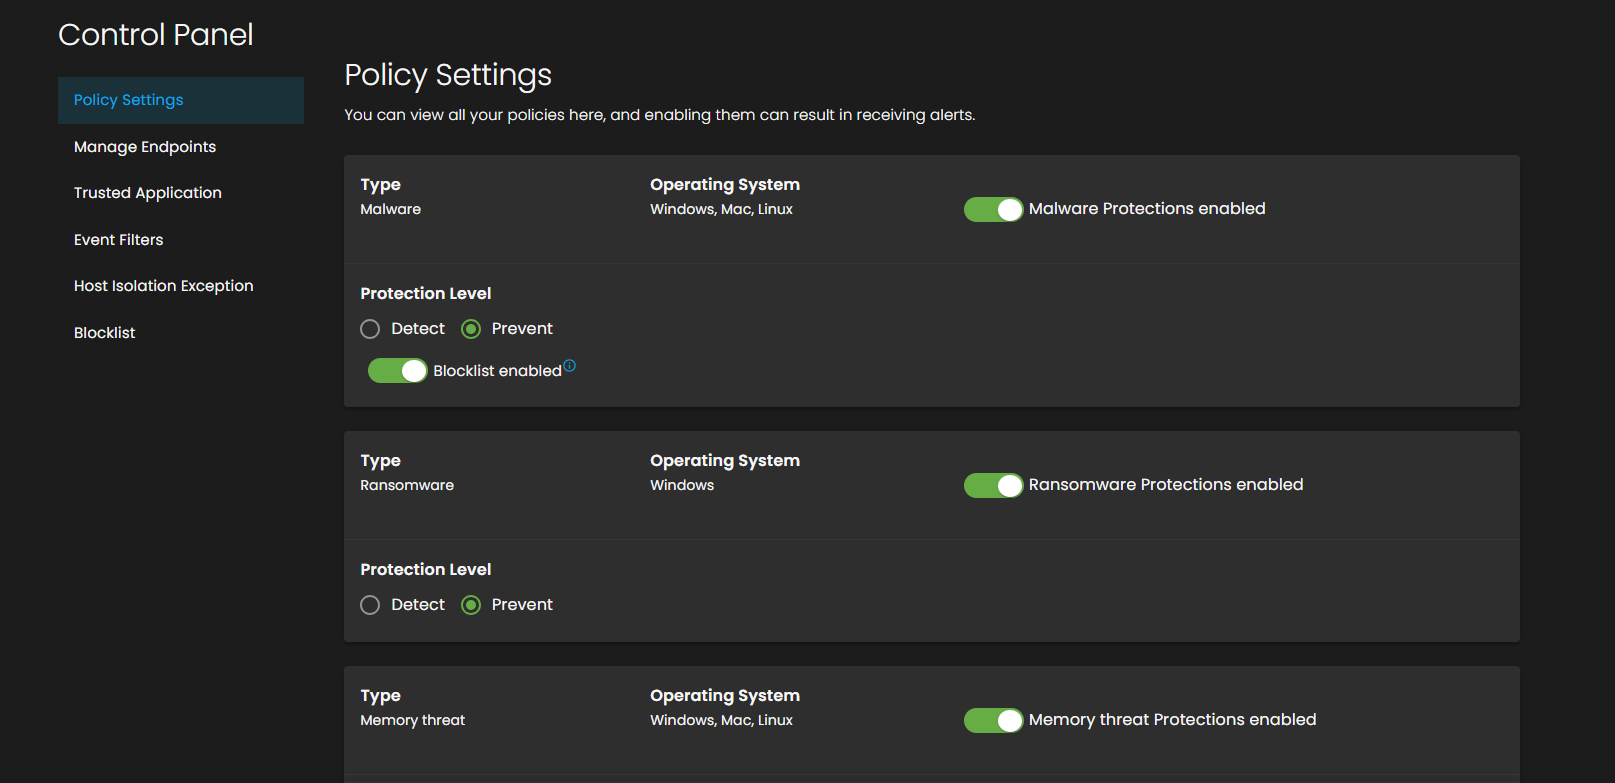
1. In the Control Panel, click on **Manage Endpoints** from the Policy Settings menu. [![image.png](https://cytechint-docs-bookstack.s3.amazonaws.com/uploads/images/gallery/2025-11/scaled-1680-/LzJq0msYlP0EGDCC-image.png)](https://cytechint-docs-bookstack.s3.amazonaws.com/uploads/images/gallery/2025-11/LzJq0msYlP0EGDCC-image.png)
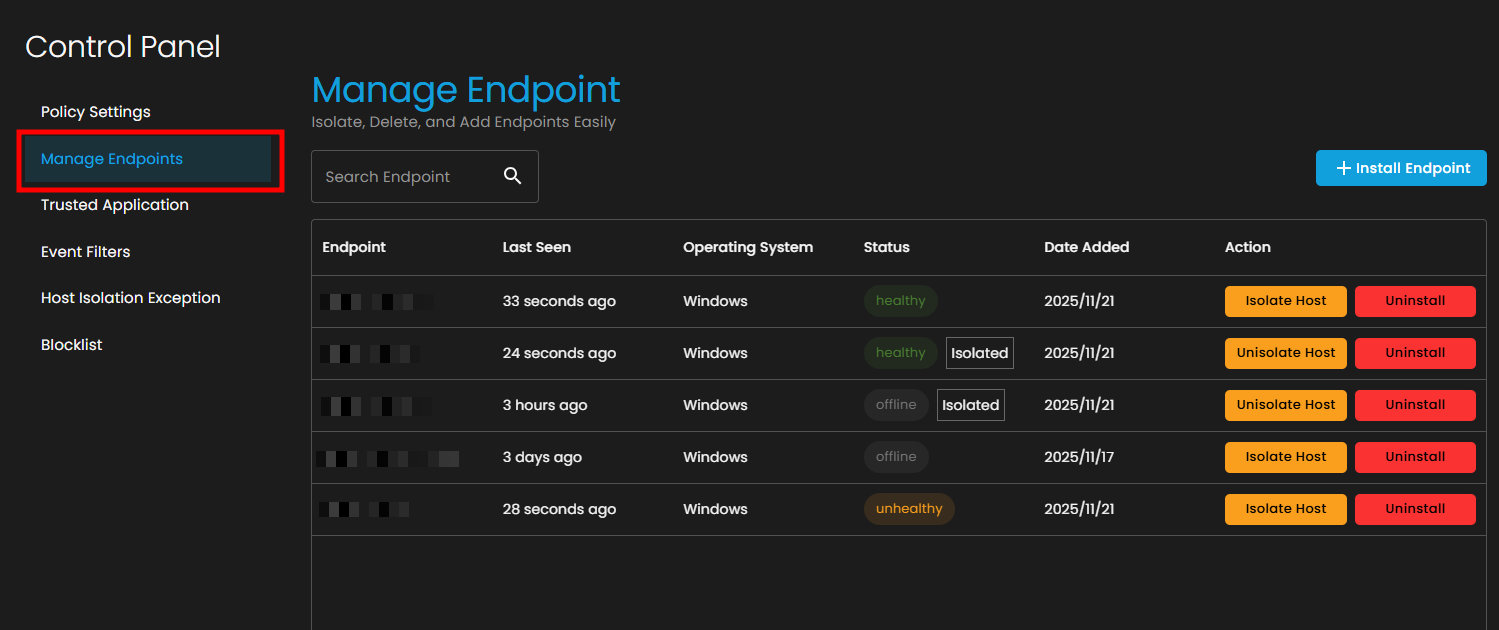
2. You'll see a table displaying all registered endpoints with the following information: 
    - Operating System
    - Status (healthy, unhealthy, offline, isolated)
    - Date Added
    - Available Actions

##### **3. Isolate an Endpoint**

[![image.png](https://cytechint-docs-bookstack.s3.amazonaws.com/uploads/images/gallery/2025-11/scaled-1680-/Lxpse2fLqCaPg8b5-image.png)](https://cytechint-docs-bookstack.s3.amazonaws.com/uploads/images/gallery/2025-11/Lxpse2fLqCaPg8b5-image.png)
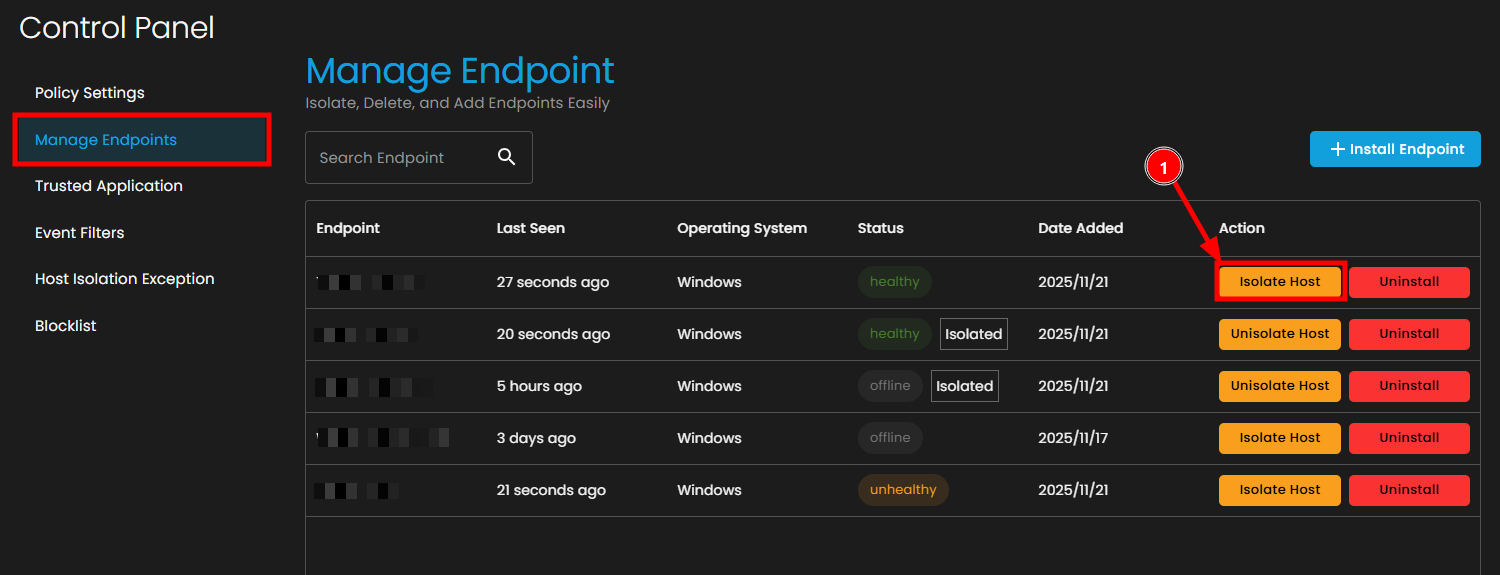
If you need to isolate an endpoint first:

1. Locate the target endpoint in the list
2. Click the **Isolate Host** button in the Action column
3. In the **"Isolate Endpoint"** dialog box:  
    [![image.png](https://cytechint-docs-bookstack.s3.amazonaws.com/uploads/images/gallery/2025-11/scaled-1680-/zli5njPStB6XXdv8-image.png)](https://cytechint-docs-bookstack.s3.amazonaws.com/uploads/images/gallery/2025-11/zli5njPStB6XXdv8-image.png)
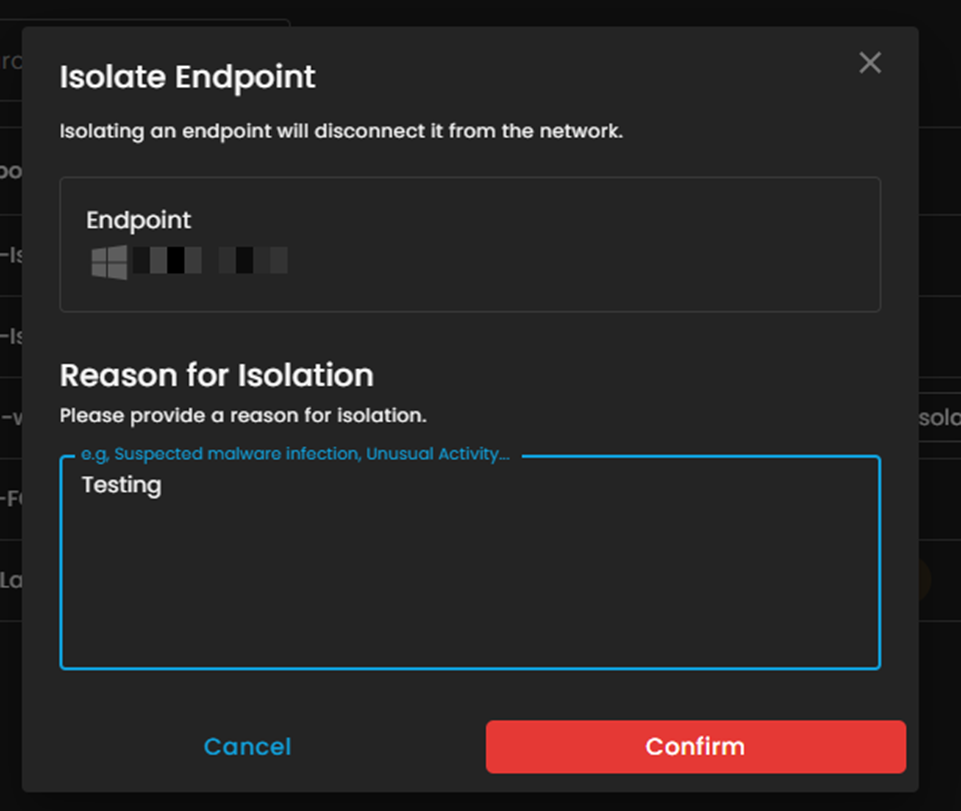
4. Click the **Confirm** button to proceed
5. The endpoint status will change to **Isolated**[![image.png](https://cytechint-docs-bookstack.s3.amazonaws.com/uploads/images/gallery/2025-11/scaled-1680-/vcb0U03c0BVgbqO8-image.png)](https://cytechint-docs-bookstack.s3.amazonaws.com/uploads/images/gallery/2025-11/vcb0U03c0BVgbqO8-image.png)
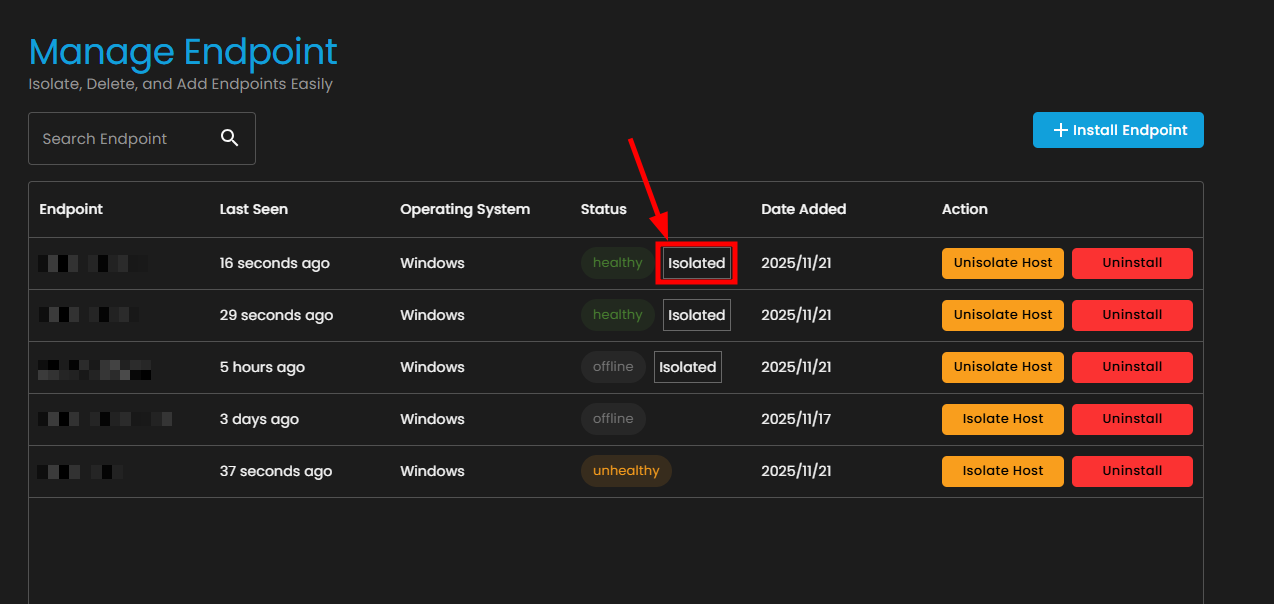
**Note:** Once isolated, the endpoint will be disconnected from the network and unable to access external resources except those specified in the Host Isolation Exception list.

[![image.png](https://cytechint-docs-bookstack.s3.amazonaws.com/uploads/images/gallery/2025-11/scaled-1680-/nIEBHsP8xH7Mt8Ct-image.png)](https://cytechint-docs-bookstack.s3.amazonaws.com/uploads/images/gallery/2025-11/nIEBHsP8xH7Mt8Ct-image.png)
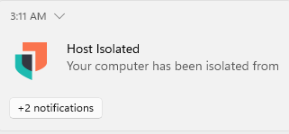
**Testing connection status:**

[![image.png](https://cytechint-docs-bookstack.s3.amazonaws.com/uploads/images/gallery/2025-11/scaled-1680-/aiLyYurpe7M3gdKW-image.png)](https://cytechint-docs-bookstack.s3.amazonaws.com/uploads/images/gallery/2025-11/aiLyYurpe7M3gdKW-image.png)
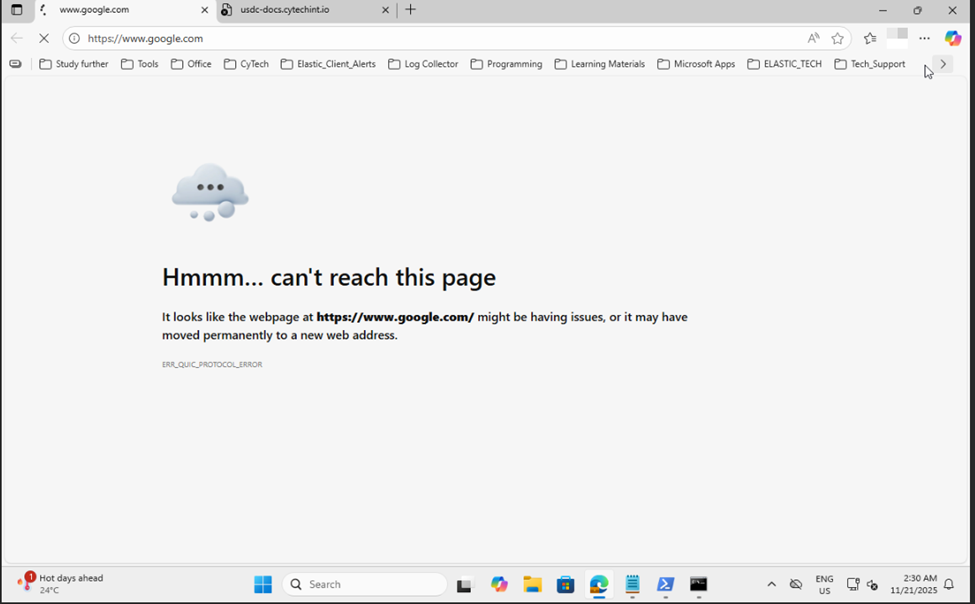
[![image.png](https://cytechint-docs-bookstack.s3.amazonaws.com/uploads/images/gallery/2025-11/scaled-1680-/SIb5U9mswhd25n09-image.png)](https://cytechint-docs-bookstack.s3.amazonaws.com/uploads/images/gallery/2025-11/SIb5U9mswhd25n09-image.png)[ ![image.png](https://cytechint-docs-bookstack.s3.amazonaws.com/uploads/images/gallery/2025-11/scaled-1680-/KhX5tJUe1saR9TPG-image.png)](https://cytechint-docs-bookstack.s3.amazonaws.com/uploads/images/gallery/2025-11/KhX5tJUe1saR9TPG-image.png)
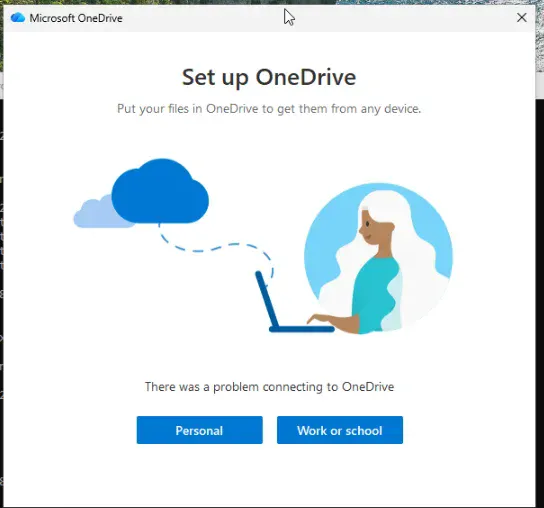
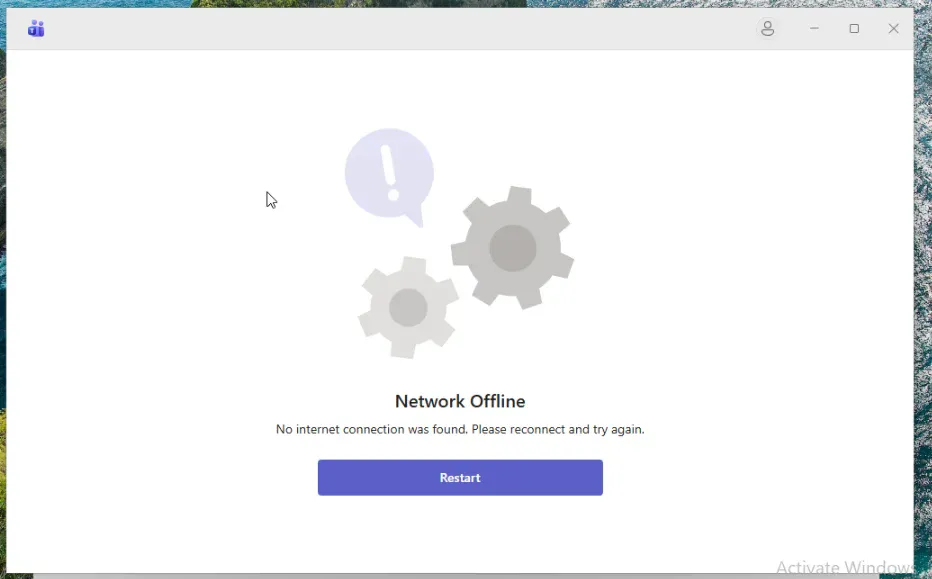
##### **4. Verify Isolation Status**


After isolation, you can verify the endpoint's network status:

1. Open Command Prompt on the isolated endpoint
2. Test connectivity by pinging a public IP address:
3. You should see **General failure** messages, confirming the host is isolated
4. The ping statistics should show **100% loss**[![image.png](https://cytechint-docs-bookstack.s3.amazonaws.com/uploads/images/gallery/2025-11/scaled-1680-/9uDYHvjCGIusatl7-image.png)](https://cytechint-docs-bookstack.s3.amazonaws.com/uploads/images/gallery/2025-11/9uDYHvjCGIusatl7-image.png)
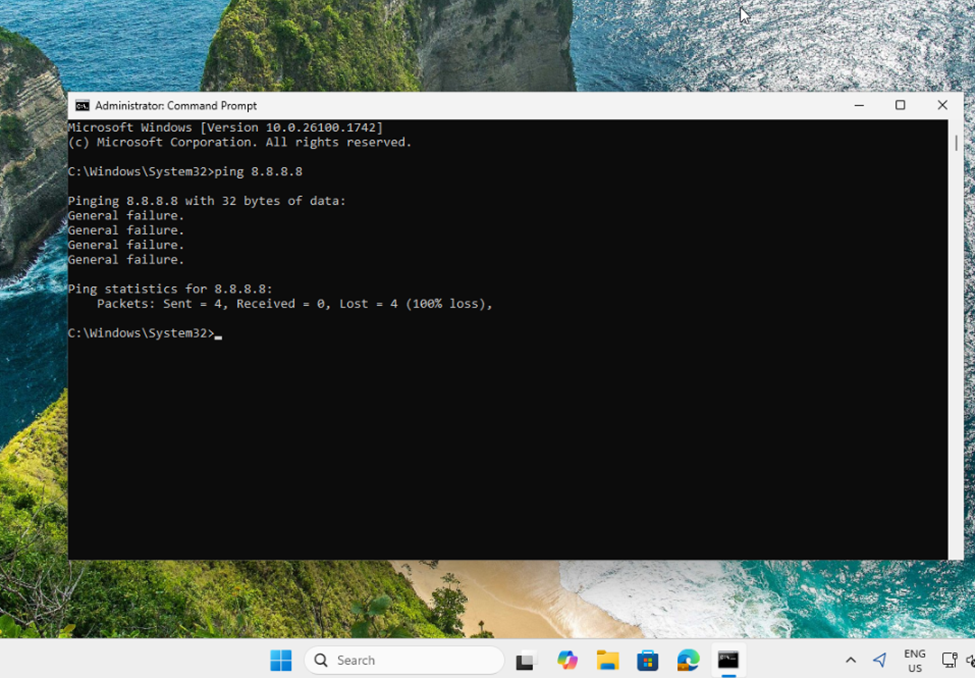
##### **Pros and Cons**

<table id="bkmrk-aspect-pros-cons-thr"><thead><tr><th data-col-size="sm">Aspect</th><th data-col-size="lg">Pros</th><th data-col-size="lg">Cons</th></tr></thead><tbody><tr><td data-col-size="sm">**Threat Containment**</td><td data-col-size="lg">Rapidly halts malware propagation and lateral movement, limiting breach scope to one device and reducing overall network risk.</td><td data-col-size="lg">If the isolating agent (e.g., EDR software) is compromised, it could fail, creating a single point of failure.</td></tr><tr><td data-col-size="sm">**Response Efficiency**</td><td data-col-size="lg">Buys critical time for forensic analysis, remediation, and recovery—especially useful off-hours or in automated setups. Enables precise logging and process termination without physical access.</td><td data-col-size="lg">Manual containment can require human escalation, leading to delays; automation risks over-isolation on false positives, disrupting business-critical systems.</td></tr><tr><td data-col-size="sm">**Security Posture**</td><td data-col-size="lg">Enhances visibility into isolated incidents for better threat hunting; integrates with zero-trust models to enforce granular controls.</td><td data-col-size="lg">Generates potential alert fatigue if tied to detection systems; narrow focus on single hosts may miss multi-device attacks.</td></tr><tr><td data-col-size="sm">**Operational Impact**</td><td data-col-size="lg">Minimizes downtime compared to full network shutdowns; supports staged recovery to restore operations quickly.</td><td data-col-size="lg">Can cause immediate productivity loss (e.g., blocking remote work); resource-intensive on endpoints, potentially slowing performance.</td></tr><tr><td data-col-size="sm">**Management &amp; Scalability**</td><td data-col-size="lg">Cost-effective with open-source tools; flexible for mobile/remote devices across environments.</td><td data-col-size="lg">Complex to deploy and maintain consistently in large networks; high risk of misconfiguration leading to security gaps or unintended blocks.</td></tr></tbody></table>

##### **Conclusion**

In summary, host isolation is a proactive "firebreak" in cybersecurity, excelling in speed and precision for containing incidents but demanding robust testing and policy integration to mitigate its operational trade-offs. For high-stakes environments like enterprises, combining it with tools like EDR or NAC maximizes benefits while addressing limitations.

# AQUILA - Host Isolation Exception

#### **Overview**

Host isolation exceptions (also called endpoint isolation exclusions) are configurable rules in Endpoint Detection and Response (EDR) systems—such as Elastic Security, Microsoft Defender for Endpoint, or Cortex XDR—that allow specific IP addresses, processes, services, or endpoints to bypass network isolation restrictions. While full isolation blocks nearly all inbound and outbound traffic to quarantine a potentially compromised host, exceptions carve out secure "whitelists" for essential communications. This ensures critical functions like remote remediation, security telemetry, or business tools (e.g., Microsoft Teams or Outlook) remain operational without fully severing the device from the network. Exceptions must be defined cautiously, as they create controlled openings in an otherwise locked-down state.

These features are implemented via policy-based rules in EDR consoles, often supporting wildcards for flexibility (e.g., allowing all processes to reach a specific management IP). They complement host isolation by balancing security with usability, particularly in regulated environments like PCI DSS where partial connectivity is needed for compliance or operations.

#### **Prerequisites**

- Administrator permissions

#### **Step By Step Guide**

##### **1. Navigate to Endpoint Management**

[![image.png](https://cytechint-docs-bookstack.s3.amazonaws.com/uploads/images/gallery/2025-11/scaled-1680-/TtdYFKy7u1Z3Tusd-image.png)](https://cytechint-docs-bookstack.s3.amazonaws.com/uploads/images/gallery/2025-11/TtdYFKy7u1Z3Tusd-image.png)
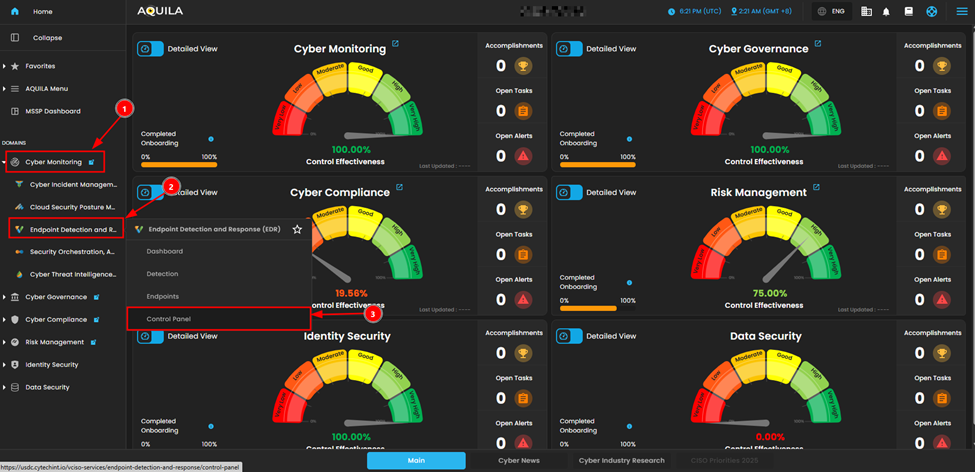
##### **2. Configure Host Isolation Exception**

To allow isolated endpoints to connect to specific IP addresses:

In the Control Panel left sidebar, under **Event Filters**, click on **Host Isolation Exception**

[![image.png](https://cytechint-docs-bookstack.s3.amazonaws.com/uploads/images/gallery/2025-11/scaled-1680-/fQupJgOyZZyOT5wx-image.png)](https://cytechint-docs-bookstack.s3.amazonaws.com/uploads/images/gallery/2025-11/fQupJgOyZZyOT5wx-image.png)
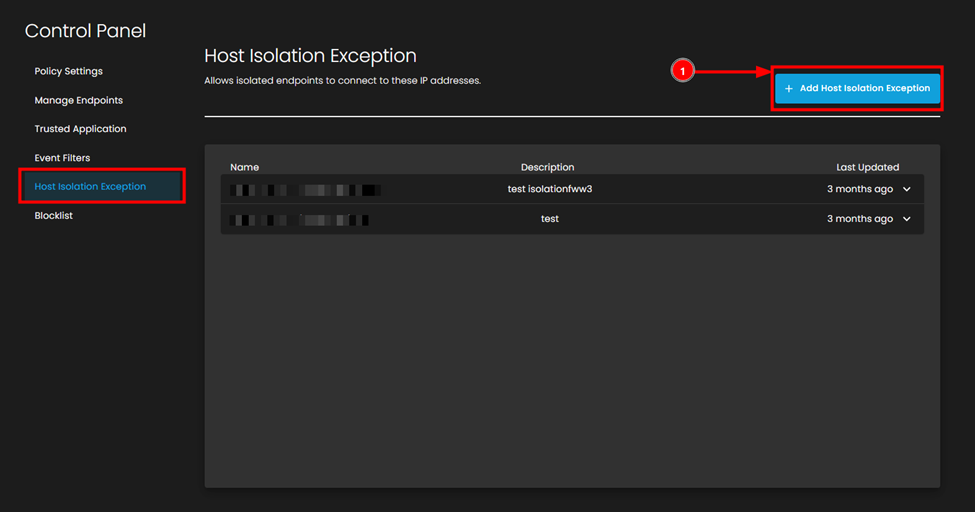
1. Click the **+ Add Host Isolation Exception** button (top right, blue button)
2. In the "**Add Host Isolation Exception**" dialog box, fill in the following fields:

[![image.png](https://cytechint-docs-bookstack.s3.amazonaws.com/uploads/images/gallery/2025-11/scaled-1680-/bjSjX2BWCrY46ISj-image.png)](https://cytechint-docs-bookstack.s3.amazonaws.com/uploads/images/gallery/2025-11/bjSjX2BWCrY46ISj-image.png)
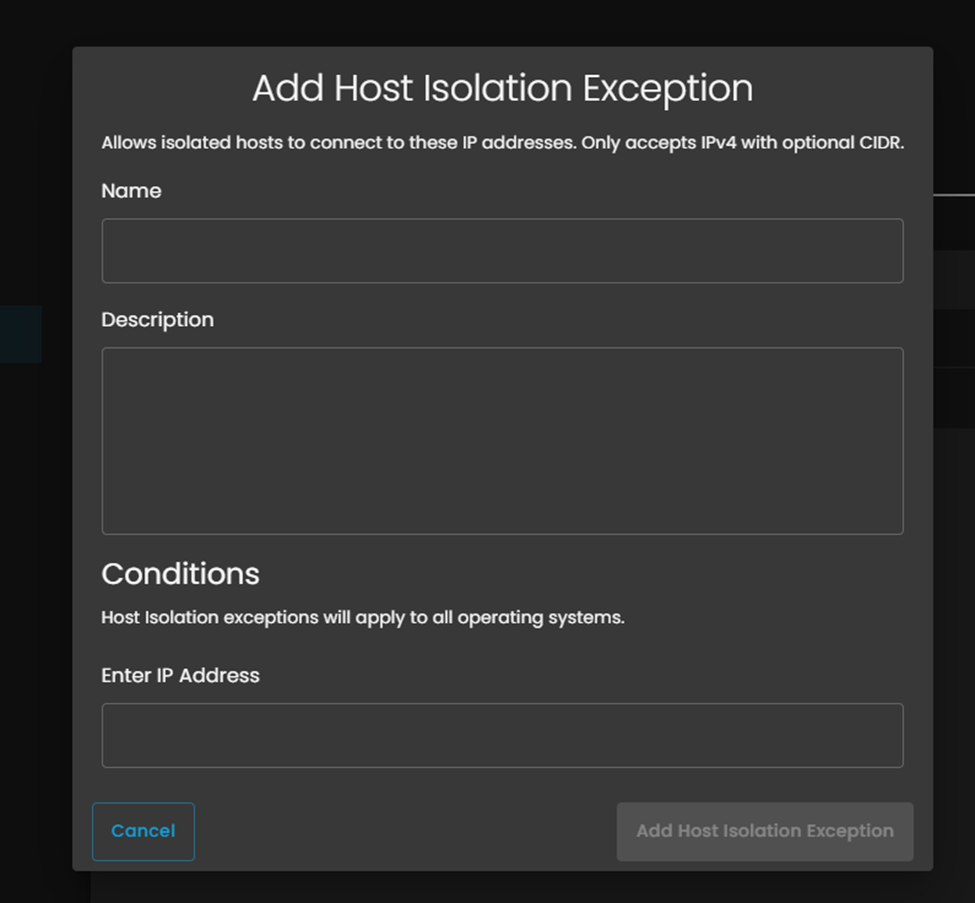
 **3. Enter IP Address:**

- - Enter the IPv4 address you want to whitelist
    - You can only enter one IP address per exception

 4. Click the **Add Host Isolation Exception** button to save

##### **3. Verify the Exception is Active**

 5. Return to the Host Isolation Exception page

 6. Verify your newly created exception appears in the list

[![image.png](https://cytechint-docs-bookstack.s3.amazonaws.com/uploads/images/gallery/2025-11/scaled-1680-/NyH4Qk780SHJ5zMA-image.png)](https://cytechint-docs-bookstack.s3.amazonaws.com/uploads/images/gallery/2025-11/NyH4Qk780SHJ5zMA-image.png)
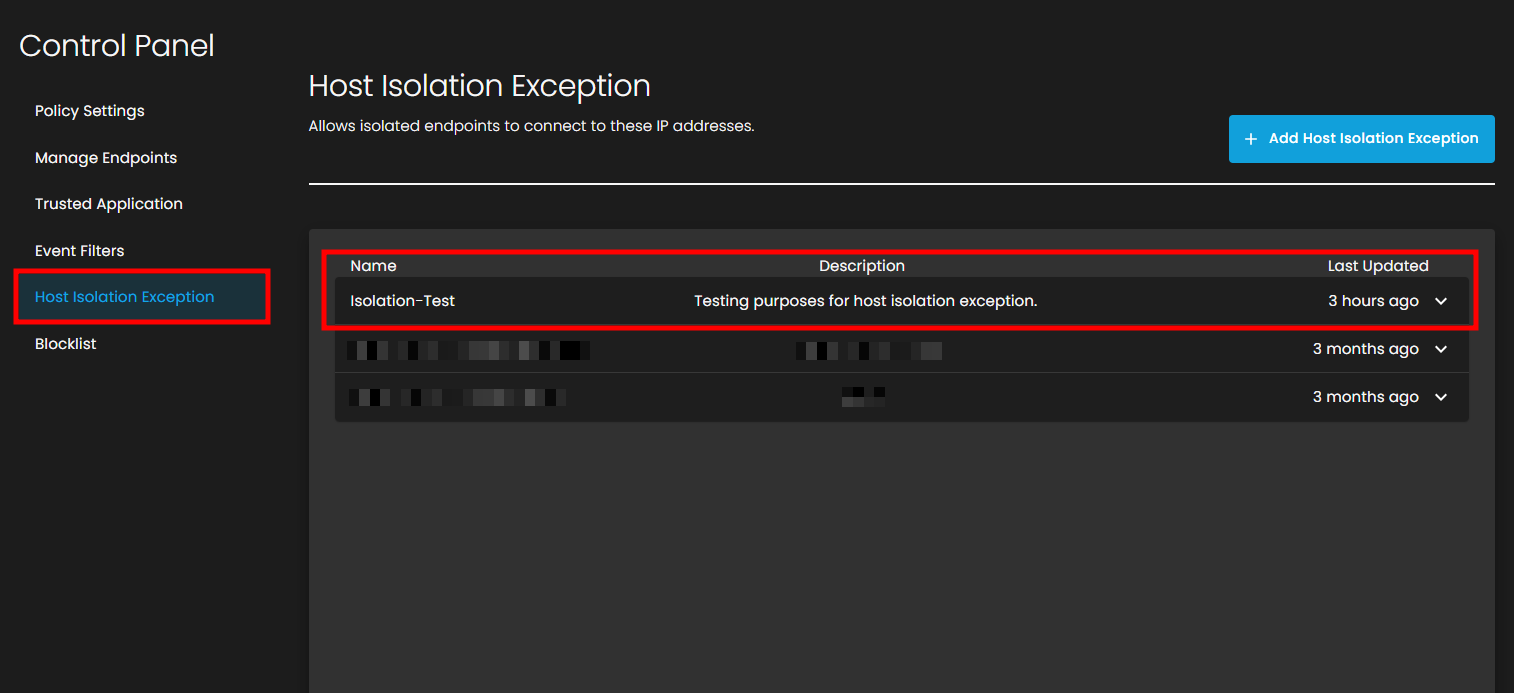
##### **4. Test the Exception**

To confirm the exception is working:

 7. Return to the isolated endpoint

 8. Open Command Prompt

 9. Test connectivity to the whitelisted IP address:

[![image.png](https://cytechint-docs-bookstack.s3.amazonaws.com/uploads/images/gallery/2025-11/scaled-1680-/vfMi6pQpTkxdSwSv-image.png)](https://cytechint-docs-bookstack.s3.amazonaws.com/uploads/images/gallery/2025-11/vfMi6pQpTkxdSwSv-image.png)
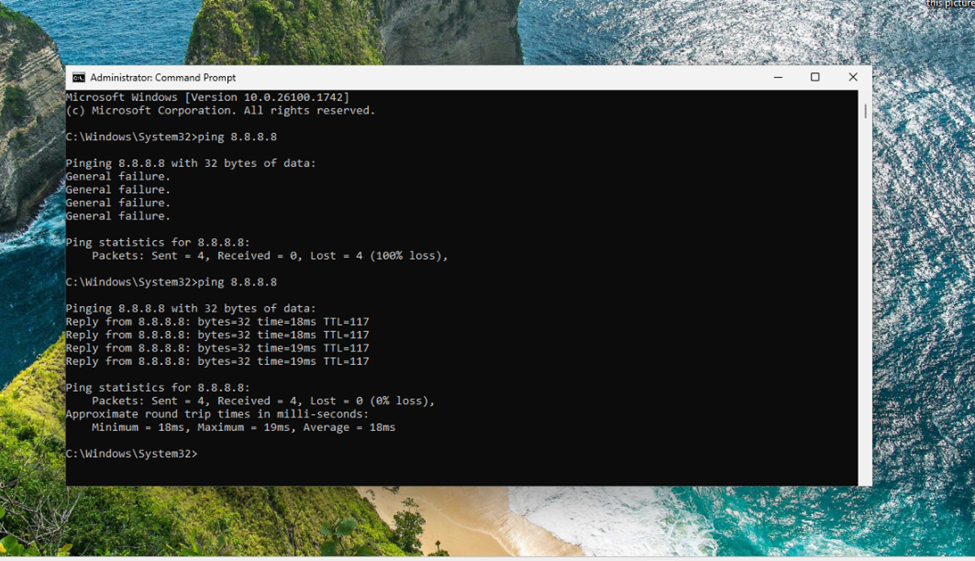
 10. You should now see successful replies:

- - Reply from 8.8.8.8: bytes=32 time=18ms TTL=117

 11. Ping statistics should show **0% loss** with round trip times

This confirms that the isolated endpoint can now communicate with the specified IP address.

##### **5. Unisolate an Endpoint.**

- When you need to restore full network connectivity:

 12. Navigate back to **Manage Endpoints**  13. Locate the isolated endpoint (Status: **Isolated)**

[![image.png](https://cytechint-docs-bookstack.s3.amazonaws.com/uploads/images/gallery/2025-11/scaled-1680-/7TVA2El43tUAXLKE-image.png)](https://cytechint-docs-bookstack.s3.amazonaws.com/uploads/images/gallery/2025-11/7TVA2El43tUAXLKE-image.png)
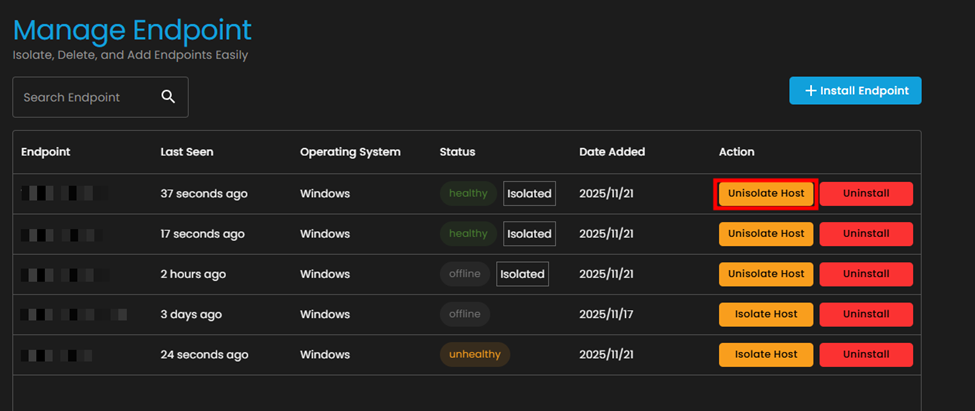
 14. Click the **Unisolate Host** button  
 15. In the "**Unisolate Endpoint**" dialog box:

[![image.png](https://cytechint-docs-bookstack.s3.amazonaws.com/uploads/images/gallery/2025-11/scaled-1680-/CBxwUOJ2O7PKY47z-image.png)](https://cytechint-docs-bookstack.s3.amazonaws.com/uploads/images/gallery/2025-11/CBxwUOJ2O7PKY47z-image.png)

- Click **confirm**.
- After that it will load while releasing

[![image.png](https://cytechint-docs-bookstack.s3.amazonaws.com/uploads/images/gallery/2025-11/scaled-1680-/DTCLmoZTKrPVeSRC-image.png)](https://cytechint-docs-bookstack.s3.amazonaws.com/uploads/images/gallery/2025-11/DTCLmoZTKrPVeSRC-image.png)
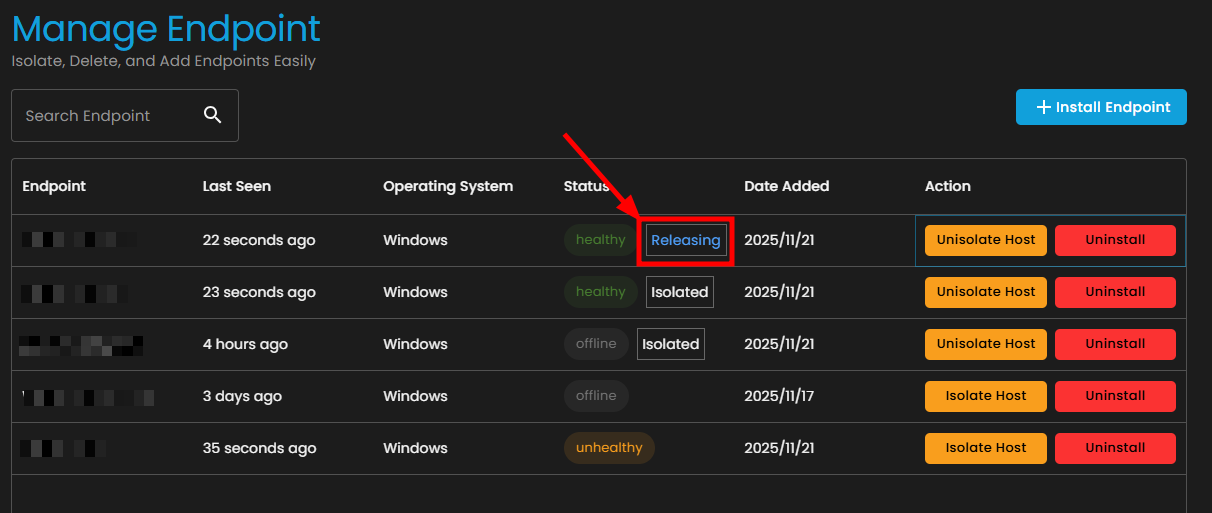
After refreshing, the endpoint action will go back to Isolate Host after releasing, meaning, the **Unisolate** is done.

##### **Pros and Cons**

<table id="bkmrk-aspect-pros-cons-ope"><thead><tr><th data-col-size="sm">Aspect</th><th data-col-size="xl">Pros</th><th data-col-size="lg">Cons</th></tr></thead><tbody><tr><td data-col-size="sm">**Operational Continuity**</td><td data-col-size="xl">Enables essential tools (e.g., email, collaboration apps like Teams) to function during isolation, minimizing downtime and user disruption. Supports remote management without physical access.</td><td data-col-size="lg">Overly broad exceptions can inadvertently allow threat persistence or lateral movement, undermining isolation's core purpose.</td></tr><tr><td data-col-size="sm">**Security Effectiveness**</td><td data-col-size="xl">Maintains secure channels for EDR telemetry and remediation (e.g., to Cortex XDR or Defender agents), ensuring ongoing monitoring and response without full blackout.</td><td data-col-size="lg">Increases vulnerability if exceptions target untrusted IPs or processes; attackers could exploit misconfigurations to bypass controls.</td></tr><tr><td data-col-size="sm">**Flexibility &amp; Scalability**</td><td data-col-size="xl">Customizable rules (e.g., by IP, process path, or service) adapt to diverse environments, with wildcards for efficient management across large fleets. Reduces false positives in automated isolation.</td><td data-col-size="lg">Prone to human error in rule creation—e.g., typos in paths or IPs—leading to ineffective exclusions or security gaps; requires rigorous auditing.</td></tr><tr><td data-col-size="sm">**Compliance &amp; Response Efficiency**</td><td data-col-size="xl">Facilitates adherence to standards like PCI DSS by allowing controlled access (e.g., to secure VLANs), while speeding up incident resolution through partial connectivity.</td><td data-col-size="lg">Adds complexity to incident response workflows; poor management can create a false sense of security or alert fatigue from repeated testing.</td></tr><tr><td data-col-size="sm">**Resource Impact**</td><td data-col-size="xl">Low overhead when narrowly defined; preserves productivity for non-critical functions without needing full network recovery.</td><td data-col-size="lg">Potential performance hit from constant rule evaluation; in high-volume environments, unoptimized exceptions can strain endpoint resources.</td></tr></tbody></table>

##### **Conclusion**  


In essence, host isolation exceptions are a vital refinement for real-world deployment, promoting a "secure by design" approach that avoids the pitfalls of rigid isolation. However, their success hinges on least-privilege principles: limit to verified, high-trust endpoints and integrate with automated validation tools. For implementation guidance in tools like Microsoft Defender, best practices emphasize starting with defaults (e.g., excluding only EDR agents) and layering in business needs via testing.

# AQUILA - Microsoft Office 365 Integration

#### <span style="color: rgb(53, 152, 219);">**<span class="TextRun SCXW264382529 BCX0" data-contrast="none" lang="EN-US" xml:lang="EN-US"><span class="NormalTextRun SCXW264382529 BCX0" data-ccp-parastyle="heading 3">Overview</span></span>**</span>

<span style="color: rgb(0, 0, 0);"><span class="TextRun SCXW264382529 BCX0" data-contrast="none" lang="EN-US" xml:lang="EN-US"><span class="NormalTextRun SCXW264382529 BCX0" data-ccp-parastyle="heading 3">This integration with Microsoft Office 365 supports the ingestion of user, administrator, system, and policy-related events. It leverages the Office 365 Management Activity API to retrieve activity logs from both Office 365 and Azure Active Directory (Azure AD).</span></span></span>

<span style="color: rgb(0, 0, 0);">This guide outlines the required steps to integrate with **Microsoft Office 365 and Azure AD** using the **Office 365 Management Activity API**. It covers application registration, permission setup, audit log configuration, and retrieval of key credentials for secure API access.</span>

---

#### <span style="color: rgb(53, 152, 219);">**Summary of Actions Required:**</span>

1. <span style="color: rgb(0, 0, 0);">**Register an Application** in Microsoft Entra ID (formerly Azure AD) to establish identity and enable API access.</span>
2. <span style="color: rgb(0, 0, 0);">**Configure API Permissions** for Microsoft Graph and Office 365 Management APIs to authorize required data access.</span>
3. <span style="color: rgb(0, 0, 0);">**Grant Admin Consent** to ensure permissions are applied tenant-wide.</span>
4. <span style="color: rgb(0, 0, 0);">**Collect Key Credentials** such as Application ID, Tenant ID, and Client Secret for use in your integration.</span>
5. <span style="color: rgb(0, 0, 0);">**Verify if Unified Audit Logging is Enabled** in Microsoft 365 to ensure activity data is available via the API.</span>

---

#### <span style="color: rgb(53, 152, 219);">**Action Items Before Proceeding:**</span>

- <span style="color: rgb(0, 0, 0);">Ensure you have **Global Admin** access to your Azure/Microsoft 365 tenant.</span>
- <span style="color: rgb(0, 0, 0);">Prepare to create or use an existing **App Registration** in Microsoft Entra ID.</span>
- <span style="color: rgb(0, 0, 0);">Confirm that **Unified Audit Logging** is enabled; otherwise, prepare to activate it via the Microsoft 365 portal or PowerShell.</span>
- <span style="color: rgb(0, 0, 0);">Take note of your **admin email address** for PowerShell commands if using CLI to manage audit log settings.</span>

---

<div class="euiFlexGroup css-1tueyet-euiFlexGroup-responsive-xs-flexStart-flexEnd-row" id="bkmrk-client-secret-value%3A"></div>#### <span style="color: rgb(53, 152, 219);">**Steps to Configure Office 365 Integration for the Client**</span>

##### <span style="color: rgb(53, 152, 219);">**<span class="TextRun SCXW264382529 BCX0" data-contrast="none" lang="EN-US" xml:lang="EN-US"><span class="NormalTextRun SCXW264382529 BCX0" data-ccp-parastyle="heading 4">Step 1: Microsoft Entra ID</span></span><span class="EOP SCXW264382529 BCX0" data-ccp-props="{"134233117":false,"134233118":false,"134245418":true,"134245529":true,"335559738":319,"335559739":319}"> - App Registration</span>**</span>

<span style="color: rgb(0, 0, 0);">**<span class="TextRun SCXW264382529 BCX0" data-contrast="auto" lang="EN-US" xml:lang="EN-US"><span class="NormalTextRun SCXW264382529 BCX0">Register Your Application in Microsoft Entra ID:</span></span>**</span>

<div class="SCXW264382529 BCX0" id="bkmrk-how-to-locate%3A%C2%A0-log-"><div class="ListContainerWrapper SCXW264382529 BCX0">- - <span style="color: rgb(0, 0, 0);"><span class="TextRun SCXW264382529 BCX0" data-contrast="auto" lang="EN-US" xml:lang="EN-US"><span class="NormalTextRun SCXW264382529 BCX0">Log in to your Azure Account, click here - </span></span>**<span style="color: rgb(53, 152, 219);">[Azure Portal Link](https://portal.azure.com/#home)</span>**<span class="TextRun SCXW264382529 BCX0" data-contrast="auto" lang="EN-US" xml:lang="EN-US"><span class="NormalTextRun SCXW264382529 BCX0">.</span></span> </span>
    - <span style="color: rgb(0, 0, 0);"><span class="TextRun SCXW264382529 BCX0" data-contrast="auto" lang="EN-US" xml:lang="EN-US"><span class="NormalTextRun SCXW264382529 BCX0">Navigate to </span></span><span class="TextRun SCXW264382529 BCX0" data-contrast="auto" lang="EN-US" xml:lang="EN-US"><span class="NormalTextRun SCXW264382529 BCX0">Azure Active Directory</span></span><span class="TextRun SCXW264382529 BCX0" data-contrast="auto" lang="EN-US" xml:lang="EN-US"><span class="NormalTextRun SCXW264382529 BCX0"> &gt; </span></span>**<span class="TextRun SCXW264382529 BCX0" data-contrast="auto" lang="EN-US" xml:lang="EN-US"><span class="NormalTextRun SCXW264382529 BCX0">App registrations</span></span>**<span class="TextRun SCXW264382529 BCX0" data-contrast="auto" lang="EN-US" xml:lang="EN-US"><span class="NormalTextRun SCXW264382529 BCX0">.</span></span> </span>
    - <span style="color: rgb(0, 0, 0);"><span class="TextRun SCXW264382529 BCX0" data-contrast="auto" lang="EN-US" xml:lang="EN-US"><span class="NormalTextRun SCXW264382529 BCX0">Click </span></span>**<span class="TextRun SCXW264382529 BCX0" data-contrast="auto" lang="EN-US" xml:lang="EN-US"><span class="NormalTextRun SCXW264382529 BCX0">New Registration</span></span>**<span class="TextRun SCXW264382529 BCX0" data-contrast="auto" lang="EN-US" xml:lang="EN-US"><span class="NormalTextRun SCXW264382529 BCX0">.</span></span> </span>
    - <span style="color: rgb(0, 0, 0);"><span class="TextRun SCXW264382529 BCX0" data-contrast="auto" lang="EN-US" xml:lang="EN-US"><span class="NormalTextRun SCXW264382529 BCX0">Provide a </span></span><span class="TextRun SCXW264382529 BCX0" data-contrast="auto" lang="EN-US" xml:lang="EN-US"><span class="NormalTextRun SCXW264382529 BCX0">Name</span></span><span class="TextRun SCXW264382529 BCX0" data-contrast="auto" lang="EN-US" xml:lang="EN-US"><span class="NormalTextRun SCXW264382529 BCX0"> for the application, we can suggest "**CyTechAQUILA-Monitoring**".</span></span><span class="EOP SCXW264382529 BCX0" data-ccp-props="{"134233117":false,"134233118":false,"335559738":0,"335559739":0}"> </span></span>
    - <span style="color: rgb(0, 0, 0);"><span class="TextRun SCXW264382529 BCX0" data-contrast="auto" lang="EN-US" xml:lang="EN-US"><span class="NormalTextRun SCXW264382529 BCX0">Click </span></span>**<span class="TextRun SCXW264382529 BCX0" data-contrast="auto" lang="EN-US" xml:lang="EN-US"><span class="NormalTextRun SCXW264382529 BCX0">Register</span></span>**<span class="TextRun SCXW264382529 BCX0" data-contrast="auto" lang="EN-US" xml:lang="EN-US"><span class="NormalTextRun SCXW264382529 BCX0">.</span></span><span class="EOP SCXW264382529 BCX0" data-ccp-props="{"134233117":false,"134233118":false,"335559738":0,"335559739":0}"> </span></span>

</div><div class="ListContainerWrapper SCXW264382529 BCX0">  
</div></div>##### <span style="color: rgb(53, 152, 219);">**<span class="TextRun SCXW264382529 BCX0" data-contrast="none" lang="EN-US" xml:lang="EN-US"><span class="NormalTextRun SCXW264382529 BCX0" data-ccp-parastyle="heading 4">Step 2: API Permissions</span></span>**</span>

<span style="color: rgb(0, 0, 0);">**<span class="TextRun SCXW264382529 BCX0" data-contrast="none" lang="EN-US" xml:lang="EN-US"><span class="NormalTextRun SCXW264382529 BCX0" data-ccp-parastyle="heading 4"><span class="EOP SCXW264382529 BCX0" data-ccp-props="{"134233117":false,"134233118":false,"335559738":0,"335559739":0}">Microsoft Graph API Permissions:</span></span></span>**</span>

<span style="color: rgb(0, 0, 0);">If **User.Read** permission under **Microsoft Graph** tile is not added by default, add this permission.</span>

<div class="SCXW264382529 BCX0" id="bkmrk-how-to-locate%3A%C2%A0-navi"><div class="ListContainerWrapper SCXW264382529 BCX0">- - <span style="color: rgb(0, 0, 0);"><span class="TextRun SCXW264382529 BCX0" data-contrast="auto" lang="EN-US" xml:lang="EN-US"><span class="NormalTextRun SCXW264382529 BCX0">Navigate to </span></span>**<span class="TextRun SCXW264382529 BCX0" data-contrast="auto" lang="EN-US" xml:lang="EN-US"><span class="NormalTextRun SCXW264382529 BCX0">App registrations</span></span>**<span class="TextRun SCXW264382529 BCX0" data-contrast="auto" lang="EN-US" xml:lang="EN-US"><span class="NormalTextRun SCXW264382529 BCX0"> in the Azure Portal.</span></span> </span>
    - <span style="color: rgb(0, 0, 0);"><span class="TextRun SCXW264382529 BCX0" data-contrast="auto" lang="EN-US" xml:lang="EN-US"><span class="NormalTextRun SCXW264382529 BCX0">Select the App you just created, then go to </span></span>**<span class="TextRun SCXW264382529 BCX0" data-contrast="auto" lang="EN-US" xml:lang="EN-US"><span class="NormalTextRun SCXW264382529 BCX0">API Permissions</span></span>**<span class="TextRun SCXW264382529 BCX0" data-contrast="auto" lang="EN-US" xml:lang="EN-US"><span class="NormalTextRun SCXW264382529 BCX0">.</span></span><span class="EOP SCXW264382529 BCX0" data-ccp-props="{"134233117":false,"134233118":false,"335559738":0,"335559739":0}"> </span></span>
    - <span style="color: rgb(0, 0, 0);"><span class="EOP SCXW264382529 BCX0" data-ccp-props="{"134233117":false,"134233118":false,"335559738":0,"335559739":0}">Search for **Microsoft Graph.**</span></span>
    - <span class="NormalTextRun SCXW264382529 BCX0">Click </span>**<span class="TextRun SCXW264382529 BCX0" data-contrast="auto" lang="EN-US" xml:lang="EN-US"><span class="NormalTextRun SCXW264382529 BCX0">Add </span><span class="NormalTextRun ContextualSpellingAndGrammarErrorV2Themed SCXW264382529 BCX0">a permission</span></span>**<span class="TextRun SCXW264382529 BCX0" data-contrast="auto" lang="EN-US" xml:lang="EN-US"><span class="NormalTextRun SCXW264382529 BCX0">.</span></span>
    - <span class="NormalTextRun SCXW264382529 BCX0">Select </span>**<span class="TextRun SCXW264382529 BCX0" data-contrast="auto" lang="EN-US" xml:lang="EN-US"><span class="NormalTextRun SCXW264382529 BCX0">Microsoft Graph</span></span>**<span class="TextRun SCXW264382529 BCX0" data-contrast="auto" lang="EN-US" xml:lang="EN-US"><span class="NormalTextRun SCXW264382529 BCX0"> **&gt;** </span></span>**<span class="TextRun SCXW264382529 BCX0" data-contrast="auto" lang="EN-US" xml:lang="EN-US"><span class="NormalTextRun SCXW264382529 BCX0">Delegated permissions</span></span>**<span class="TextRun SCXW264382529 BCX0" data-contrast="auto" lang="EN-US" xml:lang="EN-US"><span class="NormalTextRun SCXW264382529 BCX0">.</span></span>
    - <span class="NormalTextRun SCXW264382529 BCX0">Search for and add </span>**<span class="NormalTextRun SpellingErrorV2Themed SCXW264382529 BCX0">User.Read</span>**<span class="NormalTextRun SCXW264382529 BCX0">.</span><span class="EOP SCXW264382529 BCX0" data-ccp-props="{"134233117":false,"134233118":false,"335559738":0,"335559739":0}"> </span>

</div></div><span style="color: rgb(0, 0, 0);">**<span class="TextRun SCXW264382529 BCX0" data-contrast="auto" lang="EN-US" xml:lang="EN-US"><span class="NormalTextRun SCXW264382529 BCX0">Office 365 Management API Permissions:</span></span><span class="EOP SCXW264382529 BCX0" data-ccp-props="{"134233117":false,"134233118":false,"335559738":240,"335559739":240}"> </span>**</span>

<div class="SCXW264382529 BCX0" id="bkmrk-how-to-locate%3A%C2%A0-in-a"><div class="ListContainerWrapper SCXW264382529 BCX0">- - <span style="color: rgb(0, 0, 0);"><span class="TextRun SCXW264382529 BCX0" data-contrast="auto" lang="EN-US" xml:lang="EN-US"><span class="NormalTextRun SCXW264382529 BCX0">Search for </span></span>**<span class="TextRun SCXW264382529 BCX0" data-contrast="auto" lang="EN-US" xml:lang="EN-US"><span class="NormalTextRun SCXW264382529 BCX0">Office 365 Management APIs</span></span>**<span class="TextRun SCXW264382529 BCX0" data-contrast="auto" lang="EN-US" xml:lang="EN-US"><span class="NormalTextRun SCXW264382529 BCX0"> and add the required permissions.</span></span><span class="EOP SCXW264382529 BCX0" data-ccp-props="{"134233117":false,"134233118":false,"335559738":0,"335559739":0}"> </span></span>
    - <span style="color: rgb(0, 0, 0);"><span class="TextRun SCXW264382529 BCX0" data-contrast="auto" lang="EN-US" xml:lang="EN-US"><span class="NormalTextRun SCXW264382529 BCX0">In </span></span>**<span class="TextRun SCXW264382529 BCX0" data-contrast="auto" lang="EN-US" xml:lang="EN-US"><span class="NormalTextRun SCXW264382529 BCX0">Application Permissions</span></span>**<span class="TextRun SCXW264382529 BCX0" data-contrast="auto" lang="EN-US" xml:lang="EN-US"><span class="NormalTextRun SCXW264382529 BCX0">, look for permissions.</span></span></span>
    - <span style="color: rgb(0, 0, 0);"><span class="TextRun SCXW264382529 BCX0" data-contrast="auto" lang="EN-US" xml:lang="EN-US"><span class="NormalTextRun SpellingErrorV2Themed SCXW264382529 BCX0">Under ActivityFeed select: </span></span>**<span class="TextRun SCXW264382529 BCX0" data-contrast="auto" lang="EN-US" xml:lang="EN-US"><span class="NormalTextRun SpellingErrorV2Themed SCXW264382529 BCX0">ActivityFeed.Read</span></span>** </span>
    - Optionally, select **ActivityFeed.ReadDLP** to read DLP policy events.

</div><div class="ListContainerWrapper SCXW264382529 BCX0">  
</div></div><span style="color: rgb(0, 0, 0);">**<span class="TextRun SCXW264382529 BCX0" data-contrast="auto" lang="EN-US" xml:lang="EN-US"><span class="NormalTextRun SCXW264382529 BCX0">Grant Admin Consent:</span></span><span class="EOP SCXW264382529 BCX0" data-ccp-props="{"134233117":false,"134233118":false,"335559738":240,"335559739":240}"> </span>**</span>

<div class="SCXW264382529 BCX0" id="bkmrk-in-api-permissions%2C-"><div class="ListContainerWrapper SCXW264382529 BCX0">- - <span style="color: rgb(0, 0, 0);"><span class="TextRun SCXW264382529 BCX0" data-contrast="auto" lang="EN-US" xml:lang="EN-US"><span class="NormalTextRun SCXW264382529 BCX0">In </span></span><span class="TextRun SCXW264382529 BCX0" data-contrast="auto" lang="EN-US" xml:lang="EN-US"><span class="NormalTextRun SCXW264382529 BCX0">API Permissions</span></span><span class="TextRun SCXW264382529 BCX0" data-contrast="auto" lang="EN-US" xml:lang="EN-US"><span class="NormalTextRun SCXW264382529 BCX0">, click </span></span><span class="TextRun SCXW264382529 BCX0" data-contrast="auto" lang="EN-US" xml:lang="EN-US"><span class="NormalTextRun SCXW264382529 BCX0">**Grant admin consent** for &lt;tenant name&gt;</span></span><span class="TextRun SCXW264382529 BCX0" data-contrast="auto" lang="EN-US" xml:lang="EN-US"><span class="NormalTextRun SCXW264382529 BCX0">.</span></span> </span>
    - <span style="color: rgb(0, 0, 0);"><span class="TextRun SCXW264382529 BCX0" data-contrast="auto" lang="EN-US" xml:lang="EN-US"><span class="NormalTextRun SCXW264382529 BCX0">**Confirm** the action.</span></span></span><span style="color: rgb(0, 0, 0);"><span class="EOP SCXW264382529 BCX0" data-ccp-props="{"134233117":false,"134233118":false,"335559738":0,"335559739":0}"> </span></span>

</div></div>[![image.png](https://cytechint-docs-bookstack.s3.amazonaws.com/uploads/images/gallery/2025-05/scaled-1680-/j87rAOhhKu89leDM-image.png)](https://cytechint-docs-bookstack.s3.amazonaws.com/uploads/images/gallery/2025-05/j87rAOhhKu89leDM-image.png)

##### <span style="color: rgb(53, 152, 219);">**<span class="TextRun SCXW264382529 BCX0" data-contrast="none" lang="EN-US" xml:lang="EN-US"><span class="NormalTextRun SCXW264382529 BCX0" data-ccp-parastyle="heading 4">Step 3: Integration Requirements for Office 365</span></span><span class="EOP SCXW264382529 BCX0" data-ccp-props="{"134233117":false,"134233118":false,"134245418":true,"134245529":true,"335559738":319,"335559739":319}"> </span>**</span>

<span style="color: rgb(0, 0, 0);">**<span class="TextRun SCXW264382529 BCX0" data-contrast="auto" lang="EN-US" xml:lang="EN-US"><span class="NormalTextRun SCXW264382529 BCX0">Application (Client) ID:</span></span><span class="EOP SCXW264382529 BCX0" data-ccp-props="{"134233117":false,"134233118":false,"335559738":240,"335559739":240}"> </span>**</span>

<div class="SCXW264382529 BCX0" id="bkmrk-how-to-locate%3A%C2%A0-go-t"><div class="ListContainerWrapper SCXW264382529 BCX0">- - <span style="color: rgb(0, 0, 0);"><span class="TextRun SCXW264382529 BCX0" data-contrast="auto" lang="EN-US" xml:lang="EN-US"><span class="NormalTextRun SCXW264382529 BCX0">Go to </span></span>**<span class="TextRun SCXW264382529 BCX0" data-contrast="auto" lang="EN-US" xml:lang="EN-US"><span class="NormalTextRun SCXW264382529 BCX0">App registrations</span></span>**<span class="TextRun SCXW264382529 BCX0" data-contrast="auto" lang="EN-US" xml:lang="EN-US"><span class="NormalTextRun SCXW264382529 BCX0"> &gt; **Select your application**.</span></span> </span>
    - <span style="color: rgb(0, 0, 0);"><span class="TextRun SCXW264382529 BCX0" data-contrast="auto" lang="EN-US" xml:lang="EN-US"><span class="NormalTextRun SCXW264382529 BCX0">Copy the </span></span>**<span class="TextRun SCXW264382529 BCX0" data-contrast="auto" lang="EN-US" xml:lang="EN-US"><span class="NormalTextRun SCXW264382529 BCX0">Application (client) ID</span></span>**<span class="TextRun SCXW264382529 BCX0" data-contrast="auto" lang="EN-US" xml:lang="EN-US"><span class="NormalTextRun SCXW264382529 BCX0"> from the overview page.</span></span><span class="EOP SCXW264382529 BCX0" data-ccp-props="{"134233117":false,"134233118":false,"335559738":0,"335559739":0}"> </span></span>

</div></div><span style="color: rgb(0, 0, 0);">**<span class="TextRun SCXW264382529 BCX0" data-contrast="auto" lang="EN-US" xml:lang="EN-US"><span class="NormalTextRun SCXW264382529 BCX0">Directory (Tenant) ID:</span></span><span class="EOP SCXW264382529 BCX0" data-ccp-props="{"134233117":false,"134233118":false,"335559738":240,"335559739":240}"> </span>**</span>

<div class="SCXW264382529 BCX0" id="bkmrk-in-the-azure-portal%2C"><div class="ListContainerWrapper SCXW264382529 BCX0">- - <span style="color: rgb(0, 0, 0);"><span class="TextRun SCXW264382529 BCX0" data-contrast="auto" lang="EN-US" xml:lang="EN-US"><span class="NormalTextRun SCXW264382529 BCX0">In the Azure Portal, navigate to </span></span>**<span class="TextRun SCXW264382529 BCX0" data-contrast="auto" lang="EN-US" xml:lang="EN-US"><span class="NormalTextRun SCXW264382529 BCX0">Azure Active Directory</span></span>**<span class="TextRun SCXW264382529 BCX0" data-contrast="auto" lang="EN-US" xml:lang="EN-US"><span class="NormalTextRun SCXW264382529 BCX0"> &gt; </span></span>**<span class="TextRun SCXW264382529 BCX0" data-contrast="auto" lang="EN-US" xml:lang="EN-US"><span class="NormalTextRun SCXW264382529 BCX0">Overview</span></span>**<span class="TextRun SCXW264382529 BCX0" data-contrast="auto" lang="EN-US" xml:lang="EN-US"><span class="NormalTextRun SCXW264382529 BCX0">.</span></span> </span>
    - <span style="color: rgb(0, 0, 0);"><span class="TextRun SCXW264382529 BCX0" data-contrast="auto" lang="EN-US" xml:lang="EN-US"><span class="NormalTextRun SCXW264382529 BCX0">Copy the </span></span>**<span class="TextRun SCXW264382529 BCX0" data-contrast="auto" lang="EN-US" xml:lang="EN-US"><span class="NormalTextRun SCXW264382529 BCX0">Directory (tenant) ID</span></span>**<span class="TextRun SCXW264382529 BCX0" data-contrast="auto" lang="EN-US" xml:lang="EN-US"><span class="NormalTextRun SCXW264382529 BCX0">.</span></span><span class="EOP SCXW264382529 BCX0" data-ccp-props="{"134233117":false,"134233118":false,"335559738":0,"335559739":0}"> </span></span>

</div></div>[![image.png](https://cytechint-docs-bookstack.s3.amazonaws.com/uploads/images/gallery/2025-05/scaled-1680-/cxxxBJdvPcIbiMHV-image.png)](https://cytechint-docs-bookstack.s3.amazonaws.com/uploads/images/gallery/2025-05/cxxxBJdvPcIbiMHV-image.png)

<span style="color: rgb(0, 0, 0);">**<span class="TextRun SCXW264382529 BCX0" data-contrast="auto" lang="EN-US" xml:lang="EN-US"><span class="NormalTextRun SCXW264382529 BCX0">Create New Client Secret (Value):</span></span><span class="EOP SCXW264382529 BCX0" data-ccp-props="{"134233117":false,"134233118":false,"335559738":240,"335559739":240}"> </span>**</span>

<div class="SCXW264382529 BCX0" id="bkmrk-in-app-registrations"><div class="ListContainerWrapper SCXW264382529 BCX0">- - <span style="color: rgb(0, 0, 0);"><span class="TextRun SCXW264382529 BCX0" data-contrast="auto" lang="EN-US" xml:lang="EN-US"><span class="NormalTextRun SCXW264382529 BCX0">In </span></span>**<span class="TextRun SCXW264382529 BCX0" data-contrast="auto" lang="EN-US" xml:lang="EN-US"><span class="NormalTextRun SCXW264382529 BCX0">App registrations &gt; Select your application</span></span>**<span class="TextRun SCXW264382529 BCX0" data-contrast="auto" lang="EN-US" xml:lang="EN-US"><span class="NormalTextRun SCXW264382529 BCX0">, go to </span></span>**<span class="TextRun SCXW264382529 BCX0" data-contrast="auto" lang="EN-US" xml:lang="EN-US"><span class="NormalTextRun SCXW264382529 BCX0">Certificates &amp; secrets</span></span>**<span class="TextRun SCXW264382529 BCX0" data-contrast="auto" lang="EN-US" xml:lang="EN-US"><span class="NormalTextRun SCXW264382529 BCX0">.</span></span> </span>
    - <span style="color: rgb(0, 0, 0);"><span class="TextRun SCXW264382529 BCX0" data-contrast="auto" lang="EN-US" xml:lang="EN-US"><span class="NormalTextRun SCXW264382529 BCX0">Click </span></span>**<span class="TextRun SCXW264382529 BCX0" data-contrast="auto" lang="EN-US" xml:lang="EN-US"><span class="NormalTextRun SCXW264382529 BCX0">New client secret</span></span>**<span class="TextRun SCXW264382529 BCX0" data-contrast="auto" lang="EN-US" xml:lang="EN-US"><span class="NormalTextRun SCXW264382529 BCX0">.</span></span> </span>
    - <span style="color: rgb(0, 0, 0);"><span class="TextRun SCXW264382529 BCX0" data-contrast="auto" lang="EN-US" xml:lang="EN-US"><span class="NormalTextRun SCXW264382529 BCX0">Add a description and </span><span class="NormalTextRun SCXW264382529 BCX0">expiration</span><span class="NormalTextRun SCXW264382529 BCX0"> period, then click </span></span><span class="TextRun SCXW264382529 BCX0" data-contrast="auto" lang="EN-US" xml:lang="EN-US"><span class="NormalTextRun SCXW264382529 BCX0">Add</span></span><span class="TextRun SCXW264382529 BCX0" data-contrast="auto" lang="EN-US" xml:lang="EN-US"><span class="NormalTextRun SCXW264382529 BCX0">.</span></span> </span>
    - <span style="color: rgb(0, 0, 0);"><span class="TextRun SCXW264382529 BCX0" data-contrast="auto" lang="EN-US" xml:lang="EN-US"><span class="NormalTextRun SCXW264382529 BCX0">Copy the </span></span>**<span class="TextRun SCXW264382529 BCX0" data-contrast="auto" lang="EN-US" xml:lang="EN-US"><span class="NormalTextRun SCXW264382529 BCX0">Value</span></span>**<span class="TextRun SCXW264382529 BCX0" data-contrast="auto" lang="EN-US" xml:lang="EN-US"><span class="NormalTextRun SCXW264382529 BCX0"> **(displayed only once)**.</span></span><span class="EOP SCXW264382529 BCX0" data-ccp-props="{"134233117":false,"134233118":false,"335559738":0,"335559739":0}"> </span></span>

</div></div>[![image.png](https://cytechint-docs-bookstack.s3.amazonaws.com/uploads/images/gallery/2025-05/scaled-1680-/fjoxX4o659L9qigQ-image.png)](https://cytechint-docs-bookstack.s3.amazonaws.com/uploads/images/gallery/2025-05/fjoxX4o659L9qigQ-image.png)

##### <span style="color: rgb(53, 152, 219);">**<span class="TextRun SCXW264382529 BCX0" data-contrast="none" lang="EN-US" xml:lang="EN-US"><span class="NormalTextRun SCXW264382529 BCX0" data-ccp-parastyle="heading 3">Step </span><span class="NormalTextRun SCXW264382529 BCX0" data-ccp-parastyle="heading 3">4:</span><span class="NormalTextRun SCXW264382529 BCX0" data-ccp-parastyle="heading 3"> Verify Unified Audit Logging</span></span><span class="EOP SCXW264382529 BCX0" data-ccp-props="{"134233117":false,"134233118":false,"134245418":true,"134245529":true,"335559738":281,"335559739":281}"> is Enabled</span>**</span>

<span style="color: rgb(0, 0, 0);"><span class="TextRun SCXW264382529 BCX0" data-contrast="auto" lang="EN-US" xml:lang="EN-US"><span class="NormalTextRun SCXW264382529 BCX0">Unified Audit Logging must be enabled before accessing data via the Office 365 Management Activity API.</span></span><span class="EOP SCXW264382529 BCX0" data-ccp-props="{"134233117":false,"134233118":false,"335559738":240,"335559739":240}"> </span></span>

<span style="color: rgb(0, 0, 0);">**<span class="TextRun SCXW264382529 BCX0" data-contrast="none" lang="EN-US" xml:lang="EN-US"><span class="NormalTextRun SCXW264382529 BCX0" data-ccp-parastyle="heading 3">Method 1: Using Microsoft 365 Security &amp; Compliance Center</span></span><span class="EOP SCXW264382529 BCX0" data-ccp-props="{"134233117":false,"134233118":false,"134245418":true,"134245529":true,"335559738":281,"335559739":281}"> </span>**</span>

<div class="SCXW264382529 BCX0" id="bkmrk-sign-in-to-microsoft"><div class="ListContainerWrapper SCXW264382529 BCX0">1. <span style="color: rgb(0, 0, 0);"><span class="TextRun SCXW264382529 BCX0" data-contrast="auto" lang="EN-US" xml:lang="EN-US"><span class="NormalTextRun SCXW264382529 BCX0">Sign in to Microsoft 365:</span></span> </span>
    
    
    - <span style="color: rgb(0, 0, 0);"><span class="TextRun SCXW264382529 BCX0" data-contrast="auto" lang="EN-US" xml:lang="EN-US"><span class="NormalTextRun SCXW264382529 BCX0">Go to </span></span>[<span class="TextRun Underlined SCXW264382529 BCX0" data-contrast="none" lang="EN-US" xml:lang="EN-US"><span class="NormalTextRun SCXW264382529 BCX0" data-ccp-charstyle="Hyperlink">https://admin.microsoft.com</span></span>](https://admin.microsoft.com/)<span class="TextRun SCXW264382529 BCX0" data-contrast="auto" lang="EN-US" xml:lang="EN-US"><span class="NormalTextRun SCXW264382529 BCX0"> and sign in with your Global Admin credentials.</span></span><span class="EOP SCXW264382529 BCX0" data-ccp-props="{"134233117":false,"134233118":false,"335559738":0,"335559739":0}"> </span></span>

</div></div><div class="SCXW264382529 BCX0" id="bkmrk-access-the-security-"><div class="ListContainerWrapper SCXW264382529 BCX0">2. <span style="color: rgb(0, 0, 0);"><span class="TextRun SCXW264382529 BCX0" data-contrast="auto" lang="EN-US" xml:lang="EN-US"><span class="NormalTextRun SCXW264382529 BCX0">Access the Security &amp; Compliance Center:</span></span> </span>
    
    
    - <span style="color: rgb(0, 0, 0);"><span class="TextRun SCXW264382529 BCX0" data-contrast="auto" lang="EN-US" xml:lang="EN-US"><span class="NormalTextRun SCXW264382529 BCX0">In the left-hand menu, under </span></span><span class="TextRun SCXW264382529 BCX0" data-contrast="auto" lang="EN-US" xml:lang="EN-US"><span class="NormalTextRun SCXW264382529 BCX0">Admin centers</span></span><span class="TextRun SCXW264382529 BCX0" data-contrast="auto" lang="EN-US" xml:lang="EN-US"><span class="NormalTextRun SCXW264382529 BCX0">, click on </span></span><span class="TextRun SCXW264382529 BCX0" data-contrast="auto" lang="EN-US" xml:lang="EN-US"><span class="NormalTextRun SCXW264382529 BCX0">Security</span></span><span class="TextRun SCXW264382529 BCX0" data-contrast="auto" lang="EN-US" xml:lang="EN-US"><span class="NormalTextRun SCXW264382529 BCX0"> (or go directly to </span></span>[<span class="TextRun Underlined SCXW264382529 BCX0" data-contrast="none" lang="EN-US" xml:lang="EN-US"><span class="NormalTextRun SCXW264382529 BCX0" data-ccp-charstyle="Hyperlink">https://security.microsoft.com</span></span>](https://security.microsoft.com/)<span class="TextRun SCXW264382529 BCX0" data-contrast="auto" lang="EN-US" xml:lang="EN-US"><span class="NormalTextRun SCXW264382529 BCX0">).</span></span><span class="EOP SCXW264382529 BCX0" data-ccp-props="{"134233117":false,"134233118":false,"335559738":0,"335559739":0}"> </span></span>

</div><div class="ListContainerWrapper SCXW264382529 BCX0">3. <span style="color: rgb(0, 0, 0);"><span class="TextRun SCXW264382529 BCX0" data-contrast="auto" lang="EN-US" xml:lang="EN-US"><span class="NormalTextRun SCXW264382529 BCX0">Navigate to Audit Log Search:</span></span> </span>
    
    
    - <span style="color: rgb(0, 0, 0);"><span class="TextRun SCXW264382529 BCX0" data-contrast="auto" lang="EN-US" xml:lang="EN-US"><span class="NormalTextRun SCXW264382529 BCX0">In the Security &amp; Compliance Center, go to </span></span><span class="TextRun SCXW264382529 BCX0" data-contrast="auto" lang="EN-US" xml:lang="EN-US"><span class="NormalTextRun SCXW264382529 BCX0">Search</span></span><span class="TextRun SCXW264382529 BCX0" data-contrast="auto" lang="EN-US" xml:lang="EN-US"><span class="NormalTextRun SCXW264382529 BCX0"> in the left-hand menu and click on </span></span><span class="TextRun SCXW264382529 BCX0" data-contrast="auto" lang="EN-US" xml:lang="EN-US"><span class="NormalTextRun SCXW264382529 BCX0">Audit log search</span></span><span class="TextRun SCXW264382529 BCX0" data-contrast="auto" lang="EN-US" xml:lang="EN-US"><span class="NormalTextRun SCXW264382529 BCX0">.</span></span><span class="EOP SCXW264382529 BCX0" data-ccp-props="{"134233117":false,"134233118":false,"335559738":0,"335559739":0}"> </span></span>

</div><div class="ListContainerWrapper SCXW264382529 BCX0">4. <span style="color: rgb(0, 0, 0);"><span class="TextRun SCXW264382529 BCX0" data-contrast="auto" lang="EN-US" xml:lang="EN-US"><span class="NormalTextRun SCXW264382529 BCX0">Check Audit Log Status:</span></span> </span>
    
    
    - <span style="color: rgb(0, 0, 0);"><span class="TextRun SCXW264382529 BCX0" data-contrast="auto" lang="EN-US" xml:lang="EN-US"><span class="NormalTextRun SCXW264382529 BCX0">If you see </span><span class="NormalTextRun SCXW264382529 BCX0">an option</span><span class="NormalTextRun SCXW264382529 BCX0"> to search the audit log, then audit logging is already enabled.</span></span></span> <span style="color: rgb(0, 0, 0);"><span class="EOP SCXW264382529 BCX0" data-ccp-props="{"134233117":false,"134233118":false,"335559738":0,"335559739":0}">[![image (2).png](https://cytechint-docs-bookstack.s3.amazonaws.com/uploads/images/gallery/2025-05/scaled-1680-/WHIm6mw3MmYsEzmv-image-2.png)](https://cytechint-docs-bookstack.s3.amazonaws.com/uploads/images/gallery/2025-05/WHIm6mw3MmYsEzmv-image-2.png)</span></span>

</div></div><div class="SCXW264382529 BCX0" id="bkmrk-if-you-see-a-banner-"><div class="ListContainerWrapper SCXW264382529 BCX0">- - <span style="color: rgb(0, 0, 0);"><span class="TextRun SCXW264382529 BCX0" data-contrast="auto" lang="EN-US" xml:lang="EN-US"><span class="NormalTextRun SCXW264382529 BCX0">If you see a banner that says "Start recording user and admin activity" or a prompt to enable auditing, it means that audit logging is not yet enabled.</span></span><span class="EOP SCXW264382529 BCX0" data-ccp-props="{"134233117":false,"134233118":false,"335559738":0,"335559739":0}"> </span></span><span style="color: rgb(0, 0, 0);"><span class="EOP SCXW264382529 BCX0" data-ccp-props="{"134233117":false,"134233118":false,"335559738":0,"335559739":0}">[![image.png](https://cytechint-docs-bookstack.s3.amazonaws.com/uploads/images/gallery/2026-05/scaled-1680-/iouUelw3mFkmCdPj-image.png)](https://cytechint-docs-bookstack.s3.amazonaws.com/uploads/images/gallery/2026-05/iouUelw3mFkmCdPj-image.png)</span></span>

</div></div><div class="SCXW264382529 BCX0" id="bkmrk--6"></div><div class="SCXW264382529 BCX0" id="bkmrk-enable-audit-logging"><div class="ListContainerWrapper SCXW264382529 BCX0">5. <span style="color: rgb(0, 0, 0);"><span class="TextRun SCXW264382529 BCX0" data-contrast="auto" lang="EN-US" xml:lang="EN-US"><span class="NormalTextRun SCXW264382529 BCX0">Enable Audit Logging:</span></span></span>
    
    
    - <span style="color: rgb(0, 0, 0);"><span class="TextRun SCXW264382529 BCX0" data-contrast="auto" lang="EN-US" xml:lang="EN-US"><span class="NormalTextRun SCXW264382529 BCX0">If audit logging is not enabled, you can click on the prompt to enable it. This will enable auditing for all activities within your Microsoft 365 environment. The process may take a few hours to be fully operational.</span></span><span class="EOP SCXW264382529 BCX0" data-ccp-props="{"134233117":false,"134233118":false,"335559738":0,"335559739":0}"> </span></span>

</div></div><span style="color: rgb(0, 0, 0);">**<span class="TextRun SCXW264382529 BCX0" data-contrast="none" lang="EN-US" xml:lang="EN-US"><span class="NormalTextRun SCXW264382529 BCX0" data-ccp-parastyle="heading 4">Method 2: Using </span><span class="NormalTextRun SpellingErrorV2Themed SCXW264382529 BCX0" data-ccp-parastyle="heading 4">Powershell</span></span><span class="EOP SCXW264382529 BCX0" data-ccp-props="{"134245418":true,"134245529":true,"335559738":80,"335559739":40}"> </span>**</span>

<span style="color: rgb(0, 0, 0);"><span class="TextRun SCXW264382529 BCX0" data-contrast="none" lang="EN-US" xml:lang="EN-US"><span class="NormalTextRun SCXW264382529 BCX0" data-ccp-parastyle="heading 4">1.</span><span class="NormalTextRun SCXW264382529 BCX0" data-ccp-parastyle="heading 4">Install and Update Exchange Online Management Module</span></span><span class="EOP SCXW264382529 BCX0" data-ccp-props="{"134245418":true,"134245529":true,"335559738":80,"335559739":40}"> </span></span>

<div class="SCXW264382529 BCX0" id="bkmrk-open-powershell-as-a"><div class="ListContainerWrapper SCXW264382529 BCX0">- <span style="color: rgb(0, 0, 0);"><span class="TextRun SCXW264382529 BCX0" data-contrast="auto" lang="EN-US" xml:lang="EN-US"><span class="NormalTextRun SCXW264382529 BCX0">Open PowerShell as Administrator.</span></span> </span>
- <span style="color: rgb(0, 0, 0);"><span class="TextRun SCXW264382529 BCX0" data-contrast="auto" lang="EN-US" xml:lang="EN-US"><span class="NormalTextRun SCXW264382529 BCX0">Install the module:</span></span><span class="EOP SCXW264382529 BCX0" data-ccp-props="{"134233117":false,"134233118":false,"335559738":0,"335559739":0}"> </span></span>

</div></div>```
Install-Module -Name ExchangeOnlineManagement
```

<div class="SCXW264382529 BCX0" id="bkmrk-update-the-module%3A%C2%A0"><div class="ListContainerWrapper SCXW264382529 BCX0">- <span style="color: rgb(0, 0, 0);"><span class="TextRun SCXW264382529 BCX0" data-contrast="auto" lang="EN-US" xml:lang="EN-US"><span class="NormalTextRun SCXW264382529 BCX0">Update the module:</span></span><span class="EOP SCXW264382529 BCX0" data-ccp-props="{"134233117":false,"134233118":false,"335559738":0,"335559739":0}"> </span></span>

</div></div>```
Update-Module -Name ExchangeOnlineManagement
```

<div class="SCXW264382529 BCX0" id="bkmrk-import-the-module%C2%A0"><div class="ListContainerWrapper SCXW264382529 BCX0">- <span style="color: rgb(0, 0, 0);"><span class="TextRun SCXW264382529 BCX0" data-contrast="auto" lang="EN-US" xml:lang="EN-US"><span class="NormalTextRun SCXW264382529 BCX0">Import the module</span></span><span class="EOP SCXW264382529 BCX0" data-ccp-props="{"134233117":false,"134233118":false,"335559738":0,"335559739":0}"> </span></span>

</div></div>```
Import-Module ExchangeOnlineManagement 
```

<span style="color: rgb(0, 0, 0);"><span class="TextRun SCXW264382529 BCX0" data-contrast="none" lang="EN-US" xml:lang="EN-US"><span class="NormalTextRun SCXW264382529 BCX0" data-ccp-parastyle="heading 4">2.</span><span class="NormalTextRun SCXW264382529 BCX0" data-ccp-parastyle="heading 4">Connect to Exchange Online</span></span><span class="EOP SCXW264382529 BCX0" data-ccp-props="{"134233117":false,"134233118":false,"134245418":true,"134245529":true,"335559738":319,"335559739":319}"> </span></span>

<div class="SCXW264382529 BCX0" id="bkmrk-run-the-following-co"><div class="ListContainerWrapper SCXW264382529 BCX0">- <span style="color: rgb(0, 0, 0);"><span class="TextRun SCXW264382529 BCX0" data-contrast="auto" lang="EN-US" xml:lang="EN-US"><span class="NormalTextRun SCXW264382529 BCX0">Run the following command:</span></span><span class="EOP SCXW264382529 BCX0" data-ccp-props="{"134233117":false,"134233118":false,"335559738":0,"335559739":0}"> </span></span>

</div></div>```
Connect-ExchangeOnline -UserPrincipalName <admin-email-address>
```

<div class="SCXW264382529 BCX0" id="bkmrk-replace-%3Cadmin-email"><div class="ListContainerWrapper SCXW264382529 BCX0">- <span style="color: rgb(0, 0, 0);"><span class="TextRun SCXW264382529 BCX0" data-contrast="auto" lang="EN-US" xml:lang="EN-US"><span class="NormalTextRun SCXW264382529 BCX0">Replace &lt;admin-email-address&gt; with the admin email. Authenticate if </span><span class="NormalTextRun SCXW264382529 BCX0">required</span><span class="NormalTextRun SCXW264382529 BCX0">.</span></span><span class="EOP SCXW264382529 BCX0" data-ccp-props="{"134233117":false,"134233118":false,"335559738":0,"335559739":0}"> </span></span>

</div></div><span style="color: rgb(0, 0, 0);">**<span class="TextRun SCXW264382529 BCX0" data-contrast="none" lang="EN-US" xml:lang="EN-US"><span class="NormalTextRun SCXW264382529 BCX0" data-ccp-parastyle="heading 4">3.</span><span class="NormalTextRun SCXW264382529 BCX0" data-ccp-parastyle="heading 4">Check and Enable Unified Audit Logging</span></span><span class="EOP SCXW264382529 BCX0" data-ccp-props="{"134245418":true,"134245529":true,"335559738":80,"335559739":40}"> </span>**</span>

<span class="TextRun SCXW264382529 BCX0" data-contrast="auto" lang="EN-US" style="color: rgb(0, 0, 0);" xml:lang="EN-US"><span class="NormalTextRun SCXW264382529 BCX0">Check Status:</span></span>

<div class="SCXW264382529 BCX0" id="bkmrk-run%3A%C2%A0"><div class="ListContainerWrapper SCXW264382529 BCX0">- <span style="color: rgb(0, 0, 0);"><span class="TextRun SCXW264382529 BCX0" data-contrast="auto" lang="EN-US" xml:lang="EN-US"><span class="NormalTextRun SCXW264382529 BCX0">Run:</span></span><span class="EOP SCXW264382529 BCX0" data-ccp-props="{"134233117":false,"134233118":false,"335559738":0,"335559739":0}"> </span></span>

</div></div>```
Get-AdminAuditLogConfig | Format-List UnifiedAuditLogIngestionEnabled
```

<div class="SCXW264382529 BCX0" id="bkmrk-if-the-output-is-tru"><div class="ListContainerWrapper SCXW264382529 BCX0">- <span style="color: rgb(0, 0, 0);"><span class="TextRun SCXW264382529 BCX0" data-contrast="auto" lang="EN-US" xml:lang="EN-US"><span class="NormalTextRun SCXW264382529 BCX0">If the output is True, Unified Audit Logging is already enabled.</span></span><span class="EOP SCXW264382529 BCX0" data-ccp-props="{"134233117":false,"134233118":false,"335559738":0,"335559739":0}"> </span></span>

</div></div><span style="color: rgb(0, 0, 0);"><span class="TextRun SCXW264382529 BCX0" data-contrast="auto" lang="EN-US" xml:lang="EN-US"><span class="NormalTextRun SCXW264382529 BCX0">Enable Logging (if needed):</span></span><span class="EOP SCXW264382529 BCX0" data-ccp-props="{"134233117":false,"134233118":false,"335559738":240,"335559739":240}"> </span></span>

<div class="SCXW264382529 BCX0" id="bkmrk-if-the-output-is-fal"><div class="ListContainerWrapper SCXW264382529 BCX0">- <span style="color: rgb(0, 0, 0);"><span class="TextRun SCXW264382529 BCX0" data-contrast="auto" lang="EN-US" xml:lang="EN-US"><span class="NormalTextRun SCXW264382529 BCX0">If the output is False, enable it:</span></span><span class="EOP SCXW264382529 BCX0" data-ccp-props="{"134233117":false,"134233118":false,"335559738":0,"335559739":0}"> </span></span>

</div></div>```
Set-AdminAuditLogConfig -UnifiedAuditLogIngestionEnabled $true
```

<div class="SCXW264382529 BCX0" id="bkmrk-verify-again%3A%C2%A0"><div class="ListContainerWrapper SCXW264382529 BCX0">- <span style="color: rgb(0, 0, 0);"><span class="TextRun SCXW264382529 BCX0" data-contrast="auto" lang="EN-US" xml:lang="EN-US"><span class="NormalTextRun SCXW264382529 BCX0">Verify again:</span></span><span class="EOP SCXW264382529 BCX0" data-ccp-props="{"134233117":false,"134233118":false,"335559738":0,"335559739":0}"> </span></span>

</div></div>```
Get-AdminAuditLogConfig | Format-List UnifiedAuditLogIngestionEnabled 
```

#### <span style="color: rgb(53, 152, 219);"><span class="EOP SCXW264382529 BCX0" data-ccp-props="{"134233117":false,"134233118":false,"335559738":0,"335559739":0}"> </span>**AQUILA – Microsoft 365 Integration <span class="TextRun SCXW264382529 BCX0" data-contrast="none" lang="EN-US" xml:lang="EN-US"><span class="NormalTextRun SCXW264382529 BCX0" data-ccp-parastyle="heading 3">Requirements</span></span>**</span>

<span class="TextRun SCXW264382529 BCX0" data-contrast="none" lang="EN-US" style="color: rgb(0, 0, 0);" xml:lang="EN-US"><span class="NormalTextRun SCXW264382529 BCX0" data-ccp-parastyle="heading 3">Please saved and provide this values to AQUILA Support Team.</span></span>

1. <span style="color: rgb(0, 0, 0);">**<span class="TextRun SCXW264382529 BCX0" data-contrast="none" lang="EN-US" xml:lang="EN-US"><span class="NormalTextRun SCXW264382529 BCX0" data-ccp-parastyle="heading 3">Directory (tenant) ID: </span></span>**</span>
2. <span style="color: rgb(0, 0, 0);">**<span class="TextRun SCXW264382529 BCX0" data-contrast="none" lang="EN-US" xml:lang="EN-US"><span class="NormalTextRun SCXW264382529 BCX0" data-ccp-parastyle="heading 3">Application (client) ID:</span></span>**</span>
3. <div aria-label="Client Secret" class="euiFlexItem css-kpsrin-euiFlexItem-growZero"><span style="color: rgb(0, 0, 0);">**Client Secret Value:**</span><span style="color: rgb(0, 0, 0);"><span class="EOP SCXW264382529 BCX0" data-ccp-props="{"134233117":false,"134233118":false,"335559738":0,"335559739":0}"> </span></span></div>

#### <span style="color: rgb(53, 152, 219);">**AQUILA – Microsoft 365 Integration**</span>

<span style="color: rgb(0, 0, 0);">**1.** Log in to AQUILA click here - <span style="color: rgb(53, 152, 219);">**[CyTech - AQUILA](https://cytechint.io/)**</span>. Choose **Cyber Monitoring** and click the **small arrow icon** to redirect you to the Cyber Monitoring Dashboard.</span>

<span style="color: rgb(0, 0, 0);">[![image.png](https://cytechint-docs-bookstack.s3.amazonaws.com/uploads/images/gallery/2025-05/scaled-1680-/QUruqc4qZzjj39A2-image.png)](https://cytechint-docs-bookstack.s3.amazonaws.com/uploads/images/gallery/2025-05/QUruqc4qZzjj39A2-image.png)</span>

<span style="color: rgb(0, 0, 0);">2. In the dashboard, choose **Cyber Incident Management (SIEM and XDR)**.</span>

<span style="color: rgb(0, 0, 0);">[![image.png](https://cytechint-docs-bookstack.s3.amazonaws.com/uploads/images/gallery/2025-05/scaled-1680-/i68EMO7YfIStKeyl-image.png)](https://cytechint-docs-bookstack.s3.amazonaws.com/uploads/images/gallery/2025-05/i68EMO7YfIStKeyl-image.png)</span>

<span style="color: rgb(0, 0, 0);">3. Navigate through the leftmost top and click **Cyber Incident Monitoring**.</span>

<span style="color: rgb(0, 0, 0);">[![image.png](https://cytechint-docs-bookstack.s3.amazonaws.com/uploads/images/gallery/2025-05/scaled-1680-/KgRo0wYa67PKNCws-image.png)](https://cytechint-docs-bookstack.s3.amazonaws.com/uploads/images/gallery/2025-05/KgRo0wYa67PKNCws-image.png)</span>

<span style="color: rgb(0, 0, 0);">4. Navigate through **Settings&gt;Log Source&gt;Search Bar&gt;Add to Agent**.</span>

[![image.png](https://cytechint-docs-bookstack.s3.amazonaws.com/uploads/images/gallery/2025-05/scaled-1680-/fWvdjNBxjAB77OEo-image.png)](https://cytechint-docs-bookstack.s3.amazonaws.com/uploads/images/gallery/2025-05/fWvdjNBxjAB77OEo-image.png)

<span style="color: rgb(0, 0, 0);">5. Choose your **Log Collector**. *(If you not yet installed your **Log Collector** please refer to this link -*</span><span style="color: rgb(0, 0, 0);"> [**Log Collector** **Installation.**](https://docs.cytechint.io/books/log-collector-installations)</span><span style="color: rgb(0, 0, 0);">)</span>

<span style="color: rgb(0, 0, 0);">[![image.png](https://cytechint-docs-bookstack.s3.amazonaws.com/uploads/images/gallery/2025-05/scaled-1680-/1VIERSAN80moG8fG-image.png)](https://cytechint-docs-bookstack.s3.amazonaws.com/uploads/images/gallery/2025-05/1VIERSAN80moG8fG-image.png)</span>

<span style="color: rgb(0, 0, 0);">6. In the integration settings follow the instructions given below.</span>

- <span style="color: rgb(0, 0, 0);">Click the **drop arrow** to display the contents needed for the integration setup.</span>
- <span style="color: rgb(0, 0, 0);">In the **Office 365 logs section** &gt; **Disable** &gt; **Collect Office 365 audit logs**</span>

<span style="color: rgb(0, 0, 0);">**[![image.png](https://cytechint-docs-bookstack.s3.amazonaws.com/uploads/images/gallery/2025-05/scaled-1680-/exwrKGAswsASVPAr-image.png)](https://cytechint-docs-bookstack.s3.amazonaws.com/uploads/images/gallery/2025-05/exwrKGAswsASVPAr-image.png)**</span>

- <span style="color: rgb(0, 0, 0);">Scroll down and go to **Microsoft Office 365 audit logs section**.</span>
- <span style="color: rgb(0, 0, 0);">Input the credentials for **Directory(tenant) ID, Application(client) ID and the Client Secret Value**.</span>
- <span style="color: rgb(0, 0, 0);">Finally, click **Next** to install the log source integration.</span>

[![image.png](https://cytechint-docs-bookstack.s3.amazonaws.com/uploads/images/gallery/2025-05/scaled-1680-/Tbrp2u6d1RtjobOm-image.png)](https://cytechint-docs-bookstack.s3.amazonaws.com/uploads/images/gallery/2025-05/Tbrp2u6d1RtjobOm-image.png)

<span style="color: rgb(0, 0, 0);">7. Wait for the **Successfull** window to display, this will confirm the successfull integration.</span>

<span style="color: rgb(0, 0, 0);">[![image.png](https://cytechint-docs-bookstack.s3.amazonaws.com/uploads/images/gallery/2025-05/scaled-1680-/CNFzJRIuFuvZIEdI-image.png)](https://cytechint-docs-bookstack.s3.amazonaws.com/uploads/images/gallery/2025-05/CNFzJRIuFuvZIEdI-image.png)</span>

<span style="color: rgb(0, 0, 0);">*If you need further assistance, kindly contact our support at* <span style="color: rgb(53, 152, 219);">***support@cytechint.com***</span> *for prompt assistance and guidance.*</span>

# AQUILA - Mimecast API v2 Integration

### <span style="color: rgb(53, 152, 219);">**Mimecast Integration Guide**</span>

Integrate **Mimecast** with your security platform via API to collect email threat data, archive logs, DLP events, and other security-related logs for centralized visibility and incident response.

**API 2.0 is the current standard** - It's been generally available for over a year and is what Mimecast recommends for new integrations

#### <span style="color: rgb(53, 152, 219);">**Credentials &amp; API Access Setup (Mimecast API v2)**</span>

Before configuring the integration, prepare your API credentials from the Mimecast Admin Console.

Needed Credentials:

- **API URL**
- **Client ID**
- **Client Secret**

##### **Creating an API 2.0 Application**:

**To create an API 2.0 Application, follow the steps below:**

1. Log in to ***Mimecast Administration Console***
2. Navigate to ***Integrations | API and Platform Integrations***
3. Locate the following ***Mimecast API 2.0*** tile and click on ***Generate Keys.***

***[![Mimecast1.png](https://cytechint-docs-bookstack.s3.amazonaws.com/uploads/images/gallery/2025-07/scaled-1680-/rBSxoLyzOZzCIIZV-mimecast1.png)](https://cytechint-docs-bookstack.s3.amazonaws.com/uploads/images/gallery/2025-07/rBSxoLyzOZzCIIZV-mimecast1.png)***

4. <div>After reading the ***Terms &amp; Conditions***, complete the ***I accept*** check box to enable the ***Next*** button to progress onto the next step.</div>
5. <div>Complete the ***Application Details*** section.</div>

[![image.png](https://cytechint-docs-bookstack.s3.amazonaws.com/uploads/images/gallery/2025-07/scaled-1680-/AwHf7pOPYvohGct1-image.png)](https://cytechint-docs-bookstack.s3.amazonaws.com/uploads/images/gallery/2025-07/AwHf7pOPYvohGct1-image.png)

> - We highly recommend creating a dedicated custom role with ***only*** the permissions required for the Application to function.
> - Select the minimum set of Products the App needs to access to function.

6. Should we need to contact you regarding this API application, please provide details for a ***Technical Point of Contact.***

[![image.png](https://cytechint-docs-bookstack.s3.amazonaws.com/uploads/images/gallery/2025-07/scaled-1680-/UoNpggyWtQCY1t4a-image.png)](https://cytechint-docs-bookstack.s3.amazonaws.com/uploads/images/gallery/2025-07/UoNpggyWtQCY1t4a-image.png)

> Mimecast recommends a group rather than an individual contact.

7. Review the Summary information for the API application and click on ***Add*** if you are happy to proceed with creating the application.

[![image.png](https://cytechint-docs-bookstack.s3.amazonaws.com/uploads/images/gallery/2025-07/scaled-1680-/4JKQu1krMKlvDmMq-image.png)](https://cytechint-docs-bookstack.s3.amazonaws.com/uploads/images/gallery/2025-07/4JKQu1krMKlvDmMq-image.png)

 8. The wizard completes and displays a pop-up window including your Client ID and Client Secret key data, where you can copy and save the credentials for the API application.

[![image.png](https://cytechint-docs-bookstack.s3.amazonaws.com/uploads/images/gallery/2025-07/scaled-1680-/RGHA38BGBhwInynP-image.png)](https://cytechint-docs-bookstack.s3.amazonaws.com/uploads/images/gallery/2025-07/RGHA38BGBhwInynP-image.png)

#### <span style="color: rgb(53, 152, 219);">**Base URL (Mimecast API v2)**</span>

To transition from your current API 1.0 URLs to API 2.0, we provide three API gateway options tailored to fulfill your performance, compliance, and data residency requirements:

- **Global URL**: The global API URL <mark class="code">api.services.mimecast.com</mark> which serves traffic from the nearest instance ensuring reduced latency and enhanced performance.
- **UK Instance URL**: For compliance and data residency requirements, customers can choose to process traffic via the UK instance using the regional URL: <mark class="code">uk-api.services.mimecast.com</mark>. This ensures API traffic is only processed within the UK instance of the Apigee Gateway.
- **US Instance URL**: Similarly, customers with compliance or residency requirements in the US can use <mark class="code">us-api.services.mimecast.com</mark> to process API traffic exclusively through the US instance of the Apigee Gateway.

<div class="_tableContainer_80l1q_1" id="bkmrk-data-stream-permissi"><div class="_tableWrapper_80l1q_14 group flex w-fit flex-col-reverse" tabindex="-1"><table border="1" class="w-fit min-w-(--thread-content-width)" data-end="2931" data-start="2486" style="border-collapse: collapse; border-style: solid; width: 100%; height: 150.234px;"><thead data-end="2560" data-start="2486"><tr data-end="2560" data-start="2486" style="height: 29.7969px;"><th data-col-size="sm" data-end="2514" data-start="2486" style="width: 21.6925%; height: 29.7969px;">Factor</th><th data-col-size="sm" data-end="2560" data-start="2514" style="width: 24.6722%; height: 29.7969px;">Global URL</th><th style="width: 27.056%;">UK Instance URL</th><th style="width: 26.5793%;">US Instance URL</th></tr></thead><tbody data-end="2931" data-start="2636"><tr data-end="2709" data-start="2636" style="height: 30.1094px;"><td data-col-size="sm" data-end="2663" data-start="2636" style="width: 21.6925%; height: 30.1094px;">URL Details</td><td data-col-size="sm" data-end="2709" data-start="2663" style="width: 24.6722%; height: 30.1094px;">api.services.mimecast.com</td><td style="width: 27.056%;">uk-api.services.mimecast.com</td><td style="width: 26.5793%;">us-api.services.mimecast.com</td></tr><tr data-end="2783" data-start="2710" style="height: 30.1094px;"><td data-col-size="sm" data-end="2737" data-start="2710" style="width: 21.6925%; height: 30.1094px;">Availability</td><td style="width: 24.6722%;">✅Auto failover for high uptime</td><td style="width: 27.056%;">![](https://developer.services.mimecast.com/files/api-overview-warning.png?v=1752047380000) No failover - requests fail if UK instance is down</td><td style="width: 26.5793%;">![](https://developer.services.mimecast.com/files/api-overview-warning.png?v=1752047380000) No failover - requests fail if US instance is down</td></tr></tbody></table>

</div></div><div class="_tableContainer_80l1q_1" id="bkmrk-data-stream-required"></div>#### <span style="color: rgb(53, 152, 219);">**Aquila Integration Configuration**</span>

##### **AQUILA – Mimecast Integration**

**1.** Log in to AQUILA click here - **[CyTech - AQUILA](https://cytechint.io/)**. Choose **Cyber Monitoring -&gt; Cyber Incident Management (CIM) -&gt; Settings**.

![image.png](https://cytechint-docs-bookstack.s3.amazonaws.com/uploads/images/gallery/2025-07/scaled-1680-/ADhvXH5PXr7DLcsb-image.png)

2\. Navigate through **Log Source -&gt; Search Bar (Search the Source to Add) -&gt; Add to Agent**.

![image.png](https://cytechint-docs-bookstack.s3.amazonaws.com/uploads/images/gallery/2025-07/scaled-1680-/CekkCjyu80NlCNMQ-image.png)

3\. Choose your **Log Collector**. *(If you not yet installed your **Log Collector** please refer to this link -* [**Log Collector** **Installation.**](https://docs.cytechint.io/books/log-collector-installations))

![image.png](https://cytechint-docs-bookstack.s3.amazonaws.com/uploads/images/gallery/2025-07/scaled-1680-/Z8PeeZ0paI1PLBNl-image.png)

**4. In the integration settings follow the instructions given below.**

- Click the **drop-down arrow** to display the contents needed for the integration setup.

![image.png](https://cytechint-docs-bookstack.s3.amazonaws.com/uploads/images/gallery/2025-07/scaled-1680-/lFaQpLYUxG6MNlQK-image.png)

- Upon clicking the drop-down arrow, disable the **v1 API.**

![image.png](https://cytechint-docs-bookstack.s3.amazonaws.com/uploads/images/gallery/2025-07/scaled-1680-/3Z9UT3lv6GH8s0AI-image.png)

- This integration we will use the **v2 API**. Input the required Fields: **Client ID, Client Secret** and API URL (Mimecast API v2 base URL).**

![image.png](https://cytechint-docs-bookstack.s3.amazonaws.com/uploads/images/gallery/2025-07/scaled-1680-/gHykOx2Hwy2oMSo1-image.png)

- Click the drop-down arrow on all the other fields**.**

**![image.png](https://cytechint-docs-bookstack.s3.amazonaws.com/uploads/images/gallery/2025-07/scaled-1680-/S6oYCbJbgOwdxc8Z-image.png)**

- Click the Tags text field and add the 2 examples**.**

![image.png](https://cytechint-docs-bookstack.s3.amazonaws.com/uploads/images/gallery/2025-07/scaled-1680-/gTGMPDPdQe400Kl5-image.png)

![image.png](https://cytechint-docs-bookstack.s3.amazonaws.com/uploads/images/gallery/2025-07/scaled-1680-/kXdZtBmkvQYpieow-image.png)

- Finally, click **Next** to install the log source integration.

![image.png](https://cytechint-docs-bookstack.s3.amazonaws.com/uploads/images/gallery/2025-07/scaled-1680-/4jbMGaSlHzY6UCmv-image.png)

5\. Wait for the **Successful** window to display, this will confirm the successful integration.

![image.png](https://cytechint-docs-bookstack.s3.amazonaws.com/uploads/images/gallery/2025-05/scaled-1680-/CNFzJRIuFuvZIEdI-image.png)

**Reference Links:**

[**API &amp; Integrations - Managing API 2.0 for Cloud Gateway**](https://mimecastsupport.zendesk.com/hc/en-us/articles/34000360548755-API-Integrations-Managing-API-2-0-for-Cloud-Gateway#h_01JK62GWQ91FX2VPS7EWE3M9RX)

[**Update Base URL**](https://developer.services.mimecast.com/api-1-0-to-2-0-migration-guide)

*If you need further assistance, kindly contact our support at* ***support@cytechint.com*** *for prompt assistance and guidance.*

# AQUILA - Nginx Integration (Ubuntu or Linux Platform) (OLD)

#### <span style="color: rgb(53, 152, 219);">**Overview**</span>

The **Nginx Integration** provides comprehensive monitoring and observability for **Nginx servers**, enabling visibility into both **logs** and **metrics** data. This integration ensures effective tracking of server performance, user activity, and error occurrences, supporting proactive management and troubleshooting of Nginx environments.

It collects two main types of data:

- **Logs** — Capture and record events occurring within the Nginx server. These include access logs (client requests) and error logs (issues encountered during request handling). Log data helps in auditing activities, identifying issues, and analyzing request patterns.
- **Metrics** — Provide real-time performance insights into Nginx server operations. Metrics include details such as the total number of **active client connections**, connection states, request counts, and other performance indicators essential for capacity planning and system optimization.

By utilizing this integration, administrators gain visibility into both operational and performance aspects of Nginx, enabling effective monitoring, troubleshooting, and optimization of web infrastructure.

#### <span style="color: rgb(53, 152, 219);">**Prerequisites**</span>

Before setting up the **Nginx Integration**, ensure that the following requirements are met:

1. **Nginx Server Installed and Running**
    
    
    - A functioning **Nginx server** must be installed on your host system.
    - Verify that the Nginx service is active and accessible.
2. **Access Permissions**
    
    
    - Administrative or root privileges are required to configure log file paths and enable the Nginx status module.
    - Read permissions must be granted for Nginx log files (e.g., `access.log` and `error.log`).
3. **Nginx Status Module Enabled**
    
    
    - The **stub\_status** module should be enabled to allow collection of server metrics such as active connections and request rates.
    - Add or verify the following configuration in your Nginx configuration file (usually located in `/etc/nginx/sites-enabled/default.conf`):

```
location /nginx_status {
    stub_status on;
    access_log off;
    allow 127.0.0.1;    # restrict access as needed
    allow <Network_IP>; # e.g. 192.172.10.0/24
    deny all;
}
```

- Restart Nginx after making changes:

```bash
sudo systemctl restart nginx
```

4\. **Network Connectivity**

- Ensure that the system where monitoring is configured can connect to the Nginx host via the appropriate network ports (typically port **80** or **443**).

5\. **Log File Availability**

- Confirm that standard Nginx log files are present in their default or custom locations: 
    - Access logs: `/var/log/nginx/access.log`
    - Error logs: `/var/log/nginx/error.log`

#### <span style="color: rgb(53, 152, 219);">**Step 1: Install Log Collector Agent**</span>

On the device where **Nginx Server** is installed, you must also install the **AQUILA Log Collector Agent**. This agent is responsible for collecting the Nginx access and error logs and forwarding them to AQUILA for processing.

Please refer to the official manuals for installing the **AQUILA Log Collector Agent** on different operating systems:

- **Linux:** [Log Collector Installation - Linux Manual](https://docs.cytechint.io/books/log-collector-installations/page/log-collector-installation-linux-manual)
- **Windows:** [Log Collector Installation - Windows Manual](https://docs.cytechint.io/books/log-collector-installations/page/log-collector-installation-windows-manual)
- **Mac:** [Log Collector Installation - Mac Manual](https://docs.cytechint.io/books/log-collector-installations/page/log-collector-installation-mac-manual)

Ensure that after installation, the Log Collector service is running properly.

#### <span style="color: rgb(53, 152, 219);">**Step 2: Integrate Nginx on AQUILA**</span>

1. Log in to the **AQUILA** site.
2. Navigate to **Cyber Monitoring → Cyber Incident Management (CIM) → Settings**.

![image.png](https://cytechint-docs-bookstack.s3.amazonaws.com/uploads/images/gallery/2025-09/scaled-1680-/LufwuzyvCZwrQEVT-image.png)

3\. In **Settings for CIM**, go to **Log Source**. In the **Search Integration** textbox, type **"Nginx"** and choose **Nginx logs and metrics** and then click **Add to Agent**.

[![image.png](https://cytechint-docs-bookstack.s3.amazonaws.com/uploads/images/gallery/2025-10/scaled-1680-/7GeNXll3qJ1snfq0-image.png)](https://cytechint-docs-bookstack.s3.amazonaws.com/uploads/images/gallery/2025-10/7GeNXll3qJ1snfq0-image.png)

4\. Choose the **Log Collector** that was installed earlier and click the **+** button.

![1.png](https://cytechint-docs-bookstack.s3.amazonaws.com/uploads/images/gallery/2025-09/scaled-1680-/VNHHfnY0lYNsLpPo-1.png)

5\. In the **Nginx Logs and Metrics** section, **disable** the option to *Collect logs from third-party REST APIs*, and ensure that *Collect logs from Nginx instances* remains **enabled**.

[![image.png](https://cytechint-docs-bookstack.s3.amazonaws.com/uploads/images/gallery/2025-10/scaled-1680-/ftlm54TN3ND8R5NZ-image.png)](https://cytechint-docs-bookstack.s3.amazonaws.com/uploads/images/gallery/2025-10/ftlm54TN3ND8R5NZ-image.png)

6\. Scroll down and ensure that **Collect metrics from Nginx instances** is **enabled**. In the **Hosts** field, enter the **Loopback IP address** of the device where both the **Nginx Server** and **Log Collector Agent** are installed. By default, this address is **127.0.0.1**, unless it has been modified.

[![image.png](https://cytechint-docs-bookstack.s3.amazonaws.com/uploads/images/gallery/2025-10/scaled-1680-/9Ko1MDgMwsXhEvWV-image.png)](https://cytechint-docs-bookstack.s3.amazonaws.com/uploads/images/gallery/2025-10/9Ko1MDgMwsXhEvWV-image.png)

7\. For the following log types, specify the exact file paths:

- **Access Logs:** e.g., `/var/log/nginx/access.log*`
- **Error Logs:** e.g., `/var/log/nginx/error.log*`

<p class="callout info">**Note:** Ensure that each path ends with an asterisk (`*`) to include all relevant log files.</p>

- Navigate to **Nginx access logs** and **error logs** sections and input the paths.

[![image.png](https://cytechint-docs-bookstack.s3.amazonaws.com/uploads/images/gallery/2025-10/scaled-1680-/p26smGSPZBp0RaHv-image.png)](https://cytechint-docs-bookstack.s3.amazonaws.com/uploads/images/gallery/2025-10/p26smGSPZBp0RaHv-image.png)

[![image.png](https://cytechint-docs-bookstack.s3.amazonaws.com/uploads/images/gallery/2025-10/scaled-1680-/QX2cuxPxZIsVhNEo-image.png)](https://cytechint-docs-bookstack.s3.amazonaws.com/uploads/images/gallery/2025-10/QX2cuxPxZIsVhNEo-image.png)

- For the **Tags** configuration, click the text field and select the default options: 
    - **Access Logs:** `nginx-access`
    - **Error Logs:** `nginx-error`

8\. Verify the **Server Status Path** under the **Nginx stubstatus metrics** section. If the path has not been modified, retain the **default value**.

[![image.png](https://cytechint-docs-bookstack.s3.amazonaws.com/uploads/images/gallery/2025-10/scaled-1680-/0XCaVgK6lmjAfZ2B-image.png)](https://cytechint-docs-bookstack.s3.amazonaws.com/uploads/images/gallery/2025-10/0XCaVgK6lmjAfZ2B-image.png)

8\. Once all paths and tags have been entered, click **Next** to continue.

9\. Wait for the **Successful** window to display, this will confirm the successful integration.

![image.png](https://cytechint-docs-bookstack.s3.amazonaws.com/uploads/images/gallery/2025-09/scaled-1680-/5vmEDGiUFIH8j57q-image.png)

*If you need further assistance, kindly contact our support at **support@cytechint.com** for prompt assistance and guidance.*

# AQUILA - Oracle Audit Logs Integration

##### This integration is for ingesting Audit Trail logs and fetching performance, tablespace and sysmetric metrics from Oracle Databases.

##### The integration expects an \*.aud audit file that is generated from Oracle Databases by default. If this has been disabled, then please see the [Oracle Database Audit Trail Documentation](https://docs.oracle.com/en/database/oracle/oracle-database/19/dbseg/introduction-to-auditing.html#GUID-8D96829C-9151-4FA4-BED9-831D088F12FF).

#### **Requirements**

##### Connectivity to Oracle can be facilitated in two ways either by using official Oracle libraries or by using a JDBC driver. Facilitation of the connectivity using JDBC is not supported currently with Metricbeat. Connectivity can be facilitated using Oracle libraries and the detailed steps to do the same are mentioned below.

#### **Oracle Database Connection Pre-requisites**

##### To get connected with the Oracle Database ORACLE\_SID, ORACLE\_BASE, ORACLE\_HOME environment variables should be set.

##### For example: Let’s consider Oracle Database 21c installation using RPM manually by following the [Oracle Installation instructions](https://docs.oracle.com/en/database/oracle/oracle-database/21/ladbi/running-rpm-packages-to-install-oracle-database.html). Environment variables should be set as follows: `ORACLE_SID=ORCLCDB` `ORACLE_BASE=/opt/oracle/oradata` `ORACLE_HOME=/opt/oracle/product/21c/dbhome_1` Also, add `$ORACLE_HOME/bin` to the `PATH` environment variable.

#### **Oracle Instant Client**

##### Oracle Instant Client enables development and deployment of applications that connect to Oracle Database. The Instant Client libraries provide the necessary network connectivity and advanced data features to make full use of Oracle Database. If you have OCI Oracle server which comes with these libraries pre-installed, you don't need a separate client installation.

##### The OCI library install few Client Shared Libraries that must be referenced on the machine where Metricbeat is installed. Please follow the [Oracle Client Installation link](https://docs.oracle.com/en/database/oracle/oracle-database/21/lacli/install-instant-client-using-zip.html#GUID-D3DCB4FB-D3CA-4C25-BE48-3A1FB5A22E84) link for OCI Instant Client set up. The OCI Instant Client is available with the Oracle Universal Installer, RPM file or ZIP file. Download links can be found at the [Oracle Instant Client Download page](https://www.oracle.com/database/technologies/instant-client/downloads.html).

##### If Elastic Agent is running as a systemd service and not using `ldconfig` is an option, to update the links to the shared libraries, you can use the `LD_LIBRARY_PATH` environment variable instead. Follow these steps to ensure Elastic Agent and its spawned processes respect the `LD_LIBRARY_PATH` environment variable.

> ##### Prerequisites: Ensure that you have administrative privileges to modify the Elastic Agent systemd service configuration.

##### **Steps:**

1. ##### Check the status of the Elastic Agent systemd service by running the following command: `systemctl status elastic-agent.service` Take note of the path to the elastic-agent.service file, which is typically located in the systemd service directory. Example path: `/etc/systemd/system/elastic-agent.service`
2. ##### Open the elastic-agent.service file in your preferred text editor, find the `EnvironmentFile` key (commonly found at `/etc/sysconfig/elastic-agent`), and verify its contents, as these configurations are essential for the elastic-agent's runtime environment initialization. If the EnvironmentFile is absent, create it and set the necessary permissions to ensure the elastic-agent has full access.
3. ##### Add the LD\_LIBRARY\_PATH environment variable to the configured `EnvironmentFile`. You can set it to the directory where libraries (`libclntsh.so`) are located. For example, if your libraries are in the `/opt/oracle/instantclient_21_1 directory`, add the following line to the `EnvironmentFile` (i.e. `/etc/systemd/system/elastic-agent.service`)
    
    ##### `LD_LIBRARY_PATH=/opt/oracle/instantclient_21_1`
4. ##### Save the changes made to the configured `EnvironmentFile`.
5. ##### Restart the Elastic Agent systemd service to apply the changes by running the following command:
    
    ##### `systemctl restart elastic-agent.service`
    
    ##### Ensure that you replace `/opt/oracle/instantclient_21_1` with the actual path to the directory where the required libraries (`libclntsh.so`) are located. This will set the library search path for the Elastic Agent service to include the specified directory, allowing it to locate the required libraries.
    
    ##### \* Please take note of the **Path** since we will need it later for the integration part.

#### **Enable Listener**

##### The Oracle listener is a service that runs on the database host and receives requests from Oracle clients. Make sure that [Listener](https://docs.oracle.com/cd/B19306%5F01/network.102/b14213/lsnrctl.htm) is be running. To check if the listener is running or not, run:

##### `lsnrctl STATUS`

##### If the listener is not running, use the command to start:

##### `lsnrctl START`

##### Then, Metricbeat can be launched.

#### **Oracle DSN Configuration**

##### The following two configuration formats are supported:

```
oracle://<user>:<password>@<connection_string>
user="<user>" password="<password>" connectString="<connection_string>" sysdba=<true|false>

```

<div class="highlight" id="bkmrk-"><button aria-label="Copy code to clipboard" class="copybtn o-tooltip--left" data-clipboard-target="#codecell0" data-tooltip="Copy"><svg class="size-6" fill="none" stroke="currentColor" stroke-width="1.5" viewbox="0 0 24 24" xmlns="http://www.w3.org/2000/svg"></svg></button></div>##### Example values are:

```
oracle://sys:Oradoc_db1@0.0.0.0:1521/ORCLCDB.localdomain?sysdba=1
user="sys" password="Oradoc_db1" connectString="0.0.0.0:1521/ORCLCDB.localdomain" sysdba=true

```

<div class="highlight" id="bkmrk--1"><button aria-label="Copy code to clipboard" class="copybtn o-tooltip--left" data-clipboard-target="#codecell1" data-tooltip="Copy"><svg class="size-6" fill="none" stroke="currentColor" stroke-width="1.5" viewbox="0 0 24 24" xmlns="http://www.w3.org/2000/svg"></svg></button></div>##### In the first, URL-based format, special characters should be URL encoded.

##### In the seoncd, logfmt-encoded DSN format, if the password contains a backslash character (`\`), it must be escaped with another backslash. For example, if the password is `my\_password`, it must be written as `my\\_password`.

##### To mask the password shown in the DSN, remove the username and password from the DSN string, and configure the DSN to only include the host address and any additional parameters required for the connection. Subsequently, we can use the username and password fields under advanced options in the backend to configure them.

##### \* Please take note of the **Oracle DSN** since we will need it later for the integration part.

#### **Integration on AQUILA**

1. ##### Login to **AQUILA**. Go to **Cyber Monitoring** -&gt; **Cyber Incident Management (CIM)** -&gt; **Settings**.

![image.png](https://cytechint-docs-bookstack.s3.amazonaws.com/uploads/images/gallery/2025-07/scaled-1680-/y9IIfN2IghY0IbCy-image.png)

##### 2. Choose **Log Source**. Type "**Oracle**" on the text field then choose the first shown on **List of Integrations** and click **Add to Agent**.

![image.png](https://cytechint-docs-bookstack.s3.amazonaws.com/uploads/images/gallery/2025-07/scaled-1680-/H0rfivk2I1hB0uvC-image.png)

##### 3. Choose what **Log Collector** you want to integrate the **Log Source**.

![image.png](https://cytechint-docs-bookstack.s3.amazonaws.com/uploads/images/gallery/2025-07/scaled-1680-/evNXMDaI8iZPgOYl-image.png)

##### 4. Click the drop-down arrow on **Oracle Audit Logs**. On the **Oracle DSN** textbox input the details you gathered earlier.

![image.png](https://cytechint-docs-bookstack.s3.amazonaws.com/uploads/images/gallery/2025-07/scaled-1680-/IUlZCQw4Mio7oEXe-image.png)

##### 5. Scroll down and click the drop-down arrow on **Oracle Audit Log**. In the **Paths** textbox input the data you gathered earlier. In the **Tags** textbox, click the textbox and it will show 1 value choose that.

![image.png](https://cytechint-docs-bookstack.s3.amazonaws.com/uploads/images/gallery/2025-07/scaled-1680-/LBxfZD96ryJIVWZz-image.png)

##### 6. For **Memory metrics, Oracle performance metrics, Sysmetric related metrics, System Statistics** and **Oracle** **tablespace metrics** just click all the **Tags** textbox on them and choose the only value shown. After that click **next**.

![image.png](https://cytechint-docs-bookstack.s3.amazonaws.com/uploads/images/gallery/2025-07/scaled-1680-/xSQluT4o4IB7fB89-image.png)

![image.png](https://cytechint-docs-bookstack.s3.amazonaws.com/uploads/images/gallery/2025-07/scaled-1680-/9KPia3lWEOcbJypS-image.png)

![image.png](https://cytechint-docs-bookstack.s3.amazonaws.com/uploads/images/gallery/2025-07/scaled-1680-/BVV6sINSO79l8bpt-image.png)

![image.png](https://cytechint-docs-bookstack.s3.amazonaws.com/uploads/images/gallery/2025-07/scaled-1680-/g0u0xV3ussqwLfdV-image.png)

![image.png](https://cytechint-docs-bookstack.s3.amazonaws.com/uploads/images/gallery/2025-07/scaled-1680-/lOp1i6wBbglWjC4m-image.png)

##### 7. Wait for the **Successful** window to display, this will confirm the successful integration.

![image.png](https://cytechint-docs-bookstack.s3.amazonaws.com/uploads/images/gallery/2025-07/scaled-1680-/qqQMRTFr5V1HLZOJ-image.png)

*If you need further assistance, kindly contact our support at **support@cytechint.com** for prompt assistance and guidance.*

# AQUILA - PostgreSQL Integration

##### <span style="color: rgb(53, 152, 219);">**Please find below the instructions required to set up this integration:**</span>

<div data-ogsc="black" id="bkmrk-to-configure%C2%A0postgre"><span style="color: rgb(0, 0, 0);">To configure <span class="markgiltepduu" data-markjs="true" data-ogab="" data-ogac="" data-ogsb="" data-ogsc=""><span class="markdbxmv250o" data-markjs="true" data-ogab="" data-ogac="" data-ogsb="" data-ogsc="">PostgreS</span>QL</span> with the specified logging settings, you need to modify the **<span class="markgiltepduu" data-markjs="true" data-ogab="" data-ogac="" data-ogsb="" data-ogsc=""><span class="markdbxmv250o" data-markjs="true" data-ogab="" data-ogac="" data-ogsb="" data-ogsc="">postgres</span>ql</span>.conf file**, which is typically located in the <span class="markgiltepduu" data-markjs="true" data-ogab="" data-ogac="" data-ogsb="" data-ogsc=""><span class="markdbxmv250o" data-markjs="true" data-ogab="" data-ogac="" data-ogsb="" data-ogsc="">PostgreS</span>QL</span> data directory. Here are the steps to configure these settings:</span></div><div data-ogsc="black" id="bkmrk-"></div><div data-ogsc="black" id="bkmrk-step-1%3A%C2%A0locate-the%C2%A0p"><span style="color: rgb(0, 0, 0);"><span data-ogsc="rgb(200, 38, 19)" style="color: rgb(53, 152, 219);">**Step 1:**</span> Locate the **<span class="markgiltepduu" data-markjs="true" data-ogab="" data-ogac="" data-ogsb="" data-ogsc=""><span class="markdbxmv250o" data-markjs="true" data-ogab="" data-ogac="" data-ogsb="" data-ogsc="">postgres</span>ql</span>.conf file**. This file is usually found in the **data directory of your <span class="markgiltepduu" data-markjs="true" data-ogab="" data-ogac="" data-ogsb="" data-ogsc=""><span class="markdbxmv250o" data-markjs="true" data-ogab="" data-ogac="" data-ogsb="" data-ogsc="">PostgreS</span>QL</span> installation**. The exact path can vary depending on your operating system and installation method.</span></div><div data-ogsc="black" id="bkmrk--1">  
</div><div data-ogsc="black" id="bkmrk-step-2%3A%C2%A0edit-the%C2%A0pos"><span style="color: rgb(0, 0, 0);"><span data-ogsc="rgb(200, 38, 19)" style="color: rgb(53, 152, 219);">**Step 2:**</span> **Edit the <span class="markgiltepduu" data-markjs="true" data-ogab="" data-ogac="" data-ogsb="" data-ogsc=""><span class="markdbxmv250o" data-markjs="true" data-ogab="" data-ogac="" data-ogsb="" data-ogsc="">postgres</span>ql</span>.conf file**. Open the file in a text editor with appropriate permissions (you might need superuser privileges).</span></div><div data-ogsc="black" id="bkmrk-add-or-modify-the-fo"><span style="color: rgb(0, 0, 0);">Add or modify the following settings:</span></div>- <div data-ogsc=""><span style="color: rgb(0, 0, 0);">**logging\_collector = 'on'**: Enables the logging collector, which is responsible for capturing log messages sent to stderr and redirecting them into log files.</span></div>
- <div data-ogsc=""><span style="color: rgb(0, 0, 0);">**log\_destination = 'csvlog'**: Sets the log output format to CSV, which is useful for structured logging.</span></div>
- <div data-ogsc=""><span style="color: rgb(0, 0, 0);">**log\_statement = 'none'**: Disables logging of all SQL statements.</span></div>
- <div data-ogsc=""><span style="color: rgb(0, 0, 0);">**log\_checkpoints = 'on'**: Logs each checkpoint.</span></div>
- <div data-ogsc=""><span style="color: rgb(0, 0, 0);">**log\_connections = 'on'**: Logs each successful connection.</span></div>
- <div data-ogsc=""><span style="color: rgb(0, 0, 0);">**log\_disconnections = 'on'**: Logs each disconnection.</span></div>
- <div data-ogsc=""><span style="color: rgb(0, 0, 0);">**log\_lock\_waits = 'on'**: Logs lock waits that exceed the deadlock\_timeout.</span></div>
- <div data-ogsc=""><span style="color: rgb(0, 0, 0);">**log\_min\_duration\_statement = 0**: Logs all statements with their durations. Setting this to 0 logs all statements regardless of their execution time.</span></div>

<div data-ogsc="rgb(36, 36, 36)" id="bkmrk--2"><span data-ogsb="white" data-ogsc="" style="color: rgb(0, 0, 0);">![](https://cytechint-docs-bookstack.s3.amazonaws.com/uploads/images/gallery/2025-09/3ghvIgyg3snBxO4t-embedded-image-kia6gqmh.png)</span></div><div data-ogsc="black" id="bkmrk-step-3%3A%C2%A0save-the-cha"><span style="color: rgb(0, 0, 0);"><span style="color: rgb(53, 152, 219);"><span data-ogsc="rgb(200, 38, 19)">**Step 3:**</span> </span>Save the changes. After editing the file, save your changes.</span></div><div data-ogsc="black" id="bkmrk--4">  
</div><div data-ogsc="black" id="bkmrk-step-4%3A%C2%A0restart%C2%A0post"><span style="color: rgb(0, 0, 0);"><span data-ogsc="rgb(200, 38, 19)">**<span style="color: rgb(53, 152, 219);">Step 4:</span>** </span>Restart <span class="markgiltepduu" data-markjs="true" data-ogab="" data-ogac="" data-ogsb="" data-ogsc=""><span class="markdbxmv250o" data-markjs="true" data-ogab="" data-ogac="" data-ogsb="" data-ogsc="">PostgreS</span>QL</span>: For the changes to take effect, you need to restart the <span class="markgiltepduu" data-markjs="true" data-ogab="" data-ogac="" data-ogsb="" data-ogsc=""><span class="markdbxmv250o" data-markjs="true" data-ogab="" data-ogac="" data-ogsb="" data-ogsc="">PostgreS</span>QL</span> service. The command to restart <span class="markgiltepduu" data-markjs="true" data-ogab="" data-ogac="" data-ogsb="" data-ogsc=""><span class="markdbxmv250o" data-markjs="true" data-ogab="" data-ogac="" data-ogsb="" data-ogsc="">PostgreS</span>QL</span> can vary depending on your system. Here are some common commands:</span></div>- <span style="color: rgb(0, 0, 0);">On Linux systems using systemd:</span>
- <table data-editing-info="{"topBorderColor":"#ABABAB","bottomBorderColor":"#ABABAB","verticalBorderColor":"#ABABAB","hasHeaderRow":false,"hasFirstColumn":false,"hasBandedRows":false,"hasBandedColumns":false,"bgColorEven":null,"bgColorOdd":"#EEEEEE","headerRowColor":"#ABABAB","tableBorderFormat":0,"verticalAlign":null}"><tbody><tr><td><div data-ogsc="black"><span style="color: rgb(0, 0, 0);">sudo systemctl restart <span class="markgiltepduu" data-markjs="true" data-ogab="" data-ogac="" data-ogsb="" data-ogsc=""><span class="markdbxmv250o" data-markjs="true" data-ogab="" data-ogac="" data-ogsb="" data-ogsc="">postgres</span>ql</span></span></div></td></tr></tbody></table>
- <div data-ogsc=""><span style="color: rgb(0, 0, 0);">On systems using init.d:</span></div>
- <table data-editing-info="{"topBorderColor":"#ABABAB","bottomBorderColor":"#ABABAB","verticalBorderColor":"#ABABAB","hasHeaderRow":false,"hasFirstColumn":false,"hasBandedRows":false,"hasBandedColumns":false,"bgColorEven":null,"bgColorOdd":"#EEEEEE","headerRowColor":"#ABABAB","tableBorderFormat":0,"verticalAlign":null}"><tbody><tr><td><div data-ogsc="black"><span style="color: rgb(0, 0, 0);">sudo /etc/init.d/<span class="markgiltepduu" data-markjs="true" data-ogab="" data-ogac="" data-ogsb="" data-ogsc=""><span class="markdbxmv250o" data-markjs="true" data-ogab="" data-ogac="" data-ogsb="" data-ogsc="">postgres</span>ql</span> restart</span></div></td></tr></tbody></table>

<div data-ogsc="black" id="bkmrk-on-windows%2C-you-can-"><span style="color: rgb(0, 0, 0);">On Windows, you can restart the <span class="markgiltepduu" data-markjs="true" data-ogab="" data-ogac="" data-ogsb="" data-ogsc=""><span class="markdbxmv250o" data-markjs="true" data-ogab="" data-ogac="" data-ogsb="" data-ogsc="">PostgreS</span>QL</span> service from the Services management console.</span></div><div data-ogsc="black" id="bkmrk-after-completing-the"><span style="color: rgb(0, 0, 0);">After completing these steps, <span class="markgiltepduu" data-markjs="true" data-ogab="" data-ogac="" data-ogsb="" data-ogsc=""><span class="markdbxmv250o" data-markjs="true" data-ogab="" data-ogac="" data-ogsb="" data-ogsc="">PostgreS</span>QL</span> will be configured to log according to the specified settings.</span></div><div data-ogsc="black" id="bkmrk-for-more-detailed-in"><span style="color: rgb(0, 0, 0);">For more detailed information, you can refer to these documentations:</span></div>- <div data-ogsc=""><span style="color: rgb(132, 63, 161);">[Runtime-config-logging](https://www.postgresql.org/docs/current/runtime-config-logging.html "https://www.postgresql.org/docs/current/runtime-config-logging.html")</span></div>
- <div data-ogsc=""><span style="color: rgb(132, 63, 161);">[<span class="markgiltepduu" data-markjs="true" data-ogab="" data-ogac="" data-ogsb="" data-ogsc=""><span class="markdbxmv250o" data-markjs="true" data-ogab="" data-ogac="" data-ogsb="" data-ogsc="">PostgreS</span>QL</span> Elastic Integration](https://www.elastic.co/docs/reference/integrations/postgresql "https://www.elastic.co/docs/reference/integrations/postgresql")</span></div>

<p class="callout warning"><span style="color: rgb(0, 0, 0);">**Required credentials for PostgreSQL Integration access:**</span></p>

**<span style="color: rgb(0, 0, 0);">Log file paths:</span>**

- **<span style="color: rgb(0, 0, 0);">/var/log/postgresql/postgresql-\*-*.log*  
    </span>**
- **<span style="color: rgb(0, 0, 0);">/var/log/postgresql/postgresql-\*-*.csv*</span>**

<span style="color: rgb(0, 0, 0);">*If you need further assistance, kindly contact our support at* <span style="color: rgb(53, 152, 219);">***support@cytechint.com***</span> *for prompt assistance and guidance.*</span>

# AQUILA - Salesforce Integration

#### <span style="color: rgb(53, 152, 219);">**Overview**</span>

The Salesforce integration enables you to monitor your Salesforce instance. Salesforce is a customer relationship management (CRM) platform that supports businesses in managing marketing, sales, commerce, service, and IT teams from a unified platform accessible from anywhere.

#### <span style="color: rgb(53, 152, 219);">**Data Streams Logs**</span>

- Salesforce Apex Logs
- Salesforce Login Logs
- Salesforce Logout Logs
- Salesforce SetupAudit Logs

#### <span style="color: rgb(53, 152, 219);">**Configuration**</span>

To configure the Salesforce integration, you need the following information:

- **Create New User Account for the Integration**
- **Salesforce instance URL**
- **Client key and client secret for authentication**
- **Username**
- **Password**
- **Token URL**
- **API version**

#### **<span style="color: rgb(53, 152, 219);">Step 1: Create New User Account</span>**

- Go to **Home** page of **Salesforce** and click **Setup** in the top right menu bar.
- In the left side you will see a **Quick Find** search textbox, type **Users**.
- Click **Users** and it will redirect you to the **Users setup** page.
- Click **New User** button and fill up the form: 
    - First Name
    - Last Name
    - Email
    - Set **User License** to "**Salesforce**"
    - Choose an appropriate **Profile** (see below) 
        - **Profile and Permission Set Configuration**
            - **Create a custom profile** or clone an existing minimal profile: 
                - Clone the **"Standard User"** profile and name it something like **"Log Extraction Service"** or whatever you prefer.
                - Remove unnecessary permissions, keeping only: 
                    - **API Enabled**
                    - **View Setup and Configuration**
                    - **Specific object permissions for logs you need to extract**
            - **Essential permissions** for log extraction: 
                - **API Enabled** - Required for programmatic access
                - **View All Data** - If you need comprehensive log access
                - **Read** access to specific objects containing log data
    - Scroll down to the bottom and **check** the box that says **Generate new password and notify user immediately.**
    - Click **Save**.
- Open the account and set a new password.

Please take note of the **Email Address,** **Username** and **Password** associated with this account, as they will be required during the API and integration setup process.

#### **<span style="color: rgb(53, 152, 219);">Step 2: Salesforce instance URL</span>**

This is the URL of your Salesforce Organization.

- **Salesforce Classic:** Given the example URL <span style="color: rgb(53, 152, 219);">https://na9.salesforce.com/home/home.jsp</span>, the Salesforce Instance URL is extracted as <span style="color: rgb(53, 152, 219);">https://na9.salesforce.com</span>.
- **Salesforce Lightning:** The instance URL is available under your user name in the **View Profile** tab. Use the correct instance URL in case of Salesforce Lightning because it uses <span style="color: rgb(53, 152, 219);">\*.lightning.force.com</span> but the instance URL is <span style="color: rgb(53, 152, 219);">\*.salesforce.com</span>.

<p class="callout info">Ensure the **Instance URL** is noted, as it will be used in both API creation and integration steps.</p>

#### <span style="color: rgb(53, 152, 219);">**Step 3: Client Key and Client Secret for Authentication**</span>

To use this integration, you need to create a new Salesforce Application using OAuth. Follow these steps to create a connected application in Salesforce:

- Log in to **Salesforce** with the user credentials you want to collect data with.
- Click **Setup** in the top right menu bar.

 ![image.png](https://cytechint-docs-bookstack.s3.amazonaws.com/uploads/images/gallery/2025-08/scaled-1680-/QoIVW5iX5eqeV9Z0-image.png)

- In the **Quick Find textbox**, search for **App Manager** or you can scroll down to **PLATFORM TOOLS** and select **App Manager.**

 ![Salesforce1.png](https://cytechint-docs-bookstack.s3.amazonaws.com/uploads/images/gallery/2025-08/scaled-1680-/JRiRcKa9Gz5lC8Wd-salesforce1.png)

- In the upper right corner, choose the **New External Client App.**

 ![image.png](https://cytechint-docs-bookstack.s3.amazonaws.com/uploads/images/gallery/2025-08/scaled-1680-/1Ywn6j28Wr32yheg-image.png)

- Provide a name for the connected application. This name will be displayed in the App Manager and on its App Launcher tile.
- Enter the API name. The default is a version of the name without spaces. Only letters, numbers, and underscores are allowed. If the original app name contains any other characters, edit the default name.
- Enter the **email address** of the **new account** you created earlier.

![Salesforce2.png](https://cytechint-docs-bookstack.s3.amazonaws.com/uploads/images/gallery/2025-08/scaled-1680-/kAlzKr6Cx5cE3XYl-salesforce2.png)

- Under the **API (Enable OAuth Settings)** section, check the box for **Enable OAuth Settings**.
- In the **Callback URL** field, enter the instance URL as specified in **Salesforce instance URL.** Example URL: <span style="color: rgb(53, 152, 219);">https://na9.salesforce.com</span>
- Select the following OAuth scopes to apply to the connected app:
    
    
    - **Manage user data via APIs (api)**
    - **Perform requests at any time (refresh\_token, offline\_access)**
    - (Optional) If you encounter any permission issues during data collection, add the **Full access (full)** scope.

![Salesforce3.png](https://cytechint-docs-bookstack.s3.amazonaws.com/uploads/images/gallery/2025-08/scaled-1680-/CI9AMM1P66ijSHa9-salesforce3.png)

- Select **Require Secret for the Web Server Flow** to require the app's client secret in exchange for an access token.
- Select **Require Secret for Refresh Token Flow** to require the app's client secret in the authorization request of a refresh token and hybrid refresh token flow.

 ![Salesforce4.png](https://cytechint-docs-bookstack.s3.amazonaws.com/uploads/images/gallery/2025-08/scaled-1680-/U3sH6qYPGs9nKXJS-salesforce4.png)

- Then scroll up above the **Callback URL** on the **App Settings** you will see the **Consumer Key and Secret** button, click it.

 ![Salesforce7.png](https://cytechint-docs-bookstack.s3.amazonaws.com/uploads/images/gallery/2025-08/scaled-1680-/6phcALMosjc4PtNu-salesforce7.png)

- It will create another tab. Verify the user account by entering the Verification Code.

 ![Salesforce5.png](https://cytechint-docs-bookstack.s3.amazonaws.com/uploads/images/gallery/2025-08/scaled-1680-/5CUisvcTjiFDwwdG-salesforce5.png)

- Copy the `Consumer Key` and `Consumer Secret` from the Consumer Details section. These values should be used as the **Client ID** and **Client Secret**, respectively, in the integration.

![Salesforce6.png](https://cytechint-docs-bookstack.s3.amazonaws.com/uploads/images/gallery/2025-08/scaled-1680-/F9X2W6zDwOupc1Nm-salesforce6.png)

- Close that tab and go back to the **External Client App Manager**. Click **Save**.

#### <span style="color: rgb(53, 152, 219);">**Step 4: Username**</span>

Provide the **Username** of the new account that you created earlier.


#### <span style="color: rgb(53, 152, 219);">**Step 5: Password**</span>

Please provide the **password** you set upon accessing the new account.

<p class="callout info">**Note:**  
When using a Salesforce instance with a security token, append the token directly to your password without spaces or special characters. For example, if your password is **Password** and your security token is **12345** enter: **Pasword12345**</p>

#### <span style="color: rgb(53, 152, 219);">**Step 6: Token URL**</span>

- Use the token URL to obtain authentication tokens for API access.
- For most Salesforce instances, the token URL follows this format: <span style="color: rgb(53, 152, 219);">https://login.salesforce.com/services/oauth2/token</span>.
- If you're using a Salesforce sandbox environment, use <span style="color: rgb(53, 152, 219);">https://test.salesforce.com/services/oauth2/token</span> instead.
- For custom Salesforce domains, replace **login.salesforce.com** with your custom domain name. For example, if your custom domain is <span style="color: rgb(53, 152, 219);">**mycompany.my.salesforce.com**</span>, the token URL becomes **<span style="color: rgb(53, 152, 219);">https://mycompany.my.salesforce.com/services/oauth2/token</span>.** This applies to Sandbox environments as well.
- In the Salesforce integration, we internally append <span style="color: rgb(53, 152, 219);">**/services/oauth2/token**</span> to the URL. Make sure that the URL you provide in the Salesforce integration is the base URL without the **<span style="color: rgb(53, 152, 219);">/services/oauth2/token</span>** part. For example, if your custom domain is <span style="color: rgb(53, 152, 219);">**mycompany.my.salesforce.com**</span>, the complete token URL would be <span style="color: rgb(53, 152, 219);">**https://mycompany.my.salesforce.com/services/oauth2/token**</span>, but the URL you provide in the Salesforce integration should be **<span style="color: rgb(53, 152, 219);">https://mycompany.my.salesforce.com</span>.** In most cases, this is the same as the Salesforce instance URL.

<p class="callout info">**NOTE:** Salesforce Lightning users must use URL with \*.salesforce.com domain (similar to the Salesforce instance URL) instead of \*.lightning.force.com because the Salesforce API does not work with \*.lightning.force.com.</p>

#### <span style="color: rgb(53, 152, 219);">**Step 7: API Version**</span>

To find the API version:

- Go to the search textbox and type **Api Version**. Click the first **Api Version** on the list.

<span style="color: rgb(132, 63, 161);">***Reference**: [https://www.integrate.io/blog/salesforce-rest-api-integration/](https://www.integrate.io/blog/salesforce-rest-api-integration/)*</span>

<p class="callout warning">**Please provide these credentials and send it to CyTech Support:**  
</p>

- **Salesforce instance URL**
- **Client key and client secret for authentication**
- **Username**
- **Password**
- **Token URL**
- **API version**

<span style="color: rgb(132, 63, 161);"> </span>

 *If you need further assistance, kindly contact our support at* <span style="color: rgb(53, 152, 219);">***support@cytechint.com***</span> *for prompt assistance and guidance.*

# AQUILA - Salesforce Integration via JWT Authentication

#### <span style="color: rgb(53, 152, 219);">**Overview**</span>

With the OAuth 2.0 JWT bearer token flow, the client posts a JWT to the Salesforce OAuth token endpoint. Salesforce processes the JWT, which includes a digital signature, and issues an access token based on prior approval of the app.

##### <span style="color: rgb(53, 152, 219);">**Check "View Event Log Files" Permission**</span>

1. Check Your Org's Event Monitoring License: 
    - Go to **Setup** &gt; **Quick Find** &gt; **Installed Packages** or **Company Information** (under **Quick Find** &gt; **Company Settings**).

[![image.png](https://cytechint-docs-bookstack.s3.amazonaws.com/uploads/images/gallery/2025-10/scaled-1680-/U4TmmE3cQ8FkSVMy-image.png)](https://cytechint-docs-bookstack.s3.amazonaws.com/uploads/images/gallery/2025-10/U4TmmE3cQ8FkSVMy-image.png)

[![image.png](https://cytechint-docs-bookstack.s3.amazonaws.com/uploads/images/gallery/2025-10/scaled-1680-/LIihGVNMxVgle7HR-image.png)](https://cytechint-docs-bookstack.s3.amazonaws.com/uploads/images/gallery/2025-10/LIihGVNMxVgle7HR-image.png)

- Look for **Event Log File Browser** or **Event Monitoring** and enable it if it shows an option to do so.

2\. Enable **Event Monitoring** Features:

- **Setup** &gt; **Quick Find** &gt; **Event Monitoring Settings** (or search "**Event Log File Browser**").
- If the page loads: Check Enable **Event Log File Browser** &gt; **Save**.

[![image.png](https://cytechint-docs-bookstack.s3.amazonaws.com/uploads/images/gallery/2025-10/scaled-1680-/8BOA33WA4VWtnQti-image.png)](https://cytechint-docs-bookstack.s3.amazonaws.com/uploads/images/gallery/2025-10/8BOA33WA4VWtnQti-image.png)

##### <span style="color: rgb(53, 152, 219);">**Clone and Modify the Profile**</span>

1. **Log in to Salesforce Setup:**
    
    
    - Go to **Setup** (gear icon &gt; Setup) as an admin.
2. **Clone the Standard User Profile:**
    
    
    - Navigate to **Setup** &gt; **Quick Find** &gt; **Profiles**.
    - Find **Standard User** &gt; Click **Clone** next to it.
    - **Profile Information**:
        
        
        - **Profile Name**: e.g., "Standard User - Log Integration".
        - **Description**: "Cloned for Elastic log integration with API and ELF access."
        - **User License:** Salesforce Integration
    - **Save.** This creates a new custom profile based on Standard User.

[![image.png](https://cytechint-docs-bookstack.s3.amazonaws.com/uploads/images/gallery/2025-10/scaled-1680-/qiDAHpYFkEPgiEkp-image.png)](https://cytechint-docs-bookstack.s3.amazonaws.com/uploads/images/gallery/2025-10/qiDAHpYFkEPgiEkp-image.png)

[![image.png](https://cytechint-docs-bookstack.s3.amazonaws.com/uploads/images/gallery/2025-10/scaled-1680-/4Ef32pDrHX40ujej-image.png)](https://cytechint-docs-bookstack.s3.amazonaws.com/uploads/images/gallery/2025-10/4Ef32pDrHX40ujej-image.png)

3\. **Edit System Permissions in the Cloned Profile:**

- In **Profiles**, find your new cloned profile &gt; Click **Edit** &gt; Go to the **System Permissions** section (or use Quick Find for "System Permissions").
- Enable the following checkboxes (these are the key changes from Standard User, which starts with them **disabled** for security):

<table border="1" id="bkmrk-permission-change-fr" style="border-collapse: collapse; width: 100%;"><colgroup><col style="width: 18.7128%;"></col><col style="width: 24.6802%;"></col><col style="width: 31.6965%;"></col><col style="width: 25.0298%;"></col></colgroup><tbody><tr><td>**Permission**

</td><td>**Change from Standard User**

</td><td>**Why Enable It?**

</td><td>**How to Enable**

</td></tr><tr><td>**API Enabled**

</td><td>Disabled → **Enabled**

</td><td>Allows REST/SOAP API calls for fetching logs (e.g., EventLogFile queries). Essential for Elastic integration.

</td><td>Check the box under **System Permissions**.

</td></tr><tr><td>**View Event Log Files**

</td><td>Disabled → **Enabled**

</td><td>Grants read access to historical Event Log Files (ELF) like logins and Apex events. Core for log ingestion.

</td><td>Check the box under **System Permissions**.

</td></tr><tr><td>**View All Data**

</td><td>Disabled → **Enabled**

</td><td>Provides broader object read access if ELF queries fail due to restrictions.

</td><td>Check the box under **System Permissions.**

</td></tr></tbody></table>

- **Do NOT enable** unrelated permissions like "Modify All Data" or "Delete All Data" to maintain least-privilege.
- **Save** the profile.

[![image.png](https://cytechint-docs-bookstack.s3.amazonaws.com/uploads/images/gallery/2025-10/scaled-1680-/GBJfyTQF4sZQAPad-image.png)](https://cytechint-docs-bookstack.s3.amazonaws.com/uploads/images/gallery/2025-10/GBJfyTQF4sZQAPad-image.png)

[![image.png](https://cytechint-docs-bookstack.s3.amazonaws.com/uploads/images/gallery/2025-10/scaled-1680-/ojzUxOjf1O1lPgkG-image.png) ](https://cytechint-docs-bookstack.s3.amazonaws.com/uploads/images/gallery/2025-10/ojzUxOjf1O1lPgkG-image.png)[![image.png](https://cytechint-docs-bookstack.s3.amazonaws.com/uploads/images/gallery/2025-10/scaled-1680-/5vtL2PVBfnF5cQzo-image.png)](https://cytechint-docs-bookstack.s3.amazonaws.com/uploads/images/gallery/2025-10/5vtL2PVBfnF5cQzo-image.png)

4\. **Assign the Cloned Profile to Your Integration User:**

- **Setup** &gt; **Quick Find** &gt; **Users** &gt; Select your integration user &gt; **Edit**.
- **Profile**: Select "Standard User - Log Integration".
- **Save**.

[![image.png](https://cytechint-docs-bookstack.s3.amazonaws.com/uploads/images/gallery/2025-10/scaled-1680-/qhkItD6XiK1CFQhp-image.png)](https://cytechint-docs-bookstack.s3.amazonaws.com/uploads/images/gallery/2025-10/qhkItD6XiK1CFQhp-image.png)

5\. **Handle Event Monitoring Permissions (Not in Profile—Use Permission Set)**:

- The "View Real-Time Event Monitoring Data" isn't a direct profile permission; it's tied to Event Manager.
- **Create a Permission Set**:
    
    
    - Go to **Setup** &gt; **Quick Find** &gt; **Permission Sets** &gt; **New**.
    - **Label/Name**: e.g., "Event Monitoring Access".
    - **License**: "Salesforce Integration" (matches Standard User).
    - **Save** &gt; **System Permissions** tab &gt; **Enable View All Data, API Enabled** and **View Event Log Files**.
    - **Event Log File Browser** tab: Enable access to specific events.
- **Assign the Permission Set**:
    
    
    - **Permission Set Assignments** &gt; **New** &gt; Select your integration user &gt; **Assign**.
- **Enable Events in Event Manager**:
    
    
    - **Setup** &gt; **Quick Find** &gt; **Event Manager**.
    - For desired events (e.g., Login Event), click dropdown &gt; **Enable Storage**. This requires the Event Log File Browser add-on license.
    - This starts log retention (up to 1 year for ELF; real-time requires add-on license).

[![image.png](https://cytechint-docs-bookstack.s3.amazonaws.com/uploads/images/gallery/2025-10/scaled-1680-/LXDTLpk0pyGbbY3s-image.png)](https://cytechint-docs-bookstack.s3.amazonaws.com/uploads/images/gallery/2025-10/LXDTLpk0pyGbbY3s-image.png)

[![image.png](https://cytechint-docs-bookstack.s3.amazonaws.com/uploads/images/gallery/2025-10/scaled-1680-/D8Y4bOlMcDszmNK7-image.png)](https://cytechint-docs-bookstack.s3.amazonaws.com/uploads/images/gallery/2025-10/D8Y4bOlMcDszmNK7-image.png)

[![image.png](https://cytechint-docs-bookstack.s3.amazonaws.com/uploads/images/gallery/2025-10/scaled-1680-/UYgRTF1B9eBBHcJM-image.png)](https://cytechint-docs-bookstack.s3.amazonaws.com/uploads/images/gallery/2025-10/UYgRTF1B9eBBHcJM-image.png)

[![image.png](https://cytechint-docs-bookstack.s3.amazonaws.com/uploads/images/gallery/2025-10/scaled-1680-/mZK9M3XpWzK5wY7H-image.png)](https://cytechint-docs-bookstack.s3.amazonaws.com/uploads/images/gallery/2025-10/mZK9M3XpWzK5wY7H-image.png)

[![image.png](https://cytechint-docs-bookstack.s3.amazonaws.com/uploads/images/gallery/2025-10/scaled-1680-/46QNcp9BP7XGJpKv-image.png)](https://cytechint-docs-bookstack.s3.amazonaws.com/uploads/images/gallery/2025-10/46QNcp9BP7XGJpKv-image.png)

[![image.png](https://cytechint-docs-bookstack.s3.amazonaws.com/uploads/images/gallery/2025-10/scaled-1680-/mKejjzBlT8OlcNnT-image.png)](https://cytechint-docs-bookstack.s3.amazonaws.com/uploads/images/gallery/2025-10/mKejjzBlT8OlcNnT-image.png)

[![image.png](https://cytechint-docs-bookstack.s3.amazonaws.com/uploads/images/gallery/2025-10/scaled-1680-/Xa5mknGrKzfF3qBh-image.png)](https://cytechint-docs-bookstack.s3.amazonaws.com/uploads/images/gallery/2025-10/Xa5mknGrKzfF3qBh-image.png)


[![image.png](https://cytechint-docs-bookstack.s3.amazonaws.com/uploads/images/gallery/2025-10/scaled-1680-/86ImA5HtfQ5IoowY-image.png)](https://cytechint-docs-bookstack.s3.amazonaws.com/uploads/images/gallery/2025-10/86ImA5HtfQ5IoowY-image.png)

[![image.png](https://cytechint-docs-bookstack.s3.amazonaws.com/uploads/images/gallery/2025-10/scaled-1680-/7tlqTYV46fCHPntx-image.png)](https://cytechint-docs-bookstack.s3.amazonaws.com/uploads/images/gallery/2025-10/7tlqTYV46fCHPntx-image.png)

##### <span style="color: rgb(53, 152, 219);">**Client Key and Certification Signature Configuration**</span>

To use this integration, you need to create a new Salesforce Application using OAuth. Follow these steps to create a connected application in Salesforce:

- Log in to **Salesforce** with the user credentials you want to collect data with.
- Click **Setup** in the top right menu bar.

 ![image.png](https://cytechint-docs-bookstack.s3.amazonaws.com/uploads/images/gallery/2025-08/scaled-1680-/QoIVW5iX5eqeV9Z0-image.png)

- In the **Quick Find textbox**, search for **App Manager** or you can scroll down to **PLATFORM TOOLS** and select **App Manager.**

 ![Salesforce1.png](https://cytechint-docs-bookstack.s3.amazonaws.com/uploads/images/gallery/2025-08/scaled-1680-/JRiRcKa9Gz5lC8Wd-salesforce1.png)

- In the upper right corner, choose the **New External Client App.**

 ![image.png](https://cytechint-docs-bookstack.s3.amazonaws.com/uploads/images/gallery/2025-08/scaled-1680-/1Ywn6j28Wr32yheg-image.png)

- Provide a name for the connected application. This name will be displayed in the App Manager and on its App Launcher tile.
- Enter the API name. The default is a version of the name without spaces. Only letters, numbers, and underscores are allowed. If the original app name contains any other characters, edit the default name.
- Enter the **email address** of the **new account** you created earlier.

![Salesforce2.png](https://cytechint-docs-bookstack.s3.amazonaws.com/uploads/images/gallery/2025-08/scaled-1680-/kAlzKr6Cx5cE3XYl-salesforce2.png)

- Under the **API (Enable OAuth Settings)** section, check the box for **Enable OAuth Settings**.
- In the **Callback URL** field, enter the instance URL as specified in **Salesforce instance URL.** Example URL: https://na9.salesforce.com
- Select the following OAuth scopes to apply to the connected app:
    
    
    - **Manage user data via APIs (api)**
    - **Perform requests at any time (refresh\_token, offline\_access)**
    - (Optional) If you encounter any permission issues during data collection, add the **Full access (full)** scope.

![Salesforce3.png](https://cytechint-docs-bookstack.s3.amazonaws.com/uploads/images/gallery/2025-08/scaled-1680-/CI9AMM1P66ijSHa9-salesforce3.png)

- Select **Require Secret for the Web Server Flow** to require the app's client secret in exchange for an access token.
- Select **Require Secret for Refresh Token Flow** to require the app's client secret in the authorization request of a refresh token and hybrid refresh token flow.

 ![Salesforce4.png](https://cytechint-docs-bookstack.s3.amazonaws.com/uploads/images/gallery/2025-08/scaled-1680-/U3sH6qYPGs9nKXJS-salesforce4.png)

- Then scroll up above the **Callback URL** on the **App Settings** you will see the **Consumer Key and Secret** button, click it.

 ![Salesforce7.png](https://cytechint-docs-bookstack.s3.amazonaws.com/uploads/images/gallery/2025-08/scaled-1680-/6phcALMosjc4PtNu-salesforce7.png)

- It will create another tab. Verify the user account by entering the Verification Code.

 ![Salesforce5.png](https://cytechint-docs-bookstack.s3.amazonaws.com/uploads/images/gallery/2025-08/scaled-1680-/5CUisvcTjiFDwwdG-salesforce5.png)

- Copy the `Consumer Key` and `Consumer Secret` from the Consumer Details section. These values should be used as the **Client ID** and **Client Secret**, respectively, in the integration.

![Salesforce6.png](https://cytechint-docs-bookstack.s3.amazonaws.com/uploads/images/gallery/2025-08/scaled-1680-/F9X2W6zDwOupc1Nm-salesforce6.png)

- Close that tab and go back to the **External Client App Manager**. Click **Save**.

##### **Required fields for JWT Authentication Integration:**

- ##### JWT Authentication Audience URL
- ##### JWT Authentication Client Key Path
- ##### Username
- ##### Client ID
- ##### Instance URL
- ##### Token URL

##### Provide this required fields to **CyTech Support**.

Reference Link:

[OAuth 2.0 JWT Bearer Flow for Server-to-Server Integration in Salesforce](https://www.youtube.com/watch?v=AEcQIXvV_I8)

*If you need further assistance, kindly contact our support at **support@cytechint.com** for prompt assistance and guidance.*

# AQUILA - Setup Integration from Auth0

### <span style="color: rgb(53, 152, 219);">**Auth0 Integration Guide**</span>

Integrate **Auth0** to ingest identity-related logs such as login attempts, user authentications, MFA usage, and blocked requests to support identity threat detection and correlation.

#### <span style="color: rgb(53, 152, 219);">**Credentials &amp; API Access Setup (Auth0)**</span>

Before setting up the integration, create a Machine-to-Machine application in Auth0 to collect logs via API.

##### **Steps**:

1. **Log in to Auth0 Dashboard**
    
    
    - Go to [https://auth0.com](https://auth0.com)
2. **Create a Machine-to-Machine Application**
    
    
    - Navigate to **Applications → Applications**
    - Click **Create Application**
        
        
        - Enter a name
        - Choose the type: **Machine to Machine**
    - Click **Create**
3. **Authorize the Auth0 Management API**
    
    
    - When prompted, select **Auth0 Management API**
    - Grant the required scopes depending on the data you want to collect: 
        - **Login Activity: `read:logs`, `read:users`**
        - **MFA Logs: `read:logs`**
        - **Failed Logins: `read:logs`**
        - **User Access Logs:<span style="mso-tab-count: 1;"> `read:logs`, `read:users`</span>**
    - Click **Authorize**
4. **Get the Required Credentials**
    
    
    - Go to **Applications → Applications**
    - Select your created app
    - Go to the **Settings** tab
    - Copy the following values: 
        - **Client ID**: Used for authentication
        - **Client Secret**: Used with Client ID for API access
        - **Auth0 Domain**: Your tenant domain (e.g., your-tenant.us.auth0.com)
        - **Base URL**: Your Auth0 API base URL (e.g., https://your-tenant.us.auth0.com) — same as Domain but with https:// prefix)
5. **These values will be entered into the integration form required on Aquila**

#### <span style="color: rgb(53, 152, 219);">**Permissions Reference (Auth0 M2M App)**</span>

Ensure the app is granted the following scopes from the **Auth0 Management API**:

<div class="_tableContainer_80l1q_1" id="bkmrk-data-stream-scope-re"><div class="_tableWrapper_80l1q_14 group flex w-fit flex-col-reverse" tabindex="-1"><table border="1" class="w-fit min-w-(--thread-content-width)" data-end="3411" data-start="2868" style="width: 99.1667%; border-collapse: collapse; border-style: solid;"><thead data-end="2957" data-start="2868"><tr data-end="2957" data-start="2868"><th data-col-size="sm" data-end="2890" data-start="2868" style="width: 30.8821%;">Data Stream</th><th data-col-size="sm" data-end="2920" data-start="2890" style="width: 34.0218%;">Scopes Required</th><th data-col-size="sm" data-end="2957" data-start="2920" style="width: 35.0962%;">Why Needed</th></tr></thead><tbody data-end="3411" data-start="3048"><tr data-end="3138" data-start="3048"><td data-col-size="sm" data-end="3071" data-start="3048" style="width: 30.8821%;">**Login Activity**</td><td data-col-size="sm" data-end="3101" data-start="3071" style="width: 34.0218%;">`read:logs`, `read:users`</td><td data-col-size="sm" data-end="3138" data-start="3101" style="width: 35.0962%;">View login records and user info</td></tr><tr data-end="3229" data-start="3139"><td data-col-size="sm" data-end="3162" data-start="3139" style="width: 30.8821%;">**MFA Logs**</td><td data-col-size="sm" data-end="3192" data-start="3162" style="width: 34.0218%;">`read:logs`</td><td data-col-size="sm" data-end="3229" data-start="3192" style="width: 35.0962%;">Pull logs related to MFA events</td></tr><tr data-end="3320" data-start="3230"><td data-col-size="sm" data-end="3253" data-start="3230" style="width: 30.8821%;">**Failed Logins**</td><td data-col-size="sm" data-end="3283" data-start="3253" style="width: 34.0218%;">`read:logs`</td><td data-col-size="sm" data-end="3320" data-start="3283" style="width: 35.0962%;">Detect login failure events</td></tr><tr data-end="3411" data-start="3321"><td data-col-size="sm" data-end="3344" data-start="3321" style="width: 30.8821%;">**User Access Logs**</td><td data-col-size="sm" data-end="3374" data-start="3344" style="width: 34.0218%;">`read:logs`, `read:users`</td><td data-col-size="sm" data-end="3411" data-start="3374" style="width: 35.0962%;">Track user sessions &amp; activity</td></tr></tbody></table>

</div></div>####  

#### <span style="color: rgb(53, 152, 219);">**Aquila Integration Configuration**</span>

##### **AQUILA – Auth0 Integration**

**1.** Log in to AQUILA click here - **[CyTech - AQUILA](https://cytechint.io/)**. Choose **Cyber Monitoring** and click the **small arrow icon** to redirect you to the Cyber Monitoring Dashboard.

[![image.png](https://cytechint-docs-bookstack.s3.amazonaws.com/uploads/images/gallery/2025-07/scaled-1680-/pvtVUycKNLpiyZFP-image.png)](https://cytechint-docs-bookstack.s3.amazonaws.com/uploads/images/gallery/2025-07/pvtVUycKNLpiyZFP-image.png)

2\. In the dashboard, choose **Cyber Incident Management (SIEM and XDR)**.

[![image.png](https://cytechint-docs-bookstack.s3.amazonaws.com/uploads/images/gallery/2025-05/scaled-1680-/i68EMO7YfIStKeyl-image.png)](https://cytechint-docs-bookstack.s3.amazonaws.com/uploads/images/gallery/2025-05/i68EMO7YfIStKeyl-image.png)

3\. Navigate through the top left icon and click the Collapse/Expand button.

[![image.png](https://cytechint-docs-bookstack.s3.amazonaws.com/uploads/images/gallery/2025-07/scaled-1680-/llqjBgJ5b1dlLdh8-image.png)](https://cytechint-docs-bookstack.s3.amazonaws.com/uploads/images/gallery/2025-07/llqjBgJ5b1dlLdh8-image.png)

4\. Navigate the "**Cyber Incident Monitoring"** then hover the **"Cyber Incident Management"** till you see the settings.

[![image.png](https://cytechint-docs-bookstack.s3.amazonaws.com/uploads/images/gallery/2025-07/scaled-1680-/z4rUEJDEBmsHf9kd-image.png)](https://cytechint-docs-bookstack.s3.amazonaws.com/uploads/images/gallery/2025-07/z4rUEJDEBmsHf9kd-image.png)

5\. Click the "**Settings** and Navigate through **Settings&gt;Log Source&gt;Search Bar (Search the Source to Add)&gt;Add to Agent**.

[![image.png](https://cytechint-docs-bookstack.s3.amazonaws.com/uploads/images/gallery/2025-07/scaled-1680-/qMBu98h6WaqojM41-image.png)](https://cytechint-docs-bookstack.s3.amazonaws.com/uploads/images/gallery/2025-07/qMBu98h6WaqojM41-image.png)

6\. Choose your **Log Collector**. *(If you not yet installed your **Log Collector** please refer to this link -* [**Log Collector** **Installation.**](https://docs.cytechint.io/books/log-collector-installations))

[![image.png](https://cytechint-docs-bookstack.s3.amazonaws.com/uploads/images/gallery/2025-05/scaled-1680-/1VIERSAN80moG8fG-image.png)](https://cytechint-docs-bookstack.s3.amazonaws.com/uploads/images/gallery/2025-05/1VIERSAN80moG8fG-image.png)

**7. In the integration settings follow the instructions given below.**

- Click the **drop arrow** to display the contents needed for the integration setup.
- Choose the Integration between **via Webhooks** or **API requests.**

[![image.png](https://cytechint-docs-bookstack.s3.amazonaws.com/uploads/images/gallery/2025-07/scaled-1680-/ykuDBJDprHeuotlo-image.png)](https://cytechint-docs-bookstack.s3.amazonaws.com/uploads/images/gallery/2025-07/ykuDBJDprHeuotlo-image.png)

- Scroll down and go to the Auth0 Logs section.
- This one is for **Log** **Events via Webhooks**. Enter the required fields **Local Address, Listen Port,** and **Webhook Path**

[![image.png](https://cytechint-docs-bookstack.s3.amazonaws.com/uploads/images/gallery/2025-07/scaled-1680-/mhLQQNTaU7n192Uu-image.png)](https://cytechint-docs-bookstack.s3.amazonaws.com/uploads/images/gallery/2025-07/mhLQQNTaU7n192Uu-image.png)

- This one is for **Log Events via API Requests**. Input the credentials: **Base** **URL,** **Client ID and the Client Secret Value**.
- Finally, click **Next** to install the log source integration.

[![image.png](https://cytechint-docs-bookstack.s3.amazonaws.com/uploads/images/gallery/2025-07/scaled-1680-/c4h9UGcTveuXoV6W-image.png)](https://cytechint-docs-bookstack.s3.amazonaws.com/uploads/images/gallery/2025-07/c4h9UGcTveuXoV6W-image.png)

8\. Wait for the **Successful** window to display, this will confirm the successful integration.

[![image.png](https://cytechint-docs-bookstack.s3.amazonaws.com/uploads/images/gallery/2025-05/scaled-1680-/CNFzJRIuFuvZIEdI-image.png)](https://cytechint-docs-bookstack.s3.amazonaws.com/uploads/images/gallery/2025-05/CNFzJRIuFuvZIEdI-image.png)

*If you need further assistance, kindly contact our support at* ***support@cytechint.com*** *for prompt assistance and guidance.*

# AQUILA - SNIFF & Detect

<span style="color: rgb(0, 0, 0);">**Outlook Add-in for Microsoft 365**</span>

---

#### <span style="color: rgb(53, 152, 219);">**Overview** </span>[![image.png](https://cytechint-docs-bookstack.s3.amazonaws.com/uploads/images/gallery/2026-03/scaled-1680-/BFSw7RHFx4DdtKYR-image.png)](https://cytechint-docs-bookstack.s3.amazonaws.com/uploads/images/gallery/2026-03/BFSw7RHFx4DdtKYR-image.png)

<span style="color: rgb(0, 0, 0);">AQUILA – SNIFF &amp; Detect is a custom integration app within the **AQUILA platform** that enables Microsoft 365 environments to deploy **advanced malicious email detection** capabilities.</span>  
<span style="color: rgb(0, 0, 0);">The app is packaged as a **manifest.xml** file and can be added to an organization’s Microsoft 365 tenant via the **Integration Apps** section in the Microsoft 365 Admin Center.</span>

---

#### <span style="color: rgb(53, 152, 219);">**Key Capabilities &amp; Value** </span>[![image.png](https://cytechint-docs-bookstack.s3.amazonaws.com/uploads/images/gallery/2026-03/scaled-1680-/8GsYtIeM7CiwrbzV-image.png)](https://cytechint-docs-bookstack.s3.amazonaws.com/uploads/images/gallery/2026-03/8GsYtIeM7CiwrbzV-image.png)

- <span style="color: rgb(0, 0, 0);">**Seamless Integration** – Install in Microsoft 365 with just a few clicks, no complex infrastructure required.</span>
- <span style="color: rgb(0, 0, 0);">**Permission-Driven Security** – Requires admin approval to grant permissions, ensuring a secure deployment process.</span>
- <span style="color: rgb(0, 0, 0);">**Centralized Control** – Managed via AQUILA and distributed through the AQUILA Store for consistent updates.</span>
- <span style="color: rgb(0, 0, 0);">**AI-Enhanced Detection** – Uses AQUILA’s AI and Cyber Threat Intelligence to scan and detect malicious emails in real time.</span>
- <span style="color: rgb(0, 0, 0);">**User-Friendly Accessibility** – Appears in the “More apps” section for assigned users, making it easy to launch.</span>
- <span style="color: rgb(0, 0, 0);">**Minimal Footprint** – Only ~6 KiB in size, ensuring fast installation without performance impact.</span>

---

#### <span style="color: rgb(53, 152, 219);">**<span class="TextRun SCXW129338488 BCX0" data-contrast="auto" lang="EN-PH" xml:lang="EN-PH"><span class="NormalTextRun SCXW129338488 BCX0">Installation &amp; Deployment Manual – Simple Step-by-Step</span></span>**</span>[![image.png](https://cytechint-docs-bookstack.s3.amazonaws.com/uploads/images/gallery/2026-03/scaled-1680-/K7Mmeai5fcmudTHG-image.png)](https://cytechint-docs-bookstack.s3.amazonaws.com/uploads/images/gallery/2026-03/K7Mmeai5fcmudTHG-image.png)

1. <span style="color: rgb(0, 0, 0);">**Download the Integration Package**</span>
    
    
    - <span style="color: rgb(0, 0, 0);">Visit the AQUILA Store and download the Sniff &amp; Detect integration (manifest.xml).</span>[![image.png](https://cytechint-docs-bookstack.s3.amazonaws.com/uploads/images/gallery/2025-08/scaled-1680-/b7bKUm3nKsq0c5Bm-image.png)](https://cytechint-docs-bookstack.s3.amazonaws.com/uploads/images/gallery/2025-08/b7bKUm3nKsq0c5Bm-image.png)
2. <span style="color: rgb(0, 0, 0);">**Access Microsoft 365 Admin Center - <span class="TextRun SCXW129338488 BCX0" data-contrast="auto" lang="EN-PH" xml:lang="EN-PH"><span class="NormalTextRun SCXW129338488 BCX0"> <span style="color: rgb(132, 63, 161);">[https://admin.microsoft.com](https://admin.microsoft.com/)</span></span></span>**</span>
    
    
    - <span style="color: rgb(0, 0, 0);">Log in as a **Global Admin** or **Exchange Admin**.</span>
3. <span style="color: rgb(0, 0, 0);">**Upload the Integration**</span>
    
    
    - <span style="color: rgb(0, 0, 0);">Go to **Settings** → **Integration Apps** → **Upload Custom Apps** </span>[![image.png](https://cytechint-docs-bookstack.s3.amazonaws.com/uploads/images/gallery/2025-08/scaled-1680-/GwkifKIdnmjk0lTD-image.png)](https://cytechint-docs-bookstack.s3.amazonaws.com/uploads/images/gallery/2025-08/GwkifKIdnmjk0lTD-image.png)
    - <span style="color: rgb(0, 0, 0);"><span class="TextRun SCXW129338488 BCX0" data-contrast="auto" lang="EN-PH" xml:lang="EN-PH"><span class="NormalTextRun SCXW129338488 BCX0">Follow the steps to Deploy the </span></span><span class="TextRun SCXW129338488 BCX0" data-contrast="auto" lang="EN-PH" xml:lang="EN-PH"><span class="NormalTextRun SCXW129338488 BCX0">Sniff and Detect </span></span><span class="TextRun SCXW129338488 BCX0" data-contrast="auto" lang="EN-PH" xml:lang="EN-PH"><span class="NormalTextRun SCXW129338488 BCX0">App</span></span><span class="EOP SCXW129338488 BCX0" data-ccp-props="{}"> .</span></span>
    - <span style="color: rgb(0, 0, 0);"><span class="EOP SCXW129338488 BCX0" data-ccp-props="{}">App Type → Office Add-in</span></span>
    - <div class="appsSectionStartContainer-924" elementtiming="5889" id="bkmrk-choose-how-to-upload">Choose how to upload app <span style="color: rgb(0, 0, 0);"><span class="EOP SCXW129338488 BCX0" data-ccp-props="{}">→ </span></span> Upload Manifest file (.xml) from device<span style="color: rgb(0, 0, 0);"><span class="EOP SCXW129338488 BCX0" data-ccp-props="{}">→ Choose</span></span><span style="color: rgb(0, 0, 0);"><span class="EOP SCXW129338488 BCX0" data-ccp-props="{}"> the manifest.xml file.</span></span></div><div class="ms-ChoiceFieldGroup root-1001" data-automation-id="ManifestSelection" elementtiming="5925"><div aria-labelledby="appUploadWaysLabel" elementtiming="5924" role="radiogroup"><div class="ms-ChoiceFieldGroup-flexContainer" elementtiming="5923">  
        </div></div></div>[![image.png](https://cytechint-docs-bookstack.s3.amazonaws.com/uploads/images/gallery/2025-08/scaled-1680-/r5PYE4pQkIBgAGDe-image.png)](https://cytechint-docs-bookstack.s3.amazonaws.com/uploads/images/gallery/2025-08/r5PYE4pQkIBgAGDe-image.png)
4. <span style="color: rgb(0, 0, 0);">**Deploy and Assign Users**</span>
    
    
    - <span style="color: rgb(0, 0, 0);">Assign the app to the relevant users or groups.</span><span style="color: rgb(0, 0, 0);"><span class="SCXW129338488 BCX0"><span class="WACImageContainer NoPadding BlobObject SCXW129338488 BCX0" role="presentation">![A screenshot of a computer
        
        AI-generated content may be incorrect.](https://cytechint-docs-bookstack.s3.amazonaws.com/uploads/images/gallery/2025-08/n0UA10j7KNEKEACd-embedded-image-qfdhfvme.png)</span></span></span>
5. <span style="color: rgb(0, 0, 0);">**Grant Permissions**</span>
    
    
    - <span style="color: rgb(0, 0, 0);">Accept all required permissions:</span>
        
        
        - <span style="color: rgb(0, 0, 0);">ReadWriteItem</span>
        - <span style="color: rgb(0, 0, 0);">SendReceiveData</span><span style="color: rgb(0, 0, 0);"><span class="SCXW129338488 BCX0"><span class="WACImageContainer NoPadding BlobObject SCXW129338488 BCX0" role="presentation">![A screenshot of a computer
            
            AI-generated content may be incorrect.](https://cytechint-docs-bookstack.s3.amazonaws.com/uploads/images/gallery/2025-08/dJR48DUn5j21lKkQ-embedded-image-cge2vkh0.png)</span></span></span>
6. <span style="color: rgb(0, 0, 0);">**Allow Propagation Time**</span>
    
    
    - <span class="MuiTypography-root MuiTypography-body1 css-pps2qs">In the Integrated Apps page of the Admin Center, confirm the add-in appears with status '<span style="color: rgb(22, 145, 121);">**OK**</span>'.</span>
    - <span style="color: rgb(0, 0, 0);">Wait up to **72 hours** for the app to be available across all assigned accounts.</span>[![image.png](https://cytechint-docs-bookstack.s3.amazonaws.com/uploads/images/gallery/2025-08/scaled-1680-/xFBy6BimbAdQektG-image.png)](https://cytechint-docs-bookstack.s3.amazonaws.com/uploads/images/gallery/2025-08/xFBy6BimbAdQektG-image.png)
7. <span style="color: rgb(0, 0, 0);">**Access the App**</span>
    
    
    - <span class="MuiTypography-root MuiTypography-body1 css-pps2qs">Open Outlook and check the apps panel to ensure Sniff &amp; Detect is listed and accessible.</span>
    - <span style="color: rgb(0, 0, 0);">Users can launch it from **More apps** in Microsoft 365.</span>

[![image.png](https://cytechint-docs-bookstack.s3.amazonaws.com/uploads/images/gallery/2025-08/scaled-1680-/x0FuZ3iJt7A0EjRE-image.png)](https://cytechint-docs-bookstack.s3.amazonaws.com/uploads/images/gallery/2025-08/x0FuZ3iJt7A0EjRE-image.png)

---

#### <span style="color: rgb(53, 152, 219);">**<span data-teams="true">How to Use Sniff and Detect </span>**</span>[![image.png](https://cytechint-docs-bookstack.s3.amazonaws.com/uploads/images/gallery/2026-03/scaled-1680-/s5bSBYRa4bCuZWbE-image.png)](https://cytechint-docs-bookstack.s3.amazonaws.com/uploads/images/gallery/2026-03/s5bSBYRa4bCuZWbE-image.png)

- <span style="color: rgb(0, 0, 0);">A phishing email impersonating Netflix. An arrow points to the **SNIFF &amp; Detect** icon, indicating where to scan or flag the email as suspicious.</span>

[![image.png](https://cytechint-docs-bookstack.s3.amazonaws.com/uploads/images/gallery/2025-08/scaled-1680-/fdE09hu7Rl60QyT9-image.png)](https://cytechint-docs-bookstack.s3.amazonaws.com/uploads/images/gallery/2025-08/fdE09hu7Rl60QyT9-image.png)

- <article class="text-token-text-primary w-full focus:outline-none scroll-mt-[calc(var(--header-height)+min(200px,max(70px,20svh)))]" data-scroll-anchor="true" data-testid="conversation-turn-24" data-turn="assistant" data-turn-id="request-WEB:f057c933-6170-480a-a00a-6172cc6a9351-11" dir="auto" tabindex="-1"><span style="color: rgb(0, 0, 0);">Click the “**Scan This Email**” button and wait for the scan to complete.</span>
    
    </article>

[![image.png](https://cytechint-docs-bookstack.s3.amazonaws.com/uploads/images/gallery/2025-08/scaled-1680-/pRLtXFAqIgrMvZMx-image.png)](https://cytechint-docs-bookstack.s3.amazonaws.com/uploads/images/gallery/2025-08/pRLtXFAqIgrMvZMx-image.png)

- <span style="color: rgb(0, 0, 0);">SNIFF &amp; Detect has scanned the email, highlighting possible errors such as  
    1. Arrow **1** points to the **Language issues** section, showing spelling and grammar mistakes found in the phishing email.  
    2. Arrow **2** points to the **What you should do** section, giving safety advice on how to handle the suspicious email.</span>

[![image.png](https://cytechint-docs-bookstack.s3.amazonaws.com/uploads/images/gallery/2025-08/scaled-1680-/o6vEVWiMGeCI3Gsk-image.png)](https://cytechint-docs-bookstack.s3.amazonaws.com/uploads/images/gallery/2025-08/o6vEVWiMGeCI3Gsk-image.png)

- <span style="color: rgb(0, 0, 0);">**Arrow 1** – Highlights the **AI Insight Results** tab in SNIFF &amp; Detect, which contains the automated analysis results of the scanned email.</span>
- <span style="color: rgb(0, 0, 0);">**Arrow 2** – Points to the **Malicious** classification summary. This section briefly explains the reasons the email is flagged, such as suspicious sender details, urgent tone, spelling and grammar errors, and suspicious links.</span>
- <span style="color: rgb(0, 0, 0);">**Arrow 3** – Directs attention to the actual phishing email content pretending to be from Netflix, warning about a payment failure and urging the user to update their payment information.</span>
- <span style="color: rgb(0, 0, 0);">**Arrow 4** – Indicates the **Report as Phishing** button, which the user can click to formally report the suspicious email to security for further action.</span>

[![image.png](https://cytechint-docs-bookstack.s3.amazonaws.com/uploads/images/gallery/2025-08/scaled-1680-/xCI6XwmmK0SHb2Jv-image.png)](https://cytechint-docs-bookstack.s3.amazonaws.com/uploads/images/gallery/2025-08/xCI6XwmmK0SHb2Jv-image.png)

- <span style="color: rgb(0, 0, 0);">Click the "**Run a deep scan**" button, which allows for a more detailed examination of the email to detect hidden threats and malicious indicators.</span>

[![image.png](https://cytechint-docs-bookstack.s3.amazonaws.com/uploads/images/gallery/2025-08/scaled-1680-/51ELQvK9m7iXcuUC-image.png)](https://cytechint-docs-bookstack.s3.amazonaws.com/uploads/images/gallery/2025-08/51ELQvK9m7iXcuUC-image.png)

- <span style="color: rgb(0, 0, 0);">**SNIFF &amp; Detect** doing a deep scan on a suspected phishing email pretending to be from Netflix. The scan may take a couple of minutes to finish.</span>

[![image.png](https://cytechint-docs-bookstack.s3.amazonaws.com/uploads/images/gallery/2025-08/scaled-1680-/W3myFSHB02eaTvS2-image.png)](https://cytechint-docs-bookstack.s3.amazonaws.com/uploads/images/gallery/2025-08/W3myFSHB02eaTvS2-image.png)

- <span style="color: rgb(0, 0, 0);">The scan results are now finished and ready to check.</span>

[![image.png](https://cytechint-docs-bookstack.s3.amazonaws.com/uploads/images/gallery/2025-08/scaled-1680-/mALzljyROiLcmqPz-image.png)](https://cytechint-docs-bookstack.s3.amazonaws.com/uploads/images/gallery/2025-08/mALzljyROiLcmqPz-image.png)

- <span style="color: rgb(0, 0, 0);">This is the result of a deep scan conducted by the Sniff &amp; Detect tool on a suspicious email impersonating Netflix.</span>  
    <span style="color: rgb(0, 0, 0);">1. **Arrow 1** highlights the domain **netflix-billing.com,** which is flagged as a spoofed domain used to impersonate Netflix and trick users into entering sensitive information.</span>  
    <span style="color: rgb(0, 0, 0);">2. **Arrow 2** lists phishing-related email addresses such as **richmond@cytcehint.com** and [<span style="color: rgb(0, 0, 0);">**support@netflix-billing.com**</span>](mailto:support@netflix-billing), which are likely used to send or support the fraudulent email.</span>  
    <span style="color: rgb(0, 0, 0);">3. **Arrow 3** shows the IP address **192.168.1.45**, flagged as part of the phishing infrastructure. Although it's a private IP, its presence suggests internal spoofing or malicious setup.</span>

[![image.png](https://cytechint-docs-bookstack.s3.amazonaws.com/uploads/images/gallery/2025-08/scaled-1680-/4JxCoYEvR1qYSOzV-image.png)](https://cytechint-docs-bookstack.s3.amazonaws.com/uploads/images/gallery/2025-08/4JxCoYEvR1qYSOzV-image.png)

<span class="EOP SCXW129338488 BCX0" data-ccp-props="{}" style="color: rgb(0, 0, 0);">*If you need further assistance, kindly contact our support at* <span style="color: rgb(53, 152, 219);">***support@cytechint.com***</span> *for prompt assistance and guidance.*</span>

# AQUILA - SonicWall Firewall Integration

<span style="color: rgb(0, 0, 0);">This integration collects syslog messages from SonicWall firewalls. It has been tested with **Enhanced Syslog** logs from SonicOS versions 6.5 and 7.0, following the<span style="color: rgb(132, 63, 161);"> **[SonicWall Log Events reference guide](https://www.sonicwall.com/techdocs/pdf/sonicos-6-5-4-log-events-reference-guide.pdf)**</span>.</span>

---

### <span style="color: rgb(53, 152, 219);">**Configuration**</span>

<span style="color: rgb(0, 0, 0);">To set up the integration, configure a **Syslog Server** on your SonicWall firewall with the following settings:</span>

- <span style="color: rgb(0, 0, 0);">**Name or IP Address:**</span>  
    <span style="color: rgb(0, 0, 0);">The address where your Elastic Agent (or AQUILA Agent) running this integration is reachable.</span>
- <span style="color: rgb(0, 0, 0);">**Port:**</span>  
    <span style="color: rgb(0, 0, 0);">The UDP port number for Syslog, matching the port configured in your integration.</span>
- <span style="color: rgb(0, 0, 0);">**Server Type:**</span>  
    <span style="color: rgb(0, 0, 0);">Select **Syslog Server**.</span>
- <span style="color: rgb(0, 0, 0);">**Syslog Format:**</span>  
    <span style="color: rgb(0, 0, 0);">Choose **Enhanced Syslog**.</span>
- <span style="color: rgb(0, 0, 0);">**Syslog ID:**</span>  
    <span style="color: rgb(0, 0, 0);">The default value is `firewall`. Change this if you want to differentiate logs from multiple firewalls. This value is stored in the `observer.name` field.</span>

---

### <span style="color: rgb(53, 152, 219);">**Time Configuration Recommendation**</span>

<span style="color: rgb(0, 0, 0);">To avoid timestamp discrepancies:</span>

- <span style="color: rgb(0, 0, 0);">Enable **Display UTC in logs** in your SonicWall device under:</span>  
    <span style="color: rgb(0, 0, 0);">`Device > Settings > Time Configuration`</span>
- <span style="color: rgb(0, 0, 0);">If you use local time instead, configure the **Timezone Offset** setting in your integration to match your firewall’s timezone.</span>

---

### <span style="color: rgb(53, 152, 219);">**Connectivity**</span>

<span style="color: rgb(0, 0, 0);">Ensure proper network connectivity between your SonicWall firewall and the AQUILA Agent (or Elastic Agent) to receive syslog messages successfully.</span>

<span style="color: rgb(0, 0, 0);">*<span class="TextRun SCXW71272603 BCX0" data-contrast="auto" lang="EN-US" xml:lang="EN-US"><span class="NormalTextRun SCXW71272603 BCX0">If you need further </span><span class="NormalTextRun SCXW71272603 BCX0">assistance</span><span class="NormalTextRun SCXW71272603 BCX0">, kindly contact our support at </span></span><span style="color: rgb(53, 152, 219);">**<span class="TextRun SCXW71272603 BCX0" data-contrast="none" lang="EN-US" xml:lang="EN-US"><span class="NormalTextRun SCXW71272603 BCX0">support@cytechint.com</span></span>**</span><span class="TextRun SCXW71272603 BCX0" data-contrast="auto" lang="EN-US" xml:lang="EN-US"><span class="NormalTextRun SCXW71272603 BCX0"> for prompt </span><span class="NormalTextRun SCXW71272603 BCX0">assistance</span><span class="NormalTextRun SCXW71272603 BCX0"> and guidance.</span></span><span class="EOP SCXW71272603 BCX0" data-ccp-props="{}"></span>*</span>

# AQUILA - Varonis (DLP) Integration

### <span style="color: rgb(53, 152, 219);">**Purpose**</span>

<span style="color: rgb(0, 0, 0);">This document outlines the procedure to integrate **Varonis DatAlert** or **DatAdvantage** with a SIEM platform using **Syslog (CEF)**. The integration provides visibility into sensitive data access, permissions changes, and threat alerts.</span>

##### <span style="color: rgb(53, 152, 219);">**Prerequisites**</span>

- <span style="color: rgb(0, 0, 0);">Admin access to **Varonis DatAlert Console**</span>
- <span style="color: rgb(0, 0, 0);">IP address and port of your **SIEM/syslog collector**</span>
- <span style="color: rgb(0, 0, 0);">Network/firewall access from Varonis to SIEM (UDP or TCP port open)</span>
- <span style="color: rgb(0, 0, 0);">(Optional) CEF parsing support in your SIEM</span>

##### <span style="color: rgb(53, 152, 219);">**Step 1: Configure Varonis DatAlert for Syslog forwarding**</span>

1. <span style="color: rgb(0, 0, 0);">Log in to your **Varonis UI** using admin credentials.</span>
2. <span style="color: rgb(0, 0, 0);">In Data Advantage, Navigate to:</span>  
    <span style="color: rgb(0, 0, 0);">**Tools** → **DatAlert** → **Select DatAlert.**</span>

[![image.png](https://cytechint-docs-bookstack.s3.amazonaws.com/uploads/images/gallery/2025-10/scaled-1680-/T1GpiSEOTyEGyjPL-image.png)](https://cytechint-docs-bookstack.s3.amazonaws.com/uploads/images/gallery/2025-10/T1GpiSEOTyEGyjPL-image.png)

<span style="color: rgb(0, 0, 0);">3. Now, select **Configuration.**  
4\. In **Syslog Message Forwarding**,  
</span>

- <span style="color: rgb(0, 0, 0);">**Syslog Message IP Address:** AQUILA log collector IP</span>
- <span style="color: rgb(0, 0, 0);">**Port: 10514** (if the port has already been used, you can set another one)</span>
- <span style="color: rgb(0, 0, 0);">**Transport protocol:** Choose **UDP** or **TCP** (if not already an option; some Varonis versions infer it)</span>
- <span style="color: rgb(0, 0, 0);">**Facility name:** Choose a different facility.</span>

[![image.png](https://cytechint-docs-bookstack.s3.amazonaws.com/uploads/images/gallery/2026-06/scaled-1680-/H4qC8oP7koYwCy5S-image.png)](https://cytechint-docs-bookstack.s3.amazonaws.com/uploads/images/gallery/2026-06/H4qC8oP7koYwCy5S-image.png)

<span style="color: rgb(0, 0, 0);">5. Click **Apply.**</span>

##### <span style="color: rgb(53, 152, 219);">**Step 2: Create Alert Template in Varonis DatAlert**</span>

1. <span style="color: rgb(0, 0, 0);">In **DatAlert**, select **Alert Templates**.</span>
2. <span style="color: rgb(0, 0, 0);">Click on the **Green Plus** sign to add a New Alert Template.</span>
    - <span style="color: rgb(0, 0, 0);">In the Template name, select the **'External system default template (CEF)'**</span>
    - <span style="color: rgb(0, 0, 0);">In the Apply to alert methods, select the **'Syslog message'**</span>
3. <span style="color: rgb(0, 0, 0);">Click **OK.**</span>

[![image.png](https://cytechint-docs-bookstack.s3.amazonaws.com/uploads/images/gallery/2026-06/scaled-1680-/aEWJh6P68iLccait-image.png)](https://cytechint-docs-bookstack.s3.amazonaws.com/uploads/images/gallery/2026-06/aEWJh6P68iLccait-image.png)

[![image.png](https://cytechint-docs-bookstack.s3.amazonaws.com/uploads/images/gallery/2026-06/scaled-1680-/AlBqxNaiSiN27ETg-image.png)](https://cytechint-docs-bookstack.s3.amazonaws.com/uploads/images/gallery/2026-06/AlBqxNaiSiN27ETg-image.png)

[![image.png](https://cytechint-docs-bookstack.s3.amazonaws.com/uploads/images/gallery/2026-06/scaled-1680-/HPmTOp9hMqvURY5A-image.png)](https://cytechint-docs-bookstack.s3.amazonaws.com/uploads/images/gallery/2026-06/HPmTOp9hMqvURY5A-image.png)

##### <span style="color: rgb(53, 152, 219);">**Step 3: Configuring alerts for single or multiple rules**</span>

<span style="color: rgb(0, 0, 0);">To select the Syslog alert method for a single rule:</span>

1. <span style="color: rgb(0, 0, 0);">From the DatAlert rules table, select the **rule**, then click **Edit Rule**. The rule editing menu appears.</span>
2. <span style="color: rgb(0, 0, 0);">From the left menu, select **Alerts Method**. The “**Alert Method**” window appears.</span>
3. <span style="color: rgb(0, 0, 0);">Select **Syslog message**.</span>
4. <span style="color: rgb(0, 0, 0);">Click **OK**.</span>

<span style="color: rgb(0, 0, 0);">To select the Syslog alert method for multiple rules:</span>

1. <span style="color: rgb(0, 0, 0);">From the DatAlert rules table, select the **rules**, then click **Edit Rule**. The rule editing menu appears and just "control A" to select all rules.</span>

[![image.png](https://cytechint-docs-bookstack.s3.amazonaws.com/uploads/images/gallery/2026-06/scaled-1680-/PftyRnOYp0u3639o-image.png)](https://cytechint-docs-bookstack.s3.amazonaws.com/uploads/images/gallery/2026-06/PftyRnOYp0u3639o-image.png)

1. <span style="color: rgb(0, 0, 0);">From the left menu, select **Alerts Method**. The “**Alert Method**” window appears, and its contents are disabled for selection.</span>
2. <span style="color: rgb(0, 0, 0);">Click the **edit** icon for the Syslog message option, then click the checkbox next to **Syslog message**.</span>
3. <span style="color: rgb(0, 0, 0);">Click **OK**.</span>

[![image.png](https://cytechint-docs-bookstack.s3.amazonaws.com/uploads/images/gallery/2026-06/scaled-1680-/qxgzGKNqhjnofPTA-image.png)](https://cytechint-docs-bookstack.s3.amazonaws.com/uploads/images/gallery/2026-06/qxgzGKNqhjnofPTA-image.png)

---

<p class="callout danger">**<span class="TextRun SCXW124724174 BCX0" data-contrast="none" lang="EN-US" xml:lang="EN-US"><span class="NormalTextRun SCXW124724174 BCX0">Please provide the following information to </span><span class="NormalTextRun SpellingErrorV2Themed SCXW124724174 BCX0">CyTech Support</span><span class="NormalTextRun SCXW124724174 BCX0">:</span></span><span class="EOP SCXW124724174 BCX0" data-ccp-props="{"134233117":false,"134233118":false,"335551550":0,"335551620":0,"335559738":240,"335559739":240}"> </span>**</p>

<div class="ListContainerWrapper SCXW124724174 BCX0" id="bkmrk-project-id%C2%A0---the-pr">- <span style="color: rgb(0, 0, 0);">**Port Address**</span>
- <span style="color: rgb(0, 0, 0);">**Protocol (TCP or UDP)**</span>

</div><span style="color: rgb(0, 0, 0);">*If you need further assistance, kindly contact our support at **[support@cytechint.com](mailto:info@cytechint.com)** for prompt assistance and guidance.*</span>

# AQUILA CSPM - AWS Integration

#### [](https://www.elastic.co/guide/en/security/current/cspm-get-started.html#cspm-overview)**<span style="color: rgb(53, 152, 219);">Overview</span>**

<span style="color: rgb(0, 0, 0);">This page explains how to get started monitoring the security posture of your cloud assets using the Cloud Security Posture Management (CSPM) feature.</span>

<div class="book" id="bkmrk-find%C2%A0integrations%C2%A0in" lang="en"><div class="section"></div></div>#### [](https://www.elastic.co/guide/en/security/current/cspm-get-started.html#cspm-set-up-cloud-access-section)**<span style="color: rgb(53, 152, 219);">Set up cloud account access</span>**

<span style="color: rgb(0, 0, 0);">The CSPM integration requires access to AWS’s built-in [`SecurityAudit` IAM policy](https://docs.aws.amazon.com/IAM/latest/UserGuide/access_policies_job-functions.html#jf_security-auditor) in order to discover and evaluate resources in your cloud account. To provide access we need:</span>

<div class="book" id="bkmrk-default-instance-rol" lang="en"><div class="section"><div class="ulist itemizedlist">- <span style="color: rgb(0, 0, 0);">**IAM Role**</span>
- <span style="color: rgb(0, 0, 0);">**[Direct access keys](https://www.elastic.co/guide/en/security/current/cspm-get-started.html#cspm-use-keys-directly "Option 2 - Direct access keys")**</span>

</div></div></div>#### [](https://www.elastic.co/guide/en/security/current/cspm-get-started.html#cspm-use-instance-role)<span style="color: rgb(53, 152, 219);">**Create IAM User**</span>

<span style="color: rgb(0, 0, 0);">Follow AWS’s [IAM roles for Amazon EC2](https://docs.aws.amazon.com/AWSEC2/latest/UserGuide/iam-roles-for-amazon-ec2.html) documentation to create an IAM role using the IAM console, which automatically generates an instance profile.</span>

<div class="book" id="bkmrk-create-an-iam-role%3A-" lang="en"><div class="section"><div class="olist orderedlist">1. <span style="color: rgb(0, 0, 0);">Create an IAM role:</span>
    
    <div class="olist orderedlist">
    1. <span style="color: rgb(0, 0, 0);">In AWS, go to your IAM dashboard. Click <span class="strong strong">**Roles**</span>, then <span class="strong strong">**Create role**</span>.</span>
    2. <span style="color: rgb(0, 0, 0);">On the <span class="strong strong">**Select trusted entity**</span> page, under <span class="strong strong">**Trusted entity type**</span>, select <span class="strong strong">**AWS service**</span>.</span>
    3. <span style="color: rgb(0, 0, 0);">Under <span class="strong strong">**Use case**</span>, select <span class="strong strong">**EC2**</span>. Click <span class="strong strong">**Next**</span>.</span>
        
        <div class="imageblock"><div class="content">![The Select trusted entity screen in AWS](https://www.elastic.co/guide/en/security/current/images/cspm-aws-auth-1.png)</div></div>
    4. <span style="color: rgb(0, 0, 0);">On the <span class="strong strong">**Add permissions**</span> page, search for and select `SecurityAudit`. Click <span class="strong strong">**Next**</span>.</span>
        
        <div class="imageblock"><div class="content">![The Add permissions screen in AWS](https://www.elastic.co/guide/en/security/current/images/cspm-aws-auth-2.png)</div></div>
    5. <span style="color: rgb(0, 0, 0);">On the <span class="strong strong">**Name, review, and create**</span> page, name your role, then click <span class="strong strong">**Create role**</span>.</span>
    
    </div>
2. <span style="color: rgb(0, 0, 0);">Attach your new IAM role to an EC2 instance:</span>
    
    <div class="olist orderedlist">
    1. <span style="color: rgb(0, 0, 0);">In AWS, select an EC2 instance.</span>
    2. <span style="color: rgb(0, 0, 0);">Select <span class="strong strong">**Actions &gt; Security &gt; Modify IAM role**</span>.</span>
        
        <div class="imageblock"><div class="content">![The EC2 page in AWS](https://www.elastic.co/guide/en/security/current/images/cspm-aws-auth-3.png)</div></div>
    3. <span style="color: rgb(0, 0, 0);">On the <span class="strong strong">**Modify IAM role**</span> page, search for and select your new IAM role.</span>
    4. <span style="color: rgb(0, 0, 0);">Click <span class="strong strong">**Update IAM role**</span>.</span>
    
    </div>

</div></div></div>#### [](https://www.elastic.co/guide/en/security/current/cspm-get-started.html#cspm-use-keys-directly)<span style="color: rgb(53, 152, 219);">**Create Direct access keys**</span>

<span style="color: rgb(0, 0, 0);">Access keys are long-term credentials for an IAM user or AWS account root user. To use access keys as credentials, you must provide the `Access key ID` and the `Secret Access Key`. After you provide credentials, [finish manual setup](https://www.elastic.co/guide/en/security/current/cspm-get-started.html#cspm-finish-manual "Finish manual setup").</span>

<span style="color: rgb(0, 0, 0);">For more details, refer to [Access Keys and Secret Access Keys](https://docs.aws.amazon.com/general/latest/gr/aws-sec-cred-types.html).</span>

<div class="book" id="bkmrk-access-key-id%3A-the-f" lang="en"><div class="section"><div class="ulist itemizedlist">- <span style="color: rgb(0, 0, 0);">`Access key ID`: The first part of the access key.</span>
- <span style="color: rgb(0, 0, 0);">`Secret Access Key`: The second part of the access key.</span>

</div></div></div>*source: <span style="color: rgb(53, 152, 219);">https://www.elastic.co/guide/en/security/current/cspm-get-started.html</span>*

<p class="callout danger">**<span class="TextRun SCXW124724174 BCX0" data-contrast="none" lang="EN-US" xml:lang="EN-US"><span class="NormalTextRun SCXW124724174 BCX0">Please provide the following information to </span><span class="NormalTextRun SpellingErrorV2Themed SCXW124724174 BCX0">CyTech Support</span><span class="NormalTextRun SCXW124724174 BCX0">:</span></span><span class="EOP SCXW124724174 BCX0" data-ccp-props="{"134233117":false,"134233118":false,"335551550":0,"335551620":0,"335559738":240,"335559739":240}"> </span>**</p>

<div class="ListContainerWrapper SCXW124724174 BCX0" id="bkmrk-project-id%C2%A0---the-pr">- **Access key ID**
- **Secret Access Key**

</div>#### <span style="color: rgb(53, 152, 219);">**How to integrate to AQUILA CSPM Module**</span>

##### <span style="color: rgb(53, 152, 219);">**Pre-requisites**</span>

1. <span style="color: rgb(0, 0, 0);">**Access to CyTech - AQUILA**</span>
    - <span style="color: rgb(0, 0, 0);">Only users assigned the **"Owner"** or **"Admin"** role can access the Log Collector installation resources within the platform.</span>

<p class="callout success">**To navigate to CSPM Module please follow the instructions below:**</p>

<div class="x_elementToProof" id="bkmrk-step1%3A-log-in-to-cyt">**<span style="color: rgb(0, 0, 0);">Step 1: Log in to CyTech - AQUILA. Click here --&gt;</span> [AQUILACYBER.ai](https://aquilacyber.ai/overview-v3/dashboard/maindashboard)**</div><div class="x_elementToProof" id="bkmrk-step2%3A-click-on-cybe"><span style="color: rgb(0, 0, 0);">**Step 2: Click on Cyber Monitoring.**</span></div>[![image.png](https://cytechint-docs-bookstack.s3.amazonaws.com/uploads/images/gallery/2025-06/scaled-1680-/hItzqzN09q61CMZZ-image.png)](https://cytechint-docs-bookstack.s3.amazonaws.com/uploads/images/gallery/2025-06/hItzqzN09q61CMZZ-image.png)

<span class="TextRun SCXW124724174 BCX0" data-contrast="none" lang="EN-US" style="color: rgb(0, 0, 0);" xml:lang="EN-US"><span class="NormalTextRun SCXW124724174 BCX0">**Step 3: Choose Cloud Security Posture Management (CSPM).**</span></span>

[![image.png](https://cytechint-docs-bookstack.s3.amazonaws.com/uploads/images/gallery/2025-06/scaled-1680-/EbsP1Kz74gmIWnyZ-image.png)](https://cytechint-docs-bookstack.s3.amazonaws.com/uploads/images/gallery/2025-06/EbsP1Kz74gmIWnyZ-image.png)

<span style="color: rgb(0, 0, 0);">**Step 4: Click the "Let's Go" or "Onboard CSPM" icon to launch installation window.**</span>

[![image.png](https://cytechint-docs-bookstack.s3.amazonaws.com/uploads/images/gallery/2025-06/scaled-1680-/h53Z6TJIUeSrsoc5-image.png)](https://cytechint-docs-bookstack.s3.amazonaws.com/uploads/images/gallery/2025-06/h53Z6TJIUeSrsoc5-image.png)

<span style="color: rgb(0, 0, 0);">**Step 5: Click "Let's go" to start the integration process.**</span>

[![image.png](https://cytechint-docs-bookstack.s3.amazonaws.com/uploads/images/gallery/2025-06/scaled-1680-/7DPNcbHQ3TI5nSmY-image.png)](https://cytechint-docs-bookstack.s3.amazonaws.com/uploads/images/gallery/2025-06/7DPNcbHQ3TI5nSmY-image.png)

<span style="color: rgb(0, 0, 0);">**Step 6: Choose your log collector. If you haven't installed a log collector yet choose "New Log Collector" click here --&gt;**</span> [Log Collector Installation](https://docs.cytechint.io/books/log-collector-installations). <span style="color: rgb(0, 0, 0);">**If you have already have an existing log collector choose "Current Log Collector" and click "Next".**</span>

[![image.png](https://cytechint-docs-bookstack.s3.amazonaws.com/uploads/images/gallery/2025-06/scaled-1680-/YmaKgMpQPUBQOutG-image.png)](https://cytechint-docs-bookstack.s3.amazonaws.com/uploads/images/gallery/2025-06/YmaKgMpQPUBQOutG-image.png)

<span style="color: rgb(0, 0, 0);">**Step 7: Click "Next" if the requirements are met.**</span>

[![image.png](https://cytechint-docs-bookstack.s3.amazonaws.com/uploads/images/gallery/2025-06/scaled-1680-/9XREDs3GMrovq966-image.png)](https://cytechint-docs-bookstack.s3.amazonaws.com/uploads/images/gallery/2025-06/9XREDs3GMrovq966-image.png)

<span style="color: rgb(0, 0, 0);">**Step 8: Choose your current log collector. This will collect the logs coming from your log sources.**</span>

[![image.png](https://cytechint-docs-bookstack.s3.amazonaws.com/uploads/images/gallery/2025-06/scaled-1680-/6JtsLkQBByfBwsLN-image.png)](https://cytechint-docs-bookstack.s3.amazonaws.com/uploads/images/gallery/2025-06/6JtsLkQBByfBwsLN-image.png)

<span style="color: rgb(0, 0, 0);">**Step 9: Choose Amazon Web Services and click "Next" to proceed.**</span>

[![image.png](https://cytechint-docs-bookstack.s3.amazonaws.com/uploads/images/gallery/2025-06/scaled-1680-/tnsMSyjrIYJJrPQC-image.png)](https://cytechint-docs-bookstack.s3.amazonaws.com/uploads/images/gallery/2025-06/tnsMSyjrIYJJrPQC-image.png)

<span style="color: rgb(0, 0, 0);">**Step 10: Input all the required credentials from the previous AWS configurations and click "Next" to initiate the integration process. Wait for couple of minutes until a success window shows up.**</span>

[![image.png](https://cytechint-docs-bookstack.s3.amazonaws.com/uploads/images/gallery/2025-06/scaled-1680-/W3Utk1FQhuv2qKTK-image.png)](https://cytechint-docs-bookstack.s3.amazonaws.com/uploads/images/gallery/2025-06/W3Utk1FQhuv2qKTK-image.png)

<p class="callout info"><span class="TextRun SCXW124724174 BCX0" data-contrast="none" lang="EN-US" xml:lang="EN-US"><span class="NormalTextRun SCXW124724174 BCX0">**<span style="color: rgb(224, 62, 45);">Please refer to this manual for the full guidelines of our CSPM Module. *click here--&gt;*</span> [CyTech - AQUILA CSPM Manual ](https://docs.cytechint.io/books/log-collector-installations/page/cytech-aquila-cloud-security-posture-management-cspm-module)**</span></span></p>

[](https://www.elastic.co/guide/en/security/current/cspm-get-started.html#cspm-finish-manual)

<span class="EOP SCXW124724174 BCX0" data-ccp-props="{"134233117":false,"134233118":false,"335551550":0,"335551620":0,"335559738":240,"335559739":240}">*If you need further assistance, kindly contact our support at **[support@cytechint.com](mailto:info@cytechint.com)** for prompt assistance and guidance.*</span>

# AQUILA CSPM - Azure Integration

<span style="color: rgb(0, 0, 0);">This manual explains how to get started monitoring the security posture of your Azure CSP using the Cloud Security Posture Management (CSPM) feature.</span>

#### <span style="color: rgb(53, 152, 219);">**Requirements**</span>

<div class="ulist itemizedlist" id="bkmrk-cspm-only-works-in-t">- <span style="color: rgb(0, 0, 0);">The user who gives the CSPM integration permissions in Azure must be an Azure subscription **admin**.</span>

</div>#### <span style="color: rgb(53, 152, 219);">**Setup**</span>

<span style="color: rgb(53, 152, 219);">**Service principal with client secret** </span>

<span style="color: rgb(0, 0, 0);">Before using this method, you must have set up a **Microsoft Entra application** and **service principal that can access resources**. Please go **<span style="color: rgb(53, 152, 219);">[here](https://learn.microsoft.com/en-us/entra/identity-platform/howto-create-service-principal-portal#get-tenant-and-app-id-values-for-signing-in)</span>** before following the steps below.</span>

<div class="olist orderedlist" id="bkmrk-on-the%C2%A0add-cloud-sec">1. <span style="color: rgb(0, 0, 0);">The following information is required.</span>
    1. <span style="color: rgb(0, 0, 0);">Directory **(tenant) ID** and **Application (client) ID**</span>
        - <span style="color: rgb(0, 0, 0);">To get these values:</span>
            - <span style="color: rgb(0, 0, 0);">Go to the <span class="strong strong">**Registered apps**</span> section of Microsoft Entra ID.</span>
            - <span style="color: rgb(0, 0, 0);">Click on <span class="strong strong">**New Registration**</span>, name your app and click <span class="strong strong">**Register**</span>.</span>
            - <span style="color: rgb(0, 0, 0);">Copy your new app’s **Directory (tenant) ID** and **Application (client) ID**. </span>
    2. <span style="color: rgb(0, 0, 0);">**Client Secret**</span>
        - <span style="color: rgb(0, 0, 0);">In Azure portal, select <span class="strong strong">Certificates &amp; secrets</span>, then go to the <span class="strong strong">Client secrets</span> tab. Click <span class="strong strong">New client secret</span>.</span>
        - <span style="color: rgb(0, 0, 0);">Copy the new secret **"Value"**.</span>
2. <span style="color: rgb(0, 0, 0);">Return to Azure. Go to your Azure subscription list and select the subscription or management group you want to monitor with CSPM.</span>
3. <span style="color: rgb(0, 0, 0);">Go to <span class="strong strong">**Access control (IAM)**</span> and select <span class="strong strong">**Add Role Assignment**</span>.</span>
4. <span style="color: rgb(0, 0, 0);">Select the **Reader** function role, assign access to <span class="strong strong">**User, group, or service principal**</span>, and select your new app.</span>

</div>#### <span style="color: rgb(53, 152, 219);">**How to integrate to AQUILA CSPM Module**</span>

##### <span style="color: rgb(53, 152, 219);">**Pre-requisites**</span>

1. <span style="color: rgb(0, 0, 0);">**Access to CyTech - AQUILA**</span>
    - <span style="color: rgb(0, 0, 0);">Only users assigned the **"Owner"** or **"Admin"** role can access the Log Collector installation resources within the platform.</span>

<p class="callout success">**To navigate to CSPM Module please follow the instructions below:**</p>

<div class="x_elementToProof" id="bkmrk-step1%3A-log-in-to-cyt">**<span style="color: rgb(0, 0, 0);">Step 1: Log in to CyTech - AQUILA. Click here --&gt;</span> [AQUILACYBER.ai](https://aquilacyber.ai/overview-v3/dashboard/maindashboard)**</div><div class="x_elementToProof" id="bkmrk-step2%3A-click-on-cybe"><span style="color: rgb(0, 0, 0);">**Step 2: Click on Cyber Monitoring.**</span></div>[![image.png](https://cytechint-docs-bookstack.s3.amazonaws.com/uploads/images/gallery/2025-06/scaled-1680-/hItzqzN09q61CMZZ-image.png)](https://cytechint-docs-bookstack.s3.amazonaws.com/uploads/images/gallery/2025-06/hItzqzN09q61CMZZ-image.png)

<span class="TextRun SCXW124724174 BCX0" data-contrast="none" lang="EN-US" style="color: rgb(0, 0, 0);" xml:lang="EN-US"><span class="NormalTextRun SCXW124724174 BCX0">**Step 3: Choose Cloud Security Posture Management (CSPM).**</span></span>

[![image.png](https://cytechint-docs-bookstack.s3.amazonaws.com/uploads/images/gallery/2025-06/scaled-1680-/EbsP1Kz74gmIWnyZ-image.png)](https://cytechint-docs-bookstack.s3.amazonaws.com/uploads/images/gallery/2025-06/EbsP1Kz74gmIWnyZ-image.png)

<span style="color: rgb(0, 0, 0);">**Step 4: Click the "Let's Go" or "Onboard CSPM" icon to launch installation window.**</span>

[![image.png](https://cytechint-docs-bookstack.s3.amazonaws.com/uploads/images/gallery/2025-06/scaled-1680-/h53Z6TJIUeSrsoc5-image.png)](https://cytechint-docs-bookstack.s3.amazonaws.com/uploads/images/gallery/2025-06/h53Z6TJIUeSrsoc5-image.png)

<span style="color: rgb(0, 0, 0);">**Step 5: Click "Let's go" to start the integration process.**</span>

[![image.png](https://cytechint-docs-bookstack.s3.amazonaws.com/uploads/images/gallery/2025-06/scaled-1680-/7DPNcbHQ3TI5nSmY-image.png)](https://cytechint-docs-bookstack.s3.amazonaws.com/uploads/images/gallery/2025-06/7DPNcbHQ3TI5nSmY-image.png)

<span style="color: rgb(0, 0, 0);">**Step 6: Choose your log collector. If you haven't installed a log collector yet choose "New Log Collector" click here --&gt;**</span> [Log Collector Installation](https://docs.cytechint.io/books/log-collector-installations). <span style="color: rgb(0, 0, 0);">**If you have already have an existing log collector choose "Current Log Collector" and click "Next".**</span>

[![image.png](https://cytechint-docs-bookstack.s3.amazonaws.com/uploads/images/gallery/2025-06/scaled-1680-/YmaKgMpQPUBQOutG-image.png)](https://cytechint-docs-bookstack.s3.amazonaws.com/uploads/images/gallery/2025-06/YmaKgMpQPUBQOutG-image.png)

<span style="color: rgb(0, 0, 0);">**Step 7: Click "Next" if the requirements are met.**</span>

[![image.png](https://cytechint-docs-bookstack.s3.amazonaws.com/uploads/images/gallery/2025-06/scaled-1680-/9XREDs3GMrovq966-image.png)](https://cytechint-docs-bookstack.s3.amazonaws.com/uploads/images/gallery/2025-06/9XREDs3GMrovq966-image.png)

<span style="color: rgb(0, 0, 0);">**Step 8: Choose your current log collector. This will collect the logs coming from your log sources.**</span>

[![image.png](https://cytechint-docs-bookstack.s3.amazonaws.com/uploads/images/gallery/2025-06/scaled-1680-/6JtsLkQBByfBwsLN-image.png)](https://cytechint-docs-bookstack.s3.amazonaws.com/uploads/images/gallery/2025-06/6JtsLkQBByfBwsLN-image.png)

<span style="color: rgb(0, 0, 0);">**Step 9: Choose Azure and click "Next" to proceed.**</span>

<div class="olist orderedlist" id="bkmrk-go-to-the-azure-port"></div>[![image.png](https://cytechint-docs-bookstack.s3.amazonaws.com/uploads/images/gallery/2025-06/scaled-1680-/emYpLrE9GwYlBYXG-image.png)](https://cytechint-docs-bookstack.s3.amazonaws.com/uploads/images/gallery/2025-06/emYpLrE9GwYlBYXG-image.png)

<span style="color: rgb(0, 0, 0);">**Step 10: Input all the required credentials from the previous Azure configurations and click "Next" to initiate the integration process. Wait for couple of minutes until a success window shows up.**</span>

[![image.png](https://cytechint-docs-bookstack.s3.amazonaws.com/uploads/images/gallery/2025-06/scaled-1680-/rSv3hwdVltbKSxrr-image.png)](https://cytechint-docs-bookstack.s3.amazonaws.com/uploads/images/gallery/2025-06/rSv3hwdVltbKSxrr-image.png)

<p class="callout info"><span class="TextRun SCXW124724174 BCX0" data-contrast="none" lang="EN-US" xml:lang="EN-US"><span class="NormalTextRun SCXW124724174 BCX0">**<span style="color: rgb(224, 62, 45);">Please refer to this manual for the full guidelines of our CSPM Module. *click here--&gt;*</span> [CyTech - AQUILA CSPM Manual ](https://docs.cytechint.io/books/log-collector-installations/page/cytech-aquila-cloud-security-posture-management-cspm-module)**</span></span></p>

 *If you need further assistance, kindly contact our support at **[support@cytechint.com](mailto:info@cytechint.com)** for prompt assistance and guidance.*

# AQUILA CSPM - GCP Integration

##### <span style="color: rgb(53, 152, 219);">**Authentication**</span>

<span style="color: rgb(0, 0, 0);">To use this CSPM Google Cloud Platform (GCP) integration, you need to set up a ***Service Account*** with a ***Role*** and a ***Service Account Key*** to access data on your GCP project.</span>

##### <span style="color: rgb(53, 152, 219);">**1. Service Account**</span>

<span style="color: rgb(0, 0, 0);">First, you need to [create a Service Account](https://cloud.google.com/iam/docs/creating-managing-service-accounts). A Service Account (SA) is a particular type of Google account intended to represent a non-human user who needs to access the GCP resources.</span>

<span style="color: rgb(0, 0, 0);">The AQUILA Agent uses the SA to access data on Google Cloud Platform using the Google APIs.</span>

##### <span style="color: rgb(53, 152, 219);">**2. Required IAM Service Account Roles:**</span>

<span style="color: rgb(53, 152, 219);">**For CSPM-GCP Integration**</span>

- <span style="color: rgb(0, 0, 0);">**Browser**: This role grants read access to the project hierarchy.</span>
- <span style="color: rgb(0, 0, 0);">**Cloud Asset Viewer**: Can view asset metadata across GCP services.</span>

<span style="color: rgb(0, 0, 0);">Click here --&gt;</span> [GCP - How to Add a Role](https://docs.cytechint.io/books/system-integrations/page/gcp-how-to-add-a-role)

##### <span style="color: rgb(53, 152, 219);">**3. Enable API Services**</span>

- <span style="color: rgb(0, 0, 0);">**Cloud Asset API**: Provides metadata inventory and history of GCP resources and IAM policies for security analysis, audit, and compliance.</span>

<span style="color: rgb(0, 0, 0);">Click here --&gt; </span>[GCP - How to enable Cloud Asset API](https://docs.cytechint.io/books/system-integrations/page/gcp-how-to-enable-cloud-asset-api)

##### <span style="color: rgb(53, 152, 219);">**<span class="TextRun SCXW124724174 BCX0" data-contrast="none" lang="EN-US" xml:lang="EN-US"><span class="NormalTextRun SCXW124724174 BCX0">4. Service Account Key </span></span><span class="EOP SCXW124724174 BCX0" data-ccp-props="{"134233117":false,"134233118":false,"335551550":0,"335551620":0,"335559738":240,"335559739":240}"> </span>**</span>

<span style="color: rgb(0, 0, 0);"><span class="TextRun SCXW124724174 BCX0" data-contrast="none" lang="EN-US" xml:lang="EN-US"><span class="NormalTextRun SCXW124724174 BCX0">Next, with the Service Account (SA) with access to Google Cloud Platform (GCP) resources setup, you need some credentials to associate with it: a Service Account Key. </span></span><span class="EOP SCXW124724174 BCX0" data-ccp-props="{"134233117":false,"134233118":false,"335551550":0,"335551620":0,"335559738":240,"335559739":240}"> </span></span>

<span style="color: rgb(0, 0, 0);"><span class="TextRun SCXW124724174 BCX0" data-contrast="none" lang="EN-US" xml:lang="EN-US"><span class="NormalTextRun SCXW124724174 BCX0">From the list of SA (Service Accounts): </span></span><span class="EOP SCXW124724174 BCX0" data-ccp-props="{"134233117":false,"134233118":false,"335551550":0,"335551620":0,"335559738":240,"335559739":240}"> </span></span>

<div class="ListContainerWrapper SCXW124724174 BCX0" id="bkmrk-go-to%C2%A0iam-%26-admin-%3E-">1. <span style="color: rgb(0, 0, 0);">Go to **IAM &amp; Admin &gt; Service Accounts** in the GCP Console.</span>
2. <span style="color: rgb(0, 0, 0);">Click the service account you created.</span>
3. <span style="color: rgb(0, 0, 0);">Under the **"Keys"** section, click **"Add Key" &gt; "Create new key"**.</span>
4. <span style="color: rgb(0, 0, 0);">Choose **JSON** as the key type.</span>
5. <span style="color: rgb(0, 0, 0);">**Download and securely store** the generated private key (it cannot be retrieved again from GCP if lost).</span>

</div>
<p class="callout danger">**<span class="TextRun SCXW124724174 BCX0" data-contrast="none" lang="EN-US" xml:lang="EN-US"><span class="NormalTextRun SCXW124724174 BCX0">Please provide the following information to </span><span class="NormalTextRun SpellingErrorV2Themed SCXW124724174 BCX0">CyTech Support</span><span class="NormalTextRun SCXW124724174 BCX0">:</span></span><span class="EOP SCXW124724174 BCX0" data-ccp-props="{"134233117":false,"134233118":false,"335551550":0,"335551620":0,"335559738":240,"335559739":240}"> </span>**</p>

<div class="ListContainerWrapper SCXW124724174 BCX0" id="bkmrk-project-id%C2%A0---the-pr">- <span style="color: rgb(0, 0, 0);"><span class="TextRun SCXW124724174 BCX0" data-contrast="none" lang="EN-US" xml:lang="EN-US">**<span class="NormalTextRun SCXW124724174 BCX0">Project </span>**<span class="NormalTextRun ContextualSpellingAndGrammarErrorV2Themed SCXW124724174 BCX0">**ID** -</span> </span><span class="TextRun SCXW124724174 BCX0" data-contrast="none" lang="EN-US" xml:lang="EN-US"><span class="NormalTextRun SCXW124724174 BCX0">The Project ID is the Google Cloud project ID where your resources exist. </span></span></span>
- <span style="color: rgb(0, 0, 0);"><span class="TextRun SCXW124724174 BCX0" data-contrast="none" lang="EN-US" xml:lang="EN-US"><span class="NormalTextRun SCXW124724174 BCX0">**Credentials File** - </span></span><span class="TextRun SCXW124724174 BCX0" data-contrast="none" lang="EN-US" xml:lang="EN-US"><span class="NormalTextRun SCXW124724174 BCX0">Save the JSON file with the private key in a secure location of the file system, and make sure that the Log Collector Agent has at least read-only privileges to this file.</span></span></span>

</div>#### <span style="color: rgb(53, 152, 219);">**How to integrate to AQUILA CSPM Module**</span>

##### <span style="color: rgb(53, 152, 219);">**Pre-requisites**</span>

1. <span style="color: rgb(0, 0, 0);">**Access to CyTech - AQUILA**</span>
    - <span style="color: rgb(0, 0, 0);">Only users assigned the **"Owner"** or **"Admin"** role can access the Log Collector installation resources within the platform.</span>

<p class="callout success">**To navigate to CSPM Module please follow the instructions below:**</p>

<div class="x_elementToProof" id="bkmrk-step1%3A-log-in-to-cyt">**<span style="color: rgb(0, 0, 0);">Step 1: Log in to CyTech - AQUILA. Click here --&gt;</span> [AQUILACYBER.ai](https://aquilacyber.ai/overview-v3/dashboard/maindashboard)**</div><div class="x_elementToProof" id="bkmrk-step2%3A-click-on-cybe"><span style="color: rgb(0, 0, 0);">**Step 2: Click on Cyber Monitoring.**</span></div>[![image.png](https://cytechint-docs-bookstack.s3.amazonaws.com/uploads/images/gallery/2025-06/scaled-1680-/hItzqzN09q61CMZZ-image.png)](https://cytechint-docs-bookstack.s3.amazonaws.com/uploads/images/gallery/2025-06/hItzqzN09q61CMZZ-image.png)

<span class="TextRun SCXW124724174 BCX0" data-contrast="none" lang="EN-US" style="color: rgb(0, 0, 0);" xml:lang="EN-US"><span class="NormalTextRun SCXW124724174 BCX0">**Step 3: Choose Cloud Security Posture Management (CSPM).**</span></span>

[![image.png](https://cytechint-docs-bookstack.s3.amazonaws.com/uploads/images/gallery/2025-06/scaled-1680-/EbsP1Kz74gmIWnyZ-image.png)](https://cytechint-docs-bookstack.s3.amazonaws.com/uploads/images/gallery/2025-06/EbsP1Kz74gmIWnyZ-image.png)

<span style="color: rgb(0, 0, 0);">**Step 4: Click the "Let's Go" or "Onboard CSPM" icon to launch installation window.**</span>

[![image.png](https://cytechint-docs-bookstack.s3.amazonaws.com/uploads/images/gallery/2025-06/scaled-1680-/h53Z6TJIUeSrsoc5-image.png)](https://cytechint-docs-bookstack.s3.amazonaws.com/uploads/images/gallery/2025-06/h53Z6TJIUeSrsoc5-image.png)

<span style="color: rgb(0, 0, 0);">**Step 5: Click "Let's go" to start the integration process.**</span>

[![image.png](https://cytechint-docs-bookstack.s3.amazonaws.com/uploads/images/gallery/2025-06/scaled-1680-/7DPNcbHQ3TI5nSmY-image.png)](https://cytechint-docs-bookstack.s3.amazonaws.com/uploads/images/gallery/2025-06/7DPNcbHQ3TI5nSmY-image.png)

<span style="color: rgb(0, 0, 0);">**Step 6: Choose your log collector. If you haven't installed a log collector yet choose "New Log Collector" click here --&gt;**</span> [Log Collector Installation](https://docs.cytechint.io/books/log-collector-installations). <span style="color: rgb(0, 0, 0);">**If you have already have an existing log collector choose "Current Log Collector" and click "Next".**</span>

[![image.png](https://cytechint-docs-bookstack.s3.amazonaws.com/uploads/images/gallery/2025-06/scaled-1680-/YmaKgMpQPUBQOutG-image.png)](https://cytechint-docs-bookstack.s3.amazonaws.com/uploads/images/gallery/2025-06/YmaKgMpQPUBQOutG-image.png)

<span style="color: rgb(0, 0, 0);">**Step 7: Click "Next" if the requirements are met.**</span>

[![image.png](https://cytechint-docs-bookstack.s3.amazonaws.com/uploads/images/gallery/2025-06/scaled-1680-/9XREDs3GMrovq966-image.png)](https://cytechint-docs-bookstack.s3.amazonaws.com/uploads/images/gallery/2025-06/9XREDs3GMrovq966-image.png)

<span style="color: rgb(0, 0, 0);">**Step 8: Choose your current log collector. This will collect the logs coming from your log sources.**</span>

[![image.png](https://cytechint-docs-bookstack.s3.amazonaws.com/uploads/images/gallery/2025-06/scaled-1680-/6JtsLkQBByfBwsLN-image.png)](https://cytechint-docs-bookstack.s3.amazonaws.com/uploads/images/gallery/2025-06/6JtsLkQBByfBwsLN-image.png)

<span style="color: rgb(0, 0, 0);">**Step 9: Choose Google Cloud Platform and click "Next" to proceed.**</span>

[![image.png](https://cytechint-docs-bookstack.s3.amazonaws.com/uploads/images/gallery/2025-06/scaled-1680-/IFKXnmI3U8F8BD8P-image.png)](https://cytechint-docs-bookstack.s3.amazonaws.com/uploads/images/gallery/2025-06/IFKXnmI3U8F8BD8P-image.png)

<span style="color: rgb(0, 0, 0);">**Step 10: Input all the required credentials from the previous GCP configurations and click "Next" to initiate the integration process. Wait for couple of minutes until a success window shows up.**</span>

[![image.png](https://cytechint-docs-bookstack.s3.amazonaws.com/uploads/images/gallery/2025-06/scaled-1680-/MmlY4HH1QBJ1g991-image.png)](https://cytechint-docs-bookstack.s3.amazonaws.com/uploads/images/gallery/2025-06/MmlY4HH1QBJ1g991-image.png)

<p class="callout info"><span class="TextRun SCXW124724174 BCX0" data-contrast="none" lang="EN-US" xml:lang="EN-US"><span class="NormalTextRun SCXW124724174 BCX0">**<span style="color: rgb(224, 62, 45);">Please refer to this manual for the full guidelines of our CSPM Module. *click here--&gt;*</span> [CyTech - AQUILA CSPM Manual ](https://docs.cytechint.io/books/log-collector-installations/page/cytech-aquila-cloud-security-posture-management-cspm-module)**</span></span></p>

<span class="EOP SCXW124724174 BCX0" data-ccp-props="{"134233117":false,"134233118":false,"335551550":0,"335551620":0,"335559738":240,"335559739":240}">*If you need further assistance, kindly contact our support at **[support@cytechint.com](mailto:info@cytechint.com)** for prompt assistance and guidance.*</span>

<div class="ListContainerWrapper SCXW124724174 BCX0" id="bkmrk-go-to-iam-%26-admin-%3E-"></div>

# AQUILA GCP Integration

This Google Cloud integration collects and analyzes a wide range of logs and metrics to provide comprehensive visibility into your cloud environment. It ingests **Firewall Logs**, **VPC Flow Logs**, **DNS Logs**, and **Load Balancing Logs** exported from **Cloud Logging** via a **Pub/Sub topic sink**. Additionally, it gathers detailed **metrics and metadata** from **Google Cloud Monitoring** across core services, including **Compute Engine**, **Cloud SQL**, **Cloud Run**, **GKE**, **Firestore**, **Dataproc**, **Pub/Sub**, **Redis**, **Storage**, **Load Balancing**, and **Billing**. This enables in-depth monitoring of infrastructure, application performance, network activity, and cost trends.

##### <span style="color: rgb(53, 152, 219);">**Logs**</span>

- **Firewall Logs**: Record allowed and denied network traffic based on firewall rules.
- **VPC Flow Logs**: Capture IP traffic flowing to and from network interfaces in a VPC.
- **DNS Logs**: Track DNS queries and responses handled by Google Cloud DNS.
- **Load Balancing Logs**: Provide request-level logs of traffic handled by load balancers, including latency and backend info.

---

##### <span style="color: rgb(53, 152, 219);">**Metrics**</span>

- **GCP Billing Metrics**: Track resource usage and cost across GCP services.
- **GCP Compute Metrics**: Monitor performance of Compute Engine instances (CPU, memory, disk, etc.).
- **GCP Firestore Metrics**: Provide insights into Firestore usage like reads, writes, and storage.
- **GCP Load Balancing Metrics**: Measure load balancer traffic, request counts, latency, and backend health.
- **GCP Storage Metrics**: Report usage, operation counts, and latency for Cloud Storage buckets.
- **GCP GKE Metrics**: Monitor Kubernetes clusters including node health, pod usage, and resource consumption.
- **GCP Dataproc Metrics**: Track job status, cluster usage, and Hadoop/Spark performance in Dataproc.
- **GCP PubSub Metrics**: Show message throughput, subscription rates, and processing latency.
- **GCP Redis Metrics**: Display memory usage, operations per second, and cache hit/miss rates for Memorystore Redis.
- **GCP Cloud Run Metrics**: Measure request counts, container instance metrics, and response times.
- **GCP CloudSQL Metrics**: Provide visibility into database performance, including connections, query latency, and CPU usage.

##### <span style="color: rgb(53, 152, 219);">**Authentication**</span>

To use this Google Cloud Platform (GCP) integration, you need to set up a ***Service Account*** with a ***Role*** and a ***Service Account Key*** to access data on your GCP project.

##### <span style="color: rgb(53, 152, 219);">**1. Service Account**</span>

First, you need to [create a Service Account](https://cloud.google.com/iam/docs/creating-managing-service-accounts). A Service Account (SA) is a particular type of Google account intended to represent a non-human user who needs to access the GCP resources.

The AQUILA Agent uses the SA to access data on Google Cloud Platform using the Google APIs.

##### <span style="color: rgb(53, 152, 219);">**2. Required IAM Service Account Roles:**</span>

- **Cloud Memorystore Redis Viewer**: Can view configuration and metadata of Redis instances.
- **Cloud SQL Viewer**: Can view Cloud SQL instance metadata and settings, but not data.
- **Compute Viewer**: Can view all Compute Engine resources (instances, disks, etc.) but not modify them.
- **Logs Viewer**: Can view logs in Cloud Logging across the project.
- **Monitoring Viewer**: Can view monitoring dashboards, alerts, and metrics in Cloud Monitoring.
- **Private Logs Viewer**: Can view all logs, including those with restricted data (e.g., data access logs).
- **Pub/Sub Subscriber**: Grants permission to receive and acknowledge messages from Pub/Sub subscriptions.
- **Viewer**: Read-only access to all resources in a project.

##### <span style="color: rgb(53, 152, 219);">**<span class="TextRun SCXW124724174 BCX0" data-contrast="none" lang="EN-US" xml:lang="EN-US"><span class="NormalTextRun SCXW124724174 BCX0">3. Logs Collection Configuration</span></span><span class="EOP SCXW124724174 BCX0" data-ccp-props="{"134233117":false,"134233118":false,"335551550":1,"335551620":1,"335559738":300,"335559739":300}"> </span>**</span>

<span class="TextRun SCXW124724174 BCX0" data-contrast="none" lang="EN-US" xml:lang="EN-US"><span class="NormalTextRun SCXW124724174 BCX0">With a properly configured Service Account and the integration setting in place, </span><span class="NormalTextRun SCXW124724174 BCX0">it’s</span><span class="NormalTextRun SCXW124724174 BCX0"> time to start collecting some logs.</span></span><span class="EOP SCXW124724174 BCX0" data-ccp-props="{"134233117":false,"134233118":false,"335551550":1,"335551620":1,"335559738":0,"335559739":276}"> </span>

<span style="color: rgb(53, 152, 219);">**<span class="TextRun SCXW124724174 BCX0" data-contrast="none" lang="EN-US" xml:lang="EN-US"><span class="NormalTextRun SCXW124724174 BCX0">Requirements</span></span><span class="EOP SCXW124724174 BCX0" data-ccp-props="{"134233117":false,"134233118":false,"335551550":1,"335551620":1,"335559738":0,"335559739":276}"> </span>**</span>

<span class="TextRun SCXW124724174 BCX0" data-contrast="none" lang="EN-US" xml:lang="EN-US"><span class="NormalTextRun SCXW124724174 BCX0">You need to create a few dedicated Google Cloud resources before starting, in detail:</span></span><span class="EOP SCXW124724174 BCX0" data-ccp-props="{"134233117":false,"134233118":false,"335551550":1,"335551620":1,"335559738":0,"335559739":276}"> </span>

<div class="ListContainerWrapper SCXW124724174 BCX0" id="bkmrk-log-sink%C2%A0">- **Pub/Sub Topic**: A messaging endpoint where publishers send messages that can then be delivered to one or more subscribers.
- **Subscription**: A configuration attached to a Pub/Sub topic that delivers messages to subscribers, either by push or pull.
- **Log Sink**: A configuration that routes logs from Cloud Logging to a specified destination such as Pub/Sub, Cloud Storage, or BigQuery.

</div><p class="callout info"><span class="EOP SCXW124724174 BCX0" data-ccp-props="{"134233117":false,"134233118":false,"335551550":1,"335551620":1,"335559685":0,"335559738":0,"335559739":0}"> </span><span class="TextRun SCXW124724174 BCX0" data-contrast="none" lang="EN-US" xml:lang="EN-US"><span class="NormalTextRun SCXW124724174 BCX0">It’s</span><span class="NormalTextRun SCXW124724174 BCX0"> </span><span class="NormalTextRun ContextualSpellingAndGrammarErrorV2Themed SCXW124724174 BCX0">recommend</span><span class="NormalTextRun ContextualSpellingAndGrammarErrorV2Themed SCXW124724174 BCX0">ed</span> <span class="NormalTextRun SCXW124724174 BCX0">to have </span><span class="NormalTextRun ContextualSpellingAndGrammarErrorV2Themed SCXW124724174 BCX0">a </span><span class="NormalTextRun ContextualSpellingAndGrammarErrorV2Themed SCXW124724174 BCX0">separate</span><span class="NormalTextRun SCXW124724174 BCX0"> Pub/</span><span class="NormalTextRun ContextualSpellingAndGrammarErrorV2Themed SCXW124724174 BCX0">Sub topics</span><span class="NormalTextRun SCXW124724174 BCX0"> for each of the log types so that they can be parsed and stored in a specific data stream.</span></span><span class="EOP SCXW124724174 BCX0" data-ccp-props="{"134233117":false,"134233118":false,"335551550":1,"335551620":1,"335559685":0,"335559738":0,"335559739":0}"> </span></p>

<span class="TextRun SCXW124724174 BCX0" data-contrast="none" lang="EN-US" xml:lang="EN-US"><span class="NormalTextRun SCXW124724174 BCX0">Here’s</span><span class="NormalTextRun SCXW124724174 BCX0"> an example of collecting Audit Logs using a Pub/</span><span class="NormalTextRun ContextualSpellingAndGrammarErrorV2Themed SCXW124724174 BCX0">Sub topic</span><span class="NormalTextRun SCXW124724174 BCX0">, a subscription, and a Log Router. We will create the resources in the Google Cloud Console and then configure the Google Cloud Platform integration.</span></span><span class="EOP SCXW124724174 BCX0" data-ccp-props="{"134233117":false,"134233118":false,"335551550":1,"335551620":1,"335559738":0,"335559739":276}"> </span>

##### <span style="color: rgb(53, 152, 219);">**Example Setup Using Google Cloud Console**</span>

1. Navigate to **"Logging" &gt; "Log Router" &gt; "Create Sink"**.
2. Provide a **Sink name** and description.
3. For **Sink destination**, select **"Cloud Pub/Sub topic"**. Choose an existing topic or create a new one.
4. If a new topic is created, you must also **create a subscription** for it.
5. Under **"Choose logs to include in sink"**, use a filter like: logName:"cloudaudit.googleapis.com"

##### <span style="color: rgb(53, 152, 219);">**4. Enable API Services**</span>

- **Cloud SQL Admin API**: Enables programmatic management of Cloud SQL instances, including creation, configuration, and backups.
- **Memorystore for Redis API**: Allows automated management of Redis instances on Memorystore, including provisioning, scaling, and configuration.

##### <span style="color: rgb(53, 152, 219);">**<span class="TextRun SCXW124724174 BCX0" data-contrast="none" lang="EN-US" xml:lang="EN-US"><span class="NormalTextRun SCXW124724174 BCX0">5. Service Account Key </span></span><span class="EOP SCXW124724174 BCX0" data-ccp-props="{"134233117":false,"134233118":false,"335551550":0,"335551620":0,"335559738":240,"335559739":240}"> </span>**</span>

<span class="TextRun SCXW124724174 BCX0" data-contrast="none" lang="EN-US" xml:lang="EN-US"><span class="NormalTextRun SCXW124724174 BCX0">Next, with the Service Account (SA) with access to Google Cloud Platform (GCP) resources setup, you need some credentials to associate with it: a Service Account Key. </span></span><span class="EOP SCXW124724174 BCX0" data-ccp-props="{"134233117":false,"134233118":false,"335551550":0,"335551620":0,"335559738":240,"335559739":240}"> </span>

<span class="TextRun SCXW124724174 BCX0" data-contrast="none" lang="EN-US" xml:lang="EN-US"><span class="NormalTextRun SCXW124724174 BCX0">From the list of SA (Service Accounts): </span></span><span class="EOP SCXW124724174 BCX0" data-ccp-props="{"134233117":false,"134233118":false,"335551550":0,"335551620":0,"335559738":240,"335559739":240}"> </span>

<div class="ListContainerWrapper SCXW124724174 BCX0" id="bkmrk-go-to%C2%A0iam-%26-admin-%3E-">1. Go to **IAM &amp; Admin &gt; Service Accounts** in the GCP Console.
2. Click the service account you created.
3. Under the **"Keys"** section, click **"Add Key" &gt; "Create new key"**.
4. Choose **JSON** as the key type.
5. **Download and securely store** the generated private key (it cannot be retrieved again from GCP if lost).

</div>
<p class="callout danger">**<span class="TextRun SCXW124724174 BCX0" data-contrast="none" lang="EN-US" xml:lang="EN-US"><span class="NormalTextRun SCXW124724174 BCX0">Please provide the following information to </span><span class="NormalTextRun SpellingErrorV2Themed SCXW124724174 BCX0">CyTech</span><span class="NormalTextRun SCXW124724174 BCX0">:</span></span><span class="EOP SCXW124724174 BCX0" data-ccp-props="{"134233117":false,"134233118":false,"335551550":0,"335551620":0,"335559738":240,"335559739":240}"> </span>**</p>

<div class="ListContainerWrapper SCXW124724174 BCX0" id="bkmrk-project-id%C2%A0---the-pr">- <span class="TextRun SCXW124724174 BCX0" data-contrast="none" lang="EN-US" xml:lang="EN-US">**<span class="NormalTextRun SCXW124724174 BCX0">Project </span>**<span class="NormalTextRun ContextualSpellingAndGrammarErrorV2Themed SCXW124724174 BCX0">**ID** -</span> </span><span class="TextRun SCXW124724174 BCX0" data-contrast="none" lang="EN-US" xml:lang="EN-US"><span class="NormalTextRun SCXW124724174 BCX0">The Project ID is the Google Cloud project ID where your resources exist. </span></span>
- <span class="TextRun SCXW124724174 BCX0" data-contrast="none" lang="EN-US" xml:lang="EN-US"><span class="NormalTextRun SCXW124724174 BCX0">**Credentials File** - </span></span><span class="TextRun SCXW124724174 BCX0" data-contrast="none" lang="EN-US" xml:lang="EN-US"><span class="NormalTextRun SCXW124724174 BCX0">Save the JSON file with the private key in a secure location of the file system, and make sure that the Log Collector Agent has at least read-only privileges to this file.</span><span class="NormalTextRun SCXW124724174 BCX0"> </span></span><span class="TextRun SCXW124724174 BCX0" data-contrast="none" lang="EN-US" xml:lang="EN-US"><span class="NormalTextRun SCXW124724174 BCX0">Specify the file path in the Log Collector Agent integration UI in the "Credentials File" field. For example: /home/ubuntu/</span><span class="NormalTextRun SpellingErrorV2Themed SCXW124724174 BCX0">credentials.json</span><span class="NormalTextRun SCXW124724174 BCX0">.</span></span>
- <span class="TextRun SCXW124724174 BCX0" data-contrast="none" lang="EN-US" xml:lang="EN-US">**<span class="NormalTextRun SCXW124724174 BCX0">Pub/</span><span class="NormalTextRun SCXW124724174 BCX0">Sub Topic</span>**<span class="NormalTextRun SCXW124724174 BCX0"> </span><span class="NormalTextRun SCXW124724174 BCX0">- </span></span><span class="TextRun SCXW124724174 BCX0" data-contrast="none" lang="EN-US" xml:lang="EN-US"><span class="NormalTextRun SCXW124724174 BCX0">Name of the topic where the logs are written to.</span></span>
- <span class="TextRun SCXW124724174 BCX0" data-contrast="none" lang="EN-US" xml:lang="EN-US">**<span class="NormalTextRun SCXW124724174 BCX0">Subscription</span>**<span class="NormalTextRun SCXW124724174 BCX0"> - </span></span><span class="TextRun SCXW124724174 BCX0" data-contrast="none" lang="EN-US" xml:lang="EN-US"><span class="NormalTextRun SCXW124724174 BCX0">Use the short subscription name here, not the full-blown path with the project ID. You can find it as "Subscription ID" on the Google Cloud Console.</span></span><span class="EOP SCXW124724174 BCX0" data-ccp-props="{"134233117":false,"134233118":false,"335551550":0,"335551620":0,"335559738":240,"335559739":240}"> </span>

</div><span class="EOP SCXW124724174 BCX0" data-ccp-props="{"134233117":false,"134233118":false,"335551550":0,"335551620":0,"335559738":240,"335559739":240}">*If you need further assistance, kindly contact our support at **[support@cytechint.com](mailto:info@cytechint.com)** for prompt assistance and guidance.*</span>

<div class="ListContainerWrapper SCXW124724174 BCX0" id="bkmrk-go-to-iam-%26-admin-%3E-"></div>

# Atlassian Bitbucket Integrations

##### <span style="color: rgb(53, 152, 219);">**<span class="TextRun SCXW200387551 BCX8" data-contrast="none" lang="EN-US" xml:lang="EN-US"><span class="NormalTextRun SCXW200387551 BCX8" data-ccp-charstyle="Style (Complex) Open Sans" data-ccp-charstyle-defn="{"ObjectId":"a006c213-dbb7-4dd5-9687-d2ba335f6fc5|49","ClassId":1073872969,"Properties":[469775450,"Style (Complex) Open Sans",201340122,"1",134233614,"true",469778129,"StyleComplexOpenSans",335572020,"1",201342448,"1",469777841,"Open Sans",469777842,"Open Sans",469777843,"Calibri",469777844,"Open Sans",469769226,"Open Sans,Calibri",469778324,"Default Paragraph Font"]}">Introduction</span></span><span class="EOP SCXW200387551 BCX8" data-ccp-props="{"134245418":true,"134245529":true,"201341983":0,"335559738":240,"335559739":0,"335559740":360}"> </span>**</span>

<span class="TextRun SCXW200387551 BCX8" data-contrast="auto" lang="EN-US" xml:lang="EN-US"><span class="NormalTextRun SCXW200387551 BCX8" data-ccp-charstyle="Style (Complex) Open Sans">The </span><span class="NormalTextRun SCXW200387551 BCX8" data-ccp-charstyle="Style (Complex) Open Sans">Bitbucket</span><span class="NormalTextRun SCXW200387551 BCX8" data-ccp-charstyle="Style (Complex) Open Sans"> integration collects audit logs from the audit log files or the </span></span>[<span class="TextRun Underlined SCXW200387551 BCX8" data-contrast="none" lang="EN-US" xml:lang="EN-US"><span class="NormalTextRun SCXW200387551 BCX8" data-ccp-charstyle="Hyperlink">audit API</span></span>](https://developer.atlassian.com/server/bitbucket/reference/rest-api/)<span class="TextRun SCXW200387551 BCX8" data-contrast="auto" lang="EN-US" xml:lang="EN-US"><span class="NormalTextRun SCXW200387551 BCX8" data-ccp-charstyle="Style (Complex) Open Sans">.</span></span><span class="EOP SCXW200387551 BCX8" data-ccp-props="{"201341983":0,"335559685":360,"335559739":160,"335559740":259}"> </span>

<span class="TextRun SCXW200387551 BCX8" data-contrast="auto" lang="EN-US" xml:lang="EN-US"><span class="NormalTextRun SCXW200387551 BCX8" data-ccp-charstyle="Style (Complex) Open Sans">Reference: </span></span> [<span class="TextRun Underlined SCXW200387551 BCX8" data-contrast="none" lang="EN-US" xml:lang="EN-US"><span class="NormalTextRun SCXW200387551 BCX8" data-ccp-charstyle="Hyperlink">https://developer.atlassian.com/server/bitbucket/reference/rest-api/</span></span>](https://developer.atlassian.com/server/bitbucket/reference/rest-api/) <span class="EOP SCXW200387551 BCX8" data-ccp-props="{"201341983":0,"335559731":360,"335559739":160,"335559740":259}"> </span>

<div class="SCXW200387551 BCX8" id="bkmrk-"><div class="OutlineElement Ltr SCXW200387551 BCX8">  
</div><div class="ListContainerWrapper SCXW200387551 BCX8">  
</div></div>##### <span style="color: rgb(53, 152, 219);">**<span class="TextRun SCXW200387551 BCX8" data-contrast="none" lang="EN-US" xml:lang="EN-US"><span class="NormalTextRun SCXW200387551 BCX8" data-ccp-charstyle="Style (Complex) Open Sans">Assumptions</span></span><span class="EOP SCXW200387551 BCX8" data-ccp-props="{"134245418":true,"134245529":true,"201341983":0,"335559738":240,"335559739":0,"335559740":360}"> </span>**</span>

<span class="TextRun SCXW200387551 BCX8" data-contrast="auto" lang="EN-US" xml:lang="EN-US"><span class="NormalTextRun SCXW200387551 BCX8" data-ccp-charstyle="Style (Complex) Open Sans">The procedures described in Section </span></span><span class="FieldRange SCXW200387551 BCX8"><span class="TextRun SCXW200387551 BCX8" data-contrast="auto" lang="EN-US" xml:lang="EN-US"><span class="NormalTextRun SCXW200387551 BCX8" data-ccp-charstyle="Style (Complex) Open Sans">3</span></span></span><span class="TextRun SCXW200387551 BCX8" data-contrast="auto" lang="EN-US" xml:lang="EN-US"> <span class="NormalTextRun SCXW200387551 BCX8" data-ccp-charstyle="Style (Complex) Open Sans">assume</span><span class="NormalTextRun SCXW200387551 BCX8" data-ccp-charstyle="Style (Complex) Open Sans"> that a Log Collector has already been </span><span class="NormalTextRun SCXW200387551 BCX8" data-ccp-charstyle="Style (Complex) Open Sans">set up</span><span class="NormalTextRun SCXW200387551 BCX8" data-ccp-charstyle="Style (Complex) Open Sans">. </span></span><span class="EOP SCXW200387551 BCX8" data-ccp-props="{"201341983":0,"335559685":360,"335559739":160,"335559740":259}"> </span>

<div class="SCXW200387551 BCX8" id="bkmrk--1"><div class="OutlineElement Ltr SCXW200387551 BCX8">  
</div><div class="ListContainerWrapper SCXW200387551 BCX8">  
</div></div>##### <span style="color: rgb(53, 152, 219);">**<span class="TextRun SCXW200387551 BCX8" data-contrast="none" lang="EN-US" xml:lang="EN-US"><span class="NormalTextRun SCXW200387551 BCX8" data-ccp-charstyle="Style (Complex) Open Sans">Requirements</span></span><span class="EOP SCXW200387551 BCX8" data-ccp-props="{"134245418":true,"134245529":true,"201341983":0,"335559738":240,"335559739":0,"335559740":360}"> </span>**</span>

<span class="TextRun SCXW200387551 BCX8" data-contrast="auto" lang="EN-US" xml:lang="EN-US"><span class="NormalTextRun SCXW200387551 BCX8" data-ccp-charstyle="Style (Complex) Open Sans">For more information on auditing in Bitbucket and how it can be configured, see </span></span>[<span class="TextRun Underlined SCXW200387551 BCX8" data-contrast="none" lang="EN-US" xml:lang="EN-US"><span class="NormalTextRun SCXW200387551 BCX8" data-ccp-charstyle="Hyperlink">View and configure the audit log</span></span>](https://confluence.atlassian.com/bitbucketserver/view-and-configure-the-audit-log-776640417.html)<span class="TextRun SCXW200387551 BCX8" data-contrast="auto" lang="EN-US" xml:lang="EN-US"><span class="NormalTextRun SCXW200387551 BCX8" data-ccp-charstyle="Style (Complex) Open Sans"> on Atlassian's website.</span></span><span class="EOP SCXW200387551 BCX8" data-ccp-props="{"201341983":0,"335559685":360,"335559739":160,"335559740":259}"> </span>

<span class="TextRun SCXW200387551 BCX8" data-contrast="auto" lang="EN-US" xml:lang="EN-US"><span class="NormalTextRun SCXW200387551 BCX8" data-ccp-charstyle="Style (Complex) Open Sans">Reference:</span> </span>[<span class="TextRun Underlined SCXW200387551 BCX8" data-contrast="none" lang="EN-US" xml:lang="EN-US"><span class="NormalTextRun SCXW200387551 BCX8" data-ccp-charstyle="Hyperlink">https://confluence.atlassian.com/bitbucketserver/view-and-configure-the-audit-log-776640417.html</span></span>](https://confluence.atlassian.com/bitbucketserver/view-and-configure-the-audit-log-776640417.html) <span class="EOP SCXW200387551 BCX8" data-ccp-props="{"201341983":0,"335559685":360,"335559739":160,"335559740":259}"> </span>

<span class="EOP SCXW200387551 BCX8" data-ccp-props="{"201341983":0,"335559685":360,"335559739":160,"335559740":259}"> </span>

##### <span style="color: rgb(53, 152, 219);">**<span class="TextRun SCXW200387551 BCX8" data-contrast="auto" lang="EN-US" xml:lang="EN-US"><span class="NormalTextRun SCXW200387551 BCX8" data-ccp-charstyle="Style (Complex) Open Sans">Logs</span></span><span class="EOP SCXW200387551 BCX8" data-ccp-props="{"201341983":0,"335559685":360,"335559739":160,"335559740":259}"> </span>**</span>

**<span class="TextRun SCXW200387551 BCX8" data-contrast="auto" lang="EN-US" xml:lang="EN-US"><span class="NormalTextRun SCXW200387551 BCX8" data-ccp-charstyle="Style (Complex) Open Sans">Audit</span></span><span class="EOP SCXW200387551 BCX8" data-ccp-props="{"201341983":0,"335559685":360,"335559739":160,"335559740":259}"> </span>**

<span class="TextRun SCXW200387551 BCX8" data-contrast="auto" lang="EN-US" xml:lang="EN-US"><span class="NormalTextRun SCXW200387551 BCX8" data-ccp-charstyle="Style (Complex) Open Sans">The </span><span class="NormalTextRun SCXW200387551 BCX8" data-ccp-charstyle="Style (Complex) Open Sans">Confluence</span><span class="NormalTextRun SCXW200387551 BCX8" data-ccp-charstyle="Style (Complex) Open Sans"> integration collects audit logs from the audit log files or the audit API from self-hosted </span><span class="NormalTextRun SCXW200387551 BCX8" data-ccp-charstyle="Style (Complex) Open Sans">Confluence</span><span class="NormalTextRun SCXW200387551 BCX8" data-ccp-charstyle="Style (Complex) Open Sans"> Data Center. It has been tested with </span><span class="NormalTextRun SCXW200387551 BCX8" data-ccp-charstyle="Style (Complex) Open Sans">Confluence 7.14</span><span class="NormalTextRun SCXW200387551 BCX8" data-ccp-charstyle="Style (Complex) Open Sans">.2 but is expected to work with newer versions. As of version 1.2.0, this integration added experimental support for Atlassian </span><span class="NormalTextRun SCXW200387551 BCX8" data-ccp-charstyle="Style (Complex) Open Sans">Confluence</span><span class="NormalTextRun SCXW200387551 BCX8" data-ccp-charstyle="Style (Complex) Open Sans"> Cloud. JIRA Cloud only supports Basic Auth using </span><span class="NormalTextRun ContextualSpellingAndGrammarErrorV2Themed SCXW200387551 BCX8" data-ccp-charstyle="Style (Complex) Open Sans">username</span><span class="NormalTextRun SCXW200387551 BCX8" data-ccp-charstyle="Style (Complex) Open Sans"> and a Personal Access Token.</span></span><span class="EOP SCXW200387551 BCX8" data-ccp-props="{"201341983":0,"335559685":360,"335559739":160,"335559740":259}"> </span>

<div class="SCXW200387551 BCX8" id="bkmrk--2"><div class="OutlineElement Ltr SCXW200387551 BCX8">  
</div><div class="ListContainerWrapper SCXW200387551 BCX8">  
</div></div>##### <span style="color: rgb(53, 152, 219);">**<span class="TextRun SCXW200387551 BCX8" data-contrast="none" lang="EN-US" xml:lang="EN-US"><span class="NormalTextRun SCXW200387551 BCX8" data-ccp-charstyle="Style (Complex) Open Sans">Atlassian </span><span class="NormalTextRun SCXW200387551 BCX8" data-ccp-charstyle="Style (Complex) Open Sans">Bitbucket </span><span class="NormalTextRun SCXW200387551 BCX8" data-ccp-charstyle="Style (Complex) Open Sans">I</span><span class="NormalTextRun SCXW200387551 BCX8" data-ccp-charstyle="Style (Complex) Open Sans">ntegration </span><span class="NormalTextRun SCXW200387551 BCX8" data-ccp-charstyle="Style (Complex) Open Sans">Procedures</span></span><span class="EOP SCXW200387551 BCX8" data-ccp-props="{"134245418":true,"134245529":true,"201341983":0,"335559738":240,"335559739":0,"335559740":360}"> </span>**</span>

<div class="SCXW200387551 BCX8" id="bkmrk--3"><div class="ListContainerWrapper SCXW200387551 BCX8">  
</div><div class="OutlineElement Ltr SCXW200387551 BCX8">  
</div></div><span class="TextRun Highlight SCXW200387551 BCX8" data-contrast="none" lang="EN-US" xml:lang="EN-US"><span class="NormalTextRun SCXW200387551 BCX8" data-ccp-charstyle="normaltextrun" data-ccp-charstyle-defn="{"ObjectId":"a006c213-dbb7-4dd5-9687-d2ba335f6fc5|73","ClassId":1073872969,"Properties":[469775450,"normaltextrun",201340122,"1",134233614,"true",469778129,"normaltextrun",335572020,"1",469778324,"Default Paragraph Font"]}">Please provide the following information to </span><span class="NormalTextRun SpellingErrorV2Themed SCXW200387551 BCX8" data-ccp-charstyle="normaltextrun">CyTech</span><span class="NormalTextRun SCXW200387551 BCX8" data-ccp-charstyle="normaltextrun">:</span><span class="NormalTextRun SCXW200387551 BCX8" data-ccp-charstyle="eop" data-ccp-charstyle-defn="{"ObjectId":"a006c213-dbb7-4dd5-9687-d2ba335f6fc5|74","ClassId":1073872969,"Properties":[469775450,"eop",201340122,"1",134233614,"true",469778129,"eop",335572020,"1",469778324,"Default Paragraph Font"]}"> </span></span>

<span class="TextRun SCXW200387551 BCX8" data-contrast="none" lang="EN-US" xml:lang="EN-US">**<span class="NormalTextRun SCXW200387551 BCX8" data-ccp-charstyle="CyTech Heading 1 Char">Collect Bitbucket audit logs via log </span><span class="NormalTextRun SCXW200387551 BCX8" data-ccp-charstyle="CyTech Heading 1 Char">files</span>**</span>**<span class="EOP SCXW200387551 BCX8" data-ccp-props="{"134245418":true,"134245529":true,"201341983":0,"335559685":360,"335559738":40,"335559739":0,"335559740":360}"> </span>**

<div class="SCXW200387551 BCX8" id="bkmrk-path%C2%A0-preserve-origi"><div class="ListContainerWrapper SCXW200387551 BCX8">1. <span class="TextRun SCXW200387551 BCX8" data-contrast="auto" lang="EN-US" xml:lang="EN-US"><span class="NormalTextRun SCXW200387551 BCX8">Path</span></span><span class="EOP SCXW200387551 BCX8" data-ccp-props="{"201341983":0,"335559685":1080,"335559739":160,"335559740":259}"> </span>

</div><div class="ListContainerWrapper SCXW200387551 BCX8">2. <span class="TextRun SCXW200387551 BCX8" data-contrast="auto" lang="EN-US" xml:lang="EN-US"><span class="NormalTextRun SCXW200387551 BCX8">Preserve </span><span class="NormalTextRun SCXW200387551 BCX8">O</span><span class="NormalTextRun SCXW200387551 BCX8">riginal </span><span class="NormalTextRun SCXW200387551 BCX8">E</span><span class="NormalTextRun SCXW200387551 BCX8">vent</span><span class="NormalTextRun SCXW200387551 BCX8">?</span><span class="NormalTextRun SCXW200387551 BCX8"> (Enable Yes/No)</span></span><span class="EOP SCXW200387551 BCX8" data-ccp-props="{"201341983":0,"335559685":1080,"335559739":160,"335559740":259}"> </span>

</div><div class="ListContainerWrapper SCXW200387551 BCX8">- <span class="TextRun SCXW200387551 BCX8" data-contrast="auto" lang="EN-US" xml:lang="EN-US"><span class="NormalTextRun SCXW200387551 BCX8">Preserves a raw copy of the original event, added to the field </span><span class="NormalTextRun SpellingErrorV2Themed SCXW200387551 BCX8">event.original</span></span><span class="EOP SCXW200387551 BCX8" data-ccp-props="{"201341983":0,"335559685":2520,"335559739":160,"335559740":259}"> </span>

</div><div class="ListContainerWrapper SCXW200387551 BCX8">3. <span class="TextRun SCXW200387551 BCX8" data-contrast="auto" lang="EN-US" xml:lang="EN-US"><span class="NormalTextRun SCXW200387551 BCX8">Tags</span></span><span class="EOP SCXW200387551 BCX8" data-ccp-props="{"201341983":0,"335559685":1080,"335559739":160,"335559740":259}"> </span>

</div><div class="ListContainerWrapper SCXW200387551 BCX8">4. <span class="TextRun SCXW200387551 BCX8" data-contrast="auto" lang="EN-US" xml:lang="EN-US"><span class="NormalTextRun SCXW200387551 BCX8">Processors (Optional)</span></span><span class="EOP SCXW200387551 BCX8" data-ccp-props="{"201341983":0,"335559739":160,"335559740":259}"> </span>

</div><div class="ListContainerWrapper SCXW200387551 BCX8">5. <span class="TextRun SCXW200387551 BCX8" data-contrast="auto" lang="EN-US" xml:lang="EN-US"><span class="NormalTextRun SCXW200387551 BCX8">Processors are used to reduce the number of fields in the exported event or to enhance the event with metadata. This executes in the agent before the logs are parsed.</span></span><span class="EOP SCXW200387551 BCX8" data-ccp-props="{"201341983":0,"335559739":160,"335559740":259}"> </span>

</div><div class="ListContainerWrapper SCXW200387551 BCX8">6. <span class="TextRun SCXW200387551 BCX8" data-contrast="auto" lang="EN-US" xml:lang="EN-US"><span class="NormalTextRun SCXW200387551 BCX8">Indexing settings (experimental</span><span class="NormalTextRun SCXW200387551 BCX8">) (Enable Yes/No)</span></span><span class="EOP SCXW200387551 BCX8" data-ccp-props="{"201341983":0,"335559739":160,"335559740":259}"> </span>

</div><div class="ListContainerWrapper SCXW200387551 BCX8">7. <span class="TextRun SCXW200387551 BCX8" data-contrast="auto" lang="EN-US" xml:lang="EN-US"><span class="NormalTextRun SCXW200387551 BCX8">Select data streams to configure indexing options. This is an experimental feature and may have effects on other properties.</span></span><span class="EOP SCXW200387551 BCX8" data-ccp-props="{"201341983":0,"335559739":160,"335559740":259}"> </span>

</div></div><span class="TextRun SCXW200387551 BCX8" data-contrast="none" lang="EN-US" xml:lang="EN-US">**<span class="NormalTextRun SCXW200387551 BCX8" data-ccp-charstyle="CyTech Heading 1 Char">Collect Bitbucket audit logs via API</span><span class="NormalTextRun SCXW200387551 BCX8" data-ccp-charstyle="CyTech Heading 1 Char"> (Enable Yes/No)</span>**</span>**<span class="EOP SCXW200387551 BCX8" data-ccp-props="{"201341983":0,"335559685":720,"335559739":160,"335559740":259}"> </span>**

<div class="SCXW200387551 BCX8" id="bkmrk-api-url---the-api-ur"><div class="OutlineElement Ltr SCXW200387551 BCX8">  
</div><div class="ListContainerWrapper SCXW200387551 BCX8">1. <span class="TextRun Highlight SCXW200387551 BCX8" data-contrast="none" lang="EN-CA" xml:lang="EN-CA"><span class="NormalTextRun SCXW200387551 BCX8" data-ccp-parastyle="CyTech Heading 2" data-ccp-parastyle-defn="{"ObjectId":"a006c213-dbb7-4dd5-9687-d2ba335f6fc5|21","ClassId":1073872969,"Properties":[469775450,"CyTech Heading 2",201340122,"2",134234082,"true",134233614,"true",469778129,"CyTechHeading2",335572020,"1",201342448,"2",469777841,"Open Sans",469777842,"Open Sans",469777843,"",469777844,"Open Sans",469769226,"Open Sans",335551500,"14393361",268442635,"28",335551547,"4105",335559740,"360",201341983,"0",335559739,"0",335559738,"40",335560102,"1",134245418,"true",134245529,"true",469777929,"CyTech Heading 2 Char",469778324,"heading 2"]}" data-ccp-parastyle-linked-defn="{"ObjectId":"a006c213-dbb7-4dd5-9687-d2ba335f6fc5|24","ClassId":1073872969,"Properties":[469775450,"CyTech Heading 2 Char",201340122,"1",134233614,"true",469778129,"CyTechHeading2Char",335572020,"1",134231262,"true",201342448,"2",469777841,"Open Sans",469777842,"Open Sans",469777843,"",469777844,"Open Sans",469769226,"Open Sans",335551500,"14393361",268442635,"28",335551547,"4105",469777929,"CyTech Heading 2",469778324,"Heading 2 Char"]}">API URL</span><span class="NormalTextRun SCXW200387551 BCX8" data-ccp-parastyle="CyTech Heading 2"> - </span><span class="NormalTextRun SCXW200387551 BCX8" data-ccp-parastyle="CyTech Heading 2">The API URL without the path.</span></span><span class="EOP SCXW200387551 BCX8" data-ccp-props="{"134245418":true,"134245529":true,"201341983":0,"335559685":1125,"335559738":40,"335559739":0,"335559740":360}"> </span>

</div><div class="ListContainerWrapper SCXW200387551 BCX8">2. <span class="TextRun Highlight SCXW200387551 BCX8" data-contrast="none" lang="EN-CA" xml:lang="EN-CA"><span class="NormalTextRun SCXW200387551 BCX8" data-ccp-parastyle="CyTech Heading 2">Bitbucket Username</span><span class="NormalTextRun SCXW200387551 BCX8" data-ccp-parastyle="CyTech Heading 2"> - </span><span class="NormalTextRun SCXW200387551 BCX8" data-ccp-parastyle="CyTech Heading 2">JIRA Username. Needs to be used with a Password. Do not fill if you are using a personal access token.</span></span><span class="EOP SCXW200387551 BCX8" data-ccp-props="{"134245418":true,"134245529":true,"201341983":0,"335559685":1125,"335559738":40,"335559739":0,"335559740":360}"> </span>

</div></div><div class="SCXW200387551 BCX8" id="bkmrk-bitbucket-password--"><div class="ListContainerWrapper SCXW200387551 BCX8">3. <span class="TextRun Highlight SCXW200387551 BCX8" data-contrast="none" lang="EN-CA" xml:lang="EN-CA"><span class="NormalTextRun SCXW200387551 BCX8" data-ccp-parastyle="CyTech Heading 2">Bitbucket Password</span><span class="NormalTextRun SCXW200387551 BCX8" data-ccp-parastyle="CyTech Heading 2"> - </span><span class="NormalTextRun SCXW200387551 BCX8" data-ccp-parastyle="CyTech Heading 2">JIRA Password. Needs to be used with a Username. Do not fill if you are using a personal access token.</span></span><span class="EOP SCXW200387551 BCX8" data-ccp-props="{"134245418":true,"134245529":true,"201341983":0,"335559685":1125,"335559738":40,"335559739":0,"335559740":360}"> </span>

</div><div class="ListContainerWrapper SCXW200387551 BCX8">4. <span class="TextRun Highlight SCXW200387551 BCX8" data-contrast="none" lang="EN-CA" xml:lang="EN-CA"><span class="NormalTextRun SCXW200387551 BCX8" data-ccp-parastyle="CyTech Heading 2">Personal Access Token</span><span class="NormalTextRun SCXW200387551 BCX8" data-ccp-parastyle="CyTech Heading 2"> - </span><span class="NormalTextRun SCXW200387551 BCX8" data-ccp-parastyle="CyTech Heading 2">The Personal Access Token. If set, Username and Password will be ignored.</span></span><span class="EOP SCXW200387551 BCX8" data-ccp-props="{"134245418":true,"134245529":true,"201341983":0,"335559685":1125,"335559738":40,"335559739":0,"335559740":360}"> </span>

</div><div class="ListContainerWrapper SCXW200387551 BCX8">5. <span class="TextRun Highlight SCXW200387551 BCX8" data-contrast="none" lang="EN-CA" xml:lang="EN-CA"><span class="NormalTextRun SCXW200387551 BCX8" data-ccp-parastyle="CyTech Heading 2">Initial Interval</span><span class="NormalTextRun SCXW200387551 BCX8" data-ccp-parastyle="CyTech Heading 2"> - </span><span class="NormalTextRun SCXW200387551 BCX8" data-ccp-parastyle="CyTech Heading 2">Initial interval for the first API call. Defaults to 24 hours.</span></span><span class="EOP SCXW200387551 BCX8" data-ccp-props="{"134245418":true,"134245529":true,"201341983":0,"335559738":40,"335559739":0,"335559740":360}"> </span>

</div></div>

# Atlassian Bitbucket Integrations (New)

##### **<span class="TextRun SCXW200387551 BCX8" data-contrast="none" lang="EN-US" xml:lang="EN-US"><span class="NormalTextRun SCXW200387551 BCX8" data-ccp-charstyle="Style (Complex) Open Sans" data-ccp-charstyle-defn="{"ObjectId":"a006c213-dbb7-4dd5-9687-d2ba335f6fc5|49","ClassId":1073872969,"Properties":[469775450,"Style (Complex) Open Sans",201340122,"1",134233614,"true",469778129,"StyleComplexOpenSans",335572020,"1",201342448,"1",469777841,"Open Sans",469777842,"Open Sans",469777843,"Calibri",469777844,"Open Sans",469769226,"Open Sans,Calibri",469778324,"Default Paragraph Font"]}">Introduction</span></span><span class="EOP SCXW200387551 BCX8" data-ccp-props="{"134245418":true,"134245529":true,"201341983":0,"335559738":240,"335559739":0,"335559740":360}"> </span>**

<span class="TextRun SCXW200387551 BCX8" data-contrast="auto" lang="EN-US" xml:lang="EN-US"><span class="NormalTextRun SCXW200387551 BCX8" data-ccp-charstyle="Style (Complex) Open Sans">The </span><span class="NormalTextRun SCXW200387551 BCX8" data-ccp-charstyle="Style (Complex) Open Sans">Bitbucket</span><span class="NormalTextRun SCXW200387551 BCX8" data-ccp-charstyle="Style (Complex) Open Sans"> integration collects audit logs from the audit log files or the </span></span>[<span class="TextRun Underlined SCXW200387551 BCX8" data-contrast="none" lang="EN-US" xml:lang="EN-US"><span class="NormalTextRun SCXW200387551 BCX8" data-ccp-charstyle="Hyperlink">audit API</span></span>](https://developer.atlassian.com/server/bitbucket/reference/rest-api/)<span class="TextRun SCXW200387551 BCX8" data-contrast="auto" lang="EN-US" xml:lang="EN-US"><span class="NormalTextRun SCXW200387551 BCX8" data-ccp-charstyle="Style (Complex) Open Sans">.</span></span><span class="EOP SCXW200387551 BCX8" data-ccp-props="{"201341983":0,"335559685":360,"335559739":160,"335559740":259}"> </span>

<span class="TextRun SCXW200387551 BCX8" data-contrast="auto" lang="EN-US" xml:lang="EN-US"><span class="NormalTextRun SCXW200387551 BCX8" data-ccp-charstyle="Style (Complex) Open Sans">Reference: </span></span> <span class="TextRun Underlined SCXW200387551 BCX8" data-contrast="none" lang="EN-US" xml:lang="EN-US"><span class="NormalTextRun SCXW200387551 BCX8" data-ccp-charstyle="Hyperlink">[https://developer.atlassian.com/server/bitbucket/reference/rest-api/](https://developer.atlassian.com/server/bitbucket/reference/rest-api/)</span></span> <span class="EOP SCXW200387551 BCX8" data-ccp-props="{"201341983":0,"335559731":360,"335559739":160,"335559740":259}"> </span>

##### **<span class="TextRun SCXW200387551 BCX8" data-contrast="none" lang="EN-US" xml:lang="EN-US"><span class="NormalTextRun SCXW200387551 BCX8" data-ccp-charstyle="Style (Complex) Open Sans">Assumptions</span></span><span class="EOP SCXW200387551 BCX8" data-ccp-props="{"134245418":true,"134245529":true,"201341983":0,"335559738":240,"335559739":0,"335559740":360}"> </span>**

<span class="TextRun SCXW200387551 BCX8" data-contrast="auto" lang="EN-US" xml:lang="EN-US"><span class="NormalTextRun SCXW200387551 BCX8" data-ccp-charstyle="Style (Complex) Open Sans">The procedures described in Section </span></span><span class="FieldRange SCXW200387551 BCX8"><span class="TextRun SCXW200387551 BCX8" data-contrast="auto" lang="EN-US" xml:lang="EN-US"><span class="NormalTextRun SCXW200387551 BCX8" data-ccp-charstyle="Style (Complex) Open Sans">3</span></span></span><span class="TextRun SCXW200387551 BCX8" data-contrast="auto" lang="EN-US" xml:lang="EN-US"> <span class="NormalTextRun SCXW200387551 BCX8" data-ccp-charstyle="Style (Complex) Open Sans">assume</span><span class="NormalTextRun SCXW200387551 BCX8" data-ccp-charstyle="Style (Complex) Open Sans"> that a Log Collector has already been </span><span class="NormalTextRun SCXW200387551 BCX8" data-ccp-charstyle="Style (Complex) Open Sans">set up</span><span class="NormalTextRun SCXW200387551 BCX8" data-ccp-charstyle="Style (Complex) Open Sans">. </span></span><span class="EOP SCXW200387551 BCX8" data-ccp-props="{"201341983":0,"335559685":360,"335559739":160,"335559740":259}"> </span>

<div class="SCXW200387551 BCX8" id="bkmrk--1"></div>##### **<span class="TextRun SCXW200387551 BCX8" data-contrast="none" lang="EN-US" xml:lang="EN-US"><span class="NormalTextRun SCXW200387551 BCX8" data-ccp-charstyle="Style (Complex) Open Sans">Requirements</span></span><span class="EOP SCXW200387551 BCX8" data-ccp-props="{"134245418":true,"134245529":true,"201341983":0,"335559738":240,"335559739":0,"335559740":360}"> </span>**

<span class="TextRun SCXW200387551 BCX8" data-contrast="auto" lang="EN-US" xml:lang="EN-US"><span class="NormalTextRun SCXW200387551 BCX8" data-ccp-charstyle="Style (Complex) Open Sans">For more information on auditing in Bitbucket and how it can be configured, see </span></span>[<span class="TextRun Underlined SCXW200387551 BCX8" data-contrast="none" lang="EN-US" xml:lang="EN-US"><span class="NormalTextRun SCXW200387551 BCX8" data-ccp-charstyle="Hyperlink">View and configure the audit log</span></span>](https://confluence.atlassian.com/bitbucketserver/view-and-configure-the-audit-log-776640417.html)<span class="TextRun SCXW200387551 BCX8" data-contrast="auto" lang="EN-US" xml:lang="EN-US"><span class="NormalTextRun SCXW200387551 BCX8" data-ccp-charstyle="Style (Complex) Open Sans"> on Atlassian's website.</span></span><span class="EOP SCXW200387551 BCX8" data-ccp-props="{"201341983":0,"335559685":360,"335559739":160,"335559740":259}"> </span>

<span class="TextRun SCXW200387551 BCX8" data-contrast="auto" lang="EN-US" xml:lang="EN-US"><span class="NormalTextRun SCXW200387551 BCX8" data-ccp-charstyle="Style (Complex) Open Sans">Reference:</span> </span>[<span class="TextRun Underlined SCXW200387551 BCX8" data-contrast="none" lang="EN-US" xml:lang="EN-US"><span class="NormalTextRun SCXW200387551 BCX8" data-ccp-charstyle="Hyperlink">https://confluence.atlassian.com/bitbucketserver/view-and-configure-the-audit-log-776640417.html</span></span>](https://confluence.atlassian.com/bitbucketserver/view-and-configure-the-audit-log-776640417.html) <span class="EOP SCXW200387551 BCX8" data-ccp-props="{"201341983":0,"335559685":360,"335559739":160,"335559740":259}"> </span>

##### **<span class="TextRun SCXW200387551 BCX8" data-contrast="auto" lang="EN-US" xml:lang="EN-US"><span class="NormalTextRun SCXW200387551 BCX8" data-ccp-charstyle="Style (Complex) Open Sans">Logs</span></span><span class="EOP SCXW200387551 BCX8" data-ccp-props="{"201341983":0,"335559685":360,"335559739":160,"335559740":259}"> </span>**

**<span class="TextRun SCXW200387551 BCX8" data-contrast="auto" lang="EN-US" xml:lang="EN-US"><span class="NormalTextRun SCXW200387551 BCX8" data-ccp-charstyle="Style (Complex) Open Sans">Audit</span></span><span class="EOP SCXW200387551 BCX8" data-ccp-props="{"201341983":0,"335559685":360,"335559739":160,"335559740":259}"> </span>**

<span class="TextRun SCXW200387551 BCX8" data-contrast="auto" lang="EN-US" xml:lang="EN-US"><span class="NormalTextRun SCXW200387551 BCX8" data-ccp-charstyle="Style (Complex) Open Sans">The </span><span class="NormalTextRun SCXW200387551 BCX8" data-ccp-charstyle="Style (Complex) Open Sans">Confluence</span><span class="NormalTextRun SCXW200387551 BCX8" data-ccp-charstyle="Style (Complex) Open Sans"> integration collects audit logs from the audit log files or the audit API from self-hosted </span><span class="NormalTextRun SCXW200387551 BCX8" data-ccp-charstyle="Style (Complex) Open Sans">Confluence</span><span class="NormalTextRun SCXW200387551 BCX8" data-ccp-charstyle="Style (Complex) Open Sans"> Data Center. It has been tested with </span><span class="NormalTextRun SCXW200387551 BCX8" data-ccp-charstyle="Style (Complex) Open Sans">Confluence 7.14</span><span class="NormalTextRun SCXW200387551 BCX8" data-ccp-charstyle="Style (Complex) Open Sans">.2 but is expected to work with newer versions. As of version 1.2.0, this integration added experimental support for Atlassian </span><span class="NormalTextRun SCXW200387551 BCX8" data-ccp-charstyle="Style (Complex) Open Sans">Confluence</span><span class="NormalTextRun SCXW200387551 BCX8" data-ccp-charstyle="Style (Complex) Open Sans"> Cloud. JIRA Cloud only supports Basic Auth using </span><span class="NormalTextRun ContextualSpellingAndGrammarErrorV2Themed SCXW200387551 BCX8" data-ccp-charstyle="Style (Complex) Open Sans">username</span><span class="NormalTextRun SCXW200387551 BCX8" data-ccp-charstyle="Style (Complex) Open Sans"> and a Personal Access Token.</span></span><span class="EOP SCXW200387551 BCX8" data-ccp-props="{"201341983":0,"335559685":360,"335559739":160,"335559740":259}"> </span>

<div class="SCXW200387551 BCX8" id="bkmrk--2"><div class="ListContainerWrapper SCXW200387551 BCX8"></div></div>##### **<span class="TextRun SCXW200387551 BCX8" data-contrast="none" lang="EN-US" xml:lang="EN-US"><span class="NormalTextRun SCXW200387551 BCX8" data-ccp-charstyle="Style (Complex) Open Sans">Atlassian </span><span class="NormalTextRun SCXW200387551 BCX8" data-ccp-charstyle="Style (Complex) Open Sans">Bitbucket </span><span class="NormalTextRun SCXW200387551 BCX8" data-ccp-charstyle="Style (Complex) Open Sans">I</span><span class="NormalTextRun SCXW200387551 BCX8" data-ccp-charstyle="Style (Complex) Open Sans">ntegration </span><span class="NormalTextRun SCXW200387551 BCX8" data-ccp-charstyle="Style (Complex) Open Sans">Procedures</span></span><span class="EOP SCXW200387551 BCX8" data-ccp-props="{"134245418":true,"134245529":true,"201341983":0,"335559738":240,"335559739":0,"335559740":360}"> </span>**

<span class="TextRun Highlight SCXW200387551 BCX8" data-contrast="none" lang="EN-US" xml:lang="EN-US"><span class="NormalTextRun SCXW200387551 BCX8" data-ccp-charstyle="normaltextrun" data-ccp-charstyle-defn="{"ObjectId":"a006c213-dbb7-4dd5-9687-d2ba335f6fc5|73","ClassId":1073872969,"Properties":[469775450,"normaltextrun",201340122,"1",134233614,"true",469778129,"normaltextrun",335572020,"1",469778324,"Default Paragraph Font"]}">Please provide the following information to </span><span class="NormalTextRun SpellingErrorV2Themed SCXW200387551 BCX8" data-ccp-charstyle="normaltextrun">CyTech</span><span class="NormalTextRun SCXW200387551 BCX8" data-ccp-charstyle="normaltextrun">:</span><span class="NormalTextRun SCXW200387551 BCX8" data-ccp-charstyle="eop" data-ccp-charstyle-defn="{"ObjectId":"a006c213-dbb7-4dd5-9687-d2ba335f6fc5|74","ClassId":1073872969,"Properties":[469775450,"eop",201340122,"1",134233614,"true",469778129,"eop",335572020,"1",469778324,"Default Paragraph Font"]}"> </span></span>

<span class="TextRun SCXW200387551 BCX8" data-contrast="none" lang="EN-US" xml:lang="EN-US">**<span class="NormalTextRun SCXW200387551 BCX8" data-ccp-charstyle="CyTech Heading 1 Char">Collect Bitbucket audit logs via log </span><span class="NormalTextRun SCXW200387551 BCX8" data-ccp-charstyle="CyTech Heading 1 Char">files</span>**</span>**<span class="EOP SCXW200387551 BCX8" data-ccp-props="{"134245418":true,"134245529":true,"201341983":0,"335559685":360,"335559738":40,"335559739":0,"335559740":360}"> </span>**

<div class="SCXW200387551 BCX8" id="bkmrk-path%C2%A0-preserve-origi"><div class="ListContainerWrapper SCXW200387551 BCX8">1. <span class="TextRun SCXW200387551 BCX8" data-contrast="auto" lang="EN-US" xml:lang="EN-US"><span class="NormalTextRun SCXW200387551 BCX8">Path</span></span><span class="EOP SCXW200387551 BCX8" data-ccp-props="{"201341983":0,"335559685":1080,"335559739":160,"335559740":259}"> </span>

</div><div class="ListContainerWrapper SCXW200387551 BCX8">2. <span class="TextRun SCXW200387551 BCX8" data-contrast="auto" lang="EN-US" xml:lang="EN-US"><span class="NormalTextRun SCXW200387551 BCX8">Preserve </span><span class="NormalTextRun SCXW200387551 BCX8">O</span><span class="NormalTextRun SCXW200387551 BCX8">riginal </span><span class="NormalTextRun SCXW200387551 BCX8">E</span><span class="NormalTextRun SCXW200387551 BCX8">vent</span><span class="NormalTextRun SCXW200387551 BCX8">?</span><span class="NormalTextRun SCXW200387551 BCX8"> (Enable Yes/No)</span></span><span class="EOP SCXW200387551 BCX8" data-ccp-props="{"201341983":0,"335559685":1080,"335559739":160,"335559740":259}"> </span>

</div><div class="ListContainerWrapper SCXW200387551 BCX8">- <span class="TextRun SCXW200387551 BCX8" data-contrast="auto" lang="EN-US" xml:lang="EN-US"><span class="NormalTextRun SCXW200387551 BCX8">Preserves a raw copy of the original event, added to the field </span><span class="NormalTextRun SpellingErrorV2Themed SCXW200387551 BCX8">event.original</span></span><span class="EOP SCXW200387551 BCX8" data-ccp-props="{"201341983":0,"335559685":2520,"335559739":160,"335559740":259}"> </span>

</div><div class="ListContainerWrapper SCXW200387551 BCX8">3. <span class="TextRun SCXW200387551 BCX8" data-contrast="auto" lang="EN-US" xml:lang="EN-US"><span class="NormalTextRun SCXW200387551 BCX8">Tags</span></span><span class="EOP SCXW200387551 BCX8" data-ccp-props="{"201341983":0,"335559685":1080,"335559739":160,"335559740":259}"> </span>

</div><div class="ListContainerWrapper SCXW200387551 BCX8">4. <span class="TextRun SCXW200387551 BCX8" data-contrast="auto" lang="EN-US" xml:lang="EN-US"><span class="NormalTextRun SCXW200387551 BCX8">Processors (Optional)</span></span><span class="EOP SCXW200387551 BCX8" data-ccp-props="{"201341983":0,"335559739":160,"335559740":259}"> </span>

</div><div class="ListContainerWrapper SCXW200387551 BCX8">5. <span class="TextRun SCXW200387551 BCX8" data-contrast="auto" lang="EN-US" xml:lang="EN-US"><span class="NormalTextRun SCXW200387551 BCX8">Processors are used to reduce the number of fields in the exported event or to enhance the event with metadata. This executes in the agent before the logs are parsed.</span></span><span class="EOP SCXW200387551 BCX8" data-ccp-props="{"201341983":0,"335559739":160,"335559740":259}"> </span>

</div><div class="ListContainerWrapper SCXW200387551 BCX8">6. <span class="TextRun SCXW200387551 BCX8" data-contrast="auto" lang="EN-US" xml:lang="EN-US"><span class="NormalTextRun SCXW200387551 BCX8">Indexing settings (experimental</span><span class="NormalTextRun SCXW200387551 BCX8">) (Enable Yes/No)</span></span><span class="EOP SCXW200387551 BCX8" data-ccp-props="{"201341983":0,"335559739":160,"335559740":259}"> </span>

</div><div class="ListContainerWrapper SCXW200387551 BCX8">7. <span class="TextRun SCXW200387551 BCX8" data-contrast="auto" lang="EN-US" xml:lang="EN-US"><span class="NormalTextRun SCXW200387551 BCX8">Select data streams to configure indexing options. This is an experimental feature and may have effects on other properties.</span></span><span class="EOP SCXW200387551 BCX8" data-ccp-props="{"201341983":0,"335559739":160,"335559740":259}"> </span>

</div></div><span class="TextRun SCXW200387551 BCX8" data-contrast="none" lang="EN-US" xml:lang="EN-US">**<span class="NormalTextRun SCXW200387551 BCX8" data-ccp-charstyle="CyTech Heading 1 Char">Collect Bitbucket audit logs via API</span><span class="NormalTextRun SCXW200387551 BCX8" data-ccp-charstyle="CyTech Heading 1 Char"> (Enable Yes/No)</span>**</span>**<span class="EOP SCXW200387551 BCX8" data-ccp-props="{"201341983":0,"335559685":720,"335559739":160,"335559740":259}"> </span>**

<div class="SCXW200387551 BCX8" id="bkmrk-api-url---the-api-ur"><div class="OutlineElement Ltr SCXW200387551 BCX8">  
</div><div class="ListContainerWrapper SCXW200387551 BCX8">1. <span class="TextRun Highlight SCXW200387551 BCX8" data-contrast="none" lang="EN-CA" xml:lang="EN-CA"><span class="NormalTextRun SCXW200387551 BCX8" data-ccp-parastyle="CyTech Heading 2" data-ccp-parastyle-defn="{"ObjectId":"a006c213-dbb7-4dd5-9687-d2ba335f6fc5|21","ClassId":1073872969,"Properties":[469775450,"CyTech Heading 2",201340122,"2",134234082,"true",134233614,"true",469778129,"CyTechHeading2",335572020,"1",201342448,"2",469777841,"Open Sans",469777842,"Open Sans",469777843,"",469777844,"Open Sans",469769226,"Open Sans",335551500,"14393361",268442635,"28",335551547,"4105",335559740,"360",201341983,"0",335559739,"0",335559738,"40",335560102,"1",134245418,"true",134245529,"true",469777929,"CyTech Heading 2 Char",469778324,"heading 2"]}" data-ccp-parastyle-linked-defn="{"ObjectId":"a006c213-dbb7-4dd5-9687-d2ba335f6fc5|24","ClassId":1073872969,"Properties":[469775450,"CyTech Heading 2 Char",201340122,"1",134233614,"true",469778129,"CyTechHeading2Char",335572020,"1",134231262,"true",201342448,"2",469777841,"Open Sans",469777842,"Open Sans",469777843,"",469777844,"Open Sans",469769226,"Open Sans",335551500,"14393361",268442635,"28",335551547,"4105",469777929,"CyTech Heading 2",469778324,"Heading 2 Char"]}">API URL</span><span class="NormalTextRun SCXW200387551 BCX8" data-ccp-parastyle="CyTech Heading 2"> - </span><span class="NormalTextRun SCXW200387551 BCX8" data-ccp-parastyle="CyTech Heading 2">The API URL without the path.</span></span><span class="EOP SCXW200387551 BCX8" data-ccp-props="{"134245418":true,"134245529":true,"201341983":0,"335559685":1125,"335559738":40,"335559739":0,"335559740":360}"> </span>

</div><div class="ListContainerWrapper SCXW200387551 BCX8">2. <span class="TextRun Highlight SCXW200387551 BCX8" data-contrast="none" lang="EN-CA" xml:lang="EN-CA"><span class="NormalTextRun SCXW200387551 BCX8" data-ccp-parastyle="CyTech Heading 2">Bitbucket Username</span><span class="NormalTextRun SCXW200387551 BCX8" data-ccp-parastyle="CyTech Heading 2"> - </span><span class="NormalTextRun SCXW200387551 BCX8" data-ccp-parastyle="CyTech Heading 2">JIRA Username. Needs to be used with a Password. Do not fill if you are using a personal access token.</span></span><span class="EOP SCXW200387551 BCX8" data-ccp-props="{"134245418":true,"134245529":true,"201341983":0,"335559685":1125,"335559738":40,"335559739":0,"335559740":360}"> </span>

</div></div><div class="SCXW200387551 BCX8" id="bkmrk-bitbucket-password%C2%A0-"><div class="ListContainerWrapper SCXW200387551 BCX8">3. <span class="TextRun Highlight SCXW200387551 BCX8" data-contrast="none" lang="EN-CA" xml:lang="EN-CA"><span class="NormalTextRun SCXW200387551 BCX8" data-ccp-parastyle="CyTech Heading 2">Bitbucket Password</span><span class="NormalTextRun SCXW200387551 BCX8" data-ccp-parastyle="CyTech Heading 2"> - </span><span class="NormalTextRun SCXW200387551 BCX8" data-ccp-parastyle="CyTech Heading 2">JIRA Password. Needs to be used with a Username. Do not fill if you are using a personal access token.</span></span><span class="EOP SCXW200387551 BCX8" data-ccp-props="{"134245418":true,"134245529":true,"201341983":0,"335559685":1125,"335559738":40,"335559739":0,"335559740":360}"> </span>

</div><div class="ListContainerWrapper SCXW200387551 BCX8">4. <span class="TextRun Highlight SCXW200387551 BCX8" data-contrast="none" lang="EN-CA" xml:lang="EN-CA"><span class="NormalTextRun SCXW200387551 BCX8" data-ccp-parastyle="CyTech Heading 2">Personal Access Token</span><span class="NormalTextRun SCXW200387551 BCX8" data-ccp-parastyle="CyTech Heading 2"> - </span><span class="NormalTextRun SCXW200387551 BCX8" data-ccp-parastyle="CyTech Heading 2">The Personal Access Token. If set, Username and Password will be ignored.</span></span><span class="EOP SCXW200387551 BCX8" data-ccp-props="{"134245418":true,"134245529":true,"201341983":0,"335559685":1125,"335559738":40,"335559739":0,"335559740":360}"> </span>

</div><div class="ListContainerWrapper SCXW200387551 BCX8">5. <span class="TextRun Highlight SCXW200387551 BCX8" data-contrast="none" lang="EN-CA" xml:lang="EN-CA"><span class="NormalTextRun SCXW200387551 BCX8" data-ccp-parastyle="CyTech Heading 2">Initial Interval</span><span class="NormalTextRun SCXW200387551 BCX8" data-ccp-parastyle="CyTech Heading 2"> - </span><span class="NormalTextRun SCXW200387551 BCX8" data-ccp-parastyle="CyTech Heading 2">Initial interval for the first API call. Defaults to 24 hours.</span></span><span class="EOP SCXW200387551 BCX8" data-ccp-props="{"134245418":true,"134245529":true,"201341983":0,"335559738":40,"335559739":0,"335559740":360}"> </span>

</div></div>#####  

##### **<span class="EOP SCXW200387551 BCX8" data-ccp-props="{"134245418":true,"134245529":true,"201341983":0,"335559738":40,"335559739":0,"335559740":360}">Create Access Token:</span>**

Access Tokens are single-purpose access tokens (or passwords) with access to a single workspace with limited permissions (specified at creation time). Use tokens for tasks such as scripting, CI/CD tools, and testing Bitbucket integrations or Marketplace apps while in development.

To create an Access Token:

1. At [bitbucket.org](http://bitbucket.org/ "http://bitbucket.org/"), navigate to the target workspace for the Access Token. This workspace is the only one that the Workspace Access Token can access.
2. On the sidebar, select **Settings**.
3. On the sidebar, under **Security**, select **Access tokens**.
4. Select **Create Workspace Access Token**.
5. Give the Workspace Access Token a name, usually related to the app or task that will use the token.
6. Select the permissions the Access Token needs. *Note give the Access Token admin permission.*
7. Select the **Create** button. The page will display the **Workspace Access Token created** dialog.
8. Copy the generated token and either record or paste it into the app that requires access. *The token is only displayed once and can't be retrieved later*.

*If you need further assistance, kindly contact our support at <info@cytechint.com> for prompt assistance and guidance.*

# Automatically fetch user accounts ( Google IAM )

<p class="callout info">**STEP 1: Enable APIs**</p>

You’ll need access to one of the following APIs:

- **Cloud Identity API** (for non-Google Workspace orgs)
- **Admin SDK API** (for Google Workspace)

<p class="callout info">How to Enable:</p>

1. Go to Google Cloud Console
2. Navigate to: APIs &amp; Services &gt; Library
3. Search for:
    
    
    - Cloud Identity AP
    - Admin SDK API
4. Click **Enable**

---

<p class="callout info">**STEP 2: Set Up a Service Account**</p>

1. In the Cloud Console, go to : IAM &amp; Admin &gt; Service Accounts
2. Click **Create Service Account**
3. Name it and click **Create and Continue**
4. Assign roles:
    
    
    - For Cloud Identity: Cloud Identity User Read
    - For Admin SDK: Viewer or User Management Admin

---

<p class="callout info">**STEP 3: Create and Download Credentials**</p>

1. Go back to your service account.
2. Under the **Keys** tab, click **Add Key &gt; JSON**
3. Save the .json file securely — this will be used to authenticate API requests.

---

<p class="callout info">**STEP 4: Grant Domain-Wide Delegation (if using Admin SDK)**</p>

This allows your service account to impersonate an admin.

1. In the Service Account settings, enable **“Enable G Suite Domain-wide Delegation”**
2. Go to your [Google Admin console](https://admin.google.com/)
3. Add a new client: Security &gt; API Controls &gt; Domain-wide Delegation
    
    
    - **Client ID:** from your service account JSON

<p class="callout info">**STEP 5: Fetch User Accounts Pro-grammatically**</p>

Use Python and google-auth + google-api-python-client.

<p class="callout info">**STEP 6: Automate the Process**</p>

- Schedule the script to run via:
    
    
    - **Cloud Scheduler** (GCP-native)
    - **Cron job** (Linux VM)
    - **Cloud Functions / Cloud Run** (for serverless)

---

<p class="callout info">**STEP 7: Send or Sync Data**</p>

Once you fetch users:

- You can store them in:
    
    
    - Elasticsearch

# Automatically Fetch User Accounts without Manually Importing for JumpCloud

#### **<span style="color: rgb(53, 152, 219);">JumpCloud</span>**

**Intoduction**

JumpCloud allows you to automate user account creation and syncing **without manual CSV uploads** by integrating with external identity sources like **Active Directory, OneLogin, Okta, Azure AD, or APIs**.

**Automatic User Provisioning in JumpCloud**

Automatic provisioning means **creating and updating user accounts in JumpCloud from another source system** (e.g., your Identity Provider or directory service) using SCIM or other integrations — **no spreadsheets, no forms, no manual steps**.

<table border="1" id="bkmrk-source-system-integr" style="border-collapse: collapse; width: 100%; height: 142.344px; border: 1px double rgb(0, 0, 0);"><colgroup><col style="width: 33.3775%;"></col><col style="width: 33.3775%;"></col><col style="width: 33.3775%;"></col></colgroup><tbody><tr style="height: 35.9201px;"><th data-col-size="sm" data-end="902" data-start="875" style="height: 35.9201px;">**Source System**

</th><th data-col-size="sm" data-end="925" data-start="902" style="height: 35.9201px;">**Integration Type**

</th><th data-col-size="sm" data-end="972" data-start="925" style="height: 35.9201px;">**Description**

</th></tr><tr style="height: 46.6667px;"><td data-col-size="sm" data-end="1098" data-start="1071" style="height: 46.6667px;">**Active Directory (AD)**</td><td data-col-size="sm" data-end="1121" data-start="1098" style="height: 46.6667px;">AD Sync Agent</td><td data-col-size="sm" data-end="1168" data-start="1121" style="height: 46.6667px;">Syncs users/groups from AD to JumpCloud</td></tr><tr style="height: 29.8785px;"><td data-col-size="sm" data-end="1202" data-start="1169" style="height: 29.8785px;">**OneLogin / Okta / Azure AD**</td><td data-col-size="sm" data-end="1219" data-start="1202" style="height: 29.8785px;">SCIM Connector</td><td data-col-size="sm" data-end="1266" data-start="1219" style="height: 29.8785px;">Push users via SCIM to JumpCloud</td></tr><tr style="height: 29.8785px;"><td data-col-size="sm" data-end="1302" data-start="1267" style="height: 29.8785px;">**Google Workspace / HR System**</td><td data-col-size="sm" data-end="1324" data-start="1302" style="height: 29.8785px;">API Script (custom)</td><td data-col-size="sm" data-end="1370" data-start="1324" style="height: 29.8785px;">Use API to fetch users and sync to JC</td></tr></tbody></table>

#### <span style="color: rgb(53, 152, 219);">**Option 1: Active Directory (AD) Sync**</span>

##### Description:

Use JumpCloud’s **AD Sync Agent** to connect your on-prem Active Directory to JumpCloud.

<p class="callout info">What It Does:</p>

- Automatically fetches users and groups from AD into JumpCloud.
- Keeps user profiles updated.
- Supports password sync and group assignments.

##### Steps:

1. 1. **Install the AD Import Agent**:
        
        
        - Log in to JumpCloud Admin Portal.
        - Navigate to **Directory Integrations → Active Directory**.
        - Download the **AD Import Agent**.
        - Install it on your Domain Controller or a Windows server joined to the domain.
    2. **Install the AD Sync Agent (optional for write-back)**:
        
        
        - If you want to sync changes from JumpCloud to AD (two-way), install the Sync Agent too.
    3. **Register the Agents**:
        
        
        - During installation, provide the **JumpCloud API key**.
        - Approve the agent from the JumpCloud admin dashboard.
    4. **Set Up AD Group(s) for Sync**:
        
        
        - Create an AD security group (e.g., JumpCloudSyncUsers).
        - Add AD users to this group. Only members will sync.
    5. **Configure OU and Attribute Settings**:
        
        
        - Specify which Organizational Units (OUs) to include.
        - Map attributes like email, phone, title, etc.
    6. **Test and Enable Sync**:
        
        
        - Run a test sync.
        - Review previewed user data in JumpCloud.
        - Enable production sync.
    7. **Monitor Sync**:
        
        
        - Use the AD Integration logs in JumpCloud to monitor status.

#### <span style="color: rgb(53, 152, 219);">**Option 2: SCIM-Based Provisioning from OneLogin, Okta, Azure AD**</span>

##### Description:

If you're using a cloud identity provider, you can **push users into JumpCloud** using SCIM.

<p class="callout info">What It Does:</p>

- Auto-creates users in JumpCloud.
- Syncs attribute updates (name, email, etc.).
- Suspends users when removed from the source.

##### Steps:

1. **Prepare JumpCloud SCIM Settings**:
    
    
    - In JumpCloud Admin Portal, go to **SSO Applications → + Add App**.
    - Choose **Custom SCIM Connector**.
    - JumpCloud provides:
        
        
        - **SCIM Base URL**
        - **Bearer Token** (API key)
2. **Configure SCIM in IdP (e.g., OneLogin/Okta)**:
    
    
    - Create a new SCIM app integration.
    - Enter the SCIM Base URL and Token provided by JumpCloud.
    - Set the SCIM version to **2.0**.
3. **Define Provisioning Rules**:
    
    
    - Choose what triggers user creation (e.g., role membership).
    - Assign the app to users or groups.
4. **Enable SCIM Provisioning**:
    
    
    - Turn on auto-provisioning in your IdP.
    - Confirm SCIM connection test passes.
5. **Sync Begins Automatically**:
    
    
    - Users assigned in IdP are instantly created/updated in JumpCloud.
    - No manual intervention required.


#### <span style="color: rgb(53, 152, 219);">**Option 3: Custom Script Using JumpCloud API**</span>

##### Description:

If users are stored in another system (like Google Workspace, a database, or an HR app), use **JumpCloud’s API** to fetch and sync users automatically.

<p class="callout info">What It Does:</p>

- Programmatically creates users in JumpCloud.
- Can run on a schedule (daily, hourly, etc.).
- Completely hands-free after setup.

##### Steps:

1. **Get JumpCloud API Credentials**:
    
    
    - Go to **Admin Portal → API Settings**.
    - Copy your **API Key**.
2. **Write a Script**:
    
    
    - Use Python, Bash, or PowerShell.
    - Example logic:
        
        
        - Connect to your data source.
        - Format users as JSON.
        - Call POST /systemusers or PUT /systemusers/{id}.
3. **Schedule the Script**:
    
    
    - On Linux: Use cron to run the script hourly/daily.
    - On Windows: Use **Task Scheduler**.
4. **Optional**: Log output or push alerts to Slack/email.

<table border="1" id="bkmrk-method-no-manual-upl" style="border-collapse: collapse; width: 100%; height: 119.514px;"><colgroup><col style="width: 25.0336%;"></col><col style="width: 25.0336%;"></col><col style="width: 25.0336%;"></col><col style="width: 25.0336%;"></col></colgroup><tbody><tr style="height: 29.8785px;"><th data-col-size="sm" data-end="3592" data-start="3577" style="height: 29.8785px;">Method</th><th data-col-size="sm" data-end="3611" data-start="3592" style="height: 29.8785px;">No Manual Upload</th><th data-col-size="sm" data-end="3631" data-start="3611" style="height: 29.8785px;">Real-Time Updates</th><th data-col-size="sm" data-end="3648" data-start="3631" style="height: 29.8785px;">Deletion Sync</th></tr><tr style="height: 29.8785px;"><td class="align-center" data-col-size="sm" data-end="3737" data-start="3722" style="height: 29.8785px;">AD Sync</td><td class="align-center" data-col-size="sm" data-end="3756" data-start="3737" style="height: 29.8785px;">**✓**</td><td class="align-center" data-col-size="sm" data-end="3776" data-start="3756" style="height: 29.8785px;">**✓**</td><td class="align-center" data-col-size="sm" data-end="3794" data-start="3776" style="height: 29.8785px;">**✓**</td></tr><tr style="height: 29.8785px;"><td class="align-center" data-col-size="sm" data-end="3810" data-start="3795" style="height: 29.8785px;">SCIM (IdPs)</td><td class="align-center" data-col-size="sm" data-end="3829" data-start="3810" style="height: 29.8785px;">**✓**</td><td class="align-center" data-col-size="sm" data-end="3849" data-start="3829" style="height: 29.8785px;">**✓**</td><td class="align-center" data-col-size="sm" data-end="3867" data-start="3849" style="height: 29.8785px;">**✓**</td></tr><tr style="height: 29.8785px;"><td class="align-center" data-col-size="sm" data-end="3883" data-start="3868" style="height: 29.8785px;">Custom API</td><td class="align-center" data-col-size="sm" data-end="3902" data-start="3883" style="height: 29.8785px;">**✓**</td><td class="align-center" data-col-size="sm" data-end="3924" data-start="3902" style="height: 29.8785px;">**☓** (depends on job)</td><td class="align-center" data-col-size="sm" data-end="3942" data-start="3924" style="height: 29.8785px;">**✓**</td></tr></tbody></table>

#### <span style="color: rgb(53, 152, 219);">JumpCloud API</span>

- <span style="color: rgb(53, 152, 219);">https://docs.jumpcloud.com/api/</span>

# Automatically Fetch User Accounts without Manually Importing for OneLogin (via SCIM)

#### **<span style="color: rgb(53, 152, 219);"><span class="TextRun SCXW258088085 BCX8" data-contrast="auto" lang="EN-US" xml:lang="EN-US"><span class="NormalTextRun ContextualSpellingAndGrammarErrorV2Themed GrammarErrorHighlight SCXW258088085 BCX8">OneLogin (via </span><span class="NormalTextRun SCXW258088085 BCX8">SCIM)</span></span><span class="EOP SCXW258088085 BCX8" data-ccp-props="{}"> </span></span>**

**Introduction:**

OneLogin gives users the ability to access the applications and other resources they need to do their job by logging in once to a single interface. Platforms like OneLogin are known as **Identity and Access Management (IAM)** solutions that are primarily used to provide their users with a **Single Sign-on (SSO)** experience. OneLogin allows you to automatically send user account data (name, email, role, etc.) into external apps like **Slack, Zoom, Salesforce, or your custom platform** using SCIM without any CSV uploads or manual entry.


##### <span style="color: rgb(53, 152, 219);">**<span class="TextRun SCXW258088085 BCX8" data-contrast="auto" lang="EN-US" xml:lang="EN-US"><span class="NormalTextRun SCXW258088085 BCX8">SCIM</span></span>**</span>

SCIM (System for Cross-domain Identity Management) is a standard protocol that automates how users are created, updated, or removed across applications. With SCIM, OneLogin can sync user details, like name, email, role to apps like Zoom, or custom platforms that support SCIM.

**SCIM helps by:**

- Automatically creating users when they’re added to OneLogin
- Updating user info when their OneLogin profile changes
- Disabling or deleting users from apps when removed in OneLogin

SCIM is ideal for improving security, reducing IT overhead, and ensuring consistent identity data across platforms.

##### <span style="color: rgb(53, 152, 219);">**SAML**</span>

  
SAML (Security Assertion Markup Language) is a standard used for **Single Sign-On (SSO)**. It allows users to log in once to OneLogin and gain access to multiple connected apps (like G Suite, Zoom, or Salesforce) without logging in again.

How it works:

- The user logs in to OneLogin.
- OneLogin sends a **secure login token** (assertion) to the app (service provider).
- The app trusts OneLogin and grants access, no separate password needed.

SAML is useful for improving security and user convenience. It’s often used alongside **SCIM**, where SAML handles authentication and SCIM handles user creation, updates, and removals.

##### <span style="color: rgb(53, 152, 219);">**What is Automatic User Provisioning via OneLogin?**</span>

Automatic provisioning means **OneLogin pushes user details to your app** when a user is added, updated, or deleted using the SCIM protocol. This reduces errors, saves IT time, and ensures data stays in sync.

<p class="callout info">**What You Need to Integrate App with OneLogin (SCIM)**</p>

<table border="1" id="bkmrk-requirement-descript" style="width: 103.452%; height: 173.087px; border-collapse: collapse; border-style: solid;"><tbody><tr style="height: 42.8785px;"><th style="width: 36.4751%; height: 42.8785px;">**Requirement**</th><th style="width: 63.5382%; height: 42.8785px;">**Description**</th></tr><tr style="height: 46.6667px;"><td style="width: 36.4751%; height: 46.6667px;">**SCIM API Endpoint**</td><td style="width: 63.5382%; height: 46.6667px;">A web link where OneLogin can send create/update/delete user requests</td></tr><tr style="height: 36.875px;"><td style="width: 36.4751%; height: 36.875px;">**Bearer Token**</td><td style="width: 63.5382%; height: 36.875px;">A secret token (like a password) so OneLogin can authenticate securely</td></tr><tr style="height: 46.6667px;"><td style="width: 36.4751%; height: 46.6667px;">**SCIM 2.0 Support**</td><td style="width: 63.5382%; height: 46.6667px;">Your app must support SCIM 2.0 (understand user creation/update requests)</td></tr></tbody></table>

<div id="bkmrk-"></div><div id="bkmrk-set-up-scim-integrat"><span style="color: rgb(53, 152, 219);">**Set Up SCIM Integration from OneLogin to Your App**</span></div><div id="bkmrk--1"></div><div id="bkmrk-description%3A">**Description:**</div>Use OneLogin’s SCIM connector to automatically create, update, or deactivate user accounts in your SCIM-compatible application.

**What It Does:**

- Auto-creates users in your app.
- Syncs updates to user info (like title, phone, etc.).
- Deactivates/suspends users when removed in OneLogin.

#### **<span style="color: rgb(53, 152, 219);">Setup Steps:</span>**

##### <span style="color: rgb(53, 152, 219);">**Prepare Your App for SCIM Integration**</span>

- Create a **SCIM 2.0-compatible API endpoint** in your app.
- Generate a **Bearer Token** your app will recognize.
- Support basic SCIM actions:
    
    
    - POST /Users (create)
    - PATCH /Users/{id} (update)
    - DELETE /Users/{id} or deactivate (active: false)

#####  

##### <span style="color: rgb(53, 152, 219);">**Add Your App in OneLogin**</span>

- Go to **Admin Portal → Apps → Add App**.
- Search and select your app (e.g., Zoom, Slack, or Custom SCIM).
- Save and go to the app configuration.

#####  

##### **<span style="color: rgb(53, 152, 219);">Enable SCIM Provisioning</span>**

- Navigate to the **Provisioning** tab in the app.
- Enable **"Enable Provisioning"**.
- Enter:
    
    
    - **SCIM Base URL** (from your app)
    - **Bearer Token** (from your app)
- Save your settings.

#####  

##### <span style="color: rgb(53, 152, 219);">**Configure Provisioning Behavior**</span>

- Choose what OneLogin does when:
    
    
    - A user is added → Create in your app
    - A user is updated → Sync changes
    - A user is removed → Suspend/Delete in your app
- Toggle actions to **"Automatically"** if you don’t want manual approval.

#####  

##### <span style="color: rgb(53, 152, 219);">**Set Up User Mappings**</span>

- Go to **Users → Mappings**.
- Create or edit a mapping rule:
    
    
    - Assign users to the app based on role, department, etc.
    - Define how OneLogin sends attributes like name, email, title.

##### <span style="color: rgb(53, 152, 219);">**Assign the App to Users or Roles**</span>

- Go to the **Users** tab:
    
    
    - Assign the app directly to users
    - Or assign it to a Role, then assign users to that role

If provisioning is active, users matching the rules will be auto-synced to your app.

<div id="bkmrk--3"></div><p class="callout info">**What Happens Next?**</p>

Once integrated:

- When a user is added to OneLogin → They are automatically created in your app.
- If their profile changes in OneLogin → Your app is updated.
- If they’re removed → OneLogin disables or deletes them in your app.

<table border="1" id="bkmrk-requirement-purpose-" style="border-collapse: collapse; width: 100%; height: 300.785px;"><colgroup><col style="width: 49.947%;"></col><col style="width: 49.947%;"></col></colgroup><tbody><tr style="height: 31.8785px;"><td class="align-center">**Requirement**</td><td class="align-center">**Purpose**</td></tr><tr style="height: 29.8785px;"><td>**SCIM API URL**</td><td>Endpoint where OneLogin sends user actions</td></tr><tr style="height: 29.8785px;"><td>**Bearer Token**</td><td>Authenticates OneLogin to your app</td></tr><tr style="height: 29.8785px;"><td>**SCIM 2.0 Support**</td><td>Lets your app understand and apply user changes</td></tr><tr style="height: 29.8785px;"><td>**OneLogin Step**</td><td>Description</td></tr><tr style="height: 29.8785px;"><td>**Add App**</td><td>Add your SCIM-compatible app to OneLogin</td></tr><tr style="height: 29.8785px;"><td>**Enable Provisioning**</td><td>Enter SCIM URL + Token</td></tr><tr style="height: 29.8785px;"><td>**Set Provisioning Rules**</td><td>Choose when to create/update/delete users</td></tr><tr style="height: 29.8785px;"><td>**Create Mappings**</td><td>Map OneLogin attributes to your app fields</td></tr><tr style="height: 29.8785px;"><td>**Assign Users/Roles**</td><td>Control which users get sent to your app</td></tr></tbody></table>

# Automation on fetching user accounts for Azure

To **automatically fetch user accounts into Azure** (e.g., for Azure Active Directory / Microsoft Entra ID) **without manually importing them**, your approach depends on the **source of the user accounts**. Below are common scenarios and how to automate the sync:

##### <span style="color: rgb(53, 152, 219);">**From On-Premises Active Directory**</span>

Use **Azure AD Connect** to automatically sync users from on-premises AD to Azure AD.

**Steps:**

1. **Install Azure AD Connect** on your on-prem AD server.
2. Configure it to:
    
    
    - Use **password hash synchronization** or **pass-through authentication**.
    - Enable **automatic synchronization**.
3. Azure AD Connect will:
    
    
    - Regularly sync users, groups, and passwords to Azure AD automatically.
    - No manual importing needed after setup.

##### <span style="color: rgb(53, 152, 219);">**From a Third-Party HR System or App (e.g., Workday, SAP, etc.)**</span>

Use **provisioning connectors** available in **Microsoft Entra (Azure AD)**.

**Steps:**

1. Go to **Entra ID &gt; Enterprise Applications &gt; Your App &gt; Provisioning**.
2. Configure **automatic user provisioning** with the source system.
3. Provide credentials/API endpoints of the source system.
4. Define mappings for user properties.

Works for Workday, SuccessFactors, SAP, Oracle, etc.

##### <span style="color: rgb(53, 152, 219);">**From CSV/Flat Files in a Scheduled Way**</span>

Use **PowerShell** or **Azure Automation** to import from CSV regularly.

**Option A: PowerShell Script (with schedule)**

- Write a script using `Import-Csv` + `New-AzureADUser` or `Set-AzureADUser`.
- Schedule it using **Task Scheduler** or **Azure Automation**.

 **Option B: Logic Apps or Power Automate**

- Use a **Logic App** to watch for a file in OneDrive, SharePoint, or Blob Storage.
- Parse it and create/update users in Azure AD via **Microsoft Graph API**.

##### <span style="color: rgb(53, 152, 219);">**Via Microsoft Graph API**</span>

If user accounts are coming from a custom app or identity source, use **Graph API** to programmatically sync them.

**Key Points:**

- Write a script or backend app that calls `POST https://graph.microsoft.com/v1.0/users`.
- Authenticate using **client credentials flow** (service principal).
- Automate the execution on a schedule.

##### <span style="color: rgb(224, 62, 45);">**Notes:**</span>

- You need proper permissions: **User administrator** or **Global administrator** in Azure AD.
- Use **SCIM provisioning** if the third-party app supports it.

# Automation on fetching user accounts for Okta

To **automatically fetch user accounts into Okta** without needing to manually import them, you should set up a **Directory Integration** that allows Okta to **sync users from an external directory**, such as **Active Directory (AD)**, **LDAP**, or through a **SCIM integration**. Here's how to approach each method:

##### <span style="color: rgb(53, 152, 219);">**Active Directory (AD) Integration (Most Common)**</span>

This is the best option if you're using Windows Server AD.

**Steps:**

1. **Install the Okta AD Agent** on a domain-joined Windows Server.
2. In the Okta Admin Console:
    
    
    - Go to **Directory &gt; Directory Integrations**.
    - Click **Add Directory** &gt; **Add Active Directory**.
3. Follow the wizard:
    
    
    - Provide domain credentials.
    - Select the OUs you want to sync.
    - Schedule automatic imports (default every hour).
4. After setup, Okta will **automatically sync users and groups** from AD to Okta.

Okta will **periodically pull new users, updates, and removals**.

##### <span style="color: rgb(53, 152, 219);">**LDAP Directory Integration**</span>

If you're using OpenLDAP or similar:

**Steps:**

1. Install the **Okta LDAP Agent** on a server that can access your LDAP directory.
2. Go to **Directory &gt; Directory Integrations** in Okta and add your LDAP configuration.
3. Schedule sync or enable real-time sync depending on the directory.

##### <span style="color: rgb(53, 152, 219);">**SCIM (System for Cross-domain Identity Management)**</span>

If your source system supports SCIM (like HR systems, custom apps, etc.):

**Steps:**

1. Ensure the external system supports **SCIM 2.0**.
2. In Okta, go to **Applications** &gt; add SCIM-based integration (or create a custom SCIM app).
3. Configure:
    
    
    - SCIM base URL
    - Bearer token
4. Okta will **auto-provision and deprovision** users via SCIM.

##### <span style="color: rgb(53, 152, 219);">**Okta Workflows or API Automation (Advanced)**</span>

For custom scenarios (e.g. syncing from a CSV, API, or Google Workspace):

- Use **Okta Workflows** or the **Okta API** to periodically fetch and push user data.
- Okta Workflows has connectors to services like Google Sheets, Slack, Salesforce, etc.
- You can build a scheduled flow that fetches data and creates users in Okta.

##### <span style="color: rgb(224, 62, 45);">**Manual Import = Only Needed If:**</span>

- You don’t use a supported directory or SCIM.
- You're uploading static CSV files.

##### **<span style="color: rgb(45, 194, 107);">Sync Frequency</span>**

- AD/LDAP: Every 1 hour (default), configurable
- SCIM: Real-time (if supported), or scheduled via Okta
- API/Workflows: As you define it (e.g., every 15 minutes)

# AWS Cloudtrails Integrations

##### <span style="color: rgb(53, 152, 219);">**<span class="TextRun SCXW8068218 BCX8" data-contrast="none" lang="EN-US" xml:lang="EN-US"><span class="NormalTextRun SCXW8068218 BCX8" data-ccp-charstyle="Style (Complex) Open Sans" data-ccp-charstyle-defn="{"ObjectId":"9f2947a9-fc0d-43c0-904c-edffe79616e9|47","ClassId":1073872969,"Properties":[201342446,"1",201342447,"5",201342448,"1",201342449,"1",469777841,"Open Sans",469777842,"Open Sans",469777843,"Calibri",469777844,"Open Sans",201341986,"1",469769226,"Open Sans",268442635,"22",335559704,"1037",335559705,"1033",335551547,"1033",335559740,"259",201341983,"0",335559739,"160",469775450,"Style (Complex) Open Sans",201340122,"1",134233614,"true",469778129,"StyleComplexOpenSans",335572020,"1",469778324,"Default Paragraph Font"]}">Introduction</span></span><span class="EOP SCXW8068218 BCX8" data-ccp-props="{"134245418":true,"134245529":true,"201341983":0,"335559738":240,"335559739":0,"335559740":360}"> </span>**</span>

<span class="TextRun SCXW8068218 BCX8" data-contrast="none" lang="EN-US" xml:lang="EN-US"><span class="NormalTextRun SCXW8068218 BCX8" data-ccp-parastyle="Normal (Web)">The AWS CloudTrail integration allows you to monitor </span></span>[<span class="TextRun Underlined SCXW8068218 BCX8" data-contrast="none" lang="EN-US" xml:lang="EN-US"><span class="NormalTextRun SCXW8068218 BCX8" data-ccp-charstyle="Hyperlink">AWS CloudTrail</span></span>](https://aws.amazon.com/cloudtrail/)<span class="EOP SCXW8068218 BCX8" data-ccp-props="{"134233117":false,"134233118":false,"201341983":0,"335557856":16777215,"335559731":360,"335559738":0,"335559739":0,"335559740":240}"> </span>

<span class="TextRun SCXW8068218 BCX8" data-contrast="none" lang="EN-US" xml:lang="EN-US"><span class="NormalTextRun SCXW8068218 BCX8" data-ccp-parastyle="Normal (Web)">Reference:</span></span> [<span class="TextRun Underlined SCXW8068218 BCX8" data-contrast="none" lang="EN-US" xml:lang="EN-US"><span class="NormalTextRun SCXW8068218 BCX8" data-ccp-charstyle="Hyperlink">https://aws.amazon.com/cloudtrail/</span></span>](https://aws.amazon.com/cloudtrail/) <span class="EOP SCXW8068218 BCX8" data-ccp-props="{"134233117":false,"134233118":false,"201341983":0,"335557856":16777215,"335559731":360,"335559738":0,"335559739":0,"335559740":240}"> </span>

<span class="TextRun SCXW8068218 BCX8" data-contrast="none" lang="EN-US" xml:lang="EN-US"><span class="NormalTextRun SCXW8068218 BCX8" data-ccp-parastyle="Normal (Web)">Use the AWS CloudTrail integration to collect and parse logs related to account activity across your AWS infrastructure. Then visualize that data in Kibana, create alerts to </span><span class="NormalTextRun SCXW8068218 BCX8" data-ccp-parastyle="Normal (Web)">notify you</span><span class="NormalTextRun SCXW8068218 BCX8" data-ccp-parastyle="Normal (Web)"> if something goes wrong, and reference logs when troubleshooting an issue.</span></span><span class="EOP SCXW8068218 BCX8" data-ccp-props="{"134233117":false,"134233118":false,"201341983":0,"335557856":16777215,"335559685":360,"335559738":0,"335559739":0,"335559740":240}"> </span>

<span class="TextRun SCXW8068218 BCX8" data-contrast="none" lang="EN-US" xml:lang="EN-US"><span class="NormalTextRun SCXW8068218 BCX8" data-ccp-parastyle="Normal (Web)">For example, you could use the data from this integration to spot unusual activity in your AWS accounts—like </span><span class="NormalTextRun ContextualSpellingAndGrammarErrorV2Themed SCXW8068218 BCX8" data-ccp-parastyle="Normal (Web)">excessive</span><span class="NormalTextRun SCXW8068218 BCX8" data-ccp-parastyle="Normal (Web)"> failed AWS console sign in </span><span class="NormalTextRun SCXW8068218 BCX8" data-ccp-parastyle="Normal (Web)">attempts.</span></span><span class="EOP SCXW8068218 BCX8" data-ccp-props="{"134233117":false,"134233118":false,"201341983":0,"335557856":16777215,"335559685":360,"335559738":0,"335559739":0,"335559740":240}"> </span>

<span class="TextRun SCXW8068218 BCX8" data-contrast="none" lang="EN-US" xml:lang="EN-US"><span class="NormalTextRun SCXW8068218 BCX8" data-ccp-charstyle="Style (Complex) Open Sans">The procedures described in Section </span></span><span class="FieldRange SCXW8068218 BCX8"><span class="TextRun SCXW8068218 BCX8" data-contrast="none" lang="EN-US" xml:lang="EN-US"><span class="NormalTextRun SCXW8068218 BCX8" data-ccp-charstyle="Style (Complex) Open Sans">3</span></span></span><span class="TextRun SCXW8068218 BCX8" data-contrast="none" lang="EN-US" xml:lang="EN-US"> <span class="NormalTextRun ContextualSpellingAndGrammarErrorV2Themed SCXW8068218 BCX8" data-ccp-charstyle="Style (Complex) Open Sans">assumes</span><span class="NormalTextRun SCXW8068218 BCX8" data-ccp-charstyle="Style (Complex) Open Sans"> that a Log Collector has already been </span><span class="NormalTextRun ContextualSpellingAndGrammarErrorV2Themed SCXW8068218 BCX8" data-ccp-charstyle="Style (Complex) Open Sans">setup</span><span class="NormalTextRun SCXW8068218 BCX8" data-ccp-charstyle="Style (Complex) Open Sans">. </span></span><span class="EOP SCXW8068218 BCX8" data-ccp-props="{"201341983":0,"335559685":360,"335559739":160,"335559740":259}"> </span>

##### <span style="color: rgb(53, 152, 219);">**<span class="TextRun SCXW8068218 BCX8" data-contrast="none" lang="EN-US" xml:lang="EN-US"><span class="NormalTextRun SCXW8068218 BCX8" data-ccp-parastyle="heading 4">Data streams</span></span><span class="EOP SCXW8068218 BCX8" data-ccp-props="{"134245418":true,"134245529":true,"201341983":0,"335557856":16777215,"335559731":360,"335559738":0,"335559739":0,"335559740":259}"> </span>**</span>

<span class="TextRun Highlight SCXW8068218 BCX8" data-contrast="none" lang="EN-US" xml:lang="EN-US"><span class="NormalTextRun SCXW8068218 BCX8">The AWS CloudTrail integration collects one type of data: logs.</span></span><span class="EOP SCXW8068218 BCX8" data-ccp-props="{"201341983":0,"335559731":360,"335559739":160,"335559740":259}"> </span>

<span class="TextRun Highlight SCXW8068218 BCX8" data-contrast="none" lang="EN-US" xml:lang="EN-US"><span class="NormalTextRun SCXW8068218 BCX8" data-ccp-charstyle="Strong">Logs</span></span><span class="TextRun Highlight SCXW8068218 BCX8" data-contrast="none" lang="EN-US" xml:lang="EN-US"><span class="NormalTextRun SCXW8068218 BCX8"> help you keep a record of every event that CloudTrail receives. These logs are useful for many scenarios, including security and access audits. See more details in the </span></span>[<span class="TextRun Highlight Underlined SCXW8068218 BCX8" data-contrast="none" lang="EN-US" xml:lang="EN-US"><span class="NormalTextRun SCXW8068218 BCX8" data-ccp-charstyle="Hyperlink">Logs reference</span></span>](https://aquila-elk.kb.us-east-1.aws.found.io:9243/app/integrations/detail/aws-1.28.3/overview?integration=cloudtrail#logs-reference)<span class="TextRun Highlight SCXW8068218 BCX8" data-contrast="none" lang="EN-US" xml:lang="EN-US"><span class="NormalTextRun SCXW8068218 BCX8">.</span></span><span class="EOP SCXW8068218 BCX8" data-ccp-props="{"201341983":0,"335559685":360,"335559739":160,"335559740":259}"> </span>

<span class="TextRun SCXW8068218 BCX8" data-contrast="none" lang="EN-US" xml:lang="EN-US"><span class="NormalTextRun ContextualSpellingAndGrammarErrorV2Themed SCXW8068218 BCX8">Reference :</span> </span>[<span class="TextRun Highlight Underlined SCXW8068218 BCX8" data-contrast="none" lang="EN-US" xml:lang="EN-US"><span class="NormalTextRun SCXW8068218 BCX8" data-ccp-charstyle="Hyperlink">https://aquila-elk.kb.us-east-1.aws.found.io:9243/app/integrations/detail/aws-1.28.3/overview?integration=cloudtrail - logs-reference</span></span>](https://aquila-elk.kb.us-east-1.aws.found.io:9243/app/integrations/detail/aws-1.28.3/overview?integration=cloudtrail#logs-reference)<span class="EOP SCXW8068218 BCX8" data-ccp-props="{"201341983":0,"335559685":360,"335559739":160,"335559740":259}"> </span>

##### <span style="color: rgb(53, 152, 219);">**<span class="TextRun SCXW8068218 BCX8" data-contrast="none" lang="EN-US" xml:lang="EN-US"><span class="NormalTextRun SCXW8068218 BCX8" data-ccp-charstyle="Style (Complex) Open Sans">Assumptions</span></span>**<span class="EOP SCXW8068218 BCX8" data-ccp-props="{"134245418":true,"134245529":true,"201341983":0,"335559738":240,"335559739":0,"335559740":360}"> </span></span>

<span class="TextRun SCXW8068218 BCX8" data-contrast="auto" lang="EN-US" xml:lang="EN-US"><span class="NormalTextRun SCXW8068218 BCX8" data-ccp-charstyle="Style (Complex) Open Sans">The procedures described in Section 3 </span><span class="NormalTextRun ContextualSpellingAndGrammarErrorV2Themed SCXW8068218 BCX8" data-ccp-charstyle="Style (Complex) Open Sans">assumes</span><span class="NormalTextRun SCXW8068218 BCX8" data-ccp-charstyle="Style (Complex) Open Sans"> that a Log Collector has already been </span><span class="NormalTextRun ContextualSpellingAndGrammarErrorV2Themed SCXW8068218 BCX8" data-ccp-charstyle="Style (Complex) Open Sans">setup</span><span class="NormalTextRun SCXW8068218 BCX8" data-ccp-charstyle="Style (Complex) Open Sans">. </span></span><span class="EOP SCXW8068218 BCX8" data-ccp-props="{"201341983":0,"335559685":360,"335559739":160,"335559740":259}"> </span>

<div class="SCXW8068218 BCX8" id="bkmrk-"><div class="OutlineElement Ltr SCXW8068218 BCX8">  
</div><div class="ListContainerWrapper SCXW8068218 BCX8">  
</div></div>##### <span style="color: rgb(53, 152, 219);">**<span class="TextRun SCXW8068218 BCX8" data-contrast="none" lang="EN-US" xml:lang="EN-US"><span class="NormalTextRun SCXW8068218 BCX8" data-ccp-charstyle="Style (Complex) Open Sans">Requirements</span></span><span class="EOP SCXW8068218 BCX8" data-ccp-props="{"134245418":true,"134245529":true,"201341983":0,"335559738":240,"335559739":0,"335559740":360}"> </span>**</span>

<span class="TextRun SCXW8068218 BCX8" data-contrast="none" lang="EN-US" xml:lang="EN-US"><span class="NormalTextRun SCXW8068218 BCX8" data-ccp-parastyle="Normal (Web)">You need Elasticsearch for storing and searching your data and Kibana for visualizing and managing it. You can use our hosted Elasticsearch Service on Elastic Cloud, which is recommended, or self-manage the Elastic Stack on your own hardware.</span></span><span class="EOP SCXW8068218 BCX8" data-ccp-props="{"134233117":false,"134233118":false,"201341983":0,"335557856":16777215,"335559685":360,"335559738":0,"335559739":0,"335559740":240}"> </span>

<span class="TextRun SCXW8068218 BCX8" data-contrast="none" lang="EN-US" xml:lang="EN-US"><span class="NormalTextRun SCXW8068218 BCX8" data-ccp-parastyle="Normal (Web)">Before using any AWS </span><span class="NormalTextRun ContextualSpellingAndGrammarErrorV2Themed SCXW8068218 BCX8" data-ccp-parastyle="Normal (Web)">integration</span><span class="NormalTextRun SCXW8068218 BCX8" data-ccp-parastyle="Normal (Web)"> you will need:</span></span><span class="EOP SCXW8068218 BCX8" data-ccp-props="{"134233117":false,"134233118":false,"201341983":0,"335557856":16777215,"335559731":360,"335559738":0,"335559739":0,"335559740":240}"> </span>

<div class="SCXW8068218 BCX8" id="bkmrk-aws-credentials%E2%80%AFto-c"><div class="ListContainerWrapper SCXW8068218 BCX8">- <span class="TextRun SCXW8068218 BCX8" data-contrast="none" lang="EN-US" xml:lang="EN-US"><span class="NormalTextRun SCXW8068218 BCX8" data-ccp-charstyle="Strong">AWS Credentials</span></span><span class="TextRun SCXW8068218 BCX8" data-contrast="none" lang="EN-US" xml:lang="EN-US"><span class="NormalTextRun SCXW8068218 BCX8"> to connect with your AWS account.</span></span><span class="EOP SCXW8068218 BCX8" data-ccp-props="{"201341983":0,"335557856":16777215,"335559739":0,"335559740":240}"> </span>

</div><div class="ListContainerWrapper SCXW8068218 BCX8">- <span class="TextRun SCXW8068218 BCX8" data-contrast="none" lang="EN-US" xml:lang="EN-US"><span class="NormalTextRun SCXW8068218 BCX8" data-ccp-charstyle="Strong">AWS Permissions</span></span><span class="TextRun SCXW8068218 BCX8" data-contrast="none" lang="EN-US" xml:lang="EN-US"><span class="NormalTextRun SCXW8068218 BCX8"> to make sure the user </span><span class="NormalTextRun SCXW8068218 BCX8">you're</span><span class="NormalTextRun SCXW8068218 BCX8"> using to connect has permission to share the relevant data.</span></span><span class="EOP SCXW8068218 BCX8" data-ccp-props="{"201341983":0,"335557856":16777215,"335559739":0,"335559740":240}"> </span>

</div></div><span class="TextRun SCXW8068218 BCX8" data-contrast="none" lang="EN-US" xml:lang="EN-US"><span class="NormalTextRun SCXW8068218 BCX8" data-ccp-parastyle="Normal (Web)">For more details about these requirements, see the </span></span><span class="TextRun SCXW8068218 BCX8" data-contrast="none" lang="EN-US" xml:lang="EN-US"><span class="NormalTextRun SCXW8068218 BCX8" data-ccp-charstyle="Strong">AWS</span></span><span class="TextRun SCXW8068218 BCX8" data-contrast="none" lang="EN-US" xml:lang="EN-US"><span class="NormalTextRun SCXW8068218 BCX8" data-ccp-parastyle="Normal (Web)"> integration documentation.</span></span><span class="EOP SCXW8068218 BCX8" data-ccp-props="{"134233117":false,"134233118":false,"201341983":0,"335557856":16777215,"335559685":360,"335559738":0,"335559739":0,"335559740":240}"> </span>

<span class="EOP SCXW8068218 BCX8" data-ccp-props="{"134233117":false,"134233118":false,"201341983":0,"335557856":16777215,"335559738":0,"335559739":0,"335559740":240}"> </span>

##### <span style="color: rgb(53, 152, 219);">**<span class="TextRun SCXW8068218 BCX8" data-contrast="none" lang="EN-US" xml:lang="EN-US"><span class="NormalTextRun SCXW8068218 BCX8" data-ccp-parastyle="heading 4">Setup</span></span><span class="EOP SCXW8068218 BCX8" data-ccp-props="{"134245418":true,"134245529":true,"201341983":0,"335557856":16777215,"335559731":720,"335559738":0,"335559739":0,"335559740":259}"> </span>**</span>

<span class="TextRun SCXW8068218 BCX8" data-contrast="none" lang="EN-US" xml:lang="EN-US"><span class="NormalTextRun SCXW8068218 BCX8" data-ccp-parastyle="Normal (Web)">Use this integration if you only need to collect data from the AWS CloudTrail service.</span></span><span class="EOP SCXW8068218 BCX8" data-ccp-props="{"134233117":false,"134233118":false,"201341983":0,"335557856":16777215,"335559685":720,"335559738":0,"335559739":0,"335559740":240}"> </span>

<span class="TextRun SCXW8068218 BCX8" data-contrast="none" lang="EN-US" xml:lang="EN-US"><span class="NormalTextRun SCXW8068218 BCX8" data-ccp-parastyle="Normal (Web)">If you want to collect data from two or more AWS services, consider using the </span></span><span class="TextRun SCXW8068218 BCX8" data-contrast="none" lang="EN-US" xml:lang="EN-US"><span class="NormalTextRun SCXW8068218 BCX8" data-ccp-charstyle="Strong">AWS</span></span><span class="TextRun SCXW8068218 BCX8" data-contrast="none" lang="EN-US" xml:lang="EN-US"><span class="NormalTextRun SCXW8068218 BCX8" data-ccp-parastyle="Normal (Web)"> integration. When you configure the AWS integration, you can collect data from as many AWS services as </span><span class="NormalTextRun SCXW8068218 BCX8" data-ccp-parastyle="Normal (Web)">you'd</span><span class="NormalTextRun SCXW8068218 BCX8" data-ccp-parastyle="Normal (Web)"> like.</span></span><span class="EOP SCXW8068218 BCX8" data-ccp-props="{"134233117":false,"134233118":false,"201341983":0,"335557856":16777215,"335559685":720,"335559738":0,"335559739":0,"335559740":240}"> </span>

<span class="TextRun SCXW8068218 BCX8" data-contrast="none" lang="EN-US" xml:lang="EN-US"><span class="NormalTextRun SCXW8068218 BCX8" data-ccp-parastyle="Normal (Web)">For step-by-step instructions on how to set up an integration, see the </span></span>[<span class="TextRun Underlined SCXW8068218 BCX8" data-contrast="none" lang="EN-US" xml:lang="EN-US"><span class="NormalTextRun SCXW8068218 BCX8" data-ccp-charstyle="Hyperlink">Getting started</span></span>](https://www.elastic.co/guide/en/welcome-to-elastic/current/getting-started-observability.html)<span class="TextRun SCXW8068218 BCX8" data-contrast="none" lang="EN-US" xml:lang="EN-US"><span class="NormalTextRun SCXW8068218 BCX8" data-ccp-parastyle="Normal (Web)"> guide.</span></span><span class="EOP SCXW8068218 BCX8" data-ccp-props="{"134233117":false,"134233118":false,"201341983":0,"335557856":16777215,"335559685":720,"335559738":0,"335559739":0,"335559740":240}"> </span>

<span class="EOP SCXW8068218 BCX8" data-ccp-props="{"134233117":false,"134233118":false,"201341983":0,"335557856":16777215,"335559738":0,"335559739":0,"335559740":240}"> </span>

##### <span style="color: rgb(53, 152, 219);">**<span class="TextRun SCXW8068218 BCX8" data-contrast="none" lang="EN-US" xml:lang="EN-US"><span class="NormalTextRun SCXW8068218 BCX8" data-ccp-parastyle="heading 4">Logs reference</span></span><span class="EOP SCXW8068218 BCX8" data-ccp-props="{"134245418":true,"134245529":true,"201341983":0,"335557856":16777215,"335559731":720,"335559738":0,"335559739":0,"335559740":259}"> </span>**</span>

<span class="TextRun SCXW8068218 BCX8" data-contrast="none" lang="EN-US" xml:lang="EN-US"><span class="NormalTextRun SCXW8068218 BCX8" data-ccp-parastyle="Normal (Web)">The </span></span><span class="TextRun Highlight SCXW8068218 BCX8" data-contrast="none" lang="EN-US" xml:lang="EN-US"><span class="NormalTextRun SpellingErrorV2Themed SCXW8068218 BCX8" data-ccp-charstyle="HTML Code">cloudtrail</span></span><span class="TextRun SCXW8068218 BCX8" data-contrast="none" lang="EN-US" xml:lang="EN-US"><span class="NormalTextRun SCXW8068218 BCX8" data-ccp-parastyle="Normal (Web)"> data stream collects AWS CloudTrail logs. CloudTrail monitors events like user activity and API usage in AWS services. If a user creates a trail, it delivers those events as log files to a specific Amazon S3 bucket.</span></span><span class="EOP SCXW8068218 BCX8" data-ccp-props="{"134233117":false,"134233118":false,"201341983":0,"335557856":16777215,"335559685":720,"335559738":0,"335559739":0,"335559740":240}"> </span>

<div class="SCXW8068218 BCX8" id="bkmrk--1"><div class="OutlineElement Ltr SCXW8068218 BCX8">  
</div><div class="ListContainerWrapper SCXW8068218 BCX8">  
</div></div>##### <span style="color: rgb(53, 152, 219);">**<span class="TextRun SCXW8068218 BCX8" data-contrast="none" lang="EN-US" xml:lang="EN-US"><span class="NormalTextRun SCXW8068218 BCX8" data-ccp-charstyle="normaltextrun" data-ccp-charstyle-defn="{"ObjectId":"9f2947a9-fc0d-43c0-904c-edffe79616e9|69","ClassId":1073872969,"Properties":[201342446,"1",201342447,"5",201342448,"1",201342449,"1",469777841,"Calibri",469777842,"Arial",469777843,"Calibri",469777844,"Calibri",201341986,"1",469769226,"Calibri,Arial",268442635,"22",335559704,"1037",335559705,"1033",335551547,"1033",335559740,"259",201341983,"0",335559739,"160",469775450,"normaltextrun",201340122,"1",134233614,"true",469778129,"normaltextrun",335572020,"1",469778324,"Default Paragraph Font"]}">AWS CloudTrail integration </span><span class="NormalTextRun SCXW8068218 BCX8" data-ccp-charstyle="normaltextrun">Procedures</span><span class="NormalTextRun SCXW8068218 BCX8" data-ccp-charstyle="eop" data-ccp-charstyle-defn="{"ObjectId":"9f2947a9-fc0d-43c0-904c-edffe79616e9|70","ClassId":1073872969,"Properties":[201342446,"1",201342447,"5",201342448,"1",201342449,"1",469777841,"Calibri",469777842,"Arial",469777843,"Calibri",469777844,"Calibri",201341986,"1",469769226,"Calibri,Arial",268442635,"22",335559704,"1037",335559705,"1033",335551547,"1033",335559740,"259",201341983,"0",335559739,"160",469775450,"eop",201340122,"1",134233614,"true",469778129,"eop",335572020,"1",469778324,"Default Paragraph Font"]}"> </span></span><span class="EOP SCXW8068218 BCX8" data-ccp-props="{"134233117":false,"134233118":false,"201341983":0,"335559738":0,"335559739":0,"335559740":240}"> </span>**</span>

<span class="TextRun SCXW8068218 BCX8" data-contrast="auto" lang="EN-US" xml:lang="EN-US"><span class="NormalTextRun SCXW8068218 BCX8" data-ccp-charstyle="normaltextrun">T</span><span class="NormalTextRun SCXW8068218 BCX8" data-ccp-charstyle="normaltextrun">he following will need to be provided in the Configure integration when adding the </span><span class="NormalTextRun SCXW8068218 BCX8" data-ccp-charstyle="normaltextrun">AWS Audit CloudTrail</span><span class="NormalTextRun SCXW8068218 BCX8" data-ccp-charstyle="normaltextrun"> integration.</span></span><span class="TextRun SCXW8068218 BCX8" data-contrast="auto" lang="EN-US" xml:lang="EN-US"><span class="NormalTextRun SCXW8068218 BCX8" data-ccp-charstyle="normaltextrun"> </span></span><span class="TextRun SCXW8068218 BCX8" data-contrast="auto" lang="EN-US" xml:lang="EN-US"><span class="NormalTextRun SCXW8068218 BCX8" data-ccp-charstyle="eop"> </span></span><span class="EOP SCXW8068218 BCX8" data-ccp-props="{"134233117":false,"134233118":false,"201341983":0,"335559685":360,"335559738":0,"335559739":0,"335559740":240}"> </span>

<span class="TextRun SCXW8068218 BCX8" data-contrast="none" lang="EN-US" xml:lang="EN-US"><span class="NormalTextRun SCXW8068218 BCX8" data-ccp-charstyle="normaltextrun">Procedures:</span></span><span class="TextRun SCXW8068218 BCX8" data-contrast="none" lang="EN-PH" xml:lang="EN-PH"><span class="NormalTextRun SCXW8068218 BCX8" data-ccp-charstyle="normaltextrun"> </span></span><span class="TextRun SCXW8068218 BCX8" data-contrast="none" lang="EN-US" xml:lang="EN-US"><span class="NormalTextRun SCXW8068218 BCX8" data-ccp-charstyle="eop"> </span></span><span class="EOP SCXW8068218 BCX8" data-ccp-props="{"134233117":false,"134233118":false,"201341983":0,"335559731":360,"335559738":0,"335559739":0,"335559740":240}"> </span>

<span class="TextRun SCXW8068218 BCX8" data-contrast="none" lang="EN-US" xml:lang="EN-US"><span class="NormalTextRun SCXW8068218 BCX8" data-ccp-charstyle="normaltextrun">Please provide the following information to </span><span class="NormalTextRun SpellingErrorV2Themed SCXW8068218 BCX8" data-ccp-charstyle="normaltextrun">CyTech</span><span class="NormalTextRun SCXW8068218 BCX8" data-ccp-charstyle="normaltextrun">:</span></span><span class="TextRun SCXW8068218 BCX8" data-contrast="none" lang="EN-PH" xml:lang="EN-PH"><span class="NormalTextRun SCXW8068218 BCX8" data-ccp-charstyle="normaltextrun"> </span></span><span class="TextRun SCXW8068218 BCX8" data-contrast="none" lang="EN-US" xml:lang="EN-US"><span class="NormalTextRun SCXW8068218 BCX8" data-ccp-charstyle="eop"> </span></span><span class="EOP SCXW8068218 BCX8" data-ccp-props="{"134233117":false,"134233118":false,"201341983":0,"335559731":360,"335559738":0,"335559739":0,"335559740":240}"> </span>

<span class="TextRun Highlight SCXW8068218 BCX8" data-contrast="none" lang="EN-PH" xml:lang="EN-PH"><span class="NormalTextRun SCXW8068218 BCX8" data-ccp-charstyle="normaltextrun">Configure </span><span class="NormalTextRun SCXW8068218 BCX8" data-ccp-charstyle="normaltextrun">Integration</span></span><span class="EOP SCXW8068218 BCX8" data-ccp-props="{"134233117":false,"134233118":false,"201341983":0,"335559685":360,"335559738":0,"335559739":0,"335559740":240}"> </span>

<div class="SCXW8068218 BCX8" id="bkmrk-collect-cloudtrail-l"><div class="ListContainerWrapper SCXW8068218 BCX8">1. <span class="TextRun SCXW8068218 BCX8" data-contrast="none" lang="EN-US" xml:lang="EN-US"><span class="NormalTextRun SCXW8068218 BCX8" data-ccp-parastyle="paragraph" data-ccp-parastyle-defn="{"ObjectId":"9f2947a9-fc0d-43c0-904c-edffe79616e9|73","ClassId":1073872969,"Properties":[469777841,"Times New Roman",469777844,"Times New Roman",469769226,"Times New Roman",201342446,"1",201342447,"5",201342448,"1",201342449,"1",469777842,"Times New Roman",469777843,"Times New Roman",201341986,"1",268442635,"24",335559704,"1037",335559705,"1033",335551547,"1033",335559740,"240",201341983,"0",335559739,"160",469775450,"paragraph",201340122,"2",134233614,"true",469778129,"paragraph",335572020,"1",134233118,"true",134233117,"true",469778324,"Normal"]}">Collect CloudTrail logs from S3 (Enable)</span></span><span class="EOP SCXW8068218 BCX8" data-ccp-props="{"134233117":false,"134233118":false,"201341983":0,"335559738":0,"335559739":0,"335559740":240}"> </span>

</div><div class="ListContainerWrapper SCXW8068218 BCX8">- <span class="TextRun SCXW8068218 BCX8" data-contrast="none" lang="EN-US" xml:lang="EN-US"><span class="NormalTextRun SCXW8068218 BCX8">Queue URL is </span><span class="NormalTextRun SCXW8068218 BCX8">required</span> </span><span class="TextRun SCXW8068218 BCX8" data-contrast="none" lang="EN-US" xml:lang="EN-US"><span class="NormalTextRun SCXW8068218 BCX8">(URL of the AWS SQS queue that messages will be received from.)</span></span><span class="EOP SCXW8068218 BCX8" data-ccp-props="{"201341983":0,"335557856":16777215,"335559739":160,"335559740":259}"> </span>

</div><div class="ListContainerWrapper SCXW8068218 BCX8">2. <span class="TextRun SCXW8068218 BCX8" data-contrast="none" lang="EN-US" xml:lang="EN-US"><span class="NormalTextRun SCXW8068218 BCX8">Collect CloudTrail logs from </span><span class="NormalTextRun ContextualSpellingAndGrammarErrorV2Themed SCXW8068218 BCX8">CloudWatch</span><span class="NormalTextRun ContextualSpellingAndGrammarErrorV2Themed SCXW8068218 BCX8">(</span><span class="NormalTextRun SCXW8068218 BCX8">Optional)</span></span><span class="EOP SCXW8068218 BCX8" data-ccp-props="{"201341983":0,"335557856":16777215,"335559739":160,"335559740":259}"> </span>

</div><div class="ListContainerWrapper SCXW8068218 BCX8">- <span class="TextRun Highlight SCXW8068218 BCX8" data-contrast="none" lang="EN-US" xml:lang="EN-US"><span class="NormalTextRun SCXW8068218 BCX8">Log Group ARN </span></span><span class="TextRun Highlight SCXW8068218 BCX8" data-contrast="none" lang="EN-US" xml:lang="EN-US"><span class="NormalTextRun SCXW8068218 BCX8">(</span></span><span class="TextRun Highlight SCXW8068218 BCX8" data-contrast="none" lang="EN-US" xml:lang="EN-US"><span class="NormalTextRun SCXW8068218 BCX8">ARN of the log group to collect logs from.)</span></span><span class="EOP SCXW8068218 BCX8" data-ccp-props="{"201341983":0,"335557856":16777215,"335559739":160,"335559740":259}"> </span>

</div><div class="ListContainerWrapper SCXW8068218 BCX8">3. <span class="TextRun SCXW8068218 BCX8" data-contrast="none" lang="EN-US" xml:lang="EN-US"><span class="NormalTextRun SCXW8068218 BCX8">Collect CloudTrail logs from third-party REST API (</span><span class="NormalTextRun SCXW8068218 BCX8">Optional</span><span class="NormalTextRun SCXW8068218 BCX8">)</span></span><span class="EOP SCXW8068218 BCX8" data-ccp-props="{"201341983":0,"335557856":16777215,"335559739":160,"335559740":259}"> </span>

</div><div class="ListContainerWrapper SCXW8068218 BCX8">- <span class="TextRun Highlight SCXW8068218 BCX8" data-contrast="none" lang="EN-US" xml:lang="EN-US"><span class="NormalTextRun SCXW8068218 BCX8">URL of Splunk Enterprise Server </span></span><span class="TextRun Highlight SCXW8068218 BCX8" data-contrast="none" lang="EN-US" xml:lang="EN-US"><span class="NormalTextRun SCXW8068218 BCX8">(</span><span class="NormalTextRun SCXW8068218 BCX8">i.e.</span><span class="NormalTextRun SCXW8068218 BCX8"> scheme://host:port, path is automatic)</span></span><span class="EOP SCXW8068218 BCX8" data-ccp-props="{"201341983":0,"335557856":16777215,"335559739":160,"335559740":259}"> </span>

</div><div class="ListContainerWrapper SCXW8068218 BCX8">- <span class="TextRun Highlight SCXW8068218 BCX8" data-contrast="none" lang="EN-US" xml:lang="EN-US"><span class="NormalTextRun SCXW8068218 BCX8">Splunk REST API Username</span></span><span class="EOP SCXW8068218 BCX8" data-ccp-props="{"201341983":0,"335557856":16777215,"335559739":160,"335559740":259}"> </span>

</div><div class="ListContainerWrapper SCXW8068218 BCX8">- <span class="TextRun Highlight SCXW8068218 BCX8" data-contrast="none" lang="EN-US" xml:lang="EN-US"><span class="NormalTextRun SCXW8068218 BCX8">Splunk REST API Password</span></span><span class="EOP SCXW8068218 BCX8" data-ccp-props="{"201341983":0,"335557856":16777215,"335559739":160,"335559740":259}"> </span>

</div><div class="ListContainerWrapper SCXW8068218 BCX8">- <span class="TextRun Highlight SCXW8068218 BCX8" data-contrast="none" lang="EN-US" xml:lang="EN-US"><span class="NormalTextRun SCXW8068218 BCX8">Splunk Authorization Token </span></span><span class="TextRun Highlight SCXW8068218 BCX8" data-contrast="none" lang="EN-US" xml:lang="EN-US"><span class="NormalTextRun SCXW8068218 BCX8">(Bearer Token or Session Key, </span><span class="NormalTextRun SCXW8068218 BCX8">e.g.</span><span class="NormalTextRun SCXW8068218 BCX8"> "Bearer eyJFd3e46..." or "Splunk 192fd3e...". Cannot be used with username and password</span></span><span class="TextRun Highlight SCXW8068218 BCX8" data-contrast="none" lang="EN-US" xml:lang="EN-US"><span class="NormalTextRun SCXW8068218 BCX8">.)</span></span><span class="EOP SCXW8068218 BCX8" data-ccp-props="{"201341983":0,"335557856":16777215,"335559739":160,"335559740":259}"> </span>

</div></div>

# AWS GuardDuty Integrations

##### <span style="color: rgb(53, 152, 219);">**<span class="TextRun SCXW17604168 BCX8" data-contrast="none" lang="EN-US" xml:lang="EN-US"><span class="NormalTextRun SCXW17604168 BCX8" data-ccp-charstyle="Style (Complex) Open Sans" data-ccp-charstyle-defn="{"ObjectId":"8f6aa46f-554d-421f-a2c9-9098b3bdbc49|2","ClassId":1073872969,"Properties":[201342446,"1",201342447,"5",201342448,"1",201342449,"1",469777841,"Open Sans",469777842,"Open Sans",469777843,"Calibri",469777844,"Open Sans",201341986,"1",469769226,"Open Sans",268442635,"22",335559704,"1037",335559705,"1033",335551547,"1033",335559740,"259",201341983,"0",335559739,"160",469775450,"Style (Complex) Open Sans",201340122,"1",134233614,"true",469778129,"StyleComplexOpenSans",335572020,"1",469778324,"Default Paragraph Font"]}">Introduction</span></span><span class="EOP SCXW17604168 BCX8" data-ccp-props="{"134245418":true,"134245529":true,"201341983":0,"335559738":240,"335559739":0,"335559740":360}"> </span>**</span>

<span class="TextRun SCXW17604168 BCX8" data-contrast="auto" lang="EN-US" xml:lang="EN-US"><span class="NormalTextRun SCXW17604168 BCX8" data-ccp-charstyle="Style (Complex) Open Sans">The Amazon </span><span class="NormalTextRun SpellingErrorV2Themed SCXW17604168 BCX8" data-ccp-charstyle="Style (Complex) Open Sans">GuardDuty</span><span class="NormalTextRun SCXW17604168 BCX8" data-ccp-charstyle="Style (Complex) Open Sans"> integration collects and parses data from Amazon </span><span class="NormalTextRun SpellingErrorV2Themed SCXW17604168 BCX8" data-ccp-charstyle="Style (Complex) Open Sans">GuardDuty</span><span class="NormalTextRun SCXW17604168 BCX8" data-ccp-charstyle="Style (Complex) Open Sans"> Findings REST APIs.</span></span><span class="EOP SCXW17604168 BCX8" data-ccp-props="{"201341983":0,"335559685":360,"335559739":160,"335559740":259}"> </span>

<span class="TextRun SCXW17604168 BCX8" data-contrast="auto" lang="EN-US" xml:lang="EN-US"><span class="NormalTextRun SCXW17604168 BCX8" data-ccp-charstyle="Style (Complex) Open Sans">The Amazon </span><span class="NormalTextRun SpellingErrorV2Themed SCXW17604168 BCX8" data-ccp-charstyle="Style (Complex) Open Sans">GuardDuty</span><span class="NormalTextRun SCXW17604168 BCX8" data-ccp-charstyle="Style (Complex) Open Sans"> integration can be used in three different modes to collect data:</span></span><span class="EOP SCXW17604168 BCX8" data-ccp-props="{"201341983":0,"335559685":360,"335559739":160,"335559740":259}"> </span>

<div class="SCXW17604168 BCX8" id="bkmrk-http-rest-api---amaz"><div class="ListContainerWrapper SCXW17604168 BCX8">- <span class="TextRun SCXW17604168 BCX8" data-contrast="auto" lang="EN-US" xml:lang="EN-US"><span class="NormalTextRun SCXW17604168 BCX8" data-ccp-charstyle="Style (Complex) Open Sans">HTTP REST API - Amazon </span><span class="NormalTextRun SpellingErrorV2Themed SCXW17604168 BCX8" data-ccp-charstyle="Style (Complex) Open Sans">GuardDuty</span><span class="NormalTextRun SCXW17604168 BCX8" data-ccp-charstyle="Style (Complex) Open Sans"> pushes logs directly to an HTTP REST API. </span></span><span class="EOP SCXW17604168 BCX8" data-ccp-props="{"201341983":0,"335559739":160,"335559740":259}"> </span>

</div><div class="ListContainerWrapper SCXW17604168 BCX8">- <span class="TextRun SCXW17604168 BCX8" data-contrast="auto" lang="EN-US" xml:lang="EN-US"><span class="NormalTextRun SCXW17604168 BCX8" data-ccp-charstyle="Style (Complex) Open Sans">AWS S3 polling - Amazon </span><span class="NormalTextRun SpellingErrorV2Themed SCXW17604168 BCX8" data-ccp-charstyle="Style (Complex) Open Sans">GuardDuty</span><span class="NormalTextRun SCXW17604168 BCX8" data-ccp-charstyle="Style (Complex) Open Sans"> writes data to S3 and Elastic Agent polls the S3 bucket by listing its contents and reading new </span><span class="NormalTextRun ContextualSpellingAndGrammarErrorV2Themed SCXW17604168 BCX8" data-ccp-charstyle="Style (Complex) Open Sans">files.</span></span> <span class="EOP SCXW17604168 BCX8" data-ccp-props="{"201341983":0,"335559739":160,"335559740":259}"> </span>

</div><div class="ListContainerWrapper SCXW17604168 BCX8">- <span class="TextRun SCXW17604168 BCX8" data-contrast="auto" lang="EN-US" xml:lang="EN-US"><span class="NormalTextRun SCXW17604168 BCX8" data-ccp-charstyle="Style (Complex) Open Sans">AWS S3 SQS - Amazon </span><span class="NormalTextRun SpellingErrorV2Themed SCXW17604168 BCX8" data-ccp-charstyle="Style (Complex) Open Sans">GuardDuty</span><span class="NormalTextRun SCXW17604168 BCX8" data-ccp-charstyle="Style (Complex) Open Sans"> writes data to S3, S3 pushes a new object notification to SQS, Elastic Agent receives the notification from SQS, and then reads the S3 object. Multiple Agents can be used in this mode.</span></span><span class="EOP SCXW17604168 BCX8" data-ccp-props="{"201341983":0,"335559739":160,"335559740":259}"> </span>

</div></div>##### **<span class="TextRun SCXW17604168 BCX8" data-contrast="none" lang="EN-US" xml:lang="EN-US"><span class="NormalTextRun SCXW17604168 BCX8" data-ccp-charstyle="Style (Complex) Open Sans">Assumptions</span></span><span class="EOP SCXW17604168 BCX8" data-ccp-props="{"134245418":true,"134245529":true,"201341983":0,"335559738":240,"335559739":0,"335559740":360}"> </span>**

<span class="TextRun SCXW17604168 BCX8" data-contrast="auto" lang="EN-US" xml:lang="EN-US"><span class="NormalTextRun SCXW17604168 BCX8" data-ccp-charstyle="Style (Complex) Open Sans">The procedures described in Section </span></span><span class="FieldRange SCXW17604168 BCX8"><span class="TextRun SCXW17604168 BCX8" data-contrast="auto" lang="EN-US" xml:lang="EN-US"><span class="NormalTextRun SCXW17604168 BCX8" data-ccp-charstyle="Style (Complex) Open Sans">3</span></span></span><span class="TextRun SCXW17604168 BCX8" data-contrast="auto" lang="EN-US" xml:lang="EN-US"> <span class="NormalTextRun SCXW17604168 BCX8" data-ccp-charstyle="Style (Complex) Open Sans">assume</span><span class="NormalTextRun SCXW17604168 BCX8" data-ccp-charstyle="Style (Complex) Open Sans"> that a Log Collector has already been </span><span class="NormalTextRun SCXW17604168 BCX8" data-ccp-charstyle="Style (Complex) Open Sans">setup</span><span class="NormalTextRun SCXW17604168 BCX8" data-ccp-charstyle="Style (Complex) Open Sans">. </span></span><span class="EOP SCXW17604168 BCX8" data-ccp-props="{"201341983":0,"335559685":360,"335559739":160,"335559740":259}"> </span>

<div class="SCXW17604168 BCX8" id="bkmrk-"><div class="OutlineElement Ltr SCXW17604168 BCX8">  
</div><div class="ListContainerWrapper SCXW17604168 BCX8">  
</div></div>##### <span style="color: rgb(53, 152, 219);">**<span class="TextRun SCXW17604168 BCX8" data-contrast="none" lang="EN-US" xml:lang="EN-US"><span class="NormalTextRun SCXW17604168 BCX8" data-ccp-charstyle="Style (Complex) Open Sans">Requirements</span></span><span class="EOP SCXW17604168 BCX8" data-ccp-props="{"134245418":true,"134245529":true,"201341983":0,"335559738":240,"335559739":0,"335559740":360}"> </span>**</span>

<span class="TextRun SCXW17604168 BCX8" data-contrast="auto" lang="EN-US" xml:lang="EN-US"><span class="NormalTextRun SCXW17604168 BCX8">You need Elasticsearch for storing and searching your data and Kibana for visualizing and managing it. You can use our hosted Elasticsearch Service on Elastic Cloud, which is recommended, or self-manage the Elastic Stack on your own hardware.</span></span><span class="EOP SCXW17604168 BCX8" data-ccp-props="{"201341983":0,"335559685":360,"335559739":160,"335559740":259}"> </span>

<span class="TextRun SCXW17604168 BCX8" data-contrast="auto" lang="EN-GB" xml:lang="EN-GB"><span class="NormalTextRun SCXW17604168 BCX8">Note</span></span><span class="TextRun SCXW17604168 BCX8" data-contrast="auto" lang="EN-GB" xml:lang="EN-GB"><span class="NormalTextRun SCXW17604168 BCX8">: It is recommended to use AWS SQS for Amazon </span><span class="NormalTextRun SpellingErrorV2Themed SCXW17604168 BCX8">GuardDuty</span><span class="NormalTextRun SCXW17604168 BCX8">.</span></span><span class="EOP SCXW17604168 BCX8" data-ccp-props="{"201341983":0,"335559685":360,"335559739":160,"335559740":259}"> </span>

##### <span style="color: rgb(53, 152, 219);">**<span class="TextRun SCXW17604168 BCX8" data-contrast="none" lang="EN-US" xml:lang="EN-US"><span class="NormalTextRun SCXW17604168 BCX8" data-ccp-parastyle="CyTech Heading 1" data-ccp-parastyle-defn="{"ObjectId":"27f59124-cc65-4424-bd88-30a674ad0b05|227","ClassId":1073872969,"Properties":[469777841,"Open Sans",469777844,"Open Sans",469769226,"Open Sans",201342446,"1",201342447,"4",201342448,"2",201342449,"1",469777842,"Open Sans",469777843,"",201341986,"4",268442635,"36",335559704,"1037",335559705,"1033",335551547,"1033",335559740,"360",201341983,"0",335559739,"0",335551500,"1809913",335559738,"240",335560102,"0",134245418,"true",134245529,"true",469775450,"CyTech Heading 1",201340122,"2",134234082,"true",134233614,"true",469778129,"CyTechHeading1",335572020,"1",469777929,"CyTech Heading 1 Char",469778324,"heading 1"]}" data-ccp-parastyle-linked-defn="{"ObjectId":"27f59124-cc65-4424-bd88-30a674ad0b05|230","ClassId":1073872969,"Properties":[201342446,"1",201342447,"4",201342448,"2",201342449,"1",469777841,"Open Sans",469777842,"Open Sans",469777843,"",469777844,"Open Sans",201341986,"1",469769226,"Open Sans",268442635,"36",335559704,"1037",335559705,"1033",335551547,"1033",335559740,"259",201341983,"0",335559739,"160",335551500,"1809913",469775450,"CyTech Heading 1 Char",201340122,"1",134233614,"true",469778129,"CyTechHeading1Char",335572020,"1",134231262,"true",469777929,"CyTech Heading 1",469778324,"Heading 1 Char"]}">Aws </span><span class="NormalTextRun SpellingErrorV2Themed SCXW17604168 BCX8" data-ccp-parastyle="CyTech Heading 1">Guard</span><span class="NormalTextRun SpellingErrorV2Themed SCXW17604168 BCX8" data-ccp-parastyle="CyTech Heading 1">Duty</span><span class="NormalTextRun SCXW17604168 BCX8" data-ccp-parastyle="CyTech Heading 1"> integration Procedures</span></span><span class="EOP SCXW17604168 BCX8" data-ccp-props="{"134245418":true,"134245529":true,"201341983":0,"335559738":240,"335559739":0,"335559740":360}"> </span>**</span>

<span class="TextRun SCXW17604168 BCX8" data-contrast="auto" lang="EN-US" xml:lang="EN-US"><span class="NormalTextRun SCXW17604168 BCX8">To collect data from AWS S3 Bucket, follow the steps below:</span></span><span class="EOP SCXW17604168 BCX8" data-ccp-props="{"201341983":0,"335559685":360,"335559739":160,"335559740":259}"> </span>

<div class="SCXW17604168 BCX8" id="bkmrk-configure-the-data-f"><div class="ListContainerWrapper SCXW17604168 BCX8">- <span class="TextRun SCXW17604168 BCX8" data-contrast="auto" lang="EN-US" xml:lang="EN-US"><span class="NormalTextRun SCXW17604168 BCX8">Configure the </span></span>[<span class="TextRun Underlined SCXW17604168 BCX8" data-contrast="none" lang="EN-US" xml:lang="EN-US"><span class="NormalTextRun SCXW17604168 BCX8" data-ccp-charstyle="Hyperlink">Data Forwarder</span></span>](https://docs.aws.amazon.com/guardduty/latest/ug/guardduty_exportfindings.html)<span class="TextRun SCXW17604168 BCX8" data-contrast="auto" lang="EN-US" xml:lang="EN-US"><span class="NormalTextRun SCXW17604168 BCX8"> to ingest data into an AWS S3 bucket. However, the user can set the parameter "Bucket List Prefix" according to the requirement.</span></span><span class="EOP SCXW17604168 BCX8" data-ccp-props="{"201341983":0,"335559739":160,"335559740":259}"> </span>

</div><div class="OutlineElement Ltr SCXW17604168 BCX8">  
</div></div><span class="TextRun SCXW17604168 BCX8" data-contrast="auto" lang="EN-US" xml:lang="EN-US"><span class="NormalTextRun SCXW17604168 BCX8">To collect data from AWS SQS, follow the steps below:</span></span><span class="EOP SCXW17604168 BCX8" data-ccp-props="{"201341983":0,"335559685":360,"335559739":160,"335559740":259}"> </span>

<div class="SCXW17604168 BCX8" id="bkmrk-if-data-forwarding-t"><div class="ListContainerWrapper SCXW17604168 BCX8">1. <span class="TextRun SCXW17604168 BCX8" data-contrast="auto" lang="EN-US" xml:lang="EN-US"><span class="NormalTextRun SCXW17604168 BCX8">If data </span><span class="NormalTextRun SCXW17604168 BCX8">forwarding</span><span class="NormalTextRun SCXW17604168 BCX8"> to an AWS S3 bucket </span><span class="NormalTextRun SCXW17604168 BCX8">hasn't</span><span class="NormalTextRun SCXW17604168 BCX8"> been configured, then first </span><span class="NormalTextRun ContextualSpellingAndGrammarErrorV2Themed SCXW17604168 BCX8">setup</span><span class="NormalTextRun SCXW17604168 BCX8"> an AWS S3 bucket as mentioned in the documentation above.</span></span><span class="EOP SCXW17604168 BCX8" data-ccp-props="{"201341983":0,"335559739":160,"335559740":259}"> </span>

</div><div class="ListContainerWrapper SCXW17604168 BCX8">2. <span class="TextRun SCXW17604168 BCX8" data-contrast="auto" lang="EN-US" xml:lang="EN-US"><span class="NormalTextRun SCXW17604168 BCX8">To </span><span class="NormalTextRun ContextualSpellingAndGrammarErrorV2Themed SCXW17604168 BCX8">setup</span><span class="NormalTextRun SCXW17604168 BCX8"> an SQS queue, follow "Step 1: Create an Amazon SQS queue" mentioned in the </span></span>[<span class="TextRun Underlined SCXW17604168 BCX8" data-contrast="none" lang="EN-US" xml:lang="EN-US"><span class="NormalTextRun SCXW17604168 BCX8" data-ccp-charstyle="Hyperlink">Documentation</span></span>](https://docs.aws.amazon.com/AmazonS3/latest/userguide/ways-to-add-notification-config-to-bucket.html)<span class="TextRun SCXW17604168 BCX8" data-contrast="auto" lang="EN-US" xml:lang="EN-US"><span class="NormalTextRun SCXW17604168 BCX8">.</span></span><span class="EOP SCXW17604168 BCX8" data-ccp-props="{"201341983":0,"335559739":160,"335559740":259}"> </span>

</div><div class="ListContainerWrapper SCXW17604168 BCX8">- <span class="TextRun SCXW17604168 BCX8" data-contrast="auto" lang="EN-US" xml:lang="EN-US"><span class="NormalTextRun SCXW17604168 BCX8">While creating an SQS queue, please provide the same bucket ARN that has been generated after creating the AWS S3 bucket.</span></span><span class="EOP SCXW17604168 BCX8" data-ccp-props="{"201341983":0,"335559739":160,"335559740":259}"> </span>

</div></div><div class="SCXW17604168 BCX8" id="bkmrk-setup-event-notifica"><div class="ListContainerWrapper SCXW17604168 BCX8">3. <span class="TextRun SCXW17604168 BCX8" data-contrast="none" lang="EN-US" xml:lang="EN-US"><span class="NormalTextRun SCXW17604168 BCX8">Setup event notification for an S3 bucket. Follow this </span></span>[<span class="TextRun Underlined SCXW17604168 BCX8" data-contrast="none" lang="EN-US" xml:lang="EN-US"><span class="NormalTextRun SCXW17604168 BCX8" data-ccp-charstyle="Hyperlink">guide</span></span>](https://docs.aws.amazon.com/AmazonS3/latest/userguide/enable-event-notifications.html)<span class="TextRun SCXW17604168 BCX8" data-contrast="none" lang="EN-US" xml:lang="EN-US"><span class="NormalTextRun SCXW17604168 BCX8">.</span></span><span class="EOP SCXW17604168 BCX8" data-ccp-props="{"201341983":0,"335559739":160,"335559740":259}"> </span>

</div><div class="ListContainerWrapper SCXW17604168 BCX8">- <span class="TextRun SCXW17604168 BCX8" data-contrast="auto" lang="EN-US" xml:lang="EN-US"><span class="NormalTextRun SCXW17604168 BCX8">The user </span><span class="NormalTextRun AdvancedProofingIssueV2Themed SCXW17604168 BCX8">has to</span><span class="NormalTextRun SCXW17604168 BCX8"> perform Step 3 for the </span><span class="NormalTextRun SpellingErrorV2Themed SCXW17604168 BCX8">guardduty</span><span class="NormalTextRun SCXW17604168 BCX8"> data-stream, and the prefix parameter should be set the same as the S3 Bucket List Prefix as created earlier. For example, </span></span><span class="TextRun SCXW17604168 BCX8" data-contrast="none" lang="EN-US" xml:lang="EN-US"><span class="NormalTextRun SCXW17604168 BCX8">logs/</span></span><span class="TextRun SCXW17604168 BCX8" data-contrast="auto" lang="EN-US" xml:lang="EN-US"><span class="NormalTextRun SCXW17604168 BCX8"> for </span><span class="NormalTextRun SpellingErrorV2Themed SCXW17604168 BCX8">guardduty</span><span class="NormalTextRun SCXW17604168 BCX8"> data stream.</span></span><span class="EOP SCXW17604168 BCX8" data-ccp-props="{"201341983":0,"335559739":160,"335559740":259}"> </span>

</div><div class="ListContainerWrapper SCXW17604168 BCX8">- <span class="TextRun SCXW17604168 BCX8" data-contrast="auto" lang="EN-US" xml:lang="EN-US"><span class="NormalTextRun SCXW17604168 BCX8">For all the event notifications that have been created, select the event type as s</span><span class="NormalTextRun ContextualSpellingAndGrammarErrorV2Themed SCXW17604168 BCX8">3:ObjectCreated</span><span class="NormalTextRun SCXW17604168 BCX8">:\*, select the destination type SQS Queue, and select the queue that has been created in Step 2.</span></span><span class="EOP SCXW17604168 BCX8" data-ccp-props="{"201341983":0,"335559739":160,"335559740":259}"> </span>

</div></div><span class="TextRun SCXW17604168 BCX8" data-contrast="none" lang="EN-US" xml:lang="EN-US"><span class="NormalTextRun SCXW17604168 BCX8">Note</span></span><span class="TextRun SCXW17604168 BCX8" data-contrast="none" lang="EN-US" xml:lang="EN-US"><span class="NormalTextRun SCXW17604168 BCX8">:</span></span><span class="EOP SCXW17604168 BCX8" data-ccp-props="{"201341983":0,"335559685":360,"335559739":160,"335559740":259}"> </span>

<div class="SCXW17604168 BCX8" id="bkmrk-credentials-for-the-"><div class="ListContainerWrapper SCXW17604168 BCX8">- <span class="TextRun SCXW17604168 BCX8" data-contrast="none" lang="EN-US" xml:lang="EN-US"><span class="NormalTextRun SCXW17604168 BCX8">Credentials for the above AWS S3 and SQS input types should be configured according to the </span></span>[<span class="TextRun Underlined SCXW17604168 BCX8" data-contrast="none" lang="EN-US" xml:lang="EN-US"><span class="NormalTextRun SCXW17604168 BCX8" data-ccp-charstyle="Hyperlink">input configuration guide</span></span>](https://www.elastic.co/guide/en/beats/filebeat/current/filebeat-input-aws-s3.html#aws-credentials-config)<span class="TextRun SCXW17604168 BCX8" data-contrast="none" lang="EN-US" xml:lang="EN-US"><span class="NormalTextRun SCXW17604168 BCX8">.</span></span><span class="EOP SCXW17604168 BCX8" data-ccp-props="{"201341983":0,"335559685":1080,"335559739":160,"335559740":259}"> </span>

</div><div class="ListContainerWrapper SCXW17604168 BCX8">- <span class="TextRun SCXW17604168 BCX8" data-contrast="none" lang="EN-US" xml:lang="EN-US"><span class="NormalTextRun SCXW17604168 BCX8">Data collection via AWS S3 Bucket and AWS SQS are mutually exclusive in this case.</span></span><span class="EOP SCXW17604168 BCX8" data-ccp-props="{"201341983":0,"335559685":1080,"335559739":160,"335559740":259}"> </span>

</div><div class="OutlineElement Ltr SCXW17604168 BCX8">  
</div></div><span class="TextRun SCXW17604168 BCX8" data-contrast="auto" lang="EN-US" xml:lang="EN-US"><span class="NormalTextRun SCXW17604168 BCX8">To collect data from Amazon </span><span class="NormalTextRun SpellingErrorV2Themed SCXW17604168 BCX8">GuardDuty</span><span class="NormalTextRun SCXW17604168 BCX8"> API, users must have an Access Key and a Secret Key. To create an API </span><span class="NormalTextRun ContextualSpellingAndGrammarErrorV2Themed SCXW17604168 BCX8">token</span><span class="NormalTextRun SCXW17604168 BCX8"> follow the steps below:</span></span><span class="EOP SCXW17604168 BCX8" data-ccp-props="{"201341983":0,"335559685":360,"335559739":160,"335559740":259}"> </span>

<div class="SCXW17604168 BCX8" id="bkmrk-login-to-https%3A%2F%2Fcon"><div class="ListContainerWrapper SCXW17604168 BCX8">1. <span class="TextRun SCXW17604168 BCX8" data-contrast="none" lang="EN-US" xml:lang="EN-US"><span class="NormalTextRun SCXW17604168 BCX8">Login to </span></span>[<span class="TextRun Underlined SCXW17604168 BCX8" data-contrast="none" lang="EN-US" xml:lang="EN-US"><span class="NormalTextRun SCXW17604168 BCX8" data-ccp-charstyle="Hyperlink">https://console.aws.amazon.com/</span></span>](https://console.aws.amazon.com/)<span class="TextRun SCXW17604168 BCX8" data-contrast="none" lang="EN-US" xml:lang="EN-US"><span class="NormalTextRun SCXW17604168 BCX8">.</span></span><span class="EOP SCXW17604168 BCX8" data-ccp-props="{"201341983":0,"335559739":160,"335559740":259}"> </span>

</div><div class="ListContainerWrapper SCXW17604168 BCX8">2. <span class="TextRun SCXW17604168 BCX8" data-contrast="none" lang="EN-US" xml:lang="EN-US"><span class="NormalTextRun SCXW17604168 BCX8">Go to </span></span>[<span class="TextRun Underlined SCXW17604168 BCX8" data-contrast="none" lang="EN-US" xml:lang="EN-US"><span class="NormalTextRun SCXW17604168 BCX8" data-ccp-charstyle="Hyperlink">https://console.aws.amazon.com/iam/</span></span>](https://console.aws.amazon.com/iam/)<span class="TextRun SCXW17604168 BCX8" data-contrast="none" lang="EN-US" xml:lang="EN-US"> <span class="NormalTextRun SpellingErrorV2Themed SCXW17604168 BCX8">to</span><span class="NormalTextRun SCXW17604168 BCX8"> access the IAM console.</span></span><span class="EOP SCXW17604168 BCX8" data-ccp-props="{"201341983":0,"335559739":160,"335559740":259}"> </span>

</div><div class="ListContainerWrapper SCXW17604168 BCX8">3. <span class="TextRun SCXW17604168 BCX8" data-contrast="none" lang="EN-US" xml:lang="EN-US"><span class="NormalTextRun SCXW17604168 BCX8">On the navigation menu, choose Users.</span></span><span class="EOP SCXW17604168 BCX8" data-ccp-props="{"201341983":0,"335559739":160,"335559740":259}"> </span>

</div><div class="ListContainerWrapper SCXW17604168 BCX8">4. <span class="TextRun SCXW17604168 BCX8" data-contrast="none" lang="EN-US" xml:lang="EN-US"><span class="NormalTextRun SCXW17604168 BCX8">Choose your IAM </span><span class="NormalTextRun ContextualSpellingAndGrammarErrorV2Themed SCXW17604168 BCX8">user name</span><span class="NormalTextRun SCXW17604168 BCX8">.</span></span><span class="EOP SCXW17604168 BCX8" data-ccp-props="{"201341983":0,"335559739":160,"335559740":259}"> </span>

</div><div class="ListContainerWrapper SCXW17604168 BCX8">5. <span class="TextRun SCXW17604168 BCX8" data-contrast="none" lang="EN-US" xml:lang="EN-US"><span class="NormalTextRun SCXW17604168 BCX8">Select </span><span class="NormalTextRun ContextualSpellingAndGrammarErrorV2Themed SCXW17604168 BCX8">Create</span><span class="NormalTextRun SCXW17604168 BCX8"> access key from the Security Credentials tab.</span></span><span class="EOP SCXW17604168 BCX8" data-ccp-props="{"201341983":0,"335559739":160,"335559740":259}"> </span>

</div></div><div class="SCXW17604168 BCX8" id="bkmrk-to-see-the-new-acces"><div class="ListContainerWrapper SCXW17604168 BCX8">6. <span class="TextRun SCXW17604168 BCX8" data-contrast="none" lang="EN-US" xml:lang="EN-US"><span class="NormalTextRun SCXW17604168 BCX8">To see the new access key, choose Show.</span></span><span class="EOP SCXW17604168 BCX8" data-ccp-props="{"201341983":0,"335559739":160,"335559740":259}"> </span>

</div></div><span class="TextRun SCXW17604168 BCX8" data-contrast="auto" lang="EN-US" xml:lang="EN-US"><span class="NormalTextRun SCXW17604168 BCX8">Note</span></span><span class="EOP SCXW17604168 BCX8" data-ccp-props="{"201341983":0,"335559685":360,"335559739":160,"335559740":259}"> </span>

<div class="SCXW17604168 BCX8" id="bkmrk-the-secret-access-ke"><div class="ListContainerWrapper SCXW17604168 BCX8">- <span class="TextRun SCXW17604168 BCX8" data-contrast="none" lang="EN-US" xml:lang="EN-US"><span class="NormalTextRun SCXW17604168 BCX8">The Secret Access Key and Access Key ID are </span><span class="NormalTextRun SCXW17604168 BCX8">required</span><span class="NormalTextRun SCXW17604168 BCX8"> for the current integration package.</span></span><span class="EOP SCXW17604168 BCX8" data-ccp-props="{"201341983":0,"335559685":1080,"335559739":160,"335559740":259}"> </span>

</div><div class="OutlineElement Ltr SCXW17604168 BCX8">  
</div></div><span class="EOP SCXW17604168 BCX8" data-ccp-props="{"201341983":0,"335559739":160,"335559740":259}"></span>

# AWS Integrations

##### <span style="color: rgb(53, 152, 219);">**<span class="TextRun SCXW148341486 BCX8" data-contrast="none" lang="EN-US" xml:lang="EN-US"><span class="NormalTextRun SCXW148341486 BCX8" data-ccp-charstyle="Style (Complex) Open Sans" data-ccp-charstyle-defn="{"ObjectId":"e27ea779-7590-4666-9f57-d1cbdda07f5a|29","ClassId":1073872969,"Properties":[469775450,"Style (Complex) Open Sans",201340122,"1",134233614,"true",469778129,"StyleComplexOpenSans",335572020,"1",201342448,"1",469777841,"Open Sans",469777842,"Open Sans",469777843,"Calibri",469777844,"Open Sans",469769226,"Open Sans,Calibri",469778324,"Default Paragraph Font"]}">Introduction</span></span><span class="EOP SCXW148341486 BCX8" data-ccp-props="{"134245418":true,"134245529":true,"201341983":0,"335559738":240,"335559739":0,"335559740":360}"> </span>**</span>

<span class="TextRun SCXW148341486 BCX8" data-contrast="auto" lang="EN-US" xml:lang="EN-US"><span class="NormalTextRun SCXW148341486 BCX8" data-ccp-charstyle="Style (Complex) Open Sans">This document </span><span class="NormalTextRun SCXW148341486 BCX8" data-ccp-charstyle="Style (Complex) Open Sans">shows information related to AWS Integration. </span></span><span class="EOP SCXW148341486 BCX8" data-ccp-props="{"201341983":0,"335559685":360,"335559739":160,"335559740":259}"> </span>

<span class="TextRun SCXW148341486 BCX8" data-contrast="auto" lang="EN-US" xml:lang="EN-US"><span class="NormalTextRun SCXW148341486 BCX8" data-ccp-charstyle="Style (Complex) Open Sans">The AWS integration is used to fetch logs and metrics from Amazon Web Services</span><span class="NormalTextRun SCXW148341486 BCX8" data-ccp-charstyle="Style (Complex) Open Sans">.</span></span><span class="EOP SCXW148341486 BCX8" data-ccp-props="{"201341983":0,"335559685":360,"335559739":160,"335559740":259}"> </span>

<span class="TextRun SCXW148341486 BCX8" data-contrast="auto" lang="EN-US" xml:lang="EN-US"><span class="NormalTextRun SCXW148341486 BCX8" data-ccp-charstyle="Style (Complex) Open Sans">T</span><span class="NormalTextRun SCXW148341486 BCX8" data-ccp-charstyle="Style (Complex) Open Sans">he </span><span class="NormalTextRun SCXW148341486 BCX8" data-ccp-charstyle="Style (Complex) Open Sans">usage of the </span><span class="NormalTextRun SCXW148341486 BCX8" data-ccp-charstyle="Style (Complex) Open Sans">AWS integration </span><span class="NormalTextRun SCXW148341486 BCX8" data-ccp-charstyle="Style (Complex) Open Sans">is </span><span class="NormalTextRun SCXW148341486 BCX8" data-ccp-charstyle="Style (Complex) Open Sans">to collect metrics and logs across many AWS services managed by </span><span class="NormalTextRun SCXW148341486 BCX8" data-ccp-charstyle="Style (Complex) Open Sans">your</span><span class="NormalTextRun SCXW148341486 BCX8" data-ccp-charstyle="Style (Complex) Open Sans"> AWS account.</span></span><span class="EOP SCXW148341486 BCX8" data-ccp-props="{"201341983":0,"335559685":360,"335559739":160,"335559740":259}"> </span>

<div class="SCXW148341486 BCX8" id="bkmrk-"><div class="ListContainerWrapper SCXW148341486 BCX8"></div></div>##### <span style="color: rgb(53, 152, 219);">**<span class="TextRun SCXW148341486 BCX8" data-contrast="none" lang="EN-US" xml:lang="EN-US"><span class="NormalTextRun SCXW148341486 BCX8" data-ccp-charstyle="Style (Complex) Open Sans">Assumptions</span></span><span class="EOP SCXW148341486 BCX8" data-ccp-props="{"134245418":true,"134245529":true,"201341983":0,"335559738":240,"335559739":0,"335559740":360}"> </span>**</span>

<span class="TextRun SCXW148341486 BCX8" data-contrast="auto" lang="EN-US" xml:lang="EN-US"><span class="NormalTextRun SCXW148341486 BCX8" data-ccp-charstyle="Style (Complex) Open Sans">The procedures described in Section </span></span><span class="FieldRange SCXW148341486 BCX8"><span class="TextRun SCXW148341486 BCX8" data-contrast="auto" lang="EN-US" xml:lang="EN-US"><span class="NormalTextRun SCXW148341486 BCX8" data-ccp-charstyle="Style (Complex) Open Sans">3</span></span></span><span class="TextRun SCXW148341486 BCX8" data-contrast="auto" lang="EN-US" xml:lang="EN-US"> <span class="NormalTextRun ContextualSpellingAndGrammarErrorV2Themed SCXW148341486 BCX8" data-ccp-charstyle="Style (Complex) Open Sans">assumes</span><span class="NormalTextRun SCXW148341486 BCX8" data-ccp-charstyle="Style (Complex) Open Sans"> that a Log Collector has already been </span><span class="NormalTextRun ContextualSpellingAndGrammarErrorV2Themed SCXW148341486 BCX8" data-ccp-charstyle="Style (Complex) Open Sans">setup</span><span class="NormalTextRun SCXW148341486 BCX8" data-ccp-charstyle="Style (Complex) Open Sans">. </span></span><span class="EOP SCXW148341486 BCX8" data-ccp-props="{"201341983":0,"335559685":360,"335559739":160,"335559740":259}"> </span>

##### <span style="color: rgb(53, 152, 219);">**<span class="TextRun SCXW148341486 BCX8" data-contrast="none" lang="EN-US" xml:lang="EN-US"><span class="NormalTextRun SCXW148341486 BCX8" data-ccp-charstyle="Style (Complex) Open Sans">Requirements</span></span><span class="EOP SCXW148341486 BCX8" data-ccp-props="{"134245418":true,"134245529":true,"201341983":0,"335559738":240,"335559739":0,"335559740":360}"> </span>**</span>

<span class="TextRun SCXW148341486 BCX8" data-contrast="auto" lang="EN-US" xml:lang="EN-US"><span class="NormalTextRun SCXW148341486 BCX8" data-ccp-charstyle="Style (Complex) Open Sans">Before using the AWS </span><span class="NormalTextRun ContextualSpellingAndGrammarErrorV2Themed SCXW148341486 BCX8" data-ccp-charstyle="Style (Complex) Open Sans">integration</span><span class="NormalTextRun SCXW148341486 BCX8" data-ccp-charstyle="Style (Complex) Open Sans"> you will need:</span></span><span class="EOP SCXW148341486 BCX8" data-ccp-props="{"201341983":0,"335559685":360,"335559739":160,"335559740":259}"> </span>

<div class="SCXW148341486 BCX8" id="bkmrk-aws-credentials-to-c"><div class="ListContainerWrapper SCXW148341486 BCX8">- <span class="TextRun SCXW148341486 BCX8" data-contrast="auto" lang="EN-US" xml:lang="EN-US"><span class="NormalTextRun SCXW148341486 BCX8" data-ccp-charstyle="Style (Complex) Open Sans">AWS Credentials</span></span><span class="TextRun SCXW148341486 BCX8" data-contrast="auto" lang="EN-US" xml:lang="EN-US"><span class="NormalTextRun SCXW148341486 BCX8" data-ccp-charstyle="Style (Complex) Open Sans"> to connect with your AWS account.</span></span><span class="EOP SCXW148341486 BCX8" data-ccp-props="{"201341983":0,"335559739":160,"335559740":259}"> </span>
- <span class="TextRun SCXW148341486 BCX8" data-contrast="auto" lang="EN-US" xml:lang="EN-US"><span class="NormalTextRun SCXW148341486 BCX8" data-ccp-charstyle="Style (Complex) Open Sans">AWS Permissions</span></span><span class="TextRun SCXW148341486 BCX8" data-contrast="auto" lang="EN-US" xml:lang="EN-US"><span class="NormalTextRun SCXW148341486 BCX8" data-ccp-charstyle="Style (Complex) Open Sans"> to make sure the user </span><span class="NormalTextRun SCXW148341486 BCX8" data-ccp-charstyle="Style (Complex) Open Sans">you're</span><span class="NormalTextRun SCXW148341486 BCX8" data-ccp-charstyle="Style (Complex) Open Sans"> using to connect has permission to share the relevant data.</span></span><span class="EOP SCXW148341486 BCX8" data-ccp-props="{"201341983":0,"335559739":160,"335559740":259}"> </span>

</div><div class="ListContainerWrapper SCXW148341486 BCX8">  
</div></div>##### <span style="color: rgb(53, 152, 219);">**<span class="TextRun SCXW148341486 BCX8" data-contrast="none" lang="EN-CA" xml:lang="EN-CA"><span class="NormalTextRun SCXW148341486 BCX8" data-ccp-charstyle="Style (Complex) Open Sans">AWS Credentials</span></span><span class="EOP SCXW148341486 BCX8" data-ccp-props="{"134245418":true,"134245529":true,"201341983":0,"335559738":40,"335559739":0,"335559740":360}"> </span>**</span>

<span style="color: rgb(53, 152, 219);">**<span class="TextRun SCXW46477066 BCX8" data-contrast="none" lang="EN-CA" xml:lang="EN-CA"><span class="NormalTextRun SCXW46477066 BCX8" data-ccp-charstyle="Style (Complex) Open Sans" data-ccp-charstyle-defn="{"ObjectId":"e27ea779-7590-4666-9f57-d1cbdda07f5a|29","ClassId":1073872969,"Properties":[469775450,"Style (Complex) Open Sans",201340122,"1",134233614,"true",469778129,"StyleComplexOpenSans",335572020,"1",201342448,"1",469777841,"Open Sans",469777842,"Open Sans",469777843,"Calibri",469777844,"Open Sans",469769226,"Open Sans,Calibri",469778324,"Default Paragraph Font"]}">Use access keys directly</span> </span><span class="TextRun SCXW46477066 BCX8" data-contrast="none" lang="EN-CA" xml:lang="EN-CA"><span class="NormalTextRun SCXW46477066 BCX8" data-ccp-charstyle="Style (Complex) Open Sans">(Option 1</span><span class="NormalTextRun SCXW46477066 BCX8" data-ccp-charstyle="Style (Complex) Open Sans"> Recommended</span><span class="NormalTextRun SCXW46477066 BCX8" data-ccp-charstyle="Style (Complex) Open Sans">)</span></span>**<span class="EOP SCXW46477066 BCX8" data-ccp-props="{"134245418":true,"134245529":true,"201341983":0,"335559738":40,"335559739":0,"335559740":360}"> </span></span>

<span class="TextRun SCXW46477066 BCX8" data-contrast="auto" lang="EN-US" xml:lang="EN-US"><span class="NormalTextRun SCXW46477066 BCX8" data-ccp-charstyle="Style (Complex) Open Sans">Access keys are long-term credentials for an IAM user or the AWS account root user. To use access keys as credentials, you need to provide:</span></span><span class="EOP SCXW46477066 BCX8" data-ccp-props="{"201341983":0,"335559685":720,"335559739":160,"335559740":259}"> </span>

<div class="ListContainerWrapper SCXW46477066 BCX8" id="bkmrk-access_key_id%3A-the-f">- <span class="TextRun SCXW46477066 BCX8" data-contrast="auto" lang="EN-US" xml:lang="EN-US"><span class="NormalTextRun SpellingErrorV2Themed SCXW46477066 BCX8" data-ccp-charstyle="Style (Complex) Open Sans">access\_key\_id</span><span class="NormalTextRun SCXW46477066 BCX8" data-ccp-charstyle="Style (Complex) Open Sans">: The first part of the access key.</span></span><span class="EOP SCXW46477066 BCX8" data-ccp-props="{"201341983":0,"335559739":160,"335559740":259}"> </span>
- <span class="TextRun SCXW46477066 BCX8" data-contrast="auto" lang="EN-US" xml:lang="EN-US"><span class="NormalTextRun SpellingErrorV2Themed SCXW46477066 BCX8" data-ccp-charstyle="Style (Complex) Open Sans">secret\_access\_key</span><span class="NormalTextRun SCXW46477066 BCX8" data-ccp-charstyle="Style (Complex) Open Sans">: The second part of the access key.</span></span><span class="EOP SCXW46477066 BCX8" data-ccp-props="{"201341983":0,"335559739":160,"335559740":259}"> </span>

</div>**<span class="TextRun SCXW46477066 BCX8" data-contrast="none" lang="EN-CA" xml:lang="EN-CA"><span style="color: rgb(53, 152, 219);"><span class="NormalTextRun SCXW46477066 BCX8" data-ccp-charstyle="Style (Complex) Open Sans">Use an </span><span class="NormalTextRun SCXW46477066 BCX8" data-ccp-charstyle="Style (Complex) Open Sans">IAM role Amazon Resource Name (ARN)</span></span><span class="NormalTextRun SCXW46477066 BCX8" data-ccp-charstyle="Style (Complex) Open Sans"> </span></span><span class="EOP SCXW46477066 BCX8" data-ccp-props="{"134245418":true,"134245529":true,"201341983":0,"335559738":40,"335559739":0,"335559740":360}"> </span>**

<span class="TextRun SCXW46477066 BCX8" data-contrast="auto" lang="EN-US" xml:lang="EN-US"><span class="NormalTextRun SCXW46477066 BCX8" data-ccp-charstyle="Style (Complex) Open Sans">To use an IAM role ARN, you need to provide either a credential profile or access keys along with the </span></span><span class="TextRun SCXW46477066 BCX8" data-contrast="auto" lang="EN-US" xml:lang="EN-US"><span class="NormalTextRun SpellingErrorV2Themed SCXW46477066 BCX8" data-ccp-charstyle="Style (Complex) Open Sans">role\_arn</span></span><span class="TextRun SCXW46477066 BCX8" data-contrast="auto" lang="EN-US" xml:lang="EN-US"><span class="NormalTextRun SCXW46477066 BCX8" data-ccp-charstyle="Style (Complex) Open Sans"> advanced </span><span class="NormalTextRun SCXW46477066 BCX8" data-ccp-charstyle="Style (Complex) Open Sans">option</span><span class="NormalTextRun SCXW46477066 BCX8" data-ccp-charstyle="Style (Complex) Open Sans">. </span></span><span class="TextRun SCXW46477066 BCX8" data-contrast="auto" lang="EN-US" xml:lang="EN-US"><span class="NormalTextRun SpellingErrorV2Themed SCXW46477066 BCX8" data-ccp-charstyle="Style (Complex) Open Sans">role\_arn</span></span><span class="TextRun SCXW46477066 BCX8" data-contrast="auto" lang="EN-US" xml:lang="EN-US"><span class="NormalTextRun SCXW46477066 BCX8" data-ccp-charstyle="Style (Complex) Open Sans"> is used to specify which AWS IAM role to assume for generating temporary credentials.</span></span><span class="EOP SCXW46477066 BCX8" data-ccp-props="{"201341983":0,"335559685":1224,"335559739":160,"335559740":259}"> </span>

**<span style="color: rgb(53, 152, 219);"><span class="TextRun SCXW46477066 BCX8" data-contrast="none" lang="EN-CA" xml:lang="EN-CA"><span class="NormalTextRun SCXW46477066 BCX8" data-ccp-charstyle="Style (Complex) Open Sans">Use a shared credentials file </span></span><span class="TextRun SCXW46477066 BCX8" data-contrast="none" lang="EN-CA" xml:lang="EN-CA"><span class="NormalTextRun SCXW46477066 BCX8" data-ccp-charstyle="Style (Complex) Open Sans">(Option 2)</span></span></span><span class="EOP SCXW46477066 BCX8" data-ccp-props="{"134245418":true,"134245529":true,"201341983":0,"335559738":40,"335559739":0,"335559740":360}"> </span>**

<span class="TextRun SCXW46477066 BCX8" data-contrast="auto" lang="EN-US" xml:lang="EN-US"><span class="NormalTextRun SCXW46477066 BCX8" data-ccp-charstyle="Style (Complex) Open Sans">Instead of providing the </span><span class="NormalTextRun SpellingErrorV2Themed SCXW46477066 BCX8" data-ccp-charstyle="Style (Complex) Open Sans">access\_key\_id</span><span class="NormalTextRun SCXW46477066 BCX8" data-ccp-charstyle="Style (Complex) Open Sans"> and </span><span class="NormalTextRun SpellingErrorV2Themed SCXW46477066 BCX8" data-ccp-charstyle="Style (Complex) Open Sans">secret\_access\_key</span><span class="NormalTextRun SCXW46477066 BCX8" data-ccp-charstyle="Style (Complex) Open Sans"> directly to the integration, you will </span><span class="NormalTextRun SCXW46477066 BCX8" data-ccp-charstyle="Style (Complex) Open Sans">provide</span><span class="NormalTextRun SCXW46477066 BCX8" data-ccp-charstyle="Style (Complex) Open Sans"> two advanced options to look up the access keys in the shared credentials file:</span></span><span class="EOP SCXW46477066 BCX8" data-ccp-props="{"201341983":0,"335559685":1224,"335559739":160,"335559740":259}"> </span>

<div class="ListContainerWrapper SCXW46477066 BCX8" id="bkmrk-credential_profile_n">- <span class="TextRun SCXW46477066 BCX8" data-contrast="auto" lang="EN-US" xml:lang="EN-US"><span class="NormalTextRun SpellingErrorV2Themed SCXW46477066 BCX8" data-ccp-charstyle="Style (Complex) Open Sans">credential\_profile\_name</span><span class="NormalTextRun SCXW46477066 BCX8" data-ccp-charstyle="Style (Complex) Open Sans">: The profile name in shared credentials file.</span></span><span class="EOP SCXW46477066 BCX8" data-ccp-props="{"201341983":0,"335559739":160,"335559740":259}"> </span>

</div><span class="TextRun SCXW46477066 BCX8" data-contrast="auto" lang="EN-US" xml:lang="EN-US"><span class="NormalTextRun SpellingErrorV2Themed SCXW46477066 BCX8" data-ccp-charstyle="Style (Complex) Open Sans">shared\_credential\_file</span><span class="NormalTextRun SCXW46477066 BCX8" data-ccp-charstyle="Style (Complex) Open Sans">: The directory of the shared credentials file.</span></span><span class="EOP SCXW46477066 BCX8" data-ccp-props="{"201341983":0,"335559685":1224,"335559739":160,"335559740":259}"> </span>

<span class="TextRun SCXW148341486 BCX8" data-contrast="auto" lang="EN-US" xml:lang="EN-US"><span class="NormalTextRun SCXW148341486 BCX8" data-ccp-charstyle="Style (Complex) Open Sans">Access keys are long-term credentials for an IAM user or the AWS account root user. To use access keys as credentials, you need to provide:</span></span><span class="EOP SCXW148341486 BCX8" data-ccp-props="{"201341983":0,"335559685":720,"335559739":160,"335559740":259}"> </span>

<div class="SCXW148341486 BCX8" id="bkmrk-access_key_id%3A-the-f-1"><div class="ListContainerWrapper SCXW148341486 BCX8">- <span class="TextRun SCXW148341486 BCX8" data-contrast="auto" lang="EN-US" xml:lang="EN-US"><span class="NormalTextRun SpellingErrorV2Themed SCXW148341486 BCX8" data-ccp-charstyle="Style (Complex) Open Sans">access\_key\_id</span><span class="NormalTextRun SCXW148341486 BCX8" data-ccp-charstyle="Style (Complex) Open Sans">: The first part of the access key.</span></span><span class="EOP SCXW148341486 BCX8" data-ccp-props="{"201341983":0,"335559739":160,"335559740":259}"> </span>
- <span class="TextRun SCXW148341486 BCX8" data-contrast="auto" lang="EN-US" xml:lang="EN-US"><span class="NormalTextRun SpellingErrorV2Themed SCXW148341486 BCX8" data-ccp-charstyle="Style (Complex) Open Sans">secret\_access\_key</span><span class="NormalTextRun SCXW148341486 BCX8" data-ccp-charstyle="Style (Complex) Open Sans">: The second part of the access key.</span></span><span class="EOP SCXW148341486 BCX8" data-ccp-props="{"201341983":0,"335559739":160,"335559740":259}"> </span>

</div></div><div class="OutlineElement Ltr SCXW148341486 BCX8" id="bkmrk--2">  
</div><div class="OutlineElement Ltr SCXW148341486 BCX8" id="bkmrk--3"></div><span style="color: rgb(53, 152, 219);">**<span class="TextRun SCXW148341486 BCX8" data-contrast="none" lang="EN-CA" xml:lang="EN-CA"><span class="NormalTextRun SCXW148341486 BCX8" data-ccp-charstyle="Style (Complex) Open Sans">AWS Permissions</span></span><span class="EOP SCXW148341486 BCX8" data-ccp-props="{"134245418":true,"134245529":true,"201341983":0,"335559738":40,"335559739":0,"335559740":360}"> </span>**</span>

<span class="TextRun SCXW148341486 BCX8" data-contrast="auto" lang="EN-US" xml:lang="EN-US"><span class="NormalTextRun SCXW148341486 BCX8" data-ccp-charstyle="Style (Complex) Open Sans">Specific AWS permissions are </span><span class="NormalTextRun SCXW148341486 BCX8" data-ccp-charstyle="Style (Complex) Open Sans">required</span><span class="NormalTextRun SCXW148341486 BCX8" data-ccp-charstyle="Style (Complex) Open Sans"> for the IAM user to make specific AWS API calls. To enable the AWS integration to collect metrics and logs from all supported services, make sure</span> <span class="NormalTextRun SCXW148341486 BCX8" data-ccp-charstyle="Style (Complex) Open Sans">to give </span></span><span class="TextRun SCXW148341486 BCX8" data-contrast="auto" lang="EN-US" xml:lang="EN-US"><span class="NormalTextRun SCXW148341486 BCX8" data-ccp-charstyle="Style (Complex) Open Sans">necessary permissions </span></span><span class="TextRun SCXW148341486 BCX8" data-contrast="auto" lang="EN-US" xml:lang="EN-US"><span class="NormalTextRun SCXW148341486 BCX8" data-ccp-charstyle="Style (Complex) Open Sans">which </span><span class="NormalTextRun SpellingErrorV2Themed SCXW148341486 BCX8" data-ccp-charstyle="Style (Complex) Open Sans">CyTech</span> <span class="NormalTextRun SCXW148341486 BCX8" data-ccp-charstyle="Style (Complex) Open Sans">to </span><span class="NormalTextRun SCXW148341486 BCX8" data-ccp-charstyle="Style (Complex) Open Sans">monitor</span><span class="NormalTextRun SCXW148341486 BCX8" data-ccp-charstyle="Style (Complex) Open Sans">.</span></span><span class="EOP SCXW148341486 BCX8" data-ccp-props="{"201341983":0,"335559685":720,"335559739":160,"335559740":259}"> </span>

<span class="TextRun SCXW148341486 BCX8" data-contrast="auto" lang="EN-US" xml:lang="EN-US"><span class="NormalTextRun SCXW148341486 BCX8" data-ccp-charstyle="Style (Complex) Open Sans">Reference permissions:</span></span><span class="EOP SCXW148341486 BCX8" data-ccp-props="{"201341983":0,"335559685":720,"335559739":160,"335559740":259}"> </span>

<div class="SCXW148341486 BCX8" id="bkmrk-ec2%3Adescribeinstance"><div class="ListContainerWrapper SCXW148341486 BCX8">- <span class="TextRun SCXW148341486 BCX8" data-contrast="auto" lang="EN-US" xml:lang="EN-US"><span class="NormalTextRun SCXW148341486 BCX8" data-ccp-charstyle="Style (Complex) Open Sans">ec</span><span class="NormalTextRun ContextualSpellingAndGrammarErrorV2Themed SCXW148341486 BCX8" data-ccp-charstyle="Style (Complex) Open Sans">2:DescribeInstances</span></span><span class="EOP SCXW148341486 BCX8" data-ccp-props="{"201341983":0,"335559739":160,"335559740":259}"> </span>
- <span class="TextRun SCXW148341486 BCX8" data-contrast="auto" lang="EN-US" xml:lang="EN-US"><span class="NormalTextRun SCXW148341486 BCX8" data-ccp-charstyle="Style (Complex) Open Sans">ec</span><span class="NormalTextRun ContextualSpellingAndGrammarErrorV2Themed SCXW148341486 BCX8" data-ccp-charstyle="Style (Complex) Open Sans">2:DescribeRegions</span></span><span class="EOP SCXW148341486 BCX8" data-ccp-props="{"201341983":0,"335559739":160,"335559740":259}"> </span>
- <span class="TextRun SCXW148341486 BCX8" data-contrast="auto" lang="EN-US" xml:lang="EN-US"><span class="NormalTextRun SpellingErrorV2Themed SCXW148341486 BCX8" data-ccp-charstyle="Style (Complex) Open Sans">cloudwatch:GetMetricData</span></span><span class="EOP SCXW148341486 BCX8" data-ccp-props="{"201341983":0,"335559739":160,"335559740":259}"> </span>
- <span class="TextRun SCXW148341486 BCX8" data-contrast="auto" lang="EN-US" xml:lang="EN-US"><span class="NormalTextRun SpellingErrorV2Themed SCXW148341486 BCX8" data-ccp-charstyle="Style (Complex) Open Sans">cloudwatch:ListMetrics</span></span><span class="EOP SCXW148341486 BCX8" data-ccp-props="{"201341983":0,"335559739":160,"335559740":259}"> </span>
- <span class="TextRun SCXW148341486 BCX8" data-contrast="auto" lang="EN-US" xml:lang="EN-US"><span class="NormalTextRun SpellingErrorV2Themed SCXW148341486 BCX8" data-ccp-charstyle="Style (Complex) Open Sans">iam:ListAccountAliases</span></span><span class="EOP SCXW148341486 BCX8" data-ccp-props="{"201341983":0,"335559739":160,"335559740":259}"> </span>
- <span class="TextRun SCXW148341486 BCX8" data-contrast="auto" lang="EN-US" xml:lang="EN-US"><span class="NormalTextRun SpellingErrorV2Themed SCXW148341486 BCX8" data-ccp-charstyle="Style (Complex) Open Sans">rds:DescribeDBInstances</span></span><span class="EOP SCXW148341486 BCX8" data-ccp-props="{"201341983":0,"335559739":160,"335559740":259}"> </span>
- <span class="TextRun SCXW148341486 BCX8" data-contrast="auto" lang="EN-US" xml:lang="EN-US"><span class="NormalTextRun SpellingErrorV2Themed SCXW148341486 BCX8" data-ccp-charstyle="Style (Complex) Open Sans">rds:ListTagsForResource</span></span><span class="EOP SCXW148341486 BCX8" data-ccp-props="{"201341983":0,"335559739":160,"335559740":259}"> </span>
- <span class="TextRun SCXW148341486 BCX8" data-contrast="auto" lang="EN-US" xml:lang="EN-US"><span class="NormalTextRun SCXW148341486 BCX8" data-ccp-charstyle="Style (Complex) Open Sans">s</span><span class="NormalTextRun ContextualSpellingAndGrammarErrorV2Themed SCXW148341486 BCX8" data-ccp-charstyle="Style (Complex) Open Sans">3:GetObject</span></span><span class="EOP SCXW148341486 BCX8" data-ccp-props="{"201341983":0,"335559739":160,"335559740":259}"> </span>
- <span class="TextRun SCXW148341486 BCX8" data-contrast="auto" lang="EN-US" xml:lang="EN-US"><span class="NormalTextRun SpellingErrorV2Themed SCXW148341486 BCX8" data-ccp-charstyle="Style (Complex) Open Sans">sns:ListTopics</span></span><span class="EOP SCXW148341486 BCX8" data-ccp-props="{"201341983":0,"335559739":160,"335559740":259}"> </span>
- <span class="TextRun SCXW148341486 BCX8" data-contrast="auto" lang="EN-US" xml:lang="EN-US"><span class="NormalTextRun SpellingErrorV2Themed SCXW148341486 BCX8" data-ccp-charstyle="Style (Complex) Open Sans">sqs:ChangeMessageVisibility</span></span><span class="EOP SCXW148341486 BCX8" data-ccp-props="{"201341983":0,"335559739":160,"335559740":259}"> </span>
- <span class="TextRun SCXW148341486 BCX8" data-contrast="auto" lang="EN-US" xml:lang="EN-US"><span class="NormalTextRun SpellingErrorV2Themed SCXW148341486 BCX8" data-ccp-charstyle="Style (Complex) Open Sans">sqs:DeleteMessage</span></span><span class="EOP SCXW148341486 BCX8" data-ccp-props="{"201341983":0,"335559739":160,"335559740":259}"> </span>
- <span class="TextRun SCXW148341486 BCX8" data-contrast="auto" lang="EN-US" xml:lang="EN-US"><span class="NormalTextRun SpellingErrorV2Themed SCXW148341486 BCX8" data-ccp-charstyle="Style (Complex) Open Sans">sqs:ListQueues</span></span><span class="EOP SCXW148341486 BCX8" data-ccp-props="{"201341983":0,"335559739":160,"335559740":259}"> </span>
- <span class="TextRun SCXW148341486 BCX8" data-contrast="auto" lang="EN-US" xml:lang="EN-US"><span class="NormalTextRun SpellingErrorV2Themed SCXW148341486 BCX8" data-ccp-charstyle="Style (Complex) Open Sans">sqs:ReceiveMessage</span></span><span class="EOP SCXW148341486 BCX8" data-ccp-props="{"201341983":0,"335559739":160,"335559740":259}"> </span>
- <span class="TextRun SCXW148341486 BCX8" data-contrast="auto" lang="EN-US" xml:lang="EN-US"><span class="NormalTextRun SpellingErrorV2Themed SCXW148341486 BCX8" data-ccp-charstyle="Style (Complex) Open Sans">sts:AssumeRole</span></span><span class="EOP SCXW148341486 BCX8" data-ccp-props="{"201341983":0,"335559739":160,"335559740":259}"> </span>
- <span class="TextRun SCXW148341486 BCX8" data-contrast="auto" lang="EN-US" xml:lang="EN-US"><span class="NormalTextRun SpellingErrorV2Themed SCXW148341486 BCX8" data-ccp-charstyle="Style (Complex) Open Sans">sts:GetCallerIdentity</span></span><span class="EOP SCXW148341486 BCX8" data-ccp-props="{"201341983":0,"335559739":160,"335559740":259}"> </span>
- <span class="TextRun SCXW148341486 BCX8" data-contrast="auto" lang="EN-US" xml:lang="EN-US"><span class="NormalTextRun SpellingErrorV2Themed SCXW148341486 BCX8" data-ccp-charstyle="Style (Complex) Open Sans">tag:GetResources</span></span><span class="EOP SCXW148341486 BCX8" data-ccp-props="{"201341983":0,"335559739":160,"335559740":259}"> </span>

</div></div>##### <span style="color: rgb(53, 152, 219);">**<span class="TextRun SCXW148341486 BCX8" data-contrast="none" lang="EN-US" xml:lang="EN-US"><span class="NormalTextRun SCXW148341486 BCX8" data-ccp-charstyle="Style (Complex) Open Sans">AWS</span><span class="NormalTextRun SCXW148341486 BCX8" data-ccp-charstyle="Style (Complex) Open Sans"> Integrations </span><span class="NormalTextRun SCXW148341486 BCX8" data-ccp-charstyle="Style (Complex) Open Sans">Procedures</span></span><span class="EOP SCXW148341486 BCX8" data-ccp-props="{"134245418":true,"134245529":true,"201341983":0,"335559738":240,"335559739":0,"335559740":360}"> </span>**</span>

<span style="color: rgb(53, 152, 219);">**<span class="TextRun SCXW148341486 BCX8" data-contrast="none" lang="EN-US" xml:lang="EN-US"><span class="NormalTextRun SCXW148341486 BCX8" data-ccp-parastyle="CyTech Heading 2" data-ccp-parastyle-defn="{"ObjectId":"e27ea779-7590-4666-9f57-d1cbdda07f5a|1","ClassId":1073872969,"Properties":[469775450,"CyTech Heading 2",201340122,"2",134234082,"true",134233614,"true",469778129,"CyTechHeading2",335572020,"1",201342448,"2",469777841,"Open Sans",469777842,"Open Sans",469777843,"",469777844,"Open Sans",469769226,"Open Sans",335551500,"14393361",268442635,"28",335551547,"4105",335559740,"360",201341983,"0",335559739,"0",335559738,"40",335560102,"1",134245418,"true",134245529,"true",469777929,"CyTech Heading 2 Char",469778324,"heading 2"]}" data-ccp-parastyle-linked-defn="{"ObjectId":"e27ea779-7590-4666-9f57-d1cbdda07f5a|4","ClassId":1073872969,"Properties":[469775450,"CyTech Heading 2 Char",201340122,"1",134233614,"true",469778129,"CyTechHeading2Char",335572020,"1",134231262,"true",201342448,"2",469777841,"Open Sans",469777842,"Open Sans",469777843,"",469777844,"Open Sans",469769226,"Open Sans",335551500,"14393361",268442635,"28",335551547,"4105",469777929,"CyTech Heading 2",469778324,"Heading 2 Char"]}">Access Key ID and Secret Access Key:</span><span class="NormalTextRun SCXW148341486 BCX8" data-ccp-parastyle="CyTech Heading 2"> </span></span>**<span class="EOP SCXW148341486 BCX8" data-ccp-props="{"134245418":true,"134245529":true,"201341983":0,"335559738":40,"335559739":0,"335559740":360}"> </span></span>

<span class="TextRun SCXW148341486 BCX8" data-contrast="auto" lang="EN-US" xml:lang="EN-US"><span class="NormalTextRun SCXW148341486 BCX8">These are associated with AWS Identity and Access Management (IAM) users and are used for programmatic access to AWS services. To find them:</span></span><span class="EOP SCXW148341486 BCX8" data-ccp-props="{"201341983":0,"335559739":160,"335559740":259}"> </span>

<div class="SCXW148341486 BCX8" id="bkmrk-access-the-aws-manag"><div class="ListContainerWrapper SCXW148341486 BCX8">- <span class="TextRun SCXW148341486 BCX8" data-contrast="auto" lang="EN-US" xml:lang="EN-US"><span class="NormalTextRun SCXW148341486 BCX8">Access the AWS Management Console.</span></span><span class="EOP SCXW148341486 BCX8" data-ccp-props="{"201341983":0,"335559739":160,"335559740":259}"> </span>
- <span class="TextRun SCXW148341486 BCX8" data-contrast="auto" lang="EN-US" xml:lang="EN-US"><span class="NormalTextRun SCXW148341486 BCX8">Go to the "IAM" (Identity and Access Management) service.</span></span><span class="EOP SCXW148341486 BCX8" data-ccp-props="{"201341983":0,"335559739":160,"335559740":259}"> </span>
- <span class="TextRun SCXW148341486 BCX8" data-contrast="auto" lang="EN-US" xml:lang="EN-US"><span class="NormalTextRun SCXW148341486 BCX8">Select the IAM user for which you want to retrieve the access keys.</span></span><span class="EOP SCXW148341486 BCX8" data-ccp-props="{"201341983":0,"335559739":160,"335559740":259}"> </span>
- <span class="TextRun SCXW148341486 BCX8" data-contrast="auto" lang="EN-US" xml:lang="EN-US"><span class="NormalTextRun SCXW148341486 BCX8">Under the "Security credentials" tab, you can find the Access Key ID and you can create a new Secret Access Key if needed.</span></span><span class="EOP SCXW148341486 BCX8" data-ccp-props="{"201341983":0,"335559739":160,"335559740":259}"> </span>

</div><div class="OutlineElement Ltr SCXW148341486 BCX8">  
</div></div><span style="color: rgb(53, 152, 219);">**<span class="TextRun SCXW148341486 BCX8" data-contrast="none" lang="EN-US" xml:lang="EN-US"><span class="NormalTextRun SCXW148341486 BCX8" data-ccp-parastyle="CyTech Heading 2">S3 Bucket ARN:</span><span class="NormalTextRun SCXW148341486 BCX8" data-ccp-parastyle="CyTech Heading 2"> </span></span><span class="EOP SCXW148341486 BCX8" data-ccp-props="{"134245418":true,"134245529":true,"201341983":0,"335559738":40,"335559739":0,"335559740":360}"> </span>**</span>

<span class="TextRun SCXW148341486 BCX8" data-contrast="auto" lang="EN-US" xml:lang="EN-US"><span class="NormalTextRun SCXW148341486 BCX8">You can find the Amazon Resource Name (ARN) for an S3 bucket in the S3 Management Console or by using the AWS CLI. It typically looks like this:</span></span><span class="EOP SCXW148341486 BCX8" data-ccp-props="{"201341983":0,"335559739":160,"335559740":259}"> </span>

<div class="SCXW148341486 BCX8" id="bkmrk-access-the-aws-manag-1"><div class="ListContainerWrapper SCXW148341486 BCX8">- <span class="TextRun SCXW148341486 BCX8" data-contrast="auto" lang="EN-US" xml:lang="EN-US"><span class="NormalTextRun SCXW148341486 BCX8">Access the AWS Management Console.</span></span><span class="EOP SCXW148341486 BCX8" data-ccp-props="{"201341983":0,"335559739":160,"335559740":259}"> </span>
- <span class="TextRun SCXW148341486 BCX8" data-contrast="auto" lang="EN-US" xml:lang="EN-US"><span class="NormalTextRun SCXW148341486 BCX8">Go to S3 Bucket Service</span></span><span class="EOP SCXW148341486 BCX8" data-ccp-props="{"201341983":0,"335559739":160,"335559740":259}"> </span>
- <span class="TextRun SCXW148341486 BCX8" data-contrast="auto" lang="EN-US" xml:lang="EN-US"><span class="NormalTextRun SCXW148341486 BCX8">Navigate </span><span class="NormalTextRun SCXW148341486 BCX8">properties.</span></span><span class="EOP SCXW148341486 BCX8" data-ccp-props="{"201341983":0,"335559739":160,"335559740":259}"> </span>
- <span class="TextRun SCXW148341486 BCX8" data-contrast="auto" lang="EN-US" xml:lang="EN-US"><span class="NormalTextRun SCXW148341486 BCX8">Find the ARN under Bucket overview</span></span><span class="LineBreakBlob BlobObject DragDrop SCXW148341486 BCX8"><span class="SCXW148341486 BCX8"> </span>  
    </span><span class="TextRun SCXW148341486 BCX8" data-contrast="auto" lang="EN-US" xml:lang="EN-US"><span class="NormalTextRun SCXW148341486 BCX8">Sample: </span><span class="NormalTextRun ContextualSpellingAndGrammarErrorV2Themed SCXW148341486 BCX8">arn:aws</span><span class="NormalTextRun SCXW148341486 BCX8">:s</span><span class="NormalTextRun ContextualSpellingAndGrammarErrorV2Themed SCXW148341486 BCX8">3:::</span><span class="NormalTextRun SCXW148341486 BCX8">your-bucket-name</span></span><span class="EOP SCXW148341486 BCX8" data-ccp-props="{"201341983":0,"335559739":160,"335559740":259}"> </span>

</div><div class="OutlineElement Ltr SCXW148341486 BCX8">  
</div></div><span style="color: rgb(53, 152, 219);">**<span class="TextRun SCXW148341486 BCX8" data-contrast="none" lang="EN-US" xml:lang="EN-US"><span class="NormalTextRun SCXW148341486 BCX8" data-ccp-parastyle="CyTech Heading 2">Log Group ARN:</span></span><span class="EOP SCXW148341486 BCX8" data-ccp-props="{"134245418":true,"134245529":true,"201341983":0,"335559738":0,"335559739":0,"335559740":360}"> </span>**</span>

<span class="TextRun SCXW148341486 BCX8" data-contrast="auto" lang="EN-US" xml:lang="EN-US"><span class="NormalTextRun SCXW148341486 BCX8">Log Groups are associated with AWS CloudWatch Logs. You can find the ARN for a log group as follows:</span></span><span class="EOP SCXW148341486 BCX8" data-ccp-props="{"201341983":0,"335559739":160,"335559740":259}"> </span>

<div class="SCXW148341486 BCX8" id="bkmrk-access-the-aws-manag-2"><div class="ListContainerWrapper SCXW148341486 BCX8">- <span class="TextRun SCXW148341486 BCX8" data-contrast="auto" lang="EN-US" xml:lang="EN-US"><span class="NormalTextRun SCXW148341486 BCX8">Access the AWS Management Console.</span></span><span class="EOP SCXW148341486 BCX8" data-ccp-props="{"201341983":0,"335559739":160,"335559740":259}"> </span>
- <span class="TextRun SCXW148341486 BCX8" data-contrast="auto" lang="EN-US" xml:lang="EN-US"><span class="NormalTextRun SCXW148341486 BCX8">Go to the "CloudWatch" service.</span></span><span class="EOP SCXW148341486 BCX8" data-ccp-props="{"201341983":0,"335559739":160,"335559740":259}"> </span>
- <span class="TextRun SCXW148341486 BCX8" data-contrast="auto" lang="EN-US" xml:lang="EN-US"><span class="NormalTextRun SCXW148341486 BCX8">In the CloudWatch Logs section, select the log group </span><span class="NormalTextRun SCXW148341486 BCX8">you're</span><span class="NormalTextRun SCXW148341486 BCX8"> interested in.</span></span><span class="EOP SCXW148341486 BCX8" data-ccp-props="{"201341983":0,"335559739":160,"335559740":259}"> </span>
- <span class="TextRun SCXW148341486 BCX8" data-contrast="auto" lang="EN-US" xml:lang="EN-US"><span class="NormalTextRun SCXW148341486 BCX8">Select the log group that you want to open.</span></span><span class="EOP SCXW148341486 BCX8" data-ccp-props="{"201341983":0,"335559739":160,"335559740":259}"> </span>
- <span class="TextRun SCXW148341486 BCX8" data-contrast="auto" lang="EN-US" xml:lang="EN-US"><span class="NormalTextRun SCXW148341486 BCX8">In the details of the log group, you will find the ARN.</span></span><span class="EOP SCXW148341486 BCX8" data-ccp-props="{"201341983":0,"335559739":160,"335559740":259}"> </span>

</div><div class="OutlineElement Ltr SCXW148341486 BCX8">  
</div></div>**<span style="color: rgb(53, 152, 219);"><span class="TextRun SCXW148341486 BCX8" data-contrast="none" lang="EN-US" xml:lang="EN-US"><span class="NormalTextRun SCXW148341486 BCX8" data-ccp-parastyle="CyTech Heading 2">SQS Queue URL: </span></span><span class="TextRun SCXW148341486 BCX8" data-contrast="none" lang="EN-US" xml:lang="EN-US"><span class="NormalTextRun SCXW148341486 BCX8" data-ccp-parastyle="CyTech Heading 2">(Ignore if </span><span class="NormalTextRun SCXW148341486 BCX8" data-ccp-parastyle="CyTech Heading 2">you're</span><span class="NormalTextRun SCXW148341486 BCX8" data-ccp-parastyle="CyTech Heading 2"> not using SQS Queue URL)</span></span></span><span class="EOP SCXW148341486 BCX8" data-ccp-props="{"134245418":true,"134245529":true,"201341983":0,"335559738":40,"335559739":0,"335559740":360}"> </span>**

<span class="TextRun SCXW148341486 BCX8" data-contrast="auto" lang="EN-US" xml:lang="EN-US"><span class="NormalTextRun SCXW148341486 BCX8">To find the URL of an Amazon Simple Queue Service (SQS) queue:</span></span><span class="EOP SCXW148341486 BCX8" data-ccp-props="{"201341983":0,"335559739":0,"335559740":259}"> </span>

<div class="SCXW148341486 BCX8" id="bkmrk-access-the-aws-manag-3"><div class="ListContainerWrapper SCXW148341486 BCX8">- <span class="TextRun SCXW148341486 BCX8" data-contrast="auto" lang="EN-US" xml:lang="EN-US"><span class="NormalTextRun SCXW148341486 BCX8">Access the AWS Management Console.</span></span><span class="EOP SCXW148341486 BCX8" data-ccp-props="{"201341983":0,"335559739":0,"335559740":259}"> </span>
- <span class="TextRun SCXW148341486 BCX8" data-contrast="auto" lang="EN-US" xml:lang="EN-US"><span class="NormalTextRun SCXW148341486 BCX8">Go to the "SQS" service.</span></span><span class="EOP SCXW148341486 BCX8" data-ccp-props="{"201341983":0,"335559739":0,"335559740":259}"> </span>
- <span class="TextRun SCXW148341486 BCX8" data-contrast="auto" lang="EN-US" xml:lang="EN-US"><span class="NormalTextRun SCXW148341486 BCX8">Select the specific queue </span><span class="NormalTextRun SCXW148341486 BCX8">you're</span><span class="NormalTextRun SCXW148341486 BCX8"> interested in.</span></span><span class="EOP SCXW148341486 BCX8" data-ccp-props="{"201341983":0,"335559739":0,"335559740":259}"> </span>
- <span class="TextRun SCXW148341486 BCX8" data-contrast="auto" lang="EN-US" xml:lang="EN-US"><span class="NormalTextRun SCXW148341486 BCX8">In the queue details, you can find the Queue URL</span></span><span class="EOP SCXW148341486 BCX8" data-ccp-props="{"201341983":0,"335559739":0,"335559740":259}"> </span>

</div></div><span class="TextRun Highlight SCXW148341486 BCX8" data-contrast="auto" lang="EN-US" xml:lang="EN-US"><span class="NormalTextRun SCXW148341486 BCX8">Please </span><span class="NormalTextRun SCXW148341486 BCX8">provide the following information to </span><span class="NormalTextRun SpellingErrorV2Themed SCXW148341486 BCX8">CyTech</span><span class="NormalTextRun SCXW148341486 BCX8">:</span></span><span class="EOP SCXW148341486 BCX8" data-ccp-props="{"201341983":0,"335559739":0,"335559740":259}"> </span>

<div class="SCXW148341486 BCX8" id="bkmrk-access-key-id%C2%A0-secre"><div class="ListContainerWrapper SCXW148341486 BCX8">- <span class="TextRun SCXW148341486 BCX8" data-contrast="auto" lang="EN-US" xml:lang="EN-US"><span class="NormalTextRun SCXW148341486 BCX8">Access Key ID</span></span><span class="EOP SCXW148341486 BCX8" data-ccp-props="{"201341983":0,"335559739":0,"335559740":259}"> </span>
- <span class="TextRun SCXW148341486 BCX8" data-contrast="auto" lang="EN-US" xml:lang="EN-US"><span class="NormalTextRun SCXW148341486 BCX8">Secret Access Key</span></span><span class="EOP SCXW148341486 BCX8" data-ccp-props="{"201341983":0,"335559739":0,"335559740":259}"> </span>

</div><div class="ListContainerWrapper SCXW148341486 BCX8">1. *<span class="TextRun SCXW148341486 BCX8" data-contrast="auto" lang="EN-US" xml:lang="EN-US"><span class="NormalTextRun SCXW148341486 BCX8">S3 Bucket ARN</span><span class="NormalTextRun SCXW148341486 BCX8"> </span></span>*
2. *<span class="TextRun SCXW148341486 BCX8" data-contrast="auto" lang="EN-US" xml:lang="EN-US"><span class="NormalTextRun SCXW148341486 BCX8">Log Group ARN</span></span><span class="EOP SCXW148341486 BCX8" data-ccp-props="{"201341983":0,"335559739":0,"335559740":259}"> </span>*
3. *<span class="TextRun SCXW148341486 BCX8" data-contrast="auto" lang="EN-US" xml:lang="EN-US"><span class="NormalTextRun SCXW148341486 BCX8">SQS Queue </span><span class="NormalTextRun ContextualSpellingAndGrammarErrorV2Themed SCXW148341486 BCX8">URL</span> <span class="NormalTextRun ContextualSpellingAndGrammarErrorV2Themed SCXW148341486 BCX8">:</span> </span><span class="TextRun SCXW148341486 BCX8" data-contrast="auto" lang="EN-US" xml:lang="EN-US"><span class="NormalTextRun SCXW148341486 BCX8">(Ignore if </span><span class="NormalTextRun SCXW148341486 BCX8">you're</span><span class="NormalTextRun SCXW148341486 BCX8"> not using SQS Queue URL)</span></span><span class="EOP SCXW148341486 BCX8" data-ccp-props="{"201341983":0,"335559739":0,"335559740":259}"> </span>*

</div></div>

# AWS Security Hub Integrations

##### <span style="color: rgb(53, 152, 219);">**<span class="TextRun SCXW203222527 BCX8" data-contrast="none" lang="EN-US" xml:lang="EN-US"><span class="NormalTextRun SCXW203222527 BCX8" data-ccp-charstyle="Style (Complex) Open Sans" data-ccp-charstyle-defn="{"ObjectId":"94b90996-8e88-4c49-aed5-0c129d05229a|169","ClassId":1073872969,"Properties":[201342446,"1",201342447,"5",201342448,"1",201342449,"1",469777841,"Open Sans",469777842,"Open Sans",469777843,"Calibri",469777844,"Open Sans",201341986,"1",469769226,"Open Sans",268442635,"22",335559704,"1037",335559705,"1033",335551547,"1033",335559740,"259",201341983,"0",335559739,"160",469775450,"Style (Complex) Open Sans",201340122,"1",134233614,"true",469778129,"StyleComplexOpenSans",335572020,"1",469778324,"Default Paragraph Font"]}">Introduction</span></span><span class="EOP SCXW203222527 BCX8" data-ccp-props="{"134245418":true,"134245529":true,"201341983":0,"335559738":240,"335559739":0,"335559740":360}"> </span>**</span>

<span class="TextRun SCXW203222527 BCX8" data-contrast="auto" lang="EN-US" xml:lang="EN-US"><span class="NormalTextRun SCXW203222527 BCX8" data-ccp-charstyle="Style (Complex) Open Sans">The AWS Security Hub integration collects and parses data from AWS Security Hub REST APIs.</span></span><span class="EOP SCXW203222527 BCX8" data-ccp-props="{"201341983":0,"335559685":360,"335559739":160,"335559740":259}"> </span>

<div class="SCXW203222527 BCX8" id="bkmrk-"><div class="OutlineElement Ltr SCXW203222527 BCX8">  
</div><div class="ListContainerWrapper SCXW203222527 BCX8">  
</div></div>##### <span style="color: rgb(53, 152, 219);">**<span class="TextRun SCXW203222527 BCX8" data-contrast="none" lang="EN-US" xml:lang="EN-US"><span class="NormalTextRun SCXW203222527 BCX8" data-ccp-charstyle="Style (Complex) Open Sans">Assumptions</span></span><span class="EOP SCXW203222527 BCX8" data-ccp-props="{"134245418":true,"134245529":true,"201341983":0,"335559738":240,"335559739":0,"335559740":360}"> </span>**</span>

<span class="TextRun SCXW203222527 BCX8" data-contrast="auto" lang="EN-US" xml:lang="EN-US"><span class="NormalTextRun SCXW203222527 BCX8" data-ccp-charstyle="Style (Complex) Open Sans">The procedures described in Section </span></span><span class="FieldRange SCXW203222527 BCX8"><span class="TextRun SCXW203222527 BCX8" data-contrast="auto" lang="EN-US" xml:lang="EN-US"><span class="NormalTextRun SCXW203222527 BCX8" data-ccp-charstyle="Style (Complex) Open Sans">3</span></span></span><span class="TextRun SCXW203222527 BCX8" data-contrast="auto" lang="EN-US" xml:lang="EN-US"> <span class="NormalTextRun ContextualSpellingAndGrammarErrorV2Themed SCXW203222527 BCX8" data-ccp-charstyle="Style (Complex) Open Sans">assumes</span><span class="NormalTextRun SCXW203222527 BCX8" data-ccp-charstyle="Style (Complex) Open Sans"> that a Log Collector has already been </span><span class="NormalTextRun ContextualSpellingAndGrammarErrorV2Themed SCXW203222527 BCX8" data-ccp-charstyle="Style (Complex) Open Sans">setup</span><span class="NormalTextRun SCXW203222527 BCX8" data-ccp-charstyle="Style (Complex) Open Sans">. </span></span><span class="EOP SCXW203222527 BCX8" data-ccp-props="{"201341983":0,"335559685":360,"335559739":160,"335559740":259}"> </span>

<span style="color: rgb(53, 152, 219);"><span class="TextRun SCXW203222527 BCX8" data-contrast="none" lang="EN-US" xml:lang="EN-US"><span class="NormalTextRun SCXW203222527 BCX8" data-ccp-parastyle="CyTech Heading 1" data-ccp-parastyle-defn="{"ObjectId":"94b90996-8e88-4c49-aed5-0c129d05229a|139","ClassId":1073872969,"Properties":[469777841,"Open Sans",469777844,"Open Sans",469769226,"Open Sans",201342446,"1",201342447,"4",201342448,"2",201342449,"1",469777842,"Open Sans",469777843,"游ゴシック Light",201341986,"4",268442635,"36",335559704,"1037",335559705,"1033",335551547,"1033",335559740,"360",201341983,"0",335559739,"0",335551500,"1809913",335559738,"240",335560102,"0",134245418,"true",134245529,"true",469775450,"CyTech Heading 1",201340122,"2",134234082,"true",134233614,"true",469778129,"CyTechHeading1",335572020,"1",469777929,"CyTech Heading 1 Char",469778324,"heading 1"]}" data-ccp-parastyle-linked-defn="{"ObjectId":"94b90996-8e88-4c49-aed5-0c129d05229a|142","ClassId":1073872969,"Properties":[201342446,"1",201342447,"4",201342448,"2",201342449,"1",469777841,"Open Sans",469777842,"Open Sans",469777843,"游ゴシック Light",469777844,"Open Sans",201341986,"1",469769226,"Open Sans,游ゴシック Light",268442635,"36",335559704,"1037",335559705,"1033",335551547,"1033",335559740,"259",201341983,"0",335559739,"160",335551500,"1809913",469775450,"CyTech Heading 1 Char",201340122,"1",134233614,"true",469778129,"CyTechHeading1Char",335572020,"1",134231262,"true",469777929,"CyTech Heading 1",469778324,"Heading 1 Char"]}">**Compatibility**</span></span>**<span class="EOP SCXW203222527 BCX8" data-ccp-props="{"134245418":true,"134245529":true,"201341983":0,"335559738":240,"335559739":0,"335559740":360}"> </span>**</span>

<div class="SCXW203222527 BCX8" id="bkmrk-this-module-is-teste"><div class="ListContainerWrapper SCXW203222527 BCX8">- <span class="TextRun SCXW203222527 BCX8" data-contrast="auto" lang="EN-US" xml:lang="EN-US"><span class="NormalTextRun SCXW203222527 BCX8" data-ccp-charstyle="Style (Complex) Open Sans">This module is tested against AWS Security Hub API version 1.0.</span></span><span class="EOP SCXW203222527 BCX8" data-ccp-props="{"201341983":0,"335559739":160,"335559740":259}"> </span>

</div></div>##### <span style="color: rgb(53, 152, 219);">**<span class="TextRun SCXW203222527 BCX8" data-contrast="none" lang="EN-US" xml:lang="EN-US"><span class="NormalTextRun SCXW203222527 BCX8" data-ccp-charstyle="Style (Complex) Open Sans">Requirements</span></span><span class="EOP SCXW203222527 BCX8" data-ccp-props="{"134245418":true,"134245529":true,"201341983":0,"335559738":240,"335559739":0,"335559740":360}"> </span>**</span>

<span class="TextRun SCXW203222527 BCX8" data-contrast="auto" lang="EN-US" xml:lang="EN-US"><span class="NormalTextRun SCXW203222527 BCX8" data-ccp-charstyle="Style (Complex) Open Sans">To collect data from AWS Security Hub APIs, users must have an Access Key and a Secret Key. To create API </span><span class="NormalTextRun ContextualSpellingAndGrammarErrorV2Themed SCXW203222527 BCX8" data-ccp-charstyle="Style (Complex) Open Sans">token</span><span class="NormalTextRun SCXW203222527 BCX8" data-ccp-charstyle="Style (Complex) Open Sans"> follow below steps:</span></span><span class="EOP SCXW203222527 BCX8" data-ccp-props="{"201341983":0,"335559685":360,"335559739":160,"335559740":259}"> </span>

<div class="SCXW203222527 BCX8" id="bkmrk-login-to-https%3A%2F%2Fcon"><div class="ListContainerWrapper SCXW203222527 BCX8">1. <span class="TextRun SCXW203222527 BCX8" data-contrast="auto" lang="EN-US" xml:lang="EN-US"><span class="NormalTextRun SCXW203222527 BCX8" data-ccp-charstyle="Style (Complex) Open Sans">Login to </span></span>[<span class="TextRun Underlined SCXW203222527 BCX8" data-contrast="none" lang="EN-US" xml:lang="EN-US"><span class="NormalTextRun SCXW203222527 BCX8" data-ccp-charstyle="Hyperlink">https://console.aws.amazon.com/</span></span>](https://console.aws.amazon.com/)<span class="TextRun SCXW203222527 BCX8" data-contrast="auto" lang="EN-US" xml:lang="EN-US"><span class="NormalTextRun SCXW203222527 BCX8" data-ccp-charstyle="Style (Complex) Open Sans">.</span></span><span class="EOP SCXW203222527 BCX8" data-ccp-props="{"201341983":0,"335559739":160,"335559740":259}"> </span>

</div><div class="ListContainerWrapper SCXW203222527 BCX8">2. <span class="TextRun SCXW203222527 BCX8" data-contrast="auto" lang="EN-US" xml:lang="EN-US"><span class="NormalTextRun SCXW203222527 BCX8" data-ccp-charstyle="Style (Complex) Open Sans">Go to </span></span>[<span class="TextRun Underlined SCXW203222527 BCX8" data-contrast="none" lang="EN-US" xml:lang="EN-US"><span class="NormalTextRun SCXW203222527 BCX8" data-ccp-charstyle="Hyperlink">https://console.aws.amazon.com/iam/</span></span>](https://console.aws.amazon.com/iam/)<span class="TextRun SCXW203222527 BCX8" data-contrast="auto" lang="EN-US" xml:lang="EN-US"> <span class="NormalTextRun SpellingErrorV2Themed SCXW203222527 BCX8" data-ccp-charstyle="Style (Complex) Open Sans">to</span><span class="NormalTextRun SCXW203222527 BCX8" data-ccp-charstyle="Style (Complex) Open Sans"> access the IAM console.</span></span><span class="EOP SCXW203222527 BCX8" data-ccp-props="{"201341983":0,"335559739":160,"335559740":259}"> </span>

</div><div class="ListContainerWrapper SCXW203222527 BCX8">3. <span class="TextRun SCXW203222527 BCX8" data-contrast="auto" lang="EN-US" xml:lang="EN-US"><span class="NormalTextRun SCXW203222527 BCX8" data-ccp-charstyle="Style (Complex) Open Sans">On the navigation menu, choose Users.</span></span><span class="EOP SCXW203222527 BCX8" data-ccp-props="{"201341983":0,"335559739":160,"335559740":259}"> </span>

</div><div class="ListContainerWrapper SCXW203222527 BCX8">4. <span class="TextRun SCXW203222527 BCX8" data-contrast="auto" lang="EN-US" xml:lang="EN-US"><span class="NormalTextRun SCXW203222527 BCX8" data-ccp-charstyle="Style (Complex) Open Sans">Choose your IAM </span><span class="NormalTextRun ContextualSpellingAndGrammarErrorV2Themed SCXW203222527 BCX8" data-ccp-charstyle="Style (Complex) Open Sans">user name</span><span class="NormalTextRun SCXW203222527 BCX8" data-ccp-charstyle="Style (Complex) Open Sans">.</span></span><span class="EOP SCXW203222527 BCX8" data-ccp-props="{"201341983":0,"335559739":160,"335559740":259}"> </span>

</div><div class="ListContainerWrapper SCXW203222527 BCX8">5. <span class="TextRun SCXW203222527 BCX8" data-contrast="auto" lang="EN-US" xml:lang="EN-US"><span class="NormalTextRun SCXW203222527 BCX8" data-ccp-charstyle="Style (Complex) Open Sans">Select </span><span class="NormalTextRun ContextualSpellingAndGrammarErrorV2Themed SCXW203222527 BCX8" data-ccp-charstyle="Style (Complex) Open Sans">Create</span><span class="NormalTextRun SCXW203222527 BCX8" data-ccp-charstyle="Style (Complex) Open Sans"> access key from the Security Credentials tab.</span></span><span class="EOP SCXW203222527 BCX8" data-ccp-props="{"201341983":0,"335559739":160,"335559740":259}"> </span>

</div><div class="ListContainerWrapper SCXW203222527 BCX8">6. <span class="TextRun SCXW203222527 BCX8" data-contrast="auto" lang="EN-US" xml:lang="EN-US"><span class="NormalTextRun SCXW203222527 BCX8" data-ccp-charstyle="Style (Complex) Open Sans">To see the new access key, choose Show.</span></span><span class="EOP SCXW203222527 BCX8" data-ccp-props="{"201341983":0,"335559739":160,"335559740":259}"> </span>

</div></div>**<span class="TextRun SCXW203222527 BCX8" data-contrast="auto" lang="EN-US" xml:lang="EN-US"><span class="NormalTextRun SCXW203222527 BCX8" data-ccp-charstyle="Style (Complex) Open Sans">Note:</span></span>**

<div class="SCXW203222527 BCX8" id="bkmrk-for-the-current-inte"><div class="ListContainerWrapper SCXW203222527 BCX8">1. <span class="TextRun SCXW203222527 BCX8" data-contrast="auto" lang="EN-US" xml:lang="EN-US"><span class="NormalTextRun SCXW203222527 BCX8" data-ccp-charstyle="Style (Complex) Open Sans">For the current integration package, it is recommended to have </span><span class="NormalTextRun ContextualSpellingAndGrammarErrorV2Themed SCXW203222527 BCX8" data-ccp-charstyle="Style (Complex) Open Sans">interval</span><span class="NormalTextRun SCXW203222527 BCX8" data-ccp-charstyle="Style (Complex) Open Sans"> in hours.</span></span><span class="EOP SCXW203222527 BCX8" data-ccp-props="{"201341983":0,"335559739":160,"335559740":259}"> </span>

</div><div class="ListContainerWrapper SCXW203222527 BCX8">2. <span class="TextRun SCXW203222527 BCX8" data-contrast="auto" lang="EN-US" xml:lang="EN-US"><span class="NormalTextRun SCXW203222527 BCX8" data-ccp-charstyle="Style (Complex) Open Sans">For the current integration package, it is compulsory to add Secret Access Key and Access Key ID.</span></span><span class="EOP SCXW203222527 BCX8" data-ccp-props="{"201341983":0,"335559739":160,"335559740":259}"> </span>

</div></div>**<span class="TextRun SCXW203222527 BCX8" data-contrast="auto" lang="EN-US" xml:lang="EN-US"><span class="NormalTextRun SCXW203222527 BCX8" data-ccp-charstyle="Style (Complex) Open Sans">Logs:</span></span>**

<div class="SCXW203222527 BCX8" id="bkmrk-findings---this-is-t"><div class="ListContainerWrapper SCXW203222527 BCX8">1. <span class="TextRun SCXW203222527 BCX8" data-contrast="auto" lang="EN-US" xml:lang="EN-US"><span class="NormalTextRun SCXW203222527 BCX8" data-ccp-charstyle="Style (Complex) Open Sans">Findings</span><span class="NormalTextRun SCXW203222527 BCX8" data-ccp-charstyle="Style (Complex) Open Sans"> - </span></span><span class="TextRun SCXW203222527 BCX8" data-contrast="auto" lang="EN-US" xml:lang="EN-US"><span class="NormalTextRun SCXW203222527 BCX8" data-ccp-charstyle="Style (Complex) Open Sans">This is the </span><span class="NormalTextRun SpellingErrorV2Themed SCXW203222527 BCX8" data-ccp-charstyle="Style (Complex) Open Sans">securityhub\_findings</span><span class="NormalTextRun SCXW203222527 BCX8" data-ccp-charstyle="Style (Complex) Open Sans"> data stream.</span></span><span class="EOP SCXW203222527 BCX8" data-ccp-props="{"201341983":0,"335559739":160,"335559740":259}"> </span>

</div><div class="ListContainerWrapper SCXW203222527 BCX8">2. <span class="TextRun SCXW203222527 BCX8" data-contrast="auto" lang="EN-US" xml:lang="EN-US"><span class="NormalTextRun SCXW203222527 BCX8" data-ccp-charstyle="Style (Complex) Open Sans">Insights</span><span class="NormalTextRun SCXW203222527 BCX8" data-ccp-charstyle="Style (Complex) Open Sans"> - </span></span><span class="TextRun SCXW203222527 BCX8" data-contrast="auto" lang="EN-US" xml:lang="EN-US"><span class="NormalTextRun SCXW203222527 BCX8" data-ccp-charstyle="Style (Complex) Open Sans">This is the </span><span class="NormalTextRun SpellingErrorV2Themed SCXW203222527 BCX8" data-ccp-charstyle="Style (Complex) Open Sans">securityhub\_insights</span><span class="NormalTextRun SCXW203222527 BCX8" data-ccp-charstyle="Style (Complex) Open Sans"> data stream.</span></span><span class="EOP SCXW203222527 BCX8" data-ccp-props="{"201341983":0,"335559739":160,"335559740":259}"> </span>

</div></div><div class="SCXW203222527 BCX8" id="bkmrk--1"><div class="OutlineElement Ltr SCXW203222527 BCX8">  
</div><div class="ListContainerWrapper SCXW203222527 BCX8">  
</div></div>##### <span style="color: rgb(53, 152, 219);">**<span class="TextRun Highlight SCXW203222527 BCX8" data-contrast="none" lang="EN-US" xml:lang="EN-US"><span class="NormalTextRun SCXW203222527 BCX8" data-ccp-charstyle="normaltextrun" data-ccp-charstyle-defn="{"ObjectId":"94b90996-8e88-4c49-aed5-0c129d05229a|195","ClassId":1073872969,"Properties":[201342446,"1",201342447,"5",201342448,"1",201342449,"1",469777841,"Calibri",469777842,"Arial",469777843,"Calibri",469777844,"Calibri",201341986,"1",469769226,"Calibri,Arial",268442635,"22",335559704,"1037",335559705,"1033",335551547,"1033",335559740,"259",201341983,"0",335559739,"160",469775450,"normaltextrun",201340122,"1",134233614,"true",469778129,"normaltextrun",335572020,"1",469778324,"Default Paragraph Font"]}">A</span></span><span class="TextRun Highlight SCXW203222527 BCX8" data-contrast="none" lang="EN-US" xml:lang="EN-US"><span class="NormalTextRun SCXW203222527 BCX8" data-ccp-charstyle="normaltextrun" data-ccp-charstyle-defn="{"ObjectId":"94b90996-8e88-4c49-aed5-0c129d05229a|195","ClassId":1073872969,"Properties":[201342446,"1",201342447,"5",201342448,"1",201342449,"1",469777841,"Calibri",469777842,"Arial",469777843,"Calibri",469777844,"Calibri",201341986,"1",469769226,"Calibri,Arial",268442635,"22",335559704,"1037",335559705,"1033",335551547,"1033",335559740,"259",201341983,"0",335559739,"160",469775450,"normaltextrun",201340122,"1",134233614,"true",469778129,"normaltextrun",335572020,"1",469778324,"Default Paragraph Font"]}">WS Security Hub</span></span><span class="TextRun Highlight SCXW203222527 BCX8" data-contrast="none" lang="EN-US" xml:lang="EN-US"> <span class="NormalTextRun SCXW203222527 BCX8" data-ccp-charstyle="normaltextrun">I</span><span class="NormalTextRun SCXW203222527 BCX8" data-ccp-charstyle="normaltextrun">ntegration</span><span class="NormalTextRun SCXW203222527 BCX8" data-ccp-charstyle="eop" data-ccp-charstyle-defn="{"ObjectId":"94b90996-8e88-4c49-aed5-0c129d05229a|196","ClassId":1073872969,"Properties":[201342446,"1",201342447,"5",201342448,"1",201342449,"1",469777841,"Calibri",469777842,"Arial",469777843,"Calibri",469777844,"Calibri",201341986,"1",469769226,"Calibri,Arial",268442635,"22",335559704,"1037",335559705,"1033",335551547,"1033",335559740,"259",201341983,"0",335559739,"160",469775450,"eop",201340122,"1",134233614,"true",469778129,"eop",335572020,"1",469778324,"Default Paragraph Font"]}"> </span><span class="NormalTextRun SCXW203222527 BCX8" data-ccp-charstyle="eop">Procedures</span></span><span class="EOP SCXW203222527 BCX8" data-ccp-props="{"134245418":true,"134245529":true,"201341983":0,"335559738":240,"335559739":0,"335559740":360}"> </span>**</span>

<span class="TextRun Highlight SCXW203222527 BCX8" data-contrast="auto" lang="EN-US" xml:lang="EN-US"><span class="NormalTextRun SCXW203222527 BCX8" data-ccp-charstyle="eop">Please provide the following information to </span><span class="NormalTextRun SpellingErrorV2Themed SCXW203222527 BCX8" data-ccp-charstyle="eop">CyTech</span><span class="NormalTextRun SCXW203222527 BCX8" data-ccp-charstyle="eop">:</span></span><span class="EOP SCXW203222527 BCX8" data-ccp-props="{"201341983":0,"335559685":360,"335559739":160,"335559740":259}"> </span>

**<span class="TextRun Highlight SCXW203222527 BCX8" data-contrast="none" lang="EN-US" xml:lang="EN-US"><span class="NormalTextRun SCXW203222527 BCX8" data-ccp-charstyle="eop">Collect AWS Security Hub logs via API</span></span><span class="EOP SCXW203222527 BCX8" data-ccp-props="{"134245418":true,"134245529":true,"201341983":0,"335559738":240,"335559739":0,"335559740":360}"> </span>**

<div class="SCXW203222527 BCX8" id="bkmrk-aws-region---aws-reg"><div class="ListContainerWrapper SCXW203222527 BCX8">  
</div><div class="ListContainerWrapper SCXW203222527 BCX8">1. <span class="TextRun Highlight SCXW203222527 BCX8" data-contrast="auto" lang="EN-US" xml:lang="EN-US"><span class="NormalTextRun SCXW203222527 BCX8" data-ccp-charstyle="eop">AWS Region</span><span class="NormalTextRun SCXW203222527 BCX8" data-ccp-charstyle="eop"> - </span><span class="NormalTextRun SCXW203222527 BCX8" data-ccp-charstyle="eop">AWS Region</span><span class="NormalTextRun SCXW203222527 BCX8" data-ccp-charstyle="eop">.</span></span><span class="EOP SCXW203222527 BCX8" data-ccp-props="{"201341983":0,"335559739":160,"335559740":259}"> </span>

</div></div>**<span class="TextRun Highlight SCXW203222527 BCX8" data-contrast="none" lang="EN-US" xml:lang="EN-US"><span class="NormalTextRun SCXW203222527 BCX8" data-ccp-charstyle="eop">Collect AWS Security Hub Insights from AWS</span></span><span class="EOP SCXW203222527 BCX8" data-ccp-props="{"134245418":true,"134245529":true,"201341983":0,"335559738":240,"335559739":0,"335559740":360}"> </span>**

<div class="SCXW203222527 BCX8" id="bkmrk-aws-region---aws-reg-1"><div class="ListContainerWrapper SCXW203222527 BCX8">  
</div><div class="ListContainerWrapper SCXW203222527 BCX8">1. <span class="TextRun Highlight SCXW203222527 BCX8" data-contrast="auto" lang="EN-US" xml:lang="EN-US"><span class="NormalTextRun SCXW203222527 BCX8" data-ccp-charstyle="eop">AWS Region</span><span class="NormalTextRun SCXW203222527 BCX8" data-ccp-charstyle="eop"> - </span><span class="NormalTextRun SCXW203222527 BCX8" data-ccp-charstyle="eop">AWS Region</span><span class="NormalTextRun SCXW203222527 BCX8" data-ccp-charstyle="eop">.</span></span><span class="EOP SCXW203222527 BCX8" data-ccp-props="{"201341983":0,"335559739":160,"335559740":259}"> </span>

</div></div>

# Azure Application Insights Integration

The **Application Insights Integration** allows users to collect metrics from Azure Application Insights.

### **Key Configuration Options:**

- **Application ID**: The ID of the application from the API Access settings in the Azure portal.
- **API Key**: A generated key for authentication.

### **Data Stream: `app_insights`**

Users can retrieve various metrics with filtering options.

#### **Configuration Options:**

- **Metrics**: List of metrics to collect.
- **ID**: Metric IDs or names. Default includes requests, performance, and availability.
- **Interval**: ISO8601 duration for metric retrieval. Defaults to entire timespan if omitted.
- **Aggregation**: Functions like sum, average, etc. Defaults to metric-specific aggregation.
- **Segment**: Dimension to group metric data by.
- **Top**: Number of segments to return (valid only with `segment`).
- **Order By**: Sorting order for segments (valid only with `segment`).
- **Filter**: OData filter expression for refining results.

An example event for `app_insights` looks as following:

```json
{
    "@timestamp": "2021-08-23T14:37:42.268Z",
    "agent": {
        "ephemeral_id": "4162d5df-ab00-4c1b-b4f3-7db2e3b599d4",
        "hostname": "docker-fleet-agent",
        "id": "d979a8cf-ddeb-458f-9019-389414e0ab47",
        "name": "docker-fleet-agent",
        "type": "metricbeat",
        "version": "7.15.0"
    },
    "azure": {
        "app_insights": {
            "end_date": "2021-08-23T14:37:42.268Z",
            "start_date": "2021-08-23T14:32:42.268Z"
        },
        "application_id": "42cb59a9-d5be-400b-a5c4-69b0a0026ac6",
        "dimensions": {
            "request_name": "GET Home/Index",
            "request_url_host": "demoappobs.azurewebsites.net"
        },
        "metrics": {
            "requests_count": {
                "sum": 4
            }
        }
    },
    "cloud": {
        "provider": "azure"
    },
    "data_stream": {
        "dataset": "azure.app_insights",
        "namespace": "default",
        "type": "metrics"
    },
    "ecs": {
        "version": "8.11.0"
    },
    "elastic_agent": {
        "id": "d979a8cf-ddeb-458f-9019-389414e0ab47",
        "snapshot": true,
        "version": "7.15.0"
    },
    "event": {
        "agent_id_status": "verified",
        "dataset": "azure.app_insights",
        "duration": 503187300,
        "ingested": "2021-08-23T14:37:41Z",
        "module": "azure"
    },
    "host": {
        "architecture": "x86_64",
        "containerized": true,
        "hostname": "docker-fleet-agent",
        "id": "1642d255f9a32fc6926cddf21bb0d5d3",
        "ip": [
            "192.168.96.7"
        ],
        "mac": [
            "02-42-AC-1F-00-07"
        ],
        "name": "docker-fleet-agent",
        "os": {
            "codename": "Core",
            "family": "redhat",
            "kernel": "4.19.128-microsoft-standard",
            "name": "CentOS Linux",
            "platform": "centos",
            "type": "linux",
            "version": "7 (Core)"
        }
    },
    "metricset": {
        "name": "app_insights",
        "period": 300000
    },
    "service": {
        "type": "azure"
    }
}
```

# Azure Application Insights Integration

#### <span style="color: rgb(53, 152, 219);">**Overview**</span>

The Application Insights Integration allows users to retrieve application insights metrics from specified applications.

### <span style="color: rgb(53, 152, 219);">[Integration level configuration options](https://www.elastic.co/docs/reference/integrations/azure_application_insights/app_insights#integration-level-configuration-options)</span>

<div class="heading-wrapper" id="bkmrk-"></div>`<strong>Application ID</strong>`: ID of the application. This is Application ID from the API Access settings blade in the Azure portal.

`<strong>API Key</strong>`: The API key which will be generated, more on the steps here [https://dev.applicationinsights.io/documentation/Authorization/API-key-and-App-ID](https://dev.applicationinsights.io/documentation/Authorization/API-key-and-App-ID).

#### [Configuration options](https://www.elastic.co/docs/reference/integrations/azure_application_insights/app_insights#configuration-options)

<div class="heading-wrapper" id="bkmrk--1"></div>**`Metrics`**: List of different metrics to collect information

`<strong>id</strong>`: IDs of the metrics that's being reported. Usually, the id is descriptive enough to help identify what's measured. Default metrics include a curated selection of requests counters, performance, and service availability. The list of options can be found here [https://docs.microsoft.com/en-us/rest/api/application-insights/metrics/get#metricid](https://docs.microsoft.com/en-us/rest/api/application-insights/metrics/get#metricid)

**`interval`**: The time interval to use when retrieving metric values. This is an ISO8601 duration. If interval is omitted, the metric value is aggregated across the entire timespan. If interval is supplied, the result may adjust the interval to a more appropriate size based on the timespan used for the query.

**`aggregation`**: The aggregation to use when computing the metric values. To retrieve more than one aggregation at a time, separate them with a comma. If no aggregation is specified, then the default aggregation for the metric is used.

**`segment`**: The name of the dimension to segment the metric values by. This dimension must be applicable to the metric you are retrieving. In this case, the metric data will be segmented in the order the dimensions are listed in the parameter.

**`top`**: The number of segments to return. This value is only valid when segment is specified.

`<strong>order_by</strong>`: The aggregation function and direction to sort the segments by. This value is only valid when segment is specified.

`<strong>filter</strong>`: An expression used to filter the results. This value should be a valid OData filter expression where the keys of each clause should be applicable dimensions for the metric you are retrieving.

Example configuration:

```json
- id: ["requests/count", "requests/failed"]
  segment: "request/name"
  aggregation: ["sum"]
```

## <span style="color: rgb(53, 152, 219);">[Additional notes about metrics and costs](https://www.elastic.co/docs/reference/integrations/azure_application_insights/app_insights#additional-notes-about-metrics-and-costs)</span>

<div class="heading-wrapper" id="bkmrk--2"></div>Costs: Metric queries are charged based on the number of standard API calls. More information on pricing here [https://azure.microsoft.com/en-us/pricing/details/monitor/](https://azure.microsoft.com/en-us/pricing/details/monitor/).

Example:

```json
{
    "@timestamp": "2021-08-23T14:37:42.268Z",
    "agent": {
        "ephemeral_id": "4162d5df-ab00-4c1b-b4f3-7db2e3b599d4",
        "hostname": "docker-fleet-agent",
        "id": "d979a8cf-ddeb-458f-9019-389414e0ab47",
        "name": "docker-fleet-agent",
        "type": "metricbeat",
        "version": "7.15.0"
    },
    "azure": {
        "app_insights": {
            "end_date": "2021-08-23T14:37:42.268Z",
            "start_date": "2021-08-23T14:32:42.268Z"
        },
        "application_id": "42cb59a9-d5be-400b-a5c4-69b0a0026ac6",
        "dimensions": {
            "request_name": "GET Home/Index",
            "request_url_host": "demoappobs.azurewebsites.net"
        },
        "metrics": {
            "requests_count": {
                "sum": 4
            }
        }
    },
    "cloud": {
        "provider": "azure"
    },
    "data_stream": {
        "dataset": "azure.app_insights",
        "namespace": "default",
        "type": "metrics"
    },
    "ecs": {
        "version": "8.11.0"
    },
    "elastic_agent": {
        "id": "d979a8cf-ddeb-458f-9019-389414e0ab47",
        "snapshot": true,
        "version": "7.15.0"
    },
    "event": {
        "agent_id_status": "verified",
        "dataset": "azure.app_insights",
        "duration": 503187300,
        "ingested": "2021-08-23T14:37:41Z",
        "module": "azure"
    },
    "host": {
        "architecture": "x86_64",
        "containerized": true,
        "hostname": "docker-fleet-agent",
        "id": "1642d255f9a32fc6926cddf21bb0d5d3",
        "ip": [
            "192.168.96.7"
        ],
        "mac": [
            "02-42-AC-1F-00-07"
        ],
        "name": "docker-fleet-agent",
        "os": {
            "codename": "Core",
            "family": "redhat",
            "kernel": "4.19.128-microsoft-standard",
            "name": "CentOS Linux",
            "platform": "centos",
            "type": "linux",
            "version": "7 (Core)"
        }
    },
    "metricset": {
        "name": "app_insights",
        "period": 300000
    },
    "service": {
        "type": "azure"
    }
}
```

##### **<span class="TextRun SCXW124724174 BCX0" data-contrast="none" lang="EN-US" xml:lang="EN-US"><span class="NormalTextRun SCXW124724174 BCX0">Please provide the following information to </span><span class="NormalTextRun SpellingErrorV2Themed SCXW124724174 BCX0">CyTech Support</span><span class="NormalTextRun SCXW124724174 BCX0">:</span></span><span class="EOP SCXW124724174 BCX0" data-ccp-props="{"134233117":false,"134233118":false,"335551550":0,"335551620":0,"335559738":240,"335559739":240}"> </span>**

<div class="ListContainerWrapper SCXW124724174 BCX0" id="bkmrk-project-id%C2%A0---the-pr">- **Application ID**
- **API Key**

</div>*Documentation Link:* [https://www.elastic.co/docs/reference/integrations/azure\_application\_insights/app\_insights#additional-notes-about-metrics-and-costs](https://www.elastic.co/docs/reference/integrations/azure_application_insights/app_insights#additional-notes-about-metrics-and-costs)

# Azure Integration -Blob Storage Leasing

<div id="bkmrk-here-are-the-necessa"> **Here are the necessary steps to resolve the issue.**</div><div id="bkmrk-"></div><div id="bkmrk-step-1%3A%C2%A0go-to-your%C2%A0a">Step 1: **Go to your** <span style="color: rgb(35, 111, 161);">**Azure Portal**</span> **and log in &gt;go to** <span style="color: rgb(35, 111, 161);">**Storage Account**</span> **dedicated for Elastic Integration.**</div><div id="bkmrk-step-2%3A%C2%A0maneuver-to%C2%A0">Step 2: **Maneuver to** <span style="color: rgb(35, 111, 161);">**Data Storage**</span> **&gt;** <span style="color: rgb(35, 111, 161);">**Containers**</span>**.**</div><div id="bkmrk-step-3%3A%C2%A0check-all-th">Step 3: **Check all the <span style="color: rgb(35, 111, 161);">Blob Storage</span> dedicated for every Azure Services for Elastic Integration except for the $logs.**</div><div id="bkmrk-step-4%3A%C2%A0click-the%C2%A0th">Step 4: **Click the three dots.**</div><div id="bkmrk--1">  
</div><div id="bkmrk--2">![](https://cytechint-docs-bookstack.s3.amazonaws.com/uploads/images/gallery/2025-02/0MrKtrVgft9TBf1r-embedded-image-hcerrzpi.png)</div><div id="bkmrk--4">  
</div><div id="bkmrk--5">  
</div><div id="bkmrk-step-5%3A%C2%A0click-%22break">Step 5: **Click "**<span style="color: rgb(35, 111, 161);">**Break lease**</span>**".**</div><div id="bkmrk-%E2%80%82%E2%80%82%E2%80%82%E2%80%82%E2%80%82%E2%80%82%2Await-for-a-mo"> *\*Wait for a moment to break the lease or refresh the page.*</div><div id="bkmrk-%E2%80%82%E2%80%82%E2%80%82%E2%80%82%E2%80%82%E2%80%82%2Aif-you-can%27t-"> *\*If you can't break the lease for multiple blob storage, do it one by one.* </div><div id="bkmrk--6">  
</div><div id="bkmrk--7">  
</div><div id="bkmrk--8">![](https://cytechint-docs-bookstack.s3.amazonaws.com/uploads/images/gallery/2025-02/bSxzrbMSb9pLQL2k-embedded-image-8hgbug4s.png)</div><div id="bkmrk--10">  
</div><div id="bkmrk-step-6%3A%C2%A0you-should-h">Step 6: **You should have this output. The lease state should be "**<span style="color: rgb(35, 111, 161);">**Broken**</span>**".**</div><div id="bkmrk--11">  
</div><div id="bkmrk--12">  
</div><div id="bkmrk--13">![](https://cytechint-docs-bookstack.s3.amazonaws.com/uploads/images/gallery/2025-02/tXQJ74yFxYWpTpCy-embedded-image-fdp3fhxq.png)</div><div id="bkmrk--15">  
</div><div id="bkmrk-step-7%3A%C2%A0check-again-">Step 7: **Check again all the** <span style="color: rgb(35, 111, 161);">**Blob Storage**</span> **dedicated for every Azure Services for Elastic Integration except for the $logs.**</div><div id="bkmrk-step-8%3A%C2%A0click-the%C2%A0th">Step 8: **Click the three dots.**</div><div id="bkmrk-step-9%3A%C2%A0click-%22acqui">Step 9: **Click "**<span style="color: rgb(35, 111, 161);">**Acquire lease**</span>**".**</div><div id="bkmrk--16">  
</div><div id="bkmrk--17">![](https://cytechint-docs-bookstack.s3.amazonaws.com/uploads/images/gallery/2025-02/chwR0tJuMzfJfBXf-embedded-image-q4my64iw.png)</div><div id="bkmrk--19">  
</div><div id="bkmrk-step-10%3A%C2%A0you-should-">Step 10: **You should have this output. The lease state should be "**<span style="color: rgb(35, 111, 161);">**Leased**</span>**".**</div><div id="bkmrk-%E2%80%82%E2%80%82%E2%80%82%E2%80%82%E2%80%82%E2%80%82%2Await-for-a-mo-1"> *Wait for a moment to renew the lease or refresh the page.</div><div id="bkmrk-%E2%80%82%E2%80%82%E2%80%82%E2%80%82%E2%80%82%E2%80%82%2Aif-you-can%27t--1"> *If you can't renew the lease for multiple blob storage, do it one by one. </div><div id="bkmrk--20">  
</div><div id="bkmrk--21">  
</div><div id="bkmrk--22">  
</div><div id="bkmrk--23">![](https://cytechint-docs-bookstack.s3.amazonaws.com/uploads/images/gallery/2025-02/YuQMyLaPATEGUV6K-embedded-image-s1a2zya5.png)</div><div id="bkmrk--25">  
</div><div id="bkmrk--26">  
</div><div id="bkmrk-step-11%3A%C2%A0click-the%C2%A0t">Step 11: **Click the three dots.**</div><div id="bkmrk-step12%3A%C2%A0click%C2%A0contai">Step12: **Click** <span style="color: rgb(35, 111, 161);">**Container properties**</span>**.**</div><div id="bkmrk--27">  
</div><div id="bkmrk--28">  
</div><div id="bkmrk--29">![](https://cytechint-docs-bookstack.s3.amazonaws.com/uploads/images/gallery/2025-02/fkJPUXX1eAKqXGKX-embedded-image-ravpbmud.png)</div><div id="bkmrk--31">  
</div><div id="bkmrk--32">  
</div><div id="bkmrk-step-13%3A%C2%A0scroll-down">Step 13: **Scroll down and look for the Lease Status, Lease State, Lease Duration.** </div><div id="bkmrk-%E2%80%82%E2%80%82%E2%80%82%E2%80%82%E2%80%82%E2%80%82%C2%A0-%C2%A0-%C2%A0-you-shou"> **You should have this output: Lease Status:** <span style="color: rgb(35, 111, 161);">**Locked**</span>**, Lease State:** <span style="color: rgb(35, 111, 161);">**Leased**</span>**, Lease Duration:** <span style="color: rgb(35, 111, 161);">**Infinite**</span></div><div id="bkmrk--33">  
</div><div id="bkmrk--34">![](https://cytechint-docs-bookstack.s3.amazonaws.com/uploads/images/gallery/2025-02/rnEsu4Cc24kTJK7R-embedded-image-qwk8hpqz.png)</div><div id="bkmrk--36">  
</div><div id="bkmrk--37">  
</div><div id="bkmrk-step-14%3A%C2%A0go-back-to-">Step 14: **Go back to &gt; <span style="color: rgb(35, 111, 161);">Containers</span> and click one <span style="color: rgb(35, 111, 161);">Blob Storage</span>.**</div><div id="bkmrk--38">  
</div><div id="bkmrk--39">![](https://cytechint-docs-bookstack.s3.amazonaws.com/uploads/images/gallery/2025-02/yPnNhxrylSgoiTHn-embedded-image-fovs898u.png)</div><div id="bkmrk--41">  
</div><div id="bkmrk-step-15%3A%C2%A0click-the%C2%A0t">Step 15: **Click the three dots.**</div><div id="bkmrk-step-16%3A%C2%A0click-%22brea">Step 16: **Click "<span style="color: rgb(35, 111, 161);">Break lease</span>".**</div><div id="bkmrk--42">  
</div><div id="bkmrk--43">![](https://cytechint-docs-bookstack.s3.amazonaws.com/uploads/images/gallery/2025-02/A65KT3FKN0o6PU22-embedded-image-8ypawqmz.png)</div><div id="bkmrk--45">  
</div><div id="bkmrk--46">  
</div><div id="bkmrk-step-17%3A%C2%A0wait-for-a-">Step 17: **Wait for a moment. The lease state output should be "**<span style="color: rgb(35, 111, 161);">**Breaking**</span>**".**</div><div id="bkmrk--47">  
</div><div id="bkmrk--48">![](https://cytechint-docs-bookstack.s3.amazonaws.com/uploads/images/gallery/2025-02/f154yvKlKkcLPLL0-embedded-image-9w8vbjp4.png)</div><div id="bkmrk--50">  
</div><div id="bkmrk-step-18%3A%C2%A0after-a-mom">Step 18: **After a moment or refresh the page, it will automatically update the lease state to "**<span style="color: rgb(35, 111, 161);">**Leased**</span>**".**</div><div id="bkmrk--51">  
</div><div id="bkmrk--52">  
</div><div id="bkmrk--53">![](https://cytechint-docs-bookstack.s3.amazonaws.com/uploads/images/gallery/2025-02/pypHPtKr2IDMk5yO-embedded-image-29hllcor.png)</div><div id="bkmrk--55">  
</div><div id="bkmrk--56">  
</div><div id="bkmrk-step-19%3A%C2%A0click-the%C2%A0t">Step 19: **Click the three dots.**</div><div id="bkmrk-step-20%3A%C2%A0click%C2%A0prope">Step 20: **Click** <span style="color: rgb(35, 111, 161);">**properties**</span>**.**</div><div id="bkmrk--57">  
</div><div id="bkmrk--58">![](https://cytechint-docs-bookstack.s3.amazonaws.com/uploads/images/gallery/2025-02/hM1IrKdKNhY84AVX-embedded-image-ofkgnn4w.png)</div><div id="bkmrk--60">  
</div><div id="bkmrk-step-21%3A%C2%A0scroll-down">Step 21: **Scroll down and look for the lease status, lease state, lease duration.** </div><div id="bkmrk-%E2%80%82%E2%80%82%E2%80%82%E2%80%82%E2%80%82%E2%80%82%C2%A0-%C2%A0-%C2%A0-you-shou-1"> **You should have this output: Lease Status:** <span style="color: rgb(35, 111, 161);">**Locked**</span>**, Lease State:** <span style="color: rgb(35, 111, 161);">**Leased**</span>**, Lease Duration: <span style="color: rgb(35, 111, 161);">Fixed</span>**</div><div id="bkmrk--61">  
</div><div id="bkmrk--62">  
</div><div id="bkmrk--63">  
</div><div id="bkmrk--64">![](https://cytechint-docs-bookstack.s3.amazonaws.com/uploads/images/gallery/2025-02/LXBFEdwDdtwSwqat-embedded-image-cchgylzw.png)</div><div id="bkmrk--66">  
</div><div id="bkmrk--67">  
</div><div id="bkmrk-step-22%3A%C2%A0do-these-to">Step 22: **Do these to all the <span style="color: rgb(35, 111, 161);">Blob Storage</span> for every Azure Services and <span style="color: rgb(35, 111, 161);">repeat the process from </span>**<span style="color: rgb(35, 111, 161);">**Step 14 to Step 21**</span>**.**</div><div id="bkmrk--68">  
</div><div id="bkmrk--69">![](https://cytechint-docs-bookstack.s3.amazonaws.com/uploads/images/gallery/2025-02/mclSpTuamutvuSRN-embedded-image-bqq3zj6a.png)</div><div id="bkmrk--71">  
</div><div id="bkmrk--72"></div>

# Azure Logs Integration

### **Introduction**

This document shows information related to Azure Active Directory Integration.  
The Azure Logs integration retrieves different types of log data from Azure.

---

##### **Assumptions**

The procedures described in the **Requirements** section assumes that a Log Collector has already  
been setup.

---

##### **Requirements**

**Main Setup**

- One or more <span class="strong strong">**event hub**</span> to store in-flight logs exported by Azure services and make them available to the Log Collector 
    - Example:
    - ```
          ┌────────────────┐       ┌────────────┐
          │     adlogs     │       │  Log       │
          │ <<Event Hub>>  │─────▶ │  Collector │
          └────────────────┘       └────────────┘
        ```
    -
- One or more <span class="strong strong">diagnostic setting</span> to export logs from Azure services to Event Hubs 
    - Example:
    - ```
        ┌──────────────────┐      ┌──────────────┐     ┌─────────────────┐
        │Microsoft Entra ID│      │  Diagnostic  │     │    Event Hub    │
        │    <<source>>    │─────▶│   settings   │────▶│ <<destination>> │
        └──────────────────┘      └──────────────┘     └─────────────────┘
        ```

- One <span class="strong strong">**Storage Account Container**</span> to store information about logs consumed by the Log Collector 
    - - Example: ```
              ┌────────────────┐                     ┌────────────┐
              │     adlogs     │        logs         │  Log       │
              │ <<Event Hub>>  │────────────────────▶│  Collector │
              └────────────────┘                     └────────────┘
                                                            │
                                   consumer group info      │
              ┌────────────────┐   (state, position, or     │
              │   azurelogs    │         offset)            │
              │ <<container>>  │◀───────────────────────────┘
              └────────────────┘
            ```

This is the final diagram of the a setup for collecting Activity logs from the Azure Monitor service.

```
 ┌───────────────┐   ┌──────────────┐   ┌────────────────┐         ┌────────────┐
 │  MS Entra ID  │   │  Diagnostic  │   │     adlogs     │  logs   │  Log       │
 │  <<service>>  ├──▶│   Settings   │──▶│ <<Event Hub>>  │────────▶│ Collector │
 └───────────────┘   └──────────────┘   └────────────────┘         └────────────┘
                                                                          │
                     ┌──────────────┐          consumer group info        │
                     │  azurelogs   │          (state, position, or       │
                     │<<container>> │◀───────────────offset)──────────────┘
                     └──────────────┘
```

If the integration is running behind a firewall, please proceed [here](https://docs.cytechint.io/books/system-integrations/page/azure-logs-integration#bkmrk-additional-informati).

Here are several requirements before using the integration since the logs will  
be read from azure event hubs.

1. **The logs have to be exported first to the event hub.**  
    • Create an event hub using Azure portal.  
    • More information can be found on: [https://learn.microsoft.com/en-us/azure/event-hubs/event-hubscreate](https://learn.microsoft.com/en-us/azure/event-hubs/event-hubscreate).
2. **To export activity logs to event hubs users can follow the steps here.**  
    • Legacy collection methods  
    • More information can be found on: [https://learn.microsoft.com/en-us/azure/azuremonitor/essentials/activity-log?tabs=powershell#legacy-collectionmethods](https://learn.microsoft.com/en-us/azure/azuremonitor/essentials/activity-log?tabs=powershell#legacy-collectionmethods)
3. **To export audit and sign-in logs to event hubs users can follow the**  
    **steps here.**  
    • Stream Azure Active Directory logs  
    • More information can be found on: [https://learn.microsoft.com/en-us/azure/active-directory/reportsmonitoring/tutorial-azure-monitor-stream-logs-to-event-hub](https://learn.microsoft.com/en-us/azure/active-directory/reportsmonitoring/tutorial-azure-monitor-stream-logs-to-event-hub)

---

##### **Azure Active Directory Integration Procedures**

**Create a Resource Group**  
A resource group is a logical collection of Azure resources. All resources are  
deployed and managed in a resource group. To create a resource group:

1. Sign in to the Azure portal.
2. In the left navigation, select R**esource groups**, and then  
    select **Create a resource**.[![image.png](https://cytechint-docs-bookstack.s3.amazonaws.com/uploads/images/gallery/2024-11/scaled-1680-/rfsoNqMpu79o1Qzu-image.png)](https://cytechint-docs-bookstack.s3.amazonaws.com/uploads/images/gallery/2024-11/rfsoNqMpu79o1Qzu-image.png)
3. For **Subscription**, select the name of the Azure subscription in which  
    you want to create the resource group. For CyTech (**Azure Active Directory**) [![image.png](https://cytechint-docs-bookstack.s3.amazonaws.com/uploads/images/gallery/2024-11/scaled-1680-/ckfCmihQIfFGMIsU-image.png)](https://cytechint-docs-bookstack.s3.amazonaws.com/uploads/images/gallery/2024-11/ckfCmihQIfFGMIsU-image.png)
4. Type a unique **name for the resource group**. The system  
    immediately checks to see if the name is available in the currently  
    selected Azure subscription.[![image.png](https://cytechint-docs-bookstack.s3.amazonaws.com/uploads/images/gallery/2024-11/scaled-1680-/5i62188380p2Jgmm-image.png)](https://cytechint-docs-bookstack.s3.amazonaws.com/uploads/images/gallery/2024-11/5i62188380p2Jgmm-image.png)
5. Select a **region** for the resource group.
6. Select **Review + Create**.
7. Takes a few minutes to complete.

[![image.png](https://cytechint-docs-bookstack.s3.amazonaws.com/uploads/images/gallery/2024-11/scaled-1680-/Gra67tTYkLyxnftt-image.png)](https://cytechint-docs-bookstack.s3.amazonaws.com/uploads/images/gallery/2024-11/Gra67tTYkLyxnftt-image.png)

---

##### **Create an Event Hubs Namespace**

An Event Hubs namespace provides a unique scoping container, in which you create  
one or more event hubs. To create a namespace in your resource group using the  
portal, do the following actions:

1. In the Azure portal, and select **Create a resource** at the top left of  
    the screen.
2. Select **All services** in the left menu, and select **star (\*)** next to **Event**  
    **Hubs** in the **Analytics** category. Confirm that **Event Hubs** is added  
    to **FAVORITES** in the left navigational menu.[![image.png](https://cytechint-docs-bookstack.s3.amazonaws.com/uploads/images/gallery/2024-11/scaled-1680-/XWDbjYk9tyfO3fhx-image.png)](https://cytechint-docs-bookstack.s3.amazonaws.com/uploads/images/gallery/2024-11/XWDbjYk9tyfO3fhx-image.png)
3. Select **Event Hubs** under **FAVORITES** in the left navigational menu, and  
    select **Create** on the toolbar.[![image.png](https://cytechint-docs-bookstack.s3.amazonaws.com/uploads/images/gallery/2024-11/scaled-1680-/w7ko4IDcNBLGqh06-image.png)](https://cytechint-docs-bookstack.s3.amazonaws.com/uploads/images/gallery/2024-11/w7ko4IDcNBLGqh06-image.png)
4. On the **Create namespace** page, take the following steps:  
    a. Select the **subscription** in which you want to create the  
    namespace.  
    b. Select the **resource group** you created in the previous step.  
    c. Enter a **name** for the namespace. The system immediately checks to see if the name is available.[![image.png](https://cytechint-docs-bookstack.s3.amazonaws.com/uploads/images/gallery/2024-11/scaled-1680-/xNSBSUX5yRgFSMz3-image.png) ](https://cytechint-docs-bookstack.s3.amazonaws.com/uploads/images/gallery/2024-11/xNSBSUX5yRgFSMz3-image.png)d. Select a **location** for the namespace.  
    e. Choose **Basic** for the **pricing tier**. To learn about differences  
    between tiers, see Quotas and limits, Event Hubs Premium, and Event  
    Hubs Dedicated articles.[![image.png](https://cytechint-docs-bookstack.s3.amazonaws.com/uploads/images/gallery/2024-11/scaled-1680-/RCJf3TPjfd50URZh-image.png)](https://cytechint-docs-bookstack.s3.amazonaws.com/uploads/images/gallery/2024-11/RCJf3TPjfd50URZh-image.png)f. Leave the **throughput units** (for standard tier) or **processing**  
    **units** (for premium tier) settings as it is. To learn about throughput units  
    or processing units: Event Hubs scalability.[ ![image.png](https://cytechint-docs-bookstack.s3.amazonaws.com/uploads/images/gallery/2024-11/scaled-1680-/mGR1lyuUO6hUuJqe-image.png)](https://cytechint-docs-bookstack.s3.amazonaws.com/uploads/images/gallery/2024-11/mGR1lyuUO6hUuJqe-image.png) g. Select **Review + Create** at the bottom of the page.  
    h. On the **Review + Create** page, review the settings, and select **Create**.  
    Wait for the deployment to complete.
5. On the **Deployment** page, select **Go to resource** to navigate to the page for  
    your namespace.

[![image.png](https://cytechint-docs-bookstack.s3.amazonaws.com/uploads/images/gallery/2024-11/scaled-1680-/wIRje6SGdDLveJNW-image.png)](https://cytechint-docs-bookstack.s3.amazonaws.com/uploads/images/gallery/2024-11/wIRje6SGdDLveJNW-image.png)

---

##### **Create an Event Hub**

1. To create an event hub within the namespace, do the following actions:
2. On the **Overview** page, select + **Event hub** on the command bar.[![image.png](https://cytechint-docs-bookstack.s3.amazonaws.com/uploads/images/gallery/2024-11/scaled-1680-/9lig6swAM47b2QIl-image.png)](https://cytechint-docs-bookstack.s3.amazonaws.com/uploads/images/gallery/2024-11/9lig6swAM47b2QIl-image.png)
3. Type a name for your event hub, then select **Review + create**.[![image.png](https://cytechint-docs-bookstack.s3.amazonaws.com/uploads/images/gallery/2024-11/scaled-1680-/901pQZqZoPOl7tyb-image.png)](https://cytechint-docs-bookstack.s3.amazonaws.com/uploads/images/gallery/2024-11/901pQZqZoPOl7tyb-image.png) The **partition count** setting allows you to parallelize consumption across  
    many consumers. For more information, see Partitions.  
    The **message retention** setting specifies how long the Event Hubs service  
    keeps data. For more information, see Event retention.
4. On the **Review + create** page, select Create.
5. You can check the status of the event hub creation in alerts. After the event  
    hub is created, you see it in the list of event hubs.[![image.png](https://cytechint-docs-bookstack.s3.amazonaws.com/uploads/images/gallery/2024-11/scaled-1680-/gT6N5aMWn26OLM6p-image.png)](https://cytechint-docs-bookstack.s3.amazonaws.com/uploads/images/gallery/2024-11/gT6N5aMWn26OLM6p-image.png)

---

##### **Create a Diagnostic Setting**

The diagnostic settings export the logs from Azure services to a destination and in order to use Azure Logs integration, it must be an event hub.

To create a diagnostic settings to export logs:

<div class="olist orderedlist" id="bkmrk-locate-the-diagnosti">1. Locate the diagnostic settings for the service (for example, Microsoft Entra ID).
2. Select diagnostic settings in the <span class="strong strong">**Monitoring**</span> section of the service. Note that different services may place the diagnostic settings in different positions.
3. Select <span class="strong strong">**Add diagnostic settings**</span>.

</div>In the diagnostic settings page you have to select the source <span class="strong strong">**log categories**</span> you want to export and then select their <span class="strong strong">**destination**</span>.

#### Select log categories

Each Azure services exports a well-defined list of log categories. Check the individual integration doc to learn which log categories are supported by the integration.

#### [](https://www.elastic.co/guide/en/integrations/current/azure.html#azure-select-the-destination)Select the destination

Select the <span class="strong strong">**subscription**</span> and the <span class="strong strong">**Event Hubs namespace**</span> you previously created. Select the event hub dedicated to this integration.

Example:

```
  ┌───────────────┐   ┌──────────────┐    ┌───────────────┐       ┌────────────┐
  │  MS Entra ID  │   │  Diagnostic  │    │     adlogs    │       │  Log       │
  │  <<service>>  ├──▶│   Settings   │──▶│ <<Event Hub>> │─────▶ │ Collector │
  └───────────────┘   └──────────────┘    └───────────────┘       └────────────┘
```

---

##### **Create a Storage Account**

To create an Azure storage account with the Azure portal, follow these steps:

1. From the left portal menu, select **Storage accounts** to display a list  
    of your storage accounts. If the portal menu isn't visible, click the  
    menu button to toggle it on.
2. On the **Storage accounts** page, select **Create**.[![image.png](https://cytechint-docs-bookstack.s3.amazonaws.com/uploads/images/gallery/2024-11/scaled-1680-/RFzieDne1Aq4juN8-image.png)](https://cytechint-docs-bookstack.s3.amazonaws.com/uploads/images/gallery/2024-11/RFzieDne1Aq4juN8-image.png)
3. The following image shows a standard configuration of the basic properties[![image.png](https://cytechint-docs-bookstack.s3.amazonaws.com/uploads/images/gallery/2024-11/scaled-1680-/7igl0TMPuSppzHAD-image.png)](https://cytechint-docs-bookstack.s3.amazonaws.com/uploads/images/gallery/2024-11/7igl0TMPuSppzHAD-image.png)
4. The following image shows a standard configuration of the advanced  
    properties for a new storage account. [![image.png](https://cytechint-docs-bookstack.s3.amazonaws.com/uploads/images/gallery/2024-11/scaled-1680-/BFw71OHnlOV83PSy-image.png)](https://cytechint-docs-bookstack.s3.amazonaws.com/uploads/images/gallery/2024-11/BFw71OHnlOV83PSy-image.png)
5. The following image shows a standard configuration of the networking  
    properties for a new storage account. [![image.png](https://cytechint-docs-bookstack.s3.amazonaws.com/uploads/images/gallery/2024-11/scaled-1680-/71avFNEaMntF6jRM-image.png)](https://cytechint-docs-bookstack.s3.amazonaws.com/uploads/images/gallery/2024-11/71avFNEaMntF6jRM-image.png)
6. The following image shows a standard configuration of the data protection  
    properties for a new storage account.[![image.png](https://cytechint-docs-bookstack.s3.amazonaws.com/uploads/images/gallery/2024-11/scaled-1680-/jwCOUksZo8SvpKmW-image.png)](https://cytechint-docs-bookstack.s3.amazonaws.com/uploads/images/gallery/2024-11/jwCOUksZo8SvpKmW-image.png)
7. The following image shows a standard configuration of the encryption  
    properties for a new storage account. [![image.png](https://cytechint-docs-bookstack.s3.amazonaws.com/uploads/images/gallery/2024-11/scaled-1680-/8FXks1uCGDS2pTMw-image.png)](https://cytechint-docs-bookstack.s3.amazonaws.com/uploads/images/gallery/2024-11/8FXks1uCGDS2pTMw-image.png)
8. **Review + Create** **Tab**  
    When you navigate to the **Review + create** tab, Azure runs  
    validation on the storage account settings that you have chosen. If  
    validation passes, you can proceed to create the storage account.  
    If validation fails, then the portal indicates which settings need to be  
    modified.

The following image shows the **Review** tab data prior to the creation  
of a new storage account.

[![image.png](https://cytechint-docs-bookstack.s3.amazonaws.com/uploads/images/gallery/2024-11/scaled-1680-/USS9JDQSW7IcMsco-image.png)](https://cytechint-docs-bookstack.s3.amazonaws.com/uploads/images/gallery/2024-11/USS9JDQSW7IcMsco-image.png)

[![image.png](https://cytechint-docs-bookstack.s3.amazonaws.com/uploads/images/gallery/2024-11/scaled-1680-/wtihkFWZcmTOlVk0-image.png)](https://cytechint-docs-bookstack.s3.amazonaws.com/uploads/images/gallery/2024-11/wtihkFWZcmTOlVk0-image.png)

---

##### **Resources needed for the integration of Azure Active Directory:**

1. **Azure Diagnostics Settings**  
    Create a Diagnostics Configuration and select which log from  
    Azure will send to the event hub.  
    Navigate to **Microsoft Entra ID &gt; Monitoring &gt; Diagnostic settings**[![image.png](https://cytechint-docs-bookstack.s3.amazonaws.com/uploads/images/gallery/2024-11/scaled-1680-/m3S6a24n5DflCDxH-image.png)](https://cytechint-docs-bookstack.s3.amazonaws.com/uploads/images/gallery/2024-11/m3S6a24n5DflCDxH-image.png)
2. **Event Hub Credentials**
3. **Go to &gt; EventHub Resources &gt; Select Shared Access Policies**[![image.png](https://cytechint-docs-bookstack.s3.amazonaws.com/uploads/images/gallery/2024-11/scaled-1680-/RRnRHDMhxYsar6W5-image.png)](https://cytechint-docs-bookstack.s3.amazonaws.com/uploads/images/gallery/2024-11/RRnRHDMhxYsar6W5-image.png)[![image.png](https://cytechint-docs-bookstack.s3.amazonaws.com/uploads/images/gallery/2024-11/scaled-1680-/DTkVmvGA5zTUYYzT-image.png)](https://cytechint-docs-bookstack.s3.amazonaws.com/uploads/images/gallery/2024-11/DTkVmvGA5zTUYYzT-image.png)
4. **Please provide CyTech the:**  
    a. Event Hubs Name Not the Name Space:  
    b. Connection string-primary key:
5. **Account Storage Credentials**[![image.png](https://cytechint-docs-bookstack.s3.amazonaws.com/uploads/images/gallery/2024-11/scaled-1680-/aVuOpXD3kmp4nzYb-image.png)](https://cytechint-docs-bookstack.s3.amazonaws.com/uploads/images/gallery/2024-11/aVuOpXD3kmp4nzYb-image.png)
6. **Please provide CyTech the:**  
    a. Storage Account Name:  
    b. Key 1 Key

---

#### **Running the integration behind a firewall:**

When you run the Elastic Agent behind a firewall, to ensure proper communication with the necessary components, you need to allow traffic on port `5671` and `5672` for the event hub, and port `443` for the Storage Account container.

```
┌────────────────────────────────┐  ┌───────────────────┐  ┌───────────────────┐
│                                │  │                   │  │                   │
│ ┌────────────┐   ┌───────────┐ │  │  ┌──────────────┐ │  │ ┌───────────────┐ │
│ │ diagnostic │   │ event hub │ │  │  │azure-eventhub│ │  │ │ activity logs │ │
│ │  setting   │──▶│           │◀┼AMQP─│  <<input>>   │─┼──┼▶│<<data stream>>│ │
│ └────────────┘   └───────────┘ │  │  └──────────────┘ │  │ └───────────────┘ │
│                                │  │          │        │  │                   │
│                                │  │          │        │  │                   │
│                                │  │          │        │  │                   │
│         ┌─────────────┬─────HTTPS─┼──────────┘        │  │                   │
│ ┌───────┼─────────────┼──────┐ │  │                   │  │                   │
│ │       │             │      │ │  │                   │  │                   │
│ │       ▼             ▼      │ │  └─Log Collector─────┘  └─Elastic Cloud─────┘
│ │ ┌──────────┐  ┌──────────┐ │ │
│ │ │    0     │  │    1     │ │ │
│ │ │ <<blob>> │  │ <<blob>> │ │ │
│ │ └──────────┘  └──────────┘ │ │
│ │                            │ │
│ │                            │ │
│ └─Storage Account Container──┘ │
│                                │
│                                │
└─Azure──────────────────────────┘
```

#### Event Hub

Port `5671` and `5672` are commonly used for secure communication with the event hub. These ports are used to receive events. By allowing traffic on these ports, the Elastic Agent can establish a secure connection with the event hub.

#### Storage Account Container

Port `443` is used for secure communication with the Storage Account container. This port is commonly used for HTTPS traffic. By allowing traffic on port 443, the Elastic Agent can securely access and interact with the Storage Account container, which is essential for storing and retrieving checkpoint data for each event hub partition.

#### DNS

Optionally, you can restrict the traffic to the following domain names:

\*.servicebus.windows.net  
\*.blob.core.windows.net  
\*.cloudapp.net

---

#### **Additional Information:**

##### **Azure Active Directory Logs contain**

**Sign-in logs** – Information about sign-ins and how your users use your  
resources.

- Retrieves Azure Active Directory sign-in logs. The sign-ins report provides  
    information about the usage of managed applications and user sign-in  
    activities.

**Identity Protection logs** - Information about user risk status and the events  
that change it.

- Retrieves Azure AD Identity Protection logs. The Azure AD Identity  
    Protection service analyzes events from AD users' behavior, detects risk  
    situations, and can respond by reporting only or even blocking users at  
    risk, according to policy configurations.

**Provisioning logs** - Information about users and group synchronization to  
and from external enterprise applications.

- Retrieves Azure Active Directory Provisioning logs. The Azure AD  
    Provisioning service syncs AD users and groups to and from external  
    enterprise applications. For example, you can configure the provisioning  
    service to replicate all existing AD users and groups to an external  
    Dropbox Business account or vice-versa.

**The Provisioning Logs contain a lot of details about a inbound/outbound**  
**sync activity, like:**

- User or group details.
- Source and target systems (e.g., from Azure AD to Dropbox).
- Provisioning status.
- Provisioning steps (with details for each step).

**Audit logs** – Information about changes to your tenant, such as users and  
group management, or updates to your tenant's resources.

- Retrieves Azure Active Directory audit logs. The audit logs provide  
    traceability through logs for all changes done by various features within  
    Azure AD. Examples of audit logs include changes made to any resources  
    within Azure AD like adding or removing users, apps, groups, roles and  
    policies.

*If you need further assistance, kindly contact our support at <info@cytechint.com> for prompt assistance and guidance.*

# BitDefender Integrations

BitDefender GravityZone supports SIEM integration using "push notifications", which are JSON messages sent via HTTP POST to a HTTP or HTTPS endpoint, which this integration can consume.

**This integration additionally provides:**

1. Collection of push notification configuration via API polling, which includes the "state" of the push notification service on the BitDefender GravityZone server, e.g. indicating if it is currently enabled or disabled. This is useful as the state may change to disabled (value of 0) for unknown reasons and you may wish to alert on this event.
2. Collection of push notification statistics via API polling, which includes the number of events sent, and counters for errors of different types, which you may wish to use to troubleshoot lost push notification events and for alerting purposes.
3. Support for multiple instances of the integration, which may be needed for MSP/MSSP scenarios where multiple BitDefender GravityZone tenants exist.
4. BitDefender company ID to your own company name/description mapping, in order to determine to which tenant the event relates to in a human friendly way. This is very useful for MSP/MSSP environments or for large organizations with multiple sub-organizations.

This allows you to search, observe and visualize the BitDefender GravityZone events through Elastic, trigger alerts and monitor the BitDefender GravityZone Push Notification service for state and errors.

---

#### **Data Stream**

##### **Log Stream Push Notifications**

The BitDefender GravityZone events dataset provides events from BitDefender GravityZone push notifications that have been received.

All BitDefender GravityZone log events are available in the `bitdefender_gravityzone.events` field group.

---

#### **Compatibility**

This integration supports BitDefender GravityZone, which is the business-oriented product set sold by BitDefender.

BitDefender products for home users are not supported.

The package collects BitDefender GravityZone push notification transported events sent in `jsonrpc`, `qradar`, or `splunk` format.

The `jsonrpc` format is recommended default, but the ingest pipeline will attempt to detect if `qradar` or `splunk` format events have been received and process them accordingly.

The integration can also collect the push notification configuration and statistics by polling the BitDefender GravityZone API.

---

#### **Configuration**

##### [<svg aria-hidden="true" class="euiIcon docsmobile-15aun2l-euiIcon-m-isLoading" data-is-loading="true" height="16" role="img" viewbox="0 0 16 16" width="16" xmlns="http://www.w3.org/2000/svg"></svg>](https://www.elastic.co/docs/current/integrations/bitdefender#enabling-the-integration-in-elastic)**Enabling the integration in Elastic**

1. In Kibana go to **Management &gt; Integrations**
2. In "Search for integrations" search bar type **GravityZone**
3. Click on "BitDefender GravityZone" integration from the search results.
4. Click on **Add BitDefender GravityZone** button to add BitDefender GravityZone integration.

<figure class="euiImageWrapper docsmobile-1duoi7c-euiImageWrapper-allowFullScreen" id="bkmrk--3"><button class="docsmobile-wgpvoz-euiImageButton-hasShadowHover" data-test-subj="activateFullScreenButton" type="button">![Example Integration Configuration](https://www.elastic.co/docs/L3ZlcmNlbC9wYXRoMC93b3JkbGFrZS1kb2Nz/integration-docs/main/dist/img/bitdefender/bitdefender-integration-configuration-1.png "Example Integration Configuration")</button><div class="docsmobile-1fozaha-euiImageButton__icon-openFullScreen"><svg aria-hidden="true" class="euiIcon docsmobile-egtkjo-euiIcon-m-ghost-isLoading" data-is-loading="true" height="16" role="img" viewbox="0 0 16 16" width="16" xmlns="http://www.w3.org/2000/svg"></svg></div></figure><figure class="euiImageWrapper docsmobile-1duoi7c-euiImageWrapper-allowFullScreen" id="bkmrk--4"><button class="docsmobile-wgpvoz-euiImageButton-hasShadowHover" data-test-subj="activateFullScreenButton" type="button">![Example Integration Configuration](https://www.elastic.co/docs/L3ZlcmNlbC9wYXRoMC93b3JkbGFrZS1kb2Nz/integration-docs/main/dist/img/bitdefender/bitdefender-integration-configuration-2.png "Example Integration Configuration")</button><div class="docsmobile-1fozaha-euiImageButton__icon-openFullScreen"><svg aria-hidden="true" class="euiIcon docsmobile-egtkjo-euiIcon-m-ghost-isLoading" data-is-loading="true" height="16" role="img" viewbox="0 0 16 16" width="16" xmlns="http://www.w3.org/2000/svg"></svg></div></figure>##### **Create a BitDefender GravityZone API key that can configure a push notification service**

The API key needed to configure push notifications, and collection push notification configuration state and statistics, is typically configured within the BitDefender GravityZone cloud portal.

Bear in mind the API key will be associated to the account you create it from. A named human account may not be desirable, e.g. you may wish to (probably should) create API keys for functions such as push notifications under a non-human/software service account that will never retire or be made redundant.

Navigate to your account details within the GravityZone portal. If you have sufficient privileges, you will see the "API keys" section near the bottom of the page. Click "Add" here.

<figure class="euiImageWrapper docsmobile-1duoi7c-euiImageWrapper-allowFullScreen" id="bkmrk--5"><button class="docsmobile-wgpvoz-euiImageButton-hasShadowHover" data-test-subj="activateFullScreenButton" type="button">![Example Configuration 1](https://www.elastic.co/docs/L3ZlcmNlbC9wYXRoMC93b3JkbGFrZS1kb2Nz/integration-docs/main/dist/img/bitdefender/bitdefender-gravityzone-api-key-1.png "Example Configuration 1")</button><div class="docsmobile-1fozaha-euiImageButton__icon-openFullScreen"><svg aria-hidden="true" class="euiIcon docsmobile-egtkjo-euiIcon-m-ghost-isLoading" data-is-loading="true" height="16" role="img" viewbox="0 0 16 16" width="16" xmlns="http://www.w3.org/2000/svg"></svg></div></figure>Give the API key a description and tick the "Event Push Service API" box at minimum.

**NOTE:** If you intend to use the API key for other API calls you may need to tick other boxes.

<figure class="euiImageWrapper docsmobile-1duoi7c-euiImageWrapper-allowFullScreen" id="bkmrk--6"><button class="docsmobile-wgpvoz-euiImageButton-hasShadowHover" data-test-subj="activateFullScreenButton" type="button">![Example Configuration 2](https://www.elastic.co/docs/L3ZlcmNlbC9wYXRoMC93b3JkbGFrZS1kb2Nz/integration-docs/main/dist/img/bitdefender/bitdefender-gravityzone-api-key-2.png "Example Configuration 2")</button><div class="docsmobile-1fozaha-euiImageButton__icon-openFullScreen"><svg aria-hidden="true" class="euiIcon docsmobile-egtkjo-euiIcon-m-ghost-isLoading" data-is-loading="true" height="16" role="img" viewbox="0 0 16 16" width="16" xmlns="http://www.w3.org/2000/svg"></svg></div></figure>Click the Key value that is shown in blue.

<figure class="euiImageWrapper docsmobile-1duoi7c-euiImageWrapper-allowFullScreen" id="bkmrk-click-the-clipboard-"><button class="docsmobile-wgpvoz-euiImageButton-hasShadowHover" data-test-subj="activateFullScreenButton" type="button">![Example Configuration 3](https://www.elastic.co/docs/L3ZlcmNlbC9wYXRoMC93b3JkbGFrZS1kb2Nz/integration-docs/main/dist/img/bitdefender/bitdefender-gravityzone-api-key-3.png "Example Configuration 3")</button>Click the clipboard icon to copy the API key to your PC's clipboard.</figure><figure class="euiImageWrapper docsmobile-1duoi7c-euiImageWrapper-allowFullScreen" id="bkmrk--7"><button class="docsmobile-wgpvoz-euiImageButton-hasShadowHover" data-test-subj="activateFullScreenButton" type="button">![Example Configuration 4](https://www.elastic.co/docs/L3ZlcmNlbC9wYXRoMC93b3JkbGFrZS1kb2Nz/integration-docs/main/dist/img/bitdefender/bitdefender-gravityzone-api-key-4.png "Example Configuration 4")</button></figure>*If you need further assistance, kindly contact our support at <support@cytechint.com> for prompt assistance and guidance.*

## <svg aria-hidden="true" class="euiIcon docsmobile-15aun2l-euiIcon-m-isLoading" data-is-loading="true" height="16" role="img" viewbox="0 0 16 16" width="16" xmlns="http://www.w3.org/2000/svg"></svg>

# Bitwarden Integrations

#### **Overview**

The Bitwarden integration allows users to monitor collections, events, groups, members and policies. Bitwarden is a free and open-source password management service that stores sensitive information such as website credentials in an encrypted vault. The Bitwarden platform offers a variety of client applications including a web interface, desktop applications, browser extensions, mobile apps and a command-line interface. Bitwarden offers a cloud-hosted service as well as the ability to deploy the solution on-premises.

Use the Bitwarden integration to collect and parse data from the REST APIs. Then visualize that data in Kibana.

---

#### **Data streams**

The Bitwarden integration collects five types of data: Collections, Events, Groups, Members and Policies.

**Collections** returns a list of an organization's collections.

**Events** returns a list of an organization's event logs.

**Groups** returns a list of an organization's groups.

**Members** returns the details of an organization's members.

**Policies** returns a list of an organization's policies.

*Reference for [Rest APIs](https://bitwarden.com/help/api/) of Bitwarden.*

---

#### **Requirements**

Elasticsearch is needed to store and search data and Kibana is needed for visualizing and managing it. You can use our hosted Elasticsearch Service on Elastic Cloud, which is recommended, or self-manage the Elastic Stack on your hardware.

This module has been tested against **Bitwarden Version 2023.2.0**.

---

#### **Setup**

##### **To collect data from Bitwarden REST APIs, follow the below steps:**

1. Go to the Bitwarden console, enter an email address and master password.
2. Click **Organizations**.
3. Go to **Settings → Organization info**.
4. Click **View API Key** from API key Section.
5. Enter master password.
6. Click **View API Key**.
7. Copy **client\_id** and **client\_secret**.

*If you need further assistance, kindly contact our support at <support@cytechint.com> for prompt assistance and guidance.*

# Cato Networks - Configuring Event Log Forwarding with Two Windows Servers

<header class="mb-4 xl:mb-5" id="bkmrk-how-to-configure-win"><div class="flex"><div class="media"><div class="media-body font-size-md align-self-center">  
</div></div></div></header><section class="content article-content font-size-lg mb-6" id="bkmrk-overview-cato-networ">#### <span style="color: rgb(53, 152, 219);">How to Configure Windows Event Forwarding for User Awareness</span>

Cato Networks’ User Awareness feature usually imports the audit log events directly from the Domain Controller (DC). These log events are shown in the Event Discovery window in the Cato Management Application. Some organizations prefer to forward these events from the DC (the forwarder) to another windows server (the collector) and configure the User Awareness to import the logs from that server.

The following diagram is a sample of Windows Event Forwarding (WEF) with 2 servers: one server is the DC that acts as the forwarder and the second server is the collector. The collector pulls the security events from the forwarder. The Cato PoP imports these events from the collector and shows them in the Cato Management Application.

<div class="section top-level-topic zd-article section original-topic" dir="ltr" lang="en" xml:lang="en"><div class="section top-level-topic sub-topic section internal" dir="ltr"><div class="mediaobject"><table class="image-viewport" summary="manufactured viewport for HTML img"><tbody><tr><td>[![blobid0.png](https://support.catonetworks.com/hc/article_attachments/24218192066205)](https://support.catonetworks.com/hc/article_attachments/24218192066205)</td></tr></tbody></table>

</div></div></div>This article explains how to configure WEF on Windows server.

## <a data-zd-article="UUID-8f3f3e2d-5f81-dc36-4214-6dc0e2b8f27f" id="bkmrk--1"></a>Configuring Event Log Forwarding with Two Windows Servers

<span class="bold">**Prerequisites:**</span>

Two windows server (2016 or later) instances:

<div class="section top-level-topic zd-article section original-topic" dir="ltr" lang="en" xml:lang="en"><div class="section top-level-topic sub-topic section internal" dir="ltr"><div class="itemizedlist">- Forwarder with active directory
- Collector

</div></div></div><span class="bold">**To configure the event log forwarding:**</span>

<div class="section top-level-topic zd-article section original-topic" dir="ltr" lang="en" xml:lang="en"><div class="section top-level-topic sub-topic section internal" dir="ltr"><div class="itemizedlist">- Configure the Collector

</div><div class="itemizedlist">- Configure the Forwarder

</div><div class="section top-level-topic sub-topic section internal" dir="ltr"><div class="titlepage">  
</div></div></div></div>### <a data-zd-article="UUID-8f3f3e2d-5f81-dc36-4214-6dc0e2b8f27f" id="bkmrk--2"></a>Configuring the Event Log Collector

This section describes how to configure the windows server instance as the collector. The collector is the server that pulls the event logs from the forwarder server (DC).

#### <a data-zd-article="UUID-8f3f3e2d-5f81-dc36-4214-6dc0e2b8f27f" id="bkmrk--3"></a>Enabling the Windows Remote Management (WinRM)

Windows Remote Management (WS-Management) is a Microsoft service that allow forwarding the events to the collector. This service is automatically running by default, if not, set the service configuration with status: running and startup type: automatically.

#### <a data-zd-article="UUID-8f3f3e2d-5f81-dc36-4214-6dc0e2b8f27f" id="bkmrk--4"></a>Enabling the PowerShell Remoting

Open the Windows PowerShell console and run the command: <span class="bold">**Enable-**</span><span class="bold">**PSRemoting**</span>to enable the PowerShell Remote service. You can verify that the PSRemoting is enabled by running the command: <span class="bold">**Invoke-Command -**</span><span class="bold">**ComputerName**</span>&lt;COLLECTORHOSTNAME&gt; <span class="bold">**-**</span><span class="bold">**ScriptBlock**</span> <span class="bold">**{1}**</span>. If you don’t receive an error, then the service is running.

#### <a data-zd-article="UUID-8f3f3e2d-5f81-dc36-4214-6dc0e2b8f27f" id="bkmrk--5"></a>Starting the Subscription Collector Service

To start the subscription:

<div class="section top-level-topic zd-article section original-topic" dir="ltr" lang="en" xml:lang="en"><div class="section top-level-topic sub-topic section internal" dir="ltr"><div class="section top-level-topic sub-topic section internal" dir="ltr"><div class="section top-level-topic sub-topic section internal" dir="ltr"><div class="procedure">1. Open the Event Viewer and click on <span class="bold">**Subscription**</span><span class="bold">**.**</span>
2. A popup window appears, Click <span class="bold">**Yes**</span> to confirm the service to run automatically.
3. Right Click select <span class="bold">**Create Subscription**</span><span class="bold">**.**</span>
4. Add a Subscription name.
5. In the Destination log, select <span class="bold">**ForwardedEvents**</span><span class="bold">**.**</span>
6. Under Subscription type and source computers, select <span class="bold">**Collector initiated**</span><span class="bold">**.**</span>
7. Click Select Computers and enter the Forwarder hostname and click OK to apply. If you have multiple DCs, add them to the list.
8. Click on <span class="bold">**Select Events**</span> and verify that Event level: Information is selected.
9. Select By logs and choose the Security Events Logs.
10. To reduce many events, we recommend that you add the Event IDs that Cato uses for the User Awareness: 4768,4769,4770,4624,5145,5140,4625,4647,4608

</div></div></div></div></div>The following screenshot shows a sample of a Subscription Properties window:

<div class="section top-level-topic zd-article section original-topic" dir="ltr" lang="en" xml:lang="en"><div class="section top-level-topic sub-topic section internal" dir="ltr"><div class="section top-level-topic sub-topic section internal" dir="ltr"><div class="section top-level-topic sub-topic section internal" dir="ltr"><div class="mediaobject">[![blobid1.png](https://support.catonetworks.com/hc/article_attachments/24218192143261)](https://support.catonetworks.com/hc/article_attachments/24218192143261)</div></div><div class="section top-level-topic sub-topic section internal" dir="ltr"><div class="titlepage">  
</div></div></div></div></div>#### <a data-zd-article="UUID-8f3f3e2d-5f81-dc36-4214-6dc0e2b8f27f" id="bkmrk--6"></a>Configuring the Forwarded Events Log File

To configure the forwarded events file to use the security events:

<div class="section top-level-topic zd-article section original-topic" dir="ltr" lang="en" xml:lang="en"><div class="section top-level-topic sub-topic section internal" dir="ltr"><div class="section top-level-topic sub-topic section internal" dir="ltr"><div class="section top-level-topic sub-topic section internal" dir="ltr"><div class="procedure">1. Open the Event Viewer and navigate to Windows Logs &gt; <span class="bold">**ForwardedEvents**</span>
2. Right click on <span class="bold">**ForwardedEvents**</span> and click on Properties
3. Change the Log path to the %..\\Security.evtx file and click <span class="bold">**OK**</span>

</div><div class="mediaobject">[![blobid5.png](https://support.catonetworks.com/hc/article_attachments/24218192209693)](https://support.catonetworks.com/hc/article_attachments/24218192209693)</div></div></div><div class="section top-level-topic sub-topic section internal" dir="ltr"><div class="titlepage">  
</div></div></div></div>### <a data-zd-article="UUID-8f3f3e2d-5f81-dc36-4214-6dc0e2b8f27f" id="bkmrk--7"></a>Configuring the Forwarder (DC)

This section describes how to configure the DC as the forwarder.

#### <a data-zd-article="UUID-8f3f3e2d-5f81-dc36-4214-6dc0e2b8f27f" id="bkmrk--8"></a>Allowing Read Permissions to the Security Event Log

Open the Windows PowerShell console and run the command: <span class="bold">**wevtutil**</span><span class="bold">**gl**</span> <span class="bold">**security**</span>. This command provides information about the Security event log. Copy the <span class="bold">**channelAccess**</span> string.

#### <a data-zd-article="UUID-8f3f3e2d-5f81-dc36-4214-6dc0e2b8f27f" id="bkmrk--9"></a>Configuring the Group Policy Management for the Forwarder

<div class="section top-level-topic zd-article section original-topic" dir="ltr" lang="en" xml:lang="en"><div class="section top-level-topic sub-topic section internal" dir="ltr"><div class="section top-level-topic sub-topic section internal" dir="ltr"><div class="section top-level-topic sub-topic section internal" dir="ltr"><div class="titlepage">  
</div><div class="procedure">- Go to <span class="bold">**Server Manger &gt; Tools &gt; Group Policy Management &gt;**</span> <span class="bold">**Domains &gt;**</span> <span class="bold">**Domain Controller**</span><span class="bold">**s**</span> and click on <span class="bold">**Default Domain Controller**</span><span class="bold">**s**</span> <span class="bold">**Policy**</span>. Right Click and click Edit, when the Default Domain Controllers Policy window opens, navigate to <span class="bold">**<span class="emphasis">*Computer Configuration*</span>**</span><span class="bold"> **→** </span><span class="bold">**<span class="emphasis">*Policies*</span>**</span><span class="bold"> **→** </span><span class="bold">**<span class="emphasis">*Administrative Templates*</span>**</span><span class="bold"> **→** </span><span class="bold">**<span class="emphasis">*Windows Components*</span>**</span><span class="bold"> **→** </span><span class="bold">**<span class="emphasis">*Event Forwarding*</span>**</span><span class="bold"> **→** </span><span class="bold">**<span class="emphasis">*Configure target*</span>**</span> <span class="bold">**<span class="emphasis">*S*</span>**</span><span class="bold">**<span class="emphasis">*ubscription*</span>**</span> <span class="bold">**<span class="emphasis">*M*</span>**</span><span class="bold">**<span class="emphasis">*anager*</span>**</span> <span class="emphasis">*and*</span> Set the value for the target subscription manager: <span class="bold">**<span class="emphasis">*Server=http://&lt;*</span>**</span><span class="emphasis">*FQDN of the collector*</span><span class="bold">**<span class="emphasis">*&gt;:5985/*</span>**</span><span class="bold">**<span class="emphasis">*wsman*</span>**</span><span class="bold">**<span class="emphasis">*/*</span>**</span><span class="bold">**<span class="emphasis">*SubscriptionManager*</span>**</span><span class="bold">**<span class="emphasis">*/*</span>**</span><span class="bold">**<span class="emphasis">*WEC,Refresh*</span>**</span><span class="bold">**<span class="emphasis">*=60*</span>**</span>

</div></div></div></div></div>The following screenshot shows an example of a Subscription Manager for the “MyCollector” server.

<div class="section top-level-topic zd-article section original-topic" dir="ltr" lang="en" xml:lang="en"><div class="section top-level-topic sub-topic section internal" dir="ltr"><div class="section top-level-topic sub-topic section internal" dir="ltr"><div class="section top-level-topic sub-topic section internal" dir="ltr"><div class="mediaobject"><table class="image-viewport" summary="manufactured viewport for HTML img"><tbody><tr><td>[![blobid3.jpg](https://support.catonetworks.com/hc/article_attachments/24218197488413)](https://support.catonetworks.com/hc/article_attachments/24218197488413)</td></tr></tbody></table>

</div></div></div></div></div>2\. Navigate to <span class="bold">**Computer Configuration → Policies → Administrative Templates → Windows Components → Event Log Service → Security → Configure log access**</span> select <span class="bold">**Enabled**</span> and paste the <span class="bold">**channelAccess**</span> string from the [section](https://support.catonetworks.com/hc/en-us/articles/360013279817-How-to-Configure-Windows-Event-Forwarding-for-User-Awareness#UUID-8f3f3e2d-5f81-dc36-4214-6dc0e2b8f27f_N1692081505677 "Starting the Subscription Collector Service") above in the Log Access pane.

The following screenshot shows an example of log access configuration with the channelAccess value:

<div class="section top-level-topic zd-article section original-topic" dir="ltr" lang="en" xml:lang="en"><div class="section top-level-topic sub-topic section internal" dir="ltr"><div class="section top-level-topic sub-topic section internal" dir="ltr"><div class="section top-level-topic sub-topic section internal" dir="ltr"><div class="mediaobject"><table class="image-viewport" summary="manufactured viewport for HTML img"><tbody><tr><td>[![blobid4.png](https://support.catonetworks.com/hc/article_attachments/24218185479965)](https://support.catonetworks.com/hc/article_attachments/24218185479965)</td></tr></tbody></table>

</div></div><div class="section top-level-topic sub-topic section internal" dir="ltr"><div class="titlepage">  
</div></div></div></div></div>#### <a data-zd-article="UUID-8f3f3e2d-5f81-dc36-4214-6dc0e2b8f27f" id="bkmrk--10"></a>Adding the Network Service into the Event Log Readers Group

Go to <span class="bold">**Server Manger &gt; Tools &gt;**</span> <span class="bold">**Active Directory Users and Computers**</span> <span class="bold">**&gt;**</span> <span class="bold">**&lt;**</span><span class="bold">**Domain**</span> <span class="bold">**name&gt;**</span><span class="bold">**Builti**</span><span class="bold">**n**</span>, Right click on <span class="bold">**Event Log Readers**</span> group and click Properties. when the window opens, go to Members tab and add the Network Service account and click OK.

Open the command line and run the command <span class="bold">**gpupdate**</span> <span class="bold">**/force**</span>to update the GPO. Changes to this group require a restart for WinRM to apply the changes.

### <a data-zd-article="UUID-8f3f3e2d-5f81-dc36-4214-6dc0e2b8f27f" id="bkmrk--11"></a>Checking the Event Log Forwarding

When you complete the collector and the forwarder configuration, go to the Collector server and open the Event Viewer and navigate to <span class="bold">**Windows Logs &gt; Forwarded Events**</span>. Make sure that you can see the events in this section.

</section>Source: <span style="color: rgb(53, 152, 219);">[https://support.catonetworks.com/hc/en-us/articles/360013279817-How-to-Configure-Windows-Event-Forwarding-for-User-Awareness](https://support.catonetworks.com/hc/en-us/articles/360013279817-How-to-Configure-Windows-Event-Forwarding-for-User-Awareness)</span>

<span class="TextRun SCXW71272603 BCX0" data-contrast="auto" lang="EN-US" xml:lang="EN-US"><span class="NormalTextRun SCXW71272603 BCX0">If you need further </span><span class="NormalTextRun SCXW71272603 BCX0">assistance</span><span class="NormalTextRun SCXW71272603 BCX0">, kindly contact our support at </span></span><span style="color: rgb(53, 152, 219);">**<span class="TextRun SCXW71272603 BCX0" data-contrast="none" lang="EN-US" xml:lang="EN-US"><span class="NormalTextRun SCXW71272603 BCX0">support@cytechint.com</span></span>**</span><span class="TextRun SCXW71272603 BCX0" data-contrast="auto" lang="EN-US" xml:lang="EN-US"><span class="NormalTextRun SCXW71272603 BCX0"> for prompt </span><span class="NormalTextRun SCXW71272603 BCX0">assistance</span><span class="NormalTextRun SCXW71272603 BCX0"> and guidance.</span></span><span class="EOP SCXW71272603 BCX0" data-ccp-props="{}"></span>

# Cato Networks - Using Cato API for ELK Stack Integration

To fully integrate the Cato Networks API with the Elastic Stack (ELK Stack), you can follow this comprehensive process. This guide will cover the necessary steps to collect, transform, and visualize data from Cato Networks using the Elastic Stack.

#### <span style="color: rgb(53, 152, 219);">**Step 1: Understand the Cato Networks API**</span>

- API Documentation: Begin by reviewing the Cato Networks API documentation to understand the available endpoints, authentication methods, and data formats. This will help you determine which data you want to ingest into the Elastic Stack.

#### <span style="color: rgb(53, 152, 219);">**Step 2: Set Up Logstash for Data Collection**</span>

- Install Logstash: Ensure that Logstash is installed and running in your environment. You can download it from the \[Elastic Downloads\](<span style="color: rgb(132, 63, 161);">*https://www.elastic.co/downloads/logstash*</span>) page.
- Configure Logstash: Create a Logstash configuration file to collect data from the Cato API. Use the HTTP Poller input plugin to make requests to the API.

 Example Logstash configuration (cato\_logstash.conf):

<table border="1" id="bkmrk-input-%7B%C2%A0-%C2%A0-http_poll" style="border-collapse: collapse; width: 100%;"><colgroup><col style="width: 99.881%;"></col></colgroup><tbody><tr><td>input {  
 http\_poller {  
 urls =&gt; {  
 cato\_api =&gt; {  
 method =&gt; get  
 url =&gt; "https://api.catonetworks.com/your\_endpoint"  
 headers =&gt; {  
 Accept =&gt; "application/json"  
 Authorization =&gt; "Bearer YOUR\_API\_TOKEN"  
 }  
 }  
 }  
 request\_timeout =&gt; 60  
 schedule =&gt; { cron =&gt; "\* \* \* \* \* UTC"}  
 codec =&gt; "json"  
 metadata\_target =&gt; "http\_poller\_metadata"  
 }  
 }

 filter {  
 # Add any necessary filters to transform the data  
 # Example: json filter to parse nested JSON objects  
 json {  
 source =&gt; "message"  
 }  
 }

 output {  
 elasticsearch {  
 hosts =&gt; \["http://localhost:9200"\]  
 index =&gt; "cato\_networks\_data"  
 }  
 }

</td></tr></tbody></table>

- Run Logstash: Start Logstash with the configuration file:

<table border="1" id="bkmrk-bin%2Flogstash--f-cato" style="border-collapse: collapse; width: 100%;"><colgroup><col style="width: 99.881%;"></col></colgroup><tbody><tr><td>bin/logstash -f cato\_logstash.conf</td></tr></tbody></table>

#### <span style="color: rgb(53, 152, 219);">**Step 3: Transform Data with Logstash Filters**</span>

- Data Transformation: Use Logstash filters to parse and transform the data as needed. This might include parsing JSON fields, renaming fields, or converting data types.

 Example filter configuration:

<table border="1" id="bkmrk-filter-%7B%C2%A0-%C2%A0-json-%7B%C2%A0-" style="border-collapse: collapse; width: 100%;"><colgroup><col style="width: 99.881%;"></col></colgroup><tbody><tr><td>filter {  
 json {  
 source =&gt; "message"  
 }  
 mutate {  
 rename =&gt; { "\[old\_field\]" =&gt; "\[new\_field\]" }  
 }  
 }</td></tr></tbody></table>

#### <span style="color: rgb(53, 152, 219);">**Step 4: Index Data in Elasticsearch**</span>

- Elasticsearch Setup: Ensure that Elasticsearch is running and accessible. You can download and install it from the \[Elastic Downloads\](<span style="color: rgb(132, 63, 161);">*https://www.elastic.co/downloads/elasticsearch*</span>) page.
- Index Configuration: Make sure your Elasticsearch index is configured to handle the data structure from the Cato API. You may need to define index mappings to specify data types.

#### <span style="color: rgb(53, 152, 219);">**Step 5: Visualize Data with Kibana**</span>

- Kibana Setup: Ensure that Kibana is installed and running. You can download it from the \[Elastic Downloads\](<span style="color: rgb(132, 63, 161);">*https://www.elastic.co/downloads/kibana*</span>) page.
- Create Visualizations: Use Kibana to create visualizations and dashboards based on the data indexed in Elasticsearch. This will allow you to analyze and monitor the data from Cato Networks. 
    - Access Kibana through your web browser.
    - Navigate to the "Discover" tab to explore the ingested data.
    - Use the "Visualize" tab to create charts and graphs.
    - Build dashboards in the "Dashboard" tab to combine multiple visualizations.

#### <span style="color: rgb(53, 152, 219);">**Step 6: Secure the Integration**</span>

- Authentication: Ensure that you securely handle authentication when accessing the Cato API. Use API keys or tokens as required by the API.
- Secure Communication: Use HTTPS to encrypt data in transit between Logstash, Elasticsearch, and Kibana.

 Additional Resources

\- \[Logstash HTTP Poller Input Plugin\](<span style="color: rgb(132, 63, 161);">*https://www.elastic.co/guide/en/logstash/current/plugins-inputs-http\_poller.html*</span>)  
\- \[Elasticsearch Documentation\](<span style="color: rgb(132, 63, 161);">*https://www.elastic.co/guide/en/elasticsearch/reference/current/index.html*</span>)  
\- \[Kibana Documentation\](*<span style="color: rgb(132, 63, 161);">https://www.elastic.co/guide/en/kibana/current/index.html</span>*)

If you encounter any issues or have specific questions during the integration process, feel free to ask for further assistance.

# CATO Networks API Integration

#### **<span style="color: rgb(53, 152, 219);">1. Overview</span>**

<span style="color: rgb(0, 0, 0);">**Cato Networks** is a cloud-native Secure Access Service Edge (SASE) platform that converges networking and security into a single, unified service. It provides SD-WAN, secure internet access, zero-trust network access, and advanced threat protection over a global private backbone, simplifying operations and enhancing security and performance for organizations.</span>

#### <span style="color: rgb(53, 152, 219);">**2. Vendor configuration**</span>

In this configuration, you will set up the Cato Networks API Key and Account ID parameter to access the Cato networks API.

- In the Cato Management Application, only account administrators with the **Editor** privilege can generate keys. (CMA).
- To ingest security events, you must enable the events feeds on your account. To enable the events feed, follow the steps below: 
    1. In the navigation panel, select **System &gt; API Access Management**.
    2. <span style="color: rgb(0, 0, 0);">Select **Event Feed Enabled**. After this, your account starts sending events to the Cato API server.</span>  
        <span style="color: rgb(0, 0, 0);">[![image.png](https://cytechint-docs-bookstack.s3.amazonaws.com/uploads/images/gallery/2025-07/scaled-1680-/CCRdEQ05uuymb9fl-image.png)](https://cytechint-docs-bookstack.s3.amazonaws.com/uploads/images/gallery/2025-07/CCRdEQ05uuymb9fl-image.png)</span>

#### <span style="color: rgb(0, 0, 0);">**3. API Key**</span>

<span style="color: rgb(0, 0, 0);">All access to Cato networks requires an API Key. Follow the below instructions to set up an API Key.</span>

1. <span style="color: rgb(0, 0, 0);">In the navigation menu, click **Administration &gt; API Management**.</span>

<span style="color: rgb(0, 0, 0);">[ ![image.png](https://cytechint-docs-bookstack.s3.amazonaws.com/uploads/images/gallery/2025-07/scaled-1680-/c4u0oIDSbEqZXVpB-image.png)](https://cytechint-docs-bookstack.s3.amazonaws.com/uploads/images/gallery/2025-07/c4u0oIDSbEqZXVpB-image.png)</span>

<span style="color: rgb(0, 0, 0);"> 2. On the **API Keys** tab, click **New**. The **Create API Key** panel opens.</span>

<span style="color: rgb(0, 0, 0);"> 3. Enter a **Key Name**.</span>

<span style="color: rgb(0, 0, 0);">[ ![image.png](https://cytechint-docs-bookstack.s3.amazonaws.com/uploads/images/gallery/2025-07/scaled-1680-/ireVyydZcNnD5pp3-image.png)](https://cytechint-docs-bookstack.s3.amazonaws.com/uploads/images/gallery/2025-07/ireVyydZcNnD5pp3-image.png)</span>

<span style="color: rgb(0, 0, 0);">4. Select **View** in the **API Permission**.</span>

<span style="color: rgb(0, 0, 0);">5. Select **Any IP** to allow this API key for any IP address under the **Allow Access from IPs** section.</span>

<span style="color: rgb(0, 0, 0);">6. (Optional) Select a date when the API key expires. If you select an expiration date, then you need to update the source configuration with a new API key, or else an unauthorized error will be received.</span>

<span style="color: rgb(0, 0, 0);">7. Click **Apply**. The API key is added, and a pop-up window containing the new API key is displayed.</span>

<span style="color: rgb(0, 0, 0);">8. Copy the API Key generated by the Cato Management Application and save it in a secure location.</span>

<p class="callout info"><span style="color: rgb(0, 0, 0);">Note: </span>  
<span style="color: rgb(0, 0, 0);">The API key value will not be available after closing this window. Kindly ensure that you copy and securely save the API key before closing the window.</span></p>

<span style="color: rgb(0, 0, 0);">9. Click **OK** to close the pop-up window.</span>

<span style="color: rgb(0, 0, 0);">Reference link: [https://support.catonetworks.com/hc/en-us/articles/4413280536081-Generating-API-Keys-for-the-Cato-API](https://support.catonetworks.com/hc/en-us/articles/4413280536081-Generating-API-Keys-for-the-Cato-API)</span>

#### <span style="color: rgb(0, 0, 0);">**4. Build a Collector to Pull Events**</span>

<span style="color: rgb(0, 0, 0);">Elastic doesn’t natively support Cato, but you can use: **Logstash**</span>

<span style="color: rgb(0, 0, 0);">You need to create a **Logstash pipeline**. ***Install Logstash if not already.***</span>

##### <span style="color: rgb(53, 152, 219);">**Step 1:** ***Install Logstash On Linux (Ubuntu/Debian example)***</span>

```
wget -qO - https://artifacts.elastic.co/GPG-KEY-elasticsearch | sudo apt-key add -
sudo apt-get install apt-transport-https
echo "deb https://artifacts.elastic.co/packages/8.x/apt stable main" | sudo tee /etc/apt/sources.list.d/elastic-8.x.list
sudo apt-get update
sudo apt-get install logstash

```

<span style="color: rgb(0, 0, 0);">**Verify installation:**</span>

```
logstash --version
```

##### <span style="color: rgb(53, 152, 219);">**Step 2: Create Logstash Pipeline**</span>

**<span style="color: rgb(0, 0, 0);">2.1: Location</span>**

Create file: /etc/logstash/conf.d/cato-pipeline.conf

<span style="color: rgb(0, 0, 0);"> **Pipeline Configuration:**</span>

```
input {
  http_poller {
    urls => {
      cato => {
        method => post
        url => "https://api.catonetworks.com/v1/graphql"
        headers => {
          "x-api-key" => "YOUR_CATO_API_KEY"
          "Content-Type" => "application/json"
        }
        body => '{
          "query": "query { eventsFeed { eventType eventTime eventDetails } }"
        }'
      }
    }
    request_timeout => 60
    schedule => { cron => "* * * * *" }
    codec => "json"
    metadata_target => "http_poller_metadata"
  }
}

filter {
  if [data] {
    mutate {
      replace => { "[events]" => "%{[data][eventsFeed]}" }
    }
    split {
      field => "[events]"
    }

    mutate {
      add_field => {
        "event_type" => "%{[events][eventType]}"
        "event_time" => "%{[events][eventTime]}"
      }
    }

    json {
      source => "[events][eventDetails]"
      target => "event_details"
    }

    date {
      match => [ "event_time", "ISO8601" ]
      target => "@timestamp"
    }

    mutate {
      remove_field => [ "data", "events", "[events][eventDetails]", "http_poller_metadata" ]
    }
  }
}

output {
  elasticsearch {
    hosts => [ "http://localhost:9200" ]
    index => "cato-events-%{+YYYY.MM.dd}"
    user => "elastic"
    password => "your_elastic_password"
  }

  stdout {
    codec => rubydebug
  }
}
```

<span style="color: rgb(0, 0, 0);">**Replace:**</span>

- <span style="color: rgb(0, 0, 0);">`YOUR_CATO_API_KEY` with your Cato API</span><span style="color: rgb(0, 0, 0);"> key</span>
- <span style="color: rgb(0, 0, 0);">Elastic credentials (user, password, host)</span>

##### <span style="color: rgb(53, 152, 219);">**Step 3: Test the Pipeline**</span>

<span style="color: rgb(0, 0, 0);">**Run syntax test:**</span>

```
sudo /usr/share/logstash/bin/logstash --path.settings /etc/logstash -t
```

<span style="color: rgb(0, 0, 0);">✅ You should see: Configuration OK</span>

##### <span style="color: rgb(53, 152, 219);">**Step 4: Start Logstash**</span>

```
sudo systemctl start logstash
sudo systemctl enable logstash
```

<span style="color: rgb(0, 0, 0);">**Check logs:**</span>

```
sudo journalctl -u logstash -f
```

##### <span style="color: rgb(53, 152, 219);">**Step 5: Verify Data in Kibana**</span>

- <span style="color: rgb(53, 152, 219);"> **<span style="color: rgb(0, 0, 0);">Open Kibana: http://&lt;your-server&gt;:5601</span>** </span>
- <span style="color: rgb(0, 0, 0);"> **Log in** </span>
- <span style="color: rgb(0, 0, 0);"> **Go to: Stack Management → Data Views → Create data view** </span>
- <span style="color: rgb(0, 0, 0);"> **Name**</span><span style="color: rgb(0, 0, 0);">**:** </span>
- ```
    cato-events-*
    ```
- <span style="color: rgb(0, 0, 0);">**Save**</span><span style="color: rgb(0, 0, 0);"> </span>

<span style="color: rgb(0, 0, 0);">Then go to **Discover**, select the new data view, and explore your Cato event logs!</span>

# Cisco AMP for Endpoints API Integration

To integrate **Cisco AMP for Endpoints (now part of Cisco Secure Endpoint)** with **Elastic, follow these general steps:**

##### <span style="color: rgb(53, 152, 219);">**Get Cisco AMP API Credentials**</span>

You need to enable API access from the Cisco Secure Endpoint console.

- Log in to: <a class="cursor-pointer" data-end="425" data-start="363" rel="noopener" target="_new">https://console.amp.cisco.com</a>
- Go to **Accounts &gt; API Credentials**
- Click **Create API Credential**
- Choose **"Read &amp; Write"** or at minimum **"Read-only"**
- Save:
    
    
    - `Client ID`
    - `API Key`

These will be used to pull events from the AMP API.

##### <span style="color: rgb(53, 152, 219);">**Integrate on AQUILA**</span>

1. Log in to **[CyTech - AQUILA](https://cytechint.io/)**. Choose **Cyber Monitoring** and click the **small arrow icon** to redirect you to the Cyber Monitoring Dashboard.

[![image.png](https://cytechint-docs-bookstack.s3.amazonaws.com/uploads/images/gallery/2025-06/scaled-1680-/gJqiCpD7Puwe6BCH-image.png)](https://cytechint-docs-bookstack.s3.amazonaws.com/uploads/images/gallery/2025-06/gJqiCpD7Puwe6BCH-image.png)

2\. In the dashboard, choose **Cyber Incident Management (SIEM and XDR)**.

[![image.png](https://cytechint-docs-bookstack.s3.amazonaws.com/uploads/images/gallery/2025-06/scaled-1680-/ChCabqtdB7BToc5C-image.png)](https://cytechint-docs-bookstack.s3.amazonaws.com/uploads/images/gallery/2025-06/ChCabqtdB7BToc5C-image.png)

3\. Navigate through the leftmost top and click **Cyber Incident Monitoring**.

[![image.png](https://cytechint-docs-bookstack.s3.amazonaws.com/uploads/images/gallery/2025-06/scaled-1680-/QUgb4SjtLXECWANE-image.png)](https://cytechint-docs-bookstack.s3.amazonaws.com/uploads/images/gallery/2025-06/QUgb4SjtLXECWANE-image.png)

4\. Navigate through **Settings&gt;Log Source&gt;Search Bar&gt;Add to Agent**.

[![cisco-secure-endpoint.png](https://cytechint-docs-bookstack.s3.amazonaws.com/uploads/images/gallery/2025-06/scaled-1680-/Vfi4seGvDtckCMPv-cisco-secure-endpoint.png)](https://cytechint-docs-bookstack.s3.amazonaws.com/uploads/images/gallery/2025-06/Vfi4seGvDtckCMPv-cisco-secure-endpoint.png)

5\. Choose your **Log Collector**.

[![image.png](https://cytechint-docs-bookstack.s3.amazonaws.com/uploads/images/gallery/2025-06/scaled-1680-/fd6dcSQhfh3hAxT3-image.png)](https://cytechint-docs-bookstack.s3.amazonaws.com/uploads/images/gallery/2025-06/fd6dcSQhfh3hAxT3-image.png)

6\. In the integration settings follow the instructions given below.

1. Click the **drop arrow** to display the contents. Make sure the Collect logs from the Cisco Secure Endpoint API is **Enabled.**
2. Click the other **drop arrow** to display the other contents needed for the integration setup. Input the Client ID and the API Key.
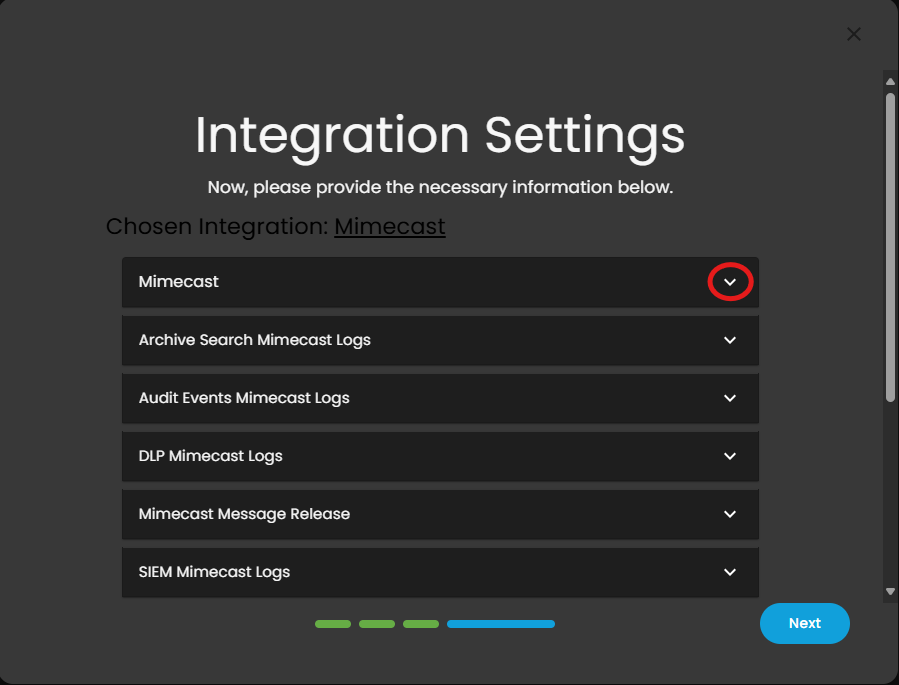
3. **Scroll down,** leave the other text fields to its default value and go to **Tags.** Click the **Tags** text field and add **cisco-secure\_endpoint** and **forwarded.**
4. Finally, click **Next** to install the log source integration.
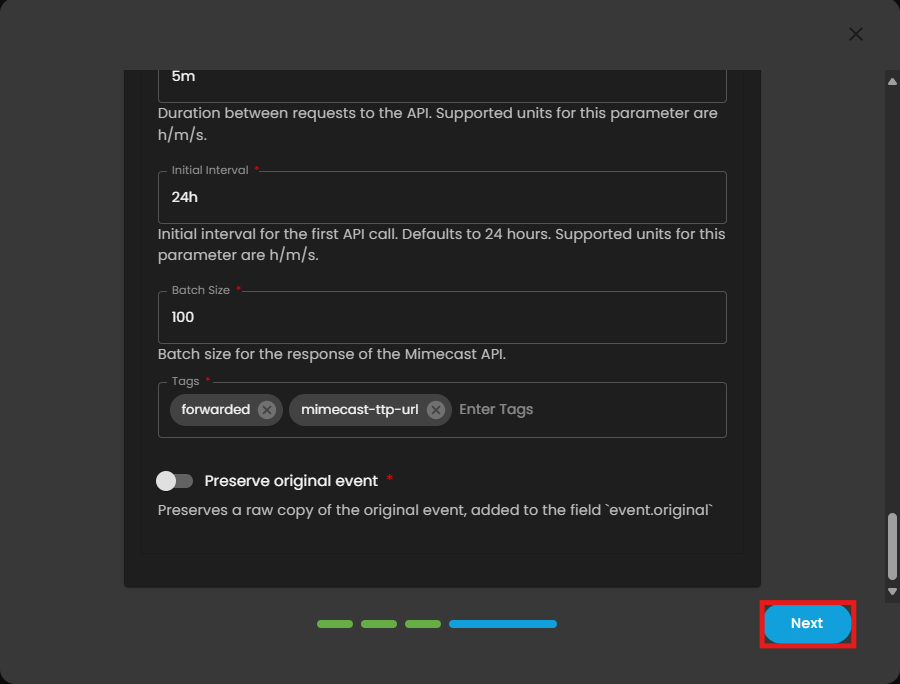
[![cisco-secure-endpoint2.png](https://cytechint-docs-bookstack.s3.amazonaws.com/uploads/images/gallery/2025-06/scaled-1680-/8tUOUxwRGHIZzxxC-cisco-secure-endpoint2.png)](https://cytechint-docs-bookstack.s3.amazonaws.com/uploads/images/gallery/2025-06/8tUOUxwRGHIZzxxC-cisco-secure-endpoint2.png)
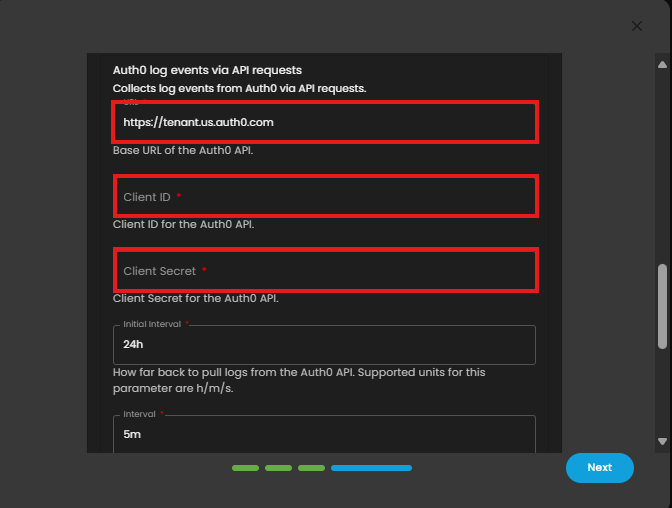
[![cisco-secure-endpoint3.png](https://cytechint-docs-bookstack.s3.amazonaws.com/uploads/images/gallery/2025-06/scaled-1680-/uC8vMozRsBzHWoP6-cisco-secure-endpoint3.png)](https://cytechint-docs-bookstack.s3.amazonaws.com/uploads/images/gallery/2025-06/uC8vMozRsBzHWoP6-cisco-secure-endpoint3.png)

[![cisco-secure-endpoint4.png](https://cytechint-docs-bookstack.s3.amazonaws.com/uploads/images/gallery/2025-06/scaled-1680-/bhVAJJmfjb38Sqrl-cisco-secure-endpoint4.png)](https://cytechint-docs-bookstack.s3.amazonaws.com/uploads/images/gallery/2025-06/bhVAJJmfjb38Sqrl-cisco-secure-endpoint4.png)

[![cisco-secure-endpoint5.png](https://cytechint-docs-bookstack.s3.amazonaws.com/uploads/images/gallery/2025-06/scaled-1680-/J5ZhAhpkaH46xRxW-cisco-secure-endpoint5.png)](https://cytechint-docs-bookstack.s3.amazonaws.com/uploads/images/gallery/2025-06/J5ZhAhpkaH46xRxW-cisco-secure-endpoint5.png)

7\. Wait for the **Successfull** window to display, this will confirm the successfull integration.

[![image.png](https://cytechint-docs-bookstack.s3.amazonaws.com/uploads/images/gallery/2025-06/scaled-1680-/bPXsUbIJSaGHmL83-image.png)](https://cytechint-docs-bookstack.s3.amazonaws.com/uploads/images/gallery/2025-06/bPXsUbIJSaGHmL83-image.png)

*If you need further assistance, kindly contact our support at **support@cytechint.com** for prompt assistance and guidance.*

# Cisco Meraki - Configuring a Syslog Server

#### **<span style="color: rgb(53, 152, 219);">Method 1: Using GUI</span>**

##### <span style="color: rgb(53, 152, 219);">**Configure log forwarding**</span>

<div class="body taskbody" id="bkmrk-sign-in-to-the%C2%A0merak"><section>1. <span class="ph cmd">Sign in to the <span style="color: rgb(0, 0, 0);">**[Meraki Dashboard](https://account.meraki.com/secure/login/dashboard_login)**</span> with administrator permissions.</span>
2. <span class="ph cmd">If your account is a member of multiple organizations, select the organization that you want to configure in the **<span class="ph uicontrol">Organization</span>** list.</span>
3. <span class="ph cmd">In the **<span class="ph uicontrol">Network</span>** list, select the network that you want to configure.</span>
4. <span class="ph cmd">In the navigation menu, click <span class="ph menucascade">**<span class="ph uicontrol">Network-wide</span>**<abbr title="and then"> &gt; </abbr>**<span class="ph uicontrol">Configure</span>**<abbr title="and then"> &gt; </abbr>**<span class="ph uicontrol">General</span>**</span>.</span>
5. <span class="ph cmd">In the **<span class="ph uicontrol">Reporting</span>** section, click **<span class="ph uicontrol">Add a syslog server</span>**.</span>
6. <span class="ph cmd">In the **<span class="ph uicontrol">Syslog servers</span>** table, configure these settings:</span><div class="itemgroup info">
    - **<span class="ph uicontrol">Server IP</span>** - Enter the IP address of your Syslog Server.
    - **<span class="ph uicontrol">Port</span>** - the default UDP port value of <span class="ph uicontrol">514</span>.
    - **<span class="ph uicontrol">Roles</span> -** Select **<span class="ph uicontrol">Security events</span>**, **<span class="ph uicontrol">Flows</span>**, and **<span class="ph uicontrol">URL</span>**.
    
    </div>
7. <span class="ph cmd">In the **<span class="ph uicontrol">Traffic Analysis</span>** section, select **<span class="ph uicontrol">Detailed: collect destination hostnames</span>**.</span>
8. <span class="ph cmd">Click **<span class="ph uicontrol">Save</span>**.</span>
9. <span class="ph cmd">In the navigation menu, click **<span class="ph menucascade"><span class="ph uicontrol">Security &amp; SD-WAN</span><abbr title="and then"> &gt; </abbr><span class="ph uicontrol">Firewall</span></span>**.</span>
10. <span class="ph cmd">In the **<span class="ph uicontrol">Layer 3</span>** section, mark the **<span class="ph uicontrol">Syslog</span>** checkbox for every rule.</span>
11. <span class="ph cmd">Click **<span class="ph uicontrol">Save</span>**.</span>

</section></div>
#### <span style="color: rgb(53, 152, 219);">**<span class="TextRun SCXW84153380 BCX0" data-contrast="none" lang="EN-US" xml:lang="EN-US"><span class="NormalTextRun SCXW84153380 BCX0" data-ccp-parastyle="heading 2">Method 2 : Linux System</span></span><span class="EOP SCXW84153380 BCX0" data-ccp-props="{"134245418":true,"134245529":true,"335559738":160,"335559739":80}"> </span>**</span>

##### <span style="color: rgb(53, 152, 219);">**<span class="TextRun SCXW84153380 BCX0" data-contrast="none" lang="EN-US" xml:lang="EN-US"><span class="NormalTextRun SCXW84153380 BCX0" data-ccp-parastyle="heading 2">Step 1: Install the syslog application:</span></span><span class="EOP SCXW84153380 BCX0" data-ccp-props="{"134245418":true,"134245529":true,"335559738":160,"335559739":80}"> </span>**</span>

<span class="TextRun SCXW84153380 BCX0" data-contrast="none" lang="EN-US" xml:lang="EN-US"><span class="NormalTextRun SpellingErrorV2Themed SCXW84153380 BCX0" data-ccp-parastyle="heading 2">sysadmin@ubuntu</span><span class="NormalTextRun SCXW84153380 BCX0" data-ccp-parastyle="heading 2">:~$ </span><span style="color: rgb(0, 0, 0);">**<span class="NormalTextRun SpellingErrorV2Themed SCXW84153380 BCX0" data-ccp-parastyle="heading 2">sudo</span><span class="NormalTextRun SCXW84153380 BCX0" data-ccp-parastyle="heading 2"> apt-get install syslog-ng</span>**</span></span><span style="color: rgb(0, 0, 0);">**<span class="EOP SCXW84153380 BCX0" data-ccp-props="{"134245418":true,"134245529":true,"335559738":160,"335559739":80}"> </span>**</span>

<span class="EOP SCXW84153380 BCX0" data-ccp-props="{"134245418":true,"134245529":true,"335559738":160,"335559739":80}"> </span><span class="TextRun SCXW84153380 BCX0" data-contrast="none" lang="EN-US" xml:lang="EN-US"><span class="NormalTextRun SCXW84153380 BCX0" data-ccp-parastyle="heading 2">Once syslog-ng has been installed it needs to be configured to receive log messages from the MX</span><span class="NormalTextRun SCXW84153380 BCX0" data-ccp-parastyle="heading 2">. </span><span class="NormalTextRun SCXW84153380 BCX0" data-ccp-parastyle="heading 2">These instructions will configure syslog-ng to store each of the role categories in their own log file</span><span class="NormalTextRun SCXW84153380 BCX0" data-ccp-parastyle="heading 2">. </span><span class="NormalTextRun SCXW84153380 BCX0" data-ccp-parastyle="heading 2">There will be an individual log file for URLs, Event Logs, etc</span><span class="NormalTextRun ContextualSpellingAndGrammarErrorV2Themed SCXW84153380 BCX0" data-ccp-parastyle="heading 2">. Alternatively</span><span class="NormalTextRun SCXW84153380 BCX0" data-ccp-parastyle="heading 2">, it could be configured to store all logs in one file</span><span class="NormalTextRun SCXW84153380 BCX0" data-ccp-parastyle="heading 2">. </span><span class="NormalTextRun SCXW84153380 BCX0" data-ccp-parastyle="heading 2">Use any </span><span class="NormalTextRun SCXW84153380 BCX0" data-ccp-parastyle="heading 2">appropriate editor</span><span class="NormalTextRun SCXW84153380 BCX0" data-ccp-parastyle="heading 2"> to make changes to the syslog-ng configuration file</span><span class="NormalTextRun SCXW84153380 BCX0" data-ccp-parastyle="heading 2">. </span><span class="NormalTextRun SCXW84153380 BCX0" data-ccp-parastyle="heading 2">In this example nano is used to edit the file.</span></span><span class="EOP SCXW84153380 BCX0" data-ccp-props="{"134245418":true,"134245529":true,"335559738":160,"335559739":80}"> </span>

<span class="TextRun SCXW84153380 BCX0" data-contrast="none" lang="EN-US" xml:lang="EN-US"><span class="NormalTextRun SpellingErrorV2Themed SCXW84153380 BCX0" data-ccp-parastyle="heading 2">sysadmin@ubuntu</span><span class="NormalTextRun SCXW84153380 BCX0" data-ccp-parastyle="heading 2">:~$ </span><span style="color: rgb(0, 0, 0);">**<span class="NormalTextRun SpellingErrorV2Themed SCXW84153380 BCX0" data-ccp-parastyle="heading 2">sudo</span><span class="NormalTextRun SCXW84153380 BCX0" data-ccp-parastyle="heading 2"> nano /</span><span class="NormalTextRun SpellingErrorV2Themed SCXW84153380 BCX0" data-ccp-parastyle="heading 2">etc</span><span class="NormalTextRun SCXW84153380 BCX0" data-ccp-parastyle="heading 2">/syslog-ng/syslog-</span><span class="NormalTextRun SpellingErrorV2Themed SCXW84153380 BCX0" data-ccp-parastyle="heading 2">ng.conf</span>**</span></span><span style="color: rgb(0, 0, 0);">**<span class="EOP SCXW84153380 BCX0" data-ccp-props="{"134245418":true,"134245529":true,"335559738":160,"335559739":80}"> </span>**</span>

<span class="TextRun SCXW84153380 BCX0" data-contrast="none" lang="EN-US" xml:lang="EN-US"><span class="NormalTextRun SCXW84153380 BCX0" data-ccp-parastyle="heading 2">The LAN IP of the MX in this example will be 192.168.10.1. The syslog server is listening on 192.168.10.241 UDP port 514. Update as needed to reflect the LAN IP of the MX and the syslog server being configured</span><span class="NormalTextRun SCXW84153380 BCX0" data-ccp-parastyle="heading 2">. </span><span class="NormalTextRun SCXW84153380 BCX0" data-ccp-parastyle="heading 2">The first section of code will configure all syslog messages from the MX to be stored in /var/log/meraki.log</span><span class="NormalTextRun SCXW84153380 BCX0" data-ccp-parastyle="heading 2">. </span><span class="NormalTextRun SCXW84153380 BCX0" data-ccp-parastyle="heading 2">The second section of code will use regular expressions to match each of the role categories and store them in individual log files</span><span class="NormalTextRun SCXW84153380 BCX0" data-ccp-parastyle="heading 2">. </span><span class="NormalTextRun SCXW84153380 BCX0" data-ccp-parastyle="heading 2">Only one of the options needs to be configured.</span></span><span class="EOP SCXW84153380 BCX0" data-ccp-props="{"134245418":true,"134245529":true,"335559738":160,"335559739":80}"> </span>

##### <span style="color: rgb(53, 152, 219);">**<span class="TextRun SCXW84153380 BCX0" data-contrast="none" lang="EN-US" xml:lang="EN-US"><span class="NormalTextRun SCXW84153380 BCX0" data-ccp-parastyle="heading 2">Step 2: Log all messages to /var/log/meraki.log:</span></span><span class="EOP SCXW84153380 BCX0" data-ccp-props="{"134245418":true,"134245529":true,"335559738":160,"335559739":80}"> </span>**</span>

<span class="TextRun SCXW84153380 BCX0" data-contrast="none" lang="EN-US" xml:lang="EN-US"><span class="NormalTextRun SCXW84153380 BCX0" data-ccp-parastyle="heading 2">\#define syslog source</span></span>

<span style="color: rgb(0, 0, 0);">**<span class="TextRun SCXW84153380 BCX0" data-contrast="none" lang="EN-US" xml:lang="EN-US"><span class="NormalTextRun SCXW84153380 BCX0" data-ccp-parastyle="heading 2">source </span><span class="NormalTextRun SpellingErrorV2Themed SCXW84153380 BCX0" data-ccp-parastyle="heading 2">s\_net</span><span class="NormalTextRun SCXW84153380 BCX0" data-ccp-parastyle="heading 2"> { </span><span class="NormalTextRun SpellingErrorV2Themed SCXW84153380 BCX0" data-ccp-parastyle="heading 2">udp</span><span class="NormalTextRun SCXW84153380 BCX0" data-ccp-parastyle="heading 2">(</span><span class="NormalTextRun SpellingErrorV2Themed SCXW84153380 BCX0" data-ccp-parastyle="heading 2">ip</span><span class="NormalTextRun SCXW84153380 BCX0" data-ccp-parastyle="heading 2">(192.168.10.241) </span><span class="NormalTextRun ContextualSpellingAndGrammarErrorV2Themed SCXW84153380 BCX0" data-ccp-parastyle="heading 2">port(</span><span class="NormalTextRun SCXW84153380 BCX0" data-ccp-parastyle="heading 2">514))</span><span class="NormalTextRun ContextualSpellingAndGrammarErrorV2Themed SCXW84153380 BCX0" data-ccp-parastyle="heading 2">; }</span><span class="NormalTextRun SCXW84153380 BCX0" data-ccp-parastyle="heading 2">;</span></span><span class="EOP SCXW84153380 BCX0" data-ccp-props="{"134245418":true,"134245529":true,"335559738":160,"335559739":80}"> </span>**</span>

<span class="TextRun SCXW84153380 BCX0" data-contrast="none" lang="EN-US" xml:lang="EN-US"><span class="NormalTextRun SCXW84153380 BCX0" data-ccp-parastyle="heading 2"> </span><span class="NormalTextRun SCXW84153380 BCX0" data-ccp-parastyle="heading 2">\#</span><span class="NormalTextRun ContextualSpellingAndGrammarErrorV2Themed SCXW84153380 BCX0" data-ccp-parastyle="heading 2">create</span><span class="NormalTextRun SCXW84153380 BCX0" data-ccp-parastyle="heading 2"> filter to match traffic (this filter will catch all syslog messages that come from the MX</span></span><span class="EOP SCXW84153380 BCX0" data-ccp-props="{"134245418":true,"134245529":true,"335559738":160,"335559739":80}"> </span>

<span style="color: rgb(0, 0, 0);">**<span class="TextRun SCXW84153380 BCX0" data-contrast="none" lang="EN-US" xml:lang="EN-US"><span class="NormalTextRun SCXW84153380 BCX0" data-ccp-parastyle="heading 2">filter </span><span class="NormalTextRun SpellingErrorV2Themed SCXW84153380 BCX0" data-ccp-parastyle="heading 2">f\_meraki</span> <span class="NormalTextRun ContextualSpellingAndGrammarErrorV2Themed SCXW84153380 BCX0" data-ccp-parastyle="heading 2">{ host</span><span class="NormalTextRun ContextualSpellingAndGrammarErrorV2Themed SCXW84153380 BCX0" data-ccp-parastyle="heading 2">( "</span><span class="NormalTextRun SCXW84153380 BCX0" data-ccp-parastyle="heading 2">192.168.10.1</span><span class="NormalTextRun ContextualSpellingAndGrammarErrorV2Themed SCXW84153380 BCX0" data-ccp-parastyle="heading 2">" )</span><span class="NormalTextRun SCXW84153380 BCX0" data-ccp-parastyle="heading 2">; };</span></span><span class="EOP SCXW84153380 BCX0" data-ccp-props="{"134245418":true,"134245529":true,"335559738":160,"335559739":80}"> </span>**</span>

<span class="TextRun SCXW84153380 BCX0" data-contrast="none" lang="EN-US" xml:lang="EN-US"><span class="NormalTextRun SCXW84153380 BCX0" data-ccp-parastyle="heading 2">\#define a destination for the syslog messages</span></span><span class="EOP SCXW84153380 BCX0" data-ccp-props="{"134245418":true,"134245529":true,"335559738":160,"335559739":80}"> </span>

<span style="color: rgb(0, 0, 0);">**<span class="TextRun SCXW84153380 BCX0" data-contrast="none" lang="EN-US" xml:lang="EN-US"><span class="NormalTextRun SCXW84153380 BCX0" data-ccp-parastyle="heading 2">destination </span><span class="NormalTextRun SpellingErrorV2Themed SCXW84153380 BCX0" data-ccp-parastyle="heading 2">df\_meraki</span> <span class="NormalTextRun ContextualSpellingAndGrammarErrorV2Themed SCXW84153380 BCX0" data-ccp-parastyle="heading 2">{ file</span><span class="NormalTextRun SCXW84153380 BCX0" data-ccp-parastyle="heading 2">("/var/log/meraki.log")</span><span class="NormalTextRun ContextualSpellingAndGrammarErrorV2Themed SCXW84153380 BCX0" data-ccp-parastyle="heading 2">; }</span><span class="NormalTextRun SCXW84153380 BCX0" data-ccp-parastyle="heading 2">;</span></span><span class="EOP SCXW84153380 BCX0" data-ccp-props="{"134245418":true,"134245529":true,"335559738":160,"335559739":80}"> </span>**</span>

<span class="TextRun SCXW84153380 BCX0" data-contrast="none" lang="EN-US" xml:lang="EN-US"><span class="NormalTextRun SCXW84153380 BCX0" data-ccp-parastyle="heading 2">\#</span><span class="NormalTextRun ContextualSpellingAndGrammarErrorV2Themed SCXW84153380 BCX0" data-ccp-parastyle="heading 2">bundle</span><span class="NormalTextRun SCXW84153380 BCX0" data-ccp-parastyle="heading 2"> the source, filter, and destination rules together with a logging rul</span><span class="NormalTextRun SCXW84153380 BCX0" data-ccp-parastyle="heading 2">e</span></span><span class="EOP SCXW84153380 BCX0" data-ccp-props="{"134245418":true,"134245529":true,"335559738":160,"335559739":80}"> </span>

<span style="color: rgb(0, 0, 0);">**<span class="TextRun SCXW84153380 BCX0" data-contrast="none" lang="EN-US" xml:lang="EN-US"><span class="NormalTextRun SCXW84153380 BCX0" data-ccp-parastyle="heading 2">log </span><span class="NormalTextRun ContextualSpellingAndGrammarErrorV2Themed SCXW84153380 BCX0" data-ccp-parastyle="heading 2">{ source</span><span class="NormalTextRun SCXW84153380 BCX0" data-ccp-parastyle="heading 2"> ( </span><span class="NormalTextRun SpellingErrorV2Themed SCXW84153380 BCX0" data-ccp-parastyle="heading 2">s\_net</span><span class="NormalTextRun SCXW84153380 BCX0" data-ccp-parastyle="heading 2"> ); filter( </span><span class="NormalTextRun SpellingErrorV2Themed SCXW84153380 BCX0" data-ccp-parastyle="heading 2">f\_meraki</span><span class="NormalTextRun SCXW84153380 BCX0" data-ccp-parastyle="heading 2"> ); destination ( </span><span class="NormalTextRun SpellingErrorV2Themed SCXW84153380 BCX0" data-ccp-parastyle="heading 2">df\_meraki</span><span class="NormalTextRun SCXW84153380 BCX0" data-ccp-parastyle="heading 2"> ); };</span></span>** <span class="TextRun SCXW84153380 BCX0" data-contrast="none" lang="EN-US" xml:lang="EN-US"><span class="NormalTextRun SCXW84153380 BCX0" data-ccp-parastyle="heading 2"> </span></span><span class="EOP SCXW84153380 BCX0" data-ccp-props="{"134245418":true,"134245529":true,"335559738":160,"335559739":80}"> </span></span>

##### **<span style="color: rgb(53, 152, 219);"><span class="TextRun SCXW84153380 BCX0" data-contrast="none" lang="EN-US" xml:lang="EN-US"><span class="NormalTextRun SCXW84153380 BCX0" data-ccp-parastyle="heading 2">Step 3: Restart the syslog-ng process:</span></span><span class="EOP SCXW84153380 BCX0" data-ccp-props="{"134245418":true,"134245529":true,"335559738":160,"335559739":80}"> </span></span>**

<span class="TextRun SCXW84153380 BCX0" data-contrast="none" lang="EN-US" xml:lang="EN-US"><span class="NormalTextRun SpellingErrorV2Themed SCXW84153380 BCX0" data-ccp-parastyle="heading 2">sysadmin@ubuntu</span><span class="NormalTextRun SCXW84153380 BCX0" data-ccp-parastyle="heading 2">:~$ </span><span style="color: rgb(0, 0, 0);">**<span class="NormalTextRun SpellingErrorV2Themed SCXW84153380 BCX0" data-ccp-parastyle="heading 2">sudo</span><span class="NormalTextRun SCXW84153380 BCX0" data-ccp-parastyle="heading 2"> /</span><span class="NormalTextRun SpellingErrorV2Themed SCXW84153380 BCX0" data-ccp-parastyle="heading 2">etc</span><span class="NormalTextRun SCXW84153380 BCX0" data-ccp-parastyle="heading 2">/</span><span class="NormalTextRun SpellingErrorV2Themed SCXW84153380 BCX0" data-ccp-parastyle="heading 2">init.d</span><span class="NormalTextRun SCXW84153380 BCX0" data-ccp-parastyle="heading 2">/syslog-ng restart</span>**</span></span>**<span class="EOP SCXW84153380 BCX0" data-ccp-props="{"134245418":true,"134245529":true,"335559738":160,"335559739":80}"> </span>**

*<span class="EOP SCXW84153380 BCX0" data-ccp-props="{"134245418":true,"134245529":true,"335559738":160,"335559739":80}">Source: [https://documentation.meraki.com/General\_Administration/Monitoring\_and\_Reporting/Syslog\_Server\_Overview\_and\_Configuration#Configuring\_a\_Syslog\_Server](https://documentation.meraki.com/General_Administration/Monitoring_and_Reporting/Syslog_Server_Overview_and_Configuration#Configuring_a_Syslog_Server)</span>*

#### <span style="color: rgb(53, 152, 219);">**<span class="TextRun SCXW71272603 BCX0" data-contrast="none" lang="EN-US" xml:lang="EN-US"><span class="NormalTextRun SCXW71272603 BCX0">Cisco Meraki - Configuring a Syslog Server Integration Procedures </span></span><span class="EOP SCXW71272603 BCX0" data-ccp-props="{}"> </span>**</span>

##### <span class="TextRun SCXW71272603 BCX0" data-contrast="auto" lang="EN-US" xml:lang="EN-US"><span class="NormalTextRun SCXW71272603 BCX0">Please provide the following information to </span><span class="NormalTextRun SpellingErrorV2Themed SCXW71272603 BCX0">CyTech</span><span class="NormalTextRun SCXW71272603 BCX0">: </span></span><span class="EOP SCXW71272603 BCX0" data-ccp-props="{}"> </span>

<span class="TextRun SCXW71272603 BCX0" data-contrast="auto" lang="EN-US" xml:lang="EN-US"><span class="NormalTextRun SCXW71272603 BCX0"><span data-teams="true">Requirements:Collect logs via syslog over UDP or TCP</span></span></span>

<span class="TextRun SCXW71272603 BCX0" data-contrast="auto" lang="EN-US" xml:lang="EN-US"><span class="NormalTextRun SCXW71272603 BCX0"><span data-teams="true">  
 \*Listen Address-&gt; Syslog Collector IP address where the Elastic-Agent is installed  
 \*Listen Port-&gt; Port Number (Please identify if TCP or UDP)</span> </span></span><span class="EOP SCXW71272603 BCX0" data-ccp-props="{}"> </span>

<span class="TextRun SCXW71272603 BCX0" data-contrast="auto" lang="EN-US" xml:lang="EN-US"><span class="NormalTextRun SCXW71272603 BCX0">If you need further </span><span class="NormalTextRun SCXW71272603 BCX0">assistance</span><span class="NormalTextRun SCXW71272603 BCX0">, kindly contact our support at </span></span><span style="color: rgb(53, 152, 219);">**<span class="TextRun SCXW71272603 BCX0" data-contrast="none" lang="EN-US" xml:lang="EN-US"><span class="NormalTextRun SCXW71272603 BCX0">support@cytechint.com</span></span>**</span><span class="TextRun SCXW71272603 BCX0" data-contrast="auto" lang="EN-US" xml:lang="EN-US"><span class="NormalTextRun SCXW71272603 BCX0"> for prompt </span><span class="NormalTextRun SCXW71272603 BCX0">assistance</span><span class="NormalTextRun SCXW71272603 BCX0"> and guidance.</span></span><span class="EOP SCXW71272603 BCX0" data-ccp-props="{}"> </span>

# CISCO Meraki Integrations

##### <span style="color: rgb(53, 152, 219);">**<span class="TextRun SCXW169125846 BCX8" data-contrast="none" lang="EN-US" xml:lang="EN-US"><span class="NormalTextRun SCXW169125846 BCX8" data-ccp-charstyle="Style (Complex) Open Sans" data-ccp-charstyle-defn="{"ObjectId":"e65f3e43-8c5d-42f7-8056-89456a882943|250","ClassId":1073872969,"Properties":[201342446,"1",201342447,"5",201342448,"1",201342449,"1",469777841,"Open Sans",469777842,"Open Sans",469777843,"Calibri",469777844,"Open Sans",201341986,"1",469769226,"Open Sans",268442635,"22",335559704,"1037",335559705,"1033",335551547,"1033",335559740,"259",201341983,"0",335559739,"160",469775450,"Style (Complex) Open Sans",201340122,"1",134233614,"true",469778129,"StyleComplexOpenSans",335572020,"1",469778324,"Default Paragraph Font"]}">Introduction</span></span>**<span class="EOP SCXW169125846 BCX8" data-ccp-props="{"134245418":true,"134245529":true,"201341983":0,"335559738":240,"335559739":0,"335559740":360}"> </span></span>

<span class="TextRun SCXW169125846 BCX8" data-contrast="auto" lang="EN-US" xml:lang="EN-US"><span class="NormalTextRun SCXW169125846 BCX8" data-ccp-charstyle="Style (Complex) Open Sans">Cisco Meraki offers a centralized cloud management platform for all Meraki devices such as MX Security Appliances, MR Access Points and so on. Its out-of-band cloud architecture creates secure, scalable, and easy-to-deploy networks that can be managed from anywhere. This can be done from almost any device using web-based Meraki Dashboard and Meraki Mobile App. Each Meraki network generates its own events.</span></span><span class="EOP SCXW169125846 BCX8" data-ccp-props="{"201341983":0,"335559685":360,"335559739":160,"335559740":259}"> </span>

<div class="SCXW169125846 BCX8" id="bkmrk-"><div class="ListContainerWrapper SCXW169125846 BCX8">  
</div></div>##### <span style="color: rgb(53, 152, 219);">**<span class="TextRun Highlight SCXW169125846 BCX8" data-contrast="none" lang="EN-US" xml:lang="EN-US"><span class="NormalTextRun SCXW169125846 BCX8" data-ccp-charstyle="normaltextrun" data-ccp-charstyle-defn="{"ObjectId":"cc0e3c79-f6ca-4f61-baf4-2c0e825cc522|21","ClassId":1073872969,"Properties":[201342446,"1",201342447,"5",201342448,"1",201342449,"1",469777841,"Calibri",469777842,"Arial",469777843,"Calibri",469777844,"Calibri",201341986,"1",469769226,"Calibri,Arial",268442635,"22",335559704,"1037",335559705,"1033",335551547,"1033",335559740,"259",201341983,"0",335559739,"160",469775450,"normaltextrun",201340122,"1",134233614,"true",469778129,"normaltextrun",335572020,"1",469778324,"Default Paragraph Font"]}">Assumptions</span></span><span class="EOP SCXW169125846 BCX8" data-ccp-props="{"134245418":true,"134245529":true,"201341983":0,"335559738":240,"335559739":0,"335559740":360}"> </span>**</span>

<span class="TextRun Highlight SCXW169125846 BCX8" data-contrast="auto" lang="EN-US" xml:lang="EN-US"><span class="NormalTextRun SCXW169125846 BCX8" data-ccp-charstyle="eop" data-ccp-charstyle-defn="{"ObjectId":"cc0e3c79-f6ca-4f61-baf4-2c0e825cc522|22","ClassId":1073872969,"Properties":[201342446,"1",201342447,"5",201342448,"1",201342449,"1",469777841,"Calibri",469777842,"Arial",469777843,"Calibri",469777844,"Calibri",201341986,"1",469769226,"Calibri,Arial",268442635,"22",335559704,"1037",335559705,"1033",335551547,"1033",335559740,"259",201341983,"0",335559739,"160",469775450,"eop",201340122,"1",134233614,"true",469778129,"eop",335572020,"1",469778324,"Default Paragraph Font"]}">The procedures described in Section 3 </span><span class="NormalTextRun ContextualSpellingAndGrammarErrorV2Themed SCXW169125846 BCX8" data-ccp-charstyle="eop">assumes</span><span class="NormalTextRun SCXW169125846 BCX8" data-ccp-charstyle="eop"> that a Log Collector has already been </span><span class="NormalTextRun ContextualSpellingAndGrammarErrorV2Themed SCXW169125846 BCX8" data-ccp-charstyle="eop">setup</span><span class="NormalTextRun SCXW169125846 BCX8" data-ccp-charstyle="eop">. </span></span><span class="EOP SCXW169125846 BCX8" data-ccp-props="{"201341983":0,"335559685":360,"335559739":160,"335559740":259}"> </span>

##### <span style="color: rgb(53, 152, 219);">**<span class="TextRun Highlight SCXW169125846 BCX8" data-contrast="none" lang="EN-US" xml:lang="EN-US"><span class="NormalTextRun SCXW169125846 BCX8" data-ccp-charstyle="eop">Compatibility</span></span><span class="EOP SCXW169125846 BCX8" data-ccp-props="{"134245418":true,"134245529":true,"201341983":0,"335559738":240,"335559739":0,"335559740":360}"> </span>**</span>

<span class="TextRun Highlight SCXW169125846 BCX8" data-contrast="auto" lang="EN-US" xml:lang="EN-US"><span class="NormalTextRun SCXW169125846 BCX8" data-ccp-charstyle="eop">A syslog server can be configured to store messages for reporting purposes from MX Security Appliances, MR Access Points, and MS switches. This package collects events from the configured syslog server. The integration supports collection of events from "MX Security Appliances" and "MR Access Points". The "MS Switch" events are not recognized.</span></span><span class="EOP SCXW169125846 BCX8" data-ccp-props="{"201341983":0,"335559685":1440,"335559739":160,"335559740":259}"> </span>

<div class="SCXW169125846 BCX8" id="bkmrk--1"><div class="OutlineElement Ltr SCXW169125846 BCX8">  
</div><div class="ListContainerWrapper SCXW169125846 BCX8">  
</div></div>##### <span style="color: rgb(53, 152, 219);">**<span class="TextRun Highlight SCXW169125846 BCX8" data-contrast="none" lang="EN-US" xml:lang="EN-US"><span class="NormalTextRun SCXW169125846 BCX8" data-ccp-charstyle="eop">Requirements</span></span><span class="EOP SCXW169125846 BCX8" data-ccp-props="{"134245418":true,"134245529":true,"201341983":0,"335559738":240,"335559739":0,"335559740":360}"> </span>**</span>

**<span class="TextRun Highlight SCXW169125846 BCX8" data-contrast="auto" lang="EN-US" xml:lang="EN-US"><span class="NormalTextRun SCXW169125846 BCX8" data-ccp-charstyle="eop">Cisco Meraki Dashboard Configuration</span></span><span class="EOP SCXW169125846 BCX8" data-ccp-props="{"201341983":0,"335559739":160,"335559740":259}"> </span>**

<span style="color: rgb(53, 152, 219);">**<span class="TextRun Highlight SCXW169125846 BCX8" data-contrast="auto" lang="EN-US" xml:lang="EN-US"><span class="NormalTextRun SCXW169125846 BCX8" data-ccp-charstyle="eop">SYSLOG</span></span><span class="EOP SCXW169125846 BCX8" data-ccp-props="{"201341983":0,"335559685":720,"335559739":160,"335559740":259}"> </span>**</span>

<span class="TextRun Highlight SCXW169125846 BCX8" data-contrast="auto" lang="EN-US" xml:lang="EN-US"><span class="NormalTextRun SCXW169125846 BCX8" data-ccp-charstyle="eop">Cisco Meraki dashboard can be used to configure one or more syslog servers and Meraki message types to be sent to the syslog servers. Refer to Syslog Server Overview and Configuration page for more information on how to configure syslog server on Cisco Meraki.</span></span><span class="EOP SCXW169125846 BCX8" data-ccp-props="{"201341983":0,"335559685":720,"335559739":160,"335559740":259}"> </span>

<span style="color: rgb(53, 152, 219);">**<span class="TextRun Highlight SCXW169125846 BCX8" data-contrast="auto" lang="EN-US" xml:lang="EN-US"><span class="NormalTextRun SCXW169125846 BCX8" data-ccp-charstyle="eop">API ENDPOINT (WEBHOOKS)</span></span><span class="EOP SCXW169125846 BCX8" data-ccp-props="{"201341983":0,"335559685":720,"335559739":160,"335559740":259}"> </span>**</span>

<span class="TextRun Highlight SCXW169125846 BCX8" data-contrast="auto" lang="EN-US" xml:lang="EN-US"><span class="NormalTextRun SCXW169125846 BCX8" data-ccp-charstyle="eop">Cisco Meraki dashboard can be used to configure Meraki webhooks. Refer to the Webhooks Dashboard Setup section.</span></span><span class="EOP SCXW169125846 BCX8" data-ccp-props="{"201341983":0,"335559685":720,"335559739":160,"335559740":259}"> </span>

**<span class="TextRun Highlight SCXW169125846 BCX8" data-contrast="auto" lang="EN-US" xml:lang="EN-US"><span class="NormalTextRun SCXW169125846 BCX8" data-ccp-charstyle="eop">Configure the Cisco Meraki </span><span class="NormalTextRun SCXW169125846 BCX8" data-ccp-charstyle="eop">integration</span></span><span class="EOP SCXW169125846 BCX8" data-ccp-props="{"201341983":0,"335559685":720,"335559739":160,"335559740":259}"> </span>**

<span style="color: rgb(53, 152, 219);">**<span class="TextRun Highlight SCXW169125846 BCX8" data-contrast="auto" lang="EN-US" xml:lang="EN-US"><span class="NormalTextRun SCXW169125846 BCX8" data-ccp-charstyle="eop">SYSLOG</span></span><span class="EOP SCXW169125846 BCX8" data-ccp-props="{"201341983":0,"335559685":720,"335559739":160,"335559740":259}"> </span>**</span>

<span class="TextRun Highlight SCXW169125846 BCX8" data-contrast="auto" lang="EN-US" xml:lang="EN-US"><span class="NormalTextRun SCXW169125846 BCX8" data-ccp-charstyle="eop">Depending on the syslog server setup in your environment check one/more of the following options "Collect syslog from Cisco Meraki via UDP", "Collect syslog from Cisco Meraki via TCP", "Collect syslog from Cisco Meraki via file".</span></span><span class="EOP SCXW169125846 BCX8" data-ccp-props="{"201341983":0,"335559685":720,"335559739":160,"335559740":259}"> </span>

<span class="TextRun Highlight SCXW169125846 BCX8" data-contrast="auto" lang="EN-US" xml:lang="EN-US"><span class="NormalTextRun SCXW169125846 BCX8" data-ccp-charstyle="eop">Enter the values for syslog host and port OR file path based on the chosen configuration options.</span></span><span class="EOP SCXW169125846 BCX8" data-ccp-props="{"201341983":0,"335559685":720,"335559739":160,"335559740":259}"> </span>

<span style="color: rgb(53, 152, 219);">**<span class="TextRun Highlight SCXW169125846 BCX8" data-contrast="auto" lang="EN-US" xml:lang="EN-US"><span class="NormalTextRun SCXW169125846 BCX8" data-ccp-charstyle="eop">API Endpoint (Webhooks)</span></span><span class="EOP SCXW169125846 BCX8" data-ccp-props="{"201341983":0,"335559685":720,"335559739":160,"335559740":259}"> </span>**</span>

<span class="TextRun Highlight SCXW169125846 BCX8" data-contrast="auto" lang="EN-US" xml:lang="EN-US"><span class="NormalTextRun SCXW169125846 BCX8" data-ccp-charstyle="eop">Check the option "Collect events from Cisco Meraki via Webhooks" option.</span></span><span class="EOP SCXW169125846 BCX8" data-ccp-props="{"201341983":0,"335559685":720,"335559739":160,"335559740":259}"> </span>

<div class="SCXW169125846 BCX8" id="bkmrk-enter-values-for-%22li"><div class="ListContainerWrapper SCXW169125846 BCX8">1. <span class="TextRun Highlight SCXW169125846 BCX8" data-contrast="auto" lang="EN-US" xml:lang="EN-US"><span class="NormalTextRun SCXW169125846 BCX8" data-ccp-charstyle="eop">Enter values for "Listen Address", "Listen Port" and "Webhook path" to form the endpoint URL. Make note of the Endpoint URL https://{AGENT\_ADDRESS}:514/meraki/events.</span></span><span class="EOP SCXW169125846 BCX8" data-ccp-props="{"201341983":0,"335559739":160,"335559740":259}"> </span>

</div><div class="ListContainerWrapper SCXW169125846 BCX8">2. <span class="TextRun Highlight SCXW169125846 BCX8" data-contrast="auto" lang="EN-US" xml:lang="EN-US"><span class="NormalTextRun SCXW169125846 BCX8" data-ccp-charstyle="eop">Enter value for "Secret value". This must match the "Shared Secret" value entered when configuring the webhook from Meraki cloud.</span></span><span class="EOP SCXW169125846 BCX8" data-ccp-props="{"201341983":0,"335559739":160,"335559740":259}"> </span>

</div><div class="ListContainerWrapper SCXW169125846 BCX8">3. <span class="TextRun Highlight SCXW169125846 BCX8" data-contrast="auto" lang="EN-US" xml:lang="EN-US"><span class="NormalTextRun SCXW169125846 BCX8" data-ccp-charstyle="eop">Enter values for "TLS". Cisco Meraki requires that the webhook accept requests over HTTPS. </span><span class="NormalTextRun ContextualSpellingAndGrammarErrorV2Themed SCXW169125846 BCX8" data-ccp-charstyle="eop">So</span><span class="NormalTextRun SCXW169125846 BCX8" data-ccp-charstyle="eop"> you must either configure the integration with a valid TLS certificate or use a reverse proxy in front of the integration.</span></span><span class="EOP SCXW169125846 BCX8" data-ccp-props="{"201341983":0,"335559739":160,"335559740":259}"> </span>

</div><div class="OutlineElement Ltr SCXW169125846 BCX8">  
</div></div>##### <span style="color: rgb(53, 152, 219);">**<span class="TextRun Highlight SCXW169125846 BCX8" data-contrast="auto" lang="EN-US" xml:lang="EN-US"><span class="NormalTextRun SCXW169125846 BCX8" data-ccp-charstyle="eop">Log Events</span></span><span class="EOP SCXW169125846 BCX8" data-ccp-props="{"201341983":0,"335559685":720,"335559739":160,"335559740":259}"> </span>**</span>

<span class="TextRun Highlight SCXW169125846 BCX8" data-contrast="auto" lang="EN-US" xml:lang="EN-US"><span class="NormalTextRun SCXW169125846 BCX8" data-ccp-charstyle="eop">Enable to collect Cisco Meraki log events for all the applications configured for the chosen log stream.</span></span><span class="EOP SCXW169125846 BCX8" data-ccp-props="{"201341983":0,"335559685":720,"335559739":160,"335559740":259}"> </span>

**<span class="TextRun Highlight SCXW169125846 BCX8" data-contrast="auto" lang="EN-US" xml:lang="EN-US"><span class="NormalTextRun SCXW169125846 BCX8" data-ccp-charstyle="eop">Logs</span></span><span class="EOP SCXW169125846 BCX8" data-ccp-props="{"201341983":0,"335559685":720,"335559739":160,"335559740":259}"> </span>**

**<span class="TextRun Highlight SCXW169125846 BCX8" data-contrast="auto" lang="EN-US" xml:lang="EN-US"><span class="NormalTextRun SCXW169125846 BCX8" data-ccp-charstyle="eop">Syslog</span></span><span class="EOP SCXW169125846 BCX8" data-ccp-props="{"201341983":0,"335559685":720,"335559739":160,"335559740":259}"> </span>**

<span class="TextRun Highlight SCXW169125846 BCX8" data-contrast="auto" lang="EN-US" xml:lang="EN-US"><span class="NormalTextRun SCXW169125846 BCX8" data-ccp-charstyle="eop">The cisco\_meraki.log dataset provides events from the configured syslog server. All Cisco Meraki syslog specific fields are available in the cisco\_meraki.log field group.</span></span><span class="EOP SCXW169125846 BCX8" data-ccp-props="{"201341983":0,"335559685":720,"335559739":160,"335559740":259}"> </span>

**<span class="TextRun Highlight SCXW169125846 BCX8" data-contrast="auto" lang="EN-US" xml:lang="EN-US"><span class="NormalTextRun SCXW169125846 BCX8" data-ccp-charstyle="eop">API Endpoint (Webhooks)</span></span><span class="EOP SCXW169125846 BCX8" data-ccp-props="{"201341983":0,"335559685":720,"335559739":160,"335559740":259}"> </span>**

<span class="EOP SCXW169125846 BCX8" data-ccp-props="{"201341983":0,"335559685":720,"335559739":160,"335559740":259}"> </span>

##### <span style="color: rgb(53, 152, 219);">**<span class="TextRun SCXW169125846 BCX8" data-contrast="none" lang="EN-US" xml:lang="EN-US"><span class="NormalTextRun SCXW169125846 BCX8" data-ccp-charstyle="eop">Cisco Meraki</span><span class="NormalTextRun SCXW169125846 BCX8" data-ccp-charstyle="eop"> Integration Procedures</span></span><span class="EOP SCXW169125846 BCX8" data-ccp-props="{"134245418":true,"134245529":true,"201341983":0,"335559738":240,"335559739":0,"335559740":360}"> </span>**</span>

<span class="TextRun SCXW169125846 BCX8" data-contrast="auto" lang="EN-US" xml:lang="EN-US"><span class="NormalTextRun SCXW169125846 BCX8" data-ccp-charstyle="eop">Please provide the following information to </span><span class="NormalTextRun SpellingErrorV2Themed SCXW169125846 BCX8" data-ccp-charstyle="eop">CyTech</span><span class="NormalTextRun SCXW169125846 BCX8" data-ccp-charstyle="eop">:</span></span><span class="EOP SCXW169125846 BCX8" data-ccp-props="{"201341983":0,"335559685":720,"335559739":160,"335559740":259}"> </span>

<div class="SCXW169125846 BCX8" id="bkmrk-collect-syslog-from-"><div class="ListContainerWrapper SCXW169125846 BCX8">1. <span class="TextRun SCXW169125846 BCX8" data-contrast="none" lang="EN-US" xml:lang="EN-US"><span class="NormalTextRun SCXW169125846 BCX8" data-ccp-charstyle="eop">Collect syslog from Cisco Meraki via UDP</span></span><span class="EOP SCXW169125846 BCX8" data-ccp-props="{"134245418":true,"134245529":true,"201341983":0,"335559738":240,"335559739":0,"335559740":360}"> </span>

</div><div class="ListContainerWrapper SCXW169125846 BCX8">- <span class="TextRun SCXW169125846 BCX8" data-contrast="auto" lang="EN-US" xml:lang="EN-US"><span class="NormalTextRun SCXW169125846 BCX8" data-ccp-charstyle="eop">Listen Address</span><span class="NormalTextRun SCXW169125846 BCX8" data-ccp-charstyle="eop"> - </span><span class="NormalTextRun SCXW169125846 BCX8" data-ccp-charstyle="eop">The bind address to listen for UDP connections. Set to 0.0.0.0 to bind to all available interfaces.</span></span><span class="EOP SCXW169125846 BCX8" data-ccp-props="{"201341983":0,"335559739":160,"335559740":259}"> </span>

</div><div class="ListContainerWrapper SCXW169125846 BCX8">- <span class="TextRun SCXW169125846 BCX8" data-contrast="auto" lang="EN-US" xml:lang="EN-US"><span class="NormalTextRun SCXW169125846 BCX8" data-ccp-charstyle="eop">Listen Port</span><span class="NormalTextRun SCXW169125846 BCX8" data-ccp-charstyle="eop"> - </span><span class="NormalTextRun SCXW169125846 BCX8" data-ccp-charstyle="eop">The UDP port number to listen on.</span></span><span class="EOP SCXW169125846 BCX8" data-ccp-props="{"201341983":0,"335559739":160,"335559740":259}"> </span>

</div></div><div class="SCXW169125846 BCX8" id="bkmrk-collect-syslog-from--1"><div class="ListContainerWrapper SCXW169125846 BCX8">2. <span class="TextRun SCXW169125846 BCX8" data-contrast="none" lang="EN-US" xml:lang="EN-US"><span class="NormalTextRun SCXW169125846 BCX8" data-ccp-charstyle="eop">Collect syslog from Cisco Meraki via </span><span class="NormalTextRun SCXW169125846 BCX8" data-ccp-charstyle="eop">TCP</span></span><span class="EOP SCXW169125846 BCX8" data-ccp-props="{"134245418":true,"134245529":true,"201341983":0,"335559738":240,"335559739":0,"335559740":360}"> </span>

</div><div class="ListContainerWrapper SCXW169125846 BCX8">- <span class="TextRun SCXW169125846 BCX8" data-contrast="auto" lang="EN-US" xml:lang="EN-US"><span class="NormalTextRun SCXW169125846 BCX8" data-ccp-charstyle="eop">Listen Address</span><span class="NormalTextRun SCXW169125846 BCX8" data-ccp-charstyle="eop"> - </span><span class="NormalTextRun SCXW169125846 BCX8" data-ccp-charstyle="eop">The bind address to listen for TCP connections. Set to 0.0.0.0 to bind to all available interfaces.</span></span><span class="EOP SCXW169125846 BCX8" data-ccp-props="{"201341983":0,"335559739":160,"335559740":259}"> </span>

</div><div class="ListContainerWrapper SCXW169125846 BCX8">- <span class="TextRun SCXW169125846 BCX8" data-contrast="auto" lang="EN-US" xml:lang="EN-US"><span class="NormalTextRun SCXW169125846 BCX8" data-ccp-charstyle="eop">Listen Port</span><span class="NormalTextRun SCXW169125846 BCX8" data-ccp-charstyle="eop"> - </span><span class="NormalTextRun SCXW169125846 BCX8" data-ccp-charstyle="eop">The UDP port number to listen on.</span></span><span class="EOP SCXW169125846 BCX8" data-ccp-props="{"201341983":0,"335559739":160,"335559740":259}"> </span>

</div></div><div class="SCXW169125846 BCX8" id="bkmrk-collect-syslog-from--2"><div class="ListContainerWrapper SCXW169125846 BCX8">3. <span class="TextRun SCXW169125846 BCX8" data-contrast="none" lang="EN-US" xml:lang="EN-US"><span class="NormalTextRun SCXW169125846 BCX8" data-ccp-charstyle="eop">Collect syslog from Cisco Meraki via </span><span class="NormalTextRun SCXW169125846 BCX8" data-ccp-charstyle="eop">file</span></span><span class="EOP SCXW169125846 BCX8" data-ccp-props="{"134245418":true,"134245529":true,"201341983":0,"335559738":240,"335559739":0,"335559740":360}"> </span>

</div><div class="ListContainerWrapper SCXW169125846 BCX8">- <span class="TextRun SCXW169125846 BCX8" data-contrast="auto" lang="EN-US" xml:lang="EN-US"><span class="NormalTextRun SCXW169125846 BCX8" data-ccp-charstyle="eop">Paths</span></span><span class="EOP SCXW169125846 BCX8" data-ccp-props="{"201341983":0,"335559739":160,"335559740":259}"> </span>

</div></div><div class="SCXW169125846 BCX8" id="bkmrk-collect-syslog-from--3"><div class="ListContainerWrapper SCXW169125846 BCX8">4. <span class="TextRun SCXW169125846 BCX8" data-contrast="none" lang="EN-US" xml:lang="EN-US"><span class="NormalTextRun SCXW169125846 BCX8" data-ccp-charstyle="eop">Collect syslog from Cisco Meraki via </span><span class="NormalTextRun SCXW169125846 BCX8" data-ccp-charstyle="eop">Webhooks</span></span><span class="EOP SCXW169125846 BCX8" data-ccp-props="{"134245418":true,"134245529":true,"201341983":0,"335559738":240,"335559739":0,"335559740":360}"> </span>

</div><div class="ListContainerWrapper SCXW169125846 BCX8">- <span class="TextRun SCXW169125846 BCX8" data-contrast="auto" lang="EN-US" xml:lang="EN-US"><span class="NormalTextRun SCXW169125846 BCX8" data-ccp-charstyle="eop">Listen Address</span><span class="NormalTextRun SCXW169125846 BCX8" data-ccp-charstyle="eop"> - </span><span class="NormalTextRun SCXW169125846 BCX8" data-ccp-charstyle="eop">Bind address for the listener. Use 0.0.0.0 to listen on all interfaces.</span></span><span class="EOP SCXW169125846 BCX8" data-ccp-props="{"201341983":0,"335559739":160,"335559740":259}"> </span>

</div><div class="ListContainerWrapper SCXW169125846 BCX8">- <span class="TextRun SCXW169125846 BCX8" data-contrast="auto" lang="EN-US" xml:lang="EN-US"><span class="NormalTextRun SCXW169125846 BCX8" data-ccp-charstyle="eop">Listen Port</span></span><span class="EOP SCXW169125846 BCX8" data-ccp-props="{"201341983":0,"335559739":160,"335559740":259}"> </span>

</div></div><div class="ListContainerWrapper SCXW169125846 BCX8" id="bkmrk-secret-value">- <span class="TextRun SCXW169125846 BCX8" data-contrast="auto" lang="EN-US" xml:lang="EN-US"><span class="NormalTextRun SCXW169125846 BCX8" data-ccp-charstyle="eop">Secret Value</span></span>

</div>

# Cisco Meraki via Syslog

1. **Login to Cisco Meraki Dashboard**: 
    - Go to the **Meraki Dashboard** and log in with your credentials.
2. **Navigate to Alerts &amp; Administration**: 
    - Go to **Network-wide** → **Alerts &amp; Administration**.
3. **Set up Syslog Server**: 
    - Under the **Alert recipients** section, select **Syslog** as the alert recipient.
    - Add the IP address and port of the Syslog server where the alerts should be sent. 
        - Example Syslog Server IP: `10.0.0.1` (Replace this with your server IP)
        - Example Port: `514` (Standard Syslog port)
4. **Enable Relevant Alerts**: 
    - Enable the types of alerts you want Meraki to send, such as security events, device status, and network performance issues.

**Guide Links**:  
[Meraki Device Reporting - Syslog, SNMP, and API - Cisco Meraki Documentation](https://documentation.meraki.com/General_Administration/Monitoring_and_Reporting/Meraki_Device_Reporting_-_Syslog%2C_SNMP%2C_and_API)

# CISCO Nexus Integrations

#### **Overview**

The Cisco Nexus integration allows users to monitor Errors and System Messages. The Cisco Nexus series switches are modular and fixed port network switches designed for the data center. All switches in the Nexus range run the modular NX-OS firmware/operating system on the fabric. NX-OS has some high-availability features compared to the well-known Cisco IOS. This platform is optimized for high-density 10 Gigabit Ethernet.

Use the Cisco Nexus integration to collect and parse data from Syslog and log files. Then visualize that data through search, correlation and visualization within Elastic Security.

---

#### **Data streams**

The Cisco Nexus integration collects one type of data: log.

**Log** consists of errors and system messages. See more details about errors and system messages

---

#### **Requirements**

Elastic Agent must be installed.

The minimum **kibana.version** required is **8.7.0**.

This module has been tested against the **Cisco Nexus Series 9000, 3172T and 3048 Switches**.

---

#### **Setup**

##### **To collect data from Cisco Nexus, follow the below steps:**

##### **Logging System Messages to a File**

<section class="body taskbody" id="bkmrk-you-can-configure-th"><section class="section context" id="bkmrk-you-can-configure-th-1">You can configure the device to log system messages to a file. By default, system messages are logged to the file /logflash/log/<var>logfilename</var> .

</section><div class="tableContainer"><table class="ol steps detailed_steps" style="width: 100%;"><thead><tr><th align="left" style="width: 8.93382%;"> </th><th align="left" style="width: 43.3904%;">Command or Action</th><th align="left" style="width: 47.6758%;">Purpose</th></tr></thead><tbody><tr class="li step"><td align="left" id="bkmrk-step%C2%A01" style="width: 8.93382%;" valign="top">**Step 1**

</td><td align="left" class="step--command" style="width: 43.3904%;" valign="top"><span class="keyword kwd">configure terminal</span>

<section class="itemgroup stepxmp"><section class="tasklabel">#### Example:

</section>```
switch# configure terminal
switch(config)#

```

</section></td><td align="left" class="step--purpose" style="width: 47.6758%;" valign="top"><section class="itemgroup info">Enters global configuration mode.

</section></td></tr><tr class="li step"><td align="left" id="bkmrk-step%C2%A02" style="width: 8.93382%;" valign="top">**Step 2**

</td><td align="left" class="step--command" style="width: 43.3904%;" valign="top">\[ <span class="keyword kwd">no</span> \] <span class="keyword kwd">logging logfile</span> <var>logfile-name severity-level</var> \[ | <span class="keyword kwd">size</span> <var>bytes</var> \]

<section class="itemgroup stepxmp"><section class="tasklabel">#### Example:

</section>```
switch(config)# logging logfile my_log 6

```

</section></td><td align="left" class="step--purpose" style="width: 47.6758%;" valign="top"><section class="itemgroup info">Configures the nonpersistent log file parameters.

<var>logfile-name</var> : Configures the name of the log file that is used to store system messages. Default filename is "message".

<var>severity-level</var> : Configures the minimum severity level to log. A lower number indicates a higher severity level. Default is 5. Range is from 0 through 7:

- 0 – emergency
- 1 – alert
- 2 – critical
- 3 – error
- 4 – warning
- 5 – notification
- 6 – informational
- 7 – debugging

<span class="keyword kwd">size</span> <var>bytes</var> : Optionally specify maximum file size. Range is from 4096 through 4194304 bytes.

</section></td></tr><tr class="li step"><td align="left" id="bkmrk-step%C2%A03" style="width: 8.93382%;" valign="top">**Step 3**

</td><td align="left" class="step--command" style="width: 43.3904%;" valign="top"><span class="keyword kwd">logging event</span> {<span class="keyword kwd">link-status</span> | <span class="keyword kwd">trunk-status</span>} {<span class="keyword kwd">enable</span> | <span class="keyword kwd">default</span>}

<section class="itemgroup stepxmp"><section class="tasklabel">#### Example:

</section>```
switch(config)# logging event link-status default
```

</section></td><td align="left" class="step--purpose" style="width: 47.6758%;" valign="top"><section class="itemgroup info">Logs interface events.

- <span class="keyword kwd">link-status</span> —Logs all UP/DOWN and CHANGE messages.
- <span class="keyword kwd">trunk-status</span> —Logs all TRUNK status messages.
- <span class="keyword kwd">enable</span> —Specifies to enable logging to override the port level configuration.
- <span class="keyword kwd">default</span> —Specifies that the default logging configuration is used by interfaces that are not explicitly configured.

</section></td></tr></tbody></table>

</div></section>---

#### **Configuring Syslog Servers**

**Note:** Cisco recommends that you configure the syslog server to use the management virtual routing and forwarding (VRF) instance. For more information on VRFs, see Cisco Nexus 9000 Series NX-OS Unicast Routing Configuration Guide.

<section class="body taskbody" id="bkmrk-you-can-configure-up"><section class="section context" id="bkmrk-you-can-configure-up-1"><div class="tableContainer">  
</div>You can configure up to eight syslog servers that reference remote systems where you want to log system messages.

</section><section class="tasklabel">#### Procedure

</section><div class="tableContainer"><table class="ol steps detailed_steps" id="bkmrk-%C2%A0-command-or-action-" style="width: 100%;"><thead><tr><th align="left" style="width: 8.46714%;"> </th><th align="left" style="width: 45.5257%;">Command or Action</th><th align="left" style="width: 46.0072%;">Purpose</th></tr></thead><tbody><tr class="li step"><td align="left" style="width: 8.46714%;" valign="top">**Step 1**

</td><td align="left" class="step--command" style="width: 45.5257%;" valign="top"><span class="keyword kwd">configure terminal</span>

<section class="itemgroup stepxmp"><section class="tasklabel">#### Example:

</section>```
switch# configure terminal
switch(config)#
```

</section></td><td align="left" class="step--purpose" style="width: 46.0072%;" valign="top"><section class="itemgroup info">Enters global configuration mode.

</section></td></tr><tr class="li step"><td align="left" id="bkmrk-step%C2%A02-1" style="width: 8.46714%;" valign="top">**Step 2**

</td><td align="left" class="step--command" style="width: 45.5257%;" valign="top">\[<span class="keyword kwd">no</span>\] <span class="keyword kwd">logging server</span> <var>host</var> \[<var>severity-level</var> \[<span class="keyword kwd">use-vrf</span> <var>vrf-name</var>\]\]

<section class="itemgroup stepxmp"><section class="tasklabel">#### Example:

</section>```
switch(config)# logging server 192.0.2.253
```

</section><section class="itemgroup stepxmp"><section class="tasklabel">#### Example:

</section>```
switch(config)# logging server 2001::3 5 use-vrf red
```

</section></td><td align="left" class="step--purpose" style="width: 46.0072%;" valign="top"><section class="itemgroup info">Configures a syslog server at the specified hostname, IPv4, or IPv6 address. You can specify logging of messages to a particular syslog server in a VRF by using the <span class="keyword kwd">use-vrf</span> keyword.<span class="ph"> The <span class="keyword kwd">use-vrf</span> <var>vrf-name</var> keyword identifies the default or management values for the VRF name. The default VRF is the management VRF, by default. However, the <span class="keyword kwd">show-running</span> command will not list the default VRF.</span> Severity levels range from 0 to 7:

- 0 – emergency
- 1 – alert
- 2 – critical
- 3 – error
- 4 – warning
- 5 – notification
- 6 – informational
- 7 – debugging

The default outgoing facility is local7.

The <span class="keyword kwd">no</span> option removes the logging server for the specified host.

The first example forwards all messages on facility local 7. The second example forwards messages with severity level 5 or lower to the specified IPv6 address in VRF red.

</section></td></tr><tr class="li step"><td align="left" id="bkmrk-step%C2%A03-1" style="width: 8.46714%;" valign="top">**Step 3**

</td><td align="left" class="step--command" style="width: 45.5257%;" valign="top"><span class="keyword kwd">logging source-interface loopback</span> <var>virtual-interface</var>

<section class="itemgroup stepxmp"><section class="tasklabel">#### Example:

</section>```
switch(config)# logging source-interface loopback 5
```

</section></td><td align="left" class="step--purpose" style="width: 46.0072%;" valign="top"><section class="itemgroup info">Enables a source interface for the remote syslog server. The range for the <var>virtual-interface</var> argument is from 0 to 1023.

</section></td></tr></tbody></table>

</div></section>**NOTE:**

- Use the Timezone Offset parameter, if the timezone is not present in the log messages.

*If you need further assistance, kindly contact our support at <support@cytechint.com> for prompt assistance and guidance.*

# CISCO Secure Email Gateway Integrations

The **Cisco Email Security Appliance (ESA)** integration is a comprehensive solution for managing and securing email traffic within an organization's network. It provides various functionalities, such as **spam filtering**, **virus scanning**, **policy enforcement**, and **data loss prevention**. The integration collects and parses data from the **Cisco Secure Email Gateway** (formerly known as **Cisco Email Security Appliance**) to provide valuable insights into the email environment. The data collection occurs through multiple methods, primarily through **TCP/UDP communication** and **log file analysis**.

---

#### **Requirements:**

- Cisco account
- Elastic agent already installed

---

#### **Compatibility**

This module has been tested against **Cisco Secure Email Gateway server version 14.0.0 Virtual Gateway C100V with the below given logs pattern**.

[<svg aria-hidden="true" class="euiIcon docsmobile-15aun2l-euiIcon-m-isLoading" data-is-loading="true" height="16" role="img" viewbox="0 0 16 16" width="16" xmlns="http://www.w3.org/2000/svg"></svg>](https://www.elastic.co/docs/current/integrations/cisco_secure_email_gateway#configurations)

---

#### **Setup**

##### **Configurations**

- Sign-in to Cisco Secure Email Gateway Portal and follow the below steps for configurations: 
    1. In Cisco Secure Email Gateway Administrator Portal, go to **System Administration** &gt; **Log Subscriptions**.
    2. Click **Add Log Subscription**.
    3. Enter all the **Required Details**.
    4. Set **Log Name** as below for the respective category: 
        - AMP Engine Logs -&gt; amp
        - Anti-Spam Logs -&gt; antispam
        - Antivirus Logs -&gt; antivirus
        - Authentication Logs -&gt; authentication
        - Bounce Logs -&gt; bounces
        - Consolidated Event Logs -&gt; consolidated\_event
        - Content Scanner Logs -&gt; content\_scanner
        - HTTP Logs -&gt; gui\_logs
        - IronPort Text Mail Logs -&gt; error\_logs
        - Text Mail Logs -&gt; mail\_logs
        - Status Logs -&gt; status
        - System Logs -&gt; system
    5. Select **Log Level** as Information.
    6. Select **Retrieval Method**.
    7. Click **Submit** and commit the Changes.

##### [<svg aria-hidden="true" class="euiIcon docsmobile-15aun2l-euiIcon-m-isLoading" data-is-loading="true" height="16" role="img" viewbox="0 0 16 16" width="16" xmlns="http://www.w3.org/2000/svg"></svg>](https://www.elastic.co/docs/current/integrations/cisco_secure_email_gateway#note)**Note**

- **Retrieval Method** Supported: 
    - **FTP Push to Remote Server** for the below categories: AMP Engine Logs, Anti-Spam Logs, Antivirus Logs, Authentication Logs, Bounce Logs, Consolidated Event Logs, Content Scanner Logs, HTTP Logs, IronPort Text Mail Logs, Text Mail Logs, Status Logs and System Logs.
    - **Syslog Push** for the below categories: AMP Engine Logs, Anti-Spam Logs, Antivirus Logs, Consolidated Event Logs, Content Scanner Logs, HTTP Logs, IronPort Text Mail Logs, Text Mail Logs, Status Logs and System Logs.

*If you need further assistance, kindly contact our support at <support@cytechint.com> for prompt assistance and guidance.*

# CISCO Secure Endpoint - Secure Endpoint API

#### <span style="color: rgb(53, 152, 219);">**Authentication** </span>

The Secure Endpoint API requires access via an authenticated and authorized account. Only authorized accounts are able to submit requests to API operations. All operations must communicate over a secure HTTPS connection.

To authenticate and access the Secure Endpoint API, perform the following:

**1. Integrate Secure Endpoint with Cisco XDR or Secure Client Cloud Management.**

- Navigate to the Secure Endpoint console.
- Click the Integrate Now button on the Secure Endpoint Dashboard.
- This enables the integration between Secure Endpoint and Cisco XDR or Secure Client Cloud Management.

Integrate xdr :

- Navigate to the Cisco XDR or Secure Client Cloud Management console and verify the integration.
- Enable the Integration (Cisco XDR only)
- Navigate to Administration -&gt; Integrations, then click + Enable
- Enable Secure Endpoint

**2. Register the API Client.**

- From within either Cisco XDR or Secure Client Cloud Management
- Navigate to Administration -&gt; API Clients.
- On the API Clients page, click the Generate API Client button to open the Add New Client form. 
    - add new client form
- Enter a Client Name and select a Scope. 
    - Note: The Secure Endpoint API will work with any of the selected Scopes.
    - The API Client will have the same permissions within Secure Endpoint as the creator of the API Client.
- Optionally, enter a Description and click Add New Client.
- The Client Id and Client Password are generated and will appear on the Add New Client form. api credential form
- Secure the Client ID and Client Password before closing the window. Copy and paste it properly.

**3. Generate an API Access Token.**

#### <span style="color: rgb(53, 152, 219);">**Method 1: Linux** </span>

Use the following OAuth2 token API to generate an API access token:

<table border="1" id="bkmrk-north-america-https%3A" style="border-collapse: collapse; width: 100%;"><colgroup><col style="width: 49.881%;"></col><col style="width: 49.881%;"></col></colgroup><tbody><tr><td>North America</td><td>[https://visibility.amp.cisco.com/iroh/oauth2/token](https://visibility.amp.cisco.com/iroh/oauth2/token)</td></tr><tr><td>Asia Pacific, Japan, and China</td><td>[https://visibility.apjc.amp.cisco.com/iroh/oauth2/token](https://visibility.apjc.amp.cisco.com/iroh/oauth2/token)</td></tr><tr><td>Europe</td><td>[https://visibility.eu.amp.cisco.com/iroh/oauth2/token](https://visibility.eu.amp.cisco.com/iroh/oauth2/token)</td></tr></tbody></table>

The Client-Id and Client-Password (Client-Secret per OAuth2) generated in the previous step are required to call the token endpoint.

Get an Access Token via the Token API:

<table border="1" id="bkmrk-%23-read-in-the-client" style="border-collapse: collapse; width: 100%;"><colgroup><col style="width: 99.881%;"></col></colgroup><tbody><tr><td>\# Read in the client\_id and client\_secret if they are not already set.   
\[ -z "$client\_id" \] &amp;&amp; read -p "client\_id: " client\_id   
\[ -z "$client\_secret" \] &amp;&amp; read -p "client\_secret: " client\_secret   
   
\# Call the token endpoint and store the result in a variable.   
result=$(curl -s 'https://visibility.eu.amp.cisco.com/iroh/oauth2/token' \\   
 --user "${client\_id}:${client\_secret}" \\   
 --header 'Content-Type: application/x-www-form-urlencoded' \\   
 --header 'Accept: application/json' \\   
 -d 'grant\_type=client\_credentials')   
   
\# Extract the access\_token from the result.   
export BEARER\_TOKEN=$(echo "$result" | jq -r .access\_token)   
   
\# Print the result.   
\[ -x "$(command -v jq)" \] &amp;&amp; echo "$result" | jq . || echo "$result" </td></tr></tbody></table>

Response:

<table border="1" id="bkmrk-%7B%C2%A0%C2%A0-%22access_token%22%3A-" style="border-collapse: collapse; width: 100%;"><colgroup><col style="width: 99.881%;"></col></colgroup><tbody><tr><td>{   
 "access\_token": "eyJhbGciO...",   
 "token\_type": "bearer",   
 "expires\_in": 600,   
 "scope": "enrich:read casebook inspect:read"   
} </td></tr></tbody></table>

4\. Generate Secure Endpoint API Access Token.

Use the following access token endpoint to generate a Secure Endpoint API access token:

<table border="1" id="bkmrk-north-america-https%3A-1" style="border-collapse: collapse; width: 100%;"><colgroup><col style="width: 49.881%;"></col><col style="width: 49.881%;"></col></colgroup><tbody><tr><td>North America</td><td>[https://api.amp.cisco.com/v3/access\_tokens ](https://visibility.amp.cisco.com/iroh/oauth2/token)</td></tr><tr><td>Asia Pacific, Japan, and China</td><td>[https://api.apjc.amp.cisco.com/v3/access\_tokens ](https://visibility.apjc.amp.cisco.com/iroh/oauth2/token)</td></tr><tr><td>Europe</td><td>[https://api.eu.amp.cisco.com/v3/access\_tokens ](https://visibility.eu.amp.cisco.com/iroh/oauth2/token)</td></tr></tbody></table>

The API access token generated in previous step is required to call the token endpoint.

Get and Access Token from the Secure Endpoint Token API:

<table border="1" id="bkmrk-%23-call-the-secure-en" style="border-collapse: collapse; width: 100%;"><colgroup><col style="width: 99.881%;"></col></colgroup><tbody><tr><td>\# Call the Secure Endpoint token endpoint and store the result in a variable.   
result=$(curl -s 'https://api.amp.cisco.com/v3/access\_tokens' \\   
 --header 'Content-Type: application/x-www-form-urlencoded' \\   
 --header 'Accept: application/json' \\   
 --header "Authorization: Bearer $BEARER\_TOKEN" \\   
 -d 'grant\_type=client\_credentials')   
   
\# Extract the access\_token from the result.   
export BEARER\_TOKEN=$(echo "$result" | jq -r .access\_token)   
   
\# Print the result.   
\[ -x "$(command -v jq)" \] &amp;&amp; echo "$result" | jq . || echo "$result" </td></tr></tbody></table>

  
Response:

<table border="1" id="bkmrk-%7B%C2%A0%C2%A0-%22access_token%22%3A--1" style="border-collapse: collapse; width: 100%;"><colgroup><col style="width: 99.881%;"></col></colgroup><tbody><tr><td>{   
 "access\_token": "eyJhbGciO..."   
}   
 </td></tr></tbody></table>

5\. Access Secure Endpoint API.

The token generated in previous step is used to access the Secure Endpoint APIs.

Request:

<table border="1" id="bkmrk-%23-call-the-secure-en-1" style="border-collapse: collapse; width: 100%;"><colgroup><col style="width: 99.881%;"></col></colgroup><tbody><tr><td>\# Call the Secure Endpoint API and store the result in a variable.   
result=$(curl -s 'https://api.amp.cisco.com/v3/organizations?size=10' \\   
\--header "Authorization: Bearer ${BEARER\_TOKEN}")   
   
\# Print the result.   
\[ -x "$(command -v jq)" \] &amp;&amp; echo "$result" | jq . || echo "$result"

</td></tr></tbody></table>

   
 Response:

<table border="1" id="bkmrk-%7B%C2%A0%C2%A0-%22meta%22%3A-%7B%C2%A0%C2%A0-%C2%A0-%22s" style="border-collapse: collapse; width: 100%;"><colgroup><col style="width: 99.881%;"></col></colgroup><tbody><tr><td>{   
 "meta": {   
 "start": 0,   
 "size": 10,   
 "total": 2   
 },   
 "data": \[   
 {   
 "name": "Example Organization #1",   
 "organizationIdentifier": "4baascfeaofqpxidpinxtt5l"   
 },   
 {   
 "name": "Example Organization #2",   
 "organizationIdentifier": "nxtf3phj4w0z41pim3vqarzk"   
 }   
 \]   
} </td></tr></tbody></table>

#### <span style="color: rgb(53, 152, 219);">**Method 2: Windows** </span>

1\. Set Client ID and Client Secret

The script reads client\_id and client\_secret from the user if not set and uses them to request an OAuth2 token.

<table border="1" id="bkmrk-%40echo-off%C2%A0rem-check-" style="border-collapse: collapse; width: 100%;"><colgroup><col style="width: 99.881%;"></col></colgroup><tbody><tr><td>@echo off   
REM Check if client\_id and client\_secret are set   
if "%client\_id%"=="" set /p client\_id="Enter client\_id: "   
if "%client\_secret%"=="" set /p client\_secret="Enter client\_secret: "   
   
REM Call the OAuth2 token endpoint   
curl -s -u "%client\_id%:%client\_secret%" ^   
 -H "Content-Type: application/x-www-form-urlencoded" ^   
 -H "Accept: application/json" ^   
 -d "grant\_type=client\_credentials" ^   
 https://visibility.amp.cisco.com/iroh/oauth2/token &gt; token.json   
   
REM Extract the access\_token using jq (ensure jq is installed)   
for /f "delims=" %%A in ('jq -r ".access\_token" token.json') do set BEARER\_TOKEN=%%A   
   
REM Output the token   
echo OAuth2 Access Token: %BEARER\_TOKEN% </td></tr></tbody></table>

  
2\. Generate Secure Endpoint API Access Token

Use the token from the previous step to generate an API access token for Secure Endpoint.

<table border="1" id="bkmrk-%40echo-off%C2%A0rem-call-t" style="border-collapse: collapse; width: 100%;"><colgroup><col style="width: 99.881%;"></col></colgroup><tbody><tr><td>@echo off   
REM Call the Secure Endpoint token endpoint   
curl -s -X POST ^   
 -H "Content-Type: application/x-www-form-urlencoded" ^   
 -H "Accept: application/json" ^   
 -H "Authorization: Bearer %BEARER\_TOKEN%" ^   
 -d "grant\_type=client\_credentials" ^   
 https://api.amp.cisco.com/v3/access\_tokens &gt; endpoint\_token.json   
   
REM Extract the access\_token using jq (ensure jq is installed)   
for /f "delims=" %%A in ('jq -r ".access\_token" endpoint\_token.json') do set SECURE\_ENDPOINT\_TOKEN=%%A   
   
REM Output the Secure Endpoint API token   
echo Secure Endpoint API Access Token: %SECURE\_ENDPOINT\_TOKEN% </td></tr></tbody></table>

  
3\. Access the Secure Endpoint API

<table border="1" id="bkmrk-%40echo-off%C2%A0rem-call-t-1" style="border-collapse: collapse; width: 100%;"><colgroup><col style="width: 99.881%;"></col></colgroup><tbody><tr><td>@echo off   
REM Call the Secure Endpoint API   
curl -s -X GET ^   
 -H "Authorization: Bearer %SECURE\_ENDPOINT\_TOKEN%" ^   
 https://api.amp.cisco.com/v3/organizations?size=10 &gt; organizations.json   
   
REM Output the API response   
echo Secure Endpoint API Response:   
type organizations.json </td></tr></tbody></table>

  
 Key Notes:

Prerequisites:

- Install curl (default on Windows 10/11 or available via Chocolatey).
- Install jq for JSON parsing (available via jq).
- Save and Run:
- Save the script as a .bat file (e.g., get\_token.bat).
- Run the script in Command Prompt or PowerShell.
- Replace Region URLs:
- Use the appropriate region URL in the curl commands (e.g., North America, APJC, or Europe).

Source: https://developer.cisco.com/docs/secure-endpoint/authentication/#3-generate-an-api-access-token

# CISCO Secure Endpoint Integrations

##### <span style="color: rgb(53, 152, 219);">**<span class="TextRun SCXW65281239 BCX8" data-contrast="none" lang="EN-US" xml:lang="EN-US"><span class="NormalTextRun SCXW65281239 BCX8" data-ccp-charstyle="Style (Complex) Open Sans" data-ccp-charstyle-defn="{"ObjectId":"a950a5e3-da42-4734-8f2c-c0bd0bcd1bec|31","ClassId":1073872969,"Properties":[469775450,"Style (Complex) Open Sans",201340122,"1",134233614,"true",469778129,"StyleComplexOpenSans",335572020,"1",201342448,"1",469777841,"Open Sans",469777842,"Open Sans",469777843,"Calibri",469777844,"Open Sans",469769226,"Open Sans,Calibri",469778324,"Default Paragraph Font"]}">Introduction</span></span><span class="EOP SCXW65281239 BCX8" data-ccp-props="{"134245418":true,"134245529":true,"201341983":0,"335559738":240,"335559739":0,"335559740":360}"> </span>**</span>

<span class="TextRun Highlight SCXW65281239 BCX8" data-contrast="auto" lang="EN-US" xml:lang="EN-US"><span class="NormalTextRun SCXW65281239 BCX8">Secure Endpoint offers cloud-delivered, advanced endpoint detection and response across multidomain control points to rapidly detect, </span><span class="NormalTextRun SCXW65281239 BCX8">contain</span><span class="NormalTextRun SCXW65281239 BCX8">, and remediate advanced threats.</span></span><span class="EOP SCXW65281239 BCX8" data-ccp-props="{"201341983":0,"335559685":360,"335559739":160,"335559740":259}"> </span>

<div class="SCXW65281239 BCX8" id="bkmrk-"><div class="ListContainerWrapper SCXW65281239 BCX8">  
</div></div>##### <span style="color: rgb(53, 152, 219);">**<span class="TextRun Highlight SCXW65281239 BCX8" data-contrast="none" lang="EN-US" xml:lang="EN-US"><span class="NormalTextRun SCXW65281239 BCX8" data-ccp-charstyle="normaltextrun" data-ccp-charstyle-defn="{"ObjectId":"a950a5e3-da42-4734-8f2c-c0bd0bcd1bec|57","ClassId":1073872969,"Properties":[469775450,"normaltextrun",201340122,"1",134233614,"true",469778129,"normaltextrun",335572020,"1",469778324,"Default Paragraph Font"]}">Assumptions</span></span><span class="EOP SCXW65281239 BCX8" data-ccp-props="{"134245418":true,"134245529":true,"201341983":0,"335559738":240,"335559739":0,"335559740":360}"> </span>**</span>

<span class="TextRun Highlight SCXW65281239 BCX8" data-contrast="auto" lang="EN-US" xml:lang="EN-US"><span class="NormalTextRun SCXW65281239 BCX8" data-ccp-charstyle="eop" data-ccp-charstyle-defn="{"ObjectId":"a950a5e3-da42-4734-8f2c-c0bd0bcd1bec|58","ClassId":1073872969,"Properties":[469775450,"eop",201340122,"1",134233614,"true",469778129,"eop",335572020,"1",469778324,"Default Paragraph Font"]}">The procedures described in Section 3 </span><span class="NormalTextRun SCXW65281239 BCX8" data-ccp-charstyle="eop">assume</span><span class="NormalTextRun SCXW65281239 BCX8" data-ccp-charstyle="eop"> that a Log Collector has already been </span><span class="NormalTextRun ContextualSpellingAndGrammarErrorV2Themed SCXW65281239 BCX8" data-ccp-charstyle="eop">setup</span><span class="NormalTextRun SCXW65281239 BCX8" data-ccp-charstyle="eop">. </span></span><span class="EOP SCXW65281239 BCX8" data-ccp-props="{"201341983":0,"335559685":360,"335559739":160,"335559740":259}"> </span>

<div class="SCXW65281239 BCX8" id="bkmrk--1"><div class="ListContainerWrapper SCXW65281239 BCX8">  
</div></div>##### **<span class="TextRun Highlight SCXW65281239 BCX8" data-contrast="none" lang="EN-US" xml:lang="EN-US"><span class="NormalTextRun SCXW65281239 BCX8" data-ccp-charstyle="eop">Requirements</span></span><span class="EOP SCXW65281239 BCX8" data-ccp-props="{"134245418":true,"134245529":true,"201341983":0,"335559738":240,"335559739":0,"335559740":360}"> </span>**

<span class="TextRun Highlight SCXW65281239 BCX8" data-contrast="auto" lang="EN-US" xml:lang="EN-US"><span class="NormalTextRun SCXW65281239 BCX8" data-ccp-charstyle="eop">This integration is for Cisco Secure Endpoint logs. It includes the following datasets for receiving logs over syslog or read from a file</span><span class="NormalTextRun SCXW65281239 BCX8" data-ccp-charstyle="eop">:</span></span><span class="EOP SCXW65281239 BCX8" data-ccp-props="{"201341983":0,"335559685":360,"335559739":160,"335559740":259}"> </span>

<div class="SCXW65281239 BCX8" id="bkmrk-event-dataset%3A-suppo"><div class="ListContainerWrapper SCXW65281239 BCX8">- <span class="TextRun Highlight SCXW65281239 BCX8" data-contrast="auto" lang="EN-US" xml:lang="EN-US"><span class="NormalTextRun SCXW65281239 BCX8" data-ccp-charstyle="eop">event</span></span><span class="TextRun Highlight SCXW65281239 BCX8" data-contrast="auto" lang="EN-US" xml:lang="EN-US"> <span class="NormalTextRun ContextualSpellingAndGrammarErrorV2Themed SCXW65281239 BCX8" data-ccp-charstyle="eop">dataset:</span><span class="NormalTextRun SCXW65281239 BCX8" data-ccp-charstyle="eop"> supports Cisco Secure Endpoint Event logs.</span></span><span class="EOP SCXW65281239 BCX8" data-ccp-props="{"201341983":0,"335559739":160,"335559740":259}"> </span>

</div></div>##### **Generating Client ID and API Key**:

<div class="SCXW65281239 BCX8" id="bkmrk-log-in-to-your-amp-f"><div class="OutlineElement Ltr SCXW65281239 BCX8">- Log in to your AMP for Endpoints Console.
- Go to Accounts &gt; Organization Settings.
- Click Configure API Credentials under Features to generate the Client ID and secure API Key.

</div></div>##### <span style="color: rgb(53, 152, 219);">**<span class="TextRun Highlight SCXW65281239 BCX8" data-contrast="auto" lang="EN-US" xml:lang="EN-US"><span class="NormalTextRun SCXW65281239 BCX8" data-ccp-charstyle="eop">Logs</span></span><span class="EOP SCXW65281239 BCX8" data-ccp-props="{"201341983":0,"335559685":720,"335559739":160,"335559740":259}"> </span>**</span>

**<span class="TextRun Highlight SCXW65281239 BCX8" data-contrast="auto" lang="EN-US" xml:lang="EN-US"><span class="NormalTextRun SCXW65281239 BCX8" data-ccp-charstyle="eop">Secure Endpoint</span></span><span class="EOP SCXW65281239 BCX8" data-ccp-props="{"201341983":0,"335559685":720,"335559739":160,"335559740":259}"> </span>**

<span class="TextRun Highlight SCXW65281239 BCX8" data-contrast="auto" lang="EN-US" xml:lang="EN-US"><span class="NormalTextRun SCXW65281239 BCX8" data-ccp-charstyle="eop">The </span></span><span class="TextRun Highlight SCXW65281239 BCX8" data-contrast="auto" lang="EN-US" xml:lang="EN-US"><span class="NormalTextRun SCXW65281239 BCX8" data-ccp-charstyle="eop">event</span></span><span class="TextRun Highlight SCXW65281239 BCX8" data-contrast="auto" lang="EN-US" xml:lang="EN-US"><span class="NormalTextRun SCXW65281239 BCX8" data-ccp-charstyle="eop"> dataset collects Cisco Secure Endpoint logs.</span></span><span class="EOP SCXW65281239 BCX8" data-ccp-props="{"201341983":0,"335559685":720,"335559739":160,"335559740":259}"> </span>

<span class="TextRun Highlight SCXW65281239 BCX8" data-contrast="auto" lang="EN-US" xml:lang="EN-US"><span class="NormalTextRun SCXW65281239 BCX8" data-ccp-charstyle="eop">What can the Secure Endpoint API be used for?</span></span><span class="EOP SCXW65281239 BCX8" data-ccp-props="{"201341983":0,"335559731":720,"335559739":160,"335559740":259}"> </span>

<div class="SCXW65281239 BCX8" id="bkmrk-generate-a-list-of-o"><div class="OutlineElement Ltr SCXW65281239 BCX8">  
</div><div class="ListContainerWrapper SCXW65281239 BCX8">- <span class="TextRun Highlight SCXW65281239 BCX8" data-contrast="auto" lang="EN-US" xml:lang="EN-US"><span class="NormalTextRun SCXW65281239 BCX8" data-ccp-charstyle="eop">Generate a list of organizations a user has access to</span></span><span class="EOP SCXW65281239 BCX8" data-ccp-props="{"201341983":0,"335559739":160,"335559740":259}"> </span>
- <span class="TextRun Highlight SCXW65281239 BCX8" data-contrast="auto" lang="EN-US" xml:lang="EN-US"><span class="NormalTextRun SCXW65281239 BCX8" data-ccp-charstyle="eop">Generate a list of policies for a specified </span><span class="NormalTextRun SCXW65281239 BCX8" data-ccp-charstyle="eop">organization</span></span><span class="EOP SCXW65281239 BCX8" data-ccp-props="{"201341983":0,"335559739":160,"335559740":259}"> </span>
- <span class="TextRun Highlight SCXW65281239 BCX8" data-contrast="none" lang="EN-US" xml:lang="EN-US"><span class="NormalTextRun SCXW65281239 BCX8">Generate specific information about a specified policy such as:</span></span><span class="EOP SCXW65281239 BCX8" data-ccp-props="{"201341983":0,"335559739":160,"335559740":259}"> </span>

</div><div class="ListContainerWrapper SCXW65281239 BCX8">- - - - <span class="TextRun Highlight SCXW65281239 BCX8" data-contrast="auto" lang="EN-US" xml:lang="EN-US"><span class="NormalTextRun SCXW65281239 BCX8" data-ccp-charstyle="eop">General policy data</span></span><span class="EOP SCXW65281239 BCX8" data-ccp-props="{"201341983":0,"335559739":160,"335559740":259}"> </span>
            - <span class="TextRun Highlight SCXW65281239 BCX8" data-contrast="auto" lang="EN-US" xml:lang="EN-US"><span class="NormalTextRun SCXW65281239 BCX8" data-ccp-charstyle="eop">Associated network control lists</span></span><span class="EOP SCXW65281239 BCX8" data-ccp-props="{"201341983":0,"335559739":160,"335559740":259}"> </span>
            - <span class="TextRun Highlight SCXW65281239 BCX8" data-contrast="auto" lang="EN-US" xml:lang="EN-US"><span class="NormalTextRun SCXW65281239 BCX8" data-ccp-charstyle="eop">Associated computers</span></span><span class="EOP SCXW65281239 BCX8" data-ccp-props="{"201341983":0,"335559739":160,"335559740":259}"> </span>
            - <span class="TextRun Highlight SCXW65281239 BCX8" data-contrast="auto" lang="EN-US" xml:lang="EN-US"><span class="NormalTextRun SCXW65281239 BCX8" data-ccp-charstyle="eop">Associated groups</span></span><span class="EOP SCXW65281239 BCX8" data-ccp-props="{"201341983":0,"335559739":160,"335559740":259}"> </span>
            - <span class="TextRun Highlight SCXW65281239 BCX8" data-contrast="auto" lang="EN-US" xml:lang="EN-US"><span class="NormalTextRun SCXW65281239 BCX8" data-ccp-charstyle="eop">Proxy settings</span></span><span class="EOP SCXW65281239 BCX8" data-ccp-props="{"201341983":0,"335559739":160,"335559740":259}"> </span>
            - <span class="TextRun Highlight SCXW65281239 BCX8" data-contrast="auto" lang="EN-US" xml:lang="EN-US"><span class="NormalTextRun SCXW65281239 BCX8" data-ccp-charstyle="eop">Policy XML</span></span><span class="EOP SCXW65281239 BCX8" data-ccp-props="{"201341983":0,"335559739":160,"335559740":259}"> </span>

</div><div class="ListContainerWrapper SCXW65281239 BCX8">- <span class="TextRun Highlight SCXW65281239 BCX8" data-contrast="auto" lang="EN-US" xml:lang="EN-US"><span class="NormalTextRun SCXW65281239 BCX8" data-ccp-charstyle="eop">Generate all policy types and operating systems available for a specified </span><span class="NormalTextRun SCXW65281239 BCX8" data-ccp-charstyle="eop">organization</span></span><span class="EOP SCXW65281239 BCX8" data-ccp-props="{"201341983":0,"335559739":160,"335559740":259}"> </span>

</div><div class="OutlineElement Ltr SCXW65281239 BCX8">  
</div></div>**<span class="TextRun Highlight SCXW65281239 BCX8" data-contrast="auto" lang="EN-US" xml:lang="EN-US"><span class="NormalTextRun SCXW65281239 BCX8" data-ccp-charstyle="eop">Top Use Cases</span></span><span class="EOP SCXW65281239 BCX8" data-ccp-props="{"201341983":0,"335559685":720,"335559739":160,"335559740":259}"> </span>**

<div class="SCXW65281239 BCX8" id="bkmrk-generating-reports-o"><div class="ListContainerWrapper SCXW65281239 BCX8">- <span class="TextRun Highlight SCXW65281239 BCX8" data-contrast="auto" lang="EN-US" xml:lang="EN-US"><span class="NormalTextRun SCXW65281239 BCX8" data-ccp-charstyle="eop">Generating reports on policy settings across an organization</span></span><span class="EOP SCXW65281239 BCX8" data-ccp-props="{"201341983":0,"335559739":160,"335559740":259}"> </span>
- <span class="TextRun Highlight SCXW65281239 BCX8" data-contrast="auto" lang="EN-US" xml:lang="EN-US"><span class="NormalTextRun SCXW65281239 BCX8" data-ccp-charstyle="eop">Inspecting a particular policy's settings</span></span><span class="EOP SCXW65281239 BCX8" data-ccp-props="{"201341983":0,"335559739":160,"335559740":259}"> </span>
- <span class="TextRun Highlight SCXW65281239 BCX8" data-contrast="auto" lang="EN-US" xml:lang="EN-US"><span class="NormalTextRun SCXW65281239 BCX8" data-ccp-charstyle="eop">Querying to find policies matching certain criteria </span><span class="NormalTextRun AdvancedProofingIssueV2Themed SCXW65281239 BCX8" data-ccp-charstyle="eop">in order to</span><span class="NormalTextRun SCXW65281239 BCX8" data-ccp-charstyle="eop"> detect which policies should be </span><span class="NormalTextRun SCXW65281239 BCX8" data-ccp-charstyle="eop">edited</span></span><span class="EOP SCXW65281239 BCX8" data-ccp-props="{"201341983":0,"335559739":160,"335559740":259}"> </span>

</div></div>**<span class="TextRun Highlight SCXW65281239 BCX8" data-contrast="auto" lang="EN-US" xml:lang="EN-US"><span class="NormalTextRun SCXW65281239 BCX8" data-ccp-charstyle="eop">Response Format</span></span><span class="EOP SCXW65281239 BCX8" data-ccp-props="{"201341983":0,"335559685":720,"335559739":160,"335559740":259}"> </span>**

<div class="SCXW65281239 BCX8" id="bkmrk-data%C2%A0-meta-errors%C2%A0"><div class="ListContainerWrapper SCXW65281239 BCX8">- <span class="TextRun Highlight SCXW65281239 BCX8" data-contrast="auto" lang="EN-US" xml:lang="EN-US"><span class="NormalTextRun SCXW65281239 BCX8" data-ccp-charstyle="eop">Data</span></span><span class="EOP SCXW65281239 BCX8" data-ccp-props="{"201341983":0,"335559739":160,"335559740":259}"> </span>
- <span class="TextRun Highlight SCXW65281239 BCX8" data-contrast="auto" lang="EN-US" xml:lang="EN-US"><span class="NormalTextRun SCXW65281239 BCX8" data-ccp-charstyle="eop">Meta</span></span>
- <span class="TextRun Highlight SCXW65281239 BCX8" data-contrast="auto" lang="EN-US" xml:lang="EN-US"><span class="NormalTextRun SCXW65281239 BCX8" data-ccp-charstyle="eop">Er</span><span class="NormalTextRun SCXW65281239 BCX8" data-ccp-charstyle="eop">ror</span><span class="NormalTextRun SCXW65281239 BCX8" data-ccp-charstyle="eop">s</span></span><span class="EOP SCXW65281239 BCX8" data-ccp-props="{"201341983":0,"335559739":160,"335559740":259}"> </span>

</div></div>##### <span style="color: rgb(53, 152, 219);">**<span class="TextRun SCXW65281239 BCX8" data-contrast="none" lang="EN-US" xml:lang="EN-US"><span class="NormalTextRun SCXW65281239 BCX8" data-ccp-charstyle="eop">Cisco </span><span class="NormalTextRun SCXW65281239 BCX8" data-ccp-charstyle="eop">Secure Endpoint</span><span class="NormalTextRun SCXW65281239 BCX8" data-ccp-charstyle="eop"> Integration Procedures</span></span><span class="EOP SCXW65281239 BCX8" data-ccp-props="{"134245418":true,"134245529":true,"201341983":0,"335559738":240,"335559739":0,"335559740":360}"> </span>**</span>

<span class="TextRun SCXW65281239 BCX8" data-contrast="auto" lang="EN-US" xml:lang="EN-US"><span class="NormalTextRun SCXW65281239 BCX8" data-ccp-charstyle="eop">Please provide the following information to </span><span class="NormalTextRun SpellingErrorV2Themed SCXW65281239 BCX8" data-ccp-charstyle="eop">CyTech</span><span class="NormalTextRun SCXW65281239 BCX8" data-ccp-charstyle="eop">:</span></span><span class="EOP SCXW65281239 BCX8" data-ccp-props="{"201341983":0,"335559685":720,"335559739":160,"335559740":259}"> </span>

**<span class="TextRun SCXW65281239 BCX8" data-contrast="none" lang="EN-US" xml:lang="EN-US"><span class="NormalTextRun SCXW65281239 BCX8" data-ccp-charstyle="eop">Collect logs from the Cisco Secure Endpoint API</span><span class="NormalTextRun SCXW65281239 BCX8" data-ccp-charstyle="eop">.</span></span><span class="EOP SCXW65281239 BCX8" data-ccp-props="{"134245418":true,"134245529":true,"201341983":0,"335559738":240,"335559739":0,"335559740":360}"> </span>**

<div class="SCXW65281239 BCX8" id="bkmrk-client-id---cisco-se"><div class="ListContainerWrapper SCXW65281239 BCX8">  
</div><div class="ListContainerWrapper SCXW65281239 BCX8">1. <span class="TextRun SCXW65281239 BCX8" data-contrast="auto" lang="EN-US" xml:lang="EN-US"><span class="NormalTextRun SCXW65281239 BCX8" data-ccp-charstyle="eop">Client ID</span><span class="NormalTextRun SCXW65281239 BCX8" data-ccp-charstyle="eop"> - </span><span class="NormalTextRun SCXW65281239 BCX8" data-ccp-charstyle="eop">Cisco Secure Endpoint Client ID</span></span><span class="EOP SCXW65281239 BCX8" data-ccp-props="{"201341983":0,"335559739":160,"335559740":259}"> </span>

</div><div class="ListContainerWrapper SCXW65281239 BCX8">2. <span class="TextRun SCXW65281239 BCX8" data-contrast="auto" lang="EN-US" xml:lang="EN-US"><span class="NormalTextRun SCXW65281239 BCX8" data-ccp-charstyle="eop">API Key </span><span class="NormalTextRun SCXW65281239 BCX8" data-ccp-charstyle="eop">- </span><span class="NormalTextRun SCXW65281239 BCX8" data-ccp-charstyle="eop">Cisco Secure Endpoint API Key</span></span><span class="EOP SCXW65281239 BCX8" data-ccp-props="{"201341983":0,"335559739":160,"335559740":259}"> </span>

</div><div class="OutlineElement Ltr SCXW65281239 BCX8">  
</div></div><span class="EOP SCXW65281239 BCX8" data-ccp-props="{"201341983":0,"335559685":1800,"335559739":160,"335559740":259}"></span>

# CISCO Umbrella Integrations

#### <span style="color: rgb(0, 0, 0);">**<span class="TextRun SCXW66975973 BCX8" data-contrast="none" lang="EN-US" xml:lang="EN-US"><span class="NormalTextRun SCXW66975973 BCX8" data-ccp-charstyle="Style (Complex) Open Sans" data-ccp-charstyle-defn="{"ObjectId":"b259de2d-fafd-47dd-be8b-aea0b22205be|49","ClassId":1073872969,"Properties":[469775450,"Style (Complex) Open Sans",201340122,"1",134233614,"true",469778129,"StyleComplexOpenSans",335572020,"1",201342448,"1",469777841,"Open Sans",469777842,"Open Sans",469777843,"Calibri",469777844,"Open Sans",469769226,"Open Sans,Calibri",469778324,"Default Paragraph Font"]}">Introduction</span></span><span class="EOP SCXW66975973 BCX8" data-ccp-props="{"134245418":true,"134245529":true,"201341983":0,"335559738":240,"335559739":0,"335559740":360}"> </span>**</span>

<span class="TextRun Highlight SCXW66975973 BCX8" data-contrast="auto" lang="EN-US" xml:lang="EN-US"><span class="NormalTextRun SCXW66975973 BCX8">Cisco Umbrella is a cloud security platform that provides an </span><span class="NormalTextRun SCXW66975973 BCX8">additional</span><span class="NormalTextRun SCXW66975973 BCX8"> line of defense against malicious software and threats on the internet by using threat intelligence. That intelligence helps prevent adware, malware, botnets, phishing attacks, and other known bad Websites from being accessed.</span></span><span class="EOP SCXW66975973 BCX8" data-ccp-props="{"201341983":0,"335559685":360,"335559739":160,"335559740":259}"> </span>


##### <span style="color: rgb(0, 0, 0);">**<span class="TextRun Highlight SCXW66975973 BCX8" data-contrast="none" lang="EN-US" xml:lang="EN-US"><span class="NormalTextRun SCXW66975973 BCX8" data-ccp-charstyle="normaltextrun" data-ccp-charstyle-defn="{"ObjectId":"b259de2d-fafd-47dd-be8b-aea0b22205be|75","ClassId":1073872969,"Properties":[469775450,"normaltextrun",201340122,"1",134233614,"true",469778129,"normaltextrun",335572020,"1",469778324,"Default Paragraph Font"]}">Assumptions</span></span><span class="EOP SCXW66975973 BCX8" data-ccp-props="{"134245418":true,"134245529":true,"201341983":0,"335559738":240,"335559739":0,"335559740":360}"> </span>**</span>

<span class="TextRun Highlight SCXW66975973 BCX8" data-contrast="auto" lang="EN-US" xml:lang="EN-US"><span class="NormalTextRun SCXW66975973 BCX8" data-ccp-charstyle="eop" data-ccp-charstyle-defn="{"ObjectId":"b259de2d-fafd-47dd-be8b-aea0b22205be|76","ClassId":1073872969,"Properties":[469775450,"eop",201340122,"1",134233614,"true",469778129,"eop",335572020,"1",469778324,"Default Paragraph Font"]}">The procedures described in Section 3 </span><span class="NormalTextRun ContextualSpellingAndGrammarErrorV2Themed SCXW66975973 BCX8" data-ccp-charstyle="eop">assumes</span><span class="NormalTextRun SCXW66975973 BCX8" data-ccp-charstyle="eop"> that a Log Collector has already been </span><span class="NormalTextRun ContextualSpellingAndGrammarErrorV2Themed SCXW66975973 BCX8" data-ccp-charstyle="eop">setup</span><span class="NormalTextRun SCXW66975973 BCX8" data-ccp-charstyle="eop">. </span></span><span class="EOP SCXW66975973 BCX8" data-ccp-props="{"201341983":0,"335559685":360,"335559739":160,"335559740":259}"> </span>

##### ***<span class="TextRun Highlight SCXW66975973 BCX8" data-contrast="none" lang="EN-US" xml:lang="EN-US"><span class="NormalTextRun SCXW66975973 BCX8" data-ccp-charstyle="normaltextrun">Prerequisites</span></span><span class="EOP SCXW66975973 BCX8" data-ccp-props="{"134245418":true,"134245529":true,"201341983":0,"335559738":240,"335559739":0,"335559740":360}"> </span>***

<div class="ListContainerWrapper SCXW66975973 BCX8" id="bkmrk-you-must-have-full-a">- - <span class="TextRun SCXW66975973 BCX8" data-contrast="auto" lang="EN-US" xml:lang="EN-US"><span class="NormalTextRun SCXW66975973 BCX8" data-ccp-charstyle="eop">You must have Full Admin access to Umbrella to create and manage Umbrella API keys or Umbrella </span><span class="NormalTextRun SpellingErrorV2Themed SCXW66975973 BCX8" data-ccp-charstyle="eop">KeyAdmin</span><span class="NormalTextRun SCXW66975973 BCX8" data-ccp-charstyle="eop"> API keys</span><span class="NormalTextRun SCXW66975973 BCX8" data-ccp-charstyle="eop">.</span></span><span class="EOP SCXW66975973 BCX8" data-ccp-props="{"201341983":0,"335559739":160,"335559740":259}"> </span>

</div>

##### <span style="color: rgb(0, 0, 0);">**<span class="TextRun Highlight SCXW66975973 BCX8" data-contrast="none" lang="EN-US" xml:lang="EN-US"><span class="NormalTextRun SCXW66975973 BCX8" data-ccp-charstyle="eop">Requirements</span></span><span class="EOP SCXW66975973 BCX8" data-ccp-props="{"134245418":true,"134245529":true,"201341983":0,"335559738":240,"335559739":0,"335559740":360}"> </span>**</span>

<span class="TextRun Highlight SCXW66975973 BCX8" data-contrast="auto" lang="EN-US" xml:lang="EN-US"><span class="NormalTextRun SCXW66975973 BCX8" data-ccp-charstyle="eop">This integration is for Cisco Umbrella. It includes the following datasets for receiving logs from an AWS S3 bucket using an SQS notification queue and Cisco Managed S3 bucket without SQS</span><span class="NormalTextRun SCXW66975973 BCX8" data-ccp-charstyle="eop">:</span></span><span class="EOP SCXW66975973 BCX8" data-ccp-props="{"201341983":0,"335559685":360,"335559739":160,"335559740":259}"> </span>

<div class="ListContainerWrapper SCXW66975973 BCX8" id="bkmrk-log-dataset%3A-support">- <span class="TextRun Highlight SCXW66975973 BCX8" data-contrast="auto" lang="EN-US" xml:lang="EN-US"><span class="NormalTextRun SCXW66975973 BCX8" data-ccp-charstyle="eop">log </span></span><span class="TextRun Highlight SCXW66975973 BCX8" data-contrast="auto" lang="EN-US" xml:lang="EN-US"><span class="NormalTextRun ContextualSpellingAndGrammarErrorV2Themed SCXW66975973 BCX8" data-ccp-charstyle="eop">dataset:</span><span class="NormalTextRun SCXW66975973 BCX8" data-ccp-charstyle="eop"> supports Cisco Umbrella logs</span><span class="NormalTextRun SCXW66975973 BCX8" data-ccp-charstyle="eop">.</span></span><span class="EOP SCXW66975973 BCX8" data-ccp-props="{"201341983":0,"335559739":160,"335559740":259}"> </span>

</div>
##### <span style="color: rgb(0, 0, 0);">**<span class="TextRun Highlight SCXW66975973 BCX8" data-contrast="auto" lang="EN-US" xml:lang="EN-US"><span class="NormalTextRun SCXW66975973 BCX8" data-ccp-charstyle="eop">Logs</span></span><span class="EOP SCXW66975973 BCX8" data-ccp-props="{"201341983":0,"335559685":720,"335559739":160,"335559740":259}"> </span>**</span>

**<span class="TextRun Highlight SCXW66975973 BCX8" data-contrast="auto" lang="EN-US" xml:lang="EN-US"><span class="NormalTextRun SCXW66975973 BCX8" data-ccp-charstyle="eop">Umbrella</span></span><span class="EOP SCXW66975973 BCX8" data-ccp-props="{"201341983":0,"335559685":720,"335559739":160,"335559740":259}"> </span>**

<span class="TextRun Highlight SCXW66975973 BCX8" data-contrast="auto" lang="EN-US" xml:lang="EN-US"><span class="NormalTextRun SCXW66975973 BCX8" data-ccp-charstyle="eop">When using Cisco Managed S3 buckets that does not use SQS there is no load balancing possibilities for multiple agents, a single agent should be configured to poll the S3 bucket for new and updated files, and the number of workers can be configured to scale vertically</span><span class="NormalTextRun SCXW66975973 BCX8" data-ccp-charstyle="eop">.</span></span><span class="EOP SCXW66975973 BCX8" data-ccp-props="{"201341983":0,"335559685":720,"335559739":160,"335559740":259}"> </span>

<span class="TextRun Highlight SCXW66975973 BCX8" data-contrast="auto" lang="EN-US" xml:lang="EN-US"><span class="NormalTextRun SCXW66975973 BCX8" data-ccp-charstyle="eop">The </span></span><span class="TextRun Highlight SCXW66975973 BCX8" data-contrast="auto" lang="EN-US" xml:lang="EN-US"><span class="NormalTextRun SCXW66975973 BCX8" data-ccp-charstyle="eop">log</span></span><span class="TextRun Highlight SCXW66975973 BCX8" data-contrast="auto" lang="EN-US" xml:lang="EN-US"><span class="NormalTextRun SCXW66975973 BCX8" data-ccp-charstyle="eop"> dataset collects Cisco Umbrella logs</span><span class="NormalTextRun SCXW66975973 BCX8" data-ccp-charstyle="eop">.</span></span><span class="EOP SCXW66975973 BCX8" data-ccp-props="{"201341983":0,"335559685":720,"335559739":160,"335559740":259}"> </span>

<span class="TextRun Highlight SCXW66975973 BCX8" data-contrast="auto" lang="EN-US" xml:lang="EN-US"><span class="NormalTextRun SCXW66975973 BCX8" data-ccp-charstyle="eop">Advantages of Integrating with the Umbrella API</span></span><span class="EOP SCXW66975973 BCX8" data-ccp-props="{"201341983":0,"335559731":720,"335559739":160,"335559740":259}"> </span>

<span class="TextRun Highlight SCXW66975973 BCX8" data-contrast="auto" lang="EN-US" xml:lang="EN-US"><span class="NormalTextRun SCXW66975973 BCX8" data-ccp-charstyle="eop">The Umbrella API features </span><span class="NormalTextRun AdvancedProofingIssueV2Themed SCXW66975973 BCX8" data-ccp-charstyle="eop">a number of</span><span class="NormalTextRun SCXW66975973 BCX8" data-ccp-charstyle="eop"> improvements over the Umbrella v1 APIs and the Umbrella Reporting v2 API.</span></span><span class="EOP SCXW66975973 BCX8" data-ccp-props="{"201341983":0,"335559685":720,"335559739":160,"335559740":259}"> </span>

<div class="SCXW66975973 BCX8" id="bkmrk-intuitive-base-uri%C2%A0-"><div class="ListContainerWrapper SCXW66975973 BCX8">- <span class="TextRun Highlight SCXW66975973 BCX8" data-contrast="auto" lang="EN-US" xml:lang="EN-US"><span class="NormalTextRun SCXW66975973 BCX8" data-ccp-charstyle="eop">Intuitive base URI</span></span><span class="EOP SCXW66975973 BCX8" data-ccp-props="{"201341983":0,"335559739":160,"335559740":259}"> </span>
- <span class="TextRun Highlight SCXW66975973 BCX8" data-contrast="auto" lang="EN-US" xml:lang="EN-US"><span class="NormalTextRun SCXW66975973 BCX8" data-ccp-charstyle="eop">API paths defined by top-level </span><span class="NormalTextRun SCXW66975973 BCX8" data-ccp-charstyle="eop">scopes</span></span><span class="EOP SCXW66975973 BCX8" data-ccp-props="{"201341983":0,"335559739":160,"335559740":259}"> </span>
- <span class="TextRun Highlight SCXW66975973 BCX8" data-contrast="auto" lang="EN-US" xml:lang="EN-US"><span class="NormalTextRun SCXW66975973 BCX8" data-ccp-charstyle="eop">Intent-based, granular API key scopes</span></span><span class="EOP SCXW66975973 BCX8" data-ccp-props="{"201341983":0,"335559739":160,"335559740":259}"> </span>
- <span class="TextRun Highlight SCXW66975973 BCX8" data-contrast="auto" lang="EN-US" xml:lang="EN-US"><span class="NormalTextRun SCXW66975973 BCX8" data-ccp-charstyle="eop">API key </span><span class="NormalTextRun SCXW66975973 BCX8" data-ccp-charstyle="eop">expiration</span></span><span class="EOP SCXW66975973 BCX8" data-ccp-props="{"201341983":0,"335559739":160,"335559740":259}"> </span>
- <span class="TextRun Highlight SCXW66975973 BCX8" data-contrast="auto" lang="EN-US" xml:lang="EN-US"><span class="NormalTextRun SCXW66975973 BCX8" data-ccp-charstyle="eop">Updated API key administration dashboard views</span></span><span class="EOP SCXW66975973 BCX8" data-ccp-props="{"201341983":0,"335559739":160,"335559740":259}"> </span>
- <span class="TextRun Highlight SCXW66975973 BCX8" data-contrast="auto" lang="EN-US" xml:lang="EN-US"><span class="NormalTextRun SCXW66975973 BCX8" data-ccp-charstyle="eop">Programmatic API key administration</span></span><span class="EOP SCXW66975973 BCX8" data-ccp-props="{"201341983":0,"335559739":160,"335559740":259}"> </span>
- <span class="TextRun Highlight SCXW66975973 BCX8" data-contrast="auto" lang="EN-US" xml:lang="EN-US"><span class="NormalTextRun SCXW66975973 BCX8" data-ccp-charstyle="eop">API authentication and authorization supported by OAuth 2.0 client credentials </span><span class="NormalTextRun SCXW66975973 BCX8" data-ccp-charstyle="eop">flow</span></span><span class="EOP SCXW66975973 BCX8" data-ccp-props="{"201341983":0,"335559739":160,"335559740":259}"> </span>
- <span class="TextRun Highlight SCXW66975973 BCX8" data-contrast="auto" lang="EN-US" xml:lang="EN-US"><span class="NormalTextRun SCXW66975973 BCX8" data-ccp-charstyle="eop">Portable, programmable API interface for client integrations</span></span><span class="EOP SCXW66975973 BCX8" data-ccp-props="{"201341983":0,"335559739":160,"335559740":259}"> </span>

</div></div><span class="TextRun Highlight SCXW66975973 BCX8" data-contrast="auto" lang="EN-US" xml:lang="EN-US"><span class="NormalTextRun SCXW66975973 BCX8" data-ccp-charstyle="eop">Before you send a request to the Umbrella API, you must create new Umbrella API credentials and generate an API access token. For more information, see Umbrella API Authentication.</span></span>

<span class="EOP SCXW66975973 BCX8" data-ccp-props="{"201341983":0,"335559685":720,"335559739":160,"335559740":259}"> [https://developer.cisco.com/docs/cloud-security/authentication/#authentication](https://developer.cisco.com/docs/cloud-security/authentication/#authentication)</span>

**<span class="TextRun Highlight SCXW66975973 BCX8" data-contrast="auto" lang="EN-US" xml:lang="EN-US"><span class="NormalTextRun SCXW66975973 BCX8" data-ccp-charstyle="eop">Authentication</span></span><span class="EOP SCXW66975973 BCX8" data-ccp-props="{"201341983":0,"335559685":720,"335559739":160,"335559740":259}"> </span>**

<span class="TextRun Highlight SCXW66975973 BCX8" data-contrast="auto" lang="EN-US" xml:lang="EN-US"><span class="NormalTextRun SCXW66975973 BCX8" data-ccp-charstyle="eop">The Umbrella API provides a standard REST interface and supports the OAuth 2.0 client credentials flow. To get started, log in to Umbrella and create an Umbrella API key. Then, use your API credentials to generate an API access token.</span></span><span class="EOP SCXW66975973 BCX8" data-ccp-props="{"201341983":0,"335559685":720,"335559739":160,"335559740":259}"> </span>

<span class="TextRun Highlight SCXW66975973 BCX8" data-contrast="auto" lang="EN-US" xml:lang="EN-US"><span class="NormalTextRun SCXW66975973 BCX8" data-ccp-charstyle="eop">Note:</span></span><span class="TextRun Highlight SCXW66975973 BCX8" data-contrast="auto" lang="EN-US" xml:lang="EN-US"><span class="NormalTextRun SCXW66975973 BCX8" data-ccp-charstyle="eop"> API keys, passwords, secrets, and tokens allow access to your private customer data. You should never share your credentials with another user or organization.</span></span><span class="EOP SCXW66975973 BCX8" data-ccp-props="{"201341983":0,"335559685":1440,"335559739":160,"335559740":259}"> </span>

**<span class="TextRun Highlight SCXW66975973 BCX8" data-contrast="auto" lang="EN-US" xml:lang="EN-US"><span class="NormalTextRun SCXW66975973 BCX8" data-ccp-charstyle="eop">Log in to </span><span class="NormalTextRun SCXW66975973 BCX8" data-ccp-charstyle="eop">Umbrella</span></span><span class="EOP SCXW66975973 BCX8" data-ccp-props="{"201341983":0,"335559685":720,"335559739":160,"335559740":259}"> </span>**

<div class="SCXW66975973 BCX8" id="bkmrk-log-in-to-umbrella-w"><div class="ListContainerWrapper SCXW66975973 BCX8">- <span class="TextRun Highlight SCXW66975973 BCX8" data-contrast="auto" lang="EN-US" xml:lang="EN-US"><span class="NormalTextRun SCXW66975973 BCX8" data-ccp-charstyle="eop">Log in to Umbrella with the following URL:</span></span> [<span class="TextRun Highlight Underlined SCXW66975973 BCX8" data-contrast="none" lang="EN-US" xml:lang="EN-US"><span class="NormalTextRun SCXW66975973 BCX8" data-ccp-charstyle="Hyperlink">https://dashboard.umbrella.com</span></span>](https://dashboard.umbrella.com/)<span class="EOP SCXW66975973 BCX8" data-ccp-props="{"201341983":0,"335559685":1440,"335559739":160,"335559740":259}"> </span>

</div></div><div class="SCXW66975973 BCX8" id="bkmrk-you-can-find-your-us"><div class="ListContainerWrapper SCXW66975973 BCX8">- <span class="TextRun Highlight SCXW66975973 BCX8" data-contrast="auto" lang="EN-US" xml:lang="EN-US"><span class="NormalTextRun SCXW66975973 BCX8" data-ccp-charstyle="eop">You can find your username after Admin in the navigation tree. Confirm that your organization appears under your username</span><span class="NormalTextRun SCXW66975973 BCX8" data-ccp-charstyle="eop">.</span></span><span class="EOP SCXW66975973 BCX8" data-ccp-props="{"201341983":0,"335559739":160,"335559740":259}"> </span>

</div></div>#### **Create Umbrella API Key**

Create an Umbrella API key ID and key secret.

**Note:** You have only one opportunity to copy your API secret. Umbrella does not save your API secret and you cannot retrieve the secret after its initial creation.

1. Navigate to **Admin &gt; API Keys** or in a Multi-org, Managed Service Provider (MSP), or Managed Secure Service Provider (MSSP) console navigate to **Console Settings &gt; API Keys**.
2. Click **API Keys** and then click **Add**.
    
    
    - The number of expired API keys appears next to the red triangle.
    - The number of API keys that expire within 30 days appears next to the yellow triangle.
3. Enter a name and description for the key. A name must contain fewer than 256 characters. The description is optional.
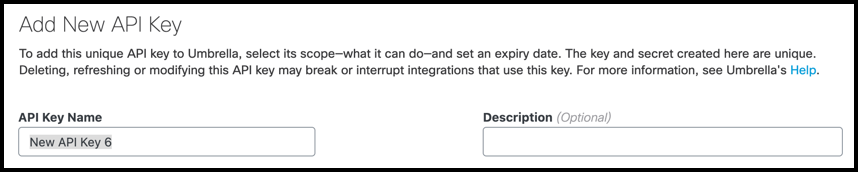
    
    ![Umbrella API key name and description](https://pubhub.devnetcloud.com/media/cloud-security-apis-in-eft/docs/images/umb-add-api-key-name-description.png#developer.cisco.com)
4. Check the key scopes and expand a key scope to view the scope categories. Check each scope category in a key scope to enable access to the API endpoints.
    
    [![image.png](https://cytechint-docs-bookstack.s3.amazonaws.com/uploads/images/gallery/2024-10/scaled-1680-/JCBMe52qf9X0Mowd-image.png)](https://cytechint-docs-bookstack.s3.amazonaws.com/uploads/images/gallery/2024-10/JCBMe52qf9X0Mowd-image.png)
5. Choose **Read-Only** or **Read / Write** for the selected scope and resource.
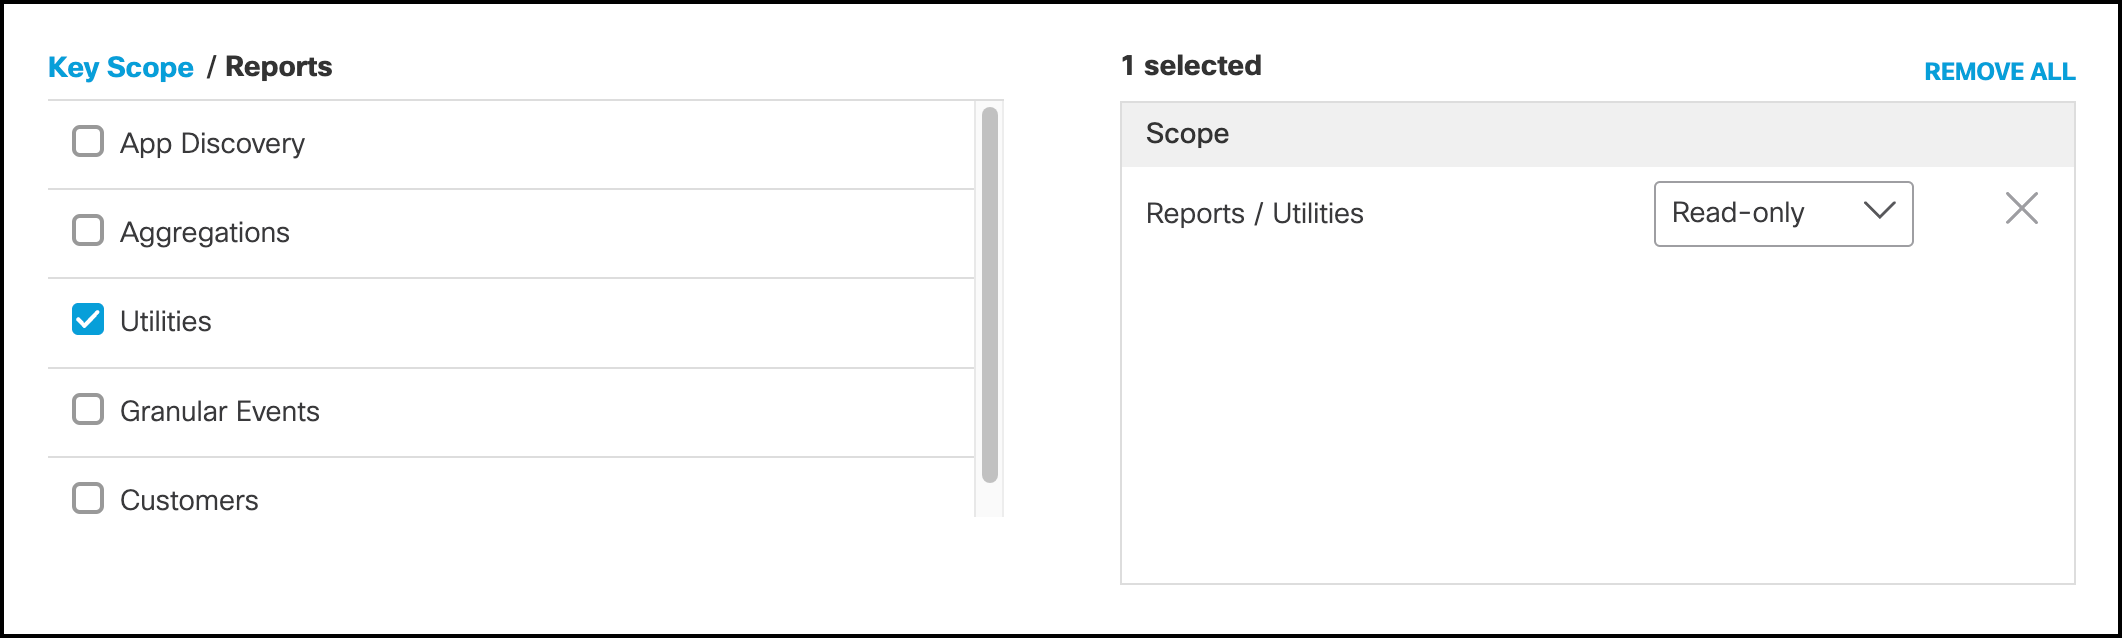
    
    ![Umbrella API key scope access](https://pubhub.devnetcloud.com/media/cloud-security-apis-in-eft/docs/images/selected-api-key-scopes-border.png#developer.cisco.com)
6. For **Expiry Date**, choose the expiration date for the key, or choose **Never expire**.
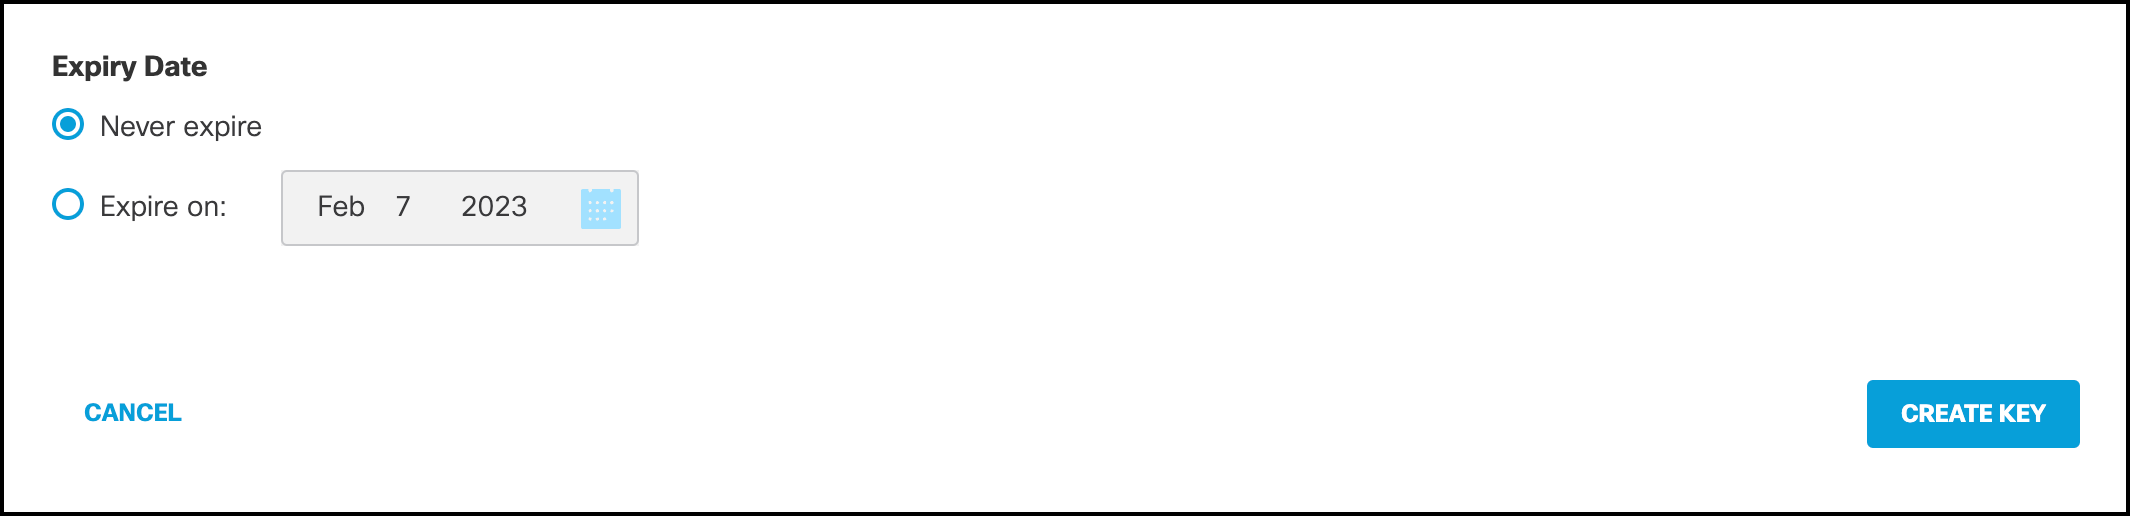
    
    ![Umbrella API expiry date](https://pubhub.devnetcloud.com/media/cloud-security-apis-in-eft/docs/images/keyadmin-create-key-button-border.png#developer.cisco.com)
7. (Optional) For **Network Restrictions**, enter a comma-separated list of public IP addresses or CIDRs, then click **ADD**.
    
    **Note:** You can add up to ten networks to your API key. You can only use your API key to authenticate requests for clients on the selected networks.
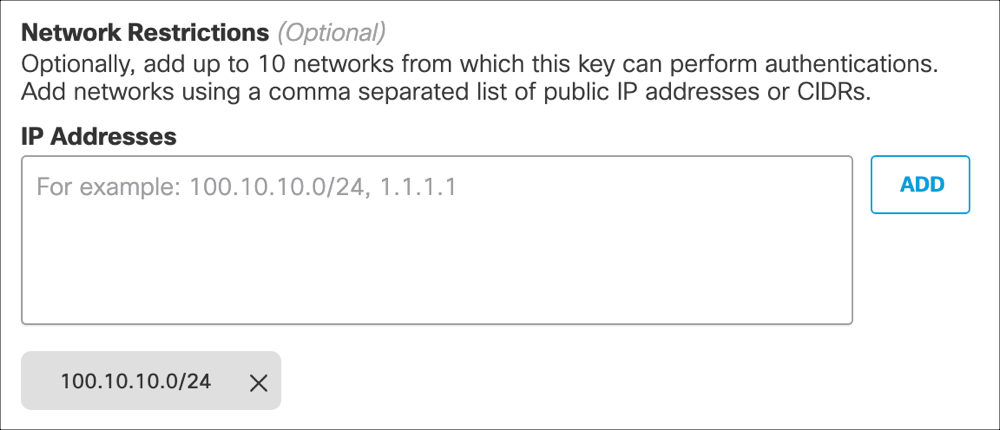
    
    ![Umbrella API network restrictions](https://pubhub.devnetcloud.com/media/cloud-security-apis-in-eft/docs/images/network-restrictions-umbrella-add-ip.png#developer.cisco.com)
8. Click **Create Key**.
9. Copy and save your **API Key** and **Key Secret**.
10. Click **Accept And Close**.

#### **Refresh Umbrella API Key**

Refresh an Umbrella API key ID and key secret.

**Note:** You have only one opportunity to copy your API secret. Umbrella does not save your API secret and you cannot retrieve the secret after its initial creation.

1. Navigate to **Admin &gt; API Keys** or in a Multi-org, Managed Service Provider (MSP), or Managed Secure Service Provider (MSSP) console, navigate to **Console Settings &gt; API Keys**.
2. Click **API Keys**, and then expand an API key.
3. Click **Refresh Key**.
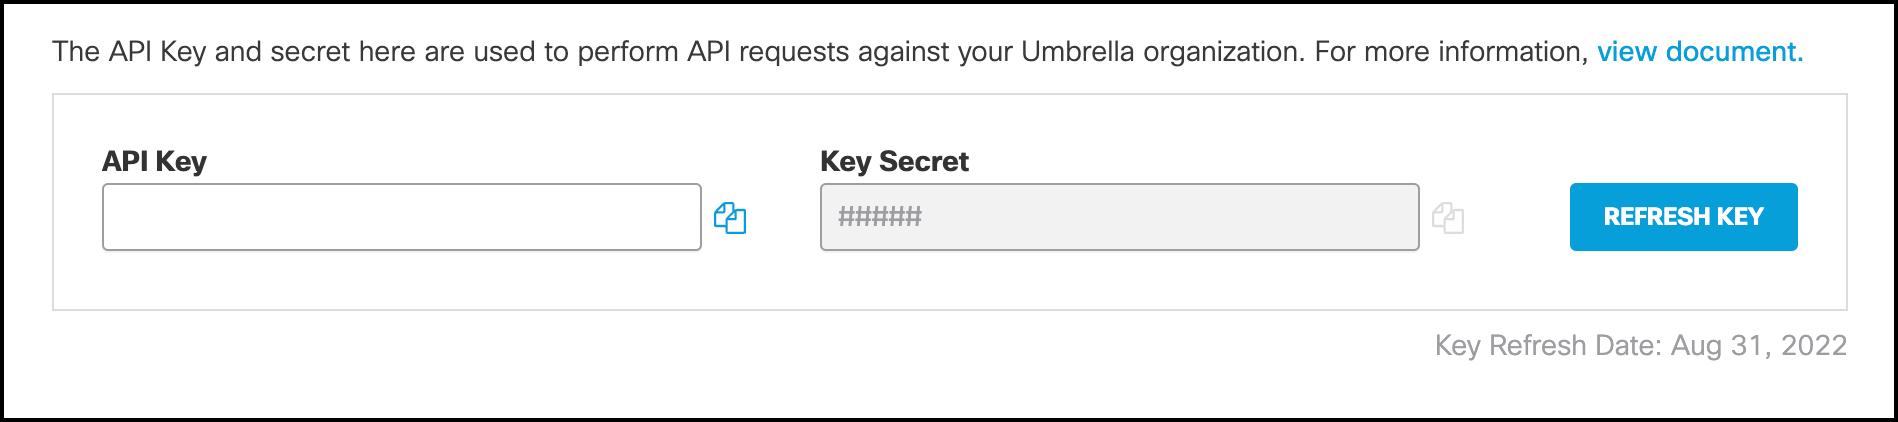
    
    ![Umbrella API dashboard](https://pubhub.devnetcloud.com/media/cloud-security-apis-in-eft/docs/images/api-key-refresh-view-border.png#developer.cisco.com)
4. Copy and save your **API Key** and **Key Secret**.
5. Click **Accept and Close**.

#### **Update Umbrella API Key**

Update an Umbrella API key.

1. Navigate to **Admin &gt; API Keys** or in a Multi-org, Managed Service Provider (MSP), or Managed Secure Service Provider (MSSP) console, navigate to **Console Settings &gt; API Keys**.
2. Click **API Keys**, and then expand an API key. You can modify the **API Key Name**, **Description**, selected scopes and permissions in **Key Scope**, and **Expiry Date**.
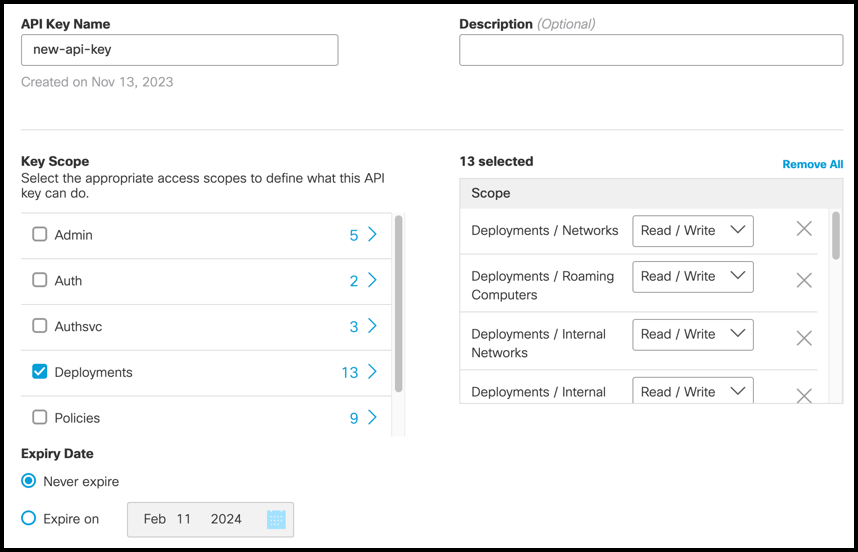
    
    ![Umbrella API scope and expiry date](https://pubhub.devnetcloud.com/media/cloud-security-apis-in-eft/docs/images/umbrella-api-key-name-desc-update-border.png#developer.cisco.com)
3. For **Network Restrictions**, update the list of IP addresses and CIDRs. Click on the **X** to remove a network address.
4. Click **Save**.

##### <span style="color: rgb(0, 0, 0);">**<span class="TextRun SCXW66975973 BCX8" data-contrast="none" lang="EN-US" xml:lang="EN-US"><span class="NormalTextRun SCXW66975973 BCX8" data-ccp-charstyle="eop">Cisco </span><span class="NormalTextRun SCXW66975973 BCX8" data-ccp-charstyle="eop">Secure Endpoint</span><span class="NormalTextRun SCXW66975973 BCX8" data-ccp-charstyle="eop"> Integration Procedures</span></span><span class="EOP SCXW66975973 BCX8" data-ccp-props="{"134245418":true,"134245529":true,"201341983":0,"335559738":240,"335559739":0,"335559740":360}"> </span>**</span>

<span class="TextRun SCXW66975973 BCX8" data-contrast="auto" lang="EN-US" xml:lang="EN-US"><span class="NormalTextRun SCXW66975973 BCX8" data-ccp-charstyle="eop">Please provide the following information to </span><span class="NormalTextRun SpellingErrorV2Themed SCXW66975973 BCX8" data-ccp-charstyle="eop">CyTech</span><span class="NormalTextRun SCXW66975973 BCX8" data-ccp-charstyle="eop">:</span></span><span class="EOP SCXW66975973 BCX8" data-ccp-props="{"201341983":0,"335559685":720,"335559739":160,"335559740":259}"> </span>

**<span class="TextRun SCXW66975973 BCX8" data-contrast="none" lang="EN-US" xml:lang="EN-US"><span class="NormalTextRun SCXW66975973 BCX8" data-ccp-charstyle="eop">Collect logs from the Cisco </span><span class="NormalTextRun SCXW66975973 BCX8" data-ccp-charstyle="eop">Umbrella</span></span><span class="EOP SCXW66975973 BCX8" data-ccp-props="{"134245418":true,"134245529":true,"201341983":0,"335559738":240,"335559739":0,"335559740":360}"> </span>**

<div class="SCXW66975973 BCX8" id="bkmrk-queue-url---url-of-t"><div class="ListContainerWrapper SCXW66975973 BCX8">1. <span class="TextRun SCXW66975973 BCX8" data-contrast="auto" lang="EN-US" xml:lang="EN-US"><span class="NormalTextRun SCXW66975973 BCX8" data-ccp-charstyle="eop">Queue URL</span></span><span class="TextRun SCXW66975973 BCX8" data-contrast="auto" lang="EN-US" xml:lang="EN-US"><span class="NormalTextRun SCXW66975973 BCX8" data-ccp-charstyle="eop"> - </span><span class="NormalTextRun SCXW66975973 BCX8" data-ccp-charstyle="eop">URL of the AWS SQS queue that messages will be received from. For Cisco Managed S3 buckets or S3 without SQS, use Bucket ARN.</span></span><span class="EOP SCXW66975973 BCX8" data-ccp-props="{"201341983":0,"335559739":160,"335559740":259}"> </span>

</div><div class="ListContainerWrapper SCXW66975973 BCX8">2. <span class="TextRun SCXW66975973 BCX8" data-contrast="auto" lang="EN-US" xml:lang="EN-US"><span class="NormalTextRun SCXW66975973 BCX8" data-ccp-charstyle="eop">Bucket ARN</span></span><span class="TextRun SCXW66975973 BCX8" data-contrast="auto" lang="EN-US" xml:lang="EN-US"> <span class="NormalTextRun SCXW66975973 BCX8" data-ccp-charstyle="eop">- </span><span class="NormalTextRun SCXW66975973 BCX8" data-ccp-charstyle="eop">Required</span><span class="NormalTextRun SCXW66975973 BCX8" data-ccp-charstyle="eop"> for Cisco Managed S3. If the S3 bucket does not use SQS, this is the address for the S3 bucket, one example is </span><span class="NormalTextRun ContextualSpellingAndGrammarErrorV2Themed SCXW66975973 BCX8" data-ccp-charstyle="eop">arn:aws</span><span class="NormalTextRun SCXW66975973 BCX8" data-ccp-charstyle="eop">:s</span><span class="NormalTextRun ContextualSpellingAndGrammarErrorV2Themed SCXW66975973 BCX8" data-ccp-charstyle="eop">3:::</span><span class="NormalTextRun SCXW66975973 BCX8" data-ccp-charstyle="eop">cisco-managed-eu-central-1 For a list of Cisco Managed buckets, please see </span></span>[<span class="TextRun Underlined SCXW66975973 BCX8" data-contrast="none" lang="EN-US" xml:lang="EN-US"><span class="NormalTextRun SCXW66975973 BCX8" data-ccp-charstyle="Hyperlink">https://docs.umbrella.com/mssp-deployment/docs/enable-logging-to-a-cisco-managed-s3-bucket</span></span>](https://docs.umbrella.com/mssp-deployment/docs/enable-logging-to-a-cisco-managed-s3-bucket)<span class="TextRun SCXW66975973 BCX8" data-contrast="auto" lang="EN-US" xml:lang="EN-US"><span class="NormalTextRun SCXW66975973 BCX8" data-ccp-charstyle="eop">.</span></span><span class="EOP SCXW66975973 BCX8" data-ccp-props="{"201341983":0,"335559739":160,"335559740":259}"> </span>

</div><div class="ListContainerWrapper SCXW66975973 BCX8">3. <span class="TextRun SCXW66975973 BCX8" data-contrast="auto" lang="EN-US" xml:lang="EN-US"><span class="NormalTextRun SCXW66975973 BCX8" data-ccp-charstyle="eop">Bucket Region</span></span><span class="TextRun SCXW66975973 BCX8" data-contrast="auto" lang="EN-US" xml:lang="EN-US"><span class="NormalTextRun SCXW66975973 BCX8" data-ccp-charstyle="eop"> - </span><span class="NormalTextRun SCXW66975973 BCX8" data-ccp-charstyle="eop">Required</span><span class="NormalTextRun SCXW66975973 BCX8" data-ccp-charstyle="eop"> for Cisco Managed S3. The region the bucket is </span><span class="NormalTextRun SCXW66975973 BCX8" data-ccp-charstyle="eop">located</span><span class="NormalTextRun SCXW66975973 BCX8" data-ccp-charstyle="eop"> in.</span></span><span class="EOP SCXW66975973 BCX8" data-ccp-props="{"201341983":0,"335559739":160,"335559740":259}"> </span>

</div><div class="ListContainerWrapper SCXW66975973 BCX8">4. <span class="TextRun SCXW66975973 BCX8" data-contrast="auto" lang="EN-US" xml:lang="EN-US"><span class="NormalTextRun SCXW66975973 BCX8" data-ccp-charstyle="eop">Bucket List Prefix</span></span><span class="TextRun SCXW66975973 BCX8" data-contrast="auto" lang="EN-US" xml:lang="EN-US"><span class="NormalTextRun SCXW66975973 BCX8" data-ccp-charstyle="eop"> - </span><span class="NormalTextRun SCXW66975973 BCX8" data-ccp-charstyle="eop">Required</span><span class="NormalTextRun SCXW66975973 BCX8" data-ccp-charstyle="eop"> for Cisco Managed S3. This sets the root folder of the S3 bucket that should be </span><span class="NormalTextRun SCXW66975973 BCX8" data-ccp-charstyle="eop">monitored</span><span class="NormalTextRun SCXW66975973 BCX8" data-ccp-charstyle="eop">, found in the S3 Web UI. Example value: 1235\_654vcasd23431e5dd6f7fsad457sdf1fd5.</span></span><span class="EOP SCXW66975973 BCX8" data-ccp-props="{"201341983":0,"335559739":160,"335559740":259}"> </span>

</div><div class="ListContainerWrapper SCXW66975973 BCX8">5. <span class="TextRun SCXW66975973 BCX8" data-contrast="auto" lang="EN-US" xml:lang="EN-US"><span class="NormalTextRun SCXW66975973 BCX8" data-ccp-charstyle="eop">Number of Workers</span></span><span class="TextRun SCXW66975973 BCX8" data-contrast="auto" lang="EN-US" xml:lang="EN-US"><span class="NormalTextRun SCXW66975973 BCX8" data-ccp-charstyle="eop"> - </span><span class="NormalTextRun SCXW66975973 BCX8" data-ccp-charstyle="eop">Required</span><span class="NormalTextRun SCXW66975973 BCX8" data-ccp-charstyle="eop"> for Cisco Managed S3. Number of workers that will process the S3 objects listed. Minimum is 1.</span></span><span class="EOP SCXW66975973 BCX8" data-ccp-props="{"201341983":0,"335559739":160,"335559740":259}"> </span>

</div><div class="ListContainerWrapper SCXW66975973 BCX8">6. <span class="TextRun SCXW66975973 BCX8" data-contrast="auto" lang="EN-US" xml:lang="EN-US"><span class="NormalTextRun SCXW66975973 BCX8" data-ccp-charstyle="eop">Bucket List Interval</span></span><span class="TextRun SCXW66975973 BCX8" data-contrast="auto" lang="EN-US" xml:lang="EN-US"><span class="NormalTextRun SCXW66975973 BCX8" data-ccp-charstyle="eop"> - </span><span class="NormalTextRun SCXW66975973 BCX8" data-ccp-charstyle="eop">Time interval for polling listing of the S3 bucket. Defaults to 120s.</span></span><span class="EOP SCXW66975973 BCX8" data-ccp-props="{"201341983":0,"335559739":160,"335559740":259}"> </span>

</div><div class="ListContainerWrapper SCXW66975973 BCX8">7. <span class="TextRun SCXW66975973 BCX8" data-contrast="auto" lang="EN-US" xml:lang="EN-US"><span class="NormalTextRun SCXW66975973 BCX8" data-ccp-charstyle="eop">Access Key ID</span></span><span class="EOP SCXW66975973 BCX8" data-ccp-props="{"201341983":0,"335559739":160,"335559740":259}"> </span>

</div><div class="ListContainerWrapper SCXW66975973 BCX8">8. <span class="TextRun SCXW66975973 BCX8" data-contrast="auto" lang="EN-US" xml:lang="EN-US"><span class="NormalTextRun SCXW66975973 BCX8" data-ccp-charstyle="eop">Secret Access Key</span></span><span class="EOP SCXW66975973 BCX8" data-ccp-props="{"201341983":0,"335559739":160,"335559740":259}"> </span>

</div></div><span class="EOP SCXW66975973 BCX8" data-ccp-props="{"201341983":0,"335559739":160,"335559740":259}">*If you need further assistance, kindly contact our support at <support@cytechint.com> for prompt assistance and guidance.*</span>

<div class="SCXW66975973 BCX8" id="bkmrk--1"></div>

# Cloudflare Integration

##### <span style="color: rgb(53, 152, 219);">**<span class="TextRun SCXW22679002 BCX8" data-contrast="none" lang="EN-US" xml:lang="EN-US"><span class="NormalTextRun SCXW22679002 BCX8" data-ccp-charstyle="Style (Complex) Open Sans" data-ccp-charstyle-defn="{"ObjectId":"5616e398-4900-4300-a34e-28c396a31491|165","ClassId":1073872969,"Properties":[469775450,"Style (Complex) Open Sans",201340122,"1",134233614,"true",469778129,"StyleComplexOpenSans",335572020,"1",201342448,"1",469777841,"Open Sans",469777842,"Open Sans",469777843,"Calibri",469777844,"Open Sans",469769226,"Open Sans,Calibri",469778324,"Default Paragraph Font"]}">Introduction</span></span><span class="EOP SCXW22679002 BCX8" data-ccp-props="{"134245418":true,"134245529":true,"201341983":0,"335559738":240,"335559739":0,"335559740":360}"> </span>**</span>

<span class="TextRun SCXW22679002 BCX8" data-contrast="auto" lang="EN-US" xml:lang="EN-US"><span class="NormalTextRun SCXW22679002 BCX8" data-ccp-charstyle="Style (Complex) Open Sans">Cloudflare integration uses Cloudflare's API to retrieve audit logs and traffic logs from Cloudflare, for a particular zone, and ingest them into Elasticsearch. This allows you to search, </span><span class="NormalTextRun SCXW22679002 BCX8" data-ccp-charstyle="Style (Complex) Open Sans">observe</span><span class="NormalTextRun SCXW22679002 BCX8" data-ccp-charstyle="Style (Complex) Open Sans"> and visualize the Cloudflare log events through Elasticsearch.</span></span><span class="EOP SCXW22679002 BCX8" data-ccp-props="{"201341983":0,"335559685":360,"335559739":160,"335559740":259}"> </span>

<span class="TextRun SCXW22679002 BCX8" data-contrast="auto" lang="EN-US" xml:lang="EN-US"><span class="NormalTextRun SCXW22679002 BCX8" data-ccp-charstyle="Style (Complex) Open Sans">Users of Cloudflare use Cloudflare services to increase the security and performance of their web sites and services.</span></span><span class="EOP SCXW22679002 BCX8" data-ccp-props="{"201341983":0,"335559685":360,"335559739":160,"335559740":259}"> </span>

<span class="TextRun SCXW22679002 BCX8" data-contrast="auto" lang="EN-US" xml:lang="EN-US"><span class="NormalTextRun SCXW22679002 BCX8" data-ccp-charstyle="Style (Complex) Open Sans">To </span><span class="NormalTextRun SCXW22679002 BCX8" data-ccp-charstyle="Style (Complex) Open Sans">enable the Cloudflare </span><span class="NormalTextRun SpellingErrorV2Themed SCXW22679002 BCX8" data-ccp-charstyle="Style (Complex) Open Sans">Logpush</span><span class="NormalTextRun SCXW22679002 BCX8" data-ccp-charstyle="Style (Complex) Open Sans">, please refer to Section </span></span><span class="FieldRange SCXW22679002 BCX8"><span class="TextRun SCXW22679002 BCX8" data-contrast="auto" lang="EN-US" xml:lang="EN-US"><span class="NormalTextRun SCXW22679002 BCX8" data-ccp-charstyle="Style (Complex) Open Sans">5</span></span></span><span class="TextRun SCXW22679002 BCX8" data-contrast="auto" lang="EN-US" xml:lang="EN-US"><span class="NormalTextRun SCXW22679002 BCX8" data-ccp-charstyle="Style (Complex) Open Sans">.</span><span class="NormalTextRun SCXW22679002 BCX8" data-ccp-charstyle="Style (Complex) Open Sans"> Currently, the procedures described </span><span class="NormalTextRun ContextualSpellingAndGrammarErrorV2Themed SCXW22679002 BCX8" data-ccp-charstyle="Style (Complex) Open Sans">is</span><span class="NormalTextRun SCXW22679002 BCX8" data-ccp-charstyle="Style (Complex) Open Sans"> for the setup of Amazon S3. </span></span><span class="EOP SCXW22679002 BCX8" data-ccp-props="{"201341983":0,"335559685":360,"335559739":160,"335559740":259}"> </span>

<div class="SCXW22679002 BCX8" id="bkmrk-"><div class="OutlineElement Ltr SCXW22679002 BCX8">  
</div><div class="ListContainerWrapper SCXW22679002 BCX8">  
</div></div>##### <span style="color: rgb(53, 152, 219);">**<span class="TextRun SCXW22679002 BCX8" data-contrast="none" lang="EN-US" xml:lang="EN-US"><span class="NormalTextRun SCXW22679002 BCX8" data-ccp-charstyle="Style (Complex) Open Sans">Assumptions</span></span><span class="EOP SCXW22679002 BCX8" data-ccp-props="{"134245418":true,"134245529":true,"201341983":0,"335559738":240,"335559739":0,"335559740":360}"> </span>**</span>

<span class="TextRun SCXW22679002 BCX8" data-contrast="auto" lang="EN-US" xml:lang="EN-US"><span class="NormalTextRun SCXW22679002 BCX8" data-ccp-charstyle="Style (Complex) Open Sans">The procedures described in Section </span></span><span class="FieldRange SCXW22679002 BCX8"><span class="TextRun SCXW22679002 BCX8" data-contrast="auto" lang="EN-US" xml:lang="EN-US"><span class="NormalTextRun SCXW22679002 BCX8" data-ccp-charstyle="Style (Complex) Open Sans">3</span></span></span><span class="TextRun SCXW22679002 BCX8" data-contrast="auto" lang="EN-US" xml:lang="EN-US"> <span class="NormalTextRun ContextualSpellingAndGrammarErrorV2Themed SCXW22679002 BCX8" data-ccp-charstyle="Style (Complex) Open Sans">assumes</span><span class="NormalTextRun SCXW22679002 BCX8" data-ccp-charstyle="Style (Complex) Open Sans"> that a Log Collector has already been </span><span class="NormalTextRun ContextualSpellingAndGrammarErrorV2Themed SCXW22679002 BCX8" data-ccp-charstyle="Style (Complex) Open Sans">setup</span><span class="NormalTextRun SCXW22679002 BCX8" data-ccp-charstyle="Style (Complex) Open Sans">. </span></span><span class="EOP SCXW22679002 BCX8" data-ccp-props="{"201341983":0,"335559685":360,"335559739":160,"335559740":259}"> </span>

<div class="SCXW22679002 BCX8" id="bkmrk--1"><div class="OutlineElement Ltr SCXW22679002 BCX8">  
</div><div class="ListContainerWrapper SCXW22679002 BCX8">  
</div></div>##### <span style="color: rgb(53, 152, 219);">**<span class="TextRun SCXW22679002 BCX8" data-contrast="none" lang="EN-US" xml:lang="EN-US"><span class="NormalTextRun SCXW22679002 BCX8" data-ccp-charstyle="Style (Complex) Open Sans">Requirements</span></span><span class="EOP SCXW22679002 BCX8" data-ccp-props="{"134245418":true,"134245529":true,"201341983":0,"335559738":240,"335559739":0,"335559740":360}"> </span>**</span>

**<span class="TextRun SCXW22679002 BCX8" data-contrast="auto" lang="EN-US" xml:lang="EN-US"><span class="NormalTextRun SCXW22679002 BCX8" data-ccp-parastyle="Normal (Web)">Configure Cloudflare audit logs data stream</span></span><span class="EOP SCXW22679002 BCX8" data-ccp-props="{"134233117":true,"134233118":true,"201341983":0,"335557856":16777215,"335559685":360,"335559739":0,"335559740":240}"> </span>**

<span class="TextRun SCXW22679002 BCX8" data-contrast="auto" lang="EN-US" xml:lang="EN-US"><span class="NormalTextRun SCXW22679002 BCX8" data-ccp-parastyle="Normal (Web)">Enter values "Auth Email", "Auth Key" and "Account ID".</span></span><span class="EOP SCXW22679002 BCX8" data-ccp-props="{"134233117":true,"134233118":true,"201341983":0,"335557856":16777215,"335559685":360,"335559739":0,"335559740":240}"> </span>

<div class="SCXW22679002 BCX8" id="bkmrk-auth-email-is-the-em"><div class="ListContainerWrapper SCXW22679002 BCX8">1. 1. 1. <span class="TextRun SCXW22679002 BCX8" data-contrast="auto" lang="EN-US" xml:lang="EN-US"><span class="NormalTextRun SCXW22679002 BCX8" data-ccp-parastyle="Normal (Web)">Auth Email is the email address associated with your account.</span></span>
        2. <span class="TextRun SCXW22679002 BCX8" data-contrast="auto" lang="EN-US" xml:lang="EN-US"><span class="NormalTextRun SCXW22679002 BCX8" data-ccp-parastyle="Normal (Web)">Auth Key is the API key generated on the "My Account" page.</span></span>
        3. <span class="TextRun SCXW22679002 BCX8" data-contrast="auto" lang="EN-US" xml:lang="EN-US"><span class="NormalTextRun SCXW22679002 BCX8" data-ccp-parastyle="Normal (Web)">Account ID can be found on the Cloudflare dashboard. Follow the navigation documentation from </span></span>[<span class="TextRun Underlined SCXW22679002 BCX8" data-contrast="none" lang="EN-US" xml:lang="EN-US"><span class="NormalTextRun SCXW22679002 BCX8" data-ccp-charstyle="Hyperlink">here</span></span>](https://developers.cloudflare.com/fundamentals/get-started/basic-tasks/find-account-and-zone-ids/)<span class="TextRun SCXW22679002 BCX8" data-contrast="auto" lang="EN-US" xml:lang="EN-US"><span class="NormalTextRun SCXW22679002 BCX8" data-ccp-parastyle="Normal (Web)">.</span></span><span class="EOP SCXW22679002 BCX8" data-ccp-props="{"134233117":true,"134233118":true,"201341983":0,"335557856":16777215,"335559739":0,"335559740":240}"> </span>

</div><div class="OutlineElement Ltr SCXW22679002 BCX8" style="padding-left: 80px;">  
</div></div>##### <span style="color: rgb(53, 152, 219);">**<span class="TextRun SCXW22679002 BCX8" data-contrast="auto" lang="EN-US" xml:lang="EN-US"><span class="NormalTextRun SCXW22679002 BCX8" data-ccp-parastyle="Normal (Web)">Configure Cloudflare logs</span></span><span class="EOP SCXW22679002 BCX8" data-ccp-props="{"134233117":true,"134233118":true,"201341983":0,"335557856":16777215,"335559685":360,"335559739":0,"335559740":240}"> </span>**</span>

<span class="TextRun SCXW22679002 BCX8" data-contrast="auto" lang="EN-US" xml:lang="EN-US"><span class="NormalTextRun SCXW22679002 BCX8" data-ccp-parastyle="Normal (Web)">These logs </span><span class="NormalTextRun SCXW22679002 BCX8" data-ccp-parastyle="Normal (Web)">contain</span><span class="NormalTextRun SCXW22679002 BCX8" data-ccp-parastyle="Normal (Web)"> data related to the connecting client, the request path through the Cloudflare network, and the response from the </span><span class="NormalTextRun ContextualSpellingAndGrammarErrorV2Themed SCXW22679002 BCX8" data-ccp-parastyle="Normal (Web)">origin</span><span class="NormalTextRun SCXW22679002 BCX8" data-ccp-parastyle="Normal (Web)"> web server. For more information see </span></span>[<span class="TextRun Underlined SCXW22679002 BCX8" data-contrast="none" lang="EN-US" xml:lang="EN-US"><span class="NormalTextRun SCXW22679002 BCX8" data-ccp-charstyle="Hyperlink">here</span></span>](https://developers.cloudflare.com/logs/logpull/)<span class="TextRun SCXW22679002 BCX8" data-contrast="auto" lang="EN-US" xml:lang="EN-US"><span class="NormalTextRun SCXW22679002 BCX8" data-ccp-parastyle="Normal (Web)">.</span></span><span class="EOP SCXW22679002 BCX8" data-ccp-props="{"134233117":true,"134233118":true,"201341983":0,"335557856":16777215,"335559685":360,"335559739":0,"335559740":240}"> </span>

<span class="TextRun SCXW22679002 BCX8" data-contrast="auto" lang="EN-US" xml:lang="EN-US"><span class="NormalTextRun SCXW22679002 BCX8" data-ccp-parastyle="Normal (Web)">The integration can retrieve Cloudflare logs using -</span></span><span class="EOP SCXW22679002 BCX8" data-ccp-props="{"134233117":true,"134233118":true,"201341983":0,"335557856":16777215,"335559685":360,"335559739":0,"335559740":240}"> </span>

<div class="SCXW22679002 BCX8" id="bkmrk-auth-email-and-auth-"><div class="ListContainerWrapper SCXW22679002 BCX8">1. 1. 1. <span class="TextRun SCXW22679002 BCX8" data-contrast="auto" lang="EN-US" xml:lang="EN-US"><span class="NormalTextRun SCXW22679002 BCX8" data-ccp-parastyle="Normal (Web)">Auth Email and Auth Key</span></span>
        2. <span class="TextRun SCXW22679002 BCX8" data-contrast="auto" lang="EN-US" xml:lang="EN-US"><span class="NormalTextRun SCXW22679002 BCX8" data-ccp-parastyle="Normal (Web)">API Token</span> <span class="NormalTextRun SCXW22679002 BCX8" data-ccp-parastyle="Normal (Web)">More information is available </span></span>[<span class="TextRun Underlined SCXW22679002 BCX8" data-contrast="none" lang="EN-US" xml:lang="EN-US"><span class="NormalTextRun SCXW22679002 BCX8" data-ccp-charstyle="Hyperlink">he</span><span class="NormalTextRun SCXW22679002 BCX8" data-ccp-charstyle="Hyperlink">r</span><span class="NormalTextRun SCXW22679002 BCX8" data-ccp-charstyle="Hyperlink">e</span></span>](https://developers.cloudflare.com/logs/logpull/requesting-logs/#required-authentication-headers)<span class="TextRun SCXW22679002 BCX8" data-contrast="auto" lang="EN-US" xml:lang="EN-US"><span class="NormalTextRun SCXW22679002 BCX8" data-ccp-parastyle="Normal (Web)">.</span></span><span class="EOP SCXW22679002 BCX8" data-ccp-props="{"134233117":true,"134233118":true,"201341983":0,"335557856":16777215,"335559739":0,"335559740":240}"> </span>

</div><div class="OutlineElement Ltr SCXW22679002 BCX8">  
</div></div>**<span class="TextRun SCXW22679002 BCX8" data-contrast="auto" lang="EN-US" style="color: rgb(53, 152, 219);" xml:lang="EN-US"><span class="NormalTextRun SCXW22679002 BCX8" data-ccp-parastyle="Normal (Web)">CONFIGURE USING AUTH EMAIL AND AUTH KEY</span></span><span class="EOP SCXW22679002 BCX8" data-ccp-props="{"134233117":true,"134233118":true,"201341983":0,"335557856":16777215,"335559685":360,"335559739":0,"335559740":240}"> </span>**

<span class="TextRun SCXW22679002 BCX8" data-contrast="auto" lang="EN-US" xml:lang="EN-US"><span class="NormalTextRun SCXW22679002 BCX8" data-ccp-parastyle="Normal (Web)">Enter values "Auth Email", "Auth Key" and "Zone ID".</span></span><span class="EOP SCXW22679002 BCX8" data-ccp-props="{"134233117":true,"134233118":true,"201341983":0,"335557856":16777215,"335559685":360,"335559739":0,"335559740":240}"> </span>

<div class="SCXW22679002 BCX8" id="bkmrk-auth-email-is-the-em-1"><div class="ListContainerWrapper SCXW22679002 BCX8">1. 1. 1. <span class="TextRun SCXW22679002 BCX8" data-contrast="auto" lang="EN-US" xml:lang="EN-US"><span class="NormalTextRun SCXW22679002 BCX8" data-ccp-parastyle="Normal (Web)">Auth Email is the email address associated with your account.</span></span>
        2. <span class="NormalTextRun SCXW22679002 BCX8" data-ccp-parastyle="Normal (Web)">Auth Key is the API key generated on the "My Account" page.</span>
        3. <span class="NormalTextRun SCXW22679002 BCX8" data-ccp-parastyle="Normal (Web)">Zone ID can be found </span>[<span class="TextRun Underlined SCXW22679002 BCX8" data-contrast="none" lang="EN-US" xml:lang="EN-US"><span class="NormalTextRun SCXW22679002 BCX8" data-ccp-charstyle="Hyperlink">he</span><span class="NormalTextRun SCXW22679002 BCX8" data-ccp-charstyle="Hyperlink">r</span><span class="NormalTextRun SCXW22679002 BCX8" data-ccp-charstyle="Hyperlink">e</span></span>](https://developers.cloudflare.com/fundamentals/get-started/basic-tasks/find-account-and-zone-ids/)<span class="TextRun SCXW22679002 BCX8" data-contrast="auto" lang="EN-US" xml:lang="EN-US"><span class="NormalTextRun SCXW22679002 BCX8" data-ccp-parastyle="Normal (Web)">.</span></span><span class="EOP SCXW22679002 BCX8" data-ccp-props="{"134233117":true,"134233118":true,"201341983":0,"335557856":16777215,"335559739":0,"335559740":240}"> </span>

</div><div class="OutlineElement Ltr SCXW22679002 BCX8" style="padding-left: 80px;">  
</div></div><span style="color: rgb(53, 152, 219);">**<span class="TextRun SCXW22679002 BCX8" data-contrast="auto" lang="EN-US" xml:lang="EN-US"><span class="NormalTextRun SCXW22679002 BCX8" data-ccp-parastyle="Normal (Web)">CONFIGURE USING API TOKEN</span></span><span class="EOP SCXW22679002 BCX8" data-ccp-props="{"134233117":true,"134233118":true,"201341983":0,"335557856":16777215,"335559685":360,"335559739":0,"335559740":240}"> </span>**</span>

<span class="TextRun SCXW22679002 BCX8" data-contrast="auto" lang="EN-US" xml:lang="EN-US"><span class="NormalTextRun SCXW22679002 BCX8" data-ccp-parastyle="Normal (Web)">Enter values "API Token" and "Zone ID".</span></span>

<span class="TextRun SCXW22679002 BCX8" data-contrast="auto" lang="EN-US" xml:lang="EN-US"><span class="NormalTextRun SCXW22679002 BCX8" data-ccp-parastyle="Normal (Web)">For the Cloudflare integration to be able to successfully get logs the following permissions must be granted to the API token -</span></span><span class="EOP SCXW22679002 BCX8" data-ccp-props="{"134233117":true,"134233118":true,"201341983":0,"335557856":16777215,"335559685":360,"335559739":0,"335559740":240}"> </span>

<div class="SCXW22679002 BCX8" id="bkmrk-account.access%3A-audi"><div class="ListContainerWrapper SCXW22679002 BCX8">- <span class="TextRun SCXW22679002 BCX8" data-contrast="auto" lang="EN-US" xml:lang="EN-US"><span class="NormalTextRun SpellingErrorV2Themed SCXW22679002 BCX8" data-ccp-parastyle="Normal (Web)">Account.Access</span><span class="NormalTextRun SCXW22679002 BCX8" data-ccp-parastyle="Normal (Web)">: Audit Logs: Read</span></span><span class="EOP SCXW22679002 BCX8" data-ccp-props="{"134233117":true,"134233118":true,"201341983":0,"335557856":16777215,"335559739":0,"335559740":240}"> </span>

</div><div class="ListContainerWrapper SCXW22679002 BCX8">1. 1. 1. <span class="TextRun SCXW22679002 BCX8" data-contrast="auto" lang="EN-US" xml:lang="EN-US"><span class="NormalTextRun SCXW22679002 BCX8" data-ccp-parastyle="Normal (Web)">API Tokens allow for more granular permission settings.</span></span>
        2. <span class="TextRun SCXW22679002 BCX8" data-contrast="auto" lang="EN-US" xml:lang="EN-US"><span class="NormalTextRun SCXW22679002 BCX8" data-ccp-parastyle="Normal (Web)">Zone ID can be found </span></span>[<span class="TextRun Underlined SCXW22679002 BCX8" data-contrast="none" lang="EN-US" xml:lang="EN-US"><span class="NormalTextRun SCXW22679002 BCX8" data-ccp-charstyle="Hyperlink">here</span></span>](https://developers.cloudflare.com/fundamentals/get-started/basic-tasks/find-account-and-zone-ids/)<span class="TextRun SCXW22679002 BCX8" data-contrast="auto" lang="EN-US" xml:lang="EN-US"><span class="NormalTextRun SCXW22679002 BCX8" data-ccp-parastyle="Normal (Web)">.</span></span><span class="EOP SCXW22679002 BCX8" data-ccp-props="{"134233117":true,"134233118":true,"201341983":0,"335557856":16777215,"335559739":0,"335559740":240}"> </span>

</div></div>##### **<span class="TextRun SCXW22679002 BCX8" data-contrast="auto" lang="EN-US" style="color: rgb(53, 152, 219);" xml:lang="EN-US"><span class="NormalTextRun SCXW22679002 BCX8" data-ccp-parastyle="Normal (Web)">Logs</span></span><span class="EOP SCXW22679002 BCX8" data-ccp-props="{"134233117":true,"134233118":true,"201341983":0,"335557856":16777215,"335559685":360,"335559739":0,"335559740":240}"> </span>**

**<span class="TextRun SCXW22679002 BCX8" data-contrast="auto" lang="EN-US" xml:lang="EN-US"><span class="NormalTextRun SCXW22679002 BCX8" data-ccp-parastyle="Normal (Web)">Audit</span></span><span class="EOP SCXW22679002 BCX8" data-ccp-props="{"134233117":true,"134233118":true,"201341983":0,"335557856":16777215,"335559685":360,"335559739":0,"335559740":240}"> </span>**

<span class="TextRun SCXW22679002 BCX8" data-contrast="auto" lang="EN-US" xml:lang="EN-US"><span class="NormalTextRun SCXW22679002 BCX8" data-ccp-parastyle="Normal (Web)">Audit logs summarize the history of changes made within your Cloudflare account. Audit logs include account-level actions like login and logout, as well as setting changes to DNS, Crypto, Firewall, Speed, Caching, Page Rules, Network, and Traffic features, etc.</span></span><span class="EOP SCXW22679002 BCX8" data-ccp-props="{"134233117":true,"134233118":true,"201341983":0,"335557856":16777215,"335559685":360,"335559739":0,"335559740":240}"> </span>

**<span class="TextRun SCXW22679002 BCX8" data-contrast="auto" lang="EN-US" xml:lang="EN-US"><span class="NormalTextRun SpellingErrorV2Themed SCXW22679002 BCX8" data-ccp-parastyle="Normal (Web)">Logpull</span></span><span class="EOP SCXW22679002 BCX8" data-ccp-props="{"134233117":true,"134233118":true,"201341983":0,"335557856":16777215,"335559685":360,"335559739":0,"335559740":240}"> </span>**

<span class="TextRun SCXW22679002 BCX8" data-contrast="auto" lang="EN-US" xml:lang="EN-US"><span class="NormalTextRun SCXW22679002 BCX8" data-ccp-parastyle="Normal (Web)">These logs </span><span class="NormalTextRun SCXW22679002 BCX8" data-ccp-parastyle="Normal (Web)">contain</span><span class="NormalTextRun SCXW22679002 BCX8" data-ccp-parastyle="Normal (Web)"> data related to the connecting client, the request path through the Cloudflare network, and the response from the </span><span class="NormalTextRun ContextualSpellingAndGrammarErrorV2Themed SCXW22679002 BCX8" data-ccp-parastyle="Normal (Web)">origin</span><span class="NormalTextRun SCXW22679002 BCX8" data-ccp-parastyle="Normal (Web)"> web server.</span></span><span class="EOP SCXW22679002 BCX8" data-ccp-props="{"134233117":true,"134233118":true,"201341983":0,"335557856":16777215,"335559685":360,"335559739":0,"335559740":240}"> </span>

<div class="SCXW22679002 BCX8" id="bkmrk--2"><div class="OutlineElement Ltr SCXW22679002 BCX8">  
</div><div class="ListContainerWrapper SCXW22679002 BCX8">  
</div></div>##### <span style="color: rgb(53, 152, 219);">**<span class="TextRun Highlight SCXW22679002 BCX8" data-contrast="none" lang="EN-US" xml:lang="EN-US"><span class="NormalTextRun SCXW22679002 BCX8" data-ccp-charstyle="normaltextrun" data-ccp-charstyle-defn="{"ObjectId":"5616e398-4900-4300-a34e-28c396a31491|191","ClassId":1073872969,"Properties":[469775450,"normaltextrun",201340122,"1",134233614,"true",469778129,"normaltextrun",335572020,"1",469778324,"Default Paragraph Font"]}">Cloudflare</span> <span class="NormalTextRun SCXW22679002 BCX8" data-ccp-charstyle="normaltextrun">I</span><span class="NormalTextRun SCXW22679002 BCX8" data-ccp-charstyle="normaltextrun">ntegration</span><span class="NormalTextRun SCXW22679002 BCX8" data-ccp-charstyle="eop" data-ccp-charstyle-defn="{"ObjectId":"5616e398-4900-4300-a34e-28c396a31491|192","ClassId":1073872969,"Properties":[469775450,"eop",201340122,"1",134233614,"true",469778129,"eop",335572020,"1",469778324,"Default Paragraph Font"]}"> </span><span class="NormalTextRun SCXW22679002 BCX8" data-ccp-charstyle="eop">Procedures</span></span><span class="EOP SCXW22679002 BCX8" data-ccp-props="{"134245418":true,"134245529":true,"201341983":0,"335559738":240,"335559739":0,"335559740":360}"> </span>**</span>

<span class="TextRun SCXW22679002 BCX8" data-contrast="auto" lang="EN-US" xml:lang="EN-US"><span class="NormalTextRun SCXW22679002 BCX8" data-ccp-charstyle="eop"> Please provide the following information to </span><span class="NormalTextRun SpellingErrorV2Themed SCXW22679002 BCX8" data-ccp-charstyle="eop">CyTech</span><span class="NormalTextRun SCXW22679002 BCX8" data-ccp-charstyle="eop">:</span></span><span class="EOP SCXW22679002 BCX8" data-ccp-props="{"201341983":0,"335559685":360,"335559739":160,"335559740":259}"> </span>

<span class="TextRun SCXW22679002 BCX8" data-contrast="auto" lang="EN-US" xml:lang="EN-US"><span class="NormalTextRun SCXW22679002 BCX8" data-ccp-charstyle="eop">See the Screenshot Below</span></span><span class="EOP SCXW22679002 BCX8" data-ccp-props="{"201341983":0,"335559685":360,"335559739":160,"335559740":259}"> </span>

<span class="SCXW22679002 BCX8"><span class="WACImageContainer NoPadding DragDrop BlobObject SCXW22679002 BCX8" role="presentation">![](https://cytechint-docs-bookstack.s3.amazonaws.com/uploads/images/gallery/2024-04/embedded-image-jzccjnyp.png)</span></span><span class="SCXW22679002 BCX8"><span class="WACImageContainer NoPadding DragDrop BlobObject SCXW22679002 BCX8" role="presentation">![Token template overview screen](https://cytechint-docs-bookstack.s3.amazonaws.com/uploads/images/gallery/2024-04/embedded-image-vw6l32yl.png)</span></span><span class="EOP SCXW22679002 BCX8" data-ccp-props="{"201341983":0,"335559685":360,"335559739":160,"335559740":259}"> </span>

<span class="EOP SCXW22679002 BCX8" data-ccp-props="{"201341983":0,"335559685":360,"335559739":160,"335559740":259}"> </span>

<span class="SCXW22679002 BCX8"><span class="WACImageContainer NoPadding DragDrop BlobObject SCXW22679002 BCX8" role="presentation">![Token summary screen displaying the resources and permissions selected](https://cytechint-docs-bookstack.s3.amazonaws.com/uploads/images/gallery/2024-04/embedded-image-cq6co1re.png)</span></span><span class="EOP SCXW22679002 BCX8" data-ccp-props="{"201341983":0,"335559685":360,"335559739":160,"335559740":259}"> </span>

<span class="SCXW22679002 BCX8"><span class="WACImageContainer NoPadding DragDrop BlobObject SCXW22679002 BCX8" role="presentation">![Token creation completion screen displaying your API token and the <code>curl</code> command to test your token](https://cytechint-docs-bookstack.s3.amazonaws.com/uploads/images/gallery/2024-04/embedded-image-rcf3i7dc.png)</span></span><span class="EOP SCXW22679002 BCX8" data-ccp-props="{"201341983":0,"335559685":360,"335559739":160,"335559740":259}"> </span>

<span class="SCXW22679002 BCX8"><span class="WACImageContainer NoPadding DragDrop BlobObject SCXW22679002 BCX8" role="presentation">![](https://cytechint-docs-bookstack.s3.amazonaws.com/uploads/images/gallery/2024-04/embedded-image-cjp6by7k.png)</span></span><span class="EOP SCXW22679002 BCX8" data-ccp-props="{"201341983":0,"335559685":360,"335559739":160,"335559740":259}"> </span>

**<span class="TextRun Highlight SCXW22679002 BCX8" data-contrast="none" lang="EN-US" xml:lang="EN-US"><span class="NormalTextRun SCXW22679002 BCX8" data-ccp-charstyle="eop">Audit Logs</span></span><span class="EOP SCXW22679002 BCX8" data-ccp-props="{"134245418":true,"134245529":true,"201341983":0,"335559738":240,"335559739":0,"335559740":360}"> </span>**

<div class="SCXW22679002 BCX8" id="bkmrk-auth-email--%C2%A0%C2%A0-auth-"><div class="ListContainerWrapper SCXW22679002 BCX8">  
</div><div class="ListContainerWrapper SCXW22679002 BCX8">1. <span class="TextRun SCXW22679002 BCX8" data-contrast="auto" lang="EN-US" xml:lang="EN-US"><span class="NormalTextRun SCXW22679002 BCX8" data-ccp-charstyle="eop">Auth Email</span> <span class="NormalTextRun SCXW22679002 BCX8" data-ccp-charstyle="eop">- </span></span><span class="EOP SCXW22679002 BCX8" data-ccp-props="{"201341983":0,"335559739":160,"335559740":259}"> </span>

</div><div class="ListContainerWrapper SCXW22679002 BCX8">2. <span class="TextRun SCXW22679002 BCX8" data-contrast="auto" lang="EN-US" xml:lang="EN-US"><span class="NormalTextRun SCXW22679002 BCX8" data-ccp-charstyle="eop">Auth Key</span><span class="NormalTextRun SCXW22679002 BCX8" data-ccp-charstyle="eop"> </span></span><span class="EOP SCXW22679002 BCX8" data-ccp-props="{"201341983":0,"335559739":160,"335559740":259}"> </span>

</div><div class="ListContainerWrapper SCXW22679002 BCX8">3. <span class="TextRun SCXW22679002 BCX8" data-contrast="auto" lang="EN-US" xml:lang="EN-US"><span class="NormalTextRun SCXW22679002 BCX8" data-ccp-charstyle="eop">Account ID</span></span><span class="EOP SCXW22679002 BCX8" data-ccp-props="{"201341983":0,"335559739":160,"335559740":259}"> </span>

</div><div class="ListContainerWrapper SCXW22679002 BCX8">  
</div></div>**<span class="TextRun Highlight SCXW22679002 BCX8" data-contrast="none" lang="EN-US" xml:lang="EN-US"><span class="NormalTextRun SCXW22679002 BCX8" data-ccp-charstyle="eop">Cloudflare Logs</span></span><span class="EOP SCXW22679002 BCX8" data-ccp-props="{"134245418":true,"134245529":true,"201341983":0,"335559738":240,"335559739":0,"335559740":360}"> </span>**

<div class="SCXW22679002 BCX8" id="bkmrk-auth-token%C2%A0%C2%A0-zone-id"><div class="ListContainerWrapper SCXW22679002 BCX8">1. <span class="TextRun SCXW22679002 BCX8" data-contrast="auto" lang="EN-US" xml:lang="EN-US"><span class="NormalTextRun SCXW22679002 BCX8" data-ccp-charstyle="eop">Auth</span> <span class="NormalTextRun SCXW22679002 BCX8" data-ccp-charstyle="eop">Token </span></span><span class="EOP SCXW22679002 BCX8" data-ccp-props="{"201341983":0,"335559739":160,"335559740":259}"> </span>

</div><div class="ListContainerWrapper SCXW22679002 BCX8">2. <span class="TextRun SCXW22679002 BCX8" data-contrast="auto" lang="EN-US" xml:lang="EN-US"><span class="NormalTextRun SCXW22679002 BCX8" data-ccp-charstyle="eop">Zone ID</span><span class="NormalTextRun SCXW22679002 BCX8" data-ccp-charstyle="eop"> </span></span><span class="EOP SCXW22679002 BCX8" data-ccp-props="{"201341983":0,"335559739":160,"335559740":259}"> </span>

</div><div class="ListContainerWrapper SCXW22679002 BCX8">  
</div></div>**<span class="TextRun Highlight SCXW22679002 BCX8" data-contrast="none" lang="EN-US" xml:lang="EN-US"><span class="NormalTextRun SCXW22679002 BCX8" data-ccp-charstyle="normaltextrun">Enable </span><span class="NormalTextRun SpellingErrorV2Themed SCXW22679002 BCX8" data-ccp-charstyle="normaltextrun">Logpush</span><span class="NormalTextRun SCXW22679002 BCX8" data-ccp-charstyle="normaltextrun"> to Amazon S3</span></span><span class="EOP SCXW22679002 BCX8" data-ccp-props="{"134245418":true,"134245529":true,"201341983":0,"335559738":240,"335559739":0,"335559740":360}"> </span>**

<span class="TextRun SCXW22679002 BCX8" data-contrast="none" lang="EN-US" xml:lang="EN-US"><span class="NormalTextRun SCXW22679002 BCX8">To enable the Cloudflare </span><span class="NormalTextRun SpellingErrorV2Themed SCXW22679002 BCX8">Logpush</span><span class="NormalTextRun SCXW22679002 BCX8"> service:</span></span><span class="EOP SCXW22679002 BCX8" data-ccp-props="{"201341983":0,"335557856":16777215,"335559739":240,"335559740":240}"> </span>

<div class="SCXW22679002 BCX8" id="bkmrk-log-in-to-the-cloudf"><div class="ListContainerWrapper SCXW22679002 BCX8">1. <span class="TextRun SCXW22679002 BCX8" data-contrast="none" lang="EN-US" xml:lang="EN-US"><span class="NormalTextRun SCXW22679002 BCX8">Log in to the Cloudflare dashboard.</span></span><span class="EOP SCXW22679002 BCX8" data-ccp-props="{"201341983":0,"335557856":16777215,"335559739":0,"335559740":240}"> </span>

</div><div class="ListContainerWrapper SCXW22679002 BCX8">2. <span class="TextRun SCXW22679002 BCX8" data-contrast="none" lang="EN-US" xml:lang="EN-US"><span class="NormalTextRun SCXW22679002 BCX8">Select the Enterprise account or domain you want to use with </span><span class="NormalTextRun SpellingErrorV2Themed SCXW22679002 BCX8">Logpush</span><span class="NormalTextRun SCXW22679002 BCX8">.</span></span><span class="EOP SCXW22679002 BCX8" data-ccp-props="{"201341983":0,"335557856":16777215,"335559739":0,"335559740":240}"> </span>

</div><div class="ListContainerWrapper SCXW22679002 BCX8">3. <span class="TextRun SCXW22679002 BCX8" data-contrast="none" lang="EN-US" xml:lang="EN-US"><span class="NormalTextRun SCXW22679002 BCX8">Go to </span></span><span class="TextRun SCXW22679002 BCX8" data-contrast="none" lang="EN-US" xml:lang="EN-US"><span class="NormalTextRun SCXW22679002 BCX8">Analytics &amp; Logs</span></span><span class="TextRun SCXW22679002 BCX8" data-contrast="none" lang="EN-US" xml:lang="EN-US"><span class="NormalTextRun SCXW22679002 BCX8"> &gt; </span></span><span class="TextRun SCXW22679002 BCX8" data-contrast="none" lang="EN-US" xml:lang="EN-US"><span class="NormalTextRun SCXW22679002 BCX8">Logs</span></span><span class="TextRun SCXW22679002 BCX8" data-contrast="none" lang="EN-US" xml:lang="EN-US"><span class="NormalTextRun SCXW22679002 BCX8">.</span></span><span class="EOP SCXW22679002 BCX8" data-ccp-props="{"201341983":0,"335557856":16777215,"335559739":0,"335559740":240}"> </span>

</div><div class="ListContainerWrapper SCXW22679002 BCX8">4. <span class="TextRun SCXW22679002 BCX8" data-contrast="none" lang="EN-US" xml:lang="EN-US"><span class="NormalTextRun SCXW22679002 BCX8">Select </span></span><span class="TextRun SCXW22679002 BCX8" data-contrast="none" lang="EN-US" xml:lang="EN-US"><span class="NormalTextRun SCXW22679002 BCX8">Add </span><span class="NormalTextRun SpellingErrorV2Themed SCXW22679002 BCX8">Logpush</span><span class="NormalTextRun SCXW22679002 BCX8"> job</span></span><span class="TextRun SCXW22679002 BCX8" data-contrast="none" lang="EN-US" xml:lang="EN-US"><span class="NormalTextRun SCXW22679002 BCX8">. A modal window opens where you will need to complete several steps.</span></span><span class="EOP SCXW22679002 BCX8" data-ccp-props="{"201341983":0,"335557856":16777215,"335559739":0,"335559740":240}"> </span>

</div><div class="ListContainerWrapper SCXW22679002 BCX8">5. <span class="TextRun SCXW22679002 BCX8" data-contrast="none" lang="EN-US" xml:lang="EN-US"><span class="NormalTextRun SCXW22679002 BCX8">Select the dataset you want to push to a storage service.</span></span><span class="EOP SCXW22679002 BCX8" data-ccp-props="{"201341983":0,"335557856":16777215,"335559739":0,"335559740":240}"> </span>

</div><div class="ListContainerWrapper SCXW22679002 BCX8">6. <span class="TextRun SCXW22679002 BCX8" data-contrast="none" lang="EN-US" xml:lang="EN-US"><span class="NormalTextRun SCXW22679002 BCX8">Select the data fields to include in your logs. Add or remove fields later by </span><span class="NormalTextRun SCXW22679002 BCX8">modifying</span><span class="NormalTextRun SCXW22679002 BCX8"> your settings in </span></span><span class="TextRun SCXW22679002 BCX8" data-contrast="none" lang="EN-US" xml:lang="EN-US"><span class="NormalTextRun SCXW22679002 BCX8">Logs</span></span><span class="TextRun SCXW22679002 BCX8" data-contrast="none" lang="EN-US" xml:lang="EN-US"><span class="NormalTextRun SCXW22679002 BCX8"> &gt; </span></span><span class="TextRun SCXW22679002 BCX8" data-contrast="none" lang="EN-US" xml:lang="EN-US"><span class="NormalTextRun SpellingErrorV2Themed SCXW22679002 BCX8">Logpush</span></span><span class="TextRun SCXW22679002 BCX8" data-contrast="none" lang="EN-US" xml:lang="EN-US"><span class="NormalTextRun SCXW22679002 BCX8">.</span></span><span class="EOP SCXW22679002 BCX8" data-ccp-props="{"201341983":0,"335557856":16777215,"335559739":0,"335559740":240}"> </span>

</div><div class="ListContainerWrapper SCXW22679002 BCX8">7. <span class="TextRun SCXW22679002 BCX8" data-contrast="none" lang="EN-US" xml:lang="EN-US"><span class="NormalTextRun SCXW22679002 BCX8">Select </span></span><span class="TextRun SCXW22679002 BCX8" data-contrast="none" lang="EN-US" xml:lang="EN-US"><span class="NormalTextRun SCXW22679002 BCX8">Amazon S3</span></span><span class="TextRun SCXW22679002 BCX8" data-contrast="none" lang="EN-US" xml:lang="EN-US"><span class="NormalTextRun SCXW22679002 BCX8">.</span></span><span class="EOP SCXW22679002 BCX8" data-ccp-props="{"201341983":0,"335557856":16777215,"335559739":0,"335559740":240}"> </span>

</div><div class="ListContainerWrapper SCXW22679002 BCX8">8. <span class="TextRun SCXW22679002 BCX8" data-contrast="none" lang="EN-US" xml:lang="EN-US"><span class="NormalTextRun SCXW22679002 BCX8">Enter or select the following destination information:</span></span><span class="EOP SCXW22679002 BCX8" data-ccp-props="{"201341983":0,"335557856":16777215,"335559739":240,"335559740":240}"> </span>

</div><div class="ListContainerWrapper SCXW22679002 BCX8">- - - <span class="TextRun SCXW22679002 BCX8" data-contrast="none" lang="EN-US" xml:lang="EN-US"><span class="NormalTextRun SCXW22679002 BCX8">Bucket path</span></span><span class="EOP SCXW22679002 BCX8" data-ccp-props="{"201341983":0,"335557856":16777215,"335559739":0,"335559740":240}"> </span>
        - <span class="TextRun SCXW22679002 BCX8" data-contrast="none" lang="EN-US" xml:lang="EN-US"><span class="NormalTextRun SCXW22679002 BCX8">Daily subfolders</span></span><span class="EOP SCXW22679002 BCX8" data-ccp-props="{"201341983":0,"335557856":16777215,"335559739":0,"335559740":240}"> </span>
        - <span class="TextRun SCXW22679002 BCX8" data-contrast="none" lang="EN-US" xml:lang="EN-US"><span class="NormalTextRun SCXW22679002 BCX8">Bucket region</span></span><span class="EOP SCXW22679002 BCX8" data-ccp-props="{"201341983":0,"335557856":16777215,"335559739":0,"335559740":240}"> </span>
        - <span class="TextRun SCXW22679002 BCX8" data-contrast="none" lang="EN-US" xml:lang="EN-US"><span class="NormalTextRun SCXW22679002 BCX8">Encryption constraint in bucket policy</span></span><span class="EOP SCXW22679002 BCX8" data-ccp-props="{"201341983":0,"335557856":16777215,"335559739":0,"335559740":240}"> </span>
        - <span class="TextRun SCXW22679002 BCX8" data-contrast="none" lang="EN-US" xml:lang="EN-US"><span class="NormalTextRun SCXW22679002 BCX8">For </span></span><span class="TextRun SCXW22679002 BCX8" data-contrast="none" lang="EN-US" xml:lang="EN-US"><span class="NormalTextRun SCXW22679002 BCX8">Grant Cloudflare access to upload files to your bucket</span></span><span class="TextRun SCXW22679002 BCX8" data-contrast="none" lang="EN-US" xml:lang="EN-US"><span class="NormalTextRun SCXW22679002 BCX8">, make sure your bucket has a policy (if you did not add it already):</span></span><span class="EOP SCXW22679002 BCX8" data-ccp-props="{"201341983":0,"335557856":16777215,"335559739":0,"335559740":240}"> </span>
        - <span class="TextRun SCXW22679002 BCX8" data-contrast="none" lang="EN-US" xml:lang="EN-US"><span class="NormalTextRun SCXW22679002 BCX8">Copy the JSON policy, then go to your bucket in the Amazon S3 console and paste the policy in </span></span><span class="TextRun SCXW22679002 BCX8" data-contrast="none" lang="EN-US" xml:lang="EN-US"><span class="NormalTextRun SCXW22679002 BCX8">Permissions</span></span><span class="TextRun SCXW22679002 BCX8" data-contrast="none" lang="EN-US" xml:lang="EN-US"><span class="NormalTextRun SCXW22679002 BCX8"> &gt; </span></span><span class="TextRun SCXW22679002 BCX8" data-contrast="none" lang="EN-US" xml:lang="EN-US"><span class="NormalTextRun SCXW22679002 BCX8">Bucket Policy</span></span><span class="TextRun SCXW22679002 BCX8" data-contrast="none" lang="EN-US" xml:lang="EN-US"><span class="NormalTextRun SCXW22679002 BCX8"> and click </span></span><span class="TextRun SCXW22679002 BCX8" data-contrast="none" lang="EN-US" xml:lang="EN-US"><span class="NormalTextRun SCXW22679002 BCX8">Save</span></span><span class="TextRun SCXW22679002 BCX8" data-contrast="none" lang="EN-US" xml:lang="EN-US"><span class="NormalTextRun SCXW22679002 BCX8">.</span></span><span class="EOP SCXW22679002 BCX8" data-ccp-props="{"201341983":0,"335557856":16777215,"335559739":0,"335559740":240}"> </span>

</div><div class="ListContainerWrapper SCXW22679002 BCX8">9. <span class="TextRun SCXW22679002 BCX8" data-contrast="none" lang="EN-US" xml:lang="EN-US"><span class="NormalTextRun SCXW22679002 BCX8">Click </span></span><span class="TextRun SCXW22679002 BCX8" data-contrast="none" lang="EN-US" xml:lang="EN-US"><span class="NormalTextRun SCXW22679002 BCX8">Validate access</span></span><span class="TextRun SCXW22679002 BCX8" data-contrast="none" lang="EN-US" xml:lang="EN-US"><span class="NormalTextRun SCXW22679002 BCX8">.</span></span><span class="EOP SCXW22679002 BCX8" data-ccp-props="{"201341983":0,"335557856":16777215,"335559739":0,"335559740":240}"> </span>

</div><div class="ListContainerWrapper SCXW22679002 BCX8">10. <span class="TextRun SCXW22679002 BCX8" data-contrast="none" lang="EN-US" xml:lang="EN-US"><span class="NormalTextRun SCXW22679002 BCX8">Enter the </span></span><span class="TextRun SCXW22679002 BCX8" data-contrast="none" lang="EN-US" xml:lang="EN-US"><span class="NormalTextRun SCXW22679002 BCX8">Ownership token</span></span><span class="TextRun SCXW22679002 BCX8" data-contrast="none" lang="EN-US" xml:lang="EN-US"><span class="NormalTextRun SCXW22679002 BCX8"> (included in a file or log Cloudflare sends to your provider) and click </span></span><span class="TextRun SCXW22679002 BCX8" data-contrast="none" lang="EN-US" xml:lang="EN-US"><span class="NormalTextRun SCXW22679002 BCX8">Prove ownership</span></span><span class="TextRun SCXW22679002 BCX8" data-contrast="none" lang="EN-US" xml:lang="EN-US"><span class="NormalTextRun SCXW22679002 BCX8">. To find the ownership token, click the </span></span><span class="TextRun SCXW22679002 BCX8" data-contrast="none" lang="EN-US" xml:lang="EN-US"><span class="NormalTextRun SCXW22679002 BCX8">Open</span></span><span class="TextRun SCXW22679002 BCX8" data-contrast="none" lang="EN-US" xml:lang="EN-US"><span class="NormalTextRun SCXW22679002 BCX8"> button in the </span></span><span class="TextRun SCXW22679002 BCX8" data-contrast="none" lang="EN-US" xml:lang="EN-US"><span class="NormalTextRun SCXW22679002 BCX8">Overview</span></span><span class="TextRun SCXW22679002 BCX8" data-contrast="none" lang="EN-US" xml:lang="EN-US"><span class="NormalTextRun SCXW22679002 BCX8"> tab of the ownership challenge file.</span></span><span class="EOP SCXW22679002 BCX8" data-ccp-props="{"201341983":0,"335557856":16777215,"335559739":0,"335559740":240}"> </span>

</div></div><div class="SCXW22679002 BCX8" id="bkmrk-click%E2%80%AFsave-and-start"><div class="ListContainerWrapper SCXW22679002 BCX8">11. <span class="TextRun SCXW22679002 BCX8" data-contrast="none" lang="EN-US" xml:lang="EN-US"><span class="NormalTextRun SCXW22679002 BCX8">Click </span></span><span class="TextRun SCXW22679002 BCX8" data-contrast="none" lang="EN-US" xml:lang="EN-US"><span class="NormalTextRun SCXW22679002 BCX8">Save and Start Pushing</span></span><span class="TextRun SCXW22679002 BCX8" data-contrast="none" lang="EN-US" xml:lang="EN-US"><span class="NormalTextRun SCXW22679002 BCX8"> to finish enabling </span><span class="NormalTextRun SpellingErrorV2Themed SCXW22679002 BCX8">Logpush</span><span class="NormalTextRun SCXW22679002 BCX8">.</span></span><span class="EOP SCXW22679002 BCX8" data-ccp-props="{"201341983":0,"335557856":16777215,"335559739":0,"335559740":240}"> </span>

</div></div><span class="TextRun SCXW22679002 BCX8" data-contrast="none" lang="EN-US" xml:lang="EN-US"><span class="NormalTextRun SCXW22679002 BCX8">Once connected, Cloudflare lists Amazon S3 as a connected service under </span></span><span class="TextRun SCXW22679002 BCX8" data-contrast="none" lang="EN-US" xml:lang="EN-US"><span class="NormalTextRun SCXW22679002 BCX8">Logs</span></span><span class="TextRun SCXW22679002 BCX8" data-contrast="none" lang="EN-US" xml:lang="EN-US"><span class="NormalTextRun SCXW22679002 BCX8"> &gt; </span></span><span class="TextRun SCXW22679002 BCX8" data-contrast="none" lang="EN-US" xml:lang="EN-US"><span class="NormalTextRun SpellingErrorV2Themed SCXW22679002 BCX8">Logpush</span></span><span class="TextRun SCXW22679002 BCX8" data-contrast="none" lang="EN-US" xml:lang="EN-US"><span class="NormalTextRun SCXW22679002 BCX8">. Edit or remove connected services from here.</span></span><span class="EOP SCXW22679002 BCX8" data-ccp-props="{"201341983":0,"335557856":16777215,"335559685":360,"335559739":0,"335559740":240}"></span>

# CrowdStrike Integration - using API

#### <span style="color: rgb(53, 152, 219);">**Steps to Get Client ID and Client Secret in CrowdStrike Falcon**</span>

1. **Log in to the Falcon Console**
    
    
    - Go to: [https://falcon.crowdstrike.com](https://falcon.crowdstrike.com)
    - Use your admin credentials to log in.
2. **Navigate to API Clients and Keys**
    
    
    - Click on the **"Support"** (question mark icon) or your **User avatar** on the top right.
    - Select **"API Clients and Keys"** from the dropdown.  
        Alternatively, go to: `https://falcon.crowdstrike.com/support/api-clients-and-keys`
3. **Create a New API Client**
    
    
    - Click on **“Add new API client”**.
    - **Name** your client and optionally add a **description**.
    - Under **API Scopes**, select the required **permissions** based on what you need (e.g., read access to Hosts, Alerts, IOCs, etc.).
        
        <div><table border="1" class="align-center" data-editing-info="{"topBorderColor":"#ABABAB","bottomBorderColor":"#ABABAB","verticalBorderColor":"#ABABAB","hasHeaderRow":false,"hasFirstColumn":false,"hasBandedRows":false,"hasBandedColumns":false,"bgColorEven":null,"bgColorOdd":"#EEEEEE","headerRowColor":"#ABABAB","tableBorderFormat":0,"verticalAlign":null}" style="height: 201px; width: 75.8333%; border-collapse: collapse;"><thead><tr><td style="width: 49.6868%;"><div>**Data Stream**</div></td><td style="width: 50.3157%;"><div>**Scope**</div></td></tr></thead><tbody><tr><td style="width: 49.6868%;"><div>Intel </div></td><td style="width: 50.3157%;"><div>read:intel</div></td></tr><tr><td style="width: 49.6868%;"><div>IOC </div></td><td style="width: 50.3157%;"><div>read:iocs</div></td></tr><tr><td style="width: 49.6868%;"><div>  
        </div></td><td style="width: 50.3157%;"><div>read:ioc-management</div></td></tr><tr><td style="width: 49.6868%;"><div>Alert</div></td><td style="width: 50.3157%;"><div>read:alert</div></td></tr><tr><td style="width: 49.6868%;"><div>Host </div></td><td style="width: 50.3157%;"><div>read:host</div></td></tr></tbody></table>
        
        </div>
    - Click **“Save”.**

<p class="callout danger">**Please provide to AQUILA support team.**</p>

1. **Copy the Client ID and Client Secret**
    
    
    - After saving, the **Client ID** and **Client Secret** will be displayed **once**.
    - Copy them immediately and store them securely (e.g., in a password manager or secrets vault).
2. **Token url**

***<span class="TextRun SCXW71272603 BCX0" data-contrast="auto" lang="EN-US" xml:lang="EN-US"><span class="NormalTextRun SCXW71272603 BCX0">If you need further </span><span class="NormalTextRun SCXW71272603 BCX0">assistance</span><span class="NormalTextRun SCXW71272603 BCX0">, kindly contact our support at </span></span><span class="TextRun SCXW71272603 BCX0" data-contrast="none" lang="EN-US" style="color: rgb(53, 152, 219);" xml:lang="EN-US"><span class="NormalTextRun SCXW71272603 BCX0">support@cytechint.com</span></span><span class="TextRun SCXW71272603 BCX0" data-contrast="auto" lang="EN-US" xml:lang="EN-US"><span class="NormalTextRun SCXW71272603 BCX0"> for prompt </span><span class="NormalTextRun SCXW71272603 BCX0">assistance</span><span class="NormalTextRun SCXW71272603 BCX0"> and guidance.</span></span><span class="EOP SCXW71272603 BCX0" data-ccp-props="{}"></span>***

# Crowdstrike Integrations

##### <span style="color: rgb(53, 152, 219);">**<span class="TextRun SCXW161465391 BCX8" data-contrast="none" lang="EN-US" xml:lang="EN-US"><span class="NormalTextRun SCXW161465391 BCX8" data-ccp-charstyle="Style (Complex) Open Sans" data-ccp-charstyle-defn="{"ObjectId":"264fdba9-759b-4a60-81af-6d470c938109|151","ClassId":1073872969,"Properties":[201342446,"1",201342447,"5",201342448,"1",201342449,"1",469777841,"Open Sans",469777842,"Open Sans",469777843,"Calibri",469777844,"Open Sans",201341986,"1",469769226,"Open Sans",268442635,"22",335559704,"1037",335559705,"1033",335551547,"1033",335559740,"259",201341983,"0",335559739,"160",469775450,"Style (Complex) Open Sans",201340122,"1",134233614,"true",469778129,"StyleComplexOpenSans",335572020,"1",469778324,"Default Paragraph Font"]}">Introduction</span></span><span class="EOP SCXW161465391 BCX8" data-ccp-props="{"134245418":true,"134245529":true,"201341983":0,"335559738":240,"335559739":0,"335559740":360}"> </span>**</span>

<span class="TextRun SCXW161465391 BCX8" data-contrast="auto" lang="EN-US" xml:lang="EN-US"><span class="NormalTextRun SCXW161465391 BCX8" data-ccp-charstyle="Style (Complex) Open Sans">This integration is for </span></span><span class="TextRun SCXW161465391 BCX8" data-contrast="none" lang="EN-US" xml:lang="EN-US"><span class="NormalTextRun SCXW161465391 BCX8" data-ccp-charstyle="Style (Complex) Open Sans">CrowdStrike products</span></span><span class="TextRun SCXW161465391 BCX8" data-contrast="auto" lang="EN-US" xml:lang="EN-US"><span class="NormalTextRun SCXW161465391 BCX8" data-ccp-charstyle="Style (Complex) Open Sans">. It includes the following datasets for receiving logs:</span></span><span class="EOP SCXW161465391 BCX8" data-ccp-props="{"201341983":0,"335559685":360,"335559739":160,"335559740":259}"> </span>

<span class="TextRun SCXW161465391 BCX8" data-contrast="none" lang="EN-US" xml:lang="EN-US"><span class="NormalTextRun SCXW161465391 BCX8" data-ccp-charstyle="Intense Quote Char">falcon</span></span><span class="TextRun SCXW161465391 BCX8" data-contrast="auto" lang="EN-US" xml:lang="EN-US"> <span class="NormalTextRun SCXW161465391 BCX8" data-ccp-charstyle="Style (Complex) Open Sans">dataset</span><span class="NormalTextRun SCXW161465391 BCX8" data-ccp-charstyle="Style (Complex) Open Sans"> consists of endpoint data and Falcon platform audit data </span><span class="NormalTextRun SCXW161465391 BCX8" data-ccp-charstyle="Style (Complex) Open Sans">forwarded</span><span class="NormalTextRun SCXW161465391 BCX8" data-ccp-charstyle="Style (Complex) Open Sans"> from Falcon SIEM Connector.</span></span><span class="EOP SCXW161465391 BCX8" data-ccp-props="{"201341983":0,"335559685":360,"335559739":160,"335559740":259}"> </span>

<span class="TextRun SCXW161465391 BCX8" data-contrast="none" lang="EN-US" xml:lang="EN-US"><span class="NormalTextRun SpellingErrorV2Themed SCXW161465391 BCX8" data-ccp-charstyle="Intense Quote Char">fdr</span></span><span class="TextRun SCXW161465391 BCX8" data-contrast="auto" lang="EN-US" xml:lang="EN-US"> <span class="NormalTextRun SCXW161465391 BCX8" data-ccp-charstyle="Style (Complex) Open Sans">dataset</span><span class="NormalTextRun SCXW161465391 BCX8" data-ccp-charstyle="Style (Complex) Open Sans"> consists of logs </span><span class="NormalTextRun SCXW161465391 BCX8" data-ccp-charstyle="Style (Complex) Open Sans">forwarded</span><span class="NormalTextRun SCXW161465391 BCX8" data-ccp-charstyle="Style (Complex) Open Sans"> using the Falcon Data Replicator.</span></span><span class="EOP SCXW161465391 BCX8" data-ccp-props="{"201341983":0,"335559685":360,"335559739":160,"335559740":259}"> </span>

<div class="SCXW161465391 BCX8" id="bkmrk-"><div class="OutlineElement Ltr SCXW161465391 BCX8">  
</div><div class="ListContainerWrapper SCXW161465391 BCX8">  
</div></div>##### <span style="color: rgb(53, 152, 219);">**<span class="TextRun Highlight SCXW161465391 BCX8" data-contrast="none" lang="EN-US" xml:lang="EN-US"><span class="NormalTextRun SCXW161465391 BCX8" data-ccp-charstyle="normaltextrun" data-ccp-charstyle-defn="{"ObjectId":"264fdba9-759b-4a60-81af-6d470c938109|177","ClassId":1073872969,"Properties":[201342446,"1",201342447,"5",201342448,"1",201342449,"1",469777841,"Calibri",469777842,"Arial",469777843,"Calibri",469777844,"Calibri",201341986,"1",469769226,"Calibri,Arial",268442635,"22",335559704,"1037",335559705,"1033",335551547,"1033",335559740,"259",201341983,"0",335559739,"160",469775450,"normaltextrun",201340122,"1",134233614,"true",469778129,"normaltextrun",335572020,"1",469778324,"Default Paragraph Font"]}">Assumptions</span></span><span class="EOP SCXW161465391 BCX8" data-ccp-props="{"134245418":true,"134245529":true,"201341983":0,"335559738":240,"335559739":0,"335559740":360}"> </span>**</span>

<span class="TextRun Highlight SCXW161465391 BCX8" data-contrast="auto" lang="EN-US" xml:lang="EN-US"><span class="NormalTextRun SCXW161465391 BCX8" data-ccp-charstyle="eop" data-ccp-charstyle-defn="{"ObjectId":"264fdba9-759b-4a60-81af-6d470c938109|178","ClassId":1073872969,"Properties":[201342446,"1",201342447,"5",201342448,"1",201342449,"1",469777841,"Calibri",469777842,"Arial",469777843,"Calibri",469777844,"Calibri",201341986,"1",469769226,"Calibri,Arial",268442635,"22",335559704,"1037",335559705,"1033",335551547,"1033",335559740,"259",201341983,"0",335559739,"160",469775450,"eop",201340122,"1",134233614,"true",469778129,"eop",335572020,"1",469778324,"Default Paragraph Font"]}">The procedures described in Section 3 </span><span class="NormalTextRun SCXW161465391 BCX8" data-ccp-charstyle="eop">assume</span><span class="NormalTextRun SCXW161465391 BCX8" data-ccp-charstyle="eop"> that a Log Collector has already been </span><span class="NormalTextRun ContextualSpellingAndGrammarErrorV2Themed SCXW161465391 BCX8" data-ccp-charstyle="eop">setup</span><span class="NormalTextRun SCXW161465391 BCX8" data-ccp-charstyle="eop">. </span></span><span class="EOP SCXW161465391 BCX8" data-ccp-props="{"201341983":0,"335559685":360,"335559739":160,"335559740":259}"> </span>

**<span class="TextRun Highlight SCXW161465391 BCX8" data-contrast="none" lang="EN-US" xml:lang="EN-US"><span class="NormalTextRun SCXW161465391 BCX8" data-ccp-charstyle="eop">Compatibility</span></span><span class="EOP SCXW161465391 BCX8" data-ccp-props="{"134245418":true,"134245529":true,"201341983":0,"335559738":240,"335559739":0,"335559740":360}"> </span>**

<span class="TextRun Highlight SCXW161465391 BCX8" data-contrast="auto" lang="EN-US" xml:lang="EN-US"><span class="NormalTextRun SCXW161465391 BCX8" data-ccp-charstyle="eop">This integration supports CrowdStrike Falcon SIEM-Connector-v2.0.</span></span><span class="EOP SCXW161465391 BCX8" data-ccp-props="{"201341983":0,"335559731":360,"335559739":160,"335559740":259}"> </span>

##### **<span class="TextRun Highlight SCXW161465391 BCX8" data-contrast="none" lang="EN-US" xml:lang="EN-US"><span class="NormalTextRun SCXW161465391 BCX8" data-ccp-charstyle="eop">Requirements</span></span><span class="EOP SCXW161465391 BCX8" data-ccp-props="{"134245418":true,"134245529":true,"201341983":0,"335559738":240,"335559739":0,"335559740":360}"> </span>**

**<span class="TextRun Highlight SCXW161465391 BCX8" data-contrast="auto" lang="EN-US" xml:lang="EN-US"><span class="NormalTextRun SCXW161465391 BCX8" data-ccp-charstyle="eop">Logs</span></span><span class="EOP SCXW161465391 BCX8" data-ccp-props="{"201341983":0,"335559685":360,"335559739":160,"335559740":259}"> </span>**

**<span class="TextRun Highlight SCXW161465391 BCX8" data-contrast="auto" lang="EN-US" xml:lang="EN-US"><span class="NormalTextRun SCXW161465391 BCX8" data-ccp-charstyle="eop">Falcon</span></span><span class="EOP SCXW161465391 BCX8" data-ccp-props="{"201341983":0,"335559685":360,"335559739":160,"335559740":259}"> </span>**

<span class="TextRun Highlight SCXW161465391 BCX8" data-contrast="auto" lang="EN-US" xml:lang="EN-US"><span class="NormalTextRun SCXW161465391 BCX8" data-ccp-charstyle="eop">Contains</span><span class="NormalTextRun SCXW161465391 BCX8" data-ccp-charstyle="eop"> endpoint data and CrowdStrike Falcon platform audit data </span><span class="NormalTextRun SCXW161465391 BCX8" data-ccp-charstyle="eop">forwarded</span><span class="NormalTextRun SCXW161465391 BCX8" data-ccp-charstyle="eop"> from Falcon SIEM Connector.</span></span><span class="EOP SCXW161465391 BCX8" data-ccp-props="{"201341983":0,"335559685":360,"335559739":160,"335559740":259}"> </span>

**<span class="TextRun Highlight SCXW161465391 BCX8" data-contrast="auto" lang="EN-US" xml:lang="EN-US"><span class="NormalTextRun SCXW161465391 BCX8" data-ccp-charstyle="eop">FDR</span></span><span class="EOP SCXW161465391 BCX8" data-ccp-props="{"201341983":0,"335559685":360,"335559739":160,"335559740":259}"> </span>**

<span class="TextRun Highlight SCXW161465391 BCX8" data-contrast="auto" lang="EN-US" xml:lang="EN-US"><span class="NormalTextRun SCXW161465391 BCX8" data-ccp-charstyle="eop">The CrowdStrike Falcon Data Replicator (FDR) allows CrowdStrike users to replicate FDR data from CrowdStrike managed S3 buckets. CrowdStrike writes notification events to a CrowdStrike managed SQS queue when new data is available in S3.</span></span><span class="EOP SCXW161465391 BCX8" data-ccp-props="{"201341983":0,"335559685":360,"335559739":160,"335559740":259}"> </span>

<span class="TextRun Highlight SCXW161465391 BCX8" data-contrast="auto" lang="EN-US" xml:lang="EN-US"><span class="NormalTextRun SCXW161465391 BCX8" data-ccp-charstyle="eop">This integration can be used in two ways. It can consume SQS notifications directly from the CrowdStrike managed SQS queue or it can be used in conjunction with the FDR tool that replicates the data to a self-managed S3 </span><span class="NormalTextRun ContextualSpellingAndGrammarErrorV2Themed SCXW161465391 BCX8" data-ccp-charstyle="eop">bucket</span><span class="NormalTextRun SCXW161465391 BCX8" data-ccp-charstyle="eop"> and the integration can </span><span class="NormalTextRun ContextualSpellingAndGrammarErrorV2Themed SCXW161465391 BCX8" data-ccp-charstyle="eop">read</span><span class="NormalTextRun SCXW161465391 BCX8" data-ccp-charstyle="eop"> from there.</span></span><span class="EOP SCXW161465391 BCX8" data-ccp-props="{"201341983":0,"335559685":360,"335559739":160,"335559740":259}"> </span>

<span class="TextRun Highlight SCXW161465391 BCX8" data-contrast="auto" lang="EN-US" xml:lang="EN-US"><span class="NormalTextRun SCXW161465391 BCX8" data-ccp-charstyle="eop">In both cases SQS messages are </span><span class="NormalTextRun SCXW161465391 BCX8" data-ccp-charstyle="eop">deleted</span><span class="NormalTextRun SCXW161465391 BCX8" data-ccp-charstyle="eop"> after they are processed. This allows you to </span><span class="NormalTextRun SCXW161465391 BCX8" data-ccp-charstyle="eop">operate</span><span class="NormalTextRun SCXW161465391 BCX8" data-ccp-charstyle="eop"> more than one Elastic Agent with this integration if needed and not have duplicate events, but it means you cannot ingest the data a second time.</span></span><span class="EOP SCXW161465391 BCX8" data-ccp-props="{"201341983":0,"335559685":360,"335559739":160,"335559740":259}"> </span>

<div class="SCXW161465391 BCX8" id="bkmrk--1"><div class="OutlineElement Ltr SCXW161465391 BCX8">  
</div><div class="ListContainerWrapper SCXW161465391 BCX8">  
</div></div>##### <span style="color: rgb(53, 152, 219);">**<span class="TextRun SCXW161465391 BCX8" data-contrast="none" lang="EN-US" xml:lang="EN-US"><span class="NormalTextRun SCXW161465391 BCX8" data-ccp-charstyle="eop">CrowdStrike Integration Procedures</span></span><span class="EOP SCXW161465391 BCX8" data-ccp-props="{"134245418":true,"134245529":true,"201341983":0,"335559738":240,"335559739":0,"335559740":360}"> </span>**</span>

<span class="TextRun SCXW161465391 BCX8" data-contrast="auto" lang="EN-US" xml:lang="EN-US"><span class="NormalTextRun SCXW161465391 BCX8" data-ccp-charstyle="eop">Please provide the following information to </span><span class="NormalTextRun SpellingErrorV2Themed SCXW161465391 BCX8" data-ccp-charstyle="eop">CyTech</span><span class="NormalTextRun SCXW161465391 BCX8" data-ccp-charstyle="eop">:</span></span><span class="EOP SCXW161465391 BCX8" data-ccp-props="{"201341983":0,"335559685":720,"335559739":160,"335559740":259}"> </span>

<div class="SCXW161465391 BCX8" id="bkmrk--2"><div class="OutlineElement Ltr SCXW161465391 BCX8">  
</div><div class="ListContainerWrapper SCXW161465391 BCX8">  
</div></div>**<span class="TextRun SCXW161465391 BCX8" data-contrast="none" lang="EN-US" xml:lang="EN-US"><span class="NormalTextRun SCXW161465391 BCX8" data-ccp-charstyle="eop">Collect CrowdStrike Falcon Data Replicator logs (input: aws-s3)</span><span class="NormalTextRun SCXW161465391 BCX8" data-ccp-charstyle="eop"> Option 1</span></span><span class="EOP SCXW161465391 BCX8" data-ccp-props="{"134245418":true,"134245529":true,"201341983":0,"335559738":240,"335559739":0,"335559740":360}"> </span>**

<div class="SCXW161465391 BCX8" id="bkmrk-aws%3A-access-key-id%C2%A0-"><div class="ListContainerWrapper SCXW161465391 BCX8">  
</div><div class="ListContainerWrapper SCXW161465391 BCX8">1. <span class="TextRun SCXW161465391 BCX8" data-contrast="auto" lang="EN-US" xml:lang="EN-US"><span class="NormalTextRun SCXW161465391 BCX8" data-ccp-charstyle="eop">AWS:</span><span class="NormalTextRun SCXW161465391 BCX8" data-ccp-charstyle="eop"> Access Key ID</span></span><span class="EOP SCXW161465391 BCX8" data-ccp-props="{"201341983":0,"335559739":160,"335559740":259}"> </span>

</div><div class="ListContainerWrapper SCXW161465391 BCX8">2. <span class="TextRun SCXW161465391 BCX8" data-contrast="auto" lang="EN-US" xml:lang="EN-US"><span class="NormalTextRun SCXW161465391 BCX8" data-ccp-charstyle="eop">AWS</span><span class="NormalTextRun SCXW161465391 BCX8" data-ccp-charstyle="eop">: Secret Access Key </span></span><span class="EOP SCXW161465391 BCX8" data-ccp-props="{"201341983":0,"335559739":160,"335559740":259}"> </span>

</div><div class="ListContainerWrapper SCXW161465391 BCX8">3. <span class="TextRun SCXW161465391 BCX8" data-contrast="auto" lang="EN-US" xml:lang="EN-US"><span class="NormalTextRun SCXW161465391 BCX8" data-ccp-charstyle="eop">AWS</span><span class="NormalTextRun SCXW161465391 BCX8" data-ccp-charstyle="eop">: Queue URL - URL of the AWS SQS queue that messages will be received from.</span></span><span class="EOP SCXW161465391 BCX8" data-ccp-props="{"201341983":0,"335559739":160,"335559740":259}"> </span>

</div><div class="ListContainerWrapper SCXW161465391 BCX8">  
</div></div>**<span class="TextRun SCXW161465391 BCX8" data-contrast="none" lang="EN-US" xml:lang="EN-US"><span class="NormalTextRun SCXW161465391 BCX8" data-ccp-charstyle="eop">Collect CrowdStrike logs via </span><span class="NormalTextRun SCXW161465391 BCX8" data-ccp-charstyle="eop">API.</span><span class="NormalTextRun SCXW161465391 BCX8" data-ccp-charstyle="eop"> Option 2 (Recommended)</span></span><span class="EOP SCXW161465391 BCX8" data-ccp-props="{"134245418":true,"134245529":true,"201341983":0,"335559738":240,"335559739":0,"335559740":360}"> </span>**

<div class="SCXW161465391 BCX8" id="bkmrk-client-id%3A-client-id"><div class="ListContainerWrapper SCXW161465391 BCX8">  
</div><div class="ListContainerWrapper SCXW161465391 BCX8">1. <span class="TextRun SCXW161465391 BCX8" data-contrast="auto" lang="EN-US" xml:lang="EN-US"><span class="NormalTextRun SCXW161465391 BCX8" data-ccp-charstyle="eop">Client </span><span class="NormalTextRun SCXW161465391 BCX8" data-ccp-charstyle="eop">ID:</span> <span class="NormalTextRun SCXW161465391 BCX8" data-ccp-charstyle="eop">Client ID for the CrowdStrike.</span></span><span class="EOP SCXW161465391 BCX8" data-ccp-props="{"201341983":0,"335559739":160,"335559740":259}"> </span>

</div><div class="ListContainerWrapper SCXW161465391 BCX8">2. <span class="TextRun SCXW161465391 BCX8" data-contrast="auto" lang="EN-US" xml:lang="EN-US"><span class="NormalTextRun SCXW161465391 BCX8" data-ccp-charstyle="eop">Client </span><span class="NormalTextRun SCXW161465391 BCX8" data-ccp-charstyle="eop">Secret</span><span class="NormalTextRun SCXW161465391 BCX8" data-ccp-charstyle="eop">:</span> <span class="NormalTextRun SCXW161465391 BCX8" data-ccp-charstyle="eop">Client Secret for the CrowdStrike.</span></span><span class="EOP SCXW161465391 BCX8" data-ccp-props="{"201341983":0,"335559739":160,"335559740":259}"> </span>

</div><div class="ListContainerWrapper SCXW161465391 BCX8">3. <span class="TextRun SCXW161465391 BCX8" data-contrast="auto" lang="EN-US" xml:lang="EN-US"><span class="NormalTextRun SCXW161465391 BCX8" data-ccp-charstyle="eop">URL</span><span class="NormalTextRun SCXW161465391 BCX8" data-ccp-charstyle="eop">:</span> <span class="NormalTextRun SCXW161465391 BCX8" data-ccp-charstyle="eop">Token URL of CrowdStrike.</span></span><span class="EOP SCXW161465391 BCX8" data-ccp-props="{"201341983":0,"335559739":160,"335559740":259}"> </span>

</div></div>

# CrowdStrike to SIEM alerts and ruling

##### **Introduction**

This guide explains how to send security alerts from CrowdStrike Falcon to your Security Information and Event Management (SIEM) system and how to create rules for alert filtering and correlation (ruling). This helps detect threats faster and reduces alert noise.

##### **What You Need Before Starting**

- CrowdStrike Falcon account with admin access
- API Client credentials from CrowdStrike
- Access to your SIEM (Splunk, QRadar, ArcSight, etc.)
- Ability to install/configure software (Windows/Linux)
- Basic knowledge of logs and syslog is helpful but not required

##### <span style="color: rgb(53, 152, 219);">**Step 1: Create an API Client in CrowdStrike Falcon**</span>

1. Log in to the CrowdStrike Falcon Console at [https://falcon.crowdstrike.com/login/](https://falcon.crowdstrike.com/login/ "CrowdStrike")
2. Go to **Support → API Clients and Keys**
3. Click **Add new API client**
4. Give the client a name like “SIEM Integration”
5. Select the following API scopes/permissions:
    
    
    - **Event streams: Read**
    - **Detections: Read**
6. Save the client and note the **Client ID** and **Client Secret** — you’ll need them later

##### <span style="color: rgb(53, 152, 219);">**Step 2: Choose Your Integration Method**</span>

There are three main ways to forward CrowdStrike data to your SIEM:

- **Falcon SIEM Connector** — easiest for most users, sends logs via syslog
- **Falcon Streaming API** — for custom coding and direct API calls
- **Falcon Data Replicator (FDR)** — for bulk data export, stored in AWS S3

##### <span style="color: rgb(53, 152, 219);">**Step 3: Download and Install Falcon SIEM Connector**</span>

**For Windows**

1. Download the SIEM Connector installer from CrowdStrike Support or Falcon Portal
2. Run the installer .exe file
3. Follow the installation wizard to complete setup

**For Linux**

1. Download the SIEM Connector package(.tar.gz)
2. Extract the package and run install script:  
    tar -xzf crowdstrike-siem-connector.tar.gz  
    cd crowdstrike-siem-connector  
    sudo ./install.sh
    
    [![image.png](https://cytechint-docs-bookstack.s3.amazonaws.com/uploads/images/gallery/2025-06/scaled-1680-/gVgtzDUz9QdyCS0V-image.png)](https://cytechint-docs-bookstack.s3.amazonaws.com/uploads/images/gallery/2025-06/gVgtzDUz9QdyCS0V-image.png)

##### <span style="color: rgb(53, 152, 219);">**Step 4: Configure the SIEM Connector**</span>

1\. Open the connector configuration file in a text editor:

- Windows:  
     C:\\Program Files\\CrowdStrike\\SIEMConnector\\config.json
- Linux:
    
     /etc/crowdstrike-siem/config.json
    
    2\. Add your CrowdStrike API credentials and your SIEM server info. Example config:
    
    {
    
     "falcon\_api": {
    
     "client\_id": "YOUR\_CLIENT\_ID",
    
     "client\_secret": "YOUR\_CLIENT\_SECRET"
    
     },
    
     "output": {
    
     "format": "json",
    
     "destination": "syslog://your.siem.server:514"
    
     }
    
    }
    
    [![image.png](https://cytechint-docs-bookstack.s3.amazonaws.com/uploads/images/gallery/2025-06/scaled-1680-/Y06bIdU8Y8Mul9KP-image.png)](https://cytechint-docs-bookstack.s3.amazonaws.com/uploads/images/gallery/2025-06/Y06bIdU8Y8Mul9KP-image.png)
    
    3\. Save the file.

##### <span style="color: rgb(53, 152, 219);">**Step 5: Start the SIEM Connector Service**</span>

**Windows**:  
Open Command Prompt as Administrator and run: "net start CrowdStrikeSIEMConnector"

**Linux**:  
Run the following commands: "sudo systemctl start crowdstrike-siem"  
"sudo systemctl enable crowdstrike-siem"

[![image.png](https://cytechint-docs-bookstack.s3.amazonaws.com/uploads/images/gallery/2025-06/scaled-1680-/By053HZDN73zseh6-image.png)](https://cytechint-docs-bookstack.s3.amazonaws.com/uploads/images/gallery/2025-06/By053HZDN73zseh6-image.png)

##### <span style="color: rgb(53, 152, 219);">**Step 6: Verify Data Flow**</span>

Check the connector logs to make sure it is running without errors:

- Windows: Logs usually at C:\\Program Files\\CrowdStrike\\SIEMConnector\\logs\\
- Linux: View logs with: tail -f /var/log/crowdstrike-siem.log

In your SIEM, search for CrowdStrike events to verify logs are being received.

##### <span style="color: rgb(53, 152, 219);">**Step 7: Create Alert Rules and Ruling in SIEM**</span>

Use your SIEM’s alerting and correlation features to build rules that:

- Filter out low-severity or false-positive alerts
- Combine multiple alerts related to the same incident for context
- Alert on high-severity or confirmed threats only

<span style="color: rgb(45, 194, 107);"> Example in Splunk**:</span><span style="color: rgb(53, 152, 219);"> </span>index=crowdstrike severity&gt;=high

[![image.png](https://cytechint-docs-bookstack.s3.amazonaws.com/uploads/images/gallery/2025-06/scaled-1680-/CsSiA2PPmVHgn4TZ-image.png)](https://cytechint-docs-bookstack.s3.amazonaws.com/uploads/images/gallery/2025-06/CsSiA2PPmVHgn4TZ-image.png)

##### <span style="color: rgb(53, 152, 219);">**Step 8: Best Practices and Tips**</span>

- Always **rotate your API credentials** regularly for security
- Use **TCP or TLS syslog forwarding** for reliable and encrypted log delivery
- Limit forwarded logs to relevant event types to avoid SIEM overload
- Monitor the health of the SIEM connector continuously
- Document all configurations and rules clearly for team collaboration

**Additional Resources:**

# CSPM-AWS Integration

# Get started with CSPM for AWS

## [](https://www.elastic.co/guide/en/security/current/cspm-get-started.html#cspm-overview)Overview

<div class="book" id="bkmrk--1" lang="en"><div class="section">  
</div></div>This page explains how to get started monitoring the security posture of your cloud assets using the Cloud Security Posture Management (CSPM) feature.

**Requirements**

<div class="book" id="bkmrk-minimum-privileges-v" lang="en"><div><div class="section"><div class="sidebar"><div class="ulist itemizedlist">- Minimum privileges vary depending on whether you need to read, write, or manage CSPM data and integrations. Refer to [CSPM privilege requirements](https://www.elastic.co/guide/en/security/current/cspm-required-permissions.html "CSPM privilege requirements").
- The CSPM integration is available to all Elastic Cloud users. On-premise deployments require an [Enterprise subscription](https://www.elastic.co/pricing).
- CSPM only works in the `Default` Kibana space. Installing the CSPM integration on a different Kibana space will not work.
- CSPM is supported only on AWS, GCP, and Azure commercial cloud platforms, and AWS GovCloud. Other government cloud platforms are not supported. [Click here to request support](https://github.com/elastic/kibana/issues/new/choose).
- The user who gives the CSPM integration AWS permissions must be an AWS account `admin`.

</div></div></div></div></div>## [](https://www.elastic.co/guide/en/security/current/cspm-get-started.html#cspm-setup)Set up CSPM for AWS

You can set up CSPM for AWS either by enrolling a single cloud account, or by enrolling an organization containing multiple accounts. Either way, first you will add the CSPM integration, then enable cloud account access. Two deployment technologies are available: agentless, and agent-based. [Agentless deployment](https://www.elastic.co/guide/en/security/current/cspm-get-started.html#cspm-aws-agentless "Agentless deployment") allows you to collect cloud posture data without having to manage the deployment of Elastic Agent in your cloud. [Agent-based deployment](https://www.elastic.co/guide/en/security/current/cspm-get-started.html#cspm-aws-agent-based "Agent-based deployment") requires you to deploy and manage Elastic Agent in the cloud account you want to monitor.[](https://www.elastic.co/guide/en/security/current/cspm-get-started.html#cspm-aws-agentless)

## [](https://www.elastic.co/guide/en/security/current/cspm-get-started.html#cspm-aws-agent-based)Agent-based deployment

<div class="book" id="bkmrk--5" lang="en"><div><div class="section"></div></div></div>### [](https://www.elastic.co/guide/en/security/current/cspm-get-started.html#cspm-add-and-name-integration)Add the CSPM integration

<div class="book" id="bkmrk-find%C2%A0integrations%C2%A0in" lang="en"><div class="section">  
<div class="olist orderedlist">1. Find <span class="strong strong">**Integrations**</span> in the navigation menu or use the [global search field](https://www.elastic.co/guide/en/kibana/8.17/introduction.html#kibana-navigation-search).
2. Search for `CSPM`, then click on the result.
3. Click <span class="strong strong">**Add Cloud Security Posture Management (CSPM)**</span>.
4. Select <span class="strong strong">**AWS**</span>, then either <span class="strong strong">**AWS Organization**</span> to onboard multiple accounts, or <span class="strong strong">**Single Account**</span> to onboard an individual account.
5. Give your integration a name that matches the purpose or team of the AWS account/organization you want to monitor, for example, `dev-aws-account`.

</div><div class="position-relative">  
</div></div></div>### [](https://www.elastic.co/guide/en/security/current/cspm-get-started.html#cspm-set-up-cloud-access-section)Set up cloud account access

<div class="book" id="bkmrk--8" lang="en"><div class="section">  
</div></div>The CSPM integration requires access to AWS’s built-in [`SecurityAudit` IAM policy](https://docs.aws.amazon.com/IAM/latest/UserGuide/access_policies_job-functions.html#jf_security-auditor) in order to discover and evaluate resources in your cloud account. There are several ways to provide access.

For most use cases, the simplest option is to use AWS CloudFormation to automatically provision the necessary resources and permissions in your AWS account. This method, as well as several manual options, are described below.

### [](https://www.elastic.co/guide/en/security/current/cspm-get-started.html#cspm-set-up-cloudformation)CloudFormation (recommended)

<div class="book" id="bkmrk-in-the%C2%A0add-cloud-sec" lang="en"><div class="section">  
<div class="olist orderedlist">1. In the <span class="strong strong">**Add Cloud Security Posture Management (CSPM) integration**</span> menu, under <span class="strong strong">**Setup Access**</span>, select <span class="strong strong">**CloudFormation**</span>.
2. In a new browser tab or window, log in as an admin to the AWS account or organization you want to onboard.
3. Return to your Kibana tab. Click <span class="strong strong">**Save and continue**</span> at the bottom of the page.
4. Review the information, then click <span class="strong strong">**Launch CloudFormation**</span>.
5. A CloudFormation template appears in a new browser tab.
6. For organization-level deployments only, you must enter the ID of the organizational units where you want to deploy into the CloudFormation template’s `OrganizationalUnitIds` field. You can find organizational unit IDs in the AWS console under <span class="strong strong">**AWS Organizations → AWS Accounts**</span> (under each organization’s name). You can also use this field to specify which accounts in your organization to monitor, and which to skip.
7. (Optional) Switch to the AWS region where you want to deploy using the controls in the upper right corner.
8. Tick the checkbox under <span class="strong strong">**Capabilities**</span> to authorize the creation of necessary resources.
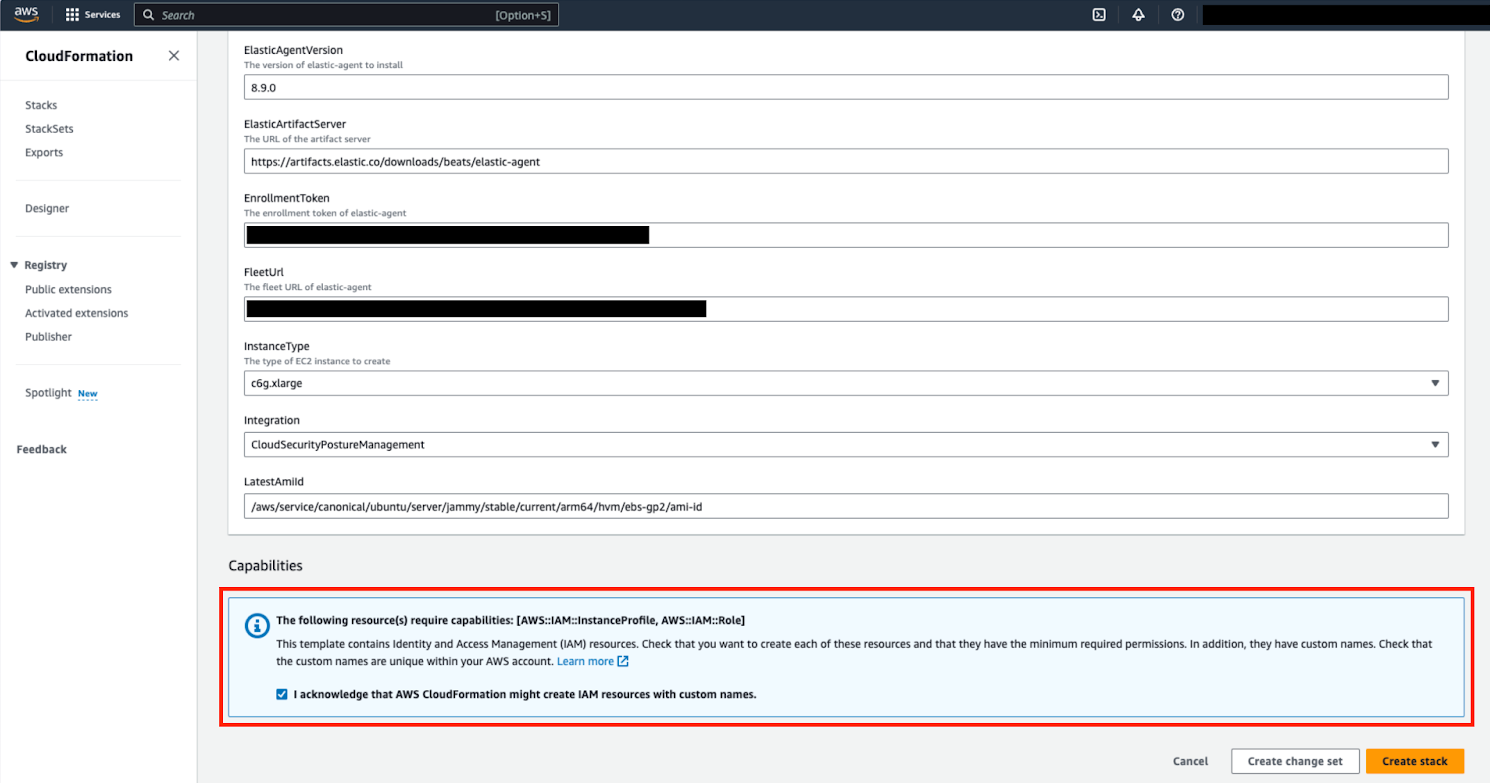
    
    <div class="imageblock"><div class="content">![The Add permissions screen in AWS](https://www.elastic.co/guide/en/security/current/images/cspm-cloudformation-template.png)</div></div>
9. At the bottom of the template, select <span class="strong strong">**Create stack**</span>.

</div></div></div>When you return to Kibana, click <span class="strong strong">**View assets**</span> to review the data being collected by your new integration.

### [](https://www.elastic.co/guide/en/security/current/cspm-get-started.html#cspm-setup-organization-manual)Manual authentication for organization-level onboarding

<div class="book" id="bkmrk--11" lang="en"><div class="section"></div></div>If you’re onboarding a single account instead of an organization, skip this section.

When using manual authentication to onboard at the organization level, you need to configure the necessary permissions using the AWS console for the organization where you want to deploy:

<div class="book" id="bkmrk-in-the-organization%E2%80%99" lang="en"><div><div class="section"><div class="ulist itemizedlist">- In the organization’s management account (root account), create an IAM role called `cloudbeat-root` (the name is important). The role needs several policies:
    
    <div class="ulist itemizedlist">
    - The following inline policy:
    
    </div>

</div><details><summary class="title">Click to expand policy</summary>

```
```

</details><div class="ulist itemizedlist">- The following trust policy:

</div><details><summary class="title">Click to expand policy</summary>

```
```

</details><div class="ulist itemizedlist">- The AWS-managed `SecurityAudit` policy.

</div><div class="important admon"><div class="icon">  
</div><div class="admon_content">  
</div></div></div></div></div>You must replace `<Management account ID>` in the trust policy with your AWS account ID.

<div class="book" id="bkmrk-next%2C-for-each-accou" lang="en"><div><div class="section"><div class="important admon"><div class="admon_content">  
</div></div><div class="ulist itemizedlist">- Next, for each account you want to scan in the organization, create an IAM role named `cloudbeat-securityaudit` with the following policies:
    
    <div class="ulist itemizedlist">
    - The AWS-managed `SecurityAudit` policy.
    - The following trust policy:
    
    </div>

</div><details><summary class="title">Click to expand policy</summary>

```
```

</details><div class="important admon"><div class="icon">  
</div><div class="admon_content">  
</div></div></div></div></div>You must replace `<Management account ID>` in the trust policy with your AWS account ID.

After creating the necessary roles, authenticate using one of the manual authentication methods.

When deploying to an organization using any of the authentication methods below, you need to make sure that the credentials you provide grant permission to assume `cloudbeat-root` privileges.

### [](https://www.elastic.co/guide/en/security/current/cspm-get-started.html#cspm-set-up-manual)Manual authentication methods

<div class="book" id="bkmrk-default-instance-rol" lang="en"><div class="section">  
<div class="ulist itemizedlist">- [Default instance role (recommended)](https://www.elastic.co/guide/en/security/current/cspm-get-started.html#cspm-use-instance-role "Option 1 - Default instance role")
- [Direct access keys](https://www.elastic.co/guide/en/security/current/cspm-get-started.html#cspm-use-keys-directly "Option 2 - Direct access keys")
- [Temporary security credentials](https://www.elastic.co/guide/en/security/current/cspm-get-started.html#cspm-use-temp-credentials "Option 3 - Temporary security credentials")
- [Shared credentials file](https://www.elastic.co/guide/en/security/current/cspm-get-started.html#cspm-use-a-shared-credentials-file "Option 4 - Shared credentials file")
- [IAM role Amazon Resource Name (ARN)](https://www.elastic.co/guide/en/security/current/cspm-get-started.html#cspm-use-iam-arn "Option 5 - IAM role Amazon Resource Name (ARN)")

</div></div></div>Whichever method you use to authenticate, make sure AWS’s built-in [`SecurityAudit` IAM policy](https://docs.aws.amazon.com/IAM/latest/UserGuide/access_policies_job-functions.html#jf_security-auditor) is attached.

#### [](https://www.elastic.co/guide/en/security/current/cspm-get-started.html#cspm-use-instance-role)Option 1 - Default instance role

If you are deploying to an AWS organization instead of an AWS account, you should already have [created a new role](https://www.elastic.co/guide/en/security/current/cspm-get-started.html#cspm-setup-organization-manual "Manual authentication for organization-level onboarding"), `cloudbeat-root`. Skip to step 2 "Attach your new IAM role to an EC2 instance", and attach this role. You can use either an existing or new EC2 instance.

Follow AWS’s [IAM roles for Amazon EC2](https://docs.aws.amazon.com/AWSEC2/latest/UserGuide/iam-roles-for-amazon-ec2.html) documentation to create an IAM role using the IAM console, which automatically generates an instance profile.

<div class="book" id="bkmrk-create-an-iam-role%3A-" lang="en"><div><div class="section"><div class="olist orderedlist">1. Create an IAM role:
    
    <div class="olist orderedlist">
    1. In AWS, go to your IAM dashboard. Click <span class="strong strong">**Roles**</span>, then <span class="strong strong">**Create role**</span>.
    2. On the <span class="strong strong">**Select trusted entity**</span> page, under <span class="strong strong">**Trusted entity type**</span>, select <span class="strong strong">**AWS service**</span>.
    3. Under <span class="strong strong">**Use case**</span>, select <span class="strong strong">**EC2**</span>. Click <span class="strong strong">**Next**</span>.
        
        <div class="imageblock"><div class="content">![The Select trusted entity screen in AWS](https://www.elastic.co/guide/en/security/current/images/cspm-aws-auth-1.png)</div></div>
    4. On the <span class="strong strong">**Add permissions**</span> page, search for and select `SecurityAudit`. Click <span class="strong strong">**Next**</span>.
        
        <div class="imageblock"><div class="content">![The Add permissions screen in AWS](https://www.elastic.co/guide/en/security/current/images/cspm-aws-auth-2.png)</div></div>
    5. On the <span class="strong strong">**Name, review, and create**</span> page, name your role, then click <span class="strong strong">**Create role**</span>.
    
    </div>
2. Attach your new IAM role to an EC2 instance:
    
    <div class="olist orderedlist">
    1. In AWS, select an EC2 instance.
    2. Select <span class="strong strong">**Actions &gt; Security &gt; Modify IAM role**</span>.
        
        <div class="imageblock"><div class="content">![The EC2 page in AWS](https://www.elastic.co/guide/en/security/current/images/cspm-aws-auth-3.png)</div></div>
    3. On the <span class="strong strong">**Modify IAM role**</span> page, search for and select your new IAM role.
    4. Click <span class="strong strong">**Update IAM role**</span>.
    5. Return to Kibana and [finish manual setup](https://www.elastic.co/guide/en/security/current/cspm-get-started.html#cspm-finish-manual "Finish manual setup").
    
    </div>

</div></div></div></div>Make sure to deploy the CSPM integration to this EC2 instance. When completing setup in Kibana, in the <span class="strong strong">**Setup Access\* section, select \*Assume role**</span>. Leave <span class="strong strong">**Role ARN**</span> empty for agentless deployments. For agent-based deployments, leave it empty unless you want to specify a role the Elastic Agent should assume instead of the default role for your EC2 instance. Click <span class="strong strong">**Save and continue**</span>.

#### [](https://www.elastic.co/guide/en/security/current/cspm-get-started.html#cspm-use-keys-directly)Option 2 - Direct access keys

Access keys are long-term credentials for an IAM user or AWS account root user. To use access keys as credentials, you must provide the `Access key ID` and the `Secret Access Key`. After you provide credentials, [finish manual setup](https://www.elastic.co/guide/en/security/current/cspm-get-started.html#cspm-finish-manual "Finish manual setup").

For more details, refer to [Access Keys and Secret Access Keys](https://docs.aws.amazon.com/general/latest/gr/aws-sec-cred-types.html).

You must select <span class="strong strong">**Programmatic access**</span> when creating the IAM user.

#### [](https://www.elastic.co/guide/en/security/current/cspm-get-started.html#cspm-use-temp-credentials)Option 3 - Temporary security credentials

You can configure temporary security credentials in AWS to last for a specified duration. They consist of an access key ID, a secret access key, and a session token, which is typically found using `GetSessionToken`.

Because temporary security credentials are short term, once they expire, you will need to generate new ones and manually update the integration’s configuration to continue collecting cloud posture data. Update the credentials before they expire to avoid data loss.

IAM users with multi-factor authentication (MFA) enabled need to submit an MFA code when calling `GetSessionToken`. For more details, refer to AWS’s [Temporary Security Credentials](https://docs.aws.amazon.com/IAM/latest/UserGuide/id_credentials_temp.html) documentation.

You can use the AWS CLI to generate temporary credentials. For example, you could use the following command if you have MFA enabled:

<div class="book" id="bkmrk--16" lang="en"><div><div class="section"><div class="pre_wrapper lang-console"><div class="console_code_copy" title="Copy to clipboard">  
</div></div></div></div></div>```
sts get-session-token --serial-number arn:aws:iam::1234:mfa/your-email@example.com --duration-seconds 129600 --token-code 123456
```

<div class="book" id="bkmrk-copy-as-curltry-in-e" lang="en"><div><div class="section"><div class="pre_wrapper lang-console"></div><div class="console_widget" data-snippet="snippets/9.console"><div class="u-space-between"><div>  
</div><div class="u-space-between"><a class="sense_widget copy_as_curl">Copy as curl</a>[Try in Elastic](http://localhost:5601/zzz/app/kibana#/dev_tools/console?load_from=https://www.elastic.co/guide/en/security/current/snippets/9.console "Try in Elastic")<a class="console_settings" title="Configure Console URL"> </a></div></div></div></div></div></div>The output from this command includes the following fields, which you should provide when configuring the KSPM integration:

<div class="book" id="bkmrk-access-key-id%3A-the-f" lang="en"><div><div class="section"><div class="ulist itemizedlist">- `Access key ID`: The first part of the access key.
- `Secret Access Key`: The second part of the access key.
- `Session Token`: The required token when using temporary security credentials.

</div></div></div></div>After you provide credentials, [finish manual setup](https://www.elastic.co/guide/en/security/current/cspm-get-started.html#cspm-finish-manual "Finish manual setup").

#### [](https://www.elastic.co/guide/en/security/current/cspm-get-started.html#cspm-use-a-shared-credentials-file)Option 4 - Shared credentials file

If you use different AWS credentials for different tools or applications, you can use profiles to define multiple access keys in the same configuration file. For more details, refer to AWS' [Shared Credentials Files](https://docs.aws.amazon.com/sdkref/latest/guide/file-format.html) documentation.

Instead of providing the `Access key ID` and `Secret Access Key` to the integration, provide the information required to locate the access keys within the shared credentials file:

<div class="book" id="bkmrk-credential-profile-n" lang="en"><div><div class="section"><div class="ulist itemizedlist">- `Credential Profile Name`: The profile name in the shared credentials file.
- `Shared Credential File`: The directory of the shared credentials file.

</div></div></div></div>If you don’t provide values for all configuration fields, the integration will use these defaults:

<div class="book" id="bkmrk-if%C2%A0access-key-id%2C%C2%A0se" lang="en"><div><div class="section"><div class="ulist itemizedlist">- If `Access key ID`, `Secret Access Key`, and `ARN Role` are not provided, then the integration will check for `Credential Profile Name`.
- If there is no `Credential Profile Name`, the default profile will be used.
- If `Shared Credential File` is empty, the default directory will be used.
- For Linux or Unix, the shared credentials file is located at `~/.aws/credentials`.

</div></div></div></div>After providing credentials, [finish manual setup](https://www.elastic.co/guide/en/security/current/cspm-get-started.html#cspm-finish-manual "Finish manual setup").

#### [](https://www.elastic.co/guide/en/security/current/cspm-get-started.html#cspm-use-iam-arn)Option 5 - IAM role Amazon Resource Name (ARN)

An IAM role Amazon Resource Name (ARN) is an IAM identity that you can create in your AWS account. You define the role’s permissions. Roles do not have standard long-term credentials such as passwords or access keys. Instead, when you assume a role, it provides temporary security credentials for your session.

To use an IAM role ARN, select <span class="strong strong">**Assume role**</span> under <span class="strong strong">**Preferred manual method**</span>, enter the ARN, and continue to Finish manual setup.

### [](https://www.elastic.co/guide/en/security/current/cspm-get-started.html#cspm-finish-manual)Finish manual setup

Once you’ve provided AWS credentials, under <span class="strong strong">**Where to add this integration**</span>:

If you want to monitor an AWS account or organization where you have not yet deployed Elastic Agent:

<div class="book" id="bkmrk-select%C2%A0new-hosts.-na" lang="en"><div><div class="section"><div class="ulist itemizedlist">- Select <span class="strong strong">**New Hosts**</span>.
- Name the Elastic Agent policy. Use a name that matches the purpose or team of the cloud account or accounts you want to monitor. For example, `dev-aws-account`.
- Click <span class="strong strong">**Save and continue**</span>, then <span class="strong strong">**Add Elastic Agent to your hosts**</span>. The <span class="strong strong">**Add agent**</span> wizard appears and provides Elastic Agent binaries, which you can download and deploy to your AWS account.

</div></div></div></div>If you want to monitor an AWS account or organization where you have already deployed Elastic Agent:

<div class="book" id="bkmrk-select%C2%A0existing-host" lang="en"><div><div class="section"><div class="ulist itemizedlist">- Select <span class="strong strong">**Existing hosts**</span>.
- Select an agent policy that applies the AWS account you want to monitor.
- Click <span class="strong strong">**Save and continue**</span>.

</div></div></div></div>source: <span style="color: rgb(53, 152, 219);">*https://www.elastic.co/guide/en/security/current/cspm-get-started.html*</span>

# Custom Windows Event Logs - Integration

## Custom Windows Event Logs

Collect and parse logs from any Windows event log channel with Elastic Agent.

The custom Windows event log package allows you to ingest events from any [Windows event log](https://docs.microsoft.com/en-us/windows/win32/wes/windows-event-log) channel. You can get a list of available event log channels by running [`Get-WinEvent -ListLog * | Format-List -Property LogName`](https://learn.microsoft.com/en-us/powershell/module/microsoft.powershell.diagnostics/get-winevent) in PowerShell on Windows Vista or newer. If `Get-WinEvent` is not available, [`Get-EventLog *`](https://learn.microsoft.com/en-us/powershell/module/microsoft.powershell.management/get-eventlog) may be used.

By executing this command in the powershell(administrator), it will list the log names that is being used.

[![image.png](https://cytechint-docs-bookstack.s3.amazonaws.com/uploads/images/gallery/2024-10/scaled-1680-/T4wDzWGP1Iq0xMF3-image.png)](https://cytechint-docs-bookstack.s3.amazonaws.com/uploads/images/gallery/2024-10/T4wDzWGP1Iq0xMF3-image.png)

Add a channel name in the Channel Name text field (e.g Application).

<div drawio-diagram="1739"><img src="https://cytechint-docs-bookstack.s3.amazonaws.com/uploads/images/drawio/2024-10/rUVR1l2nS3GHu3bO-drawing-29-1729579627.png" alt=""/></div>

# Cyber Incident Monitoring Integration Procedure

Go to &gt; Cyber Incident Monitoring

[![image.png](https://cytechint-docs-bookstack.s3.amazonaws.com/uploads/images/gallery/2024-04/scaled-1680-/image.png)](https://cytechint-docs-bookstack.s3.amazonaws.com/uploads/images/gallery/2024-04/image.png)

# CyberArk PAM

##### <span style="color: rgb(53, 152, 219);">Configure the Vault to Forward syslog Messages to PTA</span><a name="aanchor24"></a>

The system logger of the Vault must be configured to send logging data to the PTA machine for real-time data analysis.

<table cellspacing="0" class="TableStyle-AdmonNote" id="bkmrk-%C2%A0-when-pta-is-config"><colgroup><col class="TableStyle-AdmonNote-Column-Icon"></col><col class="TableStyle-AdmonNote-Column-Text"></col></colgroup><tbody><tr class="TableStyle-AdmonNote-Body-Body1"><td class="TableStyle-AdmonNote-BodyB-Icon-Body1"> </td><td class="TableStyle-AdmonNote-BodyA-Text-Body1">When PTA is configured with Vaults deployed in a distributed environment, configure the primary and satellite Vaults.

</td></tr></tbody></table>

<div class="MCDropDown dropDown dropDownConfiguration MCDropDown_Open" data-mc-state="open" id="bkmrk-to-configure-syslog-"><span class="MCDropDownHead dropDownHead">[To Configure syslog on the Vault Machine (until Vault v10.4):](https://docs.cyberark.com/pam-self-hosted/11.3/en/content/pta/configuring-vault-forward-syslog-messages.htm)</span><div class="MCDropDownBody dropDownBody"><table cellpadding="0" cellspacing="0" class="AutoNumber_p_Steps"><colgroup><col></col><col></col><col></col></colgroup><tbody><tr><td valign="top"> </td><td class="AutoNumber_p_Bullet" valign="top">1.</td><td class="AutoNumber_p_Bullet" data-mc-autonum=" 1. " valign="top">From the installation package, copy PTA.xsl to the <span class="Emphasis">Syslog</span> subdirectory of the Vault installation folder. By default, the subdirectory is:  
<span class="Emphasis">C:\\Program Files (x86)\\PrivateArk\\Server</span><span class="Emphasis">\\Syslog</span>.</td></tr></tbody></table>

<table cellpadding="0" cellspacing="0" class="AutoNumber_p_Steps"><colgroup><col></col><col></col><col></col></colgroup><tbody><tr><td valign="top"> </td><td class="AutoNumber_p_Bullet" valign="top">2.</td><td class="AutoNumber_p_Bullet" data-mc-autonum=" 2. " valign="top">In the same server installation folder,by default <span class="Emphasis">C:\\Program Files (x86)\\PrivateArk\\Server</span>, open dbparm.ini and add the following lines:</td></tr></tbody></table>

</div></div>\[SYSLOG\]  
SyslogTranslatorFile=Syslog\\PTA.xsl  
SyslogServerPort=&lt;port number&gt;  
SyslogServerIP=&lt;server IP&gt;  
SyslogServerProtocol=UDP  
SyslogMessageCodeFilter=4,17,22,24,31,38,57,60,88,130,142,145,148,149,170,183,185,295,300,301,302,303,306,307,308,344,346,359,360,361,362,372,373,374,375,376,377,378,379,380,381,411,412,414,416,418,426,434,463  
UseLegacySyslogFormat=No

Specify the following information:

<div class="MCDropDown dropDown dropDownConfiguration MCDropDown_Open" data-mc-state="open" id="bkmrk-parameter-name-defin"><div class="MCDropDownBody dropDownBody"><table cellspacing="0" class="TableStyle-Standard"><thead><tr class="TableStyle-Standard-Head-Header1"><th class="TableStyle-Standard-HeadE-Column1-Header1">Parameter Name

</th><th class="TableStyle-Standard-HeadD-Column1-Header1">Define or Select

</th></tr></thead><tbody><tr class="TableStyle-Standard-Body-Body1"><td class="TableStyle-Standard-BodyE-Column1-Body1">SyslogServerIP

</td><td class="TableStyle-Standard-BodyD-Column1-Body1">The IP address(es) of the PTA machine where messages will be sent.

</td></tr><tr class="TableStyle-Standard-Body-Body1"><td class="TableStyle-Standard-BodyE-Column1-Body1">SyslogServerPort

</td><td class="TableStyle-Standard-BodyD-Column1-Body1">The port number through which the syslog will be sent.

Specify <span class="Emphasis">514</span> to send syslogs to the default PTA port.

</td></tr><tr class="TableStyle-Standard-Body-Body1"><td class="TableStyle-Standard-BodyE-Column1-Body1">SyslogServerProtocol

</td><td class="TableStyle-Standard-BodyD-Column1-Body1">The protocol used to transfer the syslog records.

Specify: <span class="Emphasis">tcp</span> or <span class="Emphasis">udp</span>.

<table cellspacing="0" class="TableStyle-AdmonNote"><colgroup><col class="TableStyle-AdmonNote-Column-Icon"></col><col class="TableStyle-AdmonNote-Column-Text"></col></colgroup><tbody><tr class="TableStyle-AdmonNote-Body-Body1"><td class="TableStyle-AdmonNote-BodyB-Icon-Body1"> </td><td class="TableStyle-AdmonNote-BodyA-Text-Body1">PTA does not support the SSL protocol.

</td></tr></tbody></table>

</td></tr><tr class="TableStyle-Standard-Body-Body1"><td class="TableStyle-Standard-BodyE-Column1-Body1">SyslogMessageCodeFilter

</td><td class="TableStyle-Standard-BodyD-Column1-Body1">Defines which message codes will be sent from the Vault Machine to PTA through Syslog protocol.

You can specify message numbers, separated by commas. You can also specify range of numbers using ‘-‘.

Message codes are sent for the following events:

<table cellspacing="0" class="TableStyle-Standard"><colgroup><col class="TableStyle-Standard-Column-Column1"></col><col class="TableStyle-Standard-Column-Column1"></col></colgroup><thead><tr class="TableStyle-Standard-Head-Header1"><th class="TableStyle-Standard-HeadE-Column1-Header1">Code

</th><th class="TableStyle-Standard-HeadD-Column1-Header1">Activity

</th></tr></thead><tbody><tr class="TableStyle-Standard-Body-Body1"><td class="TableStyle-Standard-BodyE-Column1-Body1">4

</td><td class="TableStyle-Standard-BodyD-Column1-Body1">User Authentication

</td></tr><tr class="TableStyle-Standard-Body-Body1"><td class="TableStyle-Standard-BodyE-Column1-Body1">17

</td><td class="TableStyle-Standard-BodyD-Column1-Body1">Add Safe (Unauthorized)

</td></tr><tr class="TableStyle-Standard-Body-Body1"><td class="TableStyle-Standard-BodyE-Column1-Body1">22

</td><td class="TableStyle-Standard-BodyD-Column1-Body1">CPM Verify Password

</td></tr><tr class="TableStyle-Standard-Body-Body1"><td class="TableStyle-Standard-BodyE-Column1-Body1">24

</td><td class="TableStyle-Standard-BodyD-Column1-Body1">CPM Change Password

</td></tr><tr class="TableStyle-Standard-Body-Body1"><td class="TableStyle-Standard-BodyE-Column1-Body1">31

</td><td class="TableStyle-Standard-BodyD-Column1-Body1">CPM Reconcile Password

</td></tr><tr class="TableStyle-Standard-Body-Body1"><td class="TableStyle-Standard-BodyE-Column1-Body1">38

</td><td class="TableStyle-Standard-BodyD-Column1-Body1">CPM Verify Password Failure

</td></tr><tr class="TableStyle-Standard-Body-Body1"><td class="TableStyle-Standard-BodyE-Column1-Body1">57

</td><td class="TableStyle-Standard-BodyD-Column1-Body1">CPM Change Password Failure

</td></tr><tr class="TableStyle-Standard-Body-Body1"><td class="TableStyle-Standard-BodyE-Column1-Body1">60

</td><td class="TableStyle-Standard-BodyD-Column1-Body1">CPM Reconcile Password Failure

</td></tr><tr class="TableStyle-Standard-Body-Body1"><td class="TableStyle-Standard-BodyE-Column1-Body1">88

</td><td class="TableStyle-Standard-BodyD-Column1-Body1">Set Password

</td></tr><tr class="TableStyle-Standard-Body-Body1"><td class="TableStyle-Standard-BodyE-Column1-Body1">130

</td><td class="TableStyle-Standard-BodyD-Column1-Body1">CPM Disable Password

</td></tr><tr class="TableStyle-Standard-Body-Body1"><td class="TableStyle-Standard-BodyE-Column1-Body1">142, 145, 148, 149, 170

</td><td class="TableStyle-Standard-BodyD-Column1-Body1">Delete Safe Failure

</td></tr><tr class="TableStyle-Standard-Body-Body1"><td class="TableStyle-Standard-BodyE-Column1-Body1">183

</td><td class="TableStyle-Standard-BodyD-Column1-Body1">Delete Safe

</td></tr><tr class="TableStyle-Standard-Body-Body1"><td class="TableStyle-Standard-BodyE-Column1-Body1">185

</td><td class="TableStyle-Standard-BodyD-Column1-Body1">Add Safe

</td></tr><tr class="TableStyle-Standard-Body-Body1"><td class="TableStyle-Standard-BodyE-Column1-Body1">295

</td><td class="TableStyle-Standard-BodyD-Column1-Body1">Retrieve Password

</td></tr><tr class="TableStyle-Standard-Body-Body1"><td class="TableStyle-Standard-BodyE-Column1-Body1">300

</td><td class="TableStyle-Standard-BodyD-Column1-Body1">PSM Connect

</td></tr><tr class="TableStyle-Standard-Body-Body1"><td class="TableStyle-Standard-BodyE-Column1-Body1">301

</td><td class="TableStyle-Standard-BodyD-Column1-Body1">PSM Connect Failure

</td></tr><tr class="TableStyle-Standard-Body-Body1"><td class="TableStyle-Standard-BodyE-Column1-Body1">302

</td><td class="TableStyle-Standard-BodyD-Column1-Body1">PSM Disconnect

</td></tr><tr><td class="TableStyle-Standard-BodyE-Column1-Body1">303

</td><td class="TableStyle-Standard-BodyD-Column1-Body1">PSM Disconnect Failure

</td></tr><tr><td class="TableStyle-Standard-BodyE-Column1-Body1">306, 307, 308

</td><td class="TableStyle-Standard-BodyD-Column1-Body1">Use Password

</td></tr><tr><td class="TableStyle-Standard-BodyE-Column1-Body1">344

</td><td class="TableStyle-Standard-BodyD-Column1-Body1">Privileged Command Initiated

</td></tr><tr><td class="TableStyle-Standard-BodyE-Column1-Body1">346

</td><td class="TableStyle-Standard-BodyD-Column1-Body1">Privileged Command Completed

</td></tr><tr><td class="TableStyle-Standard-BodyE-Column1-Body1">359

</td><td class="TableStyle-Standard-BodyD-Column1-Body1"><span class="mc-variable project_variables.PSMGen variable">PSM</span> SQL Command

</td></tr><tr><td class="TableStyle-Standard-BodyE-Column1-Body1">360

</td><td class="TableStyle-Standard-BodyD-Column1-Body1"><span class="mc-variable project_variables.PSMGen variable">PSM</span> SQL Command Failure

</td></tr><tr><td class="TableStyle-Standard-BodyE-Column1-Body1">361

</td><td class="TableStyle-Standard-BodyD-Column1-Body1"><span class="mc-variable cc_product_vars.PSM-short variable">PSM</span> Keystrokes

</td></tr><tr><td class="TableStyle-Standard-BodyE-Column1-Body1">362

</td><td class="TableStyle-Standard-BodyD-Column1-Body1"><span class="mc-variable cc_product_vars.PSM-short variable">PSM</span> Keystrokes Failure

</td></tr><tr><td class="TableStyle-Standard-BodyE-Column1-Body1">372

</td><td class="TableStyle-Standard-BodyD-Column1-Body1">Terminate session

</td></tr><tr><td class="TableStyle-Standard-BodyE-Column1-Body1">373

</td><td class="TableStyle-Standard-BodyD-Column1-Body1">Terminate session Failure

</td></tr><tr><td class="TableStyle-Standard-BodyE-Column1-Body1">374

</td><td class="TableStyle-Standard-BodyD-Column1-Body1">Start Monitor session

</td></tr><tr><td class="TableStyle-Standard-BodyE-Column1-Body1">375

</td><td class="TableStyle-Standard-BodyD-Column1-Body1">Start Monitor session Failure

</td></tr><tr><td class="TableStyle-Standard-BodyE-Column1-Body1">376

</td><td class="TableStyle-Standard-BodyD-Column1-Body1">End Monitor session

</td></tr><tr><td class="TableStyle-Standard-BodyE-Column1-Body1">377

</td><td class="TableStyle-Standard-BodyD-Column1-Body1">End Monitor session Failure

</td></tr><tr><td class="TableStyle-Standard-BodyE-Column1-Body1">378

</td><td class="TableStyle-Standard-BodyD-Column1-Body1">PSM Secure Connect Session Start

</td></tr><tr><td class="TableStyle-Standard-BodyE-Column1-Body1">379

</td><td class="TableStyle-Standard-BodyD-Column1-Body1">PSM secure Connect session start Failure

</td></tr><tr><td class="TableStyle-Standard-BodyE-Column1-Body1">380

</td><td class="TableStyle-Standard-BodyD-Column1-Body1">PSM Secure Connect Session End

</td></tr><tr><td class="TableStyle-Standard-BodyE-Column1-Body1">381

</td><td class="TableStyle-Standard-BodyD-Column1-Body1">PSM secure Connect session End Failure

</td></tr><tr><td class="TableStyle-Standard-BodyE-Column1-Body1">411

</td><td class="TableStyle-Standard-BodyD-Column1-Body1">PSM Window Title

</td></tr><tr><td class="TableStyle-Standard-BodyE-Column1-Body1">412

</td><td class="TableStyle-Standard-BodyD-Column1-Body1"><span class="mc-variable cc_product_vars.PSM-short variable">PSM</span> Windows Title Failure

</td></tr><tr><td class="TableStyle-Standard-BodyE-Column1-Body1">414

</td><td class="TableStyle-Standard-BodyD-Column1-Body1">CPM Verify SSH Key

</td></tr><tr><td class="TableStyle-Standard-BodyE-Column1-Body1">416

</td><td class="TableStyle-Standard-BodyD-Column1-Body1">CPM Rotate SSH Key

</td></tr><tr><td class="TableStyle-Standard-BodyE-Column1-Body1">418

</td><td class="TableStyle-Standard-BodyD-Column1-Body1">CPM Reconcile SSH Key

</td></tr><tr><td class="TableStyle-Standard-BodyE-Column1-Body1">426

</td><td class="TableStyle-Standard-BodyD-Column1-Body1">CPM Disable SSH Key

</td></tr><tr><td class="TableStyle-Standard-BodyE-Column1-Body1">434

</td><td class="TableStyle-Standard-BodyD-Column1-Body1">CPM has deleted the public SSH key

</td></tr><tr><td class="TableStyle-Standard-BodyB-Column1-Body1">463

</td><td class="TableStyle-Standard-BodyA-Column1-Body1">Agent successfully changed the password for account

</td></tr></tbody></table>

</td></tr><tr class="TableStyle-Standard-Body-Body1"><td class="TableStyle-Standard-BodyE-Column1-Body1">SyslogTranslatorFile

</td><td class="TableStyle-Standard-BodyD-Column1-Body1">Specifies the XSL file used to parse Vault records data into Syslog protocol.

</td></tr><tr class="TableStyle-Standard-Body-Body1"><td class="TableStyle-Standard-BodyB-Column1-Body1">UseLegacySyslogFormat

</td><td class="TableStyle-Standard-BodyA-Column1-Body1">Controls the format of the syslog message, and defines whether it will be sent in a newer syslog format (RFC 5424) or in a legacy format.

Required value: <span class="Emphasis">No</span>. This enables the Vault to work with the <span class="Emphasis">newer</span> syslog format.

</td></tr></tbody></table>

<table cellpadding="0" cellspacing="0" class="AutoNumber_p_Steps"><colgroup><col></col><col></col><col></col></colgroup><tbody><tr><td valign="top"> </td><td class="AutoNumber_p_Bullet" valign="top">3.</td><td class="AutoNumber_p_Bullet" data-mc-autonum=" 3. " valign="top">To forward <span class="Emphasis">Vault syslogs</span> to multiple machines (for instance to your SIEM solution as well as to PTA), you can specify <span class="Emphasis">multiple values</span> for the following parameters and separate each value with a comma.</td></tr></tbody></table>

<table cellpadding="0" cellspacing="0" class="AutoNumber_p_Bullet2"><colgroup><col></col><col></col><col></col></colgroup><tbody><tr><td valign="top"> </td><td class="AutoNumber_p_Bullet" valign="top"><span class="bullet"><span class="mcFormatColor"><span class="mcFormatSize">■</span></span></span></td><td class="AutoNumber_p_Bullet" data-mc-autonum="<span style="color: #666666;" class="mcFormatColor"><span style="font-size: 0.6rem;" class="mcFormatSize">■</span></span>" style="box-sizing: border-box; font-size: 14px; margin-bottom: 8px; vertical-align: top; word-break: normal; overflow-wrap: normal; line-height: 1.5rem; position: relative;" valign="top">This requires a CyberArk Vault version <span class="Emphasis">7.2.5</span> or higher.</td></tr></tbody></table>

<table cellpadding="0" cellspacing="0" class="AutoNumber_p_Bullet2"><colgroup><col></col><col></col><col></col></colgroup><tbody><tr><td valign="top"> </td><td class="AutoNumber_p_Bullet" valign="top"><span class="bullet"><span class="mcFormatColor"><span class="mcFormatSize">■</span></span></span></td><td class="AutoNumber_p_Bullet" data-mc-autonum="<span style="color: #666666;" class="mcFormatColor"><span style="font-size: 0.6rem;" class="mcFormatSize">■</span></span>" style="box-sizing: border-box; font-size: 14px; margin-bottom: 8px; vertical-align: top; word-break: normal; overflow-wrap: normal; line-height: 1.5rem; position: relative;" valign="top">All destinations must use the same port and protocol, which are specified in the <span class="Emphasis">SyslogServerPort</span> and <span class="Emphasis">SyslogServerProtocol</span> fields.</td></tr></tbody></table>

<table cellpadding="0" cellspacing="0" class="AutoNumber_p_Bullet2"><colgroup><col></col><col></col><col></col></colgroup><tbody><tr><td valign="top"> </td><td class="AutoNumber_p_Bullet" valign="top"><span class="bullet"><span class="mcFormatColor"><span class="mcFormatSize">■</span></span></span></td><td class="AutoNumber_p_Bullet" data-mc-autonum="<span style="color: #666666;" class="mcFormatColor"><span style="font-size: 0.6rem;" class="mcFormatSize">■</span></span>" style="box-sizing: border-box; font-size: 14px; margin-bottom: 8px; vertical-align: top; word-break: normal; overflow-wrap: normal; line-height: 1.5rem; position: relative;" valign="top">The specified values will apply to all destinations configured in <span class="Emphasis">SyslogServerIP</span>, using the translator files specified in <span class="Emphasis">SysLogTranslatorFile</span>.</td></tr></tbody></table>

<table cellspacing="0" class="TableStyle-Standard"><thead><tr class="TableStyle-Standard-Head-Header1"><th class="TableStyle-Standard-HeadE-Column1-Header1">Parameter Name

</th><th class="TableStyle-Standard-HeadD-Column1-Header1">Comments

</th></tr></thead><tbody><tr class="TableStyle-Standard-Body-Body1"><td class="TableStyle-Standard-BodyE-Column1-Body1">SyslogServerIP

</td><td class="TableStyle-Standard-BodyD-Column1-Body1"></td></tr><tr class="TableStyle-Standard-Body-Body1"><td class="TableStyle-Standard-BodyE-Column1-Body1">SyslogTranslatorFile

</td><td class="TableStyle-Standard-BodyD-Column1-Body1"></td></tr><tr class="TableStyle-Standard-Body-Body1"><td class="TableStyle-Standard-BodyE-Column1-Body1">UseLegacySyslogFormat

</td><td class="TableStyle-Standard-BodyD-Column1-Body1"></td></tr><tr class="TableStyle-Standard-Body-Body1"><td class="TableStyle-Standard-BodyB-Column1-Body1">SyslogMessageCodeFilter

</td><td class="TableStyle-Standard-BodyA-Column1-Body1">Separate multiple values with a comma, and separate <span class="Emphasis">sets of multiple values</span> with a pipe-line, as shown in the example below.

</td></tr></tbody></table>

</div></div>The following example shows how to send different syslog messages to multiple syslog servers.

\[SYSLOG\]  
SysLogTranslatorFile=Syslog\\Arcsight.sample.xsl,Syslog\\QRadar.xsl,Syslog\\PTA.xsl  
SyslogServerPort=&lt;port number&gt;  
SysLogServerIP=1.1.1.1,1.1.2.2,1.1.3.3  
SyslogServerProtocol=UDP  
UseLegacySyslogFormat=Yes,Yes,No  
SyslogMessageCodeFilter=295,308,7,24,31,428,361,372,373,359,436,412,411,300,302,294,427,471,4

<div class="MCDropDown dropDown dropDownConfiguration MCDropDown_Open" data-mc-state="open" id="bkmrk-%C2%A0-4.-save-the-file-a"><div class="MCDropDownBody dropDownBody"><div>  
</div><table cellpadding="0" cellspacing="0" class="AutoNumber_p_Steps"><colgroup><col></col><col></col><col></col></colgroup><tbody><tr><td valign="top"> </td><td class="AutoNumber_p_Bullet" valign="top">4.</td><td class="AutoNumber_p_Bullet" data-mc-autonum=" 4. " valign="top">Save the file and close it.</td></tr></tbody></table>

<table cellpadding="0" cellspacing="0" class="AutoNumber_p_Steps"><colgroup><col></col><col></col><col></col></colgroup><tbody><tr><td valign="top"> </td><td class="AutoNumber_p_Bullet" valign="top">5.</td><td class="AutoNumber_p_Bullet" data-mc-autonum=" 5. " valign="top">Restart the Vault.</td></tr></tbody></table>

</div></div>For more detailed instructions about integrating SIEM applications, see [Security Information and Event Management Applications](https://docs.cyberark.com/pam-self-hosted/11.3/en/content/PASIMP/Integrating-with-SIEM-Applications.htm).

<div class="MCDropDown dropDown dropDownConfiguration MCDropDown_Open" data-mc-state="open" id="bkmrk-"><div class="MCDropDownBody dropDownBody" id="bkmrk--1"></div></div><div class="MCDropDown dropDown dropDownConfiguration MCDropDown_Open" data-mc-state="open" id="bkmrk-to-configure-syslog--1"><span class="MCDropDownHead dropDownHead">[To Configure syslog on the Vault Machine (from Vault v10.5):](https://docs.cyberark.com/pam-self-hosted/11.3/en/content/pta/configuring-vault-forward-syslog-messages.htm)</span><div class="MCDropDownBody dropDownBody"><table cellpadding="0" cellspacing="0" class="AutoNumber_p_Steps"><colgroup><col></col><col></col><col></col></colgroup><tbody><tr><td valign="top"> </td><td class="AutoNumber_p_Bullet" valign="top">1.</td><td class="AutoNumber_p_Bullet" data-mc-autonum=" 1. " valign="top">The PTA syslog parameters are available in the **dbparm.sample.ini** file. Copy the parameters to the **dbparm.ini** configuration file.</td></tr></tbody></table>

</div></div>\[SYSLOG\]  
SyslogTranslatorFile=Syslog\\PTA.xsl  
SyslogServerPort=&lt;port number&gt;  
SyslogServerIP=&lt;server IP&gt;  
SyslogServerProtocol=UDP  
SyslogMessageCodeFilter=295,308,7,24,31,428,361,372,373,359,436,412,411,300,302,294,427,471  
UseLegacySyslogFormat=No

<div class="MCDropDown dropDown dropDownConfiguration MCDropDown_Open" data-mc-state="open" id="bkmrk-%C2%A0-2.-to-forward%C2%A0vaul"><div class="MCDropDownBody dropDownBody"><table cellpadding="0" cellspacing="0" class="AutoNumber_p_Steps"><colgroup><col></col><col></col><col></col></colgroup><tbody><tr><td valign="top"> </td><td class="AutoNumber_p_Bullet" valign="top">2.</td><td class="AutoNumber_p_Bullet" data-mc-autonum=" 2. " valign="top">To forward <span class="Emphasis">Vault syslogs</span> to multiple machines (for instance to your SIEM solution as well as to PTA), you can specify <span class="Emphasis">multiple values</span> for the following parameters and separate each value with a comma.</td></tr></tbody></table>

<table cellpadding="0" cellspacing="0" class="AutoNumber_p_Bullet2"><colgroup><col></col><col></col><col></col></colgroup><tbody><tr><td valign="top"> </td><td class="AutoNumber_p_Bullet" valign="top"><span class="bullet"><span class="mcFormatColor"><span class="mcFormatSize">■</span></span></span></td><td class="AutoNumber_p_Bullet" data-mc-autonum="<span style="color: #666666;" class="mcFormatColor"><span style="font-size: 0.6rem;" class="mcFormatSize">■</span></span>" style="box-sizing: border-box; font-size: 14px; margin-bottom: 8px; vertical-align: top; word-break: normal; overflow-wrap: normal; line-height: 1.5rem; position: relative;" valign="top">All destinations must use the same port and protocol, which are specified in the <span class="Emphasis">SyslogServerPort</span> and <span class="Emphasis">SyslogServerProtocol</span> fields.</td></tr></tbody></table>

<table cellpadding="0" cellspacing="0" class="AutoNumber_p_Bullet2"><colgroup><col></col><col></col><col></col></colgroup><tbody><tr><td valign="top"> </td><td class="AutoNumber_p_Bullet" valign="top"><span class="bullet"><span class="mcFormatColor"><span class="mcFormatSize">■</span></span></span></td><td class="AutoNumber_p_Bullet" data-mc-autonum="<span style="color: #666666;" class="mcFormatColor"><span style="font-size: 0.6rem;" class="mcFormatSize">■</span></span>" style="box-sizing: border-box; font-size: 14px; margin-bottom: 8px; vertical-align: top; word-break: normal; overflow-wrap: normal; line-height: 1.5rem; position: relative;" valign="top">The specified values will apply to all destinations configured in <span class="Emphasis">SyslogServerIP</span>, using the translator files specified in <span class="Emphasis">SysLogTranslatorFile</span>.</td></tr></tbody></table>

<table cellspacing="0" class="TableStyle-Standard"><thead><tr class="TableStyle-Standard-Head-Header1"><th class="TableStyle-Standard-HeadE-Column1-Header1">Parameter Name

</th><th class="TableStyle-Standard-HeadD-Column1-Header1">Comments

</th></tr></thead><tbody><tr class="TableStyle-Standard-Body-Body1"><td class="TableStyle-Standard-BodyE-Column1-Body1">SyslogServerIP

</td><td class="TableStyle-Standard-BodyD-Column1-Body1"></td></tr><tr class="TableStyle-Standard-Body-Body1"><td class="TableStyle-Standard-BodyE-Column1-Body1">SyslogTranslatorFile

</td><td class="TableStyle-Standard-BodyD-Column1-Body1"></td></tr><tr class="TableStyle-Standard-Body-Body1"><td class="TableStyle-Standard-BodyE-Column1-Body1">UseLegacySyslogFormat

</td><td class="TableStyle-Standard-BodyD-Column1-Body1"></td></tr><tr class="TableStyle-Standard-Body-Body1"><td class="TableStyle-Standard-BodyB-Column1-Body1">SyslogMessageCodeFilter

</td><td class="TableStyle-Standard-BodyA-Column1-Body1">Separate multiple values with a comma, and separate <span class="Emphasis">sets of multiple values</span> with a pipe-line, as shown in the example below.

</td></tr></tbody></table>

</div></div>The following example shows how to send different syslog messages to multiple syslog servers.

\[SYSLOG\]  
SysLogTranslatorFile=Syslog\\Arcsight.sample.xsl,Syslog\\QRadar.xsl,Syslog\\PTA.xsl  
SyslogServerPort=&lt;port number&gt;  
SysLogServerIP=1.1.1.1,1.1.2.2,1.1.3.3  
SyslogServerProtocol=UDP  
UseLegacySyslogFormat=Yes,Yes,No  
SyslogMessageCodeFilter=7,8,295|295-296|295,308,7,24,31,428,361,372,373,359,436,412,411,300,302,294,427,471

<div class="MCDropDown dropDown dropDownConfiguration MCDropDown_Open" data-mc-state="open" id="bkmrk-%C2%A0-3.-to-send-secured"><div class="MCDropDownBody dropDownBody"><div>  
</div><table cellpadding="0" cellspacing="0" class="AutoNumber_p_Steps"><colgroup><col></col><col></col><col></col></colgroup><tbody><tr><td valign="top"> </td><td class="AutoNumber_p_Bullet" valign="top">3.</td><td class="AutoNumber_p_Bullet" data-mc-autonum=" 3. " valign="top">To send secured syslog data to PTA, see [Configure Vault Trusted Connection to PTA](https://docs.cyberark.com/pam-self-hosted/11.3/en/content/pta/Configure_PTA-Vault_Trusted_Connection.htm).</td></tr></tbody></table>

<table cellpadding="0" cellspacing="0" class="AutoNumber_p_Steps"><colgroup><col></col><col></col><col></col></colgroup><tbody><tr><td valign="top"> </td><td class="AutoNumber_p_Bullet" valign="top">4.</td><td class="AutoNumber_p_Bullet" data-mc-autonum=" 4. " valign="top">Save the file and close it.</td></tr></tbody></table>

<table cellpadding="0" cellspacing="0" class="AutoNumber_p_Steps"><colgroup><col></col><col></col><col></col></colgroup><tbody><tr><td valign="top"> </td><td class="AutoNumber_p_Bullet" valign="top">5.</td><td class="AutoNumber_p_Bullet" data-mc-autonum=" 5. " valign="top">Restart the Vault.</td></tr></tbody></table>

</div></div>For more detailed instructions about integrating SIEM applications, see [Security Information and Event Management Applications](https://docs.cyberark.com/pam-self-hosted/11.3/en/content/PASIMP/Integrating-with-SIEM-Applications.htm).

Source: *[https://docs.cyberark.com/pam-self-hosted/11.3/en/content/pta/configuring-vault-forward-syslog-messages.htm](https://docs.cyberark.com/pam-self-hosted/11.3/en/content/pta/configuring-vault-forward-syslog-messages.htm)*

#### <span style="color: rgb(53, 152, 219);">**<span class="TextRun SCXW71272603 BCX0" data-contrast="none" lang="EN-US" xml:lang="EN-US"><span class="NormalTextRun SCXW71272603 BCX0">CyberArk PAM Integration Procedures </span></span><span class="EOP SCXW71272603 BCX0" data-ccp-props="{}"> </span>**</span>

##### <span class="TextRun SCXW71272603 BCX0" data-contrast="auto" lang="EN-US" xml:lang="EN-US"><span class="NormalTextRun SCXW71272603 BCX0">Please provide the following information to </span><span class="NormalTextRun SpellingErrorV2Themed SCXW71272603 BCX0">CyTech</span><span class="NormalTextRun SCXW71272603 BCX0">: </span></span><span class="EOP SCXW71272603 BCX0" data-ccp-props="{}"> </span>

<span data-teams="true">Requirements:Collect logs via syslog over UDP or TCP</span>

<span data-teams="true">  
 \*Syslog Host-&gt; Syslog Collector IP address where the Elastic-Agent is installed.  
 \*Syslog Port-&gt; Port Number (Please identify if TCP or UDP)</span>

<span class="TextRun SCXW71272603 BCX0" data-contrast="auto" lang="EN-US" xml:lang="EN-US"><span class="NormalTextRun SCXW71272603 BCX0">If you need further </span><span class="NormalTextRun SCXW71272603 BCX0">assistance</span><span class="NormalTextRun SCXW71272603 BCX0">, kindly contact our support at </span></span><span style="color: rgb(53, 152, 219);">**<span class="TextRun SCXW71272603 BCX0" data-contrast="none" lang="EN-US" xml:lang="EN-US"><span class="NormalTextRun SCXW71272603 BCX0">support@cytechint.com</span></span>**</span><span class="TextRun SCXW71272603 BCX0" data-contrast="auto" lang="EN-US" xml:lang="EN-US"><span class="NormalTextRun SCXW71272603 BCX0"> for prompt </span><span class="NormalTextRun SCXW71272603 BCX0">assistance</span><span class="NormalTextRun SCXW71272603 BCX0"> and guidance.</span></span><span class="EOP SCXW71272603 BCX0" data-ccp-props="{}"> </span>

<div class="MCDropDown dropDown dropDownConfiguration MCDropDown_Open" data-mc-state="open" id="bkmrk--4"><div class="MCDropDownBody dropDownBody" id="bkmrk--5"></div></div>

# Digital Guardian Integration

<p class="callout info">Requirements</p>

<table border="1" cellpadding="2" cellspacing="0" id="bkmrk-you-must-have-why-yo" style="height: 128.562px; width: 594px; border-collapse: collapse; border-spacing: 0px; border-style: solid;" width="594"><colgroup><col style="width: 308px;" width="305"></col> <col style="width: 285px;" width="282"></col> </colgroup><thead><tr style="height: 35.3906px;"><th style="height: 35.3906px;" width="305">You Must Have

</th><th style="height: 35.3906px;" width="282">Why You Need It

</th></tr></thead><tbody><tr style="height: 35.3906px;"><td style="height: 35.3906px;" width="305">Elastic Agent installed

</td><td style="height: 35.3906px;" width="282">So Elastic can pull data from DG

</td></tr><tr style="height: 57.7812px;"><td style="height: 57.7812px;" width="305">Access to Digital Guardian (ARC and DGMC)

</td><td style="height: 57.7812px;" width="282">That’s where you get the info Elastic needs

</td></tr></tbody></table>

---

<p class="callout info">STEP 1: Get the Info from Digital Guardian</p>

You will need to collect 5 things. Just follow this one by one:

---

<p class="callout info">Get the Client ID</p>

Where to find it:

- Go to **Digital Guardian ARC**
- Log in
- Click on **Tenant Settings**
- Look for **Tenant ID**
- Copy this and save it somewhere. This is your **Client ID**

---

<p class="callout info">Get the **Authentication Token or Client Secret**</p>

Still in **Tenant Settings**

- Look for **Authentication Token**
- Copy it — this is your **secret key**
- This helps Elastic talk to Digital Guardian safely

<p class="callout info">Get the **ARC Server URL**</p>

Now go to the **Digital Guardian Management Console (DGMC)**

- Log in
- Find the **Access Gateway Base URL**
- Copy it. This is the website Elastic will connect to get the data

---

<p class="callout info">Get the **Authorization Server URL**</p>

Still in DGMC

- Look for something called **Authorization Server URL**
- Copy that too

---

<p class="callout info">Get the **Export Profile ID**</p>

Go back to ARC

- Click on **Admin** &gt; **Reports** &gt; **Export Profiles**
- Find your Export Profile
- You’ll see something like this: `export-profile:guid:abc-123-xyz`
- Copy **only the middle part** (example: just `abc-123-xyz`)

---

<p class="callout warning">Notes:</p>

- If you don’t see data right away, give it a few minutes.
- Make sure your API info (Client ID, Secret, URLs) are **correct**

# Dropbox Integrations

##### <span style="color: rgb(53, 152, 219);">**<span class="TextRun SCXW174665447 BCX8" data-contrast="none" lang="EN-US" xml:lang="EN-US"><span class="NormalTextRun SCXW174665447 BCX8" data-ccp-charstyle="Style (Complex) Open Sans" data-ccp-charstyle-defn="{"ObjectId":"03e0ffc6-d664-4a10-9462-cd64c2df5efd|121","ClassId":1073872969,"Properties":[201342446,"1",201342447,"5",201342448,"1",201342449,"1",469777841,"Open Sans",469777842,"Open Sans",469777843,"Calibri",469777844,"Open Sans",201341986,"1",469769226,"Open Sans",268442635,"22",335559704,"1037",335559705,"1033",335551547,"1033",335559740,"259",201341983,"0",335559739,"160",469775450,"Style (Complex) Open Sans",201340122,"1",134233614,"true",469778129,"StyleComplexOpenSans",335572020,"1",469778324,"Default Paragraph Font"]}">Introduction</span></span><span class="EOP SCXW174665447 BCX8" data-ccp-props="{"134245418":true,"134245529":true,"201341983":0,"335559738":240,"335559739":0,"335559740":360}"> </span>**</span>

**<span class="TextRun SCXW174665447 BCX8" data-contrast="auto" lang="EN-US" xml:lang="EN-US"><span class="NormalTextRun SCXW174665447 BCX8" data-ccp-charstyle="Style (Complex) Open Sans">Connecting Dropbox</span></span><span class="EOP SCXW174665447 BCX8" data-ccp-props="{"201341983":0,"335559685":360,"335559739":160,"335559740":259}"> </span>**

<span class="TextRun SCXW174665447 BCX8" data-contrast="auto" lang="EN-US" xml:lang="EN-US"><span class="NormalTextRun SCXW174665447 BCX8" data-ccp-charstyle="Style (Complex) Open Sans">Use the Workplace Search Dropbox connector to automatically capture, </span><span class="NormalTextRun SCXW174665447 BCX8" data-ccp-charstyle="Style (Complex) Open Sans">sync</span><span class="NormalTextRun SCXW174665447 BCX8" data-ccp-charstyle="Style (Complex) Open Sans"> and index the following items from your Dropbox service:</span></span><span class="EOP SCXW174665447 BCX8" data-ccp-props="{"201341983":0,"335559685":360,"335559739":160,"335559740":259}"> </span>

##### <span style="color: rgb(53, 152, 219);">**<span class="TextRun SCXW174665447 BCX8" data-contrast="auto" lang="EN-US" xml:lang="EN-US"><span class="NormalTextRun SCXW174665447 BCX8" data-ccp-charstyle="Style (Complex) Open Sans">Stored Files</span></span><span class="EOP SCXW174665447 BCX8" data-ccp-props="{"201341983":0,"335559685":360,"335559739":160,"335559740":259}"> </span>**</span>

<span class="TextRun SCXW174665447 BCX8" data-contrast="auto" lang="EN-US" xml:lang="EN-US"><span class="NormalTextRun SCXW174665447 BCX8" data-ccp-charstyle="Style (Complex) Open Sans">Including ID, File Metadata, File Content, Updated by, and timestamps.</span></span><span class="EOP SCXW174665447 BCX8" data-ccp-props="{"201341983":0,"335559685":360,"335559739":160,"335559740":259}"> </span>

##### <span style="color: rgb(53, 152, 219);">**<span class="TextRun SCXW174665447 BCX8" data-contrast="auto" lang="EN-US" xml:lang="EN-US"><span class="NormalTextRun SCXW174665447 BCX8" data-ccp-charstyle="Style (Complex) Open Sans">Dropbox Paper</span></span><span class="EOP SCXW174665447 BCX8" data-ccp-props="{"201341983":0,"335559685":360,"335559739":160,"335559740":259}"> </span>**</span>

<span class="TextRun SCXW174665447 BCX8" data-contrast="auto" lang="EN-US" xml:lang="EN-US"><span class="NormalTextRun SCXW174665447 BCX8" data-ccp-charstyle="Style (Complex) Open Sans">Including ID, Metadata, Content, Updated by, and timestamps.</span></span><span class="EOP SCXW174665447 BCX8" data-ccp-props="{"201341983":0,"335559685":360,"335559739":160,"335559740":259}"> </span>

<span class="TextRun SCXW174665447 BCX8" data-contrast="auto" lang="EN-US" xml:lang="EN-US"><span class="NormalTextRun SCXW174665447 BCX8" data-ccp-charstyle="Style (Complex) Open Sans">This document helps you configure and connect your Dropbox service to Workplace Search. To do this, you must register your Elastic deployment in the Dropbox Developer platform, by creating an OAuth 2.0 app. This gives your app permission to access Dropbox data. You will need your Workplace Search OAuth redirect URL, so have that handy.</span></span><span class="EOP SCXW174665447 BCX8" data-ccp-props="{"201341983":0,"335559685":360,"335559739":160,"335559740":259}"> </span>

<span class="TextRun SCXW174665447 BCX8" data-contrast="auto" lang="EN-US" xml:lang="EN-US"><span class="NormalTextRun SCXW174665447 BCX8" data-ccp-charstyle="Style (Complex) Open Sans">If you need a primer on OAuth, read the official OAuth 2.0 authorization flow RFC. The diagrams provide a good mental model of the protocol flow. Dropbox also has its own OAuth guide.</span></span><span class="EOP SCXW174665447 BCX8" data-ccp-props="{"201341983":0,"335559685":360,"335559739":160,"335559740":259}"> </span>

##### <span style="color: rgb(53, 152, 219);">**<span class="TextRun SCXW174665447 BCX8" data-contrast="none" lang="EN-US" xml:lang="EN-US"><span class="NormalTextRun SCXW174665447 BCX8" data-ccp-charstyle="Style (Complex) Open Sans">Assumptions</span></span><span class="EOP SCXW174665447 BCX8" data-ccp-props="{"134245418":true,"134245529":true,"201341983":0,"335559738":240,"335559739":0,"335559740":360}"> </span>**</span>

<span class="TextRun SCXW174665447 BCX8" data-contrast="auto" lang="EN-US" xml:lang="EN-US"><span class="NormalTextRun SCXW174665447 BCX8" data-ccp-charstyle="Style (Complex) Open Sans">The procedures described in Section </span></span><span class="FieldRange SCXW174665447 BCX8"><span class="TextRun SCXW174665447 BCX8" data-contrast="auto" lang="EN-US" xml:lang="EN-US"><span class="NormalTextRun SCXW174665447 BCX8" data-ccp-charstyle="Style (Complex) Open Sans">3</span></span></span><span class="TextRun SCXW174665447 BCX8" data-contrast="auto" lang="EN-US" xml:lang="EN-US"> <span class="NormalTextRun ContextualSpellingAndGrammarErrorV2Themed SCXW174665447 BCX8" data-ccp-charstyle="Style (Complex) Open Sans">assumes</span><span class="NormalTextRun SCXW174665447 BCX8" data-ccp-charstyle="Style (Complex) Open Sans"> that a Log Collector has already been </span><span class="NormalTextRun ContextualSpellingAndGrammarErrorV2Themed SCXW174665447 BCX8" data-ccp-charstyle="Style (Complex) Open Sans">setup</span><span class="NormalTextRun SCXW174665447 BCX8" data-ccp-charstyle="Style (Complex) Open Sans">. </span></span><span class="EOP SCXW174665447 BCX8" data-ccp-props="{"201341983":0,"335559685":360,"335559739":160,"335559740":259}"> </span>

<div class="SCXW174665447 BCX8" id="bkmrk--1"><div class="ListContainerWrapper SCXW174665447 BCX8"></div></div>##### <span style="color: rgb(53, 152, 219);">**<span class="TextRun SCXW174665447 BCX8" data-contrast="none" lang="EN-US" xml:lang="EN-US"><span class="NormalTextRun SCXW174665447 BCX8" data-ccp-charstyle="Style (Complex) Open Sans">Requirements</span></span>**<span class="EOP SCXW174665447 BCX8" data-ccp-props="{"134245418":true,"134245529":true,"201341983":0,"335559738":240,"335559739":0,"335559740":360}"> </span></span>

**<span class="TextRun SCXW174665447 BCX8" data-contrast="auto" lang="EN-US" xml:lang="EN-US"><span class="NormalTextRun SCXW174665447 BCX8">Configuring the Dropbox Connector</span></span><span class="EOP SCXW174665447 BCX8" data-ccp-props="{"201341983":0,"335559685":360,"335559739":160,"335559740":259}"> </span>**

<div class="SCXW174665447 BCX8" id="bkmrk-to-register-your-ela"><div class="ListContainerWrapper SCXW174665447 BCX8">1. <span class="TextRun SCXW174665447 BCX8" data-contrast="auto" lang="EN-US" xml:lang="EN-US"><span class="NormalTextRun SCXW174665447 BCX8">To register your Elastic deployment with Dropbox, create a new </span></span>**<span class="TextRun SCXW174665447 BCX8" data-contrast="auto" lang="EN-US" xml:lang="EN-US"><span class="NormalTextRun SCXW174665447 BCX8">OAuth app</span></span>**<span class="TextRun SCXW174665447 BCX8" data-contrast="auto" lang="EN-US" xml:lang="EN-US"><span class="NormalTextRun SCXW174665447 BCX8"> in your </span><span class="NormalTextRun ContextualSpellingAndGrammarErrorV2Themed SCXW174665447 BCX8">organization’s</span><span class="NormalTextRun SCXW174665447 BCX8"> </span></span>[<span class="TextRun Underlined SCXW174665447 BCX8" data-contrast="none" lang="EN-US" xml:lang="EN-US"><span class="NormalTextRun SCXW174665447 BCX8" data-ccp-charstyle="Hyperlink">Dropbox developer platform</span></span>](https://www.dropbox.com/developers/apps)<span class="TextRun SCXW174665447 BCX8" data-contrast="auto" lang="EN-US" xml:lang="EN-US"><span class="NormalTextRun SCXW174665447 BCX8">. Make sure to use a trusted and stable Dropbox account.</span></span><span class="EOP SCXW174665447 BCX8" data-ccp-props="{"201341983":0,"335559739":160,"335559740":259}"> </span>

</div><div class="ListContainerWrapper SCXW174665447 BCX8">2. <span class="TextRun SCXW174665447 BCX8" data-contrast="auto" lang="EN-US" xml:lang="EN-US"><span class="NormalTextRun SCXW174665447 BCX8">Provide basic information about the app and define the </span></span>**<span class="TextRun SCXW174665447 BCX8" data-contrast="auto" lang="EN-US" xml:lang="EN-US"><span class="NormalTextRun SCXW174665447 BCX8">access scopes</span></span>**<span class="TextRun SCXW174665447 BCX8" data-contrast="auto" lang="EN-US" xml:lang="EN-US"><span class="NormalTextRun SCXW174665447 BCX8">, or specific permissions, the app needs to interact with Dropbox. A good rule of thumb is that these should be </span></span><span class="TextRun SCXW174665447 BCX8" data-contrast="auto" lang="EN-US" xml:lang="EN-US"><span class="NormalTextRun SCXW174665447 BCX8">read-only</span></span><span class="TextRun SCXW174665447 BCX8" data-contrast="auto" lang="EN-US" xml:lang="EN-US"><span class="NormalTextRun SCXW174665447 BCX8"> permissions. Choose only the following permissions:</span></span><span class="EOP SCXW174665447 BCX8" data-ccp-props="{"201341983":0,"335559739":160,"335559740":259}"> </span>

</div><div class="ListContainerWrapper SCXW174665447 BCX8">- - - <span class="TextRun SCXW174665447 BCX8" data-contrast="auto" lang="EN-US" xml:lang="EN-US"><span class="NormalTextRun SpellingErrorV2Themed SCXW174665447 BCX8">files.content</span><span class="NormalTextRun SpellingErrorV2Themed SCXW174665447 BCX8">.read</span></span><span class="EOP SCXW174665447 BCX8" data-ccp-props="{"201341983":0,"335559739":160,"335559740":259}"> </span>
        - <span class="TextRun SCXW174665447 BCX8" data-contrast="auto" lang="EN-US" xml:lang="EN-US"><span class="NormalTextRun SpellingErrorV2Themed SCXW174665447 BCX8">sharing.read</span></span><span class="EOP SCXW174665447 BCX8" data-ccp-props="{"201341983":0,"335559739":160,"335559740":259}"> </span>
        - <span class="TextRun SCXW174665447 BCX8" data-contrast="auto" lang="EN-US" xml:lang="EN-US"><span class="NormalTextRun SpellingErrorV2Themed SCXW174665447 BCX8">account\_</span><span class="NormalTextRun SpellingErrorV2Themed SCXW174665447 BCX8">info.read</span></span><span class="EOP SCXW174665447 BCX8" data-ccp-props="{"201341983":0,"335559739":160,"335559740":259}"> </span>
        - <span class="TextRun SCXW174665447 BCX8" data-contrast="auto" lang="EN-US" xml:lang="EN-US"><span class="NormalTextRun SpellingErrorV2Themed SCXW174665447 BCX8">files.metadata</span><span class="NormalTextRun SpellingErrorV2Themed SCXW174665447 BCX8">.read</span></span><span class="EOP SCXW174665447 BCX8" data-ccp-props="{"201341983":0,"335559739":160,"335559740":259}"> </span>

</div><div class="OutlineElement Ltr SCXW174665447 BCX8">  
</div></div><span class="TextRun SCXW174665447 BCX8" data-contrast="auto" lang="EN-US" xml:lang="EN-US"><span class="NormalTextRun SCXW174665447 BCX8">To fetch document-level permissions, you must create an OAuth App using a team-owned (Dropbox Business) account. Enable </span></span>[<span class="TextRun Underlined SCXW174665447 BCX8" data-contrast="none" lang="EN-US" xml:lang="EN-US"><span class="NormalTextRun SCXW174665447 BCX8" data-ccp-charstyle="Hyperlink">document-level permissions</span></span>](https://www.elastic.co/guide/en/workplace-search/current/workplace-search-sources-document-permissions.html)<span class="TextRun SCXW174665447 BCX8" data-contrast="auto" lang="EN-US" xml:lang="EN-US"><span class="NormalTextRun SCXW174665447 BCX8"> by adding the following permissions:</span></span><span class="EOP SCXW174665447 BCX8" data-ccp-props="{"201341983":0,"335559739":160,"335559740":259}"> </span>

<div class="SCXW174665447 BCX8" id="bkmrk-team_info.read%C2%A0-team"><div class="OutlineElement Ltr SCXW174665447 BCX8">  
</div><div class="ListContainerWrapper SCXW174665447 BCX8">- - - <span class="TextRun SCXW174665447 BCX8" data-contrast="auto" lang="EN-US" xml:lang="EN-US"><span class="NormalTextRun SpellingErrorV2Themed SCXW174665447 BCX8">team\_</span><span class="NormalTextRun SpellingErrorV2Themed SCXW174665447 BCX8">info.read</span></span><span class="EOP SCXW174665447 BCX8" data-ccp-props="{"201341983":0,"335559739":160,"335559740":259}"> </span>
        - <span class="TextRun SCXW174665447 BCX8" data-contrast="auto" lang="EN-US" xml:lang="EN-US"><span class="NormalTextRun SpellingErrorV2Themed SCXW174665447 BCX8">team\_</span><span class="NormalTextRun SpellingErrorV2Themed SCXW174665447 BCX8">data.member</span></span><span class="EOP SCXW174665447 BCX8" data-ccp-props="{"201341983":0,"335559739":160,"335559740":259}"> </span>
        - <span class="TextRun SCXW174665447 BCX8" data-contrast="auto" lang="EN-US" xml:lang="EN-US"><span class="NormalTextRun SpellingErrorV2Themed SCXW174665447 BCX8">team\_</span><span class="NormalTextRun SpellingErrorV2Themed SCXW174665447 BCX8">data.team</span><span class="NormalTextRun SpellingErrorV2Themed SCXW174665447 BCX8">\_space</span></span><span class="EOP SCXW174665447 BCX8" data-ccp-props="{"201341983":0,"335559739":160,"335559740":259}"> </span>
        - <span class="TextRun SCXW174665447 BCX8" data-contrast="auto" lang="EN-US" xml:lang="EN-US"><span class="NormalTextRun SpellingErrorV2Themed SCXW174665447 BCX8">members.read</span></span><span class="EOP SCXW174665447 BCX8" data-ccp-props="{"201341983":0,"335559739":160,"335559740":259}"> </span>

</div><div class="ListContainerWrapper SCXW174665447 BCX8">3. <span class="TextRun SCXW174665447 BCX8" data-contrast="auto" lang="EN-US" xml:lang="EN-US"><span class="NormalTextRun SCXW174665447 BCX8">Register a </span></span>**<span class="TextRun SCXW174665447 BCX8" data-contrast="auto" lang="EN-US" xml:lang="EN-US"><span class="NormalTextRun SCXW174665447 BCX8">redirect URL</span></span>**<span class="TextRun SCXW174665447 BCX8" data-contrast="auto" lang="EN-US" xml:lang="EN-US"><span class="NormalTextRun SCXW174665447 BCX8"> for the app to use. This is where the OAuth 2.0 service will </span><span class="NormalTextRun ContextualSpellingAndGrammarErrorV2Themed SCXW174665447 BCX8">return</span><span class="NormalTextRun SCXW174665447 BCX8"> the user after they authorize the application. This is the </span></span>[<span class="TextRun Underlined SCXW174665447 BCX8" data-contrast="none" lang="EN-US" xml:lang="EN-US"><span class="NormalTextRun SCXW174665447 BCX8" data-ccp-charstyle="Hyperlink">Workplace Search OAuth redirect URL</span></span>](https://www.elastic.co/guide/en/enterprise-search/8.7/endpoints-ref.html#workplace-search-oauth-redirect-url)<span class="TextRun SCXW174665447 BCX8" data-contrast="auto" lang="EN-US" xml:lang="EN-US"><span class="NormalTextRun SCXW174665447 BCX8"> for your deployment. This must be a https endpoint for production use cases. Only use http for local development.</span></span><span class="EOP SCXW174665447 BCX8" data-ccp-props="{"201341983":0,"335559739":160,"335559740":259}"> </span>

</div><div class="ListContainerWrapper SCXW174665447 BCX8">4. <span class="TextRun SCXW174665447 BCX8" data-contrast="auto" lang="EN-US" xml:lang="EN-US"><span class="NormalTextRun SCXW174665447 BCX8">Find and record the </span><span class="NormalTextRun SpellingErrorV2Themed SCXW174665447 BCX8">client\_id</span><span class="NormalTextRun SCXW174665447 BCX8"> and </span><span class="NormalTextRun SpellingErrorV2Themed SCXW174665447 BCX8">client\_secret</span><span class="NormalTextRun SCXW174665447 BCX8"> for the app. Dropbox calls these App Key and App Secret.</span></span><span class="EOP SCXW174665447 BCX8" data-ccp-props="{"201341983":0,"335559739":160,"335559740":259}"> </span>

</div><div class="ListContainerWrapper SCXW174665447 BCX8">5. <span class="TextRun SCXW174665447 BCX8" data-contrast="auto" lang="EN-US" xml:lang="EN-US"><span class="NormalTextRun SCXW174665447 BCX8">Switch back to your organization’s Workplace Search administrative </span><span class="NormalTextRun SCXW174665447 BCX8">dashboard</span></span><span class="EOP SCXW174665447 BCX8" data-ccp-props="{"201341983":0,"335559739":160,"335559740":259}"> </span>

</div><div class="ListContainerWrapper SCXW174665447 BCX8">6. <span class="TextRun SCXW174665447 BCX8" data-contrast="auto" lang="EN-US" xml:lang="EN-US"><span class="NormalTextRun SCXW174665447 BCX8">In the </span></span>**<span class="TextRun SCXW174665447 BCX8" data-contrast="auto" lang="EN-US" xml:lang="EN-US"><span class="NormalTextRun SCXW174665447 BCX8">Sources</span></span><span class="TextRun SCXW174665447 BCX8" data-contrast="auto" lang="EN-US" xml:lang="EN-US"><span class="NormalTextRun SCXW174665447 BCX8"> —&gt; </span></span><span class="TextRun SCXW174665447 BCX8" data-contrast="auto" lang="EN-US" xml:lang="EN-US"><span class="NormalTextRun SCXW174665447 BCX8">Add Source</span></span>**<span class="TextRun SCXW174665447 BCX8" data-contrast="auto" lang="EN-US" xml:lang="EN-US"><span class="NormalTextRun SCXW174665447 BCX8"> tab, add a new </span></span>**<span class="TextRun SCXW174665447 BCX8" data-contrast="auto" lang="EN-US" xml:lang="EN-US"><span class="NormalTextRun SCXW174665447 BCX8">Dropbox</span></span>**<span class="TextRun SCXW174665447 BCX8" data-contrast="auto" lang="EN-US" xml:lang="EN-US"><span class="NormalTextRun SCXW174665447 BCX8"> </span><span class="NormalTextRun SCXW174665447 BCX8">source</span></span><span class="EOP SCXW174665447 BCX8" data-ccp-props="{"201341983":0,"335559739":160,"335559740":259}"> </span>

</div><div class="ListContainerWrapper SCXW174665447 BCX8">7. <span class="TextRun SCXW174665447 BCX8" data-contrast="auto" lang="EN-US" xml:lang="EN-US"><span class="NormalTextRun SCXW174665447 BCX8">Configure the service with Workplace Search using the App Key and App Secret.</span></span><span class="EOP SCXW174665447 BCX8" data-ccp-props="{"201341983":0,"335559739":160,"335559740":259}"> </span>

</div></div><span class="TextRun SCXW174665447 BCX8" data-contrast="auto" lang="EN-US" xml:lang="EN-US"><span class="NormalTextRun SCXW174665447 BCX8">Your Dropbox service is now configured, and you can connect it to Workplace </span><span class="NormalTextRun ContextualSpellingAndGrammarErrorV2Themed SCXW174665447 BCX8">Search.</span></span><span aria-hidden="true" class="PageBreakBlob BlobObject DragDrop ContextualSpellingAndGrammarErrorV2Themed SCXW174665447 BCX8"><span aria-hidden="true" class="PageBreakTextSpan SCXW174665447 BCX8"> </span></span><span class="EOP SCXW174665447 BCX8" data-ccp-props="{"201341983":0,"335559739":160,"335559740":259}"> </span>

<span class="EOP SCXW174665447 BCX8" data-ccp-props="{"201341983":0,"335559685":720,"335559739":160,"335559740":259}"> </span>

##### <span style="color: rgb(53, 152, 219);">**<span class="TextRun SCXW174665447 BCX8" data-contrast="none" lang="EN-US" xml:lang="EN-US"><span class="NormalTextRun SCXW174665447 BCX8" data-ccp-charstyle="Style (Complex) Open Sans">Dropbox</span><span class="NormalTextRun SCXW174665447 BCX8" data-ccp-charstyle="Style (Complex) Open Sans"> I</span><span class="NormalTextRun SCXW174665447 BCX8" data-ccp-charstyle="Style (Complex) Open Sans">ntegration </span><span class="NormalTextRun SCXW174665447 BCX8" data-ccp-charstyle="Style (Complex) Open Sans">Procedures</span></span><span class="EOP SCXW174665447 BCX8" data-ccp-props="{"134245418":true,"134245529":true,"201341983":0,"335559738":240,"335559739":0,"335559740":360}"> </span>**</span>

**<span class="TextRun SCXW174665447 BCX8" data-contrast="auto" lang="EN-US" xml:lang="EN-US"><span class="NormalTextRun SCXW174665447 BCX8">Connecting Dropbox to Workplace Search</span></span><span class="EOP SCXW174665447 BCX8" data-ccp-props="{"201341983":0,"335559685":360,"335559739":160,"335559740":259}"> </span>**

<span class="TextRun SCXW174665447 BCX8" data-contrast="auto" lang="EN-US" xml:lang="EN-US"><span class="NormalTextRun SCXW174665447 BCX8">Once the Dropbox connector is configured, you can connect a Dropbox instance to your organization’s Workplace Search deployment.</span></span><span class="EOP SCXW174665447 BCX8" data-ccp-props="{"201341983":0,"335559685":720,"335559739":160,"335559740":259}"> </span>

<div class="SCXW174665447 BCX8" id="bkmrk-follow-the-dropbox-a"><div class="ListContainerWrapper SCXW174665447 BCX8">1. <span class="TextRun SCXW174665447 BCX8" data-contrast="auto" lang="EN-US" xml:lang="EN-US"><span class="NormalTextRun SCXW174665447 BCX8">Follow the Dropbox authentication flow as presented in the Workplace Search administrative dashboard.</span></span><span class="EOP SCXW174665447 BCX8" data-ccp-props="{"201341983":0,"335559685":1080,"335559739":160,"335559740":259,"469777462":[720,1080],"469777927":[0,0],"469777928":[0,8]}"> </span>

</div><div class="ListContainerWrapper SCXW174665447 BCX8">2. <span class="TextRun SCXW174665447 BCX8" data-contrast="auto" lang="EN-US" xml:lang="EN-US"><span class="NormalTextRun SCXW174665447 BCX8">If the authentication flow succeeds, you will be redirected to Workplace Search.</span></span><span class="EOP SCXW174665447 BCX8" data-ccp-props="{"201341983":0,"335559685":1080,"335559739":160,"335559740":259,"469777462":[720,1080],"469777927":[0,0],"469777928":[0,8]}"> </span>

</div></div><span class="TextRun SCXW174665447 BCX8" data-contrast="auto" lang="EN-US" xml:lang="EN-US"><span class="NormalTextRun SCXW174665447 BCX8">Your Dropbox content becomes searchable as soon as syncing starts. Once configured and connected, Dropbox synchronizes automatically every </span></span><span class="TextRun SCXW174665447 BCX8" data-contrast="auto" lang="EN-US" xml:lang="EN-US"><span class="NormalTextRun SCXW174665447 BCX8">2 hours</span></span><span class="TextRun SCXW174665447 BCX8" data-contrast="auto" lang="EN-US" xml:lang="EN-US"><span class="NormalTextRun SCXW174665447 BCX8">.</span></span><span class="EOP SCXW174665447 BCX8" data-ccp-props="{"201341983":0,"335559685":720,"335559739":160,"335559740":259}"> </span>

**<span class="TextRun SCXW174665447 BCX8" data-contrast="auto" lang="EN-US" xml:lang="EN-US"><span class="NormalTextRun SCXW174665447 BCX8">Limiting the content to be indexed</span></span><span class="EOP SCXW174665447 BCX8" data-ccp-props="{"201341983":0,"335559685":360,"335559739":160,"335559740":259}"> </span>**

<span class="TextRun SCXW174665447 BCX8" data-contrast="auto" lang="EN-US" xml:lang="EN-US"><span class="NormalTextRun SCXW174665447 BCX8">If you </span><span class="NormalTextRun SCXW174665447 BCX8">don’t</span><span class="NormalTextRun SCXW174665447 BCX8"> need to index all available content, you can use the API to apply indexing rules. This reduces indexing load and overall index size. See </span></span>[<span class="TextRun Underlined SCXW174665447 BCX8" data-contrast="none" lang="EN-US" xml:lang="EN-US"><span class="NormalTextRun SCXW174665447 BCX8" data-ccp-charstyle="Hyperlink">Customizing indexing</span></span>](https://www.elastic.co/guide/en/workplace-search/current/workplace-search-customizing-indexing-rules.html)<span class="TextRun SCXW174665447 BCX8" data-contrast="auto" lang="EN-US" xml:lang="EN-US"><span class="NormalTextRun SCXW174665447 BCX8">.</span></span><span class="EOP SCXW174665447 BCX8" data-ccp-props="{"201341983":0,"335559685":720,"335559739":160,"335559740":259}"> </span>

<span class="TextRun SCXW174665447 BCX8" data-contrast="auto" lang="EN-US" xml:lang="EN-US"><span class="NormalTextRun SCXW174665447 BCX8">The </span><span class="NormalTextRun SpellingErrorV2Themed SCXW174665447 BCX8">path\_template</span><span class="NormalTextRun SCXW174665447 BCX8"> and </span><span class="NormalTextRun SpellingErrorV2Themed SCXW174665447 BCX8">file\_extension</span><span class="NormalTextRun SCXW174665447 BCX8"> rules are applicable for Dropbox.</span></span><span class="EOP SCXW174665447 BCX8" data-ccp-props="{"201341983":0,"335559685":720,"335559739":160,"335559740":259}"> </span>

**<span class="TextRun SCXW174665447 BCX8" data-contrast="auto" lang="EN-US" xml:lang="EN-US"><span class="NormalTextRun SCXW174665447 BCX8">Synchronized </span><span class="NormalTextRun SCXW174665447 BCX8">fields</span></span><span class="EOP SCXW174665447 BCX8" data-ccp-props="{"201341983":0,"335559685":360,"335559739":160,"335559740":259}"> </span>**

<span class="TextRun SCXW174665447 BCX8" data-contrast="auto" lang="EN-US" xml:lang="EN-US"><span class="NormalTextRun SCXW174665447 BCX8">The following table lists the fields synchronized from the connected source to Workplace Search. The attributes in the table apply to the default search application, as follows:</span></span><span class="EOP SCXW174665447 BCX8" data-ccp-props="{"201341983":0,"335559685":720,"335559739":160,"335559740":259}"> </span>

<div class="SCXW174665447 BCX8" id="bkmrk-display-name%E2%80%AF--the-l"><div class="ListContainerWrapper SCXW174665447 BCX8">- **<span class="TextRun SCXW174665447 BCX8" data-contrast="auto" lang="EN-US" xml:lang="EN-US"><span class="NormalTextRun SCXW174665447 BCX8">Display name</span></span>**<span class="TextRun SCXW174665447 BCX8" data-contrast="auto" lang="EN-US" xml:lang="EN-US"><span class="NormalTextRun SCXW174665447 BCX8"> - The label used when displayed in the </span><span class="NormalTextRun SCXW174665447 BCX8">UI</span></span><span class="EOP SCXW174665447 BCX8" data-ccp-props="{"201341983":0,"335559685":1080,"335559739":160,"335559740":259,"469777462":[720,1080],"469777927":[0,0],"469777928":[0,8]}"> </span>
- **<span class="TextRun SCXW174665447 BCX8" data-contrast="auto" lang="EN-US" xml:lang="EN-US"><span class="NormalTextRun SCXW174665447 BCX8">Field name</span></span>**<span class="TextRun SCXW174665447 BCX8" data-contrast="auto" lang="EN-US" xml:lang="EN-US"><span class="NormalTextRun SCXW174665447 BCX8"> - The name of the underlying field attribute</span></span><span class="EOP SCXW174665447 BCX8" data-ccp-props="{"201341983":0,"335559685":1080,"335559739":160,"335559740":259,"469777462":[720,1080],"469777927":[0,0],"469777928":[0,8]}"> </span>
- **<span class="TextRun SCXW174665447 BCX8" data-contrast="auto" lang="EN-US" xml:lang="EN-US"><span class="NormalTextRun SCXW174665447 BCX8">Faceted filter</span></span>**<span class="TextRun SCXW174665447 BCX8" data-contrast="auto" lang="EN-US" xml:lang="EN-US"><span class="NormalTextRun SCXW174665447 BCX8"> - whether the field is a faceted filter by default, or can be enabled (see also: </span></span>[<span class="TextRun Underlined SCXW174665447 BCX8" data-contrast="none" lang="EN-US" xml:lang="EN-US"><span class="NormalTextRun SCXW174665447 BCX8" data-ccp-charstyle="Hyperlink">Customizing filters</span></span>](https://www.elastic.co/guide/en/workplace-search/current/workplace-search-customizing-filters.html)<span class="TextRun SCXW174665447 BCX8" data-contrast="auto" lang="EN-US" xml:lang="EN-US"><span class="NormalTextRun SCXW174665447 BCX8">)</span></span><span class="EOP SCXW174665447 BCX8" data-ccp-props="{"201341983":0,"335559685":1080,"335559739":160,"335559740":259,"469777462":[720,1080],"469777927":[0,0],"469777928":[0,8]}"> </span>
- **<span class="TextRun SCXW174665447 BCX8" data-contrast="auto" lang="EN-US" xml:lang="EN-US"><span class="NormalTextRun SCXW174665447 BCX8">Automatic query refinement preceding phrases</span></span>**<span class="TextRun SCXW174665447 BCX8" data-contrast="auto" lang="EN-US" xml:lang="EN-US"><span class="NormalTextRun SCXW174665447 BCX8"> - The default list of phrases that must precede a value of this field in a search query </span><span class="NormalTextRun AdvancedProofingIssueV2Themed SCXW174665447 BCX8">in order to</span><span class="NormalTextRun SCXW174665447 BCX8"> automatically trigger query refinement. If "None," a value from this field may trigger refinement regardless of where it is found in the query string. If '', a value from this field must be the first token(s) in the query string. If N.A., automatic query refinement is not available for this field by default. All fields that have a faceted filter (default or configurable) can also be configured for </span><span class="NormalTextRun SCXW174665447 BCX8">automatic query refinement; see also </span></span>[<span class="TextRun Underlined SCXW174665447 BCX8" data-contrast="none" lang="EN-US" xml:lang="EN-US"><span class="NormalTextRun SCXW174665447 BCX8" data-ccp-charstyle="Hyperlink">Update a content source</span></span>](https://www.elastic.co/guide/en/workplace-search/current/workplace-search-content-sources-api.html#update-content-source-api)<span class="TextRun SCXW174665447 BCX8" data-contrast="auto" lang="EN-US" xml:lang="EN-US"><span class="NormalTextRun SCXW174665447 BCX8">, </span></span>[<span class="TextRun Underlined SCXW174665447 BCX8" data-contrast="none" lang="EN-US" xml:lang="EN-US"><span class="NormalTextRun SCXW174665447 BCX8" data-ccp-charstyle="Hyperlink">Get a content source’s automatic query refinement details</span></span>](https://www.elastic.co/guide/en/workplace-search/current/workplace-search-content-sources-api.html#get-automatic-query-refinement-details-api)<span class="TextRun SCXW174665447 BCX8" data-contrast="auto" lang="EN-US" xml:lang="EN-US"><span class="NormalTextRun SCXW174665447 BCX8"> and </span></span>[<span class="TextRun Underlined SCXW174665447 BCX8" data-contrast="none" lang="EN-US" xml:lang="EN-US"><span class="NormalTextRun SCXW174665447 BCX8" data-ccp-charstyle="Hyperlink">Customizing filters</span></span>](https://www.elastic.co/guide/en/workplace-search/current/workplace-search-customizing-filters.html)<span class="TextRun SCXW174665447 BCX8" data-contrast="auto" lang="EN-US" xml:lang="EN-US"><span class="NormalTextRun SCXW174665447 BCX8">.</span></span><span class="EOP SCXW174665447 BCX8" data-ccp-props="{"201341983":0,"335559685":1080,"335559739":160,"335559740":259,"469777462":[720,1080],"469777927":[0,0],"469777928":[0,8]}"> </span>

</div></div>

# Enable or Check Syslog/CEF on SonicWall

1. <span style="color: rgb(53, 152, 219);">**Log in to SonicWall UI**</span>
    - Open a web browser
    - Go to your SonicWall’s IP (e.g., `https://192.168.1.1`)
    - Login with your admin credentials
2. <span style="color: rgb(53, 152, 219);">**Navigate to Log Settings**</span>
    - Go to: 
        - Log &gt; Syslog
        - (On older firmware: `Log > Syslog > Syslog Servers`)
    - You’ll see the list of configured **Syslog Servers**
3. <span style="color: rgb(53, 152, 219);">**Check Syslog Server Configuration**</span>
    - Make sure the following are set: 
        - ****Syslog Server IP Address**:** should be the IP of the ****Elastic Agent**** host
        - **Port**: default is **514** for UDP, or **6514** for TCP/TLS
        - **Syslog Format**: 
            - Can be set to **Default**, **Syslog**, or **CEF** (Common Event Format)
            - For Elastic integrations, **Syslog** or **CEF** is typically supported
4. <span style="color: rgb(53, 152, 219);">**Enable Log Categories**</span>
    - Still under **Log &gt; Syslog**, click **Syslog Settings**
    - Ensure that **Important log categories** are **enabled for syslog**, like: 
        - **Firewall**
        - **VPN**
        - **System**
        - **User Activity**
        - **Connection dropped**
    - Set **Alert level** or **Priority**: e.g., **Information** or **Notice**
5. <span style="color: rgb(53, 152, 219);">**If Using CEF Format (For Elastic Agent CEF Integration)**</span>
    - Some SonicWall models support **CEF log format**: 
        - Go to **Log &gt; Syslog**
        - Look for an option like **“Syslog Format”** or **“Use CEF”**
        - Enable **CEF output**
    - *Note:* Not all SonicWall devices support native CEF.
6. <span style="color: rgb(53, 152, 219);">**Advanced Settings (Optional)**</span>
    - Under **Log &gt; Syslog Settings**, check: 
        - Syslog Facility (can be left as default: `Local0` or `Local4`)
        - Use **Syslog over TLS** if required, and provide the correct certs
7. <span style="color: rgb(53, 152, 219);">**Save and Apply**</span>
    - Click **Apply** or **Accept** to confirm changes
    - Ensure the firewall can reach the Elastic Agent on the configured port

# Enable Syslog on Port 514 and Allow via Firewall (Ubuntu)

##### <span style="color: rgb(53, 152, 219);">**Step 1: Install rsyslog**</span>  
<span style="color: rgb(0, 0, 0);">1. Open terminal.</span>  
<span style="color: rgb(0, 0, 0);">2. Run the following commands:</span>

```javascript
sudo apt update
sudo apt install rsyslog -y
sudo systemctl enable rsyslog
sudo systemctl start rsyslog
```

##### <span style="color: rgb(53, 152, 219);">**Step 2: Enable Syslog Reception on Port 514**</span>  
<span style="color: rgb(0, 0, 0);">1.Open the rsyslog configuration file:</span>

```javascript
sudo nano /etc/rsyslog.conf
```

##### <span style="color: rgb(0, 0, 0);">2. Find and uncomment or add these lines:</span>

```javascript
module(load="imudp")
input(type="imudp" port="514")
module(load="imtcp")
input(type="imtcp" port="514")
```

##### <span style="color: rgb(0, 0, 0);">3.Save and exit (Ctrl+X, then Y, then Enter).</span>

##### <span style="color: rgb(53, 152, 219);">**Step 3: Restart rsyslog**</span>

```javascript
sudo systemctl restart rsyslog
```

##### <span style="color: rgb(53, 152, 219);">**Step 4: Allow Port 514 in UFW Firewall**</span>  
<span style="color: rgb(0, 0, 0);">1. Run the following:</span>

```javascript
sudo ufw allow 514/udp
sudo ufw allow 514/tcp
sudo ufw reload
```

##### <span style="color: rgb(0, 0, 0);">2. Check status:</span>

```javascript
sudo ufw status
```

##### <span style="color: rgb(53, 152, 219);">**Step 5: Confirm Port is Listening**</span>

```javascript
sudo ss -tulnp | grep 514
```

##### <span style="color: rgb(0, 0, 0);">Or if netstat is available:</span>

```javascript
sudo netstat -tulnp | grep 514
```

##### <span style="color: rgb(53, 152, 219);">**Step 6: Optional - Test from Remote Client**</span>  
<span style="color: rgb(0, 0, 0);">From another machine:</span>

```java
logger -n <server-ip-address> -P 514 "Test syslog message"
```

##### <span style="color: rgb(0, 0, 0);">Then on the Ubuntu server:</span>

```javascript
sudo tail -f /var/log/syslog
```

##### <span style="color: rgb(53, 152, 219);">**Step 7: End-to-End Connectivity Test (Ping)**</span>  
<span style="color: rgb(0, 0, 0);">From Azure VM (log collector), test connectivity to Cisco Meraki and Palo Alto devices.</span>

##### <span style="color: rgb(0, 0, 0);">**Ping Cisco Meraki:**</span>

```javascript
ping <meraki_ip_address>
```

##### **<span style="color: rgb(0, 0, 0);">Ping Palo Alto:</span>**

```javascript
ping <palo_alto_ip_address>
```

##### <span style="color: rgb(224, 62, 45);">**If ping is successful, you'll see replies with time. If not, verify:**</span>

- ##### <span style="color: rgb(0, 0, 0);">NSG and UFW rules in Azure</span>
- ##### <span style="color: rgb(0, 0, 0);">On-prem firewall rules</span>
- ##### <span style="color: rgb(0, 0, 0);">IP reachability and routing</span>

*<span class="TextRun SCXW71272603 BCX0" data-contrast="auto" lang="EN-US" xml:lang="EN-US"><span class="NormalTextRun SCXW71272603 BCX0">If you need further </span><span class="NormalTextRun SCXW71272603 BCX0">assistance</span><span class="NormalTextRun SCXW71272603 BCX0">, kindly contact our support at </span></span><span style="color: rgb(53, 152, 219);">**<span class="TextRun SCXW71272603 BCX0" data-contrast="none" lang="EN-US" xml:lang="EN-US"><span class="NormalTextRun SCXW71272603 BCX0">support@cytechint.com</span></span>**</span><span class="TextRun SCXW71272603 BCX0" data-contrast="auto" lang="EN-US" xml:lang="EN-US"><span class="NormalTextRun SCXW71272603 BCX0"> for prompt </span><span class="NormalTextRun SCXW71272603 BCX0">assistance</span><span class="NormalTextRun SCXW71272603 BCX0"> and guidance.</span></span><span class="EOP SCXW71272603 BCX0" data-ccp-props="{}"></span>*

# ESET Protect Integration

ESET PROTECT allows you to efficiently manage ESET products across workstations and servers within a networked environment, supporting up to 50,000 devices from a single centralized platform. Through the ESET PROTECT Web Console, you can seamlessly deploy ESET solutions, manage tasks, enforce security policies, monitor system health, and swiftly address any issues or threats on remote devices.

---

#### **Data streams**

The ESET PROTECT integration collects three types of logs: Detection, Device Task and Event.

**Detection** is used to retrieve detections via the ESET Connect - Incident Management.

**Device Task** is used to retrieve device tasks via the ESET Connect - Automation.

**Event** is used to retrieve Detection, Firewall, HIPS, Audit, and ESET Inspect logs using the Syslog Server.

---

##### **Requirements:**

- Elastic Agent must be installed

---

#### **Setup**

##### **To collect data from ESET Connect, follow the below steps:**

1. Create API User Account (*Refer to How to Create an API User Account below*)
2. Retrieve the username and password generated during the creation of an API user account.
3. Retrieve the region from the ESET Web Console URL.

##### **To collect data from ESET PROTECT via Syslog, follow the below steps:**

1. Follow the steps to configure syslog server (*Refer to How to Configure Syslog Server*). 
    - Set the format of the payload to **JSON**.
    - Set the format of the envelope to **Syslog**.
    - Set the minimal log level to **Information** to collect all data.
    - Select all checkboxes to collect logs for all event types.
    - Enter the **IP Address** or **FQDN** of the Elastic Agent that is running the integration in the Destination IP field.

---

#### **How to Create an API User Account:**

##### **<span class="f_Heading3">For ESET Business Account and ESET MSP Administrator 2</span>**

Follow the steps below to create the dedicated API user account:

1. <span class="f_NormalList">Log in as Superuser (or Root) to your </span><span class="f_UI">ESET Business Account</span><span class="f_NormalList"> or </span><span class="f_UI">ESET MSP Administrator 2</span><span class="f_NormalList">.</span>
2. <span class="f_NormalList">Navigate to </span><span class="f_UI">User management</span><span class="f_NormalList"> and create a new user.</span>
3. Under the <span class="f_UI">Access Rights</span> section, enable the toggle next to <span class="f_UI">Integrations</span>.[![image.png](https://cytechint-docs-bookstack.s3.amazonaws.com/uploads/images/gallery/2024-11/scaled-1680-/aYONheFotttkYVLL-image.png)](https://cytechint-docs-bookstack.s3.amazonaws.com/uploads/images/gallery/2024-11/aYONheFotttkYVLL-image.png)
4. <span class="f_NormalList">Click </span><span class="f_UI">Create</span><span class="f_NormalList"> to apply the changes.</span>
5. <span class="f_NormalList">The new user receives an invitation email and must finish the account activation process.</span>

##### **<span class="f_Heading3">For ESET PROTECT Hub</span>**

Follow the steps below to create the dedicated API user account:

1. <span class="f_NormalList">Log in as a Superuser to your </span><span class="f_UI">ESET PROTECT Hub</span><span class="f_NormalList"> account.</span>
2. <span class="f_NormalList">Navigate to </span><span class="f_UI">Users</span><span class="f_NormalList"> and add a new user.</span>
3. Under the <span class="f_UI">Permissions</span> section, enable the toggle next to <span class="f_UI">Integrations</span>.[![image.png](https://cytechint-docs-bookstack.s3.amazonaws.com/uploads/images/gallery/2024-11/scaled-1680-/opgDzC1d93odlwX4-image.png)](https://cytechint-docs-bookstack.s3.amazonaws.com/uploads/images/gallery/2024-11/opgDzC1d93odlwX4-image.png)
4. <span class="f_NormalList">Click </span><span class="f_UI">Next</span><span class="f_NormalList"> and then click </span><span class="f_UI">Create</span><span class="f_NormalList"> to apply the changes.</span>
5. <span class="f_NormalList">The new user receives an invitation email and must finish the account activation process.</span>

---

#### **<span class="f_Heading1">How to Configure Syslog Server</span>**

If you have a Syslog server running in your network, you can Export logs to Syslog to receive certain events (Detection Event, Firewall Aggregated Event, HIPS Aggregated Event, etc.) from client computers running ESET Endpoint Security.

**To enable the Syslog server:**

1. Click <span class="f_UI">More</span> &gt; <span class="f_UI">Settings</span> &gt; <span class="f_UI">Syslog</span> and click the toggle next to <span class="f_UI">Enable Syslog sending</span>.
2. Specify the following mandatory settings:

- <span class="f_UI">Format of payload</span><span class="f_NormalList">: **JSON**, **LEEF** or **CEF**</span>
- <span class="f_UI">Format of envelope</span><span class="f_NormalList"> of the log: </span>**<span class="f_UI">BSD</span>**<span class="f_NormalList"> (specification), </span>**<span class="f_UI">Syslog</span>**<span class="f_NormalList"> (specification)</span>
- <span class="f_UI">Minimal log level: </span>**<span class="f_UI">Information</span>**<span class="f_NormalList">, </span>**<span class="f_UI">Warning</span>**<span class="f_NormalList">, </span>**<span class="f_UI">Error</span>**<span class="f_NormalList"> or </span>**<span class="f_UI">Critical</span>**
- <span class="f_UI">Event type of logs: </span><span class="f_NormalList">Select the type of logs you want to include **(**</span>**<span class="f_UI">Antivirus</span><span class="f_NormalList">, </span><span class="f_UI">HIPS</span><span class="f_NormalList">, </span><span class="f_UI">Firewall</span><span class="f_NormalList">, </span><span class="f_UI">Web protection</span><span class="f_NormalList">, </span><span class="f_UI">Audit Log</span><span class="f_NormalList">, </span><span class="f_UI">Blocked files</span><span class="f_NormalList">, </span><span class="f_UI">ESET Inspect alerts</span><span class="f_NormalList">).</span>**
- <span class="f_UI">**Destination IP or FQDN of TLS-compatible syslog server:** </span><span class="f_NormalList">IPv4 address or hostname of the destination for Syslog messages</span>
- **<span class="f_UI">Validate CA Root certificates of TLS connections: </span>**Click the toggle to enable the certificate validation for the connection between your Syslog server and ESET PROTECT. After enabling the validation, a new text field will be displayed where you can copy and paste the required certificate chain. The server certificate must meet the following requirements: 
    - The whole certificate chain in PEM format is uploaded and saved in the Syslog export configuration (this includes root CA, as there are no built-in trusted certificates)
    - Your Syslog server's certificate provides a Subject Alternative Name extension (DNS=/IP=), in which at least one record corresponds to the FQDN/IP hostname configuration.

> You need the certification authority version 3 (and later) with the Basic Constraints certificate extension to pass the validation.
> 
> The validation of TLS connections applies only to the certificates. Disabling the validation does not affect the TLS settings of ESET PROTECT.

<div id="bkmrk--5"><div>  
</div></div>After making the applicable changes, click **<span class="f_UI">Apply settings</span>**. The configuration becomes effective in 10 minutes.

<div id="bkmrk--6"></div>> <div>The regular application log file is constantly being written to. Syslog only serves as a medium to export certain asynchronous events, such as notifications or various client computer events.</div>

<div id="bkmrk--7"></div><div id="bkmrk-if-you-need-further-">*If you need further assistance, kindly contact our support at <support@cytechint.com> for prompt assistance and guidance.*</div>

# ESET Threat Intelligence Integrations

ESET Threat Intelligence provides advanced, real-time insights into global cybersecurity threats, empowering you to proactively defend your network and systems. By leveraging a vast database of threat data, it enables you to detect and respond to emerging threats, track attack trends, and enhance your security posture with actionable intelligence. With ESET Threat Intelligence, you can make informed decisions to protect your organization from sophisticated cyber threats.

---


#### **Setup:**

**1) Log Collector must be installed.**

**2) Prepare the information from the ESET Threat Intelligence Account:**

- Ensure that you have access to **ESET Threat Intelligence** feeds (via ESET Threat Intelligence API or downloadable data).
- Please prepare the **Username** and **Password** that you have received from ESET during their onboarding process.

---

### **References Information:** 

#### **Data streams**

This integration connects with the ESET Threat Intelligence **TAXII version 2 server**. It includes the following datasets for retrieving logs:

<table class="euiTable euiTable--responsive" id="bkmrk-dataset-taxii2-colle" style="width: 28.5714%; height: 238.375px;" tabindex="-1"><thead><tr class="euiTableRow" style="height: 29.7969px;"><th class="euiTableHeaderCell" role="columnheader" scope="col" style="width: 29.4596%; height: 29.7969px;"><span class="euiTableCellContent euiTableCellContent--alignRight"><span class="euiTableCellContent__text" title="Dataset">Dataset</span></span></th><th class="euiTableHeaderCell" role="columnheader" scope="col" style="width: 70.0587%; height: 29.7969px;"><span class="euiTableCellContent"><span class="euiTableCellContent__text" title="TAXII2 Collection name">TAXII2 Collection name</span></span></th></tr></thead><tbody><tr class="euiTableRow" style="height: 29.7969px;"><td class="euiTableRowCell euiTableRowCell--middle" style="width: 29.4596%; height: 29.7969px;"><div class="euiTableCellContent euiTableCellContent--alignRight"><span class="euiTableCellContent__text">apt</span></div></td><td class="euiTableRowCell euiTableRowCell--middle" style="width: 70.0587%; height: 29.7969px;"><div class="euiTableCellContent"><span class="euiTableCellContent__text">apt stix 2.1</span></div></td></tr><tr class="euiTableRow" style="height: 29.7969px;"><td class="euiTableRowCell euiTableRowCell--middle" style="width: 29.4596%; height: 29.7969px;"><div class="euiTableCellContent euiTableCellContent--alignRight"><span class="euiTableCellContent__text">botnet</span></div></td><td class="euiTableRowCell euiTableRowCell--middle" style="width: 70.0587%; height: 29.7969px;"><div class="euiTableCellContent"><span class="euiTableCellContent__text">botnet stix 2.1</span></div></td></tr><tr class="euiTableRow" style="height: 29.7969px;"><td class="euiTableRowCell euiTableRowCell--middle" style="width: 29.4596%; height: 29.7969px;"><div class="euiTableCellContent euiTableCellContent--alignRight"><span class="euiTableCellContent__text">cc</span></div></td><td class="euiTableRowCell euiTableRowCell--middle" style="width: 70.0587%; height: 29.7969px;"><div class="euiTableCellContent"><span class="euiTableCellContent__text">botnet.cc stix 2.1</span></div></td></tr><tr class="euiTableRow" style="height: 29.7969px;"><td class="euiTableRowCell euiTableRowCell--middle" style="width: 29.4596%; height: 29.7969px;"><div class="euiTableCellContent euiTableCellContent--alignRight"><span class="euiTableCellContent__text">domains</span></div></td><td class="euiTableRowCell euiTableRowCell--middle" style="width: 70.0587%; height: 29.7969px;"><div class="euiTableCellContent"><span class="euiTableCellContent__text">domain stix 2.1</span></div></td></tr><tr class="euiTableRow" style="height: 29.7969px;"><td class="euiTableRowCell euiTableRowCell--middle" style="width: 29.4596%; height: 29.7969px;"><div class="euiTableCellContent euiTableCellContent--alignRight"><span class="euiTableCellContent__text">files</span></div></td><td class="euiTableRowCell euiTableRowCell--middle" style="width: 70.0587%; height: 29.7969px;"><div class="euiTableCellContent"><span class="euiTableCellContent__text">file stix 2.1</span></div></td></tr><tr class="euiTableRow" style="height: 29.7969px;"><td class="euiTableRowCell euiTableRowCell--middle" style="width: 29.4596%; height: 29.7969px;"><div class="euiTableCellContent euiTableCellContent--alignRight"><span class="euiTableCellContent__text">ip</span></div></td><td class="euiTableRowCell euiTableRowCell--middle" style="width: 70.0587%; height: 29.7969px;"><div class="euiTableCellContent"><span class="euiTableCellContent__text">ip stix 2.1</span></div></td></tr><tr class="euiTableRow" style="height: 29.7969px;"><td class="euiTableRowCell euiTableRowCell--middle" style="width: 29.4596%; height: 29.7969px;"><div class="euiTableCellContent euiTableCellContent--alignRight"><span class="euiTableCellContent__text">url</span></div></td><td class="euiTableRowCell euiTableRowCell--middle" style="width: 70.0587%; height: 29.7969px;"><div class="euiTableCellContent"><span class="euiTableCellContent__text">url stix 2.1</span></div></td></tr></tbody></table>

#### **Obtaining an API Key for ESET Threat Intelligence**

**Usage of the ESET Threat Intelligence (ETI) API**

The **ESET Threat Intelligence (ETI) API** can be used directly in a web browser’s address bar as a REST API, meaning that it does not necessarily require implementation in a programming language. This allows for a straightforward integration of threat intelligence data without the need for additional software development.

**Authentication**

Authentication with the ETI API is managed via a **token**. This token can be generated in the profile section of the ESET Threat Intelligence portal. It is important to note that each token is valid for **only one hour**, ensuring secure access to the API.

To generate a token, users can either manually generate it through the portal interface or use a **CURL request**. This approach provides flexibility, allowing automated generation of tokens for integration or scheduled use.

> ##### **Generate via CURL Request**
> 
> Step 1: Open a Command-Line Interface (CLI)
> 
> - **Windows**: Open Command Prompt (cmd) or PowerShell.
> - **macOS/Linux**: Open Terminal.
> 
> Step 2: Enter the CURL Command
> 
> In the command-line interface, use the following CURL command to generate an authentication token:
> 
> **curl -F name="YOUR-USERNAME" -F pass="YOUR-PASSWORD" ETI\_URL/auth/**
> 
> Step 3: Copy and save the authentication token

***Note.***   
*After 10 failed login attempts within 5 minutes, the user will be blocked for 15 minutes.*  
*After 20 failed attempts from a specific IP address within 5 minutes, all login attempts from that IP will be blocked for 15 minutes.*

*If you need further assistance, kindly contact our support at [support@cytechint.com](mailto:info@cytechint.com) for prompt assistance and guidance.*

# F5 Integrations

##### <span style="color: rgb(53, 152, 219);">**<span class="TextRun SCXW190068663 BCX8" data-contrast="none" lang="EN-US" xml:lang="EN-US"><span class="NormalTextRun SCXW190068663 BCX8" data-ccp-charstyle="Style (Complex) Open Sans" data-ccp-charstyle-defn="{"ObjectId":"c36d8b27-4b7f-4761-960e-777cb50f45d4|250","ClassId":1073872969,"Properties":[469775450,"Style (Complex) Open Sans",201340122,"1",134233614,"true",469778129,"StyleComplexOpenSans",335572020,"1",201342448,"1",469777841,"Open Sans",469777842,"Open Sans",469777843,"Calibri",469777844,"Open Sans",469769226,"Open Sans,Calibri",469778324,"Default Paragraph Font"]}">Introduction</span></span><span class="EOP SCXW190068663 BCX8" data-ccp-props="{"134245418":true,"134245529":true,"201341983":0,"335559738":240,"335559739":0,"335559740":360}"> </span>**</span>

<span class="TextRun SCXW190068663 BCX8" data-contrast="auto" lang="EN-US" xml:lang="EN-US"><span class="NormalTextRun SCXW190068663 BCX8" data-ccp-charstyle="Style (Complex) Open Sans">This document </span><span class="NormalTextRun SCXW190068663 BCX8" data-ccp-charstyle="Style (Complex) Open Sans">shows information related to </span><span class="NormalTextRun SCXW190068663 BCX8" data-ccp-charstyle="Style (Complex) Open Sans">F5</span><span class="NormalTextRun SCXW190068663 BCX8" data-ccp-charstyle="Style (Complex) Open Sans"> Integration. </span></span><span class="EOP SCXW190068663 BCX8" data-ccp-props="{"201341983":0,"335559685":360,"335559739":160,"335559740":259}"> </span>

<span class="TextRun SCXW190068663 BCX8" data-contrast="auto" lang="EN-US" xml:lang="EN-US"><span class="NormalTextRun SCXW190068663 BCX8" data-ccp-charstyle="Style (Complex) Open Sans">The F5 BIG-IP integration allows users to monitor LTM, AFM, APM, ASM, and AVR activity. F5 BIG-IP covers software and hardware designed around application availability, access control, and security solutions.</span></span><span class="EOP SCXW190068663 BCX8" data-ccp-props="{"201341983":0,"335559685":360,"335559739":160,"335559740":259}"> </span>

<span class="EOP SCXW190068663 BCX8" data-ccp-props="{"201341983":0,"335559685":360,"335559739":160,"335559740":259}"> </span>

<span class="TextRun SCXW190068663 BCX8" data-contrast="auto" lang="EN-US" xml:lang="EN-US"><span class="NormalTextRun SCXW190068663 BCX8" data-ccp-charstyle="Style (Complex) Open Sans">The F5 BIG-IP integration can be used in three different modes to collect data:</span></span><span class="EOP SCXW190068663 BCX8" data-ccp-props="{"201341983":0,"335559685":360,"335559739":160,"335559740":259}"> </span>

<span class="EOP SCXW190068663 BCX8" data-ccp-props="{"201341983":0,"335559685":360,"335559739":160,"335559740":259}"> </span>

<span class="TextRun SCXW190068663 BCX8" data-contrast="auto" lang="EN-US" xml:lang="EN-US"><span class="NormalTextRun SCXW190068663 BCX8" data-ccp-charstyle="Style (Complex) Open Sans">HTTP Endpoint mode - F5 BIG-IP pushes logs directly to an HTTP endpoint hosted by </span><span class="NormalTextRun ContextualSpellingAndGrammarErrorV2Themed SCXW190068663 BCX8" data-ccp-charstyle="Style (Complex) Open Sans">users</span><span class="NormalTextRun SCXW190068663 BCX8" data-ccp-charstyle="Style (Complex) Open Sans">’ Elastic Agent.</span></span><span class="EOP SCXW190068663 BCX8" data-ccp-props="{"201341983":0,"335559685":360,"335559739":160,"335559740":259}"> </span>

<span class="TextRun SCXW190068663 BCX8" data-contrast="auto" lang="EN-US" xml:lang="EN-US"><span class="NormalTextRun SCXW190068663 BCX8" data-ccp-charstyle="Style (Complex) Open Sans">AWS S3 polling mode - F5 BIG-IP writes data to S3 and Elastic Agent polls the S3 bucket by listing its contents and reading new files.</span></span><span class="EOP SCXW190068663 BCX8" data-ccp-props="{"201341983":0,"335559685":360,"335559739":160,"335559740":259}"> </span>

<span class="TextRun SCXW190068663 BCX8" data-contrast="auto" lang="EN-US" xml:lang="EN-US"><span class="NormalTextRun SCXW190068663 BCX8" data-ccp-charstyle="Style (Complex) Open Sans">AWS S3 SQS mode - F5 BIG-IP writes data to S3, S3 pushes a new object notification to SQS, Elastic Agent receives the notification from SQS, and then reads the S3 object. Multiple Agents can be used in this mode.</span></span><span class="EOP SCXW190068663 BCX8" data-ccp-props="{"201341983":0,"335559685":360,"335559739":160,"335559740":259}"> </span>

<span class="TextRun SCXW190068663 BCX8" data-contrast="auto" lang="EN-US" xml:lang="EN-US"><span class="NormalTextRun SCXW190068663 BCX8" data-ccp-charstyle="Style (Complex) Open Sans">For example, users can use the data from this integration to analyze the traffic that passes through their F5 BIG-IP network.</span></span><span class="EOP SCXW190068663 BCX8" data-ccp-props="{"201341983":0,"335559685":360,"335559739":160,"335559740":259}"> </span>

<span class="EOP SCXW190068663 BCX8" data-ccp-props="{"201341983":0,"335559685":360,"335559739":160,"335559740":259}"> </span>

##### <span style="color: rgb(53, 152, 219);">**<span class="TextRun SCXW190068663 BCX8" data-contrast="auto" lang="EN-US" xml:lang="EN-US"><span class="NormalTextRun SCXW190068663 BCX8" data-ccp-charstyle="Style (Complex) Open Sans">Data streams</span></span><span class="EOP SCXW190068663 BCX8" data-ccp-props="{"201341983":0,"335559685":360,"335559739":160,"335559740":259}"> </span>**</span>

<span class="TextRun SCXW190068663 BCX8" data-contrast="auto" lang="EN-US" xml:lang="EN-US"><span class="NormalTextRun SCXW190068663 BCX8" data-ccp-charstyle="Style (Complex) Open Sans">The F5 BIG-IP integration collects one type of data stream: log.</span></span><span class="EOP SCXW190068663 BCX8" data-ccp-props="{"201341983":0,"335559685":360,"335559739":160,"335559740":259}"> </span>

<span class="TextRun SCXW190068663 BCX8" data-contrast="auto" lang="EN-US" xml:lang="EN-US"><span class="NormalTextRun SCXW190068663 BCX8" data-ccp-charstyle="Style (Complex) Open Sans">Log </span><span class="NormalTextRun ContextualSpellingAndGrammarErrorV2Themed SCXW190068663 BCX8" data-ccp-charstyle="Style (Complex) Open Sans">help</span><span class="NormalTextRun SCXW190068663 BCX8" data-ccp-charstyle="Style (Complex) Open Sans"> users to keep a record of events happening on the network using telemetry streaming. The log data stream collected by the F5 BIG-IP integration includes events that are related to network traffic. See more details in the Logs.</span></span><span class="EOP SCXW190068663 BCX8" data-ccp-props="{"201341983":0,"335559685":360,"335559739":160,"335559740":259}"> </span>

<span class="TextRun SCXW190068663 BCX8" data-contrast="auto" lang="EN-US" xml:lang="EN-US"><span class="NormalTextRun SCXW190068663 BCX8" data-ccp-charstyle="Style (Complex) Open Sans">This integration targets the five types of events as mentioned below:</span></span><span class="EOP SCXW190068663 BCX8" data-ccp-props="{"201341983":0,"335559685":360,"335559739":160,"335559740":259}"> </span>

**<span class="TextRun SCXW190068663 BCX8" data-contrast="auto" lang="EN-US" xml:lang="EN-US"><span class="NormalTextRun SCXW190068663 BCX8" data-ccp-charstyle="Style (Complex) Open Sans">LTM</span></span>**<span class="TextRun SCXW190068663 BCX8" data-contrast="auto" lang="EN-US" xml:lang="EN-US"><span class="NormalTextRun SCXW190068663 BCX8" data-ccp-charstyle="Style (Complex) Open Sans"> provides the platform for creating virtual servers, performance, service, protocol, authentication, and security profiles to define and shape users’ application traffic. For more information, refer to the link here.</span></span><span class="EOP SCXW190068663 BCX8" data-ccp-props="{"201341983":0,"335559685":360,"335559739":160,"335559740":259}"> </span>

**<span class="TextRun SCXW190068663 BCX8" data-contrast="auto" lang="EN-US" xml:lang="EN-US"><span class="NormalTextRun SCXW190068663 BCX8" data-ccp-charstyle="Style (Complex) Open Sans">AFM</span></span>**<span class="TextRun SCXW190068663 BCX8" data-contrast="auto" lang="EN-US" xml:lang="EN-US"><span class="NormalTextRun SCXW190068663 BCX8" data-ccp-charstyle="Style (Complex) Open Sans"> is designed to reduce the hardware and extra hops </span><span class="NormalTextRun SCXW190068663 BCX8" data-ccp-charstyle="Style (Complex) Open Sans">required</span><span class="NormalTextRun SCXW190068663 BCX8" data-ccp-charstyle="Style (Complex) Open Sans"> when </span><span class="NormalTextRun ContextualSpellingAndGrammarErrorV2Themed SCXW190068663 BCX8" data-ccp-charstyle="Style (Complex) Open Sans">ADC's</span><span class="NormalTextRun SCXW190068663 BCX8" data-ccp-charstyle="Style (Complex) Open Sans"> are paired with traditional firewalls and helps to protect traffic destined for the user's data center. For more information, refer to the link here.</span></span><span class="EOP SCXW190068663 BCX8" data-ccp-props="{"201341983":0,"335559685":360,"335559739":160,"335559740":259}"> </span>

**<span class="TextRun SCXW190068663 BCX8" data-contrast="auto" lang="EN-US" xml:lang="EN-US"><span class="NormalTextRun SCXW190068663 BCX8" data-ccp-charstyle="Style (Complex) Open Sans">APM</span></span>**<span class="TextRun SCXW190068663 BCX8" data-contrast="auto" lang="EN-US" xml:lang="EN-US"><span class="NormalTextRun SCXW190068663 BCX8" data-ccp-charstyle="Style (Complex) Open Sans"> provides federation, SSO, application access policies, and secure web tunneling and allows granular access to users' various applications, virtualized desktop </span><span class="NormalTextRun SCXW190068663 BCX8" data-ccp-charstyle="Style (Complex) Open Sans">environments, or just go full VPN tunnel. For more information, refer to the link here.</span></span><span class="EOP SCXW190068663 BCX8" data-ccp-props="{"201341983":0,"335559685":360,"335559739":160,"335559740":259}"> </span>

**<span class="TextRun SCXW190068663 BCX8" data-contrast="auto" lang="EN-US" xml:lang="EN-US"><span class="NormalTextRun SCXW190068663 BCX8" data-ccp-charstyle="Style (Complex) Open Sans">ASM</span></span>**<span class="TextRun SCXW190068663 BCX8" data-contrast="auto" lang="EN-US" xml:lang="EN-US"><span class="NormalTextRun SCXW190068663 BCX8" data-ccp-charstyle="Style (Complex) Open Sans"> is F5's web application </span><span class="NormalTextRun SCXW190068663 BCX8" data-ccp-charstyle="Style (Complex) Open Sans">firewall</span><span class="NormalTextRun SCXW190068663 BCX8" data-ccp-charstyle="Style (Complex) Open Sans"> (WAF) solution. It allows users to tailor acceptable and expected application behavior on a per-application basis. For more information, refer to the link here.</span></span><span class="EOP SCXW190068663 BCX8" data-ccp-props="{"201341983":0,"335559685":360,"335559739":160,"335559740":259}"> </span>

**<span class="TextRun SCXW190068663 BCX8" data-contrast="auto" lang="EN-US" xml:lang="EN-US"><span class="NormalTextRun SCXW190068663 BCX8" data-ccp-charstyle="Style (Complex) Open Sans">AVR</span></span>**<span class="TextRun SCXW190068663 BCX8" data-contrast="auto" lang="EN-US" xml:lang="EN-US"><span class="NormalTextRun SCXW190068663 BCX8" data-ccp-charstyle="Style (Complex) Open Sans"> provides detailed charts and graphs to give users more insight into the performance of web applications, with detailed views on HTTP and TCP stats, as well as system performance (CPU, memory, etc.). For more information, refer to the link here.</span></span><span class="EOP SCXW190068663 BCX8" data-ccp-props="{"201341983":0,"335559685":360,"335559739":160,"335559740":259}"> </span>

<div class="SCXW190068663 BCX8" id="bkmrk-"><div class="OutlineElement Ltr SCXW190068663 BCX8">  
</div><div class="ListContainerWrapper SCXW190068663 BCX8">  
</div></div>##### <span style="color: rgb(53, 152, 219);">**<span class="TextRun SCXW190068663 BCX8" data-contrast="none" lang="EN-US" xml:lang="EN-US"><span class="NormalTextRun SCXW190068663 BCX8" data-ccp-charstyle="Style (Complex) Open Sans">Assumptions</span></span><span class="EOP SCXW190068663 BCX8" data-ccp-props="{"134245418":true,"134245529":true,"201341983":0,"335559738":240,"335559739":0,"335559740":360}"> </span>**</span>

<span class="TextRun SCXW190068663 BCX8" data-contrast="auto" lang="EN-US" xml:lang="EN-US"><span class="NormalTextRun SCXW190068663 BCX8" data-ccp-charstyle="Style (Complex) Open Sans">The procedures described in Section </span></span><span class="FieldRange SCXW190068663 BCX8"><span class="TextRun SCXW190068663 BCX8" data-contrast="auto" lang="EN-US" xml:lang="EN-US"><span class="NormalTextRun SCXW190068663 BCX8" data-ccp-charstyle="Style (Complex) Open Sans">3</span></span></span><span class="TextRun SCXW190068663 BCX8" data-contrast="auto" lang="EN-US" xml:lang="EN-US"> <span class="NormalTextRun ContextualSpellingAndGrammarErrorV2Themed SCXW190068663 BCX8" data-ccp-charstyle="Style (Complex) Open Sans">assumes</span><span class="NormalTextRun SCXW190068663 BCX8" data-ccp-charstyle="Style (Complex) Open Sans"> that a Log Collector has already been </span><span class="NormalTextRun ContextualSpellingAndGrammarErrorV2Themed SCXW190068663 BCX8" data-ccp-charstyle="Style (Complex) Open Sans">setup</span><span class="NormalTextRun SCXW190068663 BCX8" data-ccp-charstyle="Style (Complex) Open Sans">. </span></span><span class="EOP SCXW190068663 BCX8" data-ccp-props="{"201341983":0,"335559685":360,"335559739":160,"335559740":259}"> </span>

<div class="SCXW190068663 BCX8" id="bkmrk--1"><div class="OutlineElement Ltr SCXW190068663 BCX8">  
</div><div class="ListContainerWrapper SCXW190068663 BCX8">  
</div></div>##### <span style="color: rgb(53, 152, 219);">**<span class="TextRun SCXW190068663 BCX8" data-contrast="none" lang="EN-US" xml:lang="EN-US"><span class="NormalTextRun SCXW190068663 BCX8" data-ccp-charstyle="Style (Complex) Open Sans">Requirements</span></span><span class="EOP SCXW190068663 BCX8" data-ccp-props="{"134245418":true,"134245529":true,"201341983":0,"335559738":240,"335559739":0,"335559740":360}"> </span>**</span>

<span class="TextRun SCXW190068663 BCX8" data-contrast="auto" lang="EN-US" xml:lang="EN-US"><span class="NormalTextRun SCXW190068663 BCX8" data-ccp-charstyle="Style (Complex) Open Sans">Elasticsearch </span><span class="NormalTextRun SCXW190068663 BCX8" data-ccp-charstyle="Style (Complex) Open Sans">is</span><span class="NormalTextRun SCXW190068663 BCX8" data-ccp-charstyle="Style (Complex) Open Sans"> needed to store and search data, and Kibana is needed for visualizing and managing it. You can use our hosted Elasticsearch Service on Elastic Cloud, which is recommended, or self-manage the Elastic Stack on your hardware.</span></span><span class="EOP SCXW190068663 BCX8" data-ccp-props="{"134245418":true,"134245529":true,"201341983":0,"335559685":360,"335559738":240,"335559739":0,"335559740":360}"> </span>

<span class="TextRun SCXW190068663 BCX8" data-contrast="auto" lang="EN-US" xml:lang="EN-US"><span class="NormalTextRun SCXW190068663 BCX8" data-ccp-charstyle="Style (Complex) Open Sans">The reference link for requirements of telemetry streaming is here.</span><span class="NormalTextRun SCXW190068663 BCX8" data-ccp-charstyle="Style (Complex) Open Sans"> </span></span><span class="EOP SCXW190068663 BCX8" data-ccp-props="{"134245418":true,"134245529":true,"201341983":0,"335559685":360,"335559738":240,"335559739":0,"335559740":360}"> </span>

<div class="SCXW190068663 BCX8" id="bkmrk-https%3A%2F%2Fclouddocs.f5"><div class="ListContainerWrapper SCXW190068663 BCX8">1. <span class="TextRun SCXW190068663 BCX8" data-contrast="auto" lang="EN-US" xml:lang="EN-US"><span class="NormalTextRun SCXW190068663 BCX8" data-ccp-charstyle="Style (Complex) Open Sans">https://clouddocs.f5.com/products/extensions/f5-telemetry-streaming/latest/prereqs.html</span></span><span class="EOP SCXW190068663 BCX8" data-ccp-props="{"134245418":true,"134245529":true,"201341983":0,"335559738":240,"335559739":0,"335559740":360}"> </span>

</div></div><span class="TextRun SCXW190068663 BCX8" data-contrast="auto" lang="EN-US" xml:lang="EN-US"><span class="NormalTextRun SCXW190068663 BCX8" data-ccp-charstyle="Style (Complex) Open Sans">The reference link for requirements of Application Services 3(AS3) Extension is here.</span></span><span class="EOP SCXW190068663 BCX8" data-ccp-props="{"134245418":true,"134245529":true,"201341983":0,"335559685":360,"335559738":240,"335559739":0,"335559740":360}"> </span>

<div class="SCXW190068663 BCX8" id="bkmrk-https%3A%2F%2Fclouddocs.f5-1"><div class="ListContainerWrapper SCXW190068663 BCX8">2. <span class="TextRun SCXW190068663 BCX8" data-contrast="auto" lang="EN-US" xml:lang="EN-US"><span class="NormalTextRun SCXW190068663 BCX8" data-ccp-charstyle="Style (Complex) Open Sans">https://clouddocs.f5.com/products/extensions/f5-appsvcs-extension/latest/userguide/prereqs.html</span></span><span class="EOP SCXW190068663 BCX8" data-ccp-props="{"134245418":true,"134245529":true,"201341983":0,"335559738":240,"335559739":0,"335559740":360}"> </span>

</div></div><span class="TextRun SCXW190068663 BCX8" data-contrast="auto" lang="EN-US" xml:lang="EN-US"><span class="NormalTextRun SCXW190068663 BCX8" data-ccp-charstyle="Style (Complex) Open Sans">T</span></span><span class="TextRun SCXW190068663 BCX8" data-contrast="auto" lang="EN-US" xml:lang="EN-US"><span class="NormalTextRun SCXW190068663 BCX8" data-ccp-charstyle="Style (Complex) Open Sans">his module has been tested against F5 BIG-IP version 16.1.0, Telemetry Streaming</span> <span class="NormalTextRun SCXW190068663 BCX8" data-ccp-charstyle="Style (Complex) Open Sans">version 1.32.0 and AS3 version 3.40.0.</span></span><span class="EOP SCXW190068663 BCX8" data-ccp-props="{"134245418":true,"134245529":true,"201341983":0,"335559685":360,"335559738":240,"335559739":0,"335559740":360}"> </span>

<span class="EOP SCXW190068663 BCX8" data-ccp-props="{"201341983":0,"335559739":160,"335559740":360}"> </span>

##### <span style="color: rgb(53, 152, 219);">**<span class="TextRun SCXW190068663 BCX8" data-contrast="auto" lang="EN-US" xml:lang="EN-US"><span class="NormalTextRun SCXW190068663 BCX8" data-ccp-charstyle="Style (Complex) Open Sans">Setup</span></span><span class="EOP SCXW190068663 BCX8" data-ccp-props="{"134245418":true,"134245529":true,"201341983":0,"335559738":240,"335559739":0,"335559740":360}"> </span>**</span>

**<span class="TextRun SCXW190068663 BCX8" data-contrast="auto" lang="EN-US" xml:lang="EN-US"><span class="NormalTextRun SCXW190068663 BCX8" data-ccp-charstyle="Style (Complex) Open Sans">To collect LTM, AFM, APM, ASM, and AVR data from F5 BIG-IP, the user </span><span class="NormalTextRun AdvancedProofingIssueV2Themed SCXW190068663 BCX8" data-ccp-charstyle="Style (Complex) Open Sans">has to</span><span class="NormalTextRun SCXW190068663 BCX8" data-ccp-charstyle="Style (Complex) Open Sans"> configure modules in F5 BIG-IP as per the requirements.</span></span>**<span class="EOP SCXW190068663 BCX8" data-ccp-props="{"134245418":true,"134245529":true,"201341983":0,"335559738":240,"335559739":0,"335559740":360}"> </span>

<span class="TextRun SCXW190068663 BCX8" data-contrast="auto" lang="EN-US" xml:lang="EN-US"><span class="NormalTextRun SCXW190068663 BCX8" data-ccp-charstyle="Style (Complex) Open Sans">To set up the F5 BIG-IP environment, users can use the BIG-IP system browser-based Configuration Utility or the command line tools that are provided. For more information related to the configuration of F5 BIG-IP servers, refer to </span><span class="NormalTextRun ContextualSpellingAndGrammarErrorV2Themed SCXW190068663 BCX8" data-ccp-charstyle="Style (Complex) Open Sans">F5</span><span class="NormalTextRun SCXW190068663 BCX8" data-ccp-charstyle="Style (Complex) Open Sans"> support website</span></span>[<span class="TextRun Underlined SCXW190068663 BCX8" data-contrast="none" lang="EN-US" xml:lang="EN-US"><span class="NormalTextRun SCXW190068663 BCX8" data-ccp-charstyle="Hyperlink"> here</span></span>](https://support.f5.com/csp/knowledge-center/software)<span class="TextRun SCXW190068663 BCX8" data-contrast="auto" lang="EN-US" xml:lang="EN-US"><span class="NormalTextRun SCXW190068663 BCX8" data-ccp-charstyle="Style (Complex) Open Sans">.</span></span><span class="EOP SCXW190068663 BCX8" data-ccp-props="{"134245418":true,"134245529":true,"201341983":0,"335559738":240,"335559739":0,"335559740":360}"> </span>

[<span class="TextRun Underlined SCXW190068663 BCX8" data-contrast="none" lang="EN-US" xml:lang="EN-US"><span class="NormalTextRun SCXW190068663 BCX8" data-ccp-charstyle="Hyperlink">https://support.f5.com/csp/knowledge-center/software</span></span>](https://support.f5.com/csp/knowledge-center/software)<span class="EOP SCXW190068663 BCX8" data-ccp-props="{"134245418":true,"134245529":true,"201341983":0,"335559738":240,"335559739":0,"335559740":360}"> </span>

<span class="EOP SCXW190068663 BCX8" data-ccp-props="{"134245418":true,"134245529":true,"201341983":0,"335559685":1080,"335559738":240,"335559739":0,"335559740":360}"> </span>

##### <span style="color: rgb(53, 152, 219);">**<span class="TextRun SCXW190068663 BCX8" data-contrast="auto" lang="EN-US" xml:lang="EN-US"><span class="NormalTextRun SCXW190068663 BCX8" data-ccp-charstyle="Style (Complex) Open Sans">Configuration of Telemetry Streaming in F5</span></span><span class="EOP SCXW190068663 BCX8" data-ccp-props="{"201341983":0,"335559739":160,"335559740":360}"> </span>**</span>

<span class="TextRun SCXW190068663 BCX8" data-contrast="auto" lang="EN-US" xml:lang="EN-US"><span class="NormalTextRun SCXW190068663 BCX8" data-ccp-charstyle="Style (Complex) Open Sans">For downloading and installing Telemetry Streaming, refer to the link </span></span>[<span class="TextRun Underlined SCXW190068663 BCX8" data-contrast="none" lang="EN-US" xml:lang="EN-US"><span class="NormalTextRun SCXW190068663 BCX8" data-ccp-charstyle="Hyperlink">here</span></span>](https://clouddocs.f5.com/products/extensions/f5-telemetry-streaming/latest/installation.html)<span class="TextRun SCXW190068663 BCX8" data-contrast="auto" lang="EN-US" xml:lang="EN-US"><span class="NormalTextRun SCXW190068663 BCX8" data-ccp-charstyle="Style (Complex) Open Sans">.</span></span><span class="EOP SCXW190068663 BCX8" data-ccp-props="{"201341983":0,"335559739":160,"335559740":360}"> </span>

<span class="TextRun SCXW190068663 BCX8" data-contrast="auto" lang="EN-US" xml:lang="EN-US"><span class="NormalTextRun SCXW190068663 BCX8" data-ccp-charstyle="Style (Complex) Open Sans">https://clouddocs.f5.com/products/extensions/f5-telemetry-streaming/latest/installation.html</span></span><span class="EOP SCXW190068663 BCX8" data-ccp-props="{"201341983":0,"335559739":160,"335559740":360}"> </span>

<div class="SCXW190068663 BCX8" id="bkmrk--3"><div class="OutlineElement Ltr SCXW190068663 BCX8"></div></div><span class="TextRun Highlight SCXW190068663 BCX8" data-contrast="none" lang="EN-US" xml:lang="EN-US"><span class="NormalTextRun SCXW190068663 BCX8">Telemetry Streaming will send logs in the JSON format to the destination. Telemetry Streaming is compatible with BIG-IP versions 13.0 and later. Users </span><span class="NormalTextRun AdvancedProofingIssueV2Themed SCXW190068663 BCX8">have to</span><span class="NormalTextRun SCXW190068663 BCX8"> prepare F5 servers for it and set up the Telemetry Streaming Consumer</span><span class="NormalTextRun SCXW190068663 BCX8">.</span></span><span class="TextRun SCXW190068663 BCX8" data-contrast="auto" lang="EN-US" xml:lang="EN-US"><span class="NormalTextRun SCXW190068663 BCX8"> </span><span class="NormalTextRun SCXW190068663 BCX8"> </span></span><span class="EOP SCXW190068663 BCX8" data-ccp-props="{"201341983":0,"335559739":160,"335559740":360}"> </span>

<span class="TextRun SCXW190068663 BCX8" data-contrast="auto" lang="EN-US" xml:lang="EN-US"><span class="NormalTextRun SCXW190068663 BCX8">To use telemetry streaming, </span><span class="NormalTextRun ContextualSpellingAndGrammarErrorV2Themed SCXW190068663 BCX8">user</span> <span class="NormalTextRun AdvancedProofingIssueV2Themed SCXW190068663 BCX8">have to</span><span class="NormalTextRun SCXW190068663 BCX8"> send POST request on </span></span><span class="TextRun SCXW190068663 BCX8" data-contrast="none" lang="EN-US" xml:lang="EN-US"><span class="NormalTextRun SCXW190068663 BCX8">https://&lt;BIG-IP&gt;/mgmt/shared/telemetry/</span></span><span class="TextRun SCXW190068663 BCX8" data-contrast="auto" lang="EN-US" xml:lang="EN-US"><span class="NormalTextRun SCXW190068663 BCX8">declare for declaration.</span></span><span class="EOP SCXW190068663 BCX8" data-ccp-props="{"201341983":0,"335559739":160,"335559740":360}"> </span>

<span class="TextRun SCXW190068663 BCX8" data-contrast="auto" lang="EN-US" xml:lang="EN-US"><span class="NormalTextRun SCXW190068663 BCX8" data-ccp-charstyle="Style (Complex) Open Sans">F5 BIG-IP modules named LTM, AFM, ASM, and APM are not configured by Telemetry Streaming, they must be configured with AS3 or another method. Reference link for setup AS3 extension in F5 BIG-IP is </span></span>[<span class="TextRun Underlined SCXW190068663 BCX8" data-contrast="none" lang="EN-US" xml:lang="EN-US"><span class="NormalTextRun SCXW190068663 BCX8" data-ccp-charstyle="Hyperlink">here</span></span>](https://clouddocs.f5.com/products/extensions/f5-appsvcs-extension/latest/)<span class="TextRun SCXW190068663 BCX8" data-contrast="auto" lang="EN-US" xml:lang="EN-US"><span class="NormalTextRun SCXW190068663 BCX8" data-ccp-charstyle="Style (Complex) Open Sans">.</span></span><span class="EOP SCXW190068663 BCX8" data-ccp-props="{"134245418":true,"134245529":true,"201341983":0,"335559738":240,"335559739":0,"335559740":360}"> </span>

<span class="TextRun SCXW190068663 BCX8" data-contrast="auto" lang="EN-US" xml:lang="EN-US"><span class="NormalTextRun SCXW190068663 BCX8" data-ccp-charstyle="Style (Complex) Open Sans">To configure logging using AS3, refer to the </span></span>[<span class="TextRun Underlined SCXW190068663 BCX8" data-contrast="none" lang="EN-US" xml:lang="EN-US"><span class="NormalTextRun SCXW190068663 BCX8" data-ccp-charstyle="Hyperlink">link here</span></span>](https://clouddocs.f5.com/products/extensions/f5-telemetry-streaming/latest/event-listener.html?highlight=as3#configure-logging-using-as3)<span class="TextRun SCXW190068663 BCX8" data-contrast="auto" lang="EN-US" xml:lang="EN-US"><span class="NormalTextRun SCXW190068663 BCX8" data-ccp-charstyle="Style (Complex) Open Sans">.</span></span><span class="EOP SCXW190068663 BCX8" data-ccp-props="{"134245418":true,"134245529":true,"201341983":0,"335559738":240,"335559739":0,"335559740":360}"> </span>

[<span class="TextRun Underlined SCXW190068663 BCX8" data-contrast="none" lang="EN-US" xml:lang="EN-US"><span class="NormalTextRun SCXW190068663 BCX8" data-ccp-charstyle="Hyperlink">https://clouddocs.f5.com/products/extensions/f5-telemetry-streaming/latest/event-listener.html?highlight=as3#configure-logging-using-as3</span></span>](https://clouddocs.f5.com/products/extensions/f5-telemetry-streaming/latest/event-listener.html?highlight=as3#configure-logging-using-as3)<span class="EOP SCXW190068663 BCX8" data-ccp-props="{"134245418":true,"134245529":true,"201341983":0,"335559738":240,"335559739":0,"335559740":360}"> </span>

<div class="SCXW190068663 BCX8" id="bkmrk--4"><div class="ListContainerWrapper SCXW190068663 BCX8">  
</div></div>##### <span style="color: rgb(53, 152, 219);">**<span class="TextRun SCXW190068663 BCX8" data-contrast="auto" lang="EN-US" xml:lang="EN-US"><span class="NormalTextRun SCXW190068663 BCX8">To collect data from AWS S3 Bucket, follow the below steps:</span></span><span class="EOP SCXW190068663 BCX8" data-ccp-props="{"201341983":0,"335559739":160,"335559740":360}"> </span>**</span>

<div class="SCXW190068663 BCX8" id="bkmrk-create-an-amazon-s3-"><div class="ListContainerWrapper SCXW190068663 BCX8">- <span class="TextRun SCXW190068663 BCX8" data-contrast="auto" lang="EN-US" xml:lang="EN-US"><span class="NormalTextRun SCXW190068663 BCX8">Create an Amazon S3 bucket. Refer to the link </span></span>[<span class="TextRun Underlined SCXW190068663 BCX8" data-contrast="none" lang="EN-US" xml:lang="EN-US"><span class="NormalTextRun SCXW190068663 BCX8" data-ccp-charstyle="Hyperlink">here</span></span>](https://docs.aws.amazon.com/AmazonS3/latest/userguide/create-bucket-overview.html)<span class="TextRun SCXW190068663 BCX8" data-contrast="auto" lang="EN-US" xml:lang="EN-US"><span class="NormalTextRun SCXW190068663 BCX8">.</span></span>

</div></div><span class="NormalTextRun SCXW190068663 BCX8">https://docs.aws.amazon.com/AmazonS3/latest/userguide/create-bucket-overview.html</span><span class="EOP SCXW190068663 BCX8" data-ccp-props="{"201341983":0,"335559739":160,"335559740":360}"> </span>

<div class="SCXW190068663 BCX8" id="bkmrk-the-default-value-of"><div class="ListContainerWrapper SCXW190068663 BCX8">  
</div><div class="ListContainerWrapper SCXW190068663 BCX8">- <span class="TextRun SCXW190068663 BCX8" data-contrast="auto" lang="EN-US" xml:lang="EN-US"><span class="NormalTextRun SCXW190068663 BCX8">The default value of the "Bucket List Prefix" is listed below. However, the user can set the parameter "Bucket List Prefix" according to the requirement.</span></span><span class="EOP SCXW190068663 BCX8" data-ccp-props="{"201341983":0,"335559739":160,"335559740":360}"> </span>

</div><div class="OutlineElement Ltr SCXW190068663 BCX8">  
</div></div>##### <span style="color: rgb(53, 152, 219);">**<span class="TextRun SCXW190068663 BCX8" data-contrast="auto" lang="EN-US" xml:lang="EN-US"><span class="NormalTextRun SCXW190068663 BCX8">To collect data from AWS SQS, follow the below steps:</span></span><span class="EOP SCXW190068663 BCX8" data-ccp-props="{"201341983":0,"335559739":160,"335559740":360}"> </span>**</span>

<div class="SCXW190068663 BCX8" id="bkmrk-if-data-forwarding-t"><div class="ListContainerWrapper SCXW190068663 BCX8">- <span class="TextRun SCXW190068663 BCX8" data-contrast="auto" lang="EN-US" xml:lang="EN-US"><span class="NormalTextRun SCXW190068663 BCX8" data-ccp-charstyle="Style (Complex) Open Sans">If data </span><span class="NormalTextRun SCXW190068663 BCX8" data-ccp-charstyle="Style (Complex) Open Sans">forwarding</span><span class="NormalTextRun SCXW190068663 BCX8" data-ccp-charstyle="Style (Complex) Open Sans"> to an AWS S3 Bucket </span><span class="NormalTextRun SCXW190068663 BCX8" data-ccp-charstyle="Style (Complex) Open Sans">hasn't</span><span class="NormalTextRun SCXW190068663 BCX8" data-ccp-charstyle="Style (Complex) Open Sans"> been configured, then first set up an AWS S3 Bucket as mentioned in the above documentation.</span></span><span class="EOP SCXW190068663 BCX8" data-ccp-props="{"201341983":0,"335559739":160,"335559740":360}"> </span>

</div></div><div class="SCXW190068663 BCX8" id="bkmrk-to-set-up-an-sqs-que"><div class="ListContainerWrapper SCXW190068663 BCX8">- <span class="TextRun SCXW190068663 BCX8" data-contrast="auto" lang="EN-US" xml:lang="EN-US"><span class="NormalTextRun SCXW190068663 BCX8" data-ccp-charstyle="Style (Complex) Open Sans">To set up an SQS queue, follow "Step 1: Create an Amazon SQS queue" mentioned in the </span></span>[<span class="TextRun Underlined SCXW190068663 BCX8" data-contrast="none" lang="EN-US" xml:lang="EN-US"><span class="NormalTextRun SCXW190068663 BCX8" data-ccp-charstyle="Hyperlink">Documentation</span></span>](https://docs.aws.amazon.com/AmazonS3/latest/userguide/ways-to-add-notification-config-to-bucket.html)<span class="TextRun SCXW190068663 BCX8" data-contrast="auto" lang="EN-US" xml:lang="EN-US"><span class="NormalTextRun SCXW190068663 BCX8" data-ccp-charstyle="Style (Complex) Open Sans">.</span></span> [<span class="TextRun Underlined SCXW190068663 BCX8" data-contrast="none" lang="EN-US" xml:lang="EN-US"><span class="NormalTextRun SCXW190068663 BCX8" data-ccp-charstyle="Hyperlink">https://docs.aws.amazon.com/AmazonS3/latest/userguide/ways-to-add-notification-config-to-bucket.html</span></span>](https://docs.aws.amazon.com/AmazonS3/latest/userguide/ways-to-add-notification-config-to-bucket.html)<span class="EOP SCXW190068663 BCX8" data-ccp-props="{"201341983":0,"335559739":160,"335559740":360}"> </span>

</div></div><div class="SCXW190068663 BCX8" id="bkmrk-while-creating-an-sq"><div class="ListContainerWrapper SCXW190068663 BCX8">- - <span class="TextRun SCXW190068663 BCX8" data-contrast="none" lang="EN-US" xml:lang="EN-US"><span class="NormalTextRun SCXW190068663 BCX8">While creating an SQS Queue, please provide the same bucket ARN that has been generated after creating an AWS S3 Bucket.</span></span><span class="EOP SCXW190068663 BCX8" data-ccp-props="{"201341983":0,"335557856":16777215,"335559739":0,"335559740":360}"> </span>

</div></div><div class="SCXW190068663 BCX8" id="bkmrk-set-up-event-notific"><div class="OutlineElement Ltr SCXW190068663 BCX8">  
</div><div class="ListContainerWrapper SCXW190068663 BCX8">- <span class="TextRun SCXW190068663 BCX8" data-contrast="auto" lang="EN-US" xml:lang="EN-US"><span class="NormalTextRun SCXW190068663 BCX8" data-ccp-charstyle="Style (Complex) Open Sans">Set up event notifications for an S3 bucket. Follow this </span></span>[<span class="TextRun Underlined SCXW190068663 BCX8" data-contrast="none" lang="EN-US" xml:lang="EN-US"><span class="NormalTextRun SCXW190068663 BCX8" data-ccp-charstyle="Hyperlink">link</span></span>](https://docs.aws.amazon.com/AmazonS3/latest/userguide/enable-event-notifications.html)<span class="TextRun SCXW190068663 BCX8" data-contrast="auto" lang="EN-US" xml:lang="EN-US"><span class="NormalTextRun SCXW190068663 BCX8" data-ccp-charstyle="Style (Complex) Open Sans">.</span></span> [<span class="TextRun Underlined SCXW190068663 BCX8" data-contrast="none" lang="EN-US" xml:lang="EN-US"><span class="NormalTextRun SCXW190068663 BCX8" data-ccp-charstyle="Hyperlink">https://docs.aws.amazon.com/AmazonS3/latest/userguide/enable-event-notifications.html</span></span>](https://docs.aws.amazon.com/AmazonS3/latest/userguide/enable-event-notifications.html)<span class="EOP SCXW190068663 BCX8" data-ccp-props="{"201341983":0,"335559739":160,"335559740":360}"> </span>

</div><div class="ListContainerWrapper SCXW190068663 BCX8">- - <span class="TextRun SCXW190068663 BCX8" data-contrast="auto" lang="EN-US" xml:lang="EN-US"><span class="NormalTextRun SCXW190068663 BCX8" data-ccp-charstyle="Style (Complex) Open Sans">Users </span><span class="NormalTextRun AdvancedProofingIssueV2Themed SCXW190068663 BCX8" data-ccp-charstyle="Style (Complex) Open Sans">have to</span><span class="NormalTextRun SCXW190068663 BCX8" data-ccp-charstyle="Style (Complex) Open Sans"> set the prefix parameter the same as the S3 Bucket List Prefix as created earlier. (</span><span class="NormalTextRun ContextualSpellingAndGrammarErrorV2Themed SCXW190068663 BCX8" data-ccp-charstyle="Style (Complex) Open Sans">for</span><span class="NormalTextRun SCXW190068663 BCX8" data-ccp-charstyle="Style (Complex) Open Sans"> example, log/ for a log data stream.)</span></span>
    - <span class="TextRun SCXW190068663 BCX8" data-contrast="none" lang="EN-US" xml:lang="EN-US"><span class="NormalTextRun SCXW190068663 BCX8">Select the event type as s</span><span class="NormalTextRun ContextualSpellingAndGrammarErrorV2Themed SCXW190068663 BCX8">3:ObjectCreated</span><span class="NormalTextRun SCXW190068663 BCX8">:\*, select the destination type SQS Queue, and select the queue that has been created in Step 2.</span></span><span class="EOP SCXW190068663 BCX8" data-ccp-props="{"201341983":0,"335557856":16777215,"335559739":0,"335559740":360}"> </span>

</div></div><span class="TextRun SCXW190068663 BCX8" data-contrast="auto" lang="EN-US" xml:lang="EN-US"><span class="NormalTextRun SCXW190068663 BCX8" data-ccp-charstyle="Style (Complex) Open Sans">**Note**:</span></span><span class="EOP SCXW190068663 BCX8" data-ccp-props="{"201341983":0,"335559739":160,"335559740":360}"> </span>

<div class="SCXW190068663 BCX8" id="bkmrk-credentials-for-the-"><div class="ListContainerWrapper SCXW190068663 BCX8">- <span class="TextRun SCXW190068663 BCX8" data-contrast="auto" lang="EN-US" xml:lang="EN-US"><span class="NormalTextRun SCXW190068663 BCX8" data-ccp-charstyle="Style (Complex) Open Sans">Credentials for the above AWS S3 and SQS input types should be configured using the </span></span>[<span class="TextRun Underlined SCXW190068663 BCX8" data-contrast="none" lang="EN-US" xml:lang="EN-US"><span class="NormalTextRun SCXW190068663 BCX8" data-ccp-charstyle="Hyperlink">link</span></span>](https://www.elastic.co/guide/en/beats/filebeat/current/filebeat-input-aws-s3.html#aws-credentials-config)<span class="TextRun SCXW190068663 BCX8" data-contrast="auto" lang="EN-US" xml:lang="EN-US"><span class="NormalTextRun SCXW190068663 BCX8" data-ccp-charstyle="Style (Complex) Open Sans">.</span></span> [<span class="TextRun Underlined SCXW190068663 BCX8" data-contrast="none" lang="EN-US" xml:lang="EN-US"><span class="NormalTextRun SCXW190068663 BCX8" data-ccp-charstyle="Hyperlink">https://www.elastic.co/guide/en/beats/filebeat/current/filebeat-input-aws-s3.html#aws-credentials-config</span></span>](https://www.elastic.co/guide/en/beats/filebeat/current/filebeat-input-aws-s3.html#aws-credentials-config)<span class="EOP SCXW190068663 BCX8" data-ccp-props="{"201341983":0,"335559739":160,"335559740":360}"> </span>

</div><div class="ListContainerWrapper SCXW190068663 BCX8">- <span class="TextRun SCXW190068663 BCX8" data-contrast="auto" lang="EN-US" xml:lang="EN-US"><span class="NormalTextRun SCXW190068663 BCX8" data-ccp-charstyle="Style (Complex) Open Sans">Data collection via AWS S3 Bucket and AWS SQS are mutually exclusive in this case.</span></span><span class="EOP SCXW190068663 BCX8" data-ccp-props="{"201341983":0,"335559739":160,"335559740":360}"> </span>

</div><div class="OutlineElement Ltr SCXW190068663 BCX8">  
</div></div>**<span class="TextRun SCXW190068663 BCX8" data-contrast="auto" lang="EN-US" xml:lang="EN-US"><span class="NormalTextRun SCXW190068663 BCX8" data-ccp-charstyle="Style (Complex) Open Sans">Enabling the integration in Elastic</span></span><span class="EOP SCXW190068663 BCX8" data-ccp-props="{"201341983":0,"335559739":160,"335559740":360}"> </span>**

<div class="SCXW190068663 BCX8" id="bkmrk-in-kibana-go-to-mana"><div class="ListContainerWrapper SCXW190068663 BCX8">1. <span class="TextRun SCXW190068663 BCX8" data-contrast="auto" lang="EN-US" xml:lang="EN-US"><span class="NormalTextRun SCXW190068663 BCX8" data-ccp-charstyle="Style (Complex) Open Sans">In Kibana go to Management &gt; Integrations.</span></span><span class="EOP SCXW190068663 BCX8" data-ccp-props="{"201341983":0,"335559739":160,"335559740":360}"> </span>

</div><div class="ListContainerWrapper SCXW190068663 BCX8">2. <span class="TextRun SCXW190068663 BCX8" data-contrast="auto" lang="EN-US" xml:lang="EN-US"><span class="NormalTextRun SCXW190068663 BCX8" data-ccp-charstyle="Style (Complex) Open Sans">In the "Search for integrations" search bar, type F5 BIG-IP.</span></span><span class="EOP SCXW190068663 BCX8" data-ccp-props="{"201341983":0,"335559739":160,"335559740":360}"> </span>

</div><div class="ListContainerWrapper SCXW190068663 BCX8">3. <span class="TextRun SCXW190068663 BCX8" data-contrast="auto" lang="EN-US" xml:lang="EN-US"><span class="NormalTextRun SCXW190068663 BCX8" data-ccp-charstyle="Style (Complex) Open Sans">Click on F5 BIG-IP integration from the search results.</span></span><span class="EOP SCXW190068663 BCX8" data-ccp-props="{"201341983":0,"335559739":160,"335559740":360}"> </span>

</div><div class="ListContainerWrapper SCXW190068663 BCX8">4. <span class="TextRun SCXW190068663 BCX8" data-contrast="auto" lang="EN-US" xml:lang="EN-US"><span class="NormalTextRun SCXW190068663 BCX8" data-ccp-charstyle="Style (Complex) Open Sans">Click on the Add F5 BIG-IP button to add F5 BIG-IP integration.</span></span><span class="EOP SCXW190068663 BCX8" data-ccp-props="{"201341983":0,"335559739":160,"335559740":360}"> </span>

</div><div class="ListContainerWrapper SCXW190068663 BCX8">5. <span class="TextRun SCXW190068663 BCX8" data-contrast="auto" lang="EN-US" xml:lang="EN-US"><span class="NormalTextRun SCXW190068663 BCX8" data-ccp-charstyle="Style (Complex) Open Sans">Enable the Integration to collect logs via AWS S3 or HTTP endpoint input.</span></span><span class="EOP SCXW190068663 BCX8" data-ccp-props="{"201341983":0,"335559739":160,"335559740":360}"> </span>

</div></div>##### <span style="color: rgb(53, 152, 219);">**<span class="TextRun SCXW190068663 BCX8" data-contrast="none" lang="EN-US" xml:lang="EN-US"><span class="NormalTextRun SCXW190068663 BCX8" data-ccp-charstyle="Style (Complex) Open Sans">F5 BIG-IP integration</span></span><span class="EOP SCXW190068663 BCX8" data-ccp-props="{"134245418":true,"134245529":true,"201341983":0,"335559738":240,"335559739":0,"335559740":360}"> </span>**</span>

<span class="TextRun SCXW190068663 BCX8" data-contrast="auto" lang="EN-US" xml:lang="EN-US"><span class="NormalTextRun SCXW190068663 BCX8" data-ccp-charstyle="normaltextrun" data-ccp-charstyle-defn="{"ObjectId":"65ff2f89-71e9-4fc7-9fcd-7e79042ac34b|20","ClassId":1073872969,"Properties":[469775450,"normaltextrun",201340122,"1",134233614,"true",469778129,"normaltextrun",335572020,"1",469778324,"Default Paragraph Font"]}">The "</span></span><span class="TextRun SCXW190068663 BCX8" data-contrast="auto" lang="EN-US" xml:lang="EN-US"><span class="NormalTextRun SCXW190068663 BCX8" data-ccp-parastyle="paragraph" data-ccp-parastyle-defn="{"ObjectId":"65ff2f89-71e9-4fc7-9fcd-7e79042ac34b|19","ClassId":1073872969,"Properties":[469775450,"paragraph",201340122,"2",134233614,"true",469778129,"paragraph",335572020,"1",469777841,"Times New Roman",469777842,"Times New Roman",469777843,"Times New Roman",469777844,"Times New Roman",469769226,"Times New Roman",268442635,"24",335559704,"1025",335559740,"240",201341983,"0",134233118,"true",134233117,"true",469778324,"Normal"]}">I</span></span><span class="TextRun SCXW190068663 BCX8" data-contrast="auto" lang="EN-US" xml:lang="EN-US"><span class="NormalTextRun SCXW190068663 BCX8" data-ccp-charstyle="normaltextrun">ntegration name</span><span class="NormalTextRun SCXW190068663 BCX8" data-ccp-charstyle="normaltextrun">" and either the "</span></span> <span class="TextRun SCXW190068663 BCX8" data-contrast="auto" lang="EN-US" xml:lang="EN-US"><span class="NormalTextRun SCXW190068663 BCX8" data-ccp-charstyle="normaltextrun">Description</span><span class="NormalTextRun SCXW190068663 BCX8" data-ccp-charstyle="normaltextrun">" </span><span class="NormalTextRun SCXW190068663 BCX8" data-ccp-charstyle="normaltextrun">and the following</span> <span class="NormalTextRun SCXW190068663 BCX8" data-ccp-charstyle="normaltextrun">will need to be provided in the </span><span class="NormalTextRun SCXW190068663 BCX8" data-ccp-charstyle="normaltextrun">Configure </span><span class="NormalTextRun SCXW190068663 BCX8" data-ccp-charstyle="normaltextrun">integration</span><span class="NormalTextRun SCXW190068663 BCX8" data-ccp-charstyle="normaltextrun"> when adding the</span> <span class="NormalTextRun SCXW190068663 BCX8" data-ccp-charstyle="normaltextrun">F5 BIG-IP integration</span><span class="NormalTextRun SCXW190068663 BCX8" data-ccp-charstyle="normaltextrun">.</span><span class="NormalTextRun SCXW190068663 BCX8" data-ccp-charstyle="eop" data-ccp-charstyle-defn="{"ObjectId":"65ff2f89-71e9-4fc7-9fcd-7e79042ac34b|21","ClassId":1073872969,"Properties":[469775450,"eop",201340122,"1",134233614,"true",469778129,"eop",335572020,"1",469778324,"Default Paragraph Font"]}"> </span></span><span class="EOP SCXW190068663 BCX8" data-ccp-props="{"134233117":false,"134233118":false,"201341983":0,"335559685":360,"335559738":0,"335559739":0,"335559740":360}"> </span>

<span class="TextRun SCXW190068663 BCX8" data-contrast="auto" lang="EN-US" xml:lang="EN-US"><span class="NormalTextRun SCXW190068663 BCX8" data-ccp-charstyle="Style (Complex) Open Sans">**Procedures**:</span></span><span class="EOP SCXW190068663 BCX8" data-ccp-props="{"201341983":0,"335559739":160,"335559740":360}"> </span>

<span class="TextRun SCXW190068663 BCX8" data-contrast="auto" lang="EN-US" xml:lang="EN-US"><span class="NormalTextRun SCXW190068663 BCX8" data-ccp-charstyle="Style (Complex) Open Sans">Please provide the following information to </span><span class="NormalTextRun SpellingErrorV2Themed SCXW190068663 BCX8" data-ccp-charstyle="Style (Complex) Open Sans">CyTech</span><span class="NormalTextRun SCXW190068663 BCX8" data-ccp-charstyle="Style (Complex) Open Sans">:</span></span><span class="EOP SCXW190068663 BCX8" data-ccp-props="{"201341983":0,"335559739":160,"335559740":360}"> </span>

**<span class="TextRun SCXW190068663 BCX8" data-contrast="none" lang="EN-US" xml:lang="EN-US"><span class="NormalTextRun SCXW190068663 BCX8" data-ccp-charstyle="Style (Complex) Open Sans">Collect F5 BIG-IP logs via HTTP Endpoint:</span></span><span class="EOP SCXW190068663 BCX8" data-ccp-props="{"134245418":true,"134245529":true,"201341983":0,"335559685":720,"335559738":240,"335559739":0,"335559740":360}"> </span>**

<div class="SCXW190068663 BCX8" id="bkmrk-listen-address---the"><div class="ListContainerWrapper SCXW190068663 BCX8">1. <span class="TextRun SCXW190068663 BCX8" data-contrast="auto" lang="EN-US" xml:lang="EN-US"><span class="NormalTextRun SCXW190068663 BCX8" data-ccp-charstyle="Style (Complex) Open Sans">Listen Address </span><span class="NormalTextRun SCXW190068663 BCX8" data-ccp-charstyle="Style (Complex) Open Sans">- </span><span class="NormalTextRun SCXW190068663 BCX8" data-ccp-charstyle="Style (Complex) Open Sans">The bind address to listen for http endpoint connections. Set to 0.0.0.0 to bind to all available interfaces.</span></span><span class="EOP SCXW190068663 BCX8" data-ccp-props="{"201341983":0,"335559739":160,"335559740":360}"> </span>

</div></div>**<span class="TextRun Highlight SCXW190068663 BCX8" data-contrast="none" lang="EN-US" xml:lang="EN-US"><span class="NormalTextRun SCXW190068663 BCX8" data-ccp-parastyle="CyTech Heading 1">F5 BIG-IP logs via HTTP Endpoint:</span></span><span class="EOP SCXW190068663 BCX8" data-ccp-props="{"134245418":true,"134245529":true,"201341983":0,"335559685":720,"335559738":240,"335559739":0,"335559740":360}"> </span>**

<div class="SCXW190068663 BCX8" id="bkmrk-listen-port---the-po"><div class="ListContainerWrapper SCXW190068663 BCX8">1. <span class="TextRun SCXW190068663 BCX8" data-contrast="auto" lang="EN-US" xml:lang="EN-US"><span class="NormalTextRun SCXW190068663 BCX8" data-ccp-charstyle="Style (Complex) Open Sans">Listen Port</span><span class="NormalTextRun SCXW190068663 BCX8" data-ccp-charstyle="Style (Complex) Open Sans"> - </span><span class="NormalTextRun SCXW190068663 BCX8" data-ccp-charstyle="Style (Complex) Open Sans">The port number the listener binds to.</span></span><span class="EOP SCXW190068663 BCX8" data-ccp-props="{"201341983":0,"335559739":160,"335559740":360}"> </span>

</div></div>

# Forescout

#### <span style="color: rgb(53, 152, 219);">Method 1: </span><span style="color: rgb(53, 152, 219);">Network logs forwarding</span>

The Network logs forwarding page ("Settings" &gt; "System Settings" &gt; "Network logs forwarding") allows users to enable and configure the forwarding of Network Logs to a third-party solution by means of syslog messages. The pages and configuration steps required to enable forwarding of Network Logs are exactly the same as those described for Alerts. The only difference lies in the semantics adopted when users un-tick the "always active" checkbox in the alert forwarding conditions, but leave the conditions "tree" empty. For Alerts, this results in all alerts being forwarded, whereas for Network Logs, this results in no log begin forwarded. The rationale is that Alerts are important events that are generally desirable to be forwarded to an analyst, whereas Network Logs are useful additional intelligence for context and threat hunting. This choice of default behavior is to prevent user mistakes in the configuration of eyeInspect to impact their monitoring capabilities. Pre-set messages for CEF, LEEF and JSON (Splunk) are available also for Network Logs forwarding.

<article aria-labelledby="t_network_cntrlr_102_h_configure_the_plugin_receiver_port__title__Toc536460205" class="topic task nested1" id="bkmrk-source%3A-https%3A%2F%2Fdocs"><span style="color: rgb(53, 152, 219);"><span style="color: rgb(0, 0, 0);">Source:</span> *[https://docs.forescout.com/bundle/eyeinspect-user-guide-v5-5-0/page/gitdoc-eyeinspect/eyeInspect/eyeInspect\_User\_Guide/network-logs-forwarding.html](https://docs.forescout.com/bundle/eyeinspect-user-guide-v5-5-0/page/gitdoc-eyeinspect/eyeInspect/eyeInspect_User_Guide/network-logs-forwarding.html)*</span>

#### <span style="color: rgb(53, 152, 219);">Configure the plugin receiver port</span>

<div class="body taskbody"><section class="section context">Configure the Syslog plugin port for receiving syslog events for each <span class="keyword">Forescout Platform</span> device configured as a syslog server (receiver of wireless events and/or switch events) in the management interface. Each device receives syslog events sent from managed, individual network devices.

To configure the port for receiving syslog events:

</section><section>1. <span class="ph cmd">Select <span class="ph menucascade"><span class="ph uicontrol">Tools</span><abbr title="and then"> &gt; </abbr><span class="ph uicontrol">Options</span></span>.</span>
2. <span class="ph cmd">From the Options pane, select <span class="ph uicontrol">Syslog</span>.</span>
3. <span class="ph cmd">Select the <span class="ph uicontrol">Receive From</span> tab and specify this information:</span><div class="itemgroup info"><dl class="dl" id="bkmrk-source-type-ip-addre"><dt class="dt dlterm">Source Type</dt><dd class="dd"></dd><dt class="dt dlterm">IP Address</dt><dd class="dd">Specify the syslog server IP address.</dd><dt class="dt dlterm">UDP Port</dt><dd class="dd">
    - Cisco Meraki: Specify the port number that you configured for the syslog server port in the Meraki Dashboard. Cisco Meraki only supports using UDP protocol for sending syslog events.
    - Ruckus SmartZone: Specify the port number that you configured the syslog server port and protocol in the Ruckus SmartZone Web GUI
    - Arista CloudVision WiFi: Arista CloudVision WiFi only supports using port <kbd class="ph userinput">514</kbd> for sending syslog events.
    
    </dd><dt class="dt dlterm">TCP Port</dt><dd class="dd">Prisma Access: Specify port <kbd class="ph userinput">514</kbd>.</dd><dt class="dt dlterm">Use TLS</dt><dd class="dd">Optional. Select this checkbox to instruct <span class="keyword">Forescout Platform</span> to encrypt communication with the syslog sources. For required certificates when using "Receive From" syslog servers, refer to: [Certificate Management](https://docs.forescout.com/csh?context=certificate-management) in the Syslog Plugin Configuration Guide.</dd></dl></div>
4. <span class="ph cmd">Select <span class="ph menucascade"><span class="ph uicontrol">Apply</span><abbr title="and then"> &gt; </abbr><span class="ph uicontrol">Yes</span></span>.</span>
5. <span class="ph cmd">Repeat steps ‎4–‎8 for each device configured as a syslog server in the management interface.</span>

</section></div></article><article aria-labelledby="t_network_cntrlr_102_h_verify_the_plugin_is_running__title__Toc536460206" class="topic concept nested1" id="bkmrk-verify-the-plugin-is">#### <span style="color: rgb(53, 152, 219);">Verify the plugin is running</span>

Verify that the Syslog plugin is running in all of the <span class="keyword">Forescout Platform</span> devices that are configured in the management interface as syslog servers (In the Console, select <span class="ph menucascade"><span class="ph uicontrol">Options</span><abbr title="and then"> &gt; </abbr><span class="ph uicontrol">Modules</span></span> and expand the <span class="ph uicontrol">Core Extensions</span> module entry).

If the plugin is not running in all of these <span class="keyword">Forescout Platform</span> devices, select <span class="ph menucascade"><span class="ph uicontrol">Syslog</span><abbr title="and then"> &gt; </abbr><span class="ph uicontrol">Start</span></span>.

Source: <span style="color: rgb(53, 152, 219);">*https://docs.forescout.com/bundle/network-cntrlr-1-2-8-h/page/c-syslog-plugin-configuration-p-d1e1407.html*</span>

</article>#### <span style="color: rgb(53, 152, 219);">Method 2: Generate an API key for application integration</span>

<section class="section context" id="bkmrk-to-generate-an-api-k">To generate an API key for your custom application to query ingested log telemetry and other sources of data, complete the following procedure:

</section><section id="bkmrk-in-forescout-cloud-c">1. <span class="ph cmd">In Forescout Cloud Console, select **Integrations** under the **Administration** menu.</span>
2. <span class="ph cmd">Click the **Generate API Key** button next to the category of your application - **IoT/OT** or **SIEM**.</span>The **Generate API Key** configuration screen appears.
    
    <div class="itemgroup info">![](https://docs-be.forescout.com/bundle/forescout-cloud-administration-guide/page/gitdoc-global/_reusables_global/images/forescout_cloud_administration_guide_task_generating_a_query_service_api_key_api_key_management_march11_6951180.png?_LANG=enus)</div>
3. <span class="ph cmd">Select a time for the API key to expire or select "Never Expires".</span>
4. <span class="ph cmd">Select users to receive Email notifications about the API key generation and expiry date.</span>
5. <span class="ph cmd">Click the **Generate** button and copy the API key that appears. This API key is unique and non-retrievable once the window is closed. Store the key in a secure location now; it will be needed by the application with which you are integrating.</span><div class="itemgroup info"><div class="note note note_note" id="bkmrk-when-generating-an-a"><div class="note__body">When generating an API key for <span class="ph uicontrol">Risk Sharing</span> applications, the configuration screen will display the API endpoint URL needed to communicate with the API.</div></div></div><div class="note__body">  
    </div>

</section>Source: *<span style="color: rgb(53, 152, 219);">https://docs.forescout.com/bundle/forescout-cloud-administration-guide/page/gitdoc-cloud/Cloud/forescout-cloud-administration-guide/generate\_an\_api\_key\_for\_application\_integration.html</span>*

<div class="zDocsTopicActions zDocsTopicActions" id="bkmrk-"><div class="zDocsBundlePagination" data-testid="next-prev-container"><div class="zDocsPrevTopicButton zDocsPrevTopicButton"><span class="">[<svg aria-hidden="true" class="ico-prev"></svg>](https://docs.forescout.com/bundle/forescout-cloud-administration-guide/page/gitdoc-cloud/Cloud/forescout-cloud-administration-guide/app_integration_management_59999_d172e1_d173e1.html)</span></div><div class="zDocsNextTopicButton zDocsNextTopicButton"><span class="">[<svg aria-hidden="true" class="ico-next"></svg>](https://docs.forescout.com/bundle/forescout-cloud-administration-guide/page/gitdoc-cloud/Cloud/forescout-cloud-administration-guide/case_management_integrations_17588_d186e1_d187e1.html)</span></div></div><div class="zDocsTopicShare zDocsShareButton"><span aria-expanded="false" aria-label="Share" class="d-none d-lg-flex zDocsShareDialogButton" data-toggle="dropdown" data-tooltip-content="Share" data-tooltip-id="zDocsTopicActionsTooltip" role="button" tabindex="0"><svg aria-hidden="true" class="ico-share"></svg></span></div><div class="zDocsExportPdfMenu zDocsExportMenu" data-testid="export-pdf-menu"><span aria-expanded="false" aria-label="Save PDF" class="d-none d-lg-flex" data-toggle="dropdown" data-tooltip-content="Save PDF" data-tooltip-id="zDocsTopicActionsTooltip" role="button" tabindex="0"><svg aria-hidden="true" class="ico-pdf"></svg></span></div><div class="zDocsFeedback zDocsFeedback zDocsTopicFeedback"><span aria-label="Feedback" class="zDocsFeedbackButton d-none d-lg-flex" data-backdrop="static" data-target="#feedbackModal_main_272844" data-toggle="modal" data-tooltip-content="Feedback" data-tooltip-id="zDocsTopicActionsTooltip" role="button" tabindex="0"><svg aria-hidden="true" class="ico-feedback"></svg></span></div></div>

# Fortinet-Fortigate Integrations

#### <span style="color: rgb(53, 152, 219);">**<span class="TextRun SCXW6714996 BCX8" data-contrast="none" lang="EN-US" xml:lang="EN-US"><span class="NormalTextRun SCXW6714996 BCX8" data-ccp-charstyle="Style (Complex) Open Sans" data-ccp-charstyle-defn="{"ObjectId":"9a7bc4e5-fdbe-49bb-b4b1-242c524be63e|85","ClassId":1073872969,"Properties":[201342446,"1",201342447,"5",201342448,"1",201342449,"1",469777841,"Open Sans",469777842,"Open Sans",469777843,"Calibri",469777844,"Open Sans",201341986,"1",469769226,"Open Sans",268442635,"22",335559704,"1037",335559705,"1033",335551547,"1033",335559740,"259",201341983,"0",335559739,"160",469775450,"Style (Complex) Open Sans",201340122,"1",134233614,"true",469778129,"StyleComplexOpenSans",335572020,"1",469778324,"Default Paragraph Font"]}">Introduction</span></span><span class="EOP SCXW6714996 BCX8" data-ccp-props="{"134245418":true,"134245529":true,"201341983":0,"335559738":240,"335559739":0,"335559740":276}"> </span>**</span>

<span class="TextRun SCXW6714996 BCX8" data-contrast="auto" lang="EN-US" xml:lang="EN-US"><span class="NormalTextRun SCXW6714996 BCX8" data-ccp-charstyle="Style (Complex) Open Sans">This integration is for Fortinet FortiGate logs sent in the syslog format.</span></span><span class="EOP SCXW6714996 BCX8" data-ccp-props="{"201341983":0,"335559685":360,"335559739":160,"335559740":276}"> </span>

---

#### <span style="color: rgb(53, 152, 219);">**<span class="TextRun SCXW6714996 BCX8" data-contrast="none" lang="EN-US" xml:lang="EN-US"><span class="NormalTextRun SCXW6714996 BCX8" data-ccp-charstyle="Style (Complex) Open Sans" data-ccp-charstyle-defn="{"ObjectId":"9a7bc4e5-fdbe-49bb-b4b1-242c524be63e|85","ClassId":1073872969,"Properties":[201342446,"1",201342447,"5",201342448,"1",201342449,"1",469777841,"Open Sans",469777842,"Open Sans",469777843,"Calibri",469777844,"Open Sans",201341986,"1",469769226,"Open Sans",268442635,"22",335559704,"1037",335559705,"1033",335551547,"1033",335559740,"259",201341983,"0",335559739,"160",469775450,"Style (Complex) Open Sans",201340122,"1",134233614,"true",469778129,"StyleComplexOpenSans",335572020,"1",469778324,"Default Paragraph Font"]}">Pre-requisite:</span></span>**</span>

##### <span style="color: rgb(53, 152, 219);">**<span class="TextRun SCXW6714996 BCX8" data-contrast="none" lang="EN-US" xml:lang="EN-US"><span class="NormalTextRun SCXW6714996 BCX8" data-ccp-charstyle="Style (Complex) Open Sans" data-ccp-charstyle-defn="{"ObjectId":"9a7bc4e5-fdbe-49bb-b4b1-242c524be63e|85","ClassId":1073872969,"Properties":[201342446,"1",201342447,"5",201342448,"1",201342449,"1",469777841,"Open Sans",469777842,"Open Sans",469777843,"Calibri",469777844,"Open Sans",201341986,"1",469769226,"Open Sans",268442635,"22",335559704,"1037",335559705,"1033",335551547,"1033",335559740,"259",201341983,"0",335559739,"160",469775450,"Style (Complex) Open Sans",201340122,"1",134233614,"true",469778129,"StyleComplexOpenSans",335572020,"1",469778324,"Default Paragraph Font"]}">Configure syslog on FortiGate</span></span>**</span>

<span data-contrast="auto">From the GUI:</span><span data-ccp-props="{"134233118":true,"335559685":-9,"335559738":120}"> </span>

1. <span data-contrast="auto">Log into **FortiGate.**</span><span data-ccp-props="{"134233118":true,"335559738":120}"> </span>
2. <span data-contrast="auto">Select </span>**<span data-contrast="auto">Log &amp; Report </span>**<span data-contrast="auto">to expand the menu.</span><span data-ccp-props="{"134233118":true,"335559738":120}"> </span>
3. <span data-contrast="auto">Select </span>**<span data-contrast="auto">Log Settings.</span>**<span data-ccp-props="{"134233118":true,"335559738":120}"> </span>[![image.png](https://cytechint-docs-bookstack.s3.amazonaws.com/uploads/images/gallery/2024-10/scaled-1680-/NA3iNK8MP2c3LEAA-image.png)](https://cytechint-docs-bookstack.s3.amazonaws.com/uploads/images/gallery/2024-10/NA3iNK8MP2c3LEAA-image.png)
4. <span data-contrast="auto">Toggle Send Logs to Syslog to **Enabled.**</span>**<span data-ccp-props="{"134233118":true,"335559738":120}"> </span>**
5. <span data-contrast="auto">Enter the Syslog Collector **IP address.** </span><span data-contrast="auto">Note: IP Address must be **host's IP Address** where the **Elastic-Agent is installed.** (For example. 192.168.1.19 as shown below)</span>[![image.png](https://cytechint-docs-bookstack.s3.amazonaws.com/uploads/images/gallery/2024-10/scaled-1680-/ab1wMS7UhXMWF0YG-image.png)](https://cytechint-docs-bookstack.s3.amazonaws.com/uploads/images/gallery/2024-10/ab1wMS7UhXMWF0YG-image.png)

**<span data-contrast="auto">If it is necessary to customize the port or protocol or setup the Syslog from the CLI below are the commands:</span><span data-ccp-props="{"134233118":true,"335559738":120}"> </span>**

**<span style="font-family: courier new,courier;">config log syslogd setting </span>**

<span style="font-family: courier new,courier;"><span data-contrast="auto"> set status enable</span><span data-ccp-props="{"134233117":false,"134233118":false,"335559738":0,"335559739":0}"> </span></span>

<span style="font-family: courier new,courier;"><span data-contrast="auto"> set server "192.168.1.19" -- change IP Address to same as host's where Elastic Agent is installed </span><span data-ccp-props="{"134233117":false,"134233118":false,"335559738":0,"335559739":0}"> </span></span>

<span style="font-family: courier new,courier;"><span data-contrast="auto"> set mode udp</span><span data-ccp-props="{"134233117":false,"134233118":false,"335559738":0,"335559739":0}"> </span></span>

<span style="font-family: courier new,courier;"><span data-contrast="auto"> set port 514</span><span data-ccp-props="{"134233117":false,"134233118":false,"335559738":0,"335559739":0}"> </span></span>

<span style="font-family: courier new,courier;"><span data-contrast="auto">end</span><span data-ccp-props="{"134233117":false,"134233118":false,"335559738":0,"335559739":0}"> </span></span>

[![image.png](https://cytechint-docs-bookstack.s3.amazonaws.com/uploads/images/gallery/2024-10/scaled-1680-/7sr8rOWpIXaLJmLL-image.png)](https://cytechint-docs-bookstack.s3.amazonaws.com/uploads/images/gallery/2024-10/7sr8rOWpIXaLJmLL-image.png)

**<span data-ccp-props="{"335559685":720}">To establish the connection to the Syslog Server using a specific Source IP Address, use the below CLI configuration: </span>**

**<span style="font-family: courier new,courier;">config log syslogd setting</span>**  
<span style="font-family: courier new,courier;"> set status enable</span>  
<span style="font-family: courier new,courier;"> set server "192.168.1.19" -- change ip address to match host's IP</span>  
<span style="font-family: courier new,courier;"> set source-ip "172.16.1.1" -- change ip address to match host's source-ip address</span>

<span style="font-family: courier new,courier;"> set mode udp</span>

<span style="font-family: courier new,courier;"> set port 514</span>  
<span style="font-family: courier new,courier;">end</span>

---

#### <span style="color: rgb(53, 152, 219);">**<span class="TextRun SCXW6714996 BCX8" data-contrast="none" lang="EN-US" xml:lang="EN-US"><span class="NormalTextRun SCXW6714996 BCX8" data-ccp-charstyle="Style (Complex) Open Sans">Assumptions</span></span><span class="EOP SCXW6714996 BCX8" data-ccp-props="{"134245418":true,"134245529":true,"201341983":0,"335559738":240,"335559739":0,"335559740":276}"> </span>**</span>

<span class="TextRun SCXW6714996 BCX8" data-contrast="auto" lang="EN-US" xml:lang="EN-US"><span class="NormalTextRun SCXW6714996 BCX8" data-ccp-charstyle="Style (Complex) Open Sans">The procedures described in Section </span></span><span class="FieldRange SCXW6714996 BCX8"><span class="TextRun SCXW6714996 BCX8" data-contrast="auto" lang="EN-US" xml:lang="EN-US"><span class="NormalTextRun SCXW6714996 BCX8" data-ccp-charstyle="Style (Complex) Open Sans">3</span></span></span><span class="TextRun SCXW6714996 BCX8" data-contrast="auto" lang="EN-US" xml:lang="EN-US"> <span class="NormalTextRun ContextualSpellingAndGrammarErrorV2Themed SCXW6714996 BCX8" data-ccp-charstyle="Style (Complex) Open Sans">assumes</span><span class="NormalTextRun SCXW6714996 BCX8" data-ccp-charstyle="Style (Complex) Open Sans"> that a Log Collector has already been </span><span class="NormalTextRun ContextualSpellingAndGrammarErrorV2Themed SCXW6714996 BCX8" data-ccp-charstyle="Style (Complex) Open Sans">setup</span><span class="NormalTextRun SCXW6714996 BCX8" data-ccp-charstyle="Style (Complex) Open Sans">. </span></span><span class="EOP SCXW6714996 BCX8" data-ccp-props="{"201341983":0,"335559685":360,"335559739":160,"335559740":259}"> </span>

**<span class="TextRun SCXW6714996 BCX8" data-contrast="none" lang="EN-CA" xml:lang="EN-CA"><span class="NormalTextRun SCXW6714996 BCX8" data-ccp-charstyle="Style (Complex) Open Sans">Compatibility</span></span>**

<span class="EOP SCXW6714996 BCX8" data-ccp-props="{"201341983":0,"335559685":360,"335559739":160,"335559740":276}">This integration has been tested against FortiOS versions 6.x and 7.x up to 7.4.1. Newer versions are expected to work but have not been tested. </span>

**<span class="TextRun SCXW6714996 BCX8" data-contrast="none" lang="EN-CA" xml:lang="EN-CA"><span class="NormalTextRun SCXW6714996 BCX8" data-ccp-charstyle="Style (Complex) Open Sans">Note</span></span>**

- When using the TCP input, be careful with the configured TCP framing. According to the [Fortigate reference](https://docs.fortinet.com/document/fortigate/7.4.0/cli-reference/405620/config-log-syslogd-setting), framing should be set to `rfc6587` when the syslog mode is reliable.

---

#### <span style="color: rgb(53, 152, 219);">**<span class="TextRun SCXW6714996 BCX8" data-contrast="none" lang="EN-US" xml:lang="EN-US"><span class="NormalTextRun SCXW6714996 BCX8" data-ccp-charstyle="eop" data-ccp-charstyle-defn="{"ObjectId":"9a7bc4e5-fdbe-49bb-b4b1-242c524be63e|112","ClassId":1073872969,"Properties":[201342446,"1",201342447,"5",201342448,"1",201342449,"1",469777841,"Calibri",469777842,"Arial",469777843,"Calibri",469777844,"Calibri",201341986,"1",469769226,"Calibri,Arial",268442635,"22",335559704,"1037",335559705,"1033",335551547,"1033",335559740,"259",201341983,"0",335559739,"160",469775450,"eop",201340122,"1",134233614,"true",469778129,"eop",335572020,"1",469778324,"Default Paragraph Font"]}">Fortinet FortiGate</span><span class="NormalTextRun SCXW6714996 BCX8" data-ccp-charstyle="eop"> Integration Procedures</span></span><span class="EOP SCXW6714996 BCX8" data-ccp-props="{"134245418":true,"134245529":true,"201341983":0,"335559738":240,"335559739":0,"335559740":276}"> </span>**</span>

<span class="TextRun SCXW6714996 BCX8" data-contrast="auto" lang="EN-US" xml:lang="EN-US"><span class="NormalTextRun SCXW6714996 BCX8" data-ccp-charstyle="eop">Please provide the following information to </span>**<span class="NormalTextRun SpellingErrorV2Themed SCXW6714996 BCX8" data-ccp-charstyle="eop">CyTech</span><span class="NormalTextRun SCXW6714996 BCX8" data-ccp-charstyle="eop">:</span>**</span>**<span class="EOP SCXW6714996 BCX8" data-ccp-props="{"201341983":0,"335559685":720,"335559739":160,"335559740":276}"> </span>**

**<span class="TextRun SCXW6714996 BCX8" data-contrast="none" lang="EN-CA" xml:lang="EN-CA"><span class="NormalTextRun SCXW6714996 BCX8" data-ccp-charstyle="eop">Collect Fortinet FortiGate logs (input: </span><span class="NormalTextRun SpellingErrorV2Themed SCXW6714996 BCX8" data-ccp-charstyle="eop">tcp</span><span class="NormalTextRun SCXW6714996 BCX8" data-ccp-charstyle="eop">)</span></span><span class="EOP SCXW6714996 BCX8" data-ccp-props="{"134245418":true,"134245529":true,"201341983":0,"335559738":40,"335559739":0,"335559740":360}"> </span>**

<div class="SCXW6714996 BCX8" id="bkmrk-listen-address---the"><div class="ListContainerWrapper SCXW6714996 BCX8">1. <span class="TextRun SCXW6714996 BCX8" data-contrast="auto" lang="EN-US" xml:lang="EN-US"><span class="NormalTextRun SCXW6714996 BCX8" data-ccp-charstyle="eop">Listen Address</span><span class="NormalTextRun SCXW6714996 BCX8" data-ccp-charstyle="eop"> - </span><span class="NormalTextRun SCXW6714996 BCX8" data-ccp-charstyle="eop">The bind address to listen for TCP connections.</span></span><span class="EOP SCXW6714996 BCX8" data-ccp-props="{"201341983":0,"335559739":160,"335559740":259}"> </span>

</div><div class="ListContainerWrapper SCXW6714996 BCX8">2. <span class="TextRun SCXW6714996 BCX8" data-contrast="auto" lang="EN-US" xml:lang="EN-US"><span class="NormalTextRun SCXW6714996 BCX8" data-ccp-charstyle="eop">Listen Port</span><span class="NormalTextRun SCXW6714996 BCX8" data-ccp-charstyle="eop"> - </span><span class="NormalTextRun SCXW6714996 BCX8" data-ccp-charstyle="eop">The TCP port number to listen on.</span></span><span class="EOP SCXW6714996 BCX8" data-ccp-props="{"201341983":0,"335559739":160,"335559740":259}"> </span>

</div><div class="ListContainerWrapper SCXW6714996 BCX8">  
</div></div>**<span class="TextRun SCXW6714996 BCX8" data-contrast="none" lang="EN-CA" xml:lang="EN-CA"><span class="NormalTextRun SCXW6714996 BCX8" data-ccp-charstyle="eop">Collect Fortinet FortiGate logs (input: </span><span class="NormalTextRun SpellingErrorV2Themed SCXW6714996 BCX8" data-ccp-charstyle="eop">udp</span><span class="NormalTextRun SCXW6714996 BCX8" data-ccp-charstyle="eop">)</span></span><span class="EOP SCXW6714996 BCX8" data-ccp-props="{"134245418":true,"134245529":true,"201341983":0,"335559738":40,"335559739":0,"335559740":360}"> </span>**

<div class="SCXW6714996 BCX8" id="bkmrk-listen-address---the-1"><div class="ListContainerWrapper SCXW6714996 BCX8">1. <span class="TextRun SCXW6714996 BCX8" data-contrast="auto" lang="EN-US" xml:lang="EN-US"><span class="NormalTextRun SCXW6714996 BCX8" data-ccp-charstyle="eop">Listen Address</span><span class="NormalTextRun SCXW6714996 BCX8" data-ccp-charstyle="eop"> - </span><span class="NormalTextRun SCXW6714996 BCX8" data-ccp-charstyle="eop">The bind address to listen for </span><span class="NormalTextRun SCXW6714996 BCX8" data-ccp-charstyle="eop">UDP</span><span class="NormalTextRun SCXW6714996 BCX8" data-ccp-charstyle="eop"> connections.</span></span><span class="EOP SCXW6714996 BCX8" data-ccp-props="{"201341983":0,"335559739":160,"335559740":276}"> </span>

</div><div class="ListContainerWrapper SCXW6714996 BCX8">2. <span class="TextRun SCXW6714996 BCX8" data-contrast="auto" lang="EN-US" xml:lang="EN-US"><span class="NormalTextRun SCXW6714996 BCX8" data-ccp-charstyle="eop">Listen Port</span><span class="NormalTextRun SCXW6714996 BCX8" data-ccp-charstyle="eop"> - </span><span class="NormalTextRun SCXW6714996 BCX8" data-ccp-charstyle="eop">The </span><span class="NormalTextRun SCXW6714996 BCX8" data-ccp-charstyle="eop">UDP </span><span class="NormalTextRun SCXW6714996 BCX8" data-ccp-charstyle="eop">port number to listen on.</span></span><span class="EOP SCXW6714996 BCX8" data-ccp-props="{"201341983":0,"335559739":160,"335559740":276}"> </span>

</div></div><span class="EOP SCXW6714996 BCX8" data-ccp-props="{"201341983":0,"335559739":160,"335559740":276}">*If you need further assistance, kindly contact our support at <info@cytechint.com> for prompt assistance and guidance.*</span>

# Forwarding logs from rsyslog client  to a remote rsyslogs server

### Introduction

This guide will walk you through setting up Rsyslog for log forwarding between a client and a remote server using Linux.

#### Setup

**Server:** The machine which will send message  
**Client:** The machine which will receive the message

####  Prerequisites

 Software Requirements

- - Linux operating system
    - Rsyslog (version 5.0 or higher recommended)
    - Root or sudo access

#### Network Requirements

- - Network connectivity between client and remote server
    - Known IP address of the remote Rsyslog server
    - Open network ports (typically 514 for UDP or TCP)

#### Step-by-Step Configuration Guide

##### Preparation  
Before beginning, ensure you have:

- - Administrative (root) access
    - Stable network connection
    - IP address of the remote server

##### Step 1: Rsyslog Installation

 1.1 Obtain Root Access

```
sudo -i
```

- Enter your root password when prompted

 1.2 Update System Packages

If you are using DNF, use the command below:

```bash
sudo dnf update
```

If you are using YUM, use the command below:

```
sudo yum update
```

 1.3 Install Rsyslog

If you are using YUM, use the command below:

```
sudo yum install rsyslog
```

If you using DNF, use the command below:

```
sudo dnf install rsyslog
```

*Verification Tip: Confirm Rsyslog is installed successfully*

 1.4 Start and Enable Rsyslog Service

```
sudo systemctl enable rsyslog
sudo systemctl start rsyslog
```

  
 1.5 Check Rsyslog Status

```
sudo systemctl status rsyslog
```

*Expected Result*: Service should be in an active state

##### Step 2: Rsyslog Server and Client Configuration

The following steps outline how to forward system logs to a remote server using either TCP or UDP ports. You can choose to use either TCP or UDP, but if both are enabled, ensure that each protocol uses a different port.

 2.1 Edit Rsyslog Configuration. Open using a text editor such as "vi" or "nano".

```
vi /etc/rsyslog.conf
```

 2.2 Enable UDP or TCP Modules. This should be done on the Client machine only.

\- For **UDP**, locate and uncomment the following lines by removing the `#` symbol. The default port is 514, but you can change it if necessary.

```
$Modload imudp
$UDPServerRun 514
```

\- For **TCP**, locate and uncomment the following lines by removing the `#` symbol. The default port is 10514, but you can change it if necessary.

```
$Modload imtcp
$inputTCPServerRun 10514
```

2.3 Configure Log Template  
Add the following line to define log storage:

```
$template RemoteLogs,"/var/log/%HOSTNAME%/%PROGRAMNAME%.log"
*.* ?RemoteLogs
& ~
```

2.4 **On Server**  
Add content below at the end of the file */etc/rsyslog.conf.*   
This will configure the log forwarding to the remote host. Please update the "target", "port" and "tcp" appropriately.

```
*.* action(type="omfwd"
queue.type="LinkedList"
action.resumeRetryCount="-1"
queue.size="10000"
queue.saveonshutdown="on"
target="10.43.138.1" Port="10514" Protocol="tcp")
```

**queue.type** enables a LinkedList in-memory queue, queue\_type can be *direct*, *linkedlist* or *fixedarray* (which are in-memory queues), or disk.  
enabled **queue.saveonshutdown** saves in-memory data if rsyslog shuts down,  
**action.resumeRetryCount**= “-1” setting prevents rsyslog from dropping messages when retrying to connect if server is not responding,  
**queue.size** where size represents the specified size of disk queue part. The defined size limit is not restrictive, rsyslog always writes one complete queue entry, even if it violates the size limit.  
**target** is the IP Address of the remote machine  
**Port** is the port of the remote machine  
**Protocol** is the protocol to be used. Values can be udp or tcp.

2.5 Add port in the firewall rules

**On client side**  
Add the provided port to the firewall

```
iptables -A INPUT -p tcp --dport 10514  -j ACCEPT
```

Next open the port using nc

```
nc -l -p 10514 -4
```

2.6 Apply Server Configuration

```
systemctl restart rsyslog
```

2.7 Verify Log Directory  
Type : ls -1  
Expected Result:   
Should see a directory with the client's hostname  
Contains files like `rsyslogd.log` and `systemd.log`

**Troubleshooting Tips**  
Ensure firewall settings allow log forwarding  
Verify network connectivity between client and server  
Check Rsyslog service status if logs aren't forwarding

**Security Considerations**  
\- Configure firewall rules appropriately  
\- Use encrypted log transmission when possible  
\- Regularly review and rotate logs

**Common Issues**  
1\. Port Blocking: Ensure port 514 is open  
2\. Permission Errors Verify root/sudo access  
3\. Network Connectivity: Check server IP and network settings

**Conclusion**  
By following these steps, you should have successfully configured Rsyslog for log forwarding between a client and a remote server.

\*\*Note:\*\* Always test in a controlled environment first and adapt instructions to your specific system configuration.

# GCP - How to Add a Role

1. <div data-olk-copy-source="MessageBody">Go to the Google Cloud Console.</div>
2. <div>Navigate to IAM.</div>
3. <div>Click on "IAM &amp; Admin" in the left navigation menu.</div>
4. <div>Select "IAM" from the submenu.</div>

<div id="bkmrk-">[![embedded-image-2hzmMzGP.png](https://cytechint-docs-bookstack.s3.amazonaws.com/uploads/images/gallery/2025-05/scaled-1680-/oUQy2a1og4T5tVPI-embedded-image-2hzmmzgp.png)](https://cytechint-docs-bookstack.s3.amazonaws.com/uploads/images/gallery/2025-05/oUQy2a1og4T5tVPI-embedded-image-2hzmmzgp.png)</div><div id="bkmrk--2">  
</div>5. <div>Find your service account.</div>
6. <div>In the IAM permissions list, locate your existing service account.</div>
7. <div>Click the edit (pencil) icon next to your service account. *(Please delete the prior custom role that we create before proceeding)*</div>

<div id="bkmrk--3">[![embedded-image-N4F381dP.png](https://cytechint-docs-bookstack.s3.amazonaws.com/uploads/images/gallery/2025-05/scaled-1680-/8JEGYGakSY2Z6afQ-embedded-image-n4f381dp.png)](https://cytechint-docs-bookstack.s3.amazonaws.com/uploads/images/gallery/2025-05/8JEGYGakSY2Z6afQ-embedded-image-n4f381dp.png)</div><div id="bkmrk--5">  
</div>8. <div>In the edit permissions panel that opens, click "ADD ANOTHER ROLE".</div>

<div id="bkmrk--6">[![embedded-image-7rkO3kj8.png](https://cytechint-docs-bookstack.s3.amazonaws.com/uploads/images/gallery/2025-05/scaled-1680-/tGHeAx5tSa1DaWcE-embedded-image-7rko3kj8.png)](https://cytechint-docs-bookstack.s3.amazonaws.com/uploads/images/gallery/2025-05/tGHeAx5tSa1DaWcE-embedded-image-7rko3kj8.png)</div><div id="bkmrk--8">  
</div>9. <div>Paste each role in the filter tab, and then select from the dropdown menu:</div>

- <div>**Pub/Sub Editor**</div>
- <div>**Cloud Asset Viewer**</div>
- <div>**Browser**</div>
- <div>**Security Reviewer**</div>
- <div>**Viewer**</div>
- <div>**Logs Viewer**</div>
- <div>**Monitoring Viewer**</div>
- <div>**Compute Viewer**</div>

<div id="bkmrk--9">[![embedded-image-WEPMGW6Y.png](https://cytechint-docs-bookstack.s3.amazonaws.com/uploads/images/gallery/2025-05/scaled-1680-/f4PAeqKglag4lHwG-embedded-image-wepmgw6y.png)](https://cytechint-docs-bookstack.s3.amazonaws.com/uploads/images/gallery/2025-05/f4PAeqKglag4lHwG-embedded-image-wepmgw6y.png)</div><div id="bkmrk--11">  
</div>10. <div>After adding each role, click "ADD ANOTHER ROLE" to add the next one</div>
11. <div>When all roles are added, click "SAVE"</div>

<div id="bkmrk--12">[![embedded-image-oqApZwWL.png](https://cytechint-docs-bookstack.s3.amazonaws.com/uploads/images/gallery/2025-05/scaled-1680-/KO0nA1VjwWiYJx8W-embedded-image-oqapzwwl.png)](https://cytechint-docs-bookstack.s3.amazonaws.com/uploads/images/gallery/2025-05/KO0nA1VjwWiYJx8W-embedded-image-oqapzwwl.png)</div><div id="bkmrk--14">  
</div>12. <div>Verify the roles</div>
13. After saving, the service account should display all the newly added roles in the IAM permissions list.  
    [![embedded-image-L35MCgKx.png](https://cytechint-docs-bookstack.s3.amazonaws.com/uploads/images/gallery/2025-05/scaled-1680-/nS29bd2IiOmAyaMp-embedded-image-l35mcgkx.png)](https://cytechint-docs-bookstack.s3.amazonaws.com/uploads/images/gallery/2025-05/nS29bd2IiOmAyaMp-embedded-image-l35mcgkx.png)

# GCP - How to enable Cloud Asset API

<span data-olk-copy-source="MessageBody">Please refer to these instructions to enable Cloud Asset API.</span>

<div data-olk-copy-source="MessageBody" id="bkmrk-to-enable-the-cloud-"><div data-olk-copy-source="MessageBody">To enable the Cloud Asset API for your Google Cloud project, follow these steps:</div>1. <div>**Go to the Google Cloud Console**:</div>

- <div>Navigate to Google Cloud Console.[![Outlook-4l0dvbcd.png](https://cytechint-docs-bookstack.s3.amazonaws.com/uploads/images/gallery/2025-05/scaled-1680-/vjGmkqtqTLwRb2DY-outlook-4l0dvbcd.png)](https://cytechint-docs-bookstack.s3.amazonaws.com/uploads/images/gallery/2025-05/vjGmkqtqTLwRb2DY-outlook-4l0dvbcd.png)</div>

<div> </div>2. <div>**Select Your Project**:</div>

- <div>From the top project drop-down, select the Google Cloud project "**neriviodata-prod**" where you want to enable the Cloud Asset API.</div>

<div>[![embedded-image-pU8XHDXK.png](https://cytechint-docs-bookstack.s3.amazonaws.com/uploads/images/gallery/2025-05/scaled-1680-/VzFtiVYS67IJsPBU-embedded-image-pu8xhdxk.png)](https://cytechint-docs-bookstack.s3.amazonaws.com/uploads/images/gallery/2025-05/VzFtiVYS67IJsPBU-embedded-image-pu8xhdxk.png)</div>3. <div>**Enable the Cloud Asset API**:</div>

- <div>Go to the left sidebar and click on **APIs &amp; Services** &gt; **Library**.</div>

<div> </div><div>[![embedded-image-iPWys2rl.png](https://cytechint-docs-bookstack.s3.amazonaws.com/uploads/images/gallery/2025-05/scaled-1680-/DaKd1MMDq14sVs4s-embedded-image-ipwys2rl.png)](https://cytechint-docs-bookstack.s3.amazonaws.com/uploads/images/gallery/2025-05/DaKd1MMDq14sVs4s-embedded-image-ipwys2rl.png)</div><div>[![embedded-image-37eUJUAh.png](https://cytechint-docs-bookstack.s3.amazonaws.com/uploads/images/gallery/2025-05/scaled-1680-/TYDpdt3lmFIqNdUZ-embedded-image-37eujuah.png)](https://cytechint-docs-bookstack.s3.amazonaws.com/uploads/images/gallery/2025-05/TYDpdt3lmFIqNdUZ-embedded-image-37eujuah.png)</div><div> </div>
- <div>In the search box, type **"Cloud Asset API"**.[![embedded-image-HNfyxMsn.png](https://cytechint-docs-bookstack.s3.amazonaws.com/uploads/images/gallery/2025-05/scaled-1680-/JvNZIHMtE2zuTb9b-embedded-image-hnfyxmsn.png)](https://cytechint-docs-bookstack.s3.amazonaws.com/uploads/images/gallery/2025-05/JvNZIHMtE2zuTb9b-embedded-image-hnfyxmsn.png)</div>

<div> </div>
- <div>Click on **Cloud Asset API** in the search results. [![embedded-image-chr092Ti.png](https://cytechint-docs-bookstack.s3.amazonaws.com/uploads/images/gallery/2025-05/scaled-1680-/ma0kyP9uxqMw2d84-embedded-image-chr092ti.png)](https://cytechint-docs-bookstack.s3.amazonaws.com/uploads/images/gallery/2025-05/ma0kyP9uxqMw2d84-embedded-image-chr092ti.png)</div>


- <div>Click the **Enable** button.</div>

<div>[![embedded-image-AuF8gVJd.png](https://cytechint-docs-bookstack.s3.amazonaws.com/uploads/images/gallery/2025-05/scaled-1680-/MqnvHG2kMhFh7Ola-embedded-image-auf8gvjd.png)](https://cytechint-docs-bookstack.s3.amazonaws.com/uploads/images/gallery/2025-05/MqnvHG2kMhFh7Ola-embedded-image-auf8gvjd.png)</div><div>  
</div>4. <div>**Verify the API is Enabled**:</div>

- <div>Once enabled, you can verify that the Cloud Asset API is active by going to **APIs &amp; Services** &gt; **Dashboard** and checking for the Cloud Asset API in the list of enabled APIs.</div>

<div> [![embedded-image-53fpDS7I.png](https://cytechint-docs-bookstack.s3.amazonaws.com/uploads/images/gallery/2025-05/scaled-1680-/JxWHDMF7W3hMmGml-embedded-image-53fpds7i.png)](https://cytechint-docs-bookstack.s3.amazonaws.com/uploads/images/gallery/2025-05/JxWHDMF7W3hMmGml-embedded-image-53fpds7i.png)</div><div>  
</div></div>[![embedded-image-OB85vN3W.png](https://cytechint-docs-bookstack.s3.amazonaws.com/uploads/images/gallery/2025-05/scaled-1680-/K7hQS9UbL5yEoYtx-embedded-image-ob85vn3w.png)](https://cytechint-docs-bookstack.s3.amazonaws.com/uploads/images/gallery/2025-05/K7hQS9UbL5yEoYtx-embedded-image-ob85vn3w.png)

<div data-olk-copy-source="MessageBody" id="bkmrk--1"><div>  
</div><div>  
</div></div>

# GCP - Setup a Log Sink

<div id="bkmrk-setup-log-sink-using">**Setup Log Sink Using Google Cloud Console**</div>1. <div>Navigate to **"Logging" &gt; "Log Router" &gt; "Create Sink"**.</div><div>[![embedded-image-heUxvdIH.png](https://cytechint-docs-bookstack.s3.amazonaws.com/uploads/images/gallery/2025-05/scaled-1680-/h51aMHC31DkMLyxU-embedded-image-heuxvdih.png)](https://cytechint-docs-bookstack.s3.amazonaws.com/uploads/images/gallery/2025-05/h51aMHC31DkMLyxU-embedded-image-heuxvdih.png)</div>
2. <div>Provide a **Sink name** and description.</div>
3. <div>For **Sink destination**, select **"Cloud Pub/Sub topic"**. Choose an existing topic "cytech-elasticsearch".</div>
4. <div>Under **"Choose logs to include in sink"**, use a filter like: **logName:"cloudaudit.googleapis.com"**</div>
5. <div>Create Sink.</div>[![embedded-image-zO9vMdpW.png](https://cytechint-docs-bookstack.s3.amazonaws.com/uploads/images/gallery/2025-05/scaled-1680-/P2tC2aPZvQOAeYCH-embedded-image-zo9vmdpw.png)](https://cytechint-docs-bookstack.s3.amazonaws.com/uploads/images/gallery/2025-05/P2tC2aPZvQOAeYCH-embedded-image-zo9vmdpw.png)

# GCP and CSPM-GCP Integration

This Google Cloud integration collects and analyzes a wide range of logs and metrics to provide comprehensive visibility into your cloud environment. It ingests **Firewall Logs**, **VPC Flow Logs**, **DNS Logs**, and **Load Balancing Logs** exported from **Cloud Logging** via a **Pub/Sub topic sink**. Additionally, it gathers detailed **metrics and metadata** from **Google Cloud Monitoring** across core services, including **Compute Engine**, **Cloud SQL**, **Cloud Run**, **GKE**, **Firestore**, **Dataproc**, **Pub/Sub**, **Redis**, **Storage**, **Load Balancing**, and **Billing**. This enables in-depth monitoring of infrastructure, application performance, network activity, and cost trends.

##### <span style="color: rgb(53, 152, 219);">**Logs**</span>

- **Firewall Logs**: Record allowed and denied network traffic based on firewall rules.
- **VPC Flow Logs**: Capture IP traffic flowing to and from network interfaces in a VPC.
- **DNS Logs**: Track DNS queries and responses handled by Google Cloud DNS.
- **Load Balancing Logs**: Provide request-level logs of traffic handled by load balancers, including latency and backend info.

---

##### <span style="color: rgb(53, 152, 219);">**Metrics**</span>

- **GCP Billing Metrics**: Track resource usage and cost across GCP services.
- **GCP Compute Metrics**: Monitor performance of Compute Engine instances (CPU, memory, disk, etc.).
- **GCP Firestore Metrics**: Provide insights into Firestore usage like reads, writes, and storage.
- **GCP Load Balancing Metrics**: Measure load balancer traffic, request counts, latency, and backend health.
- **GCP Storage Metrics**: Report usage, operation counts, and latency for Cloud Storage buckets.
- **GCP GKE Metrics**: Monitor Kubernetes clusters including node health, pod usage, and resource consumption.
- **GCP Dataproc Metrics**: Track job status, cluster usage, and Hadoop/Spark performance in Dataproc.
- **GCP PubSub Metrics**: Show message throughput, subscription rates, and processing latency.
- **GCP Redis Metrics**: Display memory usage, operations per second, and cache hit/miss rates for Memorystore Redis.
- **GCP Cloud Run Metrics**: Measure request counts, container instance metrics, and response times.
- **GCP CloudSQL Metrics**: Provide visibility into database performance, including connections, query latency, and CPU usage.

##### <span style="color: rgb(53, 152, 219);">**Authentication**</span>

To use this Google Cloud Platform (GCP) integration, you need to set up a ***Service Account*** with a ***Role*** and a ***Service Account Key*** to access data on your GCP project.

##### <span style="color: rgb(53, 152, 219);">**1. Service Account**</span>

First, you need to [create a Service Account](https://cloud.google.com/iam/docs/creating-managing-service-accounts). A Service Account (SA) is a particular type of Google account intended to represent a non-human user who needs to access the GCP resources.

The AQUILA Agent uses the SA to access data on Google Cloud Platform using the Google APIs.

##### <span style="color: rgb(53, 152, 219);">**2. Required IAM Service Account Roles:**</span>

<span style="color: rgb(53, 152, 219);">**For CSPM-GCP Integration**</span>

- **Browser**: This role grants read access to the project hierarchy.
- **Cloud Asset Viewer**: Can view asset metadata across GCP services.

<span style="color: rgb(53, 152, 219);">**For GCP Integation**</span>

- **Cloud Memorystore Redis Viewer**: Can view configuration and metadata of Redis instances.
- **Cloud SQL Viewer**: Can view Cloud SQL instance metadata and settings, but not data.
- **Compute Viewer**: Can view all Compute Engine resources (instances, disks, etc.) but not modify them.
- **Logs Viewer**: Can view logs in Cloud Logging across the project.
- **Monitoring Viewer**: Can view monitoring dashboards, alerts, and metrics in Cloud Monitoring.
- **Private Logs Viewer**: Can view all logs, including those with restricted data (e.g., data access logs).
- **Pub/Sub Subscriber**: Grants permission to receive and acknowledge messages from Pub/Sub subscriptions.
- **Viewer**: Read-only access to all resources in a project.

##### <span style="color: rgb(53, 152, 219);">**<span class="TextRun SCXW124724174 BCX0" data-contrast="none" lang="EN-US" xml:lang="EN-US"><span class="NormalTextRun SCXW124724174 BCX0">3. Logs Collection Configuration</span></span><span class="EOP SCXW124724174 BCX0" data-ccp-props="{"134233117":false,"134233118":false,"335551550":1,"335551620":1,"335559738":300,"335559739":300}"> </span>**</span>

<span class="TextRun SCXW124724174 BCX0" data-contrast="none" lang="EN-US" xml:lang="EN-US"><span class="NormalTextRun SCXW124724174 BCX0">With a properly configured Service Account and the integration setting in place, </span><span class="NormalTextRun SCXW124724174 BCX0">it’s</span><span class="NormalTextRun SCXW124724174 BCX0"> time to start collecting some logs.</span></span><span class="EOP SCXW124724174 BCX0" data-ccp-props="{"134233117":false,"134233118":false,"335551550":1,"335551620":1,"335559738":0,"335559739":276}"> </span>

<span style="color: rgb(53, 152, 219);">**<span class="TextRun SCXW124724174 BCX0" data-contrast="none" lang="EN-US" xml:lang="EN-US"><span class="NormalTextRun SCXW124724174 BCX0">Requirements</span></span><span class="EOP SCXW124724174 BCX0" data-ccp-props="{"134233117":false,"134233118":false,"335551550":1,"335551620":1,"335559738":0,"335559739":276}"> </span>**</span>

<span class="TextRun SCXW124724174 BCX0" data-contrast="none" lang="EN-US" xml:lang="EN-US"><span class="NormalTextRun SCXW124724174 BCX0">You need to create a few dedicated Google Cloud resources before starting, in detail:</span></span><span class="EOP SCXW124724174 BCX0" data-ccp-props="{"134233117":false,"134233118":false,"335551550":1,"335551620":1,"335559738":0,"335559739":276}"> </span>

<div class="ListContainerWrapper SCXW124724174 BCX0" id="bkmrk-log-sink%C2%A0">- **Pub/Sub Topic**: A messaging endpoint where publishers send messages that can then be delivered to one or more subscribers.
- **Subscription**: A configuration attached to a Pub/Sub topic that delivers messages to subscribers, either by push or pull.
- **Log Sink**: A configuration that routes logs from Cloud Logging to a specified destination such as Pub/Sub, Cloud Storage, or BigQuery.

</div><p class="callout info"><span class="EOP SCXW124724174 BCX0" data-ccp-props="{"134233117":false,"134233118":false,"335551550":1,"335551620":1,"335559685":0,"335559738":0,"335559739":0}"> </span><span class="TextRun SCXW124724174 BCX0" data-contrast="none" lang="EN-US" xml:lang="EN-US"><span class="NormalTextRun SCXW124724174 BCX0">It’s</span><span class="NormalTextRun SCXW124724174 BCX0"> </span><span class="NormalTextRun ContextualSpellingAndGrammarErrorV2Themed SCXW124724174 BCX0">recommend</span><span class="NormalTextRun ContextualSpellingAndGrammarErrorV2Themed SCXW124724174 BCX0">ed</span> <span class="NormalTextRun SCXW124724174 BCX0">to have </span><span class="NormalTextRun ContextualSpellingAndGrammarErrorV2Themed SCXW124724174 BCX0">a </span><span class="NormalTextRun ContextualSpellingAndGrammarErrorV2Themed SCXW124724174 BCX0">separate</span><span class="NormalTextRun SCXW124724174 BCX0"> Pub/</span><span class="NormalTextRun ContextualSpellingAndGrammarErrorV2Themed SCXW124724174 BCX0">Sub topics</span><span class="NormalTextRun SCXW124724174 BCX0"> for each of the log types so that they can be parsed and stored in a specific data stream.</span></span><span class="EOP SCXW124724174 BCX0" data-ccp-props="{"134233117":false,"134233118":false,"335551550":1,"335551620":1,"335559685":0,"335559738":0,"335559739":0}"> </span></p>

<span class="TextRun SCXW124724174 BCX0" data-contrast="none" lang="EN-US" xml:lang="EN-US"><span class="NormalTextRun SCXW124724174 BCX0">Here’s</span><span class="NormalTextRun SCXW124724174 BCX0"> an example of collecting Audit Logs using a Pub/</span><span class="NormalTextRun ContextualSpellingAndGrammarErrorV2Themed SCXW124724174 BCX0">Sub topic</span><span class="NormalTextRun SCXW124724174 BCX0">, a subscription, and a Log Router. We will create the resources in the Google Cloud Console and then configure the Google Cloud Platform integration.</span></span><span class="EOP SCXW124724174 BCX0" data-ccp-props="{"134233117":false,"134233118":false,"335551550":1,"335551620":1,"335559738":0,"335559739":276}"> </span>

##### <span style="color: rgb(53, 152, 219);">**Example Setup Using Google Cloud Console**</span>

1. Navigate to **"Logging" &gt; "Log Router" &gt; "Create Sink"**.
2. Provide a **Sink name** and description.
3. For **Sink destination**, select **"Cloud Pub/Sub topic"**. Choose an existing topic or create a new one.
4. If a new topic is created, you must also **create a subscription** for it.
5. Under **"Choose logs to include in sink"**, use a filter like: logName:"cloudaudit.googleapis.com"

##### <span style="color: rgb(53, 152, 219);">**4. Enable API Services**</span>

- **Cloud Asset API**: Provides metadata inventory and history of GCP resources and IAM policies for security analysis, audit, and compliance.
- **Cloud SQL Admin API**: Enables programmatic management of Cloud SQL instances, including creation, configuration, and backups.
- **Memorystore for Redis API**: Allows automated management of Redis instances on Memorystore, including provisioning, scaling, and configuration.

##### <span style="color: rgb(53, 152, 219);">**<span class="TextRun SCXW124724174 BCX0" data-contrast="none" lang="EN-US" xml:lang="EN-US"><span class="NormalTextRun SCXW124724174 BCX0">5. Service Account Key </span></span><span class="EOP SCXW124724174 BCX0" data-ccp-props="{"134233117":false,"134233118":false,"335551550":0,"335551620":0,"335559738":240,"335559739":240}"> </span>**</span>

<span class="TextRun SCXW124724174 BCX0" data-contrast="none" lang="EN-US" xml:lang="EN-US"><span class="NormalTextRun SCXW124724174 BCX0">Next, with the Service Account (SA) with access to Google Cloud Platform (GCP) resources setup, you need some credentials to associate with it: a Service Account Key. </span></span><span class="EOP SCXW124724174 BCX0" data-ccp-props="{"134233117":false,"134233118":false,"335551550":0,"335551620":0,"335559738":240,"335559739":240}"> </span>

<span class="TextRun SCXW124724174 BCX0" data-contrast="none" lang="EN-US" xml:lang="EN-US"><span class="NormalTextRun SCXW124724174 BCX0">From the list of SA (Service Accounts): </span></span><span class="EOP SCXW124724174 BCX0" data-ccp-props="{"134233117":false,"134233118":false,"335551550":0,"335551620":0,"335559738":240,"335559739":240}"> </span>

<div class="ListContainerWrapper SCXW124724174 BCX0" id="bkmrk-go-to%C2%A0iam-%26-admin-%3E-">1. Go to **IAM &amp; Admin &gt; Service Accounts** in the GCP Console.
2. Click the service account you created.
3. Under the **"Keys"** section, click **"Add Key" &gt; "Create new key"**.
4. Choose **JSON** as the key type.
5. **Download and securely store** the generated private key (it cannot be retrieved again from GCP if lost).

</div>
<p class="callout danger">**<span class="TextRun SCXW124724174 BCX0" data-contrast="none" lang="EN-US" xml:lang="EN-US"><span class="NormalTextRun SCXW124724174 BCX0">Please provide the following information to </span><span class="NormalTextRun SpellingErrorV2Themed SCXW124724174 BCX0">CyTech</span><span class="NormalTextRun SCXW124724174 BCX0">:</span></span><span class="EOP SCXW124724174 BCX0" data-ccp-props="{"134233117":false,"134233118":false,"335551550":0,"335551620":0,"335559738":240,"335559739":240}"> </span>**</p>

<div class="ListContainerWrapper SCXW124724174 BCX0" id="bkmrk-project-id%C2%A0---the-pr">- <span class="TextRun SCXW124724174 BCX0" data-contrast="none" lang="EN-US" xml:lang="EN-US">**<span class="NormalTextRun SCXW124724174 BCX0">Project </span>**<span class="NormalTextRun ContextualSpellingAndGrammarErrorV2Themed SCXW124724174 BCX0">**ID** -</span> </span><span class="TextRun SCXW124724174 BCX0" data-contrast="none" lang="EN-US" xml:lang="EN-US"><span class="NormalTextRun SCXW124724174 BCX0">The Project ID is the Google Cloud project ID where your resources exist. </span></span>
- <span class="TextRun SCXW124724174 BCX0" data-contrast="none" lang="EN-US" xml:lang="EN-US"><span class="NormalTextRun SCXW124724174 BCX0">**Credentials File** - </span></span><span class="TextRun SCXW124724174 BCX0" data-contrast="none" lang="EN-US" xml:lang="EN-US"><span class="NormalTextRun SCXW124724174 BCX0">Save the JSON file with the private key in a secure location of the file system, and make sure that the Log Collector Agent has at least read-only privileges to this file.</span><span class="NormalTextRun SCXW124724174 BCX0"> </span></span><span class="TextRun SCXW124724174 BCX0" data-contrast="none" lang="EN-US" xml:lang="EN-US"><span class="NormalTextRun SCXW124724174 BCX0">Specify the file path in the Log Collector Agent integration UI in the "Credentials File" field. For example: /home/ubuntu/</span><span class="NormalTextRun SpellingErrorV2Themed SCXW124724174 BCX0">credentials.json</span><span class="NormalTextRun SCXW124724174 BCX0">.</span></span>
- <span class="TextRun SCXW124724174 BCX0" data-contrast="none" lang="EN-US" xml:lang="EN-US">**<span class="NormalTextRun SCXW124724174 BCX0">Pub/</span><span class="NormalTextRun SCXW124724174 BCX0">Sub Topic</span>**<span class="NormalTextRun SCXW124724174 BCX0"> </span><span class="NormalTextRun SCXW124724174 BCX0">- </span></span><span class="TextRun SCXW124724174 BCX0" data-contrast="none" lang="EN-US" xml:lang="EN-US"><span class="NormalTextRun SCXW124724174 BCX0">Name of the topic where the logs are written to.</span></span>
- <span class="TextRun SCXW124724174 BCX0" data-contrast="none" lang="EN-US" xml:lang="EN-US">**<span class="NormalTextRun SCXW124724174 BCX0">Subscription</span>**<span class="NormalTextRun SCXW124724174 BCX0"> - </span></span><span class="TextRun SCXW124724174 BCX0" data-contrast="none" lang="EN-US" xml:lang="EN-US"><span class="NormalTextRun SCXW124724174 BCX0">Use the short subscription name here, not the full-blown path with the project ID. You can find it as "Subscription ID" on the Google Cloud Console.</span></span><span class="EOP SCXW124724174 BCX0" data-ccp-props="{"134233117":false,"134233118":false,"335551550":0,"335551620":0,"335559738":240,"335559739":240}"> </span>

</div><div class="ListContainerWrapper SCXW124724174 BCX0" id="bkmrk-go-to-iam-%26-admin-%3E-"></div>

# GitHub

##### <span style="color: rgb(53, 152, 219);">**<span class="TextRun SCXW62716805 BCX8" data-contrast="none" lang="EN-US" xml:lang="EN-US"><span class="NormalTextRun SCXW62716805 BCX8" data-ccp-charstyle="Style (Complex) Open Sans" data-ccp-charstyle-defn="{"ObjectId":"605ffb97-0b55-431d-9421-8d20c8d9cd64|8","ClassId":1073872969,"Properties":[201342446,"1",201342447,"5",201342448,"1",201342449,"1",469777841,"Open Sans",469777842,"Open Sans",469777843,"Calibri",469777844,"Open Sans",201341986,"1",469769226,"Open Sans",268442635,"22",335559704,"1037",335559705,"1033",335551547,"1033",335559740,"259",201341983,"0",335559739,"160",469775450,"Style (Complex) Open Sans",201340122,"1",134233614,"true",469778129,"StyleComplexOpenSans",335572020,"1",469778324,"Default Paragraph Font"]}">Introduction</span></span><span class="EOP SCXW62716805 BCX8" data-ccp-props="{"134245418":true,"134245529":true,"201341983":0,"335559738":240,"335559739":0,"335559740":360}"> </span>**</span>

<span class="TextRun SCXW62716805 BCX8" data-contrast="auto" lang="EN-US" xml:lang="EN-US"><span class="NormalTextRun SCXW62716805 BCX8" data-ccp-charstyle="Style (Complex) Open Sans">The GitHub integration collects events from the </span></span>[<span class="TextRun Underlined SCXW62716805 BCX8" data-contrast="none" lang="EN-US" xml:lang="EN-US"><span class="NormalTextRun SCXW62716805 BCX8" data-ccp-charstyle="Hyperlink">GitHub API</span></span>](https://docs.github.com/en/rest?apiVersion=2022-11-28)<span class="TextRun SCXW62716805 BCX8" data-contrast="auto" lang="EN-US" xml:lang="EN-US"><span class="NormalTextRun SCXW62716805 BCX8" data-ccp-charstyle="Style (Complex) Open Sans">.</span></span><span class="EOP SCXW62716805 BCX8" data-ccp-props="{"201341983":0,"335559685":360,"335559739":160,"335559740":259}"> </span>

<div class="ListContainerWrapper SCXW62716805 BCX8" id="bkmrk-https%3A%2F%2Fdocs.github.">- [<span class="TextRun Underlined SCXW62716805 BCX8" data-contrast="none" lang="EN-US" xml:lang="EN-US"><span class="NormalTextRun SCXW62716805 BCX8" data-ccp-charstyle="Hyperlink">https://docs.github.com/en/rest?apiVersion=2022-11-28</span></span>](https://docs.github.com/en/rest?apiVersion=2022-11-28)<span class="EOP SCXW62716805 BCX8" data-ccp-props="{"201341983":0,"335559739":160,"335559740":259}"> </span>

</div><span class="TextRun SCXW248096181 BCX8" data-contrast="auto" lang="EN-US" xml:lang="EN-US"><span class="NormalTextRun SCXW248096181 BCX8" data-ccp-charstyle="Style (Complex) Open Sans">Logs</span></span>

##### <span style="color: rgb(53, 152, 219);">**<span class="TextRun SCXW248096181 BCX8" data-contrast="auto" lang="EN-US" xml:lang="EN-US"><span class="NormalTextRun SCXW248096181 BCX8" data-ccp-charstyle="Style (Complex) Open Sans">Audit</span></span>**<span class="EOP SCXW248096181 BCX8" data-ccp-props="{"201341983":0,"335559739":160,"335559740":259}"> </span></span>

<span class="TextRun SCXW248096181 BCX8" data-contrast="auto" lang="EN-US" xml:lang="EN-US"><span class="NormalTextRun SCXW248096181 BCX8" data-ccp-charstyle="Style (Complex) Open Sans">The GitHub audit log records all events related to the GitHub organization. </span></span><span class="EOP SCXW248096181 BCX8" data-ccp-props="{"201341983":0,"335559739":160,"335559740":259}"> </span>

<span class="TextRun SCXW248096181 BCX8" data-contrast="auto" lang="EN-US" xml:lang="EN-US"><span class="NormalTextRun SCXW248096181 BCX8" data-ccp-charstyle="Style (Complex) Open Sans">To use this integration, you must be an organization owner, and you must use </span><span class="NormalTextRun ContextualSpellingAndGrammarErrorV2Themed SCXW248096181 BCX8" data-ccp-charstyle="Style (Complex) Open Sans">an</span><span class="NormalTextRun SCXW248096181 BCX8" data-ccp-charstyle="Style (Complex) Open Sans"> Personal Access Token with the </span><span class="NormalTextRun SpellingErrorV2Themed SCXW248096181 BCX8" data-ccp-charstyle="Style (Complex) Open Sans">admin:org</span><span class="NormalTextRun SCXW248096181 BCX8" data-ccp-charstyle="Style (Complex) Open Sans"> scope.</span></span><span class="EOP SCXW248096181 BCX8" data-ccp-props="{"201341983":0,"335559739":160,"335559740":259}"> </span>

<span class="TextRun SCXW248096181 BCX8" data-contrast="auto" lang="EN-US" xml:lang="EN-US"><span class="NormalTextRun SCXW248096181 BCX8" data-ccp-charstyle="Style (Complex) Open Sans">This integration is not compatible with GitHub Enterprise server.</span></span><span class="EOP SCXW248096181 BCX8" data-ccp-props="{"201341983":0,"335559739":160,"335559740":259}"> </span>

<span class="EOP SCXW248096181 BCX8" data-ccp-props="{"201341983":0,"335559739":160,"335559740":259}"> </span>

##### <span style="color: rgb(53, 152, 219);">**<span class="TextRun SCXW248096181 BCX8" data-contrast="auto" lang="EN-US" xml:lang="EN-US"><span class="NormalTextRun SCXW248096181 BCX8" data-ccp-charstyle="Style (Complex) Open Sans">Code Scanning</span></span><span class="EOP SCXW248096181 BCX8" data-ccp-props="{"201341983":0,"335559739":160,"335559740":259}"> </span>**</span>

<span class="TextRun SCXW248096181 BCX8" data-contrast="auto" lang="EN-US" xml:lang="EN-US"><span class="NormalTextRun ContextualSpellingAndGrammarErrorV2Themed SCXW248096181 BCX8" data-ccp-charstyle="Style (Complex) Open Sans">The Code</span><span class="NormalTextRun SCXW248096181 BCX8" data-ccp-charstyle="Style (Complex) Open Sans"> Scanning lets you retrieve all security vulnerabilities and coding errors from a repository setup using </span><span class="NormalTextRun SpellingErrorV2Themed SCXW248096181 BCX8" data-ccp-charstyle="Style (Complex) Open Sans">Github</span><span class="NormalTextRun SCXW248096181 BCX8" data-ccp-charstyle="Style (Complex) Open Sans"> Advanced Security Code Scanning feature. </span></span><span class="EOP SCXW248096181 BCX8" data-ccp-props="{"201341983":0,"335559739":160,"335559740":259}"> </span>

<span class="TextRun SCXW248096181 BCX8" data-contrast="auto" lang="EN-US" xml:lang="EN-US"><span class="NormalTextRun SCXW248096181 BCX8" data-ccp-charstyle="Style (Complex) Open Sans">To use this integration, GitHub Apps must have the </span><span class="NormalTextRun SpellingErrorV2Themed SCXW248096181 BCX8" data-ccp-charstyle="Style (Complex) Open Sans">security\_events</span><span class="NormalTextRun SCXW248096181 BCX8" data-ccp-charstyle="Style (Complex) Open Sans"> read permission. Or use a personal access token with the </span><span class="NormalTextRun SpellingErrorV2Themed SCXW248096181 BCX8" data-ccp-charstyle="Style (Complex) Open Sans">security\_events</span><span class="NormalTextRun SCXW248096181 BCX8" data-ccp-charstyle="Style (Complex) Open Sans"> scope for private repos or </span><span class="NormalTextRun SpellingErrorV2Themed SCXW248096181 BCX8" data-ccp-charstyle="Style (Complex) Open Sans">public\_repo</span><span class="NormalTextRun SCXW248096181 BCX8" data-ccp-charstyle="Style (Complex) Open Sans"> scope for public repos. </span></span><span class="EOP SCXW248096181 BCX8" data-ccp-props="{"201341983":0,"335559739":160,"335559740":259}"> </span>

<span class="EOP SCXW248096181 BCX8" data-ccp-props="{"201341983":0,"335559739":160,"335559740":259}"> </span>

##### <span style="color: rgb(53, 152, 219);">**<span class="TextRun SCXW248096181 BCX8" data-contrast="auto" lang="EN-US" xml:lang="EN-US"><span class="NormalTextRun SCXW248096181 BCX8" data-ccp-charstyle="Style (Complex) Open Sans">Secret Scanning</span></span><span class="EOP SCXW248096181 BCX8" data-ccp-props="{"201341983":0,"335559739":160,"335559740":259}"> </span>**</span>

<span class="TextRun SCXW248096181 BCX8" data-contrast="auto" lang="EN-US" xml:lang="EN-US"><span class="NormalTextRun SCXW248096181 BCX8" data-ccp-charstyle="Style (Complex) Open Sans">The </span><span class="NormalTextRun SpellingErrorV2Themed SCXW248096181 BCX8" data-ccp-charstyle="Style (Complex) Open Sans">Github</span><span class="NormalTextRun SCXW248096181 BCX8" data-ccp-charstyle="Style (Complex) Open Sans"> Secret Scanning lets you retrieve secret scanning for advanced security alerts from a repository setup using </span><span class="NormalTextRun SpellingErrorV2Themed SCXW248096181 BCX8" data-ccp-charstyle="Style (Complex) Open Sans">Github</span><span class="NormalTextRun SCXW248096181 BCX8" data-ccp-charstyle="Style (Complex) Open Sans"> Advanced Security Secret Scanning feature. </span></span><span class="EOP SCXW248096181 BCX8" data-ccp-props="{"201341983":0,"335559739":160,"335559740":259}"> </span>

<span class="TextRun SCXW248096181 BCX8" data-contrast="auto" lang="EN-US" xml:lang="EN-US"><span class="NormalTextRun SCXW248096181 BCX8" data-ccp-charstyle="Style (Complex) Open Sans">To use this integration, GitHub Apps must have the </span><span class="NormalTextRun SpellingErrorV2Themed SCXW248096181 BCX8" data-ccp-charstyle="Style (Complex) Open Sans">secret\_scanning\_alerts</span><span class="NormalTextRun SCXW248096181 BCX8" data-ccp-charstyle="Style (Complex) Open Sans"> read permission. Or you must be an administrator for the repository or for the organization that owns the repository, and you must use a personal access token with the repo scope or </span><span class="NormalTextRun SpellingErrorV2Themed SCXW248096181 BCX8" data-ccp-charstyle="Style (Complex) Open Sans">security\_events</span><span class="NormalTextRun SCXW248096181 BCX8" data-ccp-charstyle="Style (Complex) Open Sans"> scope. For public repositories, you may instead use the </span><span class="NormalTextRun SpellingErrorV2Themed SCXW248096181 BCX8" data-ccp-charstyle="Style (Complex) Open Sans">public\_repo</span><span class="NormalTextRun SCXW248096181 BCX8" data-ccp-charstyle="Style (Complex) Open Sans"> scope. </span></span><span class="EOP SCXW248096181 BCX8" data-ccp-props="{"201341983":0,"335559739":160,"335559740":259}"> </span>

<span class="EOP SCXW248096181 BCX8" data-ccp-props="{"201341983":0,"335559739":160,"335559740":259}"> </span>

##### <span style="color: rgb(53, 152, 219);">**<span class="TextRun SCXW248096181 BCX8" data-contrast="auto" lang="EN-US" xml:lang="EN-US"><span class="NormalTextRun SpellingErrorV2Themed SCXW248096181 BCX8" data-ccp-charstyle="Style (Complex) Open Sans">Dependabot</span></span><span class="EOP SCXW248096181 BCX8" data-ccp-props="{"201341983":0,"335559739":160,"335559740":259}"> </span>**</span>

<span class="TextRun SCXW248096181 BCX8" data-contrast="auto" lang="EN-US" xml:lang="EN-US"><span class="NormalTextRun SCXW248096181 BCX8" data-ccp-charstyle="Style (Complex) Open Sans">The </span><span class="NormalTextRun SpellingErrorV2Themed SCXW248096181 BCX8" data-ccp-charstyle="Style (Complex) Open Sans">Github</span> <span class="NormalTextRun SpellingErrorV2Themed SCXW248096181 BCX8" data-ccp-charstyle="Style (Complex) Open Sans">Dependabot</span><span class="NormalTextRun SCXW248096181 BCX8" data-ccp-charstyle="Style (Complex) Open Sans"> lets you retrieve known vulnerabilities in dependencies from a repository setup using </span><span class="NormalTextRun SpellingErrorV2Themed SCXW248096181 BCX8" data-ccp-charstyle="Style (Complex) Open Sans">Github</span><span class="NormalTextRun SCXW248096181 BCX8" data-ccp-charstyle="Style (Complex) Open Sans"> Advanced Security </span><span class="NormalTextRun SpellingErrorV2Themed SCXW248096181 BCX8" data-ccp-charstyle="Style (Complex) Open Sans">Dependabot</span><span class="NormalTextRun SCXW248096181 BCX8" data-ccp-charstyle="Style (Complex) Open Sans"> feature. </span></span><span class="EOP SCXW248096181 BCX8" data-ccp-props="{"201341983":0,"335559739":160,"335559740":259}"> </span>

<span class="EOP SCXW248096181 BCX8" data-ccp-props="{"201341983":0,"335559739":160,"335559740":259}"> </span><span class="TextRun SCXW248096181 BCX8" data-contrast="auto" lang="EN-US" xml:lang="EN-US"><span class="NormalTextRun SCXW248096181 BCX8" data-ccp-charstyle="Style (Complex) Open Sans">To use this integration, you must be an administrator for the repository or for the organization that owns the repository, and you must use a personal access token with the repo scope or </span><span class="NormalTextRun SpellingErrorV2Themed SCXW248096181 BCX8" data-ccp-charstyle="Style (Complex) Open Sans">security\_events</span><span class="NormalTextRun SCXW248096181 BCX8" data-ccp-charstyle="Style (Complex) Open Sans"> scope. For public repositories, you may instead use the </span><span class="NormalTextRun SpellingErrorV2Themed SCXW248096181 BCX8" data-ccp-charstyle="Style (Complex) Open Sans">public\_repo</span><span class="NormalTextRun SCXW248096181 BCX8" data-ccp-charstyle="Style (Complex) Open Sans"> scope. </span></span><span class="EOP SCXW248096181 BCX8" data-ccp-props="{"201341983":0,"335559739":160,"335559740":259}"> </span>

<span class="EOP SCXW248096181 BCX8" data-ccp-props="{"201341983":0,"335559739":160,"335559740":259}"> </span>

##### <span style="color: rgb(53, 152, 219);">**<span class="TextRun SCXW248096181 BCX8" data-contrast="auto" lang="EN-US" xml:lang="EN-US"><span class="NormalTextRun SCXW248096181 BCX8" data-ccp-charstyle="Style (Complex) Open Sans">Issues</span></span><span class="EOP SCXW248096181 BCX8" data-ccp-props="{"201341983":0,"335559739":160,"335559740":259}"> </span>**</span>

<span class="TextRun SCXW248096181 BCX8" data-contrast="auto" lang="EN-US" xml:lang="EN-US"><span class="NormalTextRun SCXW248096181 BCX8" data-ccp-charstyle="Style (Complex) Open Sans">The </span><span class="NormalTextRun SpellingErrorV2Themed SCXW248096181 BCX8" data-ccp-charstyle="Style (Complex) Open Sans">Github</span><span class="NormalTextRun SCXW248096181 BCX8" data-ccp-charstyle="Style (Complex) Open Sans"> Issues </span><span class="NormalTextRun SpellingErrorV2Themed SCXW248096181 BCX8" data-ccp-charstyle="Style (Complex) Open Sans">datastream</span><span class="NormalTextRun SCXW248096181 BCX8" data-ccp-charstyle="Style (Complex) Open Sans"> lets you retrieve </span><span class="NormalTextRun SpellingErrorV2Themed SCXW248096181 BCX8" data-ccp-charstyle="Style (Complex) Open Sans">github</span><span class="NormalTextRun SCXW248096181 BCX8" data-ccp-charstyle="Style (Complex) Open Sans"> issues, including pull requests, issue assignees, comments, labels, and milestones. See About Issues for more details. You can retrieve issues for specific repository or for entire organization. Since </span><span class="NormalTextRun SpellingErrorV2Themed SCXW248096181 BCX8" data-ccp-charstyle="Style (Complex) Open Sans">Github</span><span class="NormalTextRun SCXW248096181 BCX8" data-ccp-charstyle="Style (Complex) Open Sans"> API considers pull requests as issues, users can use </span><span class="NormalTextRun SpellingErrorV2Themed SCXW248096181 BCX8" data-ccp-charstyle="Style (Complex) Open Sans">github.issues.is\_pr</span><span class="NormalTextRun SCXW248096181 BCX8" data-ccp-charstyle="Style (Complex) Open Sans"> field to filter for only pull requests.</span></span>

<span class="TextRun SCXW248096181 BCX8" data-contrast="auto" lang="EN-US" xml:lang="EN-US"><span class="NormalTextRun SCXW248096181 BCX8" data-ccp-charstyle="Style (Complex) Open Sans">All issues including closed are retrieved by default. If users want to retrieve only open requests, you need to change </span><span class="NormalTextRun ContextualSpellingAndGrammarErrorV2Themed SCXW248096181 BCX8" data-ccp-charstyle="Style (Complex) Open Sans">State</span><span class="NormalTextRun SCXW248096181 BCX8" data-ccp-charstyle="Style (Complex) Open Sans"> parameter to open.</span></span><span class="EOP SCXW248096181 BCX8" data-ccp-props="{"201341983":0,"335559739":160,"335559740":259}"> </span>

<span class="TextRun SCXW248096181 BCX8" data-contrast="auto" lang="EN-US" xml:lang="EN-US"><span class="NormalTextRun SCXW248096181 BCX8" data-ccp-charstyle="Style (Complex) Open Sans">To use this integration, users must use </span><span class="NormalTextRun SpellingErrorV2Themed SCXW248096181 BCX8" data-ccp-charstyle="Style (Complex) Open Sans">Github</span><span class="NormalTextRun SCXW248096181 BCX8" data-ccp-charstyle="Style (Complex) Open Sans"> Apps or Personal Access Token with read permission to repositories or organization. Please refer to </span><span class="NormalTextRun SpellingErrorV2Themed SCXW248096181 BCX8" data-ccp-charstyle="Style (Complex) Open Sans">Github</span><span class="NormalTextRun SCXW248096181 BCX8" data-ccp-charstyle="Style (Complex) Open Sans"> Apps Permissions Required and Personal Access Token Permissions Required for more details.</span></span><span class="EOP SCXW248096181 BCX8" data-ccp-props="{"201341983":0,"335559739":160,"335559740":259}"> </span>

<div class="SCXW248096181 BCX8" id="bkmrk-assumptions%C2%A0"><div class="ListContainerWrapper SCXW248096181 BCX8">  
</div></div><div class="SCXW248096181 BCX8" id="bkmrk-compatibility%C2%A0"></div>##### **<span class="TextRun SCXW248096181 BCX8" data-contrast="none" lang="EN-US" style="color: rgb(53, 152, 219);" xml:lang="EN-US"><span class="NormalTextRun SCXW248096181 BCX8" data-ccp-charstyle="eop">GitHub</span><span class="NormalTextRun SCXW248096181 BCX8" data-ccp-charstyle="eop"> Integration Procedures</span></span><span class="EOP SCXW248096181 BCX8" data-ccp-props="{"134245418":true,"134245529":true,"201341983":0,"335559738":240,"335559739":0,"335559740":360}"> </span>**

<div class="SCXW248096181 BCX8" id="bkmrk-this-integration-is--1"><div class="ListContainerWrapper SCXW248096181 BCX8">  
</div><div class="OutlineElement Ltr SCXW248096181 BCX8"><span class="TextRun Highlight SCXW248096181 BCX8" data-contrast="none" lang="EN-US" style="outline-color: var(--color-primary); font-style: normal; font-variant-ligatures: normal; font-variant-caps: normal; font-weight: 400; font-size: 14px; font-family: -apple-system, BlinkMacSystemFont, 'Segoe UI', Oxygen, Ubuntu, Roboto, Cantarell, 'Fira Sans', 'Droid Sans', 'Helvetica Neue', sans-serif;" xml:lang="EN-US"><span class="NormalTextRun SCXW248096181 BCX8" data-ccp-parastyle="CyTech Heading 1" data-ccp-parastyle-defn="{"ObjectId":"5a90b002-20e4-447b-80ff-525bca920e3d|233","ClassId":1073872969,"Properties":[469777841,"Open Sans",469777844,"Open Sans",469769226,"Open Sans",201342446,"1",201342447,"4",201342448,"2",201342449,"1",469777842,"Open Sans",469777843,"",201341986,"4",268442635,"36",335559704,"1037",335559705,"1033",335551547,"1033",335559740,"360",201341983,"0",335559739,"0",335551500,"1809913",335559738,"240",335560102,"0",134245418,"true",134245529,"true",469775450,"CyTech Heading 1",201340122,"2",134234082,"true",134233614,"true",469778129,"CyTechHeading1",335572020,"1",469777929,"CyTech Heading 1 Char",469778324,"heading 1"]}" data-ccp-parastyle-linked-defn="{"ObjectId":"5a90b002-20e4-447b-80ff-525bca920e3d|236","ClassId":1073872969,"Properties":[201342446,"1",201342447,"4",201342448,"2",201342449,"1",469777841,"Open Sans",469777842,"Open Sans",469777843,"",469777844,"Open Sans",201341986,"1",469769226,"Open Sans",268442635,"36",335559704,"1037",335559705,"1033",335551547,"1033",335559740,"259",201341983,"0",335559739,"160",335551500,"1809913",469775450,"CyTech Heading 1 Char",201340122,"1",134233614,"true",469778129,"CyTechHeading1Char",335572020,"1",134231262,"true",469777929,"CyTech Heading 1",469778324,"Heading 1 Char"]}" style="outline-color: var(--color-primary);">This integration is not compatible with GitHub Enterprise server.</span></span><span class="EOP SCXW248096181 BCX8" data-ccp-props="{"134245418":true,"134245529":true,"201341983":0,"335559685":360,"335559738":240,"335559739":0,"335559740":360}" style="outline-color: var(--color-primary); font-style: normal; font-variant-ligatures: normal; font-variant-caps: normal; font-weight: 400; font-size: 14px; font-family: -apple-system, BlinkMacSystemFont, 'Segoe UI', Oxygen, Ubuntu, Roboto, Cantarell, 'Fira Sans', 'Droid Sans', 'Helvetica Neue', sans-serif;"> </span>  
</div></div><span class="TextRun SCXW248096181 BCX8" data-contrast="auto" lang="EN-US" xml:lang="EN-US"><span class="NormalTextRun SCXW248096181 BCX8" data-ccp-charstyle="eop">Please provide the following information to </span><span class="NormalTextRun SpellingErrorV2Themed SCXW248096181 BCX8" data-ccp-charstyle="eop">CyTech</span><span class="NormalTextRun SCXW248096181 BCX8" data-ccp-charstyle="eop">:</span></span><span class="EOP SCXW248096181 BCX8" data-ccp-props="{"201341983":0,"335559685":720,"335559739":160,"335559740":259}"> </span>

<span class="TextRun SCXW248096181 BCX8" data-contrast="auto" lang="EN-US" xml:lang="EN-US"><span class="NormalTextRun SCXW248096181 BCX8" data-ccp-charstyle="eop">1.</span><span class="NormalTextRun SCXW248096181 BCX8" data-ccp-charstyle="eop">Select Settings</span></span><span class="WACImageContainer NoPadding DragDrop BlobObject SCXW248096181 BCX8" role="presentation">![](https://cytechint-docs-bookstack.s3.amazonaws.com/uploads/images/gallery/2024-04/embedded-image-qngegf9t.png)</span><span class="EOP SCXW248096181 BCX8" data-ccp-props="{"201341983":0,"335559685":720,"335559739":160,"335559740":259}"> </span>

<span class="TextRun SCXW248096181 BCX8" data-contrast="auto" lang="EN-US" xml:lang="EN-US"><span class="NormalTextRun SCXW248096181 BCX8">2.</span> <span class="NormalTextRun SCXW248096181 BCX8">Select Developer Setting</span><span class="NormalTextRun SCXW248096181 BCX8">s</span></span><span class="EOP SCXW248096181 BCX8" data-ccp-props="{"201341983":0,"335559685":720,"335559739":160,"335559740":259}"> </span>

<span class="SCXW248096181 BCX8"><span class="WACImageContainer NoPadding DragDrop BlobObject SCXW248096181 BCX8" role="presentation">![](https://cytechint-docs-bookstack.s3.amazonaws.com/uploads/images/gallery/2024-04/embedded-image-upl0fcbw.png)</span></span><span class="EOP SCXW248096181 BCX8" data-ccp-props="{"201341983":0,"335559685":720,"335559739":160,"335559740":259}"> </span>

<span class="EOP SCXW248096181 BCX8" data-ccp-props="{"201341983":0,"335559685":720,"335559739":160,"335559740":259}"> </span>

<span class="TextRun SCXW248096181 BCX8" data-contrast="auto" lang="EN-US" xml:lang="EN-US"><span class="NormalTextRun SCXW248096181 BCX8">3. </span><span class="NormalTextRun SCXW248096181 BCX8">Select </span><span class="NormalTextRun SCXW248096181 BCX8">token (classic)</span></span><span class="WACImageContainer NoPadding DragDrop BlobObject SCXW248096181 BCX8" role="presentation">![](https://cytechint-docs-bookstack.s3.amazonaws.com/uploads/images/gallery/2024-04/embedded-image-zdikognp.png)</span><span class="EOP SCXW248096181 BCX8" data-ccp-props="{"201341983":0,"335559685":720,"335559739":160,"335559740":259}"> </span>

<span class="TextRun SCXW248096181 BCX8" data-contrast="auto" lang="EN-US" xml:lang="EN-US"><span class="NormalTextRun SCXW248096181 BCX8">4. Select </span><span class="NormalTextRun SCXW248096181 BCX8">scope</span> <span class="NormalTextRun SpellingErrorV2Themed SCXW248096181 BCX8">admin:</span><span class="NormalTextRun SpellingErrorV2Themed SCXW248096181 BCX8">scope</span></span><span class="EOP SCXW248096181 BCX8" data-ccp-props="{"201341983":0,"335559685":720,"335559739":160,"335559740":259}"> </span>

<span class="WACImageGroupContainer SCXW248096181 BCX8"><span class="WACImageContainer NoPadding AttachedToBeginning DragDrop SCXW248096181 BCX8" role="presentation">![](https://cytechint-docs-bookstack.s3.amazonaws.com/uploads/images/gallery/2024-04/embedded-image-4x2m4agr.png)</span></span>

##### <span style="color: rgb(53, 152, 219);"><span class="TextRun SCXW248096181 BCX8" data-contrast="none" lang="EN-US" xml:lang="EN-US"><span class="NormalTextRun SCXW248096181 BCX8" data-ccp-charstyle="eop">**Collect GitHub logs via** </span>**<span class="NormalTextRun SCXW248096181 BCX8" data-ccp-charstyle="eop">API</span>**</span>**<span class="EOP SCXW248096181 BCX8" data-ccp-props="{"134245418":true,"134245529":true,"201341983":0,"335559685":360,"335559738":240,"335559739":0,"335559740":360}"> </span>**</span>

<div class="SCXW248096181 BCX8" id="bkmrk-personal-access-toke"><div class="ListContainerWrapper SCXW248096181 BCX8">1. <span class="TextRun SCXW248096181 BCX8" data-contrast="auto" lang="EN-US" xml:lang="EN-US"><span class="NormalTextRun SCXW248096181 BCX8" data-ccp-charstyle="eop">Personal Access Token</span><span class="NormalTextRun SCXW248096181 BCX8" data-ccp-charstyle="eop"> - </span><span class="NormalTextRun SCXW248096181 BCX8" data-ccp-charstyle="eop">the GitHub Personal Access Token. Requires the '</span><span class="NormalTextRun SpellingErrorV2Themed SCXW248096181 BCX8" data-ccp-charstyle="eop">admin:org</span><span class="NormalTextRun SCXW248096181 BCX8" data-ccp-charstyle="eop">' </span><span class="NormalTextRun SCXW248096181 BCX8" data-ccp-charstyle="eop">scope</span></span><span class="EOP SCXW248096181 BCX8" data-ccp-props="{"201341983":0,"335559739":160,"335559740":259}"> </span>

</div></div><div class="SCXW248096181 BCX8" id="bkmrk-organization-name---"><div class="ListContainerWrapper SCXW248096181 BCX8">2. <span class="TextRun SCXW248096181 BCX8" data-contrast="auto" lang="EN-US" xml:lang="EN-US"><span class="NormalTextRun SCXW248096181 BCX8" data-ccp-charstyle="eop">Organization Name</span><span class="NormalTextRun SCXW248096181 BCX8" data-ccp-charstyle="eop"> - </span><span class="NormalTextRun SCXW248096181 BCX8" data-ccp-charstyle="eop">The GitHub organization name/ID</span></span><span class="EOP SCXW248096181 BCX8" data-ccp-props="{"201341983":0,"335559739":160,"335559740":259}"> </span>

</div></div>##### <span style="color: rgb(53, 152, 219);"><span class="TextRun SCXW248096181 BCX8" data-contrast="none" lang="EN-US" xml:lang="EN-US">**<span class="NormalTextRun SCXW248096181 BCX8" data-ccp-charstyle="eop">GHAS Code Scanning</span>**</span>**<span class="EOP SCXW248096181 BCX8" data-ccp-props="{"134245418":true,"134245529":true,"201341983":0,"335559738":240,"335559739":0,"335559740":360}"> </span>**</span>

<div class="SCXW248096181 BCX8" id="bkmrk-personal-access-toke-1"><div class="ListContainerWrapper SCXW248096181 BCX8">1. <span class="TextRun SCXW248096181 BCX8" data-contrast="auto" lang="EN-US" xml:lang="EN-US"><span class="NormalTextRun SCXW248096181 BCX8" data-ccp-charstyle="eop">Personal Access Token</span><span class="NormalTextRun SCXW248096181 BCX8" data-ccp-charstyle="eop"> - </span><span class="NormalTextRun SCXW248096181 BCX8" data-ccp-charstyle="eop">the GitHub Personal Access Token. Requires the '</span><span class="NormalTextRun SpellingErrorV2Themed SCXW248096181 BCX8" data-ccp-charstyle="eop">public\_repo</span><span class="NormalTextRun SCXW248096181 BCX8" data-ccp-charstyle="eop">' scope for public repositories and '</span><span class="NormalTextRun SpellingErrorV2Themed SCXW248096181 BCX8" data-ccp-charstyle="eop">security\_events</span><span class="NormalTextRun SCXW248096181 BCX8" data-ccp-charstyle="eop">' scope for private repositories. \\</span><span class="NormalTextRun SpellingErrorV2Themed SCXW248096181 BCX8" data-ccp-charstyle="eop">nSee</span><span class="NormalTextRun SCXW248096181 BCX8" data-ccp-charstyle="eop"> List code scanning alerts for a repository</span></span><span class="EOP SCXW248096181 BCX8" data-ccp-props="{"201341983":0,"335559739":160,"335559740":259}"> </span>

</div><div class="ListContainerWrapper SCXW248096181 BCX8">2. <span class="TextRun SCXW248096181 BCX8" data-contrast="auto" lang="EN-US" xml:lang="EN-US"><span class="NormalTextRun SCXW248096181 BCX8" data-ccp-charstyle="eop">Repository owner</span><span class="NormalTextRun SCXW248096181 BCX8" data-ccp-charstyle="eop"> - </span><span class="NormalTextRun SCXW248096181 BCX8" data-ccp-charstyle="eop">The owner of GitHub Repository. If repository belongs to an organization, owner is name of the </span><span class="NormalTextRun SCXW248096181 BCX8" data-ccp-charstyle="eop">organization</span></span><span class="EOP SCXW248096181 BCX8" data-ccp-props="{"201341983":0,"335559739":160,"335559740":259}"> </span>

</div></div>##### <span style="color: rgb(53, 152, 219);"><span class="TextRun SCXW248096181 BCX8" data-contrast="none" lang="EN-US" xml:lang="EN-US">**<span class="NormalTextRun SCXW248096181 BCX8" data-ccp-charstyle="eop">GHAS </span><span class="NormalTextRun SpellingErrorV2Themed SCXW248096181 BCX8" data-ccp-charstyle="eop">Dependabot</span>**</span><span class="EOP SCXW248096181 BCX8" data-ccp-props="{"134245418":true,"134245529":true,"201341983":0,"335559738":240,"335559739":0,"335559740":360}"> </span></span>

<div class="SCXW248096181 BCX8" id="bkmrk-personal-access-toke-2"><div class="ListContainerWrapper SCXW248096181 BCX8">1. <span class="TextRun SCXW248096181 BCX8" data-contrast="auto" lang="EN-US" xml:lang="EN-US"><span class="NormalTextRun SCXW248096181 BCX8" data-ccp-charstyle="eop">Personal Access Token</span><span class="NormalTextRun SCXW248096181 BCX8" data-ccp-charstyle="eop"> - </span><span class="NormalTextRun SCXW248096181 BCX8" data-ccp-charstyle="eop">The GitHub Personal Access Token. \\</span><span class="NormalTextRun SpellingErrorV2Themed SCXW248096181 BCX8" data-ccp-charstyle="eop">nSee</span><span class="NormalTextRun SCXW248096181 BCX8" data-ccp-charstyle="eop"> Authenticating with </span><span class="NormalTextRun SpellingErrorV2Themed SCXW248096181 BCX8" data-ccp-charstyle="eop">GraphQL</span></span><span class="EOP SCXW248096181 BCX8" data-ccp-props="{"201341983":0,"335559739":160,"335559740":259}"> </span>

</div><div class="ListContainerWrapper SCXW248096181 BCX8">2. <span class="TextRun SCXW248096181 BCX8" data-contrast="auto" lang="EN-US" xml:lang="EN-US"><span class="NormalTextRun SCXW248096181 BCX8" data-ccp-charstyle="eop">Repository owner</span><span class="NormalTextRun SCXW248096181 BCX8" data-ccp-charstyle="eop"> - </span><span class="NormalTextRun SCXW248096181 BCX8" data-ccp-charstyle="eop">The owner of GitHub Repository</span></span><span class="EOP SCXW248096181 BCX8" data-ccp-props="{"201341983":0,"335559739":160,"335559740":259}"> </span>

</div></div>##### <span class="TextRun SCXW248096181 BCX8" data-contrast="none" lang="EN-US" style="color: rgb(53, 152, 219);" xml:lang="EN-US">**<span class="NormalTextRun SpellingErrorV2Themed SCXW248096181 BCX8" data-ccp-charstyle="eop">Github</span><span class="NormalTextRun SCXW248096181 BCX8" data-ccp-charstyle="eop"> Issues</span>**</span><span class="EOP SCXW248096181 BCX8" data-ccp-props="{"134245418":true,"134245529":true,"201341983":0,"335559738":240,"335559739":0,"335559740":360}"> </span>

<span class="TextRun SCXW248096181 BCX8" data-contrast="auto" lang="EN-US" xml:lang="EN-US"><span class="NormalTextRun SCXW248096181 BCX8" data-ccp-charstyle="eop">1.</span> <span class="NormalTextRun SCXW248096181 BCX8" data-ccp-charstyle="eop">Personal Access Token</span><span class="NormalTextRun SCXW248096181 BCX8" data-ccp-charstyle="eop"> - </span><span class="NormalTextRun SCXW248096181 BCX8" data-ccp-charstyle="eop">the GitHub Personal Access Token.</span></span><span class="EOP SCXW248096181 BCX8" data-ccp-props="{"201341983":0,"335559685":1440,"335559739":160,"335559740":259}"> </span>

<span class="TextRun SCXW248096181 BCX8" data-contrast="auto" lang="EN-US" xml:lang="EN-US"><span class="NormalTextRun SCXW248096181 BCX8" data-ccp-charstyle="eop">2.</span> <span class="NormalTextRun SCXW248096181 BCX8" data-ccp-charstyle="eop">Repository owner</span><span class="NormalTextRun SCXW248096181 BCX8" data-ccp-charstyle="eop"> - </span><span class="NormalTextRun SCXW248096181 BCX8" data-ccp-charstyle="eop">The owner of GitHub Repository. If </span><span class="NormalTextRun ContextualSpellingAndGrammarErrorV2Themed SCXW248096181 BCX8" data-ccp-charstyle="eop">repository</span><span class="NormalTextRun SCXW248096181 BCX8" data-ccp-charstyle="eop"> belongs to an organization, </span><span class="NormalTextRun ContextualSpellingAndGrammarErrorV2Themed SCXW248096181 BCX8" data-ccp-charstyle="eop">owner</span><span class="NormalTextRun SCXW248096181 BCX8" data-ccp-charstyle="eop"> is </span><span class="NormalTextRun ContextualSpellingAndGrammarErrorV2Themed SCXW248096181 BCX8" data-ccp-charstyle="eop">name</span><span class="NormalTextRun SCXW248096181 BCX8" data-ccp-charstyle="eop"> of the organization.</span></span>

##### <span style="color: rgb(53, 152, 219);"><span class="TextRun SCXW248096181 BCX8" data-contrast="none" lang="EN-US" xml:lang="EN-US">**<span class="NormalTextRun SCXW248096181 BCX8" data-ccp-charstyle="eop">GHAS Secret Scanning</span>**</span>**<span class="EOP SCXW248096181 BCX8" data-ccp-props="{"134245418":true,"134245529":true,"201341983":0,"335559738":240,"335559739":0,"335559740":360}"> </span>**</span>

<span class="TextRun SCXW248096181 BCX8" data-contrast="auto" lang="EN-US" xml:lang="EN-US"><span class="NormalTextRun SCXW248096181 BCX8" data-ccp-charstyle="eop">1.</span> <span class="NormalTextRun SCXW248096181 BCX8" data-ccp-charstyle="eop">Personal Access Token</span><span class="NormalTextRun SCXW248096181 BCX8" data-ccp-charstyle="eop"> - </span><span class="NormalTextRun SCXW248096181 BCX8" data-ccp-charstyle="eop">the GitHub Personal Access Token. Requires admin access to the repository or organization owning the repository along with a personal access token with '</span><span class="NormalTextRun SpellingErrorV2Themed SCXW248096181 BCX8" data-ccp-charstyle="eop">public\_repo</span><span class="NormalTextRun SCXW248096181 BCX8" data-ccp-charstyle="eop">' scope for public repositories and repo or </span><span class="NormalTextRun SpellingErrorV2Themed SCXW248096181 BCX8" data-ccp-charstyle="eop">security\_events</span><span class="NormalTextRun SCXW248096181 BCX8" data-ccp-charstyle="eop"> scope for private repositories. \\</span><span class="NormalTextRun SpellingErrorV2Themed SCXW248096181 BCX8" data-ccp-charstyle="eop">nSee</span><span class="NormalTextRun SCXW248096181 BCX8" data-ccp-charstyle="eop"> List secret scanning alerts for a repository</span></span><span class="EOP SCXW248096181 BCX8" data-ccp-props="{"201341983":0,"335559685":1440,"335559739":160,"335559740":259}"> </span>

<span class="TextRun SCXW248096181 BCX8" data-contrast="auto" lang="EN-US" xml:lang="EN-US"><span class="NormalTextRun SCXW248096181 BCX8" data-ccp-charstyle="eop">2.</span> <span class="NormalTextRun SCXW248096181 BCX8" data-ccp-charstyle="eop">Repository owner</span><span class="NormalTextRun SCXW248096181 BCX8" data-ccp-charstyle="eop"> - </span><span class="NormalTextRun SCXW248096181 BCX8" data-ccp-charstyle="eop">The owner of GitHub Repository</span></span><span class="EOP SCXW248096181 BCX8" data-ccp-props="{"201341983":0,"335559685":1440,"335559739":160,"335559740":259}"></span>

# GitHub Integration

### GitHub Integration

The GitHub integration collects events from the [GitHub API](https://docs.github.com/en/rest).

#### Logs

##### Audit

The GitHub audit log records all events related to the GitHub organization. See [Audit log actions](https://docs.github.com/en/organizations/keeping-your-organization-secure/reviewing-the-audit-log-for-your-organization#audit-log-actions) for more details.

To use this integration, the following prerequisites must be met:

- You must be an organization owner.
- You must be using Github Enterprise Cloud.
- You must use a Personal Access Token with `read:audit_log` scope.

*This integration is not compatible with GitHub Enterprise server.*

##### Code Scanning

The Code Scanning lets you retrieve all security vulnerabilities and coding errors from a repository setup using Github Advanced Security Code Scanning feature. See [About code scanning](https://docs.github.com/en/code-security/code-scanning/automatically-scanning-your-code-for-vulnerabilities-and-errors/about-code-scanning) for more details.

To use this integration, GitHub Apps must have the `security_events` read permission. Or use a personal access token with the `security_events` scope for private repos or `public_repo` scope for public repos. See [List code scanning alerts](https://docs.github.com/en/enterprise-cloud@latest/rest/code-scanning#list-code-scanning-alerts-for-a-repository)

##### Secret Scanning

The Github Secret Scanning lets you retrieve secret scanning for advanced security alerts from a repository setup using Github Advanced Security Secret Scanning feature. See [About Secret scanning](https://docs.github.com/en/enterprise-cloud@latest/code-security/secret-scanning/about-secret-scanning) for more details.

To use this integration, GitHub Apps must have the `secret_scanning_alerts` read permission. Or you must be an administrator for the repository or for the organization that owns the repository, and you must use a personal access token with the `repo` scope or `security_events` scope. For public repositories, you may instead use the `public_repo` scope. See [List secret scanning alerts](https://docs.github.com/en/enterprise-cloud@latest/rest/secret-scanning#list-secret-scanning-alerts-for-a-repository)

##### Dependabot

The Github Dependabot lets you retrieve known vulnerabilites in dependencies from a repository setup using Github Advanced Security Dependabot feature. See [About Dependabot](https://docs.github.com/en/code-security/dependabot/dependabot-alerts) for more details.

To use this integration, you must be an administrator for the repository or for the organization that owns the repository, and you must use a personal access token with the `repo` scope or `security_events` scope. For public repositories, you may instead use the `public_repo` scope. See [Authenticating with GraphQL](https://docs.github.com/en/graphql/guides/forming-calls-with-graphql#authenticating-with-graphql) and [Token Issue](https://github.com/dependabot/feedback/issues/169)

##### Issues

The Github Issues datastream lets you retrieve github issues, including pull requests, issue assignees, comments, labels, and milestones. See [About Issues](https://docs.github.com/en/rest/issues/issues?apiVersion=latest) for more details. You can retrieve issues for specific repository or for entire organization. Since Github API considers pull requests as issues, users can use `github.issues.is_pr` field to filter for only pull requests.

All issues including `closed` are retrieved by default. If users want to retrieve only `open` requests, you need to change `State` parameter to `open`.

To use this integration, users must use Github Apps or Personal Access Token with `read` permission to repositories or organization. Please refer to [Github Apps Permissions Required](https://docs.github.com/en/rest/overview/permissions-required-for-github-apps?apiVersion=latest) and [Personal Access Token Permissions Required](https://docs.github.com/en/rest/overview/permissions-required-for-fine-grained-personal-access-tokens?apiVersion=latest) for more details.

# GitHub Integration

# **GitHub Integration**

## **Introduction**

Elastic’s GitHub integration allows you to ingest GitHub logs, alerts, and developer activities into the Elastic Stack for centralized analysis. This supports use cases like vulnerability management, compliance auditing, and DevSecOps monitoring.

Note: This integration is only compatible with **GitHub Enterprise Cloud** and is **not supported on GitHub Enterprise Server**.

---

## **GitHub Data Streams Overview**

<div class="_tableContainer_16hzy_1" id="bkmrk-feature-integration-"><div class="_tableWrapper_16hzy_14 group flex w-fit flex-col-reverse" tabindex="-1"><table class="w-fit min-w-(--thread-content-width)" data-end="1400" data-start="639"><thead data-end="747" data-start="639"><tr data-end="747" data-start="639"><th data-col-size="sm" data-end="659" data-start="639">Feature</th><th data-col-size="sm" data-end="678" data-start="659">Integration Type</th><th data-col-size="md" data-end="747" data-start="678">Description</th></tr></thead><tbody data-end="1400" data-start="856"><tr data-end="964" data-start="856"><td data-col-size="sm" data-end="876" data-start="856">Audit Logs</td><td data-col-size="sm" data-end="895" data-start="876">PAT</td><td data-col-size="md" data-end="964" data-start="895">Track org-level admin and security events</td></tr><tr data-end="1073" data-start="965"><td data-col-size="sm" data-end="985" data-start="965">Code Scanning</td><td data-col-size="sm" data-end="1004" data-start="985">GitHub App / PAT</td><td data-col-size="md" data-end="1073" data-start="1004">Pull static analysis results from GitHub Advanced Security</td></tr><tr data-end="1182" data-start="1074"><td data-col-size="sm" data-end="1094" data-start="1074">Secret Scanning</td><td data-col-size="sm" data-end="1113" data-start="1094">GitHub App / PAT</td><td data-col-size="md" data-end="1182" data-start="1113">Detect exposed secrets (API keys, tokens, etc.) in repositories</td></tr><tr data-end="1291" data-start="1183"><td data-col-size="sm" data-end="1203" data-start="1183">Dependabot Alerts</td><td data-col-size="sm" data-end="1222" data-start="1203">GitHub App / PAT</td><td data-col-size="md" data-end="1291" data-start="1222">Retrieve alerts on insecure open-source dependencies</td></tr><tr data-end="1400" data-start="1292"><td data-col-size="sm" data-end="1312" data-start="1292">Issues &amp; PRs</td><td data-col-size="sm" data-end="1331" data-start="1312">GitHub App / PAT</td><td data-col-size="md" data-end="1400" data-start="1331">Sync issues, pull requests, comments, labels, and milestones</td></tr></tbody></table>

<div class="sticky end-(--thread-content-margin) h-0 self-end select-none"><div class="absolute end-0 flex items-end"><span class="" data-state="closed"><button class="bg-token-bg-primary hover:bg-token-bg-tertiary text-token-text-secondary my-1 rounded-sm p-1 transition-opacity group-[:not(:hover):not(:focus-within)]:pointer-events-none group-[:not(:hover):not(:focus-within)]:opacity-0"><svg class="icon" fill="currentColor" height="20" viewbox="0 0 20 20" width="20" xmlns="http://www.w3.org/2000/svg"><path d="M12.668 10.667C12.668 9.95614 12.668 9.46258 12.6367 9.0791C12.6137 8.79732 12.5758 8.60761 12.5244 8.46387L12.4688 8.33399C12.3148 8.03193 12.0803 7.77885 11.793 7.60254L11.666 7.53125C11.508 7.45087 11.2963 7.39395 10.9209 7.36328C10.5374 7.33197 10.0439 7.33203 9.33301 7.33203H6.5C5.78896 7.33203 5.29563 7.33195 4.91211 7.36328C4.63016 7.38632 4.44065 7.42413 4.29688 7.47559L4.16699 7.53125C3.86488 7.68518 3.61186 7.9196 3.43555 8.20703L3.36524 8.33399C3.28478 8.49198 3.22795 8.70352 3.19727 9.0791C3.16595 9.46259 3.16504 9.95611 3.16504 10.667V13.5C3.16504 14.211 3.16593 14.7044 3.19727 15.0879C3.22797 15.4636 3.28473 15.675 3.36524 15.833L3.43555 15.959C3.61186 16.2466 3.86474 16.4807 4.16699 16.6348L4.29688 16.6914C4.44063 16.7428 4.63025 16.7797 4.91211 16.8027C5.29563 16.8341 5.78896 16.835 6.5 16.835H9.33301C10.0439 16.835 10.5374 16.8341 10.9209 16.8027C11.2965 16.772 11.508 16.7152 11.666 16.6348L11.793 16.5645C12.0804 16.3881 12.3148 16.1351 12.4688 15.833L12.5244 15.7031C12.5759 15.5594 12.6137 15.3698 12.6367 15.0879C12.6681 14.7044 12.668 14.211 12.668 13.5V10.667ZM13.998 12.665C14.4528 12.6634 14.8011 12.6602 15.0879 12.6367C15.4635 12.606 15.675 12.5492 15.833 12.4688L15.959 12.3975C16.2466 12.2211 16.4808 11.9682 16.6348 11.666L16.6914 11.5361C16.7428 11.3924 16.7797 11.2026 16.8027 10.9209C16.8341 10.5374 16.835 10.0439 16.835 9.33301V6.5C16.835 5.78896 16.8341 5.29563 16.8027 4.91211C16.7797 4.63025 16.7428 4.44063 16.6914 4.29688L16.6348 4.16699C16.4807 3.86474 16.2466 3.61186 15.959 3.43555L15.833 3.36524C15.675 3.28473 15.4636 3.22797 15.0879 3.19727C14.7044 3.16593 14.211 3.16504 13.5 3.16504H10.667C9.9561 3.16504 9.46259 3.16595 9.0791 3.19727C8.79739 3.22028 8.6076 3.2572 8.46387 3.30859L8.33399 3.36524C8.03176 3.51923 7.77886 3.75343 7.60254 4.04102L7.53125 4.16699C7.4508 4.32498 7.39397 4.53655 7.36328 4.91211C7.33985 5.19893 7.33562 5.54719 7.33399 6.00195H9.33301C10.022 6.00195 10.5791 6.00131 11.0293 6.03809C11.4873 6.07551 11.8937 6.15471 12.2705 6.34668L12.4883 6.46875C12.984 6.7728 13.3878 7.20854 13.6533 7.72949L13.7197 7.87207C13.8642 8.20859 13.9292 8.56974 13.9619 8.9707C13.9987 9.42092 13.998 9.97799 13.998 10.667V12.665ZM18.165 9.33301C18.165 10.022 18.1657 10.5791 18.1289 11.0293C18.0961 11.4302 18.0311 11.7914 17.8867 12.1279L17.8203 12.2705C17.5549 12.7914 17.1509 13.2272 16.6553 13.5313L16.4365 13.6533C16.0599 13.8452 15.6541 13.9245 15.1963 13.9619C14.8593 13.9895 14.4624 13.9935 13.9951 13.9951C13.9935 14.4624 13.9895 14.8593 13.9619 15.1963C13.9292 15.597 13.864 15.9576 13.7197 16.2939L13.6533 16.4365C13.3878 16.9576 12.9841 17.3941 12.4883 17.6982L12.2705 17.8203C11.8937 18.0123 11.4873 18.0915 11.0293 18.1289C10.5791 18.1657 10.022 18.165 9.33301 18.165H6.5C5.81091 18.165 5.25395 18.1657 4.80371 18.1289C4.40306 18.0962 4.04235 18.031 3.70606 17.8867L3.56348 17.8203C3.04244 17.5548 2.60585 17.151 2.30176 16.6553L2.17969 16.4365C1.98788 16.0599 1.90851 15.6541 1.87109 15.1963C1.83431 14.746 1.83496 14.1891 1.83496 13.5V10.667C1.83496 9.978 1.83432 9.42091 1.87109 8.9707C1.90851 8.5127 1.98772 8.10625 2.17969 7.72949L2.30176 7.51172C2.60586 7.0159 3.04236 6.6122 3.56348 6.34668L3.70606 6.28027C4.04237 6.136 4.40303 6.07083 4.80371 6.03809C5.14051 6.01057 5.53708 6.00551 6.00391 6.00391C6.00551 5.53708 6.01057 5.14051 6.03809 4.80371C6.0755 4.34588 6.15483 3.94012 6.34668 3.56348L6.46875 3.34473C6.77282 2.84912 7.20856 2.44514 7.72949 2.17969L7.87207 2.11328C8.20855 1.96886 8.56979 1.90385 8.9707 1.87109C9.42091 1.83432 9.978 1.83496 10.667 1.83496H13.5C14.1891 1.83496 14.746 1.83431 15.1963 1.87109C15.6541 1.90851 16.0599 1.98788 16.4365 2.17969L16.6553 2.30176C17.151 2.60585 17.5548 3.04244 17.8203 3.56348L17.8867 3.70606C18.031 4.04235 18.0962 4.40306 18.1289 4.80371C18.1657 5.25395 18.165 5.81091 18.165 6.5V9.33301Z"></path></svg></button></span></div></div></div></div>---

## **Option 1: GitHub Audit Logs**

**Description:**  
Audit logs contain records of all administrative and security events within a GitHub organization.

### Requirements

- GitHub Enterprise Cloud
- You must be an organization owner
- Use a Personal Access Token (PAT) with `read:audit_log` scope

### What It Does

- Captures repository creation, permission changes, team updates, and more
- Helps detect suspicious or non-compliant behavior

### Setup Steps

1. **Create a PAT**
    
    
    - Go to GitHub → Developer Settings → Personal Access Tokens
    - Click "Generate new token"
    - Select `read:audit_log` scope
    - Save the token securely
2. **Configure Integration in Elastic**
    
    
    - Navigate to Integrations in Kibana
    - Search for "GitHub" and click "Add GitHub integration"
    - Select the "Audit Logs" data stream
    - Enter your organization name and paste your PAT
3. **Test and Deploy**
    
    
    - Click "Test integration" to verify connectivity
    - Choose a data stream name and index settings
    - Click "Save and Deploy"
4. **Verify in Kibana**
    
    
    - Navigate to Discover
    - Use the index pattern `logs-github.audit-*`
    - Filter using fields such as `actor`, `action`, or `created_at`

---

## **Option 2: Code Scanning Alerts**

**Description:**  
Collect static code analysis results from GitHub Advanced Security Code Scanning.

### Requirements

- Code Scanning must be enabled per repository
- Use either:
    
    
    - GitHub App with `security_events` read permission
    - PAT with:
        
        
        - `security_events` (for private repositories)
        - `public_repo` (for public repositories)

### What It Does

- Ingests vulnerabilities and insecure code patterns
- Supports SARIF format scan results

### Setup Steps

1. **Enable Code Scanning in GitHub**
    
    
    - Go to your repository → Security → Code scanning alerts
    - Enable GitHub Advanced Security
    - Configure workflows such as CodeQL
2. **Generate PAT or GitHub App**
    
    
    - If using a PAT, ensure it includes `security_events` or `public_repo` scope
3. **Configure Integration in Elastic**
    
    
    - Open Integrations in Kibana
    - Add GitHub integration and select "Code Scanning"
    - Input organization name and credentials
4. **Test and Configure**
    
    
    - Test the integration
    - Set polling frequency (e.g., every 5 minutes)
    - Save and deploy
5. **Monitor in Kibana**
    
    
    - Use Discover with the index pattern `logs-github.code_scanning-*`
    - Filter by fields such as `severity`, `rule_id`, or `repository.name`

---

## **Option 3: Secret Scanning Alerts**

**Description:**  
Detect and alert on exposed secrets in source code repositories.

### Requirements

- Secret Scanning must be enabled in repository settings
- You must be a repository or organization administrator
- Use either:
    
    
    - GitHub App with `secret_scanning_alerts` read permission
    - PAT with:
        
        
        - `repo` or `security_events` (for private repos)
        - `public_repo` (for public repos)

### What It Does

- Flags exposed API keys, tokens, and credentials
- Helps prevent credential leaks

### Setup Steps

1. **Enable Secret Scanning**
    
    
    - Go to GitHub repo → Settings → Code Security and Analysis
    - Enable "Secret scanning alerts"
2. **Generate Access**
    
    
    - Create a PAT with appropriate scopes
    - Or set up a GitHub App with necessary permissions
3. **Configure in Elastic**
    
    
    - Go to the GitHub integration in Kibana
    - Enable the "Secret Scanning" stream
    - Provide token and repository/org details
4. **Test and Save**
    
    
    - Test the connection
    - Select desired polling interval (e.g., 10 minutes)
    - Save and deploy
5. **Analyze Alerts**
    
    
    - Open Discover and use `logs-github.secret_scanning-*`
    - Use filters such as `alert_type`, `secret_type`, and `state`

---

## **Option 4: Dependabot Alerts**

**Description:**  
Monitor dependency vulnerabilities in GitHub repositories using Dependabot.

### Requirements

- Dependabot must be enabled in repository settings
- You must be a repository or organization administrator
- Use either:
    
    
    - GitHub App
    - PAT with:
        
        
        - `repo`, `security_events`, or `public_repo` scope

### What It Does

- Identifies and alerts on known insecure packages
- Includes CVE metadata and suggested fixes

### Setup Steps

1. **Enable Dependabot in GitHub**
    
    
    - Go to Repository → Settings → Code Security and Analysis
    - Enable "Dependency Graph" and "Dependabot alerts"
2. **Generate GitHub App or PAT**
    
    
    - Ensure scopes include `repo`, `security_events`, or `public_repo`
3. **Configure in Elastic**
    
    
    - Go to GitHub integration
    - Enable "Dependabot"
    - Enter org/repo and credentials
4. **Test and Deploy**
    
    
    - Test the integration
    - Select polling interval
    - Save settings
5. **Monitor in Kibana**
    
    
    - Use Discover → `logs-github.dependabot-*`
    - Filter by `dependency_name`, `ecosystem`, `severity`, etc.

---

## **Option 5: Issues &amp; Pull Requests**

**Description:**  
Ingest GitHub issues, pull requests, comments, labels, milestones, and other metadata.

### Requirements

- Use a GitHub App or PAT with:
    
    
    - `repo` (for private repositories)
    - `public_repo` (for public repositories)
    - Optional: `read:org` for org-wide access

### What It Does

- Collects all issue and PR activity
- Enables filtering of pull requests with `github.issues.is_pr = true`

### Setup Steps

1. **Create or Use PAT / GitHub App**
    
    
    - Ensure appropriate access to repositories
2. **Enable GitHub Integration in Elastic**
    
    
    - Choose "Issues" as the data stream
    - Enter credentials and repository/organization name
3. **Customize Settings**
    
    
    - Set state filter (e.g., `state=open` for open issues only)
    - Configure sync interval
4. **Test and Activate**
    
    
    - Verify GitHub API connectivity
    - Deploy integration
5. **View Data in Kibana**
    
    
    - Go to Discover → `logs-github.issues-*`
    - Use filters such as `assignees`, `labels`, `state`, or `is_pr`

---

## **Comparison Table**

<div class="_tableContainer_16hzy_1" id="bkmrk-feature-github-app-p"><div class="_tableWrapper_16hzy_14 group flex w-fit flex-col-reverse" tabindex="-1"><table class="w-fit min-w-(--thread-content-width)" data-end="8289" data-start="7307"><thead data-end="7445" data-start="7307"><tr data-end="7445" data-start="7307"><th data-col-size="sm" data-end="7327" data-start="7307">Feature</th><th data-col-size="sm" data-end="7340" data-start="7327">GitHub App</th><th data-col-size="sm" data-end="7370" data-start="7340">PAT Support</th><th data-col-size="sm" data-end="7413" data-start="7370">Required Scopes</th><th data-col-size="sm" data-end="7428" data-start="7413">Public Repos</th><th data-col-size="sm" data-end="7445" data-start="7428">Private Repos</th></tr></thead><tbody data-end="8289" data-start="7585"><tr data-end="7725" data-start="7585"><td data-col-size="sm" data-end="7605" data-start="7585">Audit Logs</td><td data-col-size="sm" data-end="7618" data-start="7605">No</td><td data-col-size="sm" data-end="7648" data-start="7618">Yes</td><td data-col-size="sm" data-end="7691" data-start="7648">`read:audit_log`</td><td data-col-size="sm" data-end="7706" data-start="7691">No</td><td data-col-size="sm" data-end="7725" data-start="7706">Yes</td></tr><tr data-end="7866" data-start="7726"><td data-col-size="sm" data-end="7746" data-start="7726">Code Scanning</td><td data-col-size="sm" data-end="7759" data-start="7746">Yes</td><td data-col-size="sm" data-end="7789" data-start="7759">Yes</td><td data-col-size="sm" data-end="7832" data-start="7789">`security_events`, `public_repo`</td><td data-col-size="sm" data-end="7847" data-start="7832">Yes</td><td data-col-size="sm" data-end="7866" data-start="7847">Yes</td></tr><tr data-end="8007" data-start="7867"><td data-col-size="sm" data-end="7887" data-start="7867">Secret Scanning</td><td data-col-size="sm" data-end="7900" data-start="7887">Yes</td><td data-col-size="sm" data-end="7930" data-start="7900">Yes</td><td data-col-size="sm" data-end="7973" data-start="7930">`repo`, `security_events`, `public_repo`</td><td data-col-size="sm" data-end="7988" data-start="7973">Yes</td><td data-col-size="sm" data-end="8007" data-start="7988">Yes</td></tr><tr data-end="8148" data-start="8008"><td data-col-size="sm" data-end="8028" data-start="8008">Dependabot Alerts</td><td data-col-size="sm" data-end="8041" data-start="8028">Yes</td><td data-col-size="sm" data-end="8071" data-start="8041">Yes</td><td data-col-size="sm" data-end="8114" data-start="8071">`repo`, `security_events`, `public_repo`</td><td data-col-size="sm" data-end="8129" data-start="8114">Yes</td><td data-col-size="sm" data-end="8148" data-start="8129">Yes</td></tr><tr data-end="8289" data-start="8149"><td data-col-size="sm" data-end="8169" data-start="8149">Issues &amp; PRs</td><td data-col-size="sm" data-end="8182" data-start="8169">Yes</td><td data-col-size="sm" data-end="8212" data-start="8182">Yes</td><td data-col-size="sm" data-end="8255" data-start="8212">`repo`, `public_repo`, `read:org`</td><td data-col-size="sm" data-end="8270" data-start="8255">Yes</td><td data-col-size="sm" data-end="8289" data-start="8270">Yes</td></tr></tbody></table>

<div class="sticky end-(--thread-content-margin) h-0 self-end select-none"><div class="absolute end-0 flex items-end"><span class="" data-state="closed"><button class="bg-token-bg-primary hover:bg-token-bg-tertiary text-token-text-secondary my-1 rounded-sm p-1 transition-opacity group-[:not(:hover):not(:focus-within)]:pointer-events-none group-[:not(:hover):not(:focus-within)]:opacity-0"><svg class="icon" fill="currentColor" height="20" viewbox="0 0 20 20" width="20" xmlns="http://www.w3.org/2000/svg"><path d="M12.668 10.667C12.668 9.95614 12.668 9.46258 12.6367 9.0791C12.6137 8.79732 12.5758 8.60761 12.5244 8.46387L12.4688 8.33399C12.3148 8.03193 12.0803 7.77885 11.793 7.60254L11.666 7.53125C11.508 7.45087 11.2963 7.39395 10.9209 7.36328C10.5374 7.33197 10.0439 7.33203 9.33301 7.33203H6.5C5.78896 7.33203 5.29563 7.33195 4.91211 7.36328C4.63016 7.38632 4.44065 7.42413 4.29688 7.47559L4.16699 7.53125C3.86488 7.68518 3.61186 7.9196 3.43555 8.20703L3.36524 8.33399C3.28478 8.49198 3.22795 8.70352 3.19727 9.0791C3.16595 9.46259 3.16504 9.95611 3.16504 10.667V13.5C3.16504 14.211 3.16593 14.7044 3.19727 15.0879C3.22797 15.4636 3.28473 15.675 3.36524 15.833L3.43555 15.959C3.61186 16.2466 3.86474 16.4807 4.16699 16.6348L4.29688 16.6914C4.44063 16.7428 4.63025 16.7797 4.91211 16.8027C5.29563 16.8341 5.78896 16.835 6.5 16.835H9.33301C10.0439 16.835 10.5374 16.8341 10.9209 16.8027C11.2965 16.772 11.508 16.7152 11.666 16.6348L11.793 16.5645C12.0804 16.3881 12.3148 16.1351 12.4688 15.833L12.5244 15.7031C12.5759 15.5594 12.6137 15.3698 12.6367 15.0879C12.6681 14.7044 12.668 14.211 12.668 13.5V10.667ZM13.998 12.665C14.4528 12.6634 14.8011 12.6602 15.0879 12.6367C15.4635 12.606 15.675 12.5492 15.833 12.4688L15.959 12.3975C16.2466 12.2211 16.4808 11.9682 16.6348 11.666L16.6914 11.5361C16.7428 11.3924 16.7797 11.2026 16.8027 10.9209C16.8341 10.5374 16.835 10.0439 16.835 9.33301V6.5C16.835 5.78896 16.8341 5.29563 16.8027 4.91211C16.7797 4.63025 16.7428 4.44063 16.6914 4.29688L16.6348 4.16699C16.4807 3.86474 16.2466 3.61186 15.959 3.43555L15.833 3.36524C15.675 3.28473 15.4636 3.22797 15.0879 3.19727C14.7044 3.16593 14.211 3.16504 13.5 3.16504H10.667C9.9561 3.16504 9.46259 3.16595 9.0791 3.19727C8.79739 3.22028 8.6076 3.2572 8.46387 3.30859L8.33399 3.36524C8.03176 3.51923 7.77886 3.75343 7.60254 4.04102L7.53125 4.16699C7.4508 4.32498 7.39397 4.53655 7.36328 4.91211C7.33985 5.19893 7.33562 5.54719 7.33399 6.00195H9.33301C10.022 6.00195 10.5791 6.00131 11.0293 6.03809C11.4873 6.07551 11.8937 6.15471 12.2705 6.34668L12.4883 6.46875C12.984 6.7728 13.3878 7.20854 13.6533 7.72949L13.7197 7.87207C13.8642 8.20859 13.9292 8.56974 13.9619 8.9707C13.9987 9.42092 13.998 9.97799 13.998 10.667V12.665ZM18.165 9.33301C18.165 10.022 18.1657 10.5791 18.1289 11.0293C18.0961 11.4302 18.0311 11.7914 17.8867 12.1279L17.8203 12.2705C17.5549 12.7914 17.1509 13.2272 16.6553 13.5313L16.4365 13.6533C16.0599 13.8452 15.6541 13.9245 15.1963 13.9619C14.8593 13.9895 14.4624 13.9935 13.9951 13.9951C13.9935 14.4624 13.9895 14.8593 13.9619 15.1963C13.9292 15.597 13.864 15.9576 13.7197 16.2939L13.6533 16.4365C13.3878 16.9576 12.9841 17.3941 12.4883 17.6982L12.2705 17.8203C11.8937 18.0123 11.4873 18.0915 11.0293 18.1289C10.5791 18.1657 10.022 18.165 9.33301 18.165H6.5C5.81091 18.165 5.25395 18.1657 4.80371 18.1289C4.40306 18.0962 4.04235 18.031 3.70606 17.8867L3.56348 17.8203C3.04244 17.5548 2.60585 17.151 2.30176 16.6553L2.17969 16.4365C1.98788 16.0599 1.90851 15.6541 1.87109 15.1963C1.83431 14.746 1.83496 14.1891 1.83496 13.5V10.667C1.83496 9.978 1.83432 9.42091 1.87109 8.9707C1.90851 8.5127 1.98772 8.10625 2.17969 7.72949L2.30176 7.51172C2.60586 7.0159 3.04236 6.6122 3.56348 6.34668L3.70606 6.28027C4.04237 6.136 4.40303 6.07083 4.80371 6.03809C5.14051 6.01057 5.53708 6.00551 6.00391 6.00391C6.00551 5.53708 6.01057 5.14051 6.03809 4.80371C6.0755 4.34588 6.15483 3.94012 6.34668 3.56348L6.46875 3.34473C6.77282 2.84912 7.20856 2.44514 7.72949 2.17969L7.87207 2.11328C8.20855 1.96886 8.56979 1.90385 8.9707 1.87109C9.42091 1.83432 9.978 1.83496 10.667 1.83496H13.5C14.1891 1.83496 14.746 1.83431 15.1963 1.87109C15.6541 1.90851 16.0599 1.98788 16.4365 2.17969L16.6553 2.30176C17.151 2.60585 17.5548 3.04244 17.8203 3.56348L17.8867 3.70606C18.031 4.04235 18.0962 4.40306 18.1289 4.80371C18.1657 5.25395 18.165 5.81091 18.165 6.5V9.33301Z"></path></svg></button></span></div></div></div></div>---

## **Documentation References**

- Elastic GitHub Integration: [Cytech Docs](https://docs.cytechint.io/link/294#bkmrk-to-use-this-integrat-4)
- GitHub Official Docs:
    
    
    - [Audit Logs](https://docs.github.com/en/enterprise-cloud@latest/admin/monitoring-activity-in-your-enterprise/auditing-audit-log)
    - [Code Scanning](https://docs.github.com/en/code-security/code-scanning)
    - [Secret Scanning](https://docs.github.com/en/code-security/secret-scanning)
    - [Dependabot](https://docs.github.com/en/code-security/supply-chain-security)
    - [Issues API](https://docs.github.com/en/rest/issues/issues)

# GitLab Integrations

##### <span style="color: rgb(53, 152, 219);">**<span class="TextRun SCXW134263713 BCX8" data-contrast="none" lang="EN-US" xml:lang="EN-US"><span class="NormalTextRun SCXW134263713 BCX8" data-ccp-charstyle="Style (Complex) Open Sans" data-ccp-charstyle-defn="{"ObjectId":"70ba6d05-2be0-4969-bafe-19843c2cdac7|194","ClassId":1073872969,"Properties":[201342446,"1",201342447,"5",201342448,"1",201342449,"1",469777841,"Open Sans",469777842,"Open Sans",469777843,"Calibri",469777844,"Open Sans",201341986,"1",469769226,"Open Sans",268442635,"22",335559704,"1037",335559705,"1033",335551547,"1033",335559740,"259",201341983,"0",335559739,"160",469775450,"Style (Complex) Open Sans",201340122,"1",134233614,"true",469778129,"StyleComplexOpenSans",335572020,"1",469778324,"Default Paragraph Font"]}">Introduction</span></span><span class="EOP SCXW134263713 BCX8" data-ccp-props="{"134245418":true,"134245529":true,"201341983":0,"335559738":240,"335559739":0,"335559740":360}"> </span>**</span>

<span class="TextRun SCXW134263713 BCX8" data-contrast="auto" lang="EN-US" xml:lang="EN-US"><span class="NormalTextRun SCXW134263713 BCX8" data-ccp-charstyle="Style (Complex) Open Sans">Introduced in GitLab Starter 8.4. Support</span> <span class="NormalTextRun SCXW134263713 BCX8" data-ccp-charstyle="Style (Complex) Open Sans">for Amazon Elasticsearch was introduced in GitLab</span> <span class="NormalTextRun SCXW134263713 BCX8" data-ccp-charstyle="Style (Complex) Open Sans">Starter 9.0.</span></span><span class="EOP SCXW134263713 BCX8" data-ccp-props="{"201341983":0,"335559685":360,"335559739":160,"335559740":259}"> </span>

<span class="TextRun SCXW134263713 BCX8" data-contrast="auto" lang="EN-US" xml:lang="EN-US"><span class="NormalTextRun SCXW134263713 BCX8" data-ccp-charstyle="Style (Complex) Open Sans">This document describes how to set up Elasticsearch with GitLab. Once enabled,</span> <span class="NormalTextRun SCXW134263713 BCX8" data-ccp-charstyle="Style (Complex) Open Sans">you'll</span><span class="NormalTextRun SCXW134263713 BCX8" data-ccp-charstyle="Style (Complex) Open Sans"> have the benefit of fast search response times and the advantage of </span><span class="NormalTextRun SCXW134263713 BCX8" data-ccp-charstyle="Style (Complex) Open Sans">two</span></span> <span class="TextRun SCXW134263713 BCX8" data-contrast="auto" lang="EN-US" xml:lang="EN-US"><span class="NormalTextRun SCXW134263713 BCX8" data-ccp-charstyle="Style (Complex) Open Sans">special searches:</span></span><span class="EOP SCXW134263713 BCX8" data-ccp-props="{"201341983":0,"335559685":360,"335559739":160,"335559740":259}"> </span>

<div class="SCXW134263713 BCX8" id="bkmrk-advance-global-searc"><div class="ListContainerWrapper SCXW134263713 BCX8">- <span class="TextRun SCXW134263713 BCX8" data-contrast="auto" lang="EN-US" xml:lang="EN-US"><span class="NormalTextRun SCXW134263713 BCX8" data-ccp-charstyle="Style (Complex) Open Sans">Advance Global Search</span></span><span class="EOP SCXW134263713 BCX8" data-ccp-props="{"201341983":0,"335559739":160,"335559740":259}"> </span>
- <span class="TextRun SCXW134263713 BCX8" data-contrast="auto" lang="EN-US" xml:lang="EN-US"><span class="NormalTextRun SCXW134263713 BCX8" data-ccp-charstyle="Style (Complex) Open Sans">Advanced Syntax Search</span></span><span class="EOP SCXW134263713 BCX8" data-ccp-props="{"201341983":0,"335559739":160,"335559740":259}"> </span>

</div><div class="ListContainerWrapper SCXW134263713 BCX8">  
</div></div>##### <span style="color: rgb(53, 152, 219);">**<span class="TextRun SCXW134263713 BCX8" data-contrast="none" lang="EN-US" xml:lang="EN-US"><span class="NormalTextRun SCXW134263713 BCX8" data-ccp-charstyle="Style (Complex) Open Sans">Assumptions</span></span><span class="EOP SCXW134263713 BCX8" data-ccp-props="{"134245418":true,"134245529":true,"201341983":0,"335559738":240,"335559739":0,"335559740":360}"> </span>**</span>

<span class="TextRun SCXW134263713 BCX8" data-contrast="auto" lang="EN-US" xml:lang="EN-US"><span class="NormalTextRun SCXW134263713 BCX8" data-ccp-charstyle="Style (Complex) Open Sans">The procedures described in Section </span></span><span class="FieldRange SCXW134263713 BCX8"><span class="TextRun SCXW134263713 BCX8" data-contrast="auto" lang="EN-US" xml:lang="EN-US"><span class="NormalTextRun SCXW134263713 BCX8" data-ccp-charstyle="Style (Complex) Open Sans">3</span></span></span><span class="TextRun SCXW134263713 BCX8" data-contrast="auto" lang="EN-US" xml:lang="EN-US"> <span class="NormalTextRun ContextualSpellingAndGrammarErrorV2Themed SCXW134263713 BCX8" data-ccp-charstyle="Style (Complex) Open Sans">assumes</span><span class="NormalTextRun SCXW134263713 BCX8" data-ccp-charstyle="Style (Complex) Open Sans"> that a Log Collector has already been </span><span class="NormalTextRun ContextualSpellingAndGrammarErrorV2Themed SCXW134263713 BCX8" data-ccp-charstyle="Style (Complex) Open Sans">setup</span><span class="NormalTextRun SCXW134263713 BCX8" data-ccp-charstyle="Style (Complex) Open Sans">. </span></span><span class="EOP SCXW134263713 BCX8" data-ccp-props="{"201341983":0,"335559685":360,"335559739":160,"335559740":259}"> </span>

<div class="SCXW134263713 BCX8" id="bkmrk-"><div class="OutlineElement Ltr SCXW134263713 BCX8">  
</div><div class="ListContainerWrapper SCXW134263713 BCX8">  
</div></div><span class="WACImageGroupContainer SCXW134263713 BCX8"><span class="WACImageContainer NoPadding AttachedToBeginning DragDrop SCXW134263713 BCX8" role="presentation">![](https://cytechint-docs-bookstack.s3.amazonaws.com/uploads/images/gallery/2024-04/embedded-image-cken1sev.png)</span></span>

##### <span style="color: rgb(53, 152, 219);">**<span class="TextRun SCXW134263713 BCX8" data-contrast="none" lang="EN-US" xml:lang="EN-US"><span class="NormalTextRun SCXW134263713 BCX8" data-ccp-charstyle="Style (Complex) Open Sans">Requirements</span></span><span class="EOP SCXW134263713 BCX8" data-ccp-props="{"134245418":true,"134245529":true,"201341983":0,"335559738":240,"335559739":0,"335559740":360}"> </span>**</span>

<span class="TextRun SCXW134263713 BCX8" data-contrast="auto" lang="EN-US" xml:lang="EN-US"><span class="NormalTextRun SCXW134263713 BCX8" data-ccp-charstyle="Style (Complex) Open Sans">Elasticsearch 6.0+ is not supported currently. We will support 6.0+ in the future. </span></span><span class="EOP SCXW134263713 BCX8" data-ccp-props="{"201341983":0,"335559685":720,"335559739":160,"335559740":259}"> </span>

<span class="EOP SCXW134263713 BCX8" data-ccp-props="{"201341983":0,"335559685":720,"335559739":160,"335559740":259}"> </span>

##### <span style="color: rgb(53, 152, 219);">**<span class="TextRun SCXW134263713 BCX8" data-contrast="none" lang="EN-US" xml:lang="EN-US"><span class="NormalTextRun SpellingErrorV2Themed SCXW134263713 BCX8" data-ccp-charstyle="Style (Complex) Open Sans">GitLab</span><span class="NormalTextRun SpellingErrorV2Themed SCXW134263713 BCX8" data-ccp-charstyle="Style (Complex) Open Sans">I</span><span class="NormalTextRun SpellingErrorV2Themed SCXW134263713 BCX8" data-ccp-charstyle="Style (Complex) Open Sans">ntegration</span> <span class="NormalTextRun SCXW134263713 BCX8" data-ccp-charstyle="Style (Complex) Open Sans">Procedures</span></span><span class="EOP SCXW134263713 BCX8" data-ccp-props="{"134245418":true,"134245529":true,"201341983":0,"335559738":240,"335559739":0,"335559740":360}"> </span>**</span>

<span class="TextRun SCXW134263713 BCX8" data-contrast="auto" lang="EN-US" xml:lang="EN-US"><span class="NormalTextRun SCXW134263713 BCX8" data-ccp-charstyle="normaltextrun" data-ccp-charstyle-defn="{"ObjectId":"70ba6d05-2be0-4969-bafe-19843c2cdac7|219","ClassId":1073872969,"Properties":[201342446,"1",201342447,"5",201342448,"1",201342449,"1",469777841,"Calibri",469777842,"Arial",469777843,"Calibri",469777844,"Calibri",201341986,"1",469769226,"Calibri,Arial",268442635,"22",335559704,"1037",335559705,"1033",335551547,"1033",335559740,"259",201341983,"0",335559739,"160",469775450,"normaltextrun",201340122,"1",134233614,"true",469778129,"normaltextrun",335572020,"1",469778324,"Default Paragraph Font"]}">**Procedures**:</span></span><span class="TextRun SCXW134263713 BCX8" data-contrast="auto" lang="EN-PH" xml:lang="EN-PH"><span class="NormalTextRun SCXW134263713 BCX8" data-ccp-charstyle="eop" data-ccp-charstyle-defn="{"ObjectId":"70ba6d05-2be0-4969-bafe-19843c2cdac7|220","ClassId":1073872969,"Properties":[201342446,"1",201342447,"5",201342448,"1",201342449,"1",469777841,"Calibri",469777842,"Arial",469777843,"Calibri",469777844,"Calibri",201341986,"1",469769226,"Calibri,Arial",268442635,"22",335559704,"1037",335559705,"1033",335551547,"1033",335559740,"259",201341983,"0",335559739,"160",469775450,"eop",201340122,"1",134233614,"true",469778129,"eop",335572020,"1",469778324,"Default Paragraph Font"]}"> </span></span><span class="EOP SCXW134263713 BCX8" data-ccp-props="{"134233117":false,"134233118":false,"201341983":0,"335559685":360,"335559738":0,"335559739":0,"335559740":360}"> </span>

<span class="TextRun SCXW134263713 BCX8" data-contrast="auto" lang="EN-US" xml:lang="EN-US"><span class="NormalTextRun SCXW134263713 BCX8" data-ccp-charstyle="normaltextrun">Please provide the following information to </span><span class="NormalTextRun SpellingErrorV2Themed SCXW134263713 BCX8" data-ccp-charstyle="normaltextrun">CyTech</span><span class="NormalTextRun SCXW134263713 BCX8" data-ccp-charstyle="normaltextrun">:</span></span><span class="TextRun SCXW134263713 BCX8" data-contrast="auto" lang="EN-PH" xml:lang="EN-PH"><span class="NormalTextRun SCXW134263713 BCX8" data-ccp-charstyle="eop"> </span></span><span class="EOP SCXW134263713 BCX8" data-ccp-props="{"134233117":false,"134233118":false,"201341983":0,"335559685":360,"335559738":0,"335559739":0,"335559740":360}"> </span>

<span class="TextRun SCXW134263713 BCX8" data-contrast="auto" lang="EN-PH" xml:lang="EN-PH"><span class="NormalTextRun SCXW134263713 BCX8" data-ccp-charstyle="eop">Elasticsearch is not included in the Omnibus packages. You will have to install</span></span><span class="TextRun SCXW134263713 BCX8" data-contrast="auto" lang="EN-PH" xml:lang="EN-PH"><span class="NormalTextRun SCXW134263713 BCX8" data-ccp-charstyle="eop"> it yourself whether you are using the Omnibus package or </span><span class="NormalTextRun SCXW134263713 BCX8" data-ccp-charstyle="eop">installed</span></span><span class="EOP SCXW134263713 BCX8" data-ccp-props="{"134233117":true,"134233118":true,"201341983":0,"335559685":360,"335559739":0,"335559740":240}"> </span><span class="TextRun SCXW134263713 BCX8" data-contrast="auto" lang="EN-PH" xml:lang="EN-PH"><span class="NormalTextRun SCXW134263713 BCX8" data-ccp-charstyle="eop">GitLab from source. Providing detailed information on installing Elasticsearch</span></span> <span class="TextRun SCXW134263713 BCX8" data-contrast="auto" lang="EN-PH" xml:lang="EN-PH"><span class="NormalTextRun SCXW134263713 BCX8" data-ccp-charstyle="eop">is out of the scope of this document.</span></span><span class="EOP SCXW134263713 BCX8" data-ccp-props="{"134233117":true,"134233118":true,"201341983":0,"335559685":360,"335559739":0,"335559740":240}"> </span>

<span class="TextRun SCXW134263713 BCX8" data-contrast="auto" lang="EN-PH" xml:lang="EN-PH"><span class="NormalTextRun SCXW134263713 BCX8" data-ccp-charstyle="eop">Once the data is added to the database or repository and Elasticsearch is</span></span> <span class="TextRun SCXW134263713 BCX8" data-contrast="auto" lang="EN-PH" xml:lang="EN-PH"><span class="NormalTextRun SCXW134263713 BCX8" data-ccp-charstyle="eop">enabled in the admin area the search index will </span><span class="NormalTextRun SCXW134263713 BCX8" data-ccp-charstyle="eop">be</span></span> <span class="TextRun SCXW134263713 BCX8" data-contrast="auto" lang="EN-PH" xml:lang="EN-PH"><span class="NormalTextRun SCXW134263713 BCX8" data-ccp-charstyle="eop">updated automatically. Elasticsearch can be installed on the same machine as</span></span> <span class="TextRun SCXW134263713 BCX8" data-contrast="auto" lang="EN-PH" xml:lang="EN-PH"><span class="NormalTextRun SCXW134263713 BCX8" data-ccp-charstyle="eop">GitLab, or on a separate server, or you can use the Amazon Elasticsearch</span></span> <span class="TextRun SCXW134263713 BCX8" data-contrast="auto" lang="EN-PH" xml:lang="EN-PH"><span class="NormalTextRun SCXW134263713 BCX8" data-ccp-charstyle="eop">service.</span></span><span class="EOP SCXW134263713 BCX8" data-ccp-props="{"134233117":true,"134233118":true,"201341983":0,"335559685":360,"335559739":0,"335559740":240}"> </span>

<span class="TextRun SCXW134263713 BCX8" data-contrast="auto" lang="EN-PH" xml:lang="EN-PH"><span class="NormalTextRun SCXW134263713 BCX8" data-ccp-charstyle="eop">You can follow the steps as described in the official web site or</span></span> <span class="TextRun SCXW134263713 BCX8" data-contrast="auto" lang="EN-PH" xml:lang="EN-PH"><span class="NormalTextRun SCXW134263713 BCX8" data-ccp-charstyle="eop">use the packages that are available for your OS.</span></span><span class="EOP SCXW134263713 BCX8" data-ccp-props="{"134233117":false,"134233118":false,"201341983":0,"335559685":360,"335559738":0,"335559739":0,"335559740":240}"> </span>

<span class="EOP SCXW134263713 BCX8" data-ccp-props="{"201341983":0,"335559685":1440,"335559739":160,"335559740":259}"></span>

# Google Cloud Platform (GCP) Audit Logs Integration - using Pub/Sub

##### <span style="color: rgb(0, 0, 0);">**<span class="TextRun SCXW124724174 BCX0" data-contrast="none" lang="EN-US" xml:lang="EN-US"><span class="NormalTextRun SCXW124724174 BCX0">Requirements </span></span><span class="EOP SCXW124724174 BCX0" data-ccp-props="{"134233117":false,"134233118":false,"335551550":0,"335551620":0,"335559738":0,"335559739":0}"> </span>**</span>

To integrate with Google Cloud Platform (GCP), you need to set up the following:

<div class="ListContainerWrapper SCXW124724174 BCX0" id="bkmrk-service-account-with">1. <span class="TextRun SCXW124724174 BCX0" data-contrast="none" lang="EN-US" xml:lang="EN-US"><span class="NormalTextRun SCXW124724174 BCX0">**Service Account with a Role.** </span></span>
2. **<span class="TextRun SCXW124724174 BCX0" data-contrast="none" lang="EN-US" xml:lang="EN-US"><span class="NormalTextRun SCXW124724174 BCX0">Service Account Key to access data on your GCP project.</span></span><span class="EOP SCXW124724174 BCX0" data-ccp-props="{"134233117":false,"134233118":false,"335551550":0,"335551620":0,"335559738":240,"335559739":240}"> </span>**

</div>##### **<span class="TextRun SCXW124724174 BCX0" data-contrast="none" lang="EN-US" xml:lang="EN-US"><span class="NormalTextRun SCXW124724174 BCX0">Service Accounts </span></span><span class="EOP SCXW124724174 BCX0" data-ccp-props="{"134233117":false,"134233118":false,"335551550":0,"335551620":0,"335559738":240,"335559739":240}"> </span>**

A **Service Account (SA)** is a special type of Google account intended for applications or services—not human users—that need access to GCP resources.

The **Log Collector** uses this SA to access GCP data via Google APIs.

##### <span class="TextRun SCXW124724174 BCX0" data-contrast="none" lang="EN-US" xml:lang="EN-US"><span class="NormalTextRun SCXW124724174 BCX0">**Service Account with a Role**  </span></span><span class="EOP SCXW124724174 BCX0" data-ccp-props="{"134233117":false,"134233118":false,"335551550":0,"335551620":0,"335559738":240,"335559739":240}"> </span>

Assign the necessary privileges by creating a **custom role** with minimal required permissions:

#### Required Permissions:

<div class="ListContainerWrapper SCXW124724174 BCX0" id="bkmrk-compute.instances.li">- <span class="TextRun SCXW124724174 BCX0" data-contrast="none" lang="EN-US" xml:lang="EN-US">**<span class="NormalTextRun SpellingErrorV2Themed SCXW124724174 BCX0">compute.instances.list</span>**<span class="NormalTextRun SCXW124724174 BCX0"> (</span><span class="NormalTextRun SCXW124724174 BCX0">required</span><span class="NormalTextRun SCXW124724174 BCX0"> for GCP Compute instance metadata collection) (</span></span><span class="TextRun SCXW124724174 BCX0" data-contrast="none" lang="EN-US" xml:lang="EN-US"><span class="NormalTextRun SCXW124724174 BCX0">\*\*2</span></span><span class="TextRun SCXW124724174 BCX0" data-contrast="none" lang="EN-US" xml:lang="EN-US"><span class="NormalTextRun SCXW124724174 BCX0">) </span></span>
- **<span class="TextRun SCXW124724174 BCX0" data-contrast="none" lang="EN-US" xml:lang="EN-US"><span class="NormalTextRun SpellingErrorV2Themed SCXW124724174 BCX0">monitoring.metricDescriptors.list</span><span class="NormalTextRun SCXW124724174 BCX0"> </span></span>**
- **<span class="TextRun SCXW124724174 BCX0" data-contrast="none" lang="EN-US" xml:lang="EN-US"><span class="NormalTextRun SpellingErrorV2Themed SCXW124724174 BCX0">monitoring.timeSeries.list</span><span class="NormalTextRun SCXW124724174 BCX0"> </span></span>**
- **<span class="TextRun SCXW124724174 BCX0" data-contrast="none" lang="EN-US" xml:lang="EN-US"><span class="NormalTextRun SpellingErrorV2Themed SCXW124724174 BCX0">pubsub.subscriptions.consume</span></span>**
- <span class="TextRun SCXW124724174 BCX0" data-contrast="none" lang="EN-US" xml:lang="EN-US">**<span class="NormalTextRun SpellingErrorV2Themed SCXW124724174 BCX0">pubsub.subscriptions.create</span>**<span class="NormalTextRun SCXW124724174 BCX0"> (</span></span><span class="TextRun SCXW124724174 BCX0" data-contrast="none" lang="EN-US" xml:lang="EN-US"><span class="NormalTextRun SCXW124724174 BCX0">\*1</span></span><span class="TextRun SCXW124724174 BCX0" data-contrast="none" lang="EN-US" xml:lang="EN-US"><span class="NormalTextRun SCXW124724174 BCX0">)</span></span>
- **<span class="TextRun SCXW124724174 BCX0" data-contrast="none" lang="EN-US" xml:lang="EN-US"><span class="NormalTextRun SpellingErrorV2Themed SCXW124724174 BCX0">pubsub.subscriptions.get</span></span>**
- <span class="TextRun SCXW124724174 BCX0" data-contrast="none" lang="EN-US" xml:lang="EN-US">**<span class="NormalTextRun SCXW124724174 BCX0">pubsub.topics.attachSubscription</span>**<span class="NormalTextRun SCXW124724174 BCX0"> (</span></span><span class="TextRun SCXW124724174 BCX0" data-contrast="none" lang="EN-US" xml:lang="EN-US"><span class="NormalTextRun SCXW124724174 BCX0">\*1</span></span><span class="TextRun SCXW124724174 BCX0" data-contrast="none" lang="EN-US" xml:lang="EN-US"><span class="NormalTextRun SCXW124724174 BCX0">) </span></span><span class="EOP SCXW124724174 BCX0" data-ccp-props="{"134233117":false,"134233118":false,"335551550":0,"335551620":0,"335559738":240,"335559739":240}"> </span>

</div><p class="callout info">*<span class="TextRun SCXW124724174 BCX0" data-contrast="none" lang="EN-US" xml:lang="EN-US"><span class="NormalTextRun SCXW124724174 BCX0">\*1</span></span><span class="TextRun SCXW124724174 BCX0" data-contrast="none" lang="EN-US" xml:lang="EN-US"><span class="NormalTextRun SCXW124724174 BCX0"> Only </span><span class="NormalTextRun SCXW124724174 BCX0">required</span><span class="NormalTextRun SCXW124724174 BCX0"> if Agent is expected to create a new subscription. If you create the subscriptions yourself, you may omit these privileges</span><span class="NormalTextRun SCXW124724174 BCX0">. </span></span><span class="EOP SCXW124724174 BCX0" data-ccp-props="{"134233117":false,"134233118":false,"335551550":0,"335551620":0,"335559738":240,"335559739":240}"> </span>*</p>

<p class="callout info">*<span class="TextRun SCXW124724174 BCX0" data-contrast="none" lang="EN-US" xml:lang="EN-US"><span class="NormalTextRun SCXW124724174 BCX0">\*\*2</span></span><span class="TextRun SCXW124724174 BCX0" data-contrast="none" lang="EN-US" xml:lang="EN-US"><span class="NormalTextRun SCXW124724174 BCX0"> Only </span><span class="NormalTextRun SCXW124724174 BCX0">required</span><span class="NormalTextRun SCXW124724174 BCX0"> if corresponding collection will be enabled. </span></span><span class="EOP SCXW124724174 BCX0" data-ccp-props="{"134233117":false,"134233118":false,"335551550":0,"335551620":0,"335559738":240,"335559739":240}"> </span>*</p>

<p class="callout success">**<span class="TextRun SCXW124724174 BCX0" data-contrast="none" lang="EN-US" xml:lang="EN-US"><span class="NormalTextRun SCXW124724174 BCX0">After you have created the custom role, assign the role to your service account. </span></span><span class="EOP SCXW124724174 BCX0" data-ccp-props="{"134233117":false,"134233118":false,"335551550":0,"335551620":0,"335559738":240,"335559739":240}"> </span>**</p>

##### **<span class="EOP SCXW124724174 BCX0" data-ccp-props="{"134233117":false,"134233118":false,"335551550":0,"335551620":0,"335559738":240,"335559739":240}"> </span><span class="TextRun SCXW124724174 BCX0" data-contrast="none" lang="EN-US" xml:lang="EN-US"><span class="NormalTextRun SCXW124724174 BCX0">Service Account Key </span></span><span class="EOP SCXW124724174 BCX0" data-ccp-props="{"134233117":false,"134233118":false,"335551550":0,"335551620":0,"335559738":240,"335559739":240}"> </span>**

<span class="TextRun SCXW124724174 BCX0" data-contrast="none" lang="EN-US" xml:lang="EN-US"><span class="NormalTextRun SCXW124724174 BCX0">Next, with the Service Account (SA) with access to Google Cloud Platform (GCP) resources setup, you need some credentials to associate with it: a Service Account Key. </span></span><span class="EOP SCXW124724174 BCX0" data-ccp-props="{"134233117":false,"134233118":false,"335551550":0,"335551620":0,"335559738":240,"335559739":240}"> </span>

<span class="TextRun SCXW124724174 BCX0" data-contrast="none" lang="EN-US" xml:lang="EN-US"><span class="NormalTextRun SCXW124724174 BCX0">From the list of SA (Service Accounts): </span></span><span class="EOP SCXW124724174 BCX0" data-ccp-props="{"134233117":false,"134233118":false,"335551550":0,"335551620":0,"335559738":240,"335559739":240}"> </span>

<div class="ListContainerWrapper SCXW124724174 BCX0" id="bkmrk-go-to-iam-%26-admin-%3E-">1. Go to **IAM &amp; Admin &gt; Service Accounts** in the GCP Console.
2. Click the service account you created.
3. Under the **"Keys"** section, click **"Add Key" &gt; "Create new key"**.
4. Choose **JSON** as the key type.
5. **Download and securely store** the generated private key (it cannot be retrieved again from GCP if lost).

</div>##### **<span class="TextRun SCXW124724174 BCX0" data-contrast="none" lang="EN-US" xml:lang="EN-US"><span class="NormalTextRun SCXW124724174 BCX0">GCP Integrations Procedures - GCP Audit Logs </span></span><span class="EOP SCXW124724174 BCX0" data-ccp-props="{"134233117":false,"134233118":false,"335551550":0,"335551620":0,"335559738":0,"335559739":0}"> </span>**

<span class="TextRun SCXW124724174 BCX0" data-contrast="none" lang="EN-US" xml:lang="EN-US"><span class="NormalTextRun SCXW124724174 BCX0">The audit dataset collects audit logs of administrative activities and accesses within your Google Cloud resources. </span></span><span class="EOP SCXW124724174 BCX0" data-ccp-props="{"134233117":false,"134233118":false,"335551550":0,"335551620":0,"335559738":240,"335559739":240}"> </span>

<span style="color: rgb(0, 0, 0);"><span class="TextRun SCXW124724174 BCX0" data-contrast="none" lang="EN-US" xml:lang="EN-US"><span class="NormalTextRun SCXW124724174 BCX0"> </span></span>**<span class="TextRun SCXW124724174 BCX0" data-contrast="none" lang="EN-US" xml:lang="EN-US"><span class="NormalTextRun SCXW124724174 BCX0">Procedures</span></span><span class="TextRun SCXW124724174 BCX0" data-contrast="none" lang="EN-US" xml:lang="EN-US"><span class="NormalTextRun SCXW124724174 BCX0"> </span></span><span class="EOP SCXW124724174 BCX0" data-ccp-props="{"134233117":false,"134233118":false,"335551550":0,"335551620":0,"335559738":240,"335559739":240}"> </span>**</span>

<span class="TextRun SCXW124724174 BCX0" data-contrast="none" lang="EN-US" xml:lang="EN-US"><span class="NormalTextRun SCXW124724174 BCX0">The "Project Id" and the "Credentials File" will need to be provided in the integration UI when adding the Google Cloud Platform integration. </span></span><span class="EOP SCXW124724174 BCX0" data-ccp-props="{"134233117":false,"134233118":false,"335551550":0,"335551620":0,"335559738":240,"335559739":240}"> </span>

##### **<span class="TextRun SCXW124724174 BCX0" data-contrast="none" lang="EN-US" xml:lang="EN-US"><span class="NormalTextRun SCXW124724174 BCX0">Logs Collection Configuration</span></span>**<span class="EOP SCXW124724174 BCX0" data-ccp-props="{"134233117":false,"134233118":false,"335551550":1,"335551620":1,"335559738":300,"335559739":300}"> </span>

<span class="TextRun SCXW124724174 BCX0" data-contrast="none" lang="EN-US" xml:lang="EN-US"><span class="NormalTextRun SCXW124724174 BCX0">With a properly configured Service Account and the integration setting in place, </span><span class="NormalTextRun SCXW124724174 BCX0">it’s</span><span class="NormalTextRun SCXW124724174 BCX0"> time to start collecting some logs.</span></span><span class="EOP SCXW124724174 BCX0" data-ccp-props="{"134233117":false,"134233118":false,"335551550":1,"335551620":1,"335559738":0,"335559739":276}"> </span>

**<span class="TextRun SCXW124724174 BCX0" data-contrast="none" lang="EN-US" style="color: rgb(0, 0, 0);" xml:lang="EN-US"><span class="NormalTextRun SCXW124724174 BCX0">Requirements</span></span><span class="EOP SCXW124724174 BCX0" data-ccp-props="{"134233117":false,"134233118":false,"335551550":1,"335551620":1,"335559738":0,"335559739":276}"> </span>**

<span class="TextRun SCXW124724174 BCX0" data-contrast="none" lang="EN-US" xml:lang="EN-US"><span class="NormalTextRun SCXW124724174 BCX0">You need to create a few dedicated Google Cloud resources before starting, in detail:</span></span><span class="EOP SCXW124724174 BCX0" data-ccp-props="{"134233117":false,"134233118":false,"335551550":1,"335551620":1,"335559738":0,"335559739":276}"> </span>

<div class="ListContainerWrapper SCXW124724174 BCX0" id="bkmrk-log-sink%C2%A0">1. **<span class="TextRun SCXW124724174 BCX0" data-contrast="none" lang="EN-US" xml:lang="EN-US"><span class="NormalTextRun SCXW124724174 BCX0">Log Sink</span></span>**
2. **<span class="TextRun SCXW124724174 BCX0" data-contrast="none" lang="EN-US" xml:lang="EN-US"><span class="NormalTextRun SCXW124724174 BCX0">Pub/</span><span class="NormalTextRun SCXW124724174 BCX0">Sub Topic</span></span>**
3. **<span class="TextRun SCXW124724174 BCX0" data-contrast="none" lang="EN-US" xml:lang="EN-US"><span class="NormalTextRun SCXW124724174 BCX0">Subscription</span></span><span class="EOP SCXW124724174 BCX0" data-ccp-props="{"134233117":false,"134233118":false,"335551550":1,"335551620":1,"335559738":0,"335559739":0}"> </span>**

</div><p class="callout info"><span class="EOP SCXW124724174 BCX0" data-ccp-props="{"134233117":false,"134233118":false,"335551550":1,"335551620":1,"335559685":0,"335559738":0,"335559739":0}"> </span><span class="TextRun SCXW124724174 BCX0" data-contrast="none" lang="EN-US" xml:lang="EN-US"><span class="NormalTextRun SCXW124724174 BCX0">It’s</span><span class="NormalTextRun SCXW124724174 BCX0"> </span><span class="NormalTextRun ContextualSpellingAndGrammarErrorV2Themed SCXW124724174 BCX0">recommend</span><span class="NormalTextRun ContextualSpellingAndGrammarErrorV2Themed SCXW124724174 BCX0">ed</span> <span class="NormalTextRun SCXW124724174 BCX0">to have </span><span class="NormalTextRun ContextualSpellingAndGrammarErrorV2Themed SCXW124724174 BCX0">a </span><span class="NormalTextRun ContextualSpellingAndGrammarErrorV2Themed SCXW124724174 BCX0">separate</span><span class="NormalTextRun SCXW124724174 BCX0"> Pub/</span><span class="NormalTextRun ContextualSpellingAndGrammarErrorV2Themed SCXW124724174 BCX0">Sub topics</span><span class="NormalTextRun SCXW124724174 BCX0"> for each of the log types so that they can be parsed and stored in a specific data stream.</span></span><span class="EOP SCXW124724174 BCX0" data-ccp-props="{"134233117":false,"134233118":false,"335551550":1,"335551620":1,"335559685":0,"335559738":0,"335559739":0}"> </span></p>

<span class="TextRun SCXW124724174 BCX0" data-contrast="none" lang="EN-US" xml:lang="EN-US"><span class="NormalTextRun SCXW124724174 BCX0">Here’s</span><span class="NormalTextRun SCXW124724174 BCX0"> an example of collecting Audit Logs using a Pub/</span><span class="NormalTextRun ContextualSpellingAndGrammarErrorV2Themed SCXW124724174 BCX0">Sub topic</span><span class="NormalTextRun SCXW124724174 BCX0">, a subscription, and a Log Router. We will create the resources in the Google Cloud Console and then configure the Google Cloud Platform integration.</span></span><span class="EOP SCXW124724174 BCX0" data-ccp-props="{"134233117":false,"134233118":false,"335551550":1,"335551620":1,"335559738":0,"335559739":276}"> </span>

##### **Example Setup Using Google Cloud Console**

1. Navigate to **"Logging" &gt; "Log Router" &gt; "Create Sink"**.
2. Provide a **Sink name** and description.
3. For **Sink destination**, select **"Cloud Pub/Sub topic"**. Choose an existing topic or create a new one.
4. If a new topic is created, you must also **create a subscription** for it.
5. Under **"Choose logs to include in sink"**, use a filter like: logName:"cloudaudit.googleapis.com"

<p class="callout danger">**<span class="TextRun SCXW124724174 BCX0" data-contrast="none" lang="EN-US" xml:lang="EN-US"><span class="NormalTextRun SCXW124724174 BCX0">Please provide the following information to </span><span class="NormalTextRun SpellingErrorV2Themed SCXW124724174 BCX0">CyTech</span><span class="NormalTextRun SCXW124724174 BCX0">:</span></span><span class="EOP SCXW124724174 BCX0" data-ccp-props="{"134233117":false,"134233118":false,"335551550":0,"335551620":0,"335559738":240,"335559739":240}"> </span>**</p>

<div class="ListContainerWrapper SCXW124724174 BCX0" id="bkmrk-project-id%C2%A0---the-pr">- <span class="TextRun SCXW124724174 BCX0" data-contrast="none" lang="EN-US" xml:lang="EN-US">**<span class="NormalTextRun SCXW124724174 BCX0">Project </span>**<span class="NormalTextRun ContextualSpellingAndGrammarErrorV2Themed SCXW124724174 BCX0">**ID** -</span> </span><span class="TextRun SCXW124724174 BCX0" data-contrast="none" lang="EN-US" xml:lang="EN-US"><span class="NormalTextRun SCXW124724174 BCX0">The Project ID is the Google Cloud project ID where your resources exist. </span></span>
- <span class="TextRun SCXW124724174 BCX0" data-contrast="none" lang="EN-US" xml:lang="EN-US"><span class="NormalTextRun SCXW124724174 BCX0">**Credentials File** - </span></span><span class="TextRun SCXW124724174 BCX0" data-contrast="none" lang="EN-US" xml:lang="EN-US"><span class="NormalTextRun SCXW124724174 BCX0">Save the JSON file with the private key in a secure location of the file system, and make sure that the Log Collector Agent has at least read-only privileges to this file.</span><span class="NormalTextRun SCXW124724174 BCX0"> </span></span><span class="TextRun SCXW124724174 BCX0" data-contrast="none" lang="EN-US" xml:lang="EN-US"><span class="NormalTextRun SCXW124724174 BCX0">Specify the file path in the Log Collector Agent integration UI in the "Credentials File" field. For example: /home/ubuntu/</span><span class="NormalTextRun SpellingErrorV2Themed SCXW124724174 BCX0">credentials.json</span><span class="NormalTextRun SCXW124724174 BCX0">.</span></span>
- <span class="TextRun SCXW124724174 BCX0" data-contrast="none" lang="EN-US" xml:lang="EN-US">**<span class="NormalTextRun SCXW124724174 BCX0">Pub/</span><span class="NormalTextRun SCXW124724174 BCX0">Sub Topic</span>**<span class="NormalTextRun SCXW124724174 BCX0"> </span><span class="NormalTextRun SCXW124724174 BCX0">- </span></span><span class="TextRun SCXW124724174 BCX0" data-contrast="none" lang="EN-US" xml:lang="EN-US"><span class="NormalTextRun SCXW124724174 BCX0">Name of the topic where the logs are written to.</span></span>
- <span class="TextRun SCXW124724174 BCX0" data-contrast="none" lang="EN-US" xml:lang="EN-US">**<span class="NormalTextRun SCXW124724174 BCX0">Subscription</span>**<span class="NormalTextRun SCXW124724174 BCX0"> - </span></span><span class="TextRun SCXW124724174 BCX0" data-contrast="none" lang="EN-US" xml:lang="EN-US"><span class="NormalTextRun SCXW124724174 BCX0">Use the short subscription name here, not the full-blown path with the project ID. You can find it as "Subscription ID" on the Google Cloud Console.</span></span><span class="EOP SCXW124724174 BCX0" data-ccp-props="{"134233117":false,"134233118":false,"335551550":0,"335551620":0,"335559738":240,"335559739":240}"> </span>

</div>##### **<span class="EOP SCXW124724174 BCX0" data-ccp-props="{"134233117":false,"134233118":false,"335551550":0,"335551620":0,"335559738":240,"335559739":240}"> </span><span class="TextRun SCXW124724174 BCX0" data-contrast="auto" lang="EN-US" xml:lang="EN-US"><span class="NormalTextRun SCXW124724174 BCX0">After setting up GCP. Go to&gt; CISO Workplace</span><span class="NormalTextRun SCXW124724174 BCX0"> to integrate your log source. Please follow the </span><span class="NormalTextRun SCXW124724174 BCX0">instructions</span><span class="NormalTextRun SCXW124724174 BCX0"> below:</span></span><span class="EOP SCXW124724174 BCX0" data-ccp-props="{"134233117":false,"134233118":false,"335551550":0,"335551620":0,"335559738":240,"335559739":240}"> </span>**

<p class="callout info">**<span class="TextRun SCXW124724174 BCX0" data-contrast="auto" lang="EN-US" xml:lang="EN-US"><span class="NormalTextRun SCXW124724174 BCX0">Step1</span><span class="NormalTextRun SCXW124724174 BCX0">: </span></span><span class="TextRun SCXW124724174 BCX0" data-contrast="auto" lang="EN-US" xml:lang="EN-US"><span class="NormalTextRun SCXW124724174 BCX0">Log in CISO Workplace</span></span><span class="TextRun SCXW124724174 BCX0" data-contrast="auto" lang="EN-US" xml:lang="EN-US"><span class="NormalTextRun SCXW124724174 BCX0">&gt;</span></span><span class="TextRun SCXW124724174 BCX0" data-contrast="auto" lang="EN-US" xml:lang="EN-US"><span class="NormalTextRun SCXW124724174 BCX0">CISO Workplace Modules</span></span><span class="TextRun SCXW124724174 BCX0" data-contrast="auto" lang="EN-US" xml:lang="EN-US"><span class="NormalTextRun SCXW124724174 BCX0">&gt;</span></span><span class="TextRun SCXW124724174 BCX0" data-contrast="auto" lang="EN-US" xml:lang="EN-US"><span class="NormalTextRun SCXW124724174 BCX0">Cyber Monitoring</span></span><span class="TextRun SCXW124724174 BCX0" data-contrast="auto" lang="EN-US" xml:lang="EN-US"><span class="NormalTextRun SCXW124724174 BCX0">&gt;</span></span><span class="TextRun SCXW124724174 BCX0" data-contrast="auto" lang="EN-US" xml:lang="EN-US"><span class="NormalTextRun SCXW124724174 BCX0">Cyber Incident Management</span></span><span class="EOP SCXW124724174 BCX0" data-ccp-props="{"134233117":false,"134233118":false,"335551550":0,"335551620":0,"335559738":240,"335559739":240}"> </span>**</p>

<span class="SCXW124724174 BCX0"><span class="WACImageContainer NoPadding DragDrop BlobObject SCXW124724174 BCX0" role="presentation">![Picture](https://cytechint-docs-bookstack.s3.amazonaws.com/uploads/images/gallery/2025-04/R668pieExu37BVcK-embedded-image-z8el5nom.png)</span></span><span class="EOP SCXW124724174 BCX0" data-ccp-props="{"134233117":false,"134233118":false,"335551550":0,"335551620":0,"335559738":240,"335559739":240}"> </span>

<p class="callout info">**<span class="TextRun SCXW124724174 BCX0" data-contrast="auto" lang="EN-US" xml:lang="EN-US"><span class="NormalTextRun SCXW124724174 BCX0">Step2: </span></span><span class="TextRun SCXW124724174 BCX0" data-contrast="auto" lang="EN-US" xml:lang="EN-US"><span class="NormalTextRun SCXW124724174 BCX0">Navigate through Settings</span></span><span class="TextRun SCXW124724174 BCX0" data-contrast="auto" lang="EN-US" xml:lang="EN-US"><span class="NormalTextRun SCXW124724174 BCX0">&gt;</span></span><span class="TextRun SCXW124724174 BCX0" data-contrast="auto" lang="EN-US" xml:lang="EN-US"><span class="NormalTextRun SCXW124724174 BCX0">L</span><span class="NormalTextRun SCXW124724174 BCX0">og Sourc</span></span><span class="TextRun SCXW124724174 BCX0" data-contrast="auto" lang="EN-US" xml:lang="EN-US"><span class="NormalTextRun SCXW124724174 BCX0">e&gt;</span></span><span class="TextRun SCXW124724174 BCX0" data-contrast="auto" lang="EN-US" xml:lang="EN-US"><span class="NormalTextRun SCXW124724174 BCX0">Search </span><span class="NormalTextRun ContextualSpellingAndGrammarErrorV2Themed SCXW124724174 BCX0">Bar</span></span><span class="TextRun SCXW124724174 BCX0" data-contrast="auto" lang="EN-US" xml:lang="EN-US"><span class="NormalTextRun ContextualSpellingAndGrammarErrorV2Themed SCXW124724174 BCX0">(</span><span class="NormalTextRun SCXW124724174 BCX0">type GCP)&gt;Choose the type of GCP</span></span>*<span class="TextRun SCXW124724174 BCX0" data-contrast="auto" lang="EN-US" xml:lang="EN-US"><span class="NormalTextRun ContextualSpellingAndGrammarErrorV2Themed SCXW124724174 BCX0">(for example- </span><span class="NormalTextRun SCXW124724174 BCX0">Google Cloud Platform (GCP) Audit Logs - </span></span><span class="TextRun SCXW124724174 BCX0" data-contrast="auto" lang="EN-US" xml:lang="EN-US"><span class="NormalTextRun SCXW124724174 BCX0">Collect audit logs from Google Cloud Platform (GCP) with Elastic Agent</span></span><span class="TextRun SCXW124724174 BCX0" data-contrast="auto" lang="EN-US" xml:lang="EN-US"><span class="NormalTextRun SCXW124724174 BCX0">)&gt;Click "<span style="color: rgb(224, 62, 45);">Add to Agent</span>".</span></span>***</p>

<span class="SCXW124724174 BCX0"><span class="WACImageContainer NoPadding DragDrop BlobObject SCXW124724174 BCX0" role="presentation">![Picture](https://cytechint-docs-bookstack.s3.amazonaws.com/uploads/images/gallery/2025-04/BC6keXNAQdiLtK68-embedded-image-e4gabd3l.png)</span></span>

<p class="callout info">**<span class="TextRun SCXW124724174 BCX0" data-contrast="auto" lang="EN-US" xml:lang="EN-US"><span class="NormalTextRun SCXW124724174 BCX0">Step3: </span></span><span class="TextRun SCXW124724174 BCX0" data-contrast="auto" lang="EN-US" xml:lang="EN-US"><span class="NormalTextRun SCXW124724174 BCX0">Choose your "Log Collector".</span></span>**</p>

<span class="SCXW124724174 BCX0"><span class="WACImageContainer NoPadding DragDrop BlobObject SCXW124724174 BCX0" role="presentation">![Picture](https://cytechint-docs-bookstack.s3.amazonaws.com/uploads/images/gallery/2025-04/nCCYNXNsOITDNndQ-embedded-image-tmeivq60.png)</span></span><span class="TextRun SCXW124724174 BCX0" data-contrast="none" lang="EN-US" xml:lang="EN-US"><span class="NormalTextRun SCXW124724174 BCX0"> </span></span>

<p class="callout info">**<span class="TextRun SCXW124724174 BCX0" data-contrast="none" lang="EN-US" xml:lang="EN-US"><span class="NormalTextRun SCXW124724174 BCX0">Step4: Provide the "Project ID" and "Credentials File".</span></span>**</p>

<span class="WACImageContainer NoPadding DragDrop BlobObject SCXW124724174 BCX0" role="presentation">![Picture](https://cytechint-docs-bookstack.s3.amazonaws.com/uploads/images/gallery/2025-04/ayZ8wwmJA4A4Jf7d-embedded-image-icvuhbsm.png)</span><span class="EOP SCXW124724174 BCX0" data-ccp-props="{"134233117":false,"134233118":false,"335551550":0,"335551620":0,"335559738":0,"335559739":0}"> </span>

<p class="callout info"><span class="EOP SCXW124724174 BCX0" data-ccp-props="{"134233117":false,"134233118":false,"335551550":0,"335551620":0,"335559738":0,"335559739":0}"> **Step5: Click down the arrow button and make sure to "enable" Collect Google Cloud Platform (GCP) audit logs.**</span></p>

<span class="SCXW124724174 BCX0"><span class="WACImageContainer NoPadding DragDrop BlobObject SCXW124724174 BCX0" role="presentation">![Picture](https://cytechint-docs-bookstack.s3.amazonaws.com/uploads/images/gallery/2025-04/Xo91ZADr4w9ElDmO-embedded-image-qfqzjrej.png)</span></span><span class="TextRun SCXW124724174 BCX0" data-contrast="none" lang="EN-US" xml:lang="EN-US"><span class="NormalTextRun SCXW124724174 BCX0"> </span></span>

<p class="callout info">**<span class="TextRun SCXW124724174 BCX0" data-contrast="none" lang="EN-US" xml:lang="EN-US"><span class="NormalTextRun SCXW124724174 BCX0">Step6: In the Google Cloud Platform (GCP) Audit logs. Provide the "Topic" and "Subscription Name". Additionally, make sure to enable "Subscription Create" and enter "Tags"*(<span style="color: rgb(224, 62, 45);">forwarded and gcp-audit</span>)* by clicking the box. Click "Next" to proceed.</span></span>**</p>

<span class="WACImageContainer NoPadding DragDrop BlobObject SCXW124724174 BCX0" role="presentation">![Picture](https://cytechint-docs-bookstack.s3.amazonaws.com/uploads/images/gallery/2025-04/OLgqdnxBoOwYvh4f-embedded-image-gydi4wfz.png)</span><span class="EOP SCXW124724174 BCX0" data-ccp-props="{"134233117":false,"134233118":false,"335551550":0,"335551620":0,"335559738":0,"335559739":0}"> </span>

<p class="callout info">**<span class="EOP SCXW124724174 BCX0" data-ccp-props="{"134233117":false,"134233118":false,"335551550":0,"335551620":0,"335559738":0,"335559739":0}"> Step7: Wait for a couple of moment to finalize your integration.</span>**</p>

<span class="SCXW124724174 BCX0"><span class="WACImageContainer NoPadding DragDrop BlobObject SCXW124724174 BCX0" role="presentation">![Picture](https://cytechint-docs-bookstack.s3.amazonaws.com/uploads/images/gallery/2025-04/jMOVBHOgyKmY50wR-embedded-image-8nt4gkgx.png)</span></span><span class="TextRun SCXW124724174 BCX0" data-contrast="none" lang="EN-US" xml:lang="EN-US"><span class="NormalTextRun SCXW124724174 BCX0"> </span></span>

<p class="callout info">**Step8: A confirmation that the integration is finish installing.**</p>

<span class="WACImageContainer NoPadding DragDrop BlobObject SCXW124724174 BCX0" role="presentation">![Picture](https://cytechint-docs-bookstack.s3.amazonaws.com/uploads/images/gallery/2025-04/Dlajfyp478X8NxvT-embedded-image-qmqfjnyc.png)</span><span class="EOP SCXW124724174 BCX0" data-ccp-props="{"134233117":false,"134233118":false,"335551550":0,"335551620":0,"335559738":0,"335559739":0}"> </span>

<span class="EOP SCXW124724174 BCX0" data-ccp-props="{}">Documentation reference: <span style="color: rgb(53, 152, 219);">*[https://www.elastic.co/guide/en/integrations/current/gcp.html](https://www.elastic.co/guide/en/integrations/current/gcp.html)*</span></span>

<span class="EOP SCXW124724174 BCX0" data-ccp-props="{}" style="color: rgb(0, 0, 0);">*<span class="TextRun SCXW71272603 BCX0" data-contrast="auto" lang="EN-US" xml:lang="EN-US"><span class="NormalTextRun SCXW71272603 BCX0">If you need further </span><span class="NormalTextRun SCXW71272603 BCX0">assistance</span><span class="NormalTextRun SCXW71272603 BCX0">, kindly contact our support at </span></span><span style="color: rgb(53, 152, 219);">**<span class="TextRun SCXW71272603 BCX0" data-contrast="none" lang="EN-US" xml:lang="EN-US"><span class="NormalTextRun SCXW71272603 BCX0">support@cytechint.com</span></span>**</span><span class="TextRun SCXW71272603 BCX0" data-contrast="auto" lang="EN-US" xml:lang="EN-US"><span class="NormalTextRun SCXW71272603 BCX0"><span style="color: rgb(53, 152, 219);"> </span>for prompt </span><span class="NormalTextRun SCXW71272603 BCX0">assistance</span><span class="NormalTextRun SCXW71272603 BCX0"> and guidance.</span></span><span class="EOP SCXW71272603 BCX0" data-ccp-props="{}"></span>*</span>

# Google Workspace Integrations

##### <span style="color: rgb(53, 152, 219);">**<span class="TextRun SCXW11705193 BCX8" data-contrast="none" lang="EN-US" xml:lang="EN-US"><span class="NormalTextRun SCXW11705193 BCX8" data-ccp-charstyle="Style (Complex) Open Sans" data-ccp-charstyle-defn="{"ObjectId":"df5bdb3e-8585-48ee-8152-57e41e43df1e|103","ClassId":1073872969,"Properties":[469775450,"Style (Complex) Open Sans",201340122,"1",134233614,"true",469778129,"StyleComplexOpenSans",335572020,"1",201342448,"1",469777841,"Open Sans",469777842,"Open Sans",469777843,"Calibri",469777844,"Open Sans",469769226,"Open Sans,Calibri",469778324,"Default Paragraph Font"]}">Introduction</span></span><span class="EOP SCXW11705193 BCX8" data-ccp-props="{"134245418":true,"134245529":true,"201341983":0,"335559738":240,"335559739":0,"335559740":360}"> </span>**</span>

<span class="TextRun Highlight SCXW11705193 BCX8" data-contrast="auto" lang="EN-US" xml:lang="EN-US"><span class="NormalTextRun SCXW11705193 BCX8">G</span><span class="NormalTextRun SCXW11705193 BCX8">oogle Workspace (formerly G Suite) is a suite of cloud computing, productivity and collaboration tools, software and products developed and marketed by Google. It allows users to create, edit, and share documents, spreadsheets, presentations, and more. It also includes email, calendar, chat, and video conferencing tools</span><span class="NormalTextRun SCXW11705193 BCX8">.</span></span><span class="EOP SCXW11705193 BCX8" data-ccp-props="{"201341983":0,"335559685":360,"335559739":160,"335559740":259}"> </span>

<span class="TextRun Highlight SCXW11705193 BCX8" data-contrast="auto" lang="EN-US" xml:lang="EN-US"><span class="NormalTextRun SCXW11705193 BCX8">Google Workspace is designed for businesses of all sizes, from small businesses to large enterprises. It is a popular choice for businesses because it is affordable, easy to use, and secure</span><span class="NormalTextRun SCXW11705193 BCX8">.</span></span><span class="EOP SCXW11705193 BCX8" data-ccp-props="{"201341983":0,"335559685":360,"335559739":160,"335559740":259}"> </span>

<span class="TextRun SCXW11705193 BCX8" data-contrast="auto" lang="EN-US" xml:lang="EN-US"><span class="NormalTextRun SCXW11705193 BCX8" data-ccp-charstyle="Style (Complex) Open Sans">The Google Workspace integration collects and parses data from the different </span></span>[<span class="TextRun Underlined SCXW11705193 BCX8" data-contrast="none" lang="EN-US" xml:lang="EN-US"><span class="NormalTextRun SCXW11705193 BCX8" data-ccp-charstyle="Hyperlink">Google Workspace audit reports APIs</span></span>](https://developers.google.com/admin-sdk/reports)<span class="TextRun SCXW11705193 BCX8" data-contrast="auto" lang="EN-US" xml:lang="EN-US"><span class="NormalTextRun SCXW11705193 BCX8" data-ccp-charstyle="Style (Complex) Open Sans">.</span></span><span class="EOP SCXW11705193 BCX8" data-ccp-props="{"201341983":0,"335559685":360,"335559739":160,"335559740":259}"> </span>

<span class="TextRun SCXW11705193 BCX8" data-contrast="auto" lang="EN-US" xml:lang="EN-US"><span class="NormalTextRun SCXW11705193 BCX8" data-ccp-charstyle="Style (Complex) Open Sans">If you want to know more about how you can fully </span><span class="NormalTextRun SCXW11705193 BCX8" data-ccp-charstyle="Style (Complex) Open Sans">leverage</span><span class="NormalTextRun SCXW11705193 BCX8" data-ccp-charstyle="Style (Complex) Open Sans"> the Google Workspace integration, there is a multipart blog from our Security Labs that will help you:</span></span><span class="EOP SCXW11705193 BCX8" data-ccp-props="{"201341983":0,"335559685":360,"335559739":160,"335559740":259}"> </span>

<div class="SCXW11705193 BCX8" id="bkmrk-to-understand-what-g"><div class="ListContainerWrapper SCXW11705193 BCX8">1. <span class="TextRun SCXW11705193 BCX8" data-contrast="auto" lang="EN-US" xml:lang="EN-US"><span class="NormalTextRun SCXW11705193 BCX8" data-ccp-charstyle="Style (Complex) Open Sans">To understand what Google Workspace is in </span></span>[<span class="TextRun Underlined SCXW11705193 BCX8" data-contrast="none" lang="EN-US" xml:lang="EN-US"><span class="NormalTextRun SCXW11705193 BCX8" data-ccp-charstyle="Hyperlink">Part One - Surveying the Land</span></span>](https://www.elastic.co/security-labs/google-workspace-attack-surface-part-one)<span class="EOP SCXW11705193 BCX8" data-ccp-props="{"201341983":0,"335559739":160,"335559740":259}"> </span>

</div><div class="ListContainerWrapper SCXW11705193 BCX8">2. <span class="TextRun SCXW11705193 BCX8" data-contrast="auto" lang="EN-US" xml:lang="EN-US"><span class="NormalTextRun SCXW11705193 BCX8" data-ccp-charstyle="Style (Complex) Open Sans">To set it up, step by step, in </span></span>[<span class="TextRun Underlined SCXW11705193 BCX8" data-contrast="none" lang="EN-US" xml:lang="EN-US"><span class="NormalTextRun SCXW11705193 BCX8" data-ccp-charstyle="Hyperlink">Part Two - Setup Threat Detection with Elastic</span></span>](https://www.elastic.co/security-labs/google-workspace-attack-surface-part-two)<span class="EOP SCXW11705193 BCX8" data-ccp-props="{"201341983":0,"335559739":160,"335559740":259}"> </span>

</div><div class="ListContainerWrapper SCXW11705193 BCX8">3. <span class="TextRun SCXW11705193 BCX8" data-contrast="auto" lang="EN-US" xml:lang="EN-US"><span class="NormalTextRun SCXW11705193 BCX8" data-ccp-charstyle="Style (Complex) Open Sans">And to use the collected information to your advantage in </span></span>[<span class="TextRun Underlined SCXW11705193 BCX8" data-contrast="none" lang="EN-US" xml:lang="EN-US"><span class="NormalTextRun SCXW11705193 BCX8" data-ccp-charstyle="Hyperlink">Part Three - Detecting Common Threats</span></span>](https://www.elastic.co/security-labs/google-workspace-attack-surface-part-three)<span class="EOP SCXW11705193 BCX8" data-ccp-props="{"201341983":0,"335559739":160,"335559740":259}"> </span>

</div><div class="ListContainerWrapper SCXW11705193 BCX8">  
</div></div>##### <span style="color: rgb(53, 152, 219);">**<span class="TextRun Highlight SCXW11705193 BCX8" data-contrast="none" lang="EN-US" xml:lang="EN-US"><span class="NormalTextRun SCXW11705193 BCX8" data-ccp-charstyle="normaltextrun" data-ccp-charstyle-defn="{"ObjectId":"df5bdb3e-8585-48ee-8152-57e41e43df1e|129","ClassId":1073872969,"Properties":[469775450,"normaltextrun",201340122,"1",134233614,"true",469778129,"normaltextrun",335572020,"1",469778324,"Default Paragraph Font"]}">Assumptions</span></span><span class="EOP SCXW11705193 BCX8" data-ccp-props="{"134245418":true,"134245529":true,"201341983":0,"335559738":240,"335559739":0,"335559740":360}"> </span>**</span>

<span class="TextRun Highlight SCXW11705193 BCX8" data-contrast="auto" lang="EN-US" xml:lang="EN-US"><span class="NormalTextRun SCXW11705193 BCX8" data-ccp-charstyle="eop" data-ccp-charstyle-defn="{"ObjectId":"df5bdb3e-8585-48ee-8152-57e41e43df1e|130","ClassId":1073872969,"Properties":[469775450,"eop",201340122,"1",134233614,"true",469778129,"eop",335572020,"1",469778324,"Default Paragraph Font"]}">The procedures described in Section 3 </span><span class="NormalTextRun ContextualSpellingAndGrammarErrorV2Themed SCXW11705193 BCX8" data-ccp-charstyle="eop">assumes</span><span class="NormalTextRun SCXW11705193 BCX8" data-ccp-charstyle="eop"> that a Log Collector has already been </span><span class="NormalTextRun ContextualSpellingAndGrammarErrorV2Themed SCXW11705193 BCX8" data-ccp-charstyle="eop">setup</span><span class="NormalTextRun SCXW11705193 BCX8" data-ccp-charstyle="eop">. </span></span><span class="EOP SCXW11705193 BCX8" data-ccp-props="{"201341983":0,"335559685":720,"335559739":160,"335559740":259}"> </span>

**<span class="TextRun SCXW11705193 BCX8" data-contrast="none" lang="EN-US" xml:lang="EN-US"><span class="NormalTextRun SCXW11705193 BCX8" data-ccp-charstyle="eop">Compatibility</span></span><span class="EOP SCXW11705193 BCX8" data-ccp-props="{"134245418":true,"134245529":true,"201341983":0,"335559738":240,"335559739":0,"335559740":360}"> </span>**

<span class="TextRun SCXW11705193 BCX8" data-contrast="auto" lang="EN-US" xml:lang="EN-US"><span class="NormalTextRun SCXW11705193 BCX8" data-ccp-charstyle="eop">It is compatible with a subset of applications </span><span class="NormalTextRun SCXW11705193 BCX8" data-ccp-charstyle="eop">under the </span></span>[<span class="TextRun Underlined SCXW11705193 BCX8" data-contrast="none" lang="EN-US" xml:lang="EN-US"><span class="NormalTextRun SCXW11705193 BCX8" data-ccp-charstyle="Hyperlink">Google Reports API v1</span></span>](https://developers.google.com/admin-sdk/reports/v1/get-start/getting-started)<span class="TextRun SCXW11705193 BCX8" data-contrast="auto" lang="EN-US" xml:lang="EN-US"><span class="NormalTextRun SCXW11705193 BCX8" data-ccp-charstyle="eop">.</span></span><span class="EOP SCXW11705193 BCX8" data-ccp-props="{"201341983":0,"335559685":720,"335559739":160,"335559740":259}"> </span>

<div class="SCXW11705193 BCX8" id="bkmrk-"><div class="OutlineElement Ltr SCXW11705193 BCX8">  
</div><div class="ListContainerWrapper SCXW11705193 BCX8">  
</div></div>##### <span style="color: rgb(53, 152, 219);">**<span class="TextRun Highlight SCXW11705193 BCX8" data-contrast="none" lang="EN-US" xml:lang="EN-US"><span class="NormalTextRun SCXW11705193 BCX8" data-ccp-charstyle="eop">Requirements</span></span><span class="EOP SCXW11705193 BCX8" data-ccp-props="{"134245418":true,"134245529":true,"201341983":0,"335559738":240,"335559739":0,"335559740":360}"> </span>**</span>

<span class="TextRun Highlight SCXW11705193 BCX8" data-contrast="auto" lang="EN-US" xml:lang="EN-US"><span class="NormalTextRun SCXW11705193 BCX8" data-ccp-charstyle="eop">The procedures described in Section 3 </span><span class="NormalTextRun ContextualSpellingAndGrammarErrorV2Themed SCXW11705193 BCX8" data-ccp-charstyle="eop">assumes</span><span class="NormalTextRun SCXW11705193 BCX8" data-ccp-charstyle="eop"> that a Log Collector has already been </span><span class="NormalTextRun ContextualSpellingAndGrammarErrorV2Themed SCXW11705193 BCX8" data-ccp-charstyle="eop">setup</span><span class="NormalTextRun SCXW11705193 BCX8" data-ccp-charstyle="eop">. </span></span><span class="EOP SCXW11705193 BCX8" data-ccp-props="{"201341983":0,"335559685":720,"335559739":160,"335559740":259}"> </span>

**<span class="TextRun SCXW11705193 BCX8" data-contrast="none" lang="EN-US" xml:lang="EN-US"><span class="NormalTextRun AdvancedProofingIssueV2Themed SCXW11705193 BCX8" data-ccp-charstyle="eop">In order to</span><span class="NormalTextRun SCXW11705193 BCX8" data-ccp-charstyle="eop"> ingest data from the Google Reports API you must</span><span class="NormalTextRun SCXW11705193 BCX8" data-ccp-charstyle="eop">:</span></span><span class="EOP SCXW11705193 BCX8" data-ccp-props="{"134245418":true,"134245529":true,"201341983":0,"335559738":240,"335559739":0,"335559740":360}"> </span>**

<div class="SCXW11705193 BCX8" id="bkmrk-have-an-administrato"><div class="ListContainerWrapper SCXW11705193 BCX8">  
</div><div class="ListContainerWrapper SCXW11705193 BCX8">- <span class="TextRun Highlight SCXW11705193 BCX8" data-contrast="auto" lang="EN-US" xml:lang="EN-US"><span class="NormalTextRun SCXW11705193 BCX8" data-ccp-charstyle="eop">Have an</span></span><span class="TextRun Highlight SCXW11705193 BCX8" data-contrast="auto" lang="EN-US" xml:lang="EN-US"><span class="NormalTextRun SCXW11705193 BCX8" data-ccp-charstyle="eop"> administrator account</span></span><span class="TextRun Highlight SCXW11705193 BCX8" data-contrast="auto" lang="EN-US" xml:lang="EN-US"><span class="NormalTextRun SCXW11705193 BCX8" data-ccp-charstyle="eop">.</span></span><span class="EOP SCXW11705193 BCX8" data-ccp-props="{"201341983":0,"335559739":160,"335559740":259}"> </span>
- <span class="TextRun Highlight SCXW11705193 BCX8" data-contrast="auto" lang="EN-US" xml:lang="EN-US"><span class="NormalTextRun SCXW11705193 BCX8" data-ccp-charstyle="eop">Set up a </span><span class="NormalTextRun SpellingErrorV2Themed SCXW11705193 BCX8" data-ccp-charstyle="eop">ServiceAccount</span><span class="NormalTextRun SCXW11705193 BCX8" data-ccp-charstyle="eop"> using the administrator account</span><span class="NormalTextRun SCXW11705193 BCX8" data-ccp-charstyle="eop">.</span></span><span class="EOP SCXW11705193 BCX8" data-ccp-props="{"201341983":0,"335559739":160,"335559740":259}"> </span>
- <span class="TextRun Highlight SCXW11705193 BCX8" data-contrast="auto" lang="EN-US" xml:lang="EN-US"><span class="NormalTextRun SCXW11705193 BCX8" data-ccp-charstyle="eop">Set up access to the Admin SDK API for the </span><span class="NormalTextRun SpellingErrorV2Themed SCXW11705193 BCX8" data-ccp-charstyle="eop">ServiceAccount</span><span class="NormalTextRun SCXW11705193 BCX8" data-ccp-charstyle="eop">.</span></span><span class="EOP SCXW11705193 BCX8" data-ccp-props="{"201341983":0,"335559739":160,"335559740":259}"> </span>
- <span class="TextRun Highlight SCXW11705193 BCX8" data-contrast="auto" lang="EN-US" xml:lang="EN-US"><span class="NormalTextRun SCXW11705193 BCX8" data-ccp-charstyle="eop">Enable Domain-Wide Delegation for your </span><span class="NormalTextRun SpellingErrorV2Themed SCXW11705193 BCX8" data-ccp-charstyle="eop">ServiceAccount</span><span class="NormalTextRun SCXW11705193 BCX8" data-ccp-charstyle="eop">.</span></span><span class="EOP SCXW11705193 BCX8" data-ccp-props="{"201341983":0,"335559739":160,"335559740":259}"> </span>

</div></div>**<span class="TextRun Highlight SCXW11705193 BCX8" data-contrast="auto" lang="EN-US" xml:lang="EN-US"><span class="NormalTextRun SCXW11705193 BCX8" data-ccp-charstyle="eop">Create access credentials</span></span><span class="EOP SCXW11705193 BCX8" data-ccp-props="{"201341983":0,"335559685":360,"335559739":160,"335559740":259}"> </span>**

<span class="TextRun Highlight SCXW11705193 BCX8" data-contrast="auto" lang="EN-US" xml:lang="EN-US"><span class="NormalTextRun SCXW11705193 BCX8" data-ccp-charstyle="eop">Credentials are used to obtain an access token from Google's authorization servers so your app can call Google Workspace APIs. This guide describes how to choose and set up the credentials your app needs</span><span class="NormalTextRun SCXW11705193 BCX8" data-ccp-charstyle="eop">.</span></span><span class="EOP SCXW11705193 BCX8" data-ccp-props="{"201341983":0,"335559685":360,"335559739":160,"335559740":259}"> </span>

**<span class="TextRun Highlight SCXW11705193 BCX8" data-contrast="auto" lang="EN-US" xml:lang="EN-US"><span class="NormalTextRun SCXW11705193 BCX8" data-ccp-charstyle="eop">Choose the access credential that is right for you</span></span><span class="EOP SCXW11705193 BCX8" data-ccp-props="{"201341983":0,"335559685":360,"335559739":160,"335559740":259}"> </span>**

<span class="TextRun Highlight SCXW11705193 BCX8" data-contrast="auto" lang="EN-US" xml:lang="EN-US"><span class="NormalTextRun SCXW11705193 BCX8" data-ccp-charstyle="eop">The required credentials </span><span class="NormalTextRun ContextualSpellingAndGrammarErrorV2Themed SCXW11705193 BCX8" data-ccp-charstyle="eop">depends</span><span class="NormalTextRun SCXW11705193 BCX8" data-ccp-charstyle="eop"> on the type of data, platform, and access </span><span class="NormalTextRun SCXW11705193 BCX8" data-ccp-charstyle="eop">methodology</span><span class="NormalTextRun SCXW11705193 BCX8" data-ccp-charstyle="eop"> of your app. There are three types of credential types available:</span></span><span class="EOP SCXW11705193 BCX8" data-ccp-props="{"201341983":0,"335559685":360,"335559739":160,"335559740":259}"> </span>

<div class="SCXW11705193 BCX8" id="bkmrk-api-key-credentials-"><div class="ListContainerWrapper SCXW11705193 BCX8">- **<span class="TextRun Highlight SCXW11705193 BCX8" data-contrast="auto" lang="EN-US" xml:lang="EN-US"><span class="NormalTextRun SCXW11705193 BCX8" data-ccp-charstyle="eop">API key credentials</span></span>**<span class="TextRun Highlight SCXW11705193 BCX8" data-contrast="auto" lang="EN-US" xml:lang="EN-US"><span class="NormalTextRun SCXW11705193 BCX8" data-ccp-charstyle="eop"> - </span><span class="NormalTextRun SCXW11705193 BCX8" data-ccp-charstyle="eop">An API key is a long string </span><span class="NormalTextRun SCXW11705193 BCX8" data-ccp-charstyle="eop">containing</span> <span class="NormalTextRun ContextualSpellingAndGrammarErrorV2Themed SCXW11705193 BCX8" data-ccp-charstyle="eop">upper and lower case</span><span class="NormalTextRun SCXW11705193 BCX8" data-ccp-charstyle="eop"> letters, numbers, underscores, and hyphens, such as AIzaSyDaGmWKa4JsXZ-HjGw7ISLn\_3namBGewQe. This authentication method is used to anonymously access </span><span class="NormalTextRun ContextualSpellingAndGrammarErrorV2Themed SCXW11705193 BCX8" data-ccp-charstyle="eop">publicly-available</span><span class="NormalTextRun SCXW11705193 BCX8" data-ccp-charstyle="eop"> data, such as Google Workspace files shared using the "Anyone on the Internet with this link" sharing setting. For more details, see </span></span>[<span class="TextRun Highlight Underlined SCXW11705193 BCX8" data-contrast="none" lang="EN-US" xml:lang="EN-US"><span class="NormalTextRun SCXW11705193 BCX8" data-ccp-charstyle="Hyperlink">Using API keys</span></span>](https://cloud.google.com/docs/authentication/api-keys)<span class="TextRun Highlight SCXW11705193 BCX8" data-contrast="auto" lang="EN-US" xml:lang="EN-US"><span class="NormalTextRun SCXW11705193 BCX8" data-ccp-charstyle="eop">.</span> <span class="NormalTextRun SCXW11705193 BCX8" data-ccp-charstyle="eop">To create an API key</span><span class="NormalTextRun SCXW11705193 BCX8" data-ccp-charstyle="eop">:</span></span><span class="EOP SCXW11705193 BCX8" data-ccp-props="{"201341983":0,"335559739":160,"335559740":259}"> </span>

</div><div class="ListContainerWrapper SCXW11705193 BCX8">- - <span class="TextRun Highlight SCXW11705193 BCX8" data-contrast="auto" lang="EN-US" xml:lang="EN-US"><span class="NormalTextRun SCXW11705193 BCX8" data-ccp-charstyle="eop">In the Google Cloud console, go to Menu &gt; </span></span>**<span class="TextRun Highlight SCXW11705193 BCX8" data-contrast="auto" lang="EN-US" xml:lang="EN-US"><span class="NormalTextRun SCXW11705193 BCX8" data-ccp-charstyle="eop">APIs &amp; Services</span></span><span class="TextRun Highlight SCXW11705193 BCX8" data-contrast="auto" lang="EN-US" xml:lang="EN-US"><span class="NormalTextRun SCXW11705193 BCX8" data-ccp-charstyle="eop"> &gt; </span></span><span class="TextRun Highlight SCXW11705193 BCX8" data-contrast="auto" lang="EN-US" xml:lang="EN-US"><span class="NormalTextRun SCXW11705193 BCX8" data-ccp-charstyle="eop">Credentials</span></span><span class="TextRun Highlight SCXW11705193 BCX8" data-contrast="auto" lang="EN-US" xml:lang="EN-US"><span class="NormalTextRun SCXW11705193 BCX8" data-ccp-charstyle="eop">.</span></span>**<span class="EOP SCXW11705193 BCX8" data-ccp-props="{"201341983":0,"335559739":160,"335559740":259}"> </span>
    - <span class="TextRun Highlight SCXW11705193 BCX8" data-contrast="auto" lang="EN-US" xml:lang="EN-US"><span class="NormalTextRun SCXW11705193 BCX8" data-ccp-charstyle="eop">Click Create credentials &gt; API key.</span></span><span class="EOP SCXW11705193 BCX8" data-ccp-props="{"201341983":0,"335559739":160,"335559740":259}"> </span>
    - <span class="TextRun Highlight SCXW11705193 BCX8" data-contrast="auto" lang="EN-US" xml:lang="EN-US"><span class="NormalTextRun SCXW11705193 BCX8" data-ccp-charstyle="eop">Your new API key is displayed.</span></span><span class="EOP SCXW11705193 BCX8" data-ccp-props="{"201341983":0,"335559739":160,"335559740":259}"> </span>

</div><div class="ListContainerWrapper SCXW11705193 BCX8" style="padding-left: 40px;">- - - <span class="TextRun Highlight SCXW11705193 BCX8" data-contrast="auto" lang="EN-US" xml:lang="EN-US"><span class="NormalTextRun SCXW11705193 BCX8" data-ccp-charstyle="eop">Click Copy to copy your API key for use in your app's code. The API key can also be found in the "API keys" section of your project's credentials.</span></span><span class="EOP SCXW11705193 BCX8" data-ccp-props="{"201341983":0,"335559739":160,"335559740":259}"> </span>
        - <span class="TextRun Highlight SCXW11705193 BCX8" data-contrast="auto" lang="EN-US" xml:lang="EN-US"><span class="NormalTextRun SCXW11705193 BCX8" data-ccp-charstyle="eop">Click </span></span><span class="TextRun Highlight SCXW11705193 BCX8" data-contrast="auto" lang="EN-US" xml:lang="EN-US"><span class="NormalTextRun ContextualSpellingAndGrammarErrorV2Themed SCXW11705193 BCX8" data-ccp-charstyle="eop">Restrict</span><span class="NormalTextRun SCXW11705193 BCX8" data-ccp-charstyle="eop"> key</span></span><span class="TextRun Highlight SCXW11705193 BCX8" data-contrast="auto" lang="EN-US" xml:lang="EN-US"><span class="NormalTextRun SCXW11705193 BCX8" data-ccp-charstyle="eop"> to update advanced settings and limit use of your API key. For more details, see </span></span>[<span class="TextRun Highlight Underlined SCXW11705193 BCX8" data-contrast="none" lang="EN-US" xml:lang="EN-US"><span class="NormalTextRun SCXW11705193 BCX8" data-ccp-charstyle="Hyperlink">Applying API key restrictions</span></span>](https://cloud.google.com/docs/authentication/api-keys#api_key_restrictions)<span class="TextRun Highlight SCXW11705193 BCX8" data-contrast="auto" lang="EN-US" xml:lang="EN-US"><span class="NormalTextRun SCXW11705193 BCX8" data-ccp-charstyle="eop">.</span></span><span class="EOP SCXW11705193 BCX8" data-ccp-props="{"201341983":0,"335559739":160,"335559740":259}"> </span>

</div></div><div class="SCXW11705193 BCX8" id="bkmrk-oauth-client-id-cred"><div class="ListContainerWrapper SCXW11705193 BCX8">- **<span class="TextRun Highlight SCXW11705193 BCX8" data-contrast="auto" lang="EN-US" xml:lang="EN-US"><span class="NormalTextRun SCXW11705193 BCX8" data-ccp-charstyle="eop">OAuth client ID credentials</span></span>**<span class="TextRun Highlight SCXW11705193 BCX8" data-contrast="auto" lang="EN-US" xml:lang="EN-US"><span class="NormalTextRun SCXW11705193 BCX8" data-ccp-charstyle="eop"> - </span><span class="NormalTextRun SCXW11705193 BCX8" data-ccp-charstyle="eop">To authenticate as an end user and access user data in your app, you need to create one or more OAuth 2.0 Client IDs. A client ID is used to </span><span class="NormalTextRun SCXW11705193 BCX8" data-ccp-charstyle="eop">identify</span><span class="NormalTextRun SCXW11705193 BCX8" data-ccp-charstyle="eop"> a single app to Google's OAuth servers. If your app runs on multiple platforms, you must create a separate client ID for each platform.</span> <span class="NormalTextRun SCXW11705193 BCX8" data-ccp-charstyle="eop">Choose </span><span class="NormalTextRun ContextualSpellingAndGrammarErrorV2Themed SCXW11705193 BCX8" data-ccp-charstyle="eop">your</span> </span>[<span class="TextRun Highlight Underlined SCXW11705193 BCX8" data-contrast="none" lang="EN-US" xml:lang="EN-US"><span class="NormalTextRun SCXW11705193 BCX8" data-ccp-charstyle="Hyperlink">application type</span></span>](https://support.google.com/cloud/answer/6158849#service-web-app&zippy=%2Cweb-applications%2Cnative-applications)<span class="TextRun Highlight SCXW11705193 BCX8" data-contrast="auto" lang="EN-US" xml:lang="EN-US"><span class="NormalTextRun SCXW11705193 BCX8" data-ccp-charstyle="eop"> for specific instructions about how to create an OAuth client ID:</span></span><span class="EOP SCXW11705193 BCX8" data-ccp-props="{"201341983":0,"335559739":160,"335559740":259}"> </span>

</div><div class="ListContainerWrapper SCXW11705193 BCX8">- - - - - <span class="TextRun Highlight SCXW11705193 BCX8" data-contrast="auto" lang="EN-US" xml:lang="EN-US"><span class="NormalTextRun SCXW11705193 BCX8" data-ccp-charstyle="eop">Web application</span></span><span class="EOP SCXW11705193 BCX8" data-ccp-props="{"201341983":0,"335559739":160,"335559740":259}"> </span>
                - <span class="TextRun Highlight SCXW11705193 BCX8" data-contrast="auto" lang="EN-US" xml:lang="EN-US"><span class="NormalTextRun SCXW11705193 BCX8" data-ccp-charstyle="eop">Android</span></span><span class="EOP SCXW11705193 BCX8" data-ccp-props="{"201341983":0,"335559739":160,"335559740":259}"> </span>
                - <span class="TextRun Highlight SCXW11705193 BCX8" data-contrast="auto" lang="EN-US" xml:lang="EN-US"><span class="NormalTextRun SCXW11705193 BCX8" data-ccp-charstyle="eop">iOS</span></span><span class="EOP SCXW11705193 BCX8" data-ccp-props="{"201341983":0,"335559739":160,"335559740":259}"> </span>
                - <span class="TextRun Highlight SCXW11705193 BCX8" data-contrast="auto" lang="EN-US" xml:lang="EN-US"><span class="NormalTextRun SCXW11705193 BCX8" data-ccp-charstyle="eop">Chrome app</span></span><span class="EOP SCXW11705193 BCX8" data-ccp-props="{"201341983":0,"335559739":160,"335559740":259}"> </span>
                - <span class="TextRun Highlight SCXW11705193 BCX8" data-contrast="auto" lang="EN-US" xml:lang="EN-US"><span class="NormalTextRun SCXW11705193 BCX8" data-ccp-charstyle="eop">Desk</span><span class="NormalTextRun SCXW11705193 BCX8" data-ccp-charstyle="eop">top app</span></span><span class="EOP SCXW11705193 BCX8" data-ccp-props="{"201341983":0,"335559739":160,"335559740":259}"> </span>
                - <span class="TextRun Highlight SCXW11705193 BCX8" data-contrast="auto" lang="EN-US" xml:lang="EN-US"><span class="NormalTextRun SCXW11705193 BCX8" data-ccp-charstyle="eop">TVs &amp; limited-input devices</span></span><span class="EOP SCXW11705193 BCX8" data-ccp-props="{"201341983":0,"335559739":160,"335559740":259}"> </span>
                - <span class="TextRun Highlight SCXW11705193 BCX8" data-contrast="auto" lang="EN-US" xml:lang="EN-US"><span class="NormalTextRun SCXW11705193 BCX8" data-ccp-charstyle="eop">Universal Windows Platform (UWP)</span></span><span class="EOP SCXW11705193 BCX8" data-ccp-props="{"201341983":0,"335559739":160,"335559740":259}"> </span>

</div><div class="ListContainerWrapper SCXW11705193 BCX8">- **<span class="TextRun Highlight SCXW11705193 BCX8" data-contrast="auto" lang="EN-US" xml:lang="EN-US"><span class="NormalTextRun SCXW11705193 BCX8" data-ccp-charstyle="eop">Service account credentials</span></span>**<span class="TextRun Highlight SCXW11705193 BCX8" data-contrast="auto" lang="EN-US" xml:lang="EN-US"><span class="NormalTextRun SCXW11705193 BCX8" data-ccp-charstyle="eop"> - </span><span class="NormalTextRun SCXW11705193 BCX8" data-ccp-charstyle="eop">A service account is a special kind of account used by an application, rather than a person. You can use a service account to access data or perform actions by the robot account, or to access data on behalf of Google Workspace or Cloud Identity users. For more information, see </span></span>[<span class="TextRun Highlight Underlined SCXW11705193 BCX8" data-contrast="none" lang="EN-US" xml:lang="EN-US"><span class="NormalTextRun SCXW11705193 BCX8" data-ccp-charstyle="Hyperlink">Understanding service accounts</span></span>](https://cloud.google.com/iam/docs/understanding-service-accounts)<span class="TextRun Highlight SCXW11705193 BCX8" data-contrast="auto" lang="EN-US" xml:lang="EN-US"><span class="NormalTextRun SCXW11705193 BCX8" data-ccp-charstyle="eop">.</span> </span><span class="TextRun Highlight SCXW11705193 BCX8" data-contrast="auto" lang="EN-US" xml:lang="EN-US"><span class="NormalTextRun SCXW11705193 BCX8" data-ccp-charstyle="eop">Create a service account</span><span class="NormalTextRun SCXW11705193 BCX8" data-ccp-charstyle="eop">:</span></span><span class="EOP SCXW11705193 BCX8" data-ccp-props="{"201341983":0,"335559739":160,"335559740":259}"> </span>

</div><div class="ListContainerWrapper SCXW11705193 BCX8">- - - - - <span class="TextRun Highlight SCXW11705193 BCX8" data-contrast="auto" lang="EN-US" xml:lang="EN-US"><span class="NormalTextRun SCXW11705193 BCX8" data-ccp-charstyle="eop">In the Google Cloud console, go to Menu &gt; </span></span><span class="TextRun Highlight SCXW11705193 BCX8" data-contrast="auto" lang="EN-US" xml:lang="EN-US"><span class="NormalTextRun SCXW11705193 BCX8" data-ccp-charstyle="eop">IAM &amp; Admin</span></span><span class="TextRun Highlight SCXW11705193 BCX8" data-contrast="auto" lang="EN-US" xml:lang="EN-US"><span class="NormalTextRun SCXW11705193 BCX8" data-ccp-charstyle="eop"> &gt; </span></span><span class="TextRun Highlight SCXW11705193 BCX8" data-contrast="auto" lang="EN-US" xml:lang="EN-US"><span class="NormalTextRun SCXW11705193 BCX8" data-ccp-charstyle="eop">Service Accounts</span></span><span class="TextRun Highlight SCXW11705193 BCX8" data-contrast="auto" lang="EN-US" xml:lang="EN-US"><span class="NormalTextRun SCXW11705193 BCX8" data-ccp-charstyle="eop">.</span></span><span class="EOP SCXW11705193 BCX8" data-ccp-props="{"201341983":0,"335559739":160,"335559740":259}"> </span>
                - <span class="TextRun Highlight SCXW11705193 BCX8" data-contrast="auto" lang="EN-US" xml:lang="EN-US"><span class="NormalTextRun SCXW11705193 BCX8" data-ccp-charstyle="eop">Click </span></span><span class="TextRun Highlight SCXW11705193 BCX8" data-contrast="auto" lang="EN-US" xml:lang="EN-US"><span class="NormalTextRun SCXW11705193 BCX8" data-ccp-charstyle="eop">Create service account</span></span><span class="TextRun Highlight SCXW11705193 BCX8" data-contrast="auto" lang="EN-US" xml:lang="EN-US"><span class="NormalTextRun SCXW11705193 BCX8" data-ccp-charstyle="eop">.</span></span><span class="EOP SCXW11705193 BCX8" data-ccp-props="{"201341983":0,"335559739":160,"335559740":259}"> </span>
                - <span class="TextRun Highlight SCXW11705193 BCX8" data-contrast="auto" lang="EN-US" xml:lang="EN-US"><span class="NormalTextRun SCXW11705193 BCX8" data-ccp-charstyle="eop">Fill in the service account details, then click </span></span><span class="TextRun Highlight SCXW11705193 BCX8" data-contrast="auto" lang="EN-US" xml:lang="EN-US"><span class="NormalTextRun SCXW11705193 BCX8" data-ccp-charstyle="eop">Create and continue</span></span><span class="TextRun Highlight SCXW11705193 BCX8" data-contrast="auto" lang="EN-US" xml:lang="EN-US"><span class="NormalTextRun SCXW11705193 BCX8" data-ccp-charstyle="eop">.</span></span>
                - <span class="TextRun Highlight SCXW11705193 BCX8" data-contrast="auto" lang="EN-US" xml:lang="EN-US"><span class="NormalTextRun SCXW11705193 BCX8" data-ccp-charstyle="eop">Note: By default, Google creates a unique service account ID. If you would like to change the ID, modify the ID in the service account ID field.</span></span>
                - <span class="TextRun Highlight SCXW11705193 BCX8" data-contrast="auto" lang="EN-US" xml:lang="EN-US"><span class="NormalTextRun SCXW11705193 BCX8" data-ccp-charstyle="eop">Optional: Assign roles to your service account to grant access to your Google Cloud project's resources. For more details, refer to </span></span>[<span class="TextRun Highlight Underlined SCXW11705193 BCX8" data-contrast="none" lang="EN-US" xml:lang="EN-US"><span class="NormalTextRun SCXW11705193 BCX8" data-ccp-charstyle="Hyperlink">Granting, changing, and revoking access to resources</span><span class="NormalTextRun SCXW11705193 BCX8" data-ccp-charstyle="Hyperlink">.</span></span>](https://cloud.google.com/iam/docs/granting-changing-revoking-access)
                - <span class="TextRun Highlight SCXW11705193 BCX8" data-contrast="auto" lang="EN-US" xml:lang="EN-US"><span class="NormalTextRun SCXW11705193 BCX8" data-ccp-charstyle="eop">Click </span></span><span class="TextRun Highlight SCXW11705193 BCX8" data-contrast="auto" lang="EN-US" xml:lang="EN-US"><span class="NormalTextRun SCXW11705193 BCX8" data-ccp-charstyle="eop">**Continue**.</span></span>
                - <span class="TextRun Highlight SCXW11705193 BCX8" data-contrast="auto" lang="EN-US" xml:lang="EN-US"><span class="NormalTextRun SCXW11705193 BCX8" data-ccp-charstyle="eop">*Optional*: Enter users or groups that can manage and perform actions with this service account. For more details, refer to </span></span>[<span class="TextRun Highlight Underlined SCXW11705193 BCX8" data-contrast="none" lang="EN-US" xml:lang="EN-US"><span class="NormalTextRun SCXW11705193 BCX8" data-ccp-charstyle="Hyperlink">Managing service account impersonation</span></span>](https://cloud.google.com/iam/docs/impersonating-service-accounts)<span class="TextRun Highlight SCXW11705193 BCX8" data-contrast="auto" lang="EN-US" xml:lang="EN-US"><span class="NormalTextRun SCXW11705193 BCX8" data-ccp-charstyle="eop">.</span></span>
                - <span class="TextRun Highlight SCXW11705193 BCX8" data-contrast="auto" lang="EN-US" xml:lang="EN-US"><span class="NormalTextRun SCXW11705193 BCX8" data-ccp-charstyle="eop">Click </span></span>**<span class="TextRun Highlight SCXW11705193 BCX8" data-contrast="auto" lang="EN-US" xml:lang="EN-US"><span class="NormalTextRun SCXW11705193 BCX8" data-ccp-charstyle="eop">Done</span></span>**<span class="TextRun Highlight SCXW11705193 BCX8" data-contrast="auto" lang="EN-US" xml:lang="EN-US"><span class="NormalTextRun SCXW11705193 BCX8" data-ccp-charstyle="eop">. Make </span><span class="NormalTextRun ContextualSpellingAndGrammarErrorV2Themed SCXW11705193 BCX8" data-ccp-charstyle="eop">a note</span><span class="NormalTextRun SCXW11705193 BCX8" data-ccp-charstyle="eop"> of the email address for the service account.</span></span><span class="EOP SCXW11705193 BCX8" data-ccp-props="{"201341983":0,"335559739":160,"335559740":259}"> </span>

</div><div class="OutlineElement Ltr SCXW11705193 BCX8">  
</div></div>**<span class="TextRun Highlight SCXW11705193 BCX8" data-contrast="auto" lang="EN-US" xml:lang="EN-US"><span class="NormalTextRun SCXW11705193 BCX8" data-ccp-charstyle="eop">Assign a role to a service account</span><span class="NormalTextRun SCXW11705193 BCX8" data-ccp-charstyle="eop">:</span></span><span class="EOP SCXW11705193 BCX8" data-ccp-props="{"201341983":0,"335559685":1080,"335559739":160,"335559740":259}"> </span>**

<span class="TextRun Highlight SCXW11705193 BCX8" data-contrast="auto" lang="EN-US" xml:lang="EN-US"><span class="NormalTextRun SCXW11705193 BCX8" data-ccp-charstyle="eop">You must assign a prebuilt or custom role to a service account by a super administrator account.</span></span><span class="EOP SCXW11705193 BCX8" data-ccp-props="{"201341983":0,"335559685":1080,"335559739":160,"335559740":259}"> </span>

<div class="SCXW11705193 BCX8" id="bkmrk-in-the-google-admin-"><div class="ListContainerWrapper SCXW11705193 BCX8">1. <span class="TextRun Highlight SCXW11705193 BCX8" data-contrast="auto" lang="EN-US" xml:lang="EN-US"><span class="NormalTextRun SCXW11705193 BCX8" data-ccp-charstyle="eop">In the Google Admin console, go to Menu &gt; </span></span>**<span class="TextRun Highlight SCXW11705193 BCX8" data-contrast="auto" lang="EN-US" xml:lang="EN-US"><span class="NormalTextRun SCXW11705193 BCX8" data-ccp-charstyle="eop">Account</span></span><span class="TextRun Highlight SCXW11705193 BCX8" data-contrast="auto" lang="EN-US" xml:lang="EN-US"><span class="NormalTextRun SCXW11705193 BCX8" data-ccp-charstyle="eop"> &gt; </span></span><span class="TextRun Highlight SCXW11705193 BCX8" data-contrast="auto" lang="EN-US" xml:lang="EN-US"><span class="NormalTextRun SCXW11705193 BCX8" data-ccp-charstyle="eop">Admin roles</span></span><span class="TextRun Highlight SCXW11705193 BCX8" data-contrast="auto" lang="EN-US" xml:lang="EN-US"><span class="NormalTextRun SCXW11705193 BCX8" data-ccp-charstyle="eop">.</span></span><span class="EOP SCXW11705193 BCX8" data-ccp-props="{"201341983":0,"335559739":160,"335559740":259}"> </span>**

</div></div><div class="SCXW11705193 BCX8" id="bkmrk-point-to-the-role-th"><div class="ListContainerWrapper SCXW11705193 BCX8">2. <span class="TextRun Highlight SCXW11705193 BCX8" data-contrast="auto" lang="EN-US" xml:lang="EN-US"><span class="NormalTextRun SCXW11705193 BCX8" data-ccp-charstyle="eop">Point to the role that you want to assign, and then click </span></span>**<span class="TextRun Highlight SCXW11705193 BCX8" data-contrast="auto" lang="EN-US" xml:lang="EN-US"><span class="NormalTextRun SCXW11705193 BCX8" data-ccp-charstyle="eop">Assign admin</span></span><span class="TextRun Highlight SCXW11705193 BCX8" data-contrast="auto" lang="EN-US" xml:lang="EN-US"><span class="NormalTextRun SCXW11705193 BCX8" data-ccp-charstyle="eop">.</span></span><span class="EOP SCXW11705193 BCX8" data-ccp-props="{"201341983":0,"335559739":160,"335559740":259}"> </span>**

</div><div class="ListContainerWrapper SCXW11705193 BCX8">3. <span class="TextRun Highlight SCXW11705193 BCX8" data-contrast="auto" lang="EN-US" xml:lang="EN-US"><span class="NormalTextRun SCXW11705193 BCX8" data-ccp-charstyle="eop">Click </span></span>**<span class="TextRun Highlight SCXW11705193 BCX8" data-contrast="auto" lang="EN-US" xml:lang="EN-US"><span class="NormalTextRun SCXW11705193 BCX8" data-ccp-charstyle="eop">Assign service accounts</span></span><span class="TextRun Highlight SCXW11705193 BCX8" data-contrast="auto" lang="EN-US" xml:lang="EN-US"><span class="NormalTextRun SCXW11705193 BCX8" data-ccp-charstyle="eop">.</span></span><span class="EOP SCXW11705193 BCX8" data-ccp-props="{"201341983":0,"335559739":160,"335559740":259}"> </span>**

</div><div class="ListContainerWrapper SCXW11705193 BCX8">4. <span class="TextRun Highlight SCXW11705193 BCX8" data-contrast="auto" lang="EN-US" xml:lang="EN-US"><span class="NormalTextRun SCXW11705193 BCX8" data-ccp-charstyle="eop">Enter the email address of the service account.</span></span><span class="EOP SCXW11705193 BCX8" data-ccp-props="{"201341983":0,"335559739":160,"335559740":259}"> </span>

</div><div class="ListContainerWrapper SCXW11705193 BCX8">5. <span class="TextRun Highlight SCXW11705193 BCX8" data-contrast="auto" lang="EN-US" xml:lang="EN-US"><span class="NormalTextRun SCXW11705193 BCX8" data-ccp-charstyle="eop">Click </span></span>**<span class="TextRun Highlight SCXW11705193 BCX8" data-contrast="auto" lang="EN-US" xml:lang="EN-US"><span class="NormalTextRun SCXW11705193 BCX8" data-ccp-charstyle="eop">Add &gt; Assign role</span></span><span class="TextRun Highlight SCXW11705193 BCX8" data-contrast="auto" lang="EN-US" xml:lang="EN-US"><span class="NormalTextRun SCXW11705193 BCX8" data-ccp-charstyle="eop">.</span></span><span class="EOP SCXW11705193 BCX8" data-ccp-props="{"201341983":0,"335559739":160,"335559740":259}"> </span>**

</div><div class="OutlineElement Ltr SCXW11705193 BCX8">  
</div></div>**<span class="TextRun Highlight SCXW11705193 BCX8" data-contrast="auto" lang="EN-US" xml:lang="EN-US"><span class="NormalTextRun SCXW11705193 BCX8" data-ccp-charstyle="eop">Create credentials for a service account</span><span class="NormalTextRun SCXW11705193 BCX8" data-ccp-charstyle="eop">:</span></span><span class="EOP SCXW11705193 BCX8" data-ccp-props="{"201341983":0,"335559685":1080,"335559739":160,"335559740":259}"> </span>**

<span class="TextRun Highlight SCXW11705193 BCX8" data-contrast="auto" lang="EN-US" xml:lang="EN-US"><span class="NormalTextRun SCXW11705193 BCX8" data-ccp-charstyle="eop">You need to obtain credentials in the form of a public/private key pair. These credentials are used by your code to authorize service account actions within your app.</span></span><span class="EOP SCXW11705193 BCX8" data-ccp-props="{"201341983":0,"335559685":1080,"335559739":160,"335559740":259}"> </span>

<span class="TextRun Highlight SCXW11705193 BCX8" data-contrast="auto" lang="EN-US" xml:lang="EN-US"><span class="NormalTextRun SCXW11705193 BCX8" data-ccp-charstyle="eop">To obtain credentials for your service account:</span></span><span class="EOP SCXW11705193 BCX8" data-ccp-props="{"201341983":0,"335559685":1080,"335559739":160,"335559740":259}"> </span>

<div class="SCXW11705193 BCX8" id="bkmrk-in-the-google-cloud-"><div class="ListContainerWrapper SCXW11705193 BCX8">1. <span class="TextRun Highlight SCXW11705193 BCX8" data-contrast="auto" lang="EN-US" xml:lang="EN-US"><span class="NormalTextRun SCXW11705193 BCX8" data-ccp-charstyle="eop">In the Google Cloud console, go to Menu &gt; </span></span>**<span class="TextRun Highlight SCXW11705193 BCX8" data-contrast="auto" lang="EN-US" xml:lang="EN-US"><span class="NormalTextRun SCXW11705193 BCX8" data-ccp-charstyle="eop">IAM &amp; Admin</span></span><span class="TextRun Highlight SCXW11705193 BCX8" data-contrast="auto" lang="EN-US" xml:lang="EN-US"><span class="NormalTextRun SCXW11705193 BCX8" data-ccp-charstyle="eop"> &gt; </span></span><span class="TextRun Highlight SCXW11705193 BCX8" data-contrast="auto" lang="EN-US" xml:lang="EN-US"><span class="NormalTextRun SCXW11705193 BCX8" data-ccp-charstyle="eop">Service Accounts.</span></span>**<span class="EOP SCXW11705193 BCX8" data-ccp-props="{"201341983":0,"335559739":160,"335559740":259}"> </span>

</div><div class="ListContainerWrapper SCXW11705193 BCX8">2. <span class="TextRun Highlight SCXW11705193 BCX8" data-contrast="auto" lang="EN-US" xml:lang="EN-US"><span class="NormalTextRun SCXW11705193 BCX8" data-ccp-charstyle="eop">Select your service account.</span></span><span class="EOP SCXW11705193 BCX8" data-ccp-props="{"201341983":0,"335559739":160,"335559740":259}"> </span>

</div><div class="ListContainerWrapper SCXW11705193 BCX8">3. <span class="TextRun Highlight SCXW11705193 BCX8" data-contrast="auto" lang="EN-US" xml:lang="EN-US"><span class="NormalTextRun SCXW11705193 BCX8" data-ccp-charstyle="eop">Click </span></span>**<span class="TextRun Highlight SCXW11705193 BCX8" data-contrast="auto" lang="EN-US" xml:lang="EN-US"><span class="NormalTextRun SCXW11705193 BCX8" data-ccp-charstyle="eop">Keys</span></span><span class="TextRun Highlight SCXW11705193 BCX8" data-contrast="auto" lang="EN-US" xml:lang="EN-US"><span class="NormalTextRun SCXW11705193 BCX8" data-ccp-charstyle="eop"> &gt; </span></span><span class="TextRun Highlight SCXW11705193 BCX8" data-contrast="auto" lang="EN-US" xml:lang="EN-US"><span class="NormalTextRun SCXW11705193 BCX8" data-ccp-charstyle="eop">Add key</span></span><span class="TextRun Highlight SCXW11705193 BCX8" data-contrast="auto" lang="EN-US" xml:lang="EN-US"><span class="NormalTextRun SCXW11705193 BCX8" data-ccp-charstyle="eop"> &gt; </span></span><span class="TextRun Highlight SCXW11705193 BCX8" data-contrast="auto" lang="EN-US" xml:lang="EN-US"><span class="NormalTextRun SCXW11705193 BCX8" data-ccp-charstyle="eop">Create new key.</span></span><span class="EOP SCXW11705193 BCX8" data-ccp-props="{"201341983":0,"335559739":160,"335559740":259}"> </span>**

</div><div class="ListContainerWrapper SCXW11705193 BCX8">4. <span class="TextRun Highlight SCXW11705193 BCX8" data-contrast="auto" lang="EN-US" xml:lang="EN-US"><span class="NormalTextRun SCXW11705193 BCX8" data-ccp-charstyle="eop">Select </span></span>**<span class="TextRun Highlight SCXW11705193 BCX8" data-contrast="auto" lang="EN-US" xml:lang="EN-US"><span class="NormalTextRun SCXW11705193 BCX8" data-ccp-charstyle="eop">JSON</span></span>**<span class="TextRun Highlight SCXW11705193 BCX8" data-contrast="auto" lang="EN-US" xml:lang="EN-US"><span class="NormalTextRun SCXW11705193 BCX8" data-ccp-charstyle="eop">, then click </span></span><span class="TextRun Highlight SCXW11705193 BCX8" data-contrast="auto" lang="EN-US" xml:lang="EN-US"><span class="NormalTextRun SCXW11705193 BCX8" data-ccp-charstyle="eop">**Create**.</span></span><span class="EOP SCXW11705193 BCX8" data-ccp-props="{"201341983":0,"335559739":160,"335559740":259}"> </span>

</div></div><span class="TextRun Highlight SCXW11705193 BCX8" data-contrast="auto" lang="EN-US" xml:lang="EN-US"><span class="NormalTextRun SCXW11705193 BCX8" data-ccp-charstyle="eop">Your new public/private key pair is generated and downloaded to your machine as a new file. Save the downloaded JSON file as </span><span class="NormalTextRun SpellingErrorV2Themed SCXW11705193 BCX8" data-ccp-charstyle="eop">credentials.json</span><span class="NormalTextRun SCXW11705193 BCX8" data-ccp-charstyle="eop"> in your working directory. This file is the only copy of this key. For information about how to store your key securely, see </span></span>[<span class="TextRun Highlight Underlined SCXW11705193 BCX8" data-contrast="none" lang="EN-US" xml:lang="EN-US"><span class="NormalTextRun SCXW11705193 BCX8" data-ccp-charstyle="Hyperlink">Managing service account keys</span></span>](https://cloud.google.com/iam/docs/best-practices-for-managing-service-account-keys)<span class="TextRun Highlight SCXW11705193 BCX8" data-contrast="auto" lang="EN-US" xml:lang="EN-US"><span class="NormalTextRun SCXW11705193 BCX8" data-ccp-charstyle="eop">.</span></span><span class="EOP SCXW11705193 BCX8" data-ccp-props="{"201341983":0,"335559685":1800,"335559739":160,"335559740":259}"> </span>

<div class="SCXW11705193 BCX8" id="bkmrk-click-close.%C2%A0"><div class="ListContainerWrapper SCXW11705193 BCX8">5. <span class="TextRun Highlight SCXW11705193 BCX8" data-contrast="auto" lang="EN-US" xml:lang="EN-US"><span class="NormalTextRun SCXW11705193 BCX8" data-ccp-charstyle="eop">Click </span></span>**<span class="TextRun Highlight SCXW11705193 BCX8" data-contrast="auto" lang="EN-US" xml:lang="EN-US"><span class="NormalTextRun SCXW11705193 BCX8" data-ccp-charstyle="eop">Close</span></span>**<span class="TextRun Highlight SCXW11705193 BCX8" data-contrast="auto" lang="EN-US" xml:lang="EN-US"><span class="NormalTextRun SCXW11705193 BCX8" data-ccp-charstyle="eop">.</span></span><span class="EOP SCXW11705193 BCX8" data-ccp-props="{"201341983":0,"335559739":160,"335559740":259}"> </span>

</div></div><span class="EOP SCXW11705193 BCX8" data-ccp-props="{"201341983":0,"335559739":160,"335559740":259}"> </span>

**<span class="TextRun Highlight SCXW11705193 BCX8" data-contrast="auto" lang="EN-US" xml:lang="EN-US"><span class="NormalTextRun SCXW11705193 BCX8" data-ccp-charstyle="eop">Optional: Set up domain-wide delegation for a service account</span></span><span class="EOP SCXW11705193 BCX8" data-ccp-props="{"201341983":0,"335559685":1080,"335559739":160,"335559740":259}"> </span>**

<span class="TextRun Highlight SCXW11705193 BCX8" data-contrast="auto" lang="EN-US" xml:lang="EN-US"><span class="NormalTextRun SCXW11705193 BCX8" data-ccp-charstyle="eop">To call APIs on behalf of users in a Google Workspace organization, your service account needs to be granted domain-wide delegation of authority in the Google Workspace Admin console by a super administrator account. For more information, see </span></span>[<span class="TextRun Highlight Underlined SCXW11705193 BCX8" data-contrast="none" lang="EN-US" xml:lang="EN-US"><span class="NormalTextRun SCXW11705193 BCX8" data-ccp-charstyle="Hyperlink">Delegating domain-wide authority to a service account</span></span>](https://developers.google.com/identity/protocols/oauth2/service-account#delegatingauthority)<span class="TextRun Highlight SCXW11705193 BCX8" data-contrast="auto" lang="EN-US" xml:lang="EN-US"><span class="NormalTextRun SCXW11705193 BCX8" data-ccp-charstyle="eop">.</span></span><span class="EOP SCXW11705193 BCX8" data-ccp-props="{"201341983":0,"335559685":1080,"335559739":160,"335559740":259}"> </span>

<span class="TextRun Highlight SCXW11705193 BCX8" data-contrast="auto" lang="EN-US" xml:lang="EN-US"><span class="NormalTextRun SCXW11705193 BCX8" data-ccp-charstyle="eop">To set up domain-wide delegation of authority for a service account</span><span class="NormalTextRun SCXW11705193 BCX8" data-ccp-charstyle="eop">:</span></span><span class="EOP SCXW11705193 BCX8" data-ccp-props="{"201341983":0,"335559685":1080,"335559739":160,"335559740":259}"> </span>

<div class="SCXW11705193 BCX8" id="bkmrk-in-the-google-cloud--1"><div class="OutlineElement Ltr SCXW11705193 BCX8">  
</div><div class="ListContainerWrapper SCXW11705193 BCX8">1. <span class="TextRun Highlight SCXW11705193 BCX8" data-contrast="auto" lang="EN-US" xml:lang="EN-US"><span class="NormalTextRun SCXW11705193 BCX8" data-ccp-charstyle="eop">In the Google Cloud console, go to </span></span>**<span class="TextRun Highlight SCXW11705193 BCX8" data-contrast="auto" lang="EN-US" xml:lang="EN-US"><span class="NormalTextRun SCXW11705193 BCX8" data-ccp-charstyle="eop">Menu</span></span><span class="TextRun Highlight SCXW11705193 BCX8" data-contrast="auto" lang="EN-US" xml:lang="EN-US"><span class="NormalTextRun SCXW11705193 BCX8" data-ccp-charstyle="eop"> &gt; </span></span><span class="TextRun Highlight SCXW11705193 BCX8" data-contrast="auto" lang="EN-US" xml:lang="EN-US"><span class="NormalTextRun SCXW11705193 BCX8" data-ccp-charstyle="eop">IAM &amp; Admin</span></span><span class="TextRun Highlight SCXW11705193 BCX8" data-contrast="auto" lang="EN-US" xml:lang="EN-US"><span class="NormalTextRun SCXW11705193 BCX8" data-ccp-charstyle="eop"> &gt; </span></span><span class="TextRun Highlight SCXW11705193 BCX8" data-contrast="auto" lang="EN-US" xml:lang="EN-US"><span class="NormalTextRun SCXW11705193 BCX8" data-ccp-charstyle="eop">Service Accounts</span><span class="NormalTextRun SCXW11705193 BCX8" data-ccp-charstyle="eop">.</span></span><span class="EOP SCXW11705193 BCX8" data-ccp-props="{"201341983":0,"335559739":160,"335559740":259}"> </span>**

</div><div class="ListContainerWrapper SCXW11705193 BCX8">2. <span class="TextRun Highlight SCXW11705193 BCX8" data-contrast="auto" lang="EN-US" xml:lang="EN-US"><span class="NormalTextRun SCXW11705193 BCX8" data-ccp-charstyle="eop">Select your service account.</span></span><span class="EOP SCXW11705193 BCX8" data-ccp-props="{"201341983":0,"335559739":160,"335559740":259}"> </span>

</div></div><div class="SCXW11705193 BCX8" id="bkmrk-click-show-advanced-"><div class="ListContainerWrapper SCXW11705193 BCX8">3. <span class="TextRun Highlight SCXW11705193 BCX8" data-contrast="auto" lang="EN-US" xml:lang="EN-US"><span class="NormalTextRun SCXW11705193 BCX8" data-ccp-charstyle="eop">Click </span></span>**<span class="TextRun Highlight SCXW11705193 BCX8" data-contrast="auto" lang="EN-US" xml:lang="EN-US"><span class="NormalTextRun SCXW11705193 BCX8" data-ccp-charstyle="eop">Show advanced settings</span></span><span class="TextRun Highlight SCXW11705193 BCX8" data-contrast="auto" lang="EN-US" xml:lang="EN-US"><span class="NormalTextRun SCXW11705193 BCX8" data-ccp-charstyle="eop">.</span></span><span class="EOP SCXW11705193 BCX8" data-ccp-props="{"201341983":0,"335559739":160,"335559740":259}"> </span>**

</div><div class="ListContainerWrapper SCXW11705193 BCX8">4. <span class="TextRun Highlight SCXW11705193 BCX8" data-contrast="auto" lang="EN-US" xml:lang="EN-US"><span class="NormalTextRun SCXW11705193 BCX8" data-ccp-charstyle="eop">Under "Domain-wide delegation," find your service account's "Client ID." Click Copy to copy the client ID value to your clipboard</span><span class="NormalTextRun SCXW11705193 BCX8" data-ccp-charstyle="eop">.</span></span><span class="EOP SCXW11705193 BCX8" data-ccp-props="{"201341983":0,"335559739":160,"335559740":259}"> </span>

</div><div class="ListContainerWrapper SCXW11705193 BCX8">5. <span class="TextRun Highlight SCXW11705193 BCX8" data-contrast="auto" lang="EN-US" xml:lang="EN-US"><span class="NormalTextRun SCXW11705193 BCX8" data-ccp-charstyle="eop">If you have super administrator access to the relevant Google Workspace account, click </span></span>**<span class="TextRun Highlight SCXW11705193 BCX8" data-contrast="auto" lang="EN-US" xml:lang="EN-US"><span class="NormalTextRun SCXW11705193 BCX8" data-ccp-charstyle="eop">View Google Workspace Admin Console</span></span>**<span class="TextRun Highlight SCXW11705193 BCX8" data-contrast="auto" lang="EN-US" xml:lang="EN-US"><span class="NormalTextRun SCXW11705193 BCX8" data-ccp-charstyle="eop">, then sign in using a super administrator user account and continue following these steps.</span></span><span class="EOP SCXW11705193 BCX8" data-ccp-props="{"201341983":0,"335559739":160,"335559740":259}"> </span>

</div></div><span class="TextRun Highlight SCXW11705193 BCX8" data-contrast="auto" lang="EN-US" xml:lang="EN-US"><span class="NormalTextRun SCXW11705193 BCX8" data-ccp-charstyle="eop">If you </span><span class="NormalTextRun SCXW11705193 BCX8" data-ccp-charstyle="eop">don't</span><span class="NormalTextRun SCXW11705193 BCX8" data-ccp-charstyle="eop"> have super administrator access to the relevant Google Workspace account, contact a super administrator for that account and send them your service account's Client ID and list of OAuth Scopes so they can complete the following steps in the </span><span class="NormalTextRun ContextualSpellingAndGrammarErrorV2Themed SCXW11705193 BCX8" data-ccp-charstyle="eop">Admin</span><span class="NormalTextRun SCXW11705193 BCX8" data-ccp-charstyle="eop"> console.</span></span><span class="EOP SCXW11705193 BCX8" data-ccp-props="{"201341983":0,"335559685":1800,"335559739":160,"335559740":259}"> </span>

<div class="SCXW11705193 BCX8" id="bkmrk-in-the-google-admin--1"><div class="OutlineElement Ltr SCXW11705193 BCX8">  
</div><div class="ListContainerWrapper SCXW11705193 BCX8">- - - - <span class="TextRun Highlight SCXW11705193 BCX8" data-contrast="auto" lang="EN-US" xml:lang="EN-US"><span class="NormalTextRun SCXW11705193 BCX8" data-ccp-charstyle="eop">In the Google Admin console, go to Menu &gt; </span></span>**<span class="TextRun Highlight SCXW11705193 BCX8" data-contrast="auto" lang="EN-US" xml:lang="EN-US"><span class="NormalTextRun SCXW11705193 BCX8" data-ccp-charstyle="eop">Security</span></span><span class="TextRun Highlight SCXW11705193 BCX8" data-contrast="auto" lang="EN-US" xml:lang="EN-US"><span class="NormalTextRun SCXW11705193 BCX8" data-ccp-charstyle="eop"> &gt; </span></span><span class="TextRun Highlight SCXW11705193 BCX8" data-contrast="auto" lang="EN-US" xml:lang="EN-US"><span class="NormalTextRun SCXW11705193 BCX8" data-ccp-charstyle="eop">Access and data control </span></span><span class="TextRun Highlight SCXW11705193 BCX8" data-contrast="auto" lang="EN-US" xml:lang="EN-US"><span class="NormalTextRun SCXW11705193 BCX8" data-ccp-charstyle="eop">&gt; </span></span><span class="TextRun Highlight SCXW11705193 BCX8" data-contrast="auto" lang="EN-US" xml:lang="EN-US"><span class="NormalTextRun SCXW11705193 BCX8" data-ccp-charstyle="eop">API controls</span></span>**<span class="TextRun Highlight SCXW11705193 BCX8" data-contrast="auto" lang="EN-US" xml:lang="EN-US"><span class="NormalTextRun SCXW11705193 BCX8" data-ccp-charstyle="eop">.</span></span><span class="EOP SCXW11705193 BCX8" data-ccp-props="{"201341983":0,"335559739":160,"335559740":259}"> </span>

</div><div class="ListContainerWrapper SCXW11705193 BCX8" style="padding-left: 40px;">- - <span class="TextRun Highlight SCXW11705193 BCX8" data-contrast="auto" lang="EN-US" xml:lang="EN-US"><span class="NormalTextRun SCXW11705193 BCX8" data-ccp-charstyle="eop">Click </span></span>**<span class="TextRun Highlight SCXW11705193 BCX8" data-contrast="auto" lang="EN-US" xml:lang="EN-US"><span class="NormalTextRun SCXW11705193 BCX8" data-ccp-charstyle="eop">Manage Domain Wide Delegation</span></span>**<span class="TextRun Highlight SCXW11705193 BCX8" data-contrast="auto" lang="EN-US" xml:lang="EN-US"><span class="NormalTextRun SCXW11705193 BCX8" data-ccp-charstyle="eop">.</span></span><span class="EOP SCXW11705193 BCX8" data-ccp-props="{"201341983":0,"335559739":160,"335559740":259}"> </span>

</div><div class="ListContainerWrapper SCXW11705193 BCX8" style="padding-left: 40px;">- - <span class="TextRun Highlight SCXW11705193 BCX8" data-contrast="auto" lang="EN-US" xml:lang="EN-US"><span class="NormalTextRun SCXW11705193 BCX8" data-ccp-charstyle="eop">Click </span></span>**<span class="TextRun Highlight SCXW11705193 BCX8" data-contrast="auto" lang="EN-US" xml:lang="EN-US"><span class="NormalTextRun SCXW11705193 BCX8" data-ccp-charstyle="eop">Add new</span></span>**<span class="TextRun Highlight SCXW11705193 BCX8" data-contrast="auto" lang="EN-US" xml:lang="EN-US"><span class="NormalTextRun SCXW11705193 BCX8" data-ccp-charstyle="eop">.</span></span><span class="EOP SCXW11705193 BCX8" data-ccp-props="{"201341983":0,"335559739":160,"335559740":259}"> </span>

</div><div class="ListContainerWrapper SCXW11705193 BCX8" style="padding-left: 40px;">- - <span class="TextRun Highlight SCXW11705193 BCX8" data-contrast="auto" lang="EN-US" xml:lang="EN-US"><span class="NormalTextRun SCXW11705193 BCX8" data-ccp-charstyle="eop">In the "Client ID" field, paste the client ID that you previously copied.</span></span><span class="EOP SCXW11705193 BCX8" data-ccp-props="{"201341983":0,"335559739":160,"335559740":259}"> </span>

</div><div class="ListContainerWrapper SCXW11705193 BCX8" style="padding-left: 40px;">- - <span class="TextRun Highlight SCXW11705193 BCX8" data-contrast="auto" lang="EN-US" xml:lang="EN-US"><span class="NormalTextRun SCXW11705193 BCX8" data-ccp-charstyle="eop">In the "OAuth Scopes" field, enter a comma-delimited list of the scopes required by your application. This is the same set of scopes you defined when configuring the OAuth consent screen.</span></span><span class="EOP SCXW11705193 BCX8" data-ccp-props="{"201341983":0,"335559739":160,"335559740":259}"> </span>

</div><div class="ListContainerWrapper SCXW11705193 BCX8" style="padding-left: 40px;">- - <span class="TextRun Highlight SCXW11705193 BCX8" data-contrast="auto" lang="EN-US" xml:lang="EN-US"><span class="NormalTextRun SCXW11705193 BCX8" data-ccp-charstyle="eop">Click </span></span>**<span class="TextRun Highlight SCXW11705193 BCX8" data-contrast="auto" lang="EN-US" xml:lang="EN-US"><span class="NormalTextRun SCXW11705193 BCX8" data-ccp-charstyle="eop">Authorize</span></span>**<span class="TextRun Highlight SCXW11705193 BCX8" data-contrast="auto" lang="EN-US" xml:lang="EN-US"><span class="NormalTextRun SCXW11705193 BCX8" data-ccp-charstyle="eop">.</span></span>

</div></div>**<span class="TextRun SCXW11705193 BCX8" data-contrast="none" lang="EN-US" xml:lang="EN-US"><span class="NormalTextRun SCXW11705193 BCX8" data-ccp-charstyle="eop">This integration will make use of the following oauth2 scope</span><span class="NormalTextRun SCXW11705193 BCX8" data-ccp-charstyle="eop">:</span></span><span class="EOP SCXW11705193 BCX8" data-ccp-props="{"134245418":true,"134245529":true,"201341983":0,"335559738":240,"335559739":0,"335559740":360}"> </span>**

<div class="SCXW11705193 BCX8" id="bkmrk-https%3A%2F%2Fwww.googleap"><div class="ListContainerWrapper SCXW11705193 BCX8" style="padding-left: 40px;">  
</div><div class="ListContainerWrapper SCXW11705193 BCX8">- <span class="TextRun Highlight SCXW11705193 BCX8" data-contrast="auto" lang="EN-US" xml:lang="EN-US"><span class="NormalTextRun SCXW11705193 BCX8" data-ccp-charstyle="eop">https://www.googleapis.com/auth/admin.reports.audit.readonly</span></span><span class="EOP SCXW11705193 BCX8" data-ccp-props="{"201341983":0,"335559739":160,"335559740":259}"> </span>

</div></div><span class="TextRun Highlight SCXW11705193 BCX8" data-contrast="auto" lang="EN-US" xml:lang="EN-US"><span class="NormalTextRun SCXW11705193 BCX8" data-ccp-charstyle="eop">Once you have downloaded your service account credentials as a JSON file, you are ready to set up your integration</span><span class="NormalTextRun SCXW11705193 BCX8" data-ccp-charstyle="eop">.</span></span><span class="EOP SCXW11705193 BCX8" data-ccp-props="{"201341983":0,"335559685":720,"335559739":160,"335559740":259}"> </span>

<span class="TextRun Highlight SCXW11705193 BCX8" data-contrast="auto" lang="EN-US" xml:lang="EN-US"><span class="NormalTextRun SCXW11705193 BCX8" data-ccp-charstyle="eop">Click the Advanced option of Google Workspace Audit Reports. The default value of "API Host" is </span></span><span class="TextRun Highlight SCXW11705193 BCX8" data-contrast="auto" lang="EN-US" xml:lang="EN-US"><span class="NormalTextRun SCXW11705193 BCX8" data-ccp-charstyle="eop">https://www.googleapis.com</span></span><span class="TextRun Highlight SCXW11705193 BCX8" data-contrast="auto" lang="EN-US" xml:lang="EN-US"><span class="NormalTextRun SCXW11705193 BCX8" data-ccp-charstyle="eop">. The API Host will be used for collecting </span></span><span class="TextRun Highlight SCXW11705193 BCX8" data-contrast="auto" lang="EN-US" xml:lang="EN-US"><span class="NormalTextRun SpellingErrorV2Themed SCXW11705193 BCX8" data-ccp-charstyle="eop">access\_transparency</span></span><span class="TextRun Highlight SCXW11705193 BCX8" data-contrast="auto" lang="EN-US" xml:lang="EN-US"><span class="NormalTextRun SCXW11705193 BCX8" data-ccp-charstyle="eop">, </span></span><span class="TextRun Highlight SCXW11705193 BCX8" data-contrast="auto" lang="EN-US" xml:lang="EN-US"><span class="NormalTextRun SCXW11705193 BCX8" data-ccp-charstyle="eop">admin</span></span><span class="TextRun Highlight SCXW11705193 BCX8" data-contrast="auto" lang="EN-US" xml:lang="EN-US"><span class="NormalTextRun SCXW11705193 BCX8" data-ccp-charstyle="eop">, </span></span><span class="TextRun Highlight SCXW11705193 BCX8" data-contrast="auto" lang="EN-US" xml:lang="EN-US"><span class="NormalTextRun SCXW11705193 BCX8" data-ccp-charstyle="eop">device</span></span><span class="TextRun Highlight SCXW11705193 BCX8" data-contrast="auto" lang="EN-US" xml:lang="EN-US"><span class="NormalTextRun SCXW11705193 BCX8" data-ccp-charstyle="eop">, </span></span><span class="TextRun Highlight SCXW11705193 BCX8" data-contrast="auto" lang="EN-US" xml:lang="EN-US"><span class="NormalTextRun SpellingErrorV2Themed SCXW11705193 BCX8" data-ccp-charstyle="eop">context\_aware\_access</span></span><span class="TextRun Highlight SCXW11705193 BCX8" data-contrast="auto" lang="EN-US" xml:lang="EN-US"><span class="NormalTextRun SCXW11705193 BCX8" data-ccp-charstyle="eop">, </span></span><span class="TextRun Highlight SCXW11705193 BCX8" data-contrast="auto" lang="EN-US" xml:lang="EN-US"><span class="NormalTextRun SCXW11705193 BCX8" data-ccp-charstyle="eop">drive</span></span><span class="TextRun Highlight SCXW11705193 BCX8" data-contrast="auto" lang="EN-US" xml:lang="EN-US"><span class="NormalTextRun SCXW11705193 BCX8" data-ccp-charstyle="eop">, </span></span><span class="TextRun Highlight SCXW11705193 BCX8" data-contrast="auto" lang="EN-US" xml:lang="EN-US"><span class="NormalTextRun SpellingErrorV2Themed SCXW11705193 BCX8" data-ccp-charstyle="eop">gcp</span></span><span class="TextRun Highlight SCXW11705193 BCX8" data-contrast="auto" lang="EN-US" xml:lang="EN-US"><span class="NormalTextRun SCXW11705193 BCX8" data-ccp-charstyle="eop">, </span></span><span class="TextRun Highlight SCXW11705193 BCX8" data-contrast="auto" lang="EN-US" xml:lang="EN-US"><span class="NormalTextRun SCXW11705193 BCX8" data-ccp-charstyle="eop">groups</span></span><span class="TextRun Highlight SCXW11705193 BCX8" data-contrast="auto" lang="EN-US" xml:lang="EN-US"><span class="NormalTextRun SCXW11705193 BCX8" data-ccp-charstyle="eop">, </span></span><span class="TextRun Highlight SCXW11705193 BCX8" data-contrast="auto" lang="EN-US" xml:lang="EN-US"><span class="NormalTextRun SpellingErrorV2Themed SCXW11705193 BCX8" data-ccp-charstyle="eop">group\_enterprise</span></span><span class="TextRun Highlight SCXW11705193 BCX8" data-contrast="auto" lang="EN-US" xml:lang="EN-US"><span class="NormalTextRun SCXW11705193 BCX8" data-ccp-charstyle="eop">, </span></span><span class="TextRun Highlight SCXW11705193 BCX8" data-contrast="auto" lang="EN-US" xml:lang="EN-US"><span class="NormalTextRun SCXW11705193 BCX8" data-ccp-charstyle="eop">login</span></span><span class="TextRun Highlight SCXW11705193 BCX8" data-contrast="auto" lang="EN-US" xml:lang="EN-US"><span class="NormalTextRun SCXW11705193 BCX8" data-ccp-charstyle="eop">, </span></span><span class="TextRun Highlight SCXW11705193 BCX8" data-contrast="auto" lang="EN-US" xml:lang="EN-US"><span class="NormalTextRun SCXW11705193 BCX8" data-ccp-charstyle="eop">rules</span></span><span class="TextRun Highlight SCXW11705193 BCX8" data-contrast="auto" lang="EN-US" xml:lang="EN-US"><span class="NormalTextRun SCXW11705193 BCX8" data-ccp-charstyle="eop">, </span></span><span class="TextRun Highlight SCXW11705193 BCX8" data-contrast="auto" lang="EN-US" xml:lang="EN-US"><span class="NormalTextRun SpellingErrorV2Themed SCXW11705193 BCX8" data-ccp-charstyle="eop">saml</span></span><span class="TextRun Highlight SCXW11705193 BCX8" data-contrast="auto" lang="EN-US" xml:lang="EN-US"><span class="NormalTextRun SCXW11705193 BCX8" data-ccp-charstyle="eop">, </span></span><span class="TextRun Highlight SCXW11705193 BCX8" data-contrast="auto" lang="EN-US" xml:lang="EN-US"><span class="NormalTextRun SCXW11705193 BCX8" data-ccp-charstyle="eop">token</span></span><span class="TextRun Highlight SCXW11705193 BCX8" data-contrast="auto" lang="EN-US" xml:lang="EN-US"><span class="NormalTextRun SCXW11705193 BCX8" data-ccp-charstyle="eop"> and </span></span><span class="TextRun Highlight SCXW11705193 BCX8" data-contrast="auto" lang="EN-US" xml:lang="EN-US"><span class="NormalTextRun SCXW11705193 BCX8" data-ccp-charstyle="eop">user accounts</span></span><span class="TextRun Highlight SCXW11705193 BCX8" data-contrast="auto" lang="EN-US" xml:lang="EN-US"><span class="NormalTextRun SCXW11705193 BCX8" data-ccp-charstyle="eop"> logs.</span></span><span class="EOP SCXW11705193 BCX8" data-ccp-props="{"201341983":0,"335559685":720,"335559739":160,"335559740":259}"> </span>

<span class="TextRun Highlight SCXW11705193 BCX8" data-contrast="auto" lang="EN-US" xml:lang="EN-US"><span class="NormalTextRun SCXW11705193 BCX8" data-ccp-charstyle="eop">NOTE: The </span></span><span class="TextRun Highlight SCXW11705193 BCX8" data-contrast="auto" lang="EN-US" xml:lang="EN-US"><span class="NormalTextRun SCXW11705193 BCX8" data-ccp-charstyle="eop">Delegated Account</span></span><span class="TextRun Highlight SCXW11705193 BCX8" data-contrast="auto" lang="EN-US" xml:lang="EN-US"><span class="NormalTextRun SCXW11705193 BCX8" data-ccp-charstyle="eop"> value in the </span><span class="NormalTextRun ContextualSpellingAndGrammarErrorV2Themed SCXW11705193 BCX8" data-ccp-charstyle="eop">configuration,</span><span class="NormalTextRun SCXW11705193 BCX8" data-ccp-charstyle="eop"> is expected to be the email of the administrator account, and not the email of the </span><span class="NormalTextRun SpellingErrorV2Themed SCXW11705193 BCX8" data-ccp-charstyle="eop">ServiceAccount</span><span class="NormalTextRun SCXW11705193 BCX8" data-ccp-charstyle="eop">.</span></span><span class="EOP SCXW11705193 BCX8" data-ccp-props="{"201341983":0,"335559685":1440,"335559739":160,"335559740":259}"> </span>

<div class="SCXW11705193 BCX8" id="bkmrk--1"><div class="OutlineElement Ltr SCXW11705193 BCX8">  
</div><div class="ListContainerWrapper SCXW11705193 BCX8">  
</div></div>##### <span style="color: rgb(53, 152, 219);">**<span class="TextRun SCXW11705193 BCX8" data-contrast="none" lang="EN-US" xml:lang="EN-US"><span class="NormalTextRun SCXW11705193 BCX8" data-ccp-charstyle="eop">Google Workspace</span> <span class="NormalTextRun SCXW11705193 BCX8" data-ccp-charstyle="eop">Integration Procedures</span></span><span class="EOP SCXW11705193 BCX8" data-ccp-props="{"134245418":true,"134245529":true,"201341983":0,"335559738":240,"335559739":0,"335559740":360}"> </span>**</span>

<span class="TextRun SCXW11705193 BCX8" data-contrast="auto" lang="EN-US" xml:lang="EN-US"><span class="NormalTextRun SCXW11705193 BCX8" data-ccp-charstyle="eop">Please provide the following information to </span><span class="NormalTextRun SpellingErrorV2Themed SCXW11705193 BCX8" data-ccp-charstyle="eop">CyTech</span><span class="NormalTextRun SCXW11705193 BCX8" data-ccp-charstyle="eop">:</span></span><span class="EOP SCXW11705193 BCX8" data-ccp-props="{"201341983":0,"335559685":720,"335559739":160,"335559740":259}"> </span>

**<span class="TextRun SCXW11705193 BCX8" data-contrast="none" lang="EN-US" xml:lang="EN-US"><span class="NormalTextRun SCXW11705193 BCX8" data-ccp-charstyle="eop">Collect </span><span class="NormalTextRun SpellingErrorV2Themed SCXW11705193 BCX8" data-ccp-charstyle="eop">access\_transparency</span><span class="NormalTextRun SCXW11705193 BCX8" data-ccp-charstyle="eop">, admin, alert, </span><span class="NormalTextRun SpellingErrorV2Themed SCXW11705193 BCX8" data-ccp-charstyle="eop">context\_aware\_access</span><span class="NormalTextRun SCXW11705193 BCX8" data-ccp-charstyle="eop">, device, drive, </span><span class="NormalTextRun SpellingErrorV2Themed SCXW11705193 BCX8" data-ccp-charstyle="eop">gcp</span><span class="NormalTextRun SCXW11705193 BCX8" data-ccp-charstyle="eop">, groups, </span><span class="NormalTextRun SpellingErrorV2Themed SCXW11705193 BCX8" data-ccp-charstyle="eop">group\_enterprise</span><span class="NormalTextRun SCXW11705193 BCX8" data-ccp-charstyle="eop">, login, rules, </span><span class="NormalTextRun SpellingErrorV2Themed SCXW11705193 BCX8" data-ccp-charstyle="eop">saml</span><span class="NormalTextRun SCXW11705193 BCX8" data-ccp-charstyle="eop">, token and user accounts logs (input: </span><span class="NormalTextRun SpellingErrorV2Themed SCXW11705193 BCX8" data-ccp-charstyle="eop">httpjson</span><span class="NormalTextRun SCXW11705193 BCX8" data-ccp-charstyle="eop">)</span><span class="NormalTextRun SCXW11705193 BCX8" data-ccp-charstyle="eop">.</span></span><span class="EOP SCXW11705193 BCX8" data-ccp-props="{"134245418":true,"134245529":true,"201341983":0,"335559738":240,"335559739":0,"335559740":360}"> </span>**

<div class="SCXW11705193 BCX8" id="bkmrk-jwt-file---specifies"><div class="ListContainerWrapper SCXW11705193 BCX8">  
</div><div class="ListContainerWrapper SCXW11705193 BCX8">1. **<span class="TextRun SCXW11705193 BCX8" data-contrast="auto" lang="EN-US" xml:lang="EN-US"><span class="NormalTextRun SpellingErrorV2Themed SCXW11705193 BCX8" data-ccp-charstyle="eop">Jwt</span><span class="NormalTextRun SCXW11705193 BCX8" data-ccp-charstyle="eop"> File</span></span>**<span class="TextRun SCXW11705193 BCX8" data-contrast="auto" lang="EN-US" xml:lang="EN-US"><span class="NormalTextRun SCXW11705193 BCX8" data-ccp-charstyle="eop"> - </span><span class="NormalTextRun SCXW11705193 BCX8" data-ccp-charstyle="eop">Specifies the path to the JWT credentials file. NOTE: Please use either JWT File or JWT JSON parameter</span><span class="NormalTextRun SCXW11705193 BCX8" data-ccp-charstyle="eop">.</span></span><span class="EOP SCXW11705193 BCX8" data-ccp-props="{"201341983":0,"335559739":160,"335559740":259}"> </span>

</div><div class="ListContainerWrapper SCXW11705193 BCX8">2. <span class="TextRun SCXW11705193 BCX8" data-contrast="auto" lang="EN-US" xml:lang="EN-US">**<span class="NormalTextRun SpellingErrorV2Themed SCXW11705193 BCX8" data-ccp-charstyle="eop">Jwt</span><span class="NormalTextRun SCXW11705193 BCX8" data-ccp-charstyle="eop"> JSON</span>** </span><span class="TextRun SCXW11705193 BCX8" data-contrast="auto" lang="EN-US" xml:lang="EN-US"><span class="NormalTextRun SCXW11705193 BCX8" data-ccp-charstyle="eop">- </span><span class="NormalTextRun SCXW11705193 BCX8" data-ccp-charstyle="eop">Raw contents of the JWT file. Useful when hosting a file along with the agent is not possible. NOTE: Please use either JWT File or JWT JSON parameter</span><span class="NormalTextRun SCXW11705193 BCX8" data-ccp-charstyle="eop">.</span></span><span class="EOP SCXW11705193 BCX8" data-ccp-props="{"201341983":0,"335559739":160,"335559740":259}"> </span>

</div></div><div class="SCXW11705193 BCX8" id="bkmrk-delegated-account---"><div class="ListContainerWrapper SCXW11705193 BCX8">3. **<span class="TextRun SCXW11705193 BCX8" data-contrast="auto" lang="EN-US" xml:lang="EN-US"><span class="NormalTextRun SCXW11705193 BCX8" data-ccp-charstyle="eop">Delegated Account</span> </span>**<span class="TextRun SCXW11705193 BCX8" data-contrast="auto" lang="EN-US" xml:lang="EN-US"><span class="NormalTextRun SCXW11705193 BCX8" data-ccp-charstyle="eop">- </span><span class="NormalTextRun ContextualSpellingAndGrammarErrorV2Themed SCXW11705193 BCX8" data-ccp-charstyle="eop">Delegated</span><span class="NormalTextRun SCXW11705193 BCX8" data-ccp-charstyle="eop"> Account is </span><span class="NormalTextRun SCXW11705193 BCX8" data-ccp-charstyle="eop">required</span><span class="NormalTextRun SCXW11705193 BCX8" data-ccp-charstyle="eop">. </span><span class="NormalTextRun SCXW11705193 BCX8" data-ccp-charstyle="eop">Email of the admin user used to access the API.</span></span><span class="EOP SCXW11705193 BCX8" data-ccp-props="{"201341983":0,"335559739":160,"335559740":259}"> </span>

</div></div>

# How to Protect a Website with Cloudflare WAF

#### <span style="color: rgb(53, 152, 219);">**Introduction**</span>

<span style="color: rgb(0, 0, 0);">This guide explains how to protect your website using **Cloudflare Web Application Firewall (WAF)**.</span>  
<span style="color: rgb(0, 0, 0);">Cloudflare sits in front of your website and filters all incoming traffic. By changing your DNS to go through Cloudflare, you get:</span>

- <span style="color: rgb(0, 0, 0);">Protection against common web attacks (SQL injection, XSS, etc.)</span>
- <span style="color: rgb(0, 0, 0);">Built-in DDoS protection</span>
- <span style="color: rgb(0, 0, 0);">Free SSL certificates</span>
- <span style="color: rgb(0, 0, 0);">Performance benefits from Cloudflare’s global CDN</span>

<span style="color: rgb(0, 0, 0);">The process takes a few steps, but once set up, all visitors to your website are automatically filtered through Cloudflare before reaching your server.</span>

##### <span style="color: rgb(53, 152, 219);">**Step 1: Log in to Cloudflare**</span>

<span style="color: rgb(0, 0, 0);">Go to https://dash.cloudflare.com<a class="decorated-link cursor-pointer" data-end="331" data-start="273" rel="noopener" style="color: rgb(0, 0, 0);" target="_new"> </a>and log in with your account.</span>

<span style="color: rgb(0, 0, 0);">[![image.png](https://cytechint-docs-bookstack.s3.amazonaws.com/uploads/images/gallery/2025-09/scaled-1680-/KnK3WKc9iGC6MIWx-image.png)](https://cytechint-docs-bookstack.s3.amazonaws.com/uploads/images/gallery/2025-09/KnK3WKc9iGC6MIWx-image.png)</span>

##### <span style="color: rgb(53, 152, 219);">**Step 2: Add Your Website**</span>

1. <span style="color: rgb(0, 0, 0);">In the dashboard, click **+ Add** at the top.</span>
2. <span style="color: rgb(0, 0, 0);">Select **Connect a domain**.</span>

<span style="color: rgb(0, 0, 0);">[![image.png](https://cytechint-docs-bookstack.s3.amazonaws.com/uploads/images/gallery/2025-09/scaled-1680-/0wCyOwMfCVpzJGPk-image.png)](https://cytechint-docs-bookstack.s3.amazonaws.com/uploads/images/gallery/2025-09/0wCyOwMfCVpzJGPk-image.png)</span>

##### <span style="color: rgb(53, 152, 219);">**Step 3: Enter Your Domain**</span>

<span style="color: rgb(0, 0, 0);">Type your domain name (example: `yourdomain.com`) and click **Continue**.</span>

<span style="color: rgb(0, 0, 0);">[![image.png](https://cytechint-docs-bookstack.s3.amazonaws.com/uploads/images/gallery/2025-09/scaled-1680-/SqfhfS6Vfs5oCNVQ-image.png)](https://cytechint-docs-bookstack.s3.amazonaws.com/uploads/images/gallery/2025-09/SqfhfS6Vfs5oCNVQ-image.png)</span>

##### <span style="color: rgb(53, 152, 219);">**Step 4:  Choose a Plan**</span>

<span style="color: rgb(0, 0, 0);">Cloudflare will ask you to choose a plan.</span>

- <span style="color: rgb(0, 0, 0);">If you just want the WAF and basic protection, select **Free** (Plan $0).</span>
- <span style="color: rgb(0, 0, 0);">Then click **Continue**[![image.png](https://cytechint-docs-bookstack.s3.amazonaws.com/uploads/images/gallery/2025-09/scaled-1680-/I0brqMOgRA6GmMb9-image.png)](https://cytechint-docs-bookstack.s3.amazonaws.com/uploads/images/gallery/2025-09/I0brqMOgRA6GmMb9-image.png)</span>

##### <span style="color: rgb(53, 152, 219);">**Step 5: Review Your DNS Records**</span>

<span style="color: rgb(0, 0, 0);">Cloudflare scans your existing DNS records.</span>

- <span style="color: rgb(0, 0, 0);">Make sure your main records (A and CNAME for your domain and www) are there.</span>
- <span style="color: rgb(0, 0, 0);">The **orange cloud (Proxied)** should be ON for the records you want protected by Cloudflare WAF.</span>
- <span style="color: rgb(0, 0, 0);">NS (Nameserver) records should remain as **DNS only** (gray cloud).</span>

<span style="color: rgb(0, 0, 0);">[![image.png](https://cytechint-docs-bookstack.s3.amazonaws.com/uploads/images/gallery/2025-09/scaled-1680-/6KQX9ura0ZpZcCax-image.png)](https://cytechint-docs-bookstack.s3.amazonaws.com/uploads/images/gallery/2025-09/6KQX9ura0ZpZcCax-image.png)</span>

<span style="color: rgb(0, 0, 0);">Once ready, click **Continue** (you don’t need to tick the checkboxes).</span>

##### <span style="color: rgb(53, 152, 219);">**Step 6: Change Your Nameservers**</span>

<span style="color: rgb(0, 0, 0);">Cloudflare will give you **two new nameservers**.</span>

<p class="callout info"><span style="color: rgb(0, 0, 0);">Go to your **Cloudflare dashboard** → **Websites** → select your domain → **DNS** → scroll to **Cloudflare Nameservers** section.</span></p>

<span style="color: rgb(0, 0, 0);">[![image.png](https://cytechint-docs-bookstack.s3.amazonaws.com/uploads/images/gallery/2025-09/scaled-1680-/RkRekm8M5ogdeSw0-image.png)](https://cytechint-docs-bookstack.s3.amazonaws.com/uploads/images/gallery/2025-09/RkRekm8M5ogdeSw0-image.png)</span>

<span style="color: rgb(0, 0, 0);">[![image.png](https://cytechint-docs-bookstack.s3.amazonaws.com/uploads/images/gallery/2025-09/scaled-1680-/10DwLk0ct3KDQPue-image.png)](https://cytechint-docs-bookstack.s3.amazonaws.com/uploads/images/gallery/2025-09/10DwLk0ct3KDQPue-image.png)</span>

- <span style="color: rgb(0, 0, 0);">Go to your domain registrar (the company where you bought your domain, like GoDaddy or Namecheap).</span>
- <span style="color: rgb(0, 0, 0);">Replace the old nameservers with the Cloudflare ones.</span>
- <span style="color: rgb(0, 0, 0);">Save changes.</span>

<div class="contain-inline-size rounded-2xl relative bg-token-sidebar-surface-primary" id="bkmrk-your-registrar-%E2%86%92-rep"><div class="sticky top-9">  
</div><div class="overflow-y-auto p-4" dir="ltr"><span style="color: rgb(0, 0, 0);">`<span class="hljs-string">Your</span> <span class="hljs-string">registrar</span> <span class="hljs-string">→</span> <span class="hljs-attr">Replace:</span>   <span class="hljs-string">ns1.oldprovider.com</span>   <span class="hljs-string">ns2.oldprovider.com</span><span class="hljs-attr">With Cloudflare:</span>   <span class="hljs-string">ada.ns.cloudflare.com</span>   <span class="hljs-string">josh.ns.cloudflare.com</span>`</span></div></div>##### <span style="color: rgb(53, 152, 219);">**Step 7: Wait for Propagation**</span>

<span style="color: rgb(0, 0, 0);">DNS changes take time. Usually, 15 minutes up to 24 hours.</span>  
<span style="color: rgb(0, 0, 0);">When Cloudflare detects the change, your site will show as **Active** in the dashboard.</span>

<span style="color: rgb(0, 0, 0);">[![image.png](https://cytechint-docs-bookstack.s3.amazonaws.com/uploads/images/gallery/2025-09/scaled-1680-/tr27cbYyLnaXWqVu-image.png)](https://cytechint-docs-bookstack.s3.amazonaws.com/uploads/images/gallery/2025-09/tr27cbYyLnaXWqVu-image.png)</span>

##### <span style="color: rgb(53, 152, 219);">**Step 8: Enable WAF Protection**</span>

- <span style="color: rgb(0, 0, 0);">In the dashboard, go to **Security &gt; Security Rules &gt; WAF**.</span>
- <span style="color: rgb(0, 0, 0);">Enable **Managed Rulesets** (Cloudflare OWASP Core Ruleset, Cloudflare Managed Ruleset).</span>
- <span style="color: rgb(0, 0, 0);">Cloudflare will now filter malicious traffic before it reaches your site.</span>
- <span style="color: rgb(0, 0, 0);">Optionally create **Custom Rules** (e.g., block countries, rate limit requests, block SQL injection patterns).</span>
- <span style="color: rgb(0, 0, 0);">Test in “Simulate” mode before switching to “Block” to avoid false positives.</span>

<span style="color: rgb(0, 0, 0);">[![image.png](https://cytechint-docs-bookstack.s3.amazonaws.com/uploads/images/gallery/2025-09/scaled-1680-/XYGgF0rP3qvSkob6-image.png)](https://cytechint-docs-bookstack.s3.amazonaws.com/uploads/images/gallery/2025-09/XYGgF0rP3qvSkob6-image.png)</span>

##### <span style="color: rgb(53, 152, 219);">**Step 9: Verify**</span>

- <span style="color: rgb(0, 0, 0);">Use a tool like **dig** or **nslookup** to confirm the domain resolves to Cloudflare IPs (not your origin server).</span>
- <span style="color: rgb(0, 0, 0);">Try visiting the site; Cloudflare headers like **cf-cache-status** should appear.</span>
- <span style="color: rgb(0, 0, 0);">You can also test WAF by visiting **http://yoursite.com/?&lt;script&gt;alert(1)&lt;/script&gt;** (Cloudflare should block it if rules are active).</span>

<span style="color: rgb(0, 0, 0);">*If you need further assistance, kindly contact our technical support at **<support@cytechint.com>** for prompt assistance and guidance.*</span>

# How to Use Sniff and Detect

#### <span style="color: rgb(53, 152, 219);">**Overview** </span>[![image.png](https://cytechint-docs-bookstack.s3.amazonaws.com/uploads/images/gallery/2026-03/scaled-1680-/U4ks7IDbEjY7Qwvb-image.png)](https://cytechint-docs-bookstack.s3.amazonaws.com/uploads/images/gallery/2026-03/U4ks7IDbEjY7Qwvb-image.png)

<span style="color: rgb(0, 0, 0);">AQUILA – SNIFF &amp; Detect is a custom integration app within the **AQUILA platform** that enables Microsoft 365 environments to deploy **advanced malicious email detection** capabilities.</span>  
<span style="color: rgb(0, 0, 0);">The app is packaged as a **manifest.xml** file and can be added to an organization’s Microsoft 365 tenant via the **Integration Apps** section in the Microsoft 365 Admin Center.</span>

---

#### <span style="color: rgb(53, 152, 219);">**Key Capabilities &amp; Value** </span>[![image.png](https://cytechint-docs-bookstack.s3.amazonaws.com/uploads/images/gallery/2026-03/scaled-1680-/jBlpQPC2DfMETIrY-image.png)](https://cytechint-docs-bookstack.s3.amazonaws.com/uploads/images/gallery/2026-03/jBlpQPC2DfMETIrY-image.png)

- <span style="color: rgb(0, 0, 0);">**Seamless Integration** – Install in Microsoft 365 with just a few clicks, no complex infrastructure required.</span>
- <span style="color: rgb(0, 0, 0);">**Permission-Driven Security** – Requires admin approval to grant permissions, ensuring a secure deployment process.</span>
- <span style="color: rgb(0, 0, 0);">**Centralized Control** – Managed via AQUILA and distributed through the AQUILA Store for consistent updates.</span>
- <span style="color: rgb(0, 0, 0);">**AI-Enhanced Detection** – Uses AQUILA’s AI and Cyber Threat Intelligence to scan and detect malicious emails in real time.</span>
- <span style="color: rgb(0, 0, 0);">**User-Friendly Accessibility** – Appears in the “More apps” section for assigned users, making it easy to launch.</span>
- <span style="color: rgb(0, 0, 0);">**Minimal Footprint** – Only ~6 KiB in size, ensuring fast installation without performance impact.</span>

---

#### <span style="color: rgb(53, 152, 219);">**<span class="TextRun SCXW129338488 BCX0" data-contrast="auto" lang="EN-PH" xml:lang="EN-PH"><span class="NormalTextRun SCXW129338488 BCX0">Simple Step-by-Step Instructions </span></span>**</span>[![image.png](https://cytechint-docs-bookstack.s3.amazonaws.com/uploads/images/gallery/2026-03/scaled-1680-/L3FUfskDB2bTOhfG-image.png)](https://cytechint-docs-bookstack.s3.amazonaws.com/uploads/images/gallery/2026-03/L3FUfskDB2bTOhfG-image.png)

1. <span style="color: rgb(53, 152, 219);">**Access the App**</span>
    
    
    - <span class="MuiTypography-root MuiTypography-body1 css-pps2qs" style="color: rgb(0, 0, 0);">Open Outlook and check the apps panel to ensure Sniff &amp; Detect is listed and accessible.</span>
    - <span style="color: rgb(0, 0, 0);">Users can launch it from <span style="color: rgb(53, 152, 219);">**More apps**</span> in Microsoft 365.</span>

<span style="color: rgb(0, 0, 0);">[![image.png](https://cytechint-docs-bookstack.s3.amazonaws.com/uploads/images/gallery/2025-08/scaled-1680-/x0FuZ3iJt7A0EjRE-image.png)](https://cytechint-docs-bookstack.s3.amazonaws.com/uploads/images/gallery/2025-08/x0FuZ3iJt7A0EjRE-image.png)</span>


- <span style="color: rgb(0, 0, 0);">A phishing email impersonating Netflix. An arrow points to the <span style="color: rgb(53, 152, 219);">**SNIFF &amp; Detect**</span> icon, indicating where to scan or flag the email as suspicious.</span>

<span style="color: rgb(0, 0, 0);">[![image.png](https://cytechint-docs-bookstack.s3.amazonaws.com/uploads/images/gallery/2025-08/scaled-1680-/fdE09hu7Rl60QyT9-image.png)](https://cytechint-docs-bookstack.s3.amazonaws.com/uploads/images/gallery/2025-08/fdE09hu7Rl60QyT9-image.png)</span>

- <article class="text-token-text-primary w-full focus:outline-none scroll-mt-[calc(var(--header-height)+min(200px,max(70px,20svh)))]" data-scroll-anchor="true" data-testid="conversation-turn-24" data-turn="assistant" data-turn-id="request-WEB:f057c933-6170-480a-a00a-6172cc6a9351-11" dir="auto" tabindex="-1"><span style="color: rgb(0, 0, 0);">Click the “<span style="color: rgb(53, 152, 219);">**Scan This Email**</span>” button and wait for the scan to complete.</span>
    
    </article>

<span style="color: rgb(0, 0, 0);">[![image.png](https://cytechint-docs-bookstack.s3.amazonaws.com/uploads/images/gallery/2025-08/scaled-1680-/pRLtXFAqIgrMvZMx-image.png)](https://cytechint-docs-bookstack.s3.amazonaws.com/uploads/images/gallery/2025-08/pRLtXFAqIgrMvZMx-image.png)</span>

- <span style="color: rgb(0, 0, 0);">SNIFF &amp; Detect has scanned the email, highlighting possible errors such as</span>  
    <span style="color: rgb(0, 0, 0);">1. <span style="color: rgb(224, 62, 45);">**Arrow 1**</span> points to the <span style="color: rgb(53, 152, 219);">**Language issues**</span> section, showing spelling and grammar mistakes found in the phishing email.</span>  
    <span style="color: rgb(0, 0, 0);">2. <span style="color: rgb(224, 62, 45);">**Arrow 2**</span> points to the <span style="color: rgb(53, 152, 219);">**What you should do**</span> section, giving safety advice on how to handle the suspicious email.</span>

<span style="color: rgb(0, 0, 0);">[![image.png](https://cytechint-docs-bookstack.s3.amazonaws.com/uploads/images/gallery/2025-08/scaled-1680-/o6vEVWiMGeCI3Gsk-image.png)](https://cytechint-docs-bookstack.s3.amazonaws.com/uploads/images/gallery/2025-08/o6vEVWiMGeCI3Gsk-image.png)</span>

- <span style="color: rgb(0, 0, 0);"><span style="color: rgb(224, 62, 45);">**Arrow 1**</span> – Highlights the <span style="color: rgb(53, 152, 219);">**AI Insight Results**</span> tab in SNIFF &amp; Detect, which contains the automated analysis results of the scanned email.</span>
- <span style="color: rgb(0, 0, 0);"><span style="color: rgb(224, 62, 45);">**Arrow 2**</span> – Points to the <span style="color: rgb(53, 152, 219);">**Malicious**</span> classification summary. This section briefly explains the reasons the email is flagged, such as suspicious sender details, urgent tone, spelling and grammar errors, and suspicious links.</span>
- <span style="color: rgb(0, 0, 0);"><span style="color: rgb(224, 62, 45);">**Arrow 3**</span> – Directs attention to the actual phishing email content pretending to be from Netflix, warning about a payment failure and urging the user to update their payment information.</span>
- <span style="color: rgb(0, 0, 0);"><span style="color: rgb(224, 62, 45);">**Arrow 4** </span>– Indicates the <span style="color: rgb(53, 152, 219);">**Report as Phishing**</span> button, which the user can click to formally report the suspicious email to security for further action.</span>

<span style="color: rgb(0, 0, 0);">[![image.png](https://cytechint-docs-bookstack.s3.amazonaws.com/uploads/images/gallery/2025-08/scaled-1680-/xCI6XwmmK0SHb2Jv-image.png)](https://cytechint-docs-bookstack.s3.amazonaws.com/uploads/images/gallery/2025-08/xCI6XwmmK0SHb2Jv-image.png)</span>

- <span style="color: rgb(0, 0, 0);">Click the "<span style="color: rgb(53, 152, 219);">**Run a deep scan**</span>" button, which allows for a more detailed examination of the email to detect hidden threats and malicious indicators.</span>

<span style="color: rgb(0, 0, 0);">[![image.png](https://cytechint-docs-bookstack.s3.amazonaws.com/uploads/images/gallery/2025-08/scaled-1680-/51ELQvK9m7iXcuUC-image.png)](https://cytechint-docs-bookstack.s3.amazonaws.com/uploads/images/gallery/2025-08/51ELQvK9m7iXcuUC-image.png)</span>

- <span style="color: rgb(0, 0, 0);"><span style="color: rgb(53, 152, 219);">**SNIFF &amp; Detect**</span> doing a deep scan on a suspected phishing email pretending to be from Netflix. The scan may take a couple of minutes to finish.</span>

<span style="color: rgb(0, 0, 0);">[![image.png](https://cytechint-docs-bookstack.s3.amazonaws.com/uploads/images/gallery/2025-08/scaled-1680-/W3myFSHB02eaTvS2-image.png)](https://cytechint-docs-bookstack.s3.amazonaws.com/uploads/images/gallery/2025-08/W3myFSHB02eaTvS2-image.png)</span>

- <span style="color: rgb(0, 0, 0);">The scan results are now finished and ready to check.</span>

<span style="color: rgb(0, 0, 0);">[![image.png](https://cytechint-docs-bookstack.s3.amazonaws.com/uploads/images/gallery/2025-08/scaled-1680-/mALzljyROiLcmqPz-image.png)](https://cytechint-docs-bookstack.s3.amazonaws.com/uploads/images/gallery/2025-08/mALzljyROiLcmqPz-image.png)</span>

- <span style="color: rgb(0, 0, 0);">This is the result of a deep scan conducted by the Sniff &amp; Detect tool on a suspicious email impersonating Netflix.</span>  
    <span style="color: rgb(0, 0, 0);">1. <span style="color: rgb(224, 62, 45);">**Arrow 1**</span> highlights the domain **<span style="color: rgb(224, 62, 45);">netflix-billing.com</span>,** which is flagged as a spoofed domain used to impersonate Netflix and trick users into entering sensitive information.</span>  
    <span style="color: rgb(0, 0, 0);">2. **<span style="color: rgb(224, 62, 45);">Arrow 2</span>** lists phishing-related email addresses such as <span style="color: rgb(224, 62, 45);">**richmond@cytcehint.com**</span> and <span style="color: rgb(224, 62, 45);">[**support@netflix-billing.com**](mailto:support@netflix-billing)</span>, which are likely used to send or support the fraudulent email.</span>  
    <span style="color: rgb(0, 0, 0);">3. <span style="color: rgb(224, 62, 45);">**Arrow 3** </span>shows the IP address <span style="color: rgb(224, 62, 45);">**192.168.1.45**</span>, flagged as part of the phishing infrastructure. Although it's a private IP, its presence suggests internal spoofing or malicious setup.</span>

<span style="color: rgb(0, 0, 0);">[![image.png](https://cytechint-docs-bookstack.s3.amazonaws.com/uploads/images/gallery/2025-08/scaled-1680-/4JxCoYEvR1qYSOzV-image.png)](https://cytechint-docs-bookstack.s3.amazonaws.com/uploads/images/gallery/2025-08/4JxCoYEvR1qYSOzV-image.png)</span>

<span class="EOP SCXW129338488 BCX0" data-ccp-props="{}" style="color: rgb(0, 0, 0);">*If you need further assistance, kindly contact our support at* <span style="color: rgb(53, 152, 219);">***support@cytechint.com***</span> *for prompt assistance and guidance.*</span>

# Jumpcloud Integrations

##### <span style="color: rgb(53, 152, 219);">**<span class="TextRun SCXW196704865 BCX8" data-contrast="none" lang="EN-US" xml:lang="EN-US"><span class="NormalTextRun SCXW196704865 BCX8" data-ccp-charstyle="Style (Complex) Open Sans" data-ccp-charstyle-defn="{"ObjectId":"b6b34e49-ba56-4a53-a5e4-95fddf9f0589|203","ClassId":1073872969,"Properties":[201342446,"1",201342447,"5",201342448,"1",201342449,"1",469777841,"Open Sans",469777842,"Open Sans",469777843,"Calibri",469777844,"Open Sans",201341986,"1",469769226,"Open Sans",268442635,"22",335559704,"1037",335559705,"1033",335551547,"1033",335559740,"259",201341983,"0",335559739,"160",469775450,"Style (Complex) Open Sans",201340122,"1",134233614,"true",469778129,"StyleComplexOpenSans",335572020,"1",469778324,"Default Paragraph Font"]}">Introduction</span></span>**<span class="EOP SCXW196704865 BCX8" data-ccp-props="{"134245418":true,"134245529":true,"201341983":0,"335559738":240,"335559739":0,"335559740":360}"> </span></span>

<span class="TextRun SCXW196704865 BCX8" data-contrast="auto" lang="EN-US" xml:lang="EN-US"><span class="NormalTextRun SCXW196704865 BCX8" data-ccp-charstyle="Style (Complex) Open Sans">The </span><span class="NormalTextRun SpellingErrorV2Themed SCXW196704865 BCX8" data-ccp-charstyle="Style (Complex) Open Sans">JumpCloud</span><span class="NormalTextRun SCXW196704865 BCX8" data-ccp-charstyle="Style (Complex) Open Sans"> integration allows you to </span><span class="NormalTextRun SCXW196704865 BCX8" data-ccp-charstyle="Style (Complex) Open Sans">monitor</span><span class="NormalTextRun SCXW196704865 BCX8" data-ccp-charstyle="Style (Complex) Open Sans"> events related to the </span><span class="NormalTextRun SpellingErrorV2Themed SCXW196704865 BCX8" data-ccp-charstyle="Style (Complex) Open Sans">JumpCloud</span><span class="NormalTextRun SCXW196704865 BCX8" data-ccp-charstyle="Style (Complex) Open Sans"> Directory as a Service via the Directory Insights API.</span></span><span class="EOP SCXW196704865 BCX8" data-ccp-props="{"201341983":0,"335559685":360,"335559739":160,"335559740":259}"> </span>

<span class="TextRun SCXW196704865 BCX8" data-contrast="auto" lang="EN-US" xml:lang="EN-US"><span class="NormalTextRun SCXW196704865 BCX8" data-ccp-charstyle="Style (Complex) Open Sans">You can find out more about </span><span class="NormalTextRun SpellingErrorV2Themed SCXW196704865 BCX8" data-ccp-charstyle="Style (Complex) Open Sans">JumpCloud</span><span class="NormalTextRun SCXW196704865 BCX8" data-ccp-charstyle="Style (Complex) Open Sans"> and </span><span class="NormalTextRun SpellingErrorV2Themed SCXW196704865 BCX8" data-ccp-charstyle="Style (Complex) Open Sans">JumpCloud</span><span class="NormalTextRun SCXW196704865 BCX8" data-ccp-charstyle="Style (Complex) Open Sans"> Directory Insights </span></span><span class="TextRun SCXW196704865 BCX8" data-contrast="none" lang="EN-US" xml:lang="EN-US"><span class="NormalTextRun SCXW196704865 BCX8" data-ccp-charstyle="Style (Complex) Open Sans">here</span></span><span class="EOP SCXW196704865 BCX8" data-ccp-props="{"201341983":0,"335559685":360,"335559739":160,"335559740":259}"> </span>

<div class="SCXW196704865 BCX8" id="bkmrk-https%3A%2F%2Fjumpcloud.co"><div class="ListContainerWrapper SCXW196704865 BCX8">- [<span class="TextRun Underlined SCXW196704865 BCX8" data-contrast="none" lang="EN-US" xml:lang="EN-US"><span class="NormalTextRun SCXW196704865 BCX8" data-ccp-charstyle="Hyperlink">https://jumpcloud.com/platform/directory-insights</span></span>](https://jumpcloud.com/platform/directory-insights)<span class="EOP SCXW196704865 BCX8" data-ccp-props="{"201341983":0,"335559739":160,"335559740":259}"> </span>

</div></div>##### <span style="color: rgb(53, 152, 219);">**<span class="TextRun SCXW196704865 BCX8" data-contrast="auto" lang="EN-US" xml:lang="EN-US"><span class="NormalTextRun SCXW196704865 BCX8" data-ccp-charstyle="Style (Complex) Open Sans">Data streams</span></span><span class="EOP SCXW196704865 BCX8" data-ccp-props="{"201341983":0,"335559685":360,"335559739":160,"335559740":259}"> </span>**</span>

<span class="TextRun SCXW196704865 BCX8" data-contrast="auto" lang="EN-US" xml:lang="EN-US"><span class="NormalTextRun SCXW196704865 BCX8" data-ccp-charstyle="Style (Complex) Open Sans">A single data stream named "</span><span class="NormalTextRun SpellingErrorV2Themed SCXW196704865 BCX8" data-ccp-charstyle="Style (Complex) Open Sans">jumpcloud.events</span><span class="NormalTextRun SCXW196704865 BCX8" data-ccp-charstyle="Style (Complex) Open Sans">" is used by this integration.</span></span><span class="EOP SCXW196704865 BCX8" data-ccp-props="{"201341983":0,"335559685":360,"335559739":160,"335559740":259}"> </span>

<div class="SCXW196704865 BCX8" id="bkmrk-"><div class="OutlineElement Ltr SCXW196704865 BCX8">  
</div><div class="ListContainerWrapper SCXW196704865 BCX8">  
</div></div>##### <span style="color: rgb(53, 152, 219);">**<span class="TextRun SCXW196704865 BCX8" data-contrast="none" lang="EN-US" xml:lang="EN-US"><span class="NormalTextRun SCXW196704865 BCX8" data-ccp-charstyle="Style (Complex) Open Sans">Assumptions</span></span><span class="EOP SCXW196704865 BCX8" data-ccp-props="{"134245418":true,"134245529":true,"201341983":0,"335559738":240,"335559739":0,"335559740":360}"> </span>**</span>

<span class="TextRun SCXW196704865 BCX8" data-contrast="auto" lang="EN-US" xml:lang="EN-US"><span class="NormalTextRun SCXW196704865 BCX8" data-ccp-charstyle="Style (Complex) Open Sans">The procedures described in Section </span></span><span class="FieldRange SCXW196704865 BCX8"><span class="TextRun SCXW196704865 BCX8" data-contrast="auto" lang="EN-US" xml:lang="EN-US"><span class="NormalTextRun SCXW196704865 BCX8" data-ccp-charstyle="Style (Complex) Open Sans">3</span></span></span><span class="TextRun SCXW196704865 BCX8" data-contrast="auto" lang="EN-US" xml:lang="EN-US"> <span class="NormalTextRun ContextualSpellingAndGrammarErrorV2Themed SCXW196704865 BCX8" data-ccp-charstyle="Style (Complex) Open Sans">assumes</span><span class="NormalTextRun SCXW196704865 BCX8" data-ccp-charstyle="Style (Complex) Open Sans"> that a Log Collector has already been </span><span class="NormalTextRun ContextualSpellingAndGrammarErrorV2Themed SCXW196704865 BCX8" data-ccp-charstyle="Style (Complex) Open Sans">setup</span><span class="NormalTextRun SCXW196704865 BCX8" data-ccp-charstyle="Style (Complex) Open Sans">. </span></span><span class="EOP SCXW196704865 BCX8" data-ccp-props="{"201341983":0,"335559685":360,"335559739":160,"335559740":259}"> </span>

<div class="SCXW196704865 BCX8" id="bkmrk--1"><div class="OutlineElement Ltr SCXW196704865 BCX8">  
</div><div class="ListContainerWrapper SCXW196704865 BCX8">  
</div></div>##### <span style="color: rgb(53, 152, 219);">**<span class="TextRun SCXW196704865 BCX8" data-contrast="none" lang="EN-US" xml:lang="EN-US"><span class="NormalTextRun SCXW196704865 BCX8" data-ccp-charstyle="Style (Complex) Open Sans">Requirements</span></span><span class="EOP SCXW196704865 BCX8" data-ccp-props="{"134245418":true,"134245529":true,"201341983":0,"335559738":240,"335559739":0,"335559740":360}"> </span>**</span>

<span class="TextRun SCXW196704865 BCX8" data-contrast="auto" lang="EN-US" xml:lang="EN-US"><span class="NormalTextRun SCXW196704865 BCX8" data-ccp-charstyle="Style (Complex) Open Sans">An Elastic Stack with an Elastic Agent is a fundamental requirement.</span></span><span class="EOP SCXW196704865 BCX8" data-ccp-props="{"201341983":0,"335559685":360,"335559739":160,"335559740":259}"> </span>

<span class="TextRun SCXW196704865 BCX8" data-contrast="auto" lang="EN-US" xml:lang="EN-US"><span class="NormalTextRun SCXW196704865 BCX8" data-ccp-charstyle="Style (Complex) Open Sans">An established </span><span class="NormalTextRun SpellingErrorV2Themed SCXW196704865 BCX8" data-ccp-charstyle="Style (Complex) Open Sans">JumpCloud</span><span class="NormalTextRun SCXW196704865 BCX8" data-ccp-charstyle="Style (Complex) Open Sans"> tenancy with active users is the </span><span class="NormalTextRun SpellingErrorV2Themed SCXW196704865 BCX8" data-ccp-charstyle="Style (Complex) Open Sans">the</span><span class="NormalTextRun SCXW196704865 BCX8" data-ccp-charstyle="Style (Complex) Open Sans"> other requirement. Basic Directory Insights API access is available to all subscription levels.</span></span><span class="EOP SCXW196704865 BCX8" data-ccp-props="{"201341983":0,"335559685":360,"335559739":160,"335559740":259}"> </span>

<span class="TextRun SCXW196704865 BCX8" data-contrast="auto" lang="EN-US" xml:lang="EN-US"><span class="NormalTextRun SCXW196704865 BCX8" data-ccp-charstyle="Style (Complex) Open Sans">NOTE: The lowest level of subscription currently has retention limits, with access to Directory Insights events for the last 15 days at most. Other </span><span class="NormalTextRun SCXW196704865 BCX8" data-ccp-charstyle="Style (Complex) Open Sans">subscriptions</span><span class="NormalTextRun SCXW196704865 BCX8" data-ccp-charstyle="Style (Complex) Open Sans"> levels provide 90 days or </span><span class="NormalTextRun ContextualSpellingAndGrammarErrorV2Themed SCXW196704865 BCX8" data-ccp-charstyle="Style (Complex) Open Sans">longer</span><span class="NormalTextRun SCXW196704865 BCX8" data-ccp-charstyle="Style (Complex) Open Sans"> historical event access.</span></span><span class="EOP SCXW196704865 BCX8" data-ccp-props="{"201341983":0,"335559685":360,"335559739":160,"335559740":259}"> </span>

<span class="TextRun SCXW196704865 BCX8" data-contrast="auto" lang="EN-US" xml:lang="EN-US"><span class="NormalTextRun SCXW196704865 BCX8" data-ccp-charstyle="Style (Complex) Open Sans">A </span><span class="NormalTextRun SpellingErrorV2Themed SCXW196704865 BCX8" data-ccp-charstyle="Style (Complex) Open Sans">JumpCloud</span><span class="NormalTextRun SCXW196704865 BCX8" data-ccp-charstyle="Style (Complex) Open Sans"> API key is </span><span class="NormalTextRun SCXW196704865 BCX8" data-ccp-charstyle="Style (Complex) Open Sans">required</span><span class="NormalTextRun SCXW196704865 BCX8" data-ccp-charstyle="Style (Complex) Open Sans">, the </span><span class="NormalTextRun SpellingErrorV2Themed SCXW196704865 BCX8" data-ccp-charstyle="Style (Complex) Open Sans">JumpCloud</span><span class="NormalTextRun SCXW196704865 BCX8" data-ccp-charstyle="Style (Complex) Open Sans"> documentation describing how to create one is </span></span><span class="TextRun SCXW196704865 BCX8" data-contrast="none" lang="EN-US" xml:lang="EN-US"><span class="NormalTextRun SCXW196704865 BCX8" data-ccp-charstyle="Style (Complex) Open Sans">here</span></span><span class="EOP SCXW196704865 BCX8" data-ccp-props="{"201341983":0,"335559685":360,"335559739":160,"335559740":259}"> </span>

<div class="SCXW196704865 BCX8" id="bkmrk-https%3A%2F%2Fsupport.jump"><div class="ListContainerWrapper SCXW196704865 BCX8">- [<span class="TextRun Underlined SCXW196704865 BCX8" data-contrast="none" lang="EN-US" xml:lang="EN-US"><span class="NormalTextRun SCXW196704865 BCX8" data-ccp-charstyle="Hyperlink">https://support.jumpcloud.com/s/article/jumpcloud-apis1</span></span>](https://support.jumpcloud.com/s/article/jumpcloud-apis1)<span class="EOP SCXW196704865 BCX8" data-ccp-props="{"201341983":0,"335559739":160,"335559740":259}"> </span>

</div></div><span class="TextRun SCXW196704865 BCX8" data-contrast="auto" lang="EN-US" xml:lang="EN-US"><span class="NormalTextRun SCXW196704865 BCX8" data-ccp-charstyle="Style (Complex) Open Sans">This </span><span class="NormalTextRun SpellingErrorV2Themed SCXW196704865 BCX8" data-ccp-charstyle="Style (Complex) Open Sans">JumpCloud</span><span class="NormalTextRun SCXW196704865 BCX8" data-ccp-charstyle="Style (Complex) Open Sans"> Directory Insights API is documented </span></span><span class="TextRun SCXW196704865 BCX8" data-contrast="none" lang="EN-US" xml:lang="EN-US"><span class="NormalTextRun SCXW196704865 BCX8" data-ccp-charstyle="Style (Complex) Open Sans">here</span></span><span class="EOP SCXW196704865 BCX8" data-ccp-props="{"201341983":0,"335559685":360,"335559739":160,"335559740":259}"> </span>

<div class="SCXW196704865 BCX8" id="bkmrk-https%3A%2F%2Fdocs.jumpclo"><div class="ListContainerWrapper SCXW196704865 BCX8">- [<span class="TextRun Underlined SCXW196704865 BCX8" data-contrast="none" lang="EN-US" xml:lang="EN-US"><span class="NormalTextRun SCXW196704865 BCX8" data-ccp-charstyle="Hyperlink">https://docs.jumpcloud.com/api/insights/directory/1.0/index.html#section/Overview</span></span>](https://docs.jumpcloud.com/api/insights/directory/1.0/index.html#section/Overview)<span class="EOP SCXW196704865 BCX8" data-ccp-props="{"201341983":0,"335559739":160,"335559740":259}"> </span>

</div><div class="ListContainerWrapper SCXW196704865 BCX8">  
</div></div>##### <span style="text-decoration: underline; color: rgb(53, 152, 219);">**<span class="TextRun SCXW196704865 BCX8" data-contrast="none" lang="EN-US" xml:lang="EN-US"><span class="NormalTextRun SpellingErrorV2Themed SCXW196704865 BCX8" data-ccp-charstyle="Style (Complex) Open Sans">JumpCloud</span><span class="NormalTextRun SCXW196704865 BCX8" data-ccp-charstyle="Style (Complex) Open Sans"> I</span><span class="NormalTextRun SCXW196704865 BCX8" data-ccp-charstyle="Style (Complex) Open Sans">ntegration</span> <span class="NormalTextRun SCXW196704865 BCX8" data-ccp-charstyle="Style (Complex) Open Sans">Procedures</span></span><span class="EOP SCXW196704865 BCX8" data-ccp-props="{"134245418":true,"134245529":true,"201341983":0,"335559738":240,"335559739":0,"335559740":360}"> </span>**</span>

<div class="SCXW196704865 BCX8" id="bkmrk--2"><div class="ListContainerWrapper SCXW196704865 BCX8">  
</div><div class="OutlineElement Ltr SCXW196704865 BCX8">  
</div></div><span class="TextRun SCXW196704865 BCX8" data-contrast="auto" lang="EN-US" xml:lang="EN-US"><span class="NormalTextRun SCXW196704865 BCX8" data-ccp-charstyle="normaltextrun" data-ccp-charstyle-defn="{"ObjectId":"b6b34e49-ba56-4a53-a5e4-95fddf9f0589|228","ClassId":1073872969,"Properties":[201342446,"1",201342447,"5",201342448,"1",201342449,"1",469777841,"Calibri",469777842,"Arial",469777843,"Calibri",469777844,"Calibri",201341986,"1",469769226,"Calibri,Arial",268442635,"22",335559704,"1037",335559705,"1033",335551547,"1033",335559740,"259",201341983,"0",335559739,"160",469775450,"normaltextrun",201340122,"1",134233614,"true",469778129,"normaltextrun",335572020,"1",469778324,"Default Paragraph Font"]}">**Procedures**:</span></span><span class="TextRun SCXW196704865 BCX8" data-contrast="auto" lang="EN-PH" xml:lang="EN-PH"><span class="NormalTextRun SCXW196704865 BCX8" data-ccp-charstyle="eop" data-ccp-charstyle-defn="{"ObjectId":"b6b34e49-ba56-4a53-a5e4-95fddf9f0589|229","ClassId":1073872969,"Properties":[201342446,"1",201342447,"5",201342448,"1",201342449,"1",469777841,"Calibri",469777842,"Arial",469777843,"Calibri",469777844,"Calibri",201341986,"1",469769226,"Calibri,Arial",268442635,"22",335559704,"1037",335559705,"1033",335551547,"1033",335559740,"259",201341983,"0",335559739,"160",469775450,"eop",201340122,"1",134233614,"true",469778129,"eop",335572020,"1",469778324,"Default Paragraph Font"]}"> </span></span><span class="EOP SCXW196704865 BCX8" data-ccp-props="{"134233117":false,"134233118":false,"201341983":0,"335559685":360,"335559738":0,"335559739":0,"335559740":360}"> </span>

<span class="TextRun SCXW196704865 BCX8" data-contrast="auto" lang="EN-US" xml:lang="EN-US"><span class="NormalTextRun SCXW196704865 BCX8" data-ccp-charstyle="normaltextrun">Please provide the following information to </span><span class="NormalTextRun SpellingErrorV2Themed SCXW196704865 BCX8" data-ccp-charstyle="normaltextrun">CyTech</span><span class="NormalTextRun SCXW196704865 BCX8" data-ccp-charstyle="normaltextrun">:</span></span><span class="TextRun SCXW196704865 BCX8" data-contrast="auto" lang="EN-PH" xml:lang="EN-PH"><span class="NormalTextRun SCXW196704865 BCX8" data-ccp-charstyle="eop"> </span></span><span class="EOP SCXW196704865 BCX8" data-ccp-props="{"134233117":false,"134233118":false,"201341983":0,"335559685":360,"335559738":0,"335559739":0,"335559740":360}"> </span>

<span class="TextRun SCXW196704865 BCX8" data-contrast="auto" lang="EN-US" xml:lang="EN-US"><span class="NormalTextRun SCXW196704865 BCX8">Enabling the integration in Elastic</span></span><span class="EOP SCXW196704865 BCX8" data-ccp-props="{"201341983":0,"335559685":360,"335559739":160,"335559740":259}"> </span>

<div class="SCXW196704865 BCX8" id="bkmrk-in-kibana-go-to-mana"><div class="ListContainerWrapper SCXW196704865 BCX8">1. <span class="TextRun SCXW196704865 BCX8" data-contrast="auto" lang="EN-US" xml:lang="EN-US"><span class="NormalTextRun SCXW196704865 BCX8">In Kibana go to Management &gt; Integrations</span></span><span class="EOP SCXW196704865 BCX8" data-ccp-props="{"201341983":0,"335559685":1080,"335559739":160,"335559740":259}"> </span>

</div><div class="ListContainerWrapper SCXW196704865 BCX8">2. <span class="TextRun SCXW196704865 BCX8" data-contrast="auto" lang="EN-US" xml:lang="EN-US"><span class="NormalTextRun SCXW196704865 BCX8">In "Search for integrations" search bar type </span><span class="NormalTextRun SpellingErrorV2Themed SCXW196704865 BCX8">JumpCloud</span></span><span class="EOP SCXW196704865 BCX8" data-ccp-props="{"201341983":0,"335559685":1080,"335559739":160,"335559740":259}"> </span>

</div><div class="ListContainerWrapper SCXW196704865 BCX8">3. <span class="TextRun SCXW196704865 BCX8" data-contrast="auto" lang="EN-US" xml:lang="EN-US"><span class="NormalTextRun SCXW196704865 BCX8">Click on "</span><span class="NormalTextRun SpellingErrorV2Themed SCXW196704865 BCX8">JumpCloud</span><span class="NormalTextRun SCXW196704865 BCX8">" integration from the search results.</span></span><span class="EOP SCXW196704865 BCX8" data-ccp-props="{"201341983":0,"335559685":1080,"335559739":160,"335559740":259}"> </span>

</div><div class="ListContainerWrapper SCXW196704865 BCX8">4. <span class="TextRun SCXW196704865 BCX8" data-contrast="auto" lang="EN-US" xml:lang="EN-US"><span class="NormalTextRun SCXW196704865 BCX8">Click on </span><span class="NormalTextRun ContextualSpellingAndGrammarErrorV2Themed SCXW196704865 BCX8">Add</span> <span class="NormalTextRun SpellingErrorV2Themed SCXW196704865 BCX8">JumpCloud</span><span class="NormalTextRun SCXW196704865 BCX8"> button to add the </span><span class="NormalTextRun SpellingErrorV2Themed SCXW196704865 BCX8">JumpCloud</span><span class="NormalTextRun SCXW196704865 BCX8"> integration.</span></span><span class="EOP SCXW196704865 BCX8" data-ccp-props="{"201341983":0,"335559685":1080,"335559739":160,"335559740":259}"> </span>

</div><div class="ListContainerWrapper SCXW196704865 BCX8">5. <span class="TextRun SCXW196704865 BCX8" data-contrast="auto" lang="EN-US" xml:lang="EN-US"><span class="NormalTextRun SCXW196704865 BCX8">Configure the integration as </span><span class="NormalTextRun SCXW196704865 BCX8">appropriate</span></span><span class="EOP SCXW196704865 BCX8" data-ccp-props="{"201341983":0,"335559685":1080,"335559739":160,"335559740":259}"> </span>

</div><div class="ListContainerWrapper SCXW196704865 BCX8">6. <span class="TextRun SCXW196704865 BCX8" data-contrast="auto" lang="EN-US" xml:lang="EN-US"><span class="NormalTextRun SCXW196704865 BCX8">Assign the integration to a new Elastic Agent host, or an existing Elastic Agent </span><span class="NormalTextRun SCXW196704865 BCX8">host</span></span><span class="EOP SCXW196704865 BCX8" data-ccp-props="{"201341983":0,"335559685":1080,"335559739":160,"335559740":259}"> </span>

</div><div class="OutlineElement Ltr SCXW196704865 BCX8">  
</div></div><span class="WACImageGroupContainer SCXW196704865 BCX8"><span class="WACImageContainer NoPadding AttachedToBeginning DragDrop SCXW196704865 BCX8" role="presentation">![Example of Add JumpCloud Integration](https://cytechint-docs-bookstack.s3.amazonaws.com/uploads/images/gallery/2024-04/embedded-image-umiupvdz.png)</span></span><span class="EOP SCXW196704865 BCX8" data-ccp-props="{"201341983":0,"335559739":160,"335559740":259}"></span>

# JWT For Kali

To create a JSON Web Token (JWT) for Salesforce on **Kali Linux**, you can follow the steps below. Kali Linux is a Debian-based Linux distribution, so the process is similar to other Linux environments. You will use tools like **OpenSSL** for key generation and a programming language (e.g., Python) to generate the JWT.

---

### Step 1: Install Required Tools

Ensure you have the necessary tools installed on Kali Linux:

1. **OpenSSL**:
    
    
    - OpenSSL is pre-installed on Kali Linux. Verify by running: ```
        ✄𐘗```
        openssl version
        ```
        ```
        
        <div class="euiMarkdownFormat__codeblockWrapper"><div class="euiCodeBlock prismjs language-bash remark-prismjs--fenced css-1lecq5a-euiCodeBlock-m-hasControls"><div class="euiCodeBlock__controls css-1wtdjjj-euiCodeBlock__controls-s"><div class="euiCodeBlock__copyButton"><span class="euiToolTipAnchor css-jcaat8-euiToolTipAnchor-inlineBlock"><button aria-label="Copy" class="euiButtonIcon css-sfdbbx-euiButtonIcon-xs-empty-text" data-test-subj="euiCodeBlockCopy" type="button"><svg aria-hidden="true" class="euiIcon euiButtonIcon__icon css-1kvegpu-euiIcon-m-inherit" height="16" role="img" viewbox="0 0 16 16" width="16" xmlns="http://www.w3.org/2000/svg"><path d="M2 2.729V2a1 1 0 0 1 1-1h2v1H3v12h4v1H3a1 1 0 0 1-1-1V2.729zM14 5V2a1 1 0 0 0-1-1h-2v1h2v3h1zm-1 1h2v9H8V6h5V5H8a1 1 0 0 0-1 1v9a1 1 0 0 0 1 1h7a1 1 0 0 0 1-1V6a1 1 0 0 0-1-1h-2v1z"></path><path d="M9 10h5V9H9v1zm0-2h5V7H9v1zm0 4h5v-1H9v1zm0 2h5v-1H9v1zm2-12V1a1 1 0 0 0-1-1H6a1 1 0 0 0-1 1v1h1V1h4v1h1zM5 3h6V2H5v1z"></path></svg></button></span></div></div></div></div>
    - If not installed, use: <div class="euiMarkdownFormat__codeblockWrapper"><div class="euiCodeBlock prismjs language-bash remark-prismjs--fenced css-1lecq5a-euiCodeBlock-m-hasControls"><div class="css-gb1zbv-euiScreenReaderOnly">  
        </div></div></div>```
        ✄𐘗```
        sudo apt update
        sudo apt install openssl
        ```
        ```
        
        <div class="euiMarkdownFormat__codeblockWrapper"><div class="euiCodeBlock prismjs language-bash remark-prismjs--fenced css-1lecq5a-euiCodeBlock-m-hasControls"><div class="euiCodeBlock__controls css-1wtdjjj-euiCodeBlock__controls-s"><div class="euiCodeBlock__copyButton"><span class="euiToolTipAnchor css-jcaat8-euiToolTipAnchor-inlineBlock"><button aria-label="Copy" class="euiButtonIcon css-sfdbbx-euiButtonIcon-xs-empty-text" data-test-subj="euiCodeBlockCopy" type="button"><svg aria-hidden="true" class="euiIcon euiButtonIcon__icon css-1kvegpu-euiIcon-m-inherit" height="16" role="img" viewbox="0 0 16 16" width="16" xmlns="http://www.w3.org/2000/svg"><path d="M2 2.729V2a1 1 0 0 1 1-1h2v1H3v12h4v1H3a1 1 0 0 1-1-1V2.729zM14 5V2a1 1 0 0 0-1-1h-2v1h2v3h1zm-1 1h2v9H8V6h5V5H8a1 1 0 0 0-1 1v9a1 1 0 0 0 1 1h7a1 1 0 0 0 1-1V6a1 1 0 0 0-1-1h-2v1z"></path><path d="M9 10h5V9H9v1zm0-2h5V7H9v1zm0 4h5v-1H9v1zm0 2h5v-1H9v1zm2-12V1a1 1 0 0 0-1-1H6a1 1 0 0 0-1 1v1h1V1h4v1h1zM5 3h6V2H5v1z"></path></svg></button></span></div></div></div></div>
2. **Python**:
    
    
    - Python is pre-installed on Kali Linux. Verify by running: <div class="euiMarkdownFormat__codeblockWrapper"><div class="euiCodeBlock prismjs language-bash remark-prismjs--fenced css-1lecq5a-euiCodeBlock-m-hasControls"><div class="css-gb1zbv-euiScreenReaderOnly">  
        </div></div></div>```
        ✄𐘗```
        python3 --version
        ```
        ```
        
        <div class="euiMarkdownFormat__codeblockWrapper"><div class="euiCodeBlock prismjs language-bash remark-prismjs--fenced css-1lecq5a-euiCodeBlock-m-hasControls"><div class="euiCodeBlock__controls css-1wtdjjj-euiCodeBlock__controls-s"><div class="euiCodeBlock__copyButton"><span class="euiToolTipAnchor css-jcaat8-euiToolTipAnchor-inlineBlock"><button aria-label="Copy" class="euiButtonIcon css-sfdbbx-euiButtonIcon-xs-empty-text" data-test-subj="euiCodeBlockCopy" type="button"><svg aria-hidden="true" class="euiIcon euiButtonIcon__icon css-1kvegpu-euiIcon-m-inherit" height="16" role="img" viewbox="0 0 16 16" width="16" xmlns="http://www.w3.org/2000/svg"><path d="M2 2.729V2a1 1 0 0 1 1-1h2v1H3v12h4v1H3a1 1 0 0 1-1-1V2.729zM14 5V2a1 1 0 0 0-1-1h-2v1h2v3h1zm-1 1h2v9H8V6h5V5H8a1 1 0 0 0-1 1v9a1 1 0 0 0 1 1h7a1 1 0 0 0 1-1V6a1 1 0 0 0-1-1h-2v1z"></path><path d="M9 10h5V9H9v1zm0-2h5V7H9v1zm0 4h5v-1H9v1zm0 2h5v-1H9v1zm2-12V1a1 1 0 0 0-1-1H6a1 1 0 0 0-1 1v1h1V1h4v1h1zM5 3h6V2H5v1z"></path></svg></button></span></div></div></div></div>
    - If not installed, use: <div class="euiMarkdownFormat__codeblockWrapper"><div class="euiCodeBlock prismjs language-bash remark-prismjs--fenced css-1lecq5a-euiCodeBlock-m-hasControls"><div class="css-gb1zbv-euiScreenReaderOnly">  
        </div></div></div>```
        ✄𐘗```
        sudo apt update
        sudo apt install python3
        ```
        ```
        
        <div class="euiMarkdownFormat__codeblockWrapper"><div class="euiCodeBlock prismjs language-bash remark-prismjs--fenced css-1lecq5a-euiCodeBlock-m-hasControls"><div class="euiCodeBlock__controls css-1wtdjjj-euiCodeBlock__controls-s"><div class="euiCodeBlock__copyButton"><span class="euiToolTipAnchor css-jcaat8-euiToolTipAnchor-inlineBlock"><button aria-label="Copy" class="euiButtonIcon css-sfdbbx-euiButtonIcon-xs-empty-text" data-test-subj="euiCodeBlockCopy" type="button"><svg aria-hidden="true" class="euiIcon euiButtonIcon__icon css-1kvegpu-euiIcon-m-inherit" height="16" role="img" viewbox="0 0 16 16" width="16" xmlns="http://www.w3.org/2000/svg"><path d="M2 2.729V2a1 1 0 0 1 1-1h2v1H3v12h4v1H3a1 1 0 0 1-1-1V2.729zM14 5V2a1 1 0 0 0-1-1h-2v1h2v3h1zm-1 1h2v9H8V6h5V5H8a1 1 0 0 0-1 1v9a1 1 0 0 0 1 1h7a1 1 0 0 0 1-1V6a1 1 0 0 0-1-1h-2v1z"></path><path d="M9 10h5V9H9v1zm0-2h5V7H9v1zm0 4h5v-1H9v1zm0 2h5v-1H9v1zm2-12V1a1 1 0 0 0-1-1H6a1 1 0 0 0-1 1v1h1V1h4v1h1zM5 3h6V2H5v1z"></path></svg></button></span></div></div></div></div>
3. **Python Libraries**:
    
    
    - Install the `PyJWT` library for generating JWTs: <div class="euiMarkdownFormat__codeblockWrapper"><div class="euiCodeBlock prismjs language-bash remark-prismjs--fenced css-1lecq5a-euiCodeBlock-m-hasControls"><div class="css-gb1zbv-euiScreenReaderOnly">  
        </div></div></div>```
        ✄𐘗```
        pip3 install pyjwt
        ```
        ```
        
        <div class="euiMarkdownFormat__codeblockWrapper"><div class="euiCodeBlock prismjs language-bash remark-prismjs--fenced css-1lecq5a-euiCodeBlock-m-hasControls"><div class="euiCodeBlock__controls css-1wtdjjj-euiCodeBlock__controls-s"><div class="euiCodeBlock__copyButton"><span class="euiToolTipAnchor css-jcaat8-euiToolTipAnchor-inlineBlock"><button aria-label="Copy" class="euiButtonIcon css-sfdbbx-euiButtonIcon-xs-empty-text" data-test-subj="euiCodeBlockCopy" type="button"><svg aria-hidden="true" class="euiIcon euiButtonIcon__icon css-1kvegpu-euiIcon-m-inherit" height="16" role="img" viewbox="0 0 16 16" width="16" xmlns="http://www.w3.org/2000/svg"><path d="M2 2.729V2a1 1 0 0 1 1-1h2v1H3v12h4v1H3a1 1 0 0 1-1-1V2.729zM14 5V2a1 1 0 0 0-1-1h-2v1h2v3h1zm-1 1h2v9H8V6h5V5H8a1 1 0 0 0-1 1v9a1 1 0 0 0 1 1h7a1 1 0 0 0 1-1V6a1 1 0 0 0-1-1h-2v1z"></path><path d="M9 10h5V9H9v1zm0-2h5V7H9v1zm0 4h5v-1H9v1zm0 2h5v-1H9v1zm2-12V1a1 1 0 0 0-1-1H6a1 1 0 0 0-1 1v1h1V1h4v1h1zM5 3h6V2H5v1z"></path></svg></button></span></div></div></div></div>

---

### Step 2: Generate a Private-Public Key Pair

Use OpenSSL to generate the private and public keys:

1. **Generate Private Key**:
    
    <div class="euiMarkdownFormat__codeblockWrapper"><div class="euiCodeBlock prismjs language-bash remark-prismjs--fenced css-1lecq5a-euiCodeBlock-m-hasControls"><div class="css-gb1zbv-euiScreenReaderOnly">  
    </div></div></div>```
    ✄𐘗```
    openssl genrsa -out private.key 2048
    ```
    ```
    
    <div class="euiMarkdownFormat__codeblockWrapper"><div class="euiCodeBlock prismjs language-bash remark-prismjs--fenced css-1lecq5a-euiCodeBlock-m-hasControls"><div class="euiCodeBlock__controls css-1wtdjjj-euiCodeBlock__controls-s"><div class="euiCodeBlock__copyButton"><span class="euiToolTipAnchor css-jcaat8-euiToolTipAnchor-inlineBlock"><button aria-label="Copy" class="euiButtonIcon css-sfdbbx-euiButtonIcon-xs-empty-text" data-test-subj="euiCodeBlockCopy" type="button"><svg aria-hidden="true" class="euiIcon euiButtonIcon__icon css-1kvegpu-euiIcon-m-inherit" height="16" role="img" viewbox="0 0 16 16" width="16" xmlns="http://www.w3.org/2000/svg"><path d="M2 2.729V2a1 1 0 0 1 1-1h2v1H3v12h4v1H3a1 1 0 0 1-1-1V2.729zM14 5V2a1 1 0 0 0-1-1h-2v1h2v3h1zm-1 1h2v9H8V6h5V5H8a1 1 0 0 0-1 1v9a1 1 0 0 0 1 1h7a1 1 0 0 0 1-1V6a1 1 0 0 0-1-1h-2v1z"></path><path d="M9 10h5V9H9v1zm0-2h5V7H9v1zm0 4h5v-1H9v1zm0 2h5v-1H9v1zm2-12V1a1 1 0 0 0-1-1H6a1 1 0 0 0-1 1v1h1V1h4v1h1zM5 3h6V2H5v1z"></path></svg></button></span></div></div></div></div>
2. **Generate Public Key**:
    
    <div class="euiMarkdownFormat__codeblockWrapper"><div class="euiCodeBlock prismjs language-bash remark-prismjs--fenced css-1lecq5a-euiCodeBlock-m-hasControls"><div class="css-gb1zbv-euiScreenReaderOnly">  
    </div></div></div>```
    ✄𐘗```
    openssl rsa -in private.key -pubout -out public.key
    ```
    ```
    
    <div class="euiMarkdownFormat__codeblockWrapper"><div class="euiCodeBlock prismjs language-bash remark-prismjs--fenced css-1lecq5a-euiCodeBlock-m-hasControls"><div class="euiCodeBlock__controls css-1wtdjjj-euiCodeBlock__controls-s"><div class="euiCodeBlock__copyButton"><span class="euiToolTipAnchor css-jcaat8-euiToolTipAnchor-inlineBlock"><button aria-label="Copy" class="euiButtonIcon css-sfdbbx-euiButtonIcon-xs-empty-text" data-test-subj="euiCodeBlockCopy" type="button"><svg aria-hidden="true" class="euiIcon euiButtonIcon__icon css-1kvegpu-euiIcon-m-inherit" height="16" role="img" viewbox="0 0 16 16" width="16" xmlns="http://www.w3.org/2000/svg"><path d="M2 2.729V2a1 1 0 0 1 1-1h2v1H3v12h4v1H3a1 1 0 0 1-1-1V2.729zM14 5V2a1 1 0 0 0-1-1h-2v1h2v3h1zm-1 1h2v9H8V6h5V5H8a1 1 0 0 0-1 1v9a1 1 0 0 0 1 1h7a1 1 0 0 0 1-1V6a1 1 0 0 0-1-1h-2v1z"></path><path d="M9 10h5V9H9v1zm0-2h5V7H9v1zm0 4h5v-1H9v1zm0 2h5v-1H9v1zm2-12V1a1 1 0 0 0-1-1H6a1 1 0 0 0-1 1v1h1V1h4v1h1zM5 3h6V2H5v1z"></path></svg></button></span></div></div></div></div>
3. **Verify Keys**:
    
    
    - View the private key: <div class="euiMarkdownFormat__codeblockWrapper"><div class="euiCodeBlock prismjs language-bash remark-prismjs--fenced css-1lecq5a-euiCodeBlock-m-hasControls"><div class="css-gb1zbv-euiScreenReaderOnly">  
        </div></div></div>```
        ✄𐘗```
        cat private.key
        ```
        ```
        
        <div class="euiMarkdownFormat__codeblockWrapper"><div class="euiCodeBlock prismjs language-bash remark-prismjs--fenced css-1lecq5a-euiCodeBlock-m-hasControls"><div class="euiCodeBlock__controls css-1wtdjjj-euiCodeBlock__controls-s"><div class="euiCodeBlock__copyButton"><span class="euiToolTipAnchor css-jcaat8-euiToolTipAnchor-inlineBlock"><button aria-label="Copy" class="euiButtonIcon css-sfdbbx-euiButtonIcon-xs-empty-text" data-test-subj="euiCodeBlockCopy" type="button"><svg aria-hidden="true" class="euiIcon euiButtonIcon__icon css-1kvegpu-euiIcon-m-inherit" height="16" role="img" viewbox="0 0 16 16" width="16" xmlns="http://www.w3.org/2000/svg"><path d="M2 2.729V2a1 1 0 0 1 1-1h2v1H3v12h4v1H3a1 1 0 0 1-1-1V2.729zM14 5V2a1 1 0 0 0-1-1h-2v1h2v3h1zm-1 1h2v9H8V6h5V5H8a1 1 0 0 0-1 1v9a1 1 0 0 0 1 1h7a1 1 0 0 0 1-1V6a1 1 0 0 0-1-1h-2v1z"></path><path d="M9 10h5V9H9v1zm0-2h5V7H9v1zm0 4h5v-1H9v1zm0 2h5v-1H9v1zm2-12V1a1 1 0 0 0-1-1H6a1 1 0 0 0-1 1v1h1V1h4v1h1zM5 3h6V2H5v1z"></path></svg></button></span></div></div></div></div>
    - View the public key: <div class="euiMarkdownFormat__codeblockWrapper"><div class="euiCodeBlock prismjs language-bash remark-prismjs--fenced css-1lecq5a-euiCodeBlock-m-hasControls"><div class="css-gb1zbv-euiScreenReaderOnly">  
        </div></div></div>```
        ✄𐘗```
        cat public.key
        ```
        ```
        
        <div class="euiMarkdownFormat__codeblockWrapper"><div class="euiCodeBlock prismjs language-bash remark-prismjs--fenced css-1lecq5a-euiCodeBlock-m-hasControls"><div class="euiCodeBlock__controls css-1wtdjjj-euiCodeBlock__controls-s"><div class="euiCodeBlock__copyButton"><span class="euiToolTipAnchor css-jcaat8-euiToolTipAnchor-inlineBlock"><button aria-label="Copy" class="euiButtonIcon css-sfdbbx-euiButtonIcon-xs-empty-text" data-test-subj="euiCodeBlockCopy" type="button"><svg aria-hidden="true" class="euiIcon euiButtonIcon__icon css-1kvegpu-euiIcon-m-inherit" height="16" role="img" viewbox="0 0 16 16" width="16" xmlns="http://www.w3.org/2000/svg"><path d="M2 2.729V2a1 1 0 0 1 1-1h2v1H3v12h4v1H3a1 1 0 0 1-1-1V2.729zM14 5V2a1 1 0 0 0-1-1h-2v1h2v3h1zm-1 1h2v9H8V6h5V5H8a1 1 0 0 0-1 1v9a1 1 0 0 0 1 1h7a1 1 0 0 0 1-1V6a1 1 0 0 0-1-1h-2v1z"></path><path d="M9 10h5V9H9v1zm0-2h5V7H9v1zm0 4h5v-1H9v1zm0 2h5v-1H9v1zm2-12V1a1 1 0 0 0-1-1H6a1 1 0 0 0-1 1v1h1V1h4v1h1zM5 3h6V2H5v1z"></path></svg></button></span></div></div></div></div>
4. **Upload Public Key to Salesforce**:
    
    
    - Log in to Salesforce and navigate to **Setup** &gt; **App Manager** &gt; Select your Connected App &gt; **Edit Policies** &gt; Upload the public key under **Certificate and Key Management**.

---

### Step 3: Create the JWT Using Python

Use Python to generate the JWT. Below is the Python script:

#### Python Script (`generate_jwt.py`)

<div class="euiMarkdownFormat__codeblockWrapper" id="bkmrk-python-code-block%3A"><div class="euiCodeBlock prismjs language-python remark-prismjs--fenced css-1lecq5a-euiCodeBlock-m-hasControls"><div class="css-gb1zbv-euiScreenReaderOnly">python code block:</div></div></div>```
✄𐘗```
import jwt
import time

# Define the private key
private_key = """
-----BEGIN RSA PRIVATE KEY-----
YOUR_PRIVATE_KEY_HERE
-----END RSA PRIVATE KEY-----
"""

# Define the JWT payload
payload = {
    "iss": "YOUR_CONSUMER_KEY",  # Consumer Key from Salesforce Connected App
    "sub": "YOUR_SALESFORCE_USERNAME",  # Salesforce username
    "aud": "https://login.salesforce.com",  # Use https://test.salesforce.com for sandbox
    "exp": int(time.time()) + 300  # Token expiration time (5 minutes from now)
}

# Generate the JWT
token = jwt.encode(payload, private_key, algorithm="RS256")
print("Generated JWT:")
print(token)
```
```

<div class="euiMarkdownFormat__codeblockWrapper" id="bkmrk--3"><div class="euiCodeBlock prismjs language-python remark-prismjs--fenced css-1lecq5a-euiCodeBlock-m-hasControls"><div class="euiCodeBlock__controls css-1wtdjjj-euiCodeBlock__controls-s"><div class="euiCodeBlock__copyButton"><span class="euiToolTipAnchor css-jcaat8-euiToolTipAnchor-inlineBlock"><button aria-label="Copy" class="euiButtonIcon css-sfdbbx-euiButtonIcon-xs-empty-text" data-test-subj="euiCodeBlockCopy" type="button"><svg aria-hidden="true" class="euiIcon euiButtonIcon__icon css-1kvegpu-euiIcon-m-inherit" height="16" role="img" viewbox="0 0 16 16" width="16" xmlns="http://www.w3.org/2000/svg"><path d="M2 2.729V2a1 1 0 0 1 1-1h2v1H3v12h4v1H3a1 1 0 0 1-1-1V2.729zM14 5V2a1 1 0 0 0-1-1h-2v1h2v3h1zm-1 1h2v9H8V6h5V5H8a1 1 0 0 0-1 1v9a1 1 0 0 0 1 1h7a1 1 0 0 0 1-1V6a1 1 0 0 0-1-1h-2v1z"></path><path d="M9 10h5V9H9v1zm0-2h5V7H9v1zm0 4h5v-1H9v1zm0 2h5v-1H9v1zm2-12V1a1 1 0 0 0-1-1H6a1 1 0 0 0-1 1v1h1V1h4v1h1zM5 3h6V2H5v1z"></path></svg></button></span></div></div></div></div>#### Steps to Run the Script

1. Save the script as `generate_jwt.py`.
2. Run the script: <div class="euiMarkdownFormat__codeblockWrapper"><div class="euiCodeBlock prismjs language-bash remark-prismjs--fenced css-1lecq5a-euiCodeBlock-m-hasControls"><div class="css-gb1zbv-euiScreenReaderOnly">  
    </div></div></div>```
    ✄𐘗```
    python3 generate_jwt.py
    ```
    ```
    
    <div class="euiMarkdownFormat__codeblockWrapper"><div class="euiCodeBlock prismjs language-bash remark-prismjs--fenced css-1lecq5a-euiCodeBlock-m-hasControls"><div class="euiCodeBlock__controls css-1wtdjjj-euiCodeBlock__controls-s"><div class="euiCodeBlock__copyButton"><span class="euiToolTipAnchor css-jcaat8-euiToolTipAnchor-inlineBlock"><button aria-label="Copy" class="euiButtonIcon css-sfdbbx-euiButtonIcon-xs-empty-text" data-test-subj="euiCodeBlockCopy" type="button"><svg aria-hidden="true" class="euiIcon euiButtonIcon__icon css-1kvegpu-euiIcon-m-inherit" height="16" role="img" viewbox="0 0 16 16" width="16" xmlns="http://www.w3.org/2000/svg"><path d="M2 2.729V2a1 1 0 0 1 1-1h2v1H3v12h4v1H3a1 1 0 0 1-1-1V2.729zM14 5V2a1 1 0 0 0-1-1h-2v1h2v3h1zm-1 1h2v9H8V6h5V5H8a1 1 0 0 0-1 1v9a1 1 0 0 0 1 1h7a1 1 0 0 0 1-1V6a1 1 0 0 0-1-1h-2v1z"></path><path d="M9 10h5V9H9v1zm0-2h5V7H9v1zm0 4h5v-1H9v1zm0 2h5v-1H9v1zm2-12V1a1 1 0 0 0-1-1H6a1 1 0 0 0-1 1v1h1V1h4v1h1zM5 3h6V2H5v1z"></path></svg></button></span></div></div></div></div>
3. The script will output the JWT token.

---

### Step 4: Use the JWT to Obtain an Access Token

Send the JWT to Salesforce using `curl` to obtain an access token.

#### Example Command

<div class="euiMarkdownFormat__codeblockWrapper" id="bkmrk--5"><div class="euiCodeBlock prismjs language-bash remark-prismjs--fenced css-1lecq5a-euiCodeBlock-m-hasControls"><div class="css-gb1zbv-euiScreenReaderOnly">  
</div></div></div>```
✄𐘗```
curl -X POST https://login.salesforce.com/services/oauth2/token \
  -d "grant_type=urn:ietf:params:oauth:grant-type:jwt-bearer" \
  -d "assertion=YOUR_JWT"
```
```

<div class="euiMarkdownFormat__codeblockWrapper" id="bkmrk--6"><div class="euiCodeBlock prismjs language-bash remark-prismjs--fenced css-1lecq5a-euiCodeBlock-m-hasControls"><div class="euiCodeBlock__controls css-1wtdjjj-euiCodeBlock__controls-s"><div class="euiCodeBlock__copyButton"><span class="euiToolTipAnchor css-jcaat8-euiToolTipAnchor-inlineBlock"><button aria-label="Copy" class="euiButtonIcon css-sfdbbx-euiButtonIcon-xs-empty-text" data-test-subj="euiCodeBlockCopy" type="button"><svg aria-hidden="true" class="euiIcon euiButtonIcon__icon css-1kvegpu-euiIcon-m-inherit" height="16" role="img" viewbox="0 0 16 16" width="16" xmlns="http://www.w3.org/2000/svg"><path d="M2 2.729V2a1 1 0 0 1 1-1h2v1H3v12h4v1H3a1 1 0 0 1-1-1V2.729zM14 5V2a1 1 0 0 0-1-1h-2v1h2v3h1zm-1 1h2v9H8V6h5V5H8a1 1 0 0 0-1 1v9a1 1 0 0 0 1 1h7a1 1 0 0 0 1-1V6a1 1 0 0 0-1-1h-2v1z"></path><path d="M9 10h5V9H9v1zm0-2h5V7H9v1zm0 4h5v-1H9v1zm0 2h5v-1H9v1zm2-12V1a1 1 0 0 0-1-1H6a1 1 0 0 0-1 1v1h1V1h4v1h1zM5 3h6V2H5v1z"></path></svg></button></span></div></div></div></div>Replace `YOUR_JWT` with the JWT generated in the previous step.

#### Example Response

<div class="euiMarkdownFormat__codeblockWrapper" id="bkmrk-json-code-block%3A"><div class="euiCodeBlock prismjs language-json remark-prismjs--fenced css-1lecq5a-euiCodeBlock-m-hasControls"><div class="css-gb1zbv-euiScreenReaderOnly">json code block:</div></div></div>```
✄𐘗```
{
  "access_token": "00Dxx0000000000!AQEAQI...",
  "instance_url": "https://yourInstance.salesforce.com",
  "id": "https://login.salesforce.com/id/00Dxx0000000000/005xx000001Sv6e",
  "token_type": "Bearer",
  "issued_at": "1693142400",
  "signature": "abcdef123456..."
}
```
```

<div class="euiMarkdownFormat__codeblockWrapper" id="bkmrk--7"><div class="euiCodeBlock prismjs language-json remark-prismjs--fenced css-1lecq5a-euiCodeBlock-m-hasControls"><div class="euiCodeBlock__controls css-1wtdjjj-euiCodeBlock__controls-s"><div class="euiCodeBlock__copyButton"><span class="euiToolTipAnchor css-jcaat8-euiToolTipAnchor-inlineBlock"><button aria-label="Copy" class="euiButtonIcon css-sfdbbx-euiButtonIcon-xs-empty-text" data-test-subj="euiCodeBlockCopy" type="button"><svg aria-hidden="true" class="euiIcon euiButtonIcon__icon css-1kvegpu-euiIcon-m-inherit" height="16" role="img" viewbox="0 0 16 16" width="16" xmlns="http://www.w3.org/2000/svg"><path d="M2 2.729V2a1 1 0 0 1 1-1h2v1H3v12h4v1H3a1 1 0 0 1-1-1V2.729zM14 5V2a1 1 0 0 0-1-1h-2v1h2v3h1zm-1 1h2v9H8V6h5V5H8a1 1 0 0 0-1 1v9a1 1 0 0 0 1 1h7a1 1 0 0 0 1-1V6a1 1 0 0 0-1-1h-2v1z"></path><path d="M9 10h5V9H9v1zm0-2h5V7H9v1zm0 4h5v-1H9v1zm0 2h5v-1H9v1zm2-12V1a1 1 0 0 0-1-1H6a1 1 0 0 0-1 1v1h1V1h4v1h1zM5 3h6V2H5v1z"></path></svg></button></span></div></div></div></div>---

### Step 5: Use the Access Token

Use the `access_token` to make authenticated API requests to Salesforce.

#### Example API Request

<div class="euiMarkdownFormat__codeblockWrapper" id="bkmrk--9"><div class="euiCodeBlock prismjs language-bash remark-prismjs--fenced css-1lecq5a-euiCodeBlock-m-hasControls"><div class="css-gb1zbv-euiScreenReaderOnly">  
</div></div></div>```
✄𐘗```
curl -H "Authorization: Bearer YOUR_ACCESS_TOKEN" \
     https://yourInstance.salesforce.com/services/data/v57.0/sobjects/Account
```
```

<div class="euiMarkdownFormat__codeblockWrapper" id="bkmrk--10"><div class="euiCodeBlock prismjs language-bash remark-prismjs--fenced css-1lecq5a-euiCodeBlock-m-hasControls"><div class="euiCodeBlock__controls css-1wtdjjj-euiCodeBlock__controls-s"><div class="euiCodeBlock__copyButton"><span class="euiToolTipAnchor css-jcaat8-euiToolTipAnchor-inlineBlock"><button aria-label="Copy" class="euiButtonIcon css-sfdbbx-euiButtonIcon-xs-empty-text" data-test-subj="euiCodeBlockCopy" type="button"><svg aria-hidden="true" class="euiIcon euiButtonIcon__icon css-1kvegpu-euiIcon-m-inherit" height="16" role="img" viewbox="0 0 16 16" width="16" xmlns="http://www.w3.org/2000/svg"><path d="M2 2.729V2a1 1 0 0 1 1-1h2v1H3v12h4v1H3a1 1 0 0 1-1-1V2.729zM14 5V2a1 1 0 0 0-1-1h-2v1h2v3h1zm-1 1h2v9H8V6h5V5H8a1 1 0 0 0-1 1v9a1 1 0 0 0 1 1h7a1 1 0 0 0 1-1V6a1 1 0 0 0-1-1h-2v1z"></path><path d="M9 10h5V9H9v1zm0-2h5V7H9v1zm0 4h5v-1H9v1zm0 2h5v-1H9v1zm2-12V1a1 1 0 0 0-1-1H6a1 1 0 0 0-1 1v1h1V1h4v1h1zM5 3h6V2H5v1z"></path></svg></button></span></div></div></div></div>---

### Troubleshooting

1. **Invalid Grant Error**:
    
    
    - Ensure the `sub` field matches the Salesforce username.
    - Ensure the `aud` field matches the correct Salesforce environment (`login.salesforce.com` or `test.salesforce.com`).
2. **Expired Token**:
    
    
    - Ensure the `exp` field is set to a future time (e.g., 5 minutes from now).
3. **Invalid Signature**:
    
    
    - Ensure the private key matches the public key uploaded to Salesforce.
4. **Debugging**:
    
    
    - Use verbose mode in `curl` to debug: <div class="euiMarkdownFormat__codeblockWrapper"><div class="euiCodeBlock prismjs language-bash remark-prismjs--fenced css-1lecq5a-euiCodeBlock-m-hasControls"><div class="css-gb1zbv-euiScreenReaderOnly">  
        </div></div></div>```
        ✄𐘗```
        curl -v -X POST https://login.salesforce.com/services/oauth2/token \
          -d "grant_type=urn:ietf:params:oauth:grant-type:jwt-bearer" \
          -d "assertion=YOUR_JWT"
        ```
        ```
        
        <div class="euiMarkdownFormat__codeblockWrapper"><div class="euiCodeBlock prismjs language-bash remark-prismjs--fenced css-1lecq5a-euiCodeBlock-m-hasControls"><div class="euiCodeBlock__controls css-1wtdjjj-euiCodeBlock__controls-s"><div class="euiCodeBlock__copyButton"><span class="euiToolTipAnchor css-jcaat8-euiToolTipAnchor-inlineBlock"><button aria-label="Copy" class="euiButtonIcon css-sfdbbx-euiButtonIcon-xs-empty-text" data-test-subj="euiCodeBlockCopy" type="button"><svg aria-hidden="true" class="euiIcon euiButtonIcon__icon css-1kvegpu-euiIcon-m-inherit" height="16" role="img" viewbox="0 0 16 16" width="16" xmlns="http://www.w3.org/2000/svg"><path d="M2 2.729V2a1 1 0 0 1 1-1h2v1H3v12h4v1H3a1 1 0 0 1-1-1V2.729zM14 5V2a1 1 0 0 0-1-1h-2v1h2v3h1zm-1 1h2v9H8V6h5V5H8a1 1 0 0 0-1 1v9a1 1 0 0 0 1 1h7a1 1 0 0 0 1-1V6a1 1 0 0 0-1-1h-2v1z"></path><path d="M9 10h5V9H9v1zm0-2h5V7H9v1zm0 4h5v-1H9v1zm0 2h5v-1H9v1zm2-12V1a1 1 0 0 0-1-1H6a1 1 0 0 0-1 1v1h1V1h4v1h1zM5 3h6V2H5v1z"></path></svg></button></span></div></div></div></div>

---

### Additional Resources

- [Salesforce JWT Bearer Token Flow<svg aria-hidden="true" class="euiIcon css-1mv5qmp-euiIcon-s" height="16" role="presentation" viewbox="0 0 16 16" width="16" xmlns="http://www.w3.org/2000/svg"><path d="M11 2h2.293L6.646 8.646l.708.708L14 2.707V5h1V1h-4v1Z"></path><path d="M3 2a1 1 0 0 0-1 1v10a1 1 0 0 0 1 1h10a1 1 0 0 0 1-1V7h-1v6H3V3h6V2H3Z"></path></svg><span class="css-gb1zbv-euiScreenReaderOnly">(external, opens in a new tab or window)</span>](https://help.salesforce.com/s/articleView?id=sf.remoteaccess_oauth_jwt_flow.htm&type=5)
- [PyJWT Documentation<svg aria-hidden="true" class="euiIcon css-1mv5qmp-euiIcon-s" height="16" role="presentation" viewbox="0 0 16 16" width="16" xmlns="http://www.w3.org/2000/svg"><path d="M11 2h2.293L6.646 8.646l.708.708L14 2.707V5h1V1h-4v1Z"></path><path d="M3 2a1 1 0 0 0-1 1v10a1 1 0 0 0 1 1h10a1 1 0 0 0 1-1V7h-1v6H3V3h6V2H3Z"></path></svg><span class="css-gb1zbv-euiScreenReaderOnly">(external, opens in a new tab or window)</span>](https://pyjwt.readthedocs.io/)
- [OpenSSL Documentation<svg aria-hidden="true" class="euiIcon css-1mv5qmp-euiIcon-s" height="16" role="presentation" viewbox="0 0 16 16" width="16" xmlns="http://www.w3.org/2000/svg"><path d="M11 2h2.293L6.646 8.646l.708.708L14 2.707V5h1V1h-4v1Z"></path><path d="M3 2a1 1 0 0 0-1 1v10a1 1 0 0 0 1 1h10a1 1 0 0 0 1-1V7h-1v6H3V3h6V2H3Z"></path></svg><span class="css-gb1zbv-euiScreenReaderOnly">(external, opens in a new tab or window)</span>](https://www.openssl.org/docs/)

Let me know if you need further assistance!

# ManageEngine

# Log Forwarder

EventLog Analyzer's Syslog Forwarder transmits logs from various sources to a destination server. Logs from syslog devices are forwarded as raw logs, whereas logs from other sources are converted to specific formats such as JSON, RFC 5424, RFC 5424 With Structured Data, and RFC 3164, or a custom format, and then forwarded to the destination server.

## <span style="color: rgb(53, 152, 219);">Steps to start forwarding logs</span>

#### <span style="color: rgb(53, 152, 219);">Creating a new profile</span>

1. Navigate to **Settings → Admin Settings → Integrations → Log Forwarding**.
2. To add a new forwarder profile, click on Add New Profile on the top right corner of the page.
3. Enter the **Forwarder Name**.
4. Enter the **Destination Server** to which the logs have to be forwarded to.
5. Select the required **Protocol**, either **UDP** or **TCP** from the drop down.
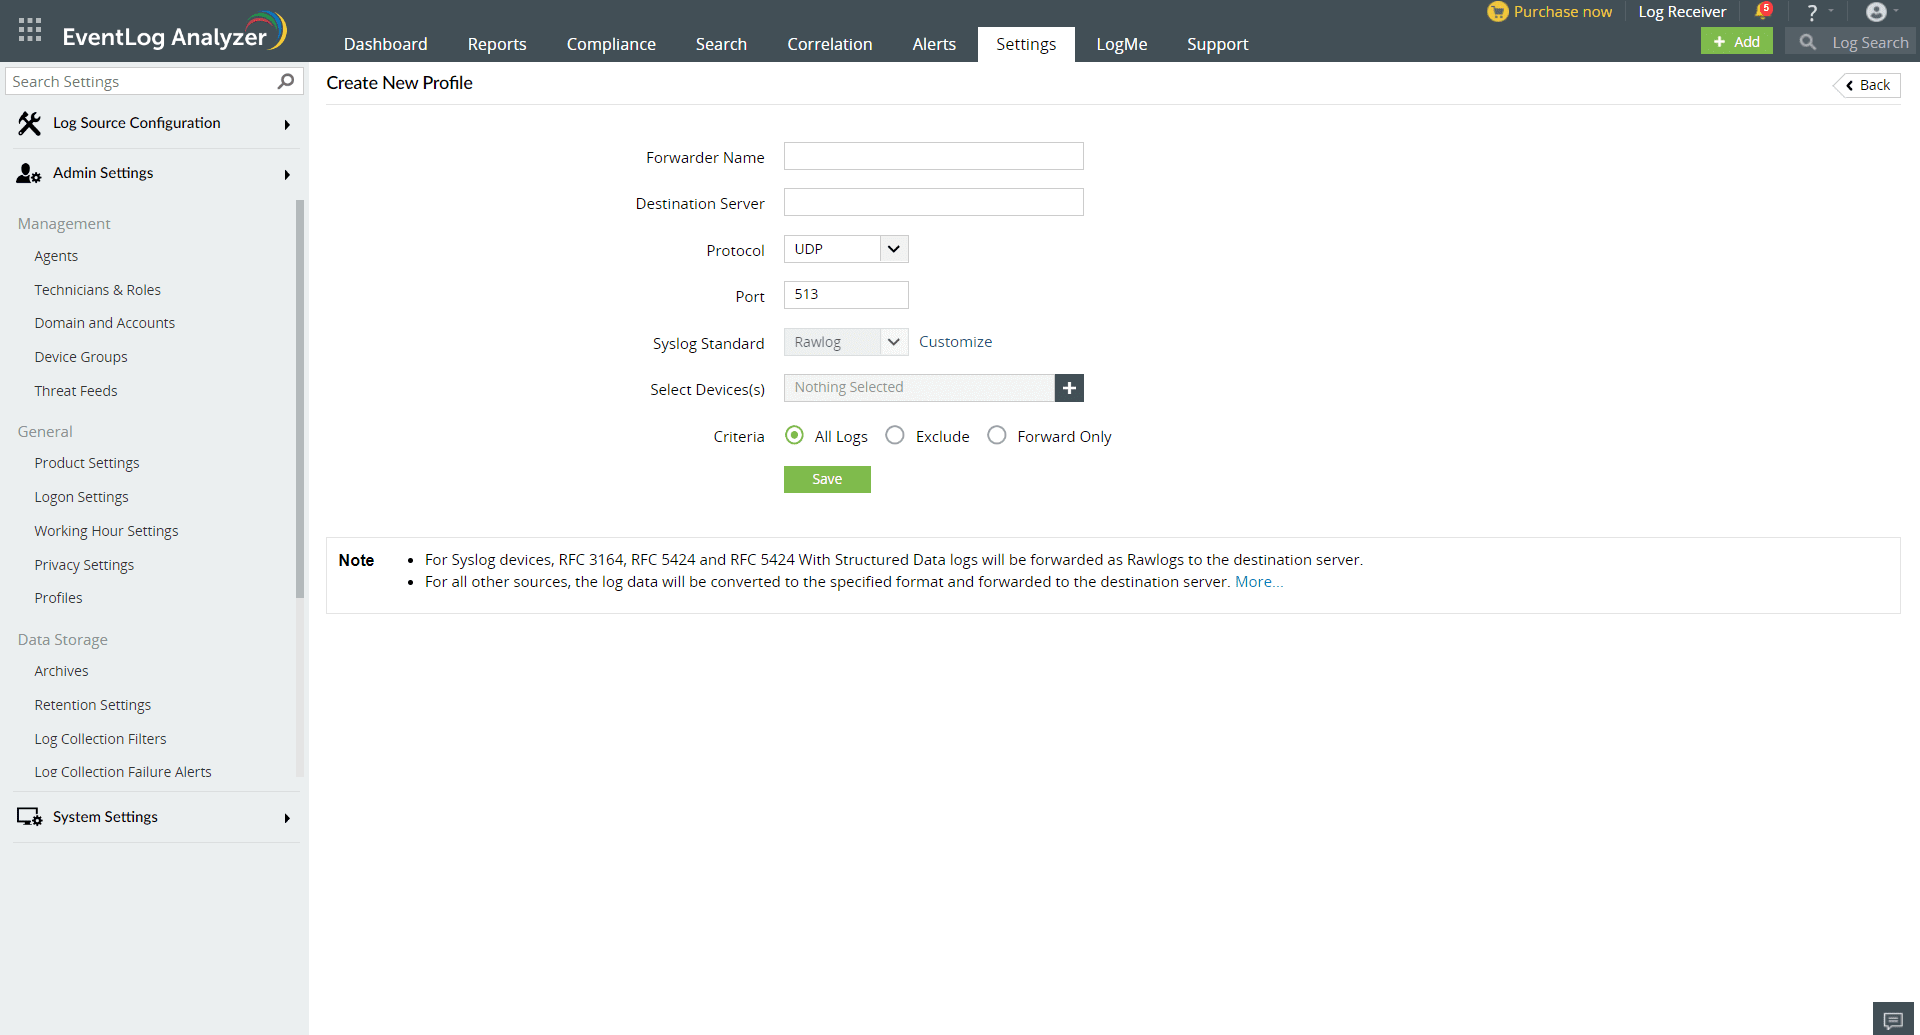
![Log Forwarder](https://www.manageengine.com/products/eventlog/help/images/log-forwarder.png)

1. Enter the **Port** number. The default port number is 513.
2. Select the required **Syslog Standard** by clicking on **Customize**. The formats include Rawlog, JSON, RFC 5424, RFC 5424 With Structured Data, RFC 3164 and Custom.
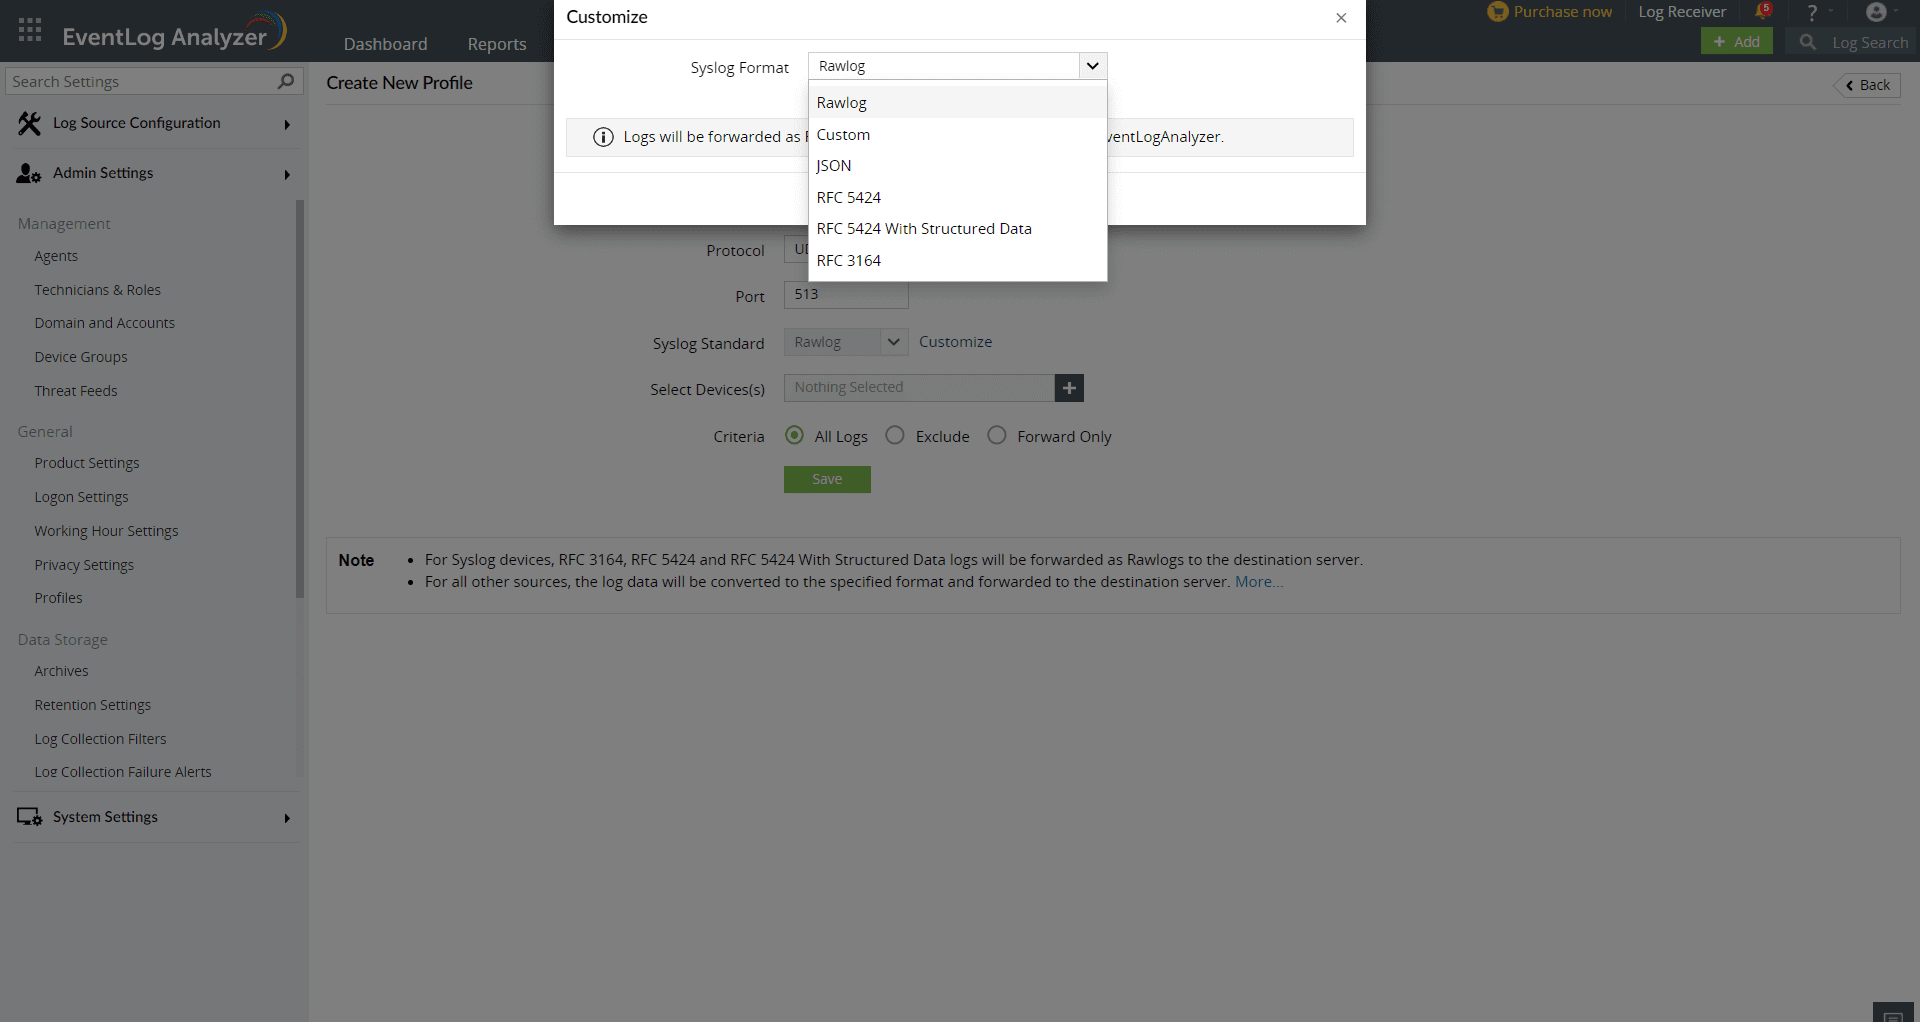
![Log Forwarder](https://www.manageengine.com/products/eventlog/help/images/log-forwarder-01.png)

1. Select the required format and click **Save**.
2. To create a custom Syslog Format, select **Custom** from the drop-down.

- Enter the **Syslog Format**.
- Enter the **Syslog Message Structure**.
- Enable **Additional Log Fields**.
- Enter the **Timestamp Format**.
- Click **Save**.
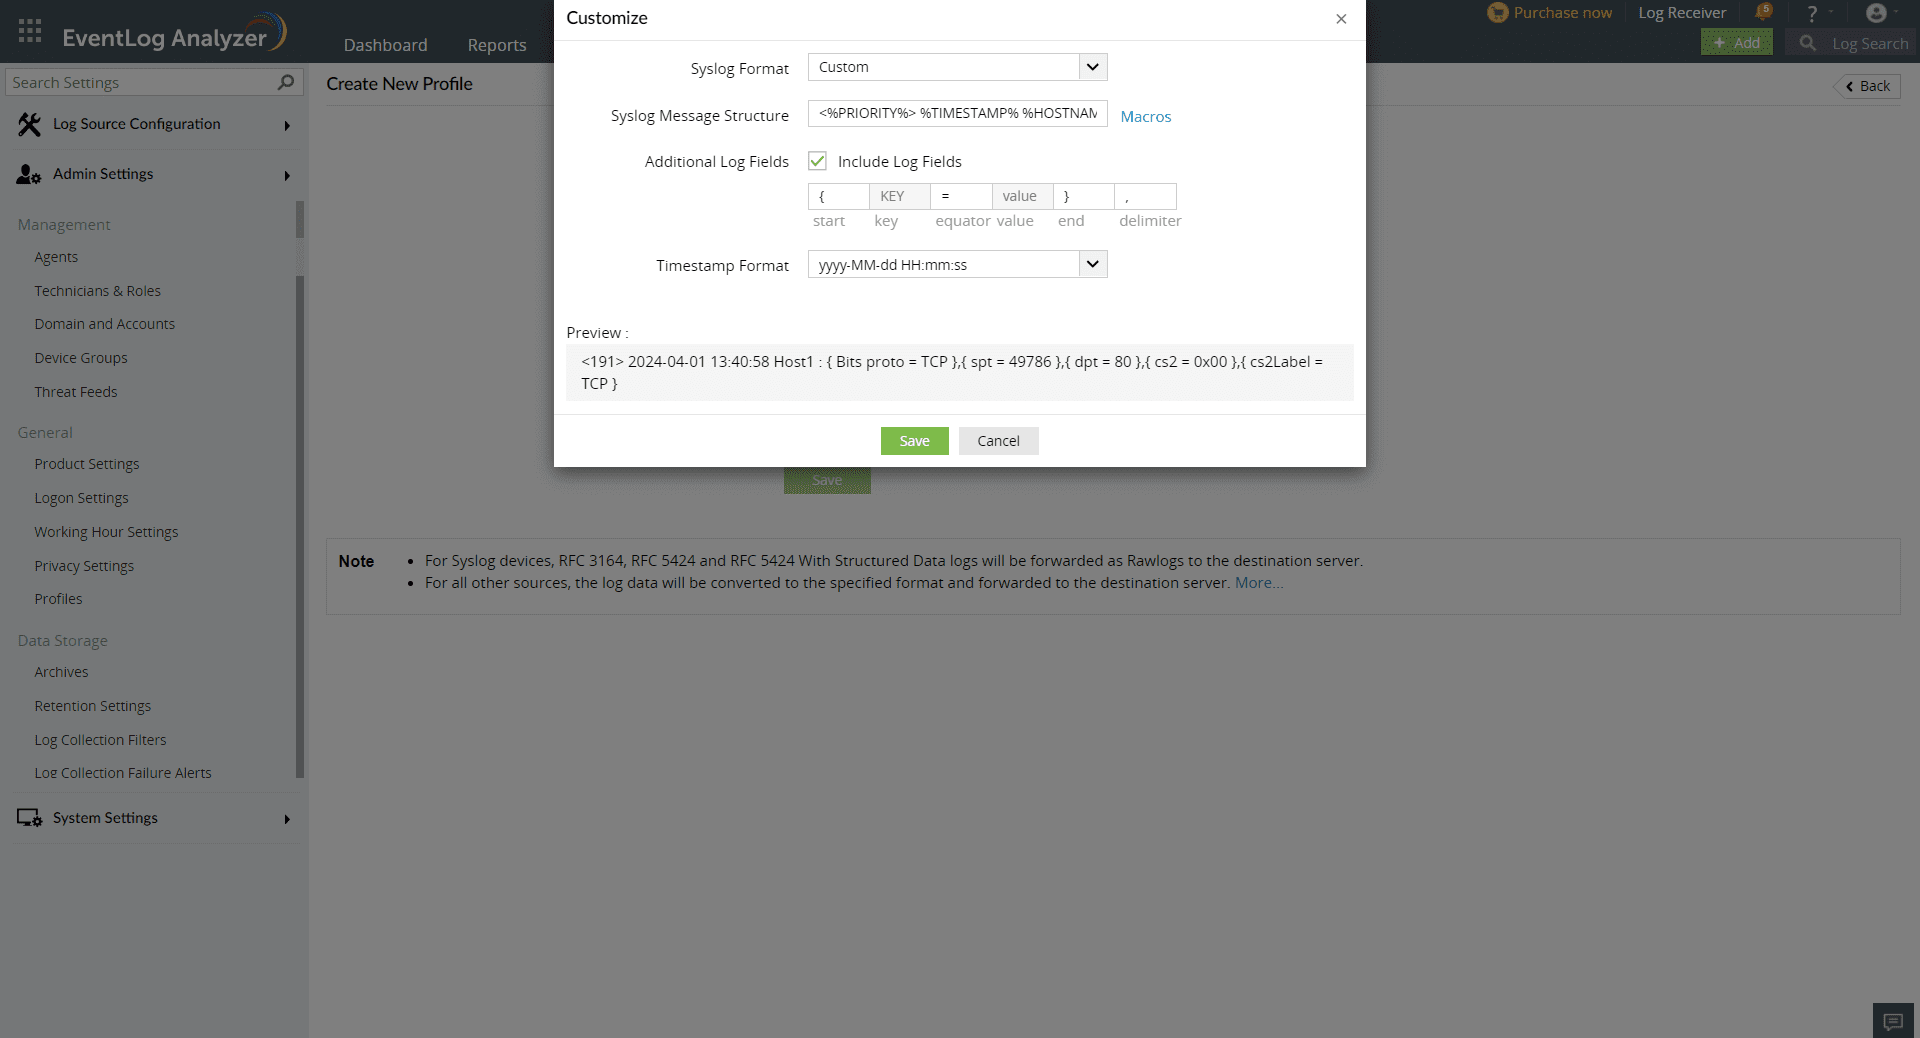
![Log Forwarder](https://www.manageengine.com/products/eventlog/help/images/log-forwarder-02.png)

1. Under **Select Devices**, add the source devices from which logs have to be fetched.
2. Select the required **Criteria**.

- **All logs** - It forwards all incoming logs.
- **Exclude** - It excludes specific logs based on the given criteria before forwarding.
- **Forward Only** - It forwards only specific logs based on the given criteria.
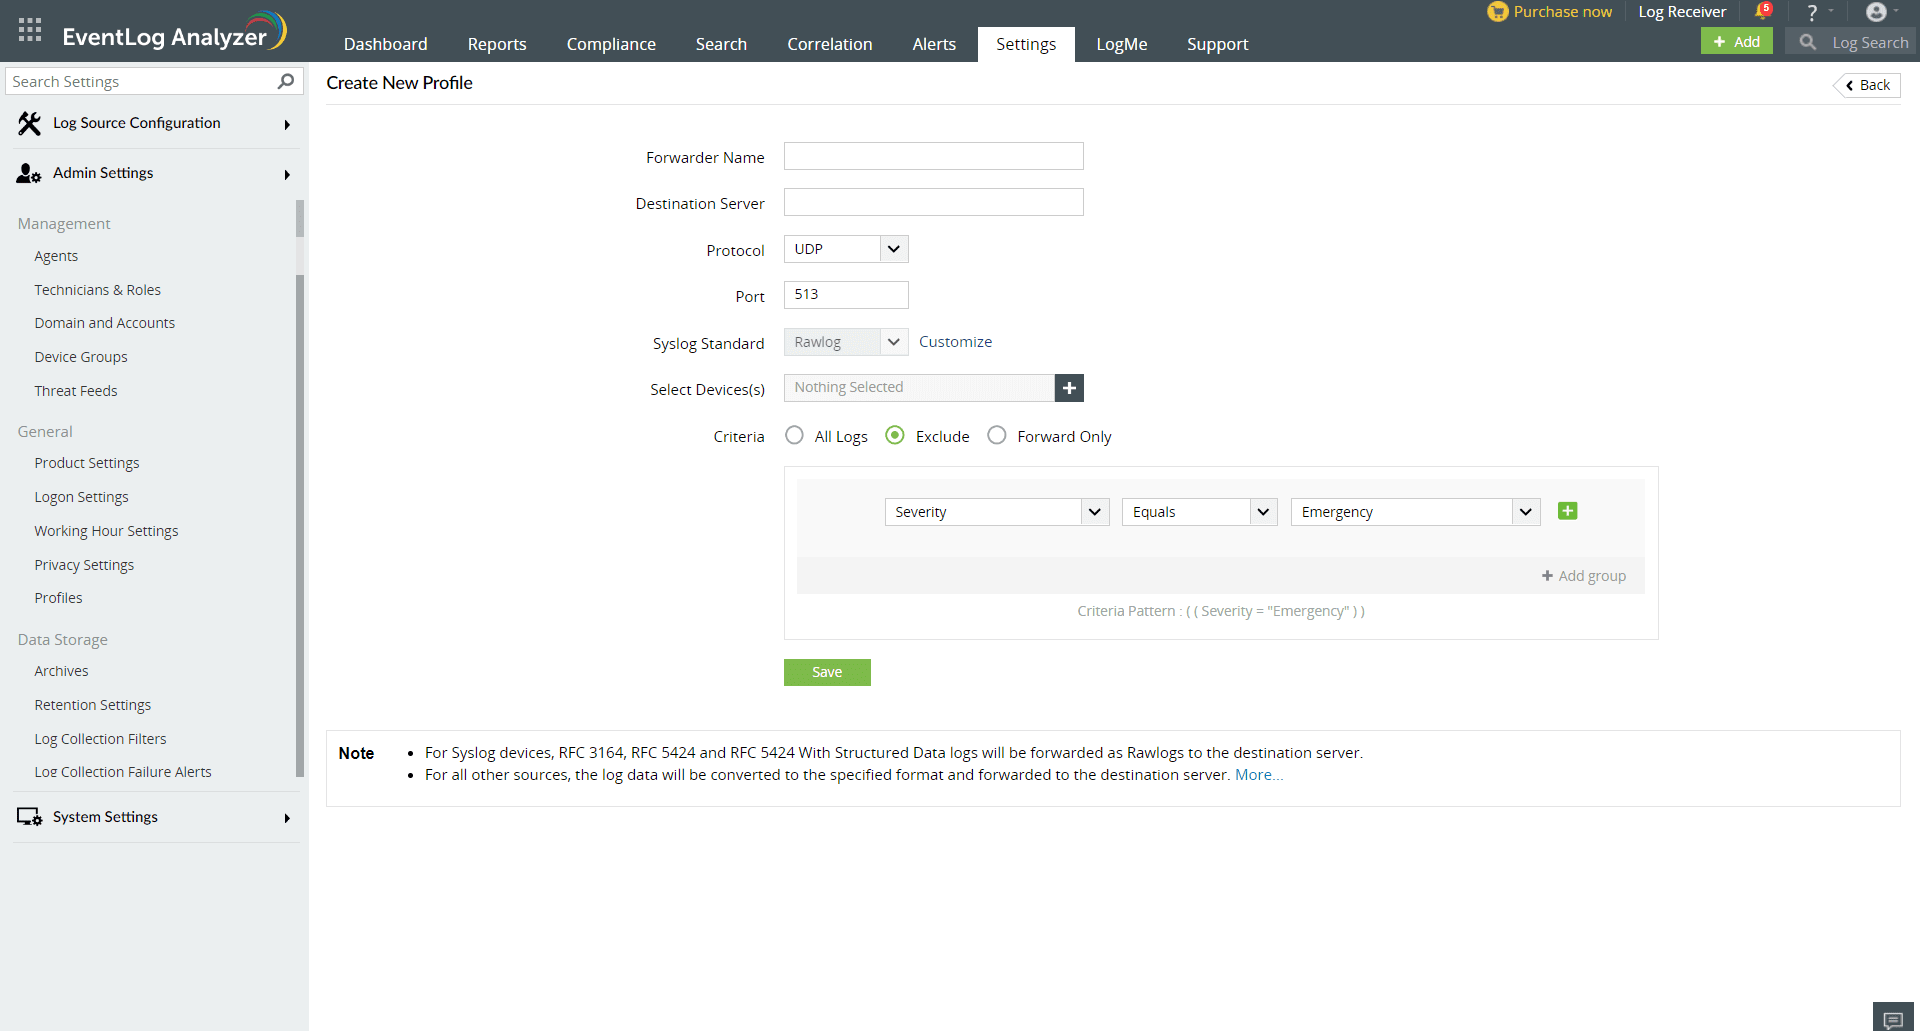
![Log Forwarder](https://www.manageengine.com/products/eventlog/help/images/log-forwarder-03.png)

1. Click **Save**.

#### <span style="color: rgb(53, 152, 219);">Updating an existing profile</span>

1. Navigate to **Settings → Admin Settings → Integrations → Log Forwarding**.
2. Click on the **Update Profile** icon on the profile that has to be updated.
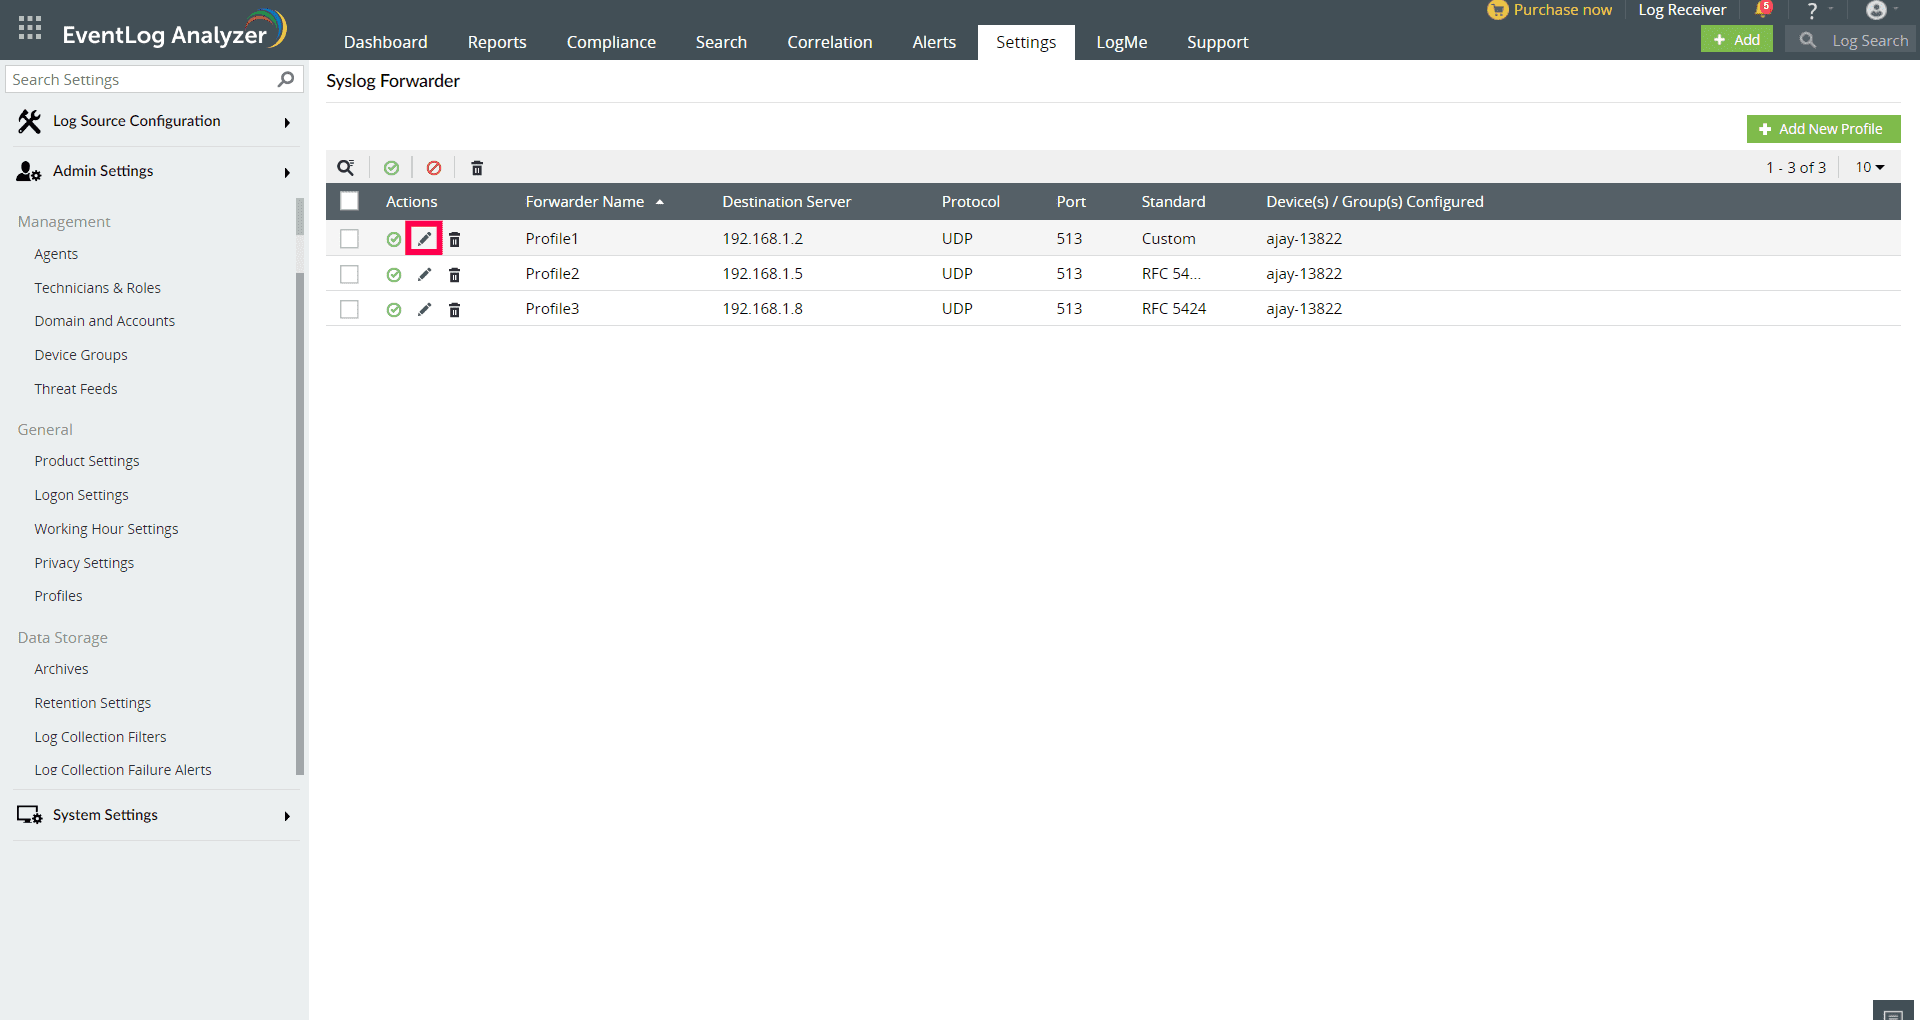
![Log Forwarder](https://www.manageengine.com/products/eventlog/help/images/log-forwarder-04.png)

1. The **Forwarder Name** would already exist here.
2. Refer to [steps 4 to 11](https://www.manageengine.com/products/eventlog/help/StandaloneManagedServer-UserGuide/Configurations/log-forwarder.html#step4) under Creating a new profile.
3. Click **Update**.
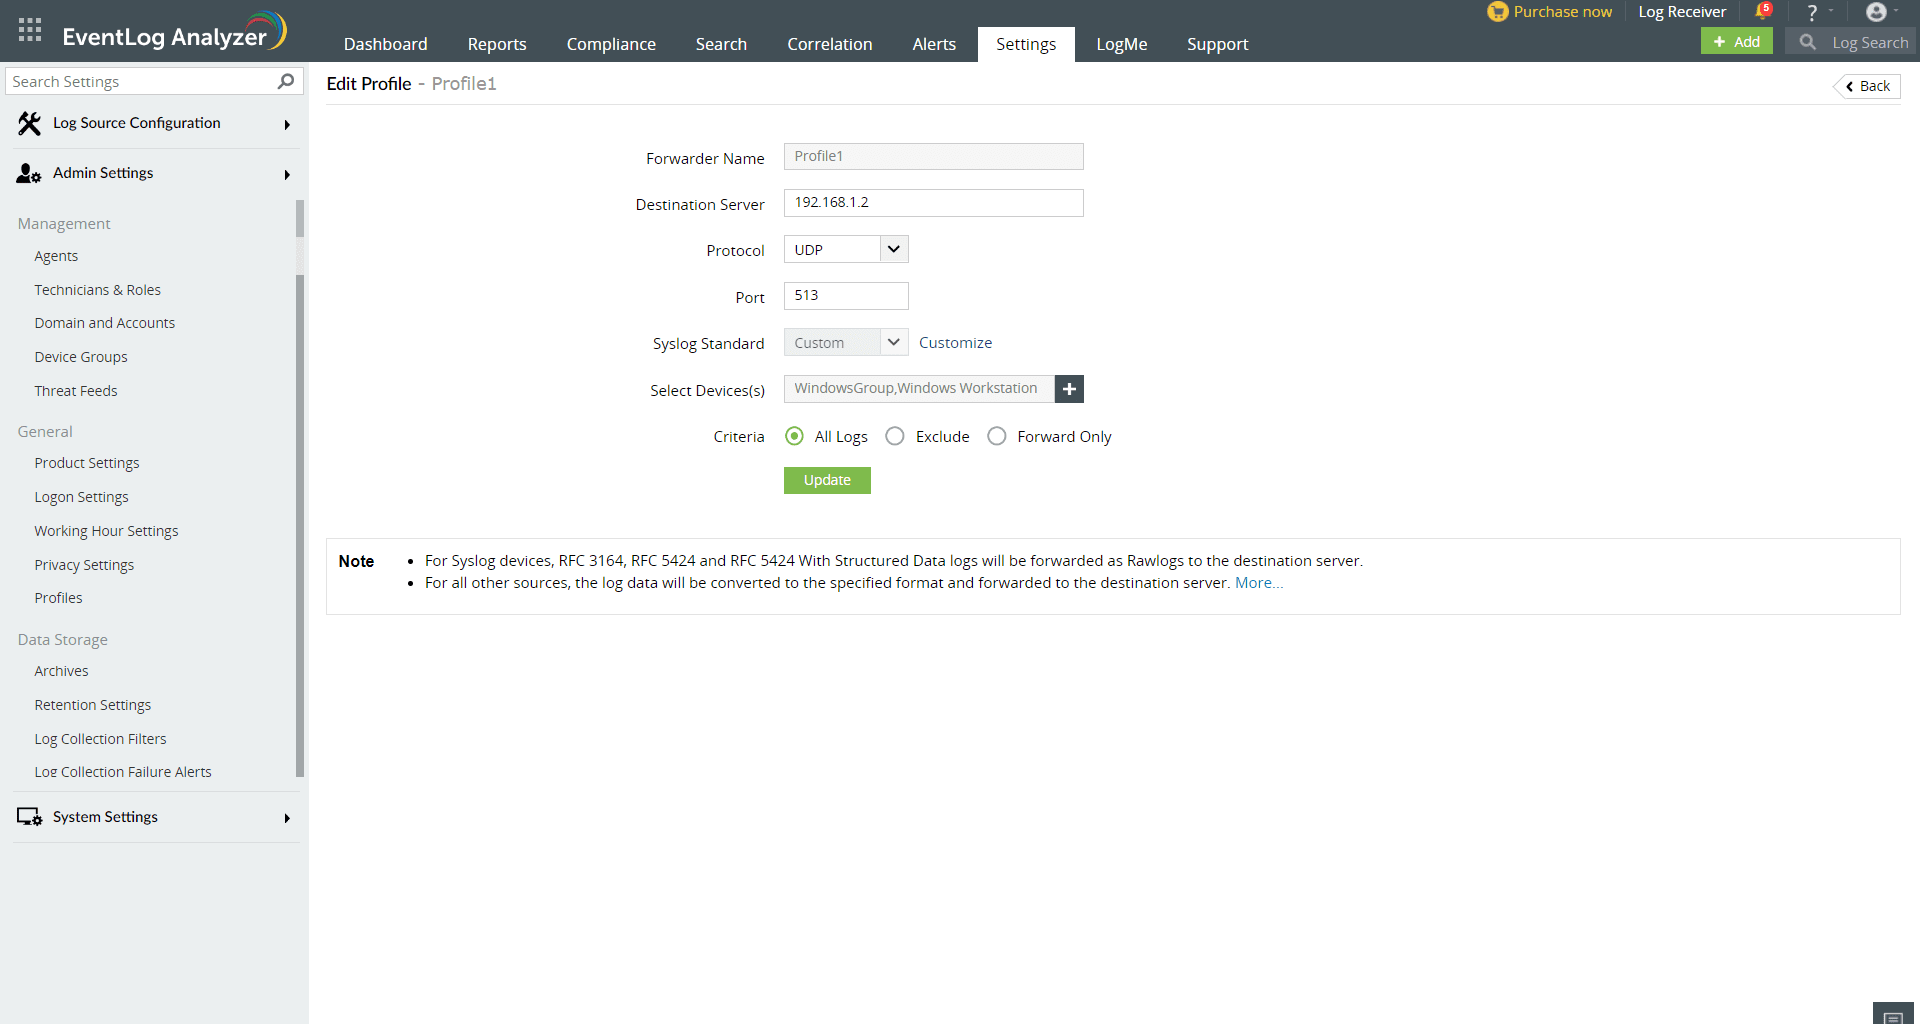
![Log Forwarder](https://www.manageengine.com/products/eventlog/help/images/log-forwarder-05.png)

#### <span style="color: rgb(53, 152, 219);">Managing forwarder profiles</span>

EventLog Analyzer allows you to create up to 5 distinct profiles to enable seamless log forwarding. The profile dashboard allows you to enable, disable, update and delete the forwarder profiles.
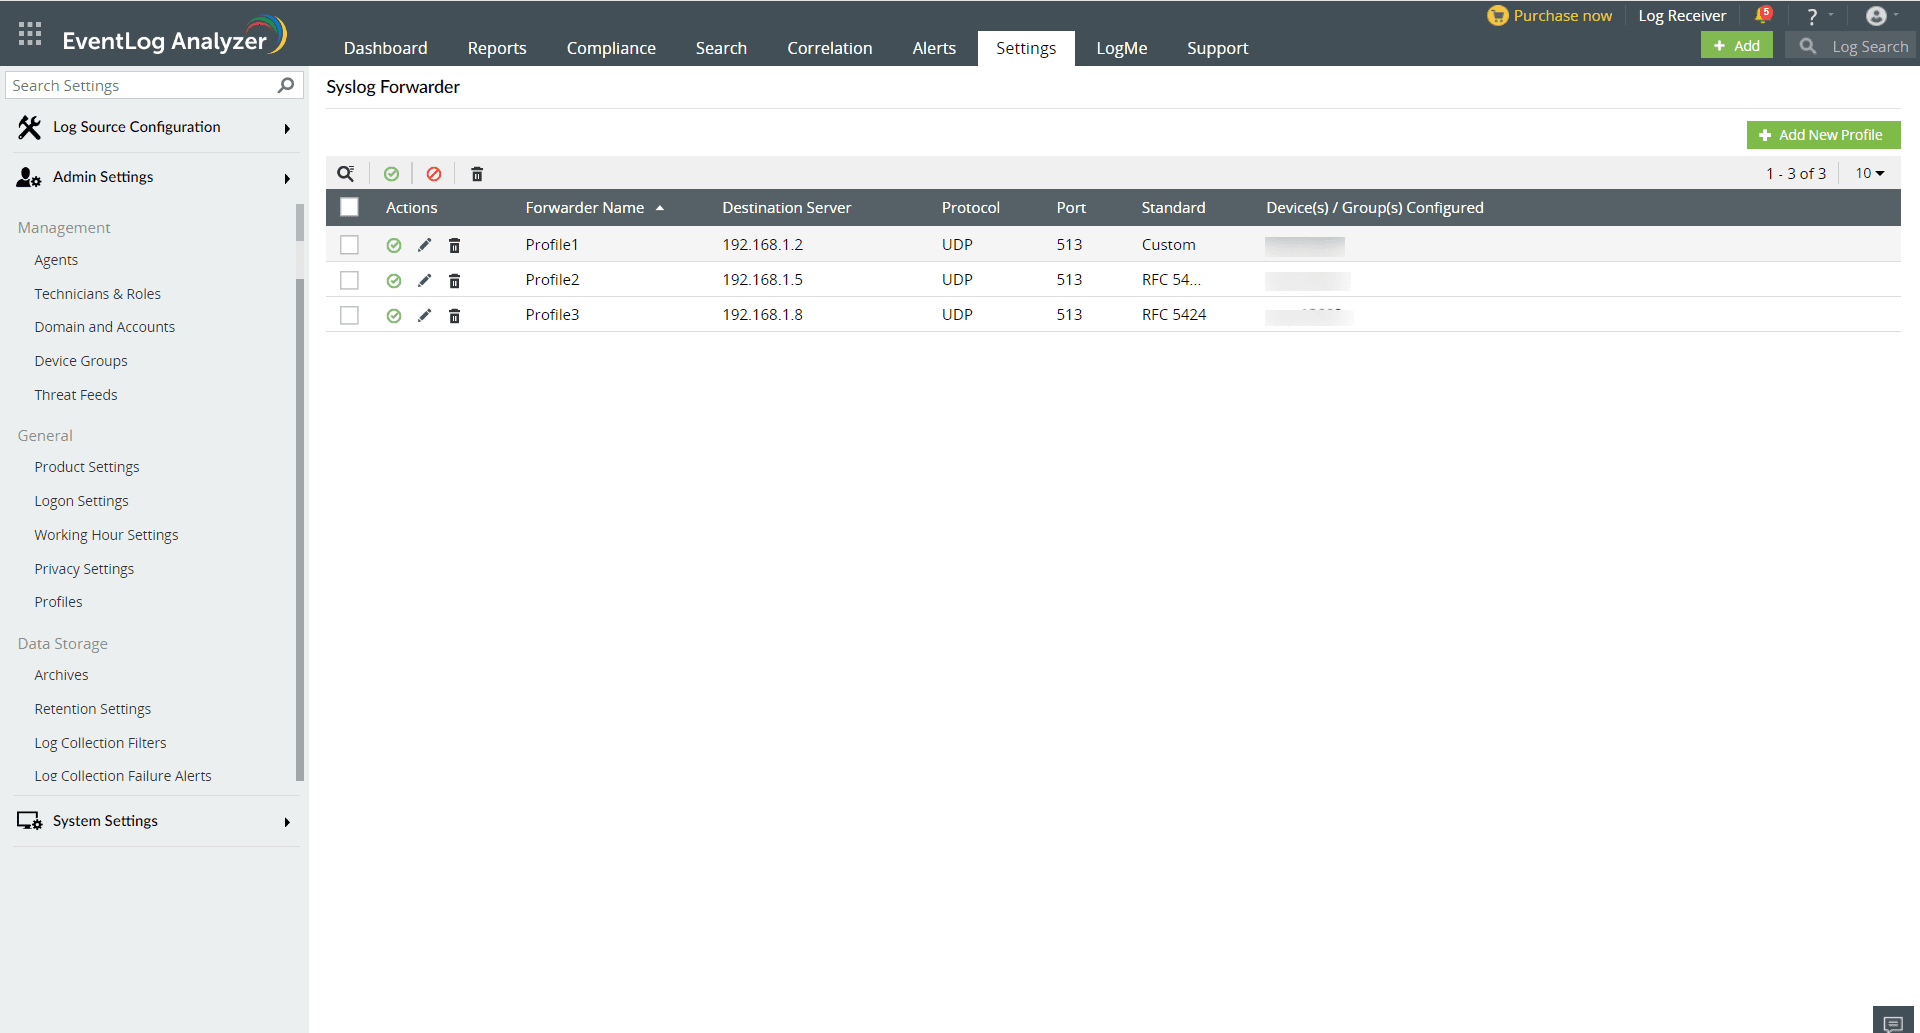
![Log Forwarder](https://www.manageengine.com/products/eventlog/help/images/log-forwarder-06.png)

Source: *<span style="color: rgb(53, 152, 219);">[https://www.manageengine.com/products/eventlog/help/StandaloneManagedServer-UserGuide/Configurations/log-forwarder.html](https://www.manageengine.com/products/eventlog/help/StandaloneManagedServer-UserGuide/Configurations/log-forwarder.html)</span>*

<span style="color: rgb(0, 0, 0);">***<span class="TextRun SCXW71272603 BCX0" data-contrast="auto" lang="EN-US" xml:lang="EN-US"><span class="NormalTextRun SCXW71272603 BCX0">If you need further </span><span class="NormalTextRun SCXW71272603 BCX0">assistance</span><span class="NormalTextRun SCXW71272603 BCX0">, kindly contact our support at </span></span><span class="TextRun SCXW71272603 BCX0" data-contrast="none" lang="EN-US" style="color: rgb(53, 152, 219);" xml:lang="EN-US"><span class="NormalTextRun SCXW71272603 BCX0">support@cytechint.com</span></span><span class="TextRun SCXW71272603 BCX0" data-contrast="auto" lang="EN-US" xml:lang="EN-US"><span class="NormalTextRun SCXW71272603 BCX0"><span style="color: rgb(53, 152, 219);"> </span>for prompt </span><span class="NormalTextRun SCXW71272603 BCX0">assistance</span><span class="NormalTextRun SCXW71272603 BCX0"> and guidance.</span></span><span class="EOP SCXW71272603 BCX0" data-ccp-props="{}"></span>***</span>

# Microsoft 365

<div class="SCXW268368253 BCX8" id="bkmrk-"><div class="ListContainerWrapper SCXW268368253 BCX8">  
</div></div><span class="TextRun SCXW268368253 BCX8" data-contrast="auto" lang="EN-US" xml:lang="EN-US"><span class="NormalTextRun SCXW268368253 BCX8" data-ccp-charstyle="Style (Complex) Open Sans">Microsoft</span><span class="NormalTextRun SCXW268368253 BCX8" data-ccp-charstyle="Style (Complex) Open Sans"> Office 365</span><span class="NormalTextRun SCXW268368253 BCX8" data-ccp-charstyle="Style (Complex) Open Sans"> integration</span> <span class="NormalTextRun SCXW268368253 BCX8" data-ccp-charstyle="Style (Complex) Open Sans">currently supports user, admin, system, and policy actions and events from Office 365 and Azure AD activity logs exposed by the Office 365 Management Activity API.</span></span>

##### **<span class="TextRun SCXW268368253 BCX8" data-contrast="none" lang="EN-US" style="color: rgb(53, 152, 219);" xml:lang="EN-US"><span class="NormalTextRun SCXW268368253 BCX8" data-ccp-charstyle="Style (Complex) Open Sans">Procedures</span></span><span class="EOP SCXW268368253 BCX8" data-ccp-props="{"134245418":true,"134245529":true,"201341983":0,"335559738":40,"335559739":0,"335559740":259}"> </span>**

<span style="color: rgb(53, 152, 219);"><span class="TextRun SCXW268368253 BCX8" data-contrast="none" lang="EN-US" xml:lang="EN-US"><span class="NormalTextRun SCXW268368253 BCX8" data-ccp-charstyle="Intense Emphasis">To perform the setup, please confirm that you have the following access:</span></span><span class="EOP SCXW268368253 BCX8" data-ccp-props="{"201341983":0,"335559685":720,"335559739":160,"335559740":259}"> </span></span>

<div class="SCXW268368253 BCX8" id="bkmrk-a-microsoft-office-3"><div class="ListContainerWrapper SCXW268368253 BCX8">1. <span class="TextRun SCXW268368253 BCX8" data-contrast="none" lang="EN-CA" xml:lang="EN-CA"><span class="NormalTextRun SCXW268368253 BCX8" data-ccp-charstyle="Style (Complex) Open Sans">A Microsoft Office 365 account with Administrative Privileges</span></span>
2. <span class="TextRun SCXW268368253 BCX8" data-contrast="none" lang="EN-CA" xml:lang="EN-CA"><span class="NormalTextRun SCXW268368253 BCX8" data-ccp-charstyle="Style (Complex) Open Sans">A Microsoft Azure account with Administrative Privileges</span></span><span class="EOP SCXW268368253 BCX8" data-ccp-props="{"201341983":0,"335559685":1080,"335559739":160,"335559740":360}"> </span>

</div><div class="ListContainerWrapper SCXW268368253 BCX8">  
</div></div><span style="color: rgb(53, 152, 219);"><span class="TextRun SCXW268368253 BCX8" data-contrast="none" lang="EN-US" xml:lang="EN-US"><span class="NormalTextRun SCXW268368253 BCX8" data-ccp-charstyle="Style (Complex) Open Sans">Register a new Office 365 web application</span></span> <span class="TextRun SCXW268368253 BCX8" data-contrast="auto" lang="EN-PH" xml:lang="EN-PH"><span class="NormalTextRun SCXW268368253 BCX8">To get started collecting Office 365 logs, register an Office 365 web application:</span></span><span class="EOP SCXW268368253 BCX8" data-ccp-props="{"201341983":0,"335559685":720,"335559739":160,"335559740":259}"> </span></span>

<div class="SCXW268368253 BCX8" id="bkmrk-log-into-the-office-"><div class="ListContainerWrapper SCXW268368253 BCX8">1. <span class="TextRun SCXW268368253 BCX8" data-contrast="auto" lang="EN-PH" xml:lang="EN-PH"><span class="NormalTextRun SCXW268368253 BCX8">Log into the Office 365 portal as an Active Directory tenant administrator.</span></span>
2. <span class="TextRun SCXW268368253 BCX8" data-contrast="auto" lang="EN-PH" xml:lang="EN-PH"><span class="NormalTextRun SCXW268368253 BCX8">Click </span></span><span class="TextRun SCXW268368253 BCX8" data-contrast="auto" lang="EN-PH" xml:lang="EN-PH"><span class="NormalTextRun SCXW268368253 BCX8">Show all</span></span><span class="TextRun SCXW268368253 BCX8" data-contrast="auto" lang="EN-PH" xml:lang="EN-PH"><span class="NormalTextRun SCXW268368253 BCX8"> to expand the left navigation area, and then click </span></span><span class="TextRun SCXW268368253 BCX8" data-contrast="auto" lang="EN-PH" xml:lang="EN-PH"><span class="NormalTextRun SCXW268368253 BCX8">Azure Active Directory</span></span><span class="TextRun SCXW268368253 BCX8" data-contrast="auto" lang="EN-PH" xml:lang="EN-PH"><span class="NormalTextRun SCXW268368253 BCX8">.</span></span>
3. <span class="TextRun SCXW268368253 BCX8" data-contrast="auto" lang="EN-PH" xml:lang="EN-PH"><span class="NormalTextRun SCXW268368253 BCX8">Select </span></span><span class="TextRun SCXW268368253 BCX8" data-contrast="auto" lang="EN-PH" xml:lang="EN-PH"><span class="NormalTextRun SCXW268368253 BCX8">App Registrations</span></span><span class="TextRun SCXW268368253 BCX8" data-contrast="auto" lang="EN-PH" xml:lang="EN-PH"><span class="NormalTextRun SCXW268368253 BCX8">, and then click </span></span><span class="TextRun SCXW268368253 BCX8" data-contrast="auto" lang="EN-PH" xml:lang="EN-PH"><span class="NormalTextRun SCXW268368253 BCX8">+ New application registration</span></span><span class="TextRun SCXW268368253 BCX8" data-contrast="auto" lang="EN-PH" xml:lang="EN-PH"><span class="NormalTextRun SCXW268368253 BCX8">.</span></span><span class="EOP SCXW268368253 BCX8" data-ccp-props="{"201341983":0,"335559685":1440,"335559739":160,"335559740":259}"> </span>
4. <span class="TextRun SCXW268368253 BCX8" data-contrast="auto" lang="EN-PH" xml:lang="EN-PH"><span class="NormalTextRun SCXW268368253 BCX8">Provide the following information in the fields:</span></span><span class="EOP SCXW268368253 BCX8" data-ccp-props="{"201341983":0,"335559685":1440,"335559739":160,"335559740":259}"> </span>

</div><div class="ListContainerWrapper SCXW268368253 BCX8">1. 1. - <span class="TextRun SCXW268368253 BCX8" data-contrast="auto" lang="EN-PH" xml:lang="EN-PH"><span class="NormalTextRun SCXW268368253 BCX8">Name – for example, o365</span><span class="NormalTextRun SCXW268368253 BCX8">cytech</span><span class="NormalTextRun SCXW268368253 BCX8">.</span></span>
        - <span class="TextRun SCXW268368253 BCX8" data-contrast="auto" lang="EN-PH" xml:lang="EN-PH"><span class="NormalTextRun SCXW268368253 BCX8">Select </span></span><span class="TextRun SCXW268368253 BCX8" data-contrast="auto" lang="EN-PH" xml:lang="EN-PH"><span class="NormalTextRun SCXW268368253 BCX8">Single tenant</span></span><span class="TextRun SCXW268368253 BCX8" data-contrast="auto" lang="EN-PH" xml:lang="EN-PH"><span class="NormalTextRun SCXW268368253 BCX8"> for supported account types.</span></span>
        - <span class="TextRun SCXW268368253 BCX8" data-contrast="auto" lang="EN-PH" xml:lang="EN-PH"><span class="NormalTextRun SCXW268368253 BCX8">Leave the Redirect URI blank.</span></span>
        - <span class="TextRun SCXW268368253 BCX8" data-contrast="auto" lang="EN-PH" xml:lang="EN-PH"><span class="NormalTextRun SCXW268368253 BCX8">The </span></span><span class="TextRun Highlight SCXW268368253 BCX8" data-contrast="none" lang="EN-US" xml:lang="EN-US"><span class="NormalTextRun SCXW268368253 BCX8">Audit Log Search</span> </span><span class="TextRun SCXW268368253 BCX8" data-contrast="auto" lang="EN-PH" xml:lang="EN-PH"><span class="NormalTextRun SCXW268368253 BCX8">needs to be enabled.</span></span>
        - <span class="TextRun SCXW268368253 BCX8" data-contrast="auto" lang="EN-PH" xml:lang="EN-PH"><span class="NormalTextRun SCXW268368253 BCX8">Click </span></span><span class="TextRun SCXW268368253 BCX8" data-contrast="auto" lang="EN-PH" xml:lang="EN-PH"><span class="NormalTextRun SCXW268368253 BCX8">Register</span></span><span class="TextRun SCXW268368253 BCX8" data-contrast="auto" lang="EN-PH" xml:lang="EN-PH"><span class="NormalTextRun SCXW268368253 BCX8"> and note the Application (client) ID.</span></span><span class="EOP SCXW268368253 BCX8" data-ccp-props="{"201341983":0,"335559685":1440,"335559739":160,"335559740":259}"> </span>

</div><div class="ListContainerWrapper SCXW268368253 BCX8">  
</div></div><span style="color: rgb(53, 152, 219);"><span class="TextRun SCXW268368253 BCX8" data-contrast="none" lang="EN-US" xml:lang="EN-US"><span class="NormalTextRun SCXW268368253 BCX8" data-ccp-charstyle="Style (Complex) Open Sans">Setup Active Directory security permissions</span></span> </span>

<span class="TextRun SCXW268368253 BCX8" data-contrast="auto" lang="EN-PH" xml:lang="EN-PH"><span class="NormalTextRun SCXW268368253 BCX8">The Active Directory security permissions allow the application you created to read threat intelligence data and activity reports for your organization.</span></span><span class="EOP SCXW268368253 BCX8" data-ccp-props="{"201341983":0,"335559685":720,"335559739":160,"335559740":259}"> </span>

<span class="TextRun SCXW268368253 BCX8" data-contrast="auto" lang="EN-PH" xml:lang="EN-PH"><span class="NormalTextRun SCXW268368253 BCX8">To set up Active Directory permissions:</span></span><span class="EOP SCXW268368253 BCX8" data-ccp-props="{"201341983":0,"335559685":720,"335559739":160,"335559740":259}"> </span>

<div class="SCXW268368253 BCX8" id="bkmrk-on-the-main-panel-un"><div class="ListContainerWrapper SCXW268368253 BCX8">1. <span class="TextRun SCXW268368253 BCX8" data-contrast="auto" lang="EN-PH" xml:lang="EN-PH"><span class="NormalTextRun SCXW268368253 BCX8">On the main panel under the new application, click </span></span><span class="TextRun SCXW268368253 BCX8" data-contrast="auto" lang="EN-PH" xml:lang="EN-PH"><span class="NormalTextRun SCXW268368253 BCX8">API Permissions</span></span><span class="TextRun SCXW268368253 BCX8" data-contrast="auto" lang="EN-PH" xml:lang="EN-PH"><span class="NormalTextRun SCXW268368253 BCX8">, and then click </span></span><span class="TextRun SCXW268368253 BCX8" data-contrast="auto" lang="EN-PH" xml:lang="EN-PH"><span class="NormalTextRun SCXW268368253 BCX8">+ Add </span><span class="NormalTextRun ContextualSpellingAndGrammarErrorV2Themed SCXW268368253 BCX8">a permission</span></span><span class="TextRun SCXW268368253 BCX8" data-contrast="auto" lang="EN-PH" xml:lang="EN-PH"><span class="NormalTextRun SCXW268368253 BCX8">.</span></span>
2. <span class="NormalTextRun SCXW268368253 BCX8">Locate and click on </span><span class="TextRun SCXW268368253 BCX8" data-contrast="auto" lang="EN-PH" xml:lang="EN-PH"><span class="NormalTextRun SCXW268368253 BCX8">Office 365 Management APIs</span></span><span class="TextRun SCXW268368253 BCX8" data-contrast="auto" lang="EN-PH" xml:lang="EN-PH"><span class="NormalTextRun SCXW268368253 BCX8">.</span></span>
3. <span class="NormalTextRun SCXW268368253 BCX8">In </span><span class="TextRun SCXW268368253 BCX8" data-contrast="auto" lang="EN-PH" xml:lang="EN-PH"><span class="NormalTextRun SCXW268368253 BCX8">Application permissions</span></span><span class="TextRun SCXW268368253 BCX8" data-contrast="auto" lang="EN-PH" xml:lang="EN-PH"><span class="NormalTextRun SCXW268368253 BCX8">, expand and select </span></span><span class="TextRun SCXW268368253 BCX8" data-contrast="auto" lang="EN-PH" xml:lang="EN-PH"><span class="NormalTextRun SpellingErrorV2Themed SCXW268368253 BCX8">ActivityFeed.Read</span></span><span class="TextRun SCXW268368253 BCX8" data-contrast="auto" lang="EN-PH" xml:lang="EN-PH"><span class="NormalTextRun SCXW268368253 BCX8">, </span></span><span class="TextRun SCXW268368253 BCX8" data-contrast="auto" lang="EN-PH" xml:lang="EN-PH"><span class="NormalTextRun SpellingErrorV2Themed SCXW268368253 BCX8">ActivityFeed.ReadDlp</span></span><span class="TextRun SCXW268368253 BCX8" data-contrast="auto" lang="EN-PH" xml:lang="EN-PH"><span class="NormalTextRun SCXW268368253 BCX8">, </span></span><span class="TrackedChange SCXW268368253 BCX8"><span class="TextRun SCXW268368253 BCX8" data-contrast="auto" lang="EN-PH" xml:lang="EN-PH"><span class="NormalTextRun SpellingErrorV2Themed SCXW268368253 BCX8">ActivityReports.Read</span></span></span><span class="TextRun SCXW268368253 BCX8" data-contrast="auto" lang="EN-PH" xml:lang="EN-PH"><span class="NormalTextRun SCXW268368253 BCX8">, and </span></span><span class="TextRun SCXW268368253 BCX8" data-contrast="auto" lang="EN-PH" xml:lang="EN-PH"><span class="NormalTextRun SpellingErrorV2Themed SCXW268368253 BCX8">ServiceHealth.Read</span></span>
4. <span class="NormalTextRun SCXW268368253 BCX8">Ensure all necessary permissions are selected, and then click </span><span class="TextRun SCXW268368253 BCX8" data-contrast="auto" lang="EN-PH" xml:lang="EN-PH"><span class="NormalTextRun SCXW268368253 BCX8">Add permissions</span></span><span class="TextRun SCXW268368253 BCX8" data-contrast="auto" lang="EN-PH" xml:lang="EN-PH"><span class="NormalTextRun SCXW268368253 BCX8">.</span></span>
5. <span class="NormalTextRun SCXW268368253 BCX8">Click </span><span class="TextRun SCXW268368253 BCX8" data-contrast="auto" lang="EN-PH" xml:lang="EN-PH"><span class="NormalTextRun SCXW268368253 BCX8">Grant admin consent</span></span><span class="TextRun SCXW268368253 BCX8" data-contrast="auto" lang="EN-PH" xml:lang="EN-PH"><span class="NormalTextRun SCXW268368253 BCX8">, and then click </span></span><span class="TextRun SCXW268368253 BCX8" data-contrast="auto" lang="EN-PH" xml:lang="EN-PH"><span class="NormalTextRun SCXW268368253 BCX8">Accept</span></span><span class="TextRun SCXW268368253 BCX8" data-contrast="auto" lang="EN-PH" xml:lang="EN-PH"><span class="NormalTextRun SCXW268368253 BCX8"> to confirm.</span></span>
6. <span class="NormalTextRun SCXW268368253 BCX8">On the left navigation area, select </span><span class="TextRun SCXW268368253 BCX8" data-contrast="auto" lang="EN-PH" xml:lang="EN-PH"><span class="NormalTextRun SCXW268368253 BCX8">Certificates &amp; secrets</span></span><span class="TextRun SCXW268368253 BCX8" data-contrast="auto" lang="EN-PH" xml:lang="EN-PH"><span class="NormalTextRun SCXW268368253 BCX8">, and then click </span></span><span class="TextRun SCXW268368253 BCX8" data-contrast="auto" lang="EN-PH" xml:lang="EN-PH"><span class="NormalTextRun SCXW268368253 BCX8">+ New client secret</span></span><span class="TextRun SCXW268368253 BCX8" data-contrast="auto" lang="EN-PH" xml:lang="EN-PH"><span class="NormalTextRun SCXW268368253 BCX8">.</span></span>
7. <span class="NormalTextRun SCXW268368253 BCX8">Make Sure to Copy the </span><span class="NormalTextRun SCXW268368253 BCX8">Value </span><span class="NormalTextRun SCXW268368253 BCX8">(</span><span class="TextRun SCXW268368253 BCX8" data-contrast="auto" lang="EN-PH" xml:lang="EN-PH"><span class="NormalTextRun SCXW268368253 BCX8">Client Secret (Api Key</span></span><span class="TextRun SCXW268368253 BCX8" data-contrast="auto" lang="EN-PH" xml:lang="EN-PH"><span class="NormalTextRun SCXW268368253 BCX8">)</span><span class="NormalTextRun SCXW268368253 BCX8"> will </span><span class="NormalTextRun SCXW268368253 BCX8">disappear</span></span><span class="EOP SCXW268368253 BCX8" data-ccp-props="{"201341983":0,"335559685":1440,"335559739":160,"335559740":259}"> </span>

</div></div><div class="SCXW268368253 BCX8" id="bkmrk-type-a-key%E2%80%AFdescripti"><div class="ListContainerWrapper SCXW268368253 BCX8">8. <span class="SCXW268368253 BCX8"><span class="WACImageContainer NoPadding DragDrop BlobObject SCXW268368253 BCX8" role="presentation">![](https://cytechint-docs-bookstack.s3.amazonaws.com/uploads/images/gallery/2024-04/embedded-image-u6xezwro.png)</span></span>
9. <span class="NormalTextRun SCXW268368253 BCX8">Type a key </span><span class="TextRun SCXW268368253 BCX8" data-contrast="auto" lang="EN-PH" xml:lang="EN-PH"><span class="NormalTextRun SCXW268368253 BCX8">Description</span></span><span class="TextRun SCXW268368253 BCX8" data-contrast="auto" lang="EN-PH" xml:lang="EN-PH"><span class="NormalTextRun SCXW268368253 BCX8"> and set the duration to </span></span><span class="TextRun SCXW268368253 BCX8" data-contrast="auto" lang="EN-PH" xml:lang="EN-PH"><span class="NormalTextRun SCXW268368253 BCX8">Never</span></span><span class="TextRun SCXW268368253 BCX8" data-contrast="auto" lang="EN-PH" xml:lang="EN-PH"><span class="NormalTextRun SCXW268368253 BCX8"> or Maximum Grant time</span></span><span class="TextRun SCXW268368253 BCX8" data-contrast="auto" lang="EN-PH" xml:lang="EN-PH"><span class="NormalTextRun SCXW268368253 BCX8">.</span></span>
10. <span class="NormalTextRun SCXW268368253 BCX8">Click </span><span class="TextRun SCXW268368253 BCX8" data-contrast="auto" lang="EN-PH" xml:lang="EN-PH"><span class="NormalTextRun SCXW268368253 BCX8">Add</span></span><span class="TextRun SCXW268368253 BCX8" data-contrast="auto" lang="EN-PH" xml:lang="EN-PH"><span class="NormalTextRun SCXW268368253 BCX8">.</span></span>
11. <span class="NormalTextRun SCXW268368253 BCX8">Click </span><span class="TextRun SCXW268368253 BCX8" data-contrast="auto" lang="EN-PH" xml:lang="EN-PH"><span class="NormalTextRun SCXW268368253 BCX8">Overview</span></span><span class="TextRun SCXW268368253 BCX8" data-contrast="auto" lang="EN-PH" xml:lang="EN-PH"><span class="NormalTextRun SCXW268368253 BCX8"> to return to the application summary, and then click the link under </span></span><span class="TextRun SCXW268368253 BCX8" data-contrast="auto" lang="EN-PH" xml:lang="EN-PH"><span class="NormalTextRun SCXW268368253 BCX8">Managed application in local directory</span></span><span class="TextRun SCXW268368253 BCX8" data-contrast="auto" lang="EN-PH" xml:lang="EN-PH"><span class="NormalTextRun SCXW268368253 BCX8">.</span></span>
12. <span class="NormalTextRun SCXW268368253 BCX8">Click </span><span class="TextRun SCXW268368253 BCX8" data-contrast="auto" lang="EN-PH" xml:lang="EN-PH"><span class="NormalTextRun SCXW268368253 BCX8">Properties</span></span><span class="TextRun SCXW268368253 BCX8" data-contrast="auto" lang="EN-PH" xml:lang="EN-PH"><span class="NormalTextRun SCXW268368253 BCX8">, and then note the Object ID associated with the application.</span></span><span class="EOP SCXW268368253 BCX8" data-ccp-props="{"201341983":0,"335559685":1440,"335559739":160,"335559740":259}"> </span>

</div></div>##### **Steps to Renew the Client Secret (API Key):**

1. **Log into the Azure Portal**:
    
    
    - Go to the Azure Portal and log in using an account with administrative privileges.
2. **Navigate to Azure Active Directory**:
    
    
    - In the left navigation pane, select **Azure Active Directory**.
    - If it's not visible, click **Show all** to expand the list and find it.
3. **Go to App Registrations**:
    
    
    - Under **Azure Active Directory**, select **App Registrations**.
    - Find your registered application (e.g., "o365cytech") in the list, or use the **search bar** to locate it.
4. **Open Certificates &amp; Secrets**:
    
    
    - Click on the registered app to open its details page.
    - In the left-hand menu, select **Certificates &amp; Secrets**.
5. **Generate a New Client Secret**:
    
    
    - Under **Client Secrets**, you'll see a list of previously created secrets, along with their expiration dates.
    - Click **+ New client secret** to create a new one.
6. **Configure the New Secret**:
    
    
    - Enter a description for the new key (e.g., "Renewed Key for o365cytech").
    - Set the duration for the new client secret:
7. **Save and Copy the New Secret**:
    
    
    - Click **Add**.
    - Once the new secret is generated, **copy the value immediately**. This is your new client secret (API key). The secret value will be hidden after you leave this page, so make sure to store it securely.
8. **Update Any Services Using the Key**:
    
    
    - If any services or scripts are using the previous client secret, you'll need to update them with the new one.
9. **Remove the Old Secret (Optional)**:
    
    
    - If the old client secret is no longer needed, you can delete it to avoid confusion. Simply click the **trash icon** next to the old key under **Client Secrets**.

# Microsoft 365 DLP Integration and Monitoring

#### **Summary of Actions Required:**

<span style="color: rgb(0, 0, 0);">Register an app in Microsoft Entra ID and configure API permissions for Microsoft Graph and Office 365 Management APIs. Grant admin consent and collect credentials (Application ID, Tenant ID, Client Secret). Ensure Unified Audit Logging is enabled in Microsoft 365.</span>

<span style="color: rgb(53, 152, 219);">**Pre-requisites:**</span>

- <span style="color: rgb(0, 0, 0);">**Global Admin** access</span>
- <span style="color: rgb(0, 0, 0);">**Microsoft 365 E5** or Compliance add-on licenses</span>
- <span style="color: rgb(0, 0, 0);">**Required roles**: Compliance Administrator, Security Reader, Global Reader, or a custom role with DLP alert access</span>

<span style="color: rgb(53, 152, 219);">**DLP Alerts:**</span>

- <span style="color: rgb(0, 0, 0);">Go to Microsoft Purview Portal &gt; Data Loss Prevention &gt; Alerts</span>
- <span style="color: rgb(0, 0, 0);">Ensure DLP policies are set to generate alerts</span>

---

<article class="text-token-text-primary w-full" data-scroll-anchor="true" data-testid="conversation-turn-48" dir="auto" id="bkmrk-%C2%A0important-note-on-m">##### <span style="color: rgb(186, 55, 42);"> **Important Note on Microsoft 365 Alert API Limitations**</span>

<span style="color: rgb(0, 0, 0);">There is an **inherent limitation in the Microsoft 365 Security Alert APIs** that impacts the level of detail you receive in alert data—this is critical when planning your integration and choosing the appropriate license tier.</span>

<div class="text-base my-auto mx-auto pb-10 [--thread-content-margin:--spacing(4)] @[37rem]:[--thread-content-margin:--spacing(6)] @[72rem]:[--thread-content-margin:--spacing(16)] px-(--thread-content-margin)"><div class="[--thread-content-max-width:32rem] @[34rem]:[--thread-content-max-width:40rem] @[64rem]:[--thread-content-max-width:48rem] mx-auto flex max-w-(--thread-content-max-width) flex-1 text-base gap-4 md:gap-5 lg:gap-6 group/turn-messages focus-visible:outline-hidden" tabindex="-1"><div class="group/conversation-turn relative flex w-full min-w-0 flex-col agent-turn"><div class="relative flex-col gap-1 md:gap-3"><div class="flex max-w-full flex-col grow"><div class="min-h-8 text-message relative flex w-full flex-col items-end gap-2 text-start break-words whitespace-normal [.text-message+&]:mt-5" data-message-author-role="assistant" data-message-id="525d64ab-3fb8-425d-9957-efce61d72091" data-message-model-slug="gpt-4o" dir="auto"><div class="flex w-full flex-col gap-1 empty:hidden first:pt-[3px]"><div class="markdown prose dark:prose-invert w-full break-words dark">- <span style="color: rgb(0, 0, 0);">**v1.0 Alerts API** (available under Microsoft 365 E3 and E5):</span>
    
    
    - <span style="color: rgb(0, 0, 0);">Provides only **basic alert information**, such as:</span>
        
        
        - <span style="color: rgb(0, 0, 0);">Alert title, category, severity, and timestamps</span>
        - <span style="color: rgb(0, 0, 0);">Limited context about the affected user or object</span>
    - <span style="color: rgb(0, 0, 0);">Designed primarily for **initial alerting and manual investigation**</span>
- <span style="color: rgb(0, 0, 0);">**v2.0 Alerts API** *(currently in beta, available with Microsoft 365 E5 or Defender Plan 2)*:</span>
    
    
    - <span style="color: rgb(0, 0, 0);">Delivers **richer alert context**, including:</span>
        
        
        - <span style="color: rgb(0, 0, 0);">Detailed user activities leading up to the alert</span>
        - <span style="color: rgb(0, 0, 0);">Supporting evidence (emails, files, device info)</span>
        - <span style="color: rgb(0, 0, 0);">Remediation guidance and recommendations</span>
    - <span style="color: rgb(0, 0, 0);">Useful for **automated triage**, faster incident response, and deeper analysis</span>

</div></div></div></div></div></div></div></div><span style="color: rgb(0, 0, 0);">**License Implication**:</span>

<div class="text-base my-auto mx-auto pb-10 [--thread-content-margin:--spacing(4)] @[37rem]:[--thread-content-margin:--spacing(6)] @[72rem]:[--thread-content-margin:--spacing(16)] px-(--thread-content-margin)"><div class="[--thread-content-max-width:32rem] @[34rem]:[--thread-content-max-width:40rem] @[64rem]:[--thread-content-max-width:48rem] mx-auto flex max-w-(--thread-content-max-width) flex-1 text-base gap-4 md:gap-5 lg:gap-6 group/turn-messages focus-visible:outline-hidden" tabindex="-1"><div class="group/conversation-turn relative flex w-full min-w-0 flex-col agent-turn"><div class="relative flex-col gap-1 md:gap-3"><div class="flex max-w-full flex-col grow"><div class="min-h-8 text-message relative flex w-full flex-col items-end gap-2 text-start break-words whitespace-normal [.text-message+&]:mt-5" data-message-author-role="assistant" data-message-id="525d64ab-3fb8-425d-9957-efce61d72091" data-message-model-slug="gpt-4o" dir="auto"><div class="flex w-full flex-col gap-1 empty:hidden first:pt-[3px]"><div class="markdown prose dark:prose-invert w-full break-words dark">- <span style="color: rgb(0, 0, 0);">If you’re using **Microsoft 365 E3**, only **v1.0 is supported**, limiting you to high-level alert insights.</span>
- <span style="color: rgb(0, 0, 0);">For access to **v2.0’s extended context**, an **E5 license or add-on** is required.</span>

</div></div></div></div></div></div></div></div><span style="color: rgb(0, 0, 0);">**Our Position**:</span>  
<span style="color: rgb(0, 0, 0);">In Microsoft 365 E3, the information from the **v1.0 API is sufficient** to initiate timely investigations.</span>  
<span style="color: rgb(0, 0, 0);">However, depending on your operational requirements, you may need to assess whether the **basic alert data is adequate** or if the **richer, contextual insights of v2.0** are necessary for your workflows.</span>

<p class="callout info"><span style="color: rgb(0, 0, 0);">**Consider this carefully when designing your alert ingestion pipeline or evaluating Microsoft 365 licensing options.** </span></p>

</article>---

<div class="euiFlexGroup css-1tueyet-euiFlexGroup-responsive-xs-flexStart-flexEnd-row" id="bkmrk-client-secret-value%3A"></div>##### <span style="color: rgb(53, 152, 219);">**<span class="TextRun SCXW264382529 BCX0" data-contrast="none" lang="EN-US" xml:lang="EN-US"><span class="NormalTextRun SCXW264382529 BCX0" data-ccp-parastyle="heading 4">Step 1: Microsoft Entra ID</span></span><span class="EOP SCXW264382529 BCX0" data-ccp-props="{"134233117":false,"134233118":false,"134245418":true,"134245529":true,"335559738":319,"335559739":319}"> - App Registration</span>**</span>

<span style="color: rgb(0, 0, 0);">**<span class="TextRun SCXW264382529 BCX0" data-contrast="auto" lang="EN-US" xml:lang="EN-US"><span class="NormalTextRun SCXW264382529 BCX0">Register Your Application in Microsoft Entra ID:</span></span>**</span>

<div class="SCXW264382529 BCX0" id="bkmrk-how-to-locate%3A%C2%A0-log-"><div class="ListContainerWrapper SCXW264382529 BCX0">- - <span style="color: rgb(0, 0, 0);"><span class="TextRun SCXW264382529 BCX0" data-contrast="auto" lang="EN-US" xml:lang="EN-US"><span class="NormalTextRun SCXW264382529 BCX0">Log in to your Azure Account, click here - </span></span><span style="color: rgb(132, 63, 161);">**[Azure Portal Link](https://portal.azure.com/#home)**</span><span class="TextRun SCXW264382529 BCX0" data-contrast="auto" lang="EN-US" xml:lang="EN-US"><span class="NormalTextRun SCXW264382529 BCX0">.</span></span></span>
    - <span style="color: rgb(0, 0, 0);"><span class="TextRun SCXW264382529 BCX0" data-contrast="auto" lang="EN-US" xml:lang="EN-US"><span class="NormalTextRun SCXW264382529 BCX0">Navigate to </span></span><span class="TextRun SCXW264382529 BCX0" data-contrast="auto" lang="EN-US" xml:lang="EN-US"><span class="NormalTextRun SCXW264382529 BCX0">Azure Active Directory</span></span><span class="TextRun SCXW264382529 BCX0" data-contrast="auto" lang="EN-US" xml:lang="EN-US"><span class="NormalTextRun SCXW264382529 BCX0"> &gt; </span></span>**<span class="TextRun SCXW264382529 BCX0" data-contrast="auto" lang="EN-US" xml:lang="EN-US"><span class="NormalTextRun SCXW264382529 BCX0">App registrations</span></span>**<span class="TextRun SCXW264382529 BCX0" data-contrast="auto" lang="EN-US" xml:lang="EN-US"><span class="NormalTextRun SCXW264382529 BCX0">.</span></span></span>
    - <span style="color: rgb(0, 0, 0);"><span class="TextRun SCXW264382529 BCX0" data-contrast="auto" lang="EN-US" xml:lang="EN-US"><span class="NormalTextRun SCXW264382529 BCX0">Click </span></span>**<span class="TextRun SCXW264382529 BCX0" data-contrast="auto" lang="EN-US" xml:lang="EN-US"><span class="NormalTextRun SCXW264382529 BCX0">New Registration</span></span>**<span class="TextRun SCXW264382529 BCX0" data-contrast="auto" lang="EN-US" xml:lang="EN-US"><span class="NormalTextRun SCXW264382529 BCX0">.</span></span></span>
    - <span style="color: rgb(0, 0, 0);"><span class="TextRun SCXW264382529 BCX0" data-contrast="auto" lang="EN-US" xml:lang="EN-US"><span class="NormalTextRun SCXW264382529 BCX0">Provide a </span></span><span class="TextRun SCXW264382529 BCX0" data-contrast="auto" lang="EN-US" xml:lang="EN-US"><span class="NormalTextRun SCXW264382529 BCX0">Name</span></span><span class="TextRun SCXW264382529 BCX0" data-contrast="auto" lang="EN-US" xml:lang="EN-US"><span class="NormalTextRun SCXW264382529 BCX0"> for the application, we can suggest "**CyTechAQUILA-Monitoring**".</span></span><span class="EOP SCXW264382529 BCX0" data-ccp-props="{"134233117":false,"134233118":false,"335559738":0,"335559739":0}"> </span></span>
    - <span style="color: rgb(0, 0, 0);"><span class="TextRun SCXW264382529 BCX0" data-contrast="auto" lang="EN-US" xml:lang="EN-US"><span class="NormalTextRun SCXW264382529 BCX0">Click </span></span>**<span class="TextRun SCXW264382529 BCX0" data-contrast="auto" lang="EN-US" xml:lang="EN-US"><span class="NormalTextRun SCXW264382529 BCX0">Register</span></span>**<span class="TextRun SCXW264382529 BCX0" data-contrast="auto" lang="EN-US" xml:lang="EN-US"><span class="NormalTextRun SCXW264382529 BCX0">.</span></span><span class="EOP SCXW264382529 BCX0" data-ccp-props="{"134233117":false,"134233118":false,"335559738":0,"335559739":0}"> </span></span>

</div></div>##### <span style="color: rgb(53, 152, 219);">**<span class="TextRun SCXW264382529 BCX0" data-contrast="none" lang="EN-US" xml:lang="EN-US"><span class="NormalTextRun SCXW264382529 BCX0" data-ccp-parastyle="heading 4">Step 2: API Permissions</span></span>**</span>

<span style="color: rgb(0, 0, 0);">**<span class="TextRun SCXW264382529 BCX0" data-contrast="none" lang="EN-US" xml:lang="EN-US"><span class="NormalTextRun SCXW264382529 BCX0" data-ccp-parastyle="heading 4"><span class="EOP SCXW264382529 BCX0" data-ccp-props="{"134233117":false,"134233118":false,"335559738":0,"335559739":0}">Microsoft Graph API Permissions:</span></span></span>**</span>

<div class="SCXW264382529 BCX0" id="bkmrk-navigate-to%C2%A0app-regi"><div class="ListContainerWrapper SCXW264382529 BCX0">- - <span style="color: rgb(0, 0, 0);"><span class="TextRun SCXW264382529 BCX0" data-contrast="auto" lang="EN-US" xml:lang="EN-US"><span class="NormalTextRun SCXW264382529 BCX0">Navigate to </span></span>**<span class="TextRun SCXW264382529 BCX0" data-contrast="auto" lang="EN-US" xml:lang="EN-US"><span class="NormalTextRun SCXW264382529 BCX0">App registrations</span></span>**<span class="TextRun SCXW264382529 BCX0" data-contrast="auto" lang="EN-US" xml:lang="EN-US"><span class="NormalTextRun SCXW264382529 BCX0"> in the Azure Portal.</span></span></span>
    - <span style="color: rgb(0, 0, 0);"><span class="TextRun SCXW264382529 BCX0" data-contrast="auto" lang="EN-US" xml:lang="EN-US"><span class="NormalTextRun SCXW264382529 BCX0">Select the App you just created, then go to </span></span>**<span class="TextRun SCXW264382529 BCX0" data-contrast="auto" lang="EN-US" xml:lang="EN-US"><span class="NormalTextRun SCXW264382529 BCX0">API Permissions</span></span>**<span class="TextRun SCXW264382529 BCX0" data-contrast="auto" lang="EN-US" xml:lang="EN-US"><span class="NormalTextRun SCXW264382529 BCX0">.</span></span><span class="EOP SCXW264382529 BCX0" data-ccp-props="{"134233117":false,"134233118":false,"335559738":0,"335559739":0}"> </span></span>
    - <span class="EOP SCXW264382529 BCX0" data-ccp-props="{"134233117":false,"134233118":false,"335559738":0,"335559739":0}" style="color: rgb(0, 0, 0);">Search for **Microsoft Graph.**</span>
    - <span style="color: rgb(0, 0, 0);"><span class="NormalTextRun SCXW264382529 BCX0">Click </span>**<span class="TextRun SCXW264382529 BCX0" data-contrast="auto" lang="EN-US" xml:lang="EN-US"><span class="NormalTextRun SCXW264382529 BCX0">Add </span><span class="NormalTextRun ContextualSpellingAndGrammarErrorV2Themed SCXW264382529 BCX0">a permission</span></span>**<span class="TextRun SCXW264382529 BCX0" data-contrast="auto" lang="EN-US" xml:lang="EN-US"><span class="NormalTextRun SCXW264382529 BCX0">.</span></span></span>
    - <span style="color: rgb(0, 0, 0);"><span class="NormalTextRun SCXW264382529 BCX0">Select </span>**<span class="TextRun SCXW264382529 BCX0" data-contrast="auto" lang="EN-US" xml:lang="EN-US"><span class="NormalTextRun SCXW264382529 BCX0">Microsoft Graph</span></span>**<span class="TextRun SCXW264382529 BCX0" data-contrast="auto" lang="EN-US" xml:lang="EN-US"><span class="NormalTextRun SCXW264382529 BCX0"> **&gt;** **Application**</span></span>**<span class="TextRun SCXW264382529 BCX0" data-contrast="auto" lang="EN-US" xml:lang="EN-US"><span class="NormalTextRun SCXW264382529 BCX0"> permissions</span></span>**<span class="TextRun SCXW264382529 BCX0" data-contrast="auto" lang="EN-US" xml:lang="EN-US"><span class="NormalTextRun SCXW264382529 BCX0">.</span></span></span>
    - <span style="color: rgb(0, 0, 0);"><span class="NormalTextRun SCXW264382529 BCX0">Search for and add</span></span>
        - <span style="color: rgb(0, 0, 0);">**<span class="NormalTextRun SpellingErrorV2Themed SCXW264382529 BCX0">AuditLog.Read.All</span>**</span>
        - <span style="color: rgb(0, 0, 0);">**<span class="NormalTextRun SpellingErrorV2Themed SCXW264382529 BCX0">Files.Read.All</span>**</span>
        - <span style="color: rgb(0, 0, 0);">**<span class="NormalTextRun SpellingErrorV2Themed SCXW264382529 BCX0">InformationProtectionConfig.Read.All</span>**</span>
        - <span style="color: rgb(0, 0, 0);">**<span class="NormalTextRun SpellingErrorV2Themed SCXW264382529 BCX0">InformationProtectionPolicy.Read.All</span>**</span>
        - <span style="color: rgb(0, 0, 0);">**<span class="NormalTextRun SpellingErrorV2Themed SCXW264382529 BCX0">Policy.Read.All</span>**</span>
        - <span style="color: rgb(0, 0, 0);">**<span class="NormalTextRun SpellingErrorV2Themed SCXW264382529 BCX0">SecurityAlert.Read.All</span>**</span>
        - <span style="color: rgb(0, 0, 0);">**<span class="NormalTextRun SpellingErrorV2Themed SCXW264382529 BCX0">SecurityEvents.Read.All</span>**</span>
        - <span style="color: rgb(0, 0, 0);">**<span class="NormalTextRun SpellingErrorV2Themed SCXW264382529 BCX0">SecurityEvents.ReadWrite.All</span>**</span>
        - <span style="color: rgb(0, 0, 0);">**<span class="NormalTextRun SpellingErrorV2Themed SCXW264382529 BCX0">SecurityIncident.Read.All</span>**</span>
        - <span style="color: rgb(0, 0, 0);">**<span class="NormalTextRun SpellingErrorV2Themed SCXW264382529 BCX0">SensitivityLabels.Read.All</span>**</span>
        - <span style="color: rgb(0, 0, 0);">**<span class="NormalTextRun SpellingErrorV2Themed SCXW264382529 BCX0">Sites.Read.All</span>**</span>
        - <span style="color: rgb(0, 0, 0);">**<span class="NormalTextRun SpellingErrorV2Themed SCXW264382529 BCX0">User.Read.All</span>**</span>

</div></div>[![image.png](https://cytechint-docs-bookstack.s3.amazonaws.com/uploads/images/gallery/2025-07/scaled-1680-/Z7ppaAKB1MfELxkK-image.png)](https://cytechint-docs-bookstack.s3.amazonaws.com/uploads/images/gallery/2025-07/Z7ppaAKB1MfELxkK-image.png)

<span style="color: rgb(0, 0, 0);">**<span class="TextRun SCXW264382529 BCX0" data-contrast="auto" lang="EN-US" xml:lang="EN-US"><span class="NormalTextRun SCXW264382529 BCX0">Office 365 Management API Permissions:</span></span><span class="EOP SCXW264382529 BCX0" data-ccp-props="{"134233117":false,"134233118":false,"335559738":240,"335559739":240}"> </span>**</span>

<div class="SCXW264382529 BCX0" id="bkmrk-search-for%C2%A0office-36"><div class="ListContainerWrapper SCXW264382529 BCX0">- - <span style="color: rgb(0, 0, 0);"><span class="TextRun SCXW264382529 BCX0" data-contrast="auto" lang="EN-US" xml:lang="EN-US"><span class="NormalTextRun SCXW264382529 BCX0">Search for </span></span>**<span class="TextRun SCXW264382529 BCX0" data-contrast="auto" lang="EN-US" xml:lang="EN-US"><span class="NormalTextRun SCXW264382529 BCX0">Office 365 Management APIs</span></span>**<span class="TextRun SCXW264382529 BCX0" data-contrast="auto" lang="EN-US" xml:lang="EN-US"><span class="NormalTextRun SCXW264382529 BCX0"> and add the required permissions.</span></span><span class="EOP SCXW264382529 BCX0" data-ccp-props="{"134233117":false,"134233118":false,"335559738":0,"335559739":0}"> </span></span>
    - <span style="color: rgb(0, 0, 0);"><span class="TextRun SCXW264382529 BCX0" data-contrast="auto" lang="EN-US" xml:lang="EN-US"><span class="NormalTextRun SCXW264382529 BCX0">In </span></span>**<span class="TextRun SCXW264382529 BCX0" data-contrast="auto" lang="EN-US" xml:lang="EN-US"><span class="NormalTextRun SCXW264382529 BCX0">Application Permissions</span></span>**<span class="TextRun SCXW264382529 BCX0" data-contrast="auto" lang="EN-US" xml:lang="EN-US"><span class="NormalTextRun SCXW264382529 BCX0">, look for permissions.</span></span></span>
    - <span style="color: rgb(0, 0, 0);"><span class="TextRun SCXW264382529 BCX0" data-contrast="auto" lang="EN-US" xml:lang="EN-US"><span class="NormalTextRun SCXW264382529 BCX0">To read DLP policy events u</span></span>nder ActivityFeed select:</span>
        - **<span style="color: rgb(0, 0, 0);">ActivityFeed.Read</span>**
        - **<span style="color: rgb(0, 0, 0);">ActivityFeed.ReadDlp</span>**
        - **<span style="color: rgb(0, 0, 0);">ServiceHealth.Read</span>**

</div></div>[![image.png](https://cytechint-docs-bookstack.s3.amazonaws.com/uploads/images/gallery/2025-07/scaled-1680-/5bF8oLjRedkpp044-image.png)](https://cytechint-docs-bookstack.s3.amazonaws.com/uploads/images/gallery/2025-07/5bF8oLjRedkpp044-image.png)

<span style="color: rgb(0, 0, 0);">**<span class="TextRun SCXW264382529 BCX0" data-contrast="auto" lang="EN-US" xml:lang="EN-US"><span class="NormalTextRun SCXW264382529 BCX0">Grant Admin Consent:</span></span><span class="EOP SCXW264382529 BCX0" data-ccp-props="{"134233117":false,"134233118":false,"335559738":240,"335559739":240}"> </span>**</span>

<div class="SCXW264382529 BCX0" id="bkmrk-in-api-permissions%2C-"><div class="ListContainerWrapper SCXW264382529 BCX0">- - <span style="color: rgb(0, 0, 0);"><span class="TextRun SCXW264382529 BCX0" data-contrast="auto" lang="EN-US" xml:lang="EN-US"><span class="NormalTextRun SCXW264382529 BCX0">In </span></span><span class="TextRun SCXW264382529 BCX0" data-contrast="auto" lang="EN-US" xml:lang="EN-US"><span class="NormalTextRun SCXW264382529 BCX0">API Permissions</span></span><span class="TextRun SCXW264382529 BCX0" data-contrast="auto" lang="EN-US" xml:lang="EN-US"><span class="NormalTextRun SCXW264382529 BCX0">, click </span></span><span class="TextRun SCXW264382529 BCX0" data-contrast="auto" lang="EN-US" xml:lang="EN-US"><span class="NormalTextRun SCXW264382529 BCX0">**Grant admin consent** for &lt;tenant name&gt;</span></span><span class="TextRun SCXW264382529 BCX0" data-contrast="auto" lang="EN-US" xml:lang="EN-US"><span class="NormalTextRun SCXW264382529 BCX0">.</span></span></span>
    - <span style="color: rgb(0, 0, 0);"><span class="TextRun SCXW264382529 BCX0" data-contrast="auto" lang="EN-US" xml:lang="EN-US"><span class="NormalTextRun SCXW264382529 BCX0">**Confirm** the action.</span></span><span class="EOP SCXW264382529 BCX0" data-ccp-props="{"134233117":false,"134233118":false,"335559738":0,"335559739":0}"> </span></span>

</div></div>[![image.png](https://cytechint-docs-bookstack.s3.amazonaws.com/uploads/images/gallery/2025-07/scaled-1680-/pDONetipdYsasVlS-image.png)](https://cytechint-docs-bookstack.s3.amazonaws.com/uploads/images/gallery/2025-07/pDONetipdYsasVlS-image.png)

##### <span style="color: rgb(53, 152, 219);">**<span class="TextRun SCXW264382529 BCX0" data-contrast="none" lang="EN-US" xml:lang="EN-US"><span class="NormalTextRun SCXW264382529 BCX0" data-ccp-parastyle="heading 4">Step 3: Integration Requirements for Office 365</span></span><span class="EOP SCXW264382529 BCX0" data-ccp-props="{"134233117":false,"134233118":false,"134245418":true,"134245529":true,"335559738":319,"335559739":319}"> </span>**</span>

<span style="color: rgb(0, 0, 0);">**<span class="TextRun SCXW264382529 BCX0" data-contrast="auto" lang="EN-US" xml:lang="EN-US"><span class="NormalTextRun SCXW264382529 BCX0">Application (Client) ID:</span></span><span class="EOP SCXW264382529 BCX0" data-ccp-props="{"134233117":false,"134233118":false,"335559738":240,"335559739":240}"> </span>**</span>

<div class="SCXW264382529 BCX0" id="bkmrk-how-to-locate%3A%C2%A0-go-t"><div class="ListContainerWrapper SCXW264382529 BCX0">- - <span style="color: rgb(0, 0, 0);"><span class="TextRun SCXW264382529 BCX0" data-contrast="auto" lang="EN-US" xml:lang="EN-US"><span class="NormalTextRun SCXW264382529 BCX0">Go to </span></span>**<span class="TextRun SCXW264382529 BCX0" data-contrast="auto" lang="EN-US" xml:lang="EN-US"><span class="NormalTextRun SCXW264382529 BCX0">App registrations</span></span>**<span class="TextRun SCXW264382529 BCX0" data-contrast="auto" lang="EN-US" xml:lang="EN-US"><span class="NormalTextRun SCXW264382529 BCX0"> &gt; **Select your application**.</span></span></span>
    - <span style="color: rgb(0, 0, 0);"><span class="TextRun SCXW264382529 BCX0" data-contrast="auto" lang="EN-US" xml:lang="EN-US"><span class="NormalTextRun SCXW264382529 BCX0">Copy the </span></span>**<span class="TextRun SCXW264382529 BCX0" data-contrast="auto" lang="EN-US" xml:lang="EN-US"><span class="NormalTextRun SCXW264382529 BCX0">Application (client) ID</span></span>**<span class="TextRun SCXW264382529 BCX0" data-contrast="auto" lang="EN-US" xml:lang="EN-US"><span class="NormalTextRun SCXW264382529 BCX0"> from the overview page.</span></span><span class="EOP SCXW264382529 BCX0" data-ccp-props="{"134233117":false,"134233118":false,"335559738":0,"335559739":0}"> </span></span>

</div></div><span style="color: rgb(0, 0, 0);">**<span class="TextRun SCXW264382529 BCX0" data-contrast="auto" lang="EN-US" xml:lang="EN-US"><span class="NormalTextRun SCXW264382529 BCX0">Directory (Tenant) ID:</span></span><span class="EOP SCXW264382529 BCX0" data-ccp-props="{"134233117":false,"134233118":false,"335559738":240,"335559739":240}"> </span>**</span>

<div class="SCXW264382529 BCX0" id="bkmrk-in-the-azure-portal%2C"><div class="ListContainerWrapper SCXW264382529 BCX0">- - <span style="color: rgb(0, 0, 0);"><span class="TextRun SCXW264382529 BCX0" data-contrast="auto" lang="EN-US" xml:lang="EN-US"><span class="NormalTextRun SCXW264382529 BCX0">In the Azure Portal, navigate to </span></span>**<span class="TextRun SCXW264382529 BCX0" data-contrast="auto" lang="EN-US" xml:lang="EN-US"><span class="NormalTextRun SCXW264382529 BCX0">Azure Active Directory</span></span>**<span class="TextRun SCXW264382529 BCX0" data-contrast="auto" lang="EN-US" xml:lang="EN-US"><span class="NormalTextRun SCXW264382529 BCX0"> &gt; </span></span>**<span class="TextRun SCXW264382529 BCX0" data-contrast="auto" lang="EN-US" xml:lang="EN-US"><span class="NormalTextRun SCXW264382529 BCX0">Overview</span></span>**<span class="TextRun SCXW264382529 BCX0" data-contrast="auto" lang="EN-US" xml:lang="EN-US"><span class="NormalTextRun SCXW264382529 BCX0">.</span></span></span>
    - <span style="color: rgb(0, 0, 0);"><span class="TextRun SCXW264382529 BCX0" data-contrast="auto" lang="EN-US" xml:lang="EN-US"><span class="NormalTextRun SCXW264382529 BCX0">Copy the </span></span>**<span class="TextRun SCXW264382529 BCX0" data-contrast="auto" lang="EN-US" xml:lang="EN-US"><span class="NormalTextRun SCXW264382529 BCX0">Directory (tenant) ID</span></span>**<span class="TextRun SCXW264382529 BCX0" data-contrast="auto" lang="EN-US" xml:lang="EN-US"><span class="NormalTextRun SCXW264382529 BCX0">.</span></span><span class="EOP SCXW264382529 BCX0" data-ccp-props="{"134233117":false,"134233118":false,"335559738":0,"335559739":0}"> </span></span>

</div></div>[![image.png](https://cytechint-docs-bookstack.s3.amazonaws.com/uploads/images/gallery/2025-07/scaled-1680-/qrBfOWGafjDMJqVo-image.png)](https://cytechint-docs-bookstack.s3.amazonaws.com/uploads/images/gallery/2025-07/qrBfOWGafjDMJqVo-image.png)

<span style="color: rgb(0, 0, 0);">**<span class="TextRun SCXW264382529 BCX0" data-contrast="auto" lang="EN-US" xml:lang="EN-US"><span class="NormalTextRun SCXW264382529 BCX0">Create New Client Secret (Value):</span></span><span class="EOP SCXW264382529 BCX0" data-ccp-props="{"134233117":false,"134233118":false,"335559738":240,"335559739":240}"> </span>**</span>

<div class="SCXW264382529 BCX0" id="bkmrk-in-app-registrations"><div class="ListContainerWrapper SCXW264382529 BCX0">- - <span style="color: rgb(0, 0, 0);"><span class="TextRun SCXW264382529 BCX0" data-contrast="auto" lang="EN-US" xml:lang="EN-US"><span class="NormalTextRun SCXW264382529 BCX0">In </span></span>**<span class="TextRun SCXW264382529 BCX0" data-contrast="auto" lang="EN-US" xml:lang="EN-US"><span class="NormalTextRun SCXW264382529 BCX0">App registrations &gt; Select your application</span></span>**<span class="TextRun SCXW264382529 BCX0" data-contrast="auto" lang="EN-US" xml:lang="EN-US"><span class="NormalTextRun SCXW264382529 BCX0">, go to </span></span>**<span class="TextRun SCXW264382529 BCX0" data-contrast="auto" lang="EN-US" xml:lang="EN-US"><span class="NormalTextRun SCXW264382529 BCX0">Certificates &amp; secrets</span></span>**<span class="TextRun SCXW264382529 BCX0" data-contrast="auto" lang="EN-US" xml:lang="EN-US"><span class="NormalTextRun SCXW264382529 BCX0">.</span></span></span>
    - <span style="color: rgb(0, 0, 0);"><span class="TextRun SCXW264382529 BCX0" data-contrast="auto" lang="EN-US" xml:lang="EN-US"><span class="NormalTextRun SCXW264382529 BCX0">Click </span></span>**<span class="TextRun SCXW264382529 BCX0" data-contrast="auto" lang="EN-US" xml:lang="EN-US"><span class="NormalTextRun SCXW264382529 BCX0">New client secret</span></span>**<span class="TextRun SCXW264382529 BCX0" data-contrast="auto" lang="EN-US" xml:lang="EN-US"><span class="NormalTextRun SCXW264382529 BCX0">.</span></span></span>
    - <span style="color: rgb(0, 0, 0);"><span class="TextRun SCXW264382529 BCX0" data-contrast="auto" lang="EN-US" xml:lang="EN-US"><span class="NormalTextRun SCXW264382529 BCX0">Add a description and </span><span class="NormalTextRun SCXW264382529 BCX0">expiration</span><span class="NormalTextRun SCXW264382529 BCX0"> period, then click </span></span><span class="TextRun SCXW264382529 BCX0" data-contrast="auto" lang="EN-US" xml:lang="EN-US"><span class="NormalTextRun SCXW264382529 BCX0">Add</span></span><span class="TextRun SCXW264382529 BCX0" data-contrast="auto" lang="EN-US" xml:lang="EN-US"><span class="NormalTextRun SCXW264382529 BCX0">.</span></span></span>
    - <span style="color: rgb(0, 0, 0);"><span class="TextRun SCXW264382529 BCX0" data-contrast="auto" lang="EN-US" xml:lang="EN-US"><span class="NormalTextRun SCXW264382529 BCX0">Copy the </span></span>**<span class="TextRun SCXW264382529 BCX0" data-contrast="auto" lang="EN-US" xml:lang="EN-US"><span class="NormalTextRun SCXW264382529 BCX0">Value</span></span>**<span class="TextRun SCXW264382529 BCX0" data-contrast="auto" lang="EN-US" xml:lang="EN-US"><span class="NormalTextRun SCXW264382529 BCX0"> **(displayed only once)**.</span></span><span class="EOP SCXW264382529 BCX0" data-ccp-props="{"134233117":false,"134233118":false,"335559738":0,"335559739":0}"> </span></span>

</div></div><span style="color: rgb(0, 0, 0);">[![image.png](https://cytechint-docs-bookstack.s3.amazonaws.com/uploads/images/gallery/2025-05/scaled-1680-/fjoxX4o659L9qigQ-image.png)](https://cytechint-docs-bookstack.s3.amazonaws.com/uploads/images/gallery/2025-05/fjoxX4o659L9qigQ-image.png)</span>

##### <span style="color: rgb(53, 152, 219);">**<span class="TextRun SCXW264382529 BCX0" data-contrast="none" lang="EN-US" xml:lang="EN-US"><span class="NormalTextRun SCXW264382529 BCX0" data-ccp-parastyle="heading 3">Step </span><span class="NormalTextRun SCXW264382529 BCX0" data-ccp-parastyle="heading 3">4:</span><span class="NormalTextRun SCXW264382529 BCX0" data-ccp-parastyle="heading 3"> Verify Unified Audit Logging</span></span><span class="EOP SCXW264382529 BCX0" data-ccp-props="{"134233117":false,"134233118":false,"134245418":true,"134245529":true,"335559738":281,"335559739":281}"> is Enabled</span>**</span>

<span style="color: rgb(0, 0, 0);"><span class="TextRun SCXW264382529 BCX0" data-contrast="auto" lang="EN-US" xml:lang="EN-US"><span class="NormalTextRun SCXW264382529 BCX0">Unified Audit Logging must be enabled before accessing data via the Office 365 Management Activity API.</span></span><span class="EOP SCXW264382529 BCX0" data-ccp-props="{"134233117":false,"134233118":false,"335559738":240,"335559739":240}"> </span></span>

<span style="color: rgb(0, 0, 0);">**<span class="TextRun SCXW264382529 BCX0" data-contrast="none" lang="EN-US" xml:lang="EN-US"><span class="NormalTextRun SCXW264382529 BCX0" data-ccp-parastyle="heading 3">Method 1: Using Microsoft 365 Security &amp; Compliance Center</span></span><span class="EOP SCXW264382529 BCX0" data-ccp-props="{"134233117":false,"134233118":false,"134245418":true,"134245529":true,"335559738":281,"335559739":281}"> </span>**</span>

<div class="SCXW264382529 BCX0" id="bkmrk-sign-in-to-microsoft"><div class="ListContainerWrapper SCXW264382529 BCX0">1. <span class="TextRun SCXW264382529 BCX0" data-contrast="auto" lang="EN-US" style="color: rgb(0, 0, 0);" xml:lang="EN-US"><span class="NormalTextRun SCXW264382529 BCX0">Sign in to Microsoft 365:</span></span>
    
    
    - <span style="color: rgb(0, 0, 0);"><span class="TextRun SCXW264382529 BCX0" data-contrast="auto" lang="EN-US" xml:lang="EN-US"><span class="NormalTextRun SCXW264382529 BCX0">Go to </span></span><span style="color: rgb(132, 63, 161);">**[<span class="TextRun Underlined SCXW264382529 BCX0" data-contrast="none" lang="EN-US" xml:lang="EN-US"><span class="NormalTextRun SCXW264382529 BCX0" data-ccp-charstyle="Hyperlink">https://admin.microsoft.com</span></span>](https://admin.microsoft.com/)**</span><span class="TextRun SCXW264382529 BCX0" data-contrast="auto" lang="EN-US" xml:lang="EN-US"><span class="NormalTextRun SCXW264382529 BCX0"> and sign in with your Global Admin credentials.</span></span><span class="EOP SCXW264382529 BCX0" data-ccp-props="{"134233117":false,"134233118":false,"335559738":0,"335559739":0}"> </span></span>

</div></div><div class="SCXW264382529 BCX0" id="bkmrk-access-the-security-"><div class="ListContainerWrapper SCXW264382529 BCX0">2. <span class="TextRun SCXW264382529 BCX0" data-contrast="auto" lang="EN-US" style="color: rgb(0, 0, 0);" xml:lang="EN-US"><span class="NormalTextRun SCXW264382529 BCX0">Access the Security &amp; Compliance Center:</span></span>
    
    
    - <span style="color: rgb(0, 0, 0);"><span class="TextRun SCXW264382529 BCX0" data-contrast="auto" lang="EN-US" xml:lang="EN-US"><span class="NormalTextRun SCXW264382529 BCX0">In the left-hand menu, under </span></span><span class="TextRun SCXW264382529 BCX0" data-contrast="auto" lang="EN-US" xml:lang="EN-US"><span class="NormalTextRun SCXW264382529 BCX0">Admin centers</span></span><span class="TextRun SCXW264382529 BCX0" data-contrast="auto" lang="EN-US" xml:lang="EN-US"><span class="NormalTextRun SCXW264382529 BCX0">, click on </span></span><span class="TextRun SCXW264382529 BCX0" data-contrast="auto" lang="EN-US" xml:lang="EN-US"><span class="NormalTextRun SCXW264382529 BCX0">Security</span></span><span class="TextRun SCXW264382529 BCX0" data-contrast="auto" lang="EN-US" xml:lang="EN-US"><span class="NormalTextRun SCXW264382529 BCX0"> (or go directly to<span style="color: rgb(132, 63, 161);"> </span></span></span><span style="color: rgb(132, 63, 161);">**[<span class="TextRun Underlined SCXW264382529 BCX0" data-contrast="none" lang="EN-US" xml:lang="EN-US"><span class="NormalTextRun SCXW264382529 BCX0" data-ccp-charstyle="Hyperlink">https://security.microsoft.com</span></span>](https://security.microsoft.com/)**</span><span class="TextRun SCXW264382529 BCX0" data-contrast="auto" lang="EN-US" xml:lang="EN-US"><span class="NormalTextRun SCXW264382529 BCX0">).</span></span><span class="EOP SCXW264382529 BCX0" data-ccp-props="{"134233117":false,"134233118":false,"335559738":0,"335559739":0}"> </span></span>

</div><div class="ListContainerWrapper SCXW264382529 BCX0">3. <span class="TextRun SCXW264382529 BCX0" data-contrast="auto" lang="EN-US" style="color: rgb(0, 0, 0);" xml:lang="EN-US"><span class="NormalTextRun SCXW264382529 BCX0">Navigate to Audit Log Search:</span></span>
    
    
    - <span style="color: rgb(0, 0, 0);"><span class="TextRun SCXW264382529 BCX0" data-contrast="auto" lang="EN-US" xml:lang="EN-US"><span class="NormalTextRun SCXW264382529 BCX0">In the Security &amp; Compliance Center, go to </span></span><span class="TextRun SCXW264382529 BCX0" data-contrast="auto" lang="EN-US" xml:lang="EN-US"><span class="NormalTextRun SCXW264382529 BCX0">Search</span></span><span class="TextRun SCXW264382529 BCX0" data-contrast="auto" lang="EN-US" xml:lang="EN-US"><span class="NormalTextRun SCXW264382529 BCX0"> in the left-hand menu and click on </span></span>**<span class="TextRun SCXW264382529 BCX0" data-contrast="auto" lang="EN-US" xml:lang="EN-US"><span class="NormalTextRun SCXW264382529 BCX0">Audit log search</span></span>**<span class="TextRun SCXW264382529 BCX0" data-contrast="auto" lang="EN-US" xml:lang="EN-US"><span class="NormalTextRun SCXW264382529 BCX0">.</span></span><span class="EOP SCXW264382529 BCX0" data-ccp-props="{"134233117":false,"134233118":false,"335559738":0,"335559739":0}"> </span></span>

</div><div class="ListContainerWrapper SCXW264382529 BCX0">4. <span class="TextRun SCXW264382529 BCX0" data-contrast="auto" lang="EN-US" style="color: rgb(0, 0, 0);" xml:lang="EN-US"><span class="NormalTextRun SCXW264382529 BCX0">Check Audit Log Status:</span></span>
    
    
    - <span class="TextRun SCXW264382529 BCX0" data-contrast="auto" lang="EN-US" style="color: rgb(0, 0, 0);" xml:lang="EN-US"><span class="NormalTextRun SCXW264382529 BCX0">If you see </span><span class="NormalTextRun SCXW264382529 BCX0">an option</span><span class="NormalTextRun SCXW264382529 BCX0"> to **search the audit log**, then audit logging is already enabled(<span style="color: rgb(224, 62, 45);">*refer to the image below*</span>).</span></span>
    - <span style="color: rgb(0, 0, 0);"><span class="TextRun SCXW264382529 BCX0" data-contrast="auto" lang="EN-US" xml:lang="EN-US"><span class="NormalTextRun SCXW264382529 BCX0">If you see a banner that says "**Start recording user and admin activity**" or a prompt to enable auditing, it means that audit logging is not yet enabled.</span></span><span class="EOP SCXW264382529 BCX0" data-ccp-props="{"134233117":false,"134233118":false,"335559738":0,"335559739":0}"> </span></span>

</div><div class="ListContainerWrapper SCXW264382529 BCX0">  
</div></div><span class="EOP SCXW264382529 BCX0" data-ccp-props="{"134233117":false,"134233118":false,"335559738":0,"335559739":0}" style="color: rgb(0, 0, 0);">[![image (2).png](https://cytechint-docs-bookstack.s3.amazonaws.com/uploads/images/gallery/2025-05/scaled-1680-/WHIm6mw3MmYsEzmv-image-2.png)](https://cytechint-docs-bookstack.s3.amazonaws.com/uploads/images/gallery/2025-05/WHIm6mw3MmYsEzmv-image-2.png)</span>

<div class="SCXW264382529 BCX0" id="bkmrk-enable-audit-logging"><div class="ListContainerWrapper SCXW264382529 BCX0">  
</div><div class="ListContainerWrapper SCXW264382529 BCX0">5. <span class="TextRun SCXW264382529 BCX0" data-contrast="auto" lang="EN-US" style="color: rgb(0, 0, 0);" xml:lang="EN-US"><span class="NormalTextRun SCXW264382529 BCX0">Enable Audit Logging:</span></span>
    
    
    - <span style="color: rgb(0, 0, 0);"><span class="TextRun SCXW264382529 BCX0" data-contrast="auto" lang="EN-US" xml:lang="EN-US"><span class="NormalTextRun SCXW264382529 BCX0">If audit logging is not enabled, you can **click on the prompt to enable it**. This will enable auditing for all activities within your Microsoft 365 environment. The process may take a few hours to be fully operational.</span></span><span class="EOP SCXW264382529 BCX0" data-ccp-props="{"134233117":false,"134233118":false,"335559738":0,"335559739":0}"> </span></span>

</div></div>---

<span style="color: rgb(53, 152, 219);">**Microsoft Purview DLP Policy Creation – General Instruction Manual**</span>

---

#### <span style="color: rgb(53, 152, 219);">**Overview: Key Factors to Consider Before Creating a DLP Policy**</span>

<span style="color: rgb(0, 0, 0);">Before you create any DLP policy, take time to understand and document the following:</span>

##### <span style="color: rgb(0, 0, 0);">1. **Data Sensitivity and Classification**</span>

- <span style="color: rgb(0, 0, 0);">What types of sensitive information need protection?</span>
    
    
    - <span style="color: rgb(0, 0, 0);">e.g., Credit card numbers, health records, national IDs, business secrets</span>
- <span style="color: rgb(0, 0, 0);">Are sensitivity labels already being used (e.g., “Highly Confidential”)?</span>

##### <span style="color: rgb(0, 0, 0);">2. **Data Locations**</span>

- <span style="color: rgb(0, 0, 0);">Where does your organization store and share data?</span>
    
    
    - <span style="color: rgb(0, 0, 0);">Email (Exchange Online), OneDrive, SharePoint, Teams, Devices, or 3rd party apps</span>

##### <span style="color: rgb(0, 0, 0);">3. **User Scope**</span>

- <span style="color: rgb(0, 0, 0);">Who should the policy apply to?</span>
    
    
    - <span style="color: rgb(0, 0, 0);">All users, specific departments (e.g., HR, Finance), or external collaborators?</span>

##### <span style="color: rgb(0, 0, 0);">4. **Policy Actions**</span>

- <span style="color: rgb(0, 0, 0);">What should happen when sensitive data is detected?</span>
    
    
    - <span style="color: rgb(0, 0, 0);">Block sharing, restrict access, encrypt, notify, log for audit</span>

##### <span style="color: rgb(0, 0, 0);">5. **Exceptions or Conditions**</span>

- <span style="color: rgb(0, 0, 0);">Are there any legitimate business needs that require exceptions?</span>
    
    
    - <span style="color: rgb(0, 0, 0);">e.g., Finance team emailing payroll data to a vendor</span>

##### <span style="color: rgb(0, 0, 0);">6. **Notifications and Overrides**</span>

- <span style="color: rgb(0, 0, 0);">Should users be notified?</span>
- <span style="color: rgb(0, 0, 0);">Should policy tips be shown?</span>
- <span style="color: rgb(0, 0, 0);">Should users be allowed to override and justify? (For high-severity events, this is often disabled.)</span>

##### <span style="color: rgb(0, 0, 0);">7. **Audit and Investigation**</span>

- <span style="color: rgb(0, 0, 0);">Should each incident trigger admin alerts?</span>
- <span style="color: rgb(0, 0, 0);">What severity level should be set for reporting and analytics?</span>

---

#### <span style="color: rgb(53, 152, 219);">**Step-by-Step Guide: Creating a DLP Policy in Microsoft Purview**</span>

##### <span style="color: rgb(0, 0, 0);">**Step 1: Access the Microsoft Purview Portal**</span>

1. <span style="color: rgb(0, 0, 0);">Go to **<span style="color: rgb(132, 63, 161);">[https://purview.microsoft.com/](https://purview.microsoft.com/)</span>**</span>
2. <span style="color: rgb(0, 0, 0);">Navigate to: **Solutions &gt; Data loss prevention &gt; Policies**</span>

---

##### <span style="color: rgb(0, 0, 0);">**Step 2: Create a New Policy**</span>

1. <span style="color: rgb(0, 0, 0);">Click **+ Create policy**</span>
2. <span style="color: rgb(0, 0, 0);">Choose a template based on your scenario:</span>
    
    
    - <span style="color: rgb(0, 0, 0);">Predefined compliance regulations (e.g., GDPR, HIPAA)</span>
    - <span style="color: rgb(0, 0, 0);">**Custom policy** for flexibility</span>

---

##### <span style="color: rgb(0, 0, 0);">**Step 3: Name &amp; Describe the Policy**</span>

- <span style="color: rgb(0, 0, 0);">Provide a clear **name** and a short **description** of what the policy is intended to do.</span>
- <span style="color: rgb(0, 0, 0);">Tip: Include the policy intent (who it applies to, what it blocks, exceptions).</span>

---

##### <span style="color: rgb(0, 0, 0);"> **Step 4: Define Admin Scope**</span>

- <span style="color: rgb(0, 0, 0);">Select **Admin units** or apply the policy to the **entire organization** (default).</span>
- <span style="color: rgb(0, 0, 0);">Choose **Next**.</span>

---

##### <span style="color: rgb(0, 0, 0);"> **Step 5: Select Locations to Monitor**</span>

- <span style="color: rgb(0, 0, 0);">Choose the services where the policy will be active:</span>
    
    
    - <span style="color: rgb(0, 0, 0);">**Exchange email**</span>
    - <span style="color: rgb(0, 0, 0);">**SharePoint Online**</span>
    - <span style="color: rgb(0, 0, 0);">**OneDrive**</span>
    - <span style="color: rgb(0, 0, 0);">**Microsoft Teams**</span>
    - <span style="color: rgb(0, 0, 0);">**Devices** (if endpoint DLP is configured)</span>

---

##### <span style="color: rgb(0, 0, 0);">**Step 6: Define Policy Rules**</span>

1. <span style="color: rgb(0, 0, 0);">Choose: **Create or customize advanced DLP rules**</span>
2. <span style="color: rgb(0, 0, 0);">Click **Create rule**</span>
3. <span style="color: rgb(0, 0, 0);">Configure the rule components:</span>

**<span style="color: rgb(0, 0, 0);">A. Conditions</span>**

- <span style="color: rgb(0, 0, 0);">Define what triggers the rule:</span>
    
    
    - <span style="color: rgb(0, 0, 0);">**Sensitive info types** (e.g., Credit Card Number)</span>
    - <span style="color: rgb(0, 0, 0);">**Sensitivity labels** (e.g., Highly Confidential)</span>
    - <span style="color: rgb(0, 0, 0);">**File types, file extensions, sharing context**, etc.</span>

**<span style="color: rgb(0, 0, 0);">B. Exceptions (Optional)</span>**

- <span style="color: rgb(0, 0, 0);">Add **exception groups** using a **Boolean NOT operator**</span>
    
    
    - <span style="color: rgb(0, 0, 0);">Example: Sender is in “Finance Team” AND recipient is “<a class="cursor-pointer" data-end="3387" data-start="3363" rel="noopener" style="color: rgb(0, 0, 0);">trustedvendor@domain.com</a>”</span>

**<span style="color: rgb(0, 0, 0);">C. Actions</span>**

- <span style="color: rgb(0, 0, 0);">Choose what to do when the condition is met:</span>
    
    
    - <span style="color: rgb(0, 0, 0);">**Block**, **Restrict**, or **Encrypt** content</span>
    - <span style="color: rgb(0, 0, 0);">**Audit only** for simulation/testing</span>

**<span style="color: rgb(0, 0, 0);">D. User Notifications</span>**

- <span style="color: rgb(0, 0, 0);">Enable **notifications** to senders/editors</span>
- <span style="color: rgb(0, 0, 0);">Show **policy tips** in apps (e.g., Outlook, Word)</span>

**<span style="color: rgb(0, 0, 0);">E. Override Settings</span>**

- <span style="color: rgb(0, 0, 0);">Allow or disallow users to override the block by providing a justification</span>

**<span style="color: rgb(0, 0, 0);">F. Incident Reporting</span>**

- <span style="color: rgb(0, 0, 0);">Set **severity level** (Low, Medium, High)</span>
- <span style="color: rgb(0, 0, 0);">Enable **alerts** to compliance/admin teams</span>

---

##### <span style="color: rgb(0, 0, 0);">**Step 7: Finalize and Simulate**</span>

1. <span style="color: rgb(0, 0, 0);">Review the settings</span>
2. <span style="color: rgb(0, 0, 0);">Choose to run the policy in **simulation mode** (recommended for testing)</span>
3. <span style="color: rgb(0, 0, 0);">Click **Submit** to create the policy</span>

---

#### <span style="color: rgb(53, 152, 219);">**Post-Creation Tips**</span>

- <span style="color: rgb(0, 0, 0);">**Simulation Mode**: Monitor effectiveness before enforcement</span>
- <span style="color: rgb(0, 0, 0);">**Policy Testing**: Use test data to trigger the policy and confirm expected behavior</span>
- <span style="color: rgb(0, 0, 0);">**Policy Reports**: View violations under **Reports** &gt; DLP alerts</span>
- <span style="color: rgb(0, 0, 0);">**Fine-tune**: Adjust thresholds, exceptions, and scope as needed</span>

---

#### **<span style="color: rgb(53, 152, 219);">Example Use Cases You Can Build From</span>**

<div class="_tableContainer_80l1q_1" id="bkmrk-scenario-example-pol"><div class="_tableWrapper_80l1q_14 group flex w-fit flex-col-reverse" tabindex="-1"><table class="w-fit min-w-(--thread-content-width)" data-end="5007" data-start="4469" style="width: 93.2143%;"><thead data-end="4512" data-start="4469"><tr data-end="4512" data-start="4469"><th data-col-size="md" data-end="4480" data-start="4469" style="width: 59.3406%;"><span style="color: rgb(0, 0, 0);">Scenario</span></th><th data-col-size="md" data-end="4512" data-start="4480" style="width: 40.6594%;"><span style="color: rgb(0, 0, 0);">Example Policy Configuration</span></th></tr></thead><tbody data-end="5007" data-start="4558"><tr data-end="4693" data-start="4558"><td data-col-size="md" data-end="4612" data-start="4558" style="width: 59.3406%;"><span style="color: rgb(0, 0, 0);">Prevent employees from emailing credit card numbers</span></td><td data-col-size="md" data-end="4693" data-start="4612" style="width: 40.6594%;"><span style="color: rgb(0, 0, 0);">Condition: Credit Card Info</span>  
<span style="color: rgb(0, 0, 0);">Action: Block email</span>  
<span style="color: rgb(0, 0, 0);">Notify sender and admin</span></td></tr><tr data-end="4851" data-start="4694"><td data-col-size="md" data-end="4763" data-start="4694" style="width: 59.3406%;"><span style="color: rgb(0, 0, 0);">Warn users about sharing internal-only content to external domains</span></td><td data-col-size="md" data-end="4851" data-start="4763" style="width: 40.6594%;"><span style="color: rgb(0, 0, 0);">Condition: Sensitivity label = Internal</span>  
<span style="color: rgb(0, 0, 0);">Action: Show policy tip</span>  
<span style="color: rgb(0, 0, 0);">Allow override</span></td></tr><tr data-end="5007" data-start="4852"><td data-col-size="md" data-end="4907" data-start="4852" style="width: 59.3406%;"><span style="color: rgb(0, 0, 0);">Restrict uploading HR documents to personal OneDrive</span></td><td data-col-size="md" data-end="5007" data-start="4907" style="width: 40.6594%;"><span style="color: rgb(0, 0, 0);">Condition: HR keyword or file name</span>  
<span style="color: rgb(0, 0, 0);">Location: Devices</span>  
<span style="color: rgb(0, 0, 0);">Action: Block upload to personal apps</span></td></tr></tbody></table>

</div></div><span style="color: rgb(0, 0, 0);">*If you need further assistance, kindly contact our support at* <span style="color: rgb(53, 152, 219);">***support@cytechint.com***</span> *for prompt assistance and guidance.*</span>

# Microsoft Audit Logs vs Compliance Alerts for SOC Monitoring

---

### <span style="color: rgb(53, 152, 219);">1. Overview</span>

<span style="color: rgb(0, 0, 0);">This report outlines the key differences, advantages, disadvantages, and recommendations for using Microsoft Audit Logs and Microsoft Compliance Alerts in the context of Security Operations Center (SOC) monitoring.</span>

---

### <span style="color: rgb(53, 152, 219);">2. Definition and Purpose</span>

<span style="color: rgb(0, 0, 0);">**Microsoft Audit Logs**</span>

- <span style="color: rgb(0, 0, 0);">Provide detailed records of all user and administrator activities across Microsoft 365 services.</span>
- <span style="color: rgb(0, 0, 0);">Useful for tracking actions such as logins, file access, configuration changes, etc.</span>

<span style="color: rgb(0, 0, 0);">**Microsoft Compliance Alerts**</span>

- <span style="color: rgb(0, 0, 0);">Triggered based on specific compliance or security policies configured in Microsoft Purview.</span>
- <span style="color: rgb(0, 0, 0);">Designed to notify on suspicious, risky, or policy-violating behavior.</span>

---

### <span style="color: rgb(53, 152, 219);">3. Key Differences</span>

<div class="_tableContainer_1rjym_1" id="bkmrk-attribute-microsoft-"><div class="_tableWrapper_1rjym_13 group flex w-fit flex-col-reverse" tabindex="-1"><table class="w-fit min-w-(--thread-content-width)" data-end="2175" data-start="960"><thead data-end="1094" data-start="960"><tr data-end="1094" data-start="960"><th data-col-size="sm" data-end="995" data-start="960"><span style="color: rgb(0, 0, 0);">Attribute</span></th><th data-col-size="sm" data-end="1043" data-start="995"><span style="color: rgb(0, 0, 0);">Microsoft Audit Logs</span></th><th data-col-size="md" data-end="1094" data-start="1043"><span style="color: rgb(0, 0, 0);">Microsoft Compliance Alerts</span></th></tr></thead><tbody data-end="2175" data-start="1230"><tr data-end="1364" data-start="1230"><td data-col-size="sm" data-end="1265" data-start="1230"><span style="color: rgb(0, 0, 0);">Data Source</span></td><td data-col-size="sm" data-end="1313" data-start="1265"><span style="color: rgb(0, 0, 0);">Microsoft 365 Unified Audit Log (UAL)</span></td><td data-col-size="md" data-end="1364" data-start="1313"><span style="color: rgb(0, 0, 0);">Microsoft Purview (Compliance Center)</span></td></tr><tr data-end="1500" data-start="1365"><td data-col-size="sm" data-end="1400" data-start="1365"><span style="color: rgb(0, 0, 0);">Primary Use</span></td><td data-col-size="sm" data-end="1448" data-start="1400"><span style="color: rgb(0, 0, 0);">Activity tracking, investigations</span></td><td data-col-size="md" data-end="1500" data-start="1448"><span style="color: rgb(0, 0, 0);">Policy violation detection, real-time alerts</span></td></tr><tr data-end="1635" data-start="1501"><td data-col-size="sm" data-end="1536" data-start="1501"><span style="color: rgb(0, 0, 0);">Data Format</span></td><td data-col-size="sm" data-end="1584" data-start="1536"><span style="color: rgb(0, 0, 0);">Raw, event-based logs</span></td><td data-col-size="md" data-end="1635" data-start="1584"><span style="color: rgb(0, 0, 0);">Structured, policy-based alerts</span></td></tr><tr data-end="1770" data-start="1636"><td data-col-size="sm" data-end="1671" data-start="1636"><span style="color: rgb(0, 0, 0);">Trigger Method</span></td><td data-col-size="sm" data-end="1719" data-start="1671"><span style="color: rgb(0, 0, 0);">Logs all user/admin activities</span></td><td data-col-size="md" data-end="1770" data-start="1719"><span style="color: rgb(0, 0, 0);">Fires only when policies are breached</span></td></tr><tr data-end="1905" data-start="1771"><td data-col-size="sm" data-end="1806" data-start="1771"><span style="color: rgb(0, 0, 0);">Integration</span></td><td data-col-size="sm" data-end="1854" data-start="1806"><span style="color: rgb(0, 0, 0);">Supports SIEM integration</span></td><td data-col-size="md" data-end="1905" data-start="1854"><span style="color: rgb(0, 0, 0);">Supports alerting systems and workflows</span></td></tr><tr data-end="2040" data-start="1906"><td data-col-size="sm" data-end="1941" data-start="1906"><span style="color: rgb(0, 0, 0);">Licensing</span></td><td data-col-size="sm" data-end="1989" data-start="1941"><span style="color: rgb(0, 0, 0);">M365 E3/E5 (details improve with E5)</span></td><td data-col-size="md" data-end="2040" data-start="1989"><span style="color: rgb(0, 0, 0);">Requires M365 E5 or specific add-on licensing</span></td></tr><tr data-end="2175" data-start="2041"><td data-col-size="sm" data-end="2076" data-start="2041"><span style="color: rgb(0, 0, 0);">Retention</span></td><td data-col-size="sm" data-end="2124" data-start="2076"><span style="color: rgb(0, 0, 0);">Up to 1 year (based on license tier)</span></td><td data-col-size="md" data-end="2175" data-start="2124"><span style="color: rgb(0, 0, 0);">Retention defined by alert settings</span></td></tr></tbody></table>

<div class="sticky end-(--thread-content-margin) h-0 self-end select-none"><div class="absolute end-0 flex items-end"><span class="" data-state="closed" style="color: rgb(0, 0, 0);"><button aria-label="Copy Table" class="hover:bg-token-bg-tertiary text-token-text-secondary my-1 rounded-sm p-1 transition-opacity group-[:not(:hover):not(:focus-within)]:pointer-events-none group-[:not(:hover):not(:focus-within)]:opacity-0"><svg class="icon" fill="currentColor" height="20" viewbox="0 0 20 20" width="20" xmlns="http://www.w3.org/2000/svg"><path d="M12.668 10.667C12.668 9.95614 12.668 9.46258 12.6367 9.0791C12.6137 8.79732 12.5758 8.60761 12.5244 8.46387L12.4688 8.33399C12.3148 8.03193 12.0803 7.77885 11.793 7.60254L11.666 7.53125C11.508 7.45087 11.2963 7.39395 10.9209 7.36328C10.5374 7.33197 10.0439 7.33203 9.33301 7.33203H6.5C5.78896 7.33203 5.29563 7.33195 4.91211 7.36328C4.63016 7.38632 4.44065 7.42413 4.29688 7.47559L4.16699 7.53125C3.86488 7.68518 3.61186 7.9196 3.43555 8.20703L3.36524 8.33399C3.28478 8.49198 3.22795 8.70352 3.19727 9.0791C3.16595 9.46259 3.16504 9.95611 3.16504 10.667V13.5C3.16504 14.211 3.16593 14.7044 3.19727 15.0879C3.22797 15.4636 3.28473 15.675 3.36524 15.833L3.43555 15.959C3.61186 16.2466 3.86474 16.4807 4.16699 16.6348L4.29688 16.6914C4.44063 16.7428 4.63025 16.7797 4.91211 16.8027C5.29563 16.8341 5.78896 16.835 6.5 16.835H9.33301C10.0439 16.835 10.5374 16.8341 10.9209 16.8027C11.2965 16.772 11.508 16.7152 11.666 16.6348L11.793 16.5645C12.0804 16.3881 12.3148 16.1351 12.4688 15.833L12.5244 15.7031C12.5759 15.5594 12.6137 15.3698 12.6367 15.0879C12.6681 14.7044 12.668 14.211 12.668 13.5V10.667ZM13.998 12.665C14.4528 12.6634 14.8011 12.6602 15.0879 12.6367C15.4635 12.606 15.675 12.5492 15.833 12.4688L15.959 12.3975C16.2466 12.2211 16.4808 11.9682 16.6348 11.666L16.6914 11.5361C16.7428 11.3924 16.7797 11.2026 16.8027 10.9209C16.8341 10.5374 16.835 10.0439 16.835 9.33301V6.5C16.835 5.78896 16.8341 5.29563 16.8027 4.91211C16.7797 4.63025 16.7428 4.44063 16.6914 4.29688L16.6348 4.16699C16.4807 3.86474 16.2466 3.61186 15.959 3.43555L15.833 3.36524C15.675 3.28473 15.4636 3.22797 15.0879 3.19727C14.7044 3.16593 14.211 3.16504 13.5 3.16504H10.667C9.9561 3.16504 9.46259 3.16595 9.0791 3.19727C8.79739 3.22028 8.6076 3.2572 8.46387 3.30859L8.33399 3.36524C8.03176 3.51923 7.77886 3.75343 7.60254 4.04102L7.53125 4.16699C7.4508 4.32498 7.39397 4.53655 7.36328 4.91211C7.33985 5.19893 7.33562 5.54719 7.33399 6.00195H9.33301C10.022 6.00195 10.5791 6.00131 11.0293 6.03809C11.4873 6.07551 11.8937 6.15471 12.2705 6.34668L12.4883 6.46875C12.984 6.7728 13.3878 7.20854 13.6533 7.72949L13.7197 7.87207C13.8642 8.20859 13.9292 8.56974 13.9619 8.9707C13.9987 9.42092 13.998 9.97799 13.998 10.667V12.665ZM18.165 9.33301C18.165 10.022 18.1657 10.5791 18.1289 11.0293C18.0961 11.4302 18.0311 11.7914 17.8867 12.1279L17.8203 12.2705C17.5549 12.7914 17.1509 13.2272 16.6553 13.5313L16.4365 13.6533C16.0599 13.8452 15.6541 13.9245 15.1963 13.9619C14.8593 13.9895 14.4624 13.9935 13.9951 13.9951C13.9935 14.4624 13.9895 14.8593 13.9619 15.1963C13.9292 15.597 13.864 15.9576 13.7197 16.2939L13.6533 16.4365C13.3878 16.9576 12.9841 17.3941 12.4883 17.6982L12.2705 17.8203C11.8937 18.0123 11.4873 18.0915 11.0293 18.1289C10.5791 18.1657 10.022 18.165 9.33301 18.165H6.5C5.81091 18.165 5.25395 18.1657 4.80371 18.1289C4.40306 18.0962 4.04235 18.031 3.70606 17.8867L3.56348 17.8203C3.04244 17.5548 2.60585 17.151 2.30176 16.6553L2.17969 16.4365C1.98788 16.0599 1.90851 15.6541 1.87109 15.1963C1.83431 14.746 1.83496 14.1891 1.83496 13.5V10.667C1.83496 9.978 1.83432 9.42091 1.87109 8.9707C1.90851 8.5127 1.98772 8.10625 2.17969 7.72949L2.30176 7.51172C2.60586 7.0159 3.04236 6.6122 3.56348 6.34668L3.70606 6.28027C4.04237 6.136 4.40303 6.07083 4.80371 6.03809C5.14051 6.01057 5.53708 6.00551 6.00391 6.00391C6.00551 5.53708 6.01057 5.14051 6.03809 4.80371C6.0755 4.34588 6.15483 3.94012 6.34668 3.56348L6.46875 3.34473C6.77282 2.84912 7.20856 2.44514 7.72949 2.17969L7.87207 2.11328C8.20855 1.96886 8.56979 1.90385 8.9707 1.87109C9.42091 1.83432 9.978 1.83496 10.667 1.83496H13.5C14.1891 1.83496 14.746 1.83431 15.1963 1.87109C15.6541 1.90851 16.0599 1.98788 16.4365 2.17969L16.6553 2.30176C17.151 2.60585 17.5548 3.04244 17.8203 3.56348L17.8867 3.70606C18.031 4.04235 18.0962 4.40306 18.1289 4.80371C18.1657 5.25395 18.165 5.81091 18.165 6.5V9.33301Z"></path></svg></button></span></div></div></div></div>---

### <span style="color: rgb(53, 152, 219);">4. Pros and Cons</span>

<span style="color: rgb(0, 0, 0);">**Microsoft Audit Logs**</span>

- <span style="color: rgb(0, 0, 0);">**Pros:**</span>
    
    
    - <span style="color: rgb(0, 0, 0);">Detailed, timestamped activity records.</span>
    - <span style="color: rgb(0, 0, 0);">Broad visibility across services.</span>
    - <span style="color: rgb(0, 0, 0);">Excellent for historical analysis and forensic investigations.</span>
    - <span style="color: rgb(0, 0, 0);">Integrates well with SIEMs for event correlation.</span>
- <span style="color: rgb(0, 0, 0);">**Cons:**</span>
    
    
    - <span style="color: rgb(0, 0, 0);">Not real-time; requires manual or scheduled processing.</span>
    - <span style="color: rgb(0, 0, 0);">High volume and can be noisy without filtering.</span>
    - <span style="color: rgb(0, 0, 0);">Requires parsing and context-building for actionable insights.</span>

<span style="color: rgb(0, 0, 0);">**Microsoft Compliance Alerts**</span>

- <span style="color: rgb(0, 0, 0);">**Pros:**</span>
    
    
    - <span style="color: rgb(0, 0, 0);">Provides real-time detection of compliance or security policy violations.</span>
    - <span style="color: rgb(0, 0, 0);">Easy to configure and link to automated workflows or notifications.</span>
    - <span style="color: rgb(0, 0, 0);">Useful for detecting insider threats, DLP violations, or unusual behavior.</span>
- <span style="color: rgb(0, 0, 0);">**Cons:**</span>
    
    
    - <span style="color: rgb(0, 0, 0);">Alert coverage limited to configured policies only.</span>
    - <span style="color: rgb(0, 0, 0);">Less raw detail compared to audit logs.</span>
    - <span style="color: rgb(0, 0, 0);">May produce false positives if rules are not refined.</span>

---

### <span style="color: rgb(53, 152, 219);">5. Recommendations for SOC Monitoring</span>

<div class="_tableContainer_1rjym_1" id="bkmrk-monitoring-need-reco"><div class="_tableWrapper_1rjym_13 group flex w-fit flex-col-reverse" tabindex="-1"><table class="w-fit min-w-(--thread-content-width)" data-end="3613" data-start="3132"><thead data-end="3198" data-start="3132"><tr data-end="3198" data-start="3132"><th data-col-size="sm" data-end="3166" data-start="3132"><span style="color: rgb(0, 0, 0);">Monitoring Need</span></th><th data-col-size="md" data-end="3198" data-start="3166"><span style="color: rgb(0, 0, 0);">Recommended Source</span></th></tr></thead><tbody data-end="3613" data-start="3265"><tr data-end="3331" data-start="3265"><td data-col-size="sm" data-end="3299" data-start="3265"><span style="color: rgb(0, 0, 0);">Real-Time Threat Detection</span></td><td data-col-size="md" data-end="3331" data-start="3299"><span style="color: rgb(0, 0, 0);">Microsoft Compliance Alerts</span></td></tr><tr data-end="3398" data-start="3332"><td data-col-size="sm" data-end="3366" data-start="3332"><span style="color: rgb(0, 0, 0);">Threat Hunting / Investigations</span></td><td data-col-size="md" data-end="3398" data-start="3366"><span style="color: rgb(0, 0, 0);">Microsoft Audit Logs</span></td></tr><tr data-end="3464" data-start="3399"><td data-col-size="sm" data-end="3435" data-start="3399"><span style="color: rgb(0, 0, 0);">Forensics and Root Cause Analysis</span></td><td data-col-size="md" data-end="3464" data-start="3435"><span style="color: rgb(0, 0, 0);">Microsoft Audit Logs</span></td></tr><tr data-end="3531" data-start="3465"><td data-col-size="sm" data-end="3499" data-start="3465"><span style="color: rgb(0, 0, 0);">Policy Enforcement Monitoring</span></td><td data-col-size="md" data-end="3531" data-start="3499"><span style="color: rgb(0, 0, 0);">Microsoft Compliance Alerts</span></td></tr><tr data-end="3613" data-start="3532"><td data-col-size="sm" data-end="3566" data-start="3532"><span style="color: rgb(0, 0, 0);">SIEM Event Correlation</span></td><td data-col-size="md" data-end="3613" data-start="3566"><span style="color: rgb(0, 0, 0);">Both (Audit for context, Alerts for signal)</span></td></tr></tbody></table>

<div class="sticky end-(--thread-content-margin) h-0 self-end select-none"><div class="absolute end-0 flex items-end"><span class="" data-state="closed" style="color: rgb(0, 0, 0);"><button aria-label="Copy Table" class="hover:bg-token-bg-tertiary text-token-text-secondary my-1 rounded-sm p-1 transition-opacity group-[:not(:hover):not(:focus-within)]:pointer-events-none group-[:not(:hover):not(:focus-within)]:opacity-0"><svg class="icon" fill="currentColor" height="20" viewbox="0 0 20 20" width="20" xmlns="http://www.w3.org/2000/svg"><path d="M12.668 10.667C12.668 9.95614 12.668 9.46258 12.6367 9.0791C12.6137 8.79732 12.5758 8.60761 12.5244 8.46387L12.4688 8.33399C12.3148 8.03193 12.0803 7.77885 11.793 7.60254L11.666 7.53125C11.508 7.45087 11.2963 7.39395 10.9209 7.36328C10.5374 7.33197 10.0439 7.33203 9.33301 7.33203H6.5C5.78896 7.33203 5.29563 7.33195 4.91211 7.36328C4.63016 7.38632 4.44065 7.42413 4.29688 7.47559L4.16699 7.53125C3.86488 7.68518 3.61186 7.9196 3.43555 8.20703L3.36524 8.33399C3.28478 8.49198 3.22795 8.70352 3.19727 9.0791C3.16595 9.46259 3.16504 9.95611 3.16504 10.667V13.5C3.16504 14.211 3.16593 14.7044 3.19727 15.0879C3.22797 15.4636 3.28473 15.675 3.36524 15.833L3.43555 15.959C3.61186 16.2466 3.86474 16.4807 4.16699 16.6348L4.29688 16.6914C4.44063 16.7428 4.63025 16.7797 4.91211 16.8027C5.29563 16.8341 5.78896 16.835 6.5 16.835H9.33301C10.0439 16.835 10.5374 16.8341 10.9209 16.8027C11.2965 16.772 11.508 16.7152 11.666 16.6348L11.793 16.5645C12.0804 16.3881 12.3148 16.1351 12.4688 15.833L12.5244 15.7031C12.5759 15.5594 12.6137 15.3698 12.6367 15.0879C12.6681 14.7044 12.668 14.211 12.668 13.5V10.667ZM13.998 12.665C14.4528 12.6634 14.8011 12.6602 15.0879 12.6367C15.4635 12.606 15.675 12.5492 15.833 12.4688L15.959 12.3975C16.2466 12.2211 16.4808 11.9682 16.6348 11.666L16.6914 11.5361C16.7428 11.3924 16.7797 11.2026 16.8027 10.9209C16.8341 10.5374 16.835 10.0439 16.835 9.33301V6.5C16.835 5.78896 16.8341 5.29563 16.8027 4.91211C16.7797 4.63025 16.7428 4.44063 16.6914 4.29688L16.6348 4.16699C16.4807 3.86474 16.2466 3.61186 15.959 3.43555L15.833 3.36524C15.675 3.28473 15.4636 3.22797 15.0879 3.19727C14.7044 3.16593 14.211 3.16504 13.5 3.16504H10.667C9.9561 3.16504 9.46259 3.16595 9.0791 3.19727C8.79739 3.22028 8.6076 3.2572 8.46387 3.30859L8.33399 3.36524C8.03176 3.51923 7.77886 3.75343 7.60254 4.04102L7.53125 4.16699C7.4508 4.32498 7.39397 4.53655 7.36328 4.91211C7.33985 5.19893 7.33562 5.54719 7.33399 6.00195H9.33301C10.022 6.00195 10.5791 6.00131 11.0293 6.03809C11.4873 6.07551 11.8937 6.15471 12.2705 6.34668L12.4883 6.46875C12.984 6.7728 13.3878 7.20854 13.6533 7.72949L13.7197 7.87207C13.8642 8.20859 13.9292 8.56974 13.9619 8.9707C13.9987 9.42092 13.998 9.97799 13.998 10.667V12.665ZM18.165 9.33301C18.165 10.022 18.1657 10.5791 18.1289 11.0293C18.0961 11.4302 18.0311 11.7914 17.8867 12.1279L17.8203 12.2705C17.5549 12.7914 17.1509 13.2272 16.6553 13.5313L16.4365 13.6533C16.0599 13.8452 15.6541 13.9245 15.1963 13.9619C14.8593 13.9895 14.4624 13.9935 13.9951 13.9951C13.9935 14.4624 13.9895 14.8593 13.9619 15.1963C13.9292 15.597 13.864 15.9576 13.7197 16.2939L13.6533 16.4365C13.3878 16.9576 12.9841 17.3941 12.4883 17.6982L12.2705 17.8203C11.8937 18.0123 11.4873 18.0915 11.0293 18.1289C10.5791 18.1657 10.022 18.165 9.33301 18.165H6.5C5.81091 18.165 5.25395 18.1657 4.80371 18.1289C4.40306 18.0962 4.04235 18.031 3.70606 17.8867L3.56348 17.8203C3.04244 17.5548 2.60585 17.151 2.30176 16.6553L2.17969 16.4365C1.98788 16.0599 1.90851 15.6541 1.87109 15.1963C1.83431 14.746 1.83496 14.1891 1.83496 13.5V10.667C1.83496 9.978 1.83432 9.42091 1.87109 8.9707C1.90851 8.5127 1.98772 8.10625 2.17969 7.72949L2.30176 7.51172C2.60586 7.0159 3.04236 6.6122 3.56348 6.34668L3.70606 6.28027C4.04237 6.136 4.40303 6.07083 4.80371 6.03809C5.14051 6.01057 5.53708 6.00551 6.00391 6.00391C6.00551 5.53708 6.01057 5.14051 6.03809 4.80371C6.0755 4.34588 6.15483 3.94012 6.34668 3.56348L6.46875 3.34473C6.77282 2.84912 7.20856 2.44514 7.72949 2.17969L7.87207 2.11328C8.20855 1.96886 8.56979 1.90385 8.9707 1.87109C9.42091 1.83432 9.978 1.83496 10.667 1.83496H13.5C14.1891 1.83496 14.746 1.83431 15.1963 1.87109C15.6541 1.90851 16.0599 1.98788 16.4365 2.17969L16.6553 2.30176C17.151 2.60585 17.5548 3.04244 17.8203 3.56348L17.8867 3.70606C18.031 4.04235 18.0962 4.40306 18.1289 4.80371C18.1657 5.25395 18.165 5.81091 18.165 6.5V9.33301Z"></path></svg></button></span></div></div></div></div>---

### <span style="color: rgb(53, 152, 219);">6. Conclusion</span>

<span style="color: rgb(0, 0, 0);">For a complete SOC monitoring strategy, both Microsoft Audit Logs and Compliance Alerts should be used in tandem. Audit Logs provide the necessary historical detail for investigations and context, while Compliance Alerts offer timely awareness of potential security or compliance issues. Combining both ensures improved visibility, faster response times, and better alignment with security and regulatory requirements.</span>

# Microsoft SQL Server Integration

The Microsoft SQL Server integration package allows you to search, observe, and visualize the SQL Server audit logs, as well as performance and transaction log metrics.

---

#### **Requirements**

Microsoft SQL Server is installed and has connectivity with the CyTech Log Collector.

*Note. For more information regarding Microsoft SQL Server Installation, click the link ([https://learn.microsoft.com/en-us/sql/database-engine/install-windows/install-sql-server?view=sql-server-ver16)](https://learn.microsoft.com/en-us/sql/database-engine/install-windows/install-sql-server?view=sql-server-ver16)) for more info.*

---

#### **Microsoft SQL Server permissions**

Before you can start sending data to the Log Collector, make sure you have the necessary Microsoft SQL Server permissions.

If you browse Microsoft Developer Network (MSDN) for the following tables, you will find a "Permissions" section that defines the permission needed for each table.

1. `transaction_log`: 
    - sys.databases
    - sys.dm\_db\_log\_space\_usage
    - sys.dm\_db\_log\_stats (DB\_ID) (Available on SQL Server (MSSQL) 2016 (13.x) SP 2 and later)
2. `performance`: 
    - sys.dm\_os\_performance\_counters

Please make sure the user has the permissions to system as well as user-defined databases. For the particular user used in the integration, the following requirements are met:

**User setup options:**

- Grant specific permissions as mentioned in the MSDN pages above.
- Alteratively, use `sysadmin` role (includes all required permissions): This can be configured via SQL Server Management Studio (SSMS) in `Server Roles`. Read more about joining a role in the SQL Server documentation.

**User Mappings (using SQL Server Management Studio (SSMS)):**

- Open SSMS and connect to your server.
- Navigate to "Object Explorer" &gt; "Security" &gt; "Logins".
- Right-click the user and select "Properties".
- In the "User Mapping" tab, select the appropriate database and grant the required permissions.

---

#### **Setup**

Below you'll find more specific details on setting up the Microsoft SQL Server integration.

##### **Named Instance**

Microsoft SQL Server has a feature that allows running multiple databases on the same host (or clustered hosts) with separate settings. Establish a named instance connection by using the instance name along with the hostname (e.g. `host/instance_name` or `host:named_instance_port`) to collect metrics. Details of the host configuration are provided below.

##### **Host Configuration**

As part of the input configuration, you need to provide the user name, password and host details. The host configuration supports both named instances or default (no-name) instances, using the syntax below.

*Note: This integration supports collecting metrics from a single host. For multi-host metrics, each host can be run as a new integration.*

**Connecting to Default Instance (host)**:

- `host` (e.g. `localhost` (Instance name is not needed when connecting to default instance))

Note. IP Address of the SQL Server will be needed for the integration

- `host:port` (e.g. `localhost:1433`)

Note. Default port is *1433*

**Connecting to Named Instance (host)**:

- `host/instance_name` (e.g. `localhost/namedinstance_01`)
- `host:named_instance_port` (e.g. `localhost:60873`)

*If you need further assistance, kindly contact our support at <support@cytechint.com> for prompt assistance and guidance.*

# Mimecast Integrations

##### <span style="color: rgb(53, 152, 219);">**<span class="TextRun SCXW41440768 BCX8" data-contrast="none" lang="EN-US" xml:lang="EN-US"><span class="NormalTextRun SCXW41440768 BCX8" data-ccp-charstyle="Style (Complex) Open Sans" data-ccp-charstyle-defn="{"ObjectId":"7142c0a3-6268-4368-85cd-14db10031cbe|13","ClassId":1073872969,"Properties":[201342446,"1",201342447,"5",201342448,"1",201342449,"1",469777841,"Open Sans",469777842,"Open Sans",469777843,"Calibri",469777844,"Open Sans",201341986,"1",469769226,"Open Sans",268442635,"22",335559704,"1037",335559705,"1033",335551547,"1033",335559740,"259",201341983,"0",335559739,"160",469775450,"Style (Complex) Open Sans",201340122,"1",134233614,"true",469778129,"StyleComplexOpenSans",335572020,"1",469778324,"Default Paragraph Font"]}">Introduction</span></span><span class="EOP SCXW41440768 BCX8" data-ccp-props="{"134245418":true,"134245529":true,"201341983":0,"335559738":240,"335559739":0,"335559740":360}"> </span>**</span>

<span class="TextRun SCXW41440768 BCX8" data-contrast="auto" lang="EN-US" xml:lang="EN-US"><span class="NormalTextRun SCXW41440768 BCX8" data-ccp-charstyle="Style (Complex) Open Sans">The Mimecast integration collects events from the Mimecast API.</span></span><span class="EOP SCXW41440768 BCX8" data-ccp-props="{"201341983":0,"335559685":360,"335559739":160,"335559740":259}"> </span>

<div class="SCXW41440768 BCX8" id="bkmrk-"><div class="OutlineElement Ltr SCXW41440768 BCX8">  
</div><div class="ListContainerWrapper SCXW41440768 BCX8">  
</div></div>##### <span style="color: rgb(53, 152, 219);">**<span class="TextRun SCXW41440768 BCX8" data-contrast="none" lang="EN-US" xml:lang="EN-US"><span class="NormalTextRun SCXW41440768 BCX8" data-ccp-charstyle="Style (Complex) Open Sans">Assumptions</span></span><span class="EOP SCXW41440768 BCX8" data-ccp-props="{"134245418":true,"134245529":true,"201341983":0,"335559738":240,"335559739":0,"335559740":360}"> </span>**</span>

<span class="TextRun SCXW41440768 BCX8" data-contrast="auto" lang="EN-US" xml:lang="EN-US"><span class="NormalTextRun SCXW41440768 BCX8" data-ccp-charstyle="Style (Complex) Open Sans">The procedures described in Section 3 </span><span class="NormalTextRun ContextualSpellingAndGrammarErrorV2Themed SCXW41440768 BCX8" data-ccp-charstyle="Style (Complex) Open Sans">assumes</span><span class="NormalTextRun SCXW41440768 BCX8" data-ccp-charstyle="Style (Complex) Open Sans"> that a Log Collector has already been </span><span class="NormalTextRun ContextualSpellingAndGrammarErrorV2Themed SCXW41440768 BCX8" data-ccp-charstyle="Style (Complex) Open Sans">setup</span><span class="NormalTextRun SCXW41440768 BCX8" data-ccp-charstyle="Style (Complex) Open Sans">. </span></span><span class="EOP SCXW41440768 BCX8" data-ccp-props="{"201341983":0,"335559685":360,"335559739":160,"335559740":259}"> </span>

<div class="SCXW41440768 BCX8" id="bkmrk--1"><div class="OutlineElement Ltr SCXW41440768 BCX8">  
</div><div class="ListContainerWrapper SCXW41440768 BCX8">  
</div></div>##### <span style="color: rgb(53, 152, 219);">**<span class="TextRun SCXW41440768 BCX8" data-contrast="none" lang="EN-US" xml:lang="EN-US"><span class="NormalTextRun SCXW41440768 BCX8" data-ccp-charstyle="Style (Complex) Open Sans">Requirements</span></span><span class="EOP SCXW41440768 BCX8" data-ccp-props="{"134245418":true,"134245529":true,"201341983":0,"335559738":240,"335559739":0,"335559740":360}"> </span>**</span>

**<span class="TextRun SCXW41440768 BCX8" data-contrast="auto" lang="EN-US" xml:lang="EN-US"><span class="NormalTextRun SCXW41440768 BCX8" data-ccp-charstyle="Style (Complex) Open Sans">Configuration</span></span><span class="EOP SCXW41440768 BCX8" data-ccp-props="{"201341983":0,"335559685":360,"335559739":160,"335559740":259}"> </span>**

<span class="TextRun SCXW41440768 BCX8" data-contrast="auto" lang="EN-US" xml:lang="EN-US"><span class="NormalTextRun SCXW41440768 BCX8" data-ccp-charstyle="Style (Complex) Open Sans">Authorization parameters for the Mimecast API (Application Key, Application ID, Access Key, and Secret Key) should be provided by a Mimecast representative for this integration. Under Advanced options you can set the time interval between two API requests as well as the API URL. A Mimecast representative should also be able to give you this information in case you need to change the defaults.</span></span><span class="EOP SCXW41440768 BCX8" data-ccp-props="{"201341983":0,"335559685":360,"335559739":160,"335559740":259}"> </span>

<span class="TextRun SCXW41440768 BCX8" data-contrast="auto" lang="EN-US" xml:lang="EN-US"><span class="NormalTextRun SCXW41440768 BCX8" data-ccp-charstyle="Style (Complex) Open Sans">Note: Rate limit quotas may require you to set up different credentials for the different available log types.</span></span><span class="EOP SCXW41440768 BCX8" data-ccp-props="{"201341983":0,"335559685":360,"335559739":160,"335559740":259}"> </span>

**<span class="TextRun SCXW41440768 BCX8" data-contrast="auto" lang="EN-US" xml:lang="EN-US"><span class="NormalTextRun SCXW41440768 BCX8" data-ccp-charstyle="Style (Complex) Open Sans">Logs</span></span><span class="EOP SCXW41440768 BCX8" data-ccp-props="{"201341983":0,"335559685":360,"335559739":160,"335559740":259}"> </span>**

**<span class="TextRun SCXW41440768 BCX8" data-contrast="auto" lang="EN-US" xml:lang="EN-US"><span class="NormalTextRun SCXW41440768 BCX8" data-ccp-charstyle="Style (Complex) Open Sans">Audit Events</span></span><span class="EOP SCXW41440768 BCX8" data-ccp-props="{"201341983":0,"335559685":360,"335559739":160,"335559740":259}"> </span>**

<span class="TextRun SCXW41440768 BCX8" data-contrast="auto" lang="EN-US" xml:lang="EN-US"><span class="NormalTextRun SCXW41440768 BCX8" data-ccp-charstyle="Style (Complex) Open Sans">This is the </span><span class="NormalTextRun SpellingErrorV2Themed SCXW41440768 BCX8" data-ccp-charstyle="Style (Complex) Open Sans">mimecast.audit</span><span class="NormalTextRun SpellingErrorV2Themed SCXW41440768 BCX8" data-ccp-charstyle="Style (Complex) Open Sans">\_events</span><span class="NormalTextRun SCXW41440768 BCX8" data-ccp-charstyle="Style (Complex) Open Sans"> dataset. These logs </span><span class="NormalTextRun SCXW41440768 BCX8" data-ccp-charstyle="Style (Complex) Open Sans">contain</span><span class="NormalTextRun SCXW41440768 BCX8" data-ccp-charstyle="Style (Complex) Open Sans"> Mimecast audit events with the following details: audit type, event category and detailed information about the event. More information about these logs.</span></span><span class="EOP SCXW41440768 BCX8" data-ccp-props="{"201341983":0,"335559685":360,"335559739":160,"335559740":259}"> </span>

**<span class="TextRun SCXW41440768 BCX8" data-contrast="auto" lang="EN-US" xml:lang="EN-US"><span class="NormalTextRun SCXW41440768 BCX8" data-ccp-charstyle="Style (Complex) Open Sans">DLP Logs</span></span><span class="EOP SCXW41440768 BCX8" data-ccp-props="{"201341983":0,"335559685":360,"335559739":160,"335559740":259}"> </span>**

<span class="TextRun SCXW41440768 BCX8" data-contrast="auto" lang="EN-US" xml:lang="EN-US"><span class="NormalTextRun SCXW41440768 BCX8" data-ccp-charstyle="Style (Complex) Open Sans">This is the </span><span class="NormalTextRun SpellingErrorV2Themed SCXW41440768 BCX8" data-ccp-charstyle="Style (Complex) Open Sans">mimecast.dlp\_logs</span><span class="NormalTextRun SCXW41440768 BCX8" data-ccp-charstyle="Style (Complex) Open Sans"> dataset. These logs </span><span class="NormalTextRun SCXW41440768 BCX8" data-ccp-charstyle="Style (Complex) Open Sans">contain</span><span class="NormalTextRun SCXW41440768 BCX8" data-ccp-charstyle="Style (Complex) Open Sans"> information about messages that triggered a DLP or Content Examination policy. More information about these logs.</span></span><span class="EOP SCXW41440768 BCX8" data-ccp-props="{"201341983":0,"335559685":360,"335559739":160,"335559740":259}"> </span>

**<span class="TextRun SCXW41440768 BCX8" data-contrast="auto" lang="EN-US" xml:lang="EN-US"><span class="NormalTextRun SCXW41440768 BCX8" data-ccp-charstyle="Style (Complex) Open Sans">SIEM Logs</span></span><span class="EOP SCXW41440768 BCX8" data-ccp-props="{"201341983":0,"335559685":360,"335559739":160,"335559740":259}"> </span>**

<span class="TextRun SCXW41440768 BCX8" data-contrast="auto" lang="EN-US" xml:lang="EN-US"><span class="NormalTextRun SCXW41440768 BCX8" data-ccp-charstyle="Style (Complex) Open Sans">This is the </span><span class="NormalTextRun SpellingErrorV2Themed SCXW41440768 BCX8" data-ccp-charstyle="Style (Complex) Open Sans">mimecast.siem</span><span class="NormalTextRun SpellingErrorV2Themed SCXW41440768 BCX8" data-ccp-charstyle="Style (Complex) Open Sans">\_logs</span><span class="NormalTextRun SCXW41440768 BCX8" data-ccp-charstyle="Style (Complex) Open Sans"> dataset. These logs </span><span class="NormalTextRun SCXW41440768 BCX8" data-ccp-charstyle="Style (Complex) Open Sans">contain</span><span class="NormalTextRun SCXW41440768 BCX8" data-ccp-charstyle="Style (Complex) Open Sans"> information about messages that </span><span class="NormalTextRun ContextualSpellingAndGrammarErrorV2Themed SCXW41440768 BCX8" data-ccp-charstyle="Style (Complex) Open Sans">contains</span><span class="NormalTextRun SCXW41440768 BCX8" data-ccp-charstyle="Style (Complex) Open Sans"> MTA (message transfer agent) log – all inbound, outbound, and internal messages.</span></span><span class="EOP SCXW41440768 BCX8" data-ccp-props="{"201341983":0,"335559685":360,"335559739":160,"335559740":259}"> </span>

**<span class="TextRun SCXW41440768 BCX8" data-contrast="auto" lang="EN-US" xml:lang="EN-US"><span class="NormalTextRun SCXW41440768 BCX8" data-ccp-charstyle="Style (Complex) Open Sans">Threat Intel Feed Malware: Customer</span></span><span class="EOP SCXW41440768 BCX8" data-ccp-props="{"201341983":0,"335559685":360,"335559739":160,"335559740":259}"> </span>**

<span class="TextRun SCXW41440768 BCX8" data-contrast="auto" lang="EN-US" xml:lang="EN-US"><span class="NormalTextRun SCXW41440768 BCX8" data-ccp-charstyle="Style (Complex) Open Sans">This is the </span><span class="NormalTextRun SpellingErrorV2Themed SCXW41440768 BCX8" data-ccp-charstyle="Style (Complex) Open Sans">mimecast.threat</span><span class="NormalTextRun SpellingErrorV2Themed SCXW41440768 BCX8" data-ccp-charstyle="Style (Complex) Open Sans">\_intel\_malware\_customer</span><span class="NormalTextRun SCXW41440768 BCX8" data-ccp-charstyle="Style (Complex) Open Sans"> dataset. These logs </span><span class="NormalTextRun SCXW41440768 BCX8" data-ccp-charstyle="Style (Complex) Open Sans">contain</span><span class="NormalTextRun SCXW41440768 BCX8" data-ccp-charstyle="Style (Complex) Open Sans"> information about messages that return identified malware threats at a customer level. Learn more about these logs.</span></span><span class="EOP SCXW41440768 BCX8" data-ccp-props="{"201341983":0,"335559685":360,"335559739":160,"335559740":259}"> </span>

**<span class="TextRun SCXW41440768 BCX8" data-contrast="auto" lang="EN-US" xml:lang="EN-US"><span class="NormalTextRun SCXW41440768 BCX8" data-ccp-charstyle="Style (Complex) Open Sans">Threat Intel Feed Malware: Grid</span></span><span class="EOP SCXW41440768 BCX8" data-ccp-props="{"201341983":0,"335559685":360,"335559739":160,"335559740":259}"> </span>**

<span class="TextRun SCXW41440768 BCX8" data-contrast="auto" lang="EN-US" xml:lang="EN-US"><span class="NormalTextRun SCXW41440768 BCX8" data-ccp-charstyle="Style (Complex) Open Sans">This is the </span><span class="NormalTextRun SpellingErrorV2Themed SCXW41440768 BCX8" data-ccp-charstyle="Style (Complex) Open Sans">mimecast.threat</span><span class="NormalTextRun SpellingErrorV2Themed SCXW41440768 BCX8" data-ccp-charstyle="Style (Complex) Open Sans">\_intel\_malware\_grid</span><span class="NormalTextRun SCXW41440768 BCX8" data-ccp-charstyle="Style (Complex) Open Sans"> dataset. These logs </span><span class="NormalTextRun SCXW41440768 BCX8" data-ccp-charstyle="Style (Complex) Open Sans">contain</span><span class="NormalTextRun SCXW41440768 BCX8" data-ccp-charstyle="Style (Complex) Open Sans"> information about messages that return identified malware threats at a regional grid level. More about these logs.</span></span><span class="EOP SCXW41440768 BCX8" data-ccp-props="{"201341983":0,"335559685":360,"335559739":160,"335559740":259}"> </span>

**<span class="TextRun SCXW41440768 BCX8" data-contrast="auto" lang="EN-US" xml:lang="EN-US"><span class="NormalTextRun SCXW41440768 BCX8" data-ccp-charstyle="Style (Complex) Open Sans">TTP Attachment Logs</span></span><span class="EOP SCXW41440768 BCX8" data-ccp-props="{"201341983":0,"335559685":360,"335559739":160,"335559740":259}"> </span>**

<span class="TextRun SCXW41440768 BCX8" data-contrast="auto" lang="EN-US" xml:lang="EN-US"><span class="NormalTextRun SCXW41440768 BCX8" data-ccp-charstyle="Style (Complex) Open Sans">This is the </span><span class="NormalTextRun SpellingErrorV2Themed SCXW41440768 BCX8" data-ccp-charstyle="Style (Complex) Open Sans">mimecast.ttp\_ap\_logs</span><span class="NormalTextRun SCXW41440768 BCX8" data-ccp-charstyle="Style (Complex) Open Sans"> dataset. These logs </span><span class="NormalTextRun SCXW41440768 BCX8" data-ccp-charstyle="Style (Complex) Open Sans">contain</span><span class="NormalTextRun SCXW41440768 BCX8" data-ccp-charstyle="Style (Complex) Open Sans"> Mimecast TTP attachment protection logs with the following details: result of attachment analysis (if it is malicious or not etc.), date when file is released, sender and recipient address, filename and type, action triggered for the attachment, the route of the original email </span><span class="NormalTextRun SCXW41440768 BCX8" data-ccp-charstyle="Style (Complex) Open Sans">containing</span><span class="NormalTextRun SCXW41440768 BCX8" data-ccp-charstyle="Style (Complex) Open Sans"> the attachment and details. Learn more about these logs.</span></span><span class="EOP SCXW41440768 BCX8" data-ccp-props="{"201341983":0,"335559685":360,"335559739":160,"335559740":259}"> </span>

**<span class="TextRun SCXW41440768 BCX8" data-contrast="auto" lang="EN-US" xml:lang="EN-US"><span class="NormalTextRun SCXW41440768 BCX8" data-ccp-charstyle="Style (Complex) Open Sans">TTP Impersonation Logs</span></span><span class="EOP SCXW41440768 BCX8" data-ccp-props="{"201341983":0,"335559685":360,"335559739":160,"335559740":259}"> </span>**

<span class="TextRun SCXW41440768 BCX8" data-contrast="auto" lang="EN-US" xml:lang="EN-US"><span class="NormalTextRun SCXW41440768 BCX8" data-ccp-charstyle="Style (Complex) Open Sans">This is the </span><span class="NormalTextRun SpellingErrorV2Themed SCXW41440768 BCX8" data-ccp-charstyle="Style (Complex) Open Sans">mimecast.ttp\_ip\_logs</span><span class="NormalTextRun SCXW41440768 BCX8" data-ccp-charstyle="Style (Complex) Open Sans"> dataset. These logs </span><span class="NormalTextRun SCXW41440768 BCX8" data-ccp-charstyle="Style (Complex) Open Sans">contain</span><span class="NormalTextRun SCXW41440768 BCX8" data-ccp-charstyle="Style (Complex) Open Sans"> information about messages </span><span class="NormalTextRun SCXW41440768 BCX8" data-ccp-charstyle="Style (Complex) Open Sans">containing</span><span class="NormalTextRun SCXW41440768 BCX8" data-ccp-charstyle="Style (Complex) Open Sans"> information flagged by an Impersonation Protection configuration.</span></span><span class="EOP SCXW41440768 BCX8" data-ccp-props="{"201341983":0,"335559685":360,"335559739":160,"335559740":259}"> </span>

**<span class="TextRun SCXW41440768 BCX8" data-contrast="auto" lang="EN-US" xml:lang="EN-US"><span class="NormalTextRun SCXW41440768 BCX8" data-ccp-charstyle="Style (Complex) Open Sans">TTP URL Logs</span></span><span class="EOP SCXW41440768 BCX8" data-ccp-props="{"201341983":0,"335559685":360,"335559739":160,"335559740":259}"> </span>**

<span class="TextRun SCXW41440768 BCX8" data-contrast="auto" lang="EN-US" xml:lang="EN-US"><span class="NormalTextRun SCXW41440768 BCX8" data-ccp-charstyle="Style (Complex) Open Sans">This is the </span><span class="NormalTextRun SpellingErrorV2Themed SCXW41440768 BCX8" data-ccp-charstyle="Style (Complex) Open Sans">mimecast.ttp\_url\_logs</span><span class="NormalTextRun SCXW41440768 BCX8" data-ccp-charstyle="Style (Complex) Open Sans"> dataset. These logs contain Mimecast TTP attachment protection logs with the following details: the category of the URL clicked, the email address of the user who clicked the link, the </span><span class="NormalTextRun SpellingErrorV2Themed SCXW41440768 BCX8" data-ccp-charstyle="Style (Complex) Open Sans">url</span><span class="NormalTextRun SCXW41440768 BCX8" data-ccp-charstyle="Style (Complex) Open Sans"> clicked, the action taken by the user if user awareness was applied, the route of the email that contained the link, the action defined by the administrator for the URL, the date that the URL was clicked, </span><span class="NormalTextRun SpellingErrorV2Themed SCXW41440768 BCX8" data-ccp-charstyle="Style (Complex) Open Sans">url</span><span class="NormalTextRun SCXW41440768 BCX8" data-ccp-charstyle="Style (Complex) Open Sans"> scan result, the action that was taken for the click, the description of the definition that triggered the URL to be rewritten by Mimecast, the action requested by the user, an array of components of the message where the URL was found. More about these logs.</span></span><span class="EOP SCXW41440768 BCX8" data-ccp-props="{"201341983":0,"335559685":360,"335559739":160,"335559740":259}"> </span>

<span class="EOP SCXW41440768 BCX8" data-ccp-props="{"201341983":0,"335559685":360,"335559739":160,"335559740":259}"> </span>

##### <span style="color: rgb(53, 152, 219);">**<span class="TextRun SCXW41440768 BCX8" data-contrast="none" lang="EN-US" xml:lang="EN-US"><span class="NormalTextRun SCXW41440768 BCX8" data-ccp-charstyle="eop" data-ccp-charstyle-defn="{"ObjectId":"7142c0a3-6268-4368-85cd-14db10031cbe|40","ClassId":1073872969,"Properties":[201342446,"1",201342447,"5",201342448,"1",201342449,"1",469777841,"Calibri",469777842,"Arial",469777843,"Calibri",469777844,"Calibri",201341986,"1",469769226,"Calibri,Arial",268442635,"22",335559704,"1037",335559705,"1033",335551547,"1033",335559740,"259",201341983,"0",335559739,"160",469775450,"eop",201340122,"1",134233614,"true",469778129,"eop",335572020,"1",469778324,"Default Paragraph Font"]}">Mimecast</span><span class="NormalTextRun SCXW41440768 BCX8" data-ccp-charstyle="eop"> Integration Procedures</span></span><span class="EOP SCXW41440768 BCX8" data-ccp-props="{"134245418":true,"134245529":true,"201341983":0,"335559738":240,"335559739":0,"335559740":360}"> </span>**</span>

<span class="TextRun SCXW41440768 BCX8" data-contrast="auto" lang="EN-US" xml:lang="EN-US"><span class="NormalTextRun SCXW41440768 BCX8" data-ccp-charstyle="eop">Please provide the following information to </span><span class="NormalTextRun SpellingErrorV2Themed SCXW41440768 BCX8" data-ccp-charstyle="eop">CyTech</span><span class="NormalTextRun SCXW41440768 BCX8" data-ccp-charstyle="eop">:</span></span><span class="EOP SCXW41440768 BCX8" data-ccp-props="{"201341983":0,"335559685":720,"335559739":160,"335559740":259}"> </span>

<span class="TextRun SCXW41440768 BCX8" data-contrast="none" lang="EN-US" xml:lang="EN-US">**<span class="NormalTextRun SCXW41440768 BCX8" data-ccp-charstyle="eop">Mimecast API</span>**</span>**<span class="EOP SCXW41440768 BCX8" data-ccp-props="{"134245418":true,"134245529":true,"201341983":0,"335559685":360,"335559738":240,"335559739":0,"335559740":360}"> </span>**

<div class="SCXW41440768 BCX8" id="bkmrk-application-key---sp"><div class="OutlineElement Ltr SCXW41440768 BCX8">  
</div><div class="ListContainerWrapper SCXW41440768 BCX8">1. <span class="TextRun SCXW41440768 BCX8" data-contrast="auto" lang="EN-US" xml:lang="EN-US"><span class="NormalTextRun SCXW41440768 BCX8" data-ccp-charstyle="eop">Application Key</span><span class="NormalTextRun SCXW41440768 BCX8" data-ccp-charstyle="eop"> - </span><span class="NormalTextRun SCXW41440768 BCX8" data-ccp-charstyle="eop">Specifies application key for user.</span></span><span class="EOP SCXW41440768 BCX8" data-ccp-props="{"201341983":0,"335559739":160,"335559740":259}"> </span>

</div></div><div class="SCXW41440768 BCX8" id="bkmrk-application-id---set"><div class="ListContainerWrapper SCXW41440768 BCX8">2. <span class="TextRun SCXW41440768 BCX8" data-contrast="auto" lang="EN-US" xml:lang="EN-US"><span class="NormalTextRun SCXW41440768 BCX8" data-ccp-charstyle="eop">Application ID</span><span class="NormalTextRun SCXW41440768 BCX8" data-ccp-charstyle="eop"> - </span><span class="NormalTextRun SCXW41440768 BCX8" data-ccp-charstyle="eop">Set the Application Id.</span></span><span class="EOP SCXW41440768 BCX8" data-ccp-props="{"201341983":0,"335559739":160,"335559740":259}"> </span>

</div><div class="ListContainerWrapper SCXW41440768 BCX8">3. <span class="TextRun SCXW41440768 BCX8" data-contrast="auto" lang="EN-US" xml:lang="EN-US"><span class="NormalTextRun SCXW41440768 BCX8" data-ccp-charstyle="eop">Access Key</span><span class="NormalTextRun SCXW41440768 BCX8" data-ccp-charstyle="eop"> - </span><span class="NormalTextRun SCXW41440768 BCX8" data-ccp-charstyle="eop">Set Access Key.</span></span><span class="EOP SCXW41440768 BCX8" data-ccp-props="{"201341983":0,"335559739":160,"335559740":259}"> </span>

</div><div class="ListContainerWrapper SCXW41440768 BCX8">4. <span class="TextRun SCXW41440768 BCX8" data-contrast="auto" lang="EN-US" xml:lang="EN-US"><span class="NormalTextRun SCXW41440768 BCX8" data-ccp-charstyle="eop">Secret Key</span><span class="NormalTextRun SCXW41440768 BCX8" data-ccp-charstyle="eop"> - </span><span class="NormalTextRun SCXW41440768 BCX8" data-ccp-charstyle="eop">Set Secret Key.</span></span><span class="EOP SCXW41440768 BCX8" data-ccp-props="{"201341983":0,"335559739":160,"335559740":259}"> </span>

</div><div class="OutlineElement Ltr SCXW41440768 BCX8">  
</div></div><span class="EOP SCXW41440768 BCX8" data-ccp-props="{"201341983":0,"335559739":160,"335559740":259}"></span>

# MongoDB Integrations

##### <span style="color: rgb(53, 152, 219);">**<span class="TextRun SCXW7208687 BCX8" data-contrast="none" lang="EN-US" xml:lang="EN-US"><span class="NormalTextRun SCXW7208687 BCX8" data-ccp-charstyle="Style (Complex) Open Sans" data-ccp-charstyle-defn="{"ObjectId":"8f357b65-7fd7-46cf-b0fd-2db5e31ac423|31","ClassId":1073872969,"Properties":[201342446,"1",201342447,"5",201342448,"1",201342449,"1",469777841,"Open Sans",469777842,"Open Sans",469777843,"Calibri",469777844,"Open Sans",201341986,"1",469769226,"Open Sans",268442635,"22",335559704,"1037",335559705,"1033",335551547,"1033",335559740,"259",201341983,"0",335559739,"160",469775450,"Style (Complex) Open Sans",201340122,"1",134233614,"true",469778129,"StyleComplexOpenSans",335572020,"1",469778324,"Default Paragraph Font"]}">Introduction</span></span><span class="EOP SCXW7208687 BCX8" data-ccp-props="{"134245418":true,"134245529":true,"201341983":0,"335559738":240,"335559739":0,"335559740":360}"> </span>**</span>

<span class="TextRun SCXW7208687 BCX8" data-contrast="auto" lang="EN-US" xml:lang="EN-US"><span class="NormalTextRun SCXW7208687 BCX8" data-ccp-charstyle="Style (Complex) Open Sans">This integration is used to fetch logs and metrics from MongoDB.</span></span><span class="EOP SCXW7208687 BCX8" data-ccp-props="{"201341983":0,"335559685":360,"335559739":160,"335559740":259}"> </span>

<div class="SCXW7208687 BCX8" id="bkmrk-"><div class="OutlineElement Ltr SCXW7208687 BCX8">  
</div><div class="ListContainerWrapper SCXW7208687 BCX8">  
</div></div>##### <span style="color: rgb(53, 152, 219);">**<span class="TextRun SCXW7208687 BCX8" data-contrast="none" lang="EN-US" xml:lang="EN-US"><span class="NormalTextRun SCXW7208687 BCX8" data-ccp-charstyle="Style (Complex) Open Sans">Assumptions</span></span><span class="EOP SCXW7208687 BCX8" data-ccp-props="{"134245418":true,"134245529":true,"201341983":0,"335559738":240,"335559739":0,"335559740":360}"> </span>**</span>

<span class="TextRun SCXW7208687 BCX8" data-contrast="auto" lang="EN-US" xml:lang="EN-US"><span class="NormalTextRun SCXW7208687 BCX8" data-ccp-charstyle="Style (Complex) Open Sans">The procedures described in Section 3 </span><span class="NormalTextRun ContextualSpellingAndGrammarErrorV2Themed SCXW7208687 BCX8" data-ccp-charstyle="Style (Complex) Open Sans">assumes</span><span class="NormalTextRun SCXW7208687 BCX8" data-ccp-charstyle="Style (Complex) Open Sans"> that a Log Collector has already been </span><span class="NormalTextRun ContextualSpellingAndGrammarErrorV2Themed SCXW7208687 BCX8" data-ccp-charstyle="Style (Complex) Open Sans">setup</span><span class="NormalTextRun SCXW7208687 BCX8" data-ccp-charstyle="Style (Complex) Open Sans">. </span></span><span class="EOP SCXW7208687 BCX8" data-ccp-props="{"201341983":0,"335559685":360,"335559739":160,"335559740":259}"> </span>

<span class="TextRun SCXW7208687 BCX8" data-contrast="none" lang="EN-US" xml:lang="EN-US"><span class="NormalTextRun SCXW7208687 BCX8" data-ccp-charstyle="Style (Complex) Open Sans">**Compatibility**</span></span>**<span class="EOP SCXW7208687 BCX8" data-ccp-props="{"134245418":true,"134245529":true,"201341983":0,"335559685":360,"335559738":240,"335559739":0,"335559740":360}"> </span>**

<span class="TextRun SCXW7208687 BCX8" data-contrast="auto" lang="EN-US" xml:lang="EN-US"><span class="NormalTextRun SCXW7208687 BCX8" data-ccp-charstyle="Style (Complex) Open Sans">The </span></span><span class="TextRun SCXW7208687 BCX8" data-contrast="none" lang="EN-US" xml:lang="EN-US"><span class="NormalTextRun SCXW7208687 BCX8" data-ccp-charstyle="Intense Quote Char">log</span></span><span class="TextRun SCXW7208687 BCX8" data-contrast="auto" lang="EN-US" xml:lang="EN-US"><span class="NormalTextRun SCXW7208687 BCX8" data-ccp-charstyle="Style (Complex) Open Sans"> dataset is tested with logs from versions v3.2.11 and v4.4.4 in plaintext and </span><span class="NormalTextRun SpellingErrorV2Themed SCXW7208687 BCX8" data-ccp-charstyle="Style (Complex) Open Sans">json</span><span class="NormalTextRun SCXW7208687 BCX8" data-ccp-charstyle="Style (Complex) Open Sans"> formats. The </span></span><span class="TextRun SCXW7208687 BCX8" data-contrast="none" lang="EN-US" xml:lang="EN-US"><span class="NormalTextRun SpellingErrorV2Themed SCXW7208687 BCX8" data-ccp-charstyle="Intense Quote Char">collstats</span></span><span class="TextRun SCXW7208687 BCX8" data-contrast="auto" lang="EN-US" xml:lang="EN-US"><span class="NormalTextRun SCXW7208687 BCX8" data-ccp-charstyle="Style (Complex) Open Sans">, </span></span><span class="TextRun SCXW7208687 BCX8" data-contrast="none" lang="EN-US" xml:lang="EN-US"><span class="NormalTextRun SpellingErrorV2Themed SCXW7208687 BCX8" data-ccp-charstyle="Intense Quote Char">dbstats</span></span><span class="TextRun SCXW7208687 BCX8" data-contrast="auto" lang="EN-US" xml:lang="EN-US"><span class="NormalTextRun SCXW7208687 BCX8" data-ccp-charstyle="Style (Complex) Open Sans">, </span></span><span class="TextRun SCXW7208687 BCX8" data-contrast="none" lang="EN-US" xml:lang="EN-US"><span class="NormalTextRun SCXW7208687 BCX8" data-ccp-charstyle="Intense Quote Char">metrics</span></span><span class="TextRun SCXW7208687 BCX8" data-contrast="auto" lang="EN-US" xml:lang="EN-US"><span class="NormalTextRun SCXW7208687 BCX8" data-ccp-charstyle="Style (Complex) Open Sans">, </span></span><span class="TextRun SCXW7208687 BCX8" data-contrast="none" lang="EN-US" xml:lang="EN-US"><span class="NormalTextRun SpellingErrorV2Themed SCXW7208687 BCX8" data-ccp-charstyle="Intense Quote Char">replstatus</span></span><span class="TextRun SCXW7208687 BCX8" data-contrast="auto" lang="EN-US" xml:lang="EN-US"><span class="NormalTextRun SCXW7208687 BCX8" data-ccp-charstyle="Style (Complex) Open Sans"> and status datasets are tested with MongoDB 3.4 and 3.0 and are expected to work with all versions &gt;= 2.8.</span></span><span class="EOP SCXW7208687 BCX8" data-ccp-props="{"201341983":0,"335559685":360,"335559739":160,"335559740":259}"> </span>

<div class="SCXW7208687 BCX8" id="bkmrk--1"><div class="OutlineElement Ltr SCXW7208687 BCX8">  
</div><div class="ListContainerWrapper SCXW7208687 BCX8">  
</div></div>##### <span style="color: rgb(53, 152, 219);">**<span class="TextRun SCXW7208687 BCX8" data-contrast="none" lang="EN-US" xml:lang="EN-US"><span class="NormalTextRun SCXW7208687 BCX8" data-ccp-charstyle="Style (Complex) Open Sans">Requirements</span></span><span class="EOP SCXW7208687 BCX8" data-ccp-props="{"134245418":true,"134245529":true,"201341983":0,"335559738":240,"335559739":0,"335559740":360}"> </span>**</span>

<div class="SCXW7208687 BCX8" id="bkmrk--2"><div class="ListContainerWrapper SCXW7208687 BCX8">  
</div><div class="OutlineElement Ltr SCXW7208687 BCX8">  
</div></div>**<span class="TextRun SCXW7208687 BCX8" data-contrast="auto" lang="EN-US" xml:lang="EN-US"><span class="NormalTextRun SCXW7208687 BCX8" data-ccp-charstyle="Style (Complex) Open Sans">MongoDB Privileges</span></span><span class="EOP SCXW7208687 BCX8" data-ccp-props="{"201341983":0,"335559685":360,"335559739":160,"335559740":259}"> </span>**

<span class="TextRun SCXW7208687 BCX8" data-contrast="auto" lang="EN-US" xml:lang="EN-US"><span class="NormalTextRun AdvancedProofingIssueV2Themed SCXW7208687 BCX8" data-ccp-charstyle="Style (Complex) Open Sans">In order to</span><span class="NormalTextRun SCXW7208687 BCX8" data-ccp-charstyle="Style (Complex) Open Sans"> use the metrics datasets, the MongoDB user specified in the package configuration needs to have certain privileges.</span></span><span class="EOP SCXW7208687 BCX8" data-ccp-props="{"201341983":0,"335559685":360,"335559739":160,"335559740":259}"> </span>

<span class="TextRun SCXW7208687 BCX8" data-contrast="auto" lang="EN-US" xml:lang="EN-US"><span class="NormalTextRun SCXW7208687 BCX8" data-ccp-charstyle="Style (Complex) Open Sans">We recommend using the </span><span class="NormalTextRun SpellingErrorV2Themed SCXW7208687 BCX8" data-ccp-charstyle="Style (Complex) Open Sans">clusterMonitor</span><span class="NormalTextRun SCXW7208687 BCX8" data-ccp-charstyle="Style (Complex) Open Sans"> role to cover all the necessary privileges.</span></span><span class="EOP SCXW7208687 BCX8" data-ccp-props="{"201341983":0,"335559685":360,"335559739":160,"335559740":259}"> </span>

<span class="TextRun SCXW7208687 BCX8" data-contrast="auto" lang="EN-US" xml:lang="EN-US"><span class="NormalTextRun SCXW7208687 BCX8" data-ccp-charstyle="Style (Complex) Open Sans">You can use the following command in Mongo shell to create the privileged user (make sure you are using the </span></span><span class="TextRun SCXW7208687 BCX8" data-contrast="none" lang="EN-US" xml:lang="EN-US"><span class="NormalTextRun SCXW7208687 BCX8" data-ccp-charstyle="Intense Quote Char">admin</span></span><span class="TextRun SCXW7208687 BCX8" data-contrast="auto" lang="EN-US" xml:lang="EN-US"> <span class="NormalTextRun SpellingErrorV2Themed SCXW7208687 BCX8" data-ccp-charstyle="Style (Complex) Open Sans">db</span><span class="NormalTextRun SCXW7208687 BCX8" data-ccp-charstyle="Style (Complex) Open Sans"> by using </span></span><span class="TextRun SCXW7208687 BCX8" data-contrast="none" lang="EN-US" xml:lang="EN-US"><span class="NormalTextRun SpellingErrorV2Themed SCXW7208687 BCX8" data-ccp-charstyle="Intense Quote Char">db</span></span><span class="TextRun SCXW7208687 BCX8" data-contrast="auto" lang="EN-US" xml:lang="EN-US"><span class="NormalTextRun SCXW7208687 BCX8" data-ccp-charstyle="Style (Complex) Open Sans"> command in Mongo shell).</span></span><span class="EOP SCXW7208687 BCX8" data-ccp-props="{"201341983":0,"335559685":360,"335559739":160,"335559740":259}"> </span>

<span class="EOP SCXW7208687 BCX8" data-ccp-props="{"201341983":0,"335559685":360,"335559739":160,"335559740":259}"> </span>

<span class="TextRun SCXW7208687 BCX8" data-contrast="auto" lang="EN-US" xml:lang="EN-US"><span class="NormalTextRun SpellingErrorV2Themed SCXW7208687 BCX8" data-ccp-charstyle="Style (Complex) Open Sans">db.createUser</span><span class="NormalTextRun SCXW7208687 BCX8" data-ccp-charstyle="Style (Complex) Open Sans">(</span></span><span class="EOP SCXW7208687 BCX8" data-ccp-props="{"201341983":0,"335559685":360,"335559739":160,"335559740":259}"> </span>

<span class="TextRun SCXW7208687 BCX8" data-contrast="auto" lang="EN-US" xml:lang="EN-US"><span class="NormalTextRun SCXW7208687 BCX8" data-ccp-charstyle="Style (Complex) Open Sans"> {</span></span><span class="EOP SCXW7208687 BCX8" data-ccp-props="{"201341983":0,"335559685":360,"335559739":160,"335559740":259}"> </span>

<span class="TextRun SCXW7208687 BCX8" data-contrast="auto" lang="EN-US" xml:lang="EN-US"><span class="NormalTextRun SCXW7208687 BCX8" data-ccp-charstyle="Style (Complex) Open Sans"> user: "beats",</span></span><span class="EOP SCXW7208687 BCX8" data-ccp-props="{"201341983":0,"335559685":360,"335559739":160,"335559740":259}"> </span>

<span class="TextRun SCXW7208687 BCX8" data-contrast="auto" lang="EN-US" xml:lang="EN-US"><span class="NormalTextRun SCXW7208687 BCX8" data-ccp-charstyle="Style (Complex) Open Sans"> </span><span class="NormalTextRun SpellingErrorV2Themed SCXW7208687 BCX8" data-ccp-charstyle="Style (Complex) Open Sans">pwd</span><span class="NormalTextRun SCXW7208687 BCX8" data-ccp-charstyle="Style (Complex) Open Sans">: "pass",</span></span><span class="EOP SCXW7208687 BCX8" data-ccp-props="{"201341983":0,"335559685":360,"335559739":160,"335559740":259}"> </span>

<span class="TextRun SCXW7208687 BCX8" data-contrast="auto" lang="EN-US" xml:lang="EN-US"><span class="NormalTextRun SCXW7208687 BCX8" data-ccp-charstyle="Style (Complex) Open Sans"> roles: \["</span><span class="NormalTextRun SpellingErrorV2Themed SCXW7208687 BCX8" data-ccp-charstyle="Style (Complex) Open Sans">clusterMonitor</span><span class="NormalTextRun SCXW7208687 BCX8" data-ccp-charstyle="Style (Complex) Open Sans">"\]</span></span><span class="EOP SCXW7208687 BCX8" data-ccp-props="{"201341983":0,"335559685":360,"335559739":160,"335559740":259}"> </span>

<span class="TextRun SCXW7208687 BCX8" data-contrast="auto" lang="EN-US" xml:lang="EN-US"><span class="NormalTextRun SCXW7208687 BCX8" data-ccp-charstyle="Style (Complex) Open Sans"> }</span></span><span class="EOP SCXW7208687 BCX8" data-ccp-props="{"201341983":0,"335559685":360,"335559739":160,"335559740":259}"> </span>

<span class="TextRun SCXW7208687 BCX8" data-contrast="auto" lang="EN-US" xml:lang="EN-US"><span class="NormalTextRun SCXW7208687 BCX8" data-ccp-charstyle="Style (Complex) Open Sans">)</span></span><span class="EOP SCXW7208687 BCX8" data-ccp-props="{"201341983":0,"335559685":360,"335559739":160,"335559740":259}"> </span>

<span class="EOP SCXW7208687 BCX8" data-ccp-props="{"201341983":0,"335559685":360,"335559739":160,"335559740":259}"> </span>

<span class="TextRun SCXW7208687 BCX8" data-contrast="auto" lang="EN-US" xml:lang="EN-US"><span class="NormalTextRun SCXW7208687 BCX8" data-ccp-charstyle="Style (Complex) Open Sans">You can use the following command in Mongo shell to grant the role to an existing user (make sure you are using the </span></span><span class="TextRun SCXW7208687 BCX8" data-contrast="none" lang="EN-US" xml:lang="EN-US"><span class="NormalTextRun SCXW7208687 BCX8" data-ccp-charstyle="Intense Quote Char">admin</span></span><span class="TextRun SCXW7208687 BCX8" data-contrast="auto" lang="EN-US" xml:lang="EN-US"> <span class="NormalTextRun SpellingErrorV2Themed SCXW7208687 BCX8" data-ccp-charstyle="Style (Complex) Open Sans">db</span><span class="NormalTextRun SCXW7208687 BCX8" data-ccp-charstyle="Style (Complex) Open Sans"> by using </span></span><span class="TextRun SCXW7208687 BCX8" data-contrast="none" lang="EN-US" xml:lang="EN-US"><span class="NormalTextRun SpellingErrorV2Themed SCXW7208687 BCX8" data-ccp-charstyle="Intense Quote Char">db</span></span><span class="TextRun SCXW7208687 BCX8" data-contrast="auto" lang="EN-US" xml:lang="EN-US"><span class="NormalTextRun SCXW7208687 BCX8" data-ccp-charstyle="Style (Complex) Open Sans"> command in Mongo shell).</span></span><span class="EOP SCXW7208687 BCX8" data-ccp-props="{"201341983":0,"335559685":360,"335559739":160,"335559740":259}"> </span>

<span class="TextRun SCXW7208687 BCX8" data-contrast="auto" lang="EN-US" xml:lang="EN-US"><span class="NormalTextRun SpellingErrorV2Themed SCXW7208687 BCX8" data-ccp-charstyle="Style (Complex) Open Sans">db.grantRolesToUser</span><span class="NormalTextRun SCXW7208687 BCX8" data-ccp-charstyle="Style (Complex) Open Sans">("user", \["</span><span class="NormalTextRun SpellingErrorV2Themed SCXW7208687 BCX8" data-ccp-charstyle="Style (Complex) Open Sans">clusterMonitor</span><span class="NormalTextRun SCXW7208687 BCX8" data-ccp-charstyle="Style (Complex) Open Sans">"\])</span></span><span class="EOP SCXW7208687 BCX8" data-ccp-props="{"201341983":0,"335559685":360,"335559739":160,"335559740":259}"> </span>

**<span class="TextRun SCXW7208687 BCX8" data-contrast="auto" lang="EN-US" xml:lang="EN-US"><span class="NormalTextRun SCXW7208687 BCX8" data-ccp-charstyle="Style (Complex) Open Sans">Logs</span></span><span class="EOP SCXW7208687 BCX8" data-ccp-props="{"201341983":0,"335559685":360,"335559739":160,"335559740":259}"> </span>**

**<span class="TextRun SCXW7208687 BCX8" data-contrast="auto" lang="EN-US" xml:lang="EN-US"><span class="NormalTextRun SCXW7208687 BCX8" data-ccp-charstyle="Style (Complex) Open Sans">log</span></span><span class="EOP SCXW7208687 BCX8" data-ccp-props="{"201341983":0,"335559685":360,"335559739":160,"335559740":259}"> </span>**

<span class="TextRun SCXW7208687 BCX8" data-contrast="auto" lang="EN-US" xml:lang="EN-US"><span class="NormalTextRun SCXW7208687 BCX8" data-ccp-charstyle="Style (Complex) Open Sans">The log dataset collects the MongoDB logs.</span></span><span class="EOP SCXW7208687 BCX8" data-ccp-props="{"201341983":0,"335559685":360,"335559739":160,"335559740":259}"> </span>

<span class="EOP SCXW7208687 BCX8" data-ccp-props="{"201341983":0,"335559685":360,"335559739":160,"335559740":259}"> </span>

**<span class="TextRun SCXW7208687 BCX8" data-contrast="auto" lang="EN-US" xml:lang="EN-US"><span class="NormalTextRun SCXW7208687 BCX8" data-ccp-charstyle="Style (Complex) Open Sans">Metrics</span></span><span class="EOP SCXW7208687 BCX8" data-ccp-props="{"201341983":0,"335559685":360,"335559739":160,"335559740":259}"> </span>**

**<span class="TextRun SCXW7208687 BCX8" data-contrast="auto" lang="EN-US" xml:lang="EN-US"><span class="NormalTextRun SpellingErrorV2Themed SCXW7208687 BCX8" data-ccp-charstyle="Style (Complex) Open Sans">collstats</span></span><span class="EOP SCXW7208687 BCX8" data-ccp-props="{"201341983":0,"335559685":360,"335559739":160,"335559740":259}"> </span>**

<span class="TextRun SCXW7208687 BCX8" data-contrast="auto" lang="EN-US" xml:lang="EN-US"><span class="NormalTextRun SCXW7208687 BCX8" data-ccp-charstyle="Style (Complex) Open Sans">The </span></span>**<span class="TextRun SCXW7208687 BCX8" data-contrast="none" lang="EN-US" xml:lang="EN-US"><span class="NormalTextRun SpellingErrorV2Themed SCXW7208687 BCX8" data-ccp-charstyle="Intense Quote Char">collstats</span></span>**<span class="TextRun SCXW7208687 BCX8" data-contrast="auto" lang="EN-US" xml:lang="EN-US"><span class="NormalTextRun SCXW7208687 BCX8" data-ccp-charstyle="Style (Complex) Open Sans"> dataset uses the top administrative command to return usage statistics for each collection. It provides the amount of time, in microseconds, used and a count of operations for the following types: total, </span><span class="NormalTextRun SpellingErrorV2Themed SCXW7208687 BCX8" data-ccp-charstyle="Style (Complex) Open Sans">readLock</span><span class="NormalTextRun SCXW7208687 BCX8" data-ccp-charstyle="Style (Complex) Open Sans">, </span><span class="NormalTextRun SpellingErrorV2Themed SCXW7208687 BCX8" data-ccp-charstyle="Style (Complex) Open Sans">writeLock</span><span class="NormalTextRun SCXW7208687 BCX8" data-ccp-charstyle="Style (Complex) Open Sans">, queries, </span><span class="NormalTextRun SpellingErrorV2Themed SCXW7208687 BCX8" data-ccp-charstyle="Style (Complex) Open Sans">getmore</span><span class="NormalTextRun SCXW7208687 BCX8" data-ccp-charstyle="Style (Complex) Open Sans">, insert, update, remove, and commands.</span></span><span class="EOP SCXW7208687 BCX8" data-ccp-props="{"201341983":0,"335559685":360,"335559739":160,"335559740":259}"> </span>

<span class="TextRun SCXW7208687 BCX8" data-contrast="auto" lang="EN-US" xml:lang="EN-US"><span class="NormalTextRun SCXW7208687 BCX8" data-ccp-charstyle="Style (Complex) Open Sans">It requires the following privileges, which is covered by the </span><span class="NormalTextRun SpellingErrorV2Themed SCXW7208687 BCX8" data-ccp-charstyle="Style (Complex) Open Sans">clusterMonitor</span><span class="NormalTextRun SCXW7208687 BCX8" data-ccp-charstyle="Style (Complex) Open Sans"> role:</span></span><span class="EOP SCXW7208687 BCX8" data-ccp-props="{"201341983":0,"335559685":360,"335559739":160,"335559740":259}"> </span>

<div class="SCXW7208687 BCX8" id="bkmrk-top-action-on-cluste"><div class="ListContainerWrapper SCXW7208687 BCX8">- <span class="TextRun SCXW7208687 BCX8" data-contrast="auto" lang="EN-US" xml:lang="EN-US"><span class="NormalTextRun SCXW7208687 BCX8" data-ccp-charstyle="Style (Complex) Open Sans">top action on cluster resource</span></span><span class="EOP SCXW7208687 BCX8" data-ccp-props="{"201341983":0,"335559739":160,"335559740":259}"> </span>

</div></div>**<span class="TextRun SCXW7208687 BCX8" data-contrast="auto" lang="EN-US" xml:lang="EN-US"><span class="NormalTextRun SpellingErrorV2Themed SCXW7208687 BCX8" data-ccp-charstyle="Style (Complex) Open Sans">dbstats</span></span><span class="EOP SCXW7208687 BCX8" data-ccp-props="{"201341983":0,"335559685":360,"335559739":160,"335559740":259}"> </span>**

<span class="TextRun SCXW7208687 BCX8" data-contrast="auto" lang="EN-US" xml:lang="EN-US"><span class="NormalTextRun SCXW7208687 BCX8" data-ccp-charstyle="Style (Complex) Open Sans">The </span>**<span class="NormalTextRun SpellingErrorV2Themed SCXW7208687 BCX8" data-ccp-charstyle="Style (Complex) Open Sans">dbstats</span>**<span class="NormalTextRun SCXW7208687 BCX8" data-ccp-charstyle="Style (Complex) Open Sans"> dataset collects storage statistics for a given database.</span></span><span class="EOP SCXW7208687 BCX8" data-ccp-props="{"201341983":0,"335559685":360,"335559739":160,"335559740":259}"> </span>

<span class="TextRun SCXW7208687 BCX8" data-contrast="auto" lang="EN-US" xml:lang="EN-US"><span class="NormalTextRun SCXW7208687 BCX8" data-ccp-charstyle="Style (Complex) Open Sans">It requires the following privileges, which is covered by the </span><span class="NormalTextRun SpellingErrorV2Themed SCXW7208687 BCX8" data-ccp-charstyle="Style (Complex) Open Sans">clusterMonitor</span><span class="NormalTextRun SCXW7208687 BCX8" data-ccp-charstyle="Style (Complex) Open Sans"> role:</span></span><span class="EOP SCXW7208687 BCX8" data-ccp-props="{"201341983":0,"335559685":360,"335559739":160,"335559740":259}"> </span>

<div class="SCXW7208687 BCX8" id="bkmrk-listdatabases%C2%A0"><div class="ListContainerWrapper SCXW7208687 BCX8">- <span class="TextRun SCXW7208687 BCX8" data-contrast="auto" lang="EN-US" xml:lang="EN-US"><span class="NormalTextRun SpellingErrorV2Themed SCXW7208687 BCX8" data-ccp-charstyle="Style (Complex) Open Sans">listDatabases</span></span><span class="EOP SCXW7208687 BCX8" data-ccp-props="{"201341983":0,"335559739":160,"335559740":259}"> </span>

</div></div><span class="TextRun SCXW7208687 BCX8" data-contrast="auto" lang="EN-US" xml:lang="EN-US"><span class="NormalTextRun SCXW7208687 BCX8" data-ccp-charstyle="Style (Complex) Open Sans">action on cluster resource</span></span><span class="EOP SCXW7208687 BCX8" data-ccp-props="{"201341983":0,"335559685":360,"335559739":160,"335559740":259}"> </span>

<div class="SCXW7208687 BCX8" id="bkmrk-for-each-of-the-data"><div class="ListContainerWrapper SCXW7208687 BCX8">- <span class="TextRun SCXW7208687 BCX8" data-contrast="auto" lang="EN-US" xml:lang="EN-US"><span class="NormalTextRun SCXW7208687 BCX8" data-ccp-charstyle="Style (Complex) Open Sans">for each of the databases, also need </span><span class="NormalTextRun SpellingErrorV2Themed SCXW7208687 BCX8" data-ccp-charstyle="Style (Complex) Open Sans">dbStats</span></span><span class="EOP SCXW7208687 BCX8" data-ccp-props="{"201341983":0,"335559739":160,"335559740":259}"> </span>

</div></div><span class="TextRun SCXW7208687 BCX8" data-contrast="auto" lang="EN-US" xml:lang="EN-US"><span class="NormalTextRun SCXW7208687 BCX8" data-ccp-charstyle="Style (Complex) Open Sans">action on the database resource</span></span><span class="EOP SCXW7208687 BCX8" data-ccp-props="{"201341983":0,"335559685":360,"335559739":160,"335559740":259}"> </span>

**<span class="TextRun SCXW7208687 BCX8" data-contrast="auto" lang="EN-US" xml:lang="EN-US"><span class="NormalTextRun SCXW7208687 BCX8" data-ccp-charstyle="Style (Complex) Open Sans">metrics</span></span><span class="EOP SCXW7208687 BCX8" data-ccp-props="{"201341983":0,"335559685":360,"335559739":160,"335559740":259}"> </span>**

<span class="TextRun SCXW7208687 BCX8" data-contrast="auto" lang="EN-US" xml:lang="EN-US"><span class="NormalTextRun SCXW7208687 BCX8" data-ccp-charstyle="Style (Complex) Open Sans">It requires the following privileges, which is covered by the </span><span class="NormalTextRun SpellingErrorV2Themed SCXW7208687 BCX8" data-ccp-charstyle="Style (Complex) Open Sans">clusterMonitor</span><span class="NormalTextRun SCXW7208687 BCX8" data-ccp-charstyle="Style (Complex) Open Sans"> role:</span></span><span class="EOP SCXW7208687 BCX8" data-ccp-props="{"201341983":0,"335559685":360,"335559739":160,"335559740":259}"> </span>

<div class="SCXW7208687 BCX8" id="bkmrk-serverstatus%C2%A0"><div class="ListContainerWrapper SCXW7208687 BCX8">- <span class="TextRun SCXW7208687 BCX8" data-contrast="auto" lang="EN-US" xml:lang="EN-US"><span class="NormalTextRun SpellingErrorV2Themed SCXW7208687 BCX8" data-ccp-charstyle="Style (Complex) Open Sans">serverStatus</span></span><span class="EOP SCXW7208687 BCX8" data-ccp-props="{"201341983":0,"335559739":160,"335559740":259}"> </span>

</div></div><span class="TextRun SCXW7208687 BCX8" data-contrast="auto" lang="EN-US" xml:lang="EN-US"><span class="NormalTextRun SCXW7208687 BCX8" data-ccp-charstyle="Style (Complex) Open Sans">action on cluster resource</span></span><span class="EOP SCXW7208687 BCX8" data-ccp-props="{"201341983":0,"335559685":360,"335559739":160,"335559740":259}"> </span>

**<span class="TextRun SCXW7208687 BCX8" data-contrast="auto" lang="EN-US" xml:lang="EN-US"><span class="NormalTextRun SpellingErrorV2Themed SCXW7208687 BCX8" data-ccp-charstyle="Style (Complex) Open Sans">replstatus</span></span><span class="EOP SCXW7208687 BCX8" data-ccp-props="{"201341983":0,"335559685":360,"335559739":160,"335559740":259}"> </span>**

<span class="TextRun SCXW7208687 BCX8" data-contrast="auto" lang="EN-US" xml:lang="EN-US"><span class="NormalTextRun SCXW7208687 BCX8" data-ccp-charstyle="Style (Complex) Open Sans">The </span>**<span class="NormalTextRun SpellingErrorV2Themed SCXW7208687 BCX8" data-ccp-charstyle="Style (Complex) Open Sans">replstatus</span>**<span class="NormalTextRun SCXW7208687 BCX8" data-ccp-charstyle="Style (Complex) Open Sans"> dataset collects </span><span class="NormalTextRun ContextualSpellingAndGrammarErrorV2Themed SCXW7208687 BCX8" data-ccp-charstyle="Style (Complex) Open Sans">status</span><span class="NormalTextRun SCXW7208687 BCX8" data-ccp-charstyle="Style (Complex) Open Sans"> of the replica set. It requires the following privileges, which is covered by the </span><span class="NormalTextRun SpellingErrorV2Themed SCXW7208687 BCX8" data-ccp-charstyle="Style (Complex) Open Sans">clusterMonitor</span><span class="NormalTextRun SCXW7208687 BCX8" data-ccp-charstyle="Style (Complex) Open Sans"> role:</span></span><span class="EOP SCXW7208687 BCX8" data-ccp-props="{"201341983":0,"335559685":360,"335559739":160,"335559740":259}"> </span>

<div class="SCXW7208687 BCX8" id="bkmrk-find%2Flistcollections"><div class="ListContainerWrapper SCXW7208687 BCX8">- <span class="TextRun SCXW7208687 BCX8" data-contrast="auto" lang="EN-US" xml:lang="EN-US"><span class="NormalTextRun SCXW7208687 BCX8" data-ccp-charstyle="Style (Complex) Open Sans">find/</span><span class="NormalTextRun SpellingErrorV2Themed SCXW7208687 BCX8" data-ccp-charstyle="Style (Complex) Open Sans">listCollections</span><span class="NormalTextRun SCXW7208687 BCX8" data-ccp-charstyle="Style (Complex) Open Sans"> action on the local database </span><span class="NormalTextRun SCXW7208687 BCX8" data-ccp-charstyle="Style (Complex) Open Sans">resource</span></span><span class="EOP SCXW7208687 BCX8" data-ccp-props="{"201341983":0,"335559739":160,"335559740":259}"> </span>
- <span class="TextRun SCXW7208687 BCX8" data-contrast="auto" lang="EN-US" xml:lang="EN-US"><span class="NormalTextRun SpellingErrorV2Themed SCXW7208687 BCX8" data-ccp-charstyle="Style (Complex) Open Sans">collStats</span><span class="NormalTextRun SCXW7208687 BCX8" data-ccp-charstyle="Style (Complex) Open Sans"> action on the local.oplog.rs collection resource</span></span><span class="EOP SCXW7208687 BCX8" data-ccp-props="{"201341983":0,"335559739":160,"335559740":259}"> </span>
- <span class="TextRun SCXW7208687 BCX8" data-contrast="auto" lang="EN-US" xml:lang="EN-US"><span class="NormalTextRun SpellingErrorV2Themed SCXW7208687 BCX8" data-ccp-charstyle="Style (Complex) Open Sans">replSetGetStatus</span><span class="NormalTextRun SCXW7208687 BCX8" data-ccp-charstyle="Style (Complex) Open Sans"> action on cluster resource</span></span><span class="EOP SCXW7208687 BCX8" data-ccp-props="{"201341983":0,"335559739":160,"335559740":259}"> </span>

</div></div>**<span class="TextRun SCXW7208687 BCX8" data-contrast="auto" lang="EN-US" xml:lang="EN-US"><span class="NormalTextRun SCXW7208687 BCX8" data-ccp-charstyle="Style (Complex) Open Sans">status</span></span><span class="EOP SCXW7208687 BCX8" data-ccp-props="{"201341983":0,"335559685":360,"335559739":160,"335559740":259}"> </span>**

<span class="TextRun SCXW7208687 BCX8" data-contrast="auto" lang="EN-US" xml:lang="EN-US"><span class="NormalTextRun SCXW7208687 BCX8" data-ccp-charstyle="Style (Complex) Open Sans">T</span><span class="NormalTextRun SCXW7208687 BCX8" data-ccp-charstyle="Style (Complex) Open Sans">he status returns a document that provides an overview of the database's state.</span></span><span class="EOP SCXW7208687 BCX8" data-ccp-props="{"201341983":0,"335559685":360,"335559739":160,"335559740":259}"> </span>

<span class="TextRun SCXW7208687 BCX8" data-contrast="auto" lang="EN-US" xml:lang="EN-US"><span class="NormalTextRun SCXW7208687 BCX8" data-ccp-charstyle="Style (Complex) Open Sans">It requires the following privileges, which is covered by the </span><span class="NormalTextRun SpellingErrorV2Themed SCXW7208687 BCX8" data-ccp-charstyle="Style (Complex) Open Sans">clusterMonitor</span><span class="NormalTextRun SCXW7208687 BCX8" data-ccp-charstyle="Style (Complex) Open Sans"> role:</span></span><span class="EOP SCXW7208687 BCX8" data-ccp-props="{"201341983":0,"335559685":360,"335559739":160,"335559740":259}"> </span>

<div class="SCXW7208687 BCX8" id="bkmrk-serverstatus%C2%A0-1"><div class="ListContainerWrapper SCXW7208687 BCX8">- <span class="TextRun SCXW7208687 BCX8" data-contrast="auto" lang="EN-US" xml:lang="EN-US"><span class="NormalTextRun SpellingErrorV2Themed SCXW7208687 BCX8" data-ccp-charstyle="Style (Complex) Open Sans">serverStatus</span></span><span class="EOP SCXW7208687 BCX8" data-ccp-props="{"201341983":0,"335559739":160,"335559740":259}"> </span>

</div></div><span class="TextRun SCXW7208687 BCX8" data-contrast="auto" lang="EN-US" xml:lang="EN-US"><span class="NormalTextRun SCXW7208687 BCX8" data-ccp-charstyle="Style (Complex) Open Sans">action on cluster resource</span></span><span class="EOP SCXW7208687 BCX8" data-ccp-props="{"201341983":0,"335559685":360,"335559739":160,"335559740":259}"> </span>

<span class="EOP SCXW7208687 BCX8" data-ccp-props="{"201341983":0,"335559685":360,"335559739":160,"335559740":259}"> </span>

##### <span style="color: rgb(53, 152, 219);">**<span class="TextRun SCXW7208687 BCX8" data-contrast="none" lang="EN-US" xml:lang="EN-US"><span class="NormalTextRun SCXW7208687 BCX8" data-ccp-charstyle="eop" data-ccp-charstyle-defn="{"ObjectId":"8f357b65-7fd7-46cf-b0fd-2db5e31ac423|58","ClassId":1073872969,"Properties":[201342446,"1",201342447,"5",201342448,"1",201342449,"1",469777841,"Calibri",469777842,"Arial",469777843,"Calibri",469777844,"Calibri",201341986,"1",469769226,"Calibri,Arial",268442635,"22",335559704,"1037",335559705,"1033",335551547,"1033",335559740,"259",201341983,"0",335559739,"160",469775450,"eop",201340122,"1",134233614,"true",469778129,"eop",335572020,"1",469778324,"Default Paragraph Font"]}">MongoDB</span><span class="NormalTextRun SCXW7208687 BCX8" data-ccp-charstyle="eop"> Integration Procedures</span></span><span class="EOP SCXW7208687 BCX8" data-ccp-props="{"134245418":true,"134245529":true,"201341983":0,"335559738":240,"335559739":0,"335559740":360}"> </span>**</span>

<span class="TextRun SCXW7208687 BCX8" data-contrast="auto" lang="EN-US" xml:lang="EN-US"><span class="NormalTextRun SCXW7208687 BCX8" data-ccp-charstyle="eop">Please provide the following information to </span><span class="NormalTextRun SpellingErrorV2Themed SCXW7208687 BCX8" data-ccp-charstyle="eop">CyTech</span><span class="NormalTextRun SCXW7208687 BCX8" data-ccp-charstyle="eop">:</span></span><span class="EOP SCXW7208687 BCX8" data-ccp-props="{"201341983":0,"335559685":720,"335559739":160,"335559740":259}"> </span>

**<span class="TextRun SCXW7208687 BCX8" data-contrast="none" lang="EN-US" xml:lang="EN-US"><span class="NormalTextRun SCXW7208687 BCX8" data-ccp-charstyle="eop">Collect MongoDB application </span><span class="NormalTextRun SCXW7208687 BCX8" data-ccp-charstyle="eop">logs</span></span><span class="EOP SCXW7208687 BCX8" data-ccp-props="{"134245418":true,"134245529":true,"201341983":0,"335559685":360,"335559738":240,"335559739":0,"335559740":360}"> </span>**

<div class="SCXW7208687 BCX8" id="bkmrk-paths%C2%A0"><div class="ListContainerWrapper SCXW7208687 BCX8">- <span class="TextRun SCXW7208687 BCX8" data-contrast="auto" lang="EN-US" xml:lang="EN-US"><span class="NormalTextRun SCXW7208687 BCX8" data-ccp-charstyle="eop">Paths</span></span><span class="EOP SCXW7208687 BCX8" data-ccp-props="{"201341983":0,"335559739":160,"335559740":259}"> </span>

</div></div>**<span class="TextRun SCXW7208687 BCX8" data-contrast="none" lang="EN-US" xml:lang="EN-US"><span class="NormalTextRun SCXW7208687 BCX8" data-ccp-charstyle="eop">Collect MongoDB </span><span class="NormalTextRun SCXW7208687 BCX8" data-ccp-charstyle="eop">metrics</span></span><span class="EOP SCXW7208687 BCX8" data-ccp-props="{"134245418":true,"134245529":true,"201341983":0,"335559685":360,"335559738":240,"335559739":0,"335559740":360}"> </span>**

<div class="SCXW7208687 BCX8" id="bkmrk-hosts%C2%A0"><div class="ListContainerWrapper SCXW7208687 BCX8">- <span class="TextRun SCXW7208687 BCX8" data-contrast="auto" lang="EN-US" xml:lang="EN-US"><span class="NormalTextRun SCXW7208687 BCX8" data-ccp-charstyle="eop">Hosts</span></span><span class="EOP SCXW7208687 BCX8" data-ccp-props="{"201341983":0,"335559739":160,"335559740":259}"> </span>

</div></div><span class="TextRun SCXW7208687 BCX8" data-contrast="auto" lang="EN-US" xml:lang="EN-US"><span class="NormalTextRun SCXW7208687 BCX8" data-ccp-charstyle="eop">Ex: localhost:27017</span></span><span class="EOP SCXW7208687 BCX8" data-ccp-props="{"201341983":0,"335559685":1080,"335559739":160,"335559740":259}"></span>

# Nutanix

#### <span style="color: rgb(53, 152, 219);">How to Send Logs to a Remote Syslog Server</span>

##### Summary:

This article briefly describes how to configure a Nutanix cluster to send logs to an rsyslog server.

##### Description:

This article briefly describes configuring a Nutanix cluster to send logs to an rsyslog server.

##### Solution:

<div class="body-content ntnx-flex-layout ntnx-flex-item ntnx" data-display="flex" data-flex-direction="row" data-item-spacing="20px" id="bkmrk-connect-to-a-control"><div class="f3bf4f0bd4 d9f7c21675 ntnx-stacking-layout ntnx" data-item-spacing="20px"><div class="b950c60417 ntnx-stacking-layout ntnx" data-item-spacing="30px"><div class="ntnx-text-group ntnx">1. Connect to a Controller VM (CVM) in the cluster using SSH.
2. Enter the **ncli** command to log into the nCLI prompt. ```
    ```
    nutanix@cvm$ ncli
    <ncli>
    ```<button aria-label="Copy to clipboard" class="acf555778e ntnx ntnx-button" data-appearance="square" data-background="alt" data-text-size="normal" data-type="text-normal" data-width="" tabindex="0" type="button"><svg aria-hidden="true" class="clone-icon ntnx ntnx-icon standard-icon size-medium" color="inherit" viewbox="0 0 12 12" xmlns="http://www.w3.org/2000/svg"><g><path d="M2.75,4.5 C2.75,3.535 3.535,2.75 4.5,2.75 L8,2.75 L8,1 C8,0.448 7.553,0 7,0 L1,0 C0.447,0 0,0.448 0,1 L0,7 C0,7.552 0.447,8 1,8 L2.75,8 L2.75,4.5 Z" fill="inherit"></path><path d="M11,4 L5,4 C4.447,4 4,4.448 4,5 L4,11 C4,11.552 4.447,12 5,12 L11,12 C11.553,12 12,11.552 12,11 L12,5 C12,4.448 11.553,4 11,4" fill="inherit"></path></g></svg></button>
    ```
    
    Note: "&lt;ncli&gt;" is the nCLI prompt.
3. The remote syslog server is enabled by default. Disable it while you configure the settings. ```
    ```
    <ncli> rsyslog-config set-status enable=false
    ```<button aria-label="Copy to clipboard" class="acf555778e ntnx ntnx-button" data-appearance="square" data-background="alt" data-text-size="normal" data-type="text-normal" data-width="" tabindex="0" type="button"><svg aria-hidden="true" class="clone-icon ntnx ntnx-icon standard-icon size-medium" color="inherit" viewbox="0 0 12 12" xmlns="http://www.w3.org/2000/svg"><g><path d="M2.75,4.5 C2.75,3.535 3.535,2.75 4.5,2.75 L8,2.75 L8,1 C8,0.448 7.553,0 7,0 L1,0 C0.447,0 0,0.448 0,1 L0,7 C0,7.552 0.447,8 1,8 L2.75,8 L2.75,4.5 Z" fill="inherit"></path><path d="M11,4 L5,4 C4.447,4 4,4.448 4,5 L4,11 C4,11.552 4.447,12 5,12 L11,12 C11.553,12 12,11.552 12,11 L12,5 C12,4.448 11.553,4 11,4" fill="inherit"></path></g></svg></button>
    ```
4. Add an rsyslog server using the following command, which adds it to the cluster. ```
    ```
    <ncli> rsyslog-config add-server name=<remote_server_name> ip-address=<remote_server_address> port=<rsyslog port> network-protocol=udp relp-enabled=false
    ```<button aria-label="Copy to clipboard" class="acf555778e ntnx ntnx-button" data-appearance="square" data-background="alt" data-text-size="normal" data-type="text-normal" data-width="" tabindex="0" type="button"><svg aria-hidden="true" class="clone-icon ntnx ntnx-icon standard-icon size-medium" color="inherit" viewbox="0 0 12 12" xmlns="http://www.w3.org/2000/svg"><g><path d="M2.75,4.5 C2.75,3.535 3.535,2.75 4.5,2.75 L8,2.75 L8,1 C8,0.448 7.553,0 7,0 L1,0 C0.447,0 0,0.448 0,1 L0,7 C0,7.552 0.447,8 1,8 L2.75,8 L2.75,4.5 Z" fill="inherit"></path><path d="M11,4 L5,4 C4.447,4 4,4.448 4,5 L4,11 C4,11.552 4.447,12 5,12 L11,12 C11.553,12 12,11.552 12,11 L12,5 C12,4.448 11.553,4 11,4" fill="inherit"></path></g></svg></button>
    ```
5. Choose a module to forward log information from and specify the level of information to collect. ```
    ```
    <ncli> rsyslog-config add-module server-name=<remote_server_name> module-name=<module_name> level=<log_level>
    ```<button aria-label="Copy to clipboard" class="acf555778e ntnx ntnx-button" data-appearance="square" data-background="alt" data-text-size="normal" data-type="text-normal" data-width="" tabindex="0" type="button"><svg aria-hidden="true" class="clone-icon ntnx ntnx-icon standard-icon size-medium" color="inherit" viewbox="0 0 12 12" xmlns="http://www.w3.org/2000/svg"><g><path d="M2.75,4.5 C2.75,3.535 3.535,2.75 4.5,2.75 L8,2.75 L8,1 C8,0.448 7.553,0 7,0 L1,0 C0.447,0 0,0.448 0,1 L0,7 C0,7.552 0.447,8 1,8 L2.75,8 L2.75,4.5 Z" fill="inherit"></path><path d="M11,4 L5,4 C4.447,4 4,4.448 4,5 L4,11 C4,11.552 4.447,12 5,12 L11,12 C11.553,12 12,11.552 12,11 L12,5 C12,4.448 11.553,4 11,4" fill="inherit"></path></g></svg></button>
    ```
    
    Replace &lt;module\_name&gt; with one of the following: 
    - ACROPOLIS - The acropolis services are responsible for task scheduling, execution, stat collection, publishing, etc. For more information, see [Acropolis Services in the Nutanix Bible](https://nutanixbible.com/#anchor-book-of-aos-acropolis-services).
    - AUDIT - Seeds the "consolidated\_audit.log" which is used to track ergon tasks that result in changes to the cluster and UVMs.
    - CASSANDRA - Stores and manages all of the cluster metadata
    - CEREBRO - Responsible for replication and DR capabilities
    - CURATOR - Responsible for managing and distributing tasks throughout the cluster
    - GENESIS - Responsible for any services interactions (start/stop/etc.) as well as the initial configuration
    - PRISM - Management gateway for components and administrators to configure the cluster, monitor the cluster and track logins (successful and unsuccessful).
    - STARGATE - Responsible for all data management and I/O operations
    - APLOS - API requests
    - SYSLOG\_MODULE - SSH logins and much information about local root account usage (starting processes, for example)
    - ZOOKEEPER - Stores all of the cluster configuration
    
    For more information about the modules above, see [Cluster Components in the Prism Web Console Guide](https://portal.nutanix.com/page/documents/details?targetId=Web-Console-Guide-Prism-v6_7:arc-cluster-components-c.html) or [the Nutanix Bible](https://nutanixbible.com/#anchor-book-of-basics-cluster-components).
    
    Enable module logs at the ERROR level unless you require more information. Replace &lt;log\_level&gt; with one of the following: 
    - EMERGENCY
    - ALERT
    - CRITICAL
    - ERROR
    - WARNING
    - NOTICE
    - INFO
    - DEBUG
    
    For example, if you set the level to INFO, it also covers the levels above it (i.e. EMERGENCY, ALERT, CRITICAL, ERROR, WARNING and NOTICE). If you select INFO for a module, you do not have to select any of the levels above it for the same module.
    
    **Note:** CVMs send system audit logs to the syslog server by default, even when no modules are configured for the server. Below is an example of these audit logs:
    
    ```
    ```
    2021-09-09T08:56:01.353708-05:00 ntnx-xxx-cvm audispd[5307]: node=ntnx-xxx-cvm type=PROCTITLE msg=audit(1631195761.351:193118): 
    proctitle=2F7573722F62696E2F707974686F6E322E37002D42002F686F6D652F6E7574616E69782F736572766963656162696C6974792F62696E2F7573696E672D67666C616773002F686F6D652F
    6E7574616E69782F736572766963656162696C6974792F62696E2F63726F6E5F736572766963656162696C6974792E7079
    
    2021-09-09T08:56:01.353827-05:00 ntnx-xxx-cvm audispd[5307]: node=ntnx-xxx-cvm type=SYSCALL msg=audit(1631195761.351:193119): 
    arch=c000003e syscall=90 success=yes exit=0 a0=16fbbe0 a1=1ed a2=1 a3=0 items=1 ppid=5498 pid=5503 auid=1000 uid=1000 gid=1000 euid=1000 suid=1000 fsuid=1000 
    egid=1000 sgid=1000 fsgid=1000 tty=(none) ses=13210 comm="python2.7" exe="/usr/bin/python2.7" subj=nutanix_u:unconfined_r:unconfined_t:s0-s0:c0.c1023 
    key="audit_time_perm_mod_export_delete"
    
    2021-09-09T08:56:01.353939-05:00 ntnx-xxx-cvm audispd[5307]: node=ntnx-xxx-cvm type=PATH msg=audit(1631195761.351:193119): 
    item=0 name="/home/nutanix/.python-eggs/psutil-5.7.0-py2.7-linux-x86_64.egg-tmp/psutil/tmpe8m0Gx.$extract" inode=1705569 dev=09:02 mode=0100600 ouid=1000 
    ogid=1000 rdev=00:00 obj=nutanix_u:object_r:user_home_t:s0 objtype=NORMAL cap_fp=0000000000000000 cap_fi=0000000000000000 cap_fe=0 cap_fver=0
    ```<button aria-label="Copy to clipboard" class="acf555778e ntnx ntnx-button" data-appearance="square" data-background="alt" data-text-size="normal" data-type="text-normal" data-width="" tabindex="0" type="button"><svg aria-hidden="true" class="clone-icon ntnx ntnx-icon standard-icon size-medium" color="inherit" viewbox="0 0 12 12" xmlns="http://www.w3.org/2000/svg"><g><path d="M2.75,4.5 C2.75,3.535 3.535,2.75 4.5,2.75 L8,2.75 L8,1 C8,0.448 7.553,0 7,0 L1,0 C0.447,0 0,0.448 0,1 L0,7 C0,7.552 0.447,8 1,8 L2.75,8 L2.75,4.5 Z" fill="inherit"></path><path d="M11,4 L5,4 C4.447,4 4,4.448 4,5 L4,11 C4,11.552 4.447,12 5,12 L11,12 C11.553,12 12,11.552 12,11 L12,5 C12,4.448 11.553,4 11,4" fill="inherit"></path></g></svg></button>
    ```
    
    To prevent flooding of the rsyslog server with these audit logs, they need to be filtered on the server level. One possible solution is to filter logs based on the keyword "audispd".
6. Enable the rsyslog server: ```
    ```
    <ncli> rsyslog-config set-status enable=true 
    ```<button aria-label="Copy to clipboard" class="acf555778e ntnx ntnx-button" data-appearance="square" data-background="alt" data-text-size="normal" data-type="text-normal" data-width="" tabindex="0" type="button"><svg aria-hidden="true" class="clone-icon ntnx ntnx-icon standard-icon size-medium" color="inherit" viewbox="0 0 12 12" xmlns="http://www.w3.org/2000/svg"><g><path d="M2.75,4.5 C2.75,3.535 3.535,2.75 4.5,2.75 L8,2.75 L8,1 C8,0.448 7.553,0 7,0 L1,0 C0.447,0 0,0.448 0,1 L0,7 C0,7.552 0.447,8 1,8 L2.75,8 L2.75,4.5 Z" fill="inherit"></path><path d="M11,4 L5,4 C4.447,4 4,4.448 4,5 L4,11 C4,11.552 4.447,12 5,12 L11,12 C11.553,12 12,11.552 12,11 L12,5 C12,4.448 11.553,4 11,4" fill="inherit"></path></g></svg></button>
    ```
    
    Logs should start forwarding to the remote syslog server.  
    To test functionality of sending messages from the Nutanix Cluster to an external rsyslog server, use the native Linux logger command.  
    For TCP network protocol: ```
    ```
    logger -T -P <port number> -n <rsyslog ip> -s "This is a Test"
    
    ```<button aria-label="Copy to clipboard" class="acf555778e ntnx ntnx-button" data-appearance="square" data-background="alt" data-text-size="normal" data-type="text-normal" data-width="" tabindex="0" type="button"><svg aria-hidden="true" class="clone-icon ntnx ntnx-icon standard-icon size-medium" color="inherit" viewbox="0 0 12 12" xmlns="http://www.w3.org/2000/svg"><g><path d="M2.75,4.5 C2.75,3.535 3.535,2.75 4.5,2.75 L8,2.75 L8,1 C8,0.448 7.553,0 7,0 L1,0 C0.447,0 0,0.448 0,1 L0,7 C0,7.552 0.447,8 1,8 L2.75,8 L2.75,4.5 Z" fill="inherit"></path><path d="M11,4 L5,4 C4.447,4 4,4.448 4,5 L4,11 C4,11.552 4.447,12 5,12 L11,12 C11.553,12 12,11.552 12,11 L12,5 C12,4.448 11.553,4 11,4" fill="inherit"></path></g></svg></button>
    ```
    
    For UDP Network protocol​​​​: ```
    ```
    logger -d -P <port number> -n <rsyslog ip> -s "This is a Test"
    ```<button aria-label="Copy to clipboard" class="acf555778e ntnx ntnx-button" data-appearance="square" data-background="alt" data-text-size="normal" data-type="text-normal" data-width="" tabindex="0" type="button"><svg aria-hidden="true" class="clone-icon ntnx ntnx-icon standard-icon size-medium" color="inherit" viewbox="0 0 12 12" xmlns="http://www.w3.org/2000/svg"><g><path d="M2.75,4.5 C2.75,3.535 3.535,2.75 4.5,2.75 L8,2.75 L8,1 C8,0.448 7.553,0 7,0 L1,0 C0.447,0 0,0.448 0,1 L0,7 C0,7.552 0.447,8 1,8 L2.75,8 L2.75,4.5 Z" fill="inherit"></path><path d="M11,4 L5,4 C4.447,4 4,4.448 4,5 L4,11 C4,11.552 4.447,12 5,12 L11,12 C11.553,12 12,11.552 12,11 L12,5 C12,4.448 11.553,4 11,4" fill="inherit"></path></g></svg></button>
    ```
    
    The above commands should print the test message in */var/log* directory of the rsyslog server.
7. To show the current rsyslog server setting and modules added, run the following commands: ```
    <ncli> rsyslog-config ls 
    <ncli> rsyslog-config ls-modules server-name=<rsyslog_name>
    ```

</div></div></div></div>Source: <span style="color: rgb(53, 152, 219);">*[https://portal.nutanix.com/page/documents/kbs/details?targetId=kA00e0000009CEECA2](https://portal.nutanix.com/page/documents/kbs/details?targetId=kA00e0000009CEECA2)*</span>

<span style="color: rgb(0, 0, 0);">*<span class="TextRun SCXW71272603 BCX0" data-contrast="auto" lang="EN-US" xml:lang="EN-US"><span class="NormalTextRun SCXW71272603 BCX0">If you need further </span><span class="NormalTextRun SCXW71272603 BCX0">assistance</span><span class="NormalTextRun SCXW71272603 BCX0">, kindly contact our support at </span></span><span style="color: rgb(53, 152, 219);">**<span class="TextRun SCXW71272603 BCX0" data-contrast="none" lang="EN-US" xml:lang="EN-US"><span class="NormalTextRun SCXW71272603 BCX0">support@cytechint.com</span></span>**</span><span class="TextRun SCXW71272603 BCX0" data-contrast="auto" lang="EN-US" xml:lang="EN-US"><span class="NormalTextRun SCXW71272603 BCX0"><span style="color: rgb(53, 152, 219);"> </span>for prompt </span><span class="NormalTextRun SCXW71272603 BCX0">assistance</span><span class="NormalTextRun SCXW71272603 BCX0"> and guidance.</span></span><span class="EOP SCXW71272603 BCX0" data-ccp-props="{}"></span>*</span>

# OKTA Integrations

##### <span style="color: rgb(53, 152, 219);">**<span class="TextRun SCXW193918530 BCX8" data-contrast="none" lang="EN-US" xml:lang="EN-US"><span class="NormalTextRun SCXW193918530 BCX8" data-ccp-charstyle="Style (Complex) Open Sans" data-ccp-charstyle-defn="{"ObjectId":"5ff03a92-aaff-44b9-9fa8-ada03d4b14fc|151","ClassId":1073872969,"Properties":[201342446,"1",201342447,"5",201342448,"1",201342449,"1",469777841,"Open Sans",469777842,"Open Sans",469777843,"Calibri",469777844,"Open Sans",201341986,"1",469769226,"Open Sans",268442635,"22",335559704,"1037",335559705,"1033",335551547,"1033",335559740,"259",201341983,"0",335559739,"160",469775450,"Style (Complex) Open Sans",201340122,"1",134233614,"true",469778129,"StyleComplexOpenSans",335572020,"1",469778324,"Default Paragraph Font"]}">Introduction</span></span><span class="EOP SCXW193918530 BCX8" data-ccp-props="{"134245418":true,"134245529":true,"201341983":0,"335559738":240,"335559739":0,"335559740":360}"> </span>**</span>

<span class="TextRun SCXW193918530 BCX8" data-contrast="auto" lang="EN-US" xml:lang="EN-US"><span class="NormalTextRun SCXW193918530 BCX8" data-ccp-charstyle="Style (Complex) Open Sans">The Okta integration collects events from the Okta API, specifically reading from the Okta System Log API.</span></span><span class="EOP SCXW193918530 BCX8" data-ccp-props="{"201341983":0,"335559685":360,"335559739":160,"335559740":259}"> </span>

**<span class="TextRun SCXW193918530 BCX8" data-contrast="auto" lang="EN-US" xml:lang="EN-US"><span class="NormalTextRun SCXW193918530 BCX8" data-ccp-charstyle="Style (Complex) Open Sans">Logs</span></span><span class="EOP SCXW193918530 BCX8" data-ccp-props="{"201341983":0,"335559685":360,"335559739":160,"335559740":259}"> </span>**

**<span class="TextRun SCXW193918530 BCX8" data-contrast="auto" lang="EN-US" xml:lang="EN-US"><span class="NormalTextRun SCXW193918530 BCX8" data-ccp-charstyle="Style (Complex) Open Sans">System</span></span><span class="EOP SCXW193918530 BCX8" data-ccp-props="{"201341983":0,"335559685":360,"335559739":160,"335559740":259}"> </span>**

<span class="TextRun SCXW193918530 BCX8" data-contrast="auto" lang="EN-US" xml:lang="EN-US"><span class="NormalTextRun SCXW193918530 BCX8" data-ccp-charstyle="Style (Complex) Open Sans">The Okta System Log records system events related to your organization </span><span class="NormalTextRun AdvancedProofingIssueV2Themed SCXW193918530 BCX8" data-ccp-charstyle="Style (Complex) Open Sans">in order to</span><span class="NormalTextRun SCXW193918530 BCX8" data-ccp-charstyle="Style (Complex) Open Sans"> provide an audit trail that can be used to understand platform activity and to diagnose problems. This module is implemented using the </span><span class="NormalTextRun SpellingErrorV2Themed SCXW193918530 BCX8" data-ccp-charstyle="Style (Complex) Open Sans">httpjson</span><span class="NormalTextRun SCXW193918530 BCX8" data-ccp-charstyle="Style (Complex) Open Sans"> input and is configured to paginate through the logs while honoring any rate-limiting headers sent by Okta.</span></span><span class="EOP SCXW193918530 BCX8" data-ccp-props="{"201341983":0,"335559685":360,"335559739":160,"335559740":259}"> </span>

##### <span style="color: rgb(53, 152, 219);">**<span class="TextRun Highlight SCXW193918530 BCX8" data-contrast="none" lang="EN-US" xml:lang="EN-US"><span class="NormalTextRun SCXW193918530 BCX8" data-ccp-charstyle="normaltextrun" data-ccp-charstyle-defn="{"ObjectId":"5ff03a92-aaff-44b9-9fa8-ada03d4b14fc|177","ClassId":1073872969,"Properties":[201342446,"1",201342447,"5",201342448,"1",201342449,"1",469777841,"Calibri",469777842,"Arial",469777843,"Calibri",469777844,"Calibri",201341986,"1",469769226,"Calibri,Arial",268442635,"22",335559704,"1037",335559705,"1033",335551547,"1033",335559740,"259",201341983,"0",335559739,"160",469775450,"normaltextrun",201340122,"1",134233614,"true",469778129,"normaltextrun",335572020,"1",469778324,"Default Paragraph Font"]}">Okta</span> <span class="NormalTextRun SCXW193918530 BCX8" data-ccp-charstyle="normaltextrun">I</span><span class="NormalTextRun SCXW193918530 BCX8" data-ccp-charstyle="normaltextrun">ntegration</span><span class="NormalTextRun SCXW193918530 BCX8" data-ccp-charstyle="eop" data-ccp-charstyle-defn="{"ObjectId":"5ff03a92-aaff-44b9-9fa8-ada03d4b14fc|178","ClassId":1073872969,"Properties":[201342446,"1",201342447,"5",201342448,"1",201342449,"1",469777841,"Calibri",469777842,"Arial",469777843,"Calibri",469777844,"Calibri",201341986,"1",469769226,"Calibri,Arial",268442635,"22",335559704,"1037",335559705,"1033",335551547,"1033",335559740,"259",201341983,"0",335559739,"160",469775450,"eop",201340122,"1",134233614,"true",469778129,"eop",335572020,"1",469778324,"Default Paragraph Font"]}"> </span><span class="NormalTextRun SCXW193918530 BCX8" data-ccp-charstyle="eop">Procedures</span></span><span class="EOP SCXW193918530 BCX8" data-ccp-props="{"134245418":true,"134245529":true,"201341983":0,"335559738":240,"335559739":0,"335559740":360}"> </span>**</span>

<span class="TextRun Highlight SCXW193918530 BCX8" data-contrast="auto" lang="EN-US" xml:lang="EN-US"><span class="NormalTextRun SCXW193918530 BCX8" data-ccp-charstyle="eop">Please provide the following information to </span><span class="NormalTextRun SpellingErrorV2Themed SCXW193918530 BCX8" data-ccp-charstyle="eop">CyTech</span><span class="NormalTextRun SCXW193918530 BCX8" data-ccp-charstyle="eop">:</span></span><span class="EOP SCXW193918530 BCX8" data-ccp-props="{"201341983":0,"335559685":360,"335559739":160,"335559740":259}"> </span>

**<span class="TextRun Highlight SCXW193918530 BCX8" data-contrast="none" lang="EN-US" xml:lang="EN-US"><span class="NormalTextRun SCXW193918530 BCX8" data-ccp-charstyle="eop">Collect Okta logs via </span><span class="NormalTextRun SCXW193918530 BCX8" data-ccp-charstyle="eop">API</span></span><span class="EOP SCXW193918530 BCX8" data-ccp-props="{"134245418":true,"134245529":true,"201341983":0,"335559738":240,"335559739":0,"335559740":360}"> </span>**

<div class="ListContainerWrapper SCXW193918530 BCX8" id="bkmrk-api-key---api-key-is">1. <span class="TextRun Highlight SCXW193918530 BCX8" data-contrast="auto" lang="EN-US" xml:lang="EN-US"><span class="NormalTextRun SCXW193918530 BCX8" data-ccp-charstyle="eop">API Key</span><span class="NormalTextRun SCXW193918530 BCX8" data-ccp-charstyle="eop"> - </span><span class="NormalTextRun SCXW193918530 BCX8" data-ccp-charstyle="eop">API Key is </span><span class="NormalTextRun SCXW193918530 BCX8" data-ccp-charstyle="eop">required</span><span class="NormalTextRun SCXW193918530 BCX8" data-ccp-charstyle="eop">.</span></span><span class="EOP SCXW193918530 BCX8" data-ccp-props="{"201341983":0,"335559739":160,"335559740":259}"> </span>

</div><div class="ListContainerWrapper SCXW193918530 BCX8" id="bkmrk-okta-system-log-api-">2. <span class="TextRun Highlight SCXW193918530 BCX8" data-contrast="auto" lang="EN-US" xml:lang="EN-US"><span class="NormalTextRun SCXW193918530 BCX8" data-ccp-charstyle="eop">Okta System Log API </span><span class="NormalTextRun SpellingErrorV2Themed SCXW193918530 BCX8" data-ccp-charstyle="eop">Url</span><span class="NormalTextRun SCXW193918530 BCX8" data-ccp-charstyle="eop"> - </span><span class="NormalTextRun SCXW193918530 BCX8" data-ccp-charstyle="eop">Okta System Log API </span><span class="NormalTextRun SpellingErrorV2Themed SCXW193918530 BCX8" data-ccp-charstyle="eop">Url</span><span class="NormalTextRun SCXW193918530 BCX8" data-ccp-charstyle="eop"> is </span><span class="NormalTextRun SCXW193918530 BCX8" data-ccp-charstyle="eop">required</span><span class="NormalTextRun SCXW193918530 BCX8" data-ccp-charstyle="eop">.</span></span><span class="EOP SCXW193918530 BCX8" data-ccp-props="{"201341983":0,"335559739":160,"335559740":259}"> </span>

</div>

# Palo Alto Cortex XDR Integration

#### **Palo Alto Cortex XDR Integration**

Using the <span class="phrase">Cortex XDR</span> APIs, you can integrate <span class="phrase">Cortex XDR</span> with third-party apps or services to ingest alerts and to leverage alert stitching and investigation capabilities. The APIs allows you to manage incidents in a ticketing or automation system of your choice by reviewing and editing the incident's details, status, and assignee. Using the APIs, you can also retrieve information on the endpoints, create installation package, perform response actions directly on the endpoint and more.

##### **Alerts**

The Cortex XDR Alerts API is used to retrieve alerts generated by Cortex XDR based on raw endpoint data. A single alert might include one or more local endpoint events, each event generating its own document on Elasticsearch.

The Palo Alto XDR integration requires both an API key and API key ID, both which can be retrieved from the Cortex XDR UI.

##### **API**  


**Before you can begin using Cortex XDR APIs, you must generate the following items from the Cortex XDR app:**

<table id="bkmrk-value-description-ap" style="height: 199px; width: 100%;"><thead><tr><th style="width: 20.0291%;">Value</th><th style="width: 79.9709%;">Description</th></tr></thead><tbody><tr><td style="width: 20.0291%;">**API Key**</td><td style="width: 79.9709%;">The API Key is your unique identifier used as the `Authorization:{key}` header required for authenticating API calls. Depending on your desired security level, you can generate two types of API keys, Advanced or Standard, from your Cortex XDR app.</td></tr><tr><td style="width: 20.0291%;">**API Key ID**</td><td style="width: 79.9709%;">The API Key ID is your unique token used to authenticate the API Key. The header used when running an API call is `x-xdr-auth-id:{key_id}`.</td></tr><tr><td style="width: 20.0291%;">**FQDN**</td><td style="width: 79.9709%;">The FQDN is a unique host and domain name associated with each tenant. When you generate the API Key and Key ID, you are assigned an individual FQDN.</td></tr></tbody></table>

##### **Create Cortex API Key:**

The following steps describe how to generate the necessary key values:

1. Get your Cortex XDR API Key:
    
    
    1. In Cortex XDR, navigate to **Settings** &gt; **Configurations** &gt; **Integrations** &gt; **API Keys**.
    2. Select **+ New Key**.
    3. Choose the type of API Key you want to generate based on your desired security level: **Advanced** or **Standard**. The Advanced API key hashes the key useing a nonce, a random string, and a timestamp to prevent replay attacks. cURL does not support this but is suitable with scripts. Use the provided script to create the advanced API authentication token.

**Note: To integrate with Cortex XSOAR you must generate an Advanced Key.**

4. If you want to define a time limit on the API key authentication, mark **Enable Expiration Date** and select the expiration date and time. Navigate to **Settings** &gt; **Configurations** &gt; **Integrations** &gt; **API Keys** to track the **Expiration Time** field for each API key. In addition, Cortex XDR displays a API Key Expiration notification in the Notification Center one week and one day prior to the defined expiration date.
5. Provide a comment that describes the purpose for the API key, if desired.
6. Select the desired level of access for this key. You can select from the list of existing **Roles**, or you can select **Custom** to set the permissions on a more granular level. Roles are available according what was defined in the hub as described in the Manage Roles section of the Cortex XDR Administrator’s Guide.
7. **Generate** the API Key.
8. Copy the API key, and then click **Done**. This value represents your unique `Authorization:{key}`.

**Note: You will not be able to view the API Key again after you complete this step. Ensure that you copy it before closing the notification.**

##### **Cortex XDR API Key ID**

Get your Cortex XDR API Key ID.

1. 1. In the API Keys table, locate the **ID** field.
    2. Note your corresponding **ID** number. This value represents the `x-xdr-auth-id:{key_id}` token.

**Note: This key id will be used for integrations with elastic.**

##### **Cortex XDR API FQDN**  


Get your FQDN.

1. Right-click your API key and select **View Examples**.
2. Copy the **CURL Example** URL. The example contains your unique FQDN:

`https://api-{fqdn}/public_api/v1/{name of api}/{name of call}/` You can use the **CURL Example** URL to run the APIs.

*If you need further assistance, kindly contact our support at <info@cytechint.com> for prompt assistance and guidance.*

# Palo Alto Firewall Syslog Filter

##### <span style="color: rgb(53, 152, 219);">**Introduction**</span>

<span style="color: rgb(0, 0, 0);">This guide outlines how to configure **Syslog filters** on Palo Alto Networks firewalls to control which logs are sent to external Syslog servers. Proper filtering reduces noise, focuses on relevant events, and improves SIEM performance.</span>

##### <span style="color: rgb(53, 152, 219);">**Syslog Overview**</span>

<span style="color: rgb(0, 0, 0);">Syslog is a protocol used to send logs from network devices to centralized logging systems. Palo Alto firewalls support syslog forwarding for various log types: **traffic**, **threat**, **system**, and **configuration**.</span>

##### <span style="color: rgb(53, 152, 219);">**Components Involved**</span>

<div class="_tableWrapper_16hzy_14 group flex w-fit flex-col-reverse" id="bkmrk-component-descriptio-1" tabindex="-1"><table border="1" class="w-fit min-w-(--thread-content-width)" data-end="1658" data-start="1224" style="width: 108.69%; border-collapse: collapse; border-width: 1px; height: 160px;"><thead data-end="1310" data-start="1224"><tr data-end="1310" data-start="1224"><th data-col-size="sm" data-end="1249" data-start="1224" style="width: 28.1969%; border-width: 1px;"><span style="color: rgb(0, 0, 0);">Component</span>

</th><th data-col-size="md" data-end="1310" data-start="1249" style="width: 71.8058%; border-width: 1px;"><span style="color: rgb(0, 0, 0);">Description</span>

</th></tr></thead><tbody data-end="1658" data-start="1398"><tr data-end="1484" data-start="1398"><td data-col-size="sm" data-end="1423" data-start="1398" style="width: 28.1969%; border-width: 1px;"><span style="color: rgb(0, 0, 0);">Syslog Server Profile</span>

</td><td data-col-size="md" data-end="1484" data-start="1423" style="width: 71.8058%; border-width: 1px;"><span style="color: rgb(0, 0, 0);">Defines the destination server and syslog transport type</span>

</td></tr><tr data-end="1571" data-start="1485"><td data-col-size="sm" data-end="1510" data-start="1485" style="width: 28.1969%; border-width: 1px;"><span style="color: rgb(0, 0, 0);">Log Forwarding Profile</span>

</td><td data-col-size="md" data-end="1571" data-start="1510" style="width: 71.8058%; border-width: 1px;"><span style="color: rgb(0, 0, 0);">Specifies what logs to forward and to whom</span>

</td></tr><tr data-end="1658" data-start="1572"><td data-col-size="sm" data-end="1597" data-start="1572" style="width: 28.1969%; border-width: 1px;"><span style="color: rgb(0, 0, 0);">Security Policy</span>

</td><td data-col-size="md" data-end="1658" data-start="1597" style="width: 71.8058%; border-width: 1px;"><span style="color: rgb(0, 0, 0);">Determines when logs are generated and which are forwarded</span>

</td></tr></tbody></table>

</div>##### **<span style="color: rgb(53, 152, 219);">Configuration Steps</span>**

##### **<span style="color: rgb(53, 152, 219);">1. Create Syslog Server Profile</span>**

##### <span style="color: rgb(0, 0, 0);"> Navigate to: **Device** &gt; **Server Profiles** &gt; **Syslog**</span>

##### **Steps:**

1. <span style="color: rgb(0, 0, 0);">Click **Add** to create a new profile.</span>  
    [![2025-06-19_11-20.png](https://cytechint-docs-bookstack.s3.amazonaws.com/uploads/images/gallery/2025-06/scaled-1680-/UVKt7zpsTvW9bCUI-2025-06-19-11-20.png)](https://cytechint-docs-bookstack.s3.amazonaws.com/uploads/images/gallery/2025-06/UVKt7zpsTvW9bCUI-2025-06-19-11-20.png)
2. <span style="color: rgb(0, 0, 0);">Enter a </span>**<span style="color: rgb(0, 0, 0);">Name (e.g., AQUILA-Syslog-Filter).</span> [![syslog name.png](https://cytechint-docs-bookstack.s3.amazonaws.com/uploads/images/gallery/2025-06/scaled-1680-/KZGuGzwbBSly05zw-syslog-name.png)](https://cytechint-docs-bookstack.s3.amazonaws.com/uploads/images/gallery/2025-06/KZGuGzwbBSly05zw-syslog-name.png)**
3. <span style="color: rgb(0, 0, 0);">Under **Syslog Server**, click **Add** and enter:</span>
    
    
    - <span style="color: rgb(0, 0, 0);">**Name**: e.g., AQUILA-Server</span>
    - <span style="color: rgb(0, 0, 0);">**Server**: IP or hostname of your syslog server(log collecttor IP)</span>
    - <span style="color: rgb(0, 0, 0);">**Transport**: UDP or TCP</span>
    - <span style="color: rgb(0, 0, 0);">**Port**: Default is 514 (UDP)</span>
    - <span style="color: rgb(0, 0, 0);">**Facility**: e.g., local4</span>
    - <span style="color: rgb(0, 0, 0);">**Format**: BSD</span>  
        [![2025-06-19_11-33.png](https://cytechint-docs-bookstack.s3.amazonaws.com/uploads/images/gallery/2025-06/scaled-1680-/jm5IZn8oPyzwM6iS-2025-06-19-11-33.png)](https://cytechint-docs-bookstack.s3.amazonaws.com/uploads/images/gallery/2025-06/jm5IZn8oPyzwM6iS-2025-06-19-11-33.png)
4. <span style="color: rgb(0, 0, 0);">Add a **Filter** to specify:</span>
    
    
    - <span style="color: rgb(0, 0, 0);">**Log Type**: Threat</span>
    - <span style="color: rgb(0, 0, 0);">**Severity**: High</span>  
        [![levels.png](https://cytechint-docs-bookstack.s3.amazonaws.com/uploads/images/gallery/2025-06/scaled-1680-/NFrEro1pXoJSroAi-levels.png)](https://cytechint-docs-bookstack.s3.amazonaws.com/uploads/images/gallery/2025-06/NFrEro1pXoJSroAi-levels.png)
5. <span style="color: rgb(0, 0, 0);">Click </span>**<span style="color: rgb(0, 0, 0);">OK</span>**

##### <span style="color: rgb(53, 152, 219);">**2. Create Log Forwarding Profile**</span>

<span style="color: rgb(0, 0, 0);">Navigate to: **Objects** &gt; **Log Forwarding**</span>

**[![objects.png](https://cytechint-docs-bookstack.s3.amazonaws.com/uploads/images/gallery/2025-06/scaled-1680-/LUCzkkk4DwCi2xW7-objects.png)](https://cytechint-docs-bookstack.s3.amazonaws.com/uploads/images/gallery/2025-06/LUCzkkk4DwCi2xW7-objects.png)**

##### **Steps:**

1. <span style="color: rgb(0, 0, 0);">Click **Add** to create a new log forwarding profile.</span>  
    [![add.png](https://cytechint-docs-bookstack.s3.amazonaws.com/uploads/images/gallery/2025-06/scaled-1680-/RBWMVx9jxKAdvLnd-add.png)](https://cytechint-docs-bookstack.s3.amazonaws.com/uploads/images/gallery/2025-06/RBWMVx9jxKAdvLnd-add.png)
2. <span style="color: rgb(0, 0, 0);">Name it (example: syslog) </span>
3. <span style="color: rgb(0, 0, 0);">Under **Log Type**, click **Add** and configure:</span>  
    [![syslog .png](https://cytechint-docs-bookstack.s3.amazonaws.com/uploads/images/gallery/2025-06/scaled-1680-/TsTqOna0GsjIzAsU-syslog.png)](https://cytechint-docs-bookstack.s3.amazonaws.com/uploads/images/gallery/2025-06/TsTqOna0GsjIzAsU-syslog.png)
    
    
    - **Log Type**: Select Threat  
        [![traffic.png](https://cytechint-docs-bookstack.s3.amazonaws.com/uploads/images/gallery/2025-06/scaled-1680-/cyWcOslLjexb9bjy-traffic.png)](https://cytechint-docs-bookstack.s3.amazonaws.com/uploads/images/gallery/2025-06/cyWcOslLjexb9bjy-traffic.png)
    - **Filter**: severity eq high
    - **Forward Method**: Select the Syslog Server Profile you created, click **Add** then select the one you **created**
4. <span style="color: rgb(0, 0, 0);">Click </span>**<span style="color: rgb(0, 0, 0);">OK</span>  
    [![methof.png](https://cytechint-docs-bookstack.s3.amazonaws.com/uploads/images/gallery/2025-06/scaled-1680-/NITyrphhyaMsouws-methof.png)](https://cytechint-docs-bookstack.s3.amazonaws.com/uploads/images/gallery/2025-06/NITyrphhyaMsouws-methof.png)  
    [![okay.png](https://cytechint-docs-bookstack.s3.amazonaws.com/uploads/images/gallery/2025-06/scaled-1680-/o8r1tkpKiqn7aHWT-okay.png)](https://cytechint-docs-bookstack.s3.amazonaws.com/uploads/images/gallery/2025-06/o8r1tkpKiqn7aHWT-okay.png)**

##### <span style="color: rgb(53, 152, 219);">**3. Apply Log Forwarding to Security Policy**</span>

<span style="color: rgb(0, 0, 0);">**Navigate to: Policies &gt; Security**</span>

**[![sections.png](https://cytechint-docs-bookstack.s3.amazonaws.com/uploads/images/gallery/2025-06/scaled-1680-/w7oQKZI0gBzIvdui-sections.png)](https://cytechint-docs-bookstack.s3.amazonaws.com/uploads/images/gallery/2025-06/w7oQKZI0gBzIvdui-sections.png)**

##### <span style="color: rgb(0, 0, 0);">**Steps:**</span>

1. <span style="color: rgb(0, 0, 0);">Locate and **edit** the security policy you want to apply logging to.</span>
2. <span style="color: rgb(0, 0, 0);">Click the **Actions** tab.</span>
3. <span style="color: rgb(0, 0, 0);">In the **Log Forwarding** field, select the log forwarding profile you created.</span>
4. <span style="color: rgb(0, 0, 0);">(Optional) Enable logging at session start/end.</span>
5. <span style="color: rgb(0, 0, 0);">Click **OK** and then **Commit** your changes.</span>  
    [![fd.png](https://cytechint-docs-bookstack.s3.amazonaws.com/uploads/images/gallery/2025-06/scaled-1680-/QCZiWwBgPTTVKz7a-fd.png)](https://cytechint-docs-bookstack.s3.amazonaws.com/uploads/images/gallery/2025-06/QCZiWwBgPTTVKz7a-fd.png)

##### <span style="color: rgb(0, 0, 0);"><span class="TextRun SCXW71272603 BCX0" data-contrast="auto" lang="EN-US" xml:lang="EN-US"><span class="NormalTextRun SCXW71272603 BCX0"> </span><span style="color: rgb(186, 55, 42);">**<span class="NormalTextRun SCXW71272603 BCX0">Please provide the following information to </span><span class="NormalTextRun SpellingErrorV2Themed SCXW71272603 BCX0">CyTech</span><span class="NormalTextRun SCXW71272603 BCX0">: </span>**</span></span><span style="color: rgb(186, 55, 42);">**<span class="EOP SCXW71272603 BCX0" data-ccp-props="{}"> </span>**</span></span>

<span data-teams="true" style="color: rgb(0, 0, 0);">Requirements:Collect logs via syslog over UDP or TCP</span>

<span style="color: rgb(0, 0, 0);"><span data-teams="true"> </span><span data-teams="true">\***Syslog Host**-&gt; Syslog Collector IP address where the Elastic-Agent is installed.  
 \***Syslog Port**-&gt; Port Number (Please identify if TCP or UDP)</span></span>

<span style="color: rgb(0, 0, 0);">*Reference Links:* </span>

- *<span style="color: rgb(132, 63, 161);">[https://docs.paloaltonetworks.com/pan-os/10-2/pan-os-admin/monitoring/use-syslog-for-monitoring/configure-syslog-monitoring](https://docs.paloaltonetworks.com/pan-os/10-2/pan-os-admin/monitoring/use-syslog-for-monitoring/configure-syslog-monitoring "Palo alto")</span>*
- *<span style="color: rgb(132, 63, 161);">[https://www.youtube.com/watch?v=ftR3DU2MtjY&amp;t=137s](https://www.youtube.com/watch?v=ftR3DU2MtjY&t=137s "syslog system configure")</span>*

*If you need further assistance, kindly contact our support at* <span style="color: rgb(53, 152, 219);">***support@cytechint.com***</span> *for prompt assistance and guidance.*

# Palo Alto Next Generation Firewall

#### <span style="color: rgb(53, 152, 219);">**<span class="TextRun SCXW203280824 BCX0" data-contrast="auto" lang="EN-US" xml:lang="EN-US"><span class="NormalTextRun SCXW203280824 BCX0">Configure Syslog Monitoring</span></span>**</span>

<span style="color: rgb(53, 152, 219);">**<span class="TextRun SCXW203280824 BCX0" data-contrast="auto" lang="EN-US" xml:lang="EN-US"><span class="NormalTextRun SCXW203280824 BCX0">STEP 1 - </span><span class="NormalTextRun SCXW203280824 BCX0">Configure a Syslog server profile.</span></span><span class="EOP SCXW203280824 BCX0" data-ccp-props="{"134233117":false,"134233118":false,"335551550":0,"335551620":0,"335559738":240,"335559739":240}"> </span>**</span>

<div class="ListContainerWrapper SCXW203280824 BCX0" id="bkmrk-select%C2%A0device--%3Eserv">1. <span style="color: rgb(0, 0, 0);"><span class="TextRun SCXW203280824 BCX0" data-contrast="auto" lang="EN-US" xml:lang="EN-US"><span class="NormalTextRun SCXW203280824 BCX0">Select </span></span>**<span class="TextRun SCXW203280824 BCX0" data-contrast="auto" lang="EN-US" xml:lang="EN-US"><span class="NormalTextRun SCXW203280824 BCX0">Device</span></span>**<span class="TextRun SCXW203280824 BCX0" data-contrast="auto" lang="EN-US" xml:lang="EN-US"><span class="NormalTextRun SCXW203280824 BCX0">--&gt;</span></span>**<span class="TextRun SCXW203280824 BCX0" data-contrast="auto" lang="EN-US" xml:lang="EN-US"><span class="NormalTextRun SCXW203280824 BCX0">Server</span></span>**<span class="TextRun SCXW203280824 BCX0" data-contrast="auto" lang="EN-US" xml:lang="EN-US"><span class="NormalTextRun SCXW203280824 BCX0">--&gt;</span></span>**<span class="TextRun SCXW203280824 BCX0" data-contrast="auto" lang="EN-US" xml:lang="EN-US"><span class="NormalTextRun SCXW203280824 BCX0">Profiles</span></span>**<span class="TextRun SCXW203280824 BCX0" data-contrast="auto" lang="EN-US" xml:lang="EN-US"><span class="NormalTextRun SCXW203280824 BCX0">--&gt;</span></span>**<span class="TextRun SCXW203280824 BCX0" data-contrast="auto" lang="EN-US" xml:lang="EN-US"><span class="NormalTextRun SCXW203280824 BCX0">Syslo</span><span class="NormalTextRun SCXW203280824 BCX0">g</span></span>**<span class="TextRun SCXW203280824 BCX0" data-contrast="auto" lang="EN-US" xml:lang="EN-US"><span class="NormalTextRun SCXW203280824 BCX0">.</span></span><span class="EOP SCXW203280824 BCX0" data-ccp-props="{"134233117":false,"134233118":false,"335551550":0,"335551620":0,"335559738":0,"335559739":0}"> </span></span>

</div><div class="ListContainerWrapper SCXW203280824 BCX0" id="bkmrk-click%C2%A0add%C2%A0and-enter-">2. <span style="color: rgb(0, 0, 0);"><span class="TextRun SCXW203280824 BCX0" data-contrast="auto" lang="EN-US" xml:lang="EN-US"><span class="NormalTextRun SCXW203280824 BCX0">Click </span></span>**<span class="TextRun SCXW203280824 BCX0" data-contrast="auto" lang="EN-US" xml:lang="EN-US"><span class="NormalTextRun SCXW203280824 BCX0">Add</span></span>**<span class="TextRun SCXW203280824 BCX0" data-contrast="auto" lang="EN-US" xml:lang="EN-US"><span class="NormalTextRun SCXW203280824 BCX0"> and enter a </span></span>**<span class="TextRun SCXW203280824 BCX0" data-contrast="auto" lang="EN-US" xml:lang="EN-US"><span class="NormalTextRun SCXW203280824 BCX0">Name</span></span>**<span class="TextRun SCXW203280824 BCX0" data-contrast="auto" lang="EN-US" xml:lang="EN-US"><span class="NormalTextRun SCXW203280824 BCX0"> for the profile.</span></span><span class="EOP SCXW203280824 BCX0" data-ccp-props="{"134233117":false,"134233118":false,"335551550":0,"335551620":0,"335559738":0,"335559739":0}"> </span></span>

</div><div class="ListContainerWrapper SCXW203280824 BCX0" id="bkmrk-if-the-firewall-has-">3. <span style="color: rgb(0, 0, 0);"><span class="TextRun SCXW203280824 BCX0" data-contrast="auto" lang="EN-US" xml:lang="EN-US"><span class="NormalTextRun SCXW203280824 BCX0">If the </span><span class="NormalTextRun SCXW203280824 BCX0">firewall</span><span class="NormalTextRun SCXW203280824 BCX0"> has more than one virtual system (</span><span class="NormalTextRun SpellingErrorV2Themed SCXW203280824 BCX0">vsys</span><span class="NormalTextRun SCXW203280824 BCX0">), select the </span></span>**<span class="TextRun SCXW203280824 BCX0" data-contrast="auto" lang="EN-US" xml:lang="EN-US"><span class="NormalTextRun SCXW203280824 BCX0">Location</span></span>**<span class="TextRun SCXW203280824 BCX0" data-contrast="auto" lang="EN-US" xml:lang="EN-US"><span class="NormalTextRun SCXW203280824 BCX0"> (</span><span class="NormalTextRun SpellingErrorV2Themed SCXW203280824 BCX0">vsys</span><span class="NormalTextRun SCXW203280824 BCX0"> or </span></span>**<span class="TextRun SCXW203280824 BCX0" data-contrast="auto" lang="EN-US" xml:lang="EN-US"><span class="NormalTextRun SCXW203280824 BCX0">Shared</span></span>**<span class="TextRun SCXW203280824 BCX0" data-contrast="auto" lang="EN-US" xml:lang="EN-US"><span class="NormalTextRun SCXW203280824 BCX0">) where this profile is available.</span></span><span class="EOP SCXW203280824 BCX0" data-ccp-props="{"134233117":false,"134233118":false,"335551550":0,"335551620":0,"335559738":0,"335559739":0}"> </span></span>

</div><div class="ListContainerWrapper SCXW203280824 BCX0" id="bkmrk-for-each-syslog-serv">4. <span style="color: rgb(0, 0, 0);"><span class="TextRun SCXW203280824 BCX0" data-contrast="auto" lang="EN-US" xml:lang="EN-US"><span class="NormalTextRun SCXW203280824 BCX0">For each syslog server, click </span></span>**<span class="TextRun SCXW203280824 BCX0" data-contrast="auto" lang="EN-US" xml:lang="EN-US"><span class="NormalTextRun SCXW203280824 BCX0">Add</span></span>**<span class="TextRun SCXW203280824 BCX0" data-contrast="auto" lang="EN-US" xml:lang="EN-US"><span class="NormalTextRun SCXW203280824 BCX0"> and enter the information that the </span><span class="NormalTextRun SCXW203280824 BCX0">firewall</span><span class="NormalTextRun SCXW203280824 BCX0"> requires to connect to it: </span></span><span class="EOP SCXW203280824 BCX0" data-ccp-props="{"134233117":false,"134233118":false,"335551550":0,"335551620":0,"335559738":0,"335559739":0}"> </span></span>

</div><div class="ListContainerWrapper SCXW203280824 BCX0" id="bkmrk-name---unique-name-f">- - <span style="color: rgb(0, 0, 0);"><span class="TextRun SCXW203280824 BCX0" data-contrast="auto" lang="EN-US" xml:lang="EN-US">**<span class="NormalTextRun SCXW203280824 BCX0">Name</span>**<span class="NormalTextRun SCXW203280824 BCX0"> - </span></span><span class="TextRun SCXW203280824 BCX0" data-contrast="auto" lang="EN-US" xml:lang="EN-US"><span class="NormalTextRun SCXW203280824 BCX0">Unique name for the server profile.</span></span><span class="EOP SCXW203280824 BCX0" data-ccp-props="{"134233117":false,"134233118":false,"335551550":0,"335551620":0,"335559738":0,"335559739":0}"> </span></span>

</div><div class="ListContainerWrapper SCXW203280824 BCX0" id="bkmrk-syslog-server---ip-a">- - <span style="color: rgb(0, 0, 0);"><span class="TextRun SCXW203280824 BCX0" data-contrast="auto" lang="EN-US" xml:lang="EN-US">**<span class="NormalTextRun SCXW203280824 BCX0">Syslog Server</span>**<span class="NormalTextRun SCXW203280824 BCX0"> - </span></span><span class="TextRun SCXW203280824 BCX0" data-contrast="auto" lang="EN-US" xml:lang="EN-US"><span class="NormalTextRun SCXW203280824 BCX0">IP address of the syslog server.</span></span><span class="EOP SCXW203280824 BCX0" data-ccp-props="{"134233117":false,"134233118":false,"335551550":0,"335551620":0,"335559738":0,"335559739":0}"> </span></span>

</div><div class="ListContainerWrapper SCXW203280824 BCX0" id="bkmrk-transport---select%C2%A0t">- - <span style="color: rgb(0, 0, 0);"><span class="TextRun SCXW203280824 BCX0" data-contrast="auto" lang="EN-US" xml:lang="EN-US">**<span class="NormalTextRun SCXW203280824 BCX0">Transpor</span>**<span class="NormalTextRun SCXW203280824 BCX0">**t** </span><span class="NormalTextRun SCXW203280824 BCX0">- </span></span><span class="TextRun SCXW203280824 BCX0" data-contrast="auto" lang="EN-US" xml:lang="EN-US"><span class="NormalTextRun SCXW203280824 BCX0">Select TCP</span><span class="NormalTextRun SCXW203280824 BCX0"> or </span><span class="NormalTextRun SCXW203280824 BCX0">UDP</span> <span class="NormalTextRun SCXW203280824 BCX0">as the protocol for communicating with the syslog server.</span></span><span class="EOP SCXW203280824 BCX0" data-ccp-props="{"134233117":false,"134233118":false,"335551550":0,"335551620":0,"335559738":0,"335559739":0}"> </span></span>

</div><div class="ListContainerWrapper SCXW203280824 BCX0" id="bkmrk-port---the-port-numb">- - <span style="color: rgb(0, 0, 0);"><span class="TextRun SCXW203280824 BCX0" data-contrast="auto" lang="EN-US" xml:lang="EN-US">**<span class="NormalTextRun SCXW203280824 BCX0">Port</span>**<span class="NormalTextRun SCXW203280824 BCX0"> - </span></span><span class="TextRun SCXW203280824 BCX0" data-contrast="auto" lang="EN-US" xml:lang="EN-US"><span class="NormalTextRun SCXW203280824 BCX0">The port number on which to send syslog messages</span><span class="NormalTextRun SCXW203280824 BCX0">;</span><span class="NormalTextRun SCXW203280824 BCX0"> you must use the same port number on the </span><span class="NormalTextRun SCXW203280824 BCX0">firewall</span><span class="NormalTextRun SCXW203280824 BCX0"> and the syslog server.</span></span><span class="EOP SCXW203280824 BCX0" data-ccp-props="{"134233117":false,"134233118":false,"335551550":0,"335551620":0,"335559738":0,"335559739":0}"> </span></span>

</div><div class="ListContainerWrapper SCXW203280824 BCX0" id="bkmrk-click%C2%A0ok%C2%A0to-save-the">5. <span style="color: rgb(0, 0, 0);"><span class="TextRun SCXW203280824 BCX0" data-contrast="auto" lang="EN-US" xml:lang="EN-US"><span class="NormalTextRun SCXW203280824 BCX0">Click </span></span>**<span class="TextRun SCXW203280824 BCX0" data-contrast="auto" lang="EN-US" xml:lang="EN-US"><span class="NormalTextRun SCXW203280824 BCX0">OK</span></span>**<span class="TextRun SCXW203280824 BCX0" data-contrast="auto" lang="EN-US" xml:lang="EN-US"><span class="NormalTextRun SCXW203280824 BCX0"> to save the server profile.</span></span><span class="EOP SCXW203280824 BCX0" data-ccp-props="{"134233117":false,"134233118":false,"335551550":0,"335551620":0,"335559738":0,"335559739":0}"> </span></span>

</div><span class="EOP SCXW203280824 BCX0" data-ccp-props="{"134233117":false,"134233118":false,"335551550":0,"335551620":0,"335559738":0,"335559739":0}"> </span>

<span style="color: rgb(53, 152, 219);">**<span class="TextRun SCXW203280824 BCX0" data-contrast="auto" lang="EN-US" xml:lang="EN-US"><span class="NormalTextRun SCXW203280824 BCX0">STEP 2 - </span><span class="NormalTextRun SCXW203280824 BCX0">Configure syslog</span> <span class="NormalTextRun SCXW203280824 BCX0">forwardin</span><span class="NormalTextRun SCXW203280824 BCX0">g</span><span class="NormalTextRun SCXW203280824 BCX0"> for Traffic, Threat, and</span> <span class="NormalTextRun SpellingErrorV2Themed SCXW203280824 BCX0">WildFir</span><span class="NormalTextRun SpellingErrorV2Themed SCXW203280824 BCX0">e</span><span class="NormalTextRun SCXW203280824 BCX0"> Submission logs. </span></span><span class="EOP SCXW203280824 BCX0" data-ccp-props="{"134233117":false,"134233118":false,"335551550":0,"335551620":0,"335559738":0,"335559739":0}"> </span>**</span>

<div class="ListContainerWrapper SCXW203280824 BCX0" id="bkmrk-configure-the-firewa">1. <span style="color: rgb(0, 0, 0);"><span class="TextRun SCXW203280824 BCX0" data-contrast="auto" lang="EN-US" xml:lang="EN-US"><span class="NormalTextRun SCXW203280824 BCX0">Configure the </span><span class="NormalTextRun SCXW203280824 BCX0">firewall</span><span class="NormalTextRun SCXW203280824 BCX0"> to </span><span class="NormalTextRun SCXW203280824 BCX0">forward</span><span class="NormalTextRun SCXW203280824 BCX0"> logs. </span></span><span class="EOP SCXW203280824 BCX0" data-ccp-props="{"134233117":false,"134233118":false,"335551550":0,"335551620":0,"335559738":0,"335559739":0}"> </span></span>

</div><div class="ListContainerWrapper SCXW203280824 BCX0" id="bkmrk-select%C2%A0objects--%3Elog">- - <span style="color: rgb(0, 0, 0);"><span class="TextRun SCXW203280824 BCX0" data-contrast="auto" lang="EN-US" xml:lang="EN-US"><span class="NormalTextRun SCXW203280824 BCX0">Select </span></span><span class="TextRun SCXW203280824 BCX0" data-contrast="auto" lang="EN-US" xml:lang="EN-US">**<span class="NormalTextRun SCXW203280824 BCX0">Objects</span>**<span class="NormalTextRun SCXW203280824 BCX0">--&gt;</span>**<span class="NormalTextRun SCXW203280824 BCX0">Log</span> <span class="NormalTextRun SCXW203280824 BCX0">Forwarding</span>**</span><span class="TextRun SCXW203280824 BCX0" data-contrast="auto" lang="EN-US" xml:lang="EN-US"><span class="NormalTextRun SCXW203280824 BCX0">, click </span></span>**<span class="TextRun SCXW203280824 BCX0" data-contrast="auto" lang="EN-US" xml:lang="EN-US"><span class="NormalTextRun SCXW203280824 BCX0">Add</span></span>**<span class="TextRun SCXW203280824 BCX0" data-contrast="auto" lang="EN-US" xml:lang="EN-US"><span class="NormalTextRun SCXW203280824 BCX0">, and enter a </span></span>**<span class="TextRun SCXW203280824 BCX0" data-contrast="auto" lang="EN-US" xml:lang="EN-US"><span class="NormalTextRun SCXW203280824 BCX0">Name</span></span>**<span class="TextRun SCXW203280824 BCX0" data-contrast="auto" lang="EN-US" xml:lang="EN-US"><span class="NormalTextRun SCXW203280824 BCX0"> to </span><span class="NormalTextRun SCXW203280824 BCX0">identify</span><span class="NormalTextRun SCXW203280824 BCX0"> the profile.</span></span><span class="EOP SCXW203280824 BCX0" data-ccp-props="{"134233117":false,"134233118":false,"335551550":0,"335551620":0,"335559738":0,"335559739":0}"> </span></span>

</div><div class="ListContainerWrapper SCXW203280824 BCX0" id="bkmrk-for-each-log-type-an">- - <span style="color: rgb(0, 0, 0);"><span class="TextRun SCXW203280824 BCX0" data-contrast="auto" lang="EN-US" xml:lang="EN-US"><span class="NormalTextRun SCXW203280824 BCX0">For each log type and each severity level or </span><span class="NormalTextRun SpellingErrorV2Themed SCXW203280824 BCX0">WildFire</span><span class="NormalTextRun SCXW203280824 BCX0"> verdict, select the </span></span>**<span class="TextRun SCXW203280824 BCX0" data-contrast="auto" lang="EN-US" xml:lang="EN-US"><span class="NormalTextRun SCXW203280824 BCX0">Syslog server profile</span></span>**<span class="TextRun SCXW203280824 BCX0" data-contrast="auto" lang="EN-US" xml:lang="EN-US"><span class="NormalTextRun SCXW203280824 BCX0"> and click </span></span>**<span class="TextRun SCXW203280824 BCX0" data-contrast="auto" lang="EN-US" xml:lang="EN-US"><span class="NormalTextRun SCXW203280824 BCX0">OK</span></span>**<span class="TextRun SCXW203280824 BCX0" data-contrast="auto" lang="EN-US" xml:lang="EN-US"><span class="NormalTextRun SCXW203280824 BCX0">.</span></span><span class="EOP SCXW203280824 BCX0" data-ccp-props="{"134233117":false,"134233118":false,"335551550":0,"335551620":0,"335559738":0,"335559739":0}"> </span></span>

</div><div class="ListContainerWrapper SCXW203280824 BCX0" id="bkmrk-assign-the-log-forwa">2. <span style="color: rgb(0, 0, 0);"><span class="TextRun SCXW203280824 BCX0" data-contrast="auto" lang="EN-US" xml:lang="EN-US"><span class="NormalTextRun SCXW203280824 BCX0">Assign the log </span><span class="NormalTextRun SCXW203280824 BCX0">forwarding</span><span class="NormalTextRun SCXW203280824 BCX0"> profile to a security policy to trigger log generation and </span><span class="NormalTextRun SCXW203280824 BCX0">forwarding</span><span class="NormalTextRun SCXW203280824 BCX0">. </span></span> <span class="EOP SCXW203280824 BCX0" data-ccp-props="{"134233117":false,"134233118":false,"335551550":0,"335551620":0,"335559738":0,"335559739":0}"> </span></span>

</div><div class="ListContainerWrapper SCXW203280824 BCX0" id="bkmrk-select%C2%A0policies--%3Ese">- - <span style="color: rgb(0, 0, 0);"><span class="TextRun SCXW203280824 BCX0" data-contrast="auto" lang="EN-US" xml:lang="EN-US"><span class="NormalTextRun SCXW203280824 BCX0">Select </span></span><span class="TextRun SCXW203280824 BCX0" data-contrast="auto" lang="EN-US" xml:lang="EN-US">**<span class="NormalTextRun SpellingErrorV2Themed SCXW203280824 BCX0">Policies</span>**<span class="NormalTextRun SpellingErrorV2Themed SCXW203280824 BCX0">--&gt;</span>**<span class="NormalTextRun SpellingErrorV2Themed SCXW203280824 BCX0">Security</span><span class="NormalTextRun SCXW203280824 BCX0"> </span>**</span><span class="TextRun SCXW203280824 BCX0" data-contrast="auto" lang="EN-US" xml:lang="EN-US"><span class="NormalTextRun SCXW203280824 BCX0">and select a policy rule.</span></span><span class="EOP SCXW203280824 BCX0" data-ccp-props="{"134233117":false,"134233118":false,"335551550":0,"335551620":0,"335559738":0,"335559739":0}"> </span></span>

</div><div class="ListContainerWrapper SCXW203280824 BCX0" id="bkmrk-select-the%C2%A0actions%C2%A0t">- - <span style="color: rgb(0, 0, 0);"><span class="TextRun SCXW203280824 BCX0" data-contrast="auto" lang="EN-US" xml:lang="EN-US"><span class="NormalTextRun SCXW203280824 BCX0">Select the </span></span>**<span class="TextRun SCXW203280824 BCX0" data-contrast="auto" lang="EN-US" xml:lang="EN-US"><span class="NormalTextRun SCXW203280824 BCX0">Actions</span></span>**<span class="TextRun SCXW203280824 BCX0" data-contrast="auto" lang="EN-US" xml:lang="EN-US"><span class="NormalTextRun SCXW203280824 BCX0"> tab and select the </span></span>**<span class="TextRun SCXW203280824 BCX0" data-contrast="auto" lang="EN-US" xml:lang="EN-US"><span class="NormalTextRun SCXW203280824 BCX0">Log Forwarding</span></span>**<span class="TextRun SCXW203280824 BCX0" data-contrast="auto" lang="EN-US" xml:lang="EN-US"><span class="NormalTextRun SCXW203280824 BCX0"> profile you created.</span></span><span class="EOP SCXW203280824 BCX0" data-ccp-props="{"134233117":false,"134233118":false,"335551550":0,"335551620":0,"335559738":0,"335559739":0}"> </span></span>

</div><div class="ListContainerWrapper SCXW203280824 BCX0" id="bkmrk-for-traffic-logs%2C-se">- - <span style="color: rgb(0, 0, 0);"><span class="TextRun SCXW203280824 BCX0" data-contrast="auto" lang="EN-US" xml:lang="EN-US"><span class="NormalTextRun SCXW203280824 BCX0">For Traffic logs, select one or </span><span class="NormalTextRun SCXW203280824 BCX0">both </span></span>**<span class="TextRun SCXW203280824 BCX0" data-contrast="auto" lang="EN-US" xml:lang="EN-US"><span class="NormalTextRun SCXW203280824 BCX0">Log</span><span class="NormalTextRun SCXW203280824 BCX0"> at Session Start</span></span>**<span class="TextRun SCXW203280824 BCX0" data-contrast="auto" lang="EN-US" xml:lang="EN-US"><span class="NormalTextRun SCXW203280824 BCX0"> and </span></span>**<span class="TextRun SCXW203280824 BCX0" data-contrast="auto" lang="EN-US" xml:lang="EN-US"><span class="NormalTextRun SCXW203280824 BCX0">Log </span><span class="NormalTextRun SCXW203280824 BCX0">at</span><span class="NormalTextRun SCXW203280824 BCX0"> Session End</span></span>**<span class="TextRun SCXW203280824 BCX0" data-contrast="auto" lang="EN-US" xml:lang="EN-US"><span class="NormalTextRun SCXW203280824 BCX0"> check boxes, and click </span></span>**<span class="TextRun SCXW203280824 BCX0" data-contrast="auto" lang="EN-US" xml:lang="EN-US"><span class="NormalTextRun SCXW203280824 BCX0">OK</span></span>**<span class="TextRun SCXW203280824 BCX0" data-contrast="auto" lang="EN-US" xml:lang="EN-US"><span class="NormalTextRun SCXW203280824 BCX0">.</span></span><span class="EOP SCXW203280824 BCX0" data-ccp-props="{"134233117":false,"134233118":false,"335551550":0,"335551620":0,"335559738":0,"335559739":0}"> </span></span>

</div><span class="EOP SCXW203280824 BCX0" data-ccp-props="{"134233117":false,"134233118":false,"335551550":0,"335551620":0,"335559738":0,"335559739":0}"> </span>

<span style="color: rgb(53, 152, 219);">**<span class="TextRun SCXW203280824 BCX0" data-contrast="auto" lang="EN-US" xml:lang="EN-US"><span class="NormalTextRun SCXW203280824 BCX0">STEP 3 - </span><span class="NormalTextRun SCXW203280824 BCX0">Configure syslog </span><span class="NormalTextRun SCXW203280824 BCX0">forwarding</span><span class="NormalTextRun SCXW203280824 BCX0"> for System, Config, HIP Match, and Correlation logs.</span></span>** <span class="EOP SCXW203280824 BCX0" data-ccp-props="{"134233117":false,"134233118":false,"335551550":0,"335551620":0,"335559738":0,"335559739":0}"> </span></span>

<div class="ListContainerWrapper SCXW203280824 BCX0" id="bkmrk-select%C2%A0device--%3Elog-">1. <span style="color: rgb(0, 0, 0);"><span class="TextRun SCXW203280824 BCX0" data-contrast="auto" lang="EN-US" xml:lang="EN-US"><span class="NormalTextRun SCXW203280824 BCX0">Select </span></span><span class="TextRun SCXW203280824 BCX0" data-contrast="auto" lang="EN-US" xml:lang="EN-US">**<span class="NormalTextRun SCXW203280824 BCX0">Device</span>**<span class="NormalTextRun SCXW203280824 BCX0">--&gt;</span>**<span class="NormalTextRun SCXW203280824 BCX0">Log</span><span class="NormalTextRun SCXW203280824 BCX0"> Settings</span>**</span><span class="TextRun SCXW203280824 BCX0" data-contrast="auto" lang="EN-US" xml:lang="EN-US"><span class="NormalTextRun SCXW203280824 BCX0">.</span></span><span class="EOP SCXW203280824 BCX0" data-ccp-props="{"134233117":false,"134233118":false,"335551550":0,"335551620":0,"335559738":0,"335559739":0}"> </span></span>

</div><div class="ListContainerWrapper SCXW203280824 BCX0" id="bkmrk-for-system-and-corre">2. <span style="color: rgb(0, 0, 0);"><span class="TextRun SCXW203280824 BCX0" data-contrast="auto" lang="EN-US" xml:lang="EN-US"><span class="NormalTextRun SCXW203280824 BCX0">For System and Correlation logs, click each Severity level, select the </span></span>**<span class="TextRun SCXW203280824 BCX0" data-contrast="auto" lang="EN-US" xml:lang="EN-US"><span class="NormalTextRun SCXW203280824 BCX0">Syslog server profile</span></span>**<span class="TextRun SCXW203280824 BCX0" data-contrast="auto" lang="EN-US" xml:lang="EN-US"><span class="NormalTextRun SCXW203280824 BCX0">, and click </span></span>**<span class="TextRun SCXW203280824 BCX0" data-contrast="auto" lang="EN-US" xml:lang="EN-US"><span class="NormalTextRun SCXW203280824 BCX0">OK</span></span>**<span class="TextRun SCXW203280824 BCX0" data-contrast="auto" lang="EN-US" xml:lang="EN-US"><span class="NormalTextRun SCXW203280824 BCX0">.</span></span><span class="EOP SCXW203280824 BCX0" data-ccp-props="{"134233117":false,"134233118":false,"335551550":0,"335551620":0,"335559738":0,"335559739":0}"> </span></span>

</div><div class="ListContainerWrapper SCXW203280824 BCX0" id="bkmrk-for-config%2C-hip-matc">3. <span style="color: rgb(0, 0, 0);"><span class="TextRun SCXW203280824 BCX0" data-contrast="auto" lang="EN-US" xml:lang="EN-US"><span class="NormalTextRun SCXW203280824 BCX0">For Config, HIP Match, and Correlation logs, edit the section, select the </span></span>**<span class="TextRun SCXW203280824 BCX0" data-contrast="auto" lang="EN-US" xml:lang="EN-US"><span class="NormalTextRun SCXW203280824 BCX0">Syslog server profile</span></span>**<span class="TextRun SCXW203280824 BCX0" data-contrast="auto" lang="EN-US" xml:lang="EN-US"><span class="NormalTextRun SCXW203280824 BCX0">, and click </span></span>**<span class="TextRun SCXW203280824 BCX0" data-contrast="auto" lang="EN-US" xml:lang="EN-US"><span class="NormalTextRun SCXW203280824 BCX0">OK</span></span>**<span class="TextRun SCXW203280824 BCX0" data-contrast="auto" lang="EN-US" xml:lang="EN-US"><span class="NormalTextRun SCXW203280824 BCX0">.</span></span><span class="EOP SCXW203280824 BCX0" data-ccp-props="{"134233117":false,"134233118":false,"335551550":0,"335551620":0,"335559738":0,"335559739":0}"> </span></span>

</div><span class="EOP SCXW203280824 BCX0" data-ccp-props="{"134233117":false,"134233118":false,"335551550":0,"335551620":0,"335559738":0,"335559739":0}"> </span>

<span class="TextRun SCXW203280824 BCX0" data-contrast="auto" lang="EN-US" xml:lang="EN-US"><span class="NormalTextRun SCXW203280824 BCX0">Source: </span></span>*<span class="TextRun SCXW203280824 BCX0" data-contrast="none" lang="EN-US" xml:lang="EN-US"><span class="NormalTextRun SCXW203280824 BCX0">[https://docs.paloaltonetworks.com/pan-os/10-2/pan-os-admin/monitoring/use-syslog-for-monitoring/configure-syslog-monitoring](https://docs.paloaltonetworks.com/pan-os/10-2/pan-os-admin/monitoring/use-syslog-for-monitoring/configure-syslog-monitoring)</span></span><span class="EOP SCXW203280824 BCX0" data-ccp-props="{}"> </span>*

#### <span style="color: rgb(53, 152, 219);">**<span class="TextRun SCXW71272603 BCX0" data-contrast="none" lang="EN-US" xml:lang="EN-US"><span class="NormalTextRun SCXW71272603 BCX0">Palo Alto Next Generation Firewall Integration Procedures </span></span><span class="EOP SCXW71272603 BCX0" data-ccp-props="{}"> </span>**</span>

##### <span class="TextRun SCXW71272603 BCX0" data-contrast="auto" lang="EN-US" xml:lang="EN-US"><span class="NormalTextRun SCXW71272603 BCX0"> </span><span style="color: rgb(0, 0, 0);"><span class="NormalTextRun SCXW71272603 BCX0">Please provide the following information to </span><span class="NormalTextRun SpellingErrorV2Themed SCXW71272603 BCX0">CyTech</span><span class="NormalTextRun SCXW71272603 BCX0">: </span></span></span><span class="EOP SCXW71272603 BCX0" data-ccp-props="{}" style="color: rgb(0, 0, 0);"> </span>

<span data-teams="true" style="color: rgb(0, 0, 0);">Requirements:Collect logs via syslog over UDP or TCP</span>

<span style="color: rgb(0, 0, 0);"><span data-teams="true">  
 </span><span data-teams="true">\*Syslog Host-&gt; Syslog Collector IP address where the Elastic-Agent is installed.  
 \*Syslog Port-&gt; Port Number (Please identify if TCP or UDP)</span></span>

<span class="TextRun SCXW71272603 BCX0" data-contrast="auto" lang="EN-US" xml:lang="EN-US"><span class="NormalTextRun SCXW71272603 BCX0"> </span></span><span class="EOP SCXW71272603 BCX0" data-ccp-props="{}"> </span>

<span class="TextRun SCXW71272603 BCX0" data-contrast="auto" lang="EN-US" xml:lang="EN-US"><span class="NormalTextRun SCXW71272603 BCX0">If you need further </span><span class="NormalTextRun SCXW71272603 BCX0">assistance</span><span class="NormalTextRun SCXW71272603 BCX0">, kindly contact our support at </span></span><span style="color: rgb(53, 152, 219);">**<span class="TextRun SCXW71272603 BCX0" data-contrast="none" lang="EN-US" xml:lang="EN-US"><span class="NormalTextRun SCXW71272603 BCX0">support@cytechint.com</span></span>**</span><span class="TextRun SCXW71272603 BCX0" data-contrast="auto" lang="EN-US" xml:lang="EN-US"><span class="NormalTextRun SCXW71272603 BCX0"> for prompt </span><span class="NormalTextRun SCXW71272603 BCX0">assistance</span><span class="NormalTextRun SCXW71272603 BCX0"> and guidance.</span></span><span class="EOP SCXW71272603 BCX0" data-ccp-props="{}"></span>

# Phishing Campaign - Setting Up Microsoft o365

##### <span style="color: rgb(53, 152, 219);">**Why Whitelist in Office 365?**</span>

<span style="color: rgb(0, 0, 0);">Whitelisting ensures the **CyTech - AQUILA Phishing Simulation(PS) Module** functions without issue and prevents PS emails from being automatically moved to the spam folder or notifying users about potential phishing emails. The Connection Filter Policy and Spam Filtering both required to be whitelisted.</span>

##### **<span style="color: rgb(53, 152, 219);">Key Configurations:</span>**

1. <span style="color: rgb(0, 0, 0);">**[Microsoft Defender](https://security.microsoft.com/)**</span>
    - <span style="color: rgb(0, 0, 0);">Whitelist the Connection Filter Policy</span>
    - <span style="color: rgb(0, 0, 0);">Whitelist Using Advanced Delivery Policies</span>
2. <span style="color: rgb(0, 0, 0);">**[Exchange Admin Center](https://admin.exchange.microsoft.com/#/)**</span>
    - <span style="color: rgb(0, 0, 0);">Whitelist Spam Filtering</span>
    - <span style="color: rgb(0, 0, 0);">Whitelist Advanced Threat Protection (ATP)</span>

##### <span style="color: rgb(53, 152, 219);">**Whitelist Connection Filter Policy**</span>

<span style="color: rgb(0, 0, 0);">The Office 365 Exchange Connection Filter identifies good or bad source email servers by their IP addresses. The actions below will allow all emails from CyTech IP addresses to be received.</span>

##### <span style="color: rgb(53, 152, 219);">**Whitelist the Connection Filter Policy** </span>

<span style="color: rgb(0, 0, 0);">1. Login to Microsoft Defender, click here - **[<span style="color: rgb(53, 152, 219);">Microsoft Defender.</span>](https://security.microsoft.com/)**</span>

<span style="color: rgb(0, 0, 0);">2. Navigate through **Email &amp; Collaboration&gt;Policies &amp; Rules&gt;Threat Policies&gt;Anti-spam.**</span>

<span style="color: rgb(0, 0, 0);">[![image.png](https://cytechint-docs-bookstack.s3.amazonaws.com/uploads/images/gallery/2025-05/scaled-1680-/PDl8uDXvhHXHskUW-image.png)](https://cytechint-docs-bookstack.s3.amazonaws.com/uploads/images/gallery/2025-05/PDl8uDXvhHXHskUW-image.png)</span>

<span style="color: rgb(0, 0, 0);">[![image.png](https://cytechint-docs-bookstack.s3.amazonaws.com/uploads/images/gallery/2025-05/scaled-1680-/4Fah0R9XdAWXbZvU-image.png)](https://cytechint-docs-bookstack.s3.amazonaws.com/uploads/images/gallery/2025-05/4Fah0R9XdAWXbZvU-image.png)</span>

<span style="color: rgb(0, 0, 0);">3. Click on "**Connection filter policy**". Then click on "**Edit connection filter policy**".</span>

<span style="color: rgb(0, 0, 0);">[![image.png](https://cytechint-docs-bookstack.s3.amazonaws.com/uploads/images/gallery/2025-05/scaled-1680-/qNwcvxjpzdNb3STp-image.png)](https://cytechint-docs-bookstack.s3.amazonaws.com/uploads/images/gallery/2025-05/qNwcvxjpzdNb3STp-image.png)</span>

<span style="color: rgb(0, 0, 0);">4. Add the **IP's** to the "Always allow messages from the following IP addresses or address range:". Then click the "**Save**" button.</span>

<span style="color: rgb(0, 0, 0);">**Allow IP's: 35.153.237.243**(Mail Server), **107.22.65.180**(Landing Page)</span>

<span style="color: rgb(0, 0, 0);">[![image.png](https://cytechint-docs-bookstack.s3.amazonaws.com/uploads/images/gallery/2025-05/scaled-1680-/MvJvE5Zk2I9lb0Tp-image.png)](https://cytechint-docs-bookstack.s3.amazonaws.com/uploads/images/gallery/2025-05/MvJvE5Zk2I9lb0Tp-image.png)</span>

##### <span style="color: rgb(53, 152, 219);">**Whitelist Using Advanced Delivery Policies in Microsoft Defender for Office 365**</span>

<span style="color: rgb(0, 0, 0);">Phishing simulations are attacks orchestrated by your security team and used for training and learning. Simulations can help identify vulnerable users and lessen the impact of malicious attacks on your organization.</span>

<span style="color: rgb(0, 0, 0);">Third-party phishing simulations require at least one Sending domain entry \[source domain or DKIM\] AND at least one Sending IP entry. Simulations URLs to allow entries are optional, and prevent the simulated phishing URLs from being blocked at time of click.</span>

<span style="color: rgb(0, 0, 0);"> 1. Go to **Email &amp; Collaboration &gt; Policies &amp; Rules &gt; Threat policies &gt; Advanced delivery in the Rules section**.</span>

<span style="color: rgb(0, 0, 0);">[![image.png](https://cytechint-docs-bookstack.s3.amazonaws.com/uploads/images/gallery/2025-05/scaled-1680-/mN1S2kTRaISM8muh-image.png)](https://cytechint-docs-bookstack.s3.amazonaws.com/uploads/images/gallery/2025-05/mN1S2kTRaISM8muh-image.png)</span>

<span style="color: rgb(0, 0, 0);">2. In the Advanced delivery menu, navigate to the Phishing simulation tab and press Edit to either add new or configure existing values (refer to the screenshot below). After editing all the needed Domain, Sending IP and Simulation URLs to allow**.** Click **"Save".**</span>

<span style="color: rgb(0, 0, 0);">[![image.png](https://cytechint-docs-bookstack.s3.amazonaws.com/uploads/images/gallery/2025-05/scaled-1680-/8y5eyi7HQva7D6au-image.png)](https://cytechint-docs-bookstack.s3.amazonaws.com/uploads/images/gallery/2025-05/8y5eyi7HQva7D6au-image.png)</span>

<span style="color: rgb(0, 0, 0);">3. On the Edit third-party phishing simulation menu that opens, configure the following settings:</span>

<span style="color: rgb(0, 0, 0);">**Domain:** Expand this setting and enter at least one sending domain specific for campaign by clicking in the box, entering a value, and then pressing Enter or selecting the domains displayed below. Repeat this step as many times as necessary. You can add up to 20 entries.</span>

- <span data-teams="true" style="color: rgb(0, 0, 0);">slackj.com</span>
- <span data-teams="true" style="color: rgb(0, 0, 0);">ttrelli.com</span>
- <span data-teams="true" style="color: rgb(0, 0, 0);">airbnd.cc</span>
- <span data-teams="true" style="color: rgb(0, 0, 0);">attlassians.com</span>
- <span data-teams="true" style="color: rgb(0, 0, 0);">eebbey.com</span>
- <span data-teams="true" style="color: rgb(0, 0, 0);">lastpasss.net</span>
- <span data-teams="true" style="color: rgb(0, 0, 0);">my1psswords.com</span>
- <span data-teams="true" style="color: rgb(0, 0, 0);">zooms.cc</span>

<span style="color: rgb(0, 0, 0);">[![image.png](https://cytechint-docs-bookstack.s3.amazonaws.com/uploads/images/gallery/2025-05/scaled-1680-/iUgoti0IotleAb1x-image.png)](https://cytechint-docs-bookstack.s3.amazonaws.com/uploads/images/gallery/2025-05/iUgoti0IotleAb1x-image.png)</span>

<span style="color: rgb(0, 0, 0);">**Sending IP:** Expand this setting and enter at least one valid IPv4 address by clicking in the box, entering a value, and then pressing Enter or selecting the value that's displayed below the box. Repeat this step as many times as necessary. You can add up to 10 entries.</span>

<span style="color: rgb(0, 0, 0);">[![image.png](https://cytechint-docs-bookstack.s3.amazonaws.com/uploads/images/gallery/2025-05/scaled-1680-/Z463XX4cNcj2NV6U-image.png)](https://cytechint-docs-bookstack.s3.amazonaws.com/uploads/images/gallery/2025-05/Z463XX4cNcj2NV6U-image.png)</span>

<span style="color: rgb(0, 0, 0);">**Simulation URLs to allow:** Expand this setting and optionally enter specific URLs that are part of your phishing simulation campaign that should not be blocked or detonated by clicking in the box, entering a value, and then pressing Enter or selecting the value that's displayed below the box.</span>

<span style="color: rgb(0, 0, 0);">For the URL syntax format, see URL syntax for the Tenant Allow/Block List (opens in a new tab). These URLs are wrapped at the time of the click, but they aren't blocked.</span>

<span style="color: rgb(0, 0, 0);">When you're finished, you can click Add, and click close afterward if this was a first-time addition, or if you were editing existing values click Save and then click Close. </span>

- <span style="color: rgb(0, 0, 0);">[Manage allows and blocks in the Tenant Allow/Block List](https://learn.microsoft.com/en-us/defender-office-365/tenant-allow-block-list-about?view=o365-worldwide#url-syntax-for-the-tenant-allowblock-list)</span>

<span style="color: rgb(0, 0, 0);">Refer to these simulation URLs to allow in your campaign:</span>

- <span data-teams="true" style="color: rgb(0, 0, 0);">slackj.com/\*</span>
- <span data-teams="true" style="color: rgb(0, 0, 0);">ttrelli.com/\*</span>
- <span data-teams="true" style="color: rgb(0, 0, 0);">airbnd.cc/\*</span>
- <span data-teams="true" style="color: rgb(0, 0, 0);">attlassians.com/\*</span>
- <span data-teams="true" style="color: rgb(0, 0, 0);">eebbey.com/\*</span>
- <span data-teams="true" style="color: rgb(0, 0, 0);">lastpasss.net/\*</span>
- <span data-teams="true" style="color: rgb(0, 0, 0);">my1psswords.com/\*</span>
- <span data-teams="true" style="color: rgb(0, 0, 0);">zooms.cc/\*</span>

<span style="color: rgb(0, 0, 0);">[![image.png](https://cytechint-docs-bookstack.s3.amazonaws.com/uploads/images/gallery/2025-05/scaled-1680-/2upgxf44qn82hAs8-image.png)](https://cytechint-docs-bookstack.s3.amazonaws.com/uploads/images/gallery/2025-05/2upgxf44qn82hAs8-image.png)</span>

##### <span style="color: rgb(53, 152, 219);">**Whitelist Spam Filtering**</span>

<span style="color: rgb(0, 0, 0);">All mail systems have spam filtering. As the CyTech PS emails are "phishing: by definition, the Microsoft spam filter must be whitelisted. The steps below outline how to disable all spam checks for CyTech PS emails, so you won't experience issues with 100% clicked and 100% opened emails, even if the users don't click on them.</span>

<span style="color: rgb(0, 0, 0);">**Steps to Whitelist the Spam Filtering** </span>

<span style="color: rgb(53, 152, 219);"><span style="color: rgb(0, 0, 0);">1. Login to Exchange Admin Center, click here -</span> **[Exchange Admin Center.](https://admin.exchange.microsoft.com/#/)**</span>

<span style="color: rgb(0, 0, 0);">2. Navigate through **Mail flow&gt;Rules&gt;+Add a rule&gt;"Create a new rule"**.</span>

<span style="color: rgb(0, 0, 0);">[![image.png](https://cytechint-docs-bookstack.s3.amazonaws.com/uploads/images/gallery/2025-05/scaled-1680-/hAk8OrVkreZ6pU04-image.png)](https://cytechint-docs-bookstack.s3.amazonaws.com/uploads/images/gallery/2025-05/hAk8OrVkreZ6pU04-image.png)</span>

<span style="color: rgb(0, 0, 0);">3. Give the rule a name, such as "**CyTech Spam Filtering**". Click on "**Apply this rule if** → "**The sender"** → "**IP address is in any of these ranges or exactly matches".**</span>

<span style="color: rgb(0, 0, 0);">[![image.png](https://cytechint-docs-bookstack.s3.amazonaws.com/uploads/images/gallery/2025-05/scaled-1680-/gyMSuVo3bL5JlDBM-image.png)](https://cytechint-docs-bookstack.s3.amazonaws.com/uploads/images/gallery/2025-05/gyMSuVo3bL5JlDBM-image.png)</span>

<span style="color: rgb(0, 0, 0);">4. Specify the IP addresses in the field IP's: **35.153.237.243**(Mail Server), **107.22.65.180**(Landing Page). Please do not forget to click on "**Save**".</span>

<span style="color: rgb(0, 0, 0);">[![image.png](https://cytechint-docs-bookstack.s3.amazonaws.com/uploads/images/gallery/2025-05/scaled-1680-/r7CiZYkeJCeTjbwE-image.png)](https://cytechint-docs-bookstack.s3.amazonaws.com/uploads/images/gallery/2025-05/r7CiZYkeJCeTjbwE-image.png)</span>

<span style="color: rgb(0, 0, 0);">5. Click the "**+**" to add another rule condition for the message headers.</span>

<span style="color: rgb(0, 0, 0);">[![image.png](https://cytechint-docs-bookstack.s3.amazonaws.com/uploads/images/gallery/2025-05/scaled-1680-/S4ggBIlJx5MjjZNX-image.png)](https://cytechint-docs-bookstack.s3.amazonaws.com/uploads/images/gallery/2025-05/S4ggBIlJx5MjjZNX-image.png)</span>

<span style="color: rgb(0, 0, 0);">6. Click on "**The message headers...."** → "**includes any of these words".**</span>

<span style="color: rgb(0, 0, 0);">[![image.png](https://cytechint-docs-bookstack.s3.amazonaws.com/uploads/images/gallery/2025-05/scaled-1680-/mQmSmJQgc8EVK6Ft-image.png)](https://cytechint-docs-bookstack.s3.amazonaws.com/uploads/images/gallery/2025-05/mQmSmJQgc8EVK6Ft-image.png)</span>

<span style="color: rgb(0, 0, 0);">7. Click → **Enter text.**</span>

<span style="color: rgb(0, 0, 0);">[![image.png](https://cytechint-docs-bookstack.s3.amazonaws.com/uploads/images/gallery/2025-05/scaled-1680-/E2lddVdrD882aVpr-image.png)](https://cytechint-docs-bookstack.s3.amazonaws.com/uploads/images/gallery/2025-05/E2lddVdrD882aVpr-image.png)</span>

<span style="color: rgb(0, 0, 0);">8. Specify header name → **X-PHISHTEST** and specify words or phrases **→ CYTECH.**</span>

<span style="color: rgb(0, 0, 0);">[![image.png](https://cytechint-docs-bookstack.s3.amazonaws.com/uploads/images/gallery/2025-05/scaled-1680-/JIYvK0wFwmjjI0G9-image.png)](https://cytechint-docs-bookstack.s3.amazonaws.com/uploads/images/gallery/2025-05/JIYvK0wFwmjjI0G9-image.png)</span>

<span style="color: rgb(0, 0, 0);">9. Click the "**+**" to add another rule condition for the The sender.</span>

<span style="color: rgb(0, 0, 0);">[![image.png](https://cytechint-docs-bookstack.s3.amazonaws.com/uploads/images/gallery/2025-05/scaled-1680-/S4ggBIlJx5MjjZNX-image.png)](https://cytechint-docs-bookstack.s3.amazonaws.com/uploads/images/gallery/2025-05/S4ggBIlJx5MjjZNX-image.png)</span>

<span style="color: rgb(0, 0, 0);">10. Click on "**The sender...."** → "**domains is".** Specify the domain in your case**.** Then click **"Save".**</span>

<span style="color: rgb(0, 0, 0);">[![image.png](https://cytechint-docs-bookstack.s3.amazonaws.com/uploads/images/gallery/2025-05/scaled-1680-/M9MlpGJUEccQSdOf-image.png)](https://cytechint-docs-bookstack.s3.amazonaws.com/uploads/images/gallery/2025-05/M9MlpGJUEccQSdOf-image.png)</span>

<span style="color: rgb(0, 0, 0);">11. Click on "**Do the following** → **Modify the message properties** → **Set a Message Header**"</span>

<span style="color: rgb(0, 0, 0);">[![image.png](https://cytechint-docs-bookstack.s3.amazonaws.com/uploads/images/gallery/2025-05/scaled-1680-/FKdNYeHZgcr2lIs5-image.png)](https://cytechint-docs-bookstack.s3.amazonaws.com/uploads/images/gallery/2025-05/FKdNYeHZgcr2lIs5-image.png)</span>

<span style="color: rgb(0, 0, 0);">12. Click the "**Enter text**" buttons by the right side of the "**Do the following**" field and enter these values: "**MS-Exchange-Organization-BypassClutter**" and "**true**".</span>

<span style="color: rgb(0, 0, 0);">[![image.png](https://cytechint-docs-bookstack.s3.amazonaws.com/uploads/images/gallery/2025-05/scaled-1680-/n9dPl6FKLcXOswSX-image.png)](https://cytechint-docs-bookstack.s3.amazonaws.com/uploads/images/gallery/2025-05/n9dPl6FKLcXOswSX-image.png)</span>

<span style="color: rgb(0, 0, 0);">13. Click on the "**+**" sign, to add another rule condition.</span>

<span style="color: rgb(0, 0, 0);">[![image.png](https://cytechint-docs-bookstack.s3.amazonaws.com/uploads/images/gallery/2025-05/scaled-1680-/MRkPKW5VW7yuUTso-image.png)](https://cytechint-docs-bookstack.s3.amazonaws.com/uploads/images/gallery/2025-05/MRkPKW5VW7yuUTso-image.png)</span>

<span style="color: rgb(0, 0, 0);">14. Choose "**Modify the message properties** → **Set the spam confidence level (SCL)**" and select "**Bypass Spam Filtering**", this will set the value of SCL to **-1**. Then click "**Save**" button.</span>

<span style="color: rgb(0, 0, 0);">[![image.png](https://cytechint-docs-bookstack.s3.amazonaws.com/uploads/images/gallery/2025-05/scaled-1680-/C3I64J9LDmN9k8bT-image.png)](https://cytechint-docs-bookstack.s3.amazonaws.com/uploads/images/gallery/2025-05/C3I64J9LDmN9k8bT-image.png)</span>

<span style="color: rgb(0, 0, 0);">15. Make sure you have the same output as shown in the image below before proceeding on clicking the "**Next**" button.</span>

<span style="color: rgb(0, 0, 0);">[![image.png](https://cytechint-docs-bookstack.s3.amazonaws.com/uploads/images/gallery/2025-05/scaled-1680-/bhMwvKPYIz8UpsNf-image.png)](https://cytechint-docs-bookstack.s3.amazonaws.com/uploads/images/gallery/2025-05/bhMwvKPYIz8UpsNf-image.png)</span>

<span style="color: rgb(0, 0, 0);">16. Leave the Set Rule settings as is and proceed to the Review and finish window and save the rule.</span>

<span style="color: rgb(0, 0, 0);">[![image.png](https://cytechint-docs-bookstack.s3.amazonaws.com/uploads/images/gallery/2025-05/scaled-1680-/VemlEkaeC8mYkQWO-image.png)](https://cytechint-docs-bookstack.s3.amazonaws.com/uploads/images/gallery/2025-05/VemlEkaeC8mYkQWO-image.png)</span>

<span style="color: rgb(0, 0, 0);">17. Please make sure the rule is **Enabled**, and priority is **set to "0"**. Your final Completed Mail Flow Rule screen should look as below:</span>

<span style="color: rgb(0, 0, 0);">[![image.png](https://cytechint-docs-bookstack.s3.amazonaws.com/uploads/images/gallery/2025-05/scaled-1680-/ztnnPiUIWFeTARcW-image.png)](https://cytechint-docs-bookstack.s3.amazonaws.com/uploads/images/gallery/2025-05/ztnnPiUIWFeTARcW-image.png)</span>

<span style="color: rgb(0, 0, 0);">*<span class="TextRun SCXW71272603 BCX0" data-contrast="auto" lang="EN-US" xml:lang="EN-US"><span class="NormalTextRun SCXW71272603 BCX0">If you need further </span><span class="NormalTextRun SCXW71272603 BCX0">assistance</span><span class="NormalTextRun SCXW71272603 BCX0">, kindly contact our support at </span></span><span style="color: rgb(53, 152, 219);">**<span class="TextRun SCXW71272603 BCX0" data-contrast="none" lang="EN-US" xml:lang="EN-US"><span class="NormalTextRun SCXW71272603 BCX0">support@cytechint.com</span></span>**</span><span class="TextRun SCXW71272603 BCX0" data-contrast="auto" lang="EN-US" xml:lang="EN-US"><span class="NormalTextRun SCXW71272603 BCX0"> for prompt </span><span class="NormalTextRun SCXW71272603 BCX0">assistance</span><span class="NormalTextRun SCXW71272603 BCX0"> and guidance.</span></span><span class="EOP SCXW71272603 BCX0" data-ccp-props="{}"></span>*</span>

# Pulse Connect Secure Integrations

##### <span style="color: rgb(53, 152, 219);">**<span class="TextRun SCXW22408636 BCX8" data-contrast="none" lang="EN-US" xml:lang="EN-US"><span class="NormalTextRun SCXW22408636 BCX8" data-ccp-charstyle="Style (Complex) Open Sans" data-ccp-charstyle-defn="{"ObjectId":"50450b0d-f247-4fdf-a108-76d6051b70c6|31","ClassId":1073872969,"Properties":[201342446,"1",201342447,"5",201342448,"1",201342449,"1",469777841,"Open Sans",469777842,"Open Sans",469777843,"Calibri",469777844,"Open Sans",201341986,"1",469769226,"Open Sans",268442635,"22",335559704,"1037",335559705,"1033",335551547,"1033",335559740,"259",201341983,"0",335559739,"160",469775450,"Style (Complex) Open Sans",201340122,"1",134233614,"true",469778129,"StyleComplexOpenSans",335572020,"1",469778324,"Default Paragraph Font"]}">Introduction</span></span><span class="EOP SCXW22408636 BCX8" data-ccp-props="{"134245418":true,"134245529":true,"201341983":0,"335559738":240,"335559739":0,"335559740":360}"> </span>**</span>

<span class="TextRun SCXW22408636 BCX8" data-contrast="auto" lang="EN-US" xml:lang="EN-US"><span class="NormalTextRun SCXW22408636 BCX8" data-ccp-charstyle="Style (Complex) Open Sans">This integration is for </span></span>[<span class="TextRun Underlined SCXW22408636 BCX8" data-contrast="none" lang="EN-US" xml:lang="EN-US"><span class="NormalTextRun SCXW22408636 BCX8" data-ccp-charstyle="Hyperlink">Pulse Connect Secure</span></span>](https://www.ivanti.com/products/ivanti-neurons-zero-trust-access?psredirect)<span class="TextRun SCXW22408636 BCX8" data-contrast="auto" lang="EN-US" xml:lang="EN-US"><span class="NormalTextRun SCXW22408636 BCX8" data-ccp-charstyle="Style (Complex) Open Sans">.</span></span><span class="EOP SCXW22408636 BCX8" data-ccp-props="{"201341983":0,"335559685":360,"335559739":160,"335559740":259}"> </span>

<div class="SCXW22408636 BCX8" id="bkmrk-https%3A%2F%2Fwww.ivanti.c"><div class="ListContainerWrapper SCXW22408636 BCX8">- [<span class="TextRun Underlined SCXW22408636 BCX8" data-contrast="none" lang="EN-US" xml:lang="EN-US"><span class="NormalTextRun SCXW22408636 BCX8" data-ccp-charstyle="Hyperlink">https://www.ivanti.com/products/ivanti-neurons-zero-trust-access?psredirect</span></span>](https://www.ivanti.com/products/ivanti-neurons-zero-trust-access?psredirect)<span class="EOP SCXW22408636 BCX8" data-ccp-props="{"201341983":0,"335559739":160,"335559740":259}"> </span>

</div><div class="ListContainerWrapper SCXW22408636 BCX8">  
</div></div>##### <span style="color: rgb(53, 152, 219);">**<span class="TextRun SCXW22408636 BCX8" data-contrast="none" lang="EN-US" xml:lang="EN-US"><span class="NormalTextRun SCXW22408636 BCX8" data-ccp-charstyle="eop" data-ccp-charstyle-defn="{"ObjectId":"50450b0d-f247-4fdf-a108-76d6051b70c6|58","ClassId":1073872969,"Properties":[201342446,"1",201342447,"5",201342448,"1",201342449,"1",469777841,"Calibri",469777842,"Arial",469777843,"Calibri",469777844,"Calibri",201341986,"1",469769226,"Calibri,Arial",268442635,"22",335559704,"1037",335559705,"1033",335551547,"1033",335559740,"259",201341983,"0",335559739,"160",469775450,"eop",201340122,"1",134233614,"true",469778129,"eop",335572020,"1",469778324,"Default Paragraph Font"]}">Pulse Connect Secure</span><span class="NormalTextRun SCXW22408636 BCX8" data-ccp-charstyle="eop"> Integration Procedures</span></span><span class="EOP SCXW22408636 BCX8" data-ccp-props="{"134245418":true,"134245529":true,"201341983":0,"335559738":240,"335559739":0,"335559740":360}"> </span>**</span>

<span class="TextRun SCXW22408636 BCX8" data-contrast="auto" lang="EN-US" xml:lang="EN-US"><span class="NormalTextRun SCXW22408636 BCX8" data-ccp-charstyle="eop">Please provide the following information to </span><span class="NormalTextRun SpellingErrorV2Themed SCXW22408636 BCX8" data-ccp-charstyle="eop">CyTech</span><span class="NormalTextRun SCXW22408636 BCX8" data-ccp-charstyle="eop">:</span></span><span class="EOP SCXW22408636 BCX8" data-ccp-props="{"201341983":0,"335559685":720,"335559739":160,"335559740":259}"> </span>

**<span class="TextRun SCXW22408636 BCX8" data-contrast="none" lang="EN-CA" xml:lang="EN-CA"><span class="NormalTextRun SCXW22408636 BCX8" data-ccp-charstyle="eop">Collect </span><span class="NormalTextRun SCXW22408636 BCX8" data-ccp-charstyle="eop">Pulse Connect Secure</span><span class="NormalTextRun SCXW22408636 BCX8" data-ccp-charstyle="eop"> logs </span><span class="NormalTextRun SCXW22408636 BCX8" data-ccp-charstyle="eop">(input: </span><span class="NormalTextRun SpellingErrorV2Themed SCXW22408636 BCX8" data-ccp-charstyle="eop">udp</span><span class="NormalTextRun SCXW22408636 BCX8" data-ccp-charstyle="eop">)</span></span><span class="EOP SCXW22408636 BCX8" data-ccp-props="{"134245418":true,"134245529":true,"201341983":0,"335559738":40,"335559739":0,"335559740":360}"> </span>**

<div class="SCXW22408636 BCX8" id="bkmrk-syslog-host%C2%A0-syslog-"><div class="ListContainerWrapper SCXW22408636 BCX8">  
</div><div class="ListContainerWrapper SCXW22408636 BCX8">1. <span class="TextRun SCXW22408636 BCX8" data-contrast="auto" lang="EN-US" xml:lang="EN-US"><span class="NormalTextRun SCXW22408636 BCX8" data-ccp-charstyle="eop">Syslog Host</span></span><span class="EOP SCXW22408636 BCX8" data-ccp-props="{"201341983":0,"335559739":160,"335559740":259}"> </span>

</div><div class="ListContainerWrapper SCXW22408636 BCX8">2. <span class="TextRun SCXW22408636 BCX8" data-contrast="auto" lang="EN-US" xml:lang="EN-US"><span class="NormalTextRun SCXW22408636 BCX8" data-ccp-charstyle="eop">Syslog Port</span></span><span class="EOP SCXW22408636 BCX8" data-ccp-props="{"201341983":0,"335559739":160,"335559740":259}"> </span>

</div><div class="ListContainerWrapper SCXW22408636 BCX8">  
</div></div>**<span class="TextRun SCXW22408636 BCX8" data-contrast="none" lang="EN-CA" xml:lang="EN-CA"><span class="NormalTextRun SCXW22408636 BCX8" data-ccp-charstyle="eop">Collect Pulse Connect Secure logs (input: </span><span class="NormalTextRun SpellingErrorV2Themed SCXW22408636 BCX8" data-ccp-charstyle="eop">tcp</span><span class="NormalTextRun SCXW22408636 BCX8" data-ccp-charstyle="eop">)</span></span><span class="EOP SCXW22408636 BCX8" data-ccp-props="{"134245418":true,"134245529":true,"201341983":0,"335559738":40,"335559739":0,"335559740":360}"> </span>**

<div class="SCXW22408636 BCX8" id="bkmrk-syslog-host%C2%A0-syslog--1"><div class="ListContainerWrapper SCXW22408636 BCX8">1. <span class="TextRun SCXW22408636 BCX8" data-contrast="auto" lang="EN-US" xml:lang="EN-US"><span class="NormalTextRun SCXW22408636 BCX8" data-ccp-charstyle="eop">Syslog Host</span></span><span class="EOP SCXW22408636 BCX8" data-ccp-props="{"201341983":0,"335559739":160,"335559740":259}"> </span>

</div><div class="ListContainerWrapper SCXW22408636 BCX8">2. <span class="TextRun SCXW22408636 BCX8" data-contrast="auto" lang="EN-US" xml:lang="EN-US"><span class="NormalTextRun SCXW22408636 BCX8" data-ccp-charstyle="eop">Syslog Port</span></span><span class="EOP SCXW22408636 BCX8" data-ccp-props="{"201341983":0,"335559739":160,"335559740":259}"> </span>

</div><div class="OutlineElement Ltr SCXW22408636 BCX8">  
</div></div><span class="EOP SCXW22408636 BCX8" data-ccp-props="{"201341983":0,"335559739":160,"335559740":259}"> </span>

<span class="EOP SCXW22408636 BCX8" data-ccp-props="{"201341983":0,"335559685":1800,"335559739":160,"335559740":259}"> </span>

<span class="EOP SCXW22408636 BCX8" data-ccp-props="{"201341983":0,"335559685":1800,"335559739":160,"335559740":259}"> </span>

<span class="EOP SCXW22408636 BCX8" data-ccp-props="{"201341983":0,"335559685":1800,"335559739":160,"335559740":259}"></span>

# Resource Manager Endpoint Integration

The Azure Resource Manager (ARM) endpoint is the primary entry point for interacting with the Azure platform's resource management services. It allows users to deploy, manage, and organize resources like virtual machines, storage accounts, and networks within a defined Azure subscription. The ARM endpoint serves as a REST API that facilitates the creation, modification, and deletion of resources, ensuring secure and scalable management of Azure resources. It also supports role-based access control (RBAC), policy enforcement, and resource tagging for effective governance. In essence, the ARM endpoint enables seamless communication between Azure services and clients for infrastructure management.

---

#### **Requirements:**

- Microsoft Azure account

---

#### **Setup:**

##### **How to Create an Azure Resource Manager Service Endpoint**

##### **1. Create Service Principal**

<div id="bkmrk-to-create-a-service-">To create a Service Principal we must first register an application in the Azure Active Directory, which we will do now. As of this writing this can only be done in the original Azure portal. However, many of us are being forced into the new portal upon login. If you are, simply click on **Browse** and select **Active Directory** and you will be redirected to the original Azure portal.</div>1. Click on **Applications** of the selected Active directory
2. Click the **Add** button at the button of the page
3. Enter a name for your application and make sure Web Application and/or Web API is selected
4. Enter two URLs based on your application name  
    They do not have to be real. I used the same value for both.
5. Once the application is created, click on **Configure**
6. Make note of the **Client ID** because we will need it in a moment
7. Select a key duration under the keys section and click **Save** at the bottom of the page
8. Once the key is saved copy the value and place it with your Client ID  
    This will be your only chance to collect this value.

##### **2. Find Tenant ID**

With the Active Directory select on the Applications page, we can harvest the Tenant ID.

1. Click **View Endpoints** at the bottom of the page
2. Copy any of the URLS and paste into an editor
3. The GUID in the URL is your **Tenant ID**

##### **3. Find Subscription Name and ID**

You will also need the subscription name and ID to complete the service endpoint. We can get them while we are in the old portal.

1. Click **Settings** in the left vertical menu
2. Copy the **Subscription** and **Subscription ID** values

##### **4. Grant access**

<div id="bkmrk-now-that-we-have-a-s">Now that we have a service principal we need to give it access to create resources in your subscription. Return to the new Azure Portal.</div><div id="bkmrk-click%C2%A0browse%C2%A0and-sel">1. Click **Browse** and select **Subscriptions**
2. Select the subscription you are using![](https://www.donovanbrown.com/FILES%2f2015%2f12%2f2015-12-05_7-50-42.png.axdx)
3. Click the **Access** button
4. Click **Add**
5. Select **Contributor** as the roll
6. Search and select the name of the application you just created
7. Click **OK** to grant the service principal access to your subscription

</div>There is a script that can do all of this for you [here ](https://raw.githubusercontent.com/Microsoft/vso-agent-tasks/master/Tasks/DeployAzureResourceGroup/SPNCreation.ps1)on GitHub.

##### **5. Create Service Endpoint**

With the Service Principal created, we can now create the Service Endpoint in VSTS.

1. Log in to VSTS and select a project
2. Click the manage project gear icon in the upper right hand corner of the page
3. Select the **Services** tab
4. Select **Azure Resource Manager** from the **New Service Endpoint** drop down  
    <table border="1" cellpadding="2" cellspacing="0" width="640"><tbody><tr><td align="center" valign="top" width="320">**Field**</td><td align="center" valign="top" width="320">**Value**</td></tr><tr><td valign="top" width="320">Connection Name</td><td valign="top" width="320">{AnyValueYouLike}</td></tr><tr><td valign="top" width="320">Subscription Id</td><td valign="top" width="320">Subscription Id</td></tr><tr><td valign="top" width="320">Subscription Name</td><td valign="top" width="320">Subscription Name</td></tr><tr><td valign="top" width="320">Service Principal Id</td><td valign="top" width="320">Client Id</td></tr><tr><td valign="top" width="320">Service Principal Key</td><td valign="top" width="320">Key</td></tr><tr><td valign="top" width="320">Tenant Id</td><td valign="top" width="320">Tenant Id</td></tr></tbody></table>
5. Click **OK**

##### **How to navigate and locate Resource Manager Endpoint.**

1.Sign in to the Azure portal.

2.Select **Resource groups** from the left panel.

3.Select the resource group that you have already created specifically for Azure Integration.

4.Hover to "Overview".

5.Verify the following resources were created in the resource group: "Endpoint Name" and type "Endpoint".

6.Copy the Endpoint Name for integration requirement. Ex. contosocdn123(myCDNProfile/contosocdn123)

<span class="___19i3y4w ftuwxu6 f1qdqbpl fua484e f1o6l1dn fac4klo frp1kbq f12s2122 f19l72ij fcsrh55 frnyhdv fyo61pj f1spqul0 faegybh fkq5uzf f1x4fozf fwl63ro f1npyoe5 f10yrmu1 f1w45tcp f1dqeblh f18c6rdl f1e7lo8u f1dpi1ry f1vs2jsm f1o6uux1 f1nu0r7q fg0t3io ff98at f2yyzyc f1sjbqdg fyzb71r fh1aahx f1oktu5 f1d3652t fed2bxt fpeluho f1e76dpb f1lwmlrd fgtcxse f1d705n1 f1jrvuk2 f11h0gum f1tandro fxjdbx7 f1hva1tl fsaoqmu f1w7c29l f1uakdsb f7jsfu7 f1hz9qas f1vmprsu f1wogq95 f1oojlmx fpbf6y8 fy6vjqu fuo4419 fbzygsp fnuenae fw75flx f12oply1 fvyt4us f4ki1i fyy2ueq f1w3oopj fum67ou f1j64hbx f1807z01 f1q6iyvy f1s5r85c f920ium fhj6euq f30elfj f1kcike0 f1byno2r f5wk2nc">![image](https://cytechint-docs-bookstack.s3.amazonaws.com/uploads/images/gallery/2024-11/QMMyPrsX9TIZFkti-embedded-image-jiq0o5ec.jpeg)</span>

<span class="___19i3y4w ftuwxu6 f1qdqbpl fua484e f1o6l1dn fac4klo frp1kbq f12s2122 f19l72ij fcsrh55 frnyhdv fyo61pj f1spqul0 faegybh fkq5uzf f1x4fozf fwl63ro f1npyoe5 f10yrmu1 f1w45tcp f1dqeblh f18c6rdl f1e7lo8u f1dpi1ry f1vs2jsm f1o6uux1 f1nu0r7q fg0t3io ff98at f2yyzyc f1sjbqdg fyzb71r fh1aahx f1oktu5 f1d3652t fed2bxt fpeluho f1e76dpb f1lwmlrd fgtcxse f1d705n1 f1jrvuk2 f11h0gum f1tandro fxjdbx7 f1hva1tl fsaoqmu f1w7c29l f1uakdsb f7jsfu7 f1hz9qas f1vmprsu f1wogq95 f1oojlmx fpbf6y8 fy6vjqu fuo4419 fbzygsp fnuenae fw75flx f12oply1 fvyt4us f4ki1i fyy2ueq f1w3oopj fum67ou f1j64hbx f1807z01 f1q6iyvy f1s5r85c f920ium fhj6euq f30elfj f1kcike0 f1byno2r f5wk2nc">*If you need further assistance, kindly contact our support at <support@cytechint.com> for prompt assistance and guidance.*</span>

# SentinelOne Integrations

<span style="color: rgb(0, 0, 0);">The SentinelOne integration collects and parses data from SentinelOne REST APIs. This integration also offers the capability to perform response actions on SentinelOne hosts directly through the Elastic Security interface </span>

#### <span style="color: rgb(53, 152, 219);">**Compatibility**</span>

<span style="color: rgb(0, 0, 0);">This module has been tested against **SentinelOne Management Console API version 2.1**.</span>

#### <span style="color: rgb(53, 152, 219);">**API token**</span>

<span style="color: rgb(0, 0, 0);">To collect data from SentinelOne APIs, you must have an API token. To create an API token, follow these steps:</span>

1. <span style="color: rgb(0, 0, 0);">Log in to the **SentinelOne Management Console** as an **Admin**.</span>

<span style="color: rgb(0, 0, 0);">[![image.png](https://cytechint-docs-bookstack.s3.amazonaws.com/uploads/images/gallery/2024-10/scaled-1680-/vfZNCYpWdneD5rTU-image.png)](https://cytechint-docs-bookstack.s3.amazonaws.com/uploads/images/gallery/2024-10/vfZNCYpWdneD5rTU-image.png)</span>

<span style="color: rgb(0, 0, 0);">2. Navigate to **Logged User Account** from top right panel in the navigation bar.</span>

<span style="color: rgb(0, 0, 0);">3. Click **My User**.</span>

<span style="color: rgb(0, 0, 0);">4. In the API token section, click **Generate**.</span>

<span style="color: rgb(0, 0, 0);">[![image.png](https://cytechint-docs-bookstack.s3.amazonaws.com/uploads/images/gallery/2024-10/scaled-1680-/T2Q4I5N2LudoGmQO-image.png)](https://cytechint-docs-bookstack.s3.amazonaws.com/uploads/images/gallery/2024-10/T2Q4I5N2LudoGmQO-image.png)</span>

<p class="callout info"><span style="color: rgb(0, 0, 0);">The API token generated by the user is time-limited. To rotate a new token, log in with the dedicated admin account.</span></p>

<p class="callout danger">**<span style="color: rgb(0, 0, 0);">Please provide the credenetials to AQUILA Support.</span>**</p>

<span style="color: rgb(0, 0, 0);">1. **SentinelOne console URL** (https://&lt;your-sentinelone-domain&gt;.sentinelone.net<span data-teams="true"><span class="ui-provider ahr ahs iw aht ahu ahv ahw ahx ahy ahz aia aib aic aid aie aif aig aih aii aij aik ail aim ain aio aip aiq air ais ait aiu aiv aiw aix aiy" dir="ltr">, where "Domain" is the domain name of your SentinelOne account.)</span></span></span>

<span style="color: rgb(0, 0, 0);">2. **API token**</span>

#### <span style="color: rgb(53, 152, 219);">**Integrate on AQUILA**</span>

<span style="color: rgb(0, 0, 0);">**1.** Log in to **[CyTech - AQUILA](https://cytechint.io/)**. Choose **Cyber Monitoring** and click the **small arrow icon** to redirect you to the Cyber Monitoring Dashboard.</span>

[![image.png](https://cytechint-docs-bookstack.s3.amazonaws.com/uploads/images/gallery/2025-05/scaled-1680-/QUruqc4qZzjj39A2-image.png)](https://cytechint-docs-bookstack.s3.amazonaws.com/uploads/images/gallery/2025-05/QUruqc4qZzjj39A2-image.png)

<span style="color: rgb(0, 0, 0);">2. In the dashboard, choose **Cyber Incident Management (SIEM and XDR)**.</span>

[![image.png](https://cytechint-docs-bookstack.s3.amazonaws.com/uploads/images/gallery/2025-05/scaled-1680-/i68EMO7YfIStKeyl-image.png)](https://cytechint-docs-bookstack.s3.amazonaws.com/uploads/images/gallery/2025-05/i68EMO7YfIStKeyl-image.png)

<span style="color: rgb(0, 0, 0);">3. Navigate through the leftmost top and click **Cyber Incident Monitoring**.</span>

[![image.png](https://cytechint-docs-bookstack.s3.amazonaws.com/uploads/images/gallery/2025-05/scaled-1680-/KgRo0wYa67PKNCws-image.png)](https://cytechint-docs-bookstack.s3.amazonaws.com/uploads/images/gallery/2025-05/KgRo0wYa67PKNCws-image.png)

<span style="color: rgb(0, 0, 0);">4. Navigate through **Settings&gt;Log Source&gt;Search Bar&gt;Add to Agent**.</span>

[![image.png](https://cytechint-docs-bookstack.s3.amazonaws.com/uploads/images/gallery/2025-05/scaled-1680-/oe0JNmFK0Jncf3yD-image.png)](https://cytechint-docs-bookstack.s3.amazonaws.com/uploads/images/gallery/2025-05/oe0JNmFK0Jncf3yD-image.png)

<span style="color: rgb(0, 0, 0);">5. Choose your **Log Collector**.</span>

[![image.png](https://cytechint-docs-bookstack.s3.amazonaws.com/uploads/images/gallery/2025-05/scaled-1680-/1VIERSAN80moG8fG-image.png)](https://cytechint-docs-bookstack.s3.amazonaws.com/uploads/images/gallery/2025-05/1VIERSAN80moG8fG-image.png)

<span style="color: rgb(0, 0, 0);">6. In the integration settings follow the instructions given below.</span>

1. <span style="color: rgb(0, 0, 0);">Click the **drop arrow** to display the contents needed for the integration setup.</span>
2. <span style="color: rgb(0, 0, 0);">Provide **SentinelOne Console URL**.</span>
3. <span style="color: rgb(0, 0, 0);">Provide the **API Token**.</span>
4. <span style="color: rgb(0, 0, 0);">Finally, click **Next** to install the log source integration.</span>

[![image.png](https://cytechint-docs-bookstack.s3.amazonaws.com/uploads/images/gallery/2025-05/scaled-1680-/iUdkuG0aq7DTQiaz-image.png)](https://cytechint-docs-bookstack.s3.amazonaws.com/uploads/images/gallery/2025-05/iUdkuG0aq7DTQiaz-image.png)

<span style="color: rgb(0, 0, 0);">7. Wait for the **Successfull** window to display, this will confirm the successfull integration.</span>

[![image.png](https://cytechint-docs-bookstack.s3.amazonaws.com/uploads/images/gallery/2025-05/scaled-1680-/CNFzJRIuFuvZIEdI-image.png)](https://cytechint-docs-bookstack.s3.amazonaws.com/uploads/images/gallery/2025-05/CNFzJRIuFuvZIEdI-image.png)

<span style="color: rgb(0, 0, 0);">*If you need further assistance, kindly contact our support at <span style="color: rgb(53, 152, 219);">**support@cytechint.com**</span> for prompt assistance and guidance.*</span>

# Set Up Integration from SonarQube

#### <span style="color: rgb(53, 152, 219);">**SonarQube**</span>

**Introduction**

SonarQube is a self-hosted or cloud-enabled tool that scans source code to detect bugs, vulnerabilities, code smells, duplications, and coverage issues across 30+ languages. It integrates with build tools (Maven, Gradle, MSBuild) and CI/CD pipelines like Jenkins, GitLab, and GitHub Actions. With IDE plugins for VS Code, IntelliJ, Eclipse, and more, it enforces "Clean as You Code" practices during development. Built for DevSecOps, it can block pull requests or deployments if quality gates are not met.

<p class="callout warning">**Description:**  
SonarQube does not natively support direct integration with the Elastic Stack for sending code quality metrics. </p>

<p class="callout info">However, it can forward **logs**, **metrics**, or even **SonarQube API data** into Elasticsearch using custom setups.</p>

##### What It Does:

- Sends SonarQube logs to Elasticsearch for indexing and analysis in Kibana.
- Optionally pushes code quality metrics (bugs, vulnerabilities, coverage, etc.) to Elasticsearch using custom scripts.
- Enables unified observability of code health and platform behavior inside Elastic Stack.

#### <span style="color: rgb(53, 152, 219);">**Option 1: Send Logs to Elastic Using Filebeat**</span>

**Description:**

Use Filebeat to collect and forward SonarQube logs to Elasticsearch for centralized logging and visualization in Kibana.

<p class="callout info">**What It Does:**</p>

- Automatically ships log files from the SonarQube server to Elasticsearch.
- Allows real-time log monitoring, search, and alerting via Kibana.
- Supports analysis of SonarQube behavior, errors, and performance patterns.

##### Steps

**Prepare SonarQube Logs**

- **Locate logs (default path: /opt/sonarqube/logs/)**
    
    
    - web.log
    - ce.log
    - es.log
    - sonar.log

**Install Filebeat on the SonarQube Host**

- I**nstall Filebeat from**
    
    
    - <span style="color: rgb(35, 111, 161);">https://www.elastic.co/docs/reference/beats/filebeat/filebeat-installation-configuration</span>

**Configure Filebeat to Read SonarQube Logs**

- **Edit filebeat.yml configuration file:**

> filebeat.inputs:  
> \- type: log  
>  enabled: true  
>  paths:  
> \- /opt/sonarqube/logs/\*.log
> 
> output.elasticsearch:  
>  hosts: \["http://&lt;elasticsearch-host&gt;:9200"\]  
>  username: "elastic"  
>  password: "your-password"

- **Start and Enable Filebeat**

> sudo systemctl enable filebeat  
> sudo systemctl start filebeat

#### <span style="color: rgb(53, 152, 219);">**Option 2: Push Metrics to Elastic via SonarQube API**</span>

**Description:**  
Use SonarQube’s built-in Web API to extract code quality metrics and push them into Elasticsearch using a custom script.

<p class="callout info">**What It Does:**</p>

- Retrieves metrics like bugs, vulnerabilities, code smells, and coverage.
- Pushes data to an Elasticsearch index for dashboarding or analysis.
- Enables tracking of project quality trends over time in Kibana.

##### Steps:

**Enable API Access in SonarQube**

- **SonarQube provides a built-in Web API at:**
- - http://&lt;sonarqube-host&gt;/api/measures/component

- **Use the API to retrieve metrics like:**

> GET /api/measures/component?component=&lt;project\_key&gt;&amp;metricKeys=bugs,vulnerabilities,coverage

**Build a Custom Script (Python Example)**

- **Use Python to fetch and send metrics:**

> import requests, json
> 
> sonar\_url = "http://&lt;sonarqube&gt;/api/measures/component"  
> params = {"component": "your\_project", "metricKeys": "bugs,vulnerabilities,code\_smells"}
> 
> res = requests.get(sonar\_url, params=params)  
> data = res.json()
> 
> \# Send to Elasticsearch  
> es\_url = "http://&lt;elasticsearch&gt;:9200/sonarqube-metrics/\_doc"  
> requests.post(es\_url, headers={"Content-Type": "application/json"}, data=json.dumps(data))

<p class="callout info">What Happens Next?</p>

<table border="1" class="w-fit min-w-(--thread-content-width)" data-end="3199" data-start="2618" id="bkmrk-action-result-sonarq" style="height: 181px; width: 100%; border-collapse: collapse; border-style: solid;"><thead data-end="2714" data-start="2618"><tr data-end="2714" data-start="2618"><th data-col-size="sm" data-end="2655" data-start="2618" style="width: 49.9338%;">Action</th><th data-col-size="md" data-end="2714" data-start="2655" style="width: 49.9338%;">Result</th></tr></thead><tbody data-end="3199" data-start="2812"><tr data-end="2908" data-start="2812"><td data-col-size="sm" data-end="2849" data-start="2812" style="width: 49.9338%;">SonarQube writes logs</td><td data-col-size="md" data-end="2908" data-start="2849" style="width: 49.9338%;">Filebeat ships them to Elasticsearch</td></tr><tr data-end="3005" data-start="2909"><td data-col-size="sm" data-end="2946" data-start="2909" style="width: 49.9338%;">Kibana receives log data</td><td data-col-size="md" data-end="3005" data-start="2946" style="width: 49.9338%;">Visualize system behavior and performance</td></tr><tr data-end="3102" data-start="3006"><td data-col-size="sm" data-end="3043" data-start="3006" style="width: 49.9338%;">Script pulls SonarQube metrics</td><td data-col-size="md" data-end="3102" data-start="3043" style="width: 49.9338%;">Elasticsearch stores code health data (via API)</td></tr><tr data-end="3199" data-start="3103"><td data-col-size="sm" data-end="3140" data-start="3103" style="width: 49.9338%;">Kibana dashboards can be created</td><td data-col-size="md" data-end="3199" data-start="3140" style="width: 49.9338%;">Visualize bugs, vulnerabilities, coverage, etc.</td></tr></tbody></table>

<p class="callout info">Requirements</p>

<table border="1" class="w-fit min-w-(--thread-content-width)" data-end="3852" data-start="3223" id="bkmrk-requirement-purpose-" style="height: 179.271px; width: 107.857%; border-collapse: collapse; border-style: solid;"><thead data-end="3312" data-start="3223"><tr data-end="3312" data-start="3223" style="height: 29.8785px;"><th data-col-size="sm" data-end="3247" data-start="3223" style="height: 29.8785px;">Requirement</th><th data-col-size="md" data-end="3312" data-start="3247" style="height: 29.8785px;">Purpose</th></tr></thead><tbody data-end="3852" data-start="3403"><tr data-end="3492" data-start="3403" style="height: 29.8785px;"><td data-col-size="sm" data-end="3427" data-start="3403" style="height: 29.8785px;">Filebeat</td><td data-col-size="md" data-end="3492" data-start="3427" style="height: 29.8785px;">Forwards log files to Elasticsearch</td></tr><tr data-end="3582" data-start="3493" style="height: 29.8785px;"><td data-col-size="sm" data-end="3517" data-start="3493" style="height: 29.8785px;">Elasticsearch</td><td data-col-size="md" data-end="3582" data-start="3517" style="height: 29.8785px;">Stores both logs and custom metrics</td></tr><tr data-end="3672" data-start="3583" style="height: 29.8785px;"><td data-col-size="sm" data-end="3607" data-start="3583" style="height: 29.8785px;">SonarQube API</td><td data-col-size="md" data-end="3672" data-start="3607" style="height: 29.8785px;">Source of code quality data</td></tr><tr data-end="3762" data-start="3673" style="height: 29.8785px;"><td data-col-size="sm" data-end="3697" data-start="3673" style="height: 29.8785px;">Custom Script</td><td data-col-size="md" data-end="3762" data-start="3697" style="height: 29.8785px;">Pulls metrics and pushes them to Elastic</td></tr><tr data-end="3852" data-start="3763" style="height: 29.8785px;"><td data-col-size="sm" data-end="3787" data-start="3763" style="height: 29.8785px;">Cron (optional)</td><td data-col-size="md" data-end="3852" data-start="3787" style="height: 29.8785px;">Automates periodic metric synchronization</td></tr></tbody></table>

<p class="callout info">Integration Mapping Summary</p>

<table border="1" class="w-fit min-w-(--thread-content-width)" data-end="4539" data-start="3891" id="bkmrk-component-function-s" style="height: 213px; width: 106.905%; border-collapse: collapse; border-style: solid;"><thead data-end="3972" data-start="3891"><tr data-end="3972" data-start="3891"><th data-col-size="sm" data-end="3911" data-start="3891" style="width: 49.947%;">Component</th><th data-col-size="md" data-end="3972" data-start="3911" style="width: 49.947%;">Function</th></tr></thead><tbody data-end="4539" data-start="4054"><tr data-end="4134" data-start="4054"><td data-col-size="sm" data-end="4074" data-start="4054" style="width: 49.947%;">SonarQube Logs</td><td data-col-size="md" data-end="4134" data-start="4074" style="width: 49.947%;">Shipped to Elasticsearch via Filebeat</td></tr><tr data-end="4215" data-start="4135"><td data-col-size="sm" data-end="4155" data-start="4135" style="width: 49.947%;">Filebeat</td><td data-col-size="md" data-end="4215" data-start="4155" style="width: 49.947%;">Collects and forwards logs</td></tr><tr data-end="4296" data-start="4216"><td data-col-size="sm" data-end="4236" data-start="4216" style="width: 49.947%;">Elasticsearch</td><td data-col-size="md" data-end="4296" data-start="4236" style="width: 49.947%;">Stores logs and metrics</td></tr><tr data-end="4377" data-start="4297"><td data-col-size="sm" data-end="4317" data-start="4297" style="width: 49.947%;">SonarQube API</td><td data-col-size="md" data-end="4377" data-start="4317" style="width: 49.947%;">Retrieves code metrics like bugs, smells, coverage</td></tr><tr data-end="4458" data-start="4378"><td data-col-size="sm" data-end="4398" data-start="4378" style="width: 49.947%;">Custom Script</td><td data-col-size="md" data-end="4458" data-start="4398" style="width: 49.947%;">Pushes metrics to Elasticsearch</td></tr><tr data-end="4539" data-start="4459"><td data-col-size="sm" data-end="4479" data-start="4459" style="width: 49.947%;">Kibana</td><td data-col-size="md" data-end="4539" data-start="4479" style="width: 49.947%;">Visualizes logs and code quality over time</td></tr></tbody></table>

# Setup Integration from Qualys

## Qualys VMDR Integration Guide 

Integrate **Qualys Vulnerability Management, Detection and Response (VMDR)** with the Elastic Stack via REST API to ingest vulnerability, asset, and detection data directly into Elasticsearch for centralized security monitoring and analysis.

## Credentials &amp; API Access Setup

Before configuring the integration, you’ll need to prepare your API credentials in Qualys:

**Steps:**

1. Log in to the **Qualys Admin Portal**.
2. Go to **User Management**.
3. Create or select a dedicated **API User** with:
    
    
    - **API Access permission**
    - Access to:
        
        
        - **VMDR Module**
        - **Host Detection**
        - **Asset Inventory**
        - **Knowledge Base**
        - **User Activity Log** (if required)
4. Take note of:
    
    
    - **Username**
    - **Password**
    - Your **Qualys Platform API URL**:
        
        
        - Check via: [Qualys Platform Identification](https://www.qualys.com/platform-identification/)
        - Or log in to Qualys → Help → About → see “Security Operations Center (SOC)” for your URL.

## Elastic Integration Configuration

#### In Kibana:

1. Go to **Management → Integrations**.
2. In the search bar, type **Qualys VMDR**.
3. Select **Qualys VMDR** from the search results.
4. Click **Add Qualys VMDR Integration**.

#### Provide the following connection details based on the data you want to collect:

<div class="_tableContainer_80l1q_1" id="bkmrk-data-stream-required"><div class="_tableWrapper_80l1q_14 group flex w-fit flex-col-reverse" tabindex="-1"><table border="1" class="w-fit min-w-(--thread-content-width)" data-end="2135" data-start="1701" style="border-collapse: collapse; border-style: solid;"><thead data-end="1769" data-start="1701"><tr data-end="1769" data-start="1701"><th data-col-size="sm" data-end="1729" data-start="1701">Data Stream</th><th data-col-size="md" data-end="1769" data-start="1729">Required Details</th></tr></thead><tbody data-end="2135" data-start="1839"><tr data-end="1939" data-start="1839"><td data-col-size="sm" data-end="1868" data-start="1839">**Asset Host Detection**</td><td data-col-size="md" data-end="1939" data-start="1868">username, password, API URL, interval, input parameters, batch size</td></tr><tr data-end="2046" data-start="1940"><td data-col-size="sm" data-end="1969" data-start="1940">**Knowledge Base**</td><td data-col-size="md" data-end="2046" data-start="1969">username, password, API URL, initial interval, interval, input parameters</td></tr><tr data-end="2135" data-start="2047"><td data-col-size="sm" data-end="2076" data-start="2047">**User Activity Log**</td><td data-col-size="md" data-end="2135" data-start="2076">username, password, API URL, initial interval, interval</td></tr></tbody></table>

</div></div>5. Save the integration.

#### Permissions Reference (API User)

<div class="_tableContainer_80l1q_1" id="bkmrk-data-stream-role-per"><div class="_tableWrapper_80l1q_14 group flex w-fit flex-col-reverse" tabindex="-1"><table border="1" class="w-fit min-w-(--thread-content-width)" data-end="2702" data-start="2208" style="border-collapse: collapse; border-style: solid;"><thead data-end="2271" data-start="2208"><tr data-end="2271" data-start="2208"><th data-col-size="sm" data-end="2236" data-start="2208">Data Stream</th><th data-col-size="md" data-end="2251" data-start="2236">Role</th><th data-col-size="md" data-end="2271" data-start="2251">Permission Scope</th></tr></thead><tbody data-end="2702" data-start="2337"><tr data-end="2457" data-start="2337"><td data-col-size="sm" data-end="2366" data-start="2337">**Asset Host Detection**</td><td data-col-size="md" data-end="2411" data-start="2366">Managers, Unit Managers, Scanners, Readers</td><td data-col-size="md" data-end="2457" data-start="2411">VM scanned hosts (depending on role scope)</td></tr><tr data-end="2567" data-start="2458"><td data-col-size="sm" data-end="2487" data-start="2458">**Knowledge Base**</td><td data-col-size="md" data-end="2532" data-start="2487">Managers, Unit Managers, Scanners, Readers</td><td data-col-size="md" data-end="2567" data-start="2532">Can download vulnerability data</td></tr><tr data-end="2702" data-start="2568"><td data-col-size="sm" data-end="2597" data-start="2568">**User Activity Log**</td><td data-col-size="md" data-end="2642" data-start="2597">Managers, Unit Managers, Scanners, Readers</td><td data-col-size="md" data-end="2702" data-start="2642">Can view user actions (own or others, depending on role)</td></tr></tbody></table>

</div></div>

# Slack Integrations

##### **<span class="TextRun SCXW149351698 BCX8" data-contrast="none" lang="EN-US" style="color: rgb(53, 152, 219);" xml:lang="EN-US"><span class="NormalTextRun SCXW149351698 BCX8" data-ccp-charstyle="Style (Complex) Open Sans" data-ccp-charstyle-defn="{"ObjectId":"f7c7d269-611c-42b7-bc1c-7a0276d6fd28|124","ClassId":1073872969,"Properties":[469775450,"Style (Complex) Open Sans",201340122,"1",134233614,"true",469778129,"StyleComplexOpenSans",335572020,"1",201342448,"1",469777841,"Open Sans",469777842,"Open Sans",469777843,"Calibri",469777844,"Open Sans",469769226,"Open Sans,Calibri",469778324,"Default Paragraph Font"]}">Introduction</span></span><span class="EOP SCXW149351698 BCX8" data-ccp-props="{"134245418":true,"134245529":true,"201341983":0,"335559738":240,"335559739":0,"335559740":360}"> </span>**

<span class="TextRun SCXW149351698 BCX8" data-contrast="auto" lang="EN-US" xml:lang="EN-US"><span class="NormalTextRun SCXW149351698 BCX8" data-ccp-charstyle="Style (Complex) Open Sans">Slack is used by </span><span class="NormalTextRun SCXW149351698 BCX8" data-ccp-charstyle="Style (Complex) Open Sans">numerous</span><span class="NormalTextRun SCXW149351698 BCX8" data-ccp-charstyle="Style (Complex) Open Sans"> organizations as their primary chat and collaboration tool.</span></span><span class="EOP SCXW149351698 BCX8" data-ccp-props="{"201341983":0,"335559685":360,"335559739":160,"335559740":259}"> </span>

**<span class="TextRun SCXW149351698 BCX8" data-contrast="auto" lang="EN-US" xml:lang="EN-US"><span class="NormalTextRun SCXW149351698 BCX8" data-ccp-charstyle="Style (Complex) Open Sans">Please note the Audit Logs API is only available to Slack workspaces on an Enterprise Grid plan. These API methods will not work for workspaces on a Free, Standard, or Business+ plan.</span></span><span class="EOP SCXW149351698 BCX8" data-ccp-props="{"201341983":0,"335559685":360,"335559739":160,"335559740":259}"> </span>**

<div class="SCXW149351698 BCX8" id="bkmrk-"><div class="OutlineElement Ltr SCXW149351698 BCX8">  
</div><div class="ListContainerWrapper SCXW149351698 BCX8">  
</div></div>##### <span style="color: rgb(53, 152, 219);">**<span class="TextRun SCXW149351698 BCX8" data-contrast="none" lang="EN-US" xml:lang="EN-US"><span class="NormalTextRun SCXW149351698 BCX8" data-ccp-charstyle="Style (Complex) Open Sans">Assumptions</span></span><span class="EOP SCXW149351698 BCX8" data-ccp-props="{"134245418":true,"134245529":true,"201341983":0,"335559738":240,"335559739":0,"335559740":360}"> </span>**</span>

<span class="TextRun SCXW149351698 BCX8" data-contrast="auto" lang="EN-US" xml:lang="EN-US"><span class="NormalTextRun SCXW149351698 BCX8" data-ccp-charstyle="Style (Complex) Open Sans">The procedures described in Section </span></span><span class="FieldRange SCXW149351698 BCX8"><span class="TextRun SCXW149351698 BCX8" data-contrast="auto" lang="EN-US" xml:lang="EN-US"><span class="NormalTextRun SCXW149351698 BCX8" data-ccp-charstyle="Style (Complex) Open Sans">3</span></span></span><span class="TextRun SCXW149351698 BCX8" data-contrast="auto" lang="EN-US" xml:lang="EN-US"> <span class="NormalTextRun ContextualSpellingAndGrammarErrorV2Themed SCXW149351698 BCX8" data-ccp-charstyle="Style (Complex) Open Sans">assumes</span><span class="NormalTextRun SCXW149351698 BCX8" data-ccp-charstyle="Style (Complex) Open Sans"> that a Log Collector has already been </span><span class="NormalTextRun ContextualSpellingAndGrammarErrorV2Themed SCXW149351698 BCX8" data-ccp-charstyle="Style (Complex) Open Sans">setup</span><span class="NormalTextRun SCXW149351698 BCX8" data-ccp-charstyle="Style (Complex) Open Sans">. </span></span><span class="EOP SCXW149351698 BCX8" data-ccp-props="{"201341983":0,"335559685":360,"335559739":160,"335559740":259}"> </span>

<div class="SCXW149351698 BCX8" id="bkmrk--1"><div class="OutlineElement Ltr SCXW149351698 BCX8">  
</div><div class="ListContainerWrapper SCXW149351698 BCX8">  
</div></div>##### <span style="color: rgb(53, 152, 219);">**<span class="TextRun SCXW149351698 BCX8" data-contrast="none" lang="EN-US" xml:lang="EN-US"><span class="NormalTextRun SCXW149351698 BCX8" data-ccp-charstyle="Style (Complex) Open Sans">Requirements</span></span><span class="EOP SCXW149351698 BCX8" data-ccp-props="{"134245418":true,"134245529":true,"201341983":0,"335559738":240,"335559739":0,"335559740":360}"> </span>**</span>

**<span class="TextRun SCXW149351698 BCX8" data-contrast="auto" lang="EN-US" xml:lang="EN-US"><span class="NormalTextRun SCXW149351698 BCX8">Configuration</span></span><span class="EOP SCXW149351698 BCX8" data-ccp-props="{"201341983":0,"335559685":360,"335559739":160,"335559740":259}"> </span>**

**<span class="TextRun SCXW149351698 BCX8" data-contrast="auto" lang="EN-US" xml:lang="EN-US"><span class="NormalTextRun SCXW149351698 BCX8">Enabling the integration in Elastic</span></span><span class="EOP SCXW149351698 BCX8" data-ccp-props="{"201341983":0,"335559685":360,"335559739":160,"335559740":259}"> </span>**

<div class="SCXW149351698 BCX8" id="bkmrk-in-kibana-go-to%E2%80%AFmana"><div class="ListContainerWrapper SCXW149351698 BCX8">1. <span class="TextRun SCXW149351698 BCX8" data-contrast="auto" lang="EN-US" xml:lang="EN-US"><span class="NormalTextRun SCXW149351698 BCX8">In Kibana go to </span></span>**<span class="TextRun SCXW149351698 BCX8" data-contrast="auto" lang="EN-US" xml:lang="EN-US"><span class="NormalTextRun SCXW149351698 BCX8">Management &gt; Integrations</span></span>**<span class="EOP SCXW149351698 BCX8" data-ccp-props="{"201341983":0,"335559739":160,"335559740":259}"> </span>

</div></div><div class="SCXW149351698 BCX8" id="bkmrk-in-the-%22search-for-i"><div class="ListContainerWrapper SCXW149351698 BCX8">2. <span class="TextRun SCXW149351698 BCX8" data-contrast="auto" lang="EN-US" xml:lang="EN-US"><span class="NormalTextRun SCXW149351698 BCX8">In the "Search for integrations" search bar type </span></span>**<span class="TextRun SCXW149351698 BCX8" data-contrast="auto" lang="EN-US" xml:lang="EN-US"><span class="NormalTextRun SCXW149351698 BCX8">Slack</span></span><span class="TextRun SCXW149351698 BCX8" data-contrast="auto" lang="EN-US" xml:lang="EN-US"><span class="NormalTextRun SCXW149351698 BCX8">.</span></span>**<span class="EOP SCXW149351698 BCX8" data-ccp-props="{"201341983":0,"335559739":160,"335559740":259}"> </span>

</div><div class="ListContainerWrapper SCXW149351698 BCX8">3. <span class="TextRun SCXW149351698 BCX8" data-contrast="auto" lang="EN-US" xml:lang="EN-US"><span class="NormalTextRun SCXW149351698 BCX8">Click on "Slack" integration from the search results.</span></span><span class="EOP SCXW149351698 BCX8" data-ccp-props="{"201341983":0,"335559739":160,"335559740":259}"> </span>

</div><div class="ListContainerWrapper SCXW149351698 BCX8">4. <span class="TextRun SCXW149351698 BCX8" data-contrast="auto" lang="EN-US" xml:lang="EN-US"><span class="NormalTextRun SCXW149351698 BCX8">Click on </span></span>**<span class="TextRun SCXW149351698 BCX8" data-contrast="auto" lang="EN-US" xml:lang="EN-US"><span class="NormalTextRun ContextualSpellingAndGrammarErrorV2Themed SCXW149351698 BCX8">Add</span><span class="NormalTextRun SCXW149351698 BCX8"> Slack</span></span>**<span class="TextRun SCXW149351698 BCX8" data-contrast="auto" lang="EN-US" xml:lang="EN-US"><span class="NormalTextRun SCXW149351698 BCX8"> button to add Slack integration.</span></span><span class="EOP SCXW149351698 BCX8" data-ccp-props="{"201341983":0,"335559739":160,"335559740":259}"> </span>

</div><div class="OutlineElement Ltr SCXW149351698 BCX8">  
</div></div>**<span class="TextRun SCXW149351698 BCX8" data-contrast="auto" lang="EN-US" xml:lang="EN-US"><span class="NormalTextRun SCXW149351698 BCX8">Configure Slack audit logs data </span><span class="NormalTextRun SCXW149351698 BCX8">stream</span></span><span class="EOP SCXW149351698 BCX8" data-ccp-props="{"201341983":0,"335559685":360,"335559739":160,"335559740":259}"> </span>**

<span class="TextRun SCXW149351698 BCX8" data-contrast="auto" lang="EN-US" xml:lang="EN-US"><span class="NormalTextRun SCXW149351698 BCX8">Enter values "OAuth API Token".</span></span><span class="EOP SCXW149351698 BCX8" data-ccp-props="{"201341983":0,"335559685":360,"335559739":160,"335559740":259}"> </span>

<div class="SCXW149351698 BCX8" id="bkmrk-oauth-api-token%E2%80%AFwill"><div class="OutlineElement Ltr SCXW149351698 BCX8">  
</div><div class="ListContainerWrapper SCXW149351698 BCX8">1. [<span class="TextRun Underlined SCXW149351698 BCX8" data-contrast="none" lang="EN-US" xml:lang="EN-US"><span class="NormalTextRun SCXW149351698 BCX8" data-ccp-charstyle="Hyperlink">OAuth API Token</span></span>](https://api.slack.com/authentication/basics)<span class="TextRun SCXW149351698 BCX8" data-contrast="auto" lang="EN-US" xml:lang="EN-US"><span class="NormalTextRun SCXW149351698 BCX8"> will be generated when a </span></span>[<span class="TextRun Underlined SCXW149351698 BCX8" data-contrast="none" lang="EN-US" xml:lang="EN-US"><span class="NormalTextRun SCXW149351698 BCX8" data-ccp-charstyle="Hyperlink">Slack App</span></span>](https://api.slack.com/apps)<span class="TextRun SCXW149351698 BCX8" data-contrast="auto" lang="EN-US" xml:lang="EN-US"><span class="NormalTextRun SCXW149351698 BCX8"> is created.</span></span><span class="EOP SCXW149351698 BCX8" data-ccp-props="{"201341983":0,"335559739":160,"335559740":259,"469777462":[720],"469777927":[0],"469777928":[8]}"> </span>

</div><div class="OutlineElement Ltr SCXW149351698 BCX8">  
</div></div><span style="color: rgb(53, 152, 219);">**<span class="TextRun SCXW149351698 BCX8" data-contrast="auto" lang="EN-US" xml:lang="EN-US"><span class="NormalTextRun SCXW149351698 BCX8">CONFIGURE USING API TOKEN</span></span><span class="EOP SCXW149351698 BCX8" data-ccp-props="{"201341983":0,"335559685":360,"335559739":160,"335559740":259}"> </span>**</span>

<span class="TextRun SCXW149351698 BCX8" data-contrast="auto" lang="EN-US" xml:lang="EN-US"><span class="NormalTextRun SCXW149351698 BCX8">For the Slack integration to be able to successfully get logs the following "User Token Scopes"" must be granted to the Slack App:</span></span><span class="EOP SCXW149351698 BCX8" data-ccp-props="{"201341983":0,"335559685":360,"335559739":160,"335559740":259}"> </span>

<div class="SCXW149351698 BCX8" id="bkmrk-auditlogs%3Aread%C2%A0"><div class="ListContainerWrapper SCXW149351698 BCX8">- **<span class="TextRun SCXW149351698 BCX8" data-contrast="auto" lang="EN-US" xml:lang="EN-US"><span class="NormalTextRun SpellingErrorV2Themed SCXW149351698 BCX8">auditlogs:read</span></span><span class="EOP SCXW149351698 BCX8" data-ccp-props="{"201341983":0,"335559739":160,"335559740":259,"469777462":[720],"469777927":[0],"469777928":[8]}"> </span>**

</div></div>**<span class="TextRun SCXW149351698 BCX8" data-contrast="auto" lang="EN-US" xml:lang="EN-US"><span class="NormalTextRun SCXW149351698 BCX8">Logs</span></span><span class="EOP SCXW149351698 BCX8" data-ccp-props="{"201341983":0,"335559685":720,"335559739":160,"335559740":259}"> </span>**

**<span class="TextRun SCXW149351698 BCX8" data-contrast="auto" lang="EN-US" xml:lang="EN-US"><span class="NormalTextRun SCXW149351698 BCX8">Audit</span></span><span class="EOP SCXW149351698 BCX8" data-ccp-props="{"201341983":0,"335559685":720,"335559739":160,"335559740":259}"> </span>**

<span class="TextRun SCXW149351698 BCX8" data-contrast="auto" lang="EN-US" xml:lang="EN-US"><span class="NormalTextRun SCXW149351698 BCX8">Audit logs summarize the history of changes made within </span><span class="NormalTextRun ContextualSpellingAndGrammarErrorV2Themed SCXW149351698 BCX8">the Slack</span><span class="NormalTextRun SCXW149351698 BCX8"> Enterprise.</span></span><span class="EOP SCXW149351698 BCX8" data-ccp-props="{"201341983":0,"335559685":720,"335559739":160,"335559740":259}"> </span>

<span class="EOP SCXW149351698 BCX8" data-ccp-props="{"201341983":0,"335559685":360,"335559739":160,"335559740":259}"> </span>

##### <span style="color: rgb(53, 152, 219);">**<span class="TextRun Highlight SCXW149351698 BCX8" data-contrast="none" lang="EN-US" xml:lang="EN-US"><span class="NormalTextRun SCXW149351698 BCX8" data-ccp-charstyle="normaltextrun" data-ccp-charstyle-defn="{"ObjectId":"f7c7d269-611c-42b7-bc1c-7a0276d6fd28|150","ClassId":1073872969,"Properties":[469775450,"normaltextrun",201340122,"1",134233614,"true",469778129,"normaltextrun",335572020,"1",469778324,"Default Paragraph Font"]}">SLACK</span> <span class="NormalTextRun SCXW149351698 BCX8" data-ccp-charstyle="normaltextrun">I</span><span class="NormalTextRun SCXW149351698 BCX8" data-ccp-charstyle="normaltextrun">ntegration</span><span class="NormalTextRun SCXW149351698 BCX8" data-ccp-charstyle="eop" data-ccp-charstyle-defn="{"ObjectId":"f7c7d269-611c-42b7-bc1c-7a0276d6fd28|151","ClassId":1073872969,"Properties":[469775450,"eop",201340122,"1",134233614,"true",469778129,"eop",335572020,"1",469778324,"Default Paragraph Font"]}"> </span><span class="NormalTextRun SCXW149351698 BCX8" data-ccp-charstyle="eop">Procedures</span></span><span class="EOP SCXW149351698 BCX8" data-ccp-props="{"134245418":true,"134245529":true,"201341983":0,"335559738":240,"335559739":0,"335559740":360}"> </span>**</span>

<span class="TextRun SCXW149351698 BCX8" data-contrast="auto" lang="EN-US" xml:lang="EN-US"><span class="NormalTextRun SCXW149351698 BCX8">Please provide the following information to </span><span class="NormalTextRun SpellingErrorV2Themed SCXW149351698 BCX8">CyTech</span><span class="NormalTextRun SCXW149351698 BCX8">:</span></span><span class="EOP SCXW149351698 BCX8" data-ccp-props="{"201341983":0,"335559685":360,"335559739":160,"335559740":259}"> </span>

**<span class="TextRun SCXW149351698 BCX8" data-contrast="none" lang="EN-US" xml:lang="EN-US"><span class="NormalTextRun SCXW149351698 BCX8" data-ccp-parastyle="CyTech Heading 1" data-ccp-parastyle-defn="{"ObjectId":"f7c7d269-611c-42b7-bc1c-7a0276d6fd28|94","ClassId":1073872969,"Properties":[469775450,"CyTech Heading 1",201340122,"2",134234082,"true",134233614,"true",469778129,"CyTechHeading1",335572020,"1",201342448,"2",469777841,"Open Sans",469777842,"Open Sans",469777843,"",469777844,"Open Sans",469769226,"Open Sans",335551500,"1809913",268442635,"36",335559740,"360",201341983,"0",335559739,"0",335559738,"240",335560102,"0",134245418,"true",134245529,"true",469777929,"CyTech Heading 1 Char",469778324,"heading 1"]}" data-ccp-parastyle-linked-defn="{"ObjectId":"f7c7d269-611c-42b7-bc1c-7a0276d6fd28|97","ClassId":1073872969,"Properties":[469775450,"CyTech Heading 1 Char",201340122,"1",134233614,"true",469778129,"CyTechHeading1Char",335572020,"1",134231262,"true",201342448,"2",469777841,"Open Sans",469777842,"Open Sans",469777843,"",469777844,"Open Sans",469769226,"Open Sans",335551500,"1809913",268442635,"36",335551547,"1033",469777929,"CyTech Heading 1",469778324,"Heading 1 Char"]}">Collect Slack logs via </span><span class="NormalTextRun SCXW149351698 BCX8" data-ccp-parastyle="CyTech Heading 1">API</span></span><span class="EOP SCXW149351698 BCX8" data-ccp-props="{"134245418":true,"134245529":true,"201341983":0,"335559738":240,"335559739":0,"335559740":360}"> </span>**

<div class="SCXW149351698 BCX8" id="bkmrk-api-url---the-root-u"><div class="ListContainerWrapper SCXW149351698 BCX8">1. <span class="TextRun SCXW149351698 BCX8" data-contrast="auto" lang="EN-US" xml:lang="EN-US"><span class="NormalTextRun SCXW149351698 BCX8">API URL - </span><span class="NormalTextRun SCXW149351698 BCX8">The root </span><span class="NormalTextRun SCXW149351698 BCX8">URL</span><span class="NormalTextRun SCXW149351698 BCX8"> for the API endpoints</span><span class="NormalTextRun SCXW149351698 BCX8">.</span></span><span class="EOP SCXW149351698 BCX8" data-ccp-props="{"201341983":0,"335559739":160,"335559740":259}"> </span>

</div><div class="ListContainerWrapper SCXW149351698 BCX8">  
</div></div>**<span class="TextRun SCXW149351698 BCX8" data-contrast="none" lang="EN-US" xml:lang="EN-US"><span class="NormalTextRun SCXW149351698 BCX8" data-ccp-parastyle="CyTech Heading 1">Slack Audit logs</span></span><span class="EOP SCXW149351698 BCX8" data-ccp-props="{"134245418":true,"134245529":true,"201341983":0,"335559738":240,"335559739":0,"335559740":360}"> </span>**

<div class="SCXW149351698 BCX8" id="bkmrk-oauth-api-token---th"><div class="ListContainerWrapper SCXW149351698 BCX8">  
</div><div class="ListContainerWrapper SCXW149351698 BCX8">1. <span class="TextRun SCXW149351698 BCX8" data-contrast="auto" lang="EN-US" xml:lang="EN-US"><span class="NormalTextRun SCXW149351698 BCX8">OAuth API Token</span><span class="NormalTextRun SCXW149351698 BCX8"> - </span><span class="NormalTextRun SCXW149351698 BCX8">The OAuth API Token used to authenticate with the Slack API</span></span><span class="EOP SCXW149351698 BCX8" data-ccp-props="{"201341983":0,"335559739":160,"335559740":259}"> </span>

</div></div>

# Sophos Integration

#### **Overview**

The Sophos Central integration allows you to monitor Alerts and Events logs. Sophos Central is a cloud-native application with high availability. It is a cybersecurity management platform hosted on public cloud platforms. Each Sophos Central account is hosted in a named region. Sophos Central uses well-known, widely used, and industry-standard software libraries to mitigate common vulnerabilities.

Use the Sophos Central integration to collect logs across Sophos Central managed by your Sophos account. Visualize that data in Kibana, create alerts to notify you if something goes wrong, and reference data when troubleshooting an issue.

##### **Compatibility**

The Sophos Central Application does not feature version numbers. This integration has been configured and tested against **Sophos Central SIEM Integration API version v1**.

##### **Requirements**

You need Elasticsearch for storing and searching your data, and Kibana for visualizing and managing it. You can use our hosted Elasticsearch Service on Elastic Cloud, which is recommended, or self-manage the Elastic Stack on your own hardware.

#### **Setup**

##### **Elastic Integration for Sophos Central Settings**

The Elastic Integration for Sophos Central requires the following Authentication Settings in order to connect to the Target service:

- Client ID
- Client Secret
- Grant Type
- Scope
- Tenant ID
- Token URL

**NOTE**: Sophos central supports logs only upto last 24 hrs.

**Step 1 - Create a service principal**

We will show you how you can sign in to Sophos Central Admin and create a service principal. You need to have the Super Admin role to do this.

**Step 1a - Sophos Central Admin**

Sign in to Sophos Central Admin. Go to [https://central.sophos.com/manage](https://central.sophos.com/manage).

Click 'Global Settings' and then click the "API Credentials" link.

[![image.png](https://cytechint-docs-bookstack.s3.amazonaws.com/uploads/images/gallery/2024-10/scaled-1680-/J8WTNdfPSYwa4Ney-image.png)](https://cytechint-docs-bookstack.s3.amazonaws.com/uploads/images/gallery/2024-10/J8WTNdfPSYwa4Ney-image.png)

[![image.png](https://cytechint-docs-bookstack.s3.amazonaws.com/uploads/images/gallery/2024-10/scaled-1680-/kAQf0UBHEHDMxA7E-image.png)](https://cytechint-docs-bookstack.s3.amazonaws.com/uploads/images/gallery/2024-10/kAQf0UBHEHDMxA7E-image.png)

**Step 1b - Add a new set of credentials**

Supply a name for your credential set and a description, then click 'Add' as shown in the example below.

[![image.png](https://cytechint-docs-bookstack.s3.amazonaws.com/uploads/images/gallery/2024-10/scaled-1680-/V6Nbxw3xaP96XCqA-image.png)](https://cytechint-docs-bookstack.s3.amazonaws.com/uploads/images/gallery/2024-10/V6Nbxw3xaP96XCqA-image.png)

**Step 1c - Grab your client ID and secret**

Click 'Copy' to note down the client ID. Also show the client secret.

[![image.png](https://cytechint-docs-bookstack.s3.amazonaws.com/uploads/images/gallery/2024-10/scaled-1680-/G4GNGTJkg3ctQy24-image.png)](https://cytechint-docs-bookstack.s3.amazonaws.com/uploads/images/gallery/2024-10/G4GNGTJkg3ctQy24-image.png)

Click 'Copy' to note down the client secret.

[![image.png](https://cytechint-docs-bookstack.s3.amazonaws.com/uploads/images/gallery/2024-10/scaled-1680-/iUXdH1ob40RzKe26-image.png)](https://cytechint-docs-bookstack.s3.amazonaws.com/uploads/images/gallery/2024-10/iUXdH1ob40RzKe26-image.png)

⚠️ **WARNING:** It is your responsibility to store your client ID and secret securely. If these are lost or stolen, an attacker will be able to call APIs on your behalf and steal your data or cause damage.

*If you need further assistance, kindly contact our support at <info@cytechint.com> for prompt assistance and guidance.*

# Sysmon for Linux

##### <span style="color: rgb(53, 152, 219);">**<span class="TextRun SCXW19830682 BCX8" data-contrast="none" lang="EN-US" xml:lang="EN-US"><span class="NormalTextRun SCXW19830682 BCX8" data-ccp-charstyle="Style (Complex) Open Sans" data-ccp-charstyle-defn="{"ObjectId":"fb243c3d-8d58-476b-afe6-4c755da5b3a7|139","ClassId":1073872969,"Properties":[201342446,"1",201342447,"5",201342448,"1",201342449,"1",469777841,"Open Sans",469777842,"Open Sans",469777843,"Calibri",469777844,"Open Sans",201341986,"1",469769226,"Open Sans",268442635,"22",335559704,"1037",335559705,"1033",335551547,"1033",335559740,"259",201341983,"0",335559739,"160",469775450,"Style (Complex) Open Sans",201340122,"1",134233614,"true",469778129,"StyleComplexOpenSans",335572020,"1",469778324,"Default Paragraph Font"]}">Introduction</span></span><span class="EOP SCXW19830682 BCX8" data-ccp-props="{"134245418":true,"134245529":true,"201341983":0,"335559738":240,"335559739":0,"335559740":360,"469777462":[720],"469777927":[0],"469777928":[8]}"> </span>**</span>

<span class="TextRun SCXW19830682 BCX8" data-contrast="auto" lang="EN-US" xml:lang="EN-US"><span class="NormalTextRun SCXW19830682 BCX8" data-ccp-charstyle="Style (Complex) Open Sans">The Sysmon for Linux integration allows you to </span><span class="NormalTextRun SCXW19830682 BCX8" data-ccp-charstyle="Style (Complex) Open Sans">monitor</span><span class="NormalTextRun SCXW19830682 BCX8" data-ccp-charstyle="Style (Complex) Open Sans"> the </span></span><span class="TextRun Underlined SCXW19830682 BCX8" data-contrast="auto" lang="EN-US" xml:lang="EN-US"><span class="NormalTextRun SCXW19830682 BCX8" data-ccp-charstyle="Style (Complex) Open Sans">Sysmon for Linux</span></span><span class="TextRun SCXW19830682 BCX8" data-contrast="auto" lang="EN-US" xml:lang="EN-US"><span class="NormalTextRun SCXW19830682 BCX8" data-ccp-charstyle="Style (Complex) Open Sans">, which is an open-source system </span><span class="NormalTextRun SCXW19830682 BCX8" data-ccp-charstyle="Style (Complex) Open Sans">monitor</span><span class="NormalTextRun SCXW19830682 BCX8" data-ccp-charstyle="Style (Complex) Open Sans"> tool developed to collect security events from Linux environments.</span></span><span class="EOP SCXW19830682 BCX8" data-ccp-props="{"201341983":0,"335559685":360,"335559739":160,"335559740":360}"> </span>

<span class="TextRun SCXW19830682 BCX8" data-contrast="auto" lang="EN-US" xml:lang="EN-US"><span class="NormalTextRun SCXW19830682 BCX8" data-ccp-charstyle="Style (Complex) Open Sans">Use the Sysmon for Linux integration to collect logs from </span><span class="NormalTextRun SpellingErrorV2Themed SCXW19830682 BCX8" data-ccp-charstyle="Style (Complex) Open Sans">linux</span><span class="NormalTextRun SCXW19830682 BCX8" data-ccp-charstyle="Style (Complex) Open Sans"> machine which has </span><span class="NormalTextRun SpellingErrorV2Themed SCXW19830682 BCX8" data-ccp-charstyle="Style (Complex) Open Sans">sysmon</span><span class="NormalTextRun SCXW19830682 BCX8" data-ccp-charstyle="Style (Complex) Open Sans"> tool running. Then visualize that data in Kibana, create alerts to </span><span class="NormalTextRun SCXW19830682 BCX8" data-ccp-charstyle="Style (Complex) Open Sans">notify you</span><span class="NormalTextRun SCXW19830682 BCX8" data-ccp-charstyle="Style (Complex) Open Sans"> if something goes wrong, and reference data when troubleshooting an issue.</span></span><span class="EOP SCXW19830682 BCX8" data-ccp-props="{"201341983":0,"335559685":360,"335559739":160,"335559740":360}"> </span>

<span class="TextRun SCXW19830682 BCX8" data-contrast="auto" lang="EN-US" xml:lang="EN-US"><span class="NormalTextRun SCXW19830682 BCX8" data-ccp-charstyle="Style (Complex) Open Sans">NOTE: To collect Sysmon events from Windows event log, use </span></span><span class="TextRun Underlined SCXW19830682 BCX8" data-contrast="auto" lang="EN-US" xml:lang="EN-US"><span class="NormalTextRun SCXW19830682 BCX8" data-ccp-charstyle="Style (Complex) Open Sans">Windows </span><span class="NormalTextRun SpellingErrorV2Themed SCXW19830682 BCX8" data-ccp-charstyle="Style (Complex) Open Sans">sysmon\_operational</span><span class="NormalTextRun SCXW19830682 BCX8" data-ccp-charstyle="Style (Complex) Open Sans"> data stream </span></span><span class="TextRun SCXW19830682 BCX8" data-contrast="auto" lang="EN-US" xml:lang="EN-US"><span class="NormalTextRun SCXW19830682 BCX8" data-ccp-charstyle="Style (Complex) Open Sans">instead.</span></span><span class="EOP SCXW19830682 BCX8" data-ccp-props="{"201341983":0,"335559685":360,"335559739":160,"335559740":360}"> </span>

<div class="SCXW19830682 BCX8" id="bkmrk-sysmon-for-linux--%C2%A0-"><div class="ListContainerWrapper SCXW19830682 BCX8">- [<span class="TextRun Highlight Underlined SCXW19830682 BCX8" data-contrast="none" lang="EN-US" xml:lang="EN-US"><span class="NormalTextRun SCXW19830682 BCX8" data-ccp-charstyle="Hyperlink">Sysmon for Linux</span></span>](https://github.com/Sysinternals/SysmonForLinux)<span class="TextRun Highlight SCXW19830682 BCX8" data-contrast="none" lang="EN-US" xml:lang="EN-US"><span class="NormalTextRun SCXW19830682 BCX8"> - </span></span> [<span class="TextRun Underlined SCXW19830682 BCX8" data-contrast="none" lang="EN-US" xml:lang="EN-US"><span class="NormalTextRun SCXW19830682 BCX8" data-ccp-charstyle="Hyperlink">https://github.com/Sysinternals/SysmonForLinux</span></span>](https://github.com/Sysinternals/SysmonForLinux)<span class="EOP SCXW19830682 BCX8" data-ccp-props="{"201341983":0,"335559685":1080,"335559739":160,"335559740":360}"> </span>
- [<span class="TextRun Highlight Underlined SCXW19830682 BCX8" data-contrast="none" lang="EN-US" xml:lang="EN-US"><span class="NormalTextRun SCXW19830682 BCX8" data-ccp-charstyle="Hyperlink">Windows </span></span><span class="TextRun Highlight SCXW19830682 BCX8" data-contrast="none" lang="EN-US" xml:lang="EN-US"><span class="NormalTextRun SCXW19830682 BCX8" data-ccp-charstyle="HTML Code">sysmon\_operational</span></span><span class="TextRun Highlight Underlined SCXW19830682 BCX8" data-contrast="none" lang="EN-US" xml:lang="EN-US"><span class="NormalTextRun SCXW19830682 BCX8" data-ccp-charstyle="Hyperlink"> data stream</span></span>](https://docs.elastic.co/en/integrations/windows#sysmonoperational)<span class="TextRun SCXW19830682 BCX8" data-contrast="auto" lang="EN-US" xml:lang="EN-US"><span class="NormalTextRun SCXW19830682 BCX8"> - </span><span class="NormalTextRun SCXW19830682 BCX8">https://docs.elastic.co/en/integrations/windows#sysmonoperational</span></span><span class="EOP SCXW19830682 BCX8" data-ccp-props="{"201341983":0,"335559685":1080,"335559739":160,"335559740":360}"> </span>

</div></div>##### <span style="color: rgb(53, 152, 219);">**<span class="TextRun SCXW19830682 BCX8" data-contrast="none" lang="EN-US" xml:lang="EN-US"><span class="NormalTextRun SCXW19830682 BCX8" data-ccp-charstyle="Style (Complex) Open Sans">Assumptions</span></span><span class="EOP SCXW19830682 BCX8" data-ccp-props="{"134245418":true,"134245529":true,"201341983":0,"335559738":240,"335559739":0,"335559740":360}"> </span>**</span>

<span class="TextRun SCXW19830682 BCX8" data-contrast="auto" lang="EN-US" xml:lang="EN-US"><span class="NormalTextRun SCXW19830682 BCX8" data-ccp-charstyle="Style (Complex) Open Sans">The procedures described in Section 3 </span><span class="NormalTextRun ContextualSpellingAndGrammarErrorV2Themed SCXW19830682 BCX8" data-ccp-charstyle="Style (Complex) Open Sans">assumes</span><span class="NormalTextRun SCXW19830682 BCX8" data-ccp-charstyle="Style (Complex) Open Sans"> that a Log Collector has already been </span><span class="NormalTextRun ContextualSpellingAndGrammarErrorV2Themed SCXW19830682 BCX8" data-ccp-charstyle="Style (Complex) Open Sans">setup</span><span class="NormalTextRun SCXW19830682 BCX8" data-ccp-charstyle="Style (Complex) Open Sans">. </span></span><span class="EOP SCXW19830682 BCX8" data-ccp-props="{"201341983":0,"335559685":360,"335559739":160,"335559740":259}"> </span>

<div class="SCXW19830682 BCX8" id="bkmrk-"><div class="OutlineElement Ltr SCXW19830682 BCX8">  
</div><div class="ListContainerWrapper SCXW19830682 BCX8">  
</div></div>##### <span style="color: rgb(53, 152, 219);">**<span class="TextRun SCXW19830682 BCX8" data-contrast="none" lang="EN-US" xml:lang="EN-US"><span class="NormalTextRun SCXW19830682 BCX8" data-ccp-charstyle="Style (Complex) Open Sans">Requirements</span></span><span class="EOP SCXW19830682 BCX8" data-ccp-props="{"134245418":true,"134245529":true,"201341983":0,"335559738":240,"335559739":0,"335559740":360}"> </span>**</span>

**<span class="TextRun SCXW19830682 BCX8" data-contrast="auto" lang="EN-US" xml:lang="EN-US"><span class="NormalTextRun SCXW19830682 BCX8" data-ccp-charstyle="Style (Complex) Open Sans">Setup</span></span><span class="EOP SCXW19830682 BCX8" data-ccp-props="{"201341983":0,"335559685":360,"335559739":160,"335559740":360}"> </span>**

<span class="TextRun SCXW19830682 BCX8" data-contrast="auto" lang="EN-US" xml:lang="EN-US"><span class="NormalTextRun SCXW19830682 BCX8" data-ccp-charstyle="Style (Complex) Open Sans">For step-by-step instructions on how to set up an integration, see the Getting started guide.</span></span><span class="EOP SCXW19830682 BCX8" data-ccp-props="{"201341983":0,"335559685":360,"335559739":160,"335559740":360}"> </span>

<div class="SCXW19830682 BCX8" id="bkmrk-https%3A%2F%2Fwww.elastic."><div class="ListContainerWrapper SCXW19830682 BCX8">- [<span class="TextRun Underlined SCXW19830682 BCX8" data-contrast="none" lang="EN-US" xml:lang="EN-US"><span class="NormalTextRun SCXW19830682 BCX8" data-ccp-charstyle="Hyperlink">https://www.elastic.co/guide/en/welcome-to-elastic/current/getting-started-observability.html</span></span>](https://www.elastic.co/guide/en/welcome-to-elastic/current/getting-started-observability.html)<span class="EOP SCXW19830682 BCX8" data-ccp-props="{"201341983":0,"335559739":160,"335559740":360}"> </span>

</div></div>**<span class="TextRun SCXW19830682 BCX8" data-contrast="auto" lang="EN-US" xml:lang="EN-US"><span class="NormalTextRun SCXW19830682 BCX8" data-ccp-charstyle="Style (Complex) Open Sans">Data streams</span></span><span class="EOP SCXW19830682 BCX8" data-ccp-props="{"201341983":0,"335559685":360,"335559739":160,"335559740":360}"> </span>**

<span class="TextRun SCXW19830682 BCX8" data-contrast="auto" lang="EN-US" xml:lang="EN-US"><span class="NormalTextRun SCXW19830682 BCX8" data-ccp-charstyle="Style (Complex) Open Sans">The Sysmon for Linux log data stream provides events from logs produced by Sysmon tool running on Linux machine.</span></span><span class="EOP SCXW19830682 BCX8" data-ccp-props="{"201341983":0,"335559685":360,"335559739":160,"335559740":360}"> </span>

**<span class="TextRun SCXW19830682 BCX8" data-contrast="none" lang="EN-US" xml:lang="EN-US"><span class="NormalTextRun SCXW19830682 BCX8" data-ccp-charstyle="Style (Complex) Open Sans">Sysmon for Linux</span> <span class="NormalTextRun SCXW19830682 BCX8" data-ccp-charstyle="Style (Complex) Open Sans">I</span><span class="NormalTextRun SCXW19830682 BCX8" data-ccp-charstyle="Style (Complex) Open Sans">ntegration</span></span><span class="EOP SCXW19830682 BCX8" data-ccp-props="{"134245418":true,"134245529":true,"201341983":0,"335559738":240,"335559739":0,"335559740":360}"> </span>**

<span class="TextRun Highlight SCXW19830682 BCX8" data-contrast="none" lang="EN-US" xml:lang="EN-US"><span class="NormalTextRun SCXW19830682 BCX8" data-ccp-charstyle="normaltextrun" data-ccp-charstyle-defn="{"ObjectId":"fb243c3d-8d58-476b-afe6-4c755da5b3a7|155","ClassId":1073872969,"Properties":[201342446,"1",201342447,"5",201342448,"1",201342449,"1",469777841,"Calibri",469777842,"Arial",469777843,"Calibri",469777844,"Calibri",201341986,"1",469769226,"Calibri,Arial",268442635,"22",335559704,"1037",335559705,"1033",335551547,"1033",335559740,"259",201341983,"0",335559739,"160",469775450,"normaltextrun",201340122,"1",134233614,"true",469778129,"normaltextrun",335572020,"1",469778324,"Default Paragraph Font"]}">Please provide the following information to </span><span class="NormalTextRun SpellingErrorV2Themed SCXW19830682 BCX8" data-ccp-charstyle="normaltextrun">CyTech</span><span class="NormalTextRun SCXW19830682 BCX8" data-ccp-charstyle="normaltextrun">:</span></span><span class="TextRun Highlight SCXW19830682 BCX8" data-contrast="none" lang="EN-US" xml:lang="EN-US"><span class="NormalTextRun SCXW19830682 BCX8" data-ccp-charstyle="normaltextrun"> </span></span><span class="TextRun Highlight SCXW19830682 BCX8" data-contrast="none" lang="EN-US" xml:lang="EN-US"><span class="NormalTextRun SCXW19830682 BCX8" data-ccp-charstyle="eop" data-ccp-charstyle-defn="{"ObjectId":"fb243c3d-8d58-476b-afe6-4c755da5b3a7|156","ClassId":1073872969,"Properties":[201342446,"1",201342447,"5",201342448,"1",201342449,"1",469777841,"Calibri",469777842,"Arial",469777843,"Calibri",469777844,"Calibri",201341986,"1",469769226,"Calibri,Arial",268442635,"22",335559704,"1037",335559705,"1033",335551547,"1033",335559740,"259",201341983,"0",335559739,"160",469775450,"eop",201340122,"1",134233614,"true",469778129,"eop",335572020,"1",469778324,"Default Paragraph Font"]}"> </span></span><span class="EOP SCXW19830682 BCX8" data-ccp-props="{"201341983":0,"335559685":360,"335559739":160,"335559740":259}"> </span>

<span class="TextRun SCXW19830682 BCX8" data-contrast="none" lang="EN-US" xml:lang="EN-US"><span class="NormalTextRun SCXW19830682 BCX8" data-ccp-charstyle="Style (Complex) Open Sans">Collect Sysmon for Linux logs</span> <span class="NormalTextRun SCXW19830682 BCX8" data-ccp-charstyle="Style (Complex) Open Sans">(Enable Yes/No)</span></span><span class="EOP SCXW19830682 BCX8" data-ccp-props="{"134245418":true,"134245529":true,"201341983":0,"335559685":720,"335559738":240,"335559739":0,"335559740":360}"> </span>

<div class="SCXW19830682 BCX8" id="bkmrk-paths---%2Fvar%2Flog%2Fsys"><div class="ListContainerWrapper SCXW19830682 BCX8">1. <span class="TextRun SCXW19830682 BCX8" data-contrast="auto" lang="EN-US" xml:lang="EN-US"><span class="NormalTextRun SCXW19830682 BCX8">Pat</span><span class="NormalTextRun SCXW19830682 BCX8">hs - </span><span class="NormalTextRun SCXW19830682 BCX8">/var/log/</span><span class="NormalTextRun SpellingErrorV2Themed SCXW19830682 BCX8">sysmon</span><span class="NormalTextRun SCXW19830682 BCX8">\*</span></span><span class="EOP SCXW19830682 BCX8" data-ccp-props="{"201341983":0,"335559739":160,"335559740":360}"> </span>

</div></div>

# System Integrations

##### <span style="color: rgb(53, 152, 219);">**<span class="TextRun SCXW123406393 BCX8" data-contrast="none" lang="EN-US" xml:lang="EN-US"><span class="NormalTextRun SCXW123406393 BCX8" data-ccp-charstyle="Style (Complex) Open Sans" data-ccp-charstyle-defn="{"ObjectId":"011413d7-f200-446b-a233-32f2b524db20|39","ClassId":1073872969,"Properties":[201342446,"1",201342447,"5",201342448,"1",201342449,"1",469777841,"Open Sans",469777842,"Open Sans",469777843,"Calibri",469777844,"Open Sans",201341986,"1",469769226,"Open Sans",268442635,"22",335559704,"1037",335559705,"1033",335551547,"1033",335559740,"259",201341983,"0",335559739,"160",469775450,"Style (Complex) Open Sans",201340122,"1",134233614,"true",469778129,"StyleComplexOpenSans",335572020,"1",469778324,"Default Paragraph Font"]}">Introduction</span></span><span class="EOP SCXW123406393 BCX8" data-ccp-props="{"134245418":true,"134245529":true,"201341983":0,"335559685":720,"335559738":240,"335559739":0,"335559740":360,"469777462":[720],"469777927":[0],"469777928":[8]}"> </span>**</span>

<span class="TextRun SCXW123406393 BCX8" data-contrast="auto" lang="EN-US" xml:lang="EN-US"><span class="NormalTextRun SCXW123406393 BCX8" data-ccp-charstyle="Style (Complex) Open Sans">The System integration allows you to </span><span class="NormalTextRun SCXW123406393 BCX8" data-ccp-charstyle="Style (Complex) Open Sans">monitor</span><span class="NormalTextRun SCXW123406393 BCX8" data-ccp-charstyle="Style (Complex) Open Sans"> servers, personal computers, and more.</span></span><span class="EOP SCXW123406393 BCX8" data-ccp-props="{"201341983":0,"335559685":720,"335559739":160,"335559740":360}"> </span>

<span class="TextRun SCXW123406393 BCX8" data-contrast="auto" lang="EN-US" xml:lang="EN-US"><span class="NormalTextRun SCXW123406393 BCX8" data-ccp-charstyle="Style (Complex) Open Sans">Use the System integration to collect metrics and logs from your machines. Then visualize that data in Kibana, create alerts to </span><span class="NormalTextRun SCXW123406393 BCX8" data-ccp-charstyle="Style (Complex) Open Sans">notify you</span><span class="NormalTextRun SCXW123406393 BCX8" data-ccp-charstyle="Style (Complex) Open Sans"> if something goes wrong, and reference data when troubleshooting an issue.</span></span><span class="EOP SCXW123406393 BCX8" data-ccp-props="{"201341983":0,"335559685":720,"335559739":160,"335559740":360}"> </span>

<span class="TextRun SCXW123406393 BCX8" data-contrast="auto" lang="EN-US" xml:lang="EN-US"><span class="NormalTextRun SCXW123406393 BCX8" data-ccp-charstyle="Style (Complex) Open Sans">For example, if you wanted to be notified when less than 10% of the disk space is still available, you could install the System integration to send file system metrics to Elastic. Then, you could view real-time updates to disk space used on your system in Kibana's \[Metrics System\] Overview dashboard. You could also set up a new rule in the Elastic Observability Metrics app to alert you when the percent free is less than 10% of the total disk space.</span></span><span class="EOP SCXW123406393 BCX8" data-ccp-props="{"201341983":0,"335559685":720,"335559739":160,"335559740":360}"> </span>

<span style="color: rgb(53, 152, 219);"><span class="TextRun SCXW123406393 BCX8" data-contrast="auto" lang="EN-US" xml:lang="EN-US"><span class="NormalTextRun SCXW123406393 BCX8" data-ccp-charstyle="Style (Complex) Open Sans">Data streams</span></span><span class="EOP SCXW123406393 BCX8" data-ccp-props="{"201341983":0,"335559685":720,"335559739":160,"335559740":360}"> </span></span>

<span class="TextRun SCXW123406393 BCX8" data-contrast="auto" lang="EN-US" xml:lang="EN-US"><span class="NormalTextRun SCXW123406393 BCX8" data-ccp-charstyle="Style (Complex) Open Sans">The System integration collects two types of data: logs and metrics.</span></span><span class="EOP SCXW123406393 BCX8" data-ccp-props="{"201341983":0,"335559685":720,"335559739":160,"335559740":360}"> </span>

<span class="TextRun SCXW123406393 BCX8" data-contrast="auto" lang="EN-US" xml:lang="EN-US"><span class="NormalTextRun SCXW123406393 BCX8" data-ccp-charstyle="Style (Complex) Open Sans">Logs help you keep a record of events that happen on your machine. Log data streams collected by the System integration include application, system, and security events on machines running Windows and auth and syslog events on machines running macOS or Linux. See more details in the </span></span><span class="TextRun Underlined SCXW123406393 BCX8" data-contrast="auto" lang="EN-US" xml:lang="EN-US"><span class="NormalTextRun SCXW123406393 BCX8" data-ccp-charstyle="Style (Complex) Open Sans">Logs reference</span></span><span class="TextRun SCXW123406393 BCX8" data-contrast="auto" lang="EN-US" xml:lang="EN-US"><span class="NormalTextRun SCXW123406393 BCX8" data-ccp-charstyle="Style (Complex) Open Sans">.</span></span><span class="EOP SCXW123406393 BCX8" data-ccp-props="{"201341983":0,"335559685":720,"335559739":160,"335559740":360}"> </span>

<div class="SCXW123406393 BCX8" id="bkmrk-https%3A%2F%2Faquila-elk.k"><div class="ListContainerWrapper SCXW123406393 BCX8">- <span style="color: rgb(53, 152, 219);"><span class="TextRun SCXW123406393 BCX8" data-contrast="auto" lang="EN-US" xml:lang="EN-US"><span class="NormalTextRun SCXW123406393 BCX8" data-ccp-charstyle="Style (Complex) Open Sans">https://aquila-elk.kb.us-east-1.aws.found.io:9243/app/integrations/detail/system-1.20.4/overview#logs-reference</span></span><span class="EOP SCXW123406393 BCX8" data-ccp-props="{"201341983":0,"335559739":160,"335559740":360}"> </span></span>

</div><div class="OutlineElement Ltr SCXW123406393 BCX8">  
</div></div><span class="TextRun SCXW123406393 BCX8" data-contrast="auto" lang="EN-US" xml:lang="EN-US"><span class="NormalTextRun SCXW123406393 BCX8" data-ccp-charstyle="Style (Complex) Open Sans">Metrics give </span><span class="NormalTextRun ContextualSpellingAndGrammarErrorV2Themed SCXW123406393 BCX8" data-ccp-charstyle="Style (Complex) Open Sans">you</span><span class="NormalTextRun SCXW123406393 BCX8" data-ccp-charstyle="Style (Complex) Open Sans"> insight into the state of the machine. Metric data streams collected by the System integration include CPU usage, load statistics, memory usage, information on network behavior, and more. See more details in the </span></span><span class="TextRun Underlined SCXW123406393 BCX8" data-contrast="auto" lang="EN-US" xml:lang="EN-US"><span class="NormalTextRun SCXW123406393 BCX8" data-ccp-charstyle="Style (Complex) Open Sans">Metrics reference</span></span><span class="TextRun SCXW123406393 BCX8" data-contrast="auto" lang="EN-US" xml:lang="EN-US"><span class="NormalTextRun SCXW123406393 BCX8" data-ccp-charstyle="Style (Complex) Open Sans">.</span></span><span class="EOP SCXW123406393 BCX8" data-ccp-props="{"201341983":0,"335559685":720,"335559739":160,"335559740":360}"> </span>

<div class="SCXW123406393 BCX8" id="bkmrk-https%3A%2F%2Faquila-elk.k-1"><div class="ListContainerWrapper SCXW123406393 BCX8">- <span style="color: rgb(53, 152, 219);"><span class="TextRun SCXW123406393 BCX8" data-contrast="auto" lang="EN-US" xml:lang="EN-US"><span class="NormalTextRun SCXW123406393 BCX8" data-ccp-charstyle="Style (Complex) Open Sans">https://aquila-elk.kb.us-east-1.aws.found.io:9243/app/integrations/detail/system-1.20.4/overview#metrics-reference</span></span><span class="EOP SCXW123406393 BCX8" data-ccp-props="{"201341983":0,"335559739":160,"335559740":360}"> </span></span>

</div><div class="OutlineElement Ltr SCXW123406393 BCX8">  
</div></div><span class="TextRun SCXW123406393 BCX8" data-contrast="auto" lang="EN-US" xml:lang="EN-US"><span class="NormalTextRun SCXW123406393 BCX8" data-ccp-charstyle="Style (Complex) Open Sans">You can enable and disable individual data streams. If all data streams are disabled and the System integration is still enabled, Fleet uses the default data streams.</span></span><span class="EOP SCXW123406393 BCX8" data-ccp-props="{"201341983":0,"335559685":720,"335559739":160,"335559740":360}"> </span>

<div class="SCXW123406393 BCX8" id="bkmrk-"><div class="OutlineElement Ltr SCXW123406393 BCX8">  
</div><div class="ListContainerWrapper SCXW123406393 BCX8">  
</div></div>##### <span style="color: rgb(53, 152, 219);">**<span class="TextRun SCXW123406393 BCX8" data-contrast="none" lang="EN-US" xml:lang="EN-US"><span class="NormalTextRun SCXW123406393 BCX8" data-ccp-charstyle="Style (Complex) Open Sans">Assumptions</span></span><span class="EOP SCXW123406393 BCX8" data-ccp-props="{"134245418":true,"134245529":true,"201341983":0,"335559685":720,"335559738":240,"335559739":0,"335559740":360,"469777462":[720],"469777927":[0],"469777928":[8]}"> </span>**</span>

<span class="TextRun SCXW123406393 BCX8" data-contrast="auto" lang="EN-US" xml:lang="EN-US"><span class="NormalTextRun SCXW123406393 BCX8" data-ccp-charstyle="Style (Complex) Open Sans">The procedures described in Section 3 </span><span class="NormalTextRun ContextualSpellingAndGrammarErrorV2Themed SCXW123406393 BCX8" data-ccp-charstyle="Style (Complex) Open Sans">assumes</span><span class="NormalTextRun SCXW123406393 BCX8" data-ccp-charstyle="Style (Complex) Open Sans"> that a Log Collector has already been </span><span class="NormalTextRun ContextualSpellingAndGrammarErrorV2Themed SCXW123406393 BCX8" data-ccp-charstyle="Style (Complex) Open Sans">setup</span><span class="NormalTextRun SCXW123406393 BCX8" data-ccp-charstyle="Style (Complex) Open Sans">. </span></span><span class="EOP SCXW123406393 BCX8" data-ccp-props="{"201341983":0,"335559685":720,"335559739":160,"335559740":360}"> </span>

<div class="SCXW123406393 BCX8" id="bkmrk--1"><div class="OutlineElement Ltr SCXW123406393 BCX8">  
</div><div class="ListContainerWrapper SCXW123406393 BCX8">  
</div></div>##### <span style="color: rgb(53, 152, 219);">**<span class="TextRun SCXW123406393 BCX8" data-contrast="none" lang="EN-US" xml:lang="EN-US"><span class="NormalTextRun SCXW123406393 BCX8" data-ccp-charstyle="Style (Complex) Open Sans">Requirements</span></span><span class="EOP SCXW123406393 BCX8" data-ccp-props="{"134245418":true,"134245529":true,"201341983":0,"335559685":720,"335559738":240,"335559739":0,"335559740":360,"469777462":[720],"469777927":[0],"469777928":[8]}"> </span>**</span>

<span class="TextRun SCXW123406393 BCX8" data-contrast="auto" lang="EN-US" xml:lang="EN-US"><span class="NormalTextRun SCXW123406393 BCX8" data-ccp-charstyle="Style (Complex) Open Sans">You need Elasticsearch for storing and searching your data and Kibana for visualizing and managing it. You can use our hosted Elasticsearch Service on Elastic Cloud, which is recommended, or self-manage the Elastic Stack on your own hardware.</span></span><span class="EOP SCXW123406393 BCX8" data-ccp-props="{"201341983":0,"335559685":720,"335559739":160,"335559740":259}"> </span>

<span class="TextRun SCXW123406393 BCX8" data-contrast="auto" lang="EN-US" xml:lang="EN-US"><span class="NormalTextRun SCXW123406393 BCX8" data-ccp-charstyle="Style (Complex) Open Sans">Each data stream collects </span><span class="NormalTextRun SCXW123406393 BCX8" data-ccp-charstyle="Style (Complex) Open Sans">different kinds</span><span class="NormalTextRun SCXW123406393 BCX8" data-ccp-charstyle="Style (Complex) Open Sans"> of metric data, which may require dedicated permissions to be fetched and which may vary across operating systems. Details on the permissions needed for each data stream are available in the </span></span><span class="TextRun Underlined SCXW123406393 BCX8" data-contrast="auto" lang="EN-US" xml:lang="EN-US"><span class="NormalTextRun SCXW123406393 BCX8" data-ccp-charstyle="Style (Complex) Open Sans">Metrics reference</span></span><span class="TextRun SCXW123406393 BCX8" data-contrast="auto" lang="EN-US" xml:lang="EN-US"><span class="NormalTextRun SCXW123406393 BCX8" data-ccp-charstyle="Style (Complex) Open Sans">.</span></span><span class="EOP SCXW123406393 BCX8" data-ccp-props="{"201341983":0,"335559685":720,"335559739":160,"335559740":259}"> </span>

<div class="SCXW123406393 BCX8" id="bkmrk-https%3A%2F%2Faquila-elk.k-2"><div class="OutlineElement Ltr SCXW123406393 BCX8">  
</div><div class="ListContainerWrapper SCXW123406393 BCX8">- <span style="color: rgb(53, 152, 219);"><span class="TextRun SCXW123406393 BCX8" data-contrast="auto" lang="EN-US" xml:lang="EN-US"><span class="NormalTextRun SCXW123406393 BCX8" data-ccp-charstyle="Style (Complex) Open Sans">https://aquila-elk.kb.us-east-1.aws.found.io:9243/app/integrations/detail/system-1.20.4/overview#metrics-reference</span></span><span class="EOP SCXW123406393 BCX8" data-ccp-props="{"201341983":0,"335559739":160,"335559740":259}"> </span></span>

</div></div><span style="color: rgb(53, 152, 219);"><span class="TextRun SCXW123406393 BCX8" data-contrast="auto" lang="EN-US" xml:lang="EN-US"><span class="NormalTextRun SCXW123406393 BCX8" data-ccp-charstyle="Style (Complex) Open Sans">Setup</span></span><span class="EOP SCXW123406393 BCX8" data-ccp-props="{"201341983":0,"335559685":720,"335559739":160,"335559740":259}"> </span></span>

<span class="TextRun SCXW123406393 BCX8" data-contrast="auto" lang="EN-US" xml:lang="EN-US"><span class="NormalTextRun SCXW123406393 BCX8" data-ccp-charstyle="Style (Complex) Open Sans">For step-by-step instructions on how to set up an integration, see the </span></span><span class="TextRun Underlined SCXW123406393 BCX8" data-contrast="auto" lang="EN-US" xml:lang="EN-US"><span class="NormalTextRun SCXW123406393 BCX8" data-ccp-charstyle="Style (Complex) Open Sans">Getting started</span></span><span class="TextRun SCXW123406393 BCX8" data-contrast="auto" lang="EN-US" xml:lang="EN-US"><span class="NormalTextRun SCXW123406393 BCX8" data-ccp-charstyle="Style (Complex) Open Sans"> guide.</span></span><span class="EOP SCXW123406393 BCX8" data-ccp-props="{"201341983":0,"335559685":720,"335559739":160,"335559740":259}"> </span>

<div class="SCXW123406393 BCX8" id="bkmrk-https%3A%2F%2Fwww.elastic."><div class="ListContainerWrapper SCXW123406393 BCX8">- <span style="color: rgb(53, 152, 219);"><span class="TextRun SCXW123406393 BCX8" data-contrast="auto" lang="EN-US" xml:lang="EN-US"><span class="NormalTextRun SCXW123406393 BCX8" data-ccp-charstyle="Style (Complex) Open Sans">https://www.elastic.co/guide/en/welcome-to-elastic/current/getting-started-observability.html</span></span><span class="EOP SCXW123406393 BCX8" data-ccp-props="{"201341983":0,"335559739":160,"335559740":259}"> </span></span>

</div><div class="OutlineElement Ltr SCXW123406393 BCX8">  
</div></div><span style="color: rgb(53, 152, 219);"><span class="TextRun SCXW123406393 BCX8" data-contrast="auto" lang="EN-US" xml:lang="EN-US"><span class="NormalTextRun SCXW123406393 BCX8" data-ccp-charstyle="Style (Complex) Open Sans">Troubleshooting</span></span><span class="EOP SCXW123406393 BCX8" data-ccp-props="{"201341983":0,"335559685":720,"335559739":160,"335559740":259}"> </span></span>

<span class="TextRun SCXW123406393 BCX8" data-contrast="auto" lang="EN-US" xml:lang="EN-US"><span class="NormalTextRun SCXW123406393 BCX8" data-ccp-charstyle="Style (Complex) Open Sans">Note that certain data streams may access /proc to gather process information, and the resulting </span><span class="NormalTextRun SpellingErrorV2Themed SCXW123406393 BCX8" data-ccp-charstyle="Style (Complex) Open Sans">ptrace\_may\_access</span><span class="NormalTextRun SCXW123406393 BCX8" data-ccp-charstyle="Style (Complex) Open Sans">() call by the kernel to check for permissions can be blocked by </span></span><span class="TextRun Underlined SCXW123406393 BCX8" data-contrast="auto" lang="EN-US" xml:lang="EN-US"><span class="NormalTextRun SpellingErrorV2Themed SCXW123406393 BCX8" data-ccp-charstyle="Style (Complex) Open Sans">AppArmor</span><span class="NormalTextRun SCXW123406393 BCX8" data-ccp-charstyle="Style (Complex) Open Sans"> and other LSM software</span></span><span class="TextRun SCXW123406393 BCX8" data-contrast="auto" lang="EN-US" xml:lang="EN-US"><span class="NormalTextRun SCXW123406393 BCX8" data-ccp-charstyle="Style (Complex) Open Sans">, even though the System module </span><span class="NormalTextRun SCXW123406393 BCX8" data-ccp-charstyle="Style (Complex) Open Sans">doesn't</span><span class="NormalTextRun SCXW123406393 BCX8" data-ccp-charstyle="Style (Complex) Open Sans"> use </span><span class="NormalTextRun SpellingErrorV2Themed SCXW123406393 BCX8" data-ccp-charstyle="Style (Complex) Open Sans">ptrace</span><span class="NormalTextRun SCXW123406393 BCX8" data-ccp-charstyle="Style (Complex) Open Sans"> directly.</span></span><span class="EOP SCXW123406393 BCX8" data-ccp-props="{"201341983":0,"335559685":720,"335559739":160,"335559740":259}"> </span>

<div class="SCXW123406393 BCX8" id="bkmrk-https%3A%2F%2Fgitlab.com%2Fa"><div class="ListContainerWrapper SCXW123406393 BCX8">- <span style="color: rgb(53, 152, 219);"><span class="TextRun SCXW123406393 BCX8" data-contrast="auto" lang="EN-US" xml:lang="EN-US"><span class="NormalTextRun SCXW123406393 BCX8" data-ccp-charstyle="Style (Complex) Open Sans">https://gitlab.com/apparmor/apparmor/wikis/TechnicalDoc\_Proc\_and\_ptrace</span></span><span class="EOP SCXW123406393 BCX8" data-ccp-props="{"201341983":0,"335559739":160,"335559740":259}"> </span></span>

</div></div><span class="TextRun SCXW123406393 BCX8" data-contrast="auto" lang="EN-US" xml:lang="EN-US"><span class="NormalTextRun SCXW123406393 BCX8" data-ccp-charstyle="Style (Complex) Open Sans">In addition, when running inside a container the proc filesystem directory of the host should be set using </span><span class="NormalTextRun SpellingErrorV2Themed SCXW123406393 BCX8" data-ccp-charstyle="Style (Complex) Open Sans">system.hostfs</span><span class="NormalTextRun SCXW123406393 BCX8" data-ccp-charstyle="Style (Complex) Open Sans"> setting to /</span><span class="NormalTextRun SpellingErrorV2Themed SCXW123406393 BCX8" data-ccp-charstyle="Style (Complex) Open Sans">hostfs</span><span class="NormalTextRun SCXW123406393 BCX8" data-ccp-charstyle="Style (Complex) Open Sans">.</span></span><span class="EOP SCXW123406393 BCX8" data-ccp-props="{"201341983":0,"335559685":720,"335559739":160,"335559740":259}"> </span>

<span style="color: rgb(53, 152, 219);"><span class="TextRun SCXW123406393 BCX8" data-contrast="auto" lang="EN-US" xml:lang="EN-US"><span class="NormalTextRun SCXW123406393 BCX8" data-ccp-charstyle="Style (Complex) Open Sans">Logs reference</span></span><span class="EOP SCXW123406393 BCX8" data-ccp-props="{"201341983":0,"335559685":720,"335559739":160,"335559740":259}"> </span></span>

<span style="color: rgb(53, 152, 219);"><span class="TextRun SCXW123406393 BCX8" data-contrast="auto" lang="EN-US" xml:lang="EN-US"><span class="NormalTextRun SCXW123406393 BCX8" data-ccp-charstyle="Style (Complex) Open Sans">Application</span></span><span class="EOP SCXW123406393 BCX8" data-ccp-props="{"201341983":0,"335559685":720,"335559739":160,"335559740":259}"> </span></span>

<span class="TextRun SCXW123406393 BCX8" data-contrast="auto" lang="EN-US" xml:lang="EN-US"><span class="NormalTextRun SCXW123406393 BCX8" data-ccp-charstyle="Style (Complex) Open Sans">The Windows application data stream provides events from the Windows Application event log.</span></span><span class="EOP SCXW123406393 BCX8" data-ccp-props="{"201341983":0,"335559685":720,"335559739":160,"335559740":259}"> </span>

<span style="color: rgb(53, 152, 219);"><span class="TextRun SCXW123406393 BCX8" data-contrast="auto" lang="EN-US" xml:lang="EN-US"><span class="NormalTextRun SCXW123406393 BCX8" data-ccp-charstyle="Style (Complex) Open Sans">SUPPORTED OPERATING SYSTEMS</span></span><span class="EOP SCXW123406393 BCX8" data-ccp-props="{"201341983":0,"335559685":720,"335559739":160,"335559740":259}"> </span></span>

<div class="SCXW123406393 BCX8" id="bkmrk-windows%C2%A0"><div class="ListContainerWrapper SCXW123406393 BCX8">- <span style="color: rgb(53, 152, 219);"><span class="TextRun SCXW123406393 BCX8" data-contrast="auto" lang="EN-US" xml:lang="EN-US"><span class="NormalTextRun SCXW123406393 BCX8" data-ccp-charstyle="Style (Complex) Open Sans">Windows</span></span><span class="EOP SCXW123406393 BCX8" data-ccp-props="{"201341983":0,"335559739":160,"335559740":259}"> </span></span>

</div><div class="ListContainerWrapper SCXW123406393 BCX8">  
</div></div>##### <span style="color: rgb(53, 152, 219);">**<span class="TextRun SCXW123406393 BCX8" data-contrast="none" lang="EN-US" xml:lang="EN-US"><span class="NormalTextRun SCXW123406393 BCX8" data-ccp-charstyle="Style (Complex) Open Sans">System</span><span class="NormalTextRun SCXW123406393 BCX8" data-ccp-charstyle="Style (Complex) Open Sans"> Integration Procedures</span></span><span class="EOP SCXW123406393 BCX8" data-ccp-props="{"134245418":true,"134245529":true,"201341983":0,"335559685":720,"335559738":240,"335559739":0,"335559740":360,"469777462":[720],"469777927":[0],"469777928":[8]}"> </span>**</span>

<div class="SCXW123406393 BCX8" id="bkmrk--2"><div class="ListContainerWrapper SCXW123406393 BCX8">  
</div><div class="OutlineElement Ltr SCXW123406393 BCX8">  
</div></div><span class="TextRun Highlight SCXW123406393 BCX8" data-contrast="none" lang="EN-US" xml:lang="EN-US"><span class="NormalTextRun SCXW123406393 BCX8" data-ccp-charstyle="normaltextrun" data-ccp-charstyle-defn="{"ObjectId":"011413d7-f200-446b-a233-32f2b524db20|56","ClassId":1073872969,"Properties":[201342446,"1",201342447,"5",201342448,"1",201342449,"1",469777841,"Calibri",469777842,"Arial",469777843,"Calibri",469777844,"Calibri",201341986,"1",469769226,"Calibri,Arial",268442635,"22",335559704,"1037",335559705,"1033",335551547,"1033",335559740,"259",201341983,"0",335559739,"160",469775450,"normaltextrun",201340122,"1",134233614,"true",469778129,"normaltextrun",335572020,"1",469778324,"Default Paragraph Font"]}">Please provide the following information to </span><span class="NormalTextRun SpellingErrorV2Themed SCXW123406393 BCX8" data-ccp-charstyle="normaltextrun">CyTech</span><span class="NormalTextRun SCXW123406393 BCX8" data-ccp-charstyle="normaltextrun">:</span></span><span class="TextRun Highlight SCXW123406393 BCX8" data-contrast="none" lang="EN-US" xml:lang="EN-US"><span class="NormalTextRun SCXW123406393 BCX8" data-ccp-charstyle="normaltextrun"> </span></span><span class="TextRun Highlight SCXW123406393 BCX8" data-contrast="none" lang="EN-US" xml:lang="EN-US"><span class="NormalTextRun SCXW123406393 BCX8" data-ccp-charstyle="eop" data-ccp-charstyle-defn="{"ObjectId":"011413d7-f200-446b-a233-32f2b524db20|57","ClassId":1073872969,"Properties":[201342446,"1",201342447,"5",201342448,"1",201342449,"1",469777841,"Calibri",469777842,"Arial",469777843,"Calibri",469777844,"Calibri",201341986,"1",469769226,"Calibri,Arial",268442635,"22",335559704,"1037",335559705,"1033",335551547,"1033",335559740,"259",201341983,"0",335559739,"160",469775450,"eop",201340122,"1",134233614,"true",469778129,"eop",335572020,"1",469778324,"Default Paragraph Font"]}"> </span></span>

<span style="color: rgb(53, 152, 219);">**<span class="TextRun SCXW123406393 BCX8" data-contrast="none" lang="EN-US" xml:lang="EN-US"><span class="NormalTextRun SCXW123406393 BCX8" data-ccp-charstyle="Style (Complex) Open Sans">Collect logs from System instances</span><span class="NormalTextRun SCXW123406393 BCX8" data-ccp-charstyle="Style (Complex) Open Sans"> (Enable Yes/No)</span><span class="NormalTextRun SCXW123406393 BCX8" data-ccp-charstyle="Style (Complex) Open Sans"> </span></span><span class="EOP SCXW123406393 BCX8" data-ccp-props="{"134245418":true,"134245529":true,"201341983":0,"335559685":360,"335559738":40,"335559739":0,"335559740":360}"> </span>**</span>

##### <span style="color: rgb(53, 152, 219);">**<span class="TextRun SCXW123406393 BCX8" data-contrast="auto" lang="EN-US" xml:lang="EN-US"><span class="NormalTextRun SCXW123406393 BCX8" data-ccp-charstyle="Style (Complex) Open Sans">System auth logs (log)</span><span class="NormalTextRun SCXW123406393 BCX8" data-ccp-charstyle="Style (Complex) Open Sans"> (Enable Yes/No)</span></span>**<span class="EOP SCXW123406393 BCX8" data-ccp-props="{"201341983":0,"335559739":160,"335559740":360}"> </span></span>

<div class="SCXW123406393 BCX8" id="bkmrk-collect-system-auth-"><div class="ListContainerWrapper SCXW123406393 BCX8">  
</div><div class="ListContainerWrapper SCXW123406393 BCX8">- - - **<span style="color: rgb(53, 152, 219);"><span class="TextRun SCXW123406393 BCX8" data-contrast="auto" lang="EN-US" xml:lang="EN-US"><span class="NormalTextRun SCXW123406393 BCX8" data-ccp-charstyle="Style (Complex) Open Sans">Collect System auth logs using log input.</span></span><span class="EOP SCXW123406393 BCX8" data-ccp-props="{"201341983":0,"335559739":160,"335559740":360}"> </span></span>**

</div></div><div class="SCXW123406393 BCX8" id="bkmrk-paths%C2%A0-preserve-orig"><div class="ListContainerWrapper SCXW123406393 BCX8">1. <span style="color: rgb(53, 152, 219);"><span class="TextRun SCXW123406393 BCX8" data-contrast="auto" lang="EN-US" xml:lang="EN-US"><span class="NormalTextRun SCXW123406393 BCX8" data-ccp-charstyle="Style (Complex) Open Sans">Paths</span></span><span class="EOP SCXW123406393 BCX8" data-ccp-props="{"201341983":0,"335559739":160,"335559740":360}"> </span></span>

</div><div class="ListContainerWrapper SCXW123406393 BCX8">2. <span style="color: rgb(53, 152, 219);"><span class="TextRun SCXW123406393 BCX8" data-contrast="auto" lang="EN-US" xml:lang="EN-US"><span class="NormalTextRun SCXW123406393 BCX8" data-ccp-charstyle="Style (Complex) Open Sans">Preserve original event</span> <span class="NormalTextRun SCXW123406393 BCX8" data-ccp-charstyle="Style (Complex) Open Sans">(Enable Yes/No)</span></span><span class="EOP SCXW123406393 BCX8" data-ccp-props="{"201341983":0,"335559739":160,"335559740":360}"> </span></span>

</div><div class="ListContainerWrapper SCXW123406393 BCX8">- - - <span class="TextRun SCXW123406393 BCX8" data-contrast="auto" lang="EN-US" xml:lang="EN-US"><span class="NormalTextRun SCXW123406393 BCX8" data-ccp-charstyle="Style (Complex) Open Sans">Preserves a raw copy of the original event, added to the field </span><span class="NormalTextRun SpellingErrorV2Themed SCXW123406393 BCX8" data-ccp-charstyle="Style (Complex) Open Sans">event.original</span><span class="NormalTextRun SCXW123406393 BCX8" data-ccp-charstyle="Style (Complex) Open Sans">.</span></span><span class="EOP SCXW123406393 BCX8" data-ccp-props="{"201341983":0,"335559739":160,"335559740":360}"> </span>

</div><div class="ListContainerWrapper SCXW123406393 BCX8">3. <span style="color: rgb(53, 152, 219);"><span class="TextRun SCXW123406393 BCX8" data-contrast="auto" lang="EN-US" xml:lang="EN-US"><span class="NormalTextRun SCXW123406393 BCX8" data-ccp-charstyle="Style (Complex) Open Sans">Ignore events older than</span></span><span class="EOP SCXW123406393 BCX8" data-ccp-props="{"201341983":0,"335559739":160,"335559740":360}"> </span></span>

</div><div class="ListContainerWrapper SCXW123406393 BCX8">- - - <span class="TextRun SCXW123406393 BCX8" data-contrast="auto" lang="EN-US" xml:lang="EN-US"><span class="NormalTextRun SCXW123406393 BCX8" data-ccp-charstyle="Style (Complex) Open Sans">If this </span><span class="NormalTextRun SCXW123406393 BCX8" data-ccp-charstyle="Style (Complex) Open Sans">option</span><span class="NormalTextRun SCXW123406393 BCX8" data-ccp-charstyle="Style (Complex) Open Sans"> is specified, events that are older than the specified amount of time are ignored. Valid time units are "ns", "us" (or "µs"), "</span><span class="NormalTextRun SpellingErrorV2Themed SCXW123406393 BCX8" data-ccp-charstyle="Style (Complex) Open Sans">ms</span><span class="NormalTextRun SCXW123406393 BCX8" data-ccp-charstyle="Style (Complex) Open Sans">", "s", "m", "h".</span></span><span class="EOP SCXW123406393 BCX8" data-ccp-props="{"201341983":0,"335559739":160,"335559740":360}"> </span>

</div><div class="ListContainerWrapper SCXW123406393 BCX8">4. <span style="color: rgb(53, 152, 219);"><span class="TextRun SCXW123406393 BCX8" data-contrast="auto" lang="EN-US" xml:lang="EN-US"><span class="NormalTextRun SCXW123406393 BCX8" data-ccp-charstyle="Style (Complex) Open Sans">Tags</span></span><span class="EOP SCXW123406393 BCX8" data-ccp-props="{"201341983":0,"335559739":160,"335559740":360}"> </span></span>

</div><div class="ListContainerWrapper SCXW123406393 BCX8">5. <span style="color: rgb(53, 152, 219);"><span class="TextRun SCXW123406393 BCX8" data-contrast="auto" lang="EN-US" xml:lang="EN-US"><span class="NormalTextRun SCXW123406393 BCX8" data-ccp-charstyle="Style (Complex) Open Sans">Processors</span><span class="NormalTextRun SCXW123406393 BCX8" data-ccp-charstyle="Style (Complex) Open Sans"> (Optional)</span></span><span class="EOP SCXW123406393 BCX8" data-ccp-props="{"201341983":0,"335559739":160,"335559740":360}"> </span></span>

</div><div class="ListContainerWrapper SCXW123406393 BCX8">- - - <span class="TextRun SCXW123406393 BCX8" data-contrast="auto" lang="EN-US" xml:lang="EN-US"><span class="NormalTextRun SCXW123406393 BCX8" data-ccp-charstyle="Style (Complex) Open Sans">Processors are used to reduce the number of fields in the exported event or to enhance the event with metadata. This executes in the agent before the logs are parsed. See Processors for details.</span></span><span class="EOP SCXW123406393 BCX8" data-ccp-props="{"201341983":0,"335559739":160,"335559740":360}"> </span>

</div><div class="ListContainerWrapper SCXW123406393 BCX8">6. <span style="color: rgb(53, 152, 219);"><span class="TextRun SCXW123406393 BCX8" data-contrast="auto" lang="EN-US" xml:lang="EN-US"><span class="NormalTextRun SCXW123406393 BCX8" data-ccp-charstyle="Style (Complex) Open Sans">Synthetic source</span> <span class="NormalTextRun SCXW123406393 BCX8" data-ccp-charstyle="Style (Complex) Open Sans">(Enable Yes/No)</span></span><span class="EOP SCXW123406393 BCX8" data-ccp-props="{"201341983":0,"335559739":160,"335559740":360}"> </span></span>

</div><div class="OutlineElement Ltr SCXW123406393 BCX8">  
</div></div><span style="color: rgb(53, 152, 219);">**<span class="TextRun SCXW123406393 BCX8" data-contrast="none" lang="EN-US" xml:lang="EN-US"><span class="NormalTextRun SCXW123406393 BCX8" data-ccp-charstyle="Style (Complex) Open Sans">System syslog logs (log)</span></span><span class="EOP SCXW123406393 BCX8" data-ccp-props="{"134245418":true,"134245529":true,"201341983":0,"335559738":40,"335559739":0,"335559740":360}"> </span>**</span>

<div class="SCXW123406393 BCX8" id="bkmrk-paths%C2%A0"><div class="ListContainerWrapper SCXW123406393 BCX8">1. <span style="color: rgb(53, 152, 219);"><span class="TextRun SCXW123406393 BCX8" data-contrast="auto" lang="EN-US" xml:lang="EN-US"><span class="NormalTextRun SCXW123406393 BCX8">Paths</span></span><span class="EOP SCXW123406393 BCX8" data-ccp-props="{"201341983":0,"335559739":160,"335559740":360}"> </span></span>

</div></div><div class="SCXW123406393 BCX8" id="bkmrk-tags%C2%A0-processors%C2%A0-pr"><div class="ListContainerWrapper SCXW123406393 BCX8">2. <span style="color: rgb(53, 152, 219);"><span class="TextRun SCXW123406393 BCX8" data-contrast="auto" lang="EN-US" xml:lang="EN-US"><span class="NormalTextRun SCXW123406393 BCX8">Tags</span></span><span class="EOP SCXW123406393 BCX8" data-ccp-props="{"201341983":0,"335559739":160,"335559740":360}"> </span></span>

</div><div class="ListContainerWrapper SCXW123406393 BCX8">3. <span style="color: rgb(53, 152, 219);"><span class="TextRun SCXW123406393 BCX8" data-contrast="auto" lang="EN-US" xml:lang="EN-US"><span class="NormalTextRun SCXW123406393 BCX8">Processors</span></span><span class="EOP SCXW123406393 BCX8" data-ccp-props="{"201341983":0,"335559739":160,"335559740":360}"> </span></span>

</div><div class="ListContainerWrapper SCXW123406393 BCX8">- - - <span class="TextRun SCXW123406393 BCX8" data-contrast="auto" lang="EN-US" xml:lang="EN-US"><span class="NormalTextRun SCXW123406393 BCX8">Processors are used to reduce the number of fields in the exported event or to enhance the event with metadata. This executes in the agent before the logs are parsed. See Processors for details.</span></span><span class="EOP SCXW123406393 BCX8" data-ccp-props="{"201341983":0,"335559739":160,"335559740":360}"> </span>

</div><div class="ListContainerWrapper SCXW123406393 BCX8">4. <span style="color: rgb(53, 152, 219);"><span class="TextRun SCXW123406393 BCX8" data-contrast="auto" lang="EN-US" xml:lang="EN-US"><span class="NormalTextRun SCXW123406393 BCX8">Ignore events older than</span></span><span class="EOP SCXW123406393 BCX8" data-ccp-props="{"201341983":0,"335559739":160,"335559740":360}"> </span></span>

</div><div class="ListContainerWrapper SCXW123406393 BCX8">- - - <span class="TextRun SCXW123406393 BCX8" data-contrast="auto" lang="EN-US" xml:lang="EN-US"><span class="NormalTextRun SCXW123406393 BCX8">If this </span><span class="NormalTextRun SCXW123406393 BCX8">option</span><span class="NormalTextRun SCXW123406393 BCX8"> is specified, events that are older than the specified amount of time are ignored. Valid time units are "ns", "us" (or "µs"), "</span><span class="NormalTextRun SpellingErrorV2Themed SCXW123406393 BCX8">ms</span><span class="NormalTextRun SCXW123406393 BCX8">", "s", "m", "h".</span></span><span class="EOP SCXW123406393 BCX8" data-ccp-props="{"201341983":0,"335559739":160,"335559740":360}"> </span>

</div><div class="ListContainerWrapper SCXW123406393 BCX8">5. <span style="color: rgb(53, 152, 219);"><span class="TextRun SCXW123406393 BCX8" data-contrast="auto" lang="EN-US" xml:lang="EN-US"><span class="NormalTextRun SCXW123406393 BCX8">Synthetic source</span><span class="NormalTextRun SCXW123406393 BCX8"> (Enable Yes/No)</span></span><span class="EOP SCXW123406393 BCX8" data-ccp-props="{"201341983":0,"335559739":160,"335559740":360}"> </span></span>

</div><div class="OutlineElement Ltr SCXW123406393 BCX8">  
</div></div><span style="color: rgb(53, 152, 219);">**<span class="TextRun SCXW123406393 BCX8" data-contrast="none" lang="EN-US" xml:lang="EN-US"><span class="NormalTextRun SCXW123406393 BCX8" data-ccp-charstyle="Style (Complex) Open Sans">Collect events from the Windows event log</span><span class="NormalTextRun SCXW123406393 BCX8" data-ccp-charstyle="Style (Complex) Open Sans"> (Enable Yes/No)</span></span><span class="EOP SCXW123406393 BCX8" data-ccp-props="{"134245418":true,"134245529":true,"201341983":0,"335559738":40,"335559739":0,"335559740":360}"> </span>**</span>

<div class="SCXW123406393 BCX8" id="bkmrk-application-%28enable-"><div class="OutlineElement Ltr SCXW123406393 BCX8">  
</div><div class="ListContainerWrapper SCXW123406393 BCX8">1. <span style="color: rgb(53, 152, 219);"><span class="TextRun SCXW123406393 BCX8" data-contrast="auto" lang="EN-US" xml:lang="EN-US"><span class="NormalTextRun SCXW123406393 BCX8">Application</span><span class="NormalTextRun SCXW123406393 BCX8"> (Enable Yes/No)</span></span><span class="EOP SCXW123406393 BCX8" data-ccp-props="{"201341983":0,"335559739":160,"335559740":360}"> </span></span>

</div><div class="ListContainerWrapper SCXW123406393 BCX8">- - - <span class="TextRun SCXW123406393 BCX8" data-contrast="auto" lang="EN-US" xml:lang="EN-US"><span class="NormalTextRun SCXW123406393 BCX8">Collect Windows application logs.</span></span><span class="EOP SCXW123406393 BCX8" data-ccp-props="{"201341983":0,"335559739":160,"335559740":360}"> </span>

</div><div class="ListContainerWrapper SCXW123406393 BCX8">1. <span style="color: rgb(53, 152, 219);"><span class="TextRun SCXW123406393 BCX8" data-contrast="auto" lang="EN-US" xml:lang="EN-US"><span class="NormalTextRun SCXW123406393 BCX8">Preserve original event</span> <span class="NormalTextRun SCXW123406393 BCX8">(Enable Yes/No)</span></span><span class="EOP SCXW123406393 BCX8" data-ccp-props="{"201341983":0,"335559739":160,"335559740":360}"> </span></span>

</div><div class="ListContainerWrapper SCXW123406393 BCX8">- - - <span class="TextRun SCXW123406393 BCX8" data-contrast="auto" lang="EN-US" xml:lang="EN-US"><span class="NormalTextRun SCXW123406393 BCX8" data-ccp-charstyle="Style (Complex) Open Sans">Preserves a raw copy of the original XML event, added to the field </span><span class="NormalTextRun SpellingErrorV2Themed SCXW123406393 BCX8" data-ccp-charstyle="Style (Complex) Open Sans">event.original</span></span><span class="EOP SCXW123406393 BCX8" data-ccp-props="{"201341983":0,"335559739":160,"335559740":360}"> </span>

</div><div class="ListContainerWrapper SCXW123406393 BCX8">2. <span style="color: rgb(53, 152, 219);"><span class="TextRun SCXW123406393 BCX8" data-contrast="auto" lang="EN-US" xml:lang="EN-US"><span class="NormalTextRun SCXW123406393 BCX8" data-ccp-charstyle="Style (Complex) Open Sans">Event ID</span><span class="NormalTextRun SCXW123406393 BCX8" data-ccp-charstyle="Style (Complex) Open Sans"> </span></span><span class="EOP SCXW123406393 BCX8" data-ccp-props="{"201341983":0,"335559739":160,"335559740":360}"> </span></span>

</div><div class="ListContainerWrapper SCXW123406393 BCX8">- - - <span class="TextRun SCXW123406393 BCX8" data-contrast="auto" lang="EN-US" xml:lang="EN-US"><span class="NormalTextRun SCXW123406393 BCX8" data-ccp-charstyle="Style (Complex) Open Sans">A list of included and excluded (blocked) event IDs. The value is a comma-separated list. The accepted values are single event IDs to include (</span><span class="NormalTextRun SCXW123406393 BCX8" data-ccp-charstyle="Style (Complex) Open Sans">e.g.</span><span class="NormalTextRun SCXW123406393 BCX8" data-ccp-charstyle="Style (Complex) Open Sans"> 4624), a range of event IDs to include (</span><span class="NormalTextRun SCXW123406393 BCX8" data-ccp-charstyle="Style (Complex) Open Sans">e.g.</span><span class="NormalTextRun SCXW123406393 BCX8" data-ccp-charstyle="Style (Complex) Open Sans"> 4700-4800), and single event IDs to exclude (</span><span class="NormalTextRun SCXW123406393 BCX8" data-ccp-charstyle="Style (Complex) Open Sans">e.g.</span><span class="NormalTextRun SCXW123406393 BCX8" data-ccp-charstyle="Style (Complex) Open Sans"> -4735). Limit 22 IDs.</span></span><span class="EOP SCXW123406393 BCX8" data-ccp-props="{"201341983":0,"335559739":160,"335559740":360}"> </span>

</div><div class="ListContainerWrapper SCXW123406393 BCX8">3. <span style="color: rgb(53, 152, 219);"><span class="TextRun SCXW123406393 BCX8" data-contrast="auto" lang="EN-US" xml:lang="EN-US"><span class="NormalTextRun SCXW123406393 BCX8" data-ccp-charstyle="Style (Complex) Open Sans">Ignore events older than</span></span><span class="EOP SCXW123406393 BCX8" data-ccp-props="{"201341983":0,"335559739":160,"335559740":360}"> </span></span>

</div><div class="ListContainerWrapper SCXW123406393 BCX8">- - - <span class="TextRun SCXW123406393 BCX8" data-contrast="auto" lang="EN-US" xml:lang="EN-US"><span class="NormalTextRun SCXW123406393 BCX8" data-ccp-charstyle="Style (Complex) Open Sans">If this </span><span class="NormalTextRun SCXW123406393 BCX8" data-ccp-charstyle="Style (Complex) Open Sans">option</span><span class="NormalTextRun SCXW123406393 BCX8" data-ccp-charstyle="Style (Complex) Open Sans"> is specified, events that are older than the specified amount of time are ignored. Valid time units are "ns", "us" (or "µs"), "</span><span class="NormalTextRun SpellingErrorV2Themed SCXW123406393 BCX8" data-ccp-charstyle="Style (Complex) Open Sans">ms</span><span class="NormalTextRun SCXW123406393 BCX8" data-ccp-charstyle="Style (Complex) Open Sans">", "s", "m", "h".</span></span><span class="EOP SCXW123406393 BCX8" data-ccp-props="{"201341983":0,"335559739":160,"335559740":360}"> </span>

</div><div class="ListContainerWrapper SCXW123406393 BCX8">4. <span style="color: rgb(53, 152, 219);"><span class="TextRun SCXW123406393 BCX8" data-contrast="auto" lang="EN-US" xml:lang="EN-US"><span class="NormalTextRun SCXW123406393 BCX8" data-ccp-charstyle="Style (Complex) Open Sans">Language ID</span></span><span class="EOP SCXW123406393 BCX8" data-ccp-props="{"201341983":0,"335559739":160,"335559740":360}"> </span></span>

</div><div class="ListContainerWrapper SCXW123406393 BCX8">- - - <span class="TextRun SCXW123406393 BCX8" data-contrast="auto" lang="EN-US" xml:lang="EN-US"><span class="NormalTextRun SCXW123406393 BCX8" data-ccp-charstyle="Style (Complex) Open Sans">The language ID the events will be </span><span class="NormalTextRun SCXW123406393 BCX8" data-ccp-charstyle="Style (Complex) Open Sans">rendered</span><span class="NormalTextRun SCXW123406393 BCX8" data-ccp-charstyle="Style (Complex) Open Sans"> in. The language will be forced regardless of the system language. A complete list of language IDs can be found https://docs.microsoft.com/en-us/openspecs/windows\_protocols/ms-lcid/a9eac961-e77d-41a6-90a5-ce1a8b0cdb9c\[here\]. It defaults to 0, which </span><span class="NormalTextRun SCXW123406393 BCX8" data-ccp-charstyle="Style (Complex) Open Sans">indicates</span><span class="NormalTextRun SCXW123406393 BCX8" data-ccp-charstyle="Style (Complex) Open Sans"> to use the system language. E.g.: 0x0409 for </span><span class="NormalTextRun SpellingErrorV2Themed SCXW123406393 BCX8" data-ccp-charstyle="Style (Complex) Open Sans">en</span><span class="NormalTextRun SCXW123406393 BCX8" data-ccp-charstyle="Style (Complex) Open Sans">-US</span></span><span class="EOP SCXW123406393 BCX8" data-ccp-props="{"201341983":0,"335559739":160,"335559740":360}"> </span>

</div><div class="ListContainerWrapper SCXW123406393 BCX8">5. <span style="color: rgb(53, 152, 219);"><span class="TextRun SCXW123406393 BCX8" data-contrast="auto" lang="EN-US" xml:lang="EN-US"><span class="NormalTextRun SCXW123406393 BCX8" data-ccp-charstyle="Style (Complex) Open Sans">Tags</span></span><span class="EOP SCXW123406393 BCX8" data-ccp-props="{"201341983":0,"335559739":160,"335559740":360}"> </span></span>

</div></div><span style="color: rgb(53, 152, 219);"><span class="TextRun SCXW123406393 BCX8" data-contrast="auto" lang="EN-US" xml:lang="EN-US"><span class="NormalTextRun SCXW123406393 BCX8" data-ccp-charstyle="Style (Complex) Open Sans">Processors</span></span><span class="EOP SCXW123406393 BCX8" data-ccp-props="{"201341983":0,"335559685":360,"335559739":160,"335559740":360}"> </span></span>

<div class="SCXW123406393 BCX8" id="bkmrk-processors-are-used-"><div class="ListContainerWrapper SCXW123406393 BCX8">- - - <span class="TextRun SCXW123406393 BCX8" data-contrast="auto" lang="EN-US" xml:lang="EN-US"><span class="NormalTextRun SCXW123406393 BCX8" data-ccp-charstyle="Style (Complex) Open Sans">Processors are used to reduce the number of fields in the exported event or to enhance the event with metadata. This executes in the agent before the logs are parsed. See Processors for details.</span></span><span class="EOP SCXW123406393 BCX8" data-ccp-props="{"201341983":0,"335559739":160,"335559740":360}"> </span>

</div></div><div class="SCXW123406393 BCX8" id="bkmrk-synthetic-source-%28en"><div class="ListContainerWrapper SCXW123406393 BCX8">6. <span style="color: rgb(53, 152, 219);"><span class="TextRun SCXW123406393 BCX8" data-contrast="auto" lang="EN-US" xml:lang="EN-US"><span class="NormalTextRun SCXW123406393 BCX8" data-ccp-charstyle="Style (Complex) Open Sans">Synthetic source</span><span class="NormalTextRun SCXW123406393 BCX8" data-ccp-charstyle="Style (Complex) Open Sans"> (Enable Yes/No)</span></span><span class="EOP SCXW123406393 BCX8" data-ccp-props="{"201341983":0,"335559739":160,"335559740":360}"> </span></span>

</div><div class="OutlineElement Ltr SCXW123406393 BCX8">  
</div></div><span style="color: rgb(53, 152, 219);">**<span class="TextRun SCXW123406393 BCX8" data-contrast="none" lang="EN-US" xml:lang="EN-US"><span class="NormalTextRun SCXW123406393 BCX8" data-ccp-charstyle="Style (Complex) Open Sans">Security</span><span class="NormalTextRun SCXW123406393 BCX8" data-ccp-charstyle="Style (Complex) Open Sans"> (Enable Yes/No)</span></span><span class="EOP SCXW123406393 BCX8" data-ccp-props="{"134245418":true,"134245529":true,"201341983":0,"335559738":40,"335559739":0,"335559740":259}"> </span>**</span>

<div class="SCXW123406393 BCX8" id="bkmrk-preserve-original-ev"><div class="ListContainerWrapper SCXW123406393 BCX8">1. <span style="color: rgb(53, 152, 219);"><span class="TextRun SCXW123406393 BCX8" data-contrast="auto" lang="EN-US" xml:lang="EN-US"><span class="NormalTextRun SCXW123406393 BCX8">Preserve original event</span> <span class="NormalTextRun SCXW123406393 BCX8">(Enable Yes/No)</span></span><span class="EOP SCXW123406393 BCX8" data-ccp-props="{"201341983":0,"335559739":160,"335559740":259}"> </span></span>

</div><div class="ListContainerWrapper SCXW123406393 BCX8">- - - <span class="TextRun SCXW123406393 BCX8" data-contrast="auto" lang="EN-US" xml:lang="EN-US"><span class="NormalTextRun SCXW123406393 BCX8">Preserves a raw copy of the original XML event, added to the field </span><span class="NormalTextRun SpellingErrorV2Themed SCXW123406393 BCX8">event.original</span></span><span class="EOP SCXW123406393 BCX8" data-ccp-props="{"201341983":0,"335559739":160,"335559740":259}"> </span>

</div><div class="ListContainerWrapper SCXW123406393 BCX8">2. <span style="color: rgb(53, 152, 219);"><span class="TextRun SCXW123406393 BCX8" data-contrast="auto" lang="EN-US" xml:lang="EN-US"><span class="NormalTextRun SCXW123406393 BCX8">Event ID</span></span><span class="EOP SCXW123406393 BCX8" data-ccp-props="{"201341983":0,"335559739":160,"335559740":259}"> </span></span>

</div><div class="ListContainerWrapper SCXW123406393 BCX8">- - - <span class="TextRun SCXW123406393 BCX8" data-contrast="auto" lang="EN-US" xml:lang="EN-US"><span class="NormalTextRun SCXW123406393 BCX8">A list of included and excluded (blocked) event IDs. The value is a comma-separated list. The accepted values are single event IDs to include (</span><span class="NormalTextRun SCXW123406393 BCX8">e.g.</span><span class="NormalTextRun SCXW123406393 BCX8"> 4624), a range of event IDs to include (</span><span class="NormalTextRun SCXW123406393 BCX8">e.g.</span><span class="NormalTextRun SCXW123406393 BCX8"> 4700-4800), and single event IDs to exclude (</span><span class="NormalTextRun SCXW123406393 BCX8">e.g.</span><span class="NormalTextRun SCXW123406393 BCX8"> -4735). Limit 22 IDs.</span></span><span class="EOP SCXW123406393 BCX8" data-ccp-props="{"201341983":0,"335559739":160,"335559740":259}"> </span>

</div><div class="ListContainerWrapper SCXW123406393 BCX8">3. <span style="color: rgb(53, 152, 219);"><span class="TextRun SCXW123406393 BCX8" data-contrast="auto" lang="EN-US" xml:lang="EN-US"><span class="NormalTextRun SCXW123406393 BCX8">Ignore events older than</span></span><span class="EOP SCXW123406393 BCX8" data-ccp-props="{"201341983":0,"335559739":160,"335559740":259}"> </span></span>

</div><div class="ListContainerWrapper SCXW123406393 BCX8">- - - <span class="TextRun SCXW123406393 BCX8" data-contrast="auto" lang="EN-US" xml:lang="EN-US"><span class="NormalTextRun SCXW123406393 BCX8">If this </span><span class="NormalTextRun SCXW123406393 BCX8">option</span><span class="NormalTextRun SCXW123406393 BCX8"> is specified, events that are older than the specified amount of time are ignored. Valid time units are "ns", "us" (or "µs"), "</span><span class="NormalTextRun SpellingErrorV2Themed SCXW123406393 BCX8">ms</span><span class="NormalTextRun SCXW123406393 BCX8">", "s", "m", "h".</span></span><span class="EOP SCXW123406393 BCX8" data-ccp-props="{"201341983":0,"335559739":160,"335559740":259}"> </span>

</div><div class="ListContainerWrapper SCXW123406393 BCX8">4. <span style="color: rgb(53, 152, 219);"><span class="TextRun SCXW123406393 BCX8" data-contrast="auto" lang="EN-US" xml:lang="EN-US"><span class="NormalTextRun SCXW123406393 BCX8">Language ID</span></span><span class="EOP SCXW123406393 BCX8" data-ccp-props="{"201341983":0,"335559739":160,"335559740":259}"> </span></span>

</div><div class="ListContainerWrapper SCXW123406393 BCX8">- - - <span class="TextRun SCXW123406393 BCX8" data-contrast="auto" lang="EN-US" xml:lang="EN-US"><span class="NormalTextRun SCXW123406393 BCX8">The language ID the events will be </span><span class="NormalTextRun SCXW123406393 BCX8">rendered</span><span class="NormalTextRun SCXW123406393 BCX8"> in. The language will be forced regardless of the system language. A complete list of language IDs can be found https://docs.microsoft.com/en-us/openspecs/windows\_protocols/ms-lcid/a9eac961-e77d-41a6-90a5-ce1a8b0cdb9c\[here\]. It defaults to 0, which </span><span class="NormalTextRun SCXW123406393 BCX8">indicates</span><span class="NormalTextRun SCXW123406393 BCX8"> to use the system language. E.g.: 0x0409 for </span><span class="NormalTextRun SpellingErrorV2Themed SCXW123406393 BCX8">en</span><span class="NormalTextRun SCXW123406393 BCX8">-US</span></span><span class="EOP SCXW123406393 BCX8" data-ccp-props="{"201341983":0,"335559739":160,"335559740":259}"> </span>

</div><div class="ListContainerWrapper SCXW123406393 BCX8">5. <span style="color: rgb(53, 152, 219);"><span class="TextRun SCXW123406393 BCX8" data-contrast="auto" lang="EN-US" xml:lang="EN-US"><span class="NormalTextRun SCXW123406393 BCX8">Tags</span></span><span class="EOP SCXW123406393 BCX8" data-ccp-props="{"201341983":0,"335559739":160,"335559740":259}"> </span></span>

</div><div class="ListContainerWrapper SCXW123406393 BCX8">6. <span style="color: rgb(53, 152, 219);"><span class="TextRun SCXW123406393 BCX8" data-contrast="auto" lang="EN-US" xml:lang="EN-US"><span class="NormalTextRun SCXW123406393 BCX8">Processors</span></span><span class="EOP SCXW123406393 BCX8" data-ccp-props="{"201341983":0,"335559739":160,"335559740":259}"> </span></span>

</div><div class="ListContainerWrapper SCXW123406393 BCX8">- - - <span class="TextRun SCXW123406393 BCX8" data-contrast="auto" lang="EN-US" xml:lang="EN-US"><span class="NormalTextRun SCXW123406393 BCX8">Processors are used to reduce the number of fields in the exported event or to enhance the event with metadata. This executes in the agent before the logs are parsed. See Processors for details.</span></span><span class="EOP SCXW123406393 BCX8" data-ccp-props="{"201341983":0,"335559739":160,"335559740":259}"> </span>

</div><div class="ListContainerWrapper SCXW123406393 BCX8">7. <span style="color: rgb(53, 152, 219);"><span class="TextRun SCXW123406393 BCX8" data-contrast="auto" lang="EN-US" xml:lang="EN-US"><span class="NormalTextRun SCXW123406393 BCX8">Synthetic source</span><span class="NormalTextRun SCXW123406393 BCX8"> (Enable Yes/No)</span></span><span class="EOP SCXW123406393 BCX8" data-ccp-props="{"201341983":0,"335559739":160,"335559740":259}"> </span></span>

</div><div class="OutlineElement Ltr SCXW123406393 BCX8">  
</div></div><span class="EOP SCXW123406393 BCX8" data-ccp-props="{"201341983":0,"335559685":1080,"335559739":160,"335559740":259}" style="color: rgb(53, 152, 219);"> </span>

<span style="color: rgb(53, 152, 219);">**<span class="TextRun SCXW123406393 BCX8" data-contrast="none" lang="EN-US" xml:lang="EN-US"><span class="NormalTextRun SCXW123406393 BCX8" data-ccp-charstyle="Style (Complex) Open Sans">System (Enable Yes/No)</span></span><span class="EOP SCXW123406393 BCX8" data-ccp-props="{"134245418":true,"134245529":true,"201341983":0,"335559738":40,"335559739":0,"335559740":360}"> </span>**</span>

<div class="SCXW123406393 BCX8" id="bkmrk-preserve-original-ev-1"><div class="ListContainerWrapper SCXW123406393 BCX8">1. <span class="TextRun SCXW123406393 BCX8" data-contrast="auto" lang="EN-US" xml:lang="EN-US"><span class="NormalTextRun SCXW123406393 BCX8">Preserve original event</span><span class="NormalTextRun SCXW123406393 BCX8"> (Enable Yes/No)</span></span><span class="EOP SCXW123406393 BCX8" data-ccp-props="{"201341983":0,"335559739":160,"335559740":360}"> </span>

</div><div class="ListContainerWrapper SCXW123406393 BCX8">- - - <span class="TextRun SCXW123406393 BCX8" data-contrast="auto" lang="EN-US" xml:lang="EN-US"><span class="NormalTextRun SCXW123406393 BCX8">Preserves a raw copy of the original XML event, added to the field </span><span class="NormalTextRun SpellingErrorV2Themed SCXW123406393 BCX8">event.original</span></span><span class="EOP SCXW123406393 BCX8" data-ccp-props="{"201341983":0,"335559739":160,"335559740":360}"> </span>

</div><div class="ListContainerWrapper SCXW123406393 BCX8">2. <span class="TextRun SCXW123406393 BCX8" data-contrast="auto" lang="EN-US" xml:lang="EN-US"><span class="NormalTextRun SCXW123406393 BCX8">Event ID</span></span><span class="EOP SCXW123406393 BCX8" data-ccp-props="{"201341983":0,"335559739":160,"335559740":360}"> </span>

</div></div><div class="SCXW123406393 BCX8" id="bkmrk-a-list-of-included-a"><div class="ListContainerWrapper SCXW123406393 BCX8">- - - <span class="TextRun SCXW123406393 BCX8" data-contrast="auto" lang="EN-US" xml:lang="EN-US"><span class="NormalTextRun SCXW123406393 BCX8">A list of included and excluded (blocked) event IDs. The value is a comma-separated list. The accepted values are single event IDs to include (</span><span class="NormalTextRun SCXW123406393 BCX8">e.g.</span><span class="NormalTextRun SCXW123406393 BCX8"> 4624), a range of event IDs to include (</span><span class="NormalTextRun SCXW123406393 BCX8">e.g.</span><span class="NormalTextRun SCXW123406393 BCX8"> 4700-4800), and single event IDs to exclude (</span><span class="NormalTextRun SCXW123406393 BCX8">e.g.</span><span class="NormalTextRun SCXW123406393 BCX8"> -4735). Limit 22 IDs.</span></span><span class="EOP SCXW123406393 BCX8" data-ccp-props="{"201341983":0,"335559739":160,"335559740":360}"> </span>

</div><div class="ListContainerWrapper SCXW123406393 BCX8">3. <span class="TextRun SCXW123406393 BCX8" data-contrast="auto" lang="EN-US" xml:lang="EN-US"><span class="NormalTextRun SCXW123406393 BCX8">Ignore events older than</span></span><span class="EOP SCXW123406393 BCX8" data-ccp-props="{"201341983":0,"335559739":160,"335559740":360}"> </span>

</div><div class="ListContainerWrapper SCXW123406393 BCX8">- - - <span class="TextRun SCXW123406393 BCX8" data-contrast="auto" lang="EN-US" xml:lang="EN-US"><span class="NormalTextRun SCXW123406393 BCX8">If this </span><span class="NormalTextRun SCXW123406393 BCX8">option</span><span class="NormalTextRun SCXW123406393 BCX8"> is specified, events that are older than the specified amount of time are ignored. Valid time units are "ns", "us" (or "µs"), "</span><span class="NormalTextRun SpellingErrorV2Themed SCXW123406393 BCX8">ms</span><span class="NormalTextRun SCXW123406393 BCX8">", "s", "m", "h".</span></span><span class="EOP SCXW123406393 BCX8" data-ccp-props="{"201341983":0,"335559739":160,"335559740":360}"> </span>

</div><div class="ListContainerWrapper SCXW123406393 BCX8">4. <span class="TextRun SCXW123406393 BCX8" data-contrast="auto" lang="EN-US" xml:lang="EN-US"><span class="NormalTextRun SCXW123406393 BCX8">Language ID</span></span><span class="EOP SCXW123406393 BCX8" data-ccp-props="{"201341983":0,"335559739":160,"335559740":360}"> </span>

</div><div class="ListContainerWrapper SCXW123406393 BCX8">- - - <span class="TextRun SCXW123406393 BCX8" data-contrast="auto" lang="EN-US" xml:lang="EN-US"><span class="NormalTextRun SCXW123406393 BCX8">The language ID the events will be </span><span class="NormalTextRun SCXW123406393 BCX8">rendered</span><span class="NormalTextRun SCXW123406393 BCX8"> in. The language will be forced regardless of the system language. A complete list of language IDs can be found https://docs.microsoft.com/en-us/openspecs/windows\_protocols/ms-lcid/a9eac961-e77d-41a6-90a5-ce1a8b0cdb9c\[here\]. It defaults to 0, which </span><span class="NormalTextRun SCXW123406393 BCX8">indicates</span><span class="NormalTextRun SCXW123406393 BCX8"> to use the system language. E.g.: 0x0409 for </span><span class="NormalTextRun SpellingErrorV2Themed SCXW123406393 BCX8">en</span><span class="NormalTextRun SCXW123406393 BCX8">-US</span></span><span class="EOP SCXW123406393 BCX8" data-ccp-props="{"201341983":0,"335559739":160,"335559740":360}"> </span>

</div><div class="ListContainerWrapper SCXW123406393 BCX8">5. <span class="TextRun SCXW123406393 BCX8" data-contrast="auto" lang="EN-US" xml:lang="EN-US"><span class="NormalTextRun SCXW123406393 BCX8">Tags</span></span><span class="EOP SCXW123406393 BCX8" data-ccp-props="{"201341983":0,"335559739":160,"335559740":360}"> </span>

</div><div class="ListContainerWrapper SCXW123406393 BCX8">6. <span class="TextRun SCXW123406393 BCX8" data-contrast="auto" lang="EN-US" xml:lang="EN-US"><span class="NormalTextRun SCXW123406393 BCX8">Processors</span></span><span class="EOP SCXW123406393 BCX8" data-ccp-props="{"201341983":0,"335559739":160,"335559740":360}"> </span>

</div><div class="ListContainerWrapper SCXW123406393 BCX8">- - - <span class="TextRun SCXW123406393 BCX8" data-contrast="auto" lang="EN-US" xml:lang="EN-US"><span class="NormalTextRun SCXW123406393 BCX8">Processors are used to reduce the number of fields in the exported event or to enhance the event with metadata. This executes in the agent before the logs are parsed. See Processors for details.</span></span><span class="EOP SCXW123406393 BCX8" data-ccp-props="{"201341983":0,"335559739":160,"335559740":360}"> </span>

</div><div class="ListContainerWrapper SCXW123406393 BCX8">7. <span class="TextRun SCXW123406393 BCX8" data-contrast="auto" lang="EN-US" xml:lang="EN-US"><span class="NormalTextRun SCXW123406393 BCX8">Synthetic source</span><span class="NormalTextRun SCXW123406393 BCX8"> (Enable Yes/No)</span></span><span class="EOP SCXW123406393 BCX8" data-ccp-props="{"201341983":0,"335559739":160,"335559740":360}"> </span>

</div><div class="OutlineElement Ltr SCXW123406393 BCX8">  
</div></div>**<span class="TextRun SCXW123406393 BCX8" data-contrast="none" lang="EN-US" style="color: rgb(53, 152, 219);" xml:lang="EN-US"><span class="NormalTextRun SCXW123406393 BCX8" data-ccp-parastyle="heading 3">Collect metrics from System instances</span><span class="NormalTextRun SCXW123406393 BCX8" data-ccp-parastyle="heading 3"> (Enable Yes/No)</span></span><span class="EOP SCXW123406393 BCX8" data-ccp-props="{"134245418":true,"134245529":true,"201341983":0,"335559738":40,"335559739":0,"335559740":360}"> </span>**

<div class="SCXW123406393 BCX8" id="bkmrk-proc-filesystem-dire"><div class="ListContainerWrapper SCXW123406393 BCX8">1. <span class="TextRun SCXW123406393 BCX8" data-contrast="auto" lang="EN-US" xml:lang="EN-US"><span class="NormalTextRun SCXW123406393 BCX8">Proc Filesystem Directory</span></span><span class="EOP SCXW123406393 BCX8" data-ccp-props="{"201341983":0,"335559739":160,"335559740":360}"> </span>

</div><div class="ListContainerWrapper SCXW123406393 BCX8">- - - <span class="TextRun SCXW123406393 BCX8" data-contrast="auto" lang="EN-US" xml:lang="EN-US"><span class="NormalTextRun SCXW123406393 BCX8">The proc filesystem base directory.</span></span><span class="EOP SCXW123406393 BCX8" data-ccp-props="{"201341983":0,"335559739":160,"335559740":360}"> </span>

</div><div class="ListContainerWrapper SCXW123406393 BCX8">2. <span class="TextRun SCXW123406393 BCX8" data-contrast="auto" lang="EN-US" xml:lang="EN-US"><span class="NormalTextRun SCXW123406393 BCX8">Period</span></span><span class="EOP SCXW123406393 BCX8" data-ccp-props="{"201341983":0,"335559739":160,"335559740":360}"> </span>

</div><div class="ListContainerWrapper SCXW123406393 BCX8">3. <span class="TextRun SCXW123406393 BCX8" data-contrast="auto" lang="EN-US" xml:lang="EN-US"><span class="NormalTextRun SCXW123406393 BCX8">Core Metrics</span></span><span class="EOP SCXW123406393 BCX8" data-ccp-props="{"201341983":0,"335559739":160,"335559740":360}"> </span>

</div><div class="ListContainerWrapper SCXW123406393 BCX8">- - - <span class="TextRun SCXW123406393 BCX8" data-contrast="auto" lang="EN-US" xml:lang="EN-US"><span class="NormalTextRun SCXW123406393 BCX8">How to report core metrics. Can be "percentages" or "ticks"</span></span><span class="EOP SCXW123406393 BCX8" data-ccp-props="{"201341983":0,"335559739":160,"335559740":360}"> </span>

</div><div class="ListContainerWrapper SCXW123406393 BCX8">4. <span class="TextRun SCXW123406393 BCX8" data-contrast="auto" lang="EN-US" xml:lang="EN-US"><span class="NormalTextRun SCXW123406393 BCX8">Tags</span></span><span class="EOP SCXW123406393 BCX8" data-ccp-props="{"201341983":0,"335559739":160,"335559740":360}"> </span>

</div><div class="ListContainerWrapper SCXW123406393 BCX8">5. <span class="TextRun SCXW123406393 BCX8" data-contrast="auto" lang="EN-US" xml:lang="EN-US"><span class="NormalTextRun SCXW123406393 BCX8">Processors</span></span><span class="EOP SCXW123406393 BCX8" data-ccp-props="{"201341983":0,"335559739":160,"335559740":360}"> </span>

</div><div class="ListContainerWrapper SCXW123406393 BCX8">- - - <span class="TextRun SCXW123406393 BCX8" data-contrast="auto" lang="EN-US" xml:lang="EN-US"><span class="NormalTextRun SCXW123406393 BCX8">Processors are used to reduce the number of fields in the exported event or to enhance the event with metadata. This executes in the agent before the logs are parsed. See Processors for details.</span></span><span class="EOP SCXW123406393 BCX8" data-ccp-props="{"201341983":0,"335559739":160,"335559740":360}"> </span>

</div><div class="ListContainerWrapper SCXW123406393 BCX8">6. <span class="TextRun SCXW123406393 BCX8" data-contrast="auto" lang="EN-US" xml:lang="EN-US"><span class="NormalTextRun SCXW123406393 BCX8">Synthetic source</span><span class="NormalTextRun SCXW123406393 BCX8"> (Enable Yes/No)</span></span><span class="EOP SCXW123406393 BCX8" data-ccp-props="{"201341983":0,"335559739":160,"335559740":360}"> </span>

</div></div><span style="color: rgb(53, 152, 219);">**<span class="TextRun SCXW123406393 BCX8" data-contrast="none" lang="EN-US" xml:lang="EN-US"><span class="NormalTextRun SCXW123406393 BCX8" data-ccp-parastyle="heading 3">System CPU metrics</span><span class="NormalTextRun SCXW123406393 BCX8" data-ccp-parastyle="heading 3"> (Enable Yes/No)</span></span><span class="EOP SCXW123406393 BCX8" data-ccp-props="{"134245418":true,"134245529":true,"201341983":0,"335559738":40,"335559739":0,"335559740":259}"> </span>**</span>

<div class="SCXW123406393 BCX8" id="bkmrk-period%C2%A0-cpu-metrics%C2%A0"><div class="ListContainerWrapper SCXW123406393 BCX8">1. <span class="TextRun SCXW123406393 BCX8" data-contrast="auto" lang="EN-US" xml:lang="EN-US"><span class="NormalTextRun SCXW123406393 BCX8" data-ccp-charstyle="Style (Complex) Open Sans">Period</span></span><span class="EOP SCXW123406393 BCX8" data-ccp-props="{"201341983":0,"335559739":160,"335559740":360}"> </span>

</div><div class="ListContainerWrapper SCXW123406393 BCX8">2. <span class="TextRun SCXW123406393 BCX8" data-contrast="auto" lang="EN-US" xml:lang="EN-US"><span class="NormalTextRun SpellingErrorV2Themed SCXW123406393 BCX8" data-ccp-charstyle="Style (Complex) Open Sans">Cpu</span><span class="NormalTextRun SCXW123406393 BCX8" data-ccp-charstyle="Style (Complex) Open Sans"> Metrics</span></span><span class="EOP SCXW123406393 BCX8" data-ccp-props="{"201341983":0,"335559739":160,"335559740":360}"> </span>

</div><div class="ListContainerWrapper SCXW123406393 BCX8">- - - <span class="TextRun SCXW123406393 BCX8" data-contrast="auto" lang="EN-US" xml:lang="EN-US"><span class="NormalTextRun SCXW123406393 BCX8" data-ccp-charstyle="Style (Complex) Open Sans">How to report CPU metrics. Can be "percentages", "</span><span class="NormalTextRun SpellingErrorV2Themed SCXW123406393 BCX8" data-ccp-charstyle="Style (Complex) Open Sans">normalized\_percentages</span><span class="NormalTextRun SCXW123406393 BCX8" data-ccp-charstyle="Style (Complex) Open Sans">", or "ticks"</span></span><span class="EOP SCXW123406393 BCX8" data-ccp-props="{"201341983":0,"335559739":160,"335559740":360}"> </span>

</div><div class="ListContainerWrapper SCXW123406393 BCX8">3. <span class="TextRun SCXW123406393 BCX8" data-contrast="auto" lang="EN-US" xml:lang="EN-US"><span class="NormalTextRun SCXW123406393 BCX8" data-ccp-charstyle="Style (Complex) Open Sans">Tags</span></span><span class="EOP SCXW123406393 BCX8" data-ccp-props="{"201341983":0,"335559739":160,"335559740":360}"> </span>

</div><div class="ListContainerWrapper SCXW123406393 BCX8">4. <span class="TextRun SCXW123406393 BCX8" data-contrast="auto" lang="EN-US" xml:lang="EN-US"><span class="NormalTextRun SCXW123406393 BCX8" data-ccp-charstyle="Style (Complex) Open Sans">Processors</span></span><span class="EOP SCXW123406393 BCX8" data-ccp-props="{"201341983":0,"335559739":160,"335559740":360}"> </span>

</div><div class="ListContainerWrapper SCXW123406393 BCX8">- - - <span class="TextRun SCXW123406393 BCX8" data-contrast="auto" lang="EN-US" xml:lang="EN-US"><span class="NormalTextRun SCXW123406393 BCX8" data-ccp-charstyle="Style (Complex) Open Sans">Processors are used to reduce the number of fields in the exported event or to enhance the event with metadata. This executes in the agent before the logs are parsed. See Processors for details.</span></span><span class="EOP SCXW123406393 BCX8" data-ccp-props="{"201341983":0,"335559739":160,"335559740":360}"> </span>

</div><div class="ListContainerWrapper SCXW123406393 BCX8">5. <span class="TextRun SCXW123406393 BCX8" data-contrast="auto" lang="EN-US" xml:lang="EN-US"><span class="NormalTextRun SCXW123406393 BCX8" data-ccp-charstyle="Style (Complex) Open Sans">Synthetic source</span><span class="NormalTextRun SCXW123406393 BCX8" data-ccp-charstyle="Style (Complex) Open Sans"> (Enable Yes/No)</span></span><span class="EOP SCXW123406393 BCX8" data-ccp-props="{"201341983":0,"335559739":160,"335559740":360}"> </span>

</div><div class="OutlineElement Ltr SCXW123406393 BCX8">  
</div></div><span style="color: rgb(53, 152, 219);">**<span class="TextRun SCXW123406393 BCX8" data-contrast="none" lang="EN-US" xml:lang="EN-US"><span class="NormalTextRun SCXW123406393 BCX8" data-ccp-charstyle="Style (Complex) Open Sans">System </span><span class="NormalTextRun SpellingErrorV2Themed SCXW123406393 BCX8" data-ccp-charstyle="Style (Complex) Open Sans">diskio</span><span class="NormalTextRun SCXW123406393 BCX8" data-ccp-charstyle="Style (Complex) Open Sans"> metrics</span><span class="NormalTextRun SCXW123406393 BCX8" data-ccp-charstyle="Style (Complex) Open Sans"> (Enable Yes/No)</span></span><span class="EOP SCXW123406393 BCX8" data-ccp-props="{"134245418":true,"134245529":true,"201341983":0,"335559738":40,"335559739":0,"335559740":360}"> </span>**</span>

<div class="SCXW123406393 BCX8" id="bkmrk-period%C2%A0-include-devi"><div class="ListContainerWrapper SCXW123406393 BCX8">1. <span class="TextRun SCXW123406393 BCX8" data-contrast="auto" lang="EN-US" xml:lang="EN-US"><span class="NormalTextRun SCXW123406393 BCX8">Period</span></span><span class="EOP SCXW123406393 BCX8" data-ccp-props="{"201341983":0,"335559739":160,"335559740":360}"> </span>

</div><div class="ListContainerWrapper SCXW123406393 BCX8">2. <span class="TextRun SCXW123406393 BCX8" data-contrast="auto" lang="EN-US" xml:lang="EN-US"><span class="NormalTextRun SCXW123406393 BCX8">Include Devices</span></span><span class="EOP SCXW123406393 BCX8" data-ccp-props="{"201341983":0,"335559739":160,"335559740":360}"> </span>

</div><div class="ListContainerWrapper SCXW123406393 BCX8">- - - <span class="TextRun SCXW123406393 BCX8" data-contrast="auto" lang="EN-US" xml:lang="EN-US"><span class="NormalTextRun SCXW123406393 BCX8">Provide a specific list of devices to </span><span class="NormalTextRun SCXW123406393 BCX8">monitor</span><span class="NormalTextRun SCXW123406393 BCX8">. By default, all devices are </span><span class="NormalTextRun SCXW123406393 BCX8">monitored</span><span class="NormalTextRun SCXW123406393 BCX8">.</span></span><span class="EOP SCXW123406393 BCX8" data-ccp-props="{"201341983":0,"335559739":160,"335559740":360}"> </span>

</div><div class="ListContainerWrapper SCXW123406393 BCX8">3. <span class="TextRun SCXW123406393 BCX8" data-contrast="auto" lang="EN-US" xml:lang="EN-US"><span class="NormalTextRun SCXW123406393 BCX8">Tags</span></span><span class="EOP SCXW123406393 BCX8" data-ccp-props="{"201341983":0,"335559739":160,"335559740":360}"> </span>

</div><div class="ListContainerWrapper SCXW123406393 BCX8">4. <span class="TextRun SCXW123406393 BCX8" data-contrast="auto" lang="EN-US" xml:lang="EN-US"><span class="NormalTextRun SCXW123406393 BCX8">Processors</span></span><span class="EOP SCXW123406393 BCX8" data-ccp-props="{"201341983":0,"335559739":160,"335559740":360}"> </span>

</div><div class="ListContainerWrapper SCXW123406393 BCX8">- - - <span class="TextRun SCXW123406393 BCX8" data-contrast="auto" lang="EN-US" xml:lang="EN-US"><span class="NormalTextRun SCXW123406393 BCX8">Processors are used to reduce the number of fields in the exported event or to enhance the event with metadata. This executes in the agent before the logs are parsed. See Processors for details.</span></span><span class="EOP SCXW123406393 BCX8" data-ccp-props="{"201341983":0,"335559739":160,"335559740":360}"> </span>

</div><div class="ListContainerWrapper SCXW123406393 BCX8">5. <span class="TextRun SCXW123406393 BCX8" data-contrast="auto" lang="EN-US" xml:lang="EN-US"><span class="NormalTextRun SCXW123406393 BCX8">Synthetic source</span><span class="NormalTextRun SCXW123406393 BCX8"> (Enable Yes/No)</span></span><span class="EOP SCXW123406393 BCX8" data-ccp-props="{"201341983":0,"335559739":160,"335559740":360}"> </span>

</div><div class="OutlineElement Ltr SCXW123406393 BCX8">  
</div></div><span style="color: rgb(53, 152, 219);">**<span class="TextRun SCXW123406393 BCX8" data-contrast="none" lang="EN-US" xml:lang="EN-US"><span class="NormalTextRun SCXW123406393 BCX8" data-ccp-parastyle="heading 3">System filesystem metrics</span></span><span class="EOP SCXW123406393 BCX8" data-ccp-props="{"134245418":true,"134245529":true,"201341983":0,"335559738":40,"335559739":0,"335559740":360}"> </span>**</span>

<div class="SCXW123406393 BCX8" id="bkmrk-period%C2%A0-list-of-file"><div class="ListContainerWrapper SCXW123406393 BCX8">1. <span class="TextRun SCXW123406393 BCX8" data-contrast="auto" lang="EN-US" xml:lang="EN-US"><span class="NormalTextRun SCXW123406393 BCX8">Period</span></span><span class="EOP SCXW123406393 BCX8" data-ccp-props="{"201341983":0,"335559739":160,"335559740":360}"> </span>

</div><div class="ListContainerWrapper SCXW123406393 BCX8">2. <span class="TextRun SCXW123406393 BCX8" data-contrast="auto" lang="EN-US" xml:lang="EN-US"><span class="NormalTextRun SCXW123406393 BCX8">List of filesystem types to ignore</span></span><span class="EOP SCXW123406393 BCX8" data-ccp-props="{"201341983":0,"335559739":160,"335559740":360}"> </span>

</div></div><div class="SCXW123406393 BCX8" id="bkmrk-the-filesystem-datas"><div class="ListContainerWrapper SCXW123406393 BCX8">- - - <span class="TextRun SCXW123406393 BCX8" data-contrast="auto" lang="EN-US" xml:lang="EN-US"><span class="NormalTextRun SCXW123406393 BCX8">The filesystem </span><span class="NormalTextRun SpellingErrorV2Themed SCXW123406393 BCX8">datastream</span><span class="NormalTextRun SCXW123406393 BCX8"> will ignore any filesystems with a matching type as specified here. By default, this will exclude any filesystems marked as "</span><span class="NormalTextRun SpellingErrorV2Themed SCXW123406393 BCX8">nodev</span><span class="NormalTextRun SCXW123406393 BCX8">" in /proc/filesystems on </span><span class="NormalTextRun SpellingErrorV2Themed SCXW123406393 BCX8">linux</span><span class="NormalTextRun SCXW123406393 BCX8">.</span></span><span class="EOP SCXW123406393 BCX8" data-ccp-props="{"201341983":0,"335559739":160,"335559740":360}"> </span>

</div><div class="ListContainerWrapper SCXW123406393 BCX8">3. <span class="TextRun SCXW123406393 BCX8" data-contrast="auto" lang="EN-US" xml:lang="EN-US"><span class="NormalTextRun SCXW123406393 BCX8">Tags</span></span><span class="EOP SCXW123406393 BCX8" data-ccp-props="{"201341983":0,"335559739":160,"335559740":360}"> </span>

</div><div class="ListContainerWrapper SCXW123406393 BCX8">4. <span class="TextRun SCXW123406393 BCX8" data-contrast="auto" lang="EN-US" xml:lang="EN-US"><span class="NormalTextRun SCXW123406393 BCX8">Processors</span></span><span class="EOP SCXW123406393 BCX8" data-ccp-props="{"201341983":0,"335559739":160,"335559740":360}"> </span>

</div><div class="ListContainerWrapper SCXW123406393 BCX8">- - - <span class="TextRun SCXW123406393 BCX8" data-contrast="auto" lang="EN-US" xml:lang="EN-US"><span class="NormalTextRun SCXW123406393 BCX8">Processors are used to reduce the number of fields in the exported event or to enhance the event with external metadata.</span></span><span class="EOP SCXW123406393 BCX8" data-ccp-props="{"201341983":0,"335559739":160,"335559740":360}"> </span>

</div><div class="ListContainerWrapper SCXW123406393 BCX8">5. <span class="TextRun SCXW123406393 BCX8" data-contrast="auto" lang="EN-US" xml:lang="EN-US"><span class="NormalTextRun SCXW123406393 BCX8">Indexing settings (experimental)</span></span><span class="EOP SCXW123406393 BCX8" data-ccp-props="{"201341983":0,"335559739":160,"335559740":360}"> </span>

</div><div class="ListContainerWrapper SCXW123406393 BCX8">- - - <span class="TextRun SCXW123406393 BCX8" data-contrast="auto" lang="EN-US" xml:lang="EN-US"><span class="NormalTextRun SCXW123406393 BCX8">Select data streams to configure indexing options. This is an experimental feature and may have effects on other properties.</span></span><span class="EOP SCXW123406393 BCX8" data-ccp-props="{"201341983":0,"335559739":160,"335559740":360}"> </span>

</div><div class="ListContainerWrapper SCXW123406393 BCX8">6. <span class="TextRun SCXW123406393 BCX8" data-contrast="auto" lang="EN-US" xml:lang="EN-US"><span class="NormalTextRun SCXW123406393 BCX8">Synthetic source</span><span class="NormalTextRun SCXW123406393 BCX8"> (Enable Yes/No)</span></span><span class="EOP SCXW123406393 BCX8" data-ccp-props="{"201341983":0,"335559739":160,"335559740":360}"> </span>

</div><div class="OutlineElement Ltr SCXW123406393 BCX8">  
</div></div><span style="color: rgb(53, 152, 219);">**<span class="TextRun SCXW123406393 BCX8" data-contrast="none" lang="EN-US" xml:lang="EN-US"><span class="NormalTextRun SCXW123406393 BCX8" data-ccp-parastyle="heading 3">System </span><span class="NormalTextRun SpellingErrorV2Themed SCXW123406393 BCX8" data-ccp-parastyle="heading 3">fsstat</span><span class="NormalTextRun SCXW123406393 BCX8" data-ccp-parastyle="heading 3"> metrics</span><span class="NormalTextRun SCXW123406393 BCX8" data-ccp-parastyle="heading 3"> (Enable Yes/No)</span></span><span class="EOP SCXW123406393 BCX8" data-ccp-props="{"134245418":true,"134245529":true,"201341983":0,"335559738":40,"335559739":0,"335559740":360}"> </span>**</span>

<div class="SCXW123406393 BCX8" id="bkmrk-period%C2%A0-processors%C2%A0-"><div class="ListContainerWrapper SCXW123406393 BCX8">1. <span class="TextRun SCXW123406393 BCX8" data-contrast="auto" lang="EN-US" xml:lang="EN-US"><span class="NormalTextRun SCXW123406393 BCX8">Period</span></span><span class="EOP SCXW123406393 BCX8" data-ccp-props="{"201341983":0,"335559739":160,"335559740":360}"> </span>

</div><div class="ListContainerWrapper SCXW123406393 BCX8">2. <span class="TextRun SCXW123406393 BCX8" data-contrast="auto" lang="EN-US" xml:lang="EN-US"><span class="NormalTextRun SCXW123406393 BCX8">Processors</span></span><span class="EOP SCXW123406393 BCX8" data-ccp-props="{"201341983":0,"335559739":160,"335559740":360}"> </span>

</div><div class="ListContainerWrapper SCXW123406393 BCX8">- - - <span class="TextRun SCXW123406393 BCX8" data-contrast="auto" lang="EN-US" xml:lang="EN-US"><span class="NormalTextRun SCXW123406393 BCX8">Processors are used to reduce the number of fields in the exported event or to enhance the event with external metadata.</span></span><span class="EOP SCXW123406393 BCX8" data-ccp-props="{"201341983":0,"335559739":160,"335559740":360}"> </span>

</div><div class="ListContainerWrapper SCXW123406393 BCX8">3. <span class="TextRun SCXW123406393 BCX8" data-contrast="auto" lang="EN-US" xml:lang="EN-US"><span class="NormalTextRun SCXW123406393 BCX8">Tags</span></span><span class="EOP SCXW123406393 BCX8" data-ccp-props="{"201341983":0,"335559739":160,"335559740":360}"> </span>

</div><div class="ListContainerWrapper SCXW123406393 BCX8">4. <span class="TextRun SCXW123406393 BCX8" data-contrast="auto" lang="EN-US" xml:lang="EN-US"><span class="NormalTextRun SCXW123406393 BCX8">Synthetic source</span><span class="NormalTextRun SCXW123406393 BCX8"> (Enable Yes/No)</span></span><span class="EOP SCXW123406393 BCX8" data-ccp-props="{"201341983":0,"335559739":160,"335559740":360}"> </span>

</div><div class="OutlineElement Ltr SCXW123406393 BCX8">  
</div></div><span style="color: rgb(53, 152, 219);">**<span class="TextRun SCXW123406393 BCX8" data-contrast="none" lang="EN-US" xml:lang="EN-US"><span class="NormalTextRun SCXW123406393 BCX8" data-ccp-parastyle="heading 3">System load metrics</span><span class="NormalTextRun SCXW123406393 BCX8" data-ccp-parastyle="heading 3"> (Enable Yes/No)</span></span><span class="EOP SCXW123406393 BCX8" data-ccp-props="{"134245418":true,"134245529":true,"201341983":0,"335559738":40,"335559739":0,"335559740":360}"> </span>**</span>

<div class="SCXW123406393 BCX8" id="bkmrk-period%C2%A0-tags%C2%A0-proces"><div class="ListContainerWrapper SCXW123406393 BCX8">1. <span class="TextRun SCXW123406393 BCX8" data-contrast="auto" lang="EN-US" xml:lang="EN-US"><span class="NormalTextRun SCXW123406393 BCX8">Period</span></span><span class="EOP SCXW123406393 BCX8" data-ccp-props="{"201341983":0,"335559739":160,"335559740":360}"> </span>

</div><div class="ListContainerWrapper SCXW123406393 BCX8">2. <span class="TextRun SCXW123406393 BCX8" data-contrast="auto" lang="EN-US" xml:lang="EN-US"><span class="NormalTextRun SCXW123406393 BCX8">Tags</span></span><span class="EOP SCXW123406393 BCX8" data-ccp-props="{"201341983":0,"335559739":160,"335559740":360}"> </span>

</div><div class="ListContainerWrapper SCXW123406393 BCX8">3. <span class="TextRun SCXW123406393 BCX8" data-contrast="auto" lang="EN-US" xml:lang="EN-US"><span class="NormalTextRun SCXW123406393 BCX8">Processors</span></span><span class="EOP SCXW123406393 BCX8" data-ccp-props="{"201341983":0,"335559739":160,"335559740":360}"> </span>

</div><div class="ListContainerWrapper SCXW123406393 BCX8">- - - <span class="TextRun SCXW123406393 BCX8" data-contrast="auto" lang="EN-US" xml:lang="EN-US"><span class="NormalTextRun SCXW123406393 BCX8">Processors are used to reduce the number of fields in the exported event or to enhance the event with metadata. This executes in the agent before the logs are parsed. See Processors for details.</span></span><span class="EOP SCXW123406393 BCX8" data-ccp-props="{"201341983":0,"335559739":160,"335559740":360}"> </span>

</div><div class="ListContainerWrapper SCXW123406393 BCX8">4. <span class="TextRun SCXW123406393 BCX8" data-contrast="auto" lang="EN-US" xml:lang="EN-US"><span class="NormalTextRun SCXW123406393 BCX8">S</span><span class="NormalTextRun SCXW123406393 BCX8">ynthetic source</span><span class="NormalTextRun SCXW123406393 BCX8"> (Enable Yes/No)</span></span><span class="EOP SCXW123406393 BCX8" data-ccp-props="{"201341983":0,"335559739":160,"335559740":360}"> </span>

</div><div class="OutlineElement Ltr SCXW123406393 BCX8">  
</div></div><span style="color: rgb(53, 152, 219);">**<span class="TextRun SCXW123406393 BCX8" data-contrast="none" lang="EN-US" xml:lang="EN-US"><span class="NormalTextRun SCXW123406393 BCX8" data-ccp-parastyle="heading 3">System memory metrics</span><span class="NormalTextRun SCXW123406393 BCX8" data-ccp-parastyle="heading 3"> (Enable Yes/No)</span></span><span class="EOP SCXW123406393 BCX8" data-ccp-props="{"134245418":true,"134245529":true,"201341983":0,"335559738":40,"335559739":0,"335559740":360}"> </span>**</span>

<div class="SCXW123406393 BCX8" id="bkmrk-period%C2%A0-tags%C2%A0-proces-1"><div class="ListContainerWrapper SCXW123406393 BCX8">1. <span class="TextRun SCXW123406393 BCX8" data-contrast="auto" lang="EN-US" xml:lang="EN-US"><span class="NormalTextRun SCXW123406393 BCX8">Period</span></span><span class="EOP SCXW123406393 BCX8" data-ccp-props="{"201341983":0,"335559739":160,"335559740":360}"> </span>

</div><div class="ListContainerWrapper SCXW123406393 BCX8">2. <span class="TextRun SCXW123406393 BCX8" data-contrast="auto" lang="EN-US" xml:lang="EN-US"><span class="NormalTextRun SCXW123406393 BCX8">Tags</span></span><span class="EOP SCXW123406393 BCX8" data-ccp-props="{"201341983":0,"335559739":160,"335559740":360}"> </span>

</div><div class="ListContainerWrapper SCXW123406393 BCX8">3. <span class="TextRun SCXW123406393 BCX8" data-contrast="auto" lang="EN-US" xml:lang="EN-US"><span class="NormalTextRun SCXW123406393 BCX8">Processors</span></span><span class="EOP SCXW123406393 BCX8" data-ccp-props="{"201341983":0,"335559739":160,"335559740":360}"> </span>

</div><div class="ListContainerWrapper SCXW123406393 BCX8">- - - <span class="TextRun SCXW123406393 BCX8" data-contrast="auto" lang="EN-US" xml:lang="EN-US"><span class="NormalTextRun SCXW123406393 BCX8">Processors are used to reduce the number of fields in the exported event or to enhance the event with metadata. This executes in the agent before the logs are parsed. See Processors for details.</span></span><span class="EOP SCXW123406393 BCX8" data-ccp-props="{"201341983":0,"335559739":160,"335559740":360}"> </span>

</div><div class="ListContainerWrapper SCXW123406393 BCX8">4. <span class="TextRun SCXW123406393 BCX8" data-contrast="auto" lang="EN-US" xml:lang="EN-US"><span class="NormalTextRun SCXW123406393 BCX8">Synthetic source</span><span class="NormalTextRun SCXW123406393 BCX8"> (Enable Yes/No)</span></span><span class="EOP SCXW123406393 BCX8" data-ccp-props="{"201341983":0,"335559739":160,"335559740":360}"> </span>

</div><div class="OutlineElement Ltr SCXW123406393 BCX8">  
</div></div><span style="color: rgb(53, 152, 219);">**<span class="TextRun SCXW123406393 BCX8" data-contrast="none" lang="EN-US" xml:lang="EN-US"><span class="NormalTextRun SCXW123406393 BCX8" data-ccp-parastyle="heading 3">System network metrics</span><span class="NormalTextRun SCXW123406393 BCX8" data-ccp-parastyle="heading 3"> (Enable Yes/No)</span></span><span class="EOP SCXW123406393 BCX8" data-ccp-props="{"134245418":true,"134245529":true,"201341983":0,"335559738":40,"335559739":0,"335559740":360}"> </span>**</span>

<div class="SCXW123406393 BCX8" id="bkmrk-period%C2%A0-interfaces%C2%A0-"><div class="ListContainerWrapper SCXW123406393 BCX8">1. <span class="TextRun SCXW123406393 BCX8" data-contrast="auto" lang="EN-US" xml:lang="EN-US"><span class="NormalTextRun SCXW123406393 BCX8">Period</span></span><span class="EOP SCXW123406393 BCX8" data-ccp-props="{"201341983":0,"335559739":160,"335559740":360}"> </span>

</div><div class="ListContainerWrapper SCXW123406393 BCX8">2. <span class="TextRun SCXW123406393 BCX8" data-contrast="auto" lang="EN-US" xml:lang="EN-US"><span class="NormalTextRun SCXW123406393 BCX8">Interfaces</span></span><span class="EOP SCXW123406393 BCX8" data-ccp-props="{"201341983":0,"335559739":160,"335559740":360}"> </span>

</div><div class="ListContainerWrapper SCXW123406393 BCX8">- - - <span class="TextRun SCXW123406393 BCX8" data-contrast="auto" lang="EN-US" xml:lang="EN-US"><span class="NormalTextRun SCXW123406393 BCX8">List of interfaces to </span><span class="NormalTextRun SCXW123406393 BCX8">monitor</span><span class="NormalTextRun SCXW123406393 BCX8">. Will </span><span class="NormalTextRun SCXW123406393 BCX8">monitor</span><span class="NormalTextRun SCXW123406393 BCX8"> all by default.</span></span><span class="EOP SCXW123406393 BCX8" data-ccp-props="{"201341983":0,"335559739":160,"335559740":360}"> </span>

</div><div class="ListContainerWrapper SCXW123406393 BCX8">3. <span class="TextRun SCXW123406393 BCX8" data-contrast="auto" lang="EN-US" xml:lang="EN-US"><span class="NormalTextRun SCXW123406393 BCX8">Tags</span></span><span class="EOP SCXW123406393 BCX8" data-ccp-props="{"201341983":0,"335559739":160,"335559740":360}"> </span>

</div><div class="ListContainerWrapper SCXW123406393 BCX8">4. <span class="TextRun SCXW123406393 BCX8" data-contrast="auto" lang="EN-US" xml:lang="EN-US"><span class="NormalTextRun SCXW123406393 BCX8">Processors</span></span><span class="EOP SCXW123406393 BCX8" data-ccp-props="{"201341983":0,"335559739":160,"335559740":360}"> </span>

</div><div class="ListContainerWrapper SCXW123406393 BCX8">- - - <span class="TextRun SCXW123406393 BCX8" data-contrast="auto" lang="EN-US" xml:lang="EN-US"><span class="NormalTextRun SCXW123406393 BCX8">Processors are used to reduce the number of fields in the exported event or to enhance the event with metadata. This executes in the agent before the logs are parsed. See Processors for details.</span></span><span class="EOP SCXW123406393 BCX8" data-ccp-props="{"201341983":0,"335559739":160,"335559740":360}"> </span>

</div><div class="ListContainerWrapper SCXW123406393 BCX8">5. <span class="TextRun SCXW123406393 BCX8" data-contrast="auto" lang="EN-US" xml:lang="EN-US"><span class="NormalTextRun SCXW123406393 BCX8">Synthetic source</span><span class="NormalTextRun SCXW123406393 BCX8"> (Enable Yes/No) </span></span><span class="EOP SCXW123406393 BCX8" data-ccp-props="{"201341983":0,"335559739":160,"335559740":360}"> </span>

</div><div class="OutlineElement Ltr SCXW123406393 BCX8">  
</div></div>**<span class="TextRun SCXW123406393 BCX8" data-contrast="none" lang="EN-US" style="color: rgb(53, 152, 219);" xml:lang="EN-US"><span class="NormalTextRun SCXW123406393 BCX8" data-ccp-parastyle="heading 3">System process metrics</span></span><span class="EOP SCXW123406393 BCX8" data-ccp-props="{"134245418":true,"134245529":true,"201341983":0,"335559738":40,"335559739":0,"335559740":360}"> </span>**

<div class="SCXW123406393 BCX8" id="bkmrk-period%C2%A0-process-incl"><div class="ListContainerWrapper SCXW123406393 BCX8">1. <span class="TextRun SCXW123406393 BCX8" data-contrast="auto" lang="EN-US" xml:lang="EN-US"><span class="NormalTextRun SCXW123406393 BCX8">Period</span></span><span class="EOP SCXW123406393 BCX8" data-ccp-props="{"201341983":0,"335559739":160,"335559740":360}"> </span>

</div><div class="ListContainerWrapper SCXW123406393 BCX8">2. <span class="TextRun SCXW123406393 BCX8" data-contrast="auto" lang="EN-US" xml:lang="EN-US"><span class="NormalTextRun SCXW123406393 BCX8">Process Include Top N By </span><span class="NormalTextRun SpellingErrorV2Themed SCXW123406393 BCX8">Cpu</span></span><span class="EOP SCXW123406393 BCX8" data-ccp-props="{"201341983":0,"335559739":160,"335559740":360}"> </span>

</div><div class="ListContainerWrapper SCXW123406393 BCX8">- - - <span class="TextRun SCXW123406393 BCX8" data-contrast="auto" lang="EN-US" xml:lang="EN-US"><span class="NormalTextRun SCXW123406393 BCX8">Include the top N processes by CPU usage.</span></span><span class="EOP SCXW123406393 BCX8" data-ccp-props="{"201341983":0,"335559739":160,"335559740":360}"> </span>

</div><div class="ListContainerWrapper SCXW123406393 BCX8">3. <span class="TextRun SCXW123406393 BCX8" data-contrast="auto" lang="EN-US" xml:lang="EN-US"><span class="NormalTextRun SCXW123406393 BCX8">Process Include Top N By Memory</span></span><span class="EOP SCXW123406393 BCX8" data-ccp-props="{"201341983":0,"335559739":160,"335559740":360}"> </span>

</div><div class="ListContainerWrapper SCXW123406393 BCX8">- - - <span class="TextRun SCXW123406393 BCX8" data-contrast="auto" lang="EN-US" xml:lang="EN-US"><span class="NormalTextRun SCXW123406393 BCX8">Include the top N processes by memory usage.</span></span><span class="EOP SCXW123406393 BCX8" data-ccp-props="{"201341983":0,"335559739":160,"335559740":360}"> </span>

</div><div class="ListContainerWrapper SCXW123406393 BCX8">4. <span class="TextRun SCXW123406393 BCX8" data-contrast="auto" lang="EN-US" xml:lang="EN-US"><span class="NormalTextRun SCXW123406393 BCX8">Enable </span><span class="NormalTextRun SpellingErrorV2Themed SCXW123406393 BCX8">cmdline</span><span class="NormalTextRun SCXW123406393 BCX8"> cache</span><span class="NormalTextRun SCXW123406393 BCX8"> (Enable Yes/No)</span></span><span class="EOP SCXW123406393 BCX8" data-ccp-props="{"201341983":0,"335559739":160,"335559740":360}"> </span>

</div></div><div class="SCXW123406393 BCX8" id="bkmrk-if-false%2C-cmdline-of"><div class="ListContainerWrapper SCXW123406393 BCX8">- - - <span class="TextRun SCXW123406393 BCX8" data-contrast="auto" lang="EN-US" xml:lang="EN-US"><span class="NormalTextRun SCXW123406393 BCX8">If false, </span><span class="NormalTextRun SpellingErrorV2Themed SCXW123406393 BCX8">cmdline</span><span class="NormalTextRun SCXW123406393 BCX8"> of a process is not cached</span></span><span class="EOP SCXW123406393 BCX8" data-ccp-props="{"201341983":0,"335559739":160,"335559740":360}"> </span>

</div><div class="ListContainerWrapper SCXW123406393 BCX8">5. <span class="TextRun SCXW123406393 BCX8" data-contrast="auto" lang="EN-US" xml:lang="EN-US"><span class="NormalTextRun SCXW123406393 BCX8">Enable </span><span class="NormalTextRun SpellingErrorV2Themed SCXW123406393 BCX8">cgroup</span><span class="NormalTextRun SCXW123406393 BCX8"> reporting</span> <span class="NormalTextRun SCXW123406393 BCX8">(Enable Yes/No)</span></span><span class="EOP SCXW123406393 BCX8" data-ccp-props="{"201341983":0,"335559739":160,"335559740":360}"> </span>

</div><div class="ListContainerWrapper SCXW123406393 BCX8">- - - <span class="TextRun SCXW123406393 BCX8" data-contrast="auto" lang="EN-US" xml:lang="EN-US"><span class="NormalTextRun SCXW123406393 BCX8">Enable collection of </span><span class="NormalTextRun SpellingErrorV2Themed SCXW123406393 BCX8">cgroup</span><span class="NormalTextRun SCXW123406393 BCX8"> metrics from processes on Linux.</span></span><span class="EOP SCXW123406393 BCX8" data-ccp-props="{"201341983":0,"335559739":160,"335559740":360}"> </span>

</div><div class="ListContainerWrapper SCXW123406393 BCX8">6. <span class="TextRun SCXW123406393 BCX8" data-contrast="auto" lang="EN-US" xml:lang="EN-US"><span class="NormalTextRun SCXW123406393 BCX8">Env whitelist</span></span><span class="EOP SCXW123406393 BCX8" data-ccp-props="{"201341983":0,"335559739":160,"335559740":360}"> </span>

</div><div class="ListContainerWrapper SCXW123406393 BCX8">- - - <span class="TextRun SCXW123406393 BCX8" data-contrast="auto" lang="EN-US" xml:lang="EN-US"><span class="NormalTextRun SCXW123406393 BCX8">A list of regular expressions used to whitelist environment variables reported with the process </span><span class="NormalTextRun SpellingErrorV2Themed SCXW123406393 BCX8">metricset's</span><span class="NormalTextRun SCXW123406393 BCX8"> events. Defaults to empty.</span></span><span class="EOP SCXW123406393 BCX8" data-ccp-props="{"201341983":0,"335559739":160,"335559740":360}"> </span>

</div><div class="ListContainerWrapper SCXW123406393 BCX8">7. <span class="TextRun SCXW123406393 BCX8" data-contrast="auto" lang="EN-US" xml:lang="EN-US"><span class="NormalTextRun SCXW123406393 BCX8">Include CPU Ticks</span><span class="NormalTextRun SCXW123406393 BCX8"> (Enable Yes/No)</span></span><span class="EOP SCXW123406393 BCX8" data-ccp-props="{"201341983":0,"335559739":160,"335559740":360}"> </span>

</div><div class="ListContainerWrapper SCXW123406393 BCX8">- - - <span class="TextRun SCXW123406393 BCX8" data-contrast="auto" lang="EN-US" xml:lang="EN-US"><span class="NormalTextRun SCXW123406393 BCX8">Include the cumulative CPU tick values with the process metrics.</span></span><span class="EOP SCXW123406393 BCX8" data-ccp-props="{"201341983":0,"335559739":160,"335559740":360}"> </span>

</div><div class="ListContainerWrapper SCXW123406393 BCX8">8. <span class="TextRun SCXW123406393 BCX8" data-contrast="auto" lang="EN-US" xml:lang="EN-US"><span class="NormalTextRun SCXW123406393 BCX8">Processes</span></span><span class="EOP SCXW123406393 BCX8" data-ccp-props="{"201341983":0,"335559739":160,"335559740":360}"> </span>

</div><div class="ListContainerWrapper SCXW123406393 BCX8">- - - <span class="TextRun SCXW123406393 BCX8" data-contrast="auto" lang="EN-US" xml:lang="EN-US"><span class="NormalTextRun SCXW123406393 BCX8">A </span><span class="NormalTextRun ContextualSpellingAndGrammarErrorV2Themed SCXW123406393 BCX8">glob</span><span class="NormalTextRun SCXW123406393 BCX8"> to match reported processes. By </span><span class="NormalTextRun ContextualSpellingAndGrammarErrorV2Themed SCXW123406393 BCX8">default</span><span class="NormalTextRun SCXW123406393 BCX8"> all processes are reported.</span></span><span class="EOP SCXW123406393 BCX8" data-ccp-props="{"201341983":0,"335559739":160,"335559740":360}"> </span>

</div><div class="ListContainerWrapper SCXW123406393 BCX8">7. <span class="TextRun SCXW123406393 BCX8" data-contrast="auto" lang="EN-US" xml:lang="EN-US"><span class="NormalTextRun SCXW123406393 BCX8">Tags</span></span><span class="EOP SCXW123406393 BCX8" data-ccp-props="{"201341983":0,"335559739":160,"335559740":360}"> </span>

</div><div class="ListContainerWrapper SCXW123406393 BCX8">8. <span class="TextRun SCXW123406393 BCX8" data-contrast="auto" lang="EN-US" xml:lang="EN-US"><span class="NormalTextRun SCXW123406393 BCX8">Processors</span></span><span class="EOP SCXW123406393 BCX8" data-ccp-props="{"201341983":0,"335559739":160,"335559740":360}"> </span>

</div><div class="ListContainerWrapper SCXW123406393 BCX8">- - - <span class="TextRun SCXW123406393 BCX8" data-contrast="auto" lang="EN-US" xml:lang="EN-US"><span class="NormalTextRun SCXW123406393 BCX8">Processors are used to reduce the number of fields in the exported event or to enhance the event with metadata. This executes in the agent before the logs are parsed. See Processors for details.</span></span><span class="EOP SCXW123406393 BCX8" data-ccp-props="{"201341983":0,"335559739":160,"335559740":360}"> </span>

</div><div class="ListContainerWrapper SCXW123406393 BCX8">9. <span class="TextRun SCXW123406393 BCX8" data-contrast="auto" lang="EN-US" xml:lang="EN-US"><span class="NormalTextRun SCXW123406393 BCX8">Synthetic source</span><span class="NormalTextRun SCXW123406393 BCX8"> (Enable Yes/No)</span></span><span class="EOP SCXW123406393 BCX8" data-ccp-props="{"201341983":0,"335559739":160,"335559740":360}"> </span>

</div><div class="OutlineElement Ltr SCXW123406393 BCX8">  
</div></div><span style="color: rgb(53, 152, 219);">**<span class="TextRun SCXW123406393 BCX8" data-contrast="none" lang="EN-US" xml:lang="EN-US"><span class="NormalTextRun SCXW123406393 BCX8" data-ccp-parastyle="heading 3">System </span><span class="NormalTextRun SpellingErrorV2Themed SCXW123406393 BCX8" data-ccp-parastyle="heading 3">process\_summary</span><span class="NormalTextRun SCXW123406393 BCX8" data-ccp-parastyle="heading 3"> metrics</span><span class="NormalTextRun SCXW123406393 BCX8" data-ccp-parastyle="heading 3"> (Enable Yes/No)</span></span><span class="EOP SCXW123406393 BCX8" data-ccp-props="{"134245418":true,"134245529":true,"201341983":0,"335559738":40,"335559739":0,"335559740":360}"> </span>**</span>

<div class="SCXW123406393 BCX8" id="bkmrk-period%C2%A0-tags%C2%A0-proces-2"><div class="ListContainerWrapper SCXW123406393 BCX8">1. <span class="TextRun SCXW123406393 BCX8" data-contrast="auto" lang="EN-US" xml:lang="EN-US"><span class="NormalTextRun SCXW123406393 BCX8">Period</span></span><span class="EOP SCXW123406393 BCX8" data-ccp-props="{"201341983":0,"335559739":160,"335559740":360}"> </span>

</div><div class="ListContainerWrapper SCXW123406393 BCX8">2. <span class="TextRun SCXW123406393 BCX8" data-contrast="auto" lang="EN-US" xml:lang="EN-US"><span class="NormalTextRun SCXW123406393 BCX8">Tags</span></span><span class="EOP SCXW123406393 BCX8" data-ccp-props="{"201341983":0,"335559739":160,"335559740":360}"> </span>

</div><div class="ListContainerWrapper SCXW123406393 BCX8">3. <span class="TextRun SCXW123406393 BCX8" data-contrast="auto" lang="EN-US" xml:lang="EN-US"><span class="NormalTextRun SCXW123406393 BCX8">Processors</span></span><span class="EOP SCXW123406393 BCX8" data-ccp-props="{"201341983":0,"335559739":160,"335559740":360}"> </span>

</div><div class="ListContainerWrapper SCXW123406393 BCX8">- - - <span class="TextRun SCXW123406393 BCX8" data-contrast="auto" lang="EN-US" xml:lang="EN-US"><span class="NormalTextRun SCXW123406393 BCX8">Processors are used to reduce the number of fields in the exported event or to enhance the event with metadata. This executes in the agent before the logs are parsed. See Processors for details.</span></span><span class="EOP SCXW123406393 BCX8" data-ccp-props="{"201341983":0,"335559739":160,"335559740":360}"> </span>

</div><div class="ListContainerWrapper SCXW123406393 BCX8">4. <span class="TextRun SCXW123406393 BCX8" data-contrast="auto" lang="EN-US" xml:lang="EN-US"><span class="NormalTextRun SCXW123406393 BCX8">Synthetic source</span><span class="NormalTextRun SCXW123406393 BCX8"> (Enable Yes/No)</span></span><span class="EOP SCXW123406393 BCX8" data-ccp-props="{"201341983":0,"335559739":160,"335559740":360}"> </span>

</div><div class="OutlineElement Ltr SCXW123406393 BCX8">  
</div></div><span style="color: rgb(53, 152, 219);">**<span class="TextRun SCXW123406393 BCX8" data-contrast="none" lang="EN-US" xml:lang="EN-US"><span class="NormalTextRun SCXW123406393 BCX8" data-ccp-parastyle="heading 3">System </span><span class="NormalTextRun SpellingErrorV2Themed SCXW123406393 BCX8" data-ccp-parastyle="heading 3">socket\_summary</span><span class="NormalTextRun SCXW123406393 BCX8" data-ccp-parastyle="heading 3"> metrics</span><span class="NormalTextRun SCXW123406393 BCX8" data-ccp-parastyle="heading 3"> (Enable Yes/No)</span></span><span class="EOP SCXW123406393 BCX8" data-ccp-props="{"134245418":true,"134245529":true,"201341983":0,"335559738":40,"335559739":0,"335559740":360}"> </span>**</span>

<div class="SCXW123406393 BCX8" id="bkmrk-period%C2%A0-tags%C2%A0-proces-3"><div class="ListContainerWrapper SCXW123406393 BCX8">1. <span class="TextRun SCXW123406393 BCX8" data-contrast="auto" lang="EN-US" xml:lang="EN-US"><span class="NormalTextRun SCXW123406393 BCX8">Period</span></span><span class="EOP SCXW123406393 BCX8" data-ccp-props="{"201341983":0,"335559739":160,"335559740":360}"> </span>

</div><div class="ListContainerWrapper SCXW123406393 BCX8">2. <span class="TextRun SCXW123406393 BCX8" data-contrast="auto" lang="EN-US" xml:lang="EN-US"><span class="NormalTextRun SCXW123406393 BCX8">Tags</span></span><span class="EOP SCXW123406393 BCX8" data-ccp-props="{"201341983":0,"335559739":160,"335559740":360}"> </span>

</div><div class="ListContainerWrapper SCXW123406393 BCX8">3. <span class="TextRun SCXW123406393 BCX8" data-contrast="auto" lang="EN-US" xml:lang="EN-US"><span class="NormalTextRun SCXW123406393 BCX8">Processors</span></span><span class="EOP SCXW123406393 BCX8" data-ccp-props="{"201341983":0,"335559739":160,"335559740":360}"> </span>

</div><div class="ListContainerWrapper SCXW123406393 BCX8">- - - <span class="TextRun SCXW123406393 BCX8" data-contrast="auto" lang="EN-US" xml:lang="EN-US"><span class="NormalTextRun SCXW123406393 BCX8">Processors are used to reduce the number of fields in the exported event or to enhance the event with metadata. This executes in the agent before the logs are parsed. See Processors for details.</span></span><span class="EOP SCXW123406393 BCX8" data-ccp-props="{"201341983":0,"335559739":160,"335559740":360}"> </span>

</div><div class="ListContainerWrapper SCXW123406393 BCX8">4. <span class="TextRun SCXW123406393 BCX8" data-contrast="auto" lang="EN-US" xml:lang="EN-US"><span class="NormalTextRun SCXW123406393 BCX8">Synthetic source</span><span class="NormalTextRun SCXW123406393 BCX8"> (Enable Yes/No)</span></span><span class="EOP SCXW123406393 BCX8" data-ccp-props="{"201341983":0,"335559739":160,"335559740":360}"> </span>

</div><div class="OutlineElement Ltr SCXW123406393 BCX8">  
</div></div>**<span class="TextRun SCXW123406393 BCX8" data-contrast="none" lang="EN-US" style="color: rgb(53, 152, 219);" xml:lang="EN-US"><span class="NormalTextRun SCXW123406393 BCX8" data-ccp-parastyle="heading 3">System uptime metrics</span><span class="NormalTextRun SCXW123406393 BCX8" data-ccp-parastyle="heading 3"> (Enable Yes/No)</span></span><span class="EOP SCXW123406393 BCX8" data-ccp-props="{"134245418":true,"134245529":true,"201341983":0,"335559738":40,"335559739":0,"335559740":360}"> </span>**

<div class="SCXW123406393 BCX8" id="bkmrk-period%C2%A0-tags%C2%A0-proces-4"><div class="ListContainerWrapper SCXW123406393 BCX8">1. <span class="TextRun SCXW123406393 BCX8" data-contrast="auto" lang="EN-US" xml:lang="EN-US"><span class="NormalTextRun SCXW123406393 BCX8">Period</span></span><span class="EOP SCXW123406393 BCX8" data-ccp-props="{"201341983":0,"335559739":160,"335559740":360}"> </span>

</div><div class="ListContainerWrapper SCXW123406393 BCX8">2. <span class="TextRun SCXW123406393 BCX8" data-contrast="auto" lang="EN-US" xml:lang="EN-US"><span class="NormalTextRun SCXW123406393 BCX8">Tags</span></span><span class="EOP SCXW123406393 BCX8" data-ccp-props="{"201341983":0,"335559739":160,"335559740":360}"> </span>

</div><div class="ListContainerWrapper SCXW123406393 BCX8">3. <span class="TextRun SCXW123406393 BCX8" data-contrast="auto" lang="EN-US" xml:lang="EN-US"><span class="NormalTextRun SCXW123406393 BCX8">Processors</span></span><span class="EOP SCXW123406393 BCX8" data-ccp-props="{"201341983":0,"335559739":160,"335559740":360}"> </span>

</div><div class="ListContainerWrapper SCXW123406393 BCX8">- - - <span class="TextRun SCXW123406393 BCX8" data-contrast="auto" lang="EN-US" xml:lang="EN-US"><span class="NormalTextRun SCXW123406393 BCX8">Processors are used to reduce the number of fields in the exported event or to enhance the event with metadata. This executes in the agent before the logs are parsed. See Processors for details.</span></span><span class="EOP SCXW123406393 BCX8" data-ccp-props="{"201341983":0,"335559739":160,"335559740":360}"> </span>

</div><div class="ListContainerWrapper SCXW123406393 BCX8">4. <span class="TextRun SCXW123406393 BCX8" data-contrast="auto" lang="EN-US" xml:lang="EN-US"><span class="NormalTextRun SCXW123406393 BCX8">Synthetic source</span><span class="NormalTextRun SCXW123406393 BCX8"> (Enable Yes/No)</span></span><span class="EOP SCXW123406393 BCX8" data-ccp-props="{"201341983":0,"335559739":160,"335559740":360}"> </span>

</div><div class="OutlineElement Ltr SCXW123406393 BCX8">  
</div></div>**<span class="TextRun SCXW123406393 BCX8" data-contrast="none" lang="EN-US" xml:lang="EN-US"><span class="NormalTextRun SCXW123406393 BCX8" data-ccp-parastyle="heading 3" style="color: rgb(53, 152, 219);">Collect logs from third-party REST API (experimental)</span><span class="NormalTextRun SCXW123406393 BCX8" data-ccp-parastyle="heading 3"><span style="color: rgb(53, 152, 219);"> (Enable Yes/No</span>)</span></span><span class="EOP SCXW123406393 BCX8" data-ccp-props="{"134245418":true,"134245529":true,"201341983":0,"335559738":40,"335559739":0,"335559740":360}"> </span>**

<div class="SCXW123406393 BCX8" id="bkmrk-url-of-splunk-enterp"><div class="ListContainerWrapper SCXW123406393 BCX8">1. <span class="TextRun SCXW123406393 BCX8" data-contrast="auto" lang="EN-US" xml:lang="EN-US"><span class="NormalTextRun SCXW123406393 BCX8">URL of Splunk Enterprise Server</span></span><span class="EOP SCXW123406393 BCX8" data-ccp-props="{"201341983":0,"335559739":160,"335559740":360}"> </span>

</div><div class="ListContainerWrapper SCXW123406393 BCX8">- - - <span class="TextRun SCXW123406393 BCX8" data-contrast="auto" lang="EN-US" xml:lang="EN-US"><span class="NormalTextRun SCXW123406393 BCX8">i.e.</span><span class="NormalTextRun SCXW123406393 BCX8"> scheme://host:port, path is automatic</span></span><span class="EOP SCXW123406393 BCX8" data-ccp-props="{"201341983":0,"335559739":160,"335559740":360}"> </span>

</div><div class="ListContainerWrapper SCXW123406393 BCX8">2. <span class="TextRun SCXW123406393 BCX8" data-contrast="auto" lang="EN-US" xml:lang="EN-US"><span class="NormalTextRun SCXW123406393 BCX8">Splunk REST API Username</span></span><span class="EOP SCXW123406393 BCX8" data-ccp-props="{"201341983":0,"335559739":160,"335559740":360}"> </span>

</div><div class="ListContainerWrapper SCXW123406393 BCX8">3. <span class="TextRun SCXW123406393 BCX8" data-contrast="auto" lang="EN-US" xml:lang="EN-US"><span class="NormalTextRun SCXW123406393 BCX8">Splunk REST API Password</span></span><span class="EOP SCXW123406393 BCX8" data-ccp-props="{"201341983":0,"335559739":160,"335559740":360}"> </span>

</div><div class="ListContainerWrapper SCXW123406393 BCX8">4. <span class="TextRun SCXW123406393 BCX8" data-contrast="auto" lang="EN-US" xml:lang="EN-US"><span class="NormalTextRun SCXW123406393 BCX8">Splunk Authorization Token</span></span><span class="EOP SCXW123406393 BCX8" data-ccp-props="{"201341983":0,"335559739":160,"335559740":360}"> </span>

</div><div class="ListContainerWrapper SCXW123406393 BCX8">- - - <span class="TextRun SCXW123406393 BCX8" data-contrast="auto" lang="EN-US" xml:lang="EN-US"><span class="NormalTextRun SCXW123406393 BCX8">Bearer Token or Session Key, </span><span class="NormalTextRun SCXW123406393 BCX8">e.g.</span><span class="NormalTextRun SCXW123406393 BCX8"> "Bearer eyJFd3e46..." or "Splunk 192fd3e...". Cannot be used with username and password.</span></span><span class="EOP SCXW123406393 BCX8" data-ccp-props="{"201341983":0,"335559739":160,"335559740":360}"> </span>

</div><div class="ListContainerWrapper SCXW123406393 BCX8">5. <span class="TextRun SCXW123406393 BCX8" data-contrast="auto" lang="EN-US" xml:lang="EN-US"><span class="NormalTextRun SCXW123406393 BCX8">Preserve original event</span><span class="NormalTextRun SCXW123406393 BCX8"> (Enable Yes/No)</span></span><span class="EOP SCXW123406393 BCX8" data-ccp-props="{"201341983":0,"335559739":160,"335559740":360}"> </span>

</div><div class="ListContainerWrapper SCXW123406393 BCX8">- - - <span class="TextRun SCXW123406393 BCX8" data-contrast="auto" lang="EN-US" xml:lang="EN-US"><span class="NormalTextRun SCXW123406393 BCX8">Preserves a raw copy of the original event, added to the field </span><span class="NormalTextRun SpellingErrorV2Themed SCXW123406393 BCX8">event.original</span></span><span class="EOP SCXW123406393 BCX8" data-ccp-props="{"201341983":0,"335559739":160,"335559740":360}"> </span>

</div></div><div class="SCXW123406393 BCX8" id="bkmrk-ssl-configuration%C2%A0-i"><div class="ListContainerWrapper SCXW123406393 BCX8">6. <span class="TextRun SCXW123406393 BCX8" data-contrast="auto" lang="EN-US" xml:lang="EN-US"><span class="NormalTextRun SCXW123406393 BCX8">SSL Configuration</span></span><span class="EOP SCXW123406393 BCX8" data-ccp-props="{"201341983":0,"335559739":160,"335559740":360}"> </span>

</div><div class="ListContainerWrapper SCXW123406393 BCX8">- - - <span class="TextRun SCXW123406393 BCX8" data-contrast="auto" lang="EN-US" xml:lang="EN-US"><span class="NormalTextRun SCXW123406393 BCX8">i.e.</span> <span class="NormalTextRun SpellingErrorV2Themed SCXW123406393 BCX8">certificate\_authorities</span><span class="NormalTextRun SCXW123406393 BCX8">, </span><span class="NormalTextRun SpellingErrorV2Themed SCXW123406393 BCX8">supported\_protocols</span><span class="NormalTextRun SCXW123406393 BCX8">, </span><span class="NormalTextRun SpellingErrorV2Themed SCXW123406393 BCX8">verification\_mode</span><span class="NormalTextRun SCXW123406393 BCX8"> etc.</span></span><span class="EOP SCXW123406393 BCX8" data-ccp-props="{"201341983":0,"335559739":160,"335559740":360}"> </span>

</div><div class="OutlineElement Ltr SCXW123406393 BCX8">  
</div></div><span style="color: rgb(53, 152, 219);">**<span class="TextRun SCXW123406393 BCX8" data-contrast="none" lang="EN-US" xml:lang="EN-US"><span class="NormalTextRun SCXW123406393 BCX8" data-ccp-parastyle="heading 3">Windows Application Events via Splunk Enterprise REST API</span><span class="NormalTextRun SCXW123406393 BCX8" data-ccp-parastyle="heading 3"> (Enable Yes/No)</span></span><span class="EOP SCXW123406393 BCX8" data-ccp-props="{"134245418":true,"134245529":true,"201341983":0,"335559738":40,"335559739":0,"335559740":360}"> </span>**</span>

<div class="SCXW123406393 BCX8" id="bkmrk-interval-to-query-sp"><div class="OutlineElement Ltr SCXW123406393 BCX8">  
</div><div class="ListContainerWrapper SCXW123406393 BCX8">1. <span class="TextRun SCXW123406393 BCX8" data-contrast="auto" lang="EN-US" xml:lang="EN-US"><span class="NormalTextRun SCXW123406393 BCX8">Interval to query Splunk Enterprise REST API</span></span><span class="EOP SCXW123406393 BCX8" data-ccp-props="{"201341983":0,"335559739":160,"335559740":360}"> </span>

</div><div class="ListContainerWrapper SCXW123406393 BCX8">- - - <span class="TextRun SCXW123406393 BCX8" data-contrast="auto" lang="EN-US" xml:lang="EN-US"><span class="NormalTextRun SCXW123406393 BCX8">Go Duration syntax (</span><span class="NormalTextRun SpellingErrorV2Themed SCXW123406393 BCX8">eg.</span><span class="NormalTextRun SCXW123406393 BCX8"> 10s)</span></span><span class="EOP SCXW123406393 BCX8" data-ccp-props="{"201341983":0,"335559739":160,"335559740":360}"> </span>

</div><div class="ListContainerWrapper SCXW123406393 BCX8">2. <span class="TextRun SCXW123406393 BCX8" data-contrast="auto" lang="EN-US" xml:lang="EN-US"><span class="NormalTextRun SCXW123406393 BCX8">Splunk search string</span></span><span class="EOP SCXW123406393 BCX8" data-ccp-props="{"201341983":0,"335559739":160,"335559740":360}"> </span>

</div><div class="ListContainerWrapper SCXW123406393 BCX8">3. <span class="TextRun SCXW123406393 BCX8" data-contrast="auto" lang="EN-US" xml:lang="EN-US"><span class="NormalTextRun SCXW123406393 BCX8">Tags</span></span><span class="EOP SCXW123406393 BCX8" data-ccp-props="{"201341983":0,"335559739":160,"335559740":360}"> </span>

</div><div class="ListContainerWrapper SCXW123406393 BCX8">4. <span class="TextRun SCXW123406393 BCX8" data-contrast="auto" lang="EN-US" xml:lang="EN-US"><span class="NormalTextRun SCXW123406393 BCX8">Synthetic source</span><span class="NormalTextRun SCXW123406393 BCX8"> (Enable Yes/No)</span></span><span class="EOP SCXW123406393 BCX8" data-ccp-props="{"201341983":0,"335559739":160,"335559740":360}"> </span>

</div><div class="OutlineElement Ltr SCXW123406393 BCX8">  
</div></div><span style="color: rgb(53, 152, 219);">**<span class="TextRun SCXW123406393 BCX8" data-contrast="none" lang="EN-US" xml:lang="EN-US"><span class="NormalTextRun SCXW123406393 BCX8" data-ccp-parastyle="heading 3">Windows Security Events via Splunk Enterprise REST API</span><span class="NormalTextRun SCXW123406393 BCX8" data-ccp-parastyle="heading 3"> (Enable Yes/No)</span></span><span class="EOP SCXW123406393 BCX8" data-ccp-props="{"134245418":true,"134245529":true,"201341983":0,"335559738":40,"335559739":0,"335559740":360}"> </span>**</span>

<div class="SCXW123406393 BCX8" id="bkmrk-interval-to-query-sp-1"><div class="OutlineElement Ltr SCXW123406393 BCX8">  
</div><div class="ListContainerWrapper SCXW123406393 BCX8">1. <span class="TextRun SCXW123406393 BCX8" data-contrast="auto" lang="EN-US" xml:lang="EN-US"><span class="NormalTextRun SCXW123406393 BCX8">Interval to query Splunk Enterprise REST API</span></span><span class="EOP SCXW123406393 BCX8" data-ccp-props="{"201341983":0,"335559739":160,"335559740":360}"> </span>

</div><div class="ListContainerWrapper SCXW123406393 BCX8">- - - <span class="TextRun SCXW123406393 BCX8" data-contrast="auto" lang="EN-US" xml:lang="EN-US"><span class="NormalTextRun SCXW123406393 BCX8">Go Duration syntax (</span><span class="NormalTextRun SpellingErrorV2Themed SCXW123406393 BCX8">eg.</span><span class="NormalTextRun SCXW123406393 BCX8"> 10s)</span></span><span class="EOP SCXW123406393 BCX8" data-ccp-props="{"201341983":0,"335559739":160,"335559740":360}"> </span>

</div><div class="ListContainerWrapper SCXW123406393 BCX8">2. <span class="TextRun SCXW123406393 BCX8" data-contrast="auto" lang="EN-US" xml:lang="EN-US"><span class="NormalTextRun SCXW123406393 BCX8">Splunk search string</span></span><span class="EOP SCXW123406393 BCX8" data-ccp-props="{"201341983":0,"335559739":160,"335559740":360}"> </span>

</div><div class="ListContainerWrapper SCXW123406393 BCX8">3. <span class="TextRun SCXW123406393 BCX8" data-contrast="auto" lang="EN-US" xml:lang="EN-US"><span class="NormalTextRun SCXW123406393 BCX8">Tags</span></span><span class="EOP SCXW123406393 BCX8" data-ccp-props="{"201341983":0,"335559739":160,"335559740":360}"> </span>

</div><div class="ListContainerWrapper SCXW123406393 BCX8">4. <span class="TextRun SCXW123406393 BCX8" data-contrast="auto" lang="EN-US" xml:lang="EN-US"><span class="NormalTextRun SCXW123406393 BCX8">Synthetic source</span><span class="NormalTextRun SCXW123406393 BCX8"> (Enable Yes/No)</span></span><span class="EOP SCXW123406393 BCX8" data-ccp-props="{"201341983":0,"335559739":160,"335559740":360}"> </span>

</div><div class="OutlineElement Ltr SCXW123406393 BCX8">  
</div></div><span style="color: rgb(53, 152, 219);">**<span class="TextRun SCXW123406393 BCX8" data-contrast="none" lang="EN-US" xml:lang="EN-US"><span class="NormalTextRun SCXW123406393 BCX8" data-ccp-parastyle="heading 3">Windows System Events via Splunk Enterprise REST API</span><span class="NormalTextRun SCXW123406393 BCX8" data-ccp-parastyle="heading 3"> (Enable Yes/No)</span></span><span class="EOP SCXW123406393 BCX8" data-ccp-props="{"134245418":true,"134245529":true,"201341983":0,"335559738":40,"335559739":0,"335559740":259}"> </span>**</span>

<div class="SCXW123406393 BCX8" id="bkmrk-interval-to-query-sp-2"><div class="OutlineElement Ltr SCXW123406393 BCX8">  
</div><div class="ListContainerWrapper SCXW123406393 BCX8">1. <span class="TextRun SCXW123406393 BCX8" data-contrast="auto" lang="EN-US" xml:lang="EN-US"><span class="NormalTextRun SCXW123406393 BCX8">Interval to query Splunk Enterprise REST API</span></span><span class="EOP SCXW123406393 BCX8" data-ccp-props="{"201341983":0,"335559739":160,"335559740":259}"> </span>

</div><div class="ListContainerWrapper SCXW123406393 BCX8">- - - <span class="TextRun SCXW123406393 BCX8" data-contrast="auto" lang="EN-US" xml:lang="EN-US"><span class="NormalTextRun SCXW123406393 BCX8">Go Duration syntax (</span><span class="NormalTextRun SpellingErrorV2Themed SCXW123406393 BCX8">eg.</span><span class="NormalTextRun SCXW123406393 BCX8"> 10s)</span></span><span class="EOP SCXW123406393 BCX8" data-ccp-props="{"201341983":0,"335559739":160,"335559740":259}"> </span>

</div><div class="ListContainerWrapper SCXW123406393 BCX8">2. <span class="TextRun SCXW123406393 BCX8" data-contrast="auto" lang="EN-US" xml:lang="EN-US"><span class="NormalTextRun SCXW123406393 BCX8">Splunk search string</span></span><span class="EOP SCXW123406393 BCX8" data-ccp-props="{"201341983":0,"335559739":160,"335559740":259}"> </span>

</div><div class="ListContainerWrapper SCXW123406393 BCX8">3. <span class="TextRun SCXW123406393 BCX8" data-contrast="auto" lang="EN-US" xml:lang="EN-US"><span class="NormalTextRun SCXW123406393 BCX8">Tags</span></span><span class="EOP SCXW123406393 BCX8" data-ccp-props="{"201341983":0,"335559739":160,"335559740":259}"> </span>

</div><div class="ListContainerWrapper SCXW123406393 BCX8">4. <span class="TextRun SCXW123406393 BCX8" data-contrast="auto" lang="EN-US" xml:lang="EN-US"><span class="NormalTextRun SCXW123406393 BCX8">Synthetic source</span><span class="NormalTextRun SCXW123406393 BCX8"> (Enable Yes/No)</span></span><span class="EOP SCXW123406393 BCX8" data-ccp-props="{"201341983":0,"335559739":160,"335559740":360}"> </span>

</div></div>

# Team Viewer Integrations

**<span class="TextRun SCXW261657798 BCX8" data-contrast="none" lang="EN-US" xml:lang="EN-US"><span class="NormalTextRun SCXW261657798 BCX8" data-ccp-parastyle="CyTech Heading 1" data-ccp-parastyle-defn="{"ObjectId":"78598be8-bab2-4909-af94-8b1d82bf0dbd|175","ClassId":1073872969,"Properties":[469777841,"Open Sans",469777844,"Open Sans",469769226,"Open Sans",201342446,"1",201342447,"4",201342448,"2",201342449,"1",469777842,"Open Sans",469777843,"",201341986,"4",268442635,"36",335559704,"1037",335559705,"1033",335551547,"1033",335559740,"360",201341983,"0",335559739,"0",335551500,"1809913",335559738,"240",335560102,"0",134245418,"true",134245529,"true",469775450,"CyTech Heading 1",201340122,"2",134234082,"true",134233614,"true",469778129,"CyTechHeading1",335572020,"1",469777929,"CyTech Heading 1 Char",469778324,"heading 1"]}" data-ccp-parastyle-linked-defn="{"ObjectId":"78598be8-bab2-4909-af94-8b1d82bf0dbd|178","ClassId":1073872969,"Properties":[201342446,"1",201342447,"4",201342448,"2",201342449,"1",469777841,"Open Sans",469777842,"Open Sans",469777843,"",469777844,"Open Sans",201341986,"1",469769226,"Open Sans",268442635,"36",335559704,"1037",335559705,"1033",335551547,"1033",335559740,"259",201341983,"0",335559739,"160",335551500,"1809913",469775450,"CyTech Heading 1 Char",201340122,"1",134233614,"true",469778129,"CyTechHeading1Char",335572020,"1",134231262,"true",469777929,"CyTech Heading 1",469778324,"Heading 1 Char"]}" style="color: rgb(53, 152, 219);">Remote File Copy via TeamViewer</span><span class="NormalTextRun SCXW261657798 BCX8" data-ccp-parastyle="CyTech Heading 1"> </span></span><span class="EOP SCXW261657798 BCX8" data-ccp-props="{"134245418":true,"134245529":true,"201341983":0,"335559685":360,"335559738":240,"335559739":0,"335559740":360}"> </span>**

<span class="TextRun SCXW261657798 BCX8" data-contrast="auto" lang="EN-US" xml:lang="EN-US"><span class="NormalTextRun SCXW261657798 BCX8">Identifies</span><span class="NormalTextRun SCXW261657798 BCX8"> an executable or script file remotely downloaded via a TeamViewer transfer session.</span></span><span class="EOP SCXW261657798 BCX8" data-ccp-props="{"201341983":0,"335559685":360,"335559739":160,"335559740":259}"> </span>

**<span class="TextRun SCXW261657798 BCX8" data-contrast="auto" lang="EN-US" xml:lang="EN-US"><span class="NormalTextRun SCXW261657798 BCX8">Rule type: </span><span class="NormalTextRun SpellingErrorV2Themed SCXW261657798 BCX8">eql</span><span class="NormalTextRun SCXW261657798 BCX8"> </span></span><span class="EOP SCXW261657798 BCX8" data-ccp-props="{"201341983":0,"335559685":360,"335559739":160,"335559740":259}"> </span>**

**<span class="TextRun SCXW261657798 BCX8" data-contrast="auto" lang="EN-US" xml:lang="EN-US"><span class="NormalTextRun SCXW261657798 BCX8">Rule indices: </span></span><span class="EOP SCXW261657798 BCX8" data-ccp-props="{"201341983":0,"335559685":360,"335559739":160,"335559740":259}"> </span>**

<div class="SCXW261657798 BCX8" id="bkmrk-winlogbeat-%2A%C2%A0%C2%A0-logs-"><div class="ListContainerWrapper SCXW261657798 BCX8">- <span class="TextRun SCXW261657798 BCX8" data-contrast="auto" lang="EN-US" xml:lang="EN-US"><span class="NormalTextRun SpellingErrorV2Themed SCXW261657798 BCX8">winlogbeat</span><span class="NormalTextRun SCXW261657798 BCX8">-\* </span></span><span class="EOP SCXW261657798 BCX8" data-ccp-props="{"201341983":0,"335559739":160,"335559740":259}"> </span>
- <span class="TextRun SCXW261657798 BCX8" data-contrast="auto" lang="EN-US" xml:lang="EN-US"><span class="NormalTextRun SCXW261657798 BCX8">logs-</span><span class="NormalTextRun ContextualSpellingAndGrammarErrorV2Themed SCXW261657798 BCX8">endpoint.events</span><span class="NormalTextRun SCXW261657798 BCX8">.\* </span></span><span class="EOP SCXW261657798 BCX8" data-ccp-props="{"201341983":0,"335559739":160,"335559740":259}"> </span>
- <span class="TextRun SCXW261657798 BCX8" data-contrast="auto" lang="EN-US" xml:lang="EN-US"><span class="NormalTextRun SCXW261657798 BCX8">logs-</span><span class="NormalTextRun ContextualSpellingAndGrammarErrorV2Themed SCXW261657798 BCX8">windows.\*</span><span class="NormalTextRun SCXW261657798 BCX8"> </span></span><span class="EOP SCXW261657798 BCX8" data-ccp-props="{"201341983":0,"335559739":160,"335559740":259}"> </span>

</div></div><span class="TextRun SCXW261657798 BCX8" data-contrast="auto" lang="EN-US" xml:lang="EN-US"><span class="NormalTextRun SCXW261657798 BCX8">**Severity**:</span></span><span class="TextRun SCXW261657798 BCX8" data-contrast="auto" lang="EN-US" xml:lang="EN-US"><span class="NormalTextRun SCXW261657798 BCX8"> medium </span></span><span class="EOP SCXW261657798 BCX8" data-ccp-props="{"201341983":0,"335559685":360,"335559739":160,"335559740":259}"> </span>

<span class="TextRun SCXW261657798 BCX8" data-contrast="auto" lang="EN-US" xml:lang="EN-US"><span class="NormalTextRun SCXW261657798 BCX8">**Risk score**:</span></span><span class="TextRun SCXW261657798 BCX8" data-contrast="auto" lang="EN-US" xml:lang="EN-US"><span class="NormalTextRun SCXW261657798 BCX8"> 47 </span></span><span class="EOP SCXW261657798 BCX8" data-ccp-props="{"201341983":0,"335559685":360,"335559739":160,"335559740":259}"> </span>

<span class="TextRun SCXW261657798 BCX8" data-contrast="auto" lang="EN-US" xml:lang="EN-US"><span class="NormalTextRun SCXW261657798 BCX8">**Runs every**:</span></span><span class="TextRun SCXW261657798 BCX8" data-contrast="auto" lang="EN-US" xml:lang="EN-US"> <span class="NormalTextRun SCXW261657798 BCX8">5m</span><span class="NormalTextRun SCXW261657798 BCX8"> </span></span><span class="EOP SCXW261657798 BCX8" data-ccp-props="{"201341983":0,"335559685":360,"335559739":160,"335559740":259}"> </span>

<span class="TextRun SCXW261657798 BCX8" data-contrast="auto" lang="EN-US" xml:lang="EN-US"><span class="NormalTextRun SCXW261657798 BCX8">**Searches indices from**:</span></span><span class="TextRun SCXW261657798 BCX8" data-contrast="auto" lang="EN-US" xml:lang="EN-US"><span class="NormalTextRun SCXW261657798 BCX8"> now-9m (Date Math format, see also</span></span><span class="TextRun SCXW261657798 BCX8" data-contrast="auto" lang="EN-US" xml:lang="EN-US"><span class="NormalTextRun SCXW261657798 BCX8"> </span></span><span class="TextRun SCXW261657798 BCX8" data-contrast="auto" lang="EN-US" xml:lang="EN-US"><span class="NormalTextRun SCXW261657798 BCX8">Additional look-back time) </span></span><span class="EOP SCXW261657798 BCX8" data-ccp-props="{"201341983":0,"335559685":360,"335559739":160,"335559740":259}"> </span>

<span class="TextRun SCXW261657798 BCX8" data-contrast="auto" lang="EN-US" xml:lang="EN-US">**<span class="NormalTextRun SCXW261657798 BCX8">Maximum</span>**<span class="NormalTextRun SCXW261657798 BCX8"> **alerts per execution**:</span></span><span class="TextRun SCXW261657798 BCX8" data-contrast="auto" lang="EN-US" xml:lang="EN-US"><span class="NormalTextRun SCXW261657798 BCX8"> 100 </span></span><span class="EOP SCXW261657798 BCX8" data-ccp-props="{"201341983":0,"335559685":360,"335559739":160,"335559740":259}"> </span>

<span class="TextRun SCXW261657798 BCX8" data-contrast="auto" lang="EN-US" xml:lang="EN-US"><span class="NormalTextRun SCXW261657798 BCX8">**References**: </span></span><span class="EOP SCXW261657798 BCX8" data-ccp-props="{"201341983":0,"335559685":360,"335559739":160,"335559740":259}"> </span>

<div class="SCXW261657798 BCX8" id="bkmrk-https%3A%2F%2Fblog.menasec"><div class="ListContainerWrapper SCXW261657798 BCX8">- <span class="TextRun SCXW261657798 BCX8" data-contrast="auto" lang="EN-US" xml:lang="EN-US"><span class="NormalTextRun SCXW261657798 BCX8">https://blog.menasec.net/2019/11/hunting-for-suspicious-use-of.html </span></span><span class="EOP SCXW261657798 BCX8" data-ccp-props="{"201341983":0,"335559739":160,"335559740":259}"> </span>

</div></div><span class="TextRun SCXW261657798 BCX8" data-contrast="auto" lang="EN-US" xml:lang="EN-US"><span class="NormalTextRun SCXW261657798 BCX8">**Tags**: </span></span><span class="EOP SCXW261657798 BCX8" data-ccp-props="{"201341983":0,"335559685":360,"335559739":160,"335559740":259}"> </span>

<div class="SCXW261657798 BCX8" id="bkmrk-elastic%C2%A0%C2%A0-host%C2%A0%C2%A0-win"><div class="ListContainerWrapper SCXW261657798 BCX8">- <span class="TextRun SCXW261657798 BCX8" data-contrast="auto" lang="EN-US" xml:lang="EN-US"><span class="NormalTextRun SCXW261657798 BCX8">Elastic </span></span><span class="EOP SCXW261657798 BCX8" data-ccp-props="{"201341983":0,"335559739":160,"335559740":259}"> </span>
- <span class="TextRun SCXW261657798 BCX8" data-contrast="auto" lang="EN-US" xml:lang="EN-US"><span class="NormalTextRun SCXW261657798 BCX8">Host </span></span><span class="EOP SCXW261657798 BCX8" data-ccp-props="{"201341983":0,"335559739":160,"335559740":259}"> </span>
- <span class="TextRun SCXW261657798 BCX8" data-contrast="auto" lang="EN-US" xml:lang="EN-US"><span class="NormalTextRun SCXW261657798 BCX8">Windows </span></span><span class="EOP SCXW261657798 BCX8" data-ccp-props="{"201341983":0,"335559739":160,"335559740":259}"> </span>
- <span class="TextRun SCXW261657798 BCX8" data-contrast="auto" lang="EN-US" xml:lang="EN-US"><span class="NormalTextRun SCXW261657798 BCX8">Threat Detection </span></span><span class="EOP SCXW261657798 BCX8" data-ccp-props="{"201341983":0,"335559739":160,"335559740":259}"> </span>
- <span class="TextRun SCXW261657798 BCX8" data-contrast="auto" lang="EN-US" xml:lang="EN-US"><span class="NormalTextRun SCXW261657798 BCX8">Command and Control </span></span><span class="EOP SCXW261657798 BCX8" data-ccp-props="{"201341983":0,"335559739":160,"335559740":259}"> </span>

</div><div class="OutlineElement Ltr SCXW261657798 BCX8">  
</div></div><span class="TextRun SCXW261657798 BCX8" data-contrast="auto" lang="EN-US" xml:lang="EN-US"><span class="NormalTextRun SCXW261657798 BCX8">**Version**:</span></span><span class="TextRun SCXW261657798 BCX8" data-contrast="auto" lang="EN-US" xml:lang="EN-US"><span class="NormalTextRun SCXW261657798 BCX8"> 5 </span></span><span class="EOP SCXW261657798 BCX8" data-ccp-props="{"201341983":0,"335559685":360,"335559739":160,"335559740":259}"> </span>

<span class="TextRun SCXW261657798 BCX8" data-contrast="auto" lang="EN-US" xml:lang="EN-US"><span class="NormalTextRun SCXW261657798 BCX8">**Rule authors**: </span></span><span class="EOP SCXW261657798 BCX8" data-ccp-props="{"201341983":0,"335559685":360,"335559739":160,"335559740":259}"> </span>

<div class="SCXW261657798 BCX8" id="bkmrk-elastic%C2%A0%C2%A0"><div class="ListContainerWrapper SCXW261657798 BCX8">- <span class="TextRun SCXW261657798 BCX8" data-contrast="auto" lang="EN-US" xml:lang="EN-US"><span class="NormalTextRun SCXW261657798 BCX8">Elastic </span></span><span class="EOP SCXW261657798 BCX8" data-ccp-props="{"201341983":0,"335559739":160,"335559740":259}"> </span>

</div></div><span class="TextRun SCXW261657798 BCX8" data-contrast="auto" lang="EN-US" xml:lang="EN-US"><span class="NormalTextRun SCXW261657798 BCX8">**Rule license**:</span></span><span class="TextRun SCXW261657798 BCX8" data-contrast="auto" lang="EN-US" xml:lang="EN-US"><span class="NormalTextRun SCXW261657798 BCX8"> Elastic License v2</span></span><span class="EOP SCXW261657798 BCX8" data-ccp-props="{"201341983":0,"335559685":360,"335559739":160,"335559740":259}"> </span>

**<span class="TextRun SCXW261657798 BCX8" data-contrast="auto" lang="EN-US" xml:lang="EN-US"><span class="NormalTextRun SCXW261657798 BCX8">Rule query</span></span><span class="EOP SCXW261657798 BCX8" data-ccp-props="{"201341983":0,"335559685":360,"335559739":160,"335559740":259}"> </span>**

<span class="TextRun SCXW261657798 BCX8" data-contrast="auto" lang="EN-US" xml:lang="EN-US"><span class="NormalTextRun SCXW261657798 BCX8">file where </span><span class="NormalTextRun SpellingErrorV2Themed SCXW261657798 BCX8">event.type</span><span class="NormalTextRun SCXW261657798 BCX8"> == "creation" and </span><span class="NormalTextRun ContextualSpellingAndGrammarErrorV2Themed SCXW261657798 BCX8">process.name :</span><span class="NormalTextRun SCXW261657798 BCX8"> "TeamViewer.exe" and </span></span><span class="EOP SCXW261657798 BCX8" data-ccp-props="{"201341983":0,"335559685":360,"335559739":160,"335559740":259}"> </span>

<span class="TextRun SCXW261657798 BCX8" data-contrast="auto" lang="EN-US" xml:lang="EN-US"><span class="NormalTextRun SCXW261657798 BCX8"> </span><span class="NormalTextRun SpellingErrorV2Themed SCXW261657798 BCX8">file.extension</span><span class="NormalTextRun SCXW261657798 BCX8"> : ("exe", "</span><span class="NormalTextRun SpellingErrorV2Themed SCXW261657798 BCX8">dll</span><span class="NormalTextRun SCXW261657798 BCX8">", "</span><span class="NormalTextRun SpellingErrorV2Themed SCXW261657798 BCX8">scr</span><span class="NormalTextRun SCXW261657798 BCX8">", "com", "bat", "ps1", "</span><span class="NormalTextRun SpellingErrorV2Themed SCXW261657798 BCX8">vbs</span><span class="NormalTextRun SCXW261657798 BCX8">", "</span><span class="NormalTextRun SpellingErrorV2Themed SCXW261657798 BCX8">vbe</span><span class="NormalTextRun SCXW261657798 BCX8">", "</span><span class="NormalTextRun SpellingErrorV2Themed SCXW261657798 BCX8">js</span><span class="NormalTextRun SCXW261657798 BCX8">", "</span><span class="NormalTextRun SpellingErrorV2Themed SCXW261657798 BCX8">wsh</span><span class="NormalTextRun SCXW261657798 BCX8">", "</span><span class="NormalTextRun SpellingErrorV2Themed SCXW261657798 BCX8">hta</span><span class="NormalTextRun SCXW261657798 BCX8">") </span></span><span class="EOP SCXW261657798 BCX8" data-ccp-props="{"201341983":0,"335559685":360,"335559739":160,"335559740":259}"> </span>

<span class="TextRun SCXW261657798 BCX8" data-contrast="auto" lang="EN-US" xml:lang="EN-US"><span class="NormalTextRun SCXW261657798 BCX8">**Framework**:</span></span><span class="TextRun SCXW261657798 BCX8" data-contrast="auto" lang="EN-US" xml:lang="EN-US"><span class="NormalTextRun SCXW261657798 BCX8"> MITRE ATT&amp;CKTM</span></span><span class="EOP SCXW261657798 BCX8" data-ccp-props="{"201341983":0,"335559685":360,"335559739":160,"335559740":259}"> </span>

<div class="SCXW261657798 BCX8" id="bkmrk-tactic%3A%C2%A0%C2%A0-name%3A-comm"><div class="ListContainerWrapper SCXW261657798 BCX8">- <span class="TextRun SCXW261657798 BCX8" data-contrast="auto" lang="EN-US" xml:lang="EN-US"><span class="NormalTextRun SCXW261657798 BCX8">Tactic: </span></span><span class="EOP SCXW261657798 BCX8" data-ccp-props="{"201341983":0,"335559739":160,"335559740":259}"> </span>

</div><div class="ListContainerWrapper SCXW261657798 BCX8">- - - <span class="TextRun SCXW261657798 BCX8" data-contrast="auto" lang="EN-US" xml:lang="EN-US"><span class="NormalTextRun SCXW261657798 BCX8">Name: Command and Control </span></span><span class="EOP SCXW261657798 BCX8" data-ccp-props="{"201341983":0,"335559739":160,"335559740":259}"> </span>
        - <span class="TextRun SCXW261657798 BCX8" data-contrast="auto" lang="EN-US" xml:lang="EN-US"><span class="NormalTextRun SCXW261657798 BCX8">ID: TA0011 </span></span><span class="EOP SCXW261657798 BCX8" data-ccp-props="{"201341983":0,"335559739":160,"335559740":259}"> </span>
        - <span class="TextRun SCXW261657798 BCX8" data-contrast="auto" lang="EN-US" xml:lang="EN-US"><span class="NormalTextRun SCXW261657798 BCX8">Reference URL:</span></span><span class="TextRun Underlined SCXW261657798 BCX8" data-contrast="none" lang="EN-US" xml:lang="EN-US"><span class="NormalTextRun SCXW261657798 BCX8"> </span></span><span class="TextRun Underlined SCXW261657798 BCX8" data-contrast="none" lang="EN-US" xml:lang="EN-US"><span class="NormalTextRun SCXW261657798 BCX8">https://attack.mitre.org/tactics/TA0011/</span></span><span class="EOP SCXW261657798 BCX8" data-ccp-props="{"201341983":0,"335559739":160,"335559740":259}"> </span>

</div><div class="ListContainerWrapper SCXW261657798 BCX8">- <span class="TextRun SCXW261657798 BCX8" data-contrast="auto" lang="EN-US" xml:lang="EN-US"><span class="NormalTextRun SCXW261657798 BCX8">Technique: </span></span><span class="EOP SCXW261657798 BCX8" data-ccp-props="{"201341983":0,"335559739":160,"335559740":259}"> </span>

</div><div class="ListContainerWrapper SCXW261657798 BCX8">- - - <span class="TextRun SCXW261657798 BCX8" data-contrast="auto" lang="EN-US" xml:lang="EN-US"><span class="NormalTextRun SCXW261657798 BCX8">Name: Ingress Tool Transfer </span></span><span class="EOP SCXW261657798 BCX8" data-ccp-props="{"201341983":0,"335559739":160,"335559740":259}"> </span>
        - <span class="TextRun SCXW261657798 BCX8" data-contrast="auto" lang="EN-US" xml:lang="EN-US"><span class="NormalTextRun SCXW261657798 BCX8">ID: T1105 </span></span><span class="EOP SCXW261657798 BCX8" data-ccp-props="{"201341983":0,"335559739":160,"335559740":259}"> </span>
        - <span class="TextRun SCXW261657798 BCX8" data-contrast="auto" lang="EN-US" xml:lang="EN-US"><span class="NormalTextRun SCXW261657798 BCX8">Reference URL:</span></span><span class="TextRun Underlined SCXW261657798 BCX8" data-contrast="none" lang="EN-US" xml:lang="EN-US"><span class="NormalTextRun SCXW261657798 BCX8"> </span></span><span class="TextRun Underlined SCXW261657798 BCX8" data-contrast="none" lang="EN-US" xml:lang="EN-US"><span class="NormalTextRun SCXW261657798 BCX8">https://attack.mitre.org/techniques/T1105/</span></span><span class="TextRun SCXW261657798 BCX8" data-contrast="none" lang="EN-US" xml:lang="EN-US"><span class="NormalTextRun SCXW261657798 BCX8"> </span></span><span class="EOP SCXW261657798 BCX8" data-ccp-props="{"201341983":0,"335559739":160,"335559740":259}"> </span>

</div><div class="ListContainerWrapper SCXW261657798 BCX8">- <span class="TextRun SCXW261657798 BCX8" data-contrast="auto" lang="EN-US" xml:lang="EN-US"><span class="NormalTextRun SCXW261657798 BCX8">Technique: </span></span><span class="EOP SCXW261657798 BCX8" data-ccp-props="{"201341983":0,"335559739":160,"335559740":259}"> </span>

</div><div class="ListContainerWrapper SCXW261657798 BCX8">- - - <span class="TextRun SCXW261657798 BCX8" data-contrast="auto" lang="EN-US" xml:lang="EN-US"><span class="NormalTextRun SCXW261657798 BCX8">Name: Remote Access Software </span></span><span class="EOP SCXW261657798 BCX8" data-ccp-props="{"201341983":0,"335559739":160,"335559740":259}"> </span>
        - <span class="TextRun SCXW261657798 BCX8" data-contrast="auto" lang="EN-US" xml:lang="EN-US"><span class="NormalTextRun SCXW261657798 BCX8">ID: T1219 </span></span><span class="EOP SCXW261657798 BCX8" data-ccp-props="{"201341983":0,"335559739":160,"335559740":259}"> </span>
        - <span class="TextRun SCXW261657798 BCX8" data-contrast="auto" lang="EN-US" xml:lang="EN-US"><span class="NormalTextRun SCXW261657798 BCX8">Reference URL:</span></span><span class="TextRun Underlined SCXW261657798 BCX8" data-contrast="none" lang="EN-US" xml:lang="EN-US"><span class="NormalTextRun SCXW261657798 BCX8"> </span></span><span class="TextRun Underlined SCXW261657798 BCX8" data-contrast="none" lang="EN-US" xml:lang="EN-US"><span class="NormalTextRun SCXW261657798 BCX8">https://attack.mitre.org/techniques/T1219/</span></span><span class="TextRun SCXW261657798 BCX8" data-contrast="none" lang="EN-US" xml:lang="EN-US"><span class="NormalTextRun SCXW261657798 BCX8"> </span></span><span class="EOP SCXW261657798 BCX8" data-ccp-props="{"201341983":0,"335559739":160,"335559740":259}"> </span>

</div><div class="OutlineElement Ltr SCXW261657798 BCX8">  
</div></div><span class="EOP SCXW261657798 BCX8" data-ccp-props="{"201341983":0,"335559685":1080,"335559739":160,"335559740":259}"> </span><span class="TextRun Highlight SCXW261657798 BCX8" data-contrast="none" lang="EN-PH" xml:lang="EN-PH"><span class="NormalTextRun SCXW261657798 BCX8" data-ccp-charstyle="normaltextrun" data-ccp-charstyle-defn="{"ObjectId":"78598be8-bab2-4909-af94-8b1d82bf0dbd|230","ClassId":1073872969,"Properties":[201342446,"1",201342447,"5",201342448,"1",201342449,"1",469777841,"Calibri",469777842,"Arial",469777843,"Calibri",469777844,"Calibri",201341986,"1",469769226,"Calibri,Arial",268442635,"22",335559704,"1037",335559705,"1033",335551547,"1033",335559740,"259",201341983,"0",335559739,"160",469775450,"normaltextrun",201340122,"1",134233614,"true",469778129,"normaltextrun",335572020,"1",469778324,"Default Paragraph Font"]}">Source: https://www.elastic.co/guide/en/security/master/prebuilt-rule-0-14-2-remote-file-copy-via-teamviewer.html</span></span><span class="TextRun Highlight SCXW261657798 BCX8" data-contrast="none" lang="EN-US" xml:lang="EN-US"><span class="NormalTextRun SCXW261657798 BCX8" data-ccp-charstyle="eop" data-ccp-charstyle-defn="{"ObjectId":"78598be8-bab2-4909-af94-8b1d82bf0dbd|231","ClassId":1073872969,"Properties":[201342446,"1",201342447,"5",201342448,"1",201342449,"1",469777841,"Calibri",469777842,"Arial",469777843,"Calibri",469777844,"Calibri",201341986,"1",469769226,"Calibri,Arial",268442635,"22",335559704,"1037",335559705,"1033",335551547,"1033",335559740,"259",201341983,"0",335559739,"160",469775450,"eop",201340122,"1",134233614,"true",469778129,"eop",335572020,"1",469778324,"Default Paragraph Font"]}"> </span></span><span class="EOP SCXW261657798 BCX8" data-ccp-props="{"201341983":0,"335559685":1080,"335559739":160,"335559740":259}"> </span>

**<span class="TextRun SCXW261657798 BCX8" data-contrast="none" lang="EN-US" xml:lang="EN-US"><span class="NormalTextRun SCXW261657798 BCX8" data-ccp-charstyle="eop">TeamViewer Integration </span><span class="NormalTextRun SCXW261657798 BCX8" data-ccp-charstyle="eop">Procedure</span></span><span class="EOP SCXW261657798 BCX8" data-ccp-props="{"134245418":true,"134245529":true,"201341983":0,"335559738":240,"335559739":0,"335559740":360}"> </span>**

<div class="SCXW261657798 BCX8" id="bkmrk-install-the-elastic-"><div class="ListContainerWrapper SCXW261657798 BCX8">1. <span class="TextRun SCXW261657798 BCX8" data-contrast="auto" lang="EN-US" xml:lang="EN-US"><span class="NormalTextRun SCXW261657798 BCX8">Install the Elastic Stack (Elasticsearch, Kibana, and Logstash) on your Ubuntu machine by following the instructions provided on the Elastic website. </span></span><span class="EOP SCXW261657798 BCX8" data-ccp-props="{"201341983":0,"335559685":851,"335559739":160,"335559740":259}"> </span>

</div></div><span class="WACImageGroupContainer SCXW261657798 BCX8"><span class="WACImageContainer NoPadding AttachedToBeginning DragDrop SCXW261657798 BCX8" role="presentation">![Graphical user interface, text, application

Description automatically generated](https://cytechint-docs-bookstack.s3.amazonaws.com/uploads/images/gallery/2024-04/embedded-image-trjyyrkt.png)</span></span>

<div class="SCXW261657798 BCX8" id="bkmrk-once-you-have-instal"><div class="ListContainerWrapper SCXW261657798 BCX8">2. <span class="TextRun SCXW261657798 BCX8" data-contrast="auto" lang="EN-US" xml:lang="EN-US"><span class="NormalTextRun SCXW261657798 BCX8">Once you have installed and configured the Elastic Stack, navigate to the Logstash </span><span class="NormalTextRun SCXW261657798 BCX8">directory</span><span class="NormalTextRun SCXW261657798 BCX8"> and create a new configuration file for the TeamViewer logs by running the command: </span></span><span class="EOP SCXW261657798 BCX8" data-ccp-props="{"201341983":0,"335559685":851,"335559739":160,"335559740":259}"> </span>

</div><div class="OutlineElement Ltr SCXW261657798 BCX8">  
</div></div><span class="EOP SCXW261657798 BCX8" data-ccp-props="{"201341983":0,"335559739":160,"335559740":259}"> </span>

<span class="TextRun SCXW261657798 BCX8" data-contrast="auto" lang="EN-US" xml:lang="EN-US"><span class="NormalTextRun SCXW261657798 BCX8">Copy and paste the following Logstash configuration into the file: </span></span><span class="EOP SCXW261657798 BCX8" data-ccp-props="{"201341983":0,"335559685":1080,"335559739":160,"335559740":259}"> </span>

<span class="WACImageGroupContainer SCXW261657798 BCX8"><span class="WACImageContainer NoPadding AttachedToBeginning DragDrop SCXW261657798 BCX8" role="presentation">![Text

Description automatically generated](https://cytechint-docs-bookstack.s3.amazonaws.com/uploads/images/gallery/2024-04/embedded-image-xygnll1p.png)</span></span><span class="EOP SCXW261657798 BCX8" data-ccp-props="{"201341983":0,"335559739":160,"335559740":259}"> </span>

<div class="SCXW261657798 BCX8" id="bkmrk-save-and-close-the-f"><div class="OutlineElement Ltr SCXW261657798 BCX8">  
</div><div class="ListContainerWrapper SCXW261657798 BCX8">3. <span class="TextRun SCXW261657798 BCX8" data-contrast="auto" lang="EN-US" xml:lang="EN-US"><span class="NormalTextRun SCXW261657798 BCX8">Save and close the file. </span></span><span class="EOP SCXW261657798 BCX8" data-ccp-props="{"201341983":0,"335559685":1080,"335559739":160,"335559740":259}"> </span>

</div></div><div class="SCXW261657798 BCX8" id="bkmrk-start-logstash-by-ru"><div class="ListContainerWrapper SCXW261657798 BCX8">4. <span class="TextRun SCXW261657798 BCX8" data-contrast="auto" lang="EN-US" xml:lang="EN-US"><span class="NormalTextRun SCXW261657798 BCX8">Start Logstash by running the command:</span></span><span class="EOP SCXW261657798 BCX8" data-ccp-props="{"201341983":0,"335559685":1080,"335559739":160,"335559740":259}"> </span>

</div><div class="OutlineElement Ltr SCXW261657798 BCX8">  
</div></div><span class="SCXW261657798 BCX8"><span class="WACImageContainer NoPadding DragDrop BlobObject SCXW261657798 BCX8" role="presentation">![](https://cytechint-docs-bookstack.s3.amazonaws.com/uploads/images/gallery/2024-04/embedded-image-vzfmvqsv.png)</span></span><span class="LineBreakBlob BlobObject DragDrop SCXW261657798 BCX8"><span class="SCXW261657798 BCX8"> </span>  
</span><span class="EOP SCXW261657798 BCX8" data-ccp-props="{"201341983":0,"335559739":160,"335559740":259}"> </span>

<div class="SCXW261657798 BCX8" id="bkmrk-ensure-that-logstash"><div class="OutlineElement Ltr SCXW261657798 BCX8">  
</div><div class="ListContainerWrapper SCXW261657798 BCX8">5. <span class="TextRun SCXW261657798 BCX8" data-contrast="auto" lang="EN-US" xml:lang="EN-US"><span class="NormalTextRun SCXW261657798 BCX8">Ensure that Logstash is properly reading and processing the TeamViewer logs by checking the Logstash logs in the /var/log/</span><span class="NormalTextRun SpellingErrorV2Themed SCXW261657798 BCX8">logstash</span><span class="NormalTextRun SCXW261657798 BCX8">/ directory. </span></span><span class="EOP SCXW261657798 BCX8" data-ccp-props="{"201341983":0,"335551550":6,"335551620":6,"335559739":160,"335559740":259}"> </span>

</div><div class="ListContainerWrapper SCXW261657798 BCX8">6. <span class="TextRun SCXW261657798 BCX8" data-contrast="auto" lang="EN-US" xml:lang="EN-US"><span class="NormalTextRun SCXW261657798 BCX8">Navigate to the Kibana web interface by opening a web browser and entering the URL: http://localhost:5601/. </span></span><span class="EOP SCXW261657798 BCX8" data-ccp-props="{"201341983":0,"335551550":6,"335551620":6,"335559739":160,"335559740":259}"> </span>

</div><div class="ListContainerWrapper SCXW261657798 BCX8">7. <span class="TextRun SCXW261657798 BCX8" data-contrast="auto" lang="EN-US" xml:lang="EN-US"><span class="NormalTextRun SCXW261657798 BCX8">In Kibana, click on the "Discover" tab to view your logs. </span></span><span class="EOP SCXW261657798 BCX8" data-ccp-props="{"201341983":0,"335551550":6,"335551620":6,"335559739":160,"335559740":259}"> </span>

</div><div class="ListContainerWrapper SCXW261657798 BCX8">8. <span class="TextRun SCXW261657798 BCX8" data-contrast="auto" lang="EN-US" xml:lang="EN-US"><span class="NormalTextRun SCXW261657798 BCX8">Click on the "Create index pattern" button and enter the name of the TeamViewer index pattern (</span><span class="NormalTextRun SCXW261657798 BCX8">e.g.</span> <span class="NormalTextRun SpellingErrorV2Themed SCXW261657798 BCX8">teamviewer</span><span class="NormalTextRun SCXW261657798 BCX8">-\*). </span></span><span class="EOP SCXW261657798 BCX8" data-ccp-props="{"201341983":0,"335551550":6,"335551620":6,"335559739":160,"335559740":259}"> </span>

</div><div class="ListContainerWrapper SCXW261657798 BCX8">9. <span class="TextRun SCXW261657798 BCX8" data-contrast="auto" lang="EN-US" xml:lang="EN-US"><span class="NormalTextRun SCXW261657798 BCX8">Select the time range for the logs you want to </span><span class="NormalTextRun ContextualSpellingAndGrammarErrorV2Themed SCXW261657798 BCX8">view, and</span><span class="NormalTextRun SCXW261657798 BCX8"> click on the "Create index pattern" button. </span></span><span class="EOP SCXW261657798 BCX8" data-ccp-props="{"201341983":0,"335551550":6,"335551620":6,"335559739":160,"335559740":259}"> </span>

</div><div class="ListContainerWrapper SCXW261657798 BCX8">10. <span class="TextRun SCXW261657798 BCX8" data-contrast="auto" lang="EN-US" xml:lang="EN-US"><span class="NormalTextRun SCXW261657798 BCX8">You should now see a list of logs from your TeamViewer deployment. You can filter the logs based on various criteria like severity, source, or date. </span></span><span class="EOP SCXW261657798 BCX8" data-ccp-props="{"201341983":0,"335551550":6,"335551620":6,"335559739":160,"335559740":259}"> </span>

</div><div class="ListContainerWrapper SCXW261657798 BCX8">11. <span class="TextRun SCXW261657798 BCX8" data-contrast="auto" lang="EN-US" xml:lang="EN-US"><span class="NormalTextRun SCXW261657798 BCX8">You can also create custom dashboards or visualizations to </span><span class="NormalTextRun SCXW261657798 BCX8">monitor</span><span class="NormalTextRun SCXW261657798 BCX8"> specific aspects of your TeamViewer deployment, such as usage patterns or connection quality. </span></span><span class="EOP SCXW261657798 BCX8" data-ccp-props="{"201341983":0,"335551550":6,"335551620":6,"335559739":160,"335559740":259}"> </span>

</div><div class="ListContainerWrapper SCXW261657798 BCX8">12. <span class="TextRun SCXW261657798 BCX8" data-contrast="auto" lang="EN-US" xml:lang="EN-US"><span class="NormalTextRun SCXW261657798 BCX8">If you </span><span class="NormalTextRun SCXW261657798 BCX8">encounter</span><span class="NormalTextRun SCXW261657798 BCX8"> any issues with your TeamViewer deployment, you can use the logs to </span><span class="NormalTextRun SCXW261657798 BCX8">identify</span><span class="NormalTextRun SCXW261657798 BCX8"> the root cause and take corrective action.</span></span><span class="EOP SCXW261657798 BCX8" data-ccp-props="{"201341983":0,"335551550":6,"335551620":6,"335559739":160,"335559740":259}"> </span>

</div><div class="OutlineElement Ltr SCXW261657798 BCX8">  
</div></div><span class="EOP SCXW261657798 BCX8" data-ccp-props="{"201341983":0,"335551550":6,"335551620":6,"335559685":1211,"335559739":160,"335559740":259}"> </span>

<span class="EOP SCXW261657798 BCX8" data-ccp-props="{"201341983":0,"335551550":6,"335551620":6,"335559685":1211,"335559739":160,"335559740":259}"> </span>

<span style="color: rgb(53, 152, 219);">**<span class="TextRun SCXW261657798 BCX8" data-contrast="auto" lang="EN-US" xml:lang="EN-US"><span class="NormalTextRun SCXW261657798 BCX8">Source: </span><span class="NormalTextRun SCXW261657798 BCX8">ChatGPT</span><span class="NormalTextRun SCXW261657798 BCX8"> </span></span>**<span class="EOP SCXW261657798 BCX8" data-ccp-props="{"201341983":0,"335551550":6,"335551620":6,"335559739":160,"335559740":259}"> </span></span>

<div class="SCXW261657798 BCX8" id="bkmrk-elastic-official-doc"><div class="ListContainerWrapper SCXW261657798 BCX8">1. <span class="TextRun SCXW261657798 BCX8" data-contrast="auto" lang="EN-US" xml:lang="EN-US"><span class="NormalTextRun SCXW261657798 BCX8">Elastic official documentation: </span></span>[<span class="TextRun Underlined SCXW261657798 BCX8" data-contrast="none" lang="EN-US" xml:lang="EN-US"><span class="NormalTextRun SCXW261657798 BCX8" data-ccp-charstyle="Hyperlink">https://www.elastic.co/guide/index.html</span></span>](https://www.elastic.co/guide/index.html)<span class="TextRun SCXW261657798 BCX8" data-contrast="none" lang="EN-US" xml:lang="EN-US"><span class="NormalTextRun SCXW261657798 BCX8"> </span></span><span class="EOP SCXW261657798 BCX8" data-ccp-props="{"201341983":0,"335559739":160,"335559740":259}"> </span>

</div><div class="ListContainerWrapper SCXW261657798 BCX8">2. <span class="TextRun SCXW261657798 BCX8" data-contrast="auto" lang="EN-US" xml:lang="EN-US"><span class="NormalTextRun SCXW261657798 BCX8">Logstash input plugin documentation: </span></span>[<span class="TextRun Underlined SCXW261657798 BCX8" data-contrast="none" lang="EN-US" xml:lang="EN-US"><span class="NormalTextRun SCXW261657798 BCX8" data-ccp-charstyle="Hyperlink">https://www.elastic.co/guide/en/logstash/current/plugins-inputs-file.html</span></span>](https://www.elastic.co/guide/en/logstash/current/plugins-inputs-file.html)<span class="EOP SCXW261657798 BCX8" data-ccp-props="{"201341983":0,"335559739":160,"335559740":259}"> </span>

</div></div><div class="SCXW261657798 BCX8" id="bkmrk-logstash-output-plug"><div class="ListContainerWrapper SCXW261657798 BCX8">3. <span class="TextRun SCXW261657798 BCX8" data-contrast="auto" lang="EN-US" xml:lang="EN-US"><span class="NormalTextRun SCXW261657798 BCX8">Logstash output plugin documentation: </span></span><span class="TextRun Underlined SCXW261657798 BCX8" data-contrast="none" lang="EN-US" xml:lang="EN-US"><span class="NormalTextRun SCXW261657798 BCX8">https://www.elastic.co/guide/en/logstash/current/plugins-outputs-elasticsearch.html </span></span><span class="EOP SCXW261657798 BCX8" data-ccp-props="{"201341983":0,"335559739":160,"335559740":259}"> </span>

</div><div class="ListContainerWrapper SCXW261657798 BCX8">4. <span class="TextRun SCXW261657798 BCX8" data-contrast="auto" lang="EN-US" xml:lang="EN-US"><span class="NormalTextRun SCXW261657798 BCX8">Kibana official documentation: </span></span><span class="TextRun Underlined SCXW261657798 BCX8" data-contrast="none" lang="EN-US" xml:lang="EN-US"><span class="NormalTextRun SCXW261657798 BCX8">https://www.elastic.co/guide/en/kibana/current/index.html</span></span><span class="EOP SCXW261657798 BCX8" data-ccp-props="{"201341983":0,"335559739":160,"335559740":259}"> </span>

</div></div>

# VMware vSphere Integration

<span class="TextRun SCXW30962791 BCX0" data-contrast="auto" lang="EN-US" xml:lang="EN-US"><span class="NormalTextRun SCXW30962791 BCX0">This integration periodically fetches logs and metrics from vSphere vCenter servers.</span></span><span class="EOP SCXW30962791 BCX0" data-ccp-props="{"201341983":0,"335559739":160,"335559740":259}"> </span>

**<span class="EOP SCXW30962791 BCX0" data-ccp-props="{"201341983":0,"335559739":160,"335559740":259}"> </span><span class="TextRun SCXW30962791 BCX0" data-contrast="auto" lang="EN-US" style="color: rgb(0, 0, 0);" xml:lang="EN-US"><span class="NormalTextRun SCXW30962791 BCX0">Compatibility</span></span>**<span class="LineBreakBlob BlobObject DragDrop SCXW30962791 BCX0">**<span class="SCXW30962791 BCX0" style="color: rgb(0, 0, 0);"> </span>**  
</span><span class="TextRun SCXW30962791 BCX0" data-contrast="auto" lang="EN-US" xml:lang="EN-US"><span class="NormalTextRun SCXW30962791 BCX0">The integration uses the </span><span class="NormalTextRun SCXW30962791 BCX0">Govmomi</span><span class="NormalTextRun SCXW30962791 BCX0"> library to collect metrics and logs from any </span><span class="NormalTextRun SCXW30962791 BCX0">Vmware</span><span class="NormalTextRun SCXW30962791 BCX0"> SDK URL (</span><span class="NormalTextRun SCXW30962791 BCX0">ESXi</span><span class="NormalTextRun SCXW30962791 BCX0">/VCenter). This library is built for and tested against </span><span class="NormalTextRun SCXW30962791 BCX0">ESXi</span><span class="NormalTextRun SCXW30962791 BCX0"> and vCenter 6.5, 6.7 and 7.0.</span></span><span class="EOP SCXW30962791 BCX0" data-ccp-props="{"201341983":0,"335559739":160,"335559740":259}"> </span>

<span class="EOP SCXW30962791 BCX0" data-ccp-props="{"201341983":0,"335559739":160,"335559740":259}"> </span>**<span class="TextRun SCXW30962791 BCX0" data-contrast="auto" lang="EN-US" xml:lang="EN-US"><span class="NormalTextRun SCXW30962791 BCX0">Installation Guide: </span></span><span class="EOP SCXW30962791 BCX0" data-ccp-props="{"201341983":0,"335559739":160,"335559740":259}"> </span>**

[<span class="TextRun Underlined SCXW30962791 BCX0" data-contrast="none" lang="EN-US" xml:lang="EN-US"><span class="NormalTextRun SCXW30962791 BCX0" data-ccp-charstyle="Hyperlink">VM</span><span class="NormalTextRun SCXW30962791 BCX0" data-ccp-charstyle="Hyperlink">ware vSphere </span><span class="NormalTextRun SCXW30962791 BCX0" data-ccp-charstyle="Hyperlink">7</span><span class="NormalTextRun SCXW30962791 BCX0" data-ccp-charstyle="Hyperlink">.0 Installation</span></span>](https://docs.vmware.com/en/VMware-vSphere/7.0/rn/vsphere-esxi-vcenter-server-70-release-notes.html#installation-notes-for-this-release-12)<span class="LineBreakBlob BlobObject DragDrop SCXW30962791 BCX0"><span class="SCXW30962791 BCX0"> </span>  
</span>[<span class="TextRun Underlined SCXW30962791 BCX0" data-contrast="none" lang="EN-US" xml:lang="EN-US"><span class="NormalTextRun SCXW30962791 BCX0" data-ccp-charstyle="Hyperlink">Govmomi</span><span class="NormalTextRun SCXW30962791 BCX0" data-ccp-charstyle="Hyperlink"> Libr</span><span class="NormalTextRun SCXW30962791 BCX0" data-ccp-charstyle="Hyperlink">a</span><span class="NormalTextRun SCXW30962791 BCX0" data-ccp-charstyle="Hyperlink">ry</span></span>](https://github.com/vmware/govmomi?tab=readme-ov-file)<span class="EOP SCXW30962791 BCX0" data-ccp-props="{"201341983":0,"335559685":720,"335559739":160,"335559740":259}"> </span>

**<span class="EOP SCXW30962791 BCX0" data-ccp-props="{"201341983":0,"335559739":160,"335559740":259}"> </span><span class="TextRun SCXW30962791 BCX0" data-contrast="auto" lang="EN-US" xml:lang="EN-US"><span class="NormalTextRun SCXW30962791 BCX0">Inte</span><span class="NormalTextRun SCXW30962791 BCX0">gration</span><span class="NormalTextRun SCXW30962791 BCX0"> Process</span></span><span class="EOP SCXW30962791 BCX0" data-ccp-props="{"201341983":0,"335559739":160,"335559740":259}"> </span>**

**<span class="TextRun SCXW30962791 BCX0" data-contrast="auto" lang="EN-US" xml:lang="EN-US"><span class="NormalTextRun SCXW30962791 BCX0">Go&gt; </span><span class="NormalTextRun SCXW30962791 BCX0">Cyber Incident Management (XDR and MDR)</span></span><span class="EOP SCXW30962791 BCX0" data-ccp-props="{"201341983":0,"335559739":160,"335559740":259}"> </span>**

<span class="SCXW30962791 BCX0"><span class="WACImageContainer NoPadding DragDrop BlobObject SCXW30962791 BCX0" role="presentation">![](https://cytechint-docs-bookstack.s3.amazonaws.com/uploads/images/gallery/2024-06/VpkmMTVZiYCQvpSj-embedded-image-gf6t5jvs.png)</span></span><span class="EOP SCXW30962791 BCX0" data-ccp-props="{"201341983":0,"335559739":160,"335559740":259}"> </span>

**<span class="EOP SCXW30962791 BCX0" data-ccp-props="{"201341983":0,"335559739":160,"335559740":259}"> </span><span class="TextRun SCXW30962791 BCX0" data-contrast="auto" lang="EN-US" xml:lang="EN-US"><span class="NormalTextRun SCXW30962791 BCX0">Go&gt; </span><span class="NormalTextRun SCXW30962791 BCX0">Cyber Incident Management (XDR and MDR)</span><span class="NormalTextRun SCXW30962791 BCX0">&gt;</span> <span class="NormalTextRun SCXW30962791 BCX0">Settings</span></span><span class="EOP SCXW30962791 BCX0" data-ccp-props="{"201341983":0,"335559739":160,"335559740":259}"> </span>**

<span class="SCXW30962791 BCX0"><span class="WACImageContainer NoPadding DragDrop BlobObject SCXW30962791 BCX0" role="presentation">![](https://cytechint-docs-bookstack.s3.amazonaws.com/uploads/images/gallery/2024-06/JqN4RGWCTB8e4rMZ-embedded-image-dibtx8el.png)</span></span><span class="EOP SCXW30962791 BCX0" data-ccp-props="{"201341983":0,"335559739":160,"335559740":259}"> </span>

**<span class="EOP SCXW30962791 BCX0" data-ccp-props="{"201341983":0,"335559739":160,"335559740":259}"> </span><span class="TextRun SCXW30962791 BCX0" data-contrast="auto" lang="EN-US" xml:lang="EN-US"><span class="NormalTextRun SCXW30962791 BCX0">Go&gt; </span><span class="NormalTextRun SCXW30962791 BCX0">Cyber Incident Management (XDR and MDR)</span><span class="NormalTextRun SCXW30962791 BCX0">&gt;</span><span class="NormalTextRun SCXW30962791 BCX0"> Settings</span><span class="NormalTextRun SCXW30962791 BCX0">&gt;</span> <span class="NormalTextRun SCXW30962791 BCX0">Integration</span></span><span class="EOP SCXW30962791 BCX0" data-ccp-props="{"201341983":0,"335559739":160,"335559740":259}"> </span>**

<span class="SCXW30962791 BCX0"><span class="WACImageContainer NoPadding DragDrop BlobObject SCXW30962791 BCX0" role="presentation">![](https://cytechint-docs-bookstack.s3.amazonaws.com/uploads/images/gallery/2024-06/UewNbr6kyO8xoMWh-embedded-image-9qrl3qi4.png)</span></span><span class="EOP SCXW30962791 BCX0" data-ccp-props="{"201341983":0,"335559739":160,"335559740":259}"> </span>

**<span class="TextRun SCXW30962791 BCX0" data-contrast="auto" lang="EN-US" xml:lang="EN-US"><span class="NormalTextRun SCXW30962791 BCX0">Go&gt; </span><span class="NormalTextRun SCXW30962791 BCX0">Cyber Incident Management (XDR and MDR)</span><span class="NormalTextRun SCXW30962791 BCX0">&gt;</span><span class="NormalTextRun SCXW30962791 BCX0"> Settings</span><span class="NormalTextRun SCXW30962791 BCX0">&gt;</span><span class="NormalTextRun SCXW30962791 BCX0"> Integration</span><span class="NormalTextRun SCXW30962791 BCX0">&gt;</span></span><span class="LineBreakBlob BlobObject DragDrop SCXW30962791 BCX0"><span class="SCXW30962791 BCX0"> </span>  
</span><span class="TextRun SCXW30962791 BCX0" data-contrast="auto" lang="EN-US" xml:lang="EN-US"><span class="NormalTextRun SCXW30962791 BCX0">In search bar type “</span><span class="NormalTextRun SCXW30962791 BCX0">Vmware</span><span class="NormalTextRun SCXW30962791 BCX0">”</span></span><span class="EOP SCXW30962791 BCX0" data-ccp-props="{"201341983":0,"335559739":160,"335559740":259}"> </span>**

<span class="SCXW30962791 BCX0"><span class="WACImageContainer NoPadding DragDrop BlobObject SCXW30962791 BCX0" role="presentation">![](https://cytechint-docs-bookstack.s3.amazonaws.com/uploads/images/gallery/2024-06/BRvKokCWr3RXgW1y-embedded-image-q83wx4uf.png)</span></span><span class="EOP SCXW30962791 BCX0" data-ccp-props="{"201341983":0,"335559739":160,"335559740":259}"> </span>

<span class="EOP SCXW30962791 BCX0" data-ccp-props="{"201341983":0,"335559739":160,"335559740":259}"> </span>**<span class="TextRun SCXW30962791 BCX0" data-contrast="auto" lang="EN-US" xml:lang="EN-US"><span class="NormalTextRun SCXW30962791 BCX0">Click Add Agent</span></span><span class="EOP SCXW30962791 BCX0" data-ccp-props="{"201341983":0,"335559739":160,"335559740":259}"> </span>**

<span class="SCXW30962791 BCX0"><span class="WACImageContainer NoPadding DragDrop BlobObject SCXW30962791 BCX0" role="presentation">![](https://cytechint-docs-bookstack.s3.amazonaws.com/uploads/images/gallery/2024-06/G1gCerUKzyaT0mZJ-embedded-image-howvpeju.png)</span></span><span class="EOP SCXW30962791 BCX0" data-ccp-props="{"201341983":0,"335559739":160,"335559740":259}"> </span>

**<span class="EOP SCXW30962791 BCX0" data-ccp-props="{"201341983":0,"335559739":160,"335559740":259}"> </span><span class="TextRun SCXW30962791 BCX0" data-contrast="auto" lang="EN-US" xml:lang="EN-US"><span class="NormalTextRun SCXW30962791 BCX0">Choose your Log Collector</span></span><span class="EOP SCXW30962791 BCX0" data-ccp-props="{"201341983":0,"335559739":160,"335559740":259}"> </span>**

<span class="SCXW30962791 BCX0"><span class="WACImageContainer NoPadding DragDrop BlobObject SCXW30962791 BCX0" role="presentation">![A screenshot of a log collector

Description automatically generated](https://cytechint-docs-bookstack.s3.amazonaws.com/uploads/images/gallery/2024-06/8gsxZwCKYHVqluMZ-embedded-image-j62wb6dt.png)</span></span><span class="EOP SCXW30962791 BCX0" data-ccp-props="{"201341983":0,"335559739":160,"335559740":259}"> </span>

<span class="EOP SCXW30962791 BCX0" data-ccp-props="{"201341983":0,"335559739":160,"335559740":259}"> </span>

**<span class="TextRun SCXW30962791 BCX0" data-contrast="auto" lang="EN-US" xml:lang="EN-US"><span class="NormalTextRun SCXW30962791 BCX0">Click the </span><span class="NormalTextRun SCXW30962791 BCX0">vSphere logs and metrics</span></span><span class="EOP SCXW30962791 BCX0" data-ccp-props="{"201341983":0,"335559739":160,"335559740":259}"> </span>**

<span class="SCXW30962791 BCX0"><span class="WACImageContainer NoPadding DragDrop BlobObject SCXW30962791 BCX0" role="presentation">![](https://cytechint-docs-bookstack.s3.amazonaws.com/uploads/images/gallery/2024-06/XIP7jASx89was7K7-embedded-image-acefa0cb.png)</span></span><span class="EOP SCXW30962791 BCX0" data-ccp-props="{"201341983":0,"335559739":160,"335559740":259}"> </span>

<span class="EOP SCXW30962791 BCX0" data-ccp-props="{"201341983":0,"335559739":160,"335559740":259}"> </span>

**<span class="EOP SCXW30962791 BCX0" data-ccp-props="{"201341983":0,"335559739":160,"335559740":259}"> </span> <span class="TextRun SCXW30962791 BCX0" data-contrast="auto" lang="EN-US" xml:lang="EN-US"><span class="NormalTextRun SCXW30962791 BCX0">Keep it as is </span></span><span class="EOP SCXW30962791 BCX0" data-ccp-props="{"201341983":0,"335559739":160,"335559740":259}"> </span>**

<span class="SCXW30962791 BCX0"><span class="WACImageContainer NoPadding DragDrop BlobObject SCXW30962791 BCX0" role="presentation">![A screenshot of a computer

Description automatically generated](https://cytechint-docs-bookstack.s3.amazonaws.com/uploads/images/gallery/2024-06/k8exFIAambr7eL21-embedded-image-nmjrlm9c.png)</span></span><span class="EOP SCXW30962791 BCX0" data-ccp-props="{"201341983":0,"335559739":160,"335559740":259}"> </span>

<span class="EOP SCXW30962791 BCX0" data-ccp-props="{"201341983":0,"335559739":160,"335559740":259}"> </span>

**<span class="TextRun SCXW30962791 BCX0" data-contrast="auto" lang="EN-US" xml:lang="EN-US"><span class="NormalTextRun SCXW30962791 BCX0">Enter the IP address and port</span></span><span class="EOP SCXW30962791 BCX0" data-ccp-props="{"201341983":0,"335559739":160,"335559740":259}"> </span>**

<span class="SCXW30962791 BCX0"><span class="WACImageContainer NoPadding DragDrop BlobObject SCXW30962791 BCX0" role="presentation">![A screenshot of a computer

Description automatically generated](https://cytechint-docs-bookstack.s3.amazonaws.com/uploads/images/gallery/2024-06/dVVUC9kaWTcxYtmb-embedded-image-tjzqtimf.png)</span></span><span class="EOP SCXW30962791 BCX0" data-ccp-props="{"201341983":0,"335559739":160,"335559740":259}"> </span>

<span style="text-decoration: underline;">**<span class="TextRun SCXW30962791 BCX0" data-contrast="auto" lang="EN-US" xml:lang="EN-US"><span class="NormalTextRun SCXW30962791 BCX0">Example</span></span>**</span><span class="TextRun SCXW30962791 BCX0" data-contrast="auto" lang="EN-US" xml:lang="EN-US"><span class="NormalTextRun SCXW30962791 BCX0">:</span> <span class="NormalTextRun SCXW30962791 BCX0">https://127.0.0.1:8989/sdk</span></span><span class="LineBreakBlob BlobObject DragDrop SCXW30962791 BCX0"><span class="SCXW30962791 BCX0"> </span>  
</span>**<span class="TextRun SCXW30962791 BCX0" data-contrast="auto" lang="EN-US" xml:lang="EN-US"><span class="NormalTextRun SCXW30962791 BCX0">127.0.0.1</span></span>**<span class="TextRun SCXW30962791 BCX0" data-contrast="auto" lang="EN-US" xml:lang="EN-US"><span class="NormalTextRun SCXW30962791 BCX0">**:** This is the IP address of the local machine (localhost).</span></span><span class="LineBreakBlob BlobObject DragDrop SCXW30962791 BCX0"><span class="SCXW30962791 BCX0"> </span>  
</span>**<span class="TextRun SCXW30962791 BCX0" data-contrast="auto" lang="EN-US" xml:lang="EN-US"><span class="NormalTextRun SCXW30962791 BCX0">8989</span></span>**<span class="TextRun SCXW30962791 BCX0" data-contrast="auto" lang="EN-US" xml:lang="EN-US"><span class="NormalTextRun SCXW30962791 BCX0">**:** This is the port number on which the SDK service is running.</span><span class="NormalTextRun SCXW30962791 BCX0"> (Keep it as is)</span></span><span class="LineBreakBlob BlobObject DragDrop SCXW30962791 BCX0"><span class="SCXW30962791 BCX0"> </span>  
</span>**<span class="TextRun SCXW30962791 BCX0" data-contrast="auto" lang="EN-US" xml:lang="EN-US"><span class="NormalTextRun SCXW30962791 BCX0">/</span><span class="NormalTextRun SCXW30962791 BCX0">sdk</span></span>**<span class="TextRun SCXW30962791 BCX0" data-contrast="auto" lang="EN-US" xml:lang="EN-US"><span class="NormalTextRun SCXW30962791 BCX0">**:** This indicates that the SDK is accessible at this path.</span> <span class="NormalTextRun SCXW30962791 BCX0">(Keep it as is)</span></span><span class="EOP SCXW30962791 BCX0" data-ccp-props="{"201341983":0,"335559739":160,"335559740":259}"> </span>

**<span class="TextRun SCXW30962791 BCX0" data-contrast="auto" lang="EN-US" xml:lang="EN-US"><span class="NormalTextRun SCXW30962791 BCX0">Notes</span></span>**<span class="TextRun SCXW30962791 BCX0" data-contrast="auto" lang="EN-US" xml:lang="EN-US"><span class="NormalTextRun SCXW30962791 BCX0">: </span><span class="NormalTextRun SCXW30962791 BCX0">To add multiple hosts, enter each IP address following the same format </span></span><span class="TextRun SCXW30962791 BCX0" data-contrast="auto" lang="EN-US" xml:lang="EN-US"><span class="NormalTextRun SCXW30962791 BCX0">(https://&lt;IP\_or\_hostname</span><span class="NormalTextRun SCXW30962791 BCX0">&gt;:port</span><span class="NormalTextRun SCXW30962791 BCX0">/sdk)</span></span><span class="TextRun SCXW30962791 BCX0" data-contrast="auto" lang="EN-US" xml:lang="EN-US"><span class="NormalTextRun SCXW30962791 BCX0"> and press enter.</span></span><span class="EOP SCXW30962791 BCX0" data-ccp-props="{"201341983":0,"335559739":160,"335559740":259}"> </span>

<span class="EOP SCXW30962791 BCX0" data-ccp-props="{"201341983":0,"335559739":160,"335559740":259}"> </span>

**<span class="TextRun SCXW30962791 BCX0" data-contrast="auto" lang="EN-US" xml:lang="EN-US"><span class="NormalTextRun SCXW30962791 BCX0">Enter the Username and password of vSphere account</span></span><span class="EOP SCXW30962791 BCX0" data-ccp-props="{"201341983":0,"335559739":160,"335559740":259}"> </span>**

<span class="SCXW30962791 BCX0"><span class="WACImageContainer NoPadding DragDrop BlobObject SCXW30962791 BCX0" role="presentation">![A screenshot of a computer

Description automatically generated](https://cytechint-docs-bookstack.s3.amazonaws.com/uploads/images/gallery/2024-06/fBN5VrkG6q8Fe6nz-embedded-image-iaijqywd.png)</span></span><span class="EOP SCXW30962791 BCX0" data-ccp-props="{"201341983":0,"335559739":160,"335559740":259}"> </span>

**<span class="TextRun SCXW30962791 BCX0" data-contrast="auto" lang="EN-US" xml:lang="EN-US"><span class="NormalTextRun SCXW30962791 BCX0">Notes</span></span>**<span class="TextRun SCXW30962791 BCX0" data-contrast="auto" lang="EN-US" xml:lang="EN-US"><span class="NormalTextRun SCXW30962791 BCX0">: </span><span class="NormalTextRun SCXW30962791 BCX0">The insecure option bypasses the verification of the server's certificate chain, which can be useful in certain scenarios but comes with significant security risks. It is recommended to use this option only when necessary and in environments where security concerns are minimal.</span></span><span class="EOP SCXW30962791 BCX0" data-ccp-props="{"201341983":0,"335559739":160,"335559740":259}"> </span>

**<span class="EOP SCXW30962791 BCX0" data-ccp-props="{"201341983":0,"335559739":160,"335559740":259}"> </span><span class="TextRun SCXW30962791 BCX0" data-contrast="auto" lang="EN-US" xml:lang="EN-US"><span class="NormalTextRun SCXW30962791 BCX0">Logs collection</span></span><span class="EOP SCXW30962791 BCX0" data-ccp-props="{"201341983":0,"335559739":160,"335559740":259}"> </span>**

<span class="SCXW30962791 BCX0"><span class="WACImageContainer NoPadding DragDrop BlobObject SCXW30962791 BCX0" role="presentation">![](https://cytechint-docs-bookstack.s3.amazonaws.com/uploads/images/gallery/2024-06/L0chiat9flw1kebn-embedded-image-pfoyy8nz.png)</span></span><span class="EOP SCXW30962791 BCX0" data-ccp-props="{"201341983":0,"335559739":160,"335559740":259}"> </span>

<span class="EOP SCXW30962791 BCX0" data-ccp-props="{"201341983":0,"335559739":160,"335559740":259}"> </span>**<span class="TextRun SCXW30962791 BCX0" data-contrast="auto" lang="EN-US" xml:lang="EN-US"><span class="NormalTextRun SCXW30962791 BCX0">Collect logs from vSphere via UDP</span></span><span class="EOP SCXW30962791 BCX0" data-ccp-props="{"201341983":0,"335559739":160,"335559740":259}"> </span>**

<div class="OutlineElement Ltr SCXW30962791 BCX0" id="bkmrk-%C2%A0-16"><span class="EOP SCXW30962791 BCX0" data-ccp-props="{"201341983":0,"335559739":160,"335559740":259}"> [![UDP.png](https://cytechint-docs-bookstack.s3.amazonaws.com/uploads/images/gallery/2024-06/scaled-1680-/Bk7gOwlFFBxSj05j-udp.png)](https://cytechint-docs-bookstack.s3.amazonaws.com/uploads/images/gallery/2024-06/Bk7gOwlFFBxSj05j-udp.png)</span></div><div class="OutlineElement Ltr SCXW30962791 BCX0" id="bkmrk-"></div><span class="TextRun SCXW30962791 BCX0" data-contrast="auto" lang="EN-US" xml:lang="EN-US"><span class="NormalTextRun SCXW30962791 BCX0">**Tags**: Click the given tags </span></span><span class="EOP SCXW30962791 BCX0" data-ccp-props="{"201341983":0,"335559739":160,"335559740":259}"> </span>

<span class="TextRun SCXW30962791 BCX0" data-contrast="auto" lang="EN-US" xml:lang="EN-US"><span class="NormalTextRun SCXW30962791 BCX0">**UDP host to listen on**: </span><span class="NormalTextRun SCXW30962791 BCX0">This is the IP address of the machine where the log collector is running.</span></span><span class="EOP SCXW30962791 BCX0" data-ccp-props="{"201341983":0,"335559739":160,"335559740":259}"> </span>

<span class="TextRun SCXW30962791 BCX0" data-contrast="auto" lang="EN-US" xml:lang="EN-US"><span class="NormalTextRun SCXW30962791 BCX0">**UDP port to listen on:** </span><span class="NormalTextRun SCXW30962791 BCX0">This is the port on which the log collector will listen for incoming log data</span><span class="NormalTextRun SCXW30962791 BCX0">. (Keep it as is)</span></span><span class="EOP SCXW30962791 BCX0" data-ccp-props="{"201341983":0,"335559739":160,"335559740":259}"> </span>

<span class="TextRun SCXW30962791 BCX0" data-contrast="auto" lang="EN-US" xml:lang="EN-US"><span class="NormalTextRun SCXW30962791 BCX0">**Notes**: Enabling "Preserve original event" ensures raw log data is always available, crucial for troubleshooting, compliance, and verifying log accuracy. It adds raw data to </span><span class="NormalTextRun SCXW30962791 BCX0">event.original</span><span class="NormalTextRun SCXW30962791 BCX0">, doubling storage needs and potentially slowing processing if storage isn't scaled, impacting efficiency.</span></span><span class="EOP SCXW30962791 BCX0" data-ccp-props="{"201341983":0,"335559739":160,"335559740":259}"> </span>

<span class="EOP SCXW30962791 BCX0" data-ccp-props="{"201341983":0,"335559739":160,"335559740":259}"> </span>

**<span class="EOP SCXW30962791 BCX0" data-ccp-props="{"201341983":0,"335559739":160,"335559740":259}"> </span><span class="TextRun SCXW30962791 BCX0" data-contrast="auto" lang="EN-US" xml:lang="EN-US"><span class="NormalTextRun SCXW30962791 BCX0">Collect logs from vSphere via </span><span class="NormalTextRun SCXW30962791 BCX0">TCP</span></span><span class="EOP SCXW30962791 BCX0" data-ccp-props="{"201341983":0,"335559739":160,"335559740":259}"> </span>**

<span class="SCXW30962791 BCX0"><span class="WACImageContainer NoPadding DragDrop BlobObject SCXW30962791 BCX0" role="presentation">![A screenshot of a computer

Description automatically generated](https://cytechint-docs-bookstack.s3.amazonaws.com/uploads/images/gallery/2024-06/lBOjpBY2Cnh5wtFF-embedded-image-oi1ke7kl.png)</span></span><span class="EOP SCXW30962791 BCX0" data-ccp-props="{"201341983":0,"335559739":160,"335559740":259}"> </span>

<span class="EOP SCXW30962791 BCX0" data-ccp-props="{"201341983":0,"335559739":160,"335559740":259}"> </span>

<span class="TextRun SCXW30962791 BCX0" data-contrast="auto" lang="EN-US" xml:lang="EN-US"><span class="NormalTextRun SCXW30962791 BCX0">**Tags**: Click the given tags </span></span><span class="EOP SCXW30962791 BCX0" data-ccp-props="{"201341983":0,"335559739":160,"335559740":259}"> </span>

<span class="TextRun SCXW30962791 BCX0" data-contrast="auto" lang="EN-US" xml:lang="EN-US">**<span class="NormalTextRun SCXW30962791 BCX0">TCP</span>**<span class="NormalTextRun SCXW30962791 BCX0"> **host to listen on:** This is the IP address of the machine where the log collector is running.</span></span><span class="EOP SCXW30962791 BCX0" data-ccp-props="{"201341983":0,"335559739":160,"335559740":259}"> </span>

<span class="TextRun SCXW30962791 BCX0" data-contrast="auto" lang="EN-US" xml:lang="EN-US">**<span class="NormalTextRun SCXW30962791 BCX0">TCP</span>**<span class="NormalTextRun SCXW30962791 BCX0"> **port to listen on:** This is the port on which the log collector will listen for incoming log data. (Keep it as is</span><span class="NormalTextRun SCXW30962791 BCX0">)</span></span><span class="EOP SCXW30962791 BCX0" data-ccp-props="{"201341983":0,"335559739":160,"335559740":259}"> </span>

<span class="TextRun SCXW30962791 BCX0" data-contrast="auto" lang="EN-US" xml:lang="EN-US"><span class="NormalTextRun SCXW30962791 BCX0">**Notes**: </span><span class="NormalTextRun SCXW30962791 BCX0">Enabling "Preserve original event" ensures raw log data is always available, crucial for troubleshooting, compliance, and verifying log accuracy. It adds raw data to </span><span class="NormalTextRun SCXW30962791 BCX0">event.original</span><span class="NormalTextRun SCXW30962791 BCX0">, doubling storage needs and potentially slowing processing if storage isn't scaled, impacting efficiency.</span></span><span class="EOP SCXW30962791 BCX0" data-ccp-props="{"201341983":0,"335559739":160,"335559740":259}"> </span>

<span class="LineBreakBlob BlobObject DragDrop SCXW30962791 BCX0"><span class="SCXW30962791 BCX0"> </span>  
</span>**<span class="TextRun SCXW30962791 BCX0" data-contrast="auto" lang="EN-US" xml:lang="EN-US"><span class="NormalTextRun SCXW30962791 BCX0">Click Next</span><span class="NormalTextRun SCXW30962791 BCX0"> to complete the integration.</span></span><span class="EOP SCXW30962791 BCX0" data-ccp-props="{"201341983":0,"335559739":160,"335559740":259}"></span>**

# Windows Event Forwarding to Linux server using Nxlog

## Introduction

Windows Event Forwarding (WEF) allows the collection of event logs from multiple Windows machines and their forwarding to a centralized server. Using Nxlog, you can send these logs to a Linux server for storage and analysis. This documentation provides a step-by-step guide to set up Windows Event Forwarding using Nxlog to send logs to a Linux server.

## Prerequisites

- **Windows Server or Workstation**: The machine that will send logs.
- **Linux Server**: The machine that will receive logs.
- **Nxlog**: Download the latest version of Nxlog for Windows from [Nxlog's official website](https://nxlog.co/downloads).
- **Network Connectivity**: Ensure both machines can communicate over the network.
- **Rsyslog:** Download the latest version of Rsyslog for Linux server or workstation.

<div class="group/conversation-turn relative flex w-full min-w-0 flex-col agent-turn" id="bkmrk-"><div class="flex-col gap-1 md:gap-3"><div class="flex max-w-full flex-col flex-grow"><div class="min-h-8 text-message flex w-full flex-col items-end gap-2 whitespace-normal break-words [.text-message+&]:mt-5" data-message-author-role="assistant" data-message-id="8bbd0118-21e6-4342-99e3-f13ec63cf796" data-message-model-slug="gpt-4o-mini" dir="auto"><div class="flex w-full flex-col gap-1 empty:hidden first:pt-[3px]"></div></div></div></div></div>## Installing Nxlog on Windows

<div class="group/conversation-turn relative flex w-full min-w-0 flex-col agent-turn" id="bkmrk-download-nxlog%3A-obta"><div class="flex-col gap-1 md:gap-3"><div class="flex max-w-full flex-col flex-grow"><div class="min-h-8 text-message flex w-full flex-col items-end gap-2 whitespace-normal break-words [.text-message+&]:mt-5" data-message-author-role="assistant" data-message-id="8bbd0118-21e6-4342-99e3-f13ec63cf796" data-message-model-slug="gpt-4o-mini" dir="auto"><div class="flex w-full flex-col gap-1 empty:hidden first:pt-[3px]"><div class="markdown prose w-full break-words dark:prose-invert light">1. **Download Nxlog**:
    
    
    - Obtain the Nxlog Community Edition installer from the official website.
2. **Install Nxlog**:
    
    
    - Run the installer and follow the prompts to complete the installation.
3. **Start Nxlog Service**:
    
    
    - Start the Nxlog service using the Services management console or command line: **net start nxlog**  
        <div class="flex items-center text-token-text-secondary px-4 py-2 text-xs font-sans justify-between rounded-t-md h-9 bg-token-sidebar-surface-primary dark:bg-token-main-surface-secondary">  
        </div>

</div></div></div></div></div></div>## Configuring Nxlog on Windows

1. **Open Configuration File**:
    
    
    - Edit the Nxlog configuration file located at `C:\Program Files\nxlog\conf\nxlog.conf`.
2. **Configure File**:
    
    
    - Add the following lines to capture Windows Event Logs and send the logs : <div class="overflow-y-auto p-4" dir="ltr"><div>\# Input Module</div><div>&lt;Input eventlog&gt;</div><div> Module im_msvistalog</div><div> ReadFromLast True</div><div> &lt;QueryXML&gt;</div><div>&lt;QueryList&gt;</div><div>&lt;Query Id='1'&gt;</div><div>&lt;Select Path='Application'&gt;*&lt;/Select&gt;</div><div>&lt;Select Path='Security'&gt;*&lt;/Select&gt;</div><div>&lt;Select Path='System'&gt;*&lt;/Select&gt;</div><div>&lt;/Query&gt;</div><div>&lt;/QueryList&gt;</div><div> &lt;/QueryXML&gt;</div><div>&lt;/Input&gt;</div><div>  
        </div><div>\# Output Module</div><div>&lt;Output out&gt;</div><div> Module om_udp</div><div> Host 192.168.20.24 </div><div> Port 514 </div><div> # Exec $raw_event = "&lt;" + $syslog_severity + "&gt;" + $time + " " + $hostname + " " + $procname + ": " + $raw_event; </div><div> Exec parse_syslog_ietf();</div><div>&lt;/Output&gt;</div><div>  
        </div><div>\# Route</div><div>&lt;Route r&gt;</div><div> Path eventlog =&gt; out</div><div>&lt;/Route&gt;</div><div>  
        </div><div>\# Include any other necessary modules/extensions</div><div>&lt;Extension _syslog&gt;</div><div> Module xm_syslog</div><div>&lt;/Extension&gt;</div></div>

### Installing Rsyslog on Linux

- **Install Rsyslog**:
    
    
    - For Ubuntu, run: <div class="contain-inline-size rounded-md border-[0.5px] border-token-border-medium relative bg-token-sidebar-surface-primary dark:bg-gray-950"><div class="sticky top-9 md:top-[5.75rem]"></div><div class="overflow-y-auto p-4" dir="ltr">**sudo apt update sudo apt install rsyslog**</div></div>
- **Enable Rsyslog**:
    
    
    - Ensure Rsyslog is enabled and started: <div class="contain-inline-size rounded-md border-[0.5px] border-token-border-medium relative bg-token-sidebar-surface-primary dark:bg-gray-950"><div class="overflow-y-auto p-4" dir="ltr">**sudo systemctl enable rsyslog sudo systemctl start rsyslog**</div></div><div class="overflow-y-auto p-4" dir="ltr"></div>

#### Configuring Rsyslog on Linux

1. **Open Configuration File**:
    
    
    - Edit /etc/rsyslog.conf or create a new config file in /etc/rsyslog.d/.
2. **Configure Rsyslog to Listen for UDP**:**module(load="imudp") # Load UDP listener input(type="imudp" port="514")**
3. **Define Output File**:
    
    
    - Specify where to store the incoming logs:
    
    <div class="contain-inline-size rounded-md border-[0.5px] border-token-border-medium relative bg-token-sidebar-surface-primary dark:bg-gray-950"><div class="sticky top-9 md:top-[5.75rem]"></div><div class="overflow-y-auto p-4" dir="ltr">**\*.\* /var/log/windows\_events.log**</div></div>
4. **Save and Exit**:
    
    
    - Save the configuration file and restart Rsyslog: <div class="contain-inline-size rounded-md border-[0.5px] border-token-border-medium relative bg-token-sidebar-surface-primary dark:bg-gray-950"><div class="overflow-y-auto p-4" dir="ltr">**sudo systemctl restart rsyslog**</div></div><div class="overflow-y-auto p-4" dir="ltr"></div>

#### Firewall Configuration

#### Windows Firewall

1. **Open Windows Defender Firewall**:
    
    
    - Go to **Control Panel** &gt; **System and Security** &gt; **Windows Defender Firewall**.
2. **Allow Port 514**:
    
    
    - In the left pane, click **Advanced settings**.
    - Select **Inbound Rules** and click on **New Rule**.
    - Choose **Port**, then click **Next**.
    - Select **UDP** and enter **514** in the Specific local ports field.
    - Allow the connection and complete the rule setup.

#### Firewalld Configuration on Linux

1. **Open Port 514 for UDP**:
    
    <div class="contain-inline-size rounded-md border-[0.5px] border-token-border-medium relative bg-token-sidebar-surface-primary dark:bg-gray-950"><div class="sticky top-9 md:top-[5.75rem]"></div><div class="overflow-y-auto p-4" dir="ltr">**sudo firewall-cmd --permanent --add-port=514/udp**</div></div>
2. **Reload Firewalld**:
    
    <div class="contain-inline-size rounded-md border-[0.5px] border-token-border-medium relative bg-token-sidebar-surface-primary dark:bg-gray-950"><div class="sticky top-9 md:top-[5.75rem]"></div><div class="overflow-y-auto p-4" dir="ltr">**sudo firewall-cmd --reload**</div></div>
3. **Verify Open Ports**:
    
    <div class="contain-inline-size rounded-md border-[0.5px] border-token-border-medium relative bg-token-sidebar-surface-primary dark:bg-gray-950"><div class="sticky top-9 md:top-[5.75rem]"></div><div class="overflow-y-auto p-4" dir="ltr">**sudo firewall-cmd --list-all**</div></div>

### Verifying Event Forwarding

1. **Check Nxlog Status on Windows**:
    
    <div class="contain-inline-size rounded-md border-[0.5px] border-token-border-medium relative bg-token-sidebar-surface-primary dark:bg-gray-950"><div class="sticky top-9 md:top-[5.75rem]"></div><div class="overflow-y-auto p-4" dir="ltr">**nxlog -v**  
    </div></div>
2. **Monitor Logs on Linux**:
    
    
    - Use the following command to view the log file:
    
    <div class="contain-inline-size rounded-md border-[0.5px] border-token-border-medium relative bg-token-sidebar-surface-primary dark:bg-gray-950"><div class="sticky top-9 md:top-[5.75rem]"></div><div class="overflow-y-auto p-4" dir="ltr">**tail -f /var/log/windows\_events.log**</div></div>
3. **Review Rsyslog Logs**:
    
    
    - If issues arise, check Rsyslog logs located at **/var/log/syslog** or **/var/log/messages.**

# Windows Event Forwarding to Linux server using Powershell script

#### Overview

This PowerShell script forwards Windows event logs to a Linux server using the syslog protocol. It captures specific event logs, sends them to the specified syslog server, and ensures that duplicate events are not sent.

#### Prerequisites

- PowerShell on Windows
- Syslog server running on Linux (e.g., Rocky Linux) with an accessible IP
- UDP port 514 open for communication

### Powershell Script

Save the file as **.ps1** (e.g sendlogs.ps1).

**Script:**

```bash
# Define the syslog server IP address and port
$syslogServerIP = "192.168.20.24"  # Replace with your Rocky server's IP
$syslogPort = 514

# File to store last sent event info.
# Change this directory if necessary
$logFilePath = "C:\Users\Administrator\Desktop\lastEventInfo.txt"   

# Initialize last sent events
$lastSentEvents = @{}

# Check if the file exists and read the last sent events
if (Test-Path $logFilePath) {
    Write-Host "Loading last sent events from file."
    $lastSentEvents = Get-Content $logFilePath | ConvertFrom-Json
}

# Loop for sending logs
while ($true) {
    Write-Host "Checking for new logs..."

    # Define the logs you want to forward
    $logNames = @("Application", "Security", "Setup", "System")

    # Loop through each log
    foreach ($logName in $logNames) {
        Write-Host "Processing log: $logName"

        # Get new logs
        $logs = Get-WinEvent -LogName $logName | Sort-Object TimeCreated

        foreach ($log in $logs) {
            # Create a unique key based on Event ID and TimeCreated
            $eventKey = "$($log.Id)-$($log.TimeCreated.Ticks)"

            # Check if the event has already been sent
            if (-not $lastSentEvents.ContainsKey($eventKey)) {
                # Create syslog message format
                $message = "<134>" + $log.TimeCreated.ToString("yyyy-MM-dd HH:mm:ss") + " " + $log.ProviderName + ": " + $log.Message

                # Send the message to the syslog server
                $client = New-Object System.Net.Sockets.UdpClient
                $client.Connect($syslogServerIP, $syslogPort)
                $bytes = [System.Text.Encoding]::ASCII.GetBytes($message)
                $client.Send($bytes, $bytes.Length)
                $client.Close()

                # Mark the event as sent
                $lastSentEvents[$eventKey] = $true
                Write-Host "Sent log: $message"
            } else {
                Write-Host "Log already sent: $eventKey"
            }
        }
    }

    # Save the last sent events to the file
    $lastSentEvents | ConvertTo-Json | Set-Content -Path $logFilePath
    Write-Host "Last sent events updated."

    # Wait for 1 second before running again
    Start-Sleep -Seconds 1
}
```

#### Script Components

1. **Define Variables**:
    
    
    - `$syslogServerIP`: IP address of the Linux syslog server.
    - `$syslogPort`: Port number for syslog (default is 514).
    - `$logFilePath`: Path to store the last sent event information.
2. **Initialize Last Sent Events**:
    
    
    - Loads previously sent events from a file, if it exists.
3. **Main Loop**:
    
    
    - Continuously checks for new logs from specified log categories: `Application`, `Security`, `Setup`, and `System`.
4. **Processing Logs**:
    
    
    - Retrieves new logs, sorts them, and creates a unique key based on the event ID and timestamp.
    - Sends new logs to the syslog server in a specified message format.
    - Updates the log file with the newly sent events.
5. **Error Handling**:
    
    
    - Logs messages indicating whether an event has been sent or is a duplicate.

#### Usage

1. Update the `$syslogServerIP` and `$logFilePath` variables.
2. Run the script in PowerShell. It will run indefinitely, checking for new logs every second.

#### Task Scheduler

Make sure to enable the "Run with highest privileges"

[![image.png](https://cytechint-docs-bookstack.s3.amazonaws.com/uploads/images/gallery/2024-10/scaled-1680-/YfETGV3Z7d88N6PN-image.png)](https://cytechint-docs-bookstack.s3.amazonaws.com/uploads/images/gallery/2024-10/YfETGV3Z7d88N6PN-image.png)

Add a new action

1\. Fill in the Program/Script Text Box with: **powershell.exe**

2\. Fill in the Add arguments Text Box with: **-ExecutionPolicy Bypass -File "C:\\Users\\Administrator\\Desktop\\sendlogs.ps1"**

[![image.png](https://cytechint-docs-bookstack.s3.amazonaws.com/uploads/images/gallery/2024-10/scaled-1680-/5xzRjQlucdP4ZuVC-image.png)](https://cytechint-docs-bookstack.s3.amazonaws.com/uploads/images/gallery/2024-10/5xzRjQlucdP4ZuVC-image.png)

Settings Configuration

[![image.png](https://cytechint-docs-bookstack.s3.amazonaws.com/uploads/images/gallery/2024-10/scaled-1680-/V1NrUVyBufxD6TST-image.png)](https://cytechint-docs-bookstack.s3.amazonaws.com/uploads/images/gallery/2024-10/V1NrUVyBufxD6TST-image.png)

After the creating the task, you can enable the script by activating the task.

[![image.png](https://cytechint-docs-bookstack.s3.amazonaws.com/uploads/images/gallery/2024-10/scaled-1680-/QqAzkqKuwoZzgf5p-image.png)](https://cytechint-docs-bookstack.s3.amazonaws.com/uploads/images/gallery/2024-10/QqAzkqKuwoZzgf5p-image.png)

# Z Scaler Integrations

##### <span style="color: rgb(53, 152, 219);">**<span class="TextRun SCXW42879288 BCX8" data-contrast="none" lang="EN-US" xml:lang="EN-US"><span class="NormalTextRun SCXW42879288 BCX8" data-ccp-charstyle="Style (Complex) Open Sans" data-ccp-charstyle-defn="{"ObjectId":"9697cb23-59f2-4ed7-b428-0aa745846b1c|145","ClassId":1073872969,"Properties":[469775450,"Style (Complex) Open Sans",201340122,"1",134233614,"true",469778129,"StyleComplexOpenSans",335572020,"1",201342448,"1",469777841,"Open Sans",469777842,"Open Sans",469777843,"Calibri",469777844,"Open Sans",469769226,"Open Sans,Calibri",469778324,"Default Paragraph Font"]}">Introduction</span></span>**<span class="EOP SCXW42879288 BCX8" data-ccp-props="{"134245418":true,"134245529":true,"201341983":0,"335559738":240,"335559739":0,"335559740":360}"> </span></span>

<span class="TextRun SCXW42879288 BCX8" data-contrast="auto" lang="EN-US" xml:lang="EN-US"><span class="NormalTextRun SCXW42879288 BCX8">This integration is for </span><span class="NormalTextRun SCXW42879288 BCX8">Zscaler</span><span class="NormalTextRun SCXW42879288 BCX8"> Internet Access logs. It can be used to receive logs sent by NSS log server on respective TCP ports.</span></span><span class="EOP SCXW42879288 BCX8" data-ccp-props="{"201341983":0,"335559685":360,"335559739":160,"335559740":259}"> </span>

<span class="TextRun SCXW42879288 BCX8" data-contrast="auto" lang="EN-US" xml:lang="EN-US"><span class="NormalTextRun SCXW42879288 BCX8">The log message is expected to be in JSON format. The data is mapped to ECS fields where </span><span class="NormalTextRun ContextualSpellingAndGrammarErrorV2Themed SCXW42879288 BCX8">applicable</span><span class="NormalTextRun SCXW42879288 BCX8"> and the remaining fields are written under </span></span><span class="TextRun SCXW42879288 BCX8" data-contrast="auto" lang="EN-US" xml:lang="EN-US"><span class="NormalTextRun SpellingErrorV2Themed SCXW42879288 BCX8">zscaler\_</span><span class="NormalTextRun SpellingErrorV2Themed SCXW42879288 BCX8">zia</span><span class="NormalTextRun SCXW42879288 BCX8">.&lt;</span><span class="NormalTextRun SCXW42879288 BCX8">data-stream-name&gt;.\*</span></span><span class="TextRun SCXW42879288 BCX8" data-contrast="auto" lang="EN-US" xml:lang="EN-US"><span class="NormalTextRun SCXW42879288 BCX8">.</span></span><span class="EOP SCXW42879288 BCX8" data-ccp-props="{"201341983":0,"335559685":360,"335559739":160,"335559740":259}"> </span>

<span class="EOP SCXW42879288 BCX8" data-ccp-props="{"201341983":0,"335559685":360,"335559739":160,"335559740":259}"> </span>

##### <span style="color: rgb(53, 152, 219);">**<span class="TextRun SCXW42879288 BCX8" data-contrast="none" lang="EN-US" xml:lang="EN-US"><span class="NormalTextRun SCXW42879288 BCX8" data-ccp-charstyle="Style (Complex) Open Sans">Assumptions</span></span><span class="EOP SCXW42879288 BCX8" data-ccp-props="{"134245418":true,"134245529":true,"201341983":0,"335559738":240,"335559739":0,"335559740":360}"> </span>**</span>

<span class="TextRun SCXW42879288 BCX8" data-contrast="auto" lang="EN-US" xml:lang="EN-US"><span class="NormalTextRun SCXW42879288 BCX8" data-ccp-charstyle="Style (Complex) Open Sans">The procedures described in Section </span></span><span class="FieldRange SCXW42879288 BCX8"><span class="TextRun SCXW42879288 BCX8" data-contrast="auto" lang="EN-US" xml:lang="EN-US"><span class="NormalTextRun SCXW42879288 BCX8" data-ccp-charstyle="Style (Complex) Open Sans">3</span></span></span><span class="TextRun SCXW42879288 BCX8" data-contrast="auto" lang="EN-US" xml:lang="EN-US"> <span class="NormalTextRun ContextualSpellingAndGrammarErrorV2Themed SCXW42879288 BCX8" data-ccp-charstyle="Style (Complex) Open Sans">assumes</span><span class="NormalTextRun SCXW42879288 BCX8" data-ccp-charstyle="Style (Complex) Open Sans"> that a Log Collector has already been </span><span class="NormalTextRun ContextualSpellingAndGrammarErrorV2Themed SCXW42879288 BCX8" data-ccp-charstyle="Style (Complex) Open Sans">setup</span><span class="NormalTextRun SCXW42879288 BCX8" data-ccp-charstyle="Style (Complex) Open Sans">. </span></span><span class="EOP SCXW42879288 BCX8" data-ccp-props="{"201341983":0,"335559685":360,"335559739":160,"335559740":259}"> </span>

**<span class="TextRun SCXW42879288 BCX8" data-contrast="none" lang="EN-US" xml:lang="EN-US"><span class="NormalTextRun SCXW42879288 BCX8" data-ccp-charstyle="Style (Complex) Open Sans">Compatibility</span></span><span class="EOP SCXW42879288 BCX8" data-ccp-props="{"134245418":true,"134245529":true,"201341983":0,"335559738":240,"335559739":0,"335559740":360}"> </span>**

<span class="TextRun SCXW42879288 BCX8" data-contrast="auto" lang="EN-US" xml:lang="EN-US"><span class="NormalTextRun SCXW42879288 BCX8">This package has been tested against </span></span><span class="TextRun SCXW42879288 BCX8" data-contrast="auto" lang="EN-US" xml:lang="EN-US"><span class="NormalTextRun SCXW42879288 BCX8">Zscaler Internet Access version </span><span class="NormalTextRun SCXW42879288 BCX8">6.1</span></span><span class="EOP SCXW42879288 BCX8" data-ccp-props="{"201341983":0,"335559685":1440,"335559739":160,"335559740":259}"> </span>

<span class="EOP SCXW42879288 BCX8" data-ccp-props="{"201341983":0,"335559685":720,"335559731":720,"335559739":160,"335559740":259}"> </span>

##### <span style="color: rgb(53, 152, 219);">**<span class="TextRun SCXW42879288 BCX8" data-contrast="none" lang="EN-US" xml:lang="EN-US"><span class="NormalTextRun SCXW42879288 BCX8" data-ccp-charstyle="Style (Complex) Open Sans">Requirements</span></span><span class="EOP SCXW42879288 BCX8" data-ccp-props="{"134245418":true,"134245529":true,"201341983":0,"335559738":240,"335559739":0,"335559740":360}"> </span>**</span>

**<span class="TextRun SCXW42879288 BCX8" data-contrast="auto" lang="EN-US" xml:lang="EN-US"><span class="NormalTextRun SCXW42879288 BCX8" data-ccp-charstyle="Style (Complex) Open Sans">Steps for setting up NSS Feeds</span></span><span class="EOP SCXW42879288 BCX8" data-ccp-props="{"201341983":0,"335559739":160,"335559740":259}"> </span>**

<div class="SCXW42879288 BCX8" id="bkmrk-enable-the-integrati"><div class="ListContainerWrapper SCXW42879288 BCX8">1. <span class="TextRun SCXW42879288 BCX8" data-contrast="auto" lang="EN-US" xml:lang="EN-US"><span class="NormalTextRun SCXW42879288 BCX8" data-ccp-charstyle="Style (Complex) Open Sans">Enable the integration with the TCP input.</span></span><span class="EOP SCXW42879288 BCX8" data-ccp-props="{"201341983":0,"335559739":160,"335559740":259}"> </span>

</div><div class="ListContainerWrapper SCXW42879288 BCX8">2. <span class="TextRun SCXW42879288 BCX8" data-contrast="auto" lang="EN-US" xml:lang="EN-US"><span class="NormalTextRun SCXW42879288 BCX8" data-ccp-charstyle="Style (Complex) Open Sans">Configure the Zscaler NSS Server and NSS Feeds to send logs to the Elastic Agent that is running this integration. See Add NSS Server and Add NSS Feeds. Use the IP address hostname of the Elastic Agent as the 'NSS Feed SIEM IP Address/FQDN</span><span class="NormalTextRun ContextualSpellingAndGrammarErrorV2Themed SCXW42879288 BCX8" data-ccp-charstyle="Style (Complex) Open Sans">', and</span><span class="NormalTextRun SCXW42879288 BCX8" data-ccp-charstyle="Style (Complex) Open Sans"> use the listening port of the Elastic Agent as the 'SIEM TCP Port' on the Add NSS Feed configuration screen. To configure Zscaler NSS Server and NSS Feeds follow the following steps.</span></span><span class="EOP SCXW42879288 BCX8" data-ccp-props="{"201341983":0,"335559739":160,"335559740":259}"> </span>

</div><div class="ListContainerWrapper SCXW42879288 BCX8">- <span class="TextRun SCXW42879288 BCX8" data-contrast="auto" lang="EN-US" xml:lang="EN-US"><span class="NormalTextRun SCXW42879288 BCX8" data-ccp-charstyle="Style (Complex) Open Sans">In the ZIA Admin Portal, add an NSS Server.</span></span><span class="EOP SCXW42879288 BCX8" data-ccp-props="{"201341983":0,"335559739":160,"335559740":259}"> </span>

</div><div class="ListContainerWrapper SCXW42879288 BCX8">- <span class="TextRun SCXW42879288 BCX8" data-contrast="auto" lang="EN-US" xml:lang="EN-US"><span class="NormalTextRun SCXW42879288 BCX8" data-ccp-charstyle="Style (Complex) Open Sans">Log in to the ZIA Admin Portal using your admin account. If </span><span class="NormalTextRun SCXW42879288 BCX8" data-ccp-charstyle="Style (Complex) Open Sans">you're</span><span class="NormalTextRun SCXW42879288 BCX8" data-ccp-charstyle="Style (Complex) Open Sans"> unable to log in, contact Support.</span></span><span class="EOP SCXW42879288 BCX8" data-ccp-props="{"201341983":0,"335559739":160,"335559740":259}"> </span>
- <span class="TextRun SCXW42879288 BCX8" data-contrast="auto" lang="EN-US" xml:lang="EN-US"><span class="NormalTextRun SCXW42879288 BCX8" data-ccp-charstyle="Style (Complex) Open Sans">Add an NSS server. Refer to Adding NSS Servers to set up an Add NSS Server for Web and/or Firewall.</span></span><span class="EOP SCXW42879288 BCX8" data-ccp-props="{"201341983":0,"335559739":160,"335559740":259}"> </span>
- <span class="TextRun SCXW42879288 BCX8" data-contrast="auto" lang="EN-US" xml:lang="EN-US"><span class="NormalTextRun SCXW42879288 BCX8" data-ccp-charstyle="Style (Complex) Open Sans">Verify that the state of the NSS Server is healthy.</span></span><span class="EOP SCXW42879288 BCX8" data-ccp-props="{"201341983":0,"335559739":160,"335559740":259}"> </span>
- <span class="TextRun SCXW42879288 BCX8" data-contrast="auto" lang="EN-US" xml:lang="EN-US"><span class="NormalTextRun SCXW42879288 BCX8" data-ccp-charstyle="Style (Complex) Open Sans">In the ZIA Admin Portal, go to Administration &gt; </span><span class="NormalTextRun SpellingErrorV2Themed SCXW42879288 BCX8" data-ccp-charstyle="Style (Complex) Open Sans">Nanolog</span><span class="NormalTextRun SCXW42879288 BCX8" data-ccp-charstyle="Style (Complex) Open Sans"> Streaming Service &gt; NSS Servers.</span></span><span class="EOP SCXW42879288 BCX8" data-ccp-props="{"201341983":0,"335559739":160,"335559740":259}"> </span>
- <span class="TextRun SCXW42879288 BCX8" data-contrast="auto" lang="EN-US" xml:lang="EN-US"><span class="NormalTextRun SCXW42879288 BCX8" data-ccp-charstyle="Style (Complex) Open Sans">In the State column, confirm that the state of the NSS server is healthy.</span></span><span class="EOP SCXW42879288 BCX8" data-ccp-props="{"201341983":0,"335559739":160,"335559740":259}"> </span>

</div><div class="OutlineElement Ltr SCXW42879288 BCX8">  
</div></div><span class="SCXW42879288 BCX8"><span class="WACImageContainer NoPadding DragDrop BlobObject SCXW42879288 BCX8" role="presentation">![Graphical user interface, text

Description automatically generated](https://cytechint-docs-bookstack.s3.amazonaws.com/uploads/images/gallery/2024-04/embedded-image-7appumqi.png)</span></span><span class="EOP SCXW42879288 BCX8" data-ccp-props="{"201341983":0,"335557856":16777215,"335559685":720,"335559739":0,"335559740":240}"> </span>

<span class="SCXW42879288 BCX8"><span class="WACImageContainer NoPadding DragDrop BlobObject SCXW42879288 BCX8" role="presentation">![Shape NSS server setup image](https://cytechint-docs-bookstack.s3.amazonaws.com/uploads/images/gallery/2024-04/embedded-image-2cx6wk9w.png)</span></span>

<div class="SCXW42879288 BCX8" id="bkmrk-in-the-zia-admin-por"><div class="ListContainerWrapper SCXW42879288 BCX8">- <span class="TextRun SCXW42879288 BCX8" data-contrast="none" lang="EN-US" xml:lang="EN-US"><span class="NormalTextRun SCXW42879288 BCX8">In the ZIA Admin Portal, add an NSS Feed.</span></span><span class="EOP SCXW42879288 BCX8" data-ccp-props="{"201341983":0,"335557856":16777215,"335559739":0,"335559740":240}"> </span>
- <span class="TextRun SCXW42879288 BCX8" data-contrast="none" lang="EN-US" xml:lang="EN-US"><span class="NormalTextRun SCXW42879288 BCX8">Refer to </span></span>[<span class="TextRun Underlined SCXW42879288 BCX8" data-contrast="none" lang="EN-US" xml:lang="EN-US"><span class="NormalTextRun SCXW42879288 BCX8">Add NSS Feeds</span></span>](https://help.zscaler.com/zia/adding-nss-feeds)<span class="TextRun SCXW42879288 BCX8" data-contrast="none" lang="EN-US" xml:lang="EN-US"><span class="NormalTextRun SCXW42879288 BCX8"> and select the type of feed you want to configure. The following fields </span><span class="NormalTextRun SCXW42879288 BCX8">require</span><span class="NormalTextRun SCXW42879288 BCX8"> specific inputs:</span></span><span class="EOP SCXW42879288 BCX8" data-ccp-props="{"201341983":0,"335557856":16777215,"335559739":0,"335559740":240}"> </span>
- **<span class="TextRun SCXW42879288 BCX8" data-contrast="none" lang="EN-US" xml:lang="EN-US"><span class="NormalTextRun SCXW42879288 BCX8">SIEM IP Address</span></span>**<span class="TextRun SCXW42879288 BCX8" data-contrast="none" lang="EN-US" xml:lang="EN-US"><span class="NormalTextRun SCXW42879288 BCX8">: Enter the IP address of the </span></span>[<span class="TextRun Underlined SCXW42879288 BCX8" data-contrast="none" lang="EN-US" xml:lang="EN-US"><span class="NormalTextRun SCXW42879288 BCX8">Elastic agent</span></span>](https://www.elastic.co/guide/en/fleet/current/fleet-overview.html)<span class="TextRun SCXW42879288 BCX8" data-contrast="none" lang="EN-US" xml:lang="EN-US"><span class="NormalTextRun SCXW42879288 BCX8"> </span><span class="NormalTextRun SCXW42879288 BCX8">you’ll</span><span class="NormalTextRun SCXW42879288 BCX8"> be assigning the Zscaler integration to.</span></span><span class="EOP SCXW42879288 BCX8" data-ccp-props="{"201341983":0,"335557856":16777215,"335559739":0,"335559740":240}"> </span>
- **<span class="TextRun SCXW42879288 BCX8" data-contrast="none" lang="EN-US" xml:lang="EN-US"><span class="NormalTextRun SCXW42879288 BCX8">SIEM TCP Port</span></span>**<span class="TextRun SCXW42879288 BCX8" data-contrast="none" lang="EN-US" xml:lang="EN-US"><span class="NormalTextRun SCXW42879288 BCX8">: Enter the port number, depending on the logs associated with the NSS Feed. You will need to create an NSS Feed for each log type.</span></span><span class="EOP SCXW42879288 BCX8" data-ccp-props="{"201341983":0,"335557856":16777215,"335559739":0,"335559740":240}"> </span>
    
    
    - <span class="TextRun SCXW42879288 BCX8" data-contrast="none" lang="EN-US" xml:lang="EN-US"><span class="NormalTextRun SCXW42879288 BCX8">Alerts</span></span><span class="TextRun SCXW42879288 BCX8" data-contrast="none" lang="EN-US" xml:lang="EN-US"><span class="NormalTextRun SCXW42879288 BCX8">: 9010</span></span><span class="EOP SCXW42879288 BCX8" data-ccp-props="{"201341983":0,"335557856":16777215,"335559739":0,"335559740":240}"> </span>
    - <span class="TextRun SCXW42879288 BCX8" data-contrast="none" lang="EN-US" xml:lang="EN-US"><span class="NormalTextRun SCXW42879288 BCX8">DNS</span></span><span class="TextRun SCXW42879288 BCX8" data-contrast="none" lang="EN-US" xml:lang="EN-US"><span class="NormalTextRun SCXW42879288 BCX8">: 9011</span></span><span class="EOP SCXW42879288 BCX8" data-ccp-props="{"201341983":0,"335557856":16777215,"335559739":0,"335559740":240}"> </span>
    - <span class="TextRun SCXW42879288 BCX8" data-contrast="none" lang="EN-US" xml:lang="EN-US"><span class="NormalTextRun SCXW42879288 BCX8">Firewall</span></span><span class="TextRun SCXW42879288 BCX8" data-contrast="none" lang="EN-US" xml:lang="EN-US"><span class="NormalTextRun SCXW42879288 BCX8">: 9012</span></span>
    - <span class="TextRun SCXW42879288 BCX8" data-contrast="none" lang="EN-US" xml:lang="EN-US"><span class="NormalTextRun SCXW42879288 BCX8">Tunnel</span></span><span class="TextRun SCXW42879288 BCX8" data-contrast="none" lang="EN-US" xml:lang="EN-US"><span class="NormalTextRun SCXW42879288 BCX8">: 9013</span></span>
    - <span class="TextRun SCXW42879288 BCX8" data-contrast="none" lang="EN-US" xml:lang="EN-US"><span class="NormalTextRun SCXW42879288 BCX8">Web</span></span><span class="TextRun SCXW42879288 BCX8" data-contrast="none" lang="EN-US" xml:lang="EN-US"><span class="NormalTextRun SCXW42879288 BCX8">: 9014</span></span>

- **<span class="TextRun SCXW42879288 BCX8" data-contrast="none" lang="EN-US" xml:lang="EN-US"><span class="NormalTextRun SCXW42879288 BCX8">Feed Output Type</span></span>**<span class="TextRun SCXW42879288 BCX8" data-contrast="none" lang="EN-US" xml:lang="EN-US"><span class="NormalTextRun SCXW42879288 BCX8">**:** Select Custom in Feed output type and paste the </span><span class="NormalTextRun SCXW42879288 BCX8">appropriate response</span><span class="NormalTextRun SCXW42879288 BCX8"> format in Feed output format as follows:</span></span><span class="EOP SCXW42879288 BCX8" data-ccp-props="{"201341983":0,"335557856":16777215,"335559739":0,"335559740":240}"> </span>

</div></div><span class="EOP SCXW42879288 BCX8" data-ccp-props="{"201341983":0,"335557856":16777215,"335559685":3600,"335559739":0,"335559740":240}"> </span>

<span class="SCXW42879288 BCX8"><span class="WACImageContainer NoPadding DragDrop BlobObject SCXW42879288 BCX8" role="presentation">![Graphical user interface, application

Description automatically generated](https://cytechint-docs-bookstack.s3.amazonaws.com/uploads/images/gallery/2024-04/embedded-image-vvtdgnrz.png)</span></span><span class="EOP SCXW42879288 BCX8" data-ccp-props="{"201341983":0,"335557856":16777215,"335559685":2880,"335559739":0,"335559740":240}"> </span>

<span class="SCXW42879288 BCX8"><span class="WACImageContainer NoPadding DragDrop BlobObject SCXW42879288 BCX8" role="presentation">![Shape NSS Feeds setup image](https://cytechint-docs-bookstack.s3.amazonaws.com/uploads/images/gallery/2024-04/embedded-image-pduvcrwm.png)</span></span><span class="EOP SCXW42879288 BCX8" data-ccp-props="{"201341983":0,"335557856":16777215,"335559685":2160,"335559739":0,"335559740":240}"> </span>

<span style="color: rgb(53, 152, 219);">**<span class="TextRun SCXW42879288 BCX8" data-contrast="none" lang="EN-US" xml:lang="EN-US"><span class="NormalTextRun SCXW42879288 BCX8">Steps for setting up Cloud NSS Feeds</span></span><span class="EOP SCXW42879288 BCX8" data-ccp-props="{"201341983":0,"335557856":16777215,"335559739":0,"335559740":240}"> </span>**</span>

<div class="SCXW42879288 BCX8" id="bkmrk-enable-the-integrati-1"><div class="ListContainerWrapper SCXW42879288 BCX8">1. <span class="TextRun SCXW42879288 BCX8" data-contrast="none" lang="EN-US" xml:lang="EN-US"><span class="NormalTextRun SCXW42879288 BCX8">Enable the integration with the HTTP Endpoint input.</span></span><span class="EOP SCXW42879288 BCX8" data-ccp-props="{"201341983":0,"335557856":16777215,"335559739":0,"335559740":240}"> </span>

</div><div class="ListContainerWrapper SCXW42879288 BCX8">2. <span class="TextRun SCXW42879288 BCX8" data-contrast="none" lang="EN-US" xml:lang="EN-US"><span class="NormalTextRun SCXW42879288 BCX8">Configure the Zscaler Cloud NSS Feeds to send logs to the Elastic Agent that is running this integration. Provide API URL to send logs to the Elastic Agent. To configure Zscaler Cloud NSS Feeds follow the following steps.</span></span><span class="EOP SCXW42879288 BCX8" data-ccp-props="{"201341983":0,"335557856":16777215,"335559739":0,"335559740":240}"> </span>

</div><div class="ListContainerWrapper SCXW42879288 BCX8">- <span class="TextRun SCXW42879288 BCX8" data-contrast="none" lang="EN-US" xml:lang="EN-US"><span class="NormalTextRun SCXW42879288 BCX8">In the ZIA Admin Portal, add a Cloud NSS Feed.</span></span><span class="EOP SCXW42879288 BCX8" data-ccp-props="{"201341983":0,"335557856":16777215,"335559739":0,"335559740":240}"> </span>
- <span class="TextRun SCXW42879288 BCX8" data-contrast="none" lang="EN-US" xml:lang="EN-US"><span class="NormalTextRun SCXW42879288 BCX8">Log in to the ZIA Admin Portal using your admin account.</span></span><span class="EOP SCXW42879288 BCX8" data-ccp-props="{"201341983":0,"335557856":16777215,"335559739":0,"335559740":240}"> </span>
- <span class="TextRun SCXW42879288 BCX8" data-contrast="none" lang="EN-US" xml:lang="EN-US"><span class="NormalTextRun SCXW42879288 BCX8">Add a Cloud NSS Feed. See to </span></span>[<span class="TextRun Underlined SCXW42879288 BCX8" data-contrast="none" lang="EN-US" xml:lang="EN-US"><span class="NormalTextRun SCXW42879288 BCX8">Add Cloud NSS Feed</span></span>](https://help.zscaler.com/zia/adding-cloud-nss-feeds)<span class="TextRun SCXW42879288 BCX8" data-contrast="none" lang="EN-US" xml:lang="EN-US"><span class="NormalTextRun SCXW42879288 BCX8">.</span></span><span class="EOP SCXW42879288 BCX8" data-ccp-props="{"201341983":0,"335557856":16777215,"335559739":0,"335559740":240}"> </span>
- <span class="TextRun SCXW42879288 BCX8" data-contrast="none" lang="EN-US" xml:lang="EN-US"><span class="NormalTextRun SCXW42879288 BCX8">In the ZIA Admin Portal, go to Administration &gt; </span><span class="NormalTextRun SpellingErrorV2Themed SCXW42879288 BCX8">Nanolog</span><span class="NormalTextRun SCXW42879288 BCX8"> Streaming Service &gt; Cloud NSS Feeds.</span></span><span class="EOP SCXW42879288 BCX8" data-ccp-props="{"201341983":0,"335557856":16777215,"335559739":0,"335559740":240}"> </span>
- <span class="TextRun SCXW42879288 BCX8" data-contrast="none" lang="EN-US" xml:lang="EN-US"><span class="NormalTextRun SCXW42879288 BCX8">Give Feed Name, change status to Enabled.</span></span><span class="EOP SCXW42879288 BCX8" data-ccp-props="{"201341983":0,"335557856":16777215,"335559739":0,"335559740":240}"> </span>
- <span class="TextRun SCXW42879288 BCX8" data-contrast="none" lang="EN-US" xml:lang="EN-US"><span class="NormalTextRun SCXW42879288 BCX8">Select NSS Type.</span></span><span class="EOP SCXW42879288 BCX8" data-ccp-props="{"201341983":0,"335557856":16777215,"335559739":0,"335559740":240}"> </span>
- <span class="TextRun SCXW42879288 BCX8" data-contrast="none" lang="EN-US" xml:lang="EN-US"><span class="NormalTextRun SCXW42879288 BCX8">Change SIEM Type to </span><span class="NormalTextRun ContextualSpellingAndGrammarErrorV2Themed SCXW42879288 BCX8">other</span><span class="NormalTextRun SCXW42879288 BCX8">.</span></span><span class="EOP SCXW42879288 BCX8" data-ccp-props="{"201341983":0,"335557856":16777215,"335559739":0,"335559740":240}"> </span>
- <span class="TextRun SCXW42879288 BCX8" data-contrast="none" lang="EN-US" xml:lang="EN-US"><span class="NormalTextRun SCXW42879288 BCX8">Add an API URL.</span></span><span class="EOP SCXW42879288 BCX8" data-ccp-props="{"201341983":0,"335557856":16777215,"335559739":0,"335559740":240}"> </span>
- <span class="TextRun SCXW42879288 BCX8" data-contrast="none" lang="EN-US" xml:lang="EN-US"><span class="NormalTextRun SCXW42879288 BCX8">Default ports:</span></span><span class="EOP SCXW42879288 BCX8" data-ccp-props="{"201341983":0,"335557856":16777215,"335559739":0,"335559740":240}"> </span>
    
    
    - <span class="TextRun SCXW42879288 BCX8" data-contrast="none" lang="EN-US" xml:lang="EN-US"><span class="NormalTextRun SCXW42879288 BCX8">DNS</span></span><span class="TextRun SCXW42879288 BCX8" data-contrast="none" lang="EN-US" xml:lang="EN-US"><span class="NormalTextRun SCXW42879288 BCX8">: 9556</span></span><span class="EOP SCXW42879288 BCX8" data-ccp-props="{"201341983":0,"335557856":16777215,"335559739":0,"335559740":240}"> </span>
    - <span class="TextRun SCXW42879288 BCX8" data-contrast="none" lang="EN-US" xml:lang="EN-US"><span class="NormalTextRun SCXW42879288 BCX8">Firewall</span></span><span class="TextRun SCXW42879288 BCX8" data-contrast="none" lang="EN-US" xml:lang="EN-US"><span class="NormalTextRun SCXW42879288 BCX8">: 9557</span></span>
    - <span class="TextRun SCXW42879288 BCX8" data-contrast="none" lang="EN-US" xml:lang="EN-US"><span class="NormalTextRun SCXW42879288 BCX8">Tunnel</span></span><span class="TextRun SCXW42879288 BCX8" data-contrast="none" lang="EN-US" xml:lang="EN-US"><span class="NormalTextRun SCXW42879288 BCX8">: 9558</span></span>
    - <span class="TextRun SCXW42879288 BCX8" data-contrast="none" lang="EN-US" xml:lang="EN-US"><span class="NormalTextRun SCXW42879288 BCX8">Web</span></span><span class="TextRun SCXW42879288 BCX8" data-contrast="none" lang="EN-US" xml:lang="EN-US"><span class="NormalTextRun SCXW42879288 BCX8">: 9559</span></span><span class="EOP SCXW42879288 BCX8" data-ccp-props="{"201341983":0,"335557856":16777215,"335559739":0,"335559740":240}"> </span>

</div></div><div class="SCXW42879288 BCX8" id="bkmrk-select-json-as-feed-"><div class="ListContainerWrapper SCXW42879288 BCX8">- <span class="TextRun SCXW42879288 BCX8" data-contrast="none" lang="EN-US" xml:lang="EN-US"><span class="NormalTextRun SCXW42879288 BCX8">Select JSON as feed output type.</span></span><span class="EOP SCXW42879288 BCX8" data-ccp-props="{"201341983":0,"335557856":16777215,"335559739":0,"335559740":240}"> </span>
- <span class="TextRun SCXW42879288 BCX8" data-contrast="none" lang="EN-US" xml:lang="EN-US"><span class="NormalTextRun SCXW42879288 BCX8">Add </span><span class="NormalTextRun ContextualSpellingAndGrammarErrorV2Themed SCXW42879288 BCX8">same</span><span class="NormalTextRun SCXW42879288 BCX8"> custom header along with its value on </span><span class="NormalTextRun ContextualSpellingAndGrammarErrorV2Themed SCXW42879288 BCX8">both the side</span><span class="NormalTextRun SCXW42879288 BCX8"> for </span><span class="NormalTextRun SCXW42879288 BCX8">additional</span><span class="NormalTextRun SCXW42879288 BCX8"> security.</span></span><span class="EOP SCXW42879288 BCX8" data-ccp-props="{"201341983":0,"335557856":16777215,"335559739":0,"335559740":240}"> </span>

</div><div class="OutlineElement Ltr SCXW42879288 BCX8">  
</div></div><span class="EOP SCXW42879288 BCX8" data-ccp-props="{"201341983":0,"335557856":16777215,"335559685":1440,"335559739":0,"335559740":240}"> </span>

<span class="SCXW42879288 BCX8"><span class="WACImageContainer NoPadding DragDrop BlobObject SCXW42879288 BCX8" role="presentation">![Graphical user interface, text, application, email

Description automatically generated](https://cytechint-docs-bookstack.s3.amazonaws.com/uploads/images/gallery/2024-04/embedded-image-q5y9sfv3.png)</span></span><span class="EOP SCXW42879288 BCX8" data-ccp-props="{"201341983":0,"335557856":16777215,"335559685":1440,"335559739":0,"335559740":240}"> </span>

<div class="SCXW42879288 BCX8" id="bkmrk-repeat-step-2-for-ea"><div class="ListContainerWrapper SCXW42879288 BCX8">3. <span class="TextRun SCXW42879288 BCX8" data-contrast="none" lang="EN-US" xml:lang="EN-US"><span class="NormalTextRun SCXW42879288 BCX8">Repeat step 2 for each log type.</span></span><span class="EOP SCXW42879288 BCX8" data-ccp-props="{"201341983":0,"335557856":16777215,"335559739":0,"335559740":240}"> </span>

</div></div>**<span class="TextRun SCXW42879288 BCX8" data-contrast="none" lang="EN-US" xml:lang="EN-US"><span class="NormalTextRun SCXW42879288 BCX8">Please make sure to use the given response formats for NSS and Cloud NSS Feeds.</span></span><span class="EOP SCXW42879288 BCX8" data-ccp-props="{"201341983":0,"335557856":16777215,"335559685":360,"335559739":0,"335559740":240}"> </span>**

<span class="TextRun SCXW42879288 BCX8" data-contrast="none" lang="EN-US" xml:lang="EN-US"><span class="NormalTextRun SCXW42879288 BCX8">Note: Please make sure to use </span><span class="NormalTextRun ContextualSpellingAndGrammarErrorV2Themed SCXW42879288 BCX8">latest</span><span class="NormalTextRun SCXW42879288 BCX8"> version of </span><span class="NormalTextRun ContextualSpellingAndGrammarErrorV2Themed SCXW42879288 BCX8">given</span><span class="NormalTextRun SCXW42879288 BCX8"> response formats.</span></span><span class="EOP SCXW42879288 BCX8" data-ccp-props="{"201341983":0,"335557856":16777215,"335559685":360,"335559739":0,"335559740":240}"> </span>

<span class="EOP SCXW42879288 BCX8" data-ccp-props="{"201341983":0,"335559685":360,"335559739":160,"335559740":259}"> </span>

<span class="EOP SCXW42879288 BCX8" data-ccp-props="{"134233117":false,"134233118":false,"201341983":0,"335557856":16777215,"335559685":360,"335559738":0,"335559739":0,"335559740":240}"> </span>

##### <span style="color: rgb(53, 152, 219);">**<span class="TextRun Highlight SCXW42879288 BCX8" data-contrast="none" lang="EN-US" xml:lang="EN-US"><span class="NormalTextRun SCXW42879288 BCX8" data-ccp-charstyle="normaltextrun" data-ccp-charstyle-defn="{"ObjectId":"9697cb23-59f2-4ed7-b428-0aa745846b1c|171","ClassId":1073872969,"Properties":[469775450,"normaltextrun",201340122,"1",134233614,"true",469778129,"normaltextrun",335572020,"1",469778324,"Default Paragraph Font"]}">Zscaler</span> <span class="NormalTextRun SCXW42879288 BCX8" data-ccp-charstyle="normaltextrun">I</span><span class="NormalTextRun SCXW42879288 BCX8" data-ccp-charstyle="normaltextrun">ntegration</span><span class="NormalTextRun SCXW42879288 BCX8" data-ccp-charstyle="eop" data-ccp-charstyle-defn="{"ObjectId":"9697cb23-59f2-4ed7-b428-0aa745846b1c|172","ClassId":1073872969,"Properties":[469775450,"eop",201340122,"1",134233614,"true",469778129,"eop",335572020,"1",469778324,"Default Paragraph Font"]}"> </span><span class="NormalTextRun SCXW42879288 BCX8" data-ccp-charstyle="eop">Procedures</span></span><span class="EOP SCXW42879288 BCX8" data-ccp-props="{"134245418":true,"134245529":true,"201341983":0,"335559738":240,"335559739":0,"335559740":360}"> </span>**</span>

<span class="TextRun Highlight SCXW42879288 BCX8" data-contrast="auto" lang="EN-US" xml:lang="EN-US"><span class="NormalTextRun SCXW42879288 BCX8">Please provide the following information to </span><span class="NormalTextRun SpellingErrorV2Themed SCXW42879288 BCX8">CyTech</span><span class="NormalTextRun SCXW42879288 BCX8">:</span></span><span class="EOP SCXW42879288 BCX8" data-ccp-props="{"201341983":0,"335559685":360,"335559739":160,"335559740":259}"> </span>

<div class="SCXW42879288 BCX8" id="bkmrk--1"><div class="OutlineElement Ltr SCXW42879288 BCX8">  
</div><div class="ListContainerWrapper SCXW42879288 BCX8">  
</div></div>**<span class="TextRun Highlight SCXW42879288 BCX8" data-contrast="none" lang="EN-US" xml:lang="EN-US"><span class="NormalTextRun SCXW42879288 BCX8" data-ccp-parastyle="CyTech Heading 1" data-ccp-parastyle-defn="{"ObjectId":"9697cb23-59f2-4ed7-b428-0aa745846b1c|115","ClassId":1073872969,"Properties":[469775450,"CyTech Heading 1",201340122,"2",134234082,"true",134233614,"true",469778129,"CyTechHeading1",335572020,"1",201342448,"2",469777841,"Open Sans",469777842,"Open Sans",469777843,"",469777844,"Open Sans",469769226,"Open Sans",335551500,"1809913",268442635,"36",335559740,"360",201341983,"0",335559739,"0",335559738,"240",335560102,"0",134245418,"true",134245529,"true",469777929,"CyTech Heading 1 Char",469778324,"heading 1"]}" data-ccp-parastyle-linked-defn="{"ObjectId":"9697cb23-59f2-4ed7-b428-0aa745846b1c|118","ClassId":1073872969,"Properties":[469775450,"CyTech Heading 1 Char",201340122,"1",134233614,"true",469778129,"CyTechHeading1Char",335572020,"1",134231262,"true",201342448,"2",469777841,"Open Sans",469777842,"Open Sans",469777843,"",469777844,"Open Sans",469769226,"Open Sans",335551500,"1809913",268442635,"36",335551547,"1033",469777929,"CyTech Heading 1",469778324,"Heading 1 Char"]}">Collect Zscaler Internet Access logs via TCP </span><span class="NormalTextRun SCXW42879288 BCX8" data-ccp-parastyle="CyTech Heading 1">input</span></span><span class="EOP SCXW42879288 BCX8" data-ccp-props="{"134245418":true,"134245529":true,"201341983":0,"335559738":240,"335559739":0,"335559740":360}"> </span>**

<div class="SCXW42879288 BCX8" id="bkmrk-listen-address---the"><div class="ListContainerWrapper SCXW42879288 BCX8">  
</div><div class="ListContainerWrapper SCXW42879288 BCX8" style="padding-left: 40px;">1. 1. <span class="TextRun Highlight SCXW42879288 BCX8" data-contrast="auto" lang="EN-US" xml:lang="EN-US"><span class="NormalTextRun SCXW42879288 BCX8">Listen Address</span><span class="NormalTextRun SCXW42879288 BCX8"> - </span><span class="NormalTextRun SCXW42879288 BCX8">The bind address to listen for TCP connections.</span></span>
    2. <span class="TextRun Highlight SCXW42879288 BCX8" data-contrast="auto" lang="EN-US" xml:lang="EN-US"><span class="NormalTextRun SCXW42879288 BCX8">Types: </span></span><span class="EOP SCXW42879288 BCX8" data-ccp-props="{"201341983":0,"335559739":160,"335559740":259}"> </span>

</div><div class="ListContainerWrapper SCXW42879288 BCX8">- - - - - - <span class="TextRun Highlight SCXW42879288 BCX8" data-contrast="auto" lang="EN-US" xml:lang="EN-US"><span class="NormalTextRun SCXW42879288 BCX8">TCP </span><span class="NormalTextRun SCXW42879288 BCX8">Listen Port for </span><span class="NormalTextRun SCXW42879288 BCX8">Zscaler</span><span class="NormalTextRun SCXW42879288 BCX8"> Internet Access Alerts</span></span><span class="EOP SCXW42879288 BCX8" data-ccp-props="{"201341983":0,"335559739":160,"335559740":259}"> </span>

</div></div><div class="SCXW42879288 BCX8" id="bkmrk-tcp-listen-port-for-" style="padding-left: 40px;"><div class="ListContainerWrapper SCXW42879288 BCX8" style="padding-left: 40px;">- - <span class="TextRun Highlight SCXW42879288 BCX8" data-contrast="auto" lang="EN-US" xml:lang="EN-US"><span class="NormalTextRun SCXW42879288 BCX8">TCP </span><span class="NormalTextRun SCXW42879288 BCX8">Listen Port for </span><span class="NormalTextRun SCXW42879288 BCX8">Zscaler</span><span class="NormalTextRun SCXW42879288 BCX8"> Internet Access DNS </span><span class="NormalTextRun SCXW42879288 BCX8">logs</span></span><span class="EOP SCXW42879288 BCX8" data-ccp-props="{"201341983":0,"335559739":160,"335559740":259}"> </span>
    - <span class="TextRun Highlight SCXW42879288 BCX8" data-contrast="auto" lang="EN-US" xml:lang="EN-US"><span class="NormalTextRun SCXW42879288 BCX8">TCP </span><span class="NormalTextRun SCXW42879288 BCX8">Listen Port for </span><span class="NormalTextRun SCXW42879288 BCX8">Zscaler</span><span class="NormalTextRun SCXW42879288 BCX8"> Internet Access Firewall Logs </span></span><span class="EOP SCXW42879288 BCX8" data-ccp-props="{"201341983":0,"335559739":160,"335559740":259}"> </span>
    - <span class="TextRun Highlight SCXW42879288 BCX8" data-contrast="auto" lang="EN-US" xml:lang="EN-US"><span class="NormalTextRun SCXW42879288 BCX8">TCP </span><span class="NormalTextRun SCXW42879288 BCX8">Listen Port for </span><span class="NormalTextRun SCXW42879288 BCX8">Z</span><span class="NormalTextRun SCXW42879288 BCX8">scaler</span><span class="NormalTextRun SCXW42879288 BCX8"> Internet Access Tunnel Logs</span></span><span class="EOP SCXW42879288 BCX8" data-ccp-props="{"201341983":0,"335559739":160,"335559740":259}"> </span>
    - <span class="TextRun Highlight SCXW42879288 BCX8" data-contrast="auto" lang="EN-US" xml:lang="EN-US"><span class="NormalTextRun SCXW42879288 BCX8">TCP </span><span class="NormalTextRun SCXW42879288 BCX8">Listen Port for </span><span class="NormalTextRun SCXW42879288 BCX8">Zscaler</span><span class="NormalTextRun SCXW42879288 BCX8"> Internet Access Web Logs</span></span><span class="EOP SCXW42879288 BCX8" data-ccp-props="{"201341983":0,"335559739":160,"335559740":259}"> </span>

</div></div>**<span class="TextRun Highlight SCXW42879288 BCX8" data-contrast="none" lang="EN-US" xml:lang="EN-US"><span class="NormalTextRun SCXW42879288 BCX8" data-ccp-parastyle="CyTech Heading 1">Collect </span><span class="NormalTextRun SCXW42879288 BCX8" data-ccp-parastyle="CyTech Heading 1">Zscaler</span><span class="NormalTextRun SCXW42879288 BCX8" data-ccp-parastyle="CyTech Heading 1"> Internet Access logs via </span><span class="NormalTextRun SCXW42879288 BCX8" data-ccp-parastyle="CyTech Heading 1">HTTP Endpoint</span></span><span class="EOP SCXW42879288 BCX8" data-ccp-props="{"134245418":true,"134245529":true,"201341983":0,"335559738":240,"335559739":0,"335559740":360}"> </span>**

<div class="SCXW42879288 BCX8" id="bkmrk-listen-address---the-1" style="padding-left: 40px;"><div class="ListContainerWrapper SCXW42879288 BCX8" style="padding-left: 40px;">  
</div><div class="ListContainerWrapper SCXW42879288 BCX8">1. 1. <span class="TextRun Highlight SCXW42879288 BCX8" data-contrast="auto" lang="EN-US" xml:lang="EN-US"><span class="NormalTextRun SCXW42879288 BCX8">Listen Address</span><span class="NormalTextRun SCXW42879288 BCX8"> - </span><span class="NormalTextRun SCXW42879288 BCX8">The bind address to listen for http endpoint connections</span><span class="NormalTextRun SCXW42879288 BCX8">.</span></span>
    2. <span class="TextRun Highlight SCXW42879288 BCX8" data-contrast="auto" lang="EN-US" xml:lang="EN-US"><span class="NormalTextRun SCXW42879288 BCX8">Types: </span></span><span class="EOP SCXW42879288 BCX8" data-ccp-props="{"201341983":0,"335559739":160,"335559740":259}"> </span>

</div><div class="ListContainerWrapper SCXW42879288 BCX8" style="padding-left: 40px;">- - <span class="TextRun Highlight SCXW42879288 BCX8" data-contrast="auto" lang="EN-US" xml:lang="EN-US"><span class="NormalTextRun SCXW42879288 BCX8">TCP Listen Port for </span><span class="NormalTextRun SCXW42879288 BCX8">Zscaler</span><span class="NormalTextRun SCXW42879288 BCX8"> Internet Access DNS </span><span class="NormalTextRun SCXW42879288 BCX8">logs</span></span><span class="EOP SCXW42879288 BCX8" data-ccp-props="{"201341983":0,"335559739":160,"335559740":259}"> </span>
    - <span class="TextRun Highlight SCXW42879288 BCX8" data-contrast="auto" lang="EN-US" xml:lang="EN-US"><span class="NormalTextRun SCXW42879288 BCX8">TCP Listen Port for </span><span class="NormalTextRun SCXW42879288 BCX8">Zscaler</span><span class="NormalTextRun SCXW42879288 BCX8"> Internet Access Firewall Logs </span></span><span class="EOP SCXW42879288 BCX8" data-ccp-props="{"201341983":0,"335559739":160,"335559740":259}"> </span>
    - <span class="TextRun Highlight SCXW42879288 BCX8" data-contrast="auto" lang="EN-US" xml:lang="EN-US"><span class="NormalTextRun SCXW42879288 BCX8">TCP Listen Port for </span><span class="NormalTextRun SCXW42879288 BCX8">Zscaler</span><span class="NormalTextRun SCXW42879288 BCX8"> Internet Access Tunnel Logs</span></span><span class="EOP SCXW42879288 BCX8" data-ccp-props="{"201341983":0,"335559739":160,"335559740":259}"> </span>
    - <span class="TextRun Highlight SCXW42879288 BCX8" data-contrast="auto" lang="EN-US" xml:lang="EN-US"><span class="NormalTextRun SCXW42879288 BCX8">TCP Listen Port for </span><span class="NormalTextRun SCXW42879288 BCX8">Zscaler</span><span class="NormalTextRun SCXW42879288 BCX8"> Internet Access Web Logs</span></span><span class="EOP SCXW42879288 BCX8" data-ccp-props="{"201341983":0,"335559739":160,"335559740":259}"> </span>

</div></div>

# FortiGate Firewall - Syslog Configuration for Log Integration & Security Configuration Recommendations Introduction

#### Introduction

The FortiGate integration enables to monitor your Fortinet FortiGate firewall for security threats, traffic analysis, and compliance reporting. Currently, we are not receiving logs from your firewall. This guide will help you configure syslog to send logs to our monitoring system.

##### Step 1: Log in to your Fortinet FortiGate Admin Portal and Navigate to CLI Console

Log in to your FortiGate web interface and access the CLI Console. Please refer to the images below.

1. Open your web browser and go to: `https://[your-firewall-ip-address]`
2. Click on your **username** in the top-right corner
3. Select **CLI Console** from the dropdown menu

##### Step 2: Required Information for Integration

To configure FortiGate to send logs to your syslog server, we need the following information from you:

**Provide:**

```
FortiGate Source IP (Management IP): ___________________________
Log Collector IP (Where FortiGate sends logs to): ___________________________
FortiGate Model: ___________________________
Firmware Version: ___________________________

```

**To get the FortiGate information, run these commands in CLI:**

```
get system status
get system interface physical

```

##### Step 3: Execute Configuration Commands

Execute these commands on the CLI Console:

##### For Syslog Setting:

```
config log syslogd setting
    set status enable
    set server <Address of remote syslog server>
    set facility user
    set source-ip <Source IP address of syslog>
    set port 10514
    set mode tcp
    set format default
end

```

**What each setting does:**

- `set status enable` = Turns on syslog functionality
- `set server` = IP address of your log collector (where FortiGate sends logs to)
- `set facility user` = Categories logs as "user" type
- `set source-ip` = FortiGate's management IP address
- `set port 10514` = Destination port for log transmission
- `set mode tcp` = Uses TCP protocol (reliable delivery, no packet loss)
- `set format default` = Uses standard syslog format (compatible with Elastic integration)

**Example with actual values:**

```
config log syslogd setting
    set status enable
    set server 192.168.10.50
    set facility user
    set source-ip 192.168.1.99
    set port 10514
    set mode tcp
    set format default
end

```

**Note:**

- Use own log collector IP for `set server`
- Use FortiGate management IP for `set source-ip`
- We recommend using port **10514** if port **514** is already in use

##### For Syslog Filter:

```
config log syslogd filter
    set anomaly enable
    set forward-traffic enable
    set local-traffic enable
    set multicast-traffic disable
    set netscan-discovery enable
    set netscan-vulnerability enable
    set severity warning
    set sniffer-traffic enable
    set voip disable
    set ztna-traffic enable
end

```

This configuration enables logging for:

- **Anomaly events** – Unusual network behavior
- **Forward traffic** – Traffic passing through the firewall
- **Local traffic** – Traffic to/from the firewall itself
- **Network scanning** – Port scans and vulnerability scans
- **Sniffer traffic** – Packet capture events
- **ZTNA traffic** – Zero Trust Network Access events

##### Step 4: Network Firewall Configuration Requirements

**IMPORTANT:** Please ensure the following network connectivity is allowed:

**On your FortiGate device:**

- Allow **OUTBOUND** traffic from FortiGate to your log collector
- **Port:** 10514
- **Protocol:** TCP

**On your Log Collector server:**

- Allow **INBOUND** traffic from FortiGate
- **Port:** 10514
- **Protocol:** TCP

**Network Path:**

- Ensure no firewall or network device between your FortiGate is blocking TCP port 10514
- Verify your FortiGate can reach the log collector IP address

##### Step 5: Verify Configuration

After executing the commands, verify the configuration by running:

**To verify Syslog Setting:**

```
show log syslogd setting

```

**Expected output should show:**

```
status: enable
server: <Your log collector IP>
port: 10514
mode: tcp
format: default

```

**To verify Syslog Filter:**

```
show log syslogd filter

```

##### Step 6: Test Connectivity and Log Transmission

**Test 1: Verify network connectivity to your log collector**

```
execute ping <Log_Collector_IP>

```

This should return successful ping responses.

**Test 2: Send a test log message**

```
execute log test

```

This command sends a test syslog message to your log collector to verify the configuration is working.

##### Step 7: Enable Logging on Firewall Policies

For us to receive traffic logs, logging must be enabled on your firewall policies.

**GUI Method:**

1. Navigate to: **Policy &amp; Objects** → **Firewall Policy**
2. For each policy, click to edit
3. Scroll to **Logging Options**
4. Set **Log Allowed Traffic** to: **All Sessions**
5. Click **OK**

**CLI Method (to check current status):**

```
show firewall policy | grep logtraffic

```

**CLI Method (to enable logging on a specific policy):**

```
config firewall policy
    edit <policy-id>
        set logtraffic all
    next
end

```

##### Verification and Information Needed

To help us verify the integration is working correctly, we would appreciate if you could provide the following:

**Configuration Verification (Screenshots would be helpful):**

1. ☐ Output of: `show log syslogd setting`
2. ☐ Output of: `show log syslogd filter`
3. ☐ Output of: `get system status`

**Network Connectivity Test:**

Please test connectivity to your log collector by running:

```
execute ping <Your_Log_Collector_IP>

```

This helps us confirm there are no network issues between your firewall and log collector.

**Information for Our Integration Setup:**

To complete the integration on our end, please provide:

```
FortiGate Source IP: ___________________________
Log Collector IP: ___________________________
FortiGate Model: ___________________________
Firmware Version: ___________________________
Port Number: 10514
Protocol: TCP

```

**Optional (but helpful for troubleshooting):**

- Is there any firewall or network device between your FortiGate and log collector? Yes / No
- Did the ping test succeed? Yes / No

##### What Needs for Integration

After completing the configuration and provide the screenshots above, kindly provide us:

**Network Information:**

- **FortiGate Source IP** (Your FortiGate management IP): `___________________________`
- **Log Collector IP** (Your log collector server IP): `___________________________`
- **Port Number**: 10514
- **Protocol**: TCP

##### Troubleshooting Common Issues

##### Issue 1: Cannot ping log collector

**Possible causes:**

- Network firewall blocking traffic
- Incorrect routing
- Log collector server is down

**Solution:**

```
# Check your default route
get router info routing-table all

# Verify interface is up
get system interface physical

```

##### Issue 2: Test log command shows no output

**Solution:**

```
# Verify syslog is enabled
show log syslogd setting | grep status

# Check if server IP is correct
show log syslogd setting | grep server

```

##### Issue 3: Configuration not saving

**Solution:**

- Ensure you typed `end` after each config block
- Verify no syntax errors in commands
- Check you have admin permissions

##### Reference Documentation Links

**Source Link for Full Documentation Manual:**  
https://docs.cytechint.io/books/system-integrations/page/fortinet-fortigate-syslog-setting-and-syslog-filter

**Source Link Documentation for Syslog Setting:**  
https://docs.fortinet.com/document/fortigate/6.4.4/cli-reference/444620/config-log-syslogd-setting

**Source Link Documentation for Syslog Filter:**  
https://docs.fortinet.com/document/fortigate/7.0.9/cli-reference/456620/config-log-syslogd-filter  
https://help.fortinet.com/fgt/handbook/cli52\_html/index.html#page/FortiOS%205.2%20CLI/config\_log.16.17.html

**Source Link to Better Understand Log Priority Level:**  
https://help.fortinet.com/fweb/551/log/Content/FortiWeb/fortiweb-log/Priority\_level.htm

---

#### FortiGate Firewall - Security Configuration Recommendations

##### Introduction

This document provides security recommendations for your Fortinet FortiGate firewall to strengthen network security, improve policy management, and optimize firewall configuration based on industry standards.

##### **1. Enable Security Profiles on Firewall Policies**

**Risk:** Without security profiles, viruses, malware, exploits, and malicious websites can pass through your firewall undetected.

**Required Profiles for Internet-Bound Policies (LAN → WAN):**

```
☑ Antivirus (AV) - Blocks viruses, malware, ransomware
☑ Web Filter - Blocks malicious and phishing websites
☑ Application Control - Controls which applications can be used
☑ IPS (Intrusion Prevention) - Blocks hacking attempts and exploits

```

**Configuration Steps:**

1. Navigate to **Policy &amp; Objects** → **Firewall Policy**
2. Click on policy allowing internet access
3. Scroll to **Security Profiles** section
4. Enable profiles: 
    - Antivirus: `default`
    - Web Filter: `default`
    - Application Control: `default`
    - IPS: `protect_client`
5. Click **OK**

##### **2. Review and Optimize Firewall Policies**

**A) Remove Unused Policies**

1. Navigate to **Policy &amp; Objects** → **Firewall Policy**
2. Check **Hit Count** column (0 hits for 30+ days = unused)
3. Verify with department owners before deleting
4. Delete unused policies

**B) Eliminate "Any-Any" Policies**

**Dangerous policies have:**

- Source: `all`
- Destination: `all`
- Service: `ALL`

**Action:** Replace with specific rules defining exact sources, destinations, and services.

**C) Implement Naming Convention**

**Format:** `[SOURCE]-[DESTINATION]-[SERVICE]-[DESCRIPTION]`

**Examples:**

```
LAN-WAN-HTTPS-Employee_Internet_Access
LAN-DMZ-HTTP-Access_to_WebServer
Branch1-HQ-ALL-Site_to_Site_VPN

```

##### **3. Configure Address Objects**

**A) Create Named Objects for Servers**

**Naming Format:** `[TYPE]_[LOCATION]_[PURPOSE]`

**Examples:**

```
SVR_DMZ_WebServer01
SVR_HQ_DatabaseServer
NET_Branch1_LAN
HOST_Finance_Workstation

```

**Steps:**

1. Navigate to **Policy &amp; Objects** → **Addresses**
2. Click **Create New** → **Address**
3. Configure: 
    - Name: `SVR_DMZ_WebServer01`
    - Type: IP/Netmask
    - Subnet/IP: `10.10.10.50/32`
    - Comment: "Production web server"
4. Click **OK**

**B) Create Address Groups**

**Example:**

```
Group: GRP_Web_Servers
Members:
- SVR_DMZ_WebServer01
- SVR_DMZ_WebServer02
- SVR_DMZ_WebServer03

```

**Benefit:** One policy can manage multiple servers.

**C) Geographic Blocking (Optional)**

Block traffic from high-risk countries:

1. Navigate to **Policy &amp; Objects** → **Addresses**
2. Create New → Address
3. Type: Geography
4. Select countries to block
5. Create deny policy using this object

##### **4. Optimize Service Objects**

**A) Create Custom Services**

**Naming Format:** `[PROTOCOL]_[PURPOSE]_[PORT]`

**Examples:**

```
TCP_Custom_App_8080
TCP_Database_MySQL_3306
TCP_Web_Application_8443

```

**B) Create Service Groups**

**Example: Web Services**

```
GRP_Web_Services:
- HTTP (80)
- HTTPS (443)
- HTTP-ALT (8080)

```

**Example: Email Services**

```
GRP_Email_Services:
- SMTP (25)
- SMTPS (465)
- IMAPS (993)
- POP3S (995)

```

**C) Phase Out Insecure Protocols**

**Replace:**

- Telnet → SSH
- FTP → SFTP/FTPS
- HTTP → HTTPS
- SNMPv1/v2 → SNMPv3

##### **5. Configure NAT Policies**

##### Source NAT (Outbound Internet)

Verify NAT is enabled on internet access policies:

1. Go to **Policy &amp; Objects** → **Firewall Policy**
2. Click internet access policy (LAN → WAN)
3. NAT section: ```
    ☑ NAT: Enable☑ Use Outgoing Interface Address
    
    ```

##### Destination NAT (Inbound Services)

For published services (web, email servers):

```
Name: VIP_External_WebServerExternal IP: <Public IP>Mapped IP: <Internal Server IP>Port Forwarding: EnableProtocol: TCP

```

1. Navigate to **Policy &amp; Objects** → **Virtual IPs**
2. Create New → Virtual IP
3. Configure:
4. Always enable security profiles (AV, IPS) on VIP policies

##### **6. Secure VPN Configuration**

##### SSL VPN (Remote Access)

**Navigate to:** VPN → SSL-VPN Settings

**Security Settings:**

```
☑ Two-Factor Authentication: Enable
Method: FortiToken, Email, or SMS

Login Attempt Limit: 5
Lockout Duration: 30 minutes

Session Timeout: 12 hours
Idle Timeout: 30 minutes

☐ Split Tunneling: Disable (force all traffic through VPN)

```

##### IPsec VPN (Site-to-Site)

**Navigate to:** VPN → IPsec Tunnels

**Strong Encryption:**

```
Phase 1 (IKE):
- Encryption: AES256-GCM
- Authentication: SHA256
- DH Group: 14 or higher

Phase 2 (IPsec):
- Encryption: AES256-GCM
- Authentication: SHA256
- PFS: Enable (Group 14)

☑ Dead Peer Detection: Enable
Interval: 10 seconds

```

##### **7. Administrator Security**

**A) Enable Two-Factor Authentication**

1. Navigate to **System** → **Administrators**
2. Click administrator account
3. Enable Two-Factor Authentication: ```
    ☑ Enable Two-Factor AuthenticationMethod: FortiToken (recommended) or Email
    
    ```
4. Click **OK**

**B) Restrict Trusted Hosts**

Only allow admin login from specific IPs:

```
Trusted Host 1: 10.10.10.0/24 (IT subnet)
Trusted Host 2: 172.16.5.100/32 (VPN gateway)

```

**C) Disable WAN Management**

Navigate to **System** → **Settings**

```
WAN Interface:
☐ HTTPS: Disable
☐ HTTP: Disable
☐ SSH: Disable

```

##### **8. Configure Regular Backups**

##### Manual Backup

1. Click **username** (top-right)
2. Configuration → Backup
3. Choose Local PC
4. Save as: `FortiGate_[Model]_[Date].conf`

##### Backup Schedule

```
Daily: Automated
Before changes: Always
Weekly: Manual verification
Monthly: Offsite storage

Retention:
- Daily: 7 days
- Weekly: 30 days
- Monthly: 1 year

```

##### Storage Locations

```
Primary: Local computer
Secondary: Network file server
Tertiary: Cloud storage (encrypted)
Emergency: USB drive (offsite)

```

##### **9. Enable FortiGuard Services**

### Check License Status

1. Navigate to **System** → **FortiGuard**
2. Verify active licenses: ```
    ☑ Antivirus☑ IPS (Intrusion Prevention)☑ Web Filtering☑ Application Control
    
    ```
3. Check expiration dates (renew 30 days before)

##### Configure Auto-Updates

```
☑ Automatic Updates: Enable
Update Schedule: Daily
Push Update: Enable

```

##### **10. Configure NTP (Time Synchronization)**

##### Why Critical

Accurate timestamps required for:

- Log correlation
- Certificate validation
- Compliance

##### Configuration

1. Navigate to **System** → **Settings**
2. System Time section: ```
    ☑ Enable NTPSync with: FortiGuard NTP ServersTime Zone: <Your timezone>
    
    ```

##### Verify NTP

**CLI command:**

```
diagnose sys ntp status

```

**Expected:** `synchronized: yes`

##### Summary Checklist

```
Security Profiles:
☐ AV, Web Filter, App Control, IPS enabled

Policy Management:
☐ Unused policies removed
☐ "Any-any" policies replaced
☐ Naming convention implemented

Objects:
☐ Address objects for servers
☐ Address groups created
☐ Service objects organized

NAT:
☐ Source NAT configured
☐ Destination NAT secured

VPN:
☐ 2FA enabled
☐ Strong encryption
☐ Session timeouts set

Admin Security:
☐ 2FA for admins
☐ Trusted hosts configured
☐ WAN management disabled

Maintenance:
☐ Backup procedure
☐ FortiGuard licenses valid
☐ NTP working

```

##### Reference Links

**FortiGate Best Practices:**  
https://docs.fortinet.com/document/fortigate/7.4.0/best-practices

**Administration Guide:**  
https://docs.fortinet.com/document/fortigate/7.4.0/administration-guide/

**FortiGuard Services:**  
https://www.fortiguard.com/

# EDR Remote Execution - Using Respond Console Manual

### **Research on Elastic EDR Response Actions for:**

1. Forensic commands for malware investigation on isolated hosts
2. API integration documentation for external systems

### **Key Findings:**

- Elastic EDR has 11 response actions for remote host management
- Primary tool: `execute` command for running forensic commands
- Full API support available for integration with external systems
- Can automate investigation and remediation workflows

#### **AVAILABLE RESPONSE ACTIONS**

<table class=" align-center" id="bkmrk-action-purpose-use-c"><thead><tr><th>Action</th><th>Purpose</th><th>Use Case</th></tr></thead><tbody><tr><td>isolate</td><td>Block host from network</td><td>Contain infected host</td></tr><tr><td>release</td><td>Restore network access</td><td>Release clean host</td></tr><tr><td>status</td><td>Get host information</td><td>Check agent status</td></tr><tr><td>processes</td><td>List running processes</td><td>Find malicious processes</td></tr><tr><td>kill-process</td><td>Terminate process</td><td>Stop malware</td></tr><tr><td>suspend-process</td><td>Pause process</td><td>Freeze for analysis</td></tr><tr><td>get-file</td><td>Download file from host</td><td>Extract malware samples</td></tr><tr><td>upload</td><td>Upload file to host</td><td>Deploy remediation tools</td></tr><tr><td>execute</td><td>Run shell commands</td><td>Main forensic investigation tool</td></tr><tr><td>scan</td><td>Scan for malware</td><td>Verify system clean</td></tr><tr><td>runscript</td><td>Run scripts</td><td>Third-party EDR only</td></tr></tbody></table>

**Source:** [https://www.elastic.co/guide/en/security/8.18/response-actions.html](https://www.elastic.co/guide/en/security/8.18/response-actions.html "https://www.elastic.co/guide/en/security/8.18/response-actions.html")

#### **FORENSIC COMMANDS FOR INFECTED HOSTS**

##### **Investigation** 

##### **Windows Commands:**

```
Windows Commands:

# Network connections (find C2 servers)
execute --command "netstat -ano" --timeout 30s

# Running processes
execute --command "tasklist /v /fo csv" --timeout 30s

# Scheduled tasks (persistence check)
execute --command "schtasks /query /fo csv /v" --timeout 60s

# Startup programs
execute --command "wmic startup get Caption,Command" --timeout 30s

# DNS cache (domains contacted)
execute --command "ipconfig /displaydns" --timeout 30s

# PowerShell history
execute --command "type %APPDATA%\\Microsoft\\Windows\\PowerShell\\PSReadLine\\ConsoleHost_history.txt" --timeout 10s

# Registry persistence keys
execute --command "reg query HKLM\\Software\\Microsoft\\Windows\\CurrentVersion\\Run" --timeout 10s
```

##### <span data-teams="true">**Linux Commands:**</span>

```
Linux Commands:

# Network connections
execute --command "netstat -tulpn" --timeout 30s

# Process list
execute --command "ps auxf" --timeout 30s

# Cron jobs (persistence)
execute --command "crontab -l && cat /etc/crontab" --timeout 30s

# Bash history
execute --command "cat ~/.bash_history" --timeout 10s

# SSH keys
execute --command "cat ~/.ssh/authorized_keys" --timeout 10s

# Running services
execute --command "systemctl list-units --type=service --state=running" --timeout 30s
```

**What to Look For:**

- Network connections to unknown foreign IPs
- Processes running from temp directories
- Scheduled tasks with suspicious scripts
- Unknown startup programs
- Suspicious PowerShell/bash commands in history
- Registry entries pointing to malware

##### **<span data-teams="true">Extract Evidence</span>**

```
# Get suspicious file
get-file --path "C:\\Users\\Public\\suspicious.exe" --comment "Extract malware sample"

# Get logs
get-file --path "C:\\Windows\\System32\\winevt\\Logs\\Security.evtx" --comment "Get security logs"
```

**Note:** Files are downloaded as password-protected .zip (password: elastic)  
**Max file size:** 100 MB

##### **Remediation**

```
# Kill malicious process
kill-process --pid 1234 --comment "Terminate malware"

# Delete malware file (Windows)
execute --command "del /F /Q C:\\path\\to\\malware.exe" --timeout 10s

# Delete malware file (Linux)
execute --command "rm -f /path/to/malware" --timeout 10s

# Remove registry persistence (Windows)
execute --command "reg delete HKLM\\Software\\Microsoft\\Windows\\CurrentVersion\\Run /v MalwareName /f" --timeout 10s

# Remove scheduled task (Windows)
execute --command "schtasks /delete /tn MaliciousTask /f" --timeout 10s

# Scan system
scan --path "C:\\" --comment "Full system scan"
```

##### **<span data-teams="true">Verification and Release</span>**

```
# Verify processes clean
processes

# Verify no malicious connections
execute --command "netstat -ano" --timeout 30s

# If clean, release from isolation
release --comment "Host verified clean"
```

##### **<span data-teams="true">Investigation Workflow</span>**

```
1. ISOLATE → isolate --comment "Malware detected"
2. INVESTIGATE → Run forensic commands above
3. EXTRACT → get-file for suspicious files/logs
4. REMEDIATE → kill-process, delete files, remove persistence
5. SCAN → scan --path to verify clean
6. VERIFY → Re-check processes and connections
7. RELEASE → release --comment "System clean"
```

##### **API INTEGRATION**

**API Overview API Exists:** YES - Full REST API support  
**Base URL:** example:<a rel="noreferrer noopener" target="_blank" title="https://<kibana-host>:5601">`https://<kibana-host>:5601`</a>   
**Authentication:** API Key (recommended) or Basic Auth  
**Content-Type:** application/json

##### **Required Headers:**

```
Authorization: ApiKey <base64-encoded-key>
Content-Type: application/json
kbn-xsrf: true
```

**Source:** [https://www.elastic.co/guide/en/security/current/response-actions-api.html](https://www.elastic.co/guide/en/security/current/response-actions-api.html "https://www.elastic.co/guide/en/security/current/response-actions-api.html")

##### **API Endpoints**

All response actions can be triggered via API:

```
POST /api/endpoint/action/{action_type}
```

**Available action types:**

- isolate
- unisolate (release)
- running-processes (processes)
- kill-process
- suspend-process
- get-file
- execute
- upload
- scan

**Example: Execute Command via API**

**Request:**

```
POST https://kibana.example.com:5601/api/endpoint/action/execute
Authorization: ApiKey <your-api-key>
Content-Type: application/json
kbn-xsrf: true

{
  "endpoint_ids": ["host-agent-id-here"],
  "parameters": {
    "command": "netstat -ano",
    "timeout": 30
  },
  "comment": "Check network connections"
}
```

<span data-teams="true">**Response:**</span>

```
{
  "data": {
    "id": "action-12345-abcd",
    "status": "pending",
    "command": "execute",
    "agents": ["host-agent-id-here"],
    "startedAt": "2024-12-10T10:30:00.000Z",
    "isCompleted": false
  }
}
```

**Example: Isolate Host via API**

**Request:**

```
POST https://kibana.example.com:5601/api/endpoint/action/isolate
Authorization: ApiKey <your-api-key>
Content-Type: application/json
kbn-xsrf: true

{
  "endpoint_ids": ["host-agent-id-here"],
  "comment": "Malware detected - isolating host"
}
```

<span data-teams="true">**Response:**</span>

```
{
  "data": {
    "id": "action-67890-efgh",
    "status": "pending",
    "command": "isolate",
    "agents": ["host-agent-id-here"]
  }
}
```

**Check Action Status**

**Request:**

```
GET https://kibana.example.com:5601/api/endpoint/action/{action_id}
Authorization: ApiKey <your-api-key>
kbn-xsrf: true
```

<span data-teams="true">**Response:**</span>

```
{
  "data": {
    "id": "action-12345-abcd",
    "status": "successful",
    "command": "execute",
    "isCompleted": true,
    "outputs": {
      "host-agent-id": {
        "type": "json",
        "content": {
          "output": "command output here..."
        }
      }
    }
  }
}
```

API Integration Benefits

1. **Automation** - Trigger actions programmatically without manual intervention
2. **Integration** - Connect Elastic EDR with external SIEM, ticketing systems, or custom tools
3. **Bulk Operations** - Execute commands on multiple hosts simultaneously
4. **Custom Workflows** - Build automated investigation and response playbooks
5. **Faster Response** - Reduce response time from minutes to seconds

**<span data-teams="true">Python Example Code</span>**

```
import requests

# Configuration
KIBANA_URL = "https://kibana.example.com:5601"
API_KEY = "your-base64-encoded-api-key"

headers = {
    "Authorization": f"ApiKey {API_KEY}",
    "Content-Type": "application/json",
    "kbn-xsrf": "true"
}

# Isolate host
def isolate_host(endpoint_id, comment):
    url = f"{KIBANA_URL}/api/endpoint/action/isolate"
    payload = {
        "endpoint_ids": [endpoint_id],
        "comment": comment
    }
    response = requests.post(url, headers=headers, json=payload)
    return response.json()

# Execute command
def execute_command(endpoint_id, command, timeout=600):
    url = f"{KIBANA_URL}/api/endpoint/action/execute"
    payload = {
        "endpoint_ids": [endpoint_id],
        "parameters": {
            "command": command,
            "timeout": timeout
        },
        "comment": "Automated forensic command"
    }
    response = requests.post(url, headers=headers, json=payload)
    return response.json()

# Usage
result = isolate_host("abc-123-endpoint-id", "Malware detected")
print(f"Action ID: {result['data']['id']}")

result = execute_command("abc-123-endpoint-id", "netstat -ano")
print(f"Action ID: {result['data']['id']}")
```

##### **Prerequisites for API Integration**

1. **API Key** - Create in Kibana: Stack Management → API Keys
2. **Required Privileges:**
    - Host Isolation
    - Process Operations
    - Execute Operations
    - File Operations
    - Scan Operations
3. **Network Access** - System must reach Kibana URL (port 5601)
4. **Endpoint IDs** - Map hostnames to Elastic endpoint agent IDs

**<span data-teams="true">API Action Mapping Table</span>**

<table class=" align-center" id="bkmrk-response-action-api-"><thead><tr><th class="align-left">Response Action</th><th>API Endpoint</th><th>Required Parameters</th></tr></thead><tbody><tr><td>Isolate</td><td>/api/endpoint/action/isolate</td><td>endpoint\_ids</td></tr><tr><td>Release</td><td>/api/endpoint/action/unisolate</td><td>endpoint\_ids</td></tr><tr><td>Get Processes</td><td>/api/endpoint/action/running-processes</td><td>endpoint\_ids</td></tr><tr><td>Execute Command</td><td>/api/endpoint/action/execute</td><td>endpoint\_ids, parameters.command</td></tr><tr><td>Kill Process</td><td>/api/endpoint/action/kill-process</td><td>endpoint\_ids, parameters.pid</td></tr><tr><td>Get File</td><td>/api/endpoint/action/get-file</td><td>endpoint\_ids, parameters.path</td></tr><tr><td>Scan</td><td>/api/endpoint/action/scan</td><td>endpoint\_ids, parameters.path</td></tr></tbody></table>

#####  

##### **ADDITIONAL REFERENCES**

**Official Documentation:**

- Response Actions Overview: [https://www.elastic.co/guide/en/security/8.18/response-actions.html](https://www.elastic.co/guide/en/security/8.18/response-actions.html "https://www.elastic.co/guide/en/security/8.18/response-actions.html")
- Response Actions API: [https://www.elastic.co/guide/en/security/current/response-actions-api.html](https://www.elastic.co/guide/en/security/current/response-actions-api.html "https://www.elastic.co/guide/en/security/current/response-actions-api.html")
- Execute API: [https://www.elastic.co/guide/en/security/current/execute-api.html](https://www.elastic.co/guide/en/security/current/execute-api.html "https://www.elastic.co/guide/en/security/current/execute-api.html")
- API Key Management: [https://www.elastic.co/guide/en/kibana/current/api-keys.html](https://www.elastic.co/guide/en/kibana/current/api-keys.html "https://www.elastic.co/guide/en/kibana/current/api-keys.html")

**Security APIs:**

- Elastic Security APIs: [https://www.elastic.co/guide/en/security/current/security-apis.html](https://www.elastic.co/guide/en/security/current/security-apis.html "https://www.elastic.co/guide/en/security/current/security-apis.html")

# Windows Server - Deploy Software via Group Policy (GPO)

### <span style="color: rgb(0, 0, 0);">**Introduction  
</span>

<span style="color: rgb(0, 0, 0);">**Deploy Software via Group Policy (GPO)** is a method used in **Windows Active Directory (AD)** environments to automatically **install, update, or remove software** on computers or for users centrally and silently, without manual installation on each machine. It’s mainly handled by **Group Policy Objects (GPOs)** through Microsoft Installer (MSI) packages.</span>

#### <span style="color: rgb(0, 0, 0);">**Open the Windows Server Device:**</span>

- <span style="color: rgb(0, 0, 0);">Open **Server Manager dashboard** click **Tools** on the upper right side and choose the **Active Directory Users and Computers.**</span>

<span style="color: rgb(0, 0, 0);">[![image.png](https://cytechint-docs-bookstack.s3.amazonaws.com/uploads/images/gallery/2026-01/scaled-1680-/MQQgkMhG5cjA5SEQ-image.png)](https://cytechint-docs-bookstack.s3.amazonaws.com/uploads/images/gallery/2026-01/MQQgkMhG5cjA5SEQ-image.png)</span>

<span style="color: rgb(0, 0, 0);">[![image.png](https://cytechint-docs-bookstack.s3.amazonaws.com/uploads/images/gallery/2026-01/scaled-1680-/phG9efsyRpAoBEsr-image.png)](https://cytechint-docs-bookstack.s3.amazonaws.com/uploads/images/gallery/2026-01/phG9efsyRpAoBEsr-image.png)</span>

- <span style="color: rgb(0, 0, 0);">On the **Active Directory Users and Computers** right click the **Users** folder select **New** and **Group.**</span>

<span style="color: rgb(0, 0, 0);">[![image.png](https://cytechint-docs-bookstack.s3.amazonaws.com/uploads/images/gallery/2026-01/scaled-1680-/wEdjfYkKvgoRLxeH-image.png)](https://cytechint-docs-bookstack.s3.amazonaws.com/uploads/images/gallery/2026-01/wEdjfYkKvgoRLxeH-image.png)</span>

<span style="color: rgb(0, 0, 0);">After you clicked the Computer, New Object - Computer window displayed.</span>

- <span style="color: rgb(0, 0, 0);">**Input your desired Computer Name:** TSR-Deployment</span>
- <span style="color: rgb(0, 0, 0);">**Group scope: Global**</span>
- <span style="color: rgb(0, 0, 0);">**Group type: Security**</span>

<span style="color: rgb(0, 0, 0);">Click "OK" once done and you will see the **TSR-Deployment** added on the **Active Directory Users and Computers**.</span>

<span style="color: rgb(0, 0, 0);">[![image.png](https://cytechint-docs-bookstack.s3.amazonaws.com/uploads/images/gallery/2026-01/scaled-1680-/jaJv4HWiS9v3AheT-image.png)](https://cytechint-docs-bookstack.s3.amazonaws.com/uploads/images/gallery/2026-01/jaJv4HWiS9v3AheT-image.png)</span>

<span style="color: rgb(0, 0, 0);">[![image.png](https://cytechint-docs-bookstack.s3.amazonaws.com/uploads/images/gallery/2026-01/scaled-1680-/0OlRbArKvhNc6x1O-image.png)](https://cytechint-docs-bookstack.s3.amazonaws.com/uploads/images/gallery/2026-01/0OlRbArKvhNc6x1O-image.png)</span>

- <span style="color: rgb(0, 0, 0);">Next Process double click the **TSR-Deployment** on the **Active Directory Users and Computers, TSR-Deployment Properties** will appear and click the **Members** tab.</span>

<span style="color: rgb(0, 0, 0);">[![image.png](https://cytechint-docs-bookstack.s3.amazonaws.com/uploads/images/gallery/2026-01/scaled-1680-/ow5BVIAB80PJK0fs-image.png)](https://cytechint-docs-bookstack.s3.amazonaws.com/uploads/images/gallery/2026-01/ow5BVIAB80PJK0fs-image.png)</span>

- <span style="color: rgb(0, 0, 0);">Click **Add**, then select **Object Types**. Once it opens, check the **Computers**.</span>

<span style="color: rgb(0, 0, 0);">[![image.png](https://cytechint-docs-bookstack.s3.amazonaws.com/uploads/images/gallery/2026-01/scaled-1680-/YB5G1EOVe2ERMHmx-image.png)](https://cytechint-docs-bookstack.s3.amazonaws.com/uploads/images/gallery/2026-01/YB5G1EOVe2ERMHmx-image.png)</span>

<span style="color: rgb(0, 0, 0);">[![image.png](https://cytechint-docs-bookstack.s3.amazonaws.com/uploads/images/gallery/2026-01/scaled-1680-/AsF2mxZKR1A8llWC-image.png)](https://cytechint-docs-bookstack.s3.amazonaws.com/uploads/images/gallery/2026-01/AsF2mxZKR1A8llWC-image.png)</span>

- <span style="color: rgb(0, 0, 0);">Type the **computer name** that is connected to the domain. Then, click **Check Names** and select only the **Computer** icon that corresponds to your device.</span>  
      
    <span style="color: rgb(0, 0, 0);">[![image.png](https://cytechint-docs-bookstack.s3.amazonaws.com/uploads/images/gallery/2026-01/scaled-1680-/aeehraMDeA0YUH7H-image.png)](https://cytechint-docs-bookstack.s3.amazonaws.com/uploads/images/gallery/2026-01/aeehraMDeA0YUH7H-image.png)</span>

##### <span style="color: rgb(0, 0, 0);">**Creating a UNC Path for Software Folders (Windows Server)**</span>

<span style="color: rgb(0, 0, 0);">To ensure domain-joined computers can access the AQUILA EDR ZIP file package and folder for centralizing logs, create a shared network folder and configure appropriate permissions.</span>

1. <span style="color: rgb(0, 0, 0);">On a **Document** folder, create another folder inside of it with your desired name (e.g., **software**).</span>  
    
    - <span style="color: rgb(0, 0, 0);">Inside of the **software** folder, place the `<strong>aquila agent 7.msi</strong>` into this folder.</span>  
          
        <span style="color: rgb(0, 0, 0);">[![image.png](https://cytechint-docs-bookstack.s3.amazonaws.com/uploads/images/gallery/2026-01/scaled-1680-/S0lg9M1r9EFECEYj-image.png)](https://cytechint-docs-bookstack.s3.amazonaws.com/uploads/images/gallery/2026-01/S0lg9M1r9EFECEYj-image.png)</span>
        
          
        <span style="color: rgb(0, 0, 0);">[![image.png](https://cytechint-docs-bookstack.s3.amazonaws.com/uploads/images/gallery/2026-01/scaled-1680-/rvva6I87H1FJ8j0s-image.png)](https://cytechint-docs-bookstack.s3.amazonaws.com/uploads/images/gallery/2026-01/rvva6I87H1FJ8j0s-image.png)</span>
2. <span style="color: rgb(0, 0, 0);">**Enable Folder Sharing**</span>
    - <span style="color: rgb(0, 0, 0);">Right-click the **software** folder and select **Properties**.</span>
    - <span style="color: rgb(0, 0, 0);">Navigate to the **Sharing** tab and click **Advanced Sharing**.</span><span style="color: rgb(0, 0, 0);">[![image.png](https://cytechint-docs-bookstack.s3.amazonaws.com/uploads/images/gallery/2026-01/scaled-1680-/opYjeqE5wFFJ3Z8V-image.png)](https://cytechint-docs-bookstack.s3.amazonaws.com/uploads/images/gallery/2026-01/opYjeqE5wFFJ3Z8V-image.png)</span>
    - <span style="color: rgb(0, 0, 0);">Check the box **Share this folder**.</span><span style="color: rgb(0, 0, 0);">[![image.png](https://cytechint-docs-bookstack.s3.amazonaws.com/uploads/images/gallery/2026-01/scaled-1680-/BTHQBRIZqm8z8flC-image.png)](https://cytechint-docs-bookstack.s3.amazonaws.com/uploads/images/gallery/2026-01/BTHQBRIZqm8z8flC-image.png)</span>
3. <span style="color: rgb(0, 0, 0);">Set Permissions</span>
    - <span style="color: rgb(0, 0, 0);">Click Permissions</span>
    - <span style="color: rgb(0, 0, 0);">Grant the **Read** permission to `Domain Computers`.</span>
    - <span style="color: rgb(0, 0, 0);">Grant the **Full Control** permission to `Domain Admins`</span>
        
        <span style="color: rgb(0, 0, 0);">[![image.png](https://cytechint-docs-bookstack.s3.amazonaws.com/uploads/images/gallery/2026-01/scaled-1680-/myA2I9R7JSAhtqXd-image.png)](https://cytechint-docs-bookstack.s3.amazonaws.com/uploads/images/gallery/2026-01/myA2I9R7JSAhtqXd-image.png)</span>
    - <span style="color: rgb(0, 0, 0);">Once the **Permission** clicked, **Permissions for software** will be shown and kindly **Remove** the **Everyone.**</span>  
        <span style="color: rgb(0, 0, 0);">[![image.png](https://cytechint-docs-bookstack.s3.amazonaws.com/uploads/images/gallery/2026-01/scaled-1680-/3q3dwKXWXABHMPEG-image.png)](https://cytechint-docs-bookstack.s3.amazonaws.com/uploads/images/gallery/2026-01/3q3dwKXWXABHMPEG-image.png)</span>
    - <span style="color: rgb(0, 0, 0);">After clicking the **Remove**, click the **Add**, then **Select Users, Computers, Service Accounts, or Group** will be shown. Type "**auth"** then click **Check Names.** The **Multiple Names Found** will be shown and select the **Authenticated Users** and click **OK.**  </span><span style="color: rgb(0, 0, 0);">[![image.png](https://cytechint-docs-bookstack.s3.amazonaws.com/uploads/images/gallery/2026-01/scaled-1680-/vjt3uArmsu3RYQgF-image.png)](https://cytechint-docs-bookstack.s3.amazonaws.com/uploads/images/gallery/2026-01/vjt3uArmsu3RYQgF-image.png)</span>
        
        <span style="color: rgb(0, 0, 0);">[![image.png](https://cytechint-docs-bookstack.s3.amazonaws.com/uploads/images/gallery/2026-01/scaled-1680-/zVDiSopC92yCAQ9n-image.png)](https://cytechint-docs-bookstack.s3.amazonaws.com/uploads/images/gallery/2026-01/zVDiSopC92yCAQ9n-image.png)</span>
        
          
        <span style="color: rgb(0, 0, 0);">[![image.png](https://cytechint-docs-bookstack.s3.amazonaws.com/uploads/images/gallery/2026-01/scaled-1680-/TNrjql3n2fdmHv3W-image.png)](https://cytechint-docs-bookstack.s3.amazonaws.com/uploads/images/gallery/2026-01/TNrjql3n2fdmHv3W-image.png)</span>

- <span style="color: rgb(0, 0, 0);">Once **Authenticated Users** selected allow **Full Control,** click **Apply** and **OK.** Including the **Advanced Sharing** click **Apply** and **OK.** </span>

<span style="color: rgb(0, 0, 0);">[![image.png](https://cytechint-docs-bookstack.s3.amazonaws.com/uploads/images/gallery/2026-01/scaled-1680-/BGPSc75jbdelNeBK-image.png)](https://cytechint-docs-bookstack.s3.amazonaws.com/uploads/images/gallery/2026-01/BGPSc75jbdelNeBK-image.png)</span>

- <span style="color: rgb(0, 0, 0);">On the **software folder properties** click the **Security** tab. Point your mouse at **Administrator** ("username"\\administrator) and click **Edit**</span>

<span style="color: rgb(0, 0, 0);">[![image.png](https://cytechint-docs-bookstack.s3.amazonaws.com/uploads/images/gallery/2026-01/scaled-1680-/YSq1qwaWqA2Dc1Yt-image.png)](https://cytechint-docs-bookstack.s3.amazonaws.com/uploads/images/gallery/2026-01/YSq1qwaWqA2Dc1Yt-image.png)</span>

- <span style="color: rgb(0, 0, 0);">On the **Permission for software,** click **Add** and type the **Security Group** name you created "**tsr-deployment**" and click the **Check Names (**It will automatically call the **Security Group**) and click **OK.**</span>

<span style="color: rgb(0, 0, 0);">[![image.png](https://cytechint-docs-bookstack.s3.amazonaws.com/uploads/images/gallery/2026-01/scaled-1680-/6YRhck0CPRFZkvoq-image.png)](https://cytechint-docs-bookstack.s3.amazonaws.com/uploads/images/gallery/2026-01/6YRhck0CPRFZkvoq-image.png)</span>

- <span style="color: rgb(0, 0, 0);">As you can see the "**TSR-Deployment**" Security Group are added. To proceed click **Apply** and **OK.**</span>

<span style="color: rgb(0, 0, 0);">[![image.png](https://cytechint-docs-bookstack.s3.amazonaws.com/uploads/images/gallery/2026-01/scaled-1680-/5bZePJdlQQl3caCf-image.png)](https://cytechint-docs-bookstack.s3.amazonaws.com/uploads/images/gallery/2026-01/5bZePJdlQQl3caCf-image.png)</span>

#### <span style="color: rgb(0, 0, 0);">**Let's go back to the Server Manager dashboard.**</span>

- <span style="color: rgb(0, 0, 0);">On the **Server Manager** click **Tools** on the upper right side and choose the **Group Policy Management**.  
    </span><span style="color: rgb(0, 0, 0);">[![image.png](https://cytechint-docs-bookstack.s3.amazonaws.com/uploads/images/gallery/2026-01/scaled-1680-/ScQSGuxv1yulVkCs-image.png)](https://cytechint-docs-bookstack.s3.amazonaws.com/uploads/images/gallery/2026-01/ScQSGuxv1yulVkCs-image.png)</span>
- <span style="color: rgb(0, 0, 0);">Select or double click the **Domain.** </span>  
    <span style="color: rgb(0, 0, 0);">[![image.png](https://cytechint-docs-bookstack.s3.amazonaws.com/uploads/images/gallery/2026-01/scaled-1680-/k077w4t2kb6KBe91-image.png)](https://cytechint-docs-bookstack.s3.amazonaws.com/uploads/images/gallery/2026-01/k077w4t2kb6KBe91-image.png)</span>
- <span style="color: rgb(0, 0, 0);">Under your **Domain,** you can see the **domain name** `(e.g., ronwinser.com).`</span>  
    <span style="color: rgb(0, 0, 0);">[![image.png](https://cytechint-docs-bookstack.s3.amazonaws.com/uploads/images/gallery/2026-01/scaled-1680-/ccYm3gNKfXqVqixX-image.png)](https://cytechint-docs-bookstack.s3.amazonaws.com/uploads/images/gallery/2026-01/ccYm3gNKfXqVqixX-image.png)</span>
- <span style="color: rgb(0, 0, 0);">Right click your **domain name** and click the **Create a GPO in this domain, and Link it here** and give a name `(e.g., tsrapp_deployment)` click **OK** once done.</span>  
      
    <span style="color: rgb(0, 0, 0);">[![image.png](https://cytechint-docs-bookstack.s3.amazonaws.com/uploads/images/gallery/2026-01/scaled-1680-/hCOWsJlaoUZ06ZSL-image.png)](https://cytechint-docs-bookstack.s3.amazonaws.com/uploads/images/gallery/2026-01/hCOWsJlaoUZ06ZSL-image.png)</span>
    
      
    <span style="color: rgb(0, 0, 0);">[![image.png](https://cytechint-docs-bookstack.s3.amazonaws.com/uploads/images/gallery/2026-01/scaled-1680-/ZanwQn9leRwGzX2S-image.png)](https://cytechint-docs-bookstack.s3.amazonaws.com/uploads/images/gallery/2026-01/ZanwQn9leRwGzX2S-image.png)</span>
- <span style="color: rgb(0, 0, 0);">On the **GPO** you created, right click and choose the **Edit.** </span>  
    <span style="color: rgb(0, 0, 0);">[![image.png](https://cytechint-docs-bookstack.s3.amazonaws.com/uploads/images/gallery/2026-01/scaled-1680-/PgogkPRg90f6Mhs5-image.png)](https://cytechint-docs-bookstack.s3.amazonaws.com/uploads/images/gallery/2026-01/PgogkPRg90f6Mhs5-image.png)</span>
- <span style="color: rgb(0, 0, 0);">Once you **Edit**, the **Group Policy Management** Editor will be shown just click the arrow from **Computer Configuration** &gt; **Policies** &gt; **Software Settings** &gt; **Software installation,** inside the **Software installation** right click on the enviroment and choose the **New** &gt; **Package.**</span>  
      
    <span style="color: rgb(0, 0, 0);">[![image.png](https://cytechint-docs-bookstack.s3.amazonaws.com/uploads/images/gallery/2026-01/scaled-1680-/1lvK7APBP8uZ0Juv-image.png)](https://cytechint-docs-bookstack.s3.amazonaws.com/uploads/images/gallery/2026-01/1lvK7APBP8uZ0Juv-image.png)</span>
- <span style="color: rgb(0, 0, 0);">Once you clicked the **Package** it will direct you from the **folder** you've **created** with a name of "**software".** Kindly click the **Open** your **software installer (Aquila Agent 7 with MSI format)** will be added inside to your **Group Policy Management Edit** or **GPO**. Do not change the "**Assigned**" option from **Deploy Software**.</span>  
      
    <span style="color: rgb(0, 0, 0);">[![image.png](https://cytechint-docs-bookstack.s3.amazonaws.com/uploads/images/gallery/2026-01/scaled-1680-/Vdlj3jSQUhw1kjou-image.png)](https://cytechint-docs-bookstack.s3.amazonaws.com/uploads/images/gallery/2026-01/Vdlj3jSQUhw1kjou-image.png)</span>
    
      
    <span style="color: rgb(0, 0, 0);">[![image.png](https://cytechint-docs-bookstack.s3.amazonaws.com/uploads/images/gallery/2026-01/scaled-1680-/2NX9sjFNb90NK2j5-image.png)](https://cytechint-docs-bookstack.s3.amazonaws.com/uploads/images/gallery/2026-01/2NX9sjFNb90NK2j5-image.png)</span>
- <span style="color: rgb(0, 0, 0);">As you can see, we're able to **map out** also the **Network path** of the "**software"** folder we shared earlier. </span>  
      
    <span style="color: rgb(0, 0, 0);">[![image.png](https://cytechint-docs-bookstack.s3.amazonaws.com/uploads/images/gallery/2026-01/scaled-1680-/iKaLw34H5NTBa8WA-image.png)](https://cytechint-docs-bookstack.s3.amazonaws.com/uploads/images/gallery/2026-01/iKaLw34H5NTBa8WA-image.png)</span>
- <span style="color: rgb(0, 0, 0);">So now your **Aquila Agent** with **.msi** format installer is now already added in the **GPO**.</span>  
      
    #### <span style="color: rgb(0, 0, 0);">[![image.png](https://cytechint-docs-bookstack.s3.amazonaws.com/uploads/images/gallery/2026-01/scaled-1680-/o46In13znWwBH2Ap-image.png)](https://cytechint-docs-bookstack.s3.amazonaws.com/uploads/images/gallery/2026-01/o46In13znWwBH2Ap-image.png)  
    </span>

#### <span style="color: rgb(0, 0, 0);">**Let's navigate again to the "Group Policy Management".**</span>

- <span style="color: rgb(0, 0, 0);">On your **Group Policy Managent** remove the default **Authenticated Users** in **Security Filtering**.  
      
    </span><span style="color: rgb(0, 0, 0);">[![image.png](https://cytechint-docs-bookstack.s3.amazonaws.com/uploads/images/gallery/2026-01/scaled-1680-/KyeBPWWHnlDUVaqY-image.png)](https://cytechint-docs-bookstack.s3.amazonaws.com/uploads/images/gallery/2026-01/KyeBPWWHnlDUVaqY-image.png)</span>
- <span style="color: rgb(0, 0, 0);">Then click the **Add** button from **Security Filtering**, type **Security Groups** you've created, but for this case was "**TSR-Deployment**" and click the **Check Names** and press **OK.**</span>  
      
    <span style="color: rgb(0, 0, 0);">[![image.png](https://cytechint-docs-bookstack.s3.amazonaws.com/uploads/images/gallery/2026-01/scaled-1680-/wuHETHOghgSuBPwY-image.png)](https://cytechint-docs-bookstack.s3.amazonaws.com/uploads/images/gallery/2026-01/wuHETHOghgSuBPwY-image.png)</span>
- <span style="color: rgb(0, 0, 0);">Your **TSR-Deployment** which is the **Global Security group** you've created was already added on the **Security Filtering.** Kindly close the **Group Policy Management** or leave it open. </span>  
      
    <span style="color: rgb(0, 0, 0);">[![image.png](https://cytechint-docs-bookstack.s3.amazonaws.com/uploads/images/gallery/2026-01/scaled-1680-/p0rqErF1M8gAKK2i-image.png)](https://cytechint-docs-bookstack.s3.amazonaws.com/uploads/images/gallery/2026-01/p0rqErF1M8gAKK2i-image.png)</span>

> <span style="color: rgb(0, 0, 0);">In this case, the setup of **Active Directory Users and Computers** and **Group Policy Management** for software deployment via **Group Policy (GPO)** has already been completed. The installer packages have also been added to **Group Policy Management** and are ready for deployment on the client end.</span>

#### <span style="color: rgb(0, 0, 0);">**Let’s proceed to the client-side desktop that is connected to Windows Server domain.** </span>

- <span style="color: rgb(0, 0, 0);">Make sure the **PC/Desktop** is connected to the **Windows Server domain**.</span>  
    <span style="color: rgb(0, 0, 0);">[![image.png](https://cytechint-docs-bookstack.s3.amazonaws.com/uploads/images/gallery/2026-01/scaled-1680-/7sPDpslUhZ3gfCUz-image.png)](https://cytechint-docs-bookstack.s3.amazonaws.com/uploads/images/gallery/2026-01/7sPDpslUhZ3gfCUz-image.png)</span>
- <span style="color: rgb(0, 0, 0);">To automatically install the **software application** from **GPO** to client-end's desktop, we need to update the group policy through **CMD.**</span>
    1. <span style="color: rgb(0, 0, 0);">Open the **CMD** as **administrator.**</span>
    2. <span style="color: rgb(0, 0, 0);">Type **gpupdate /force** and hit **enter**.</span>  
          
        <span style="color: rgb(0, 0, 0);">[![image.png](https://cytechint-docs-bookstack.s3.amazonaws.com/uploads/images/gallery/2026-01/scaled-1680-/pW7OY5yX466t8MzL-image.png)](https://cytechint-docs-bookstack.s3.amazonaws.com/uploads/images/gallery/2026-01/pW7OY5yX466t8MzL-image.png)</span>
    3. <span style="color: rgb(0, 0, 0);">If the group policy updates successfully, type **“Y”** to restart your PC. This allows your **endpoint** to **synchronize** with the GPO.</span>
    4. <span style="color: rgb(0, 0, 0);">Once the **PC/Desktop** is open, the Aquila Agent installer will automatically be installed, to ensure everything is running kindly proceed to **task manager** and type **Aquila** on the **search bar** and check the status of its module.</span>  
          
        <span style="color: rgb(0, 0, 0);">[![image.png](https://cytechint-docs-bookstack.s3.amazonaws.com/uploads/images/gallery/2026-01/scaled-1680-/V43axki7I75jcwQm-image.png)](https://cytechint-docs-bookstack.s3.amazonaws.com/uploads/images/gallery/2026-01/V43axki7I75jcwQm-image.png)</span>

<span style="color: rgb(0, 0, 0);"> *If you need further assistance, kindly contact our technical support at <span style="color: rgb(53, 152, 219);">**<support@cytechint.com>** </span>for prompt assistance and guidance.*</span>

# Deploy Software via Group Policy (GPO) (incomplete)

### <span style="color: rgb(0, 0, 0);">**Introduction**</span>  


<span style="color: rgb(0, 0, 0);">**Deploy Software via Group Policy (GPO)** is a method used in **Windows Active Directory (AD)** environments to automatically **install, update, or remove software** on computers or for users centrally and silently, without manual installation on each machine. It’s mainly handled by **Group Policy Objects (GPOs)** through Microsoft Installer (MSI) packages.</span>

#### **<span style="color: rgb(0, 0, 0);">Open the Windows Server Device:</span>**

- <span style="color: rgb(0, 0, 0);">Open **Server Manager** click **Tools** on the upper right side and choose the **Active Directory Users and Computers.**</span>

[![image.png](https://cytechint-docs-bookstack.s3.amazonaws.com/uploads/images/gallery/2026-01/scaled-1680-/phG9efsyRpAoBEsr-image.png)](https://cytechint-docs-bookstack.s3.amazonaws.com/uploads/images/gallery/2026-01/phG9efsyRpAoBEsr-image.png)

- On the **Active Directory Users and Computers** right click the **Users** folder select **New** and **Computer.**

[![image.png](https://cytechint-docs-bookstack.s3.amazonaws.com/uploads/images/gallery/2026-01/scaled-1680-/1vYRefnPn8bKRgkY-image.png)](https://cytechint-docs-bookstack.s3.amazonaws.com/uploads/images/gallery/2026-01/1vYRefnPn8bKRgkY-image.png)
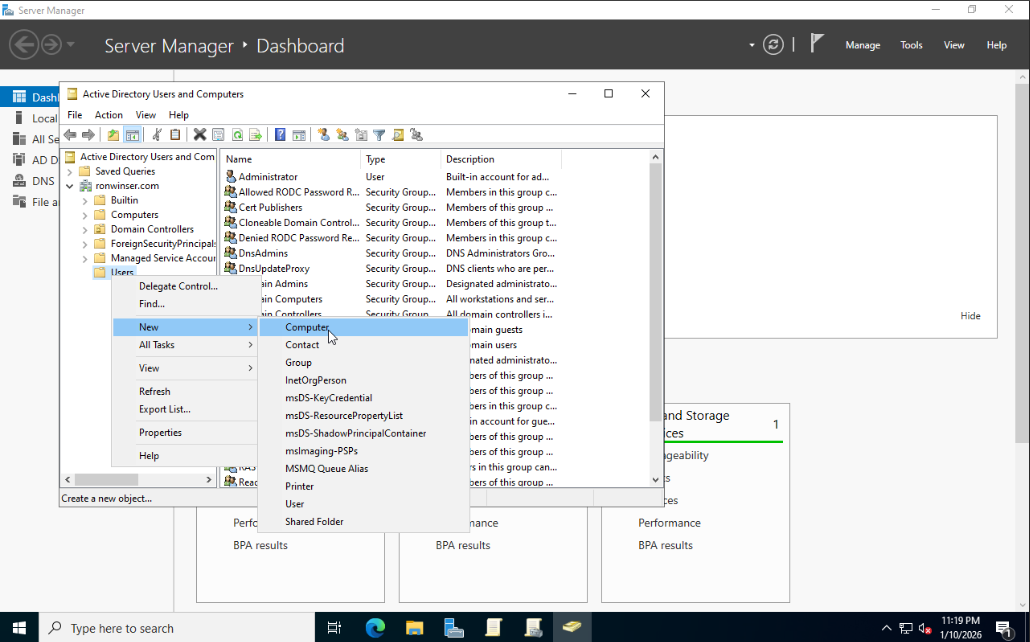
After you clicked the Computer, New Object - Computer window displayed.

- **Input your desired Computer Name:** TSR-Deployment

Click "OK" once done and you will see the TSR-Deployment added on the Active Directory Users and Computers.

[![image.png](https://cytechint-docs-bookstack.s3.amazonaws.com/uploads/images/gallery/2026-01/scaled-1680-/0ZqXIGysHHYUIEcF-image.png)](https://cytechint-docs-bookstack.s3.amazonaws.com/uploads/images/gallery/2026-01/0ZqXIGysHHYUIEcF-image.png)
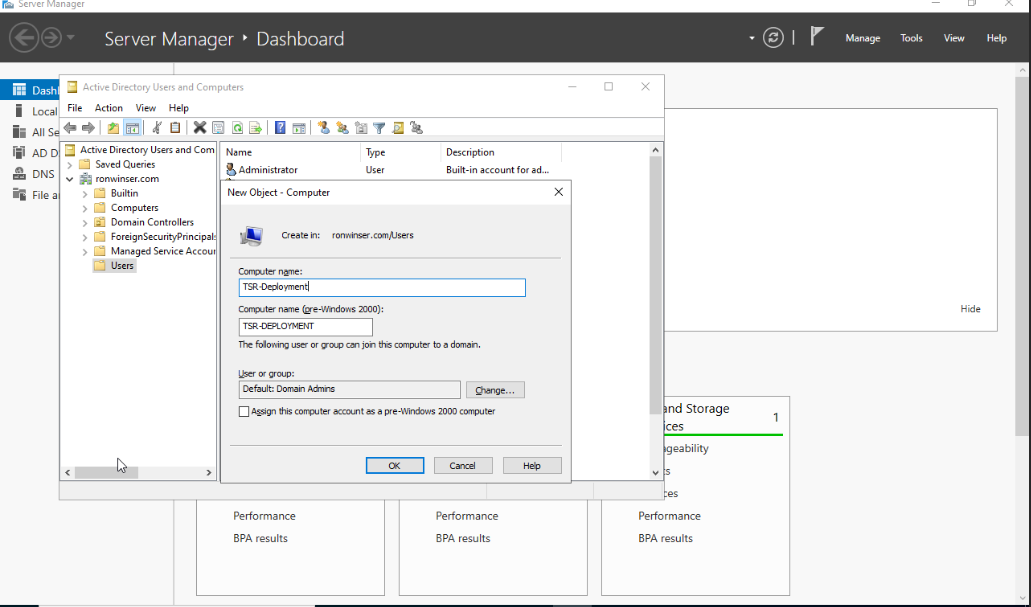
[![image.png](https://cytechint-docs-bookstack.s3.amazonaws.com/uploads/images/gallery/2026-01/scaled-1680-/0OlRbArKvhNc6x1O-image.png)](https://cytechint-docs-bookstack.s3.amazonaws.com/uploads/images/gallery/2026-01/0OlRbArKvhNc6x1O-image.png)
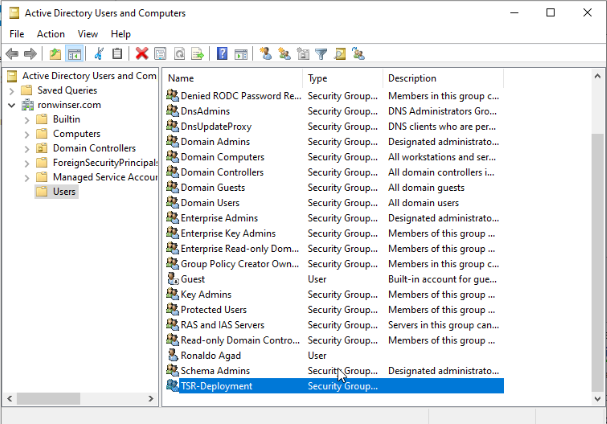
- Next Process double click the **TSR-Deployment** on the **Active Directory Uses and Computers, TSR-Deployment Properties** will appear and click the **Members** tab.

[![image.png](https://cytechint-docs-bookstack.s3.amazonaws.com/uploads/images/gallery/2026-01/scaled-1680-/ow5BVIAB80PJK0fs-image.png)](https://cytechint-docs-bookstack.s3.amazonaws.com/uploads/images/gallery/2026-01/ow5BVIAB80PJK0fs-image.png)
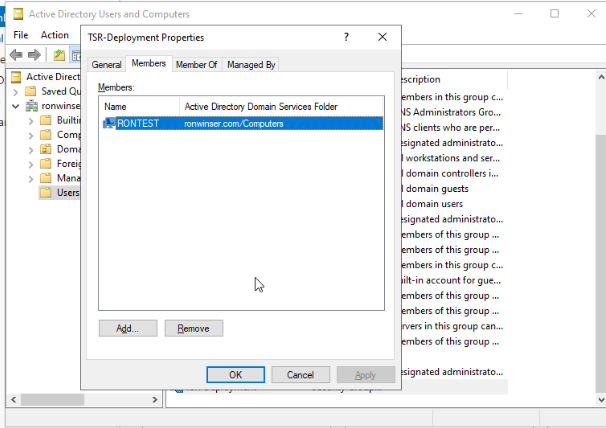
- Click the "**Add**" button, select the "**Object Types**" once it opens check the **Computer**.

[![image.png](https://cytechint-docs-bookstack.s3.amazonaws.com/uploads/images/gallery/2026-01/scaled-1680-/AsF2mxZKR1A8llWC-image.png)](https://cytechint-docs-bookstack.s3.amazonaws.com/uploads/images/gallery/2026-01/AsF2mxZKR1A8llWC-image.png)
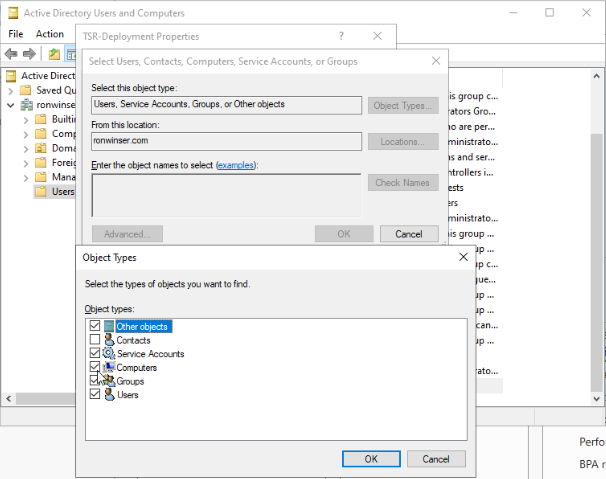
- Type your **computer name** that is connected to the domain, after that click the **Check Names** and choose only the "**Computer**" icon which is your computer device.  
      
    [![image.png](https://cytechint-docs-bookstack.s3.amazonaws.com/uploads/images/gallery/2026-01/scaled-1680-/aeehraMDeA0YUH7H-image.png)](https://cytechint-docs-bookstack.s3.amazonaws.com/uploads/images/gallery/2026-01/aeehraMDeA0YUH7H-image.png)
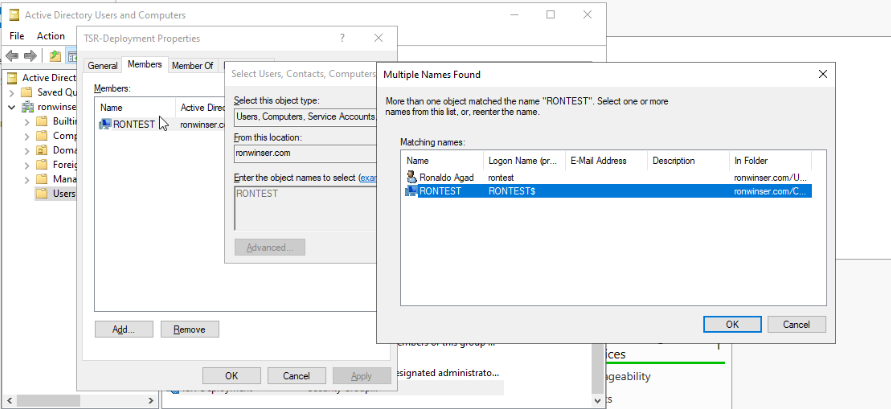
##### **Creating a UNC Path for Software Folders**

To ensure domain-joined computers can access the **AQUILA EDR ZIP** file package and folder for centralizing logs, create a shared network folder and configure appropriate permissions.

1. **Create a ZIP Folder**
    - On a file server, create a folder (e.g., `C:\ZIP`).
    - Copy the `edr-agent-8.18.1-windows-x86_64.zip` file into this folder.
2. **Enable Folder Sharing**
    - Right-click the `ZIP` folder and select **Properties**.
    - Navigate to the **Sharing** tab and click **Advanced Sharing**. [![image.png](https://cytechint-docs-bookstack.s3.amazonaws.com/uploads/images/gallery/2026-01/scaled-1680-/opYjeqE5wFFJ3Z8V-image.png)](https://cytechint-docs-bookstack.s3.amazonaws.com/uploads/images/gallery/2026-01/opYjeqE5wFFJ3Z8V-image.png)
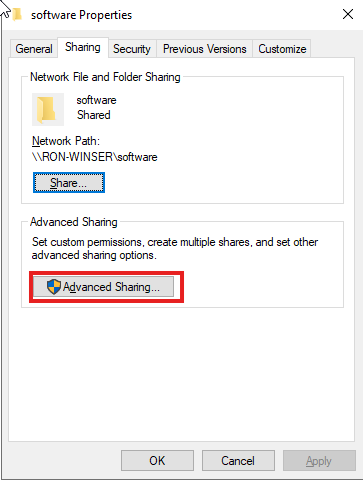
    - Check the box **Share this folder**. [![image.png](https://cytechint-docs-bookstack.s3.amazonaws.com/uploads/images/gallery/2026-01/scaled-1680-/BTHQBRIZqm8z8flC-image.png)](https://cytechint-docs-bookstack.s3.amazonaws.com/uploads/images/gallery/2026-01/BTHQBRIZqm8z8flC-image.png)
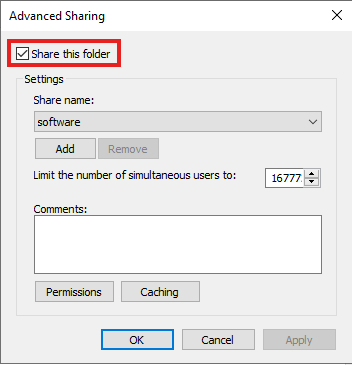
3. Set Permissions 
    - Click Permissions
    - Grant the **Read** permission to `Domain Computers`.
    - Grant the **Full Control** permission to `Domain Admins`
        
        [![image.png](https://cytechint-docs-bookstack.s3.amazonaws.com/uploads/images/gallery/2026-01/scaled-1680-/myA2I9R7JSAhtqXd-image.png)](https://cytechint-docs-bookstack.s3.amazonaws.com/uploads/images/gallery/2026-01/myA2I9R7JSAhtqXd-image.png)
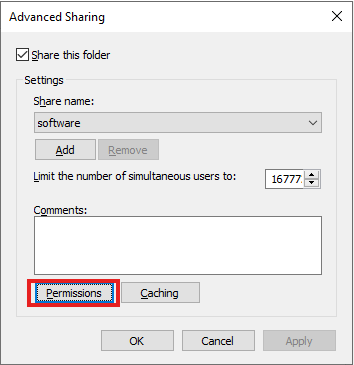
    - Also, in the **Security** tab, grant the **Read &amp; execute** permission to `Domain Computers` and **Full control** permission to `Domain Admins`.  
        [![image.png](https://cytechint-docs-bookstack.s3.amazonaws.com/uploads/images/gallery/2026-01/scaled-1680-/FxIoPizZ4sAn35bl-image.png)](https://cytechint-docs-bookstack.s3.amazonaws.com/uploads/images/gallery/2026-01/FxIoPizZ4sAn35bl-image.png)
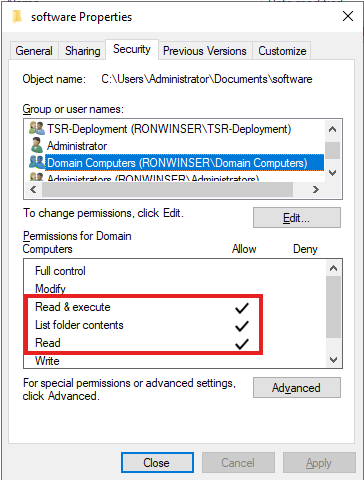
    - Save the network share path [![image.png](https://cytechint-docs-bookstack.s3.amazonaws.com/uploads/images/gallery/2026-01/scaled-1680-/n7WCkSqxbemm2zL4-image.png)](https://cytechint-docs-bookstack.s3.amazonaws.com/uploads/images/gallery/2026-01/n7WCkSqxbemm2zL4-image.png)
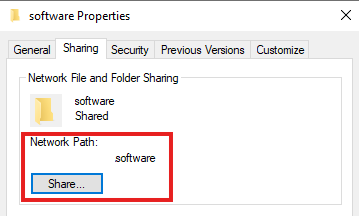
4. Open the shared folder on the User domain logged in. 
    - Use **windows + R** or search **run** on the **windows search**[![image.png](https://cytechint-docs-bookstack.s3.amazonaws.com/uploads/images/gallery/2026-01/scaled-1680-/92XIwI2hrUXOWf93-image.png)](https://cytechint-docs-bookstack.s3.amazonaws.com/uploads/images/gallery/2026-01/92XIwI2hrUXOWf93-image.png)
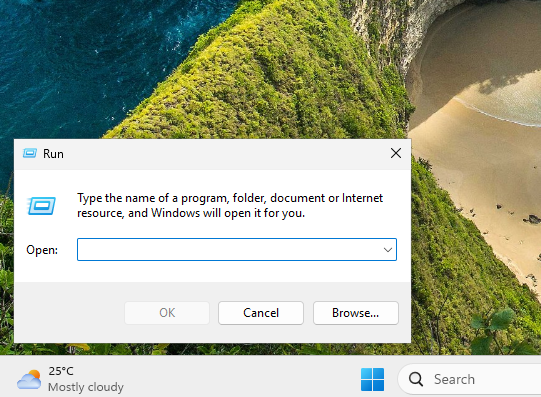
    - Type the Shared Folder path, e.g. **(\\\\ServerPath)**
        - Open the specified folder where the software are inputted[![image.png](https://cytechint-docs-bookstack.s3.amazonaws.com/uploads/images/gallery/2026-01/scaled-1680-/r3F4zuXooUThjDJQ-image.png)](https://cytechint-docs-bookstack.s3.amazonaws.com/uploads/images/gallery/2026-01/r3F4zuXooUThjDJQ-image.png)[![image.png](https://cytechint-docs-bookstack.s3.amazonaws.com/uploads/images/gallery/2026-01/scaled-1680-/AUryq6tR2kxH7SI7-image.png)](https://cytechint-docs-bookstack.s3.amazonaws.com/uploads/images/gallery/2026-01/AUryq6tR2kxH7SI7-image.png)
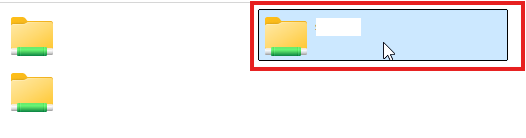
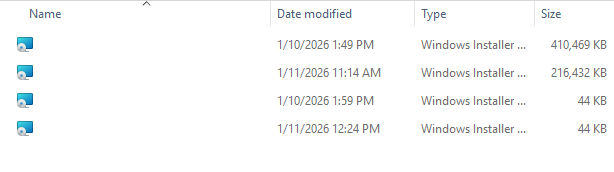
# AQUILA - Google Workspace Gmail Logs (For revision)

**Google Workspace Gmail Logs**

The integration collects and parses Gmail audit logs data available for reporting in Google Workspace. You must first export Google Workspace logs to Google BigQuery. This involves exporting all activity log events and usage reports to Google BigQuery. Only certain Google Workspace editions support this feature. For more details see [About reporting logs and BigQuery(external, opens in a new tab or window)](https://support.google.com/a/answer/9079364?hl=en "https://support.google.com/a/answer/9079364?hl=en"). The integration uses the [BigQuery API(external, opens in a new tab or window)](https://cloud.google.com/bigquery/docs/reference/rest "https://cloud.google.com/bigquery/docs/reference/rest") to query logs from BigQuery.

**Requirements**

In order to ingest data from the Google BigQuery API, you must:

1. Enable BigQuery API if not already

- In the [Google Cloud console(external, opens in a new tab or window)](https://console.cloud.google.com/ "https://console.cloud.google.com/"), navigate to **APIs &amp; Services &gt; Library**.
- Search for **BigQuery API** and select it.
- Click **Enable**.
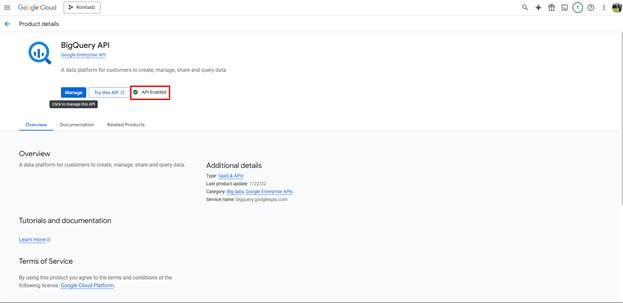
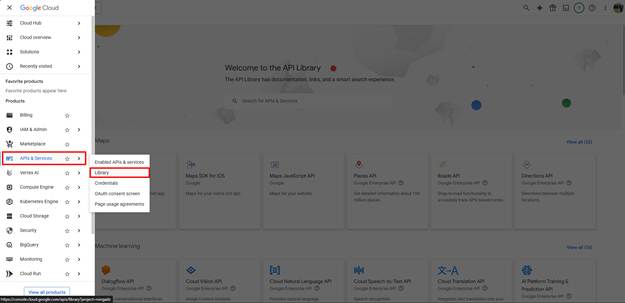
<span style="mso-no-proof: yes;">![](https://cytechint-docs-bookstack.s3.amazonaws.com/uploads/images/gallery/2026-01/uYPwXM9dOQHfPk29-embedded-image-brnb4xle.png)</span>

<span style="mso-no-proof: yes;">![](https://cytechint-docs-bookstack.s3.amazonaws.com/uploads/images/gallery/2026-01/kg9834EzQwNzLiCk-embedded-image-fmyjnfif.png)</span>

2. Create a service account:

- In the [Google Cloud console(external, opens in a new tab or window)](https://console.cloud.google.com/ "https://console.cloud.google.com/"), navigate to **APIs &amp; Services &gt; Credentials**.
- Click Create **Credentials &gt; Service account**.
- In the setup:
- Enter a name for the service account.
- Click **Create and Continue**.
- (Optional) Grant project access.
- Click **Continue**.
- (Optional) Grant user access.
- Click **Done**.
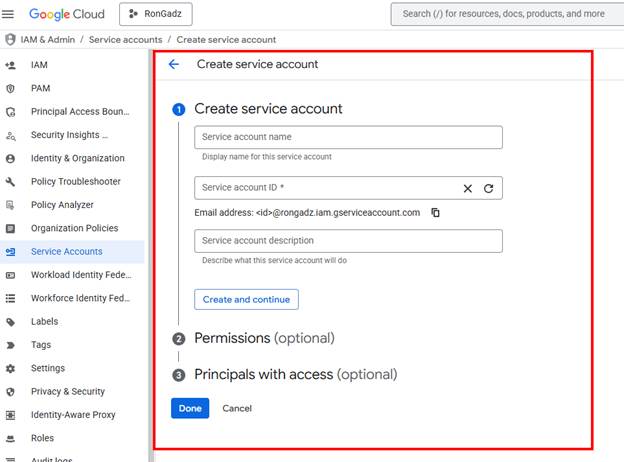
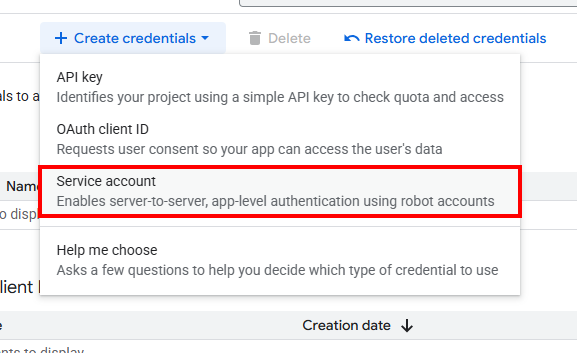
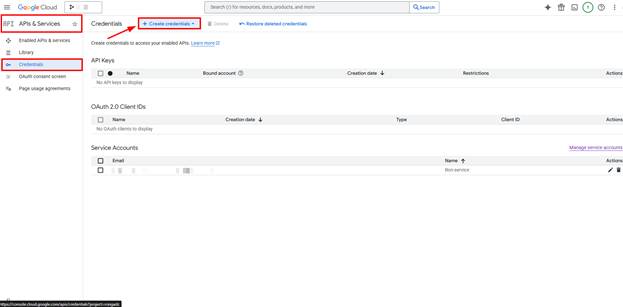

<span style="mso-no-proof: yes;">![](https://cytechint-docs-bookstack.s3.amazonaws.com/uploads/images/gallery/2026-01/l7zteQ6pvanPGyAJ-embedded-image-gnrccc9r.png)</span>

<span style="mso-no-proof: yes;">![](https://cytechint-docs-bookstack.s3.amazonaws.com/uploads/images/gallery/2026-01/7tZ82CrZysTPMw3t-embedded-image-bemswslo.png)</span>

<span style="mso-no-proof: yes;">![](https://cytechint-docs-bookstack.s3.amazonaws.com/uploads/images/gallery/2026-01/rfx9sZOvxcyMNi9N-embedded-image-wjcl13go.png)</span>

3. Generate a JSON Key:

- From the **Credentials** page, click on the name of your new service account.
- Go to the **Keys** tab.
- Click **Add Key &gt; Create new key**.
- Choose **JSON** format and click **Create**.
- Save the downloaded JSON key securely.
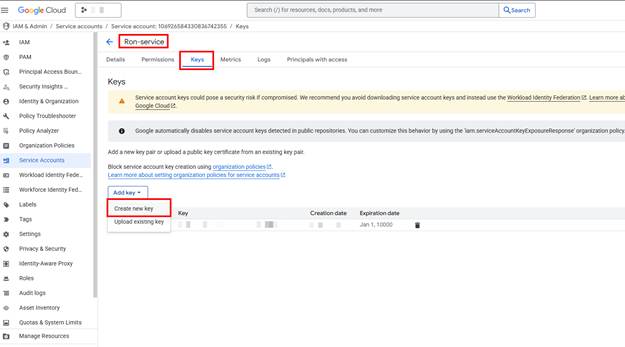
<span style="mso-no-proof: yes;">![](https://cytechint-docs-bookstack.s3.amazonaws.com/uploads/images/gallery/2026-01/2u0YbNjJG8LJejfp-embedded-image-rdoeryjn.png)</span>

4. Grant IAM Role to service account:

- Go to **IAM &amp; Admin &gt; IAM** in the Cloud Console.
- Click **Grant access**.
- Paste the service account email in the **New principals** field.
- Click **Select a role**, search for and select **BigQuery Job User**.
- Click **Save**.
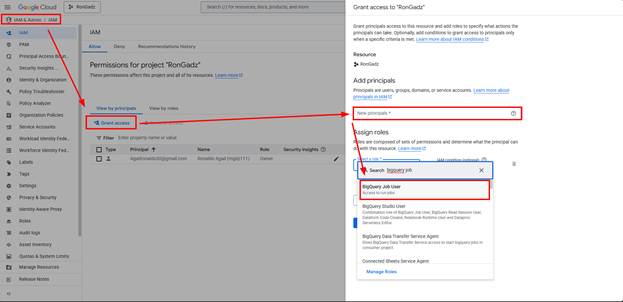
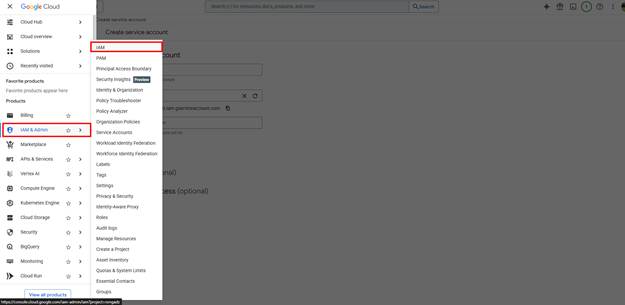
<span style="mso-no-proof: yes;">![](https://cytechint-docs-bookstack.s3.amazonaws.com/uploads/images/gallery/2026-01/bQftkt86iXedqvR9-embedded-image-o9637aou.png)</span>

<span style="mso-no-proof: yes;">![](https://cytechint-docs-bookstack.s3.amazonaws.com/uploads/images/gallery/2026-01/7o8jujmDnxWTPTyL-embedded-image-xnud2oad.png)</span>

5. Set up a BigQuery project for reporting logs

- Go to **IAM &amp; Admin page** for your project.
- Add a project editor for your project.
- Click **Grant access**.
- Enter gapps-reports@system.gserviceaccount.com in the **New principals** field.
- In **Select a role**, select **Project**, then **Editor**.
- Click **Save**.

- Add a Google Workspace administrator account as a project editor by following the same steps above.
- For more details see [Set up a BigQuery project for reporting logs(external, opens in a new tab or window)](https://support.google.com/a/answer/9082756?hl=en "https://support.google.com/a/answer/9082756?hl=en")
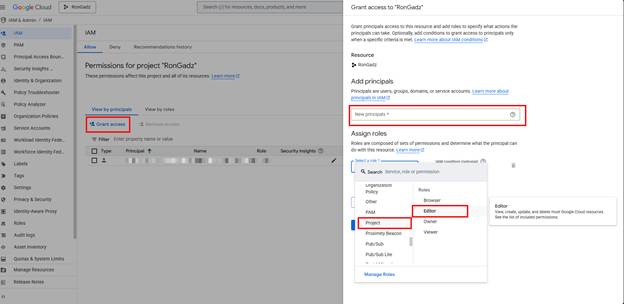
<span style="mso-no-proof: yes;">![](https://cytechint-docs-bookstack.s3.amazonaws.com/uploads/images/gallery/2026-01/yVqcG3QtVxKNCnK4-embedded-image-nmhimzvb.png)</span>

5. Set up a BigQuery Export configuration:

- Sign in to your [Google Admin console(external, opens in a new tab or window)](https://admin.google.com/ "https://admin.google.com/") with a super administrator account.
- Navigate to **Reporting &gt; Data Integrations** (Requires having the **Reports** administrator privilege).  
    Education administrators go to Menu **Reporting &gt; BigQuery export**, which opens the **Data integrations** page.
- Point to the **BigQuery Export** card and click Edit.
- To activate BigQuery logs, check the **Enable Google Workspace data export to Google BigQuery** box.
- (Optional) To export sensitive parameters of DLP rules, check the **Allow export of sensitive content from DLP rule logs** box.
- Under **BigQuery project ID**, select the project where you want to store the logs.  
    Choose a project for which gapps-reports@system.gserviceaccount.com has an editor role.
- Under **New dataset within project**, enter the name of the dataset to use for storing the logs in the project.  
    A new dataset will be created with this name in your BigQuery project.
- (Optional) Check the **Restrict the dataset to a specific geographic location** box &gt; select the location from the menu.
- Click **Save**.
- For more details see [Set up a BigQuery Export configuration(external, opens in a new tab or window)](https://support.google.com/a/answer/9079365?hl=en "https://support.google.com/a/answer/9079365?hl=en").

6. Grant Dataset Permissions: (**If this step is available to your end kindly follow the instructions but if not just skip**.)

- Go to [Google Cloud console(external, opens in a new tab or window)](https://console.cloud.google.com/ "https://console.cloud.google.com/") and search for **BigQuery**.
- Click your Google Cloud project on the left pane.
- Locate the dataset, click the **three-dot menu &gt; Share &gt; Manage Permissions**.
- Click **Add principal**.
- Paste the service account email in **New principals**.
- Select **BigQuery Data Viewer** as the role.
- Click **Save**.

This integration will make use of the following *oauth2 scope*:

- [https://www.googleapis.com/auth/bigquery](https://www.googleapis.com/auth/bigquery "https://www.googleapis.com/auth/bigquery")

Once you have downloaded your service account credentials as a JSON file, you are ready to set up your integration for collecting Gmail logs.

NOTE: For Gmail data stream, the default value of "BigQuery API Host" is [https://bigquery.googleapis.com](https://bigquery.googleapis.com "https://bigquery.googleapis.com/"). The BigQuery API Host will be used for collecting gmail logs only.

<div class="x_elementToProof" data-ogsc="rgb(0, 0, 0)" id="bkmrk-please-provide-the-f">**Please provide the following information to CyTech Support:** </div>- <div class="x_elementToProof" data-ogsc="" role="presentation"><span data-ogsc="">**GCP Project ID** (</span>GCP Project ID of project that has enabled export Gmail Logs)<span data-ogsc=""> - The unique identifier of the Google Cloud project where your BigQuery dataset is hosted and where Google Workspace Gmail logs are exported.</span></div>
- <div class="x_elementToProof" data-ogsc="" role="presentation"><span data-ogsc="">**Dataset Name** (</span>BigQuery dataset name<span data-ogsc="">) - The name of the BigQuery dataset inside the GCP project that stores the exported Gmail logs in daily tables for querying and analysis.</span></div>

# AQUILA - Zyxel USG Flex 200 SIEM Integration

#### <span style="color: rgb(53, 152, 219);">**AQUILA - Zyxel USG Flex 200 Integration**</span>

<span style="color: rgb(0, 0, 0);">The Zyxel USG Flex 200 is a unified security gateway that provides comprehensive network security and management capabilities. It generates syslog events that can be collected, analyzed, and monitored for security insights and network performance monitoring. This integration enables centralized log collection from Zyxel USG devices for visualization and analysis.</span>

---

##### <span style="color: rgb(53, 152, 219);">**Integration Overview**</span>

<span style="color: rgb(0, 0, 0);">This integration supports event collection through:</span>

- <span style="color: rgb(0, 0, 0);">Syslog messages via UDP from Zyxel USG Flex 200 devices</span>
- <span style="color: rgb(0, 0, 0);">File-based log collection from configured syslog servers</span>

<span style="color: rgb(0, 0, 0);">Events can be searched, observed, and visualized for security monitoring and network analysis.</span>

---

**Compatibility**

- <span style="color: rgb(0, 0, 0);">Supports syslog event collection from Zyxel USG Flex 200 devices via UDP on port 514</span>
- <span style="color: rgb(0, 0, 0);">Requires syslog-ng service for log collection and filtering</span>
- <span style="color: rgb(0, 0, 0);">Compatible with Linux-based log collection servers</span>

---

##### <span style="color: rgb(53, 152, 219);">**Syslog Server Configuration**</span>

**Installing Syslog-ng:**

<span style="color: rgb(0, 0, 0);">Install the syslog-ng package on your log collection server:</span>

```
sudo apt-get install syslog-ng
```

[![image.png](https://cytechint-docs-bookstack.s3.amazonaws.com/uploads/images/gallery/2026-01/scaled-1680-/KbrzzpjqEqv6VrTW-image.png)](https://cytechint-docs-bookstack.s3.amazonaws.com/uploads/images/gallery/2026-01/KbrzzpjqEqv6VrTW-image.png)
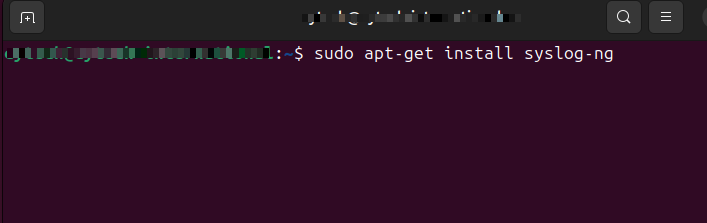
**Configuring Syslog-ng:**

<span style="color: rgb(0, 0, 0);">Edit the syslog-ng configuration file:</span>

```
sudo nano /etc/syslog-ng/syslog-ng.conf
```

[![image.png](https://cytechint-docs-bookstack.s3.amazonaws.com/uploads/images/gallery/2026-01/scaled-1680-/Uk19BubuNCGmYCTu-image.png)](https://cytechint-docs-bookstack.s3.amazonaws.com/uploads/images/gallery/2026-01/Uk19BubuNCGmYCTu-image.png)
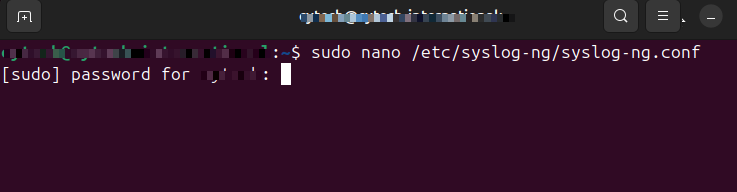
<span style="color: rgb(0, 0, 0);">Add the following configuration blocks:</span>

<span style="color: rgb(0, 0, 0);">Define the syslog source to listen for UDP traffic on IP address **&lt;IP\_Address\_of\_Log\_Source\_Server&gt;** and port 514:</span>

<p class="callout info">Replace **&lt;IP\_Address\_of\_Log\_Source\_Server&gt;** to the actual IP Address of Syslog-ng Server:</p>

```
source s_net { udp(ip(<IP_Address_of_Log_Source_Server>) port(514)); };
```

<span style="color: rgb(0, 0, 0);">Create a filter to match traffic from the Zyxel device (this filter catches all syslog messages from the Zyxel Firewall):</span>

<p class="callout info">replace **&lt;IP\_Address\_of\_Zyxel\_Firewall&gt;** to the actual IP Address of Zyxel Firewall:</p>

```
filter f_zyxel { host( "<IP_Address_of_Zyxel_Firewall>" ); };
```

<span style="color: rgb(0, 0, 0);">Define a destination file for the syslog messages:</span>

```
destination df_zyxel { file("/var/log/zyxel.log"); };
```

<span style="color: rgb(0, 0, 0);">Bundle the source, filter, and destination rules together with a logging rule:</span>

```
log { source ( s_net ); filter( f_zyxel ); destination ( df_zyxel ); };
```

<span style="color: rgb(0, 0, 0);">Restart the syslog-ng service to apply changes:</span>

```
sudo /etc/init.d/syslog-ng restart
```

[![image.png](https://cytechint-docs-bookstack.s3.amazonaws.com/uploads/images/gallery/2026-01/scaled-1680-/fvhTa7WunZmz7WrE-image.png)](https://cytechint-docs-bookstack.s3.amazonaws.com/uploads/images/gallery/2026-01/fvhTa7WunZmz7WrE-image.png)
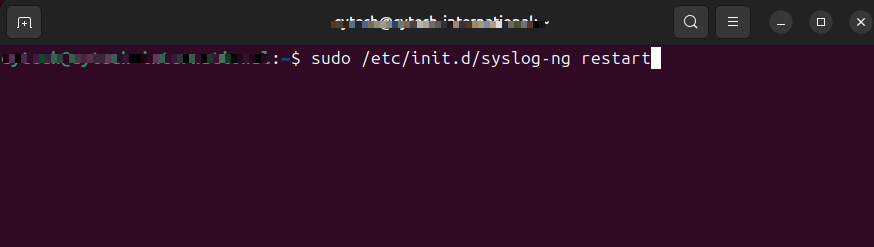
<p class="callout info">Full code snippet:</p>

```
source s_net { udp(ip(<IP_Address_of_Log_Source_Server>) port(514)); };
filter f_zyxel { host( "<IP_Address_of_Zyxel_Firewall>" ); };
destination df_zyxel { file("/var/log/zyxel.log"); };
log { source ( s_net ); filter( f_zyxel ); destination ( df_zyxel ); };
```

[![image.png](https://cytechint-docs-bookstack.s3.amazonaws.com/uploads/images/gallery/2026-01/scaled-1680-/HUopdNqBzUT0T4C7-image.png)](https://cytechint-docs-bookstack.s3.amazonaws.com/uploads/images/gallery/2026-01/HUopdNqBzUT0T4C7-image.png)

---

##### <span style="color: rgb(53, 152, 219);">**Zyxel USG Flex 200 Device Configuration**</span>

<p class="callout info">Follow these steps to configure the Zyxel USG Flex 200 to send syslog messages to your log collection server:</p>

<span style="color: rgb(0, 0, 0);">**Step 1:** Log in to the Zyxel USG Flex 200 Firewall web interface.</span>

<span style="color: rgb(0, 0, 0);">**Step 2:** Navigate to **Configuration &gt; Log &amp; Report &gt; Log Settings &gt; Remote Server 4**.</span>

<span style="color: rgb(0, 0, 0);">**Step 3:** Click **Edit** to configure the remote log server settings.</span>

[![image.png](https://cytechint-docs-bookstack.s3.amazonaws.com/uploads/images/gallery/2026-01/scaled-1680-/0b6Q3RzhRiVltELN-image.png)](https://cytechint-docs-bookstack.s3.amazonaws.com/uploads/images/gallery/2026-01/0b6Q3RzhRiVltELN-image.png)

<span style="color: rgb(0, 0, 0);">**Step 4:** Configure the following log settings for Remote Server:</span>

- <span style="color: rgb(0, 0, 0);">**Active**: Check the box to enable remote logging</span>
- <span style="color: rgb(0, 0, 0);">**Log Format**: Select **CEF/Syslog** from the dropdown menu</span>
- <span style="color: rgb(0, 0, 0);">**Server Address**: Enter the IP address of your syslog-ng server</span>
- <span style="color: rgb(0, 0, 0);">**Server Port**: Enter **514**</span>
- <span style="color: rgb(0, 0, 0);">**Log Facility**: Select any available facility from the dropdown menu</span>[![image.png](https://cytechint-docs-bookstack.s3.amazonaws.com/uploads/images/gallery/2026-01/scaled-1680-/7FbKUe8wd4FO2dXn-image.png)](https://cytechint-docs-bookstack.s3.amazonaws.com/uploads/images/gallery/2026-01/7FbKUe8wd4FO2dXn-image.png)

<span style="color: rgb(0, 0, 0);">**Step 5:** Click **Apply** or **Save** to apply the configuration changes.</span>

<p class="callout success">**Step 6:** Verify that syslog messages are being sent to the remote server by checking the log file on your Syslog server:</p>

```
sudo tail -f /var/log/zyxel.log
```

[![image.png](https://cytechint-docs-bookstack.s3.amazonaws.com/uploads/images/gallery/2026-01/scaled-1680-/BCMSFf9qeQWqQTkM-image.png)](https://cytechint-docs-bookstack.s3.amazonaws.com/uploads/images/gallery/2026-01/BCMSFf9qeQWqQTkM-image.png)

---

##### <span style="color: rgb(53, 152, 219);">**Log Rotation Configuration**</span>

<p class="callout info">To manage log file sizes and prevent disk space issues, configure log rotation for Zyxel logs.</p>

<span style="color: rgb(0, 0, 0);">Create a logrotate configuration file:</span>

```
sudo nano /etc/logrotate.d/zyxel
```

<span style="color: rgb(0, 0, 0);">Paste the following configuration to the file:</span>

```
/var/log/zyxel.log {
    daily               # Rotate logs every day
    missingok           # If the log file is missing, don't complain
    rotate 7            # Keep the last 7 days' worth of logs
    compress            # Compress old log files (e.g., .gz format)
    delaycompress       # Delay compression of the previous log file until the next rotation
    notifempty          # Do not rotate the log if it's empty
    create 0640 root root  # Create a new log file with permissions and ownership
    postrotate
        # Optional: You can add commands to run after log rotation, like restarting syslog
        # For example, to reload syslog:
        # /etc/init.d/syslog-ng reload
        # Or for rsyslog:
        # systemctl reload rsyslog
    endscript
}
```

[![image.png](https://cytechint-docs-bookstack.s3.amazonaws.com/uploads/images/gallery/2026-01/scaled-1680-/bqqeUZjzMay4Ksau-image.png)](https://cytechint-docs-bookstack.s3.amazonaws.com/uploads/images/gallery/2026-01/bqqeUZjzMay4Ksau-image.png)
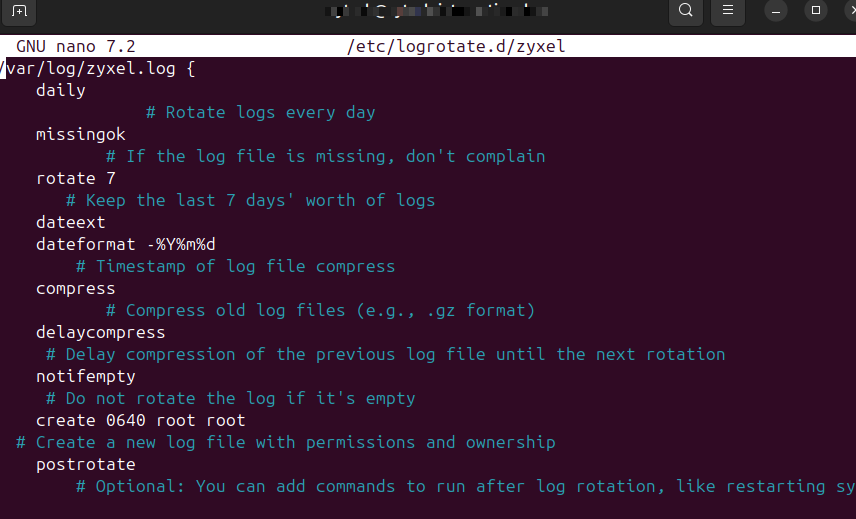
**Testing Log Rotation:**

<p class="callout success">To verify the log rotation configuration is working correctly:</p>

```
sudo logrotate --debug /etc/logrotate.d/zyxel
```

[![image.png](https://cytechint-docs-bookstack.s3.amazonaws.com/uploads/images/gallery/2026-01/scaled-1680-/OBu81Yy0KysucFvg-image.png)](https://cytechint-docs-bookstack.s3.amazonaws.com/uploads/images/gallery/2026-01/OBu81Yy0KysucFvg-image.png)

---

##### <span style="color: rgb(53, 152, 219);">**Log Events**</span>

<p class="callout info"><span style="color: rgb(0, 0, 0);">Here are the types of events you might find in the event log of a Zyxel UFG Flex 200, categorized by their typical nature:</span></p>

- <span style="color: rgb(0, 0, 0);">**System Events**:</span>
    
    
    - <span style="color: rgb(0, 0, 0);">**Boot Events**: Records when the device starts up, restarts, or shuts down.</span>
        
        
        - <span style="color: rgb(0, 0, 0);">Example: "Device started successfully" or "Reboot initiated."</span>
    - <span style="color: rgb(0, 0, 0);">**Configuration Changes**: Logs any changes to the system configuration, such as updates to firmware or network settings.</span>
        
        
        - <span style="color: rgb(0, 0, 0);">Example: "Configuration changed by user admin" or "Firmware updated."</span>
    - <span style="color: rgb(0, 0, 0);">**Service Events**: Events related to system services starting or stopping, like the DHCP service, VPN service, etc.</span>
        
        
        - <span style="color: rgb(0, 0, 0);">Example: "VPN service started" or "DHCP service stopped unexpectedly."</span>
- <span style="color: rgb(0, 0, 0);">**Network Events**:</span>
    
    
    - <span style="color: rgb(0, 0, 0);">**Connection Events**: Logs events related to device connections, such as establishing or dropping a connection with other network devices.</span>
        
        
        - <span style="color: rgb(0, 0, 0);">Example: "WAN interface up" or "LAN interface down."</span>
    - <span style="color: rgb(0, 0, 0);">**Traffic Logs**: Logs traffic-related information, such as the amount of data sent or received.</span>
        
        
        - <span style="color: rgb(0, 0, 0);">Example: "Incoming traffic exceeded threshold" or "Traffic dropped due to policy."</span>
- <span style="color: rgb(0, 0, 0);">**Security Events**:</span>
    
    
    - <span style="color: rgb(0, 0, 0);">**Authentication and Authorization Events**: Logs successful or failed login attempts, user authentications, or permissions changes.</span>
        
        
        - <span style="color: rgb(0, 0, 0);">Example: "User login from IP address 192.168.1.5" or "Failed login attempt from IP 10.0.0.1."</span>
    - <span style="color: rgb(0, 0, 0);">**Firewall or Intrusion Detection Logs**: Captures security-related incidents like firewall rule violations, intrusion attempts, or malware alerts.</span>
        
        
        - <span style="color: rgb(0, 0, 0);">Example: "Firewall rule blocked access from external IP" or "Intrusion detection alert triggered."</span>
    - <span style="color: rgb(0, 0, 0);">**VPN Events**: Logs VPN connections, including successful connections, disconnections, or errors.</span>
        
        
        - <span style="color: rgb(0, 0, 0);">Example: "VPN tunnel established" or "VPN authentication failure."</span>
- <span style="color: rgb(0, 0, 0);">**Error Events**:</span>
    
    
    - <span style="color: rgb(0, 0, 0);">**Hardware or Software Failures**: Captures any critical failures of the system’s hardware or software components.</span>
        
        
        - <span style="color: rgb(0, 0, 0);">Example: "Memory allocation failure" or "Disk error on storage device."</span>
    - <span style="color: rgb(0, 0, 0);">**Network Failures**: Logs when the network encounters issues, such as a dropped connection or misconfiguration.</span>
        
        
        - <span style="color: rgb(0, 0, 0);">Example: "Lost connection to ISP" or "Network interface error."</span>
- <span style="color: rgb(0, 0, 0);">**Warning Events**:</span>
    
    
    - <span style="color: rgb(0, 0, 0);">**Thresholds and Limits**: Logs warnings when system performance reaches a threshold or limit.</span>
        
        
        - <span style="color: rgb(0, 0, 0);">Example: "CPU usage exceeded 80%" or "Disk space running low."</span>
    - <span style="color: rgb(0, 0, 0);">**Potential Security Risks**: Alerts about actions that might pose a security risk.</span>
        
        
        - <span style="color: rgb(0, 0, 0);">Example: "Multiple failed login attempts detected" or "Suspicious packet detected."</span>
- <span style="color: rgb(0, 0, 0);">**Informational Events**:</span>
    
    
    - <span style="color: rgb(0, 0, 0);">**Status Updates**: Logs general information about the device’s operational status.</span>
        
        
        - <span style="color: rgb(0, 0, 0);">Example: "Device configuration completed" or "Service started successfully."</span>
    - <span style="color: rgb(0, 0, 0);">**Routine Operations**: Logs that provide context to everyday network activity.</span>
        
        
        - <span style="color: rgb(0, 0, 0);">Example: "DHCP lease granted to 192.168.1.10" or "Client connected via wireless."</span>

---

##### <span style="color: rgb(0, 0, 0);">**Logs Dataset**</span>

<span style="color: rgb(0, 0, 0);">The zyxel.log dataset contains events collected from the configured syslog-ng server. All Zyxel USG Flex 200 specific syslog fields are available under the /var/log/zyxel.log file for detailed analysis and security monitoring.</span>

<span style="color: rgb(0, 0, 0);">sample data logs:</span>

```
Jan 19 18:45:26 192.168.20.1 CEF:0|ZyXEL|USG FLEX 200|5.39(ABUI.1)|0|Traffic Log|4|devID=d8xxxxx40 src=1xx.1xx.xx.xx dst=4xx.xxx.2xxx.xxx spt=62126 dpt=123 dvchost=usgflex200 msg=Traffic Log cat=Traffic Log sourceTranslatedAddress=1xx.xx.xxxx.xxxx sourceTranslatedPort=6xxxx6 suser=unknown ZYduration=300 out=76 in=76 proto=17 app=others ZYnote=Traffic Log ZYdir=RND:EASTERN-2 deviceInboundInterface=RND deviceOutboundInterface=EASTERN-2 ZYmac=xx:xx:xx:xx:xx:24
```

---

*<span class="NormalTextRun SCXW71272603 BCX0">If you need further </span><span class="NormalTextRun SCXW71272603 BCX0">assistance</span><span class="NormalTextRun SCXW71272603 BCX0">, kindly contact our support at </span><span style="color: rgb(53, 152, 219);">**<span class="TextRun SCXW71272603 BCX0" data-contrast="none" lang="EN-US" xml:lang="EN-US"><span class="NormalTextRun SCXW71272603 BCX0">support@cytechint.com</span></span>**</span><span class="TextRun SCXW71272603 BCX0" data-contrast="auto" lang="EN-US" xml:lang="EN-US"><span class="NormalTextRun SCXW71272603 BCX0"> for prompt </span><span class="NormalTextRun SCXW71272603 BCX0">assistance</span><span class="NormalTextRun SCXW71272603 BCX0"> and guidance.</span></span><span class="EOP SCXW71272603 BCX0" data-ccp-props="{}"> </span>*

# NGINX Integration

#### <span style="color: rgb(53, 152, 219);">**Introduction**</span>

The Nginx integration allows you to monitor Nginx servers. Use the Nginx integration to collect metrics and logs from your server then visualize that data.

For example, if you wanted to be notified if a certain number of client requests failed in a given time period, you could install the Nginx integration to send logs to Elastic. Then, you could view the logs stream into Elastic in real time in the Observability Logs app. You could also set up a new log threshold rule in the Logs app to alert you when there are more than a certain number of events with a failing status in a given time period.

#### **<span style="color: rgb(53, 152, 219);">Data Collection Types</span>**

It collects two main types of data:

- **Logs** — Capture and record events occurring within the Nginx server. These include access logs (client requests) and error logs (issues encountered during request handling). Log data helps in auditing activities, identifying issues, and analyzing request patterns.
- **Metrics** — Provide real-time performance insights into Nginx server operations. Metrics include details such as the total number of active client connections, connection states, request counts, and other performance indicators essential for capacity planning and system optimization.

By utilizing this integration, administrators gain visibility into both operational and performance aspects of Nginx, enabling effective monitoring, troubleshooting, and optimization of web infrastructure.

#### <span style="color: rgb(53, 152, 219);">**Prerequisites**</span>

Before setting up the **Nginx Integration**, ensure that the following requirements are met:

1. **Nginx Server Installed and Running**
    
    
    - A functioning **Nginx server** must be installed on your host system.
    - Verify that the Nginx service is active and accessible.
2. **Access Permissions**
    
    
    - Administrative or root privileges are required to configure log file paths and enable the Nginx status module.
    - Read permissions must be granted for Nginx log files (e.g., `access.log` and `error.log`).
3. **Nginx Status Module Enabled**
    
    
    - The **stub\_status** module should be enabled to allow collection of server metrics such as active connections and request rates.
    - Add or verify the following configuration in your Nginx configuration file.
        
        ```
        location /nginx_status {
            stub_status;
            access_log off;
            allow 127.0.0.1;    # restrict access as needed
            allow <Network_IP>; # e.g. 192.172.10.0/24
            deny all;
        }
        ```
    - Test and Reload Nginx after making changes:
        
        ```
        sudo nginx -t              # Test first
        sudo systemctl reload nginx  # Use reload, not restart
        ```
    - Verify it works:
        
        ```
        curl http://127.0.0.1/nginx_status
        ```
        
        **Linux:**
        
        **Ubuntu/Debian:**
        
        
        - Main config: `/etc/nginx/nginx.conf`
        - Site configs: `/etc/nginx/sites-available/default`
        - Enabled sites: `/etc/nginx/sites-enabled/default` (symlink)
        
         **CentOS/RHEL:**
        
        
        - Main config: `/etc/nginx/nginx.conf`
        - Site configs: `/etc/nginx/conf.d/default.conf`
        
         **Where to add `stub_status`:**
        
        
        - Add to your site configuration file (e.g., `/etc/nginx/sites-available/default` or `/etc/nginx/conf.d/default.conf`)
        - Or add directly to `/etc/nginx/nginx.conf` in the `server` block
        
         **Windows:**
        
        **Configuration file location:**
        
        ```
        C:\nginx\conf\nginx.conf
        ```
        
        **Where to add `stub_status`:**
        
        
        - Edit `C:\nginx\conf\nginx.conf`
        - Add inside the `http { server { } }` block
        
        **macOS:**
        
        **Homebrew installation:**
        
        ```
        /usr/local/etc/nginx/nginx.conf
        ```
        
        **or**
        
        ```
        /opt/homebrew/etc/nginx/nginx.conf
        ```
        
        **MacPorts Installation:**
        
        ```
        /opt/local/etc/nginx/nginx.conf
        ```
4. **Network Connectivity**
    - Ensure that the system where monitoring is configured can connect to the Nginx host via the appropriate network ports (typically port **80** or **443**).
5. **Log File Availability**
    
    
    - Confirm that standard Nginx log files are present in their default or custom locations: 
        - Access logs: `/var/log/nginx/access.log`
        - Error logs: `/var/log/nginx/error.log`

On the device where **Nginx Server** is installed, you must also install the **AQUILA Log Collector Agent**. This agent is responsible for collecting the Nginx access and error logs and forwarding them to AQUILA for processing.

Please refer to the official manuals for installing the **AQUILA Log Collector Agent** on different operating systems:

- **Linux:** [Log Collector Installation - Linux Manual](https://docs.cytechint.io/books/log-collector-installations/page/log-collector-installation-linux-manual)
- **Windows:** [Log Collector Installation - Windows Manual](https://docs.cytechint.io/books/log-collector-installations/page/log-collector-installation-windows-manual)
- **Mac:** [Log Collector Installation - Mac Manual](https://docs.cytechint.io/books/log-collector-installations/page/log-collector-installation-mac-manual)

Ensure that after installation, the Log Collector service is running properly.

#### <span style="color: rgb(53, 152, 219);">**Required Credentials for Integration**</span>

##### **Collect logs from Nginx instances**

- Access Logs Path: *eg. **/var/log/nginx/access.log\****
- Error Logs Path: *eg. **/var/log/nginx/error.log\****

##### **Collect metrics from Nginx instances**

- Host: *eg. [http://127.0.0.1:80](http://127.0.0.1:80)*

Integrating monitoring for NGINX is straightforward once your setup and agents are in place: simply add the integration to an agent policy, configure log paths (e.g., /var/log/nginx/\*.log) and metrics host/path (e.g., http://127.0.0.1/nginx\_status), and let the managed agents handle collection. This enables real-time monitoring of access/error logs and server metrics like connections and requests, with pre-built dashboards for visualization, alerting, and anomaly detection.

NGINX integration is really helpful for boosting reliability and performance insights with minimal effort—it provides centralized management, scalable observability, and easy customization for custom log formats. If issues arise, check agent status and permissions first. For production, secure endpoints and rotate credentials. Dive into the docs for advanced tweaks!

*If you need further assistance, kindly contact our support at <info@cytechint.com> for prompt assistance and guidance.*

# AQUILA - SalesForce Integration in Two Deferent Methods (JWT Bearer Flow and Username-Password Flow)

<span style="color: rgb(0, 0, 0);">Salesforce requires secure communication protocols for authorization and data exchange between external applications and Salesforce orgs. This involves creating digital certificates, configuring external client apps, and establishing secure authentication methods. OpenSSL provides the cryptographic tools needed to generate private keys and self-signed certificates for secure communication over networks.</span>

#### <span style="color: rgb(53, 152, 219);">**Integration Overview**</span>

<span style="color: rgb(0, 0, 0);">This integration supports secure communication through:</span>

- <span style="color: rgb(0, 0, 0);">JWT (JSON Web Token) authentication using digital certificates</span>
- <span style="color: rgb(0, 0, 0);">OAuth authentication with external client apps</span>
- <span style="color: rgb(0, 0, 0);">Self-signed certificates and keystore management</span>

<span style="color: rgb(0, 0, 0);">Organizations can authorize Salesforce CLI commands and establish secure API connections using these authentication methods.</span>

#### <span style="color: rgb(53, 152, 219);">**Compatibility**</span>

- <span style="color: rgb(0, 0, 0);">Supports Salesforce CLI authorization via JWT Bearer Flow</span>
- <span style="color: rgb(0, 0, 0);">Compatible with macOS, Linux, and Windows operating systems</span>
- <span style="color: rgb(0, 0, 0);">Requires OpenSSL for certificate generation</span>

---

#### **<span style="color: rgb(53, 152, 219);">Installing OpenSSL in your Log Collector (JWT Bearer Flow)</span>**

<span style="color: rgb(0, 0, 0);">OpenSSL is an open-source software library that provides tools and protocols for secure communication over networks. It helps encrypt data so that information like passwords, credit card numbers, and private messages stay secure when sent over the internet.</span>

##### <span style="color: rgb(0, 0, 0);">**Step 1:** </span>

**<span style="color: rgb(0, 0, 0);">In Linux:</span>**

<span style="color: rgb(0, 0, 0);">Install OpenSSL on your system:</span>

```
sudo apt install openssl
```

**<span style="color: rgb(0, 0, 0);">In Windows:</span>**

<p class="callout info"><span style="color: rgb(0, 0, 0);">you can refer this manual for more info: [Openssl Installation in Windows 11](https://usdc-docs.cytechint.io/books/system-integrations/page/openssl-installation-in-windows-11 "openssl")</span></p>

##### <span style="color: rgb(0, 0, 0);">**Step 2:** </span>

<span style="color: rgb(0, 0, 0);">Verify OpenSSL installation by running:</span>

- <span style="color: rgb(0, 0, 0);">macOS/Linux: `which openssl`</span>
- <span style="color: rgb(0, 0, 0);">Windows: `where openssl`</span>

---

#### <span style="color: rgb(53, 152, 219);">**Creating a Private Key and Self-Signed Digital Certificate**</span>

<span style="color: rgb(0, 0, 0);">A digital certificate and the private key used to sign the certificate are needed to authorize an organization using the `org login jwt` command. While it is strongly advised to utilize a certificate issued by a certifying authority, you can use OpenSSL to generate a self-signed certificate to get started.</span>

<span style="color: rgb(0, 0, 0);">This process produces two files:</span>

- <span style="color: rgb(0, 0, 0);">**server.key** — The private key used when authorizing an org with the `org login jwt` command</span>
- <span style="color: rgb(0, 0, 0);">**server.crt** — The digital certificate uploaded when creating the required external client app</span>

##### <span style="color: rgb(0, 0, 0);">**Step 1:** </span>

<span style="color: rgb(0, 0, 0);">Open a terminal (macOS and Linux) or command prompt (Windows).</span>

##### <span style="color: rgb(0, 0, 0);">**Step 2:** </span>

<span style="color: rgb(0, 0, 0);">Create a directory to hold the generated files and navigate to it:</span>

```
mkdir /Users/jdoe/JWT
cd /Users/jdoe/JWT
```

##### <span style="color: rgb(0, 0, 0);">**Step 3:** </span>

<span style="color: rgb(0, 0, 0);">Create a private key and save it as server.key file:</span>

<p class="callout info"><span style="color: rgb(0, 0, 0);">Remember to change "**<span style="color: rgb(224, 62, 45);">&lt;your password&gt;</span>**" to the password of your choice. The password should be the same with the **server.pass.key** and **server.key**.</span></p>

- <span style="color: rgb(0, 0, 0);">server.pass.key command</span>

```
openssl genpkey -aes-256-cbc -algorithm RSA -pass pass:<your password> -out server.pass.key -pkeyopt rsa_keygen_bits:2048
```

- <span style="color: rgb(0, 0, 0);">server.key command</span>

```
openssl rsa -passin pass:<your password> -in server.pass.key -out server.key
```

##### <span style="color: rgb(0, 0, 0);">**Step 4:**</span>

<span style="color: rgb(0, 0, 0);"> Use the server.key file to create a certificate signing request and save it as server.csr:</span>

<p class="callout info"><span style="color: rgb(0, 0, 0);">When prompted, provide your organization’s details. Enter only the **Country Name, State or Province, Locality, and Organization Name**—you may leave all other fields blank.</span></p>

<p class="callout danger"><span style="color: rgb(0, 0, 0);">**Do not enter a password when generating the `server.csr`, as it may cause an authentication mismatch.**</span></p>

```
openssl req -new -key server.key -out server.csr
```

##### <span style="color: rgb(0, 0, 0);">**Step 5:** </span>

<span style="color: rgb(0, 0, 0);">Create a self-signed digital certificate using the server.key and server.csr files:</span>

```
openssl x509 -req -sha256 -days 365 -in server.csr -signkey server.key -out server.crt
```

##### **Step 6:**  


<span style="color: rgb(0, 0, 0);">Clone the server.key file and save it as server.pem</span>

<p class="callout info">**Important step to successfully integrate into SIEM** </p>

- For Linux

```
cp server.key server.pem
```

- For Windows 
    - ```
        copy server.key server.pem
        ```

---

#### **Creating User for JWT Bearer Flow/Username-Password Flow**

- <span class="ph cmd">In Setup, enter <kbd class="ph userinput">Users</kbd> in the Quick Find box, then select **Users**.</span>
- <span class="ph cmd">Click **New User**.</span>

[![image.png](https://cytechint-docs-bookstack.s3.amazonaws.com/uploads/images/gallery/2026-06/scaled-1680-/lxfFZ4d8GQ8QC6V2-image.png)](https://cytechint-docs-bookstack.s3.amazonaws.com/uploads/images/gallery/2026-06/lxfFZ4d8GQ8QC6V2-image.png)

- <span class="ph cmd">Fill out the form, and assign the System Administrator.</span>
- <span class="ph cmd">Role &gt; None Specified</span>
- <span class="ph cmd">User License &gt; Salesforce</span>
- <span class="ph cmd">Profile &gt; System Administrator</span>

[![image.png](https://cytechint-docs-bookstack.s3.amazonaws.com/uploads/images/gallery/2026-06/scaled-1680-/mxEgnKd9JE9SqBiP-image.png)](https://cytechint-docs-bookstack.s3.amazonaws.com/uploads/images/gallery/2026-06/mxEgnKd9JE9SqBiP-image.png)

- <span class="ph cmd">Click **Save**.</span>

---


#### <span style="color: rgb(53, 152, 219);">**Creating an External Client App in Salesforce (JWT Bearer Flow)**</span>

<span style="color: rgb(0, 0, 0);">Salesforce CLI requires an external client app in the org that you're authorizing. An external client app is a packageable framework that enables a third-party application (Salesforce CLI) to integrate with Salesforce using APIs and security protocols. You must create your own external client app when authorizing the org with the `org login jwt` command.</span>

##### <span style="color: rgb(0, 0, 0);">**Step 1:** </span>

<span style="color: rgb(0, 0, 0);">Log in to your Salesforce Organization.</span>

<p class="callout info"><span style="color: rgb(0, 0, 0);">Note: If the salesforce dashboard interface is in classic mode change it to lighting mode. </span></p>

- **<span style="color: rgb(0, 0, 0);">In the Upper Right Corner click the gear icon.</span>**

[![image.png](https://cytechint-docs-bookstack.s3.amazonaws.com/uploads/images/gallery/2026-02/scaled-1680-/Kyqkx6MxXwwySPOm-image.png)](https://cytechint-docs-bookstack.s3.amazonaws.com/uploads/images/gallery/2026-02/Kyqkx6MxXwwySPOm-image.png)

- <span style="color: rgb(0, 0, 0);">**Select setup.**</span>

[![image.png](https://cytechint-docs-bookstack.s3.amazonaws.com/uploads/images/gallery/2026-05/scaled-1680-/W418IIogPqHkBJyB-image.png)](https://cytechint-docs-bookstack.s3.amazonaws.com/uploads/images/gallery/2026-05/W418IIogPqHkBJyB-image.png)

##### <span style="color: rgb(0, 0, 0);">**STEP 2:** </span>

<span style="color: rgb(0, 0, 0);">To find the base URL and instance URL follow the guide below.</span>

- <span style="color: rgb(0, 0, 0);">In quick find box, enter <span style="color: rgb(45, 194, 107);">my domain </span>then select my domain under Company Settings.</span>
- <span style="color: rgb(0, 0, 0);">Under My Domain Details copy <span style="color: rgb(45, 194, 107);">Current My Domain URL <span style="color: rgb(0, 0, 0);">that's your base URL and Instance URL. (Give it to Cytech Support)</span></span></span>

[![image.png](https://cytechint-docs-bookstack.s3.amazonaws.com/uploads/images/gallery/2026-05/scaled-1680-/m7aiSY2jALXJCs7S-image.png)](https://cytechint-docs-bookstack.s3.amazonaws.com/uploads/images/gallery/2026-05/m7aiSY2jALXJCs7S-image.png)

##### <span style="color: rgb(0, 0, 0);">  
</span>

##### <span style="color: rgb(0, 0, 0);">**Step 3:** </span>

<span style="color: rgb(0, 0, 0);">From the Quick Find box in Setup, enter **App Manager**, then click **App Manager**.</span>

[![image.png](https://cytechint-docs-bookstack.s3.amazonaws.com/uploads/images/gallery/2026-02/scaled-1680-/hXfeVemGvOeNRe6b-image.png)](https://cytechint-docs-bookstack.s3.amazonaws.com/uploads/images/gallery/2026-02/hXfeVemGvOeNRe6b-image.png)

##### <span style="color: rgb(0, 0, 0);">**Step 3:** </span>

<span style="color: rgb(0, 0, 0);">Click **New External Client App**.</span>

##### <span style="color: rgb(0, 0, 0);">**Step 4:** </span>

<span style="color: rgb(0, 0, 0);">Update the basic information as needed, such as the external client app name and your contact email address.</span>

<p class="callout info"><span style="color: rgb(0, 0, 0);">Note: The email address provided must be valid, as **Salesforce** will use it to communicate with your team regarding any updates or issues related to your application usage.</span></p>

[![image.png](https://cytechint-docs-bookstack.s3.amazonaws.com/uploads/images/gallery/2026-02/scaled-1680-/t7RF1MsnBgsJUWO0-image.png)](https://cytechint-docs-bookstack.s3.amazonaws.com/uploads/images/gallery/2026-02/t7RF1MsnBgsJUWO0-image.png)

##### <span style="color: rgb(0, 0, 0);">**Step 5:** </span>

<span style="color: rgb(0, 0, 0);">Under **API (Enable OAuth Settings)**, click **Enable OAuth**.</span>

[![image.png](https://cytechint-docs-bookstack.s3.amazonaws.com/uploads/images/gallery/2026-02/scaled-1680-/nPBfthwtSaUVQTVu-image.png)](https://cytechint-docs-bookstack.s3.amazonaws.com/uploads/images/gallery/2026-02/nPBfthwtSaUVQTVu-image.png)

##### <span style="color: rgb(0, 0, 0);">**Step 6:** </span>

<span style="color: rgb(0, 0, 0);">Under **App Settings**, in the **Callback URL** box, enter the URL below:</span>

```
https://<base-url>/callback
```

[![image.png](https://cytechint-docs-bookstack.s3.amazonaws.com/uploads/images/gallery/2026-05/scaled-1680-/OrLg2NdHZ39JyZF9-image.png)](https://cytechint-docs-bookstack.s3.amazonaws.com/uploads/images/gallery/2026-05/OrLg2NdHZ39JyZF9-image.png)

##### <span style="color: rgb(0, 0, 0);">**Step 7:** </span>

<span style="color: rgb(0, 0, 0);">In the **OAuth Scopes** section, select these scopes:</span>

- <span style="color: rgb(0, 0, 0);">**Manage user data via APIs** (api) - Gives you access to user data.</span>
- <span style="color: rgb(0, 0, 0);">**Perform requests at any time (refresh\_token, offline\_access)** - Permits you to get an OAuth access token.</span>
- <span style="color: rgb(0, 0, 0);"> **Full access (full) -** grant all access to the permission for integration.</span>

[![image.png](https://cytechint-docs-bookstack.s3.amazonaws.com/uploads/images/gallery/2026-05/scaled-1680-/Th0Fx9Vl56KiS3Zw-image.png)](https://cytechint-docs-bookstack.s3.amazonaws.com/uploads/images/gallery/2026-05/Th0Fx9Vl56KiS3Zw-image.png)

##### <span style="color: rgb(0, 0, 0);">**Step 8:** </span>

<span style="color: rgb(0, 0, 0);">(Required for JWT) In the **Flow Enablement** section, select **Enable Client Credentials Flow** and **Enable JWT Bearer Flow**.</span>

- <span style="color: rgb(0, 0, 0);">**Enable Client Credentials Flow** - Allows your app to exchange its client credentials for an access token. And be able to access the credential Client ID.</span>
- <span style="color: rgb(0, 0, 0);">**Enable JWT Bearer Flow** - A secure, server-to-server authentication method used to integrate external applications with Salesforce without requiring manual user login.</span>

[![image.png](https://cytechint-docs-bookstack.s3.amazonaws.com/uploads/images/gallery/2026-02/scaled-1680-/ZGUvtPXQ3OVi3JeW-image.png)](https://cytechint-docs-bookstack.s3.amazonaws.com/uploads/images/gallery/2026-02/ZGUvtPXQ3OVi3JeW-image.png)

##### <span style="color: rgb(0, 0, 0);">**Step 9:** </span>

<span style="color: rgb(0, 0, 0);">(Required for JWT) Click **Upload Files** and upload your digital certificate file (<span style="color: rgb(224, 62, 45);">**server.crt**</span>).</span>

[![image.png](https://cytechint-docs-bookstack.s3.amazonaws.com/uploads/images/gallery/2026-02/scaled-1680-/EcdC04TK8734E0rN-image.png)](https://cytechint-docs-bookstack.s3.amazonaws.com/uploads/images/gallery/2026-02/EcdC04TK8734E0rN-image.png)

##### **Step 10:**

<span style="color: rgb(0, 0, 0);">In **Security** section check the following:</span>

- <span style="color: rgb(0, 0, 0);">Require secret for Refresh Token Flow</span>
- <span style="color: rgb(0, 0, 0);">Enable Refresh Token Rotation</span>

[![image.png](https://cytechint-docs-bookstack.s3.amazonaws.com/uploads/images/gallery/2026-02/scaled-1680-/ZLhwfSBBy0jmOgSJ-image.png)](https://cytechint-docs-bookstack.s3.amazonaws.com/uploads/images/gallery/2026-02/ZLhwfSBBy0jmOgSJ-image.png)

##### <span style="color: rgb(0, 0, 0);">**Step 11:** </span>

<span style="color: rgb(0, 0, 0);">Click **Create** and</span><span style="color: rgb(0, 0, 0);"> **Edit** to configure additional settings.</span>

##### <span style="color: rgb(0, 0, 0);">**Step 12:** </span>

<span style="color: rgb(0, 0, 0);">(Required for JWT) Click the **Policies** tab and configure the following:</span>

- <span style="color: rgb(0, 0, 0);">Open **OAuth(Open Authorization) Policies**</span>
- <span style="color: rgb(0, 0, 0);">In the **Plugin Policies** section, set **Permitted Users** to **Admin approved users are pre-authorized**</span>
- <span style="color: rgb(0, 0, 0);">**(Optional) In OAuth Start URL** use your organization base URL example: (https://fun-dream-996.my.salesforce.com/)</span>
- <span style="color: rgb(0, 0, 0);">Click **OK**</span>
- <span style="color: rgb(0, 0, 0);">In the **App Policies** section, select the profiles and permission sets that are pre-authorized to use this external client app</span>

[![image.png](https://cytechint-docs-bookstack.s3.amazonaws.com/uploads/images/gallery/2026-02/scaled-1680-/NuHfJZuvWFJeXBqW-image.png)](https://cytechint-docs-bookstack.s3.amazonaws.com/uploads/images/gallery/2026-02/NuHfJZuvWFJeXBqW-image.png)

[![image.png](https://cytechint-docs-bookstack.s3.amazonaws.com/uploads/images/gallery/2026-02/scaled-1680-/6YuVtsg7UDV6XJQX-image.png)](https://cytechint-docs-bookstack.s3.amazonaws.com/uploads/images/gallery/2026-02/6YuVtsg7UDV6XJQX-image.png)

##### <span style="color: rgb(0, 0, 0);">**Step 14:** </span>

<span style="color: rgb(0, 0, 0);">In the **OAuth Flows and External Client App Enhancements** section Enable Client Credentials Flow** and add username**.**</span>

[![image.png](https://cytechint-docs-bookstack.s3.amazonaws.com/uploads/images/gallery/2026-02/scaled-1680-/k3Ct7Vxw8p1x9H1b-image.png)](https://cytechint-docs-bookstack.s3.amazonaws.com/uploads/images/gallery/2026-02/k3Ct7Vxw8p1x9H1b-image.png)

##### <span style="color: rgb(0, 0, 0);">**Step 15:** </span>

<span style="color: rgb(0, 0, 0);">In the **App Authorization** section, under **OAuth(Open Authorization) Policies**, click **Expire refresh token after a specific time**.</span>

##### <span style="color: rgb(0, 0, 0);">**Step 16:** </span>

<span style="color: rgb(0, 0, 0);">Configure token expiration settings:</span>

- <span style="color: rgb(0, 0, 0);">**Refresh Token Validity Period**: Enter 365</span>
- <span style="color: rgb(0, 0, 0);">**Refresh Token Validity Unit**: Select **Day(s)**</span>

##### <span style="color: rgb(0, 0, 0);">**Step 17:** </span>

<span style="color: rgb(0, 0, 0);">In the **Session Timeout in Minutes** box, enter **15**.</span>

##### <span style="color: rgb(0, 0, 0);">**Step 18:** </span>

<span style="color: rgb(0, 0, 0);">In IP Relaxation Select **Relax IP restrictions** and the Click **Save**.</span>

[![image.png](https://cytechint-docs-bookstack.s3.amazonaws.com/uploads/images/gallery/2026-06/scaled-1680-/YTK4VIhQUhFZMT6R-image.png)](https://cytechint-docs-bookstack.s3.amazonaws.com/uploads/images/gallery/2026-06/YTK4VIhQUhFZMT6R-image.png)

##### <span style="color: rgb(0, 0, 0);">**Step 19:**</span>

<span style="color: rgb(0, 0, 0);">**Enable Allow Access to External Client App Consumer Secret via REST API**</span>

<span style="color: rgb(0, 0, 0);">**External Client App Setting &gt; Allow Access to External Client App Consumer Secret via REST API**</span>

[![image.png](https://cytechint-docs-bookstack.s3.amazonaws.com/uploads/images/gallery/2026-05/scaled-1680-/W4Jt6m6fQpESM3SS-image.png)](https://cytechint-docs-bookstack.s3.amazonaws.com/uploads/images/gallery/2026-05/W4Jt6m6fQpESM3SS-image.png)

##### <span style="color: rgb(0, 0, 0);">**Step 20:**</span>

<span style="color: rgb(0, 0, 0);">**Enable Event log files**</span>

<span style="color: rgb(0, 0, 0);">**Event Monitoring Settings &gt; Generate event log files**</span>

[![image.png](https://cytechint-docs-bookstack.s3.amazonaws.com/uploads/images/gallery/2026-05/scaled-1680-/u83m9Xo4Q4t80Gbm-image.png)](https://cytechint-docs-bookstack.s3.amazonaws.com/uploads/images/gallery/2026-05/u83m9Xo4Q4t80Gbm-image.png)

<p class="callout success"><span style="color: rgb(0, 0, 0);">Your external client app is now ready to use.</span></p>

---

##### **<span style="color: rgb(53, 152, 219);">How to Find Client ID (Consumer Key) in External Client App</span>**

- <span style="color: rgb(0, 0, 0);">type **external** in quick find search bar and click **external client app manager**</span>
- <span style="color: rgb(0, 0, 0);">under **External Client App Name** locate the app you created earlier and click it.</span>

[![image.png](https://cytechint-docs-bookstack.s3.amazonaws.com/uploads/images/gallery/2026-02/scaled-1680-/erObpFuyEh346HHr-image.png)](https://cytechint-docs-bookstack.s3.amazonaws.com/uploads/images/gallery/2026-02/erObpFuyEh346HHr-image.png)

- <span style="color: rgb(0, 0, 0);">under settings tab click **OAuth Settings** then you can the view your **client key** and **client secret** after the verification process.</span>

[![image.png](https://cytechint-docs-bookstack.s3.amazonaws.com/uploads/images/gallery/2026-02/scaled-1680-/JBmH0nQqrZgONVQx-image.png)](https://cytechint-docs-bookstack.s3.amazonaws.com/uploads/images/gallery/2026-02/JBmH0nQqrZgONVQx-image.png)

[![image.png](https://cytechint-docs-bookstack.s3.amazonaws.com/uploads/images/gallery/2026-02/scaled-1680-/sqLlW3FdmcDRQHYY-image.png)](https://cytechint-docs-bookstack.s3.amazonaws.com/uploads/images/gallery/2026-02/sqLlW3FdmcDRQHYY-image.png)

[![image.png](https://cytechint-docs-bookstack.s3.amazonaws.com/uploads/images/gallery/2026-02/scaled-1680-/RH4kDudKRkqCoRJQ-image.png)](https://cytechint-docs-bookstack.s3.amazonaws.com/uploads/images/gallery/2026-02/RH4kDudKRkqCoRJQ-image.png)

---

##### **Create A Connected Apps (Username-Password Flow)**

For security reasons, Salesforce blocks the OAuth 2.0 Username-Password flow by default in recent releases. Prefer the JWT bearer flow. If you must use the Username-Password flow, in `OAuth and OpenID Connect Settings`, select `Allow OAuth Username-Password Flows`. For more information, see the Salesforce release note: [Username-Password OAuth flow blocked by default.](https://help.salesforce.com/s/articleView?id=release-notes.rn_security_username-password_flow_blocked_by_default.htm&language=en_US&release=244&type=5)

[![image.png](https://cytechint-docs-bookstack.s3.amazonaws.com/uploads/images/gallery/2026-06/scaled-1680-/VXD6iKeRCEk6htq7-image.png)](https://cytechint-docs-bookstack.s3.amazonaws.com/uploads/images/gallery/2026-06/VXD6iKeRCEk6htq7-image.png)

- Log in to Salesforce (Lightning UI).
- From `Setup`, in `Quick Find` enter `External Client Apps` and select `Settings`. Turn on `Allow creation of connected apps`. To create a connected app, select `New Connected App`.

[![image.png](https://cytechint-docs-bookstack.s3.amazonaws.com/uploads/images/gallery/2026-06/scaled-1680-/k1o1tW0E5LEV58Zy-image.png)](https://cytechint-docs-bookstack.s3.amazonaws.com/uploads/images/gallery/2026-06/k1o1tW0E5LEV58Zy-image.png)

- Fill `Basic Information`: `Connected App Name`, `API Name`, `Contact Email`.

[![image.png](https://cytechint-docs-bookstack.s3.amazonaws.com/uploads/images/gallery/2026-06/scaled-1680-/IsDNcjY9IF5H6689-image.png)](https://cytechint-docs-bookstack.s3.amazonaws.com/uploads/images/gallery/2026-06/IsDNcjY9IF5H6689-image.png)

- In `API (Enable OAuth Settings)`, check `Enable OAuth Settings`.
- `Callback URL`: 
    - Web apps: your app callback (for example, `https://yourapp.example.com/callback`).
    - Not used by the JWT or Username-Password flows, but Salesforce requires a value; you can enter your instance URL.
- Select OAuth scopes: 
    - `Manage user data via APIs (api)`
    - `Perform requests at any time (refresh_token, offline_access)`
    - `Full access (full)`
    - Enable Client Credentials Flow
    - Enable Refresh Token Rotation

[![image.png](https://cytechint-docs-bookstack.s3.amazonaws.com/uploads/images/gallery/2026-06/scaled-1680-/xYB3Idafcolwvx4x-image.png)](https://cytechint-docs-bookstack.s3.amazonaws.com/uploads/images/gallery/2026-06/xYB3Idafcolwvx4x-image.png)

- Click `Save`. It can take up to 10 minutes for the Connected App to propagate.
- After saving, open `Manage Consumer Details` to obtain `Consumer Key` and `Consumer Secret`.

<p class="callout info">Manage Consumer Details Appears only once so better to copy consumer key and consumer secret in a safe place. </p>

[![image.png](https://cytechint-docs-bookstack.s3.amazonaws.com/uploads/images/gallery/2026-06/scaled-1680-/Vg0C8iMXaXIy0LRF-image.png)](https://cytechint-docs-bookstack.s3.amazonaws.com/uploads/images/gallery/2026-06/Vg0C8iMXaXIy0LRF-image.png)

- Then Click Manage to OAuth Policies 
    - Permitted Users &gt; All users may self-authorize
    - IP Relaxation &gt; Relax IP Restrictions
    - Refresh Token Policy &gt; Expire refresh token after "365" days
    - Client Credentials Flow &gt; "the user you created earlier"

[![image.png](https://cytechint-docs-bookstack.s3.amazonaws.com/uploads/images/gallery/2026-06/scaled-1680-/zRwgrFo6TSrG2YvC-image.png)](https://cytechint-docs-bookstack.s3.amazonaws.com/uploads/images/gallery/2026-06/zRwgrFo6TSrG2YvC-image.png)


---

##### <span style="color: rgb(53, 152, 219);">**Verify if LoginEvent is enable  
in Quick find &gt; Event Manager &gt; enable all**</span>

[![image.png](https://cytechint-docs-bookstack.s3.amazonaws.com/uploads/images/gallery/2026-06/scaled-1680-/c3FO4fC2t5KzJ44w-image.png)](https://cytechint-docs-bookstack.s3.amazonaws.com/uploads/images/gallery/2026-06/c3FO4fC2t5KzJ44w-image.png)

---

##### <span style="color: rgb(53, 152, 219);">**Required fields for JWT and Username-Password Flow Integration:**</span>

<span style="color: rgb(53, 152, 219);">**For JWT Bearer Flow:**</span>

- ##### `JWT Authentication Client Key Path (full file folder path of server.pem not in root directory)`
    
    
    - <span style="color: rgb(0, 0, 0);">ex: Users/jdoe/JWT/server.pem</span>
- ##### `Username (can be found in View Profile > Settings > Personal Information)or If you have dedicated user for integration can be found in (Quick Find > Users > Username)`
    
    
    - <span style="color: rgb(0, 0, 0);">example format: ADMIN-3dvj@force.com</span>
- ##### `Client ID (Consumer Key)`
    
    
    - example format: 3MVxxxxxtCx.CV6cbh7fSpKs\_5iexxxxxxxxxxxxxxxxxxxxxxxxxxxZKBaepcxlJUhO1
- ##### `Instance URL`  


    - <span style="color: rgb(0, 0, 0);">example format: [https://company.my.salesforce.com](https://company.my.salesforce.com)</span>
- ##### `API Version`
    
    
    - in quick find type <span style="color: rgb(45, 194, 107);">Apex Classes</span>[![image.png](https://cytechint-docs-bookstack.s3.amazonaws.com/uploads/images/gallery/2026-05/scaled-1680-/VvFkdpQXXJS8CMXh-image.png)](https://cytechint-docs-bookstack.s3.amazonaws.com/uploads/images/gallery/2026-05/VvFkdpQXXJS8CMXh-image.png)

<span style="color: rgb(53, 152, 219);">**For Username-Password Flow:**</span>

- **Username**
- **Password**
- **Consumer Key**
- **Consumer Secret**
- **Instance URL**

##### Provide this required fields to <span style="color: rgb(53, 152, 219);">[**CyTech Support**](mailto:support@cytechint.com).</span>

---

<span style="color: rgb(186, 55, 42);">Reference Link:</span>

<span style="color: rgb(186, 55, 42);"> <span style="color: rgb(53, 152, 219);"> [Create an External Client App in Your Org | Salesforce DX Developer Guide | Salesforce Developers](https://developer.salesforce.com/docs/atlas.en-us.sfdx_dev.meta/sfdx_dev/sfdx_dev_auth_eca.htm)</span></span>

---

<span style="color: rgb(0, 0, 0);">*If you need further assistance, kindly contact our support at <span style="color: rgb(53, 152, 219);">[**support@cytechint.com**](mailto:support@cytechint.com)</span> for prompt assistance and guidance.*</span>

# Whitelist in Google Workspacege

### **Whitelisting Simulated Phishing in Google Workspace (Gmail)**

**For Secure Practice Simulation Emails**

This step-by-step guide is intended for **Google Workspace administrators** to allow simulated phishing emails from **Secure Practice** by properly configuring Gmail to recognize and accept messages from specific IP addresses.

> **Note:** You must have an **admin role** in the Google Workspace Admin Console to perform these actions.

---

### **Step 1: Access the Admin Console**

1. Visit [https://admin.google.com](https://admin.google.com/)
2. Sign in using your **administrator account**

---

### **Step 2: Navigate to Gmail Settings**

1. In the left-hand menu, go to:  
    **Apps** → **Google Workspace** → **Gmail**
2. Under Gmail settings, click on **Spam, Phish and Malware**

[![image.png](https://cytechint-docs-bookstack.s3.amazonaws.com/uploads/images/gallery/2025-05/scaled-1680-/MAdg7TzWA6SuEXGl-image.png)](https://cytechint-docs-bookstack.s3.amazonaws.com/uploads/images/gallery/2025-05/MAdg7TzWA6SuEXGl-image.png)

---

### **Step 3: Add IPs to the Email Allowlist**

1. Click on **Email allowlist**
    
    
    - **35.153.237.243(Mail Server)**
    - **107.22.65.180(Landing Page)**
2. Enter the following IP addresses:
3. Click **Save**

[![image.png](https://cytechint-docs-bookstack.s3.amazonaws.com/uploads/images/gallery/2025-05/scaled-1680-/EHNr7095OZVrXU5Q-image.png)](https://cytechint-docs-bookstack.s3.amazonaws.com/uploads/images/gallery/2025-05/EHNr7095OZVrXU5Q-image.png)

---

### **Step 4: Configure Inbound Gateway**

This step ensures that Gmail treats the IP addresses above as **internal senders**, preventing SPF or DMARC validation and suppressing warnings to end-users.

1. Scroll down to the **Inbound Gateway** section
2. If not already enabled, click the **Enable** button
3. In the **Gateway IPs** field, enter the same IP addresses listed earlier
4. Optional:
    
    
    - Enable **Automatic detect external IP**
    - **Do not** enable “Reject all mail not from gateway IPs” unless already required—this may block all mail delivery if not properly configured
    - Enable **Require TLS for connections**

[![image.png](https://cytechint-docs-bookstack.s3.amazonaws.com/uploads/images/gallery/2025-05/scaled-1680-/0038sCvbVlH5I0NR-image.png)](https://cytechint-docs-bookstack.s3.amazonaws.com/uploads/images/gallery/2025-05/0038sCvbVlH5I0NR-image.png)

---

### **Step 5: Configure Message Tagging**

1. Under the **Message Tagging** section:
    
    
    - Check **"Message is considered spam if the following header regexp matches"**
    - Enter a **unique, random string** : fg2jl0ah45oahtTK56SGD23fhk2k
    - Check **"Disable Gmail spam evaluation"**

This ensures Gmail skips its spam analysis for messages from the configured IPs.

[![image.png](https://cytechint-docs-bookstack.s3.amazonaws.com/uploads/images/gallery/2025-05/scaled-1680-/jvwcnmC96C1W0GUd-image.png)](https://cytechint-docs-bookstack.s3.amazonaws.com/uploads/images/gallery/2025-05/jvwcnmC96C1W0GUd-image.png)

---

### **Step 6: Bypass Spam Filters for Trusted Senders**

1. Still under Gmail settings, go to the **Spam** section
2. Click **Configure** to create a spam filter bypass rule
3. Check: **"Bypass spam filters for messages received from addresses or domains"**
4. Click **Create or edit list** and add the following senders:
    
    
    - <span data-teams="true">slackj.com</span>
    - <span data-teams="true">ttrelli.com</span>
    - <span data-teams="true">airbnd.cc</span>
    - <span data-teams="true">attlassians.com</span>
    - <span data-teams="true">eebbey.com</span>
    - <span data-teams="true">lastpasss.net</span>
    - <span data-teams="true">my1psswords.com</span>
    - <span data-teams="true">zooms.cc</span>
5. For flexibility, uncheck **"Authentication required"** for
6. Save the address list and the new spam bypass policy

[![image.png](https://cytechint-docs-bookstack.s3.amazonaws.com/uploads/images/gallery/2025-05/scaled-1680-/ESsyInCwDlu1fTMU-image.png)](https://cytechint-docs-bookstack.s3.amazonaws.com/uploads/images/gallery/2025-05/ESsyInCwDlu1fTMU-image.png)

---

### **Step 7: Adding Message Header in Compliance**

1. Navigate to the **Compliance** section in the Google Workspace Admin console.
2. Go to the **Content Compliance** subsection.
3. Click **Configure** or **Add Another**, depending on whether a rule has already been added. This will open the **Add Setting** pop-up window.
4. In the **Content compliance** field, provide a clear description for the rule, such as **"CyTech Whitelisting"**.
5. Under **Email messages to affect**, check the **Inbound** box.
6. In the **Expressions** section, click **Add** to open a new pop-up window.
7. In the first drop-down menu, select **Metadata match**.
8. From the **Attribute** drop-down menu, choose **Source IP**.
9. In the **Match type** drop-down menu, select **Source IP is**.
10. In the value field, enter one of CyTech’s IP addresses.
    
    
    - **35.153.237.243(Mail Server)**
    - **107.22.65.180(Landing Page)**
11. In the **Headers** section, check the **Add custom headers** option.
12. Click **Add** in the **Custom headers** field.
13. In the **Header key** field, enter: **X-PHISHTEST**
14. In the **Header value** field, enter: **CYTECH**
15. Click **Save**.
16. Review all configured settings, then click **Save** again to apply the rule.

### **Optional: Temporary Adjustment for Quicker Testing**

Google offers a feature called **Enhanced Pre-Delivery Message Scanning**.  
While not recommended to disable permanently, you may consider turning it off briefly to speed up testing and configuration validation.

[![image.png](https://cytechint-docs-bookstack.s3.amazonaws.com/uploads/images/gallery/2025-05/scaled-1680-/jkWIar7Ofj3szJ11-image.png)](https://cytechint-docs-bookstack.s3.amazonaws.com/uploads/images/gallery/2025-05/jkWIar7Ofj3szJ11-image.png)

---

### **Additional Systems in Use?**

If your organization uses other email or security filtering systems, please refer to the [Whitelisting Phishing Overview](https://docs.cytechint.io/books/culture-and-awareness/chapter/whitelisting) and ensure proper bypass configurations are in place across all layers.

---

Reference Documentation Link: *[https://securepractice.co/guides/whitelisting-google](https://securepractice.co/guides/whitelisting-google)*

<span class="TextRun SCXW71272603 BCX0" data-contrast="auto" lang="EN-US" xml:lang="EN-US"><span class="NormalTextRun SCXW71272603 BCX0"> If you need further </span><span class="NormalTextRun SCXW71272603 BCX0">assistance</span><span class="NormalTextRun SCXW71272603 BCX0">, kindly contact our support at </span></span>**<span class="TextRun SCXW71272603 BCX0" data-contrast="none" lang="EN-US" xml:lang="EN-US"><span class="NormalTextRun SCXW71272603 BCX0">support@cytechint.com</span></span>**<span class="TextRun SCXW71272603 BCX0" data-contrast="auto" lang="EN-US" xml:lang="EN-US"><span class="NormalTextRun SCXW71272603 BCX0"> for prompt </span><span class="NormalTextRun SCXW71272603 BCX0">assistance</span><span class="NormalTextRun SCXW71272603 BCX0"> and guidance.</span></span><span class="EOP SCXW71272603 BCX0" data-ccp-props="{}"></span>

# AQUILA - Cato Network Integration(Linux)

Cato Networks provides a cloud-native SASE (Secure Access Service Edge) platform that converges networking and security into a global cloud service. The platform generates security and connectivity events that can be collected, analyzed, and monitored for network insights and threat detection. This integration enables centralized event collection from Cato Networks using the Cato CLI for visualization and analysis.

#### <span style="color: rgb(53, 152, 219);">**Integration Overview**</span>

This integration supports event collection through:

- Cato CLI (catocli) using the Events Feed API
- Automated event polling via systemd service
- File-based log collection with structured JSON output

<p class="callout info">Events can be searched, observed, and visualized for security monitoring, connectivity analysis, and network performance tracking.</p>

##### <span style="color: rgb(53, 152, 219);">**Compatibility**</span>

- Supports event collection for Security and Connectivity event types
- Requires Python 3.6 or higher
- Compatible with Linux, macOS, and Windows operating systems
- Requires valid Cato Network API token and Account ID
- Systemd service integration for Linux-based systems

##### <span style="color: rgb(53, 152, 219);">**Prerequisites**</span>

<p class="callout warning">Before configuring the Cato Network integration, ensure you have:</p>

- Python 3.6 or higher installed
- Python virtual environment configured
- Cato CLI (catocli) installed
- Valid Cato Network API token
- Valid Cato Network Account ID

#### <span style="color: rgb(53, 152, 219);">**Python Installation**</span>

##### <span style="color: rgb(53, 152, 219);">**Linux Installation:**</span>

##### **Step 1:** Open the Terminal and refresh package lists:

```
sudo apt update
```

[![image.png](https://cytechint-docs-bookstack.s3.amazonaws.com/uploads/images/gallery/2026-03/scaled-1680-/KF6h5bY5QGCPa5Hs-image.png)](https://cytechint-docs-bookstack.s3.amazonaws.com/uploads/images/gallery/2026-03/KF6h5bY5QGCPa5Hs-image.png)

##### **Step 2:** Update installed packages:

```
sudo apt upgrade -y
```

[![image.png](https://cytechint-docs-bookstack.s3.amazonaws.com/uploads/images/gallery/2026-03/scaled-1680-/dJLuZQGlfYpl9Yup-image.png)](https://cytechint-docs-bookstack.s3.amazonaws.com/uploads/images/gallery/2026-03/dJLuZQGlfYpl9Yup-image.png)

##### **Step 3:** Install Python (replace \[version number\] with your desired version):

```
sudo apt install python[version number]
```

[![image.png](https://cytechint-docs-bookstack.s3.amazonaws.com/uploads/images/gallery/2026-03/scaled-1680-/eEB6el60eELJcHL5-image.png)](https://cytechint-docs-bookstack.s3.amazonaws.com/uploads/images/gallery/2026-03/eEB6el60eELJcHL5-image.png)

#### <span style="color: rgb(53, 152, 219);">**Creating Python Virtual Environment**</span>

A Python virtual environment isolates project dependencies and prevents conflicts with system-wide Python packages.

#### <span style="color: rgb(53, 152, 219);">**Linux/macOS:**</span>

##### **Step 1:** Open a Terminal.

##### **Step 2:** Navigate to your project directory using the cd command:

```
cd /path/to/your/project
```

##### **Step 3:** Create a virtual environment:

```
python3 -m venv venv
```

[![image.png](https://cytechint-docs-bookstack.s3.amazonaws.com/uploads/images/gallery/2026-03/scaled-1680-/6m9xJWxlJoM4JZgX-image.png)](https://cytechint-docs-bookstack.s3.amazonaws.com/uploads/images/gallery/2026-03/6m9xJWxlJoM4JZgX-image.png)

##### **Step 4:** Activate the virtual environment:

```
source venv/bin/activate
```

[![image.png](https://cytechint-docs-bookstack.s3.amazonaws.com/uploads/images/gallery/2026-03/scaled-1680-/8JwkcTJNarZXDjV8-image.png)](https://cytechint-docs-bookstack.s3.amazonaws.com/uploads/images/gallery/2026-03/8JwkcTJNarZXDjV8-image.png)

##### **Step 5:** Once activated, the virtual environment name (e.g., (venv)) will appear in your terminal prompt.

##### **Step 6:** To deactivate the virtual environment, type:

```
deactivate
```

#### <span style="color: rgb(53, 152, 219);">**Cato CLI Installation**</span>

##### **Step 1:** Ensure your virtual environment is activated.

##### **Step 2:** Install the Cato CLI using pip:

```
pip3 install catocli
```

[![image.png](https://cytechint-docs-bookstack.s3.amazonaws.com/uploads/images/gallery/2026-03/scaled-1680-/TDTJvkiIMQeZjJSX-image.png)](https://cytechint-docs-bookstack.s3.amazonaws.com/uploads/images/gallery/2026-03/TDTJvkiIMQeZjJSX-image.png)

##### **Step 3:** Verify the installation by running:

```
catocli --version
```

[![image.png](https://cytechint-docs-bookstack.s3.amazonaws.com/uploads/images/gallery/2026-03/scaled-1680-/I7ClZSlQtUACeBRR-image.png)](https://cytechint-docs-bookstack.s3.amazonaws.com/uploads/images/gallery/2026-03/I7ClZSlQtUACeBRR-image.png)

#### <span style="color: rgb(53, 152, 219);">**Validating Cato Network API Token and Account ID**</span>

##### **Step 1:** Configure the Cato CLI with your API token and Account ID:

```
catocli configure set --cato-token "your-api-token" --account-id "12345"
```

[![image.png](https://cytechint-docs-bookstack.s3.amazonaws.com/uploads/images/gallery/2026-03/scaled-1680-/4LRoTcRf5CQwm73z-image.png)](https://cytechint-docs-bookstack.s3.amazonaws.com/uploads/images/gallery/2026-03/4LRoTcRf5CQwm73z-image.png)

<p class="callout info">Replace `"your-api-token"` with your actual Cato Network API token and `"12345"` with your Account ID.</p>

#### <span style="color: rgb(53, 152, 219);">**Configuring the Cato Network Integration (Linux)**</span>

##### <span style="color: rgb(53, 152, 219);">**Creating a Dedicated User (Optional but Recommended):**</span>

<p class="callout warning">For security and isolation, create a dedicated system user to run the Cato event collection service.</p>

##### **Step 1:** <span style="color: rgb(22, 145, 121);">Optional</span> - Create a system user named (for this example) `testing-cato`:

```
sudo useradd -r -s /bin/false testing-cato
```

##### **Step 2:** Create required directories for data, logs:

```
sudo mkdir -p /var/lib/cato /var/log/cato
```

[![image.png](https://cytechint-docs-bookstack.s3.amazonaws.com/uploads/images/gallery/2026-03/scaled-1680-/ZRqQkYqmlKfsJL4j-image.png)](https://cytechint-docs-bookstack.s3.amazonaws.com/uploads/images/gallery/2026-03/ZRqQkYqmlKfsJL4j-image.png)

##### **Step 3:** Set ownership of the directories to the dedicated user:

```
sudo chown -R testing-cato:testing-cato /var/lib/cato /var/log/cato
```

[![image.png](https://cytechint-docs-bookstack.s3.amazonaws.com/uploads/images/gallery/2026-03/scaled-1680-/1afigOby8PUfoHUA-image.png)](https://cytechint-docs-bookstack.s3.amazonaws.com/uploads/images/gallery/2026-03/1afigOby8PUfoHUA-image.png)

#### <span style="color: rgb(53, 152, 219);">**Creating the Bash Wrapper Script:**</span>

<p class="callout info">The wrapper script manages event collection, logging, and ensures only one instance runs at a time.</p>

##### **Step 1:** Create the wrapper script file:

```
sudo nano /usr/local/bin/cato-eventsfeed.sh
```

[![image.png](https://cytechint-docs-bookstack.s3.amazonaws.com/uploads/images/gallery/2026-03/scaled-1680-/b2P0ZvFyPtoVS4sx-image.png)](https://cytechint-docs-bookstack.s3.amazonaws.com/uploads/images/gallery/2026-03/b2P0ZvFyPtoVS4sx-image.png)

##### **Step 2:** Add the following content to the file:

<p class="callout danger">Important: Replace "testing-cato" in CATOCLI to the actual user</p>

```bash
Ask Cytech Support For the Source code
```

##### **<span class="token token">Step </span><span class="token token">3</span>**<span class="token token">**:** Save and </span><span class="token token">exit</span><span class="token token"> the </span><span class="token token">file</span>

##### **<span class="token token">Step </span><span class="token token">4</span>**<span class="token token">**:** Make the script executable:</span>

```
sudo chmod +x /usr/local/bin/cato-eventsfeed.sh
```

[![image.png](https://cytechint-docs-bookstack.s3.amazonaws.com/uploads/images/gallery/2026-03/scaled-1680-/ZpbIlyeQDiAgLnwn-image.png)](https://cytechint-docs-bookstack.s3.amazonaws.com/uploads/images/gallery/2026-03/ZpbIlyeQDiAgLnwn-image.png)

##### <span class="token token">**Step 5:** Set ownership to the dedicated user:</span>

```
sudo chown testing-cato:testing-cato /usr/local/bin/cato-eventsfeed.sh
```

[![image.png](https://cytechint-docs-bookstack.s3.amazonaws.com/uploads/images/gallery/2026-03/scaled-1680-/MZYxUVp3xeoPojV4-image.png)](https://cytechint-docs-bookstack.s3.amazonaws.com/uploads/images/gallery/2026-03/MZYxUVp3xeoPojV4-image.png)

#### <span style="color: rgb(53, 152, 219);">**Creating the Systemd Service File:**</span>

<p class="callout info"><span class="token token">The systemd </span><span class="token token">service</span><span class="token token"> ensures the event collection runs continuously and restarts automatically on failure.</span></p>

##### <span class="token token">**Step 1:** Create the service file:</span>

```
sudo nano /etc/systemd/system/cato-eventsfeed.service
```

[![image.png](https://cytechint-docs-bookstack.s3.amazonaws.com/uploads/images/gallery/2026-03/scaled-1680-/0rREOoDP43ogMFqm-image.png)](https://cytechint-docs-bookstack.s3.amazonaws.com/uploads/images/gallery/2026-03/0rREOoDP43ogMFqm-image.png)

##### <span class="token token">**Step 2:** Add the following content to the file:</span>

```ini
Ask Cytech Support for the Source Code
```

<p class="callout warning">Note: In Environment path, replace the path of the actual path of your python virtual path "PATH=/home/**<span style="color: rgb(53, 152, 219);">testing-cato/venv</span>/**bin:/usr/local/sbin:/usr/local/bin:/usr/sbin:/usr/bin". Change User and Group for non-root user as well.</p>

##### <span class="token token">**Step 3:** Save and exit the file (Ctrl+X, then Y, then Enter).</span>

#### <span style="color: rgb(53, 152, 219);">**<span class="token token">Configuring Log Rotation</span>**</span>

<span class="token token">To manage log file sizes and prevent disk space issues, configure log rotation for Cato event logs.</span>

##### <span class="token token">**Step 1:** Create a logrotate configuration file:</span>

```
sudo nano /etc/logrotate.d/cato-events
```

##### <span class="token token">**Step 2:** Add the following configuration to the file:</span>

```
/var/log/cato/events.log {
    hourly
    rotate 24
    missingok
    notifempty

    copytruncate

    compress
    compressoptions -1
    delaycompress

    dateext
    dateformat -%Y%m%d-%H%M%S

    create 0640 testing-cato testing-cato
}
```

<p class="callout info">This configuration:  
- Rotates logs hourly  
- Keeps the last 24 rotated log files  
- Compresses old log files to save disk space  
- Creates new log files with appropriate permissions</p>

##### **Step 3:** Save and exit the file (Ctrl+X, then Y, then Enter).

#### **<span style="color: rgb(53, 152, 219);">Configuring Hourly Log Rotation</span>**

By default, logrotate runs daily. To ensure more frequent log rotation for high-volume Cato event logs, configure the logrotate timer to run hourly.

##### <span style="color: rgb(53, 152, 219);">**Creating the Timer Override File:**</span>

##### **Step 1:** Create the systemd override directory:

```
sudo mkdir -p /etc/systemd/system/logrotate.timer.d
```

##### **Step 2:** Create the override configuration file:

```bash
sudo nano /etc/systemd/system/logrotate.timer.d/override.conf
```

##### **Step 3:** Add the following configuration to the file:

```ini
[Timer]
OnCalendar=
OnCalendar=hourly
AccuracySec=1m
Persistent=true
```

<p class="callout info">This configuration:  
- Clears the default daily schedule with the empty 'OnCalendar'=  
- Sets the timer to run hourly  
- Ensures the timer runs within 1 minute of the scheduled time  
- Catches up on missed runs if the system was offline</p>

##### **Step 4:** Save and exit the file (Ctrl+X, then Y, then Enter).

#### <span style="color: rgb(53, 152, 219);">**Reloading and Restarting the Timer**</span>

##### **Step 1:** Reload the systemd daemon to recognize configuration changes:

```bash
sudo systemctl daemon-reexec
sudo systemctl daemon-reload
```

##### **Step 2:** Restart the logrotate timer to apply the new schedule:

```
sudo systemctl restart logrotate.timer
```

##### **Step 3:** Verify the timer is active and scheduled correctly:

```
sudo systemctl status logrotate.timer
```

##### **Step 4:** Check the next scheduled run time:

```
systemctl list-timers logrotate.timer
```

The output should show the timer scheduled to run hourly.

#### <span style="color: rgb(53, 152, 219);">**Enabling and Starting the Service**</span>

##### **Step 1:** Reload systemd to recognize the new service file:

```
sudo systemctl daemon-reload
```

[![image.png](https://cytechint-docs-bookstack.s3.amazonaws.com/uploads/images/gallery/2026-03/scaled-1680-/Tu7V23sh2jsdjsNA-image.png)](https://cytechint-docs-bookstack.s3.amazonaws.com/uploads/images/gallery/2026-03/Tu7V23sh2jsdjsNA-image.png)

##### **Step 2:** Enable the service to start automatically on boot:

```
sudo systemctl enable cato-eventsfeed
```

[![image.png](https://cytechint-docs-bookstack.s3.amazonaws.com/uploads/images/gallery/2026-03/scaled-1680-/79JRLWTK8bNIR1yJ-image.png)](https://cytechint-docs-bookstack.s3.amazonaws.com/uploads/images/gallery/2026-03/79JRLWTK8bNIR1yJ-image.png)

##### **Step 3:** Start the service:

```
sudo systemctl start cato-eventsfeed
```

[![image.png](https://cytechint-docs-bookstack.s3.amazonaws.com/uploads/images/gallery/2026-03/scaled-1680-/Dudlo9JFOl1nIPH7-image.png)](https://cytechint-docs-bookstack.s3.amazonaws.com/uploads/images/gallery/2026-03/Dudlo9JFOl1nIPH7-image.png)

##### **Step 4:** Verify the service is running:

```
sudo systemctl status cato-eventsfeed
```

[![image.png](https://cytechint-docs-bookstack.s3.amazonaws.com/uploads/images/gallery/2026-03/scaled-1680-/zeBYSJRErF63eghq-image.png)](https://cytechint-docs-bookstack.s3.amazonaws.com/uploads/images/gallery/2026-03/zeBYSJRErF63eghq-image.png)

<p class="callout success">The status should show *active (running)* in green text.</p>

##### <span style="color: rgb(53, 152, 219);">**Monitoring Live Logs:**</span>

To view real-time logs from the Cato event feed service:

```
journalctl -u cato-eventsfeed -f
```

Press **Ctrl+C** to stop viewing the live logs.

##### <span style="color: rgb(53, 152, 219);">**Event Collection** **Settings**</span>

The integration collects the following event types from Cato Networks:

- **Security Events**: Threat detection, malware blocks, IPS alerts, and security policy violations
- **Connectivity Events**: Site connectivity changes, tunnel status, WAN link failures, and network performance issues

##### <span style="color: rgb(53, 152, 219);">**Configuration Parameters:**</span>

- **Marker File**: `/var/lib/cato/events-marker.txt` - Tracks the last processed event to prevent duplicates
- **Lock File**: `/var/lock/cato-eventsfeed.lock` - Ensures only one instance of the script runs at a time
- **Log File**: `/var/log/cato/events.log` - Stores collected events in JSON format
- **Runtime Limit**: 10 minutes per execution cycle
- **Event Types**: Security and Connectivity events

##### <span style="color: rgb(53, 152, 219);">**Log Events**</span>

Enable this option to collect Cato Network log events across all configured event types from your Cato SASE platform.

##### <span style="color: rgb(53, 152, 219);">**Logs Dataset**</span>

The `cato.events` dataset contains events collected from the Cato Networks Events Feed API. All Cato-specific event fields are available in the `/var/log/cato/events.log` file for detailed analysis, including:

- Event timestamps and identifiers
- Source and destination information
- Security threat classifications
- Network connectivity status
- Policy enforcement actions
- Geographic and site information

---

##### <span style="color: rgb(53, 152, 219);">**For the Back-end Side**</span>

Add this in the processor:

```yaml
processors:
  - decode_json_fields:
      fields: ["message"]
      target: ""
      overwrite_keys: true
      add_error_key: true
  - add_fields:
      target: event
      fields:
        module: cato-network
  - add_fields:
      target: component
      fields:
        id: cato-SASE
```

# AQUILA - Cato Network Integration(Windows)

Cato Networks provides a cloud-native SASE (Secure Access Service Edge) platform that converges networking and security into a global cloud service. The platform generates security and connectivity events that can be collected, analyzed, and monitored for network insights and threat detection. This integration enables centralized event collection from Cato Networks using the Cato CLI for visualization and analysis.

#### <span style="color: rgb(53, 152, 219);">**Integration Overview**</span>

This integration supports event collection through:

- Cato CLI (catocli) using the Events Feed API
- Automated event polling via Windows Service (NSSM)
- Python-based event collection script running as a background service

<p class="callout info">Events can be searched, observed, and visualized for security monitoring, connectivity analysis, and network performance tracking.</p>

##### <span style="color: rgb(53, 152, 219);">**Compatibility**</span>

- Supports event collection for Security and Connectivity event types
- Requires Python 3.6 or higher
- Compatible with Windows Server operating systems
- Requires valid Cato Network API token and Account ID
- Requires NSSM (Non-Sucking Service Manager) for Windows Service integration

##### <span style="color: rgb(53, 152, 219);">**Prerequisites**</span>

<p class="callout warning">Before configuring the Cato Network integration, ensure you have:</p>

- Python 3.6 or higher installed
- Python virtual environment configured at `C:\cato\venv`
- Cato CLI (catocli) installed
- Valid Cato Network API token
- Valid Cato Network Account ID
- NSSM (Non-Sucking Service Manager) downloaded

#### <span style="color: rgb(53, 152, 219);">**Python Installation**</span>

##### <span style="color: rgb(53, 152, 219);">**Windows Installation:**</span>

##### **Step 1:** Open your web browser and navigate to the [official Python downloads](https://www.python.org/downloads/ "https://www.python.org/downloads/") page:

##### **Step 2:** Locate the latest stable version of Python 3 (3.12 or newer is recommended) and choose the correct installer for your system type (64-bit or 32-bit).

##### **Step 3:** Click the installer link to download the .exe file.

##### **Step 4:** After downloading, locate the installer file (e.g., python-3.x.x-amd64.exe) and double-click it to start the installation.

##### **Step 5:** On the installer screen, configure the following options:

- Check **Install launcher for all users**
- Check **Add python.exe to PATH** to enable running Python from the Command Prompt

##### **Step 6:** Click **Install Now** to begin the installation process.

##### **Step 7:** Wait for the installation to complete, then click **Close** when the success message appears.

##### **Step 8:** Verify the installation:

- Open the Start menu, type **cmd**, and open Command Prompt
- Type `python --version` and press Enter to confirm the installed Python version

#### <span style="color: rgb(53, 152, 219);">**Creating Python Virtual Environment**</span>

A Python virtual environment isolates project dependencies and prevents conflicts with system-wide Python packages.

##### **Step 1:** Open Command Prompt or PowerShell.

##### **Step 2:** Create and Navigate to your project directory using the mkdir and cd command:

```
mkdir "C:\cato"
cd C:\cato
```

##### **Step 3:** Create a virtual environment:

```
python -m venv venv
```

##### **Step 4:** Activate the virtual environment:

- **Command Prompt:**```
    venv\Scripts\activate.bat
    ```

- **PowerShell:**```
    .\venv\Scripts\activate.ps1
    ```

##### **Step 5:** Once activated, the virtual environment name (e.g., (venv)) will appear in your terminal prompt.

##### **Step 6:** To deactivate the virtual environment, type:

```
deactivate
```

#### <span style="color: rgb(53, 152, 219);">**Cato CLI Installation**</span>

##### **Step 1:** Ensure your virtual environment is activated.

##### **Step 2:** Install the Cato CLI using pip:

```
pip3 install catocli
```

[![image.png](https://cytechint-docs-bookstack.s3.amazonaws.com/uploads/images/gallery/2026-03/scaled-1680-/T8innKXGPj0E8aBZ-image.png)](https://cytechint-docs-bookstack.s3.amazonaws.com/uploads/images/gallery/2026-03/T8innKXGPj0E8aBZ-image.png)

##### **Step 3:** Verify the installation by running:

```
catocli --version
```

[![image.png](https://cytechint-docs-bookstack.s3.amazonaws.com/uploads/images/gallery/2026-03/scaled-1680-/dbZLovD5Ic5UsJPu-image.png)](https://cytechint-docs-bookstack.s3.amazonaws.com/uploads/images/gallery/2026-03/dbZLovD5Ic5UsJPu-image.png)

#### <span style="color: rgb(53, 152, 219);">**Configuring Cato CLI for Local System Execution**</span>

To enable the Cato CLI to run as a Windows Service under the Local System account, modify the profile manager configuration.

##### **Step 1:** Navigate to the Cato CLI profile manager file:

```
C:\cato\venv\Lib\site-packages\catocli\Utils\profile_manager.py
```

##### **Step 2:** Open the file in a text editor (e.g., Notepad or Visual Studio Code).

##### **Step 3:** Locate the `__init__` constructor in the file:

```python
def __init__(self):
    self.cato_dir = Path.home() / '.cato'
    self.credentials_file = self.cato_dir / 'credentials'
    self.config_file = self.cato_dir / 'config'
    self.default_endpoint = "https://api.catonetworks.com/api/v1/graphql2"
```

##### **Step 4:** Replace `Path.home()` with `Path("C:/cato")`:

```python
def __init__(self):
    self.cato_dir = Path("C:/cato") / '.cato'
    self.credentials_file = self.cato_dir / 'credentials'
    self.config_file = self.cato_dir / 'config'
    self.default_endpoint = "https://api.catonetworks.com/api/v1/graphql2"
```

<p class="callout success">This change ensures the Cato CLI uses a fixed directory path instead of the user's home directory<span class="token token">,</span> which <span class="token token">is</span> essential <span class="token token">for</span> running <span class="token token">as</span> a system service<span class="token token">.</span></p>

##### <span class="token token">**Step 5:** Save and close the file.</span>

#### <span style="color: rgb(53, 152, 219);">**Validating Cato Network API Token and Account ID**</span>

##### **Step 1:** Configure the Cato CLI with your API token and Account ID:

```
catocli configure set --cato-token "your-api-token" --account-id "12345"
```

[![image.png](https://cytechint-docs-bookstack.s3.amazonaws.com/uploads/images/gallery/2026-03/scaled-1680-/anuhQHhpEoQO1jgY-image.png)](https://cytechint-docs-bookstack.s3.amazonaws.com/uploads/images/gallery/2026-03/anuhQHhpEoQO1jgY-image.png)

<p class="callout info">Replace `"your-api-token"` with your actual Cato Network API token and `"12345"` with your Account ID.</p>

#### **<span class="token token" style="color: rgb(53, 152, 219);">Downloading and Installing NSSM</span>**

<p class="callout info"><span style="color: rgb(0, 0, 0);"><span class="token token">NSSM <span class="token token">(</span>Non<span class="token token">-</span>Sucking Service Manager<span class="token token">)</span> <span class="token token">is</span> a service helper tool that allows you to run <span class="token token">any</span> application <span class="token token">as</span> a Windows Service<span class="token token">.</span></span></span></p>

##### <span style="color: rgb(0, 0, 0);"><span class="token token"><span class="token token">**Step 1:** Download [NSSM](https://nssm.cc/download "https://nssm.cc/download") from the official website:</span></span></span>

##### <span style="color: rgb(0, 0, 0);"><span class="token token"><span class="token token">**Step 2:** Extract the downloaded ZIP file.</span></span></span>

##### <span style="color: rgb(0, 0, 0);"><span class="token token"><span class="token token">**Step 3:** Copy the appropriate `nssm.exe` file (32-bit or 64-bit based on your system) to the Cato integration directory:</span></span></span>

```
C:\cato\nssm.exe
```

#### <span style="color: rgb(53, 152, 219);">**<span class="token token"><span class="token token">Creating the Python Event Collection Script</span></span>**</span>

##### <span style="color: rgb(0, 0, 0);"><span class="token token"><span class="token token">**Step 1:** Create a Python script file at:</span></span></span>

```
C:\cato\my_script.py
```

##### **Step 2:** Paste this configuration script to my\_script.py that you created earlier:

```python
Ask Cytech Support for the Soure Code
```

##### **Step <span class="token token">3:</span>** Save the script <span class="token token">file</span><span class="token token">.</span>

#### <span style="color: rgb(53, 152, 219);">**<span class="token token">Installing the Cato Events Feed as a Windows Service</span>**</span>

<p class="callout info"><span class="token token">Use NSSM to install the Python script as a Windows Service that runs automatically in the background.</span></p>

##### <span class="token token">**Step 1:** Open PowerShell as Administrator and </span><span class="token token">Navigate to the Cato directory:</span>

```
cd C:\cato
```

##### **Step 2<span class="token token">:</span>** Run the NSSM installation command<span class="token token">:</span>

```
C:\cato\nssm.exe install CatoEventsFeed
```

<p class="callout info"><span class="token token">This opens the NSSM service installer GUI.</span></p>

##### **Step 1: Configuring the Service - Application Tab:**

##### **Path:** C:\\cato\\venv\\Scripts\\python.exe  
**Startup directory:** C:\\cato  
**Arguments:** C:\\cato\\my\_script.py

[![image.png](https://cytechint-docs-bookstack.s3.amazonaws.com/uploads/images/gallery/2026-03/scaled-1680-/lmjFeXyxwLMPJ7Ce-image.png)](https://cytechint-docs-bookstack.s3.amazonaws.com/uploads/images/gallery/2026-03/lmjFeXyxwLMPJ7Ce-image.png)

##### **Step 2: Configuring the Service - Details Tab:**  
**Display name:** CatoEventsFeed  
**Description:** The platform generates security and connectivity events that can be collected, analyzed, and monitored for network insights and threat detection. This service enables centralized event collection from Cato Networks using the Cato CLI for visualization and analysis.

[![image.png](https://cytechint-docs-bookstack.s3.amazonaws.com/uploads/images/gallery/2026-03/scaled-1680-/RykIOTi9dKSTbr1G-image.png)](https://cytechint-docs-bookstack.s3.amazonaws.com/uploads/images/gallery/2026-03/RykIOTi9dKSTbr1G-image.png)

##### **Step 4: Configuring the Service - Log on tab**  
select Local System account

[![image.png](https://cytechint-docs-bookstack.s3.amazonaws.com/uploads/images/gallery/2026-03/scaled-1680-/Eh2Mzf7VDp8mQIfw-image.png)](https://cytechint-docs-bookstack.s3.amazonaws.com/uploads/images/gallery/2026-03/Eh2Mzf7VDp8mQIfw-image.png)

<p class="callout info">This allows the service to run <span class="token token">with</span> system<span class="token token">-</span>level privileges without requiring a specific user login<span class="token token">.</span></p>

##### **Step 5: Configuring the Service - Exit action tab**  
**delay restart if application runs for less than:** 5000

[![image.png](https://cytechint-docs-bookstack.s3.amazonaws.com/uploads/images/gallery/2026-03/scaled-1680-/28zTZgYlIpLbeBec-image.png)](https://cytechint-docs-bookstack.s3.amazonaws.com/uploads/images/gallery/2026-03/28zTZgYlIpLbeBec-image.png)

<p class="callout info">This setting ensures the service waits <span class="token token">5</span> seconds before attempting a restart <span class="token token">if</span> the application crashes immediately after starting<span class="token token">.</span></p>

##### **<span class="token token">Step 6: Click <span style="color: rgb(45, 194, 107);">Install service</span> to complete the installation.</span>**

#### <span style="color: rgb(53, 152, 219);">**<span class="token token">Starting the Cato Events Feed Service</span>**</span>

##### **<span class="token token">Step 1: </span>**<span class="token token">Open PowerShell as Administrator and n</span><span class="token token">avigate to the Cato directory:</span>

```
cd C:\cato
```

##### **Step 2<span class="token token">:</span>** Start the service using NSSM<span class="token token">:</span>

```
.\nssm.exe start CatoEventsFeed
```

##### **Step 3<span class="token token">: </span>**Verify the service <span class="token token">is</span> running<span class="token token">:</span>

```
sc.exe query CatoEventsFeed
```

<p class="callout success">The output should show "<span style="color: rgb(0, 0, 0);">STATE<span class="token token">:</span> RUNNING</span>"<span class="token token">.</span></p>

#### <span style="color: rgb(53, 152, 219);">**<span class="token token">Managing the Cato Events Feed Service</span>**</span>

<span style="color: rgb(53, 152, 219);">**<span class="token token">To start the service:</span>**</span>

```
C:\cato\nssm.exe start CatoEventsFeed
```

<span style="color: rgb(53, 152, 219);">**<span class="token token">To restart the service:</span>**</span>

```
C:\cato\nssm.exe restart CatoEventsFeed
```

<span style="color: rgb(53, 152, 219);">**To check service status<span class="token token">:</span>**</span>

```
C:\cato\nssm.exe status CatoEventsFeed
```

#### <span style="color: rgb(53, 152, 219);">**Event Collection Settings**</span>

The integration collects the following event types from Cato Networks:

- <span style="color: rgb(53, 152, 219);">**Security Events**</span>: Threat detection, malware blocks, IPS alerts, and security policy violations
- <span style="color: rgb(53, 152, 219);">**Connectivity Events**:</span> Site connectivity changes, tunnel status, WAN link failures, and network performance issues

#### <span style="color: rgb(53, 152, 219);">**Configuration Parameters:**</span>

- <span style="color: rgb(53, 152, 219);">**Marker File**:</span> `C:\cato\events-marker.txt` - Tracks the last processed event to prevent duplicates
- <span style="color: rgb(53, 152, 219);">**Runtime Limit**:</span> 10 minutes per execution cycle
- <span style="color: rgb(53, 152, 219);">**Event Types**:</span> Security and Connectivity events
- <span style="color: rgb(53, 152, 219);">**Collection Interval**: <span style="color: rgb(0, 0, 0);">10</span></span> minutes (configurable in my\_script.py)

#### <span style="color: rgb(53, 152, 219);">**Log Events**</span>

Enable this option to collect Cato Network log events across all configured event types from your Cato SASE platform.

#### <span style="color: rgb(53, 152, 219);">**Logs Dataset**</span>

The `cato.events` dataset contains events collected from the Cato Networks Events Feed API. All Cato-specific event fields are available in the configured log files for detailed analysis, including:

- Event timestamps and identifiers
- Source and destination information
- Security threat classifications
- Network connectivity status
- Policy enforcement actions
- Geographic and site information

# AQUILA - Atlassian Jira Integration through Oauth 2.0(3LO) and API Key

#### <span style="color: rgb(53, 152, 219);">**What are API Token Scopes?**</span>

Scopes define what actions an API token is allowed to perform in Atlassian apps such as Jira and Confluence. They enhance security by limiting permissions to only what's needed (e.g., read-only access to audit logs). Always use scoped tokens for AQUILA integrations—unscoped tokens are deprecated for most apps and may not support fine-grained access. For audit logs (events like user actions, config changes, or security incidents), use the specific scopes listed below. Broader scopes may be needed for other integrations (e.g., content indexing) but stick to these for basic monitoring to minimize risk.

##### <span style="color: rgb(53, 152, 219);">**Prerequisites**</span>

1. Atlassian Admin Email Account
2. Atlest have a read rights linux privilege
3. Broswer (firefox,chrome)

---

#### <span style="color: rgb(53, 152, 219);">**Creating an API Token with Scopes**</span>

1. Log in to [https://id.atlassian.com/manage-profile/security/api-tokens](https://id.atlassian.com/manage-profile/security/api-tokens).
2. Select "Create API token with scopes".
3. Enter a descriptive name for the token (e.g., "AQUILA- Audit Logs Monitoring").

Choose an expiration date for the token (between 1 and 365 days; consider shorter for security).

1. Select the application Jira.
2. Select the scopes or permissions the token should have: 
    - For Jira (audit logs): <span style="color: rgb(0, 0, 0);"><span class="sc-iiUIRa jEMjmA">**Classic**</span>:</span> `manage:jira-configuration or <span style="color: rgb(0, 0, 0);"><strong>Granular</strong></span>: read:audit-log:jira,read:user:jira` to access /rest/api/3/auditing/record.
3. Click "Create".
4. Copy the token and save it securely. You cannot view it again after this step. If lost, generate a new one. Share only with trusted integrations like AQUILA—revoke if compromised.

---

#### <span style="color: rgb(53, 152, 219);">**<span data-teams="true">OAuth 2.0(3LO)apps</span>**</span>

<span data-teams="true">*OAuth 2.0 (3LO)* (also known as "three-legged OAuth" or "authorization code grants") apps. OAuth 2.0 (3LO) allows external applications</span>

<span data-teams="true"> and services to access Atlassian product APIs on a user's behalf. OAuth 2.0 (3LO) apps are created and managed in the [developer console](https://developer.atlassian.com/console/myapps/).</span>

---

##### <span style="color: rgb(53, 152, 219);">**<span data-teams="true">Enabling OAuth 2.0(3LO)</span>**</span>

<span data-teams="true">1. Select your profile icon in the top-right corner, and from the dropdown, select Developer console.</span>

[![image.png](https://cytechint-docs-bookstack.s3.amazonaws.com/uploads/images/gallery/2026-04/scaled-1680-/lVVBIvX9SFkYAF3G-image.png)](https://cytechint-docs-bookstack.s3.amazonaws.com/uploads/images/gallery/2026-04/lVVBIvX9SFkYAF3G-image.png)

<span data-teams="true">2. Select your app from the list (or create one if you don't already have one).</span>

[![image.png](https://cytechint-docs-bookstack.s3.amazonaws.com/uploads/images/gallery/2026-04/scaled-1680-/AKDu1oWN0QYGsdAR-image.png)](https://cytechint-docs-bookstack.s3.amazonaws.com/uploads/images/gallery/2026-04/AKDu1oWN0QYGsdAR-image.png)[![image.png](https://cytechint-docs-bookstack.s3.amazonaws.com/uploads/images/gallery/2026-04/scaled-1680-/4mXowETiREvBPsmB-image.png)](https://cytechint-docs-bookstack.s3.amazonaws.com/uploads/images/gallery/2026-04/4mXowETiREvBPsmB-image.png)

<span data-teams="true">3. Select Permissions in the left menu.</span>

<span data-teams="true">4. Next to the API you want to add, select Configure or Add.</span>

[![image.png](https://cytechint-docs-bookstack.s3.amazonaws.com/uploads/images/gallery/2026-04/scaled-1680-/KdSLfu058Xr8DEZd-image.png)](https://cytechint-docs-bookstack.s3.amazonaws.com/uploads/images/gallery/2026-04/KdSLfu058Xr8DEZd-image.png)

<p class="callout info"><span style="color: rgb(0, 0, 0);">**Select Classic or Granular scope Classic:manage:jira-configuration was selected in this example.**</span>  
</p>

[![image.png](https://cytechint-docs-bookstack.s3.amazonaws.com/uploads/images/gallery/2026-04/scaled-1680-/3qR0Dexu0wp9FzWJ-image.png)](https://cytechint-docs-bookstack.s3.amazonaws.com/uploads/images/gallery/2026-04/3qR0Dexu0wp9FzWJ-image.png)

<span data-teams="true">5. Select Authorization in the left menu.</span>

<span data-teams="true">6. Next to OAuth 2.0 (3LO), select Configure or Add.</span>

[![image.png](https://cytechint-docs-bookstack.s3.amazonaws.com/uploads/images/gallery/2026-04/scaled-1680-/gtrKQRAoCYfo2kMp-image.png)](https://cytechint-docs-bookstack.s3.amazonaws.com/uploads/images/gallery/2026-04/gtrKQRAoCYfo2kMp-image.png)

<span data-teams="true">7. Enter the Callback URL. Set this to any URL that is accessible by the app. When you implement OAuth 2.0 (3LO) in your app (see next section), </span>

<p class="callout info">**<span data-teams="true" style="color: rgb(0, 0, 0);">The redirect\_uri must match this URL.</span>**</p>

```
https://<client_name>.atlassian.net/callback
```

[![image.png](https://cytechint-docs-bookstack.s3.amazonaws.com/uploads/images/gallery/2026-04/scaled-1680-/kZ2esEByR97f2Mfm-image.png)](https://cytechint-docs-bookstack.s3.amazonaws.com/uploads/images/gallery/2026-04/kZ2esEByR97f2Mfm-image.png)

<span data-teams="true">8. Click Save changes.</span>

<span data-teams="true">9. In <span style="color: rgb(0, 0, 0);">**Authorization URL generator**</span> Copy and Paste in the browser.</span>

[![image.png](https://cytechint-docs-bookstack.s3.amazonaws.com/uploads/images/gallery/2026-04/scaled-1680-/jufbJ3pRsu1tdHiz-image.png)](https://cytechint-docs-bookstack.s3.amazonaws.com/uploads/images/gallery/2026-04/jufbJ3pRsu1tdHiz-image.png)

[![image.png](https://cytechint-docs-bookstack.s3.amazonaws.com/uploads/images/gallery/2026-04/scaled-1680-/iSLb89AftQMgWr9y-image.png)](https://cytechint-docs-bookstack.s3.amazonaws.com/uploads/images/gallery/2026-04/iSLb89AftQMgWr9y-image.png)

<span data-teams="true">10. Copy the URL and paste in text editor (notepad).</span>

[![image.png](https://cytechint-docs-bookstack.s3.amazonaws.com/uploads/images/gallery/2026-04/scaled-1680-/J4qUrEsy6hF7BCPI-image.png)](https://cytechint-docs-bookstack.s3.amazonaws.com/uploads/images/gallery/2026-04/J4qUrEsy6hF7BCPI-image.png)

<p class="callout info"><span style="color: rgb(0, 0, 0);">**Example of a copied URL (the boxed section contains the authorization code).**</span></p>

[![image.png](https://cytechint-docs-bookstack.s3.amazonaws.com/uploads/images/gallery/2026-04/scaled-1680-/UkbRlih2M4xs1pM7-image.png)](https://cytechint-docs-bookstack.s3.amazonaws.com/uploads/images/gallery/2026-04/UkbRlih2M4xs1pM7-image.png)

---

##### <span data-teams="true"> **<span style="color: rgb(53, 152, 219);">Exchange authorization code for access token</span>**</span>

<p class="callout info"><span data-teams="true" style="color: rgb(0, 0, 0);">**Paste this Curl command into terminal.**</span></p>

```c
curl --request POST \
  --url 'https://auth.atlassian.com/oauth/token' \
  --header 'Content-Type: application/json' \
  --data '{"grant_type": "authorization_code","client_id": "YOUR_CLIENT_ID","client_secret": "YOUR_CLIENT_SECRET","code": "YOUR_AUTHORIZATION_CODE","redirect_uri": "https://YOUR_APP_CALLBACK_URL"}'
 
```

Change all fields:

- `client_id`: (*required*) Set this to the <span style="color: rgb(0, 0, 0);">**Client ID**</span> for your app. Find this in <span style="color: rgb(0, 0, 0);">**Settings**</span> for your app in the [developer console](https://developer.atlassian.com/console/myapps/ "https://developer.atlassian.com/console/myapps/").
- `client_secret`: (*required*) Set this to the <span style="color: rgb(0, 0, 0);">**Secret**</span> for your app. Find this in <span style="color: rgb(0, 0, 0);">**Settings**</span> for your app in the [developer console](https://developer.atlassian.com/console/myapps/ "https://developer.atlassian.com/console/myapps/").
- `code`: (*required*) Set this to the authorization code received from the initial authorize call (described above).
- `redirect_uri`: (*required*) Set this to the callback URL configured for your app in the [developer console](https://developer.atlassian.com/console/myapps/ "https://developer.atlassian.com/console/myapps/").

<p class="callout info"><span style="color: rgb(0, 0, 0);">**<span data-teams="true">If successful, this call returns an access token similar to this:</span>**</span></p>

```json
HTTP/1.1 200 OK
Content-Type: application/json

{
  "access_token": <string>,
  "expires_in": <expiry time of access_token in second>,
  "scope": <string>
}
 
```

---

##### <span style="color: rgb(53, 152, 219);">**Make calls to the API using the access token Get the `cloudid` for your site**</span>

Your app now has an access token that it can use to authorize requests to the APIs for the Atlassian site. To make requests, do the following:

1. <span style="color: rgb(0, 0, 0);">**Get the <span class="sc-htoDjs eujlDE">`cloudid`</span> for your site.**</span>
2. Construct the request URL using the <span class="sc-htoDjs eujlDE">`cloudid`</span>.
3. Call the API, using the access token and request URL.

---

##### <span style="color: rgb(53, 152, 219);">**Get the <span class="sc-htoDjs eujlDE">`cloud_id`</span> for your site**</span>

Make a GET request to [https://api.atlassian.com/oauth/token/accessible-resources<span aria-label="Follow" class="css-1wits42" role="img"><svg height="24" role="presentation" viewbox="0 0 24 24" width="24"><g fill="currentColor" fill-rule="evenodd"><path d="M11.031 7A1.03 1.03 0 0010 8.036a1.05 1.05 0 001.044 1.045l3.121.014.014 3.121a1.05 1.05 0 001.045 1.044 1.03 1.03 0 001.036-1.035l-.019-4.161a1.053 1.053 0 00-1.045-1.045L11.035 7h-.004z"></path><path d="M13.364 8.292l-7.072 7.071a1.002 1.002 0 000 1.415c.39.39 1.024.39 1.415 0l7.071-7.071A1.002 1.002 0 0014.071 8a1 1 0 00-.707.292z"></path></g></svg></span>](https://api.atlassian.com/oauth/token/accessible-resources) passing the access token as a bearer token in the header of the request. For example:

<p class="callout warning"><span style="color: rgb(0, 0, 0);">**Replace "ACCESS\_TOKEN" with your newly generated token.**</span></p>

```c
curl --request GET \
  --url https://api.atlassian.com/oauth/token/accessible-resources \
  --header 'Authorization: Bearer ACCESS_TOKEN' \
  --header 'Accept: application/json'

```

This will retrieve the sites that have scopes granted by the token (see [Check site access for the app](https://developer.atlassian.com/cloud/jira/platform/oauth-2-3lo-apps/#siteaccess) below for details). Find your site in the response and copy the <span class="sc-htoDjs eujlDE">`id`</span>. This is the <span class="sc-htoDjs eujlDE">`cloud_id`</span> for your site.

<p class="callout info"><span style="color: rgb(0, 0, 0);"> **sample output: a Jira site:**</span></p>

```json
[
  {
    "id": "1324a887-45db-1bf4-1e99-ef0ff456d421",
    "name": "Site name",
    "url": "https://your-domain.atlassian.net",
    "scopes": [
      "write:jira-work",
      "read:jira-user",
      "manage:jira-configuration"
    ],
    "avatarUrl": "https:\/\/site-admin-avatar-cdn.prod.public.atl-paas.net\/avatars\/240\/flag.png"
  }
]

```

---

---

#### <span style="color: rgb(53, 152, 219);">**Creating the Bash Wrapper Script:**</span>

<p class="callout info"><span style="color: rgb(0, 0, 0);">**The wrapper script manages event collection, logging, and ensures only one instance runs at a time.**</span></p>

1. **Create required directories for data, logs:**

<p class="callout info"><span style="color: rgb(0, 0, 0);">**Create a directory named `jira` (for this example):**</span></p>

```
mkdir jira
```

[![image.png](https://cytechint-docs-bookstack.s3.amazonaws.com/uploads/images/gallery/2026-04/scaled-1680-/8hPJBMDmhrLARrmY-image.png)](https://cytechint-docs-bookstack.s3.amazonaws.com/uploads/images/gallery/2026-04/8hPJBMDmhrLARrmY-image.png)

**2. Create the wrapper script file:**

```
sudo nano /usr/local/bin/jira_audit.sh
```

**3. Add the following content to the file:**

<p class="callout warning"><span style="color: rgb(0, 0, 0);">**Replace the file path `FLAT_FILE` , `CHECKPOINT_FILE `as well as `CLOUD_ID`, `USER_EMAIL`, and `API_KEY`, with their actual values.**</span></p>

```bash
Ask Cytech Support for the Source Code
```

<span class="token token">4. **Make the script executable:**</span>

```
sudo chmod +x /usr/local/bin/jira_audit.sh
```

<span class="token token">5. **Set ownership to the dedicated user**:</span>

<p class="callout warning"><span style="color: rgb(0, 0, 0);">**<span class="token token">Replace the "user:group" in this example both `testing-jira:testing-jira`.</span>**</span></p>

```
sudo chown testing-jira:testing-jira /usr/local/bin/jira_audit.sh
```

---

#### <span style="color: rgb(53, 152, 219);">**Creating the Systemd Service File:**</span>

<p class="callout info"><span style="color: rgb(0, 0, 0);">**<span class="token token">The systemd </span><span class="token token">service</span><span class="token token"> ensures the event collection runs continuously and restarts automatically on failure.</span>**</span></p>

**<span class="token token">1. Create the service file:</span>**

```
sudo nano /etc/systemd/system/jira-audit.service
```

**<span class="token token">2. Add the following content to the file:</span>**

<p class="callout warning"><span style="color: rgb(0, 0, 0);">**<span class="token token">Replace WorkingDirectory file path.</span>**</span></p>

```ini
Ask Cytech Support for The Source Code
```

---

#### <span style="color: rgb(53, 152, 219);">**Create a Systemd Timer to handle looping and run automatically in the background:**</span>

A systemd timer is a feature of <span class="hover:entity-accent entity-underline inline cursor-pointer align-baseline"><span class="whitespace-normal">systemd</span></span> used to schedule tasks to run automatically at specific times or intervals.

**<span class="token token">1. Create the timer file:</span>**

```
sudo nano /etc/systemd/system/jira-audit.timer
```

**<span class="token token">2. Add the following content to the file:</span>**

```ini
[Unit]
Description=Run Atlassian Jira Audit every 10 minutes

[Timer]
OnBootSec=60
OnUnitActiveSec=600
Persistent=true
Unit=jira-audit.service

[Install]
WantedBy=timers.target

```

---

---

#### <span style="color: rgb(53, 152, 219);">**<span class="token token">Configuring Log Rotation</span>**</span>

<span class="token token">To manage log file sizes and prevent disk space issues, configure log rotation for Jira Audit Logs.</span>

##### <span class="token token">**Step 1:** Create a logrotate configuration file:</span>

```
sudo nano /etc/logrotate.d/jira_audit
```

##### <span class="token token">**Step 2:** Add the following configuration to the file:</span>

<p class="callout warning"><span style="color: rgb(0, 0, 0);">**Replace `/home/your_user/` with your actual path, and update `user_owner` and `user_group` to match the correct user and group.**</span></p>

```
/home/your_user/jira/flattened.json {
    daily
    rotate 7
    missingok
    notifempty

    copytruncate

    compress
    compressoptions -1
    delaycompress

    dateext
    dateformat -%Y%m%d-%H%M%S

    create 0640 user_owner user_group
}
```

---

#### <span style="color: rgb(53, 152, 219);">**Enabling and Starting the Service**</span>

**Step 1:** **Reload systemd to recognize the new service file:**

```
sudo systemctl daemon-reload
```

**Step 2: Enable the service to start automatically on boot:**

```
sudo systemctl enable --now jira-audit.timer
```

**Step 3: Verify the service is running:**

```
sudo systemctl list-timers
```

<p class="callout info">**<span style="color: rgb(0, 0, 0);">You should see something like this.</span>**</p>

[![image.png](https://cytechint-docs-bookstack.s3.amazonaws.com/uploads/images/gallery/2026-04/scaled-1680-/Ny6BCgorzIHNd8Tw-image.png)](https://cytechint-docs-bookstack.s3.amazonaws.com/uploads/images/gallery/2026-04/Ny6BCgorzIHNd8Tw-image.png)

---

##### <span style="color: rgb(53, 152, 219);">**Monitoring Live Logs:**</span>

To view real-time logs from the jira-audit service:

```
journalctl -u jira-audit -f
```

<p class="callout info"><span style="color: rgb(0, 0, 0);">**Please provide the following information to CyTech.**</span></p>

- <span style="color: rgb(0, 0, 0);">**Flattened.json file path example "/home/testing-jira/jira/flattened.json"**</span>

# AQUILA - Atlassian Confluence Integration through Oauth 2.0(3LO) and API Key(File Path)

#### <span style="color: rgb(53, 152, 219);">**What are API Token Scopes?**</span>

Scopes define what actions an API token is allowed to perform in Atlassian apps such as Jira and Confluence. They enhance security by limiting permissions to only what's needed (e.g., read-only access to audit logs). Always use scoped tokens for AQUILA integrations—unscoped tokens are deprecated for most apps and may not support fine-grained access. For audit logs (events like user actions, config changes, or security incidents), use the specific scopes listed below. Broader scopes may be needed for other integrations (e.g., content indexing) but stick to these for basic monitoring to minimize risk.

##### <span style="color: rgb(53, 152, 219);">**Prerequisites**</span>

1. Atlassian Admin Email Account
2. Atlest have a read rights linux privilege
3. Broswer (firefox,chrome)

---

#### <span style="color: rgb(53, 152, 219);">**Creating an API Token with Scopes**</span>

1. Log in to [https://id.atlassian.com/manage-profile/security/api-tokens](https://id.atlassian.com/manage-profile/security/api-tokens).
2. Select "Create API token with scopes".
3. Enter a descriptive name for the token (e.g., "AQUILA- Audit Logs Monitoring").

Choose an expiration date for the token (between 1 and 365 days; consider shorter for security).

1. Select the application Atlassian Confluence.
2. Select "Create API token with scopes".
3. Select the scopes or permissions the token should have: 
    - For Atlassian Confluence (audit logs): **`read:audit-log:confluence`** to access /wiki/rest/api/audit.
4. Click "Create".
5. Copy the token and save it securely. You cannot view it again after this step. If lost, generate a new one. Share only with trusted integrations like AQUILA—revoke if compromised.

---

#### <span style="color: rgb(53, 152, 219);">**<span data-teams="true">OAuth 2.0(3LO)apps</span>**</span>

<span data-teams="true">*OAuth 2.0 (3LO)* (also known as "three-legged OAuth" or "authorization code grants") apps. OAuth 2.0 (3LO) allows external applications</span>

<span data-teams="true">and services to access Atlassian product APIs on a user's behalf. OAuth 2.0 (3LO) apps are created and managed in the [developer console](https://developer.atlassian.com/console/myapps/).</span>

---

##### <span style="color: rgb(53, 152, 219);">**<span data-teams="true">Enabling OAuth 2.0(3LO)</span>**</span>

1. <span data-teams="true">Select your profile icon in the top-right corner, and from the dropdown, select Developer console.  
    </span>[![image.png](https://cytechint-docs-bookstack.s3.amazonaws.com/uploads/images/gallery/2026-04/scaled-1680-/jxdunNFi29RQx2Wh-image.png)](https://cytechint-docs-bookstack.s3.amazonaws.com/uploads/images/gallery/2026-04/jxdunNFi29RQx2Wh-image.png)
2. Select your app from the list (or create one if you don't already have one).  
    [![image.png](https://cytechint-docs-bookstack.s3.amazonaws.com/uploads/images/gallery/2026-04/scaled-1680-/GLr4z8AGP77xDqny-image.png)](https://cytechint-docs-bookstack.s3.amazonaws.com/uploads/images/gallery/2026-04/GLr4z8AGP77xDqny-image.png)[![image.png](https://cytechint-docs-bookstack.s3.amazonaws.com/uploads/images/gallery/2026-04/scaled-1680-/5VIzqFLCjZMQjnzU-image.png)](https://cytechint-docs-bookstack.s3.amazonaws.com/uploads/images/gallery/2026-04/5VIzqFLCjZMQjnzU-image.png)
3. Select Permissions in the left menu.
4. Next to the API you want to add, select Configure or Add.  
    [![image.png](https://cytechint-docs-bookstack.s3.amazonaws.com/uploads/images/gallery/2026-04/scaled-1680-/tz9LZYlW50k0GsvZ-image.png)](https://cytechint-docs-bookstack.s3.amazonaws.com/uploads/images/gallery/2026-04/tz9LZYlW50k0GsvZ-image.png)
    
    [![image.png](https://cytechint-docs-bookstack.s3.amazonaws.com/uploads/images/gallery/2026-04/scaled-1680-/SK89J1rKP3PCjoxl-image.png)](https://cytechint-docs-bookstack.s3.amazonaws.com/uploads/images/gallery/2026-04/SK89J1rKP3PCjoxl-image.png)
5. Select Authorization in the left menu.
6. Next to OAuth 2.0 (3LO), select Configure or Add.  
    [![image.png](https://cytechint-docs-bookstack.s3.amazonaws.com/uploads/images/gallery/2026-04/scaled-1680-/dlIErAPJlf0DYWFz-image.png)](https://cytechint-docs-bookstack.s3.amazonaws.com/uploads/images/gallery/2026-04/dlIErAPJlf0DYWFz-image.png)
7. Enter the Callback URL. Set this to any URL that is accessible by the app. When you implement OAuth 2.0 (3LO) in your app (see next section). in this example "base URL /callback" <p class="callout info">**<span data-teams="true">The redirect\_uri must match this URL.</span>**</p>
    
      
    [![image.png](https://cytechint-docs-bookstack.s3.amazonaws.com/uploads/images/gallery/2026-04/scaled-1680-/vmzdQskGSufwcHHW-image.png)](https://cytechint-docs-bookstack.s3.amazonaws.com/uploads/images/gallery/2026-04/vmzdQskGSufwcHHW-image.png)
8. Click Save changes.
9. In **Authorization URL generator** Copy and Paste in the browser.  
    [![image.png](https://cytechint-docs-bookstack.s3.amazonaws.com/uploads/images/gallery/2026-04/scaled-1680-/B6IYfcH2luAqwRAs-image.png)](https://cytechint-docs-bookstack.s3.amazonaws.com/uploads/images/gallery/2026-04/B6IYfcH2luAqwRAs-image.png)
    
    [![image.png](https://cytechint-docs-bookstack.s3.amazonaws.com/uploads/images/gallery/2026-04/scaled-1680-/19XHXQfd2zApQpIO-image.png)](https://cytechint-docs-bookstack.s3.amazonaws.com/uploads/images/gallery/2026-04/19XHXQfd2zApQpIO-image.png)
10. Copy the URL and paste in text editor (notepad).  
    <p class="callout info">[![image.png](https://cytechint-docs-bookstack.s3.amazonaws.com/uploads/images/gallery/2026-04/scaled-1680-/nXh8vWzcku4XLqYA-image.png)](https://cytechint-docs-bookstack.s3.amazonaws.com/uploads/images/gallery/2026-04/nXh8vWzcku4XLqYA-image.png)  
    **Example of a copied URL (the boxed section contains the authorization code).**</p>

---

##### <span data-teams="true"> **<span style="color: rgb(53, 152, 219);">Exchange authorization code for access token</span>**</span>

<p class="callout info"><span data-teams="true">**Paste this Curl command into terminal.**</span></p>

```bash
curl --request POST \
  --url 'https://auth.atlassian.com/oauth/token' \
  --header 'Content-Type: application/json' \
  --data '{"grant_type": "authorization_code","client_id": "YOUR_CLIENT_ID","client_secret": "YOUR_CLIENT_SECRET","code": "YOUR_AUTHORIZATION_CODE","redirect_uri": "https://YOUR_APP_CALLBACK_URL"}'
```

Change all fields:

- `client_id`: (*required*) Set this to the **Client ID** for your app. Find this in **Settings** for your app in the [developer console](https://developer.atlassian.com/console/myapps/ "https://developer.atlassian.com/console/myapps/").
- `client_secret`: (*required*) Set this to the **Secret** for your app. Find this in **Settings** for your app in the [developer console](https://developer.atlassian.com/console/myapps/ "https://developer.atlassian.com/console/myapps/").
- `code`: (*required*) Set this to the authorization code received from the initial authorize call (described above).
- `redirect_uri`: (*required*) Set this to the callback URL configured for your app in the [developer console](https://developer.atlassian.com/console/myapps/ "https://developer.atlassian.com/console/myapps/").

<p class="callout info">**<span data-teams="true">If successful, this call returns an access token similar to this:</span>**</p>

```json
HTTP/1.1 200 OK
Content-Type: application/json

{
  "access_token": <string>,
  "expires_in": <expiry time of access_token in second>,
  "scope": <string>
}
```

---

##### <span style="color: rgb(53, 152, 219);">**Make calls to the API using the access token Get the `cloudid` for your site**</span>

Your app now has an access token that it can use to authorize requests to the APIs for the Atlassian site. To make requests, do the following:

1. **Get the <span class="sc-htoDjs eujlDE">`cloudid`</span> for your site.**
2. Construct the request URL using the <span class="sc-htoDjs eujlDE">`cloudid`</span>.
3. Call the API, using the access token and request URL.

---

##### <span style="color: rgb(53, 152, 219);">**Get the <span class="sc-htoDjs eujlDE">`cloud_id`</span> for your site**</span>

**Make a GET request to [https://api.atlassian.com/oauth/token/accessible-resources<span aria-label="Follow" class="css-1wits42" role="img"><svg height="24" role="presentation" viewbox="0 0 24 24" width="24"><g fill="currentColor" fill-rule="evenodd"><path d="M11.031 7A1.03 1.03 0 0010 8.036a1.05 1.05 0 001.044 1.045l3.121.014.014 3.121a1.05 1.05 0 001.045 1.044 1.03 1.03 0 001.036-1.035l-.019-4.161a1.053 1.053 0 00-1.045-1.045L11.035 7h-.004z"></path><path d="M13.364 8.292l-7.072 7.071a1.002 1.002 0 000 1.415c.39.39 1.024.39 1.415 0l7.071-7.071A1.002 1.002 0 0014.071 8a1 1 0 00-.707.292z"></path></g></svg></span>](https://api.atlassian.com/oauth/token/accessible-resources) passing the access token as a bearer token in the header of the request. For example:**

<p class="callout warning">**Replace "ACCESS\_TOKEN" with your newly generated token.**</p>

```bash
curl --request GET \
  --url https://api.atlassian.com/oauth/token/accessible-resources \
  --header 'Authorization: Bearer ACCESS_TOKEN' \
  --header 'Accept: application/json'
```

This will retrieve the sites that have scopes granted by the token (see [Check site access for the app](https://developer.atlassian.com/cloud/jira/platform/oauth-2-3lo-apps/#siteaccess) below for details). Find your site in the response and copy the <span class="sc-htoDjs eujlDE">`id`</span>. This is the <span class="sc-htoDjs eujlDE">`cloud_id`</span> for your site.

<p class="callout info">**sample output: a Atlassian Confluence site:**</p>

```json
[
  {
    "id": "1324a887-45db-1bf4-1e99-ef0ff456d421",
    "name": "Site name",
    "url": "https://your-domain.atlassian.net",
    "scopes": [
      "write:confluence-content",
      "read:confluence-content.all",
      "manage:confluence-configuration"
    ],
    "avatarUrl": "https:\/\/site-admin-avatar-cdn.prod.public.atl-paas.net\/avatars\/240\/flag.png"
  }
]

```

---

#### <span style="color: rgb(53, 152, 219);">**Creating the Bash Wrapper Script:**</span>

<p class="callout info">**The wrapper script manages event collection, logging, and ensures only one instance runs at a time.**</p>

1. **Create required directories for data, logs:** <p class="callout info">**Create a directory named `confluence` (for this example):** </p>
    
    <div>  
    </div>```
    mkdir confluence
    ```
2. **Create the wrapper script file:** ```
    sudo nano /usr/local/bin/confluence_audit.sh
    ```
3. **Add the following content to the file:  
      
    Replace the file path `FLAT_FILE` as well as `CLOUD_ID`, `USER_EMAIL`, and `API_KEY`, with their actual values.**<p class="callout warning">**Don't change "flattened.json" file name so that the script will work properly.** </p>
    
      
    ```bash
    Ask Cytech Support for the Source Code
    ```
4. **Make the script executable:** ```
    sudo chmod +x /usr/local/bin/confluence_audit.sh
    ```
5. **Set ownership to the dedicated user**:  
      
    <p class="callout warning">**<span class="token token">Replace the "user:group" in this example both `<testing-confluence:testing-confluence>`.</span>**</p>
    
      
    ```
    sudo chown testing-confluence:testing-confluence /usr/local/bin/confluence_audit.sh
    ```

---

#### <span style="color: rgb(53, 152, 219);">**Creating the Systemd Service File:**</span>

<p class="callout info">**<span class="token token">The systemd </span><span class="token token">service</span><span class="token token"> ensures the event collection runs continuously and restarts automatically on failure.</span>**</p>

**<span class="token token">1. Create the service file:  
</span>**

```
sudo nano /etc/systemd/system/confluence-audit.service
```

**<span class="token token">2. Add the following content to the file:</span>**

<p class="callout warning">**<span class="token token">Replace WorkingDirectory file path.</span>**</p>

```ini
Ask Cytech Support for the Source Code
```

---

#### <span style="color: rgb(53, 152, 219);">**Create a Systemd Timer to handle looping and run automatically in the background:**</span>

A systemd timer is a feature of <span class="hover:entity-accent entity-underline inline cursor-pointer align-baseline"><span class="whitespace-normal">systemd</span></span> used to schedule tasks to run automatically at specific times or intervals.

**<span class="token token">1. Create the timer file:</span>**

```
sudo nano /etc/systemd/system/confluence-audit.timer
```

**<span class="token token">2. Add the following content to the file:</span>**

```ini
[Unit]
Description=Run Atlassian Confluence Audit every 10 minutes

[Timer]
OnBootSec=60
OnUnitActiveSec=600
Persistent=true
Unit=confluence-audit.service

[Install]
WantedBy=timers.target
```

---

#### <span style="color: rgb(53, 152, 219);">**<span class="token token">Configuring Log Rotation</span>**</span>

<span class="token token">To manage log file sizes and prevent disk space issues, configure log rotation for Atlassian Confluence Audit Logs.</span>

##### <span class="token token">**Step 1:** Create a logrotate configuration file:</span>

```
sudo nano /etc/logrotate.d/confluence_audit
```

##### <span class="token token">**Step 2:** Add the following configuration to the file:</span>

<p class="callout warning"><span class="token token">**Replace `/home/your_user/` with your actual path, and update `user_owner` and `user_group` to match the correct user and group.**</span></p>

```
/home/your_user/confluence/flattened.json {
    daily
    rotate 7
    missingok
    notifempty

    copytruncate

    compress
    compressoptions -1
    delaycompress

    dateext
    dateformat -%Y%m%d-%H%M%S

    create 0640 user_owner user_group
}
```

---

#### <span style="color: rgb(53, 152, 219);">**Enabling and Starting the Service**</span>

**Step 1:** **Reload systemd to recognize the new service file:**

```
sudo systemctl daemon-reload
```

**Step 2: Enable the service to start automatically on boot:**

```
sudo systemctl enable --now confluence-audit.timer
```

**Step 3: Verify the service is running:**

```
sudo systemctl list-timers
```

<p class="callout info">**You should see something like this.**</p>

[![image.png](https://cytechint-docs-bookstack.s3.amazonaws.com/uploads/images/gallery/2026-04/scaled-1680-/EOvKLRBONp828xQT-image.png)](https://cytechint-docs-bookstack.s3.amazonaws.com/uploads/images/gallery/2026-04/EOvKLRBONp828xQT-image.png)

---

##### <span style="color: rgb(53, 152, 219);">**Monitoring Live Logs:**</span>

To view real-time logs from the confluence-audit service:

```
journalctl -u confluence-audit -f
```

---

<p class="callout info">**Please provide the following information to CyTech.**</p>

- **Flattened.json file path example "/home/testing-confluence/confluence/flattened.json"**

---

***If you need further assistance, kindly contact our support at <support@cytechint.com> for prompt assistance and guidance.***

# Openssl installation in windows 11

### <span style="color: rgb(53, 152, 219);">**What is openssl?**</span>

<span style="color: rgb(0, 0, 0);"><span class="hover:entity-accent entity-underline inline cursor-pointer align-baseline"><span class="whitespace-normal">OpenSSL</span></span> is a widely used open-source software library designed to provide secure communication over computer networks through encryption and cryptographic techniques. It implements the Secure Sockets Layer (SSL) and Transport Layer Security (TLS) protocols, which help protect sensitive information exchanged between clients and servers. In addition to enabling secure connections, OpenSSL offers a variety of cryptographic functions, including data encryption, decryption, digital signatures, and certificate management. Due to its reliability, flexibility, and broad platform support, OpenSSL has become an essential component in many web servers, applications, and operating systems worldwide.</span>

---

#### <span style="color: rgb(53, 152, 219);">**Installing OpenSSL in your Log Collector**</span>

<span style="color: rgb(0, 0, 0);">Download the Installer: </span>  
<span style="color: rgb(0, 0, 0);">1. Go to the <span style="color: rgb(22, 145, 121);">[Shining Light Productions](https://slproweb.com/products/Win32OpenSSL.html "openssl") </span>page and download the "Win64 OpenSSL Light" EXE installer (current version 3.x is recommended).</span>

[![image.png](https://cytechint-docs-bookstack.s3.amazonaws.com/uploads/images/gallery/2026-06/scaled-1680-/KxP2x19Yn5sgxsWh-image.png)](https://cytechint-docs-bookstack.s3.amazonaws.com/uploads/images/gallery/2026-06/KxP2x19Yn5sgxsWh-image.png)

<span style="color: rgb(0, 0, 0);">2. Run the Installer: Execute the downloaded file and follow the on-screen instructions.</span>  
<span style="color: rgb(0, 0, 0);">3. Installation Path: It is generally recommended to install in the default location, typically C:\\Program Files\\OpenSSL-Win64.</span>  
<span style="color: rgb(0, 0, 0);">4. Configure System Environment Variable:</span>  
<span style="color: rgb(0, 0, 0);">Search for "Environment Variables" in the Windows search bar.</span>  
<span style="color: rgb(0, 0, 0);">Click "Edit the system environment variables".</span>  
<span style="color: rgb(0, 0, 0);">Click "Environment Variables".</span>  
<span style="color: rgb(0, 0, 0);">Under "System Variables", find and select Path, then click "Edit".</span>

[![image.png](https://cytechint-docs-bookstack.s3.amazonaws.com/uploads/images/gallery/2026-06/scaled-1680-/34wik5flOCWndiw8-image.png)](https://cytechint-docs-bookstack.s3.amazonaws.com/uploads/images/gallery/2026-06/34wik5flOCWndiw8-image.png)

<span style="color: rgb(0, 0, 0);">Click "Edit" and add the path to the bin folder, for example: C:\\Program Files\\OpenSSL-Win64\\bin.</span>  
<span style="color: rgb(0, 0, 0);">Click OK on all windows to save.</span>

[![image.png](https://cytechint-docs-bookstack.s3.amazonaws.com/uploads/images/gallery/2026-06/scaled-1680-/b2StLkSFXyH6waz5-image.png)](https://cytechint-docs-bookstack.s3.amazonaws.com/uploads/images/gallery/2026-06/b2StLkSFXyH6waz5-image.png)

<span style="color: rgb(0, 0, 0);">**Restart the Machine to take effect the configuration.**</span>

---

*<span style="color: rgb(0, 0, 0);">If you need further assistance, kindly contact our support at</span> [**support@cytechint.com**](mailto:support@cytechint.com) <span style="color: rgb(0, 0, 0);">for prompt assistance and guidance.</span>*

# AQUILA - SalesForce Integration (Username-Password Flow)

In Salesforce, the **Username-Password Flow** is an OAuth 2.0 authentication flow where an application obtains an access token by directly sending a Salesforce username, password, and (usually) security token to Salesforce.\\

##### Important note

The Username-Password Flow is increasingly discouraged for new Salesforce integrations because it requires handling user credentials directly. For most modern integrations, the **JWT Bearer Flow** or **Client Credentials Flow** is usually preferred due to better security and easier compliance with MFA requirements.

##### How it works

The client application sends a request to Salesforce's OAuth token endpoint with:

- `grant_type=password`
- Salesforce username
- Salesforce password
- Security token (often appended to the password)
- Connected App client ID
- Connected App client secret

Salesforce validates the credentials and returns an access token if authentication succeeds.

---

Log in to your Salesforce Organization.

<p class="callout info">Note: If the salesforce dashboard interface is in classic mode change it to lighting mode. </p>

- **In the Upper Right Corner click the gear icon.**

[![image.png](https://cytechint-docs-bookstack.s3.amazonaws.com/uploads/images/gallery/2026-02/scaled-1680-/Kyqkx6MxXwwySPOm-image.png)](https://cytechint-docs-bookstack.s3.amazonaws.com/uploads/images/gallery/2026-02/Kyqkx6MxXwwySPOm-image.png)

- **Select setup.**

[![image.png](https://cytechint-docs-bookstack.s3.amazonaws.com/uploads/images/gallery/2026-05/scaled-1680-/W418IIogPqHkBJyB-image.png)](https://cytechint-docs-bookstack.s3.amazonaws.com/uploads/images/gallery/2026-05/W418IIogPqHkBJyB-image.png)
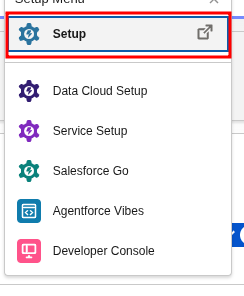
To find the base URL and instance URL follow the guide below.

- In quick find box, enter my domain then select my domain under Company Settings.
- Under My Domain Details copy Current My Domain URL that's your base URL and Instance URL. (Give it to Cytech Support)

[![image.png](https://cytechint-docs-bookstack.s3.amazonaws.com/uploads/images/gallery/2026-05/scaled-1680-/m7aiSY2jALXJCs7S-image.png)](https://cytechint-docs-bookstack.s3.amazonaws.com/uploads/images/gallery/2026-05/m7aiSY2jALXJCs7S-image.png)
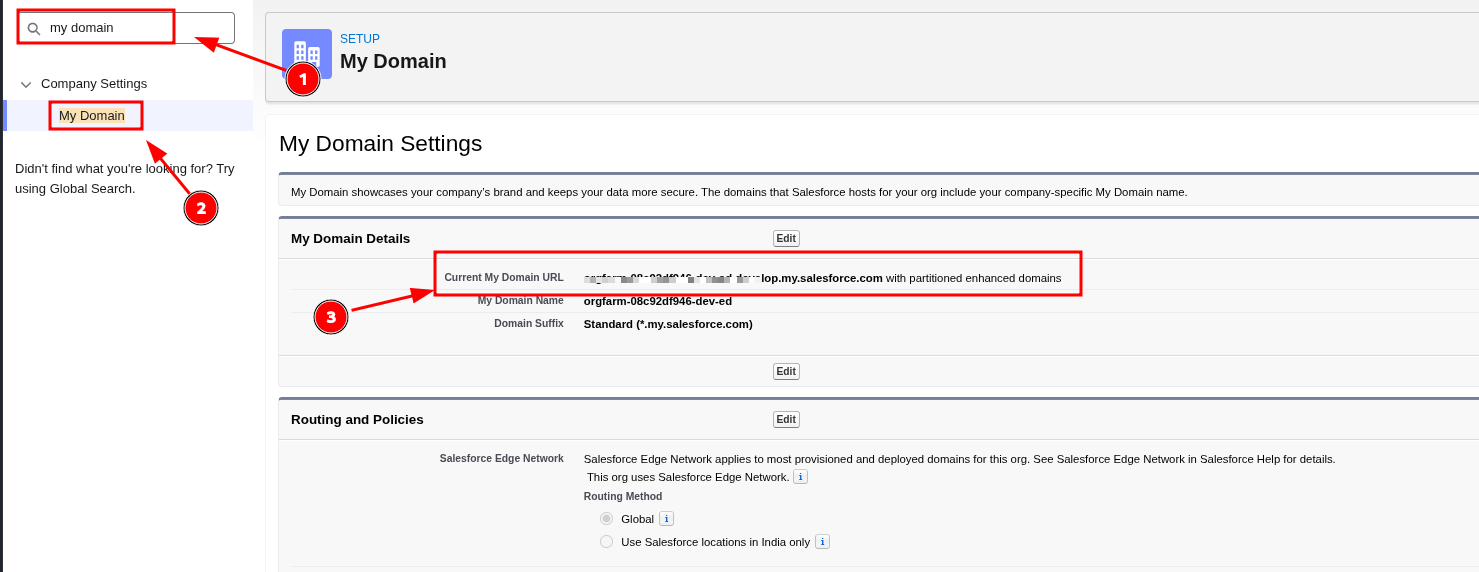
#### **Creating User**

- <span class="ph cmd">In Setup, enter <kbd class="ph userinput">Users</kbd> in the Quick Find box, then select **Users**.</span>
- <span class="ph cmd">Click **New User**.</span>

[![image.png](https://cytechint-docs-bookstack.s3.amazonaws.com/uploads/images/gallery/2026-06/scaled-1680-/MILGpKWiOlMAsQSh-image.png)](https://cytechint-docs-bookstack.s3.amazonaws.com/uploads/images/gallery/2026-06/MILGpKWiOlMAsQSh-image.png)

- <span class="ph cmd">Fill out the form, and assign the System Administrator.</span>
- <span class="ph cmd">Role &gt; None Specified</span>
- <span class="ph cmd">User License &gt; Salesforce</span>
- <span class="ph cmd">Profile &gt; System Administrator</span>

[![image.png](https://cytechint-docs-bookstack.s3.amazonaws.com/uploads/images/gallery/2026-06/scaled-1680-/mkrP09959VmcLFYj-image.png)](https://cytechint-docs-bookstack.s3.amazonaws.com/uploads/images/gallery/2026-06/mkrP09959VmcLFYj-image.png)

- <span class="ph cmd">Click **Save**.</span>

---

##### **Enable Allow Access to External Client App Consumer Secret via REST API**

**External Client App Setting &gt; Allow Access to External Client App Consumer Secret via REST API**

[![image.png](https://cytechint-docs-bookstack.s3.amazonaws.com/uploads/images/gallery/2026-05/scaled-1680-/W4Jt6m6fQpESM3SS-image.png)](https://cytechint-docs-bookstack.s3.amazonaws.com/uploads/images/gallery/2026-05/W4Jt6m6fQpESM3SS-image.png)
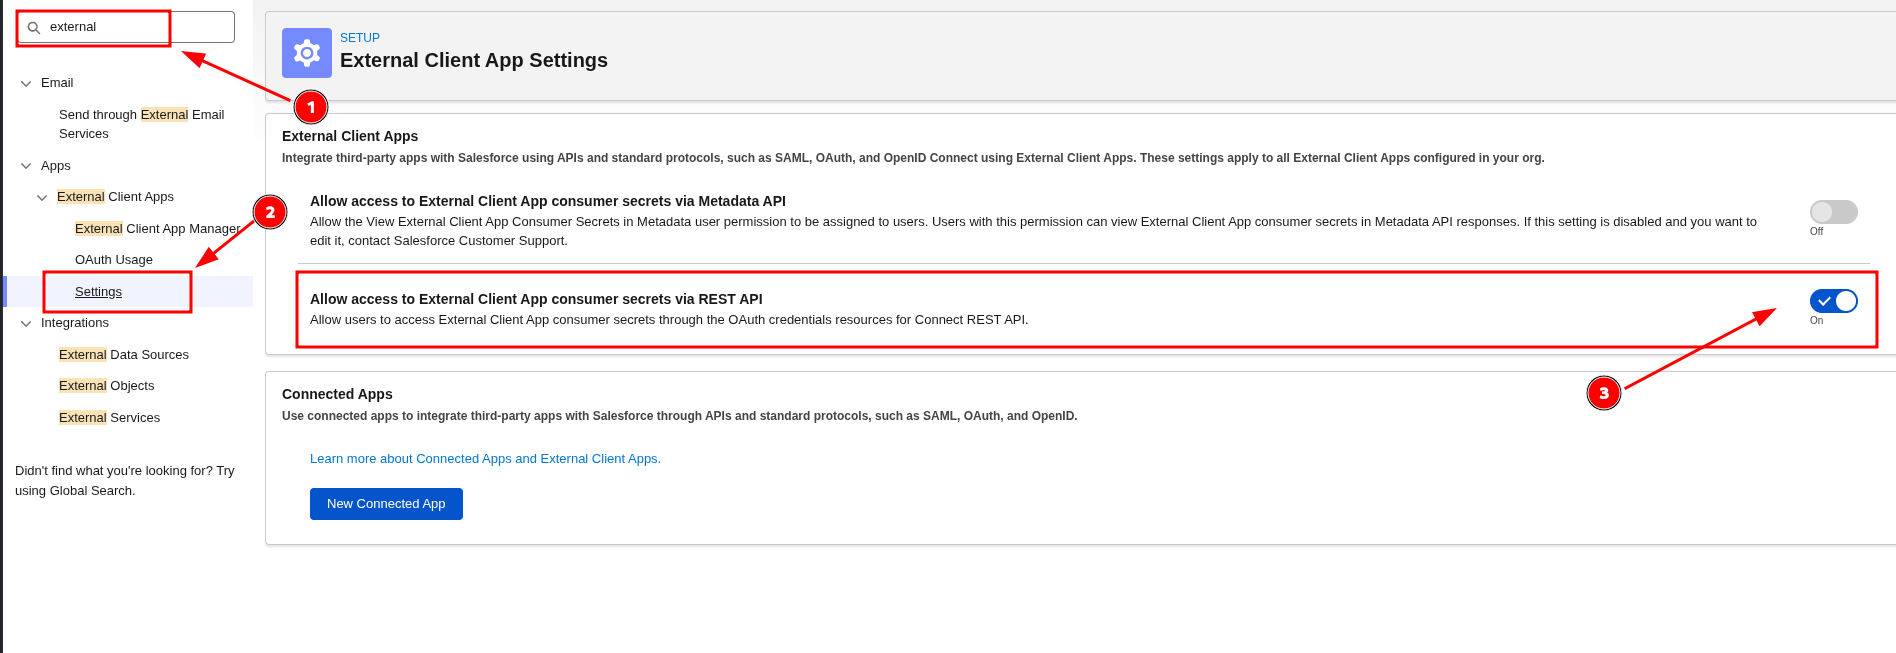
##### **Enable Event log files**

**Event Monitoring Settings &gt; Generate event log files**

[![image.png](https://cytechint-docs-bookstack.s3.amazonaws.com/uploads/images/gallery/2026-05/scaled-1680-/u83m9Xo4Q4t80Gbm-image.png)](https://cytechint-docs-bookstack.s3.amazonaws.com/uploads/images/gallery/2026-05/u83m9Xo4Q4t80Gbm-image.png)

---

#####  **Create A Connected Apps** 

For security reasons, Salesforce blocks the OAuth 2.0 Username-Password flow by default in recent releases. Prefer the JWT bearer flow. If you must use the Username-Password flow, in `OAuth and OpenID Connect Settings`, select `Allow OAuth Username-Password Flows`. For more information, see the Salesforce release note: [Username-Password OAuth flow blocked by default.](https://help.salesforce.com/s/articleView?id=release-notes.rn_security_username-password_flow_blocked_by_default.htm&language=en_US&release=244&type=5)

[![image.png](https://cytechint-docs-bookstack.s3.amazonaws.com/uploads/images/gallery/2026-06/scaled-1680-/VXD6iKeRCEk6htq7-image.png)](https://cytechint-docs-bookstack.s3.amazonaws.com/uploads/images/gallery/2026-06/VXD6iKeRCEk6htq7-image.png)

- Log in to Salesforce (Lightning UI).
- From `Setup`, in `Quick Find` enter `External Client Apps` and select `Settings`. Turn on `Allow creation of connected apps`. To create a connected app, select `New Connected App`.

[![image.png](https://cytechint-docs-bookstack.s3.amazonaws.com/uploads/images/gallery/2026-06/scaled-1680-/k1o1tW0E5LEV58Zy-image.png)](https://cytechint-docs-bookstack.s3.amazonaws.com/uploads/images/gallery/2026-06/k1o1tW0E5LEV58Zy-image.png)
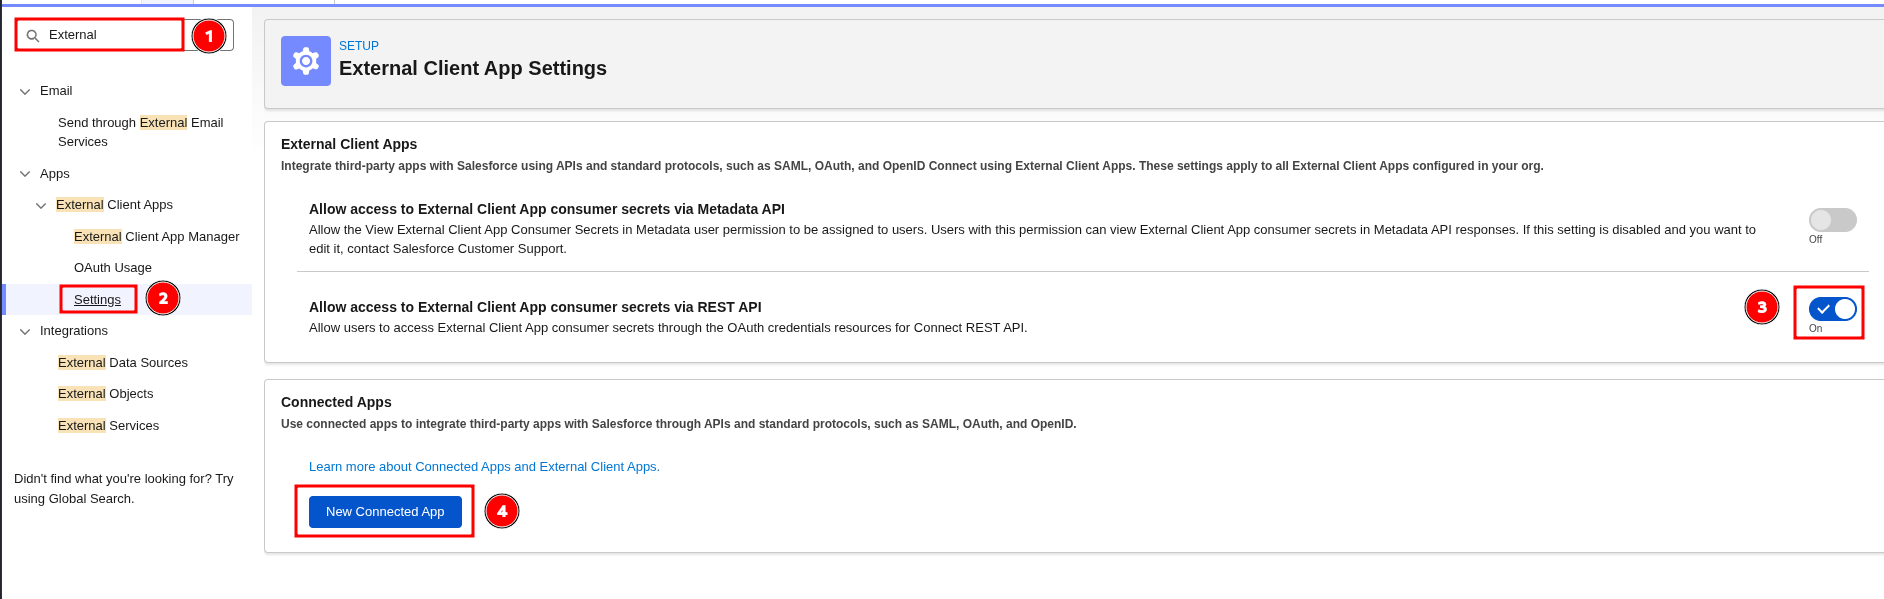
- Fill `Basic Information`: `Connected App Name`, `API Name`, `Contact Email`.

[![image.png](https://cytechint-docs-bookstack.s3.amazonaws.com/uploads/images/gallery/2026-06/scaled-1680-/IsDNcjY9IF5H6689-image.png)](https://cytechint-docs-bookstack.s3.amazonaws.com/uploads/images/gallery/2026-06/IsDNcjY9IF5H6689-image.png)
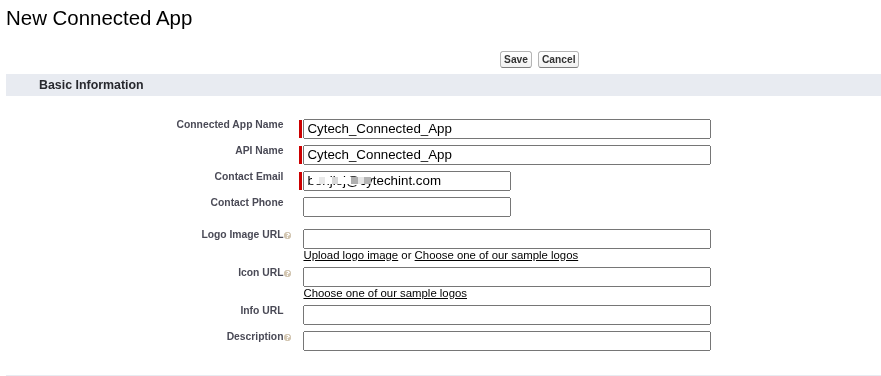
- In `API (Enable OAuth Settings)`, check `Enable OAuth Settings`.
- `Callback URL`: 
    - Web apps: your app callback (for example, `https://yourapp.example.com/callback`).
    - Not used by the JWT or Username-Password flows, but Salesforce requires a value; you can enter your instance URL.
- Select OAuth scopes: 
    - `Manage user data via APIs (api)`
    - `Perform requests at any time (refresh_token, offline_access)`
    - `Full access (full)`
    - Enable Client Credentials Flow
    - Enable Refresh Token Rotation

[![image.png](https://cytechint-docs-bookstack.s3.amazonaws.com/uploads/images/gallery/2026-06/scaled-1680-/xYB3Idafcolwvx4x-image.png)](https://cytechint-docs-bookstack.s3.amazonaws.com/uploads/images/gallery/2026-06/xYB3Idafcolwvx4x-image.png)
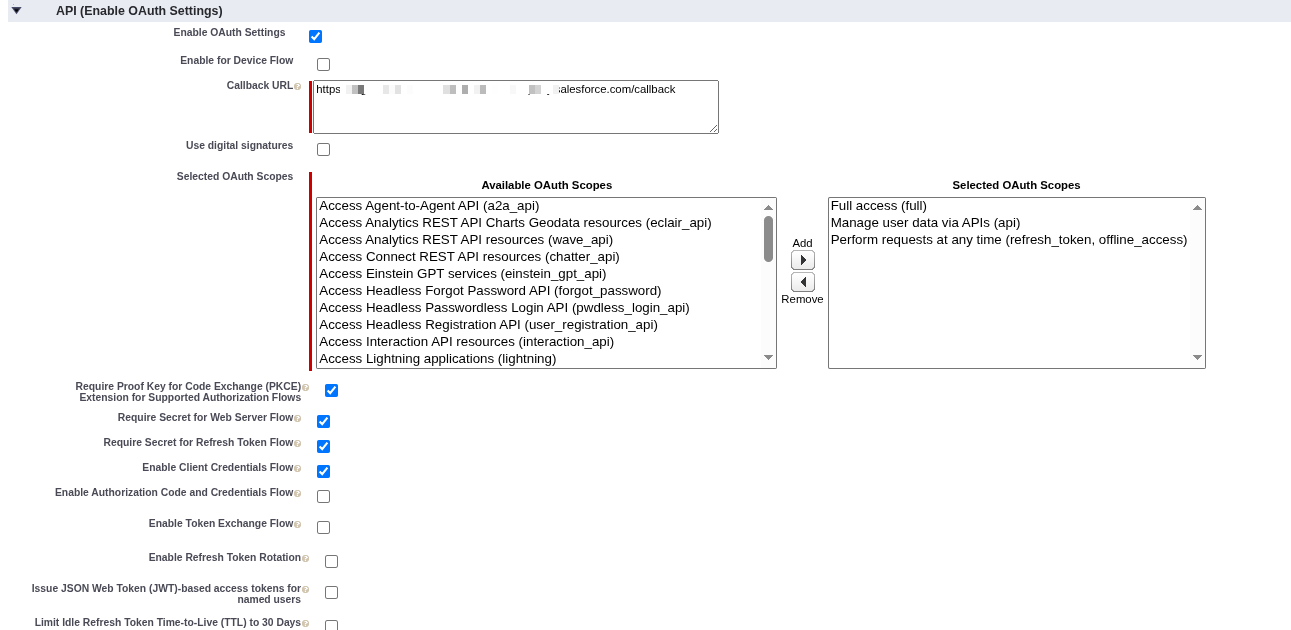
- Click `Save`. It can take up to 10 minutes for the Connected App to propagate.
- After saving, open `Manage Consumer Details` to obtain `Consumer Key` and `Consumer Secret`.

<p class="callout info">Manage Consumer Details Appears only once so better to copy consumer key and consumer secret in a safe place. </p>

[![image.png](https://cytechint-docs-bookstack.s3.amazonaws.com/uploads/images/gallery/2026-06/scaled-1680-/Vg0C8iMXaXIy0LRF-image.png)](https://cytechint-docs-bookstack.s3.amazonaws.com/uploads/images/gallery/2026-06/Vg0C8iMXaXIy0LRF-image.png)

- Then Click Manage to OAuth Policies 
    - Permitted Users &gt; All users may self-authorize
    - IP Relaxation &gt; Relax IP Restrictions
    - Refresh Token Policy &gt; Expire refresh token after "365" days

[![image.png](https://cytechint-docs-bookstack.s3.amazonaws.com/uploads/images/gallery/2026-06/scaled-1680-/zRwgrFo6TSrG2YvC-image.png)](https://cytechint-docs-bookstack.s3.amazonaws.com/uploads/images/gallery/2026-06/zRwgrFo6TSrG2YvC-image.png)
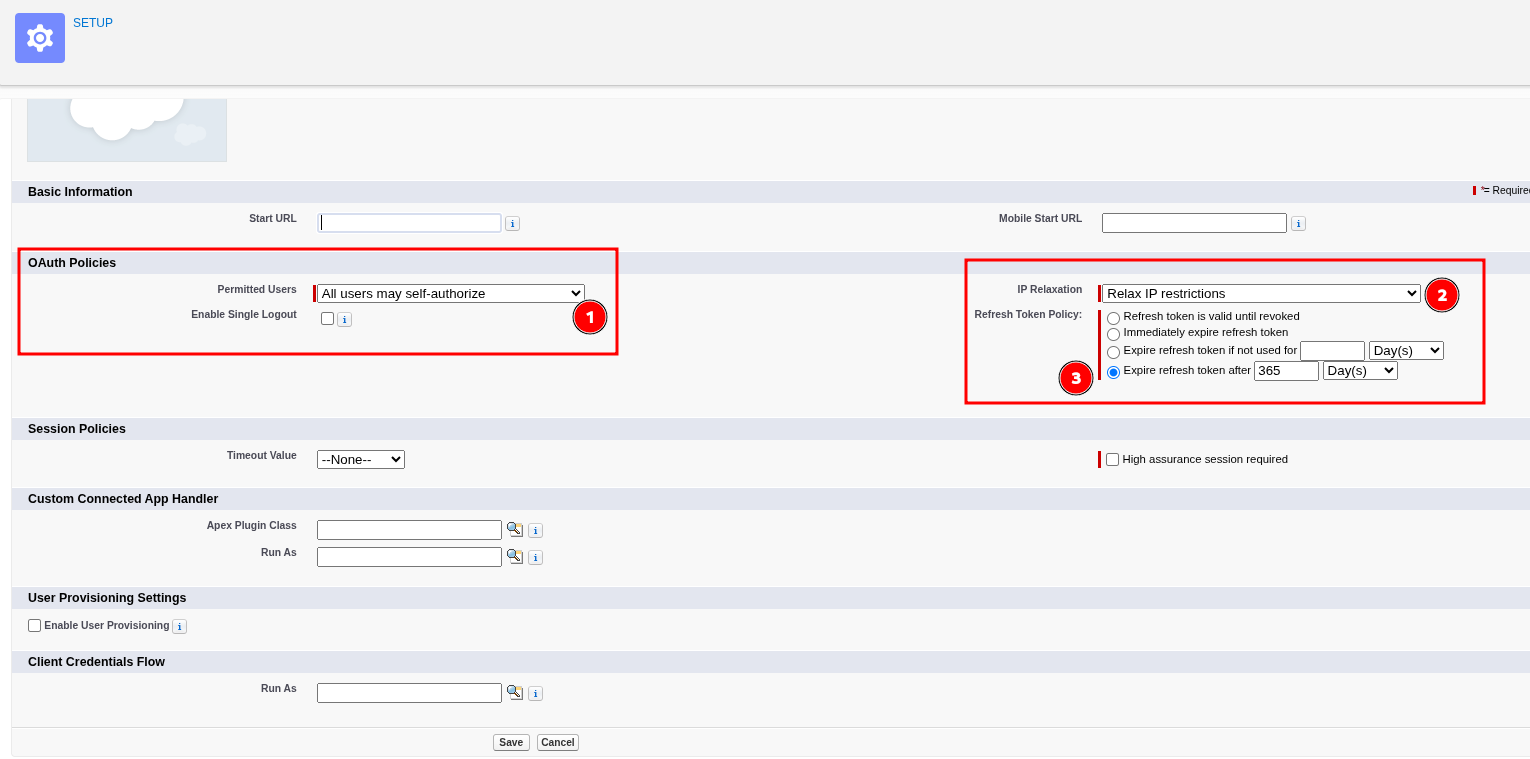

---

##### **Verify if LoginEvent is enable  
in Quick find &gt; Event Manager &gt; enable all**

[![image.png](https://cytechint-docs-bookstack.s3.amazonaws.com/uploads/images/gallery/2026-06/scaled-1680-/c3FO4fC2t5KzJ44w-image.png)](https://cytechint-docs-bookstack.s3.amazonaws.com/uploads/images/gallery/2026-06/c3FO4fC2t5KzJ44w-image.png)

---

##### Provide this to Cytech Support:

- **Username**
- **Password**
- **Consumer Key**
- **Consumer Secret**
- **Instance URL**

---

***If you need further assistance, kindly contact our support at <support@cytechint.com> for prompt assistance and guidance.***

# How to Upload Certificate in Salesforce

#### **<span style="color: rgb(53, 152, 219);">Steps to Upload Certificate:</span>**

<div class="x_elementToProof" data-olk-copy-source="MessageBody" id="bkmrk-1.-log-in-to-salesfo">1. Log in to Salesforce and navigate to **Setup**.</div><div class="x_elementToProof" id="bkmrk-2.-in-the-quick-find">2. In the Quick Find box, type **External Client App Manager** and select it from the results.</div>[![image.png](https://cytechint-docs-bookstack.s3.amazonaws.com/uploads/images/gallery/2026-07/scaled-1680-/GuiXrWIZwQn0eFOn-image.png)](https://cytechint-docs-bookstack.s3.amazonaws.com/uploads/images/gallery/2026-07/GuiXrWIZwQn0eFOn-image.png)

<div class="x_elementToProof" id="bkmrk-3.-locate-and-open-t">3. Locate and open the relevant External Client App from the list.</div><div class="x_elementToProof" id="bkmrk-4.-navigate-to-the%C2%A0s">4. Navigate to the **Setting** section and click **Edit** then under **OAuth Settings** locate **Flow Enablement**.</div>[![image.png](https://cytechint-docs-bookstack.s3.amazonaws.com/uploads/images/gallery/2026-07/scaled-1680-/nzY8PW4aL9Q1xyif-image.png)](https://cytechint-docs-bookstack.s3.amazonaws.com/uploads/images/gallery/2026-07/nzY8PW4aL9Q1xyif-image.png)

<div class="x_elementToProof" id="bkmrk-5.-click%C2%A0upload-file">5. Click **Upload Files**, then browse and select the s**erver.crt** file.</div>[![image.png](https://cytechint-docs-bookstack.s3.amazonaws.com/uploads/images/gallery/2026-07/scaled-1680-/9LEVki6pNBPuowZd-image.png)](https://cytechint-docs-bookstack.s3.amazonaws.com/uploads/images/gallery/2026-07/9LEVki6pNBPuowZd-image.png)

<div class="x_elementToProof" id="bkmrk-6.-click-save-to-app">6. Click **Save** to apply and confirm the certificate upload.</div>