For the full Log Collector Hardware Requirements Guide, please refer to this link: [Log Collector Hardware Requirements Guide](https://docs.cytechint.io/books/log-collector-installations/page/log-collector-hardware-requirements-guide "Log Collector Hardware Requirements Guide")
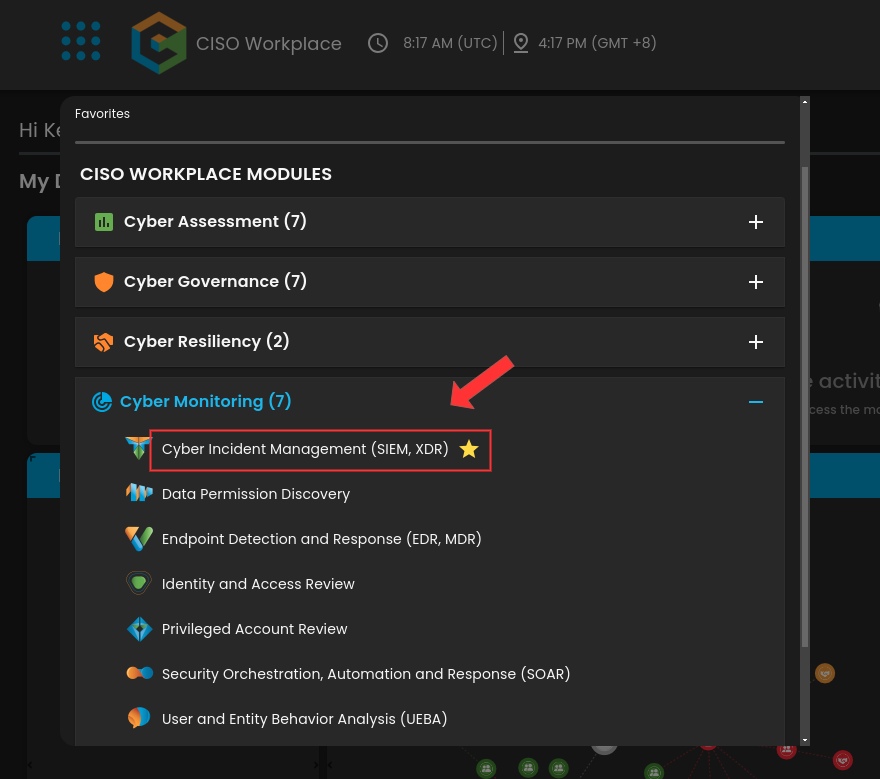
##### **Steps to Add Log Collector** Please follow the steps below to add a Log Collector using Windows Environment. 1. Log in to AQUILA click here - **[CyTech - AQUILA](https://cytechint.io/)**. Choose **Cyber Monitoring** and click the **small arrow icon** to redirect you to the Cyber Monitoring Dashboard. [](https://cytechint-docs-bookstack.s3.amazonaws.com/uploads/images/gallery/2025-05/QUruqc4qZzjj39A2-image.png) 2. In the dashboard, choose **Cyber Incident Management (SIEM and XDR)**. [](https://cytechint-docs-bookstack.s3.amazonaws.com/uploads/images/gallery/2025-05/i68EMO7YfIStKeyl-image.png) 3. Navigate through the leftmost top and click **Cyber Incident Monitoring**. [](https://cytechint-docs-bookstack.s3.amazonaws.com/uploads/images/gallery/2025-05/KgRo0wYa67PKNCws-image.png) 3. Navigate to the Log Collector section and click the '**Add Log Collector**' button to launch the installation interface. [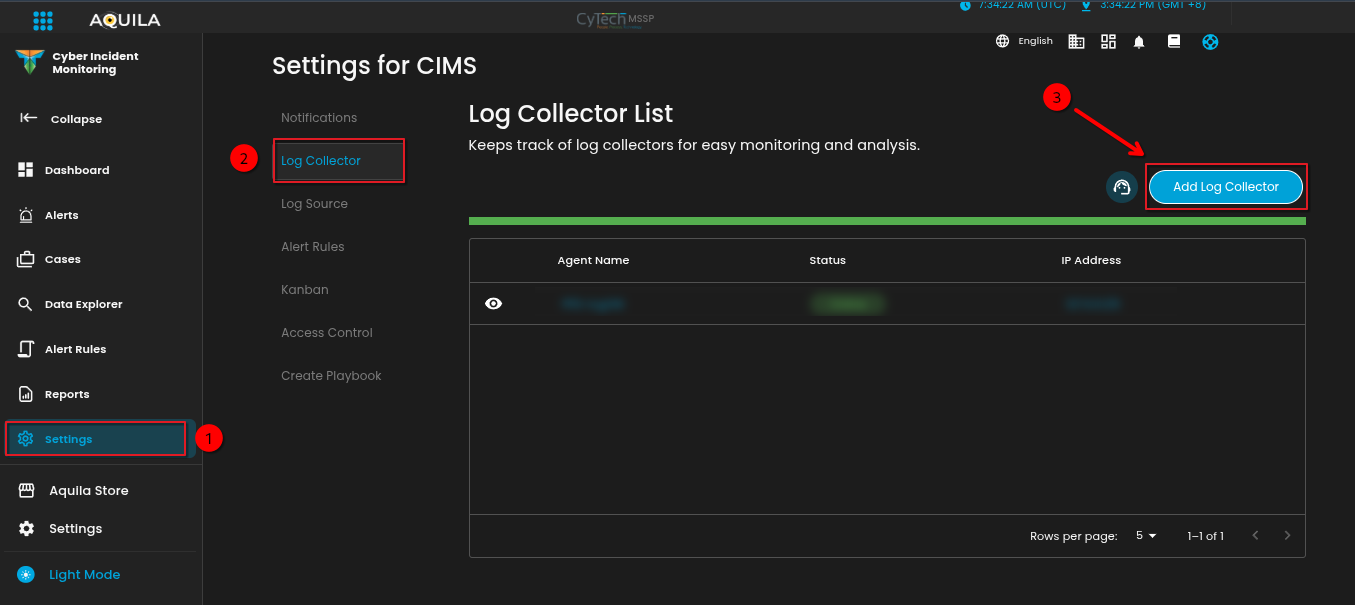](https://cytechint-docs-bookstack.s3.amazonaws.com/uploads/images/gallery/2025-05/wjGyuwkD02sNX5JG-image.png)You can also refer to our documentation manuals for Log Collector Installations Guidelines: [https://docs.cytechint.io/books/log-collector-installations](https://docs.cytechint.io/books/log-collector-installations "https://docs.cytechint.io/books/log-collector-installations")
[](https://cytechint-docs-bookstack.s3.amazonaws.com/uploads/images/gallery/2025-05/4651RxjfXk7UmqGj-image.png) 5. From the options, select the '**Automatic'** installation option. Then click '**Next'**. [](https://cytechint-docs-bookstack.s3.amazonaws.com/uploads/images/gallery/2025-05/AQSi4pI6aMzhgE5U-image.png)*\*\*\*If you encounter **Log Collector Setup Failed**. Please click "Retry" and carefully go gack to Steps 5 or 6. You can also try "**Manual**" installation. If issues persist please contact our technical support at **
For the full Log Collector Hardware Requirements Guide, please refer to this link: [Log Collector Hardware Requirements Guide](https://docs.cytechint.io/books/log-collector-installations/page/log-collector-hardware-requirements-guide "Log Collector Hardware Requirements Guide")
##### **Steps to Add Log Collector** Please follow the steps below to add a Log Collector using Windows Environment. 1. Log in to **CyTech - AQUILA**. Click here: **[AQUILACYBER.AI](https://aquilacyber.ai/)** - Click **Collapse** to view side panel. Then navigate through **Domains>Cyber Monitoring>Cyber Incident Management (CIM)>Settings**. [](https://cytechint-docs-bookstack.s3.amazonaws.com/uploads/images/gallery/2025-06/hmguGlhuEq3VHpnb-image.png) 2. Navigate to the Log Collector section and click the '**Add Log Collector**' button to launch the installation interface. [](https://cytechint-docs-bookstack.s3.amazonaws.com/uploads/images/gallery/2025-06/sPXPArzmE35GPM7i-image.png) 3. Once the installation window display is shown, thoroughly review the **System Requirements** specific to your operating system to ensure compatibility and avoid installation or runtime issues. Verifying these prerequisites is essential before proceeding with deployment. Then click "**Next**".You can also refer to our documentation manuals for Log Collector Installations Guidelines: [https://docs.cytechint.io/books/log-collector-installations](https://docs.cytechint.io/books/log-collector-installations "https://docs.cytechint.io/books/log-collector-installations")
[](https://cytechint-docs-bookstack.s3.amazonaws.com/uploads/images/gallery/2025-05/4651RxjfXk7UmqGj-image.png) 5. From the options, select the "**Manual**" installation option. Then click "**Next**". [](https://cytechint-docs-bookstack.s3.amazonaws.com/uploads/images/gallery/2025-05/9zadBjhTVstIdIng-image.png)*\*\*\*If you encounter **Log Collector Setup Failed**. Please click "Retry" and carefully go gack to Steps 5 or 6. You can also try "**Manual**" installation. If issues persist please contact our technical support at **
**Brief Description** **The Log Collector Agent is a single, unified tool that simplifies adding monitoring capabilities to your** **systems. It can collect various data types, including logs, metrics, and security** **information, from your hosts.**
Locating Log Collector Agent Service 1.Task Manager Open Task Manager, press Win + Q or use Windows search for searching “Task Manager”
[](https://cytechint-docs-bookstack.s3.amazonaws.com/uploads/images/gallery/2025-05/28Kes96XIgS756qt-image.png)After opening the Task Manager, locate and press the Services button on the Left side of the Task Manager. At the uppermost of the Task Manager, there will be a search bar to filter and search the Services in your System. Just type elastic agent.
[](https://cytechint-docs-bookstack.s3.amazonaws.com/uploads/images/gallery/2025-05/EHGbish7aA3QwxyI-image.png)After filtering the Services, you will notice two Elastic Services, choose only the “Elastic Agent” service. To restart the service, use the right click on your mouse to “restart” the service.
[](https://cytechint-docs-bookstack.s3.amazonaws.com/uploads/images/gallery/2025-05/8BbCnpylr8dABKki-image.png) # Log Collector Installation - Linux Manual #### **Log Collector Installation in CyTech - AQUILA** This guide outlines the step-by-step process for deploying the **Elastic Agent** as a log collector within the **CyTech - AQUILA** environment. Following these instructions will establish a secure and automated mechanism for log collection and management, enabling centralized visibility and analysis critical to cybersecurity operations. #### **Pre-requisites** 1. **Access to CyTech - AQUILA** - Only users assigned the **"Owner"** or **"Admin"** role can access the Log Collector installation resources within the platform. 2. **Dedicated Virtual Machine for Log Collector Deployment** - **Dedicated Unit**: It is recommended to use a separate, dedicated VM exclusively for the Log Collector to prevent resource contention and ensure stable performance. - **Virtual Machine (VM) Preferred**: Deploying the Log Collector on a VM offers greater flexibility, scalability, and easier maintenance compared to physical hardware. - **Always Online**: The virtual machine must remain continuously online to ensure uninterrupted log collection from all integrated sources.For the full Log Collector Hardware Requirements Guide, please refer to this link: [Log Collector Hardware Requirements Guide](https://docs.cytechint.io/books/log-collector-installations/page/log-collector-hardware-requirements-guide "Log Collector Hardware Requirements Guide")
##### **Steps to Add Log Collector** Please follow the steps below to add a Log Collector using Linux Environment. 1. Log in to **CyTech - AQUILA**. Click here: **[usdc.cytechint.io](https://usdc.cytechint.io/)** - Click **Collapse** to view side panel. Then navigate through **Domains>Cyber Monitoring>Cyber Incident Management (CIM)>Settings**. [](https://cytechint-docs-bookstack.s3.amazonaws.com/uploads/images/gallery/2025-06/7YXKou38EqMVz9Wg-image.png) 2. Navigate to the Log Collector section and click the '**Add Log Collector**' button to launch the installation interface. [](https://cytechint-docs-bookstack.s3.amazonaws.com/uploads/images/gallery/2025-06/HG4f71ZaFwULUkR2-image.png)You can also refer to our documentation manuals for Log Collector Installations Guidelines: [https://docs.cytechint.io/books/log-collector-installations](https://docs.cytechint.io/books/log-collector-installations "https://docs.cytechint.io/books/log-collector-installations")
[](https://cytechint-docs-bookstack.s3.amazonaws.com/uploads/images/gallery/2025-05/FjQzqzzkCCW9OUxP-image.png) 4. From the options, select the "**Manual**" installation option. Then click "**Next**". [](https://cytechint-docs-bookstack.s3.amazonaws.com/uploads/images/gallery/2025-05/9zadBjhTVstIdIng-image.png)*\*\*\*If you encounter **Log Collector Setup Failed**. Please click "Retry" and carefully go gack to Steps 5 or 6. You can also try "**Manual**" installation. If issues persist please contact our technical support at **
For the full Log Collector Hardware Requirements Guide, please refer to this link: [Log Collector Hardware Requirements Guide](https://docs.cytechint.io/books/log-collector-installations/page/log-collector-hardware-requirements-guide "Log Collector Hardware Requirements Guide")
##### **Steps to Add Log Collector** Please follow the steps below to add a Log Collector using macOS Environment. 1. Log in to **CyTech - AQUILA**. Click here: **[AQUILACYBER.AI](https://aquilacyber.ai/)** - Click **Collapse** to view side panel. Then navigate through **Domains>Cyber Monitoring>Cyber Incident Management (CIM)>Settings**. [](https://cytechint-docs-bookstack.s3.amazonaws.com/uploads/images/gallery/2025-06/hmguGlhuEq3VHpnb-image.png) 2. Navigate to the Log Collector section and click the '**Add Log Collector**' button to launch the installation interface. [](https://cytechint-docs-bookstack.s3.amazonaws.com/uploads/images/gallery/2025-06/sPXPArzmE35GPM7i-image.png)You can also refer to our documentation manuals for Log Collector Installations Guidelines: [https://docs.cytechint.io/books/log-collector-installations](https://docs.cytechint.io/books/log-collector-installations "https://docs.cytechint.io/books/log-collector-installations")
[](https://cytechint-docs-bookstack.s3.amazonaws.com/uploads/images/gallery/2025-05/bD1EXdFeE5UvHV7F-image.png) 4. From the options, select the "**Manual**" installation option. Then click "**Next**". [](https://cytechint-docs-bookstack.s3.amazonaws.com/uploads/images/gallery/2025-05/9zadBjhTVstIdIng-image.png)*\*\*\*If you encounter **Log Collector Setup Failed**. Please click "Retry" and carefully go gack to Steps 5 or 6. You can also try "**Manual**" installation. If issues persist please contact our technical support at **
Basic setup is moderately complex. Most organizations can get started in a few days with some IT expertise, though fine-tuning takes longer.
> **How much will this cost?**A basic setup can be achieved with a mid-range server cost, but costs vary based on your specific needs and whether you use physical or virtual servers.
> **Can I use a regular computer?**For very small businesses, a decent desktop computer could work initially, but most organizations should use server-grade equipment for reliability.
> **How do I know if I need more powerful hardware?**If your log collector becomes slow, loses messages, or crashes occasionally, you likely need to upgrade.
> **What happens if my log collector stops working?**If your log collector goes offline, you'll stop gathering important information and might miss critical events. Consider having a backup system ready.
> **How long should I keep logs?**This depends on your industry and compliance requirements. Most businesses keep logs for 30-90 days, while some regulated industries require 1-7 years of retention.
> **Do I need a dedicated IT person to manage this?**Not necessarily, but you do need someone comfortable with basic IT concepts. For smaller businesses, this might be a part-time responsibility or could be outsourced.
> **Can I use cloud services instead of my own hardware?**Yes, many cloud providers offer log collection services. This can reduce hardware costs but may increase ongoing operational expenses.
> **How do I protect sensitive information in logs?**Your log collection software should have features to mask or encrypt sensitive data like credit card numbers or personal information.
> **Will collecting logs slow down my other systems?**A properly configured log collector should have minimal impact on your other systems. It's designed to quietly gather information without disrupting operations.
> **How much maintenance does a log collector need?**Regular maintenance includes checking storage space, updating software, and occasionally reviewing collection rules. Plan for a few hours each month.
> **Can I collect logs from remote locations or branch offices?**Yes, but you'll need to ensure good network connectivity. For multiple locations, you might want smaller collectors at each site feeding into a central system.
> **What if I have too many logs to review?**Most log collectors include tools to filter, search, and alert on important events so you don't need to manually review everything.
> **How do I know what to collect?**Start with security-relevant systems (firewalls, servers) and critical business applications. You can expand collection as needed.
*If you need further assistance, kindly contact our support at **support@cytechint.com** for prompt assistance and guidance.* # What is a Log Source? ##### **What is a Log Source?** A log source refers to any system, application, or device that generates log data. Logs are records of events that occur within these systems, and they provide valuable information for monitoring, troubleshooting, and analyzing the performance and security of IT environments. Here’s a more detailed explanation of what constitutes a log source: 1.**Types of Log Sources**:
- **Servers**: Operating systems on servers generate logs related to system events, security, and application performance. - **Applications**: Software applications produce logs that capture user activities, errors, and other operational details. - **Network Devices**: Routers, switches, and firewalls generate logs that provide insights into network traffic and security events. - **Databases**: Database management systems log queries, transactions, and access patterns. - **Cloud Services**: Cloud platforms and services generate logs that track usage, performance, and security events. - **Containers and Orchestration Platforms**: Tools like Docker and Kubernetes produce logs related to container lifecycle events and orchestration activities. 2.**Log Data Content**:
- **Timestamps**: Indicate when an event occurred. - **Severity Levels**: Classify the importance or urgency of an event (e.g., info, warning, error). - **Event Messages**: Describe the event or action that took place. - **Source Identifiers**: Identify the origin of the log entry, such as the application name or IP address. 3.**Purpose of Logs**:
- **Monitoring**: Continuously track the health and performance of systems and applications. - **Troubleshooting**: Diagnose and resolve issues by analyzing error messages and event sequences. - **Security**: Detect and investigate security incidents by reviewing access logs and anomaly patterns. - **Compliance**: Maintain records for auditing and compliance with regulatory requirements. 4.**Log Collection and Management**:
- Logs are typically collected and managed using tools like Elastic's Filebeat, Logstash, and Elasticsearch, which help aggregate, process, and analyze log data from various sources. - Configuring log sources involves specifying which logs to collect, how to format them, and where to send them for storage and analysis.**Log sources can come from a wide variety of platforms, devices, and applications. Here’s a more detailed look at specific examples of log sources across different categories:**
1. **Operating Systems**: - **Windows**: Event logs such as Application, Security, and System logs. - **Linux/Unix**: Syslog, auth.log, dmesg, and application-specific logs. - **macOS**: System logs and application logs accessible via the Console app. 2. **Applications**: - **Web Servers**: Apache HTTP Server and Nginx access and error logs. - **Application Servers**: Tomcat, JBoss, and WebSphere logs. - **Database Systems**: MySQL, PostgreSQL, Oracle, and SQL Server logs. 3. **Network Devices**: - **Routers and Switches**: Cisco IOS logs, Juniper logs. - **Firewalls**: Palo Alto Networks, Fortinet, and Check Point logs. - **Load Balancers**: F5 BIG-IP, HAProxy logs. 4. **Security Devices**: - **Intrusion Detection Systems (IDS)**: Snort, Suricata logs. - **Security Information and Event Management (SIEM)**: Logs from platforms like Splunk, IBM QRadar. 5. **Cloud Services**: - **AWS**: CloudTrail, CloudWatch logs. - **Microsoft Azure**: Azure Monitor logs, Activity logs. - **Google Cloud Platform (GCP)**: Stackdriver logs. 6. **Containers and Orchestration Platforms**: - **Docker**: Container logs accessible via Docker CLI. - **Kubernetes**: Pod logs, kubelet logs, and cluster events. 7. **IoT Devices**: - **Smart Home Devices**: Logs from devices like smart thermostats, cameras. - **Industrial IoT**: Logs from sensors and controllers in manufacturing environments. 8. **End-User Devices**: - **Desktops and Laptops**: System and application logs from Windows, macOS, and Linux. - **Mobile Devices**: Logs from Android and iOS applications. 9. **Business Applications**: - **ERP Systems**: SAP, Oracle ERP logs. - **CRM Systems**: Salesforce, Microsoft Dynamics logs. 10. **Collaboration Tools**: - **Email Servers**: Microsoft Exchange, Postfix logs. - **Communication Platforms**: Slack, Microsoft Teams logs.These log sources provide a wealth of information that can be used for monitoring, troubleshooting, and securing IT environments. Elastic's tools like Filebeat and Logstash can be configured to collect and process logs from these diverse sources, enabling centralized analysis and visualization in Elasticsearch and Kibana.
*If you need further assistance, kindly contact our support at **support@cytechint.com** for prompt assistance and guidance.* # Log Sources vs. Log Collectors ### **Log Sources vs. Log Collectors****Log Sources**:
**Log Collectors**:
**Functionality**:
**Location**:
**Data Handling**:
**Integration**:
**Role in Monitoring**:
**To navigate to CSPM Module please follow the instructions below:**
**Here in the CSPM Dashboard you can view all the evaluations. Such as Account Evaluated, Compliance Score, Compliance by Center in Internet Security (CIS), Findings and Posture Trends.**
[](https://cytechint-docs-bookstack.s3.amazonaws.com/uploads/images/gallery/2025-06/qsJld2Z5MscJl0q9-image.png) 1. **Account Evaluated:** - This refers to the specific cloud accounts that have been assessed for security compliance. An "account" in this context typically represents a collection of cloud resources under a single administrative domain within a cloud service provider (e.g., an AWS account, an Azure subscription). Evaluating an account involves checking its resources and configurations against security benchmarks. 2. **Compliance Score:** - The compliance score is a metric that indicates how well a cloud account or resource adheres to predefined security benchmarks, such as those set by the Center for Internet Security (CIS). It is usually expressed as a percentage, with a higher score indicating better compliance. This score helps organizations quickly assess their security posture and identify areas needing improvement. 3. **Compliance by Center for Internet Security (CIS):** - This refers to the evaluation of cloud resources against the security guidelines and best practices defined by the CIS benchmarks. These benchmarks provide a set of controls and recommendations to secure cloud environments. Compliance by CIS helps organizations ensure their configurations align with industry standards for security. 4. **Findings:** - Findings are the results of the security assessments conducted by the CSPM module. They detail specific issues or misconfigurations identified during the evaluation process. Each finding typically includes information about the affected resource, the nature of the issue, its severity, and recommended remediation steps. 5. **Posture Trends:** - Posture trends refer to the analysis of changes in security posture over time. This involves tracking improvements or regressions in compliance scores and findings. Understanding posture trends helps organizations identify patterns, measure the effectiveness of their security initiatives, and make informed decisions about future security strategies.**In the Findings Dashboard - it shows you all the detailed misconfigurations evaluated by our CSPM Module. Here you view the Result, Resource ID, Resource Name, Resource Type, Rule Number, Rule Name, CIS Section, Last Checked and Cloud.**
[](https://cytechint-docs-bookstack.s3.amazonaws.com/uploads/images/gallery/2025-06/6mvMs6rru4pGH50g-image.png) ##### **Misconfigurations** This section gives an overview of all misconfiguration findings detected from cloud integrations across AWS, GCP, and Azure. --- ##### **Overall Resolve Findings** Displays the percentage of resolved vs. unresolved misconfigurations. It includes a progress bar and a warning message urging users to follow remediation steps to maintain cloud security. --- ##### **All Results Tab** Lists all misconfiguration findings from all cloud providers in one consolidated view. --- ##### **Amazon AWS Tab** Filters the findings to only show results from Amazon Web Services (AWS). --- ##### **Google Cloud Platform Tab** Shows findings that pertain exclusively to GCP (Google Cloud Platform) assets. --- ##### **Azure Tab** Filters results to display only Azure-related misconfiguration findings. --- ##### **Search & Filter Function** - **Search Bar**: Quickly locate specific misconfiguration results by keyword. - **Filter Button**: Apply advanced filters (e.g., cloud type, severity, category) to narrow down the displayed results. --- 1. **Result:** - The result indicates the outcome of a security assessment for a specific rule or check. It typically shows whether the resource passed or failed the evaluation based on compliance with the security benchmark. 2. **Resource ID:** - This is a unique identifier assigned to a specific cloud resource within an account. The Resource ID helps in precisely identifying and referencing the resource in security assessments and reports. 3. **Resource Name:** - The resource name is the human-readable name assigned to a cloud resource. It helps users easily identify and manage resources within their cloud environment. 4. **Resource Type:** - This refers to the category or kind of cloud resource being evaluated, such as a virtual machine, storage bucket, database instance, etc. Understanding the resource type is crucial for applying the correct security checks and benchmarks. 5. **Rule Number:** - The rule number is a unique identifier for a specific security rule or check within a benchmark. It helps users quickly reference and locate the rule in documentation or reports. 6. **Rule Name:** - The rule name provides a descriptive title for a security rule or check. It summarizes the purpose or focuses of the rule, such as "Ensure encryption is enabled for storage buckets." 7. **CIS Section:** - CIS Sections refer to categories of security best practices defined by the Center for Internet Security (CIS) benchmarks. These sections group related security controls and guidelines that help ensure cloud resources are configured securely. 8. **Last Checked:** - This indicates the most recent time when a particular resource or configuration was assessed for compliance with security benchmarks. It helps users understand how up to date the security posture information is. 9. **Cloud:** - In CSPM, "Cloud" refers to the specific cloud service provider or environment being assessed. This could include platforms like AWS, Azure, or Google Cloud. The CSPM module evaluates resources within these cloud environments against security benchmarks.**By clicking each of the misconfigurations [](https://cytechint-docs-bookstack.s3.amazonaws.com/uploads/images/gallery/2025-06/3jGSao8KjNrrIgU6-image.png)** **, it will show you all the details such as Evidence, Remediation and Rule Info.**
[](https://cytechint-docs-bookstack.s3.amazonaws.com/uploads/images/gallery/2025-06/XbsmEwa3lvqkMUk7-image.png)**In the evidence tab, it will give you the details of information that supports the misconfiguration.**
[](https://cytechint-docs-bookstack.s3.amazonaws.com/uploads/images/gallery/2025-06/jBNHCX3wZOLcTuKK-image.png)**Remediation tab shows all the needed instructions to resolved the misconfigurations and you can also "Add a Task" function.**
[](https://cytechint-docs-bookstack.s3.amazonaws.com/uploads/images/gallery/2025-06/I8WVSarXlqrJt86X-image.png)**Rule info tab shows the full details such as Description, Rationale, and References.**
[](https://cytechint-docs-bookstack.s3.amazonaws.com/uploads/images/gallery/2025-06/GUGjXE9K3bNNrPbM-image.png)**Task Management Section- Displays all tasks created to mitigate identified vulnerabilities from cloud security findings.**
[](https://cytechint-docs-bookstack.s3.amazonaws.com/uploads/images/gallery/2025-06/AwNyFxJ64Iqt7c9t-image.png)**Reports Section navigate through the leftmost button as highlighted in the image. **
[](https://cytechint-docs-bookstack.s3.amazonaws.com/uploads/images/gallery/2025-06/FhhqxZqqRrz1Tgcs-image.png) **Step1:** By clicking the box icon's drop-down button, it will show options to display desired findings. **Step2:** Choose desired output.**STEP 1: Identify Your Log Collector**
Determine which Elastic component you're using for log collection: - **Filebeat** – Lightweight shipper for forwarding logs. - **Logstash** – Powerful pipeline for data transformation. - **Elastic Agent** – Unified agent that supports multiple integrations.**STEP 2: Check the official Manual** Elastic maintains official installation and configuration guides:
- **Filebeat:** [https://www.elastic.co/guide/en/beats/filebeat/current/filebeat-installation.html](https://www.elastic.co/guide/en/beats/filebeat/current/filebeat-installation.html) - **Logstash:** [https://www.elastic.co/guide/en/logstash/current/installing-logstash.html](https://www.elastic.co/guide/en/logstash/current/installing-logstash.html) - **Elastic Agent:** [https://www.elastic.co/guide/en/fleet/current/elastic-agent-installation.html](https://www.elastic.co/guide/en/fleet/current/elastic-agent-installation.html)STEP 3: Verify System Pre-requisites
**Ensure the following:** - Supported OS and architecture (Linux/Windows/macOS). - Network connectivity to Elasticsearch/Fleet. - Correct file and directory permissions. - Required system dependencies installed**STEP 4: Perform a Clean Installation**