Cyber Training, Culture, and Awareness
Overview:
The Cyber Training, Culture, and Awareness provides a centralized view of phishing simulations, user awareness campaigns, and email security reports. It allows administrators to track user engagement, identify high-risk individuals, and measure the effectiveness of awareness initiatives. The dashboard combines performance metrics, reporting data, and campaign insights to strengthen organizational resilience against social engineering threats.
Key Features:
-
Accomplishment Overview: Shows user interactions across unopened, opened, visited, and compromised stages with percentage breakdowns.
-
Simulation Metrics: Summarizes total users, simulations, open rate, and click rate to measure campaign effectiveness.
-
Sniff & Detect Email Reports: Tracks user-reported emails and categorizes them as malicious, suspicious, or unrated.
-
Cyber User Awareness Campaigns: Lists ongoing campaigns with details on recipients, timelines, and response outcomes.
-
Top 10 Highest Risk Recipients: Identifies users with the highest click-prone rates for targeted training.
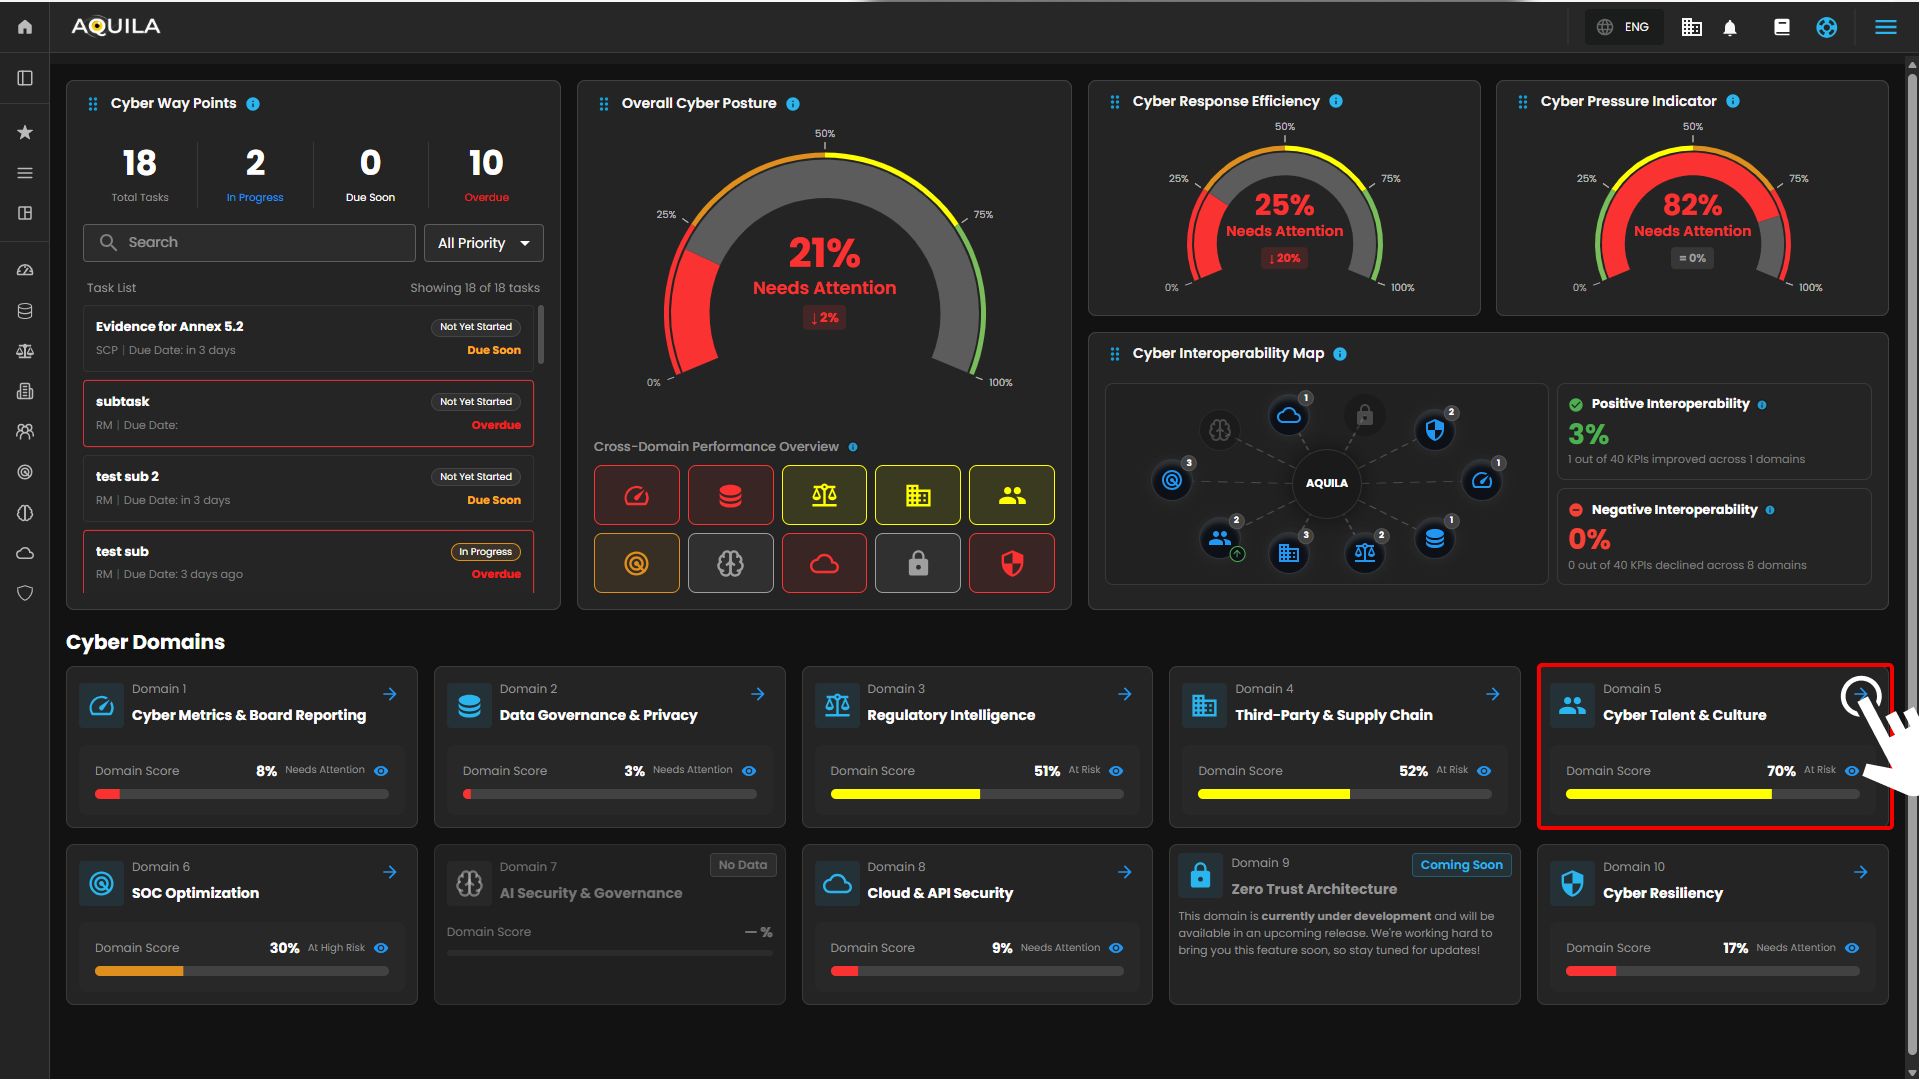
Figure 1. Overview
Step 3: Choose Cyber Training Culture and Awareness.
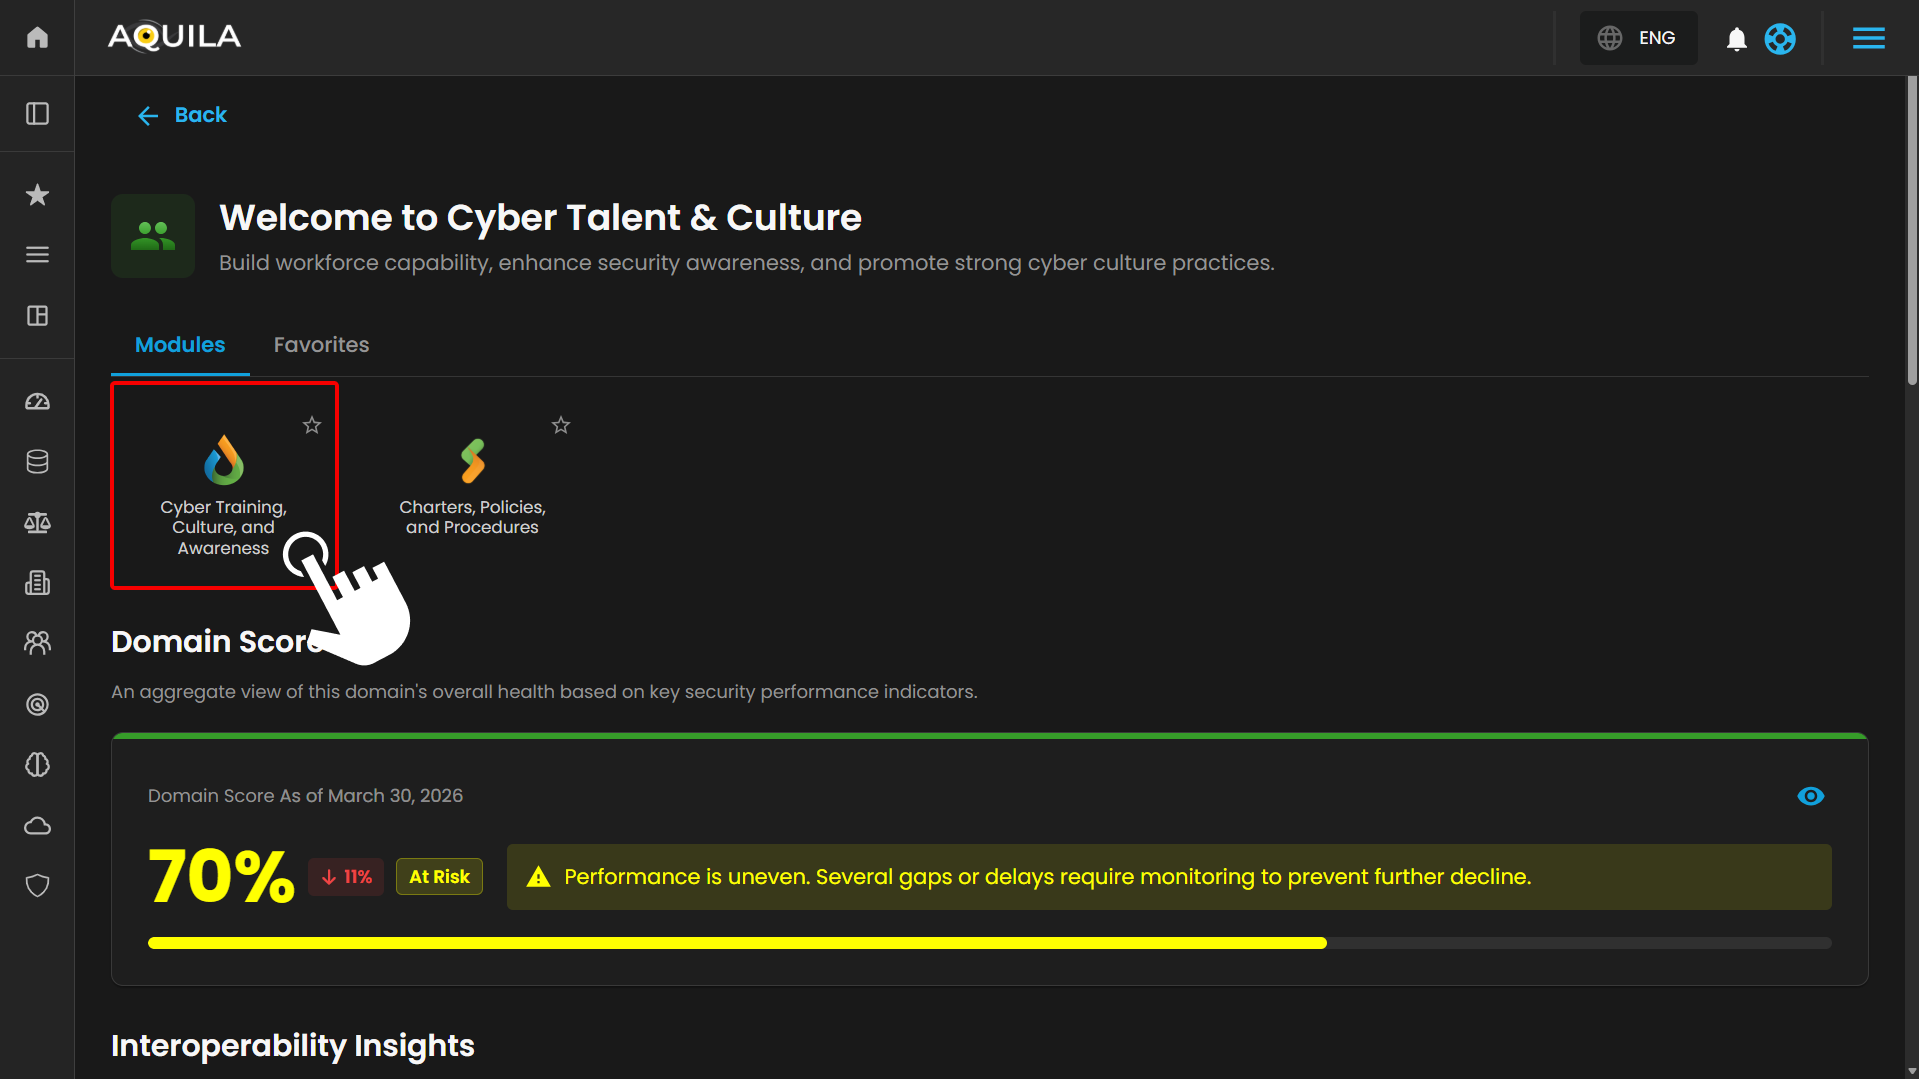
Figure 1.1 Cyber Governance Dashboard
Step 4: Hover into leftmost panel to view all the Cyber Talent & Culture sections. This Process is applicable in all navigating into a Module.
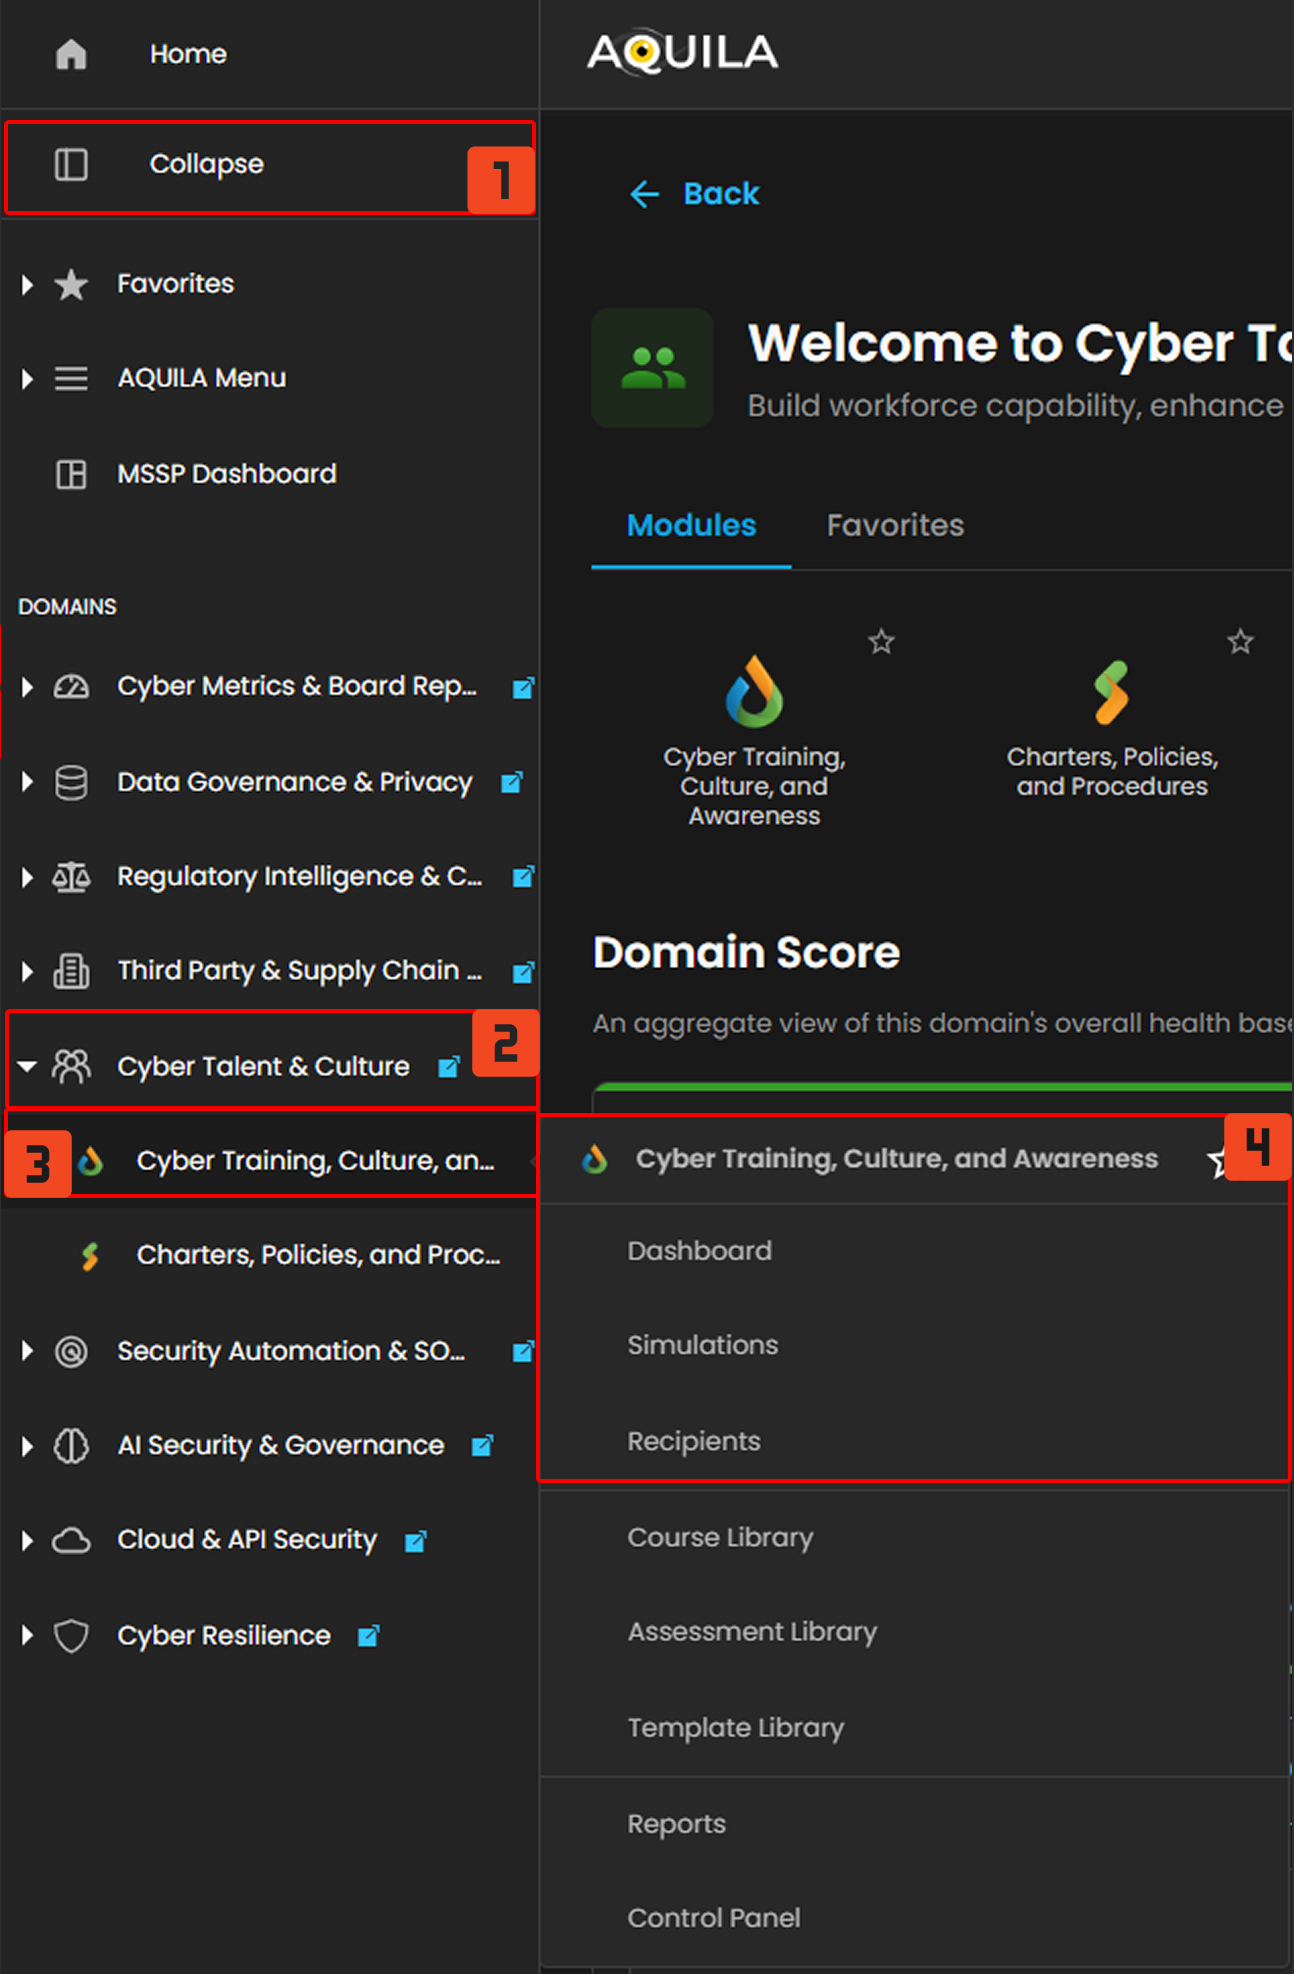
Figure 1.2 Cyber Governance Navigation
Cyber Training, Culture, and Awareness
The Cyber Training, Culture, and Awareness dashboard provides an overall view of employee cybersecurity awareness and behavior by tracking how users interact with simulated phishing campaigns, their reporting activity, and overall risk levels. It combines campaign performance metrics, user actions, and high-risk recipient insights into a single interface, allowing organizations to quickly understand their security awareness posture and identify areas where additional training or attention is needed.
Dashboard
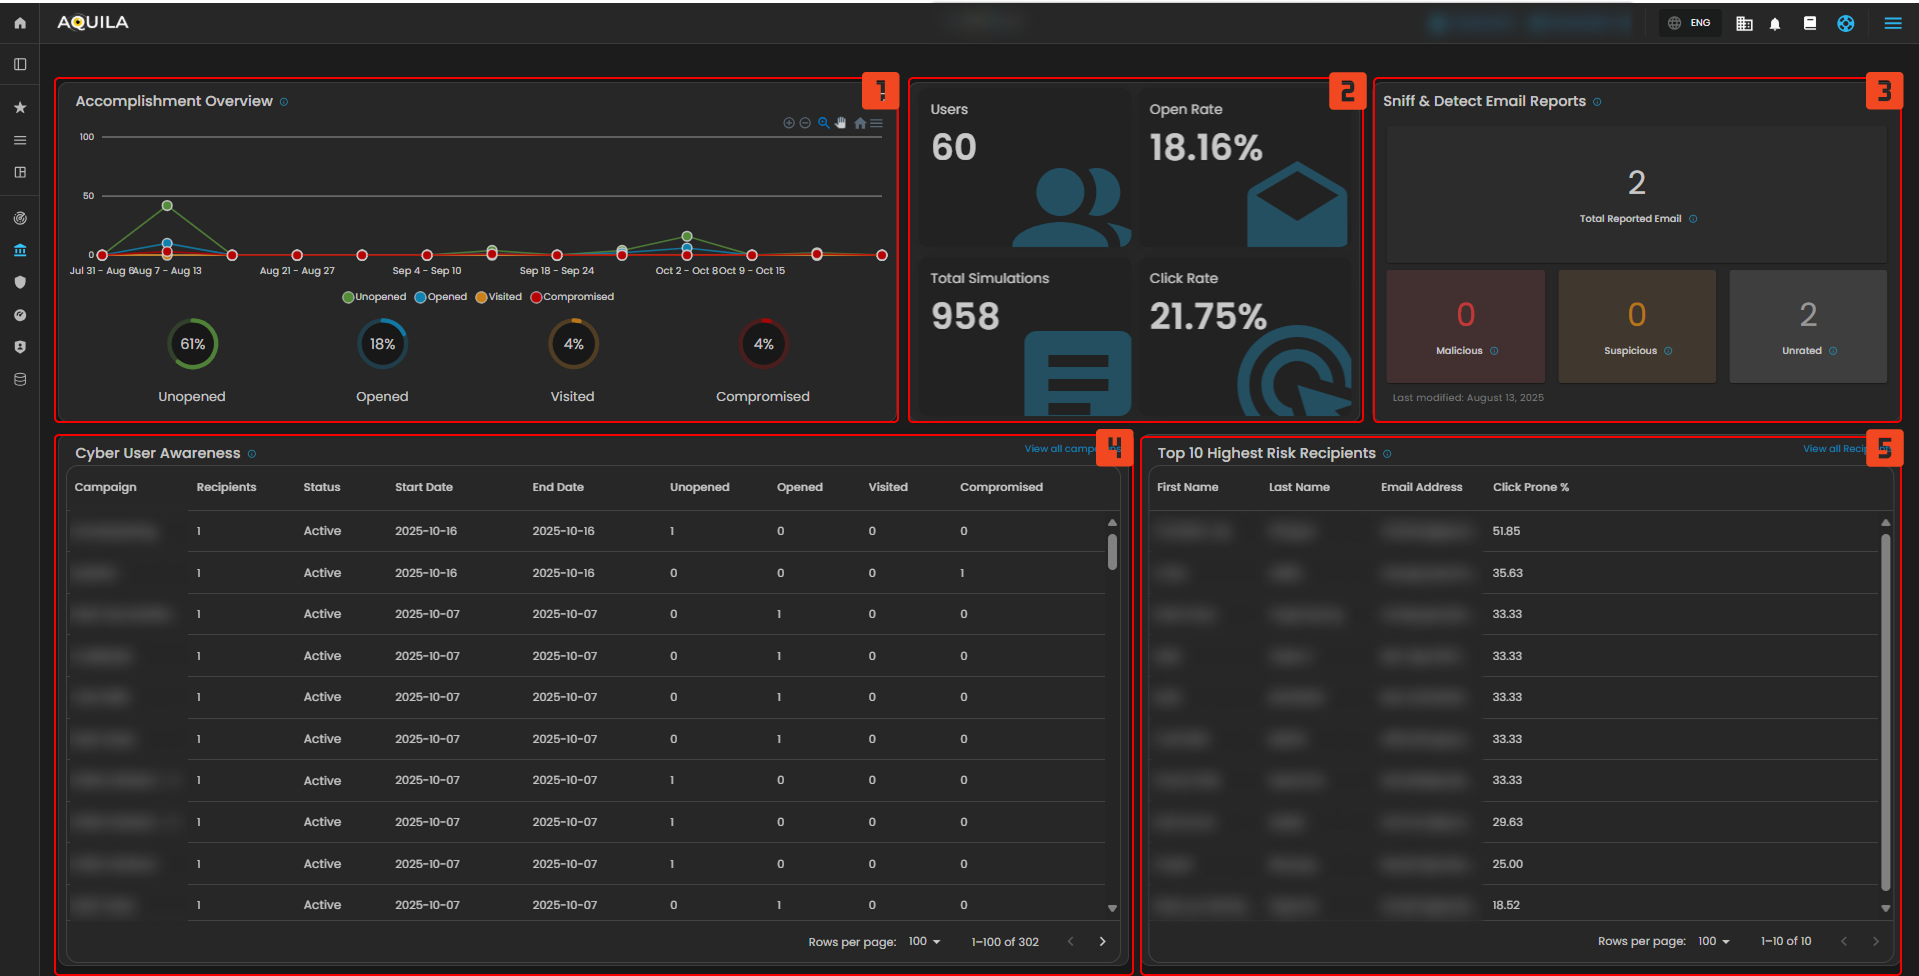
Figure 2 Cyber Governance Navigation
1. Accomplishment Overview
- This widget tracks how employees interact with awareness emails over time, showing whether they leave emails unopened, open them, click links, or fall for the simulation, helping measure overall engagement and risk behavior trends.
2. Campaign Metrics
- This provides a quick snapshot of campaign performance, summarizing the number of users involved, how often emails are opened, how many links are clicked, and the total simulations conducted, giving an at-a-glance view of effectiveness.
3. Sniff & Detect Email Reports
- This tracks the emails that users report as suspicious and classifies them into categories such as malicious, suspicious, or untagged, allowing organizations to monitor employee vigilance and reporting habits.
4. Cyber User Awareness
- This lists all active and past training campaigns with details like how many users were included, when the campaign started and ended, and how those users responded, providing transparency into training coverage and outcomes.
5. Top 10 Highest Risk Recipients
- This highlights the employees who are most likely to click on phishing links, ranking them by click-prone percentage, which helps identify individuals needing extra training or support.
Simulations
The Simulations Overall dashboard gives a unified view of all phishing simulations, showing key metrics like opens, clicks, and compromises. Its function is to measure employee susceptibility, track training effectiveness, and highlight where additional awareness is needed. It also helps organizations monitor trends over time and ensure their phishing awareness program is continuously improving.
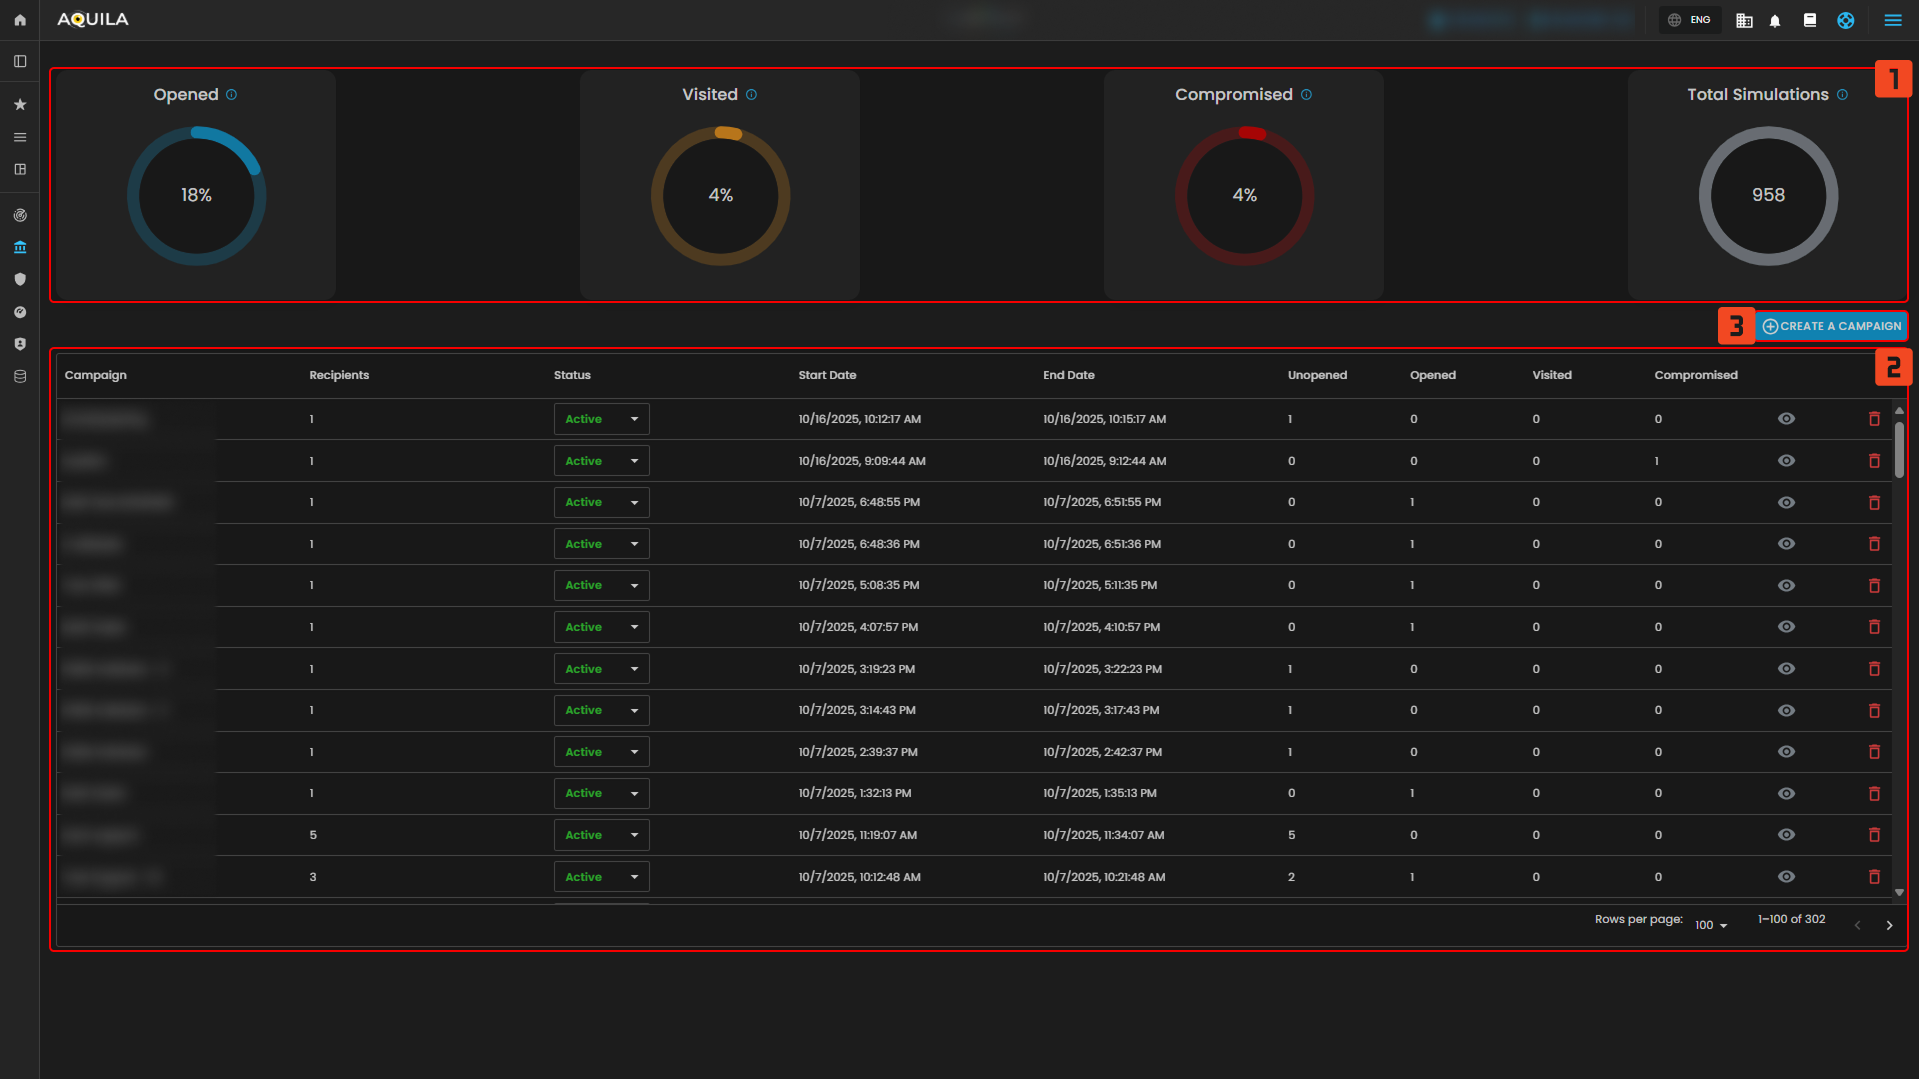
Figure 3 Simulation
1. Overall Campaign Results
- Continuously aggregates data from all phishing awareness campaigns to calculate performance metrics. It works as a real-time tracker that lets security teams measure user behavior trends and overall risk exposure without going into each campaign individually. Helps in benchmarking progress over time and in identifying whether training is improving employee caution.
2. Create a Campaign
- Serves as the main entry point to design and launch new phishing simulations. Clicking it opens a campaign builder, where administrators can, Choose or customize phishing templates. Define recipients. Configure campaign settings like duration, sending time, and difficulty. Its function is to initiate controlled phishing tests that assess and improve employee security awareness.
3. Campaign List
- Acts as a management dashboard for all phishing awareness campaigns. It organizes each campaign’s details such as recipients, current status, start/end dates, and user results. Its purpose is to give full oversight and control over all running and past simulations in one place.
Create a Campaign (Choose Landing Page)
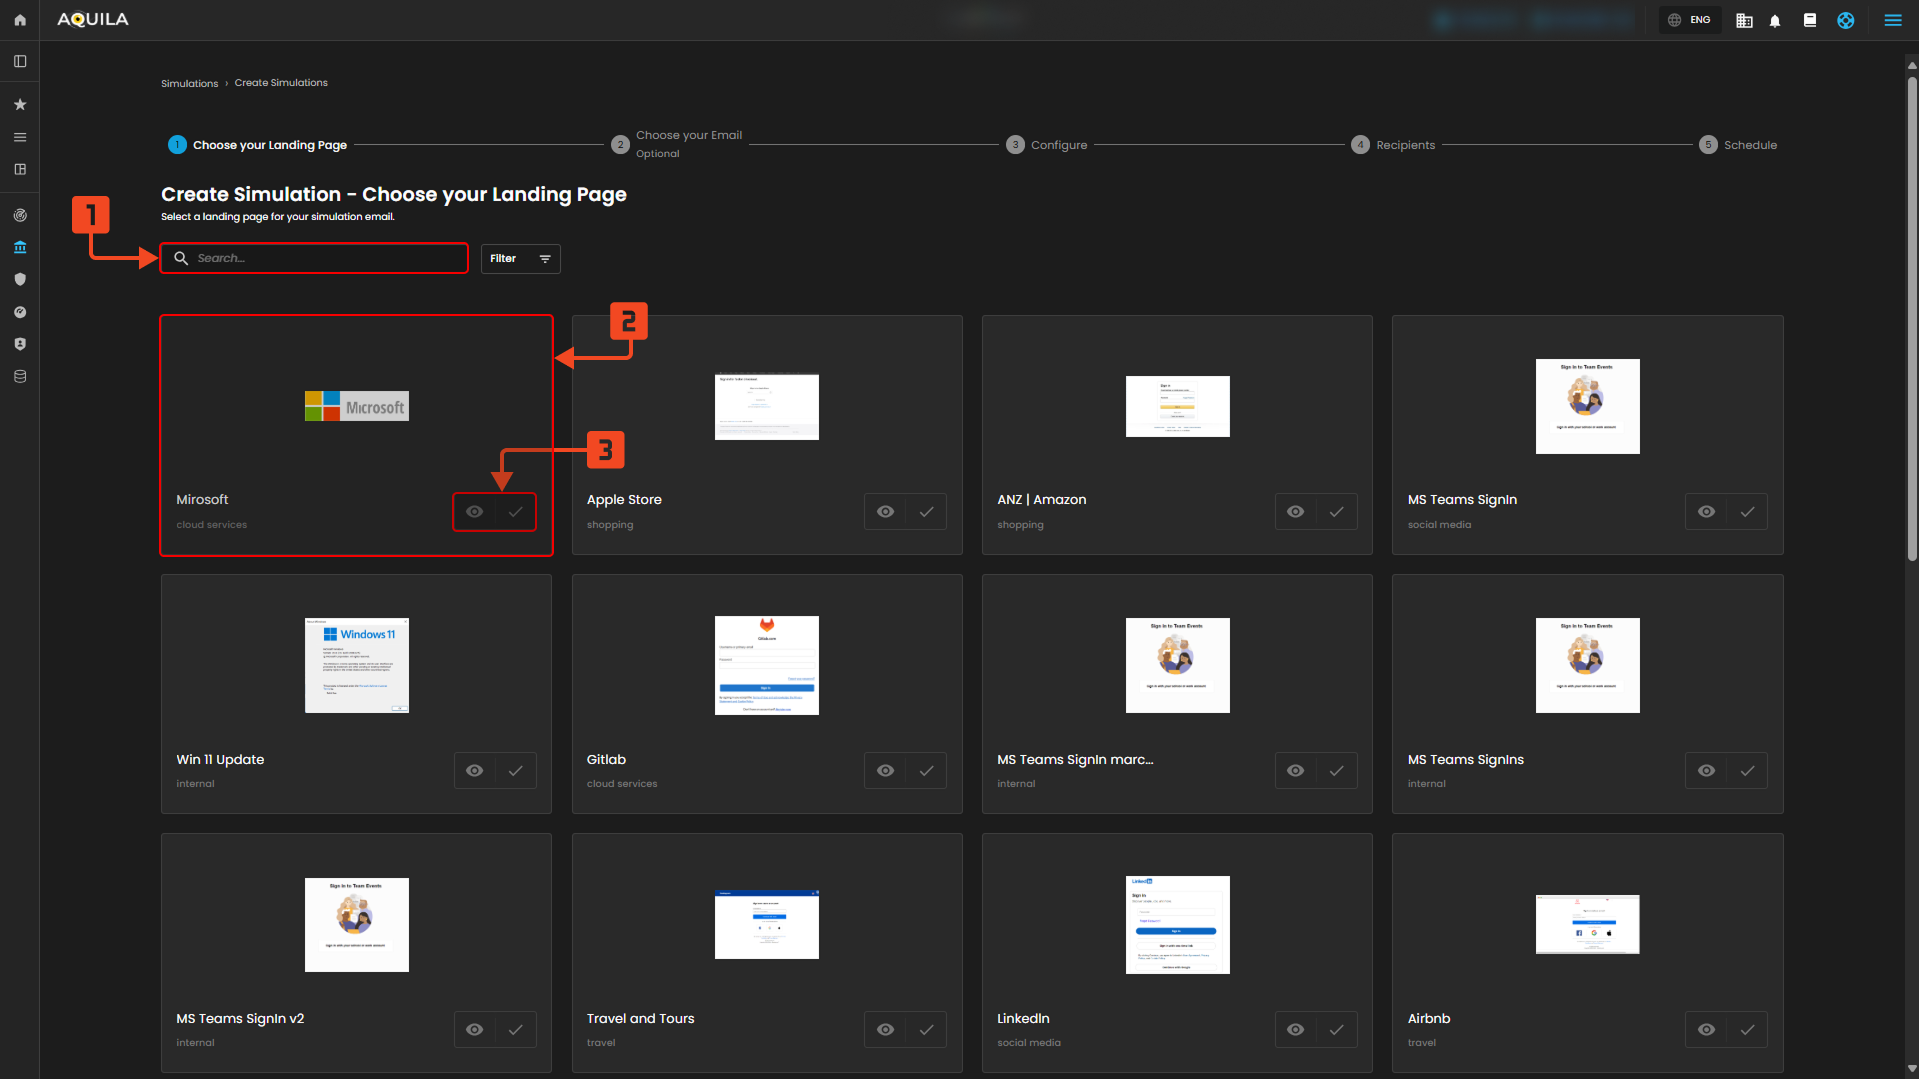
Figure 3.1 Create a Campaign (Choose landing Page)
1. Search landing pages
- Use the search box to quickly find a landing page by name or tag (e.g., “Microsoft”, “internal”); this saves time when you have many templates and lets you narrow options to ones that match the campaign theme.
2. Choose a landing-page
- Choose a landing page card to focus that page; the card shows a small preview and the page’s category so you can pick a page that looks and reads like the real target site.
3. Use the eye icon
- Open a full preview and the check control to mark that page as the chosen landing page for the simulation.
Choose Email Template

Figure 3.2 Choose Email Template
4. Search email templates
- Use the email-template search field to filter the available email designs by name or category so you can quickly match an email that pairs with your chosen landing page.
5. Email template tile
- Click an email template card to view its thumbnail and basic info (category/label); choose a template that fits the scenario you want to simulate (brand style, tone, or ask).
6. Preview / Select controls for email
- Use the eye icon to preview the full email content and the check control to select that template as the message that will be sent in the simulation.
Configure

Figure 3.3 Configure
7. Configure simulation details
- Fill the configuration form (Simulation Name, Subject, Sender Name/Email, Landing Page Domain, related course, training deadline, optional assessment limits); required fields are marked, and you should confirm the sender domain and landing-page domain are set appropriately so the simulation behaves as expected and reporting links map correctly.
- After filling the configuration, choose recipients then Next.
Schedule
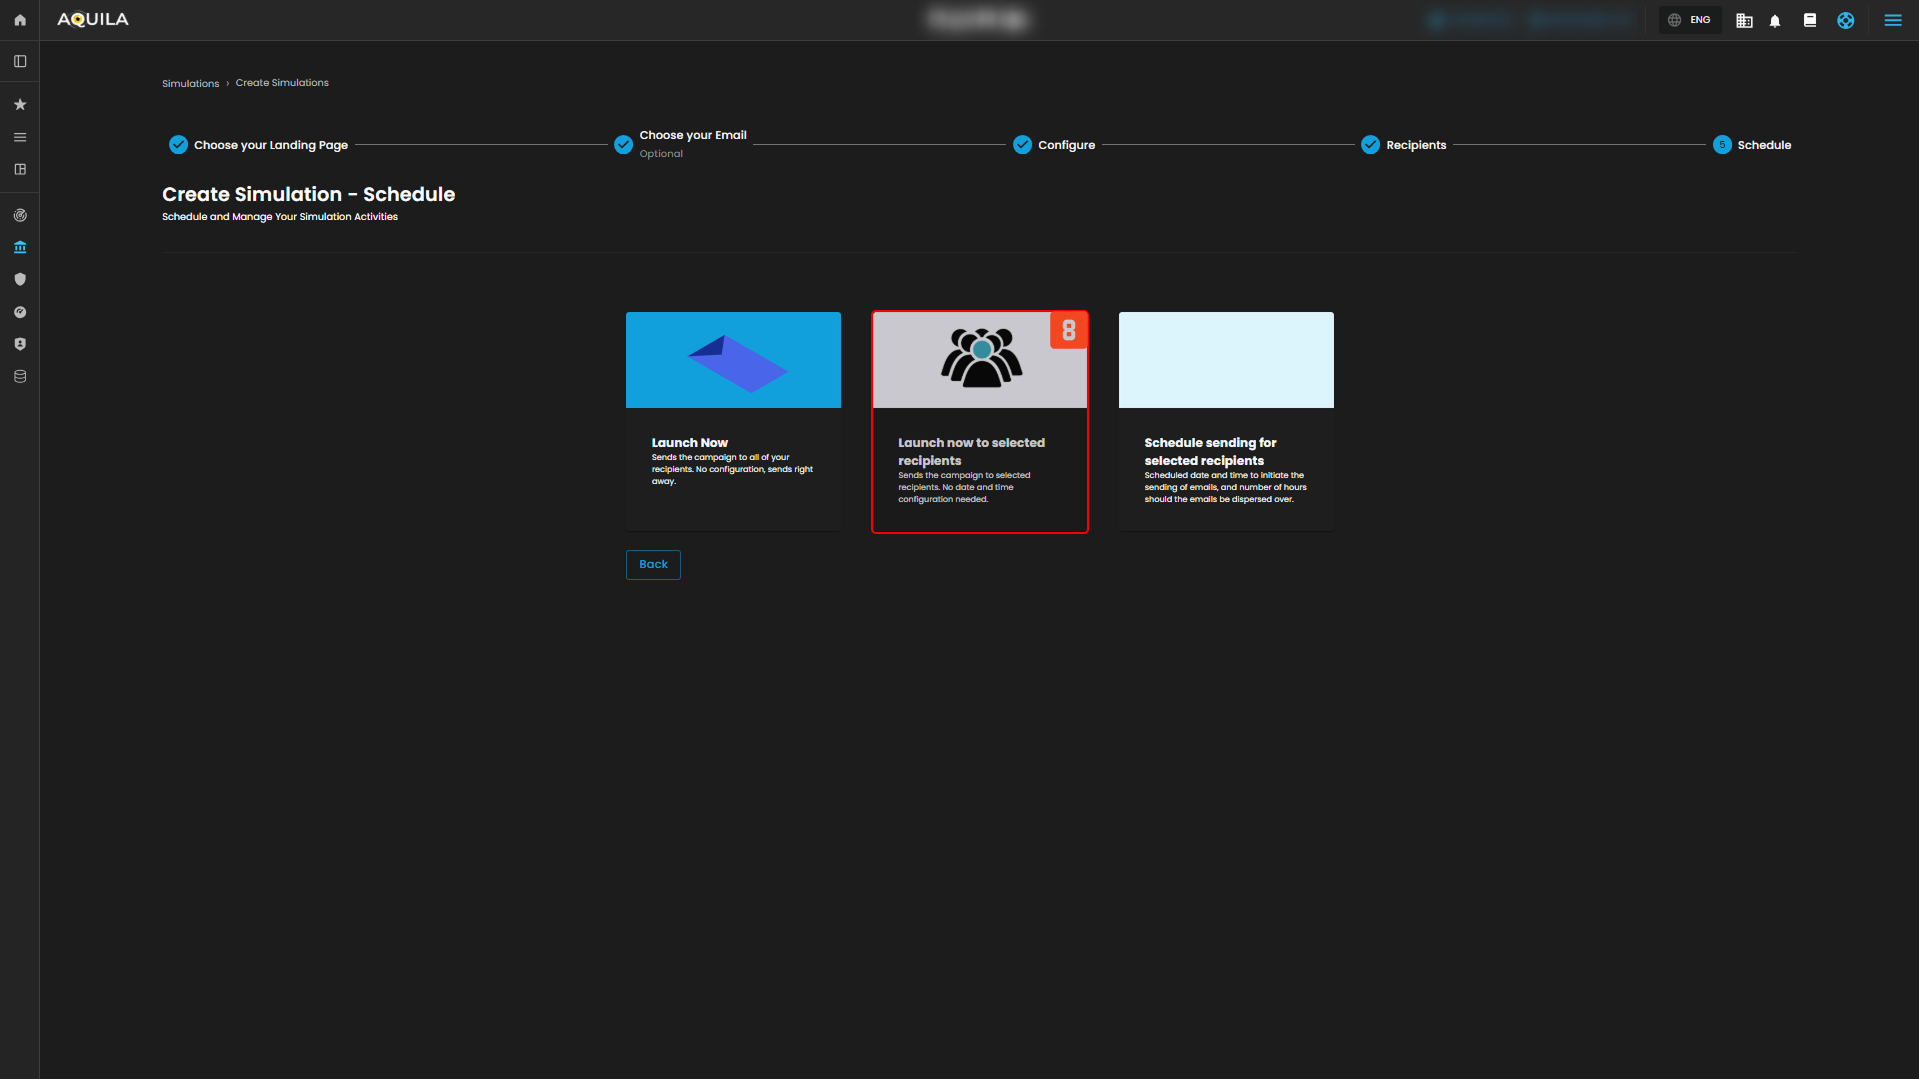
Figure 3.4 Schedule
8. Schedule / Launch options
- Choose how to send: Launch Now (all recipients immediately), Launch now to selected recipients (immediately but only the subset you pick), or Schedule (pick a date/time and dispersion window); pick the card that matches whether you want an immediate broad send, a targeted immediate send, or a planned rollout.
Recipients
The Recipients provides an overview of all users or groups included in phishing simulations. It helps organizations track recipient activity, click-prone behavior, and simulation results to identify who may need additional training.
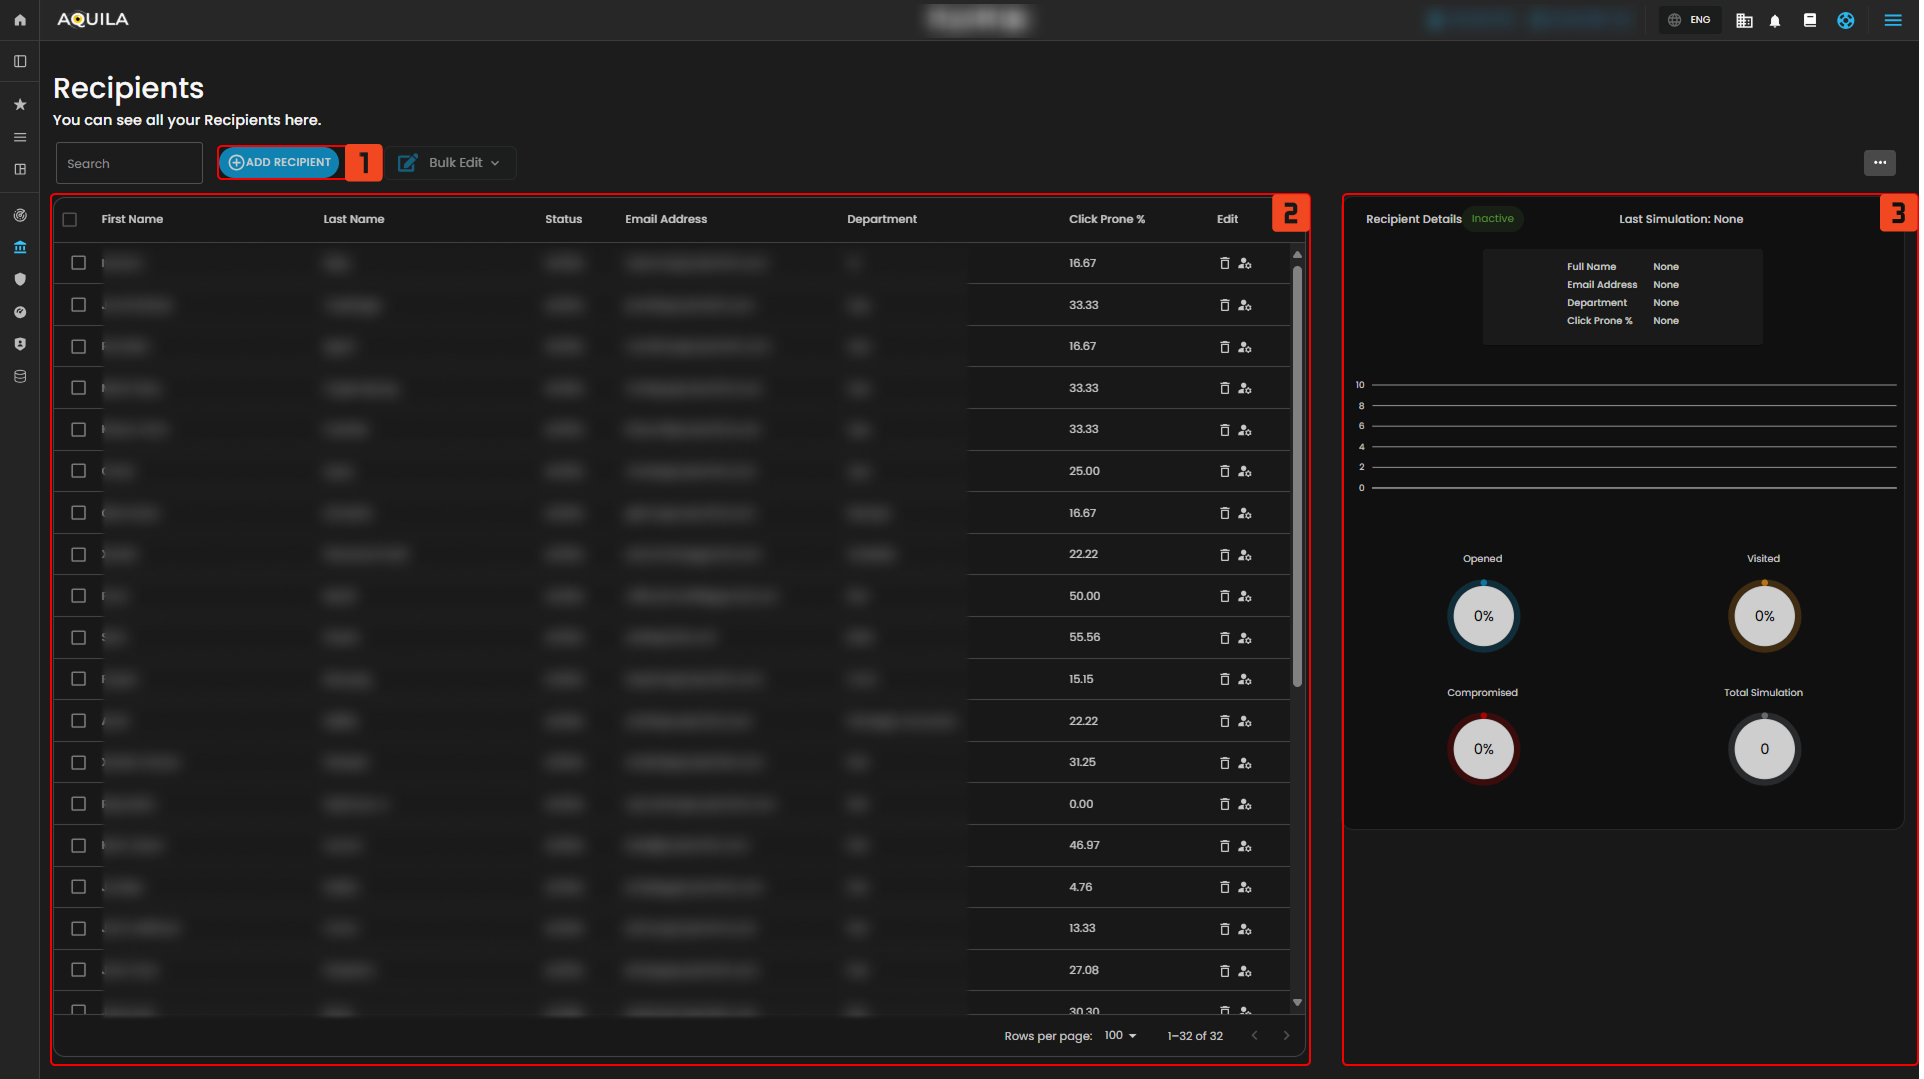
Figure 4 Recipients
1. Add Recipient – Lets you manually add a new user or group into the simulations list.
2. Recipient List – Displays all recipients with their status, department, and click-prone percentage.
3. Recipient Details Panel – Shows detailed metrics and simulation history for a selected recipient.
Clients can also edit a user's information by clicking the button beside the trash icon
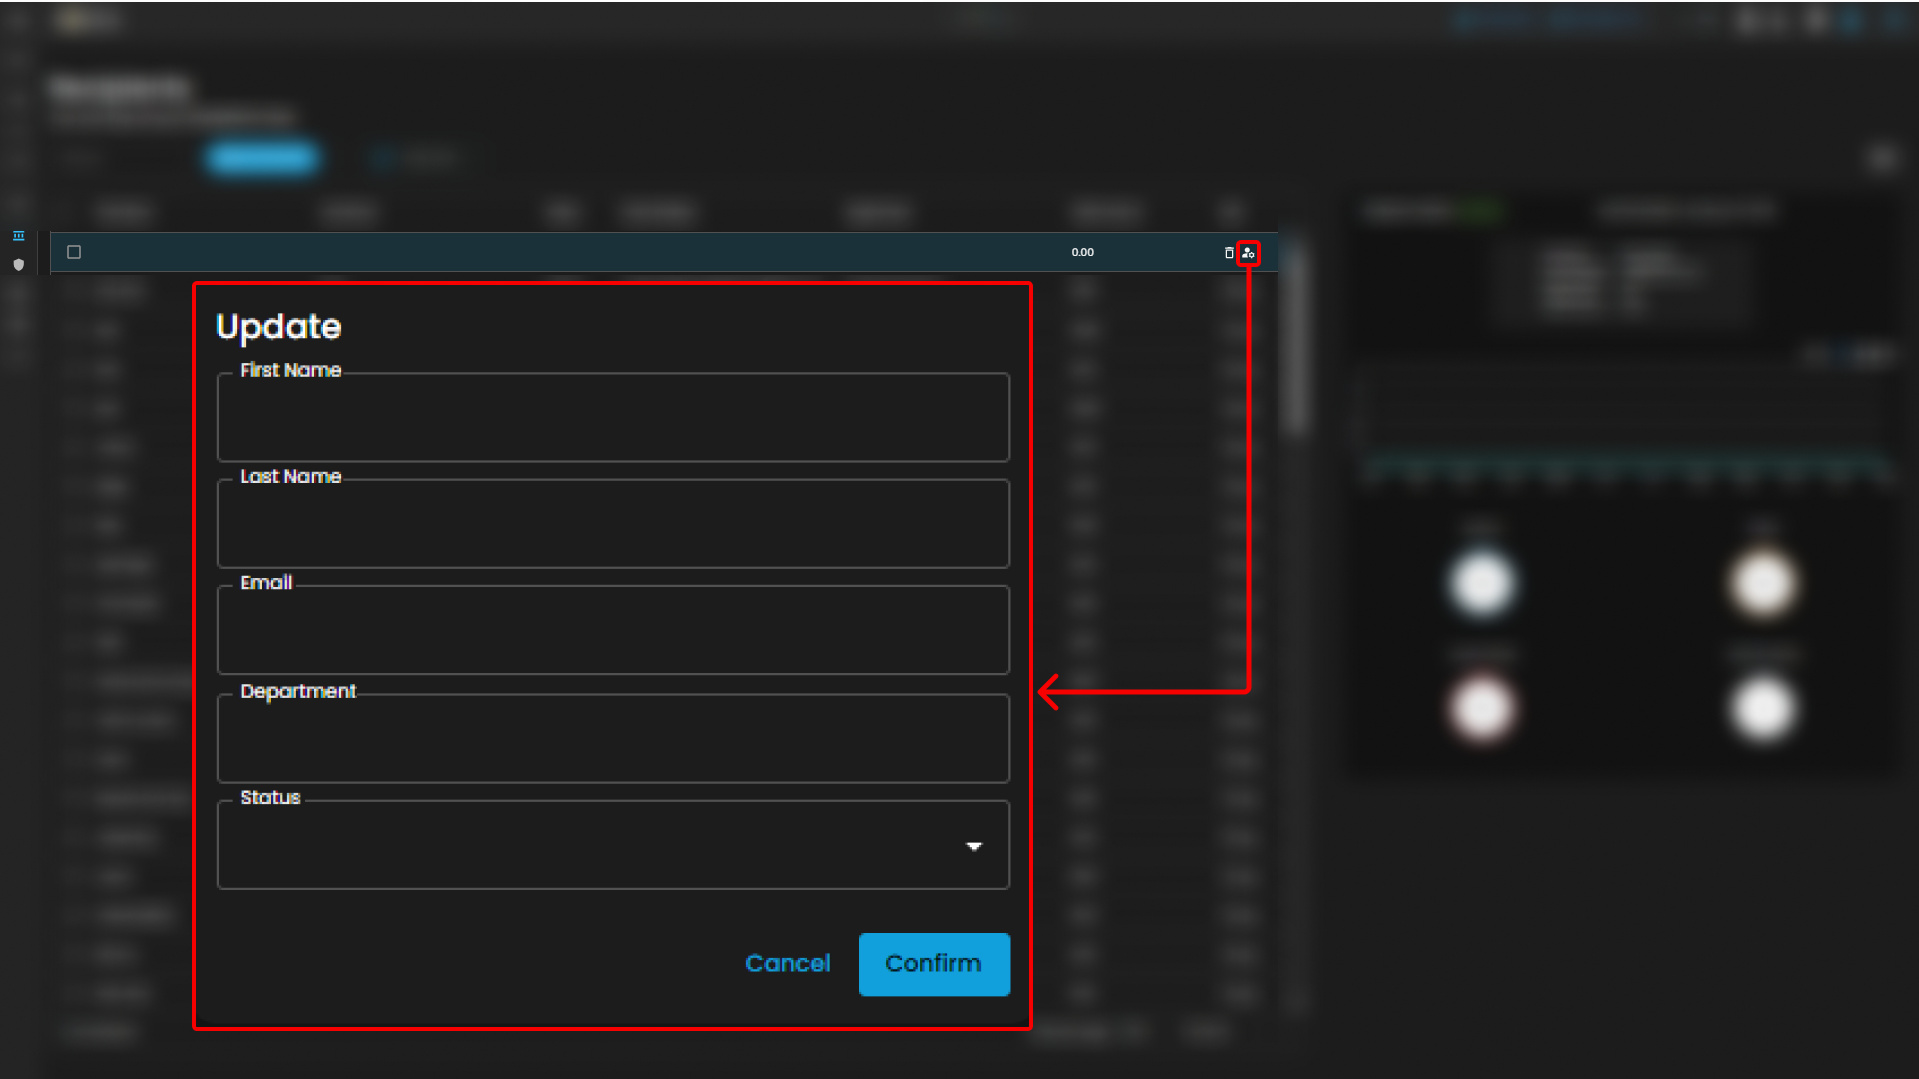
Figure 4.1 Update Info
Add Recipients
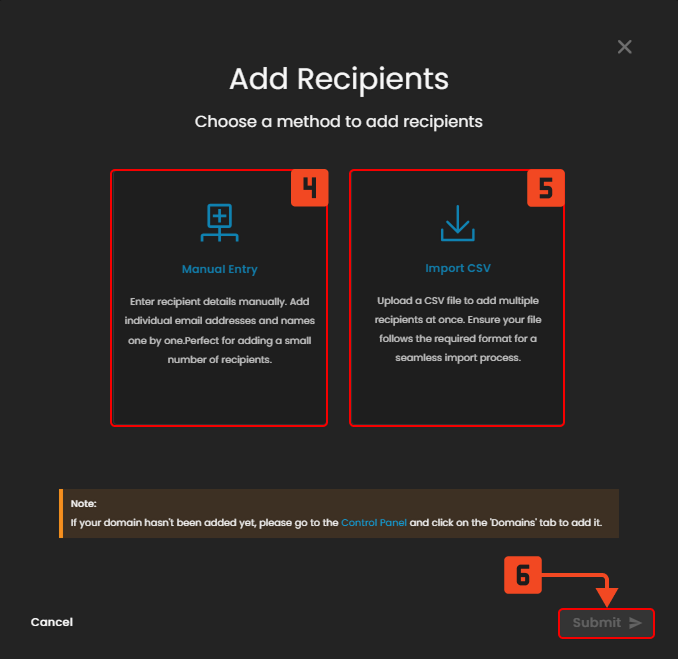
Figure 4.2 Add Recipients
4. Manual Entry – Add recipients individually by typing in their names and email addresses.
5. Import CSV – Upload a CSV file to add multiple recipients at once.
6. Submit – Confirms the chosen method and completes adding the recipients.
Course Library
The Course Library dashboard provides access to training modules on different security topics. It helps organizations assign courses, track learning progress, and strengthen employee awareness.
Course Library
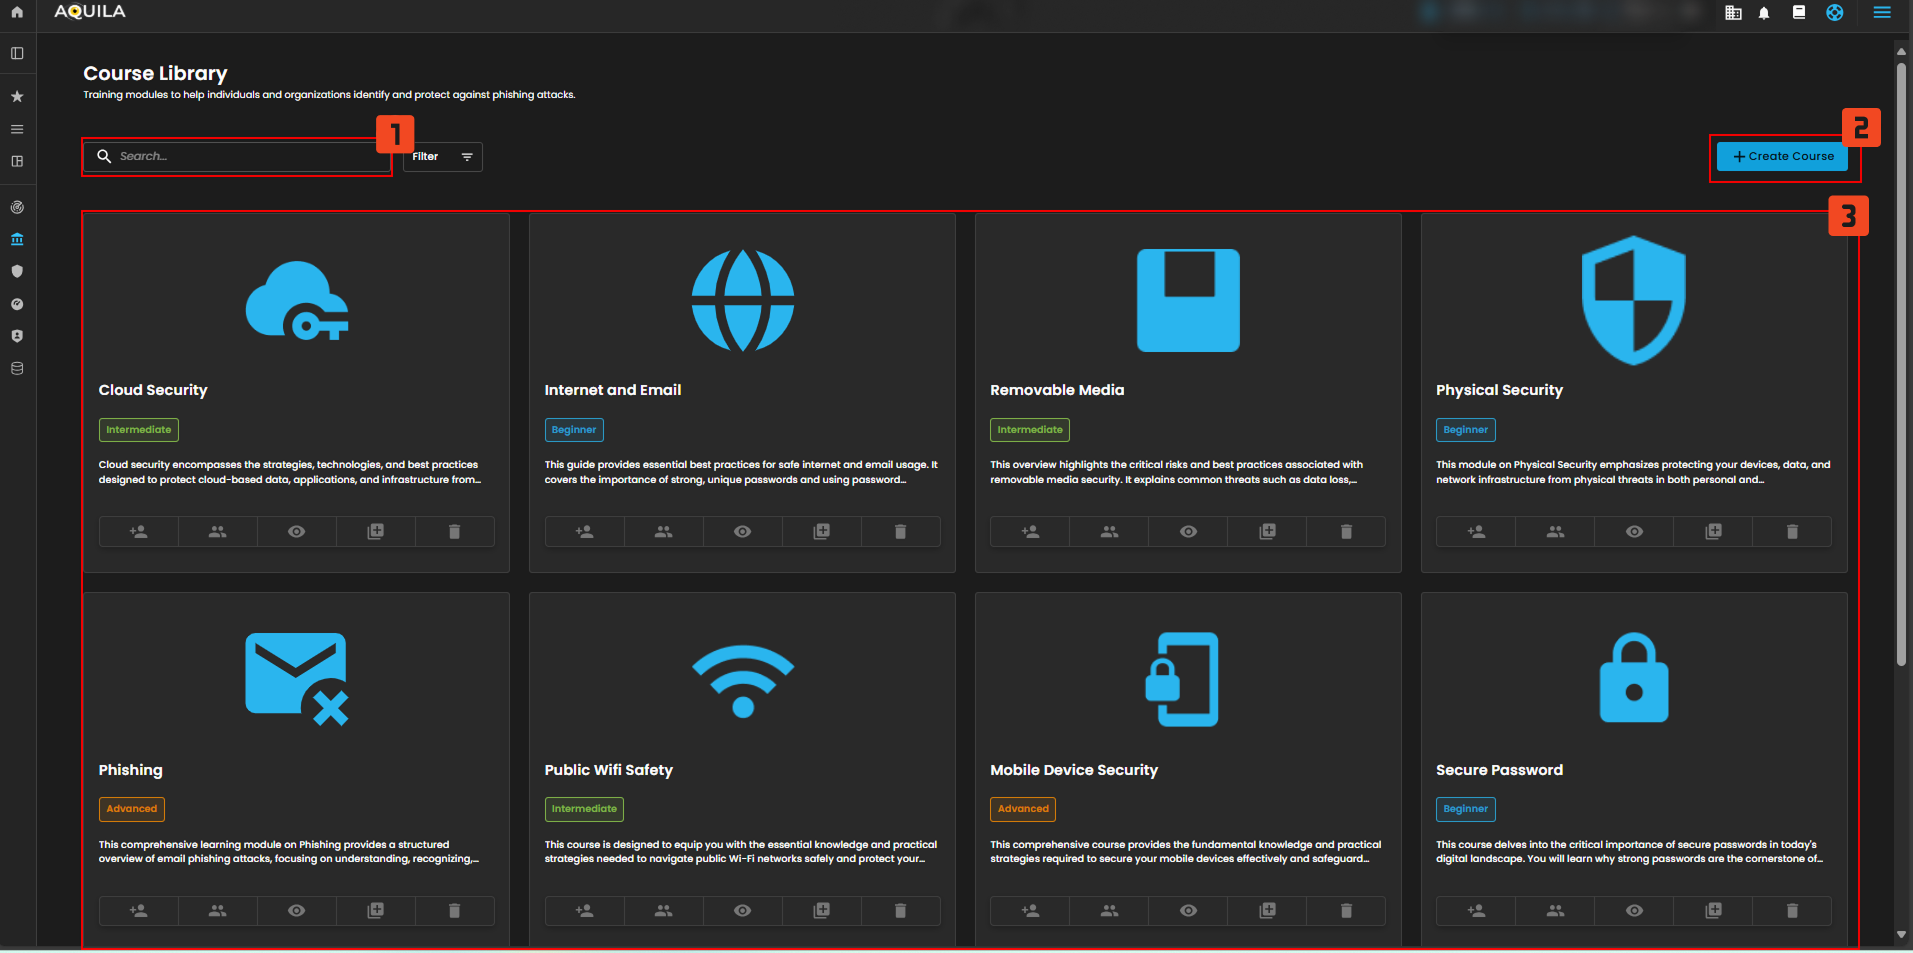
Figure 5 Add Course Library
1. Search Bar – Lets you type in keywords to quickly locate a specific course. This makes it easy to filter through many modules without scrolling.
2. Create Course – Allows administrators to build and add a custom course to the library. This is useful for tailoring training content to company-specific needs.
3. Course List – Shows all available courses grouped by topic and difficulty level. Each card provides details and actions like assigning, previewing, or deleting a course.
Create Course Modules

Figure 5.1 Create Course Modules
Assessment Library
Training modules to help individuals or organizations identify and protect against phishing attacks.
Course Assessment
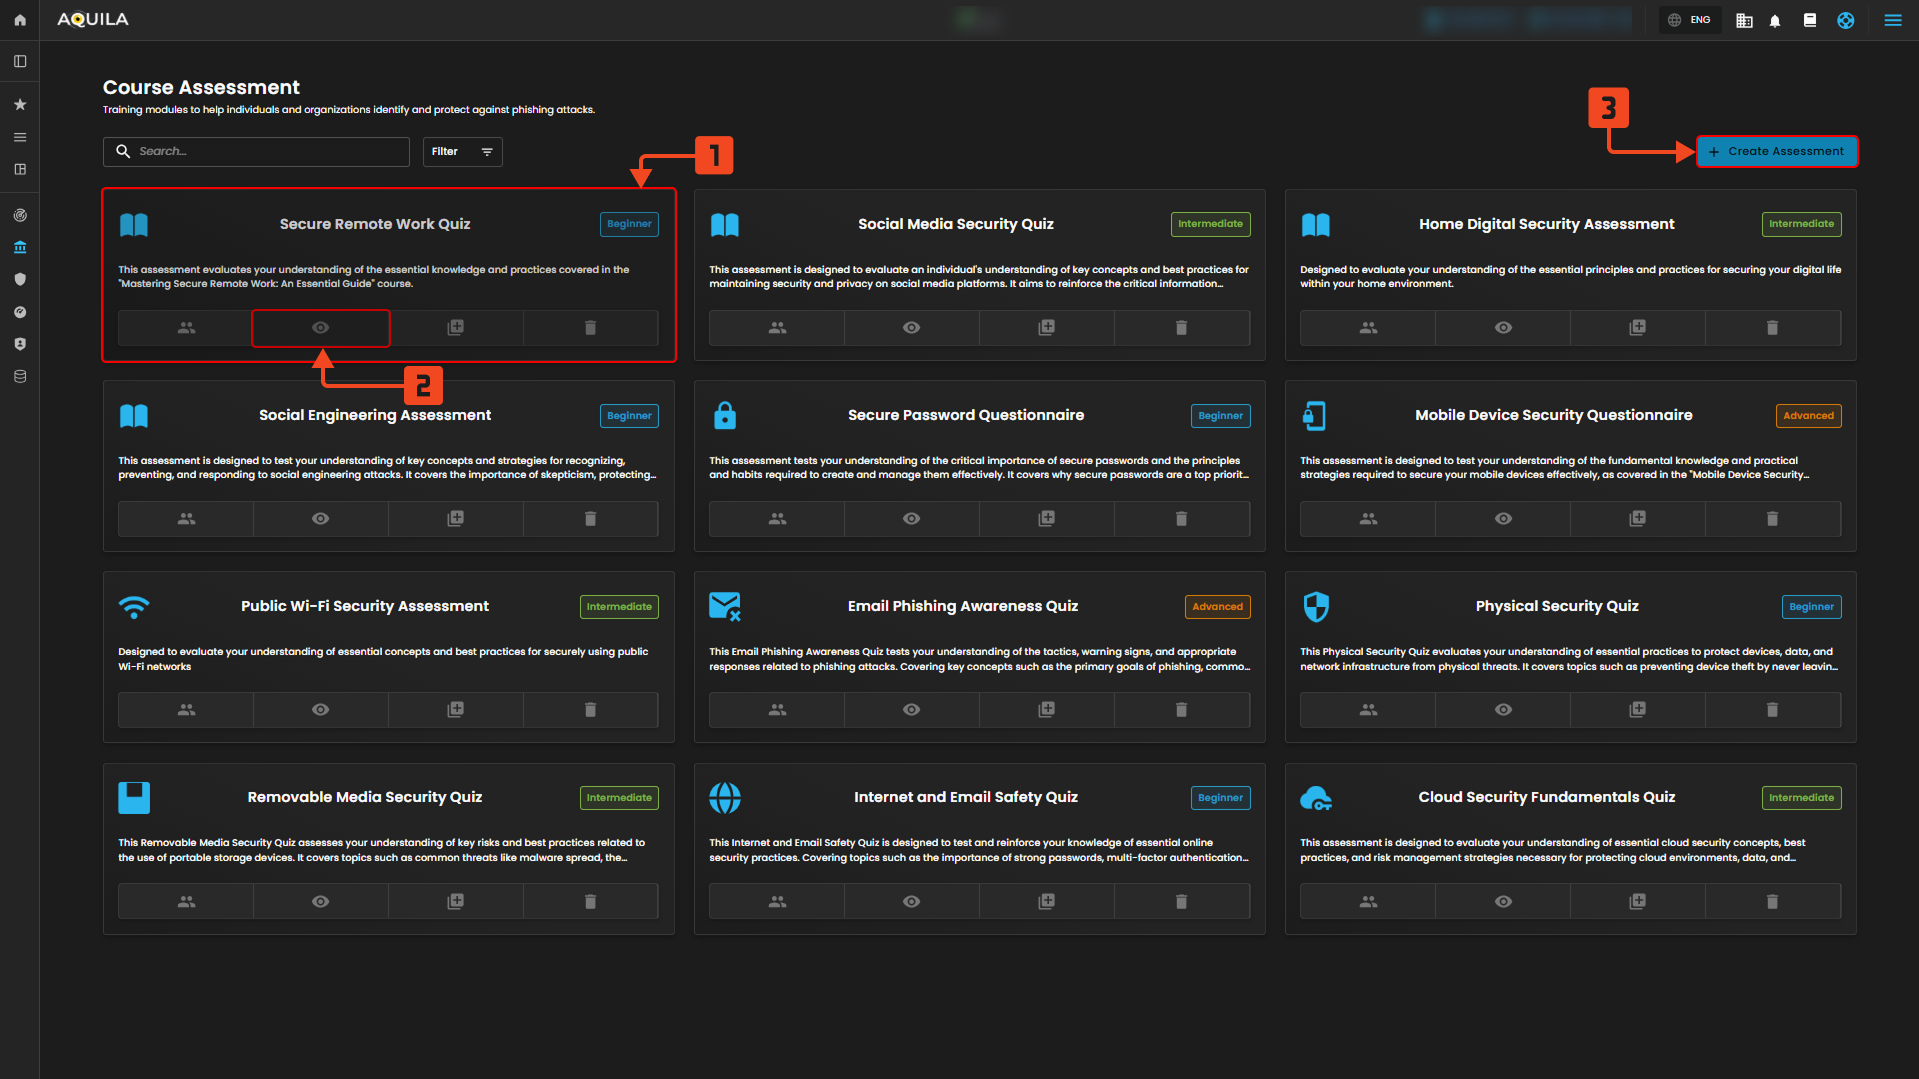
Figure 6 Course Assessment
4. Course Details Section – This is where you enter the course name, description, difficulty, duration, and upload images or icons. It provides all the information learners will see when selecting the course.
5. Submit Course – Finalizes and saves the new course into the system. Once submitted, the course becomes available in the Course Library for assignment to users.
Take Assessment
Take Assessment Button – This blue button starts the assessment immediately. Clicking it means you are ready to move forward and begin gauging your progress.
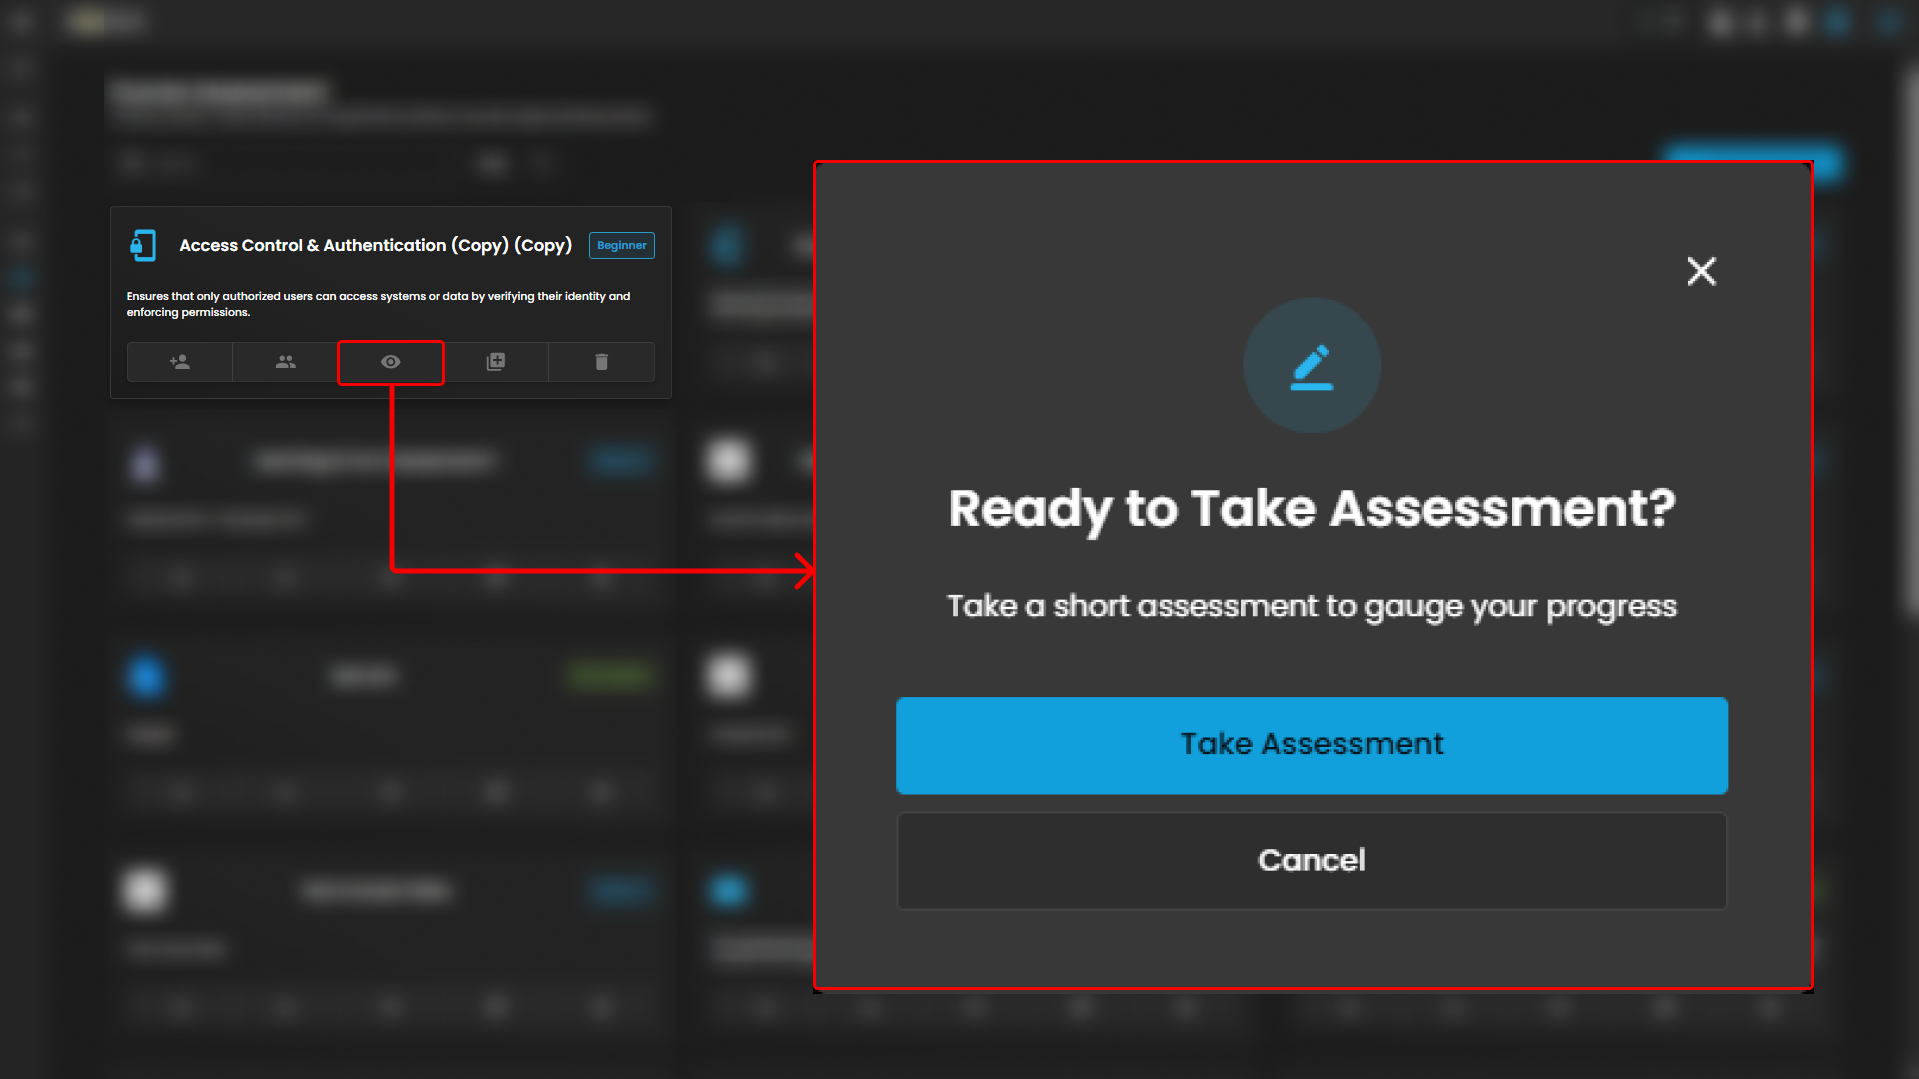
Figure 6.1 Create Course Modules
Create Course
Create Assessment Button - This button saves all the information you’ve entered and creates the assessment. It will only become active after you fill in the required fields.
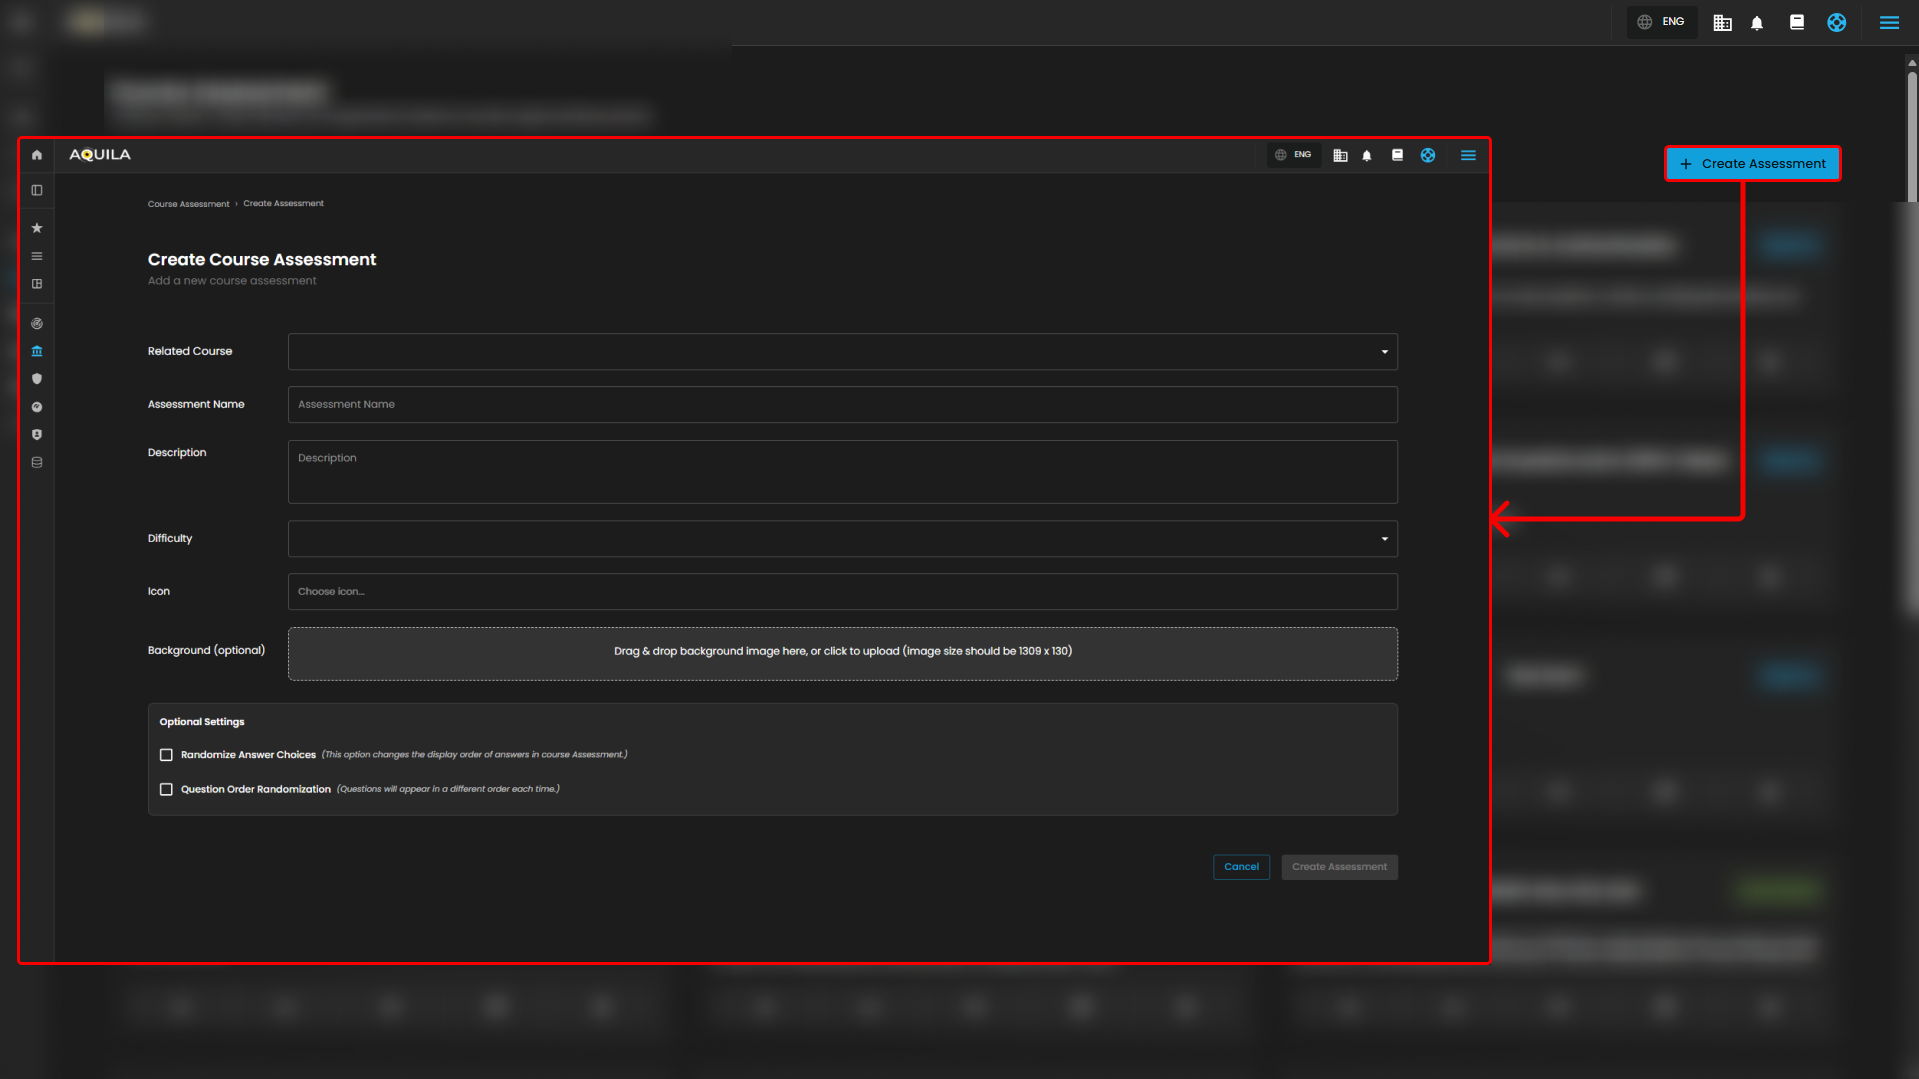
Figure 6.2 Create Course Assessment
Template Library
This page displays the available email templates in the library. You can either create a new template or select one of the pre-made options to use.
Email Template
1. Email Template Tab – This tab shows you that you are currently viewing email templates. Clicking it always brings you back to this section of the library.
2. Template Selection Area – This area displays all the available email templates. You can browse, preview, and choose the template you want to use or edit.
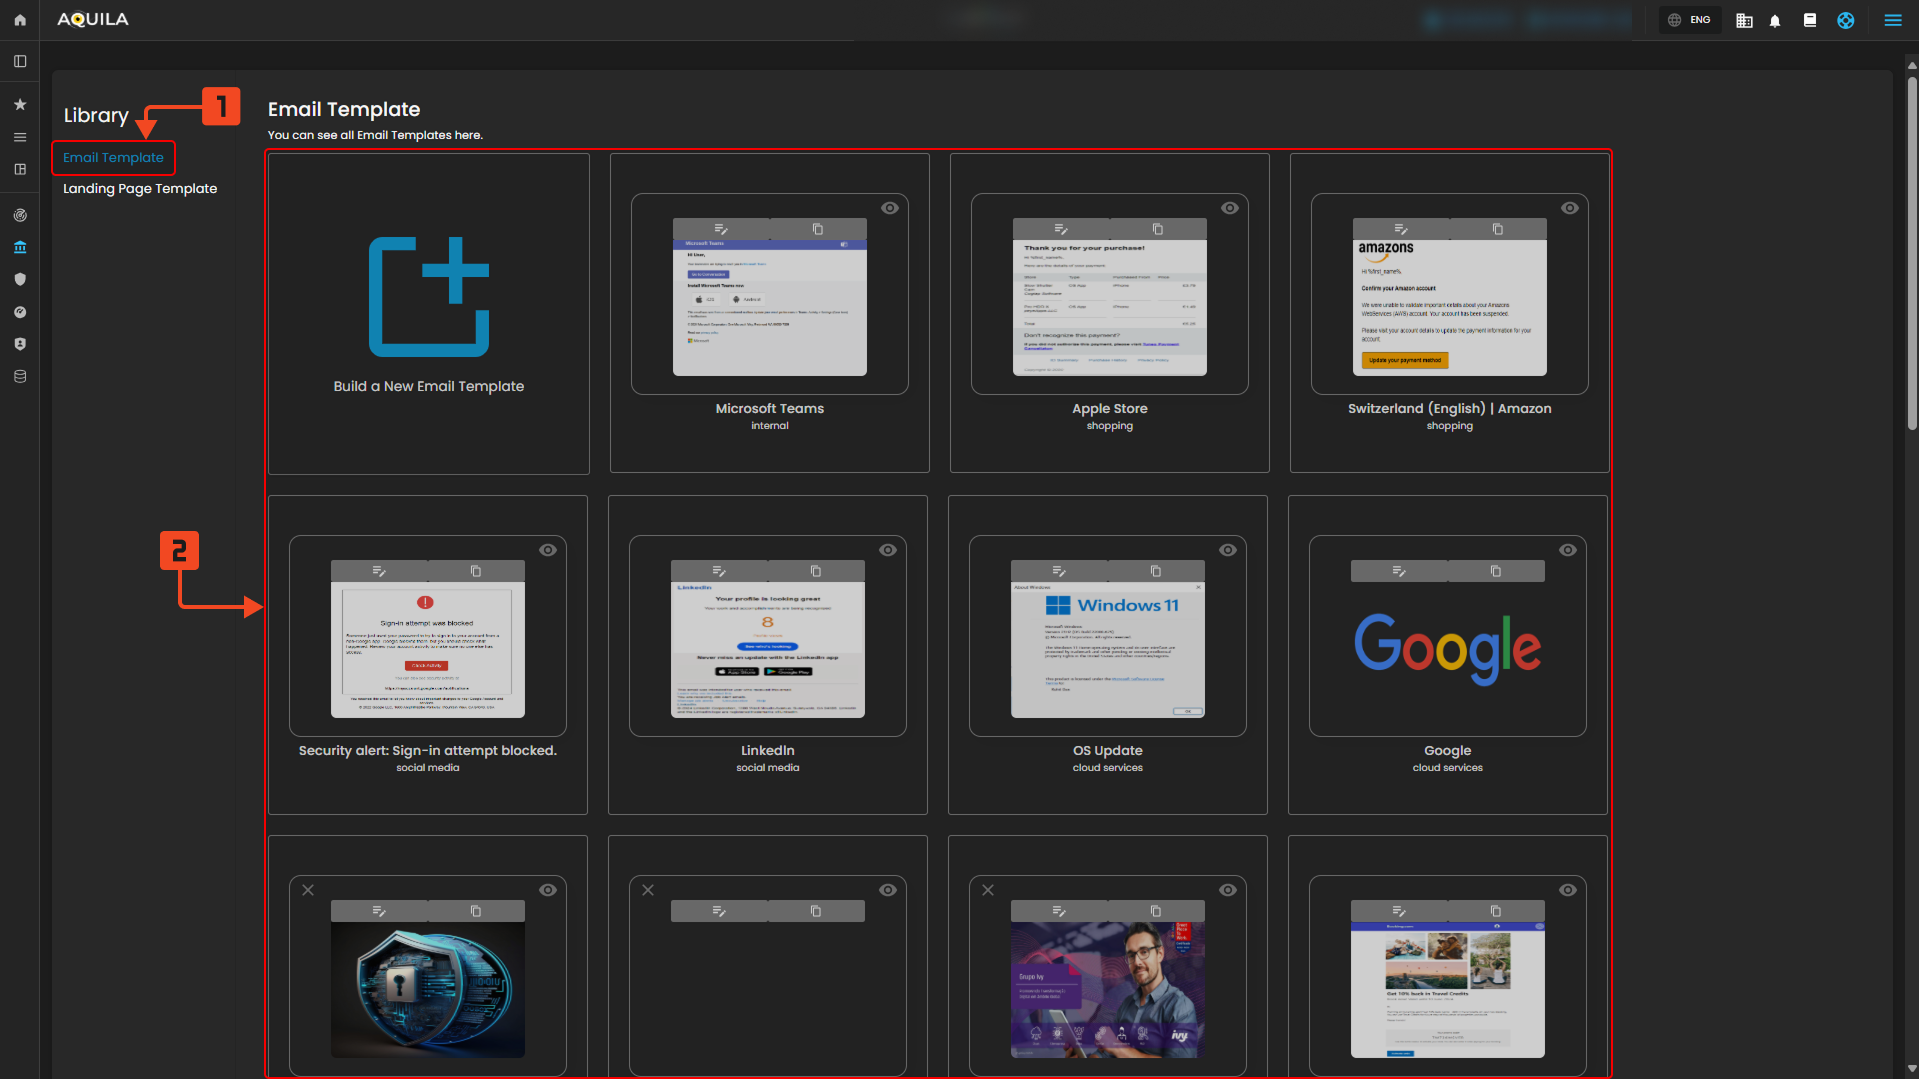
Figure 7 Email Template
Landing Page Template
1. Landing Page Template Tab – This tab confirms you’re currently viewing landing page templates. Selecting it will always open this section of the library.
2. Template Selection Area – This area contains all the available landing page templates. You can scroll, preview, and pick the template that suits your needs.
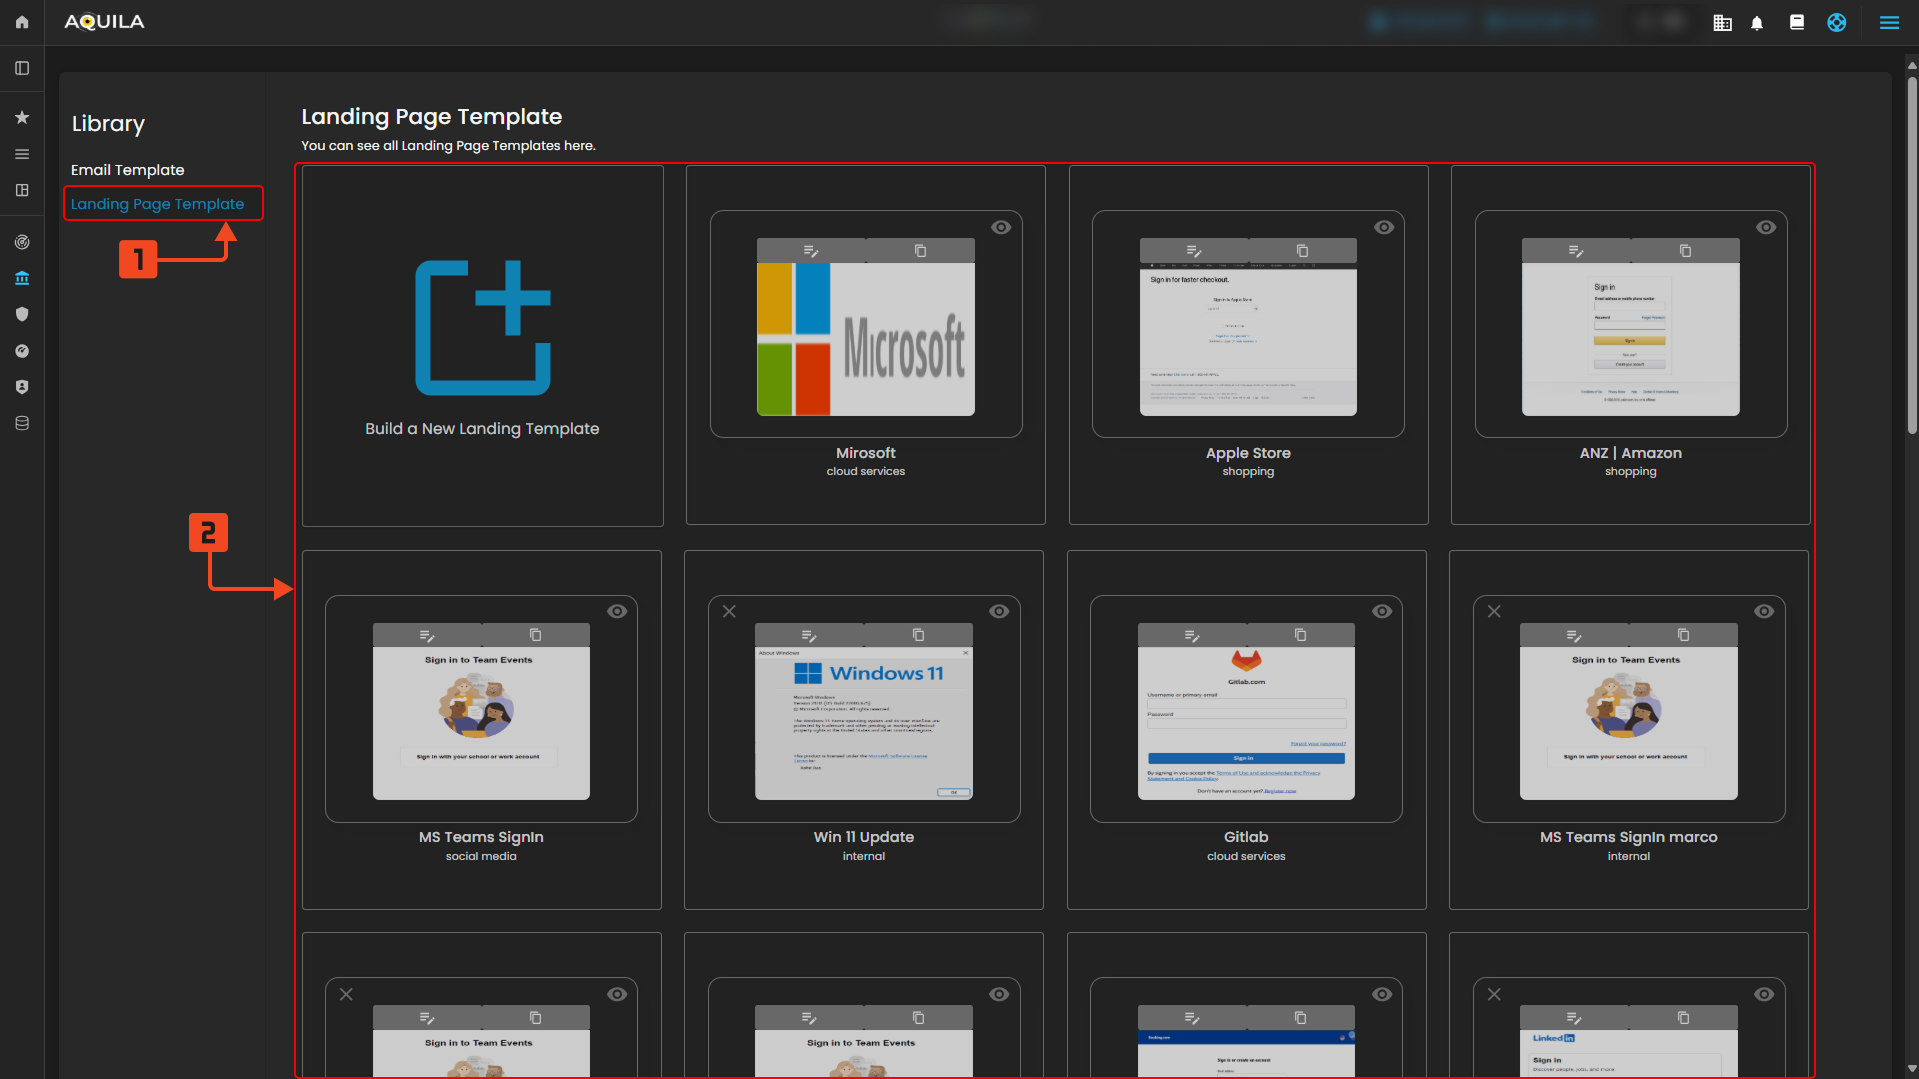
Figure 7.1 Landing Page Template
Reports
The Reports serves as the central hub for managing all performance reports within the system. From here, you can easily view existing reports, generate new ones, or download completed results for further analysis. It provides a quick and organized way to track performance data without navigating through multiple sections.
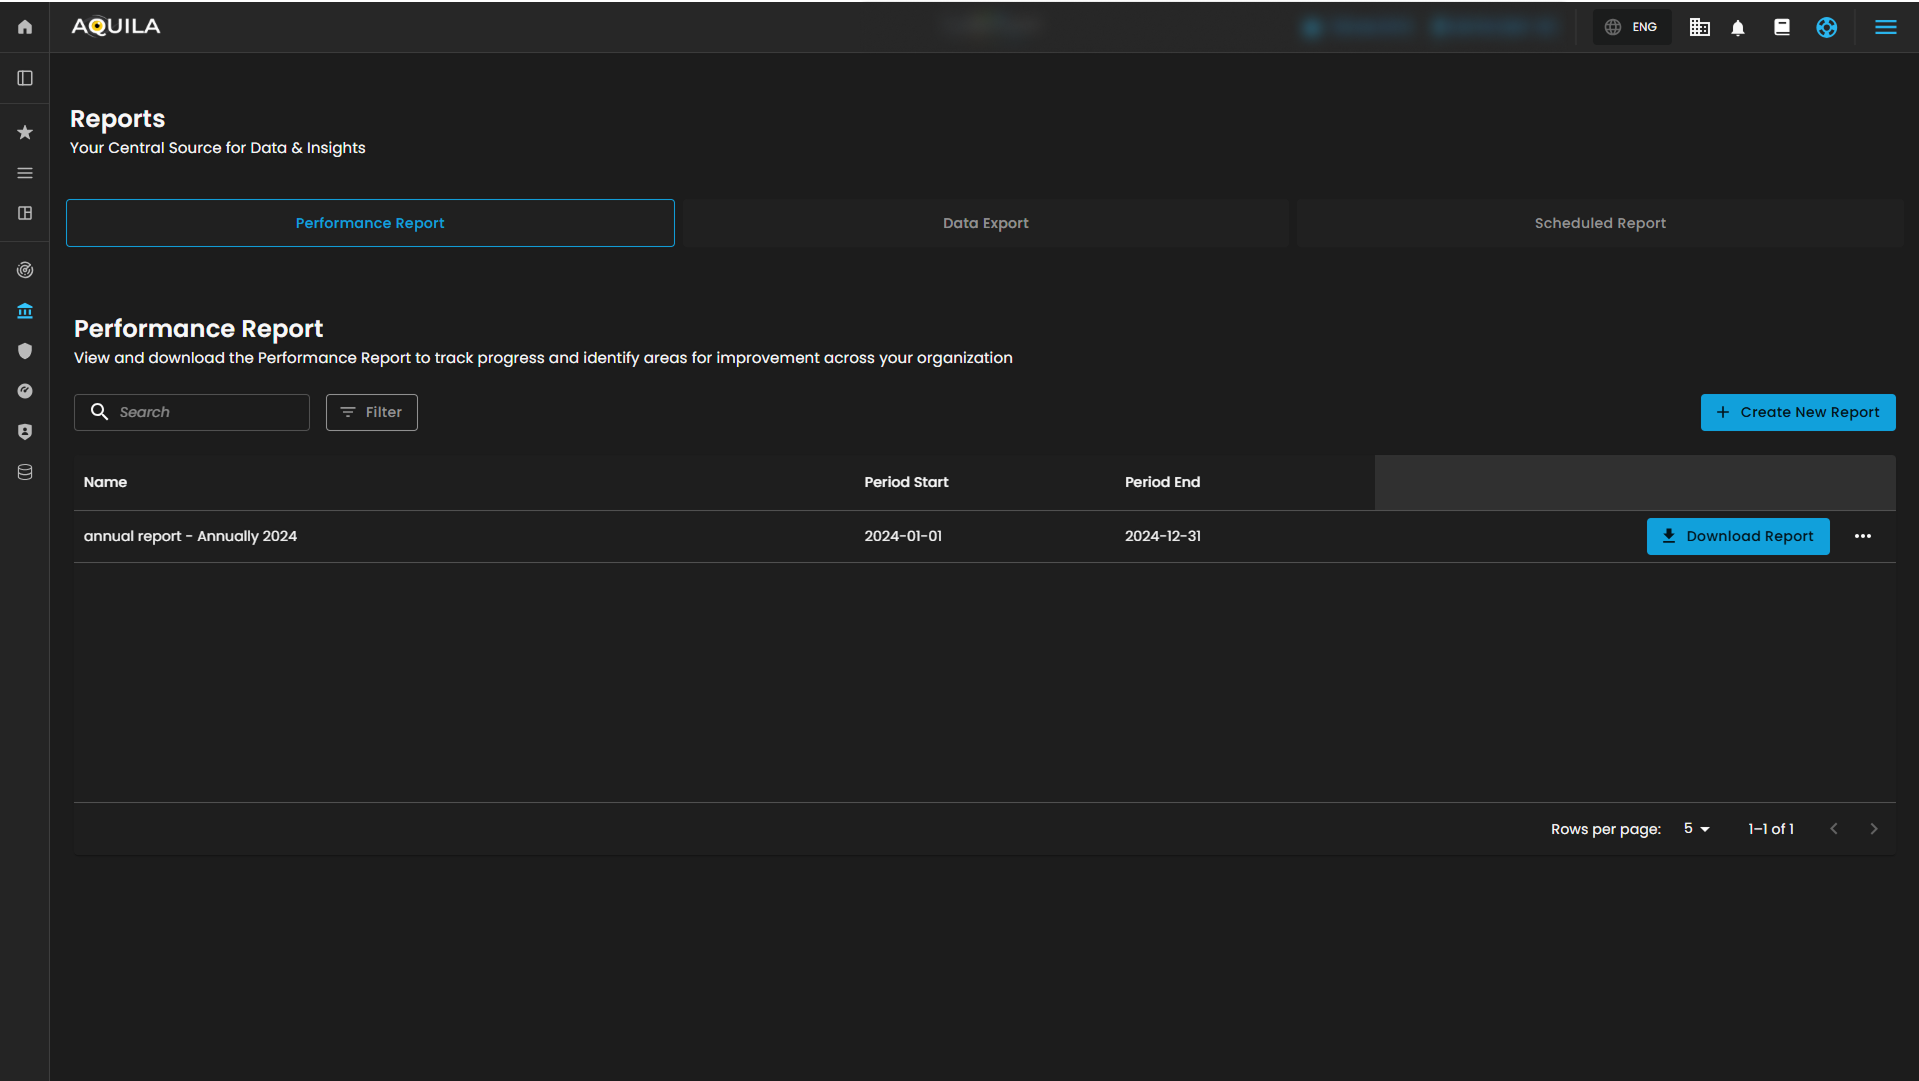
Figure 8. Reports
Performance Report Tab
- Performance Report Tab – This is the active section where you can view and manage all performance reports.
- Create New Report – Click here to set up a new performance report.
- Download Report – Allows you to download the generated report in the list.
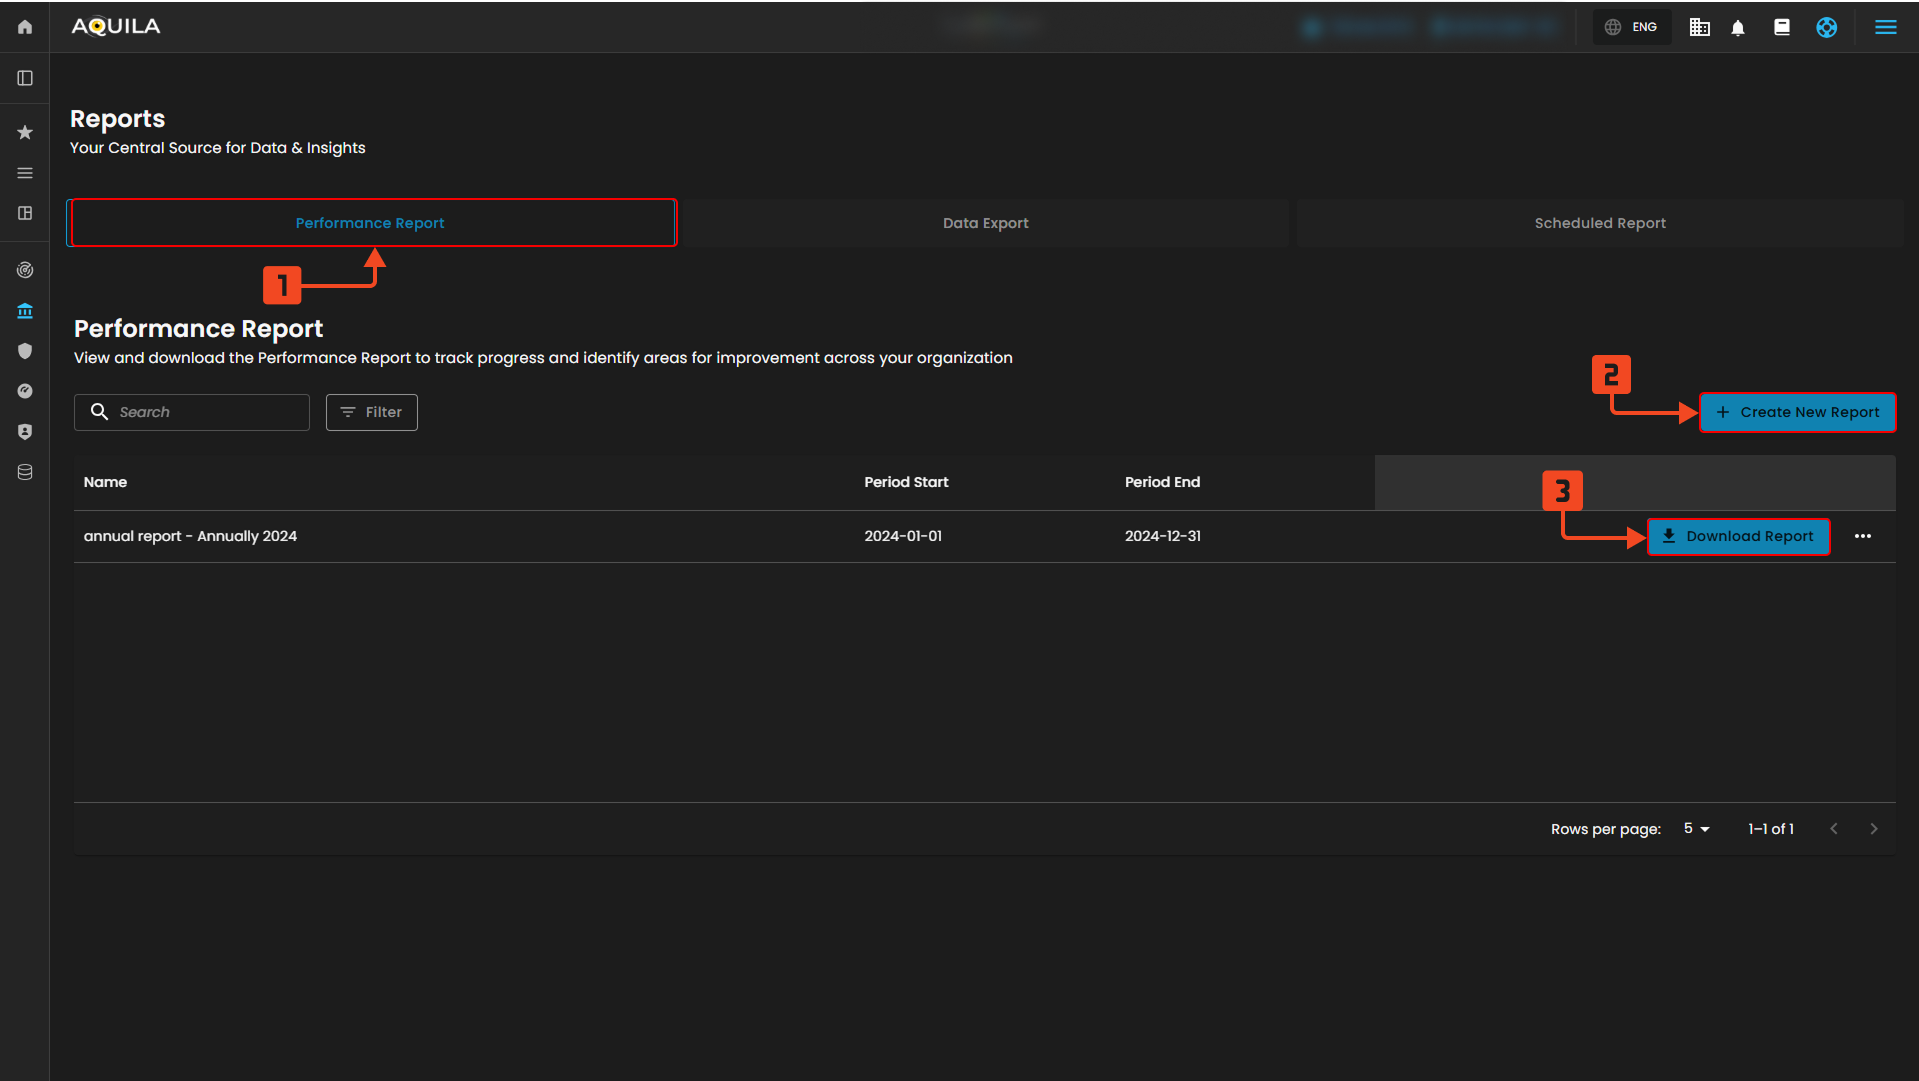
Figure 8.1 Performance Report Tab
Set-up Reports
- Report Title – Enter a name for your report.
- Report Type – Choose the type of report you want.
- Date Range – Select the start and end dates for the report data.
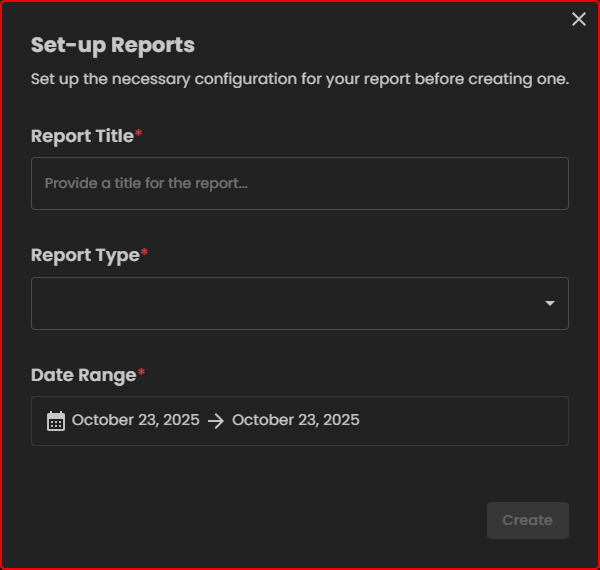
Figure 8.1.1 Set-up Reports
Scheduled Report Tab
- Scheduled Report Tab – Shows all scheduled reports that are set to run automatically.
- Add Scheduled Report – Click here to set up a new scheduled report.
- Scheduled Report Card – Displays details of an existing scheduled report.

Figure 8.2 Set-up Reports
Add Scheduled Report
- Report Name – Provide a title for the scheduled report.
- Report Date Range – Select the reporting period.
- Schedule to Send – Choose when and how often the report should be sent.
- Report Type – Pick the type of report to schedule.
- Recipient/s – Decide who will receive the report (yourself or custom recipients).
- Add Schedule Button – Finalize and save the scheduled report.

Figure 8.2.1 Add Scheduled Reports
Control Panel
This page is part of the Control Panel where you can manage system connections. It allows you to link external services, like Microsoft, to automate tasks such as adding recipients to your list. This ensures smoother integration and reduces the need for manual setup.
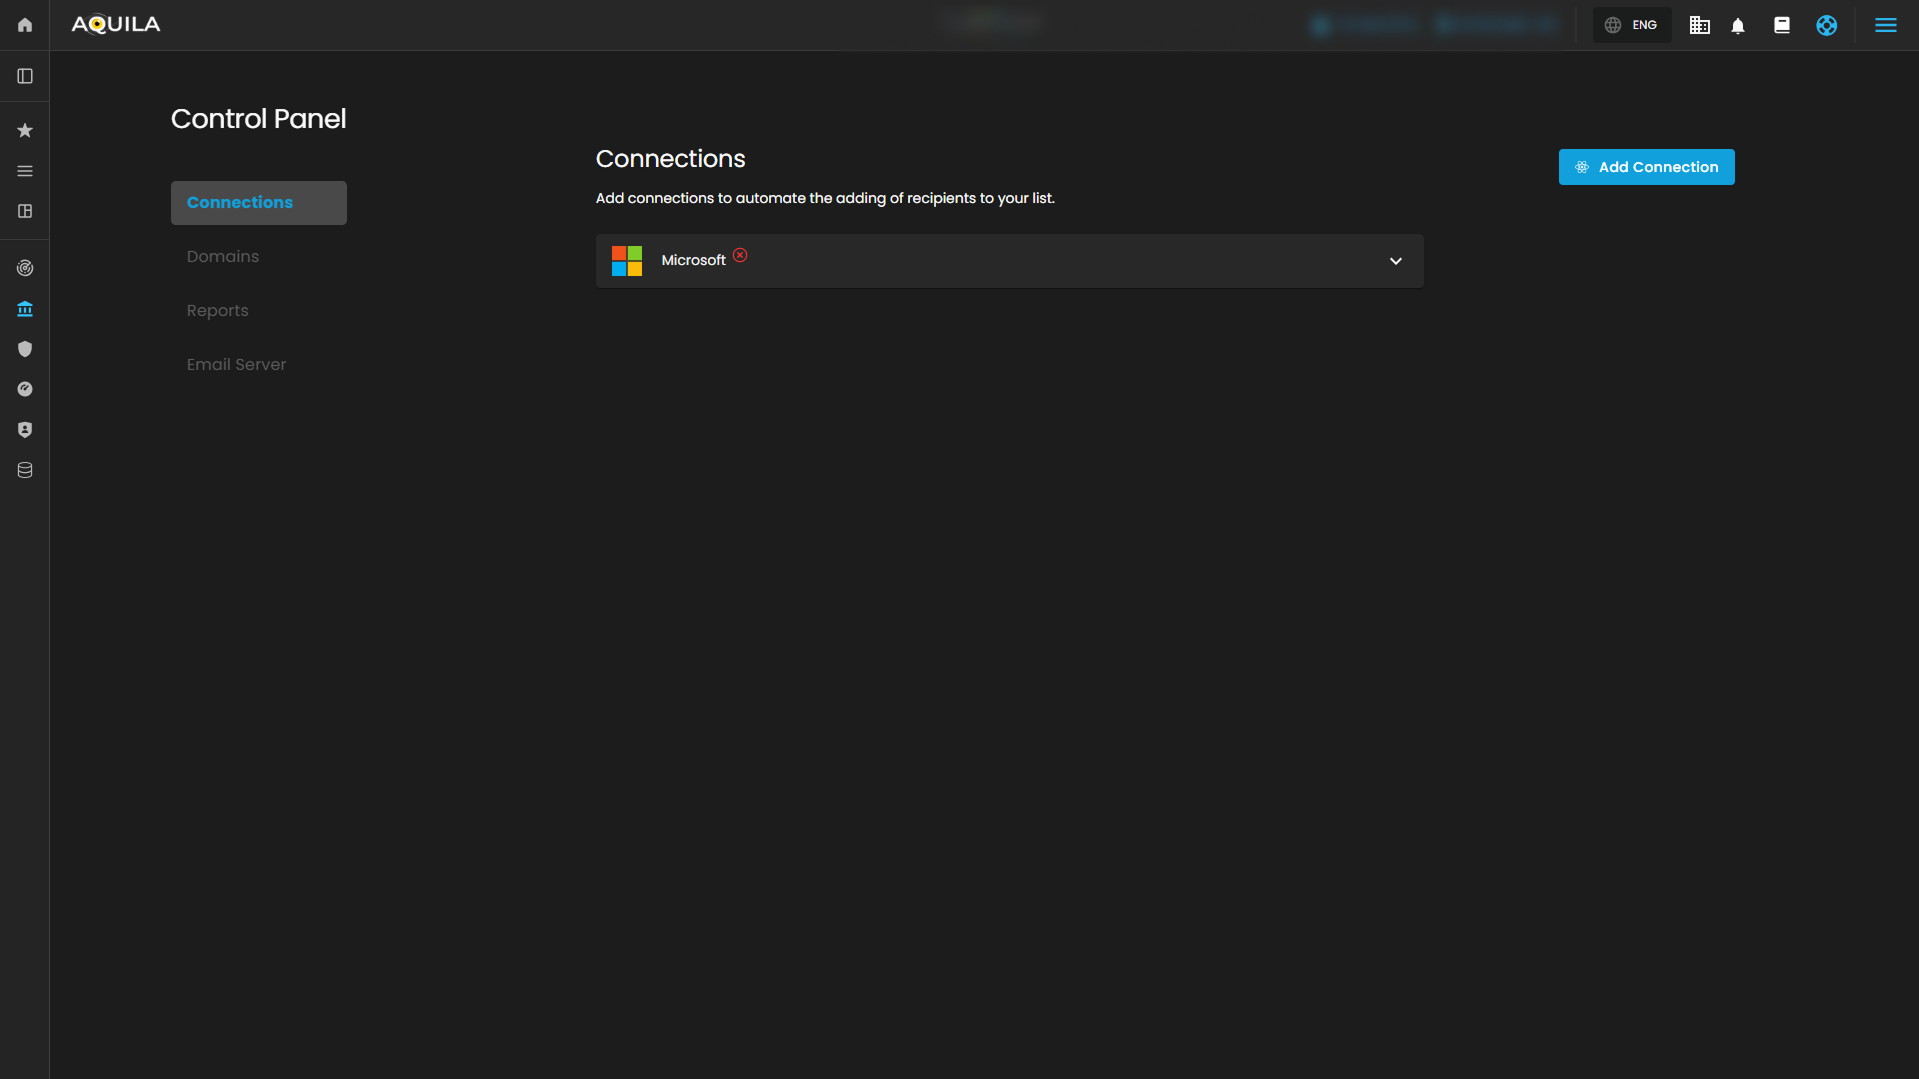
Figure 9 Control Panel
Connections
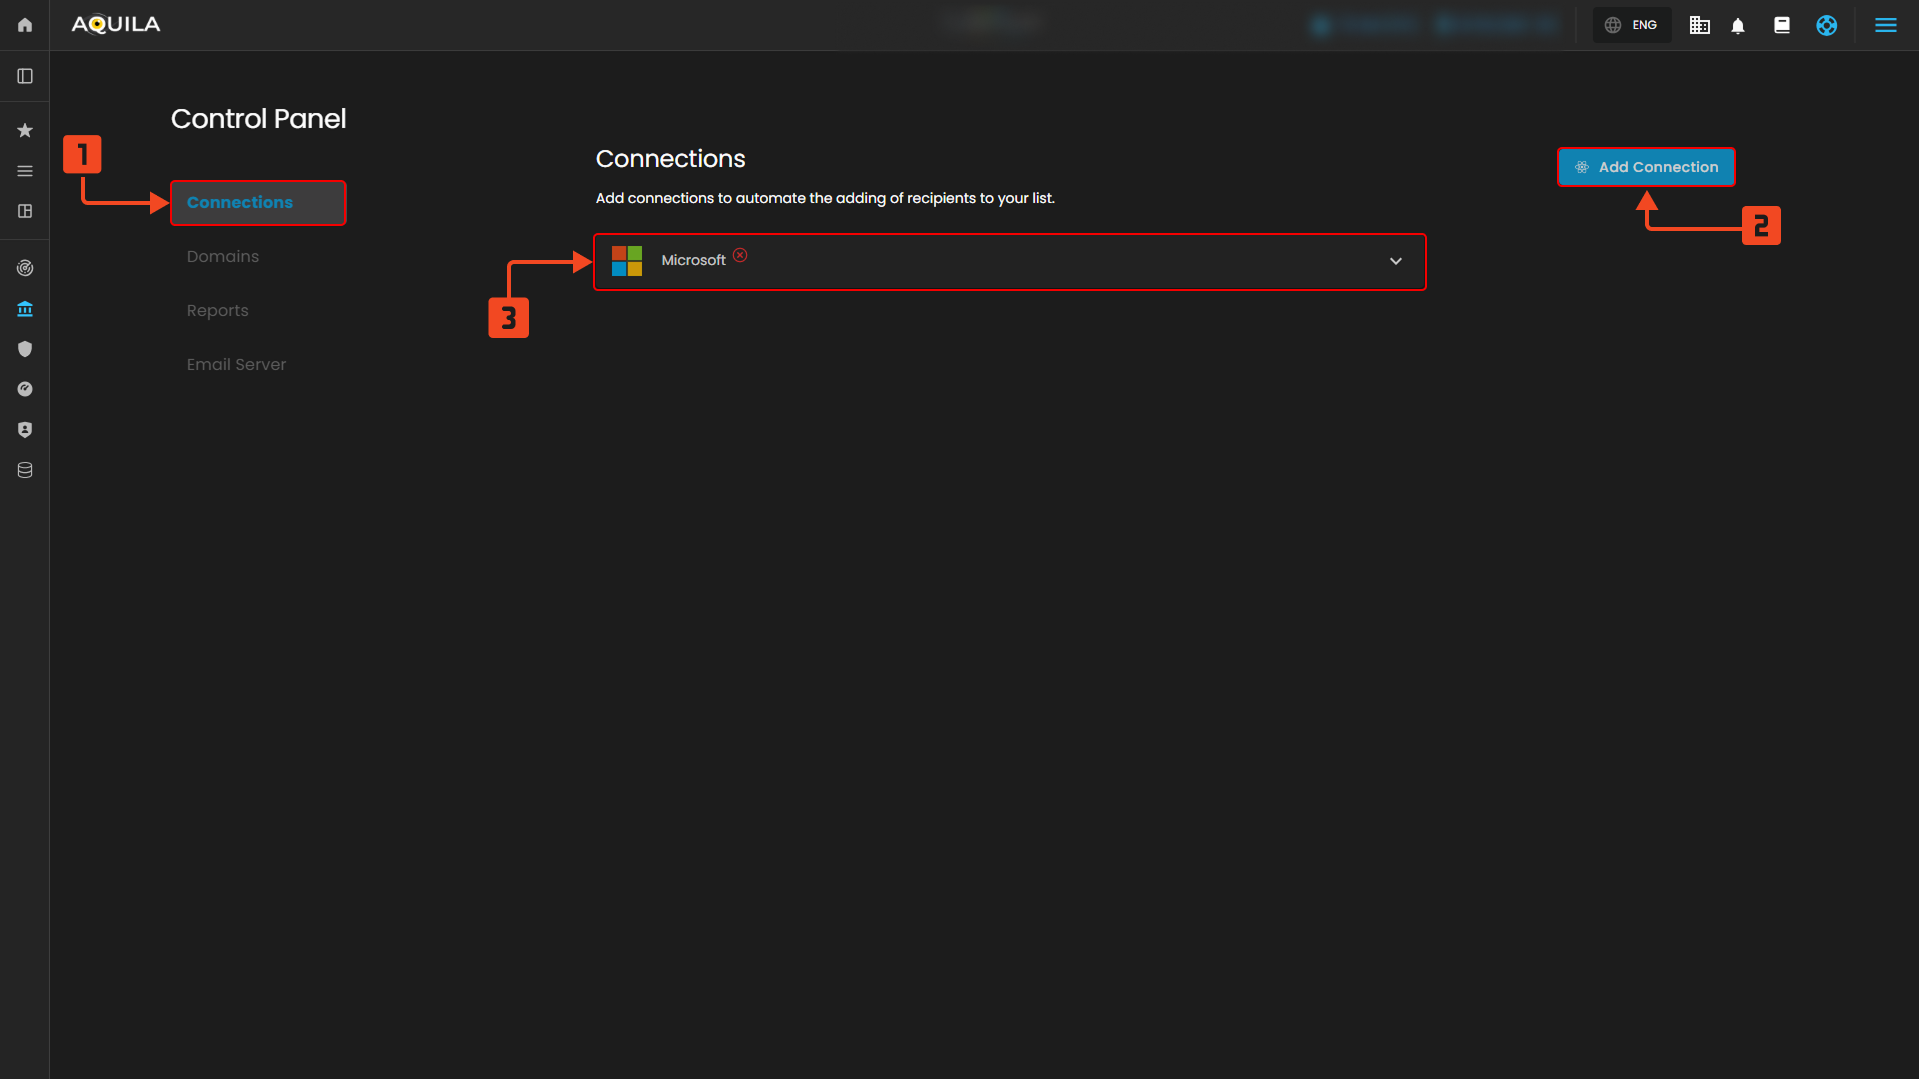
Figure 9.1 Connections
1. Connections Tab
2. Existing Connection
- This shows your current active connection (e.g., Microsoft). It confirms what service is already linked to your platform.
3. Add Connection Button
- This allows you to create a new connection with another service provider. It makes integrating additional accounts quick and simple.
Add Connection

Figure 9.1 Connections
1. Third-Party Connection Dropdown
- This dropdown allows you to select which service (e.g., Microsoft) you want to connect to AQUILA. It ensures the system knows which provider to integrate with.
Domains
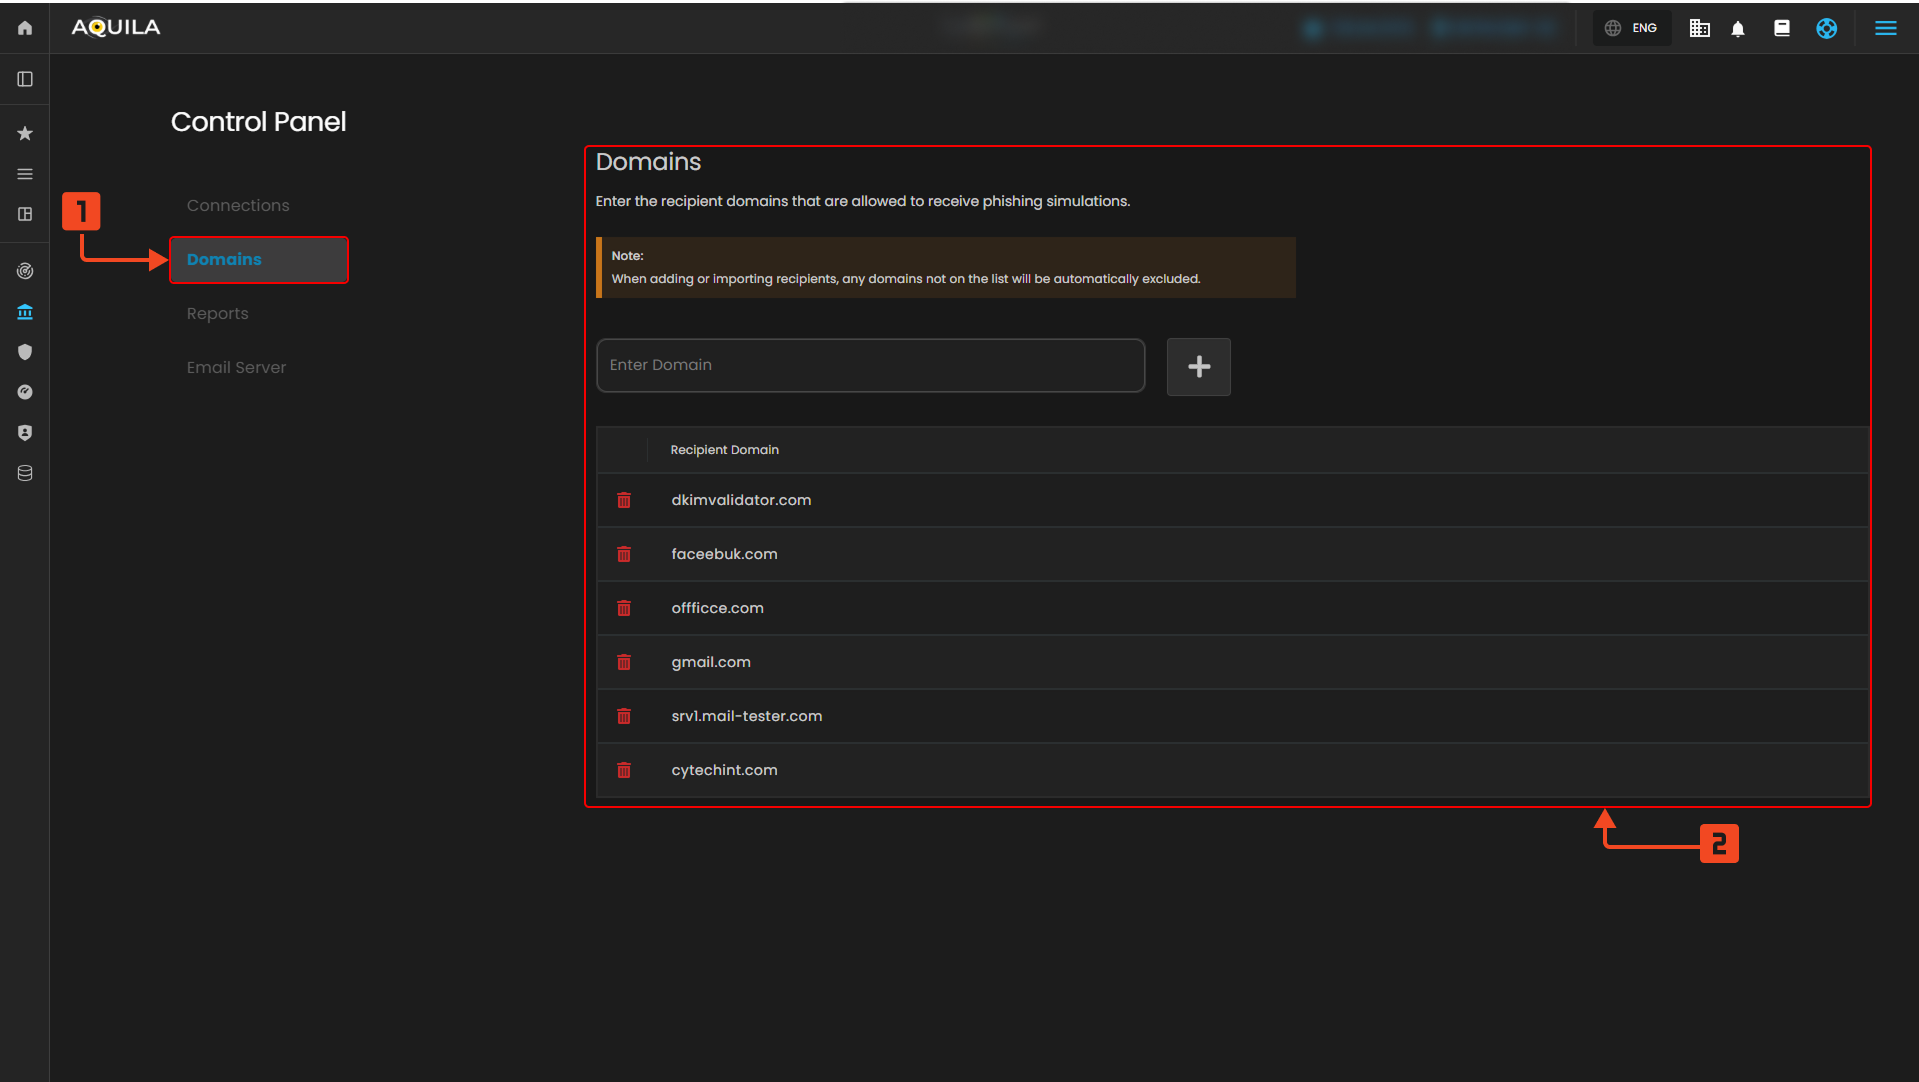
Figure 9.2 Domains
1. Domains Tab
- This tab shows where you can manage approved recipient domains. Only these domains can receive phishing simulation emails.
2. Domain List Section
- This section displays the list of allowed domains. You can add or remove domains here to control where simulation emails are delivered.
Reports
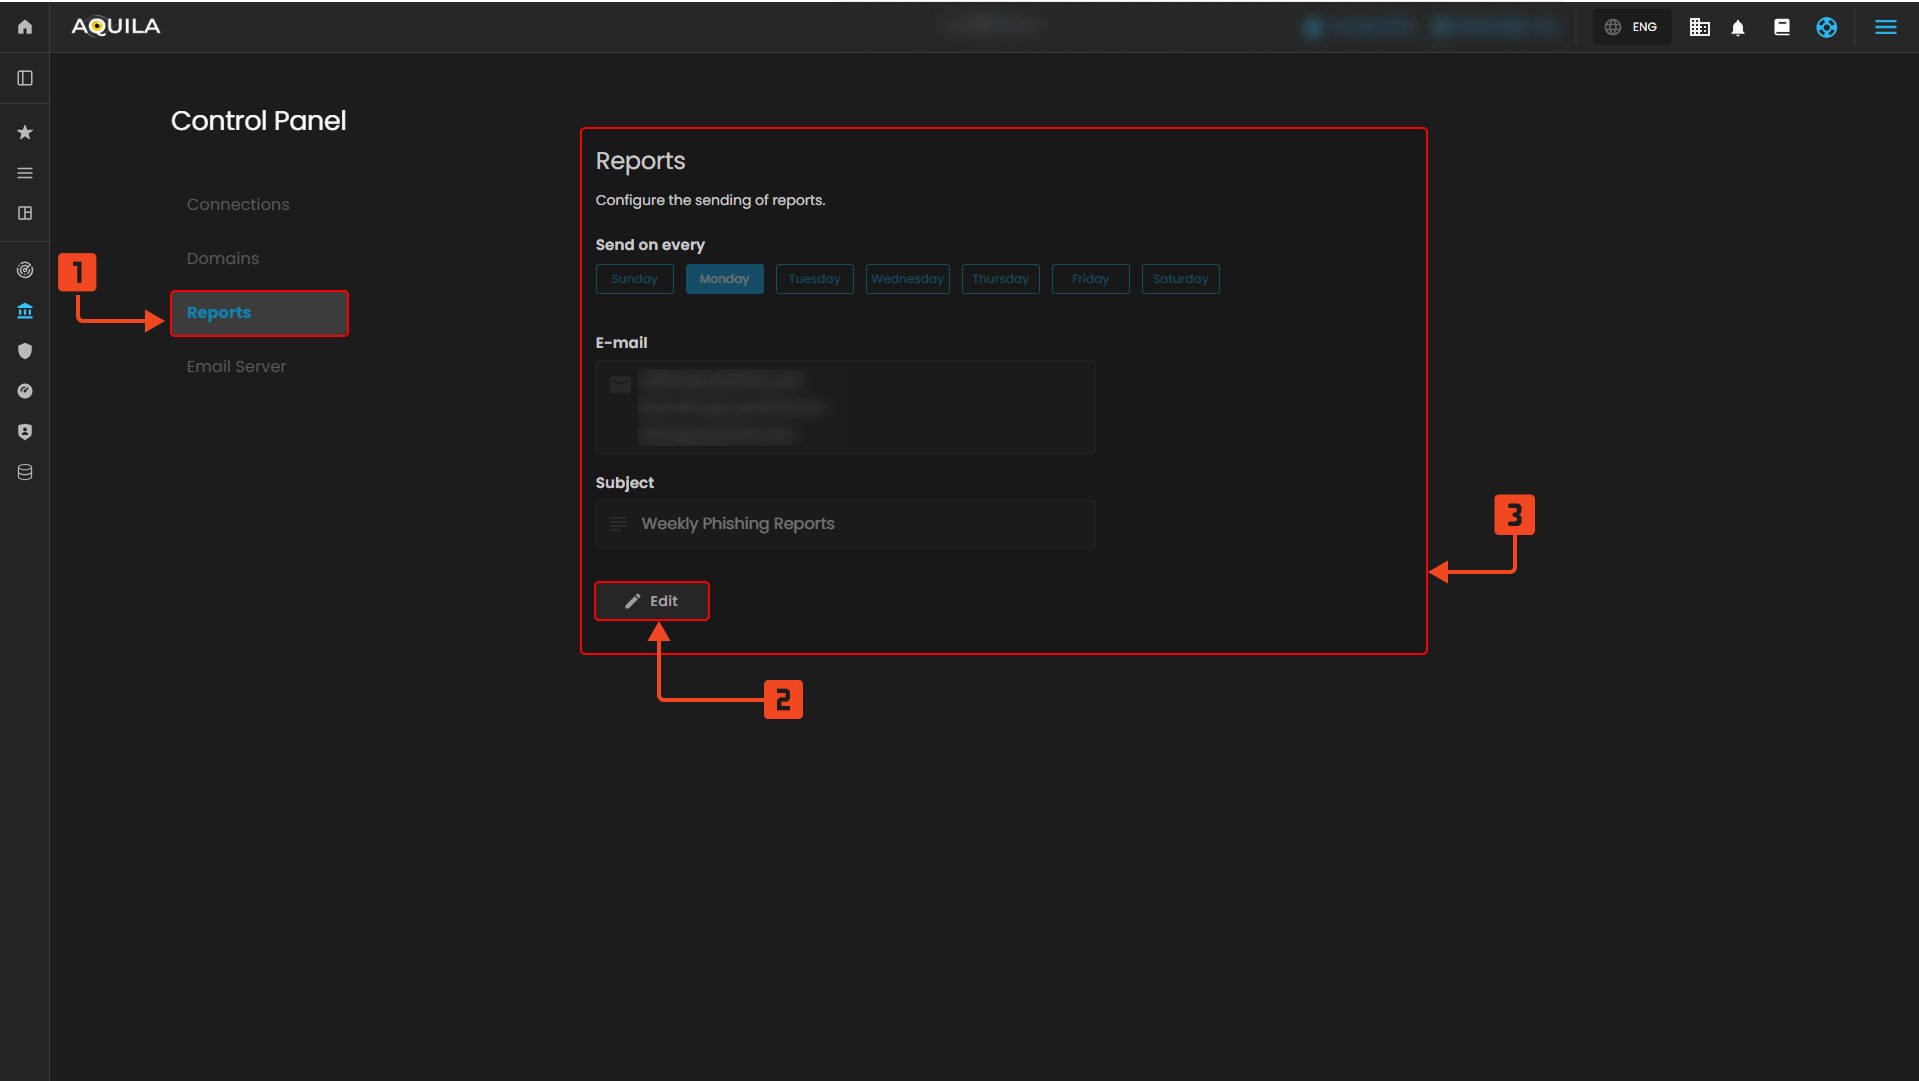
Figure 9.3 Reports
1. Reports Tab
- This tab lets you configure how and when reports are generated and sent. It helps automate phishing awareness progress tracking.
2. Report Settings Section
- This shows the current reporting configuration, including delivery days, recipient email addresses, and subject line. It ensures reports are sent regularly to the right people.
- This allows you to modify the reporting schedule or recipient details. It provides flexibility to update reports as needed.
Email Server
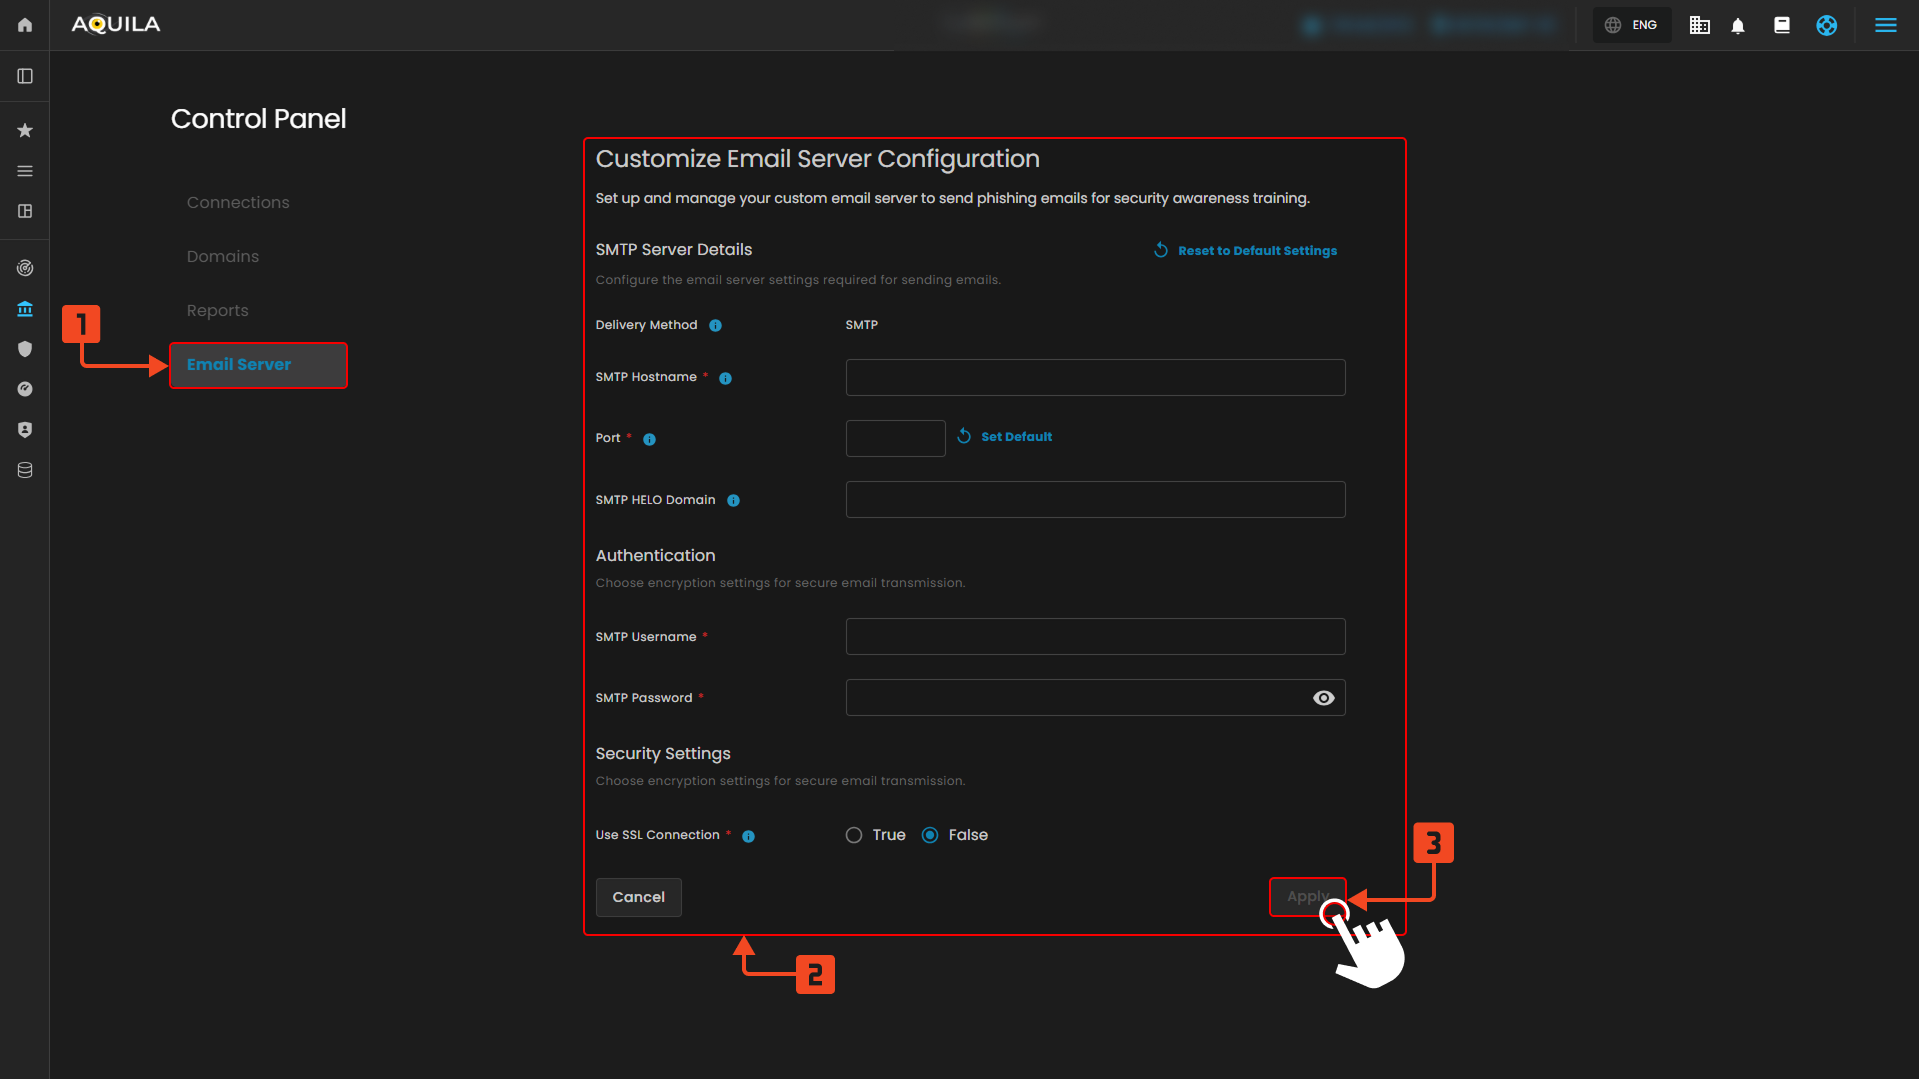
Figure 9.4 Email Server
1. Email Server Tab
- This section allows you to configure a custom SMTP server for sending phishing simulation emails. It ensures delivery control and compliance with your organization’s email system.
2. Email Server Configuration Section
- Here you input SMTP details like hostname, port, domain, username, and password. This setup allows the system to send training emails using your preferred email server.
- This saves and applies your email server settings. It ensures that your configuration takes effect for future email delivery.
If you need further assistance, kindly contact our support at support@cytechint.com for prompt assistance and guidance.