# CyTech - AQUILA EDR Automatic

# <span style="color: rgb(0, 0, 0);">Endpoint Detection and Responce (EDR) - Automatic Installation</span>

<span style="color: rgb(0, 0, 0);">Endpoint Detection and Response (EDR), is a cybersecurity technology that focuses on detecting, investigating, and responding to suspicious activities and threats on endpoints, such as workstations, laptops, and servers. EDR solutions provide visibility into endpoint activities and help security teams identify and mitigate potential threats before they can cause significant harm.</span>


#### <span style="color: rgb(0, 0, 0);">**Pre-requisites**</span>

1. <span style="color: rgb(0, 0, 0);">**Access to CyTech - AQUILA**</span>
    - <span style="color: rgb(0, 0, 0);">Only users assigned the **"Owner"** or **"Admin"** role can access the Log Collector installation resources within the platform.</span>

##### <span style="color: rgb(0, 0, 0);">**Steps to Add AQUILA EDR**</span>

<span style="color: rgb(0, 0, 0);">Please follow the steps below to add a Log Collector using Windows Environment.</span>

1. <span style="color: rgb(0, 0, 0);">Log in to **CyTech - AQUILA**. Click here: <span style="color: rgb(132, 63, 161);">**[usdc.cytechint.io](https://usdc.cytechint.io/)**</span></span>

- <span style="color: rgb(0, 0, 0);">Click **Collapse** to view side panel. Then navigate through **Domains&gt;Cyber Monitoring&gt;Endpoint Detection and Response&gt;Endpoints**.</span>

[![image.png](https://cytechint-docs-bookstack.s3.amazonaws.com/uploads/images/gallery/2025-07/scaled-1680-/Xmx63tsP8PUH0kv2-image.png)](https://cytechint-docs-bookstack.s3.amazonaws.com/uploads/images/gallery/2025-07/Xmx63tsP8PUH0kv2-image.png)

<span style="color: rgb(0, 0, 0);">2. Click "**Install Endpoint**" to start installation window.</span>

[![image.png](https://cytechint-docs-bookstack.s3.amazonaws.com/uploads/images/gallery/2025-07/scaled-1680-/o9deWEuXrGE5DcRS-image.png)](https://cytechint-docs-bookstack.s3.amazonaws.com/uploads/images/gallery/2025-07/o9deWEuXrGE5DcRS-image.png)

**<span style="color: rgb(0, 0, 0);">3. Review the needed requirements for each Operating Systems and click "Next".</span>**

[![image.png](https://cytechint-docs-bookstack.s3.amazonaws.com/uploads/images/gallery/2025-07/scaled-1680-/AOuYvfw9b8bLCyiY-image.png)](https://cytechint-docs-bookstack.s3.amazonaws.com/uploads/images/gallery/2025-07/AOuYvfw9b8bLCyiY-image.png)

**<span style="color: rgb(0, 0, 0);">4. Choose "Automatic" installation and click "Next".</span>**

[![image.png](https://cytechint-docs-bookstack.s3.amazonaws.com/uploads/images/gallery/2025-07/scaled-1680-/zAoHRaNDKRoeDKvz-image.png)](https://cytechint-docs-bookstack.s3.amazonaws.com/uploads/images/gallery/2025-07/zAoHRaNDKRoeDKvz-image.png)

<span style="color: rgb(0, 0, 0);">**5. Download the AQUILA EDR installer.**</span>

[![image.png](https://cytechint-docs-bookstack.s3.amazonaws.com/uploads/images/gallery/2025-09/scaled-1680-/vZHEXYZaozo18Bmg-image.png)](https://cytechint-docs-bookstack.s3.amazonaws.com/uploads/images/gallery/2025-09/vZHEXYZaozo18Bmg-image.png)

<span style="color: rgb(0, 0, 0);">**6. Follow the number of steps to keep the AQUILA EDR installer.**</span>

[![image.png](https://cytechint-docs-bookstack.s3.amazonaws.com/uploads/images/gallery/2025-09/scaled-1680-/YTnlrDIovYPVH27F-image.png)](https://cytechint-docs-bookstack.s3.amazonaws.com/uploads/images/gallery/2025-09/YTnlrDIovYPVH27F-image.png)

[![image.png](https://cytechint-docs-bookstack.s3.amazonaws.com/uploads/images/gallery/2025-09/scaled-1680-/gBWre1hqkblOjMtZ-image.png)](https://cytechint-docs-bookstack.s3.amazonaws.com/uploads/images/gallery/2025-09/gBWre1hqkblOjMtZ-image.png)

##### <span style="color: rgb(0, 0, 0);">**Please follow the instructions below and refer to the images below:**</span>

<span style="color: rgb(0, 0, 0);">**Step 1:** After downloading the AQUILA Agent Setup installer. Run the setup file to start the installation wizard.</span>

[![image.png](https://cytechint-docs-bookstack.s3.amazonaws.com/uploads/images/gallery/2025-07/scaled-1680-/uBqlb5h5yQqbqkY2-image.png)](https://cytechint-docs-bookstack.s3.amazonaws.com/uploads/images/gallery/2025-07/uBqlb5h5yQqbqkY2-image.png)

<p class="callout info"><span style="color: rgb(0, 0, 0);">If prompted with a User Account Control (UAC) dialog stating that the app is from an unknown publisher, click **‘Yes’** to allow the installer to make changes and proceed with the installation.</span></p>

<span style="color: rgb(0, 0, 0);">**
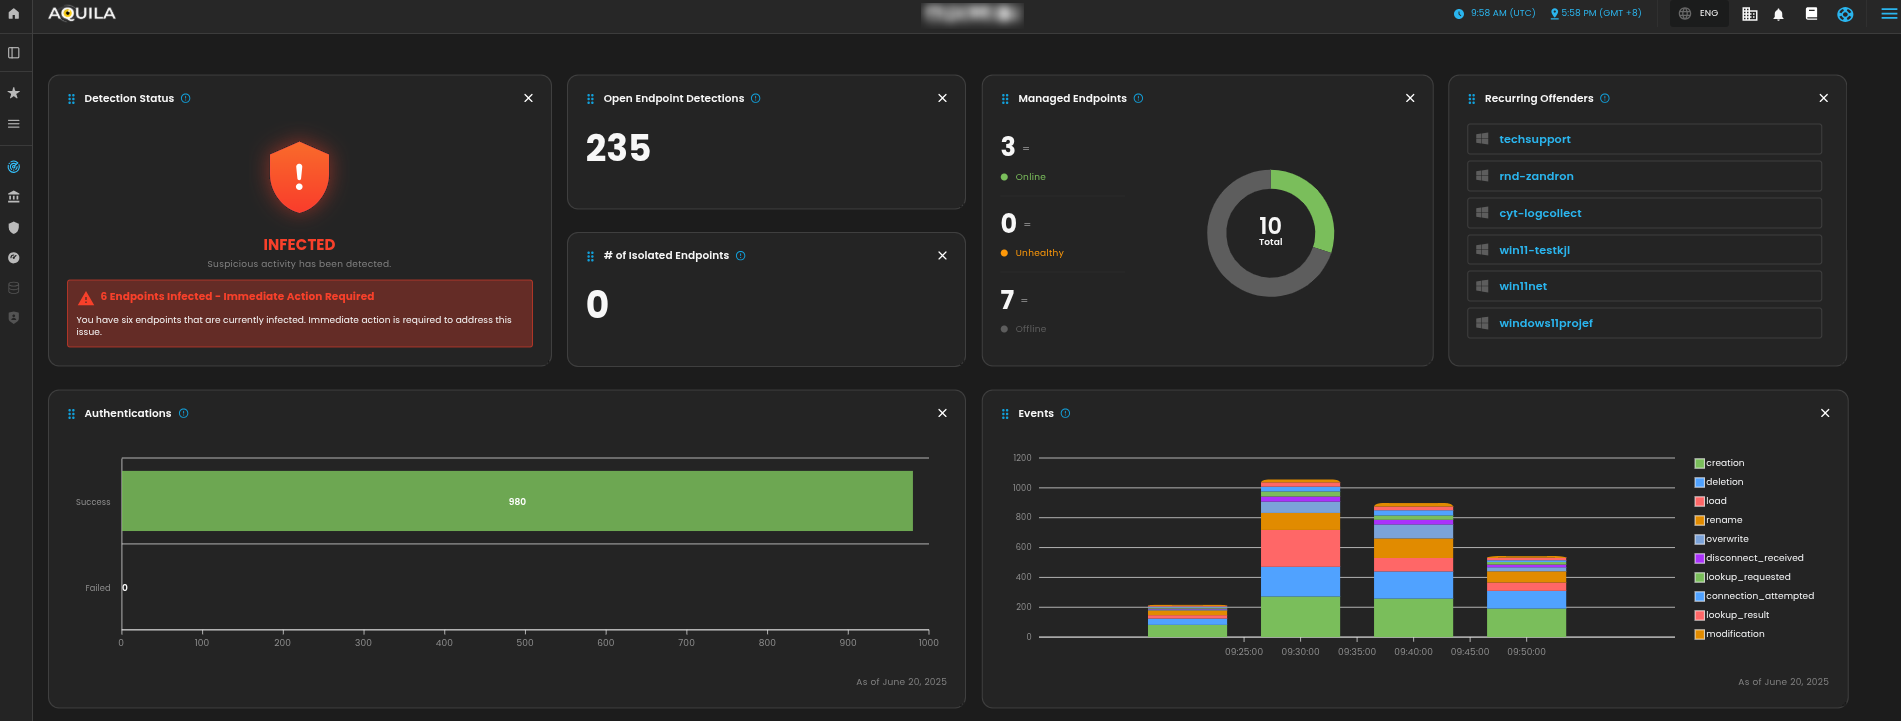
Step 2:** You may specify a custom installation directory or proceed with the default path. Click ‘**Install**’ to continue with the installation process. Wait for a moment to install the Aquila Agent. After AQUILA Agent has been succesfully installed. Click "**Finish**" to close installation wizard.</span>

<span style="color: rgb(0, 0, 0);">[![image.png](https://cytechint-docs-bookstack.s3.amazonaws.com/uploads/images/gallery/2025-06/scaled-1680-/Hni3BJkQIjEejgtw-image.png)](https://cytechint-docs-bookstack.s3.amazonaws.com/uploads/images/gallery/2025-06/Hni3BJkQIjEejgtw-image.png)</span>

**Step 3:** Provide the required Secret Token to authorize and proceed with the installation. Click "**Install Agent**" to proceed. Please wait a few minutes for the installation process to complete. This will automatically initiate enrollment into the CyTech - AQUILA platform.

[![image.png](https://cytechint-docs-bookstack.s3.amazonaws.com/uploads/images/gallery/2025-09/scaled-1680-/nHb37JZdfcyFH0Qr-image.png)
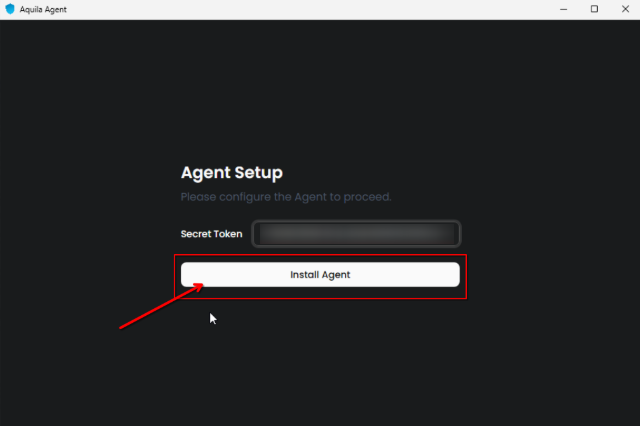
](https://cytechint-docs-bookstack.s3.amazonaws.com/uploads/images/gallery/2025-09/nHb37JZdfcyFH0Qr-image.png)

<span style="color: rgb(0, 0, 0);">**Step 4:** After successful enrollment, an overview window will be displayed. Please note that it may take some time for the device to reflect an online status. Ensure the device remains connected to the network for the EDR policy to be properly applied.</span>

<span style="color: rgb(0, 0, 0);">[![image.png](https://cytechint-docs-bookstack.s3.amazonaws.com/uploads/images/gallery/2025-06/scaled-1680-/ln4ghMC9isi5CerI-image.png)](https://cytechint-docs-bookstack.s3.amazonaws.com/uploads/images/gallery/2025-06/ln4ghMC9isi5CerI-image.png)</span>

<p class="callout info"><span style="color: rgb(0, 0, 0);">The Overview page provides a centralized dashboard displaying all recent detections related to your endpoint devices. This real-time monitoring allows security teams to quickly identify potential threats, analyze attack vectors, and prioritize response efforts based on severity and impact. By consolidating detection data, the Overview page supports proactive threat hunting and continuous endpoint security management as part of a comprehensive cybersecurity monitoring strategy.
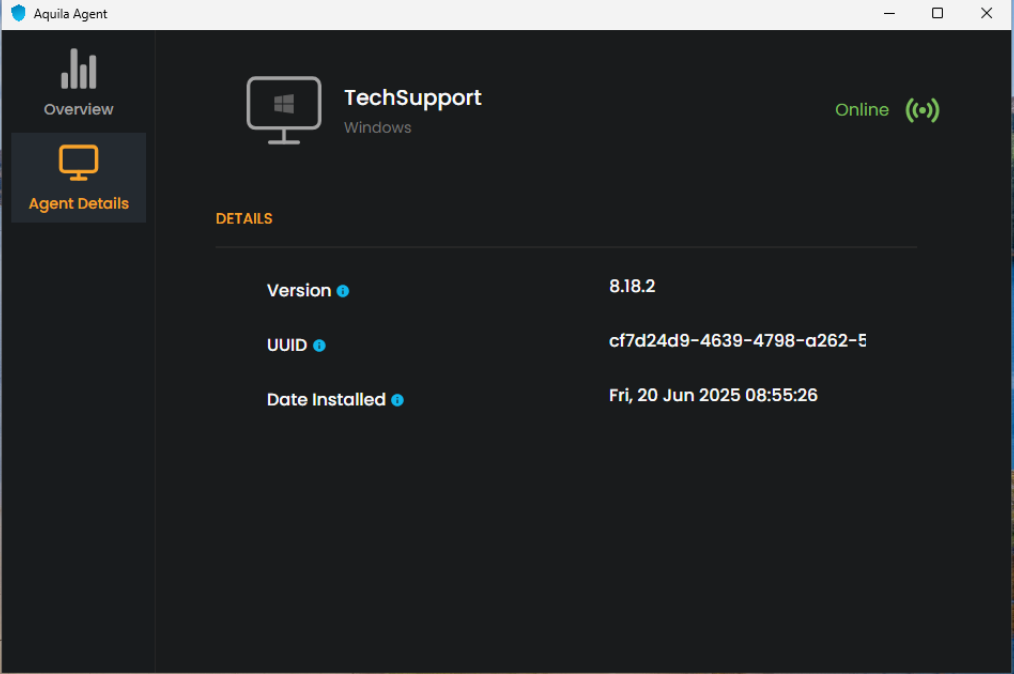
</span></p>

<span style="color: rgb(0, 0, 0);">[![image.png](https://cytechint-docs-bookstack.s3.amazonaws.com/uploads/images/gallery/2025-06/scaled-1680-/dU8R6czWUg0E8kGg-image.png)](https://cytechint-docs-bookstack.s3.amazonaws.com/uploads/images/gallery/2025-06/dU8R6czWUg0E8kGg-image.png)</span>

<p class="callout info"><span style="color: rgb(0, 0, 0);">The Agent Details panel allows you to verify the status and identity of your endpoint device.</span></p>

<span style="color: rgb(0, 0, 0);">[![image.png](https://cytechint-docs-bookstack.s3.amazonaws.com/uploads/images/gallery/2025-06/scaled-1680-/n5Jyu4liWfqQERlk-image.png)](https://cytechint-docs-bookstack.s3.amazonaws.com/uploads/images/gallery/2025-06/n5Jyu4liWfqQERlk-image.png)</span>

<p class="callout info"><span style="color: rgb(0, 0, 0);">You may also access AQUILA Agent Secure through the Windows taskbar's side dock panel.</span></p>

<span style="color: rgb(0, 0, 0);">[![image.png](https://cytechint-docs-bookstack.s3.amazonaws.com/uploads/images/gallery/2025-06/scaled-1680-/JUUlbRcGAxMcwrI0-image.png)](https://cytechint-docs-bookstack.s3.amazonaws.com/uploads/images/gallery/2025-06/JUUlbRcGAxMcwrI0-image.png)</span>

<span style="color: rgb(0, 0, 0);">7. **Before you can proceed to the final installation set-up make sure you check off each steps required. Then you can click "Next".**</span>

[![image.png](https://cytechint-docs-bookstack.s3.amazonaws.com/uploads/images/gallery/2025-07/scaled-1680-/cWjeJVZIRWQcoTlL-image.png)
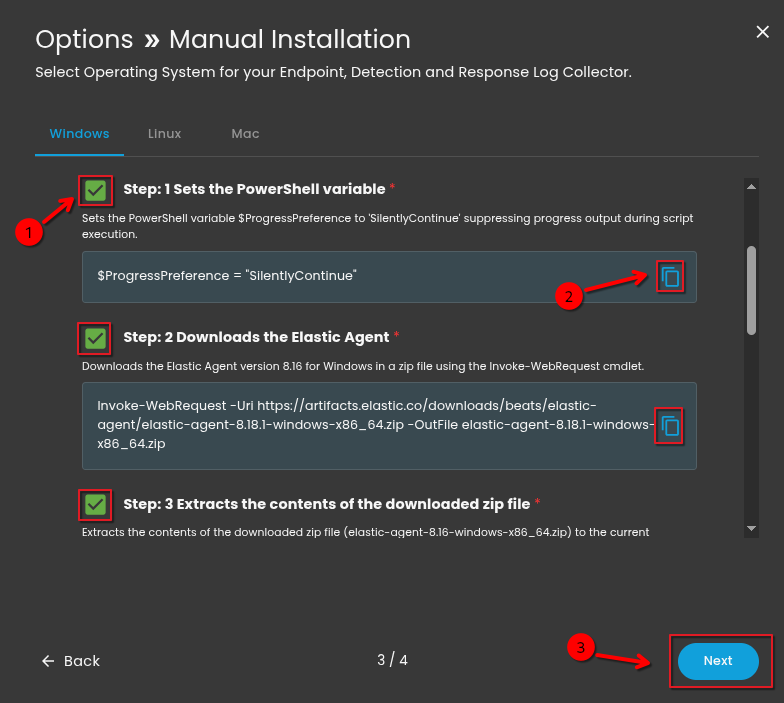
](https://cytechint-docs-bookstack.s3.amazonaws.com/uploads/images/gallery/2025-07/cWjeJVZIRWQcoTlL-image.png)

<span style="color: rgb(0, 0, 0);">8. **A new window will appear and will check the log collector status and update the latest installation of EDR agent. Wait for it to finish and after successfull installation the endpoint will displayed in the dashboard.**</span>

[![image.png](https://cytechint-docs-bookstack.s3.amazonaws.com/uploads/images/gallery/2025-07/scaled-1680-/D2CsxzzQdp5L2Z6z-image.png)
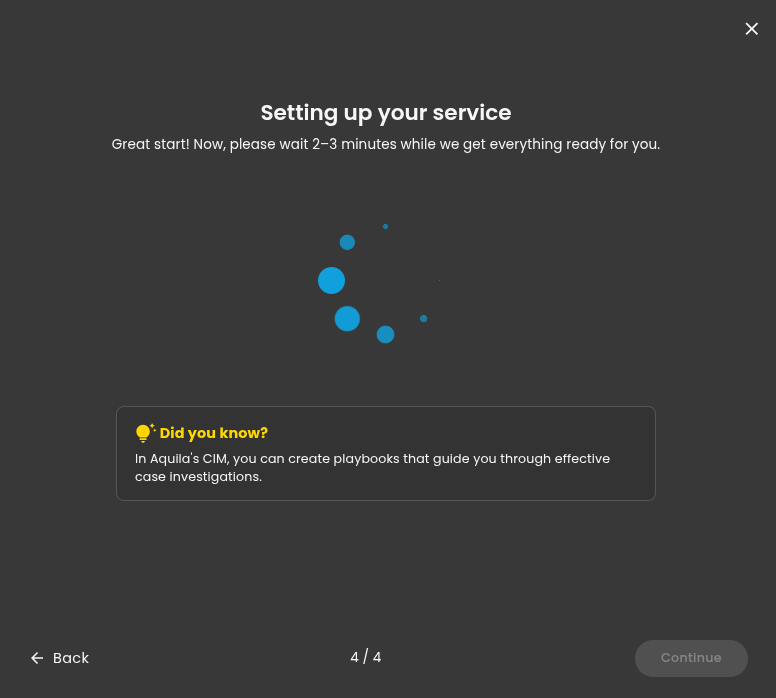
](https://cytechint-docs-bookstack.s3.amazonaws.com/uploads/images/gallery/2025-07/D2CsxzzQdp5L2Z6z-image.png)

<span style="color: rgb(0, 0, 0);">**9. This step confirms the successful installation and enrollment of the EDR Agent with the fleet server.** </span>

[![image.png](https://cytechint-docs-bookstack.s3.amazonaws.com/uploads/images/gallery/2025-07/scaled-1680-/jeJm6W66tXfIKCxC-image.png)
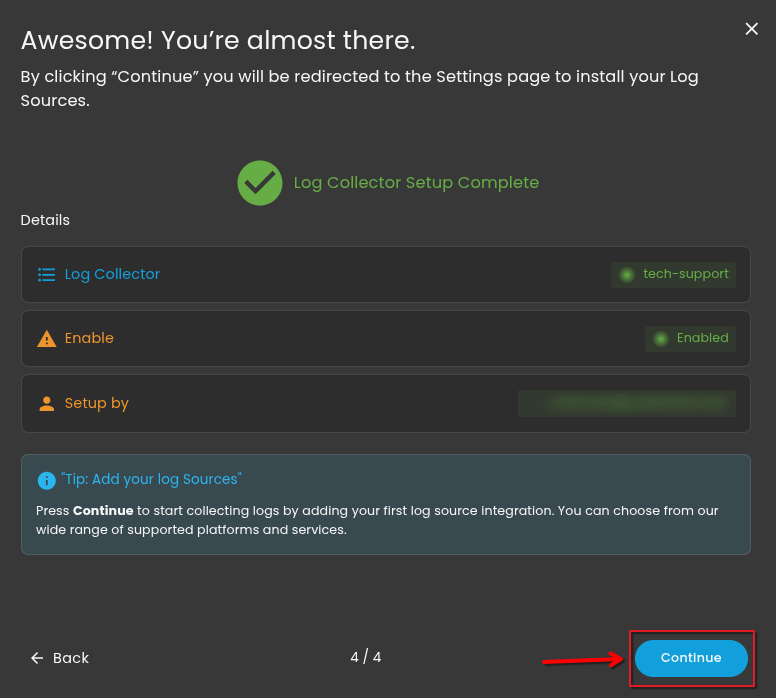
](https://cytechint-docs-bookstack.s3.amazonaws.com/uploads/images/gallery/2025-07/jeJm6W66tXfIKCxC-image.png)

<p class="callout warning">*\*\*\*If you encounter **Log Collector Setup Failed**. Please click "Retry" and carefully go gack to Steps 5 or 6. You can also try "**Manual**" installation. If issues persist please contact our technical support at **<support@cytechint.com>** for prompt assistance and guidance.*</p>

[![image.png](https://cytechint-docs-bookstack.s3.amazonaws.com/uploads/images/gallery/2025-04/scaled-1680-/uEYotwkAJTB5YZKK-image.png)](https://cytechint-docs-bookstack.s3.amazonaws.com/uploads/images/gallery/2025-04/uEYotwkAJTB5YZKK-image.png)

<p class="callout info"><span style="color: rgb(0, 0, 0);">For a more detailed report and in-depth analysis, navigate to **CyTech - AQUILA &gt; Cyber Monitoring &gt; Endpoint Detection and Response(EDR)**. This section provides comprehensive visibility into endpoint activity, detection timelines, threat classifications, and response actions to support advanced threat analysis and incident investigation.</span></p>

[![image.png](https://cytechint-docs-bookstack.s3.amazonaws.com/uploads/images/gallery/2025-06/scaled-1680-/JTplpsqWMr83Ufbi-image.png)](https://cytechint-docs-bookstack.s3.amazonaws.com/uploads/images/gallery/2025-06/JTplpsqWMr83Ufbi-image.png)

[![image.png](https://cytechint-docs-bookstack.s3.amazonaws.com/uploads/images/gallery/2025-06/scaled-1680-/jWMnSkzvcm89lb8x-image.png)](https://cytechint-docs-bookstack.s3.amazonaws.com/uploads/images/gallery/2025-06/jWMnSkzvcm89lb8x-image.png)

[![image.png](https://cytechint-docs-bookstack.s3.amazonaws.com/uploads/images/gallery/2025-06/scaled-1680-/YIdIVQT0fcq3P8IZ-image.png)](https://cytechint-docs-bookstack.s3.amazonaws.com/uploads/images/gallery/2025-06/YIdIVQT0fcq3P8IZ-image.png)

<span style="color: rgb(0, 0, 0);"> *If you need further assistance, kindly contact our technical support at <span style="color: rgb(53, 152, 219);">**<support@cytechint.com>** </span>for prompt assistance and guidance.*</span>