# AQUILA Deployment Guide: EDR Installation via AD GPO with Scheduled Task
**Introduction**
This guide provides a step-by-step process to deploy the **Aquila EDR Agent** across multiple Windows endpoints using **Group Policy Objects (GPO)** with a Scheduled Task. This method ensures automated, consistent deployment across the organization while maintaining centralized logging and verification.
**Scope & Audience**
This document is intended for:
- **System Administrators** responsible for endpoint security deployment.
- **IT Operations Teams** managing Active Directory and GPO configurations.
- **Security Engineers** who need visibility into EDR installation and validation.
The guide assumes a working knowledge of **Active Directory**, **Group Policy Management Console (GPMC)**, and **basic PowerShell scripting**.
**Pre-requisites**
- Administrator access to the Windows Server.
- A valid copy of the **Aquila Agent EXE installer**.
- The provided **Install-EDRAgent.ps1** PowerShell deployment script.
- Active Directory domain with client computers joined.
**Step 1: Log in to the Windows Server**
1. Sign in with an **Administrator account** to ensure you have the required permissions.
2. Confirm you can access **Active Directory Users and Computers (ADUC)** and **Group Policy Management**.
**Step 2: Prepare Deployment Folders**
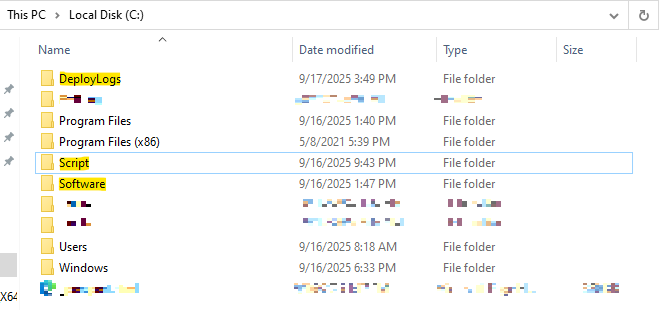
On the server, create the following directories in the system drive (`C:\`):
- **C:\\Script** → Stores the PowerShell script (`Install-EDRAgent.ps1`)
- **C:\\EXE** → Stores the installer (`AquilaAgent.exe`)
- **C:\\Logs** → Stores deployment logs from each client computer
- **C:\\ZIP →** Stores the EDR zip file
Or you can choose where the folder and files will be placed just take note of the advanced shared path on each
**Step 3: Configure Folder Sharing and Permissions**
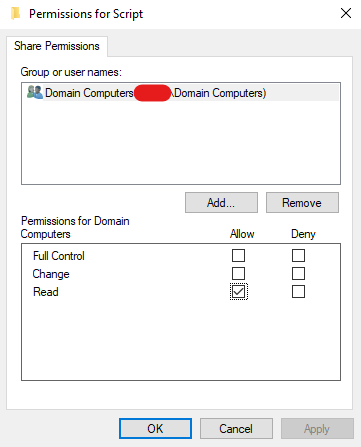
**1. Script Share (C:\\Script)**
- Right-click the folder → **Properties** → **Sharing** tab → **Advanced Sharing**.
- Check **Share this folder**.
- Click **Permissions**:
- Remove *Everyone* (optional).
- Add **Domain Computers** → grant **Read**.
- Click **OK** → **Apply**.
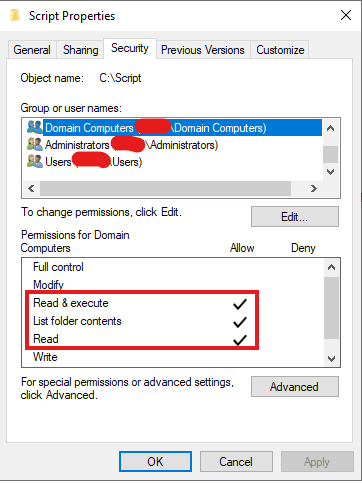
- Go to **Security (NTFS Permissions)** → **Edit**:
- Ensure **Domain Computers** have:
- ✔ Read & Execute
- ✔ List Folder Contents
- ✔ Read
**2. Software Share (C:\\Software)**
- Right-click the folder → **Properties** → **Sharing** → **Advanced Sharing**.
- Check **Share this folder**.
- Click **Permissions**:
- Add **Domain Computers** → grant **Read**.
- Click **OK** → **Apply**.
- Go to **Security (NTFS Permissions)** → **Edit**:
- Ensure **Domain Computers** have:
- ✔ Read & Execute
- ✔ List Folder Contents
- ✔ Read
**3. DeployLogs Share (C:\\DeployLogs)**
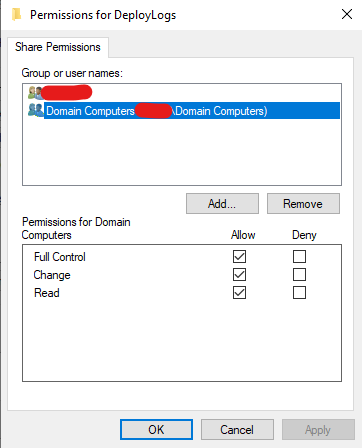
- Right-click the folder → **Properties** → **Sharing** → **Advanced Sharing**.
- Check **Share this folder**.
- Click **Permissions**:
- Add **Domain Computers** → grant **Change** (or Full Control).
- Click **OK** → **Apply**.
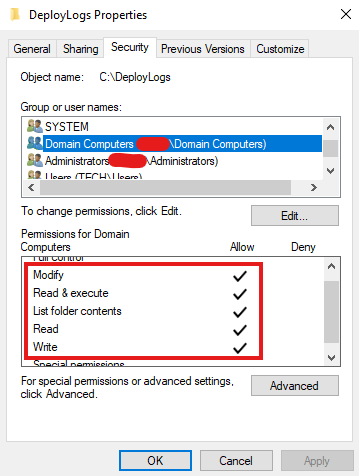
- Go to **Security (NTFS Permissions)** → **Edit**:
- Ensure **Domain Computers** have:
- ✔ Modify
- ✔ Read & Execute
- ✔ List Folder Contents
- ✔ Write
**Important Note:**
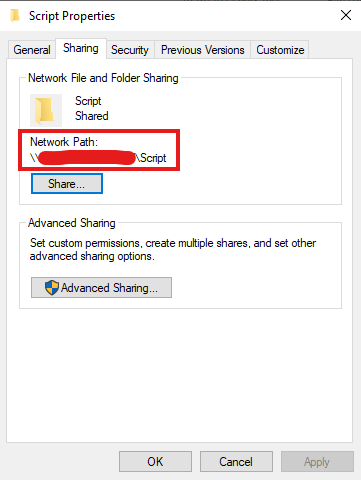
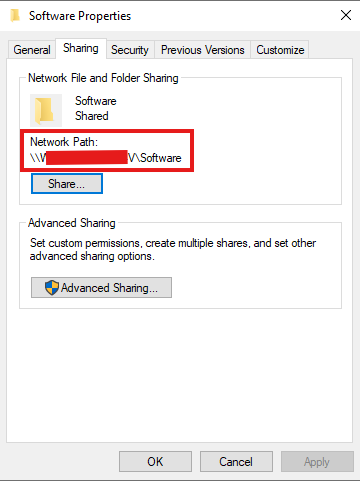
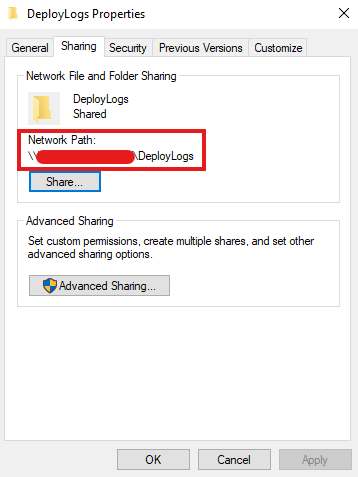
After all permissions have been configured, please take note of the **network paths** for each folder:
- **Script** → `\\YourServerHostNameHere\Script`
- **Software** → `\\YourServerHostNameHere\Software`
- **DeployLogs** → `\\YourServerHostNameHere\DeployLogs`
(Replace **YourServerHostNameHere** with the actual hostname or FQDN of your server.)
**Script:**
**Software:**
[](https://cytechint-docs-bookstack.s3.amazonaws.com/uploads/images/gallery/2025-09/FmGsfUFKvcW1xN8Q-image.png)
**DeployLogs:**
[](https://cytechint-docs-bookstack.s3.amazonaws.com/uploads/images/gallery/2025-09/GcC9nlW7h9DfGTUv-image.png)
These **UNC paths** will be required when:
- Configuring the **GPO Scheduled Task (Action Tab)** to point to the PowerShell script.
- Editing the script to reference the correct **server hostname** in your environment.
**Step 4: Place the Required Files**
The following deployment files are provided by our team and must be placed in the correct folders:
- Copy **Aquila Agent.msi** to `C:\Software`.
- Copy **DeployEDR.ps1** to `C:\Script`.
**Step 5: Open Group Policy Management**
1. On your Windows Server, open **Group Policy Management** (`gpmc.msc`).
2. Decide which **Organizational Unit (OU)** contains the computers you want to deploy the EDR to.
- Example: `Workstations` OU or `Servers` OU.
**Step 6: Create a New GPO for Deployment**
1. Right-click the target **OU** → select **Create a GPO in this domain, and Link it here**.
2. Name the GPO clearly, e.g., **EDR Deployment – Aquila Agent**.
3. Right-click the new GPO → select **Edit**.
**Step 7: Configure the Scheduled Task (to Run the Script)**
Inside the GPO Editor:
1. Navigate to:
`Computer Configuration → Preferences → Control Panel Settings → Scheduled Tasks`
2. Right-click → **New** → **Scheduled Task (At least Windows 7)**.
**General Tab**
- **Name:** `Deploy EDR – Aquila Agent`
- **Description:** Runs the deployment script to install Aquila Agent.
- **Action:** Create
- **Security Options:**
- **When running the task** textbox, type **NT AUTHORITY\\SYSTEM**
- (This runs the task as the **SYSTEM** account — full local privileges; no password needed.)
- Check **Run whether user is logged on or not**.
- Check **Run with highest privileges**.
- **Configure for:** Select `Windows®️ 7, Windows Server™ 2008R2` (or choose whichever fits in your organization).
**Triggers Tab**
- Click **New** →
- Begin the task: **At Startup** (ensures every reboot attempt deployment).
- Alternatively: **At Logon** (runs when any user logs in).
- Check **Enabled** → OK.
**Actions Tab**
- Click **New** →
- Action: **Start a program**.
- Program/script: `powershell.exe`
- Add arguments:
`-ExecutionPolicy Bypass -File "\\YourServerHostNameHere\Script\DeployEDR.ps1"`
- (Replace YourServerHostNameHere with the actual hostname or FQDN of your server.)
- Click Ok.
**Settings Tab**
- Check: **Allow task to be run on demand**.
- Check: **If the task fails, restart every 1 hour, up to 3 times**.
- Check: **Stop the task if it runs longer than X hours** (e.g., 2 hours).
Click **OK** to save the Scheduled Task.
**Step 8: Edit the Script Before Testing**
Before running any tests, update the script with the correct server hostname.
1. On the server, navigate to:
`C:\Script`
2. Locate **DeployEDR.ps1** → right-click → **Open with Notepad**.
- Alternatively: Open **Windows PowerShell ISE** → **File → Open** → navigate to `C:\Script\DeployEDR.ps1`.
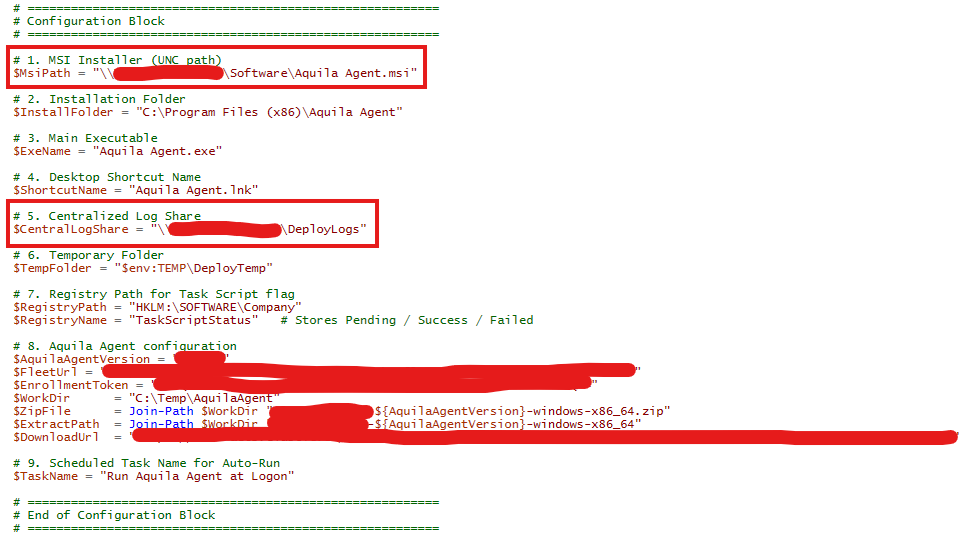
3. In the script, scroll to the **Configuration Block** section.
4. Locate the following fields:
- **`$MsiPath`**
- **`$CentralLogShare`**
5. Replace **`YourServerHostNameHere`** with the **actual server hostname**.
---
**Example Configuration Block**
**Before editing:**
`# Configuration Block$MsiPath = "\\YourServerHostNameHere\Software\Aquila Agent.msi"$CentralLogShare = "\\YourServerHostNameHere\DeployLogs" `
**After editing (example if hostname = SRV-DC01):**
`# Configuration Block$MsiPath = "\\SRV-DC01\Software\Aquila Agent.msi"$CentralLogShare = "\\SRV-DC01\DeployLogs"`
---
💡 **Tip:** If you are unsure of the server hostname:
1. Open **Command Prompt**.
2. Run:
3. Copy the displayed **hostname** and use it in the script.
**Step 9: Force GPO Update on Clients (Testing First)**
Before rolling out to production, always **test the GPO deployment** on a small set of test machines (e.g., lab devices or a pilot group). This ensures the script, permissions, and scheduled task all work as expected.
To apply the new GPO immediately on a test client machine:
1. Open **Command Prompt as Administrator** (Run as Admin).
2. Run:
`gpupdate /force`
> ⚠️ Note: Running `gpupdate` without admin rights only refreshes **user policies**. Since this deployment is a **computer policy**, it must be executed in an elevated (Administrator) Command Prompt.
**Step 10: Verify Scheduled Task on Clients**
After **forcing** the GPO, confirm that the scheduled task has been created.
1. On the client computer, open **Task Scheduler (taskschd.msc) as Administrator**.
- ⚠️ Running without admin rights may prevent you from seeing the scheduled task.
2. Navigate to **Task Scheduler Library**.
3. Locate and verify that the task **“Deploy EDR – Aquila Agent”** exists.
4. Confirm the task is configured to:
- Run under the **SYSTEM** account.
- Trigger **At Startup** or **At Logon** (depending on your configuration).
- Run with **highest privileges**.
5. Alternatively, reboot the test client to automatically trigger the scheduled task.
**Step 11: Verify EDR Installation and Logs**
1. On the client machine, open **Programs and Features** (or run `appwiz.cpl`) → confirm that **Aquila Agent** is listed as installed.
2. Review deployment logs stored in:
`\\YourServer\DeployLogs`
- Each client machine writes its installation results to this shared log folder.
- Logs will indicate whether the deployment was **successful** or if there were **errors**.
> ⚠️ **If you encounter errors in the logs** (for example, a misconfiguration in the script or hostname issues), please email the log files to our support team at **support@cytechint.com **for further assistance.
**Final Note - Customization Support**
If you already have an existing folder structure for hosting the **.msi installer** or the **deployment script** on your AD server, please email us at **support@cytechint.com.**
Our team can provide a **tailor-made version of the script** to match your environment and ensure smooth deployment.
**Troubleshooting Tips**
| **Issue**
| **Possible Cause**
| **Resolution**
|
|---|
| Task not created on client
| GPO not applied
| Run `gpresult /r` to confirm policy applied to computer.
|
| MSI installation fails (Exit Code 1)
| Wrong path or missing installer
| Verify `$MsiPath` UNC path and folder permissions.
|
| Logs not generated
| Wrong `$CentralLogShare` path
| Ensure DeployLogs share is accessible to Domain Computers.
|
| gpupdate has no effect
| Not run as Administrator
| Re-run `gpupdate /force` in elevated Command Prompt.
|
| Script doesn’t execute
| Execution policy blocking
| Ensure `-ExecutionPolicy Bypass` is in Scheduled Task arguments.
|